1
User Manual
(updated March 27, 2014)
Information in this document is subject to change without notice.
© Copyright 2013-2014, Exacq Technologies, Inc. All rights reserved.
Exacq Technologies is a trademark of Exacq Technologies, Inc. Other trademarks and trade names may
be used in this document to refer to either the entities claiming the marks and names or their products.
Exacq Technologies, Inc., disclaims any proprietary interest in trademarks and trade names other than
its own.
Exacq Technologies makes no warranty of any kind with regard to this material, including, but not
limited to, the implied warranties of merchantability and fitness for a particular purpose. Exacq
Technologies shall not be liable for errors contained herein or for incidental or consequential damages
in connection with the furnishing, performance, or use of this manual.
Exacq Technologies, Inc.
11955 Exit Five Parkway, Bldg 3
Fishers, IN 46037 USA
Contents
1 Introduction ............................................................................................................................................... 3
2 Hardware/Software Requirements .......................................................................................................... 4
3 Installation ................................................................................................................................................. 5
4 Add a Server .............................................................................................................................................. 8
5 Organization .............................................................................................................................................. 9
6 Schedule Updates .................................................................................................................................... 14
7 Dashboard ............................................................................................................................................... 17
8 Reports..................................................................................................................................................... 19
9 Options .................................................................................................................................................... 22
Appendix A: SSL Certification for Apache.................................................................................................. 24
www.exacq.com
+1.317.845.5710
+44.1438.310163
USA (Corporate Headquarters)
Europe/Middle East/Asia
Page 2 of 24
3/27/2014
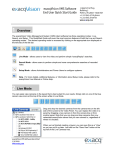
1 Introduction
Enterprise System Manager allows you to:
•
Maximize uptime of your exacqVision Enterprise servers with constant server health monitoring. Receive email
notifications or use ESM’s browser-based dashboard to receive immediate notification of system errors and
warnings.
•
Instantly assess all exacqVision Enterprise servers from anywhere using the intuitive dashboard to visually
confirm their health from a PC browser, tablet or smart phone.
•
Automatically send highly flexible email notifications regarding errors and warnings such as VMS recorder
offline, storage warnings, drive failures, temperature alarms, or disconnected cameras. Allow individual users or
groups of users to be e-mailed real-time or periodically for over 25 user-selectable errors and warnings.
•
Reduce software maintenance time with scheduled software updates. Quickly schedule hundreds or thousands
of servers to receive the latest exacqVision features.
•
Monitor camera health and events to confirm camera uptime and proper positioning.
www.exacq.com
+1.317.845.5710
+44.1438.310163
USA (Corporate Headquarters)
Europe/Middle East/Asia
Page 3 of 24
3/27/2014
2 Hardware/Software Requirements
MINIMUM SERVER REQUIREMENTS (less than 50 servers, up to five simultaneous client connections)
Processor: Intel i3-4100 or better
RAM: 8GB
Hard drive: 100GB SSD
Network: 25 Kbps per server, plus 512 Kbps per simultaneous client connection
Operating system: Windows Server 2008 R2 or Windows 7
RECOMMENDED SERVER REQUIREMENTS (500 or more servers, up to 25 simultaneous client connections)
Processor: Intel E3-1275 Xeon or better
RAM: 16GB (32GB for over 1,000 servers)
Hard drive: 250GB SSD
Network: 50 Kbps average, 1 Mbps peak per video
Operating system: Windows Server 2012 or Windows 8
Email host: SMTP email server
PC CLIENT MINIMUM REQUIREMENTS
Processor: Intel Atom Z3470 or better
RAM: 1GB
Network: 512 Kbps
Browser: Internet Explorer 9, Chrome 31, Safari 7, Mozilla Firefox 25
PORTS
Connection to exacqVision servers: port 22609*
Web Service running on exacqVision servers: port 80*
*RELATED KNOWLEDGE BASE ARTICLES:
How do I change the listen port for exacqVision Server in Windows 7?
https://exacq.com/kb/?kbid=32907
How do I change the listen port for exacqVision Server in Ubuntu Linux?
https://exacq.com/kb/?kbid=59098
How do I change the port of my Web Server in Windows 7?
https://exacq.com/kb/?kbid=56365
How do I change the port of my Web Server in Ubuntu Linux?
https://exacq.com/kb/?kbid=50095
www.exacq.com
+1.317.845.5710
+44.1438.310163
USA (Corporate Headquarters)
Europe/Middle East/Asia
Page 4 of 24
3/27/2014
3 Installation
PRE-INSTALLATION NOTES:
ESM can be installed on a Linux or Windows platform.
You must have administrator privileges for Windows installation, or root access for Linux installations.
Several steps require several minutes for the installation package to complete. This is a normal part of the
process.
Select the default database option unless you have an existing database that you want to use. In that case, the
installer will use the credentials for the database; you do not need to manually export and import the schema.
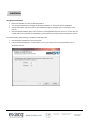
To install Enterprise System Manager, complete the following steps:
1.
2.
Run the EXE file and follow the onscreen prompts.
Enter an HTTP and HTTPS port. If a selected port is in use, you must select an unused port before you are
allowed to continue.
www.exacq.com
+1.317.845.5710
+44.1438.310163
USA (Corporate Headquarters)
Europe/Middle East/Asia
Page 5 of 24
3/27/2014
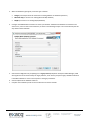
3.
When the database types appear, select the type as follows:
Postgre (most simple choice for those with no existing database or database experience)
Microsoft SQL (to connect to an existing Microsoft SQL database)
MySQL (to connect to an existing MySQL database)
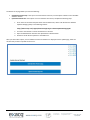
4.
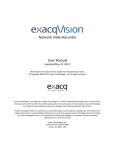
Configure the ESM database connection to match your database. If ESM and the database are located on the
same server, enter 127.0.0.1 as the hostname, as shown in the following example. You cannot advance past this
step without valid credentials.
5.
Select Perform Migration only if updating from a legacy version (ExacqVision Enterprise Health Manager). ESM
will migrate the servers monitored by the legacy software, and it will not prompt for legacy database credentials
if the ESM installation is on the same computer as the legacy installation.
Save the SQL file of the database if desired.
Complete the installation process to launch a browser and connect to ESM.
6.
7.
www.exacq.com
+1.317.845.5710
+44.1438.310163
USA (Corporate Headquarters)
Europe/Middle East/Asia
Page 6 of 24
3/27/2014
POST-INSTALLATION NOTES:
If you connect to ESM from a browser on a separate computer, you must use the IP address of the computer on
which you installed ESM.
The default admin username and password are admin and admin256. It is highly recommended that you change
the admin password.
To license the ESM installation, see the Options section of this manual.
www.exacq.com
+1.317.845.5710
+44.1438.310163
USA (Corporate Headquarters)
Europe/Middle East/Asia
Page 7 of 24
3/27/2014
4 Add a Server
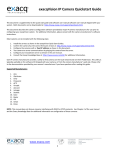
To add an exacqVision server for ESM to monitor, complete the following steps:
NOTE: An exacqVision Server must have a valid and current Enterprise license to be monitored by ESM. You can find an
exacqVision system’s license information by opening its System page on the Config (Setup) page.
1.
2.
3.
4.
5.
6.
Select Servers from the menu and then Add Server from the sub-menu.
Enter all the information about the video server. Every server must be part of a group; the default group is
shown in the Group drop-down list.
Select Browse to load a picture of the video server for easy identification among many servers in the install
location.
In the Additional Data field, enter other optional information about the server that can assist an ESM user.
Click Add One Server to complete the configuration, or click Add Another Server to repeat these steps for
another server.
All cameras and events associated with the added servers are then displayed in the ESM dashboard (not shown;
see Dashboard section for details).
2
3
1
4
5
www.exacq.com
+1.317.845.5710
+44.1438.310163
USA (Corporate Headquarters)
Europe/Middle East/Asia
Page 8 of 24
3/27/2014
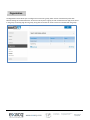
5 Organization
The Organization menu allows you to configure users and server groups, which consist of monitored systems with
identical settings of monitored features. All servers must be part of a group, and all monitored events apply to all servers
in the group. The Groups page lists all groups, along with the number of servers and users associated with the groups.
www.exacq.com
+1.317.845.5710
+44.1438.310163
USA (Corporate Headquarters)
Europe/Middle East/Asia
Page 9 of 24
3/27/2014
To add a group, select all the types of camera and server events to log, along with the number of days to store the events
before automatically deleting them. Every server is associated with one group.
NOTE: For information about each type of monitored event, see the Reports section of this manual.
www.exacq.com
+1.317.845.5710
+44.1438.310163
USA (Corporate Headquarters)
Europe/Middle East/Asia
Page 10 of 24
3/27/2014
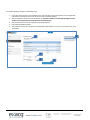
Select a group to view details and perform the following actions:
1.
2.
Import server lists from exacqVision Client. Export the list from the Add Systems page in exacqVision Client and
then import it into ESM by clicking Browse in the Bulk Add Servers section.
Export the group server list to exacqVision Client. Click the link under Group INI File to save a file that can be
imported on the Add Systems page in exacqVision Client.
1
2
www.exacq.com
+1.317.845.5710
+44.1438.310163
USA (Corporate Headquarters)
Europe/Middle East/Asia
Page 11 of 24
3/27/2014
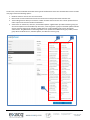
To add a user, enter the credentials and select all the types of notifications that the user should be able to view. The Add
User page contains the following options:
1.
2.
3.
4.
Realtime emails are sent as soon as an event starts.
Batch emails are summarized lists of events that occurred since the previous batch email was sent.
The throttling features allow you to limit the number of emails that can be sent over a certain period of time in
order to prevent an extreme number of notifications.
Admin users can add servers, add users, and schedule updates. A global admin (an admin without a group) can
also see the Options menu and Add Group menu item; a user assigned to a group can schedule updates and add
servers only for that group. For example, a global admin can create multiple groups, one for each group
administrator. The global admin could manage which server updates are available to the group admin, and the
group admin could add servers, schedule updates, and add users to their group.
1
2
3
www.exacq.com
+1.317.845.5710
+44.1438.310163
USA (Corporate Headquarters)
Europe/Middle East/Asia
Page 12 of 24
3/27/2014
ESM NAVIGATION TIPS
Many ESM pages, including Users, Groups, Cameras, Servers (List), and Reports, contain Search and Display Options,
which allows you to select all the information columns displayed on a page. Not all columns are displayed by default, so
view the options on each page to make sure you are displaying the appropriate information for your situation.
Many columns can be sorted by clicking the column name. Status columns can be sorted by clicking
.
To quickly find devices, servers, and other information on any page, type a word or phrase in the search box on any page
and press Enter. Results can take up to 30 seconds to appear.
www.exacq.com
+1.317.845.5710
+44.1438.310163
USA (Corporate Headquarters)
Europe/Middle East/Asia
Page 13 of 24
3/27/2014
6 Schedule Updates
Select Schedule Updates to install new exacqVision Server software to the servers at a specific time. If there is no
connection the Internet, you can manually download software updates to a portable drive, load it to the ESM server, and
then have the video servers obtain it directly from the ESM server.
The Updatable Server Versions page shows all the server versions available to be applies as updates. Only global
administrators and admins not assigned to groups can see this information.
www.exacq.com
+1.317.845.5710
+44.1438.310163
USA (Corporate Headquarters)
Europe/Middle East/Asia
Page 14 of 24
3/27/2014
The bottom of the page allows you to do the following:
Get Manifest From Exacq. If the system is connected to the Internet, use this option to obtain a list of available
software releases.
Upload Custom ZIP File. If the system is not connected to the Internet, complete the following steps.
1.
On an Internet-connected computer other than the ESM server, obtain a ZIP file from the Software
Updates Packaging Utility at the following location:
https://www.exacq.com/support/downloads.php?type=softwareUpdatesPackagingUtil
2.
3.
4.
Connect to the network on which the ESM server is located.
Open the ESM interface and select the Upload Custom ZIP File button.
Browse to the ZIP file and upload it to the ESM server.
After you select either option, a list of available versions and installers are displayed. On the update page, select the
versions that you want to update the servers to.
www.exacq.com
+1.317.845.5710
+44.1438.310163
USA (Corporate Headquarters)
Europe/Middle East/Asia
Page 15 of 24
3/27/2014
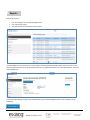
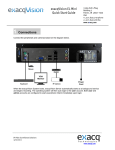
To schedule updates, complete the following steps:
1.
2.
3.
4.
5.
If you don’t want all servers to be updated on the same schedule, select Filter Options. Enter all applicable
information to identify the servers for which you want to schedule updates.
Select the software version from the drop-down list. Select the software version with the highest version
number unless specifically instructed by Exacq Technical Support.
Select the date and time for the update from the drop-down list.
Click Add to Scheduled Updates.
Verify that the servers are now listed in the Scheduled Updates table. To remove a server from the list, click
Unschedule.
1
5
2
3
www.exacq.com
4
+1.317.845.5710
+44.1438.310163
USA (Corporate Headquarters)
Europe/Middle East/Asia
Page 16 of 24
3/27/2014
7 Dashboard
The ESM Dashboard displays lists of added servers, all cameras associated with the servers, and unacknowledged events
on the servers. The color-coded indicators display the following information:
Server or camera not detected
Event occurring and unacknowledged
Health warning on server (such as temperature, storage alarm, archive alarm, CPU fan)
Server license subscription expiring soon
Event unacknowledged but open
Event unacknowledged but closed
Server or camera connected and operating
Event acknowledged and closed
The indicators at the top-right corner of the screen indicate the total number of servers and cameras in each of those
categories.
www.exacq.com
+1.317.845.5710
+44.1438.310163
USA (Corporate Headquarters)
Europe/Middle East/Asia
Page 17 of 24
3/27/2014
The right and left arrows
You can alternate between list and chart views by clicking the chart icon in each table.
chart view looks like:
allow you to scroll through additional pages of servers, cameras, and events.
This is what the
For information on event definitions and acknowledging events, see the Reports section of this manual.
www.exacq.com
+1.317.845.5710
+44.1438.310163
USA (Corporate Headquarters)
Europe/Middle East/Asia
Page 18 of 24
3/27/2014
8 Reports
Reports allows you to
view and manage a list of unacknowledged events.
view a list of open events.
search for specific events based on various criteria.
To acknowledge an event, click its entry to open a page containing detailed information about the event. (You can also
open this page from the event list on the Dashboard.) Enter any applicable comments and click Add Comment. Then click
Acknowledge Event.
You can also acknowledge all open events simultaneously using the Acknowledge All button near the bottom of the
Dashboard.
www.exacq.com
+1.317.845.5710
+44.1438.310163
USA (Corporate Headquarters)
Europe/Middle East/Asia
Page 19 of 24
3/27/2014
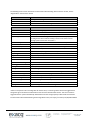
The following events can be monitored. For information about selecting which events to monitor, see the
“Organization” section of this manual.
Camera Events
Video Loss
Video Motion
Camera Disconnected
Definition
Analog or IP video signal lost.
Camera has detected motion.
Network cannot connect to analog or IP camera.
Server Events
Archive Alarm
Archive Task Alarm
Button Press
Content Age Alarm*
Definition
Failure on archiving target, such as bad mount point.
Archive task failed.
Button input on server pressed.
Video deleted before configured retention period. For example, the server
is configured to retain video for 30 days, but the server does not have
enough space to store that much video.*
Server load requires that video frames be discarded to compensate.
Capture card malfunctioned.
Capture card temperature not within recommended range.
Fan has failed on capture board
System fan not operating at recommended speed.
Discrete input on a hybrid server (or IP camera with alarm input) activated.
Login attempt failed on server.
Connection to server lost.
Invalid license on server.
License will expire in less than 30 days.
Signal sent from Client to server.
Drive capacity threshold reached.
Server storage malfunctioned.
System temperature not within recommended range.
Software update download in progress.
Server software update failed.
Server software update installing.
Server restarting after software update.
Server software update completed.
System voltage not in recommended range.
Core Throttling
DVR Board Failure
DVR Board Temperature
Fan Alarm
Fanspeed sensor alarm
Input Trigger
Login Failure
Server Disconnected
Server License Error
Server License Warning
Soft Trigger
Storage Alarm
Storage Hardware Alarm
Temperature Sensor Alarm
Update Downloading
Update Failure
Update Installing
Update Pending
Update Success
Voltage Sensor Alarm
*When a new system starts recording video for the first time, a content age alarm will not be triggered even
though the age of the oldest recorded video is lower than the desired oldest content. This event cannot be
triggered until the system automatically deletes data when the storage capacity is filled earlier than desired.
For information about troubleshooting Content Age Alarm events, see https://crm.exacq.com/kb/?kbid=64975.
www.exacq.com
+1.317.845.5710
+44.1438.310163
USA (Corporate Headquarters)
Europe/Middle East/Asia
Page 20 of 24
3/27/2014
The Search Events page allows you to find events based on various criteria, including event time, event type, and
associated cameras and servers:
www.exacq.com
+1.317.845.5710
+44.1438.310163
USA (Corporate Headquarters)
Europe/Middle East/Asia
Page 21 of 24
3/27/2014
9 Options
Options displays information about licensing, available server versions, and the email notification server.
NOTE: For information about the Updatable Server Versions page, see the Schedule Updates section of this manual.
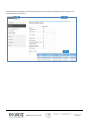
The Licensing page allows you to update the licenses of your servers. To obtain or update a license, complete the
following steps:
5
2
4
1.
2.
3.
4.
5.
You should receive a licensing email that includes a link to the activation web site and licensing instructions
(not shown here).
To download the ESM.ID file, click Download ESM.ID File For This Activation on the Licensing page. If the
system is not connected to the Internet, save the file to a portable storage device.
Submit the ESM.ID file on the activation web site (not shown here). Obtain an ESM key file and save it to the
system, or to a portable storage device if the system isn’t connected to the Internet.
Apply the ESM key file by clicking Upload ESM Key File on the Licensing page and then browsing to the file’s
location.
After uploading the license file, ESM displays “This Installation is Licensed for Use” at the top of the Licensing
page.
www.exacq.com
+1.317.845.5710
+44.1438.310163
USA (Corporate Headquarters)
Europe/Middle East/Asia
Page 22 of 24
3/27/2014
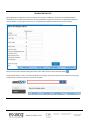
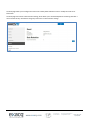
The Email page allows you to configure the email server used by ESM. Click Edit to enter or modify the email server
information.
The Email page also contains a data retention setting, which allows you to automatically delete monitoring data after a
certain number of days. Click Edit to change any email server or data retention settings.
www.exacq.com
+1.317.845.5710
+44.1438.310163
USA (Corporate Headquarters)
Europe/Middle East/Asia
Page 23 of 24
3/27/2014
Appendix A: SSL Certification for Apache
To configure and enable SSL certification for Apache in ESM, complete the following steps:
1.
2.
3.
Obtain a signed certificate from an authority such as VeriSign.
Rename the artifacts before the extension to “server” (server.crt, for example).
Save the artifacts to the following directory:
Linux: /usr/local/exacq/esm/apache_solr/apache2/conf/
Windows: \exacqVisionESM\apache_solr\apache2\conf\
4.
5.
To force any user of ESM to redirect to https, open the httpd.conf file (found in the location from the previous
step. (at the above location)
In that opened file, remove the pound sign (#) from the following lines:
#RewriteCond %{SERVER_PORT} !^443$
#RewriteRule ^/(.*) https://%{HTTP_HOST}/$1 [NC,R=301,L]
www.exacq.com
+1.317.845.5710
+44.1438.310163
USA (Corporate Headquarters)
Europe/Middle East/Asia
Page 24 of 24
3/27/2014