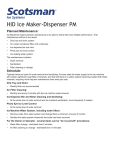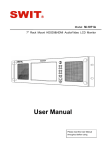
1
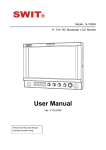
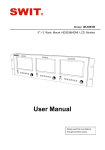
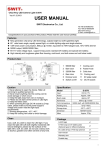
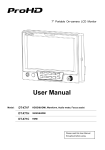
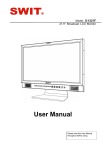
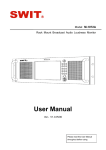
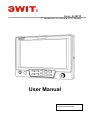
Model: S-1071F
7" Broadcast On-camera LCD Monitor
User Manual
Please read this User Manual
throughout before using.
Preface
Congratulations on your purchase of this product. Please read this user manual carefully.
1
. All internal technologies of this product are protected, including device, software and trademark.
Reproduction in whole or in part without written permission is prohibited.
2
. All brands and trademarks of SWIT Electronics Co., Ltd. are protected and other relative trademarks
in this user manual are the property of their respective owners.
3
. Due to constant effort of product development, SWIT reserves the right to make changes and
improvements to the product described in this manual without prior notice.
4
. The warranty period of this product is 2 years, and does not cover the following:
(1) Physical damage to the surface of the products, including scratches, cracks or other damage to
the LCD screen or other externally exposed parts;
(2) Misuse, abuse or negligent operation to the product;
(3) The product is disassembled by anyone other than an authorized service center.
It is considered normal that the LCD bright dot defects are not to exceed three.
5
. For any suggestions and requirements on this product, please contact us through phone, fax, Email,
etc.
SWIT Electronics Co., Ltd.
Address: 10 Hengtong Road, Nanjing Economic and Technological Development Zone,
Nanjing 210038, P.R.China
Phone: +86-25-85805753
Fax: +86-25-85805296
Email: [email protected]
Website: http://www.swit.cc
Maintenance
The Monitor
1. Please keep the signal terminals and the cooling vent away from knife-edge, metal or liquid in
order to avoid short-circuit and damage.
2. Please don't try to disassemble any parts of the monitor by yourself, which would probably
damage the monitor and do harm to human body, and it will cause the invalidation of product
warranty.
3. Please don't touch the screen with your fingers, which would probably deface the screen.
4. Please don't press the screen; the LCD is extremely exquisite and flimsy.
The power
Please use the power adapter provided or recommended by the manufacturer in order to avoid
damage. For a third party power adapter, please make sure the voltage range, supplied power, and
polarity of power lead are fit.
Please disconnect the power cable under the following situations:
1. If you do not operate this monitor for a period of time;
2. If the power cable or power adaptor is damaged;
3. If the monitor housing is broken.
Working Environment
1. Please don't lay this product on the unstable place.
2. Please don't lay this product in hot, cold or wet location.
Cleaning
1. Please clean the screen with dry and downy cloth or special LCD cleanser.
2. Please do not press hard when cleaning the screen.
3. Please do not use water or other chemical cleanser to clean the screen. The chemical may
damage the LCD.
4. For first time use, please tear off the factory LCD film. To protect the LCD screen, please post the
LCD protection film offered in the package.
1. Features
◆ New high resolution 7” LCD Panel
16:9, 1024×600, 16.77 million colors, 900:1
contrast, and H160
◆ Multiple inputs
°/ V160°viewing angle.
HD/SD-SDI, HDMI and Composite input
◆ Loop through outputs
material in recorded media.
◆ Peaking focus assist (red/blue switch)
The Peaking focus assist function is to mark the
sharpest edges of the image with red or blue color,
for users to check if the subjects are focused.
◆ Zebra stripes
Each of the 2 input HD/SD-SDI and HDMI has loop
Zebra Stripes are used to check if the image is
through output.
over exposed or not by showing black and white
◆ HDMI converted to SDI output
Supported HDMI formats: 480i / 576i / 720p (50,
59.94, 60) / 1080i (50, 59.94, 60) / 1080P (23.98
lines on the monitor. It is considered over exposed
when luminance value exceeds 90%.
◆ False color
24, 25, 29.97, 30), and the output SDI will embed
The false color is used to aid in the setting of
the audio (48KHz) from HDMI.
◆ Waveform (Y, Cb, Cr, R, G, B) and full scale
camera exposure. Under false color mode, there’s
There are totally 6 kinds of waveform display,
reference. The over exposed subjects (above 101
available under both SDI and HDMI, to check the
IRE) on the monitor will display as RED, and the
Luminance (Y), Blue-difference (Cb),
underexposed subjects will display as BLUE. For
Red-difference (Cr), Red (R), Green (G), Blue (B),
correct exposed subjects, it will display as green
and the Y, Cb, Cr can be simultaneously displayed,
and pink.
R, G, B can be simultaneously displayed, and each
of the waveforms can be set to full scale display.
◆ Vector scope
a false color key on the bottom of screen for
◆ Blue Only
Under the Blue Only Mode, only the blue pixels are
used to generate the image, because hue and
The displayed vector scope pattern is available
saturation can be adjusted quicker and more
under both SDI and HDMI, represents saturation
accurately.
as distance from the center of the circle, and hue
as the angle, in standard position, around it.
◆ Histogram (R, G, B)
The histogram is a bar graph that shows the
distribution of luminance values in the picture.
◆ DSLR scale zoom in
The Canon DSLR outputs the CMOS sensor ratio
HDMI and this zoom in mode can make the
effective image scale full screen on the monitor.
◆ User definable function keys
There’re R, G, B histograms that individually
There are 3 function keys on the monitor front
displayed simultaneously, available under both SDI
panel, that permit users to define shortcuts for the
and HDMI.
various functions.
◆ 16-ch audio meter
◆ User editable video title
Under HDSDI, it displays 16 channels audio bars,
User can edit a video title for the current camera,
with mark, and under SDSDI or HDMI, it displays 2
and the title will display on the top of screen.
channels audio bars with mark. The audio bar is
◆ Front and Rear 3-color TALLY light
green, and will turn yellow when audio exceeds
2 TALLY lights design, to give “live” signals to
-20dB, and turn red when exceeds -10dB.
people in front of the camera, as well as the
◆ SDI timecode
camera operator behind.
Under SDI input, it can display the SMPTE
◆ Image Flip
timecode, which is used extensively for
Set image to rotate by 180
synchronization, and for logging and identifying
°
2. Panel Instruction
Front view
⑴ PHONE: Earphone jack, for SDI embedded audio, HDMI embedded audio monitoring
⑵ POWER: Power on/off
Connect with power cable, press the “POWER” and the power indicator is turned on and the monitor will
be switched on and get into normal working status. Press the “POWER” again, the indicator is turned off
and monitor is switched off.
Disconnect with power cable or battery if the monitor will not be used for a period of time.
⑶ SOURCE: Input signal selection
Press “SOURCE” and revolve the “OK” to select the input video signal.
⑷ F1: User definable function key 1
⑸ FOCUS: Peaking Focus Assist
Press “FOCUS” once, it will display the current peaking on/off status. Press “FOCUS” again to switch on
RED line focus assist, switch on BLUE line focus assist, and switch off in turn.
⑹ F.COLOR: False color
Press “F.COLOR” once, it will display the current false color on/off status. Press “F.COLOR” again to
switch on/off the false color mode.
⑺ DISPLAY: Display current settings
Press “Display” to display safety mark, title and the current input signal information
⑻ F2: User definable function key 2
⑼ F3: User definable function key 3
⑽ WAVEFORM: Display waveform
Press “WAVEFORM” once, it will display the waveform menu as:
Revolve “OK” to select a waveform display mode and turn it on.
The selected waveform will display on the screen.
⑾ VECTOR: Display vector scope
Press “VECTOR” to switched on/off the Vector scope
⑿ MENU: Press to enter Menu
⒀ OK: Select and Apply
Under menu system, revolve “OK” to adjust settings and press to apply; and out of menu system,
directly revolve “OK” to adjust volume.
⒁ TALLY Light: Red, Green and Yellow 3-color TALLY indicator
Rear view
⑴ DC 12V IN: Connect with DC12V 4-pin XLR power adapter. (Pin 1: Negative, Pin 4: Positive)
⑵ TALLY Light: Red, Green and Yellow 3-color TALLY indicator
⑶ Battery mount connector:
Connect with SWIT S-7004 series quick release DV mounts, and then mount corresponding DV batteries.
See details in “Optional Battery Mount”.
⑷ SDI OUT: HDMI converted to SDI output (BNC connector)
⑸ SDI-LOOP1: HD/SD-SDI loop through output from SDI-IN1 (BNC connector)
⑹ SDI-LOOP2: HD/SD-SDI loop through output from SDI-IN2 (BNC connector)
⑺ HDMI-IN: HDMI input
⑻ TALLY controlling port (RS-232)
⑼ HDMI-LOOP: HDMI loop through output
⑽ SDI-IN2: HD/SD-SDI input (BNC connector)
⑾ SDI-IN1: HD/SD-SDI input (BNC connector)
⑿ CVBS-IN: Composite video input (BNC connector)
Input formats
Input
CVBS
HDMI
SMPTE-274M
SDI
SMPTE-296M
SMPTE-125M
ITU-R BT.656
Supported formats
PAL / NTSC
480I / 576I / 480P / 576P
1080i (60 / 59.94 / 50)
720p (60 / 59.94 / 50)
1080p (60 / 59.94 / 50 / 30 / 29.97 / 25 / 24 / 23.98)
1080i (60 / 59.94 / 50)
1080p (30 / 29.97 / 25 / 24 / 23.98)
720p (60 / 59.94 / 50)
480i (59.94)
576i (50)
3. Menu Operation
⑴ Press “MENU” and it will display menu system
⑵ Revolve “OK” to select an item. The selected item will be highlighted display.
⑶ Press “OK” to enter the selected item.
⑷ Under menu system, press “MENU” to back to previous menu.
*The menu will automatically save and quit if it remains idle.
3.1 PICTURE submenu
The PICTURE submenu includes:
CONTRAST: 0-100 value adjustment
BRIGHTNESS: 0-100 value adjustment
HUE: 0-100 value adjustment
(Only available under CVBS NTSC input)
SATURATION: 0-100 value adjustment
SHARPNESS: 0-100 value adjustment
⑴
⑵
⑶
⑷
⑸
3.2 SYSTEM submenu
The SYSTEM submenu includes:
⑴ RATIO: Aspect ratio “16:9” / “4:3” selection
⑵ SCAN: “UNDERSCAN” / “OVERSCAN” selection
⑶ ZOOM: “OFF”, “ZOOM1” and “ZOOM2” selection
⑷
⑸
⑹
ZOOM1: Canon DSLR scale zoom-in
ZOOM2: Pixel to Pixel zoom-in
MARKER: Select and set the safe area scale from
80%, 85%, 90% and 95%.
FLIP: Select “ON” to flip the picture by 180°.
RESET: Select “YES” to recover all to factory setting.
3.3 OSD submenu
The OSD submenu includes:
LANGUAGE: Menu language selection
H-POSITION: Menu horizontal position (0-100)
adjustment, real-time preview and default value: 50.
V-POSITION: Menu vertical position (0-100)
adjustment, real-time preview and default value: 50.
DURATION: Menu timeout setting (5-60)
Set a time (in seconds) in which the menu will
automatically quit if remains idle. Default: 15.
⑴
⑵
⑶
⑷
3.4 TITLE submenu
Revolve "OK" button to select the letters, and press "OK"
to input. Select SPACE to input space and DEL to delete
the left letter. Max 10 letters are supported.
After setting, press "MENU", the system will save data to
current user and quit menu. The menu will automatically
save and quit if it remains idle.
3.5 DISPLAY submenu
The DISPLAY submenu is to select the items to be
displayed on screen when ‘DISPLAY” button is pressed.
Revolve "OK" to turn on/off the items:
INFO: Including Input format, aspect ratio,
underscan/overscan, zoom status
MARKER: Safe area
TITLE: User edited title
MARKER4:3: The 4:3 scale mark on 16:9 image.
(Only available under HD input)
⑴
⑵
⑶
⑷
3.6 F KEY submenu
The F KEY Settings Submenu is to define Function Key F1, F2 and F3. The available function items are:
01- RATIO: Aspect ratio 16:9 / 4:3 switch
02- SCAN: Underscan / Overscan switch
03- ZOOM: Picture Zoom-in
04- B/W: Color / Black & white switch
05- BLUE ONLY: Blue only mode switch on/off
06- ZEBRA: Zebra over exposure switch on/off
07- VECTOR: Vector scope switch on/off
08- PATTERN: Internal colorbar switch on/off
09- RGB HIST: R, G, B Histogram switch on/off
10- TIMECODE: SDI timecode display switch on/off
11- F.COLOR: False color mode switch on/off
12- AUDIO BAR: Audio meter display switch on/off
13- FOCUS: Peaking focus assist switch on/off,
14- FLIP: Image flip
4. TALLY Light Operation
There are front and rear TALLY lights on the monitor, which can display RED, GREEN and YELLOW signals.
The TALLY light controlling port is the RS232 socket at the rear panel, and terminal description is as follows:
Terminal
Description
1
2
Y
3
G
4
R
5
6
7
GND
8
GND
9
GND
The RED light is on when connecting the terminal “R” with “GND”, and goes out when disconnecting.
The GREEN light is on when connecting the terminal “G” with “GND”, and goes out when disconnecting.
The YELLOW light is on when connecting the terminal “Y” with “GND”, and goes out when disconnecting.
5. Cold Shoe Bracket
The provided monitor bracket supports both cold shoe and screw mount for camera connection.
1. For cold shoe: anticlockwise screw the knob to draw the bolt back, slide the cold shoe mount into camera,
and then clockwise adjust the knob to fasten.
2. For screw mount: clockwise screw the knob to draw the bolt directly into the screw thread of camera till
fastened.
3. Screw the ball head knob into monitors, and lock the ball head.
① Lock
② Knob
③ Cold shoe mount
④ Screw bolt
6. Optional Battery Mount
6.1 Battery mount choice
S-1071F monitor can use Gold mount, V-mount batteries, and DV batteries by connecting with SWIT S-7004
snap-on mount. There’re following types of S-7004 for choice:
Model
S-7004F
Compatible battery type
SONY L series NP-F770/970
Recommended SWIT battery
S-8972, S-8970, S-8770
S-7004P
S-7004J
S-7004C
S-7004U
S-7004E
S-7004B
Panasonic CGA series D54S/D28S
JVC BN-V428U
Canon BP series BP-930/945
SONY BP-U series U60/30
Canon DSLR, LP-E6
Panasonic VW-VBG6
S-8D62
S-8428
S-8945, S-8845
S-8U62
S-8PE6
S-8BG6
S-7004V
JVC BN-VF823
S-8823
Remark: The Gold mount and V-mount are fixed on monitor at factory, not snap-on types.
6.2 Installation of S-7004 snap-on DV mount
Screw hole
Terminal
Slot
S-7004 DV mount is snap-on type. Please follow the instructions:
(1) Please make sure the power terminals are clean and in well condition before use.
(2) Align the S-7004 slots to the bolts of the monitor rear panel, and press tightly in.
(3) Slide the S-7004 mount down to the bottom.
(4) Fix the S-7004 mount by provided screws on the top side.
(5) Mount the corresponding battery to S-7004 to power the monitor.
Battery
release
7. Specifications
LCD Performance
Size
Display area
Resolution
Aspect ratio
Brightness
Contrast
Color
Viewing angle
Video Format
CVBS
SMPTE-274M
SDI
SMPTE-296M
SMPTE-125M
ITU-R BT.656
HDMI
General
Working voltage
Power consumption
Working temperature
Working humidity
Storage temperature
Storage humidity
Dimensions
Net weight (main body)
7 inches
153.6×90mm
1024×RGB×600
16:9/4:3
400cd m2
900:1
16.77 million colors
Horizontal: 160 Vertical: 160
/
°
°
∕
NTSC PAL
1080i (60 / 59.94 / 50)
1080p (30 / 29.97 / 25 / 24 / 23.98)
720p (60 / 59.94 / 50)
480i (59.94)
576i (50)
480I / 576I / 480P / 576P
1080i (60 / 59.94 / 50)
720p (60 / 59.94 / 50)
1080p (60 / 59.94 / 50 / 30 / 29.97 / 25 / 24 / 23.98)
DC 12V or battery 6.5V-17V
≤12W
+40
0
10% 90%
-15
+60
10% 90%
192×139×47mm
580g
℃~ ℃
~
℃~ ℃
~
8. Packing List
Simple Package
Luxury Package
1. Monitor
1. Monitor
2. User Manual
2. User Manual
3. Power adaptor
3. Power adaptor
4. Power cable
4. Power cable
5. Cold shoe bracket
5. Cold shoe bracket
6. Sun hood
6. Sun hood
7. LCD protection film
7. LCD protection film
8. Mini HDMI to standard HDMI cable
9. D-tap to 4-pin XLR cable
10. Extension arm trestle
11. Carrying case