1
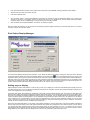
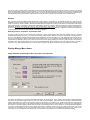
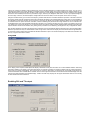
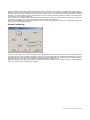
PC GRAPHICS CARD
AGP version: GC- K2A-64
PCI version: GC- K2P-64
with Windows 95, 98, ME, NT4, 2000, XP driver software
for 16:9, 16:10, 2:1 wide-screen and 4:3 resolutions
INSTALLATION G UIDE & USER MANUAL
Imagine Graphics Ltd
14 Alban Park, Hatfield Road, St. Albans, AL3 6EN, England
Tel: +44 (0)1727 844744
Fax: +44 (0)1727 811660
e-mail: [email protected] Web Site: www.imaginegraphics.co.uk
Pixel Perfect is a trademark of Imagine Graphics Ltd
Imagine Graphics’ PIXEL PERFECT™ PC graphics card
Models: GC-K2A-64 (AGP) and GC-K2P-64 (PCI)
With special Windows 95, 98, ME, NT4, 2000 and XP drivers for wide-screen plasma, LCD and CRT displays.
Use these procedures when installing a Pixel Perfect PowerVR based graphics card and drivers from Imagine Graphics with wide-screen
and 4:3 resolutions. For Windows 95/98/ME the drivers are designed to work with Microsoft’s DirectX software version 7 and above.
Please ensure your PC has DirectX installed prior to commencing the installation. A copy of the latest DirectX software can be
downloaded from Microsoft’s web site at: w w w . microsoft.com/windows/directx . Windows NT4,2000 and XP do not require installation of
DirectX software. If you are using Windows NT 4, please ensure service pack 5 or above is installed prior to driver installation this can be
located from http://www.microsoft.com/downloads/search.asp
The Pixel Perfect graphics drivers and Microsoft DirectX 7a software are located on the CD ROM included with your hardware. Drivers for
each operating system are located in separate folders. Drivers can be installed direct from the CD or copied to your computers hard disk.
Supported APIs:
Windows 95 (all versions)
Windows 98/98SE/ME
Windows 2000 / XP
Windows NT 4
Microsoft DirectX 8
OpenGL ICD
Microsoft DirectX 8
OpenGL ICD
Microsoft DirectX 8
OpenGL ICD
Microsoft DirectX 3
OpenGL ICD
Supported resolutions:
We recommend using the Pixel Perfect Display Manager application to select the appropriate wide-screen resolution for your display.
Most importantly your display make and model must be selected first using the Display Manager application in order to use the correct
timing data for your panel. This is accessed by clicking on the wide-screen panel icon located in the Windows Task Bar (Tray section).
For further instruction in using this application see the ‘Pixel Perfect Display Manager’ section in this manual. Plasma displays are only
designed to support a single wide-screen resolution, best results will be obtained by using the recommended ‘native’ resolution.
To view the current list of supported display models and recommended resolutions see the regularly updated list on our web site
http://www.imaginegraphics.co.uk/products/PixPerfect/pixelperfect.htm In addition to wide-screen resolutions the Pixel Perfect drivers for
all operating systems contain all VESA compliant 4:3 resolutions and refresh rates.
INSTALLATION GUIDES:
Windows 95
•
Shut down and switch off your c omputer, remove the cover and remove the installed graphics card. If the computer has an on-board
graphics controller you should disable it. (Some machines now automatically disable the on-board controller when a separate
graphics card is installed - check with the PC’s manufacturer or supplier.)
•
Install the Pixel Perfect graphics card in your computer.
•
Switch on your computer. Windows 95 will start and auto-detect a VGA-compatible display adapter.
•
Select Cancel to prevent Windows 95 automatically installing its own driver. A VGA 16 colour display will be used as a default.
•
With the cursor over the Windows desktop right click the mouse to select Display Properties.
•
Select the ‘Settings’ tab
•
Click on 'Advanced Properties'
•
Click on 'Change'
•
Click on 'Have Disk', then 'Browse'
•
‘Browse’ to the location of the driver files on the CD ROM, ensuring to select the folder labelled Win9x.
•
Windows should then select the Imagine Graphics wide-screen driver .inf file for you.
•
Restart your system.
After the system has restarted, you can go back into the Display Properties applet and select your preferred 16:9 or 4:3 screen resolution,
refresh rate and colour depth.
Windows 98
•
Switch off your computer, remove the cover and remove the installed graphics card. If the computer has an on-board graphics
controller you should disable it. (Some machines now automatically disable the on-board controller when a separate graphics card
is installed. Check with the PC’s manufacturer or supplier.)
•
Install the Pixel Perfect graphics card in your computer.
•
Switch on your computer. Windows 98 will start and will auto-detect a VGA-compatible display adapter.
•
Select Cancel to prevent Windows 98 automatically installing its own driver. A VGA 16 colour display will be used as a default.
•
With the cursor over the Windows desktop right click the mouse to select Display Properties.
•
Select the Settings tab
•
Click on 'Advanced'
•
Select 'Adapter' tab
•
Click on 'Change'
•
Select the radio button 'display a list of all the drivers .... ' then click Next
•
Click on 'Have Disk', then 'Browse'
•
‘Browse’ to the location of the driver files on the CD ROM, ensuring to select the folder labelled Win9x.
•
Windows should then select the Imagine Graphics wide-screen driver .inf file for you.
•
Restart your system.
After the system has restarted, you can go back into the Display Properties applet and select your preferred 16:9 or 4:3 screen resolution,
refresh rate and colour depth.
Windows ME
•
Switch off your computer, remove the cover and remove the installed graphics card. If the computer has an on-board graphics
controller you should disable it. (Some machines now automatically disable the on-board controller when a separate graphics card
is installed. Check with the PC’s manufacturer or supplier.)
•
Install the Pixel Perfect graphics card in your computer.
•
Switch on your computer. Windows ME will start and will auto-detect a VGA-compatible display adapter.
•
Select Cancel to prevent Windows ME automatically installing its own driver. A VGA 16 colour display will be used as a default.
•
With the cursor over the Windows desktop right click the mouse to select Display Properties.
•
Select the Settings tab
•
Click on 'Advanced'
•
Select 'Adapter' tab
•
Click on 'Change'
•
Select the radio button ‘Specify the location of the driver ' then click Next
•
Select the radio button ‘Display a list of all the drivers in a specific location … ‘ then click Next
•
Click on 'Have Disk', then 'Browse'
•
‘Browse’ to the location of the driver files on the CD ROM, ensuring to select the folder labelled Win9x.
•
Windows should then select the “Imagine Graphics wide-screen driver” .inf file for you.
•
Restart your system.
After the system has restarted, you can go back into the Display Properties applet and select your preferred wide-screen or 4:3 screen
resolution, refresh rate and colour depth.
Windows NT4
•
Switch off your computer, remove the cover and remove the installed graphics card. If the computer has an on-board graphics
controller you should disable it. (Some machines now automatically disable the on-board controller when a separate graphics card
is installed. Check with the PC’s manufacturer or supplier.)
•
Install the Pixel Perfect graphics card in your computer.
•
Start Windows NT 4.0. (The system must have Service Pack 5 or higher installed.)
•
IMPORTANT: When the message "Please select the operating system to start..." is displayed, select "Windows NT Workstation
Version 4.00 [VGA mode]". Wait for the desk-top to appear in VGA, 16 colour mode.
•
With the cursor over the Windows desktop right click the mouse to select Display Properties.
•
Select the ‘Settings’ tab.
•
Click on 'Display Type.'
•
Click on 'Change'.
•
Click on 'Have Disk' then 'Browse'.
•
‘Browse’ to the location of the driver files on the CD ROM, ensuring to select the folder labelled NT4.
•
Windows should then select the “Imagine Graphics wide-screen driver” .inf file for you.
•
Restart your system.
After the system has restarted, you can go back into the Display Properties applet and select your preferred wide-screen or 4:3 screen
resolution, refresh rate and colour depth.
NOTE: If installing Windows NT 4.0 for the first time with the Pixel Perfect card installed in the system:
Proceed through the Windows NT installation as normal. The installation program will prompt the user to choose a display mode.
Choose the "Cancel" button from the "Display Settings" screen to ignore this step. The installation will now finish. Install the latest NT4
service pack then follow the steps outlined above to install the driver for your Pixel Perfect card.
Windows 2000
•
Switch off your computer, remove the cover and remove the installed graphics card. If the computer has an on-board graphics
controller you should disable it. (Some machines now automatically disable the on-board controller when a separate graphics card
is installed. Check with the PC’s manufacturer or supplier.)
•
Install the Pixel Perfect graphics card in your computer.
•
Switch on your computer. Windows 2000 will start and will auto-detect a VGA-compatible display adapter.
•
Select Cancel to prevent Windows 2000 automatically attempting to install a compatible driver.
•
When updating a current Windows 2000 installation use the following procedure:
•
With the cursor over the Windows desktop right click the mouse and select ‘Properties’.
•
Select the Settings tab in Display Properties.
•
Click on 'Advanced' then select 'Adapter' tab.
•
Click on 'Properties' then select the ‘Driver’ tab.
•
Click ‘Update Driver’.
•
Check the radio button ‘Display a list of the known drivers…’ and click ‘Next’
•
‘Browse’ to the location of the driver files on the CD ROM, ensuring to select the folder labelled Win2k.
•
Select the file ‘GC-K2-64.inf’ and then click ‘OK’.
•
You may safely click ‘Yes’ and ‘Next’ to continue the installation as Windows 2000 presents a series of dialog boxes asking you to
confirm your selection.
•
Restart your system.
•
When installing Windows 2000 for the first time:
•
Open Control Panel -> System -> Hardware -> Device Manager
•
Select ‘Video Controller (VGA Compatible)’ under ‘Other Devices’ then Click on 'Properties' and select the ‘Driver’ tab.
•
Click ‘Update Driver’.
•
Check the radio button ‘Display a list of the known drivers…’ and click ‘Next’.
•
Select Display Adapters, then click ‘Have Disk’ on the display adapter list dialog box.
•
‘Browse’ to the location of the driver files on the CD ROM, ensuring to select the folder labelled Win2k.
•
Select the file ‘GC-K2-64.inf’ and then click ‘OK’.
•
You may safely click ‘Yes’ and ‘Next’ to continue the installation as Windows 2000 presents a series of dialog boxes asking you to
confirm your selection.
•
In this instance it is not necessary to restart your system, you should now be able to open the Display Properties applet and select
your preferred screen resolution.
After the system has restarted, you can go back into the Display Properties applet and select your preferred wide-screen or 4:3 screen
resolution, refresh rate and colour depth.
Windows XP
•
Switch off your computer, remove the cover and remove the installed graphics card. If the computer has an on-board graphics
controller you should disable it. (Some machines now automatically disable the on-board controller when a separate graphics card
is installed. Check with the PC’s manufacturer or supplier.)
•
Install the Pixel Perfect graphics card in your computer.
•
Switch on your computer. Windows XP will start and will auto-detect a VGA-compatible display adapter.
•
Select Cancel to prevent Windows XP automatically attempting to install a compatible driver.
•
When updating a current Windows XP installation use the following procedure:
•
With the cursor over the Windows desktop right click the mouse and select ‘Properties’.
•
Select the Settings tab in Display Properties.
•
Click on 'Advanced' then select 'Adapter' tab.
•
Click on 'Properties' then select the ‘Driver’ tab.
•
Click ‘Update Driver’.
•
Check the radio button ‘Install from a list or specific location’ and click ‘Next’
•
Check the radio button ‘Don’t search. I will choose the driver to install’ and click ‘Next’
•
Click ‘Have Disk’ and then ‘Browse’ to the location of the driver files on the CD ROM, ensuring to select the folder labelled WinXP.
•
Select the file ‘GC-K2-64.inf’’ and then click ‘OK’.
•
Click OK to install the driver.
•
You may safely ‘Next’ to continue the installation as Windows XP presents a series of dialog boxes asking you to confirm your
selection as the driver is not digitally signed. Our drivers are safe to run on Windows XP and are based on Microsoft WHQL
compliant drivers. We do not digitally sign our drivers as they are constantly updated.
•
After the driver has completed installation, click ‘Finish’ to restart your system.
•
When installing Windows XP for the first time:
•
Open Control Panel -> System -> Hardware -> Device Manager
•
Select ‘Video Controller (VGA Compatible)’ under ‘Other Devices’ then Click on 'Properties' and select the ‘Driver’ tab.
•
Check the radio button ‘Install from a list or specific location’ and click ‘Next’
•
Check the radio button ‘Don’t search. I will choose the driver to install’ and click ‘Next’
•
Click ‘Have Disk’ and then ‘Browse’ to the location of the driver files on the CD ROM, ensuring to select the folder WinXP.
•
Select the file ‘GC-K2-64.inf’ and then click ‘OK’.
•
Click OK to install the driver.
•
You may safely ‘Next’ to continue the installation as Windows XP presents a series of dialog boxes asking you to confirm your
selection as the driver is not digitally signed. Our drivers are safe to run on Windows XP and are based on Microsoft WHQL
compliant drivers. We do not digitally sign our drivers as they are constantly updated.
•
After the driver has completed installation, click ‘Finish’ to restart your system.
After the system has restarted, you can go back into the Display Properties applet and select your preferred wide-screen or 4:3 screen
resolution, refresh rate and colour depth.
Pixel Perfect Display Manager
The Pixel Perfect Display Manger enables resolution, colour depth and refresh rate setting in exactly the same way as the Windows
Control Panel Display applet. The Pixel Perfect Display Manger is accessed via the
icon in the Windows task bar tray section. This
application allows you to select the make and model of the wide-screen panel that you are using. Plasma panels and LCD displays in
particular require very specific display frequencies in order to attain the best clarity and sharpness of image. It is very important for best
results that you select the entry in the ‘Make and Model of Wide-screen Panel’ that most closely matches your wide-screen panel. If your
panel is not listed, please select either the same manufacturer or the ‘Generic’ entry as shown above.
Setting up your display
Display Manager provides Test Patterns in order to help you set up your display to produce the best possible picture quality, these are
accessed from the Tools menu. No adjustment should be necessary when using DVI, however when using the displays’ analogue input
some minor adjustments may be necessary.
The Master Test pattern demonstrates the capabilities of the panel and Pixel Perfect graphics card. The main factor that determines
ultimate picture quality is the cable connecting the graphics card and the panel. We recommend that you purchase a high quality cable.
Even with a good cable manufacturing differences make system set up essential. The only adjustment that you should need to make is
‘phase’ sometimes called “fine picture adjust”, this is undertaken using the displays’ OSD. Press ‘Enter’, the Space Bar or Left Mouse
click to advance to the next test pattern. Use the vertical bar test patterns to make the ‘Phase’ adjustment. Initially you may see some
noise or defocusing of the bars, use the panels On-Screen-Display to change the phase setting to suit your hardware. It should be
possible to remove virtually all ‘noise’ and attain sharp image focus.
Note: Using the master test pattern, if your panels’ native display resolution is not 16:9 (aspect ratio is reported on Master Test Pattern)
then the circle will not be exactly round. This happens because some panels do not implement a 16:9 native resolution yet they retain a
16:9 physical dimension. Displays achieve this by using oblong pixels. So when selecting a 16:10 or 2:1 resolution for your panel a
prefect aspect ratio is attained, however the results are significantly better than when using a 4:3 or any non-native resolution. This is a
design feature of some plasma and LCD displays and is not in any way a limitation of the Pixel Perfect card.
The ‘Sync Polarity’ override control is intended to be used only with displays that are not currently supported by our drivers. We strongly
advise using the ‘Default’ setting for all known panels. If your panel is not listed and the picture quality is very poor then we suggest using
the sync override after selecting a ‘Generic PDP’ panel. You may find that this significantly improves the image quality. Alternatively try
selecting different makes and models of display that use the same native resolution as your display from the drop down list.
Rotation
Built in display rotation is available under Windows XP, 2000 and NT4, on Windows 95, 98 and ME the rotation controls will not be
available. In order to rotate the display, select the required rotation degree radio button and click apply. This facility is provided to support
panels mounted in a portrait orientation. DirectDraw and DirectShow and OpenGL rendering is not rotated, if an application uses DirectX
within a Window then correct image rendering can be obtained by reducing the graphics hardware acceleration to the point where DirectX
is disabled. Hardware acceleration may NOT be fully disabled when using rotation. To reduce graphics hardware acceleration on
Windows 2000 and XP open the Display Properties applet in the Control Panel, Select Settings->Advanced->Trouble Shooting and then
move the slider bar to the point where DirectX acceleration is disabled.
Selecting screen resolutions and refresh rates
In order to be able to select 4:3 and wide-screen resolutions or select vertical refresh rates other than ‘Adapter Default’ or ‘Optimal’
(Windows Display Settings control), you must ‘Install’ a ‘Monitor’ via the Display->Settings->Advanced->Monitor tab. You need to select a
‘Driver’ for your ‘Monitor’ (includes Plasma displays and LCD displays). We have included on our driver distribution CD a ‘Monitor Driver’
file. This is called display.inf and is located in the ‘Monitor’ folder on the CD. If your Plasma panel, LCD/TFT flat panel or CRT was not
supplied with an installation disk you may use the driver that we provide. When installing your ‘Monitor’ please browse to the location of
the display.inf file, after selecting this you will see a list of supported displays, please select the entry most closely matching you panel or
a ‘Generic’ entry. After installing this driver you will be able to select the resolution and refresh rate most suitable for your panel.
Display Manger Menu Items
Image Retention and Phosphor Burn prevention and reduction
The Orbiter setup dialog box is accessed from Display Managers’ Screen Protection menu. Orbiter is used to shift the Windows desktop
output from the Pixel Perfect graphics card up, down, left, right around the display. This has the effect of reducing or eliminating image
retention dependent upon screen content and the maximum ‘Shift Delta’ you are able to use. Orbiter works best with small fonts and
images where the whole image can be shifted to adjacent pixels at regular intervals. Orbiter shifts by one pixel at every ‘Shift Interval’.
The maximum movement (Delta) or display shift is 20 pixels, up/down left/right. We recommend that you use the largest Delta suitable for
your screen content. Note that as the screen shifts, information or ‘Desktop’ will be lost from the edge of the screen. One or any
combination of shift patterns can be used, each pattern will complete one cycle and be immediately followed by the next. Orbiter can be
set to begin as soon as Windows starts without any user intervention, alternatively it can be started and stopped manually.
Image retention or phosphor ‘Burn’ (pixel over use) is caused by displaying static images for medium or long intervals on plasma displays,
CRTs or LCD/TFT displays. The effect of this can be reduced by using the Orbiter but if permanent Burn or short term Image Retention is
affecting your panel the Pixel Perfects’ manual or scheduled ‘Burn Reduction’ procedure may be used. This feature can help remove
image retention in a relatively short period of time and can reduce the impact of phosphor burn. Note, using the Burn Reduction
procedure does not ‘Fix’ phosphor burn, it reduces the visible effect by exercising all pixels to the same degree thus making burnt in
patterns less noticeable to the human eye. If used for extended periods the Burn Erasure procedure does ‘age’ the display. We
recommend that all precautions are taken to prevent image retention from occurring and that if it is necessary, use the Burn Reduction
facility for the minimum time necessary to affect the required improvement in your display.
We offer the following general guidelines for use of our Burn Reduction functionality but please note that each display will respond in
different amounts of time and may handle our images differently dependent upon your displays own features (reducing their intensity,
instigating screen saver or orbiter functionality etc). Generally, using the ‘Wipe’ function works better than ‘Flood’ as this will cause full
intensity illumination of your displays’ phosphor and should not trigger a screen saver. Plasma display panels are not designed to display
full screen, full intensity white. Alternatively if there is a specific image retained on the screen the ‘Negative Image’ flood can be used.
Negative images can be used to reduce the impact of a specific retained image. Display Manager supports two methods using negative
images. Either the current screen image is captured and then used to flood fill the display, or a pre-captured image can be used.
Display Manager can be used to capture the current desktop in single or multi-monitor configurations. You can also select an image
captured or created by another application the only requirement being that the image file is in Windows Bitmap format. Also be sure that
the image selected is the same size as the current desktop resolution. When using Display Manager to capture a desktop image none of
the Display Manager dialog box images will be captured. Images are saved as Windows bitmaps and are a ‘Positive’ image, the image
colours are inverted (a negative image created) at the moment the Burn Reduction procedure displays the image. You can view a
captured image either as a normal (positive) or negative image by pressing either of the ‘View’ buttons on the Capture dialog box. To
cancel display of the image press either the Esc or right mouse keys. For the Negative Image Burn Reduction procedure to do a negative
flood of the current desktop at the time the procedure is begun, select only the ‘Negative’ radio button. To use a pre-captured image, tick
the ‘Use Image’ check box, the ‘Select/Capture’ image button then becomes visible, use this to capture and or select an image.
Using the scheduler facility you can select the frequency, duration and start time of the Burn Reduction procedure. This feature removes
the need for regular manual maintenance intervention and allows the display to be maintained at times of day when it is most suitable to
be undertaken. Light image retention can be removed by ‘exercising’ the display using the Burn Reduction facility for 20-30 minutes, if this
is insufficient then the period should be extended, continue extending the period until the image retention or burn is reduced to an
acceptable degree. Note: Pixel Perfect Burn Reduction operates up to a maximum duration of 4 hours. If this is not sufficient to improve
your display we recommend attention by an experienced service engineer. When manually starting the Burn Reduction procedure the
required duration should first be selected, early ending of the procedure can be initiated by pressing the Esc key or Right Mouse button.
After the Burn Reduction procedure the display will be restored to the current Windows desktop. Especially when using the Manual Burn
Reduction procedure this may be undesirable as a static image will be restored to the display and could cause further Image Retention.
To avoid this scenario please select the ‘Blackout after Burn Reduction’ option. This causes the display to be blacked out until either the
Esc key or right mouse button is clicked.
Using EDID
Some display panels implement EDID (Extended Display Identification Data) this information can contain detailed resolution and timing
information related to your display. The Pixel Perfect driver can use this information to provide the display with it’s preferred resolution,
timing and sync polarity specifications. We recommend only using this information on panels that are not explicitly supported by the
current Pixel Perfect driver. If EDID data is available and one of the supported resolutions is selected the Pixel Perfect display driver will
use the timing data supplied by the attached display. Please note that many displays do not support this feature and/or do not correctly
list their native wide-screen resolution.
Enabling DVI and TV output
By default the Pixel Perfect display driver detects whether there is a panel attached to the DVI or TV outputs of the card at start-up to
determine if either of the outputs should be enabled. This can result in no DVI or TV image being transmitted if the display is attached
after start-up or if the cable is routed through a signal booster or optical cable. In such cases we recommend selecting the “DVI output
Enabled” or “TV Output Enabled” options. Clicking the Apply button will cause the selected output to be activated. This setting will be
retained when the computer is switched off.
Note: both DVI and TV Outputs cannot be enabled at the same time, their operation is mutually exclusive. Also, there are only three
supported TV resolutions, non of which are wide-screen, these are listed on the dialog box.
Note 2: The Pixel Perfect K2 is a single head graphics card, as such the image displayed on the DVI or TV Outputs will be exactly the
same as that on the analogue RGB output.
Screen Positioning
The screen offset position can be set by altering the output of the Pixel Perfect card. Most often this can also be set using the displays’
own OSD, the use of which is generally preferable. However if you require a greater degree of shift the Display Manager tool can be
used. When the maximum level of shift is reached the shift pixel counter will display ‘Max’. Use the Reset button to centre the display to
the default setting. The shift value will be retained and implemented when re-starting your PC.
Note: some displays will not allow you to shift screen offset when using DVI, however it should not be necessary to use this adjustment
with DVI as screen position should be exact by default.
file: Pixel Perfect Installation Guide 14.doc 02/04