1
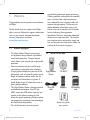
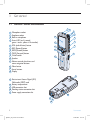
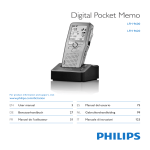
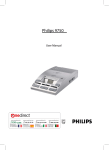
Digital Pocket Memo LFH 9370/00 For product information and support, visit www.philips.com/dictation EN User manual 3 ES Manual del usuario 65 DE Benutzerhandbuch 23 NL Gebruikershandleiding 85 FR Manuel de l‘utilisateur 45 IT Manuale di istruzioni dpm9370_ifu_en-de-fr-es-nl-it.indb 1 107 28.05.2008 17:16:58 The CE mark confirms that the device corresponds to the relevant guidelines of the European Union. The cardboard used for packaging can be recycled. This electronic device contains recyclable material. dpm9370_ifu_en-de-fr-es-nl-it.indb 2 28.05.2008 17:16:58 E N G LISH User manual 1 1.1 1.2 Welcome Product highlights What's in the box 4 4 4 2 2.1 2.2 2.3 Important Safety Disposal of your old product Technical support and warranty 5 5 5 5 3 3.1 3.2 Get started 6 Overview – controls and connections 6 Overview – display indicators and symbols 7 3.3 Install the batteries 8 3.4 Insert and eject the memory card 8 3.5 Format a new memory card 9 3.6 Activate the Digital Pocket Memo 9 3.6.1 Set the language 9 3.6.2 Set the date and time 10 3.7 Power-save mode 10 4.3 4.3.1 4.3.2 4.3.3 Delete Delete a file Delete part of a recording Delete all dictations 5 Use more of your Digital Pocket Memo 17 Use Philips SpeechExec software 17 Advanced configuration 17 Download recordings to the PC 17 Menu settings 18 Use voice-activated recording 19 Work with index marks 20 Insert an index mark 20 Delete an index mark 20 Delete all index marks 20 Assign an author's name 21 Use rechargeable batteries 21 Recharge the batteries using the Philips power supply 21 Recharge the batteries through the docking station 21 5.1 5.1.1 5.1.2 5.2 5.3 5.4 5.4.1 5.4.2 5.4.3 5.5 5.6 5.6.1 5.6.2 4 4.1 4.1.1 4.1.2 4.1.3 4.1.4 4.1.5 4.1.6 4.2 4.2.1 Using your Digital Pocket Memo Record Create a new recording Review recording Add to a recording (insert) Finish (lock) a recording Change the recording format Adjust the microphone sensitivity Playback Overview playback functions User manual dpm9370_ifu_en-de-fr-es-nl-it.indb 3 11 11 11 12 12 13 13 14 14 15 6 Technical data 15 15 16 16 22 3 28.05.2008 17:16:58 1 Welcome Congratulations on your purchase and welcome to Philips! To fully benefit from the support that Philips offers, visit our Website for support information such as user manuals, software downloads, warranty information and more: www.philips.com/dictation. 1.1 standard for professional speech processing. Offering excellent audio quality for recorded voice, .dss files allow a high compression rate, reduced file sizes, network traffic and required storage capacity. The format also allows additional information, such as the author name, to be stored in the file header, further facilitating file organization. • SpeechExec Dictate is the perfect download software to manage voice files. The intuitive user interface makes job retrieval simple and fast, and the job status information allows the tracking of all the work in progress. Product highlights • The Digital Pocket Memo's asymmetrical and ergonomic design delivers unparalleled user-friendly operation. The push button switch allows quick control and single handed operation. • Two smart buttons let you scroll through menu options and quickly make selections. • A large graphical display lets you view all file information, such as keywords (author name), length of dictation, position within the file, and other vital information at a glance. A backlit display shows all information, even in poor lighting conditions. • The Digital Pocket Memo is designed around standardized technologies. From SD (or MMC) cards, mini-USB cables, batteries and sockets to the industrystandard .dss file format for speech processing, Philips employs non-proprietary accessories and technologies for the ultimate compatibility. • The .dss file format is the international 4 dpm9370_ifu_en-de-fr-es-nl-it.indb 4 1.2 What's in the box Digital Pocket Memo CD-ROM Pouch Mini USB cable Batteries SD memory card Digital Pocket Memo LFH 9370 www.philips.com/dictation ES Manual del usuario 57 DE Benutzerhandbuch 21 NL Gebruikershandleiding 75 FR Manuel de l‘utilisateur 39 IT Manuale di istruzioni 93 EN User manual 3 Quick start guide, user manual User manual 28.05.2008 17:16:59 Important 2.1 Safety • To avoid short circuit, do not expose the product to rain or water. • Do not expose the device to excessive heat caused by heating equipment or direct sunlight. • Protect the cables from being pinched, particularly at plugs and the point where they exit from the device. • Back up your files. Philips is not responsible for any loss of data. 2.2 Disposal of your old product • Your product is designed and manufactured with high quality materials and components, that can be recycled and re-used. • When this crossed-out wheeled bin symbol is attached to a product, it indicates that the product is covered by the European Directive 2002/96/ EC. • Please become informed about the local separate collection system for electrical and electronic products. • Please act according to your local rules and do not dispose of old products with your normal household waste. The correct disposal of old products will help prevent potential negative consequences for the environment User manual dpm9370_ifu_en-de-fr-es-nl-it.indb 5 and human health. • Batteries (including built-in rechargeable batteries) contain substances that may pollute the environment. All batteries should be disposed of at an official collection point. E N G LISH 2 2.3 Technical support and warranty This Philips product was designed and manufactured to the highest quality standards. If your Philips product is not working correctly or is defective, contact your supplying Philips Speech Processing dealer who will provide you with the necessary information on how to proceed. If you have questions that your dealer cannot answer or any other related question, visit www.philips.com/dictation to contact us. No components are user-serviceable. Do not open or remove covers and do not insert objects not suitable for the specific connectors. Repairs may be made only by Philips service centers and official repair facilities. Failure to do so will void any warranty, stated or implied. Any operation expressly prohibited in this manual, any adjustments, or assembly procedures not recommended or authorized in this manual will void the warranty. 5 28.05.2008 17:16:59 3 Get started 3.1 Overview – controls and connections 1 1 2 3 4 5 6 7 8 9 10 11 12 13 14 Microphone socket Earphone socket Built-in microphone Status LED (red = record, green = insert, yellow = file transfer) EOL (end-of-letter) button REC (Record) button REW (Rewind) button FWD (Forward) button On/off switch Speaker Volume control, plus/minus and menu navigation buttons Menu button Smart buttons Display 2 3 4 5 14 6 13 7 12 8 11 9 10 15 15 16 17 18 19 Slot to insert Secure Digital (SD)/ Multimedia (MMC) card Battery compartment USB connection slot Docking station connection slot Power supply connection slot 16 19 17 18 6 dpm9370_ifu_en-de-fr-es-nl-it.indb 6 User manual 28.05.2008 17:16:59 Overview – display indicators and symbols E N G LISH 3.2 6 7 8 9 10 SP 11 12 5 13 4 3 2 1 DPM 9370.DSS PLAY NEW 14 17 16 15 1 2 3 4 5 6 7 8 9 Current function of the left smart button File name Recording number Position bar Recording position (minutes : seconds) Battery level indicator Recording mode (SP = Standard Play / LPm = Long Play mobile) Memory card is write-protected (locked) Insert recording mode is activated User manual dpm9370_ifu_en-de-fr-es-nl-it.indb 7 10 11 12 13 14 15 16 17 Voice-activated recording in progress Recording volume indicator Sensitivity level for voice-activated recording Current position in the recording Current function of the right smart button Recording is marked finished (EOL) and locked Recording is marked priority Recording contains index mark 7 28.05.2008 17:16:59 3.3 Install the batteries The Digital Pocket Memo can be operated with the two AAA batteries delivered with the product. Philips rechargeable batteries may also be used. See Use rechargeable batteries on page 21 for more information. 1 The on/off switch of the Digital Pocket Memo must be in the OFF position. 2 Open the battery compartment on the back side of the Digital Pocket Memo by sliding it outwards then folding it up. 3 Insert the two AAA batteries. The correct polarity is indicated on the inside of the battery compartment cover. 1 2 4 Close the battery compartment by folding it back and sliding the battery compartment cover inside until it clicks. 1 dpm9370_ifu_en-de-fr-es-nl-it.indb 8 Your Digital Pocket Memo is packaged with a memory card already inserted and formatted. To eject the memory card: 1 Locate the memory card slot on the top back side of the Digital Pocket Memo. 2 Press the memory card in the Digital Pocket Memo until it clicks. 1 3 Release the memory card. It will slightly emerge from the memory card slot. Simply slide it out. 1 2 2 D Note Do not mix battery types! Use two rechargeable batteries or two non-rechargeable alkaline batteries. 8 3.4 Insert and eject the memory card The Digital Pocket Memo operates with an SD (Secure Digital) memory card and supports SD cards with storage capacities of up to 2 GB. To insert a memory card: 1 Locate the memory card slot on the top back side of the Digital Pocket Memo. 2 Slide the memory card into the slot. A small illustration under the memory card slot indicates the correct orientation. 2 3 Push the memory card in until you hear a click. User manual 28.05.2008 17:17:00 The memory card that is packaged with the Digital Pocket Memo is already formatted and ready for use. If a memory card is inserted that is not formatted, the Digital Pocket Memo will offer the option to format it. Refer to the next chapter for more information. 3.5 Format a new memory card When a new, unformatted memory card (or a memory card that was formatted with a nonDigital Pocket Memo device) is inserted, the Digital Pocket Memo will display a prompt to format the memory card. To confirm and start the formatting process, press the OK smart button 1 . To cancel the formatting process, remove the memory card or press the CANCEL smart button 2 . Format memory A Delete all ? Delete all ? Yes - format B Yes - Volume All files will be lost ! Font NTIO OK ENTER BACK C format ENTER N !! CANC EL 1 2 The Digital Pocket Memo will be unable to record without a properly formatted memory card. If a new card was inserted and the User manual dpm9370_ifu_en-de-fr-es-nl-it.indb 9 D Note Formatting is not possible if the memory card is in read-only mode (locked). 3.6 Activate the Digital Pocket Memo The Digital Pocket Memo is turned on and off by sliding the ON/OFF switch. When using it for the first time, you will be prompted to set the language, date and time. 3.6.1 Set the language When using the Digital Pocket Memo for the first time, you will be prompted to set the language. ? !! ATTE Language BACK Delet e all formatting process was cancelled, insert another card that can be formatted or has already been formatted. E N G LISH D Note If the Digital Pocket Memo is turned to the ON position and there is no memory card inserted, a warning screen is displayed. 1 Press the + or – button 1 on the Digital Pocket Memo to select a language. 2 Press the OK smart button 2 to confirm your selection. The selected language will be displayed. 9 28.05.2008 17:17:00 LANGUAGE LANGUE SPRACHE IDIOMA INT FR DE ES LANG UA LANG GE UE SPRA CH IDIOM E A EXIT EXIT -/+ OK -/+ 2007-10-01 12/24: 24 OK 2 3.6.2 Set the date and time After selecting the user interface language, the Digital Pocket Memo will prompt you to set the current date and time. 1 Press the + or – button 1 repeatedly to change the value for the year, month or day. 2 Press the → smart button 2 to advance the arrow (↑) to the next entry. 3 After setting the day, press the → smart button 2 to advance the settings to the correct time. 4 Press the + or – button 1 to select a 12-hour or 24-hour clock, AM or PM (if a 12-hour clock is selected), and to change the value of the hour and minute settings. 5 Press the → smart button 2 to confirm the date and time. The Digital Pocket Memo is now ready to function. TIME: 14:22 14:22 D Note It is possible to change the language later using the menu. See Menu settings on page 18 for more information. dpm9370_ifu_en-de-fr-es-nl-it.indb 10 12/24: TIME: 24 1 10 DATE: 2007-1 0 01 DATE: INT FR DE ES OK OK 3 2 1 D Note If a mistake is made in the date/time settings, use the ← smart button 3 any time during the procedure to step back to make corrections. It is also possible to change the date and time later using the menu. See Menu settings on page 18 for more information. 3.7 Power-save mode After four minutes of inactivity, the Digital Pocket Memo automatically goes into powersave mode and the LCD screen will display the date and time. Press any button to reactivate it. If the Digital Pocket Memo is not used for more than two hours, it turns off completely. Turn the unit on by moving the On/Off switch to the OFF position and then back to the ON position. User manual 28.05.2008 17:17:00 Using your Digital Pocket Memo 4.1 4 Press the REC button 3 and start speaking. The status LED 4 glows in red (in overwrite mode) or green (in insert mode) while recording. The following information is displayed: a Recording mode b Recording position (minutes : seconds) c Current position in the recording d File number e File name Record 4.1.1 Create a new recording Follow these steps to create a recording with the Digital Pocket Memo: 1 A memory card must be inserted into the memory card slot. See Insert and eject the memory card on page 8 for more information. 2 Slide the On/Off switch to the ON position to switch on the Digital Pocket Memo. 1 3 Press the NEW smart button 2 to create a new recording. D Note The NEW smart button is not displayed if the current recording is empty. 5 For short pauses, press the REC button. 3 The status LED flashes. 4 To continue recording, press the REC button again. 3 6 To stop recording, press the STOP smart button. 5 6 a b c SP d #2 e DPM 9370.DSS 4 2 :3 4 3 #2 DP M 93 70 PLAY .D SS STOP STOP 5 SP 9 :2 3 9:23 #1 #1 DPM DPM 9370.DSS PLAY SP 2:34 PLAY SP E N G LISH 4 NEW 937 PLAY 0 .D S S NEW 2 1 User manual dpm9370_ifu_en-de-fr-es-nl-it.indb 11 E Tip For best results, speak clearly and keep the microphone 6 about four inches (ten centimeters) away from your mouth. 11 28.05.2008 17:17:01 4.1.2 Review recording Press the REW button 1 briefly while recording to jump back two seconds and start playback. Delete dictation A Overwrite Insert mode Insert Overwrite Press and hold the REW button 1 while recording to rewind. Release the REW button to stop winding and start playback. SP 5:16 #2 DPM 9370.DSS SP 5 :1 6 #2 DPM 937 0 .D S S 1 4.1.3 Add to a recording (insert) Files are recorded in overwrite mode by default. Follow these steps to switch to insert mode to make additions to your recording: 1 Press the MENU button 1 while stopped to open the Digital Pocket Memo menu. 2 Press the + or – button 2 to select the Insert mode menu and press the ENTER smart button 3 to enter the submenu. 3 Press the + or – button 2 to choose between Insert or Overwrite mode. 4 Press the OK smart button 4 to save the setting or press the CANCEL smart button 3 to exit the sub-menu without changing the setting. 5 Press the + or – button 2 to select the file into which the insertion should be made. 12 dpm9370_ifu_en-de-fr-es-nl-it.indb 12 Insert B Insert mode: Index set rite Insert Author BACK OK ENTER OK mode: Overw 4 CANC EL CANCEL 3 1 2 6 Play, forward or rewind to the position where the insertion should be made. 7 Press the REC button 5 and start speaking. The insertion will not overwrite the recording. The status LED 6 glows in red (in overwrite mode) or green (in insert mode) while recording. 8 Press the STOP smart button 7 to stop inserting. If the recording is not finished, simply fast forward to the end of the file and continue recording. 9 Repeat from step 1 to return to overwrite recording mode. SP SP 5 #2 #2 DP M 93 70 PLAY DPM 9370.DSS PLAY 6 2 :3 4 2:34 STOP .D SS STOP 7 User manual 28.05.2008 17:17:01 SP 9:23 SP 9 :2 3 2 #2 DP M #2 DPM 9370.DSS BEGIN 93 70 BEGIN .D SS NEW NEW 1 E Tip Philips SpeechExec software can be configured to download files from the Digital Pocket Memo to the PC that are marked finished only. C Caution Locked files are deleted when the memory card is formatted or the delete-all-dictations function is used. User manual dpm9370_ifu_en-de-fr-es-nl-it.indb 13 4.1.5 Change the recording format The recording format determines the audio quality of your recordings and affects the number of audio files that can fit on the memory card. E N G LISH 4.1.4 Finish (lock) a recording When a recording is finished and no additional changes will be made, follow these steps to mark it as finished and protect it from being accidentally deleted: 1 Press the + or – button 1 while stopped to select the recording to be marked finished. 2 Press the end-of-letter (EOL) button 2 to lock the file and mark it as finished. The ┱ symbol is displayed. 3 To assign priority status to the recording, press the EOL button 2 again within half a second. The ! symbol is displayed, indicating that the file has priority status. 4 To make changes to the recording, press the EOL button 2 again to remove the finished mark. The Digital Pocket Memo supports the following recording formats: • Standard Play (SP) requires 1 megabyte for 10 minutes of recording. • Long Play mobile (LPm) requires 1 megabyte for 15 minutes of recording. 1 Press the MENU button 1 while stopped to open the Digital Pocket Memo menu. 2 Press the + or – button 2 to select the Setup menu item and press the ENTER smart button. 3 3 Press the + or – button 2 to select the Record format menu item and press the ENTER smart button 3 . 4 Press the + or – button 2 to choose between SP and LPm. 5 Press the OK smart button 4 to save the setting or press the CANCEL smart button 3 to exit the sub-menu without changing the setting. Index set A B Language Insert mode Record format Author Voice activation SP Setup Backlight Language BACK <DSS> ENTER BACK Recor d form at: SP <DSS C > LPm <DSS > OK ENTER 4 CANC EL 3 1 2 13 28.05.2008 17:17:02 4.1.6 Adjust the microphone sensitivity Set the microphone sensitivity for the environment and your recording preferences. 4.2 1 Press the MENU button 1 while stopped to open the Digital Pocket Memo menu. 2 Press the + or – button 2 to select the Setup menu item and press the ENTER smart button 3 . 3 Press the + or – button 2 to select the Microphone menu item and press the ENTER smart button 3 . 4 Press the + or – button 2 to choose the microphone sensitivity: Private (low), Dictate (medium) and Conference (high). 5 Press the OK smart button 4 to save the setting or press the CANCEL smart button 3 to exit the sub-menu without changing the setting. Index set A Record lamp Insert mode Contrast Author Device beep Setup BACK e: rence The following information is displayed: a Current position in the dictation b Playback position (minutes : seconds) c Recording mode d File number e File name 3 Press the + or – button 1 to adjust the playback volume during playback. 4 Press the SPEED smart button 3 to adjust faster or slower file playback. 5 Press the STOP smart button 2 to stop playback. c b a C te Privat e OK ENTER 1 Press the + or – button 1 while stopped to select the recording to play back. 2 Press the PLAY smart button 2 to start playback. phon Dicta Dictate ENTER Micro Confe Microphone Language BACK B Playback 4 CANC EL 3 1 2 SP SP 0:00 2:34 #2 #2 #2 DPM 9370.DSS PLAY SP 2 :3 4 NEW DPM DPM 9370.DSS STOP d SPEED e 937 STOP 0 .D S S SPEED 2 3 1 14 dpm9370_ifu_en-de-fr-es-nl-it.indb 14 User manual 28.05.2008 17:17:02 4.3 Fast rewind Press the REW button 1 briefly while D Note Before deleting a file, make sure that it is not marked finished and that the memory card is not set to read-only (locked). If the file is marked finished, unlock it by pressing the EOL button once. stopped. Press the STOP smart button 3 to stop winding or the PLAY smart button 4 to stop winding and start playback. Fast forward Press the FWD button 2 briefly while stopped. Press the STOP smart button 3 to Delete E N G LISH 4.2.1 Overview playback functions stop fast forward or the PLAY smart button 4 to stop fast forward and start playback. Press and hold the REW button 1 while Rewind playing or recording. Release the REW button 4.3.1 Delete a file Follow these steps to delete a file entirely: to start playback. Press and hold the FWD button 2 while Cue playing or recording. Release the FWD button to start playback. Auto- Press the REW 1 button briefly while playing backspace or recording to recap the last second and start playback. SP SP 5 :1 6 5:16 #2 #2 DPM DPM 9370.DSS PLAY STOP 937 PLAY 0 .D S S STOP 1 1 Press the + or – button 1 while stopped to select the file to be deleted. 2 Press the MENU button 2 to open the Digital Pocket Memo menu. The Delete dictation menu item is selected. 3 Press the ENTER smart button 3 to enter the sub menu. 4 Press the OK smart button 4 to delete the file permanently. Press the CANCEL smart button 3 to cancel the operation and leave the recording intact. 2 3 4 Delete dictation Delete ? A Index set Delete dictation: B Delete ? Insert mode !! ATTE Author BACK Delet e dict ation: Delet e? !! ATTENTION !! ENTER OK CANCEL NTIO OK N !! CANC EL 4 3 2 1 User manual dpm9370_ifu_en-de-fr-es-nl-it.indb 15 15 28.05.2008 17:17:02 4.3.2 Delete part of a recording Follow these steps to delete a section from a recording: SP 1 Navigate to the beginning of the section to be deleted by playback or forward/rewind. 2 Press the MENU button 1 while stopped to open the Digital Pocket Memo menu. 3 Press the + or – button 2 to select the Delete section menu item and press the OK smart button 3 . 4 Press the MARK 1 smart button 4 . A cross symbol appears on the screen. Insert mode A B Setup Delete section CANCEL #2 #2 DPM DPM 9370.DSS CANCEL SP 2 :1 5 2:15 Author OK SP MARK 1 9370 CANC EL 3 .D S S MAR K1 A 4 1 2 5 Find the second mark position by playback or forward / rewind and press the MARK 2 smart button 5 . The second cross appears. 6 Press the DELETE smart button 5 and the OK smart button 6 to confirm the deletion of the marked section, or press the CANCEL smart button to exit without deleting. SP B 3:38 3:38 #2 DPM 9370.DSS DPM 9370.DSS MARK 2 CANCEL C #2 #2 PLAY SP 3 :3 8 Delet e? OK 6 CANC EL DELETE 5 4.3.3 Delete all dictations C Caution Files marked finished (EOL) are deleted when the delete-all-dictations function is used. Follow these steps to delete all recordings: 1 Press the MENU button 1 while stopped to open the Digital Pocket Memo menu. 2 Press the + or – button 2 to select the Setup menu item and press the ENTER smart button 3 . 3 Press the + or – button 2 to select the Delete dictations menu item and press the ENTER smart button 3 . 4 Press the ENTER smart button 3 and the OK smart button 4 to confirm the deletion, or press the CANCEL smart button 3 to exit without deleting. Index set A B Device beep Microphone Author Date & time Setup Delete dictations Language BACK BACK ENTER C delete !! ATTE Delete all ? ENTER Delet e all ? Yes - Insert mode NTIO OK N !! CANC EL 4 3 1 2 16 dpm9370_ifu_en-de-fr-es-nl-it.indb 16 User manual 28.05.2008 17:17:03 Use more of your Digital Pocket Memo 5.1 Use Philips SpeechExec software Philips SpeechExec software can be used for advanced configuration of the Digital Pocket Memo and automatic download, conversion and routing of dictation files. D Note For detailed information about SpeechExec software, refer to the SpeechExec quick reference guide. 5.1.1 Advanced configuration The Digital Pocket Memo Configuration Wizard is part of the Philips SpeechExec Dictate software and guides users through the device configurations and settings of their Digital Pocket Memo. The wizard assists users in configuring the time format, sound feedback, voice-activated recording, display appearance (standard or advanced display mode), the User manual dpm9370_ifu_en-de-fr-es-nl-it.indb 17 recording format, microphone sensitivity, author names, and file download to the PC. 1 Connect the Digital Pocket Memo to the PC using a USB cable. 2 Start Philips SpeechExec Dictate software. 3 Click Settings > General Settings on the menu bar of SpeechExec to open the settings menu and select DPM/DT Configuration > DPM Wizard from the list on the left side. 4 Click the Start Wizard... button to open the wizard. Follow the on-screen instructions to customize the Digital Pocket Memo. 5 Click the Finish button to close the wizard and confirm the transfer of the new settings to the Digital Pocket Memo. E N G LISH 5 D Note When the Digital Pocket Memo is connected to the PC for the first time, Windows detects the new hardware and automatically installs the required drivers. When the installation is complete, Windows may prompt you to restart the PC. 5.1.2 Download recordings to the PC With USB mass storage support, the Digital Pocket Memo is automatically displayed as an external drive when it is connected to the computer. It can then be accessed easily with any Microsoft Windows program as a regular drive. Use Philips SpeechExec software for automatic download, conversion and routing of files. 17 28.05.2008 17:17:03 Delete Delete ? Index Index set Insert Insert mode BACK BACK ENTER The menu offers the following options: Press the MENU button DELETE DICTATION (see page 15) INDEX SET/CLEAR (see page 20) AUTHOR (KEYWORD) (see page 21) INSERT / OVERWRITE MODE (see page 12) DELETE SECTION (see page 16) SETUP LANGUAGE RECORD FORMAT (see page 13) VOICE ACTIVATION (see page 19) BACKLIGHT RECORD LAMP ON/OFF LCD CONTRAST DEVICE BEEP ON/OFF MICROPHONE SENSITIVITY (see page 14) DATE & TIME (see page 10) DELETE ALL DICTATIONS (see page 16) FORMAT MEMORY (see page 9) PLAYBACK VOLUME DEVICE FONT (MODERN/CLASSIC) MAIN MENU SETUP MENU dpm9370_ifu_en-de-fr-es-nl-it.indb 18 3 R 18 4 ENTE 2 1 Press the MENU button 1 while stopped to open the Digital Pocket Memo menu. 2 Press the + or – button 2 to select the next/previous menu item. 3 Press the ENTER smart button 3 or the MENU button 1 to enter a submenu. Press the BACK smart button 4 to exit the menu. 4 Press the + or – button 2 to select a function. 5 Press the OK smart button 4 to confirm a selection or the CANCEL smart button 3 to exit a sub-menu without changing a setting. ation mode 1 5.2 Menu settings To access the Digital Pocket Memo menu: ? set Autho r Author D Note How and which files are downloaded after a Digital Pocket Memo is connected can be configured in the settings menu of SpeechExec or with the Configuration Wizard. Delet e dict Delete dictation 1 Make a recording with the Digital Pocket Memo. 2 Start Philips SpeechExec Dictate software. 3 Connect the Digital Pocket Memo to the PC using the USB cable or the optional USB docking station. 4 By default, the recordings on the Digital Pocket Memo will be downloaded automatically to the PC and moved to the Finished dictations folder of the worklist. User manual 28.05.2008 17:17:04 5.3 Use voice-activated recording Voice-activated recording is a convenience feature for hands-free dictation. When voice activated recording is enabled, recording will start when you begin speaking. When you stop speaking, the Digital Pocket Memo will automatically pause recording after three seconds of silence, and resume only when you begin speaking again. 1 Press the MENU button 1 while stopped to open the Digital Pocket Memo menu. 2 Press the + or – button 2 to select the Setup menu item and press the ENTER smart button 3 . 3 Press the + or – button 2 to select the Voice activation menu item and press the ENTER smart button 3 . 4 Press the + or – button 2 to choose Off or On. 5 Press the OK smart button 4 to save the setting or press the CANCEL smart button 3 to exit the sub-menu without changing the setting. User manual dpm9370_ifu_en-de-fr-es-nl-it.indb 19 A Index set B Language Record format Author Voice activation Setup Backlight activa tion: C On Off Language BACK Voice Off Insert mode E N G LISH D Note • Some settings, such as defining author names or switching to simple display mode, are available only through Philips SpeechExec Dictate. See Advanced configuration on page 17 for more information. • Press and hold the MENU button for a few seconds to access additional information about files, the device and the memory card. ENTER OK BACK ENTER 4 CANC EL 3 1 2 6 Press the REC button 5 and start speaking. The status LED 6 glows in red (in overwrite mode) or green (in insert mode) while recording. When the sound level is below the threshold sound level a , recording pauses after three seconds and the status LED flashes. 7 Press the + or – button 7 to adjust the threshold sound level a while recording. 8 Press the STOP smart 8 button to stop recording. SP 5 #2 #2 DPM 937 PLAY DPM 9370.DSS PLAY 6 SP 2 :3 4 2:34 STOP a 0 .D S S STOP 8 7 19 28.05.2008 17:17:04 5.4 Work with index marks Index marks can be used to mark certain points in a recording as points of reference. A point of reference may be the beginning of a major section, or a part of the recording that you may want to revise later or access quickly. SP 2:34 Delet e dict Delete dictation Index Index clear Insert Insert mode #2 PLAY NEW OK mode Autho r Author DPM 9370.DSS ation clear OK 3 CANC EL CANCEL 1 a 2 5.4.1 Insert an index mark 5.4.3 Delete all index marks 1 Play back, fast forward or fast rewind to the position where the index mark should be set. 2 Press the MENU button 1 while stopped to open the Digital Pocket Memo menu. 3 Press the + or – button 2 to select the Index set menu and press the OK smart button 3 . Delete dictation Index set SP 2:34 SP 2 :3 4 #2 Insert mode #2 Author OK DP M PLAY 93 70 PLAY DPM 9370.DSS CANCEL 1 Press the MENU button 1 while stopped to open the Digital Pocket Memo menu. 2 Press the + or – button 2 to select the Delete indices menu item and press the ENTER smart button 3 . 3 Press the ENTER smart button 3 and the OK smart button 4 to confirm the deletion, or press the CANCEL smart button 3 to exit without deleting. NEW a .D SS NEW 3 1 2 A Author Delete all ? B Yes - delete Delete indices Delete all ? Delete section BACK ENTER Delet e all ? Yes - Setup All indices will be lost ! !! ATTE NTIO OK BACK C delete ENTER N !! 4 CANC EL 3 1 5.4.2 Delete an index mark 1 Play back, fast forward or fast rewind to the index mark to be deleted a . 2 Press the MENU button 1 while stopped to open the Digital Pocket Memo menu. 3 Press the + or – button 2 to select the Index clear menu and press the OK smart button 3 . 20 dpm9370_ifu_en-de-fr-es-nl-it.indb 20 2 D Note The Delete Indices menu item is available only if the current dictation has at least one index mark. User manual 28.05.2008 17:17:04 D Note Author names must first be set up with Philips SpeechExec software. See Advanced configuration on page 17 for more information. By default, the keyword category AUTHOR with the keywords ‘DPM 9370' and ‘- - -' (empty = default) is available on the Digital Pocket Memo. To assign an author's name to a recording: 1 Press the MENU button 1 while stopped to open the Digital Pocket Memo menu. 2 Press the + or – button 2 to select the Author menu item. 3 Press the ENTER smart button 3 to display the list of names. 4 Press the + or − button 2 to select a name. 5 Press the OK smart button 4 to confirm or the CANCEL smart button 3 to exit without assigning a name. Delete dictation A Author: Insert mode DPM 9370 Author −−− DPM 9370 B OK ENTER OK 9370 −−− Setup BACK Autho r: DPM CANCEL 4 CANC EL 3 1 5.6 Use rechargeable batteries The Digital Pocket Memo can be operated with Philips Rechargeable Batteries 9154. To recharge these batteries, use the Philips Power Supply 9146 or the USB Docking Station 9120. E N G LISH 5.5 Assign an author's name A keyword, such as the author's name can be assigned to every recording. The keyword can be used to identify recordings and automatic file routing in Philips SpeechExec software. 5.6.1 Recharge the batteries using the Philips power supply To recharge the batteries with the Philips power supply: 1 Connect the Philips power supply to the main power supply. 2 Connect the Digital Pocket Memo to the Philips power supply. D Note It is OK to continue using the Digital Pocket Memo during recharge. The batteries will be recharged while you work, and will continue recharging even when the Digital Pocket Memo is turned off. 5.6.2 Recharge the batteries through the docking station When the Digital Pocket Memo is connected to the docking station, it is powered by the docking station and not by the batteries. If the Digital Pocket Memo is operated with rechargeable batteries, the batteries are automatically recharged while the Digital Pocket Memo is connected to the docking station. 2 User manual dpm9370_ifu_en-de-fr-es-nl-it.indb 21 21 28.05.2008 17:17:05 6 Technical data Connectivity • Docking connector: 8 pin female • USB: Mini-USB 2.0 female (full speed, 12 Mbit/s) • DC in: 6 V • Microphone: 3.5 mm, impedance 2 kΩ • Earphone: 3.5 mm, impedance 8 Ω or more • Memory card: Secure Digital (SD)/Multimedia (MMC) Display • Type: TFT-Transreflective • Diagonal screen size: 44 mm / 1.71 “ • Resolution: 128 x 128 pixels • Backlight colour: White Recording format • DSS (Digital Speech Standard) Recording media • Memory: Secure Digital (SD)/ MMC: up to 2 GB • Recording time (SP/LPm): 44/65 hours with 256 MB card Sampling frequency • Standard Play mode (SP): 12 kHz • Long Play mobile mode (LPm): 8 kHz Compression rate • Standard Play mode (SP): 13.5 kbit/s • Long Play mobile mode (LPm): 9 kbit/s Speaker • Built-in 30 mm round dynamic speaker • Output power: 200 mW Power • Battery type: two Philips AAA Ni-MH rechargeable batteries (LFH 9154) or two AAA batteries (LR03 or R03) • Power supply (optional): 6 V DC / 850 mA Green Specifications • Compliant to 2002/95/EC (RoHS) • Lead-free soldered product Operation conditions • Temperature: 5° - 45° C / 41° - 113° F • Humidity: 10 % - 90 % Specifications • Product dimensions (WxDxH): 50 x 116 x 17 mm / 2.0 x 4.6 x 0.7 “ • Weight: 106 g / 3.7 oz including batteries Optional accessories • USB Docking Station 9120 • Power supply 9146 • Philips Secure Digital (SD) memory card • Headphones 334 Battery life (SP mode) • 17 hours with Philips Ni-MH rechargeable battery / 15 hours with Philips alkaline battery Disclaimer and Notices Philips performs extensive testing with the most popular configurations. However, since PC add-ons and device drivers are updated continually, conflict-free operation cannot be guaranteed. 22 dpm9370_ifu_en-de-fr-es-nl-it.indb 22 User manual 28.05.2008 17:17:05 Discover the comprehensive range of high-end dictation products from Philips www.philips.com/dictation Specifications are subject to change without notice. Trademarks are the property of Royal Philips Electronics or their respective owners. © 2008 Royal Philips Electronics. All rights reserved. Document Version 2.0, 29/05/2008. 5103 109 9678.2 dpm9370_ifu_en-de-fr-es-nl-it.indb 128 28.05.2008 17:17:41