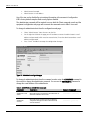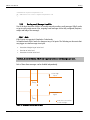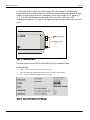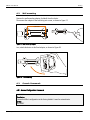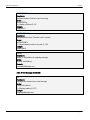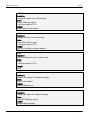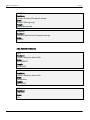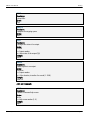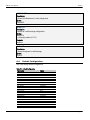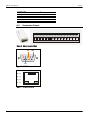
1
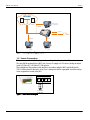
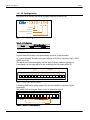
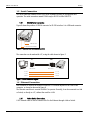
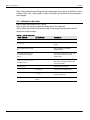
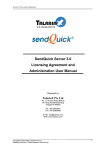
KIBe-E
User´s Manual
www.exemys.com
KIBe-E User’s Manual
Exemys
ISO 9001:2000
E MY S S. R
LISTED UL60950
16WU
47
96
9
ISO
00
1:2000
.L
EX
A1
Exemys Products are in constant evolution to satisfy our customer needs.
For that reason, the specifications and capabilities are subject to change without prior notice.
Updated information can be found at www.exemys.com
Copyright © Exemys, 2006 All Rights Reserved.
Rev. 3.2.0
www.exemys.com
Rev. 3.2.0
Pageii
KIBe-E User’s Manual
Exemys
Table of Contents
INTRODUCTION
6
1.1 The Manual ____________________________________________________________ 6
1.1.1
1.1.2
Purpose of the manual
Conventions, terms and acronyms
6
6
1.2
Product Description ___________________________________________________ 7
1.3
Power Connection ____________________________________________________ 8
1.4
I/O Configuration _____________________________________________________ 9
1.5
Serial Connection____________________________________________________ 10
1.5.1
1.6
1.6.1
RS-232 Serial Connection
10
Ethernet Connection _________________________________________________ 10
Hub or Switch Connection
10
CONFIGURATION AND OPERATION
2.1
2.1.1
2.1.2
2.1.3
2.1.4
2.1.5
2.2
2.2.1
2.2.2
2.2.3
2.2.4
2.2.5
Getting Started _____________________________________________________ 12
IP Address Configuration
Access to the configuration Web Page
Access to the Command Console through Telnet
Serial Command Console
Configuration of Network Basic Parameters through the console
12
13
14
14
15
KIBe-E Operation ____________________________________________________ 16
Administrator Configuration
Sending e-mail Messages from KIBe
Input Configuration
E-Mail Reception
Other Operation Features
A. APPENDIX
16
18
21
25
28
32
A.1.
Device Locator Application _____________________________________________ 32
2.3
Indicator Leds Codes _________________________________________________ 34
A.2.
Wall mounting ______________________________________________________ 35
A.3.
Console Commands __________________________________________________ 35
A.3.1. General Configuration Commands
A.3.2. Input Configuration Commands
A.3.3. Keep Alive Configuration Commands
A.3.4. Administrator Configuration Commands
A.3.5. POP3 Client Configuration Commands
A.3.6. SMTP Client Configuration Commands
A.3.7. E-Mail Messages Commands
www.exemys.com
12
Rev. 3.2.0
35
37
39
40
40
42
43
Pageiii
KIBe-E User’s Manual
Exemys
A.3.8. Operation Commands
A.3.9. List Commands
45
46
A.4.
Default Configuration_________________________________________________ 48
A.5.
Connectors Pinout ___________________________________________________ 49
A.6.
Technical Specifications _______________________________________________ 50
Tables
Table 1 - Acronyms_________________________________________________________________________6
Table 2 - Conventions_______________________________________________________________________7
Table 3 - I/O Configuration ___________________________________________________________________9
Table 4 - ADMINPASS and ADMINEMAIL commands _______________________________________________17
Table 5 - SMTP Client ______________________________________________________________________20
Table 6 - Input confuguration ________________________________________________________________21
Table 7 - POP3 Client Configuration ___________________________________________________________26
Table 8 - Changing the status of an output ______________________________________________________27
Table 9 - TIME and DATE commands___________________________________________________________29
Table 10 - Viewing KIBe-E Configuration ________________________________________________________31
Table 11 - Indicator Leds Codes ______________________________________________________________34
Table 12 - Default Configuration ______________________________________________________________48
Figures
Figure 1 - General Application Diagram Installation_________________________________________________8
Figure 2 - Power Connection Diagram ___________________________________________________________8
Figure 3 - Product Code Diagram ______________________________________________________________9
Figure 4 - Inputs/Outputs position diagram _______________________________________________________9
Figure 5 - Example of 2 inputs connection ________________________________________________________9
Figure 6 - Serial and Ethernet connectors position ________________________________________________10
Figure 7 - RS-232 Serial cable diagram _________________________________________________________10
Figure 8 - Ethernet Connection through a Hub or Switch ____________________________________________11
Figure 9 - KIBe’s IP Address in Netscape Navigator ________________________________________________13
Figure 10 - Open a telnet session _____________________________________________________________14
Figure 11 - HyperTerminal Configuration window _________________________________________________15
Figure 12 - Administrator configuration page ____________________________________________________17
Figure 13 - Diagram of the two types of inputs ___________________________________________________18
Figure 14 - Coded Mode Diagram _____________________________________________________________19
Figure 15 - Input mode configuration from Web page ______________________________________________19
Figure 16 - SMTP Client Configuration from Web page _____________________________________________21
Figure 17 - Input Selection __________________________________________________________________22
Figure 18 - Input Configuration_______________________________________________________________22
Figure 19 - E-Mail Number selection ___________________________________________________________23
Figure 20 - E-Mail Message Configuration_______________________________________________________23
Figure 21 - Keep Alive configuration ___________________________________________________________24
Figure 22 - Sending an E-Mail message to KIBe-E from an E-mail Client _________________________________25
Figure 23 - POP Client Configuration page ______________________________________________________26
Figure 24 - Date and Time settings ____________________________________________________________29
Figure 25 - Run / Stop KIBe-E operation.________________________________________________________30
Figure 26 - Exemys Device Locator ____________________________________________________________32
Figure 27- Wall-mounting adapter ____________________________________________________________35
www.exemys.com
Rev. 3.2.0
Pageiv
KIBe-E User’s Manual
Exemys
Figure 28 – Wall mounting __________________________________________________________________35
Figure 29 - KIBe-E Connector Pinout ___________________________________________________________49
Figure 30 - RS-232 Connector Pinout___________________________________________________________49
Figure 31 - Ethernet Connector _______________________________________________________________49
www.exemys.com
Rev. 3.2.0
Pagev
KIBe-E User’s Manual
Exemys
Chapter 1
Chapter
Introduction
1.1 The Manual
1.1.1
Purpose of the manual
The purpose of this manual is to provide instructions for the fast and simple installation and
operation of KIBe-E over you Ethernet network.
The manual starts with the product description and then provides instructions for proper
installation of its hardware. Later on, the manual includes detailed information on KIBe-E
configuration and operation.
1.1.2
Conventions, terms and acronyms
The acronyms used in this manual are listed in Table 1.
Table 1 - Acronyms
www.exemys.com
Acronym
Description
t
Bps
HTTP
IP
LAN
PC
TCP
DHCP
POP3
SMTP
E-Mail
GND
DNS
Address Resolution Protocol
Bits per second
Hyper Text Transfer Protocol
Internet Protocol
Local Area Network
Personal Computer
Transmission Control Protocol
Dynamic Host Configuration Protocol
Post Office Protocol
Simple Mail Transfer Protocol
Electronic Mail
Ground
Domain Name Server
Rev. 3.2.0
Page6
KIBe-E User’s Manual
Exemys
The conventions listed below are used in this manual.
Table 2 - Conventions
Convention
Description
A|B|C
A set of possible values for command parameters. You can type
A, B or C.
n..m
A range of possible values. You can type any value in the range
including n and m.
(text)
Any text, such as a server address.
aaa.bbb.ccc.ddd
An IP Address.
1.2 Product Description
KIBe-E is a system featuring alert notifications of events produced in different types of electric and
electronic devices. It can receive e-mail messages and act accordingly at the outputs, or inform of
the overall status of inputs/outputs.
It receives e-mail messages for the following purposes:
To modify the status of an output
To send a pulse to an output
To inform through another e-mail message of inputs/ outputs status.
For the purposes of sending e-mail messages, KIBe-E continuously analyzes the occurrence of
events at its inputs, or the reception of an e-mail message to inform of the status of its
inputs/outputs or notification. The following events can trigger an e-mail message:
A change at one of its inputs
Changes at some of its inputs
Inputs/outputs status report
Report on correct or incorrect execution of commands received via e-mail.
To such effect, KIBe-E features a 10BaseT Ethernet interface, a serial port and a set of inputs and
outputs.
At any time, and provided user knows the access code, he can access the KIBe-E command
console via a serial port o a Telnet session to observe its operation or to alter the device behavior
by changing its configuration parameters.
KIBe-E uses the SMTP protocol to send e-mail and a POP3 server account to receive e-mail, both
of which are fully configurable.
www.exemys.com
Rev. 3.2.0
Page7
KIBe-E User’s Manual
Exemys
INTERNET
SMTP
Server
POP
Server
Web browser
Configuration
ETHERNET
Outputs
ETHERNET
Inputs
ETHERNET
RS/232
Telnet
Console
Serial
Console
Figure 1 - General Application Diagram Installation
1.3 Power Connection
This product must be installed and powered according to its ratings and installation instructions.
The unit shall be powered from a NEC class 2 source of supply or a LPS source, having an output
rated 9-26 Volts AC, 9-30 Volts DC, 200 mA min.
The installation of this product inside shall be in accordance with the NEC, specifically Article
725-54. Wiring from/to this unit is to be Class 2 wiring and shall be segregated from other wiring
in the equipment as noted in the NEC.
1
2
Vin
Vin
3
4
GND V out
9-30 VDC
9-26 VAC
Figure 2 - Power Connection Diagram
www.exemys.com
Rev. 3.2.0
Page8
KIBe-E User’s Manual
Exemys
1.4 I/O Configuration
The product code indicates the amount of inputs /outputs provided by KIBe.
- 1 X I O - S T- E
Inputs
Outputs
Standard Applications
Ethernet
Figure 3 - Product Code Diagram
Table 3 - I/O Configuration
Model
KIBe-1083-ST-E
I/O Configuration
Inputs
Outputs
8
3
Figure 4 shows the location in the inputs/outputs connector, as per the model.
As it can be observed, the inputs are located adjacent to the first 4 connectors: Vin(1), Vin(2),
GND(3) and V+(4).
The outputs are located immediately after the inputs. Both are numbered starting at 0.
Consequently, the first input will be I0 and, accordingly, the first output will be O0.
n Inputs
Vin
Vin
GND V out
IØ
m Outputs
I n-1
OØ
I m-1
Figure 4 - Inputs/Outputs position diagram
A reference (GND) and a voltage output (Vout) are also available in connectors 3 and 4
respectively.
They enable to close the inputs electric circuit, as observed in figure 5.
Vin
Vin
5 - 24 VDC
GND V out
IØ
I5
I6
Dry Contact
Figure 5 - Example of 2 inputs connection
www.exemys.com
Rev. 3.2.0
Page9
KIBe-E User’s Manual
Exemys
1.5 Serial Connection
The serial connection enabled access to the serial command console for configuration and
operation. The serial connection named COM A may be RS-232 in KIBe-1083-ST-E .
1.5.1
RS-232 Serial Connection
Figure 6 shows the position of COM A connector for RS-232 interface. It is a DB9 male connector.
COM A (RS-232)
Ethernet Connector (Rj45)
Figure 6 - Serial and Ethernet connectors position
The connection can be made with a PC, using the cable shown in figure 7.
PC
DB9 Female
KIBe
DB9 Female
RxD2
3TxD
TxD3
2RxD
GND 5
5 GND
Figure 7 - RS-232 Serial cable diagram
1.6 Ethernet Connection
RJ45 connector is used for the Ethernet connection. It is located adjacent to the COM A DB9
connector, as it may be observed in figure 6.
The Ethernet connection is essential for KIBe-E to operate. Generally, it can be connected to a Hub
or Switch, or directly to a PC, without the need for a LAN.
1.6.1
Hub or Switch Connection
A UTP network cable is used to connect KIBe-E to the Ethernet through a Hub or Switch.
www.exemys.com
Rev. 3.2.0
Page10
KIBe-E User’s Manual
Exemys
RX + (1)
RX + (1)
RX - (2)
RX - (2)
TX + (3)
TX + (3)
TX - (6)
TX - (6)
KIBe-E
HUB
Figure 8 - Ethernet Connection through a Hub or Switch
www.exemys.com
Rev. 3.2.0
Page11
KIBe-E User’s Manual
Exemys
Chapter 2
Chapter
Configuration and Operation
2.1 Getting Started
The first step consists in obtaining an IP address for KIBe-E, by any of the following means:
Using the Device Locator application program (most recommended method).
Forcing an IP address entry to the ARP table.
Locally, by accessing the command console provided by KIBe-E, at the serial connection.
Once KIBe-E has an IP address, the rest of the parameters can be configured:
By accessing the configuration web page of the equipment (most recommended method).
Using the TCP command console.
Locally, by accessing the command console provided by KIBe-E, at the serial connection.
All configuration parameters are permanently stored in the memory and will be maintained even
in the event the equipment shuts down. Configuration parameters may be modified at any time
using any of the methods mentioned above.
2.1.1
IP Address Configuration
KIBe’s default configuration is IP 0.0.0.0, so when turned on, it will search for a DHCP server.
KIBe-E tries to negotiate an IP address with the DHCP server for a maximum period of 10 seconds.
If the DHCP server fails to answer in that period, KIBe-E will show an error code by means of its
indicator LEDs (see annex) and will try to establish connection with the DHCP server 60 seconds
later. This process will be repeated indefinitely until a DHCP server assigns an IP address to KIBe-E
or until the user assigns a static IP address. During the negotiation process, KIBe’s yellow LED is
steady on.
In the event it is decided that KIBe-E should have a static IP number (not assigned by a DHCP
server), one can be assigned by means of the ARP method.
If KIBe-E receives, within 7 seconds after being turned on, an ICMP packet through a ping, it will
take the destination IP of this packet, provided it is different from that configured in KIBe-E.
To this effect, an entry can be added to the ARP table of a PC in the network.
www.exemys.com
Rev. 3.2.0
Page12
KIBe-E User’s Manual
Exemys
The Windows ARP table must have at least one IP address other than its own in order for the ARP
command to work. Be sure the ARP table has at least one entry with the command:
arp –a
If the local machine is the only entry, send a ping to another device in the network.
Then add the entry to the ARP table of the PC, entering the following command:
arp -s 192.168.0.105 00-90-C2-XX-XX-XX
In Unix, the command to add an entry to the ARP table is the following:
arp -s 192.168.0.105 00:90:C2:XX:XX:XX
Send a ping to the IP address you added to the ARP table on the previous step, by entering the
following command:
ping 192.168.0.105 -t
The –t option will cause the ping to be continuously sent.
Turn KIBe-E on. The equipment will only respond after a few seconds. Once KIBe-E has responded
to the ping, it will have access to the equipment over the network.
2.1.2
Access to the configuration Web Page
Once KIBe-E has a valid IP address, you can access the web page to set up the rest of the
parameters. Use a Java-enabled web browser.
If your web browser is set to use a Proxy server, disable the option.
Enter KIBe-E IP address in the address field of your browser.
Figure 9 - KIBe’s IP Address in Netscape Navigator
KIBe-E will request you to enter the administrator password to access the page. Enter “admin” in
the user field and the administrator password to access the page.
www.exemys.com
Rev. 3.2.0
Page13
KIBe-E User’s Manual
Exemys
You will see KIBe-E configuration page on your browser. The menu will be displayed on the left,
and the general configuration page on the right hand side of the screen.
2.1.3
Access to the Command Console through Telnet
KIBe-E command console can be accessed through a Telnet session. Establish a Telnet connection
to port 23. In Windows, open a command window and enter the following command:
telnet 192.168.0.105
Figure 10 - Open a telnet session
Once the connection has been established, KIBe-E will bring up a command console welcome
message.
Without preset access code
KIBe-E – Exemys (V2.0):
-------------------->
With access code
KIBe-E - Exemys (V2.0):
--------------------Password:
If the administrator password was set, it will be requested to you through the sign: “Password:”
If you fail to enter the password, after three attempts the console will be blocked for 5 seconds
and then it will request the password again.
2.1.4
Serial Command Console
Locally, you can access the serial port command console by connecting KIBe-E to a RS-232 port of
a PC. To such effect, you must have a serial terminal program (Windows HyperTerminal or the
like).
The communications program must be set as follows: 9600 bps, Parity: None, Data bits: 8, Stop
bits: 1 and flow control: none (9600,N,8,1).
www.exemys.com
Rev. 3.2.0
Page14
KIBe-E User’s Manual
Exemys
Figure 11 - HyperTerminal Configuration window
Once it has been connected, whenever you turn KIBe-E on, you will see the command console
welcome message.
KIBe-E – Exemys (V2.0):
-------------------->
The only difference between the serial and the Telnet consoles is that the first one is always
active. It is not necessary to shut down KIBe-E to enter commands. If you connect the serial port
to a PC and you access the terminal program while KIBe-E is on, the serial console will be active.
Press ENTER once and you will see the “>” symbol that indicates that the console is waiting for a
command.
2.1.5
Configuration of Network Basic Parameters through the console
Once you access the console, you can change the network configuration parameters with the
following commands: IP, NETMASK, GATEWAY, FSTDNS and SNDDNS. If you want to change the
KIBe-E IP address, Netmask and / or Gateway, you can enter the commands to modify these
parameters. But then you must enter the END command so the changes take effect. When the
END command is executed, KIBe-E will detect that any of these three basic parameters has been
changed and the system will be restarted. If the console is run from a Telnet session, the
communication with the equipment will be interrupted. You must reopen the Telnet session using
the new IP address.
www.exemys.com
Rev. 3.2.0
Page15
KIBe-E User’s Manual
Exemys
To change the IP address, enter the following command:
>ip:192.168.0.110
Ok, IP Address
192.168.0.110
NOTICE, This parameter will be accepted upon execution of the END command.
At that moment, communication with the equipment will be interrupted.
If you are not sure, close communication without typing the END command.
>_
To change the netmask, enter the following command:
>netmask:255.255.255.0
Ok, Netmask
255.255.255.0
NOTICE, This parameter will be accepted upon execution of the END command.
At that moment, communication with the equipment will be interrupted.
If you are not sure, close communication without typing the END command.
>_
You can change the Gateway using the gateway command. Enter the following command:
>gateway:192.168.0.200
Ok, Gateway
192.168.0.200
NOTICE, This parameter will be accepted upon execution of the END command.
At that moment, communication with the equipment will be interrupted.
If you are not sure, close communication without typing the END command.
>_
KIBe-E provides two inputs for DNS servers (the first and the second servers). Use the fstdns
command to change the IP address of the first DNS server, and the snddns command to change
the IP address of the second DNS server:
> fstdns:192.168.0.200
OK, First DNS
192.168.0.200
> snddns:0.0.0.0
OK, Second DNS
0.0.0.0
>_
Enter the END command for KIBe-E to accept the network parameter changes. You will lose
communication with the equipment if the commands were entered from the Telnet console.
2.2 KIBe-E Operation
2.2.1
Administrator Configuration
KIBe-E has a security password system featuring report of events to a system administrator. The
following is the administrator’s data:
www.exemys.com
Rev. 3.2.0
Page16
KIBe-E User’s Manual
Exemys
Administrator Password.
Administrator’s e-mail address.
Any of the two can be disabled by not entering information at the moment of configuration.
KIBe’s factory default setup has both security options disabled.
The administrator password will be required to access both the Telnet command console and the
equipment configuration web page and to execute the commands sent to KIBe-E via e-mail.
To change de administrator data from the configuration web page:
Select “Administrator” from the menu on the left.
On the right hand side of the page you will see boxes to enter the administrator’s e-mail
address and password (which must be entered twice). Enter the administrator data: e-mail
address and password.
Press “Send” for KIBe-E to accept the configuration changes.
Figure 12 - Administrator configuration page
To change de administrator data from the command console: enter the ADMINPASS command in
the console to change the administrator password. You can use the ADMINEMAIL command to
change the e-mail address of the administrator.
Table 4 - ADMINPASS and ADMINEMAIL commands
www.exemys.com
Parameter
Description
Console Command
Administrator e-mail
Address
KIBe-E will send an e-mail message to this address after an
admistrator notification event occures.
ADMINEMAIL:(address)
Administrator
Password
KIBe-E will use this password for remote configuration
(configuration web page and Telnet command console)
and POP commands.
ADMINPASS:(pasword)
Rev. 3.2.0
Page17
KIBe-E User’s Manual
Exemys
>adminemail:[email protected]
OK, Administrator E-mail [email protected]
>_
2.2.2
Sending e-mail Messages from KIBe
One of the basic functions of KIBe-E is to notify events by sending e-mail messages. KIBe-E can be
set up to notify certain events. Also, outgoing e-mail messages can be fully configured (Recipient,
subject and body of the message).
2.2.2.1 Mode
KIBe-E inputs can operate in Standard or Coded mode.
In Standard mode, KIBe-E waits for changes at any of its inputs. The following are the events that
may trigger an e-mail message at an input:
Detection of beginning of active level
Duration of active level
Detection of end of active level
Therefore, in standard mode, KIBe-E can trigger up to three e-mail messages per input.
Each of these three messages can be disabled independently.
Active High
Input
t delay
Active Low
Signal
tdelay
Event that can send an
e-mail message.
Figure 13 - Diagram of the two types of inputs
www.exemys.com
Rev. 3.2.0
Page18
KIBe-E User’s Manual
Exemys
In Coded mode, KIBe-E will send an e-mail message when the last input is activated. Inputs
between the first (I0) and the one before last will form a binary code that will indicate KIBe-E the
number of e-mail message to be sent. Consequently, if KIBe-E has 8 inputs (I0..I7), inputs I0, I1,
I2, I3, I4, I5 and I6 will form the message number to be sent, with a total of up to 128
configurable messages (0..127). Input I7 will trigger the coded message number at the rest of the
inputs.
e-1083
I7
Trigger Input (I7)
I6
Coded Message Number
I0..I6
IØ
Figure 14 - Coded Mode Diagram
The mode can be set up in KIBe-E from the web page or the command console.
On the web page:
Select “General Setup” from the menu on the left.
Select the operation mode of the inputs of the list under “Inputs mode”
Press “Send” for KIBe-E to accept the new settings.
Figure 15 - Input mode configuration from Web page
www.exemys.com
Rev. 3.2.0
Page19
KIBe-E User’s Manual
Exemys
In the command console, you can change the mode by executing the INPUTMODE command.
>inputmode:s
OK, Mode
>_
STANDARD
2.2.2.2 SMTP Client
You must set up the KIBe-E SMTP client to send e-mail messages. To this effect, you must set up
the configuration parameters included in table 5.
Table 5 - SMTP Client
Parameter
Description
Console Command
SMTP enabling
If the SMTP client is enabled, it will send messages as soon
as they appear in the outgoing queue. If it is disabled,
the messages will remain in the outgoing queue to be sent.
Possible Values:
E = Enable
D = Disable
SMTPENABLE:(E|D)
SMTP authentication
(*)
Enable this feature only if the target SMTP server requires user
authentication. Username and password are those configured in
the POP3 client.
SMTPAUTH: (E|D)
SMTP Server
Messages will be sent using this SMTP server.
49 characters max.
SMTPSERVER:(server)
Maximum Timeout
If the message fails to be sent in this period of time, KIBe-E
considers that one attempt has been missed. It is set in seconds.
Possible Values:
10..150 seconds
SMTPTIMEOUT:(10..150)
Maximum message
retries
After this number of retries, KIBe-E will place this message
at the end of the outgoing queue and will send the next
message of the queue.
Possible Values:
3..10 Retries
SMTPRETRIES:(3..10)
Retry Interval
It is the time interval, measured in seconds, that KIBe-E will
allow between attempts to send the same e-mail message.
Possible Values:
1..150 seconds
SMTPRETRYINT:(1..150)
Sender
E-mail address from where messages are sent.
49 characters max.
FROM:(sender address)
(*) Only available in versions 2.1.9 and higher.
www.exemys.com
Rev. 3.2.0
Page20
KIBe-E User’s Manual
Exemys
On the web page:
Select “SMTP Configuration” from the menu on the left.
The SMTP parameter configuration will be displayed on the right. You can change any of the
values.
Then, press “Send”.
Figure 16 - SMTP Client Configuration from Web page
2.2.3
Input Configuration
In Standard mode, inputs can be configured depending on the message transmission needs and
the signal features.
Standard mode input parameters are listed in table 6.
Table 6 - Input confuguration
www.exemys.com
Parameter
Description
Command Console
Input Type
Inputs can be: Low-level active or High-level active.
INPUTTYPE:(H|L)
Input start e-mail number
E-mail number to be triggered when an positive edge
is detected in a high-level signal or a negative edge is
detected in a low-level signal.
It must be in the 0 to 127 range.
INPUTSTARTEM:(0..127)
Activity level message
number
Message number triggered after delay time, when the
signal is active. It must be in the 0 to 127 range.
INPUTACTEM:(0..127)
Activity end message
number
E-mail number to be triggered when a positive edge is
detected in a high-level signal or a negative edge is
detected in a low-level signal.
It must be in the 0 to 127 range.
INPUTENDEM:(0..127)
Rev. 3.2.0
Page21
KIBe-E User’s Manual
Exemys
Message triggering delay
due to the activity level
It is the period of time, in tenths of a second,
that KIBe-E waits before triggering the message to
indicate active level at that input. If it is equal to 0,
this event is disabled.
Possible Values:
0..10000 (1/10 seconds)
INPUTDELAY:(0..10000)
On the web page:
Select “Inputs” from the menu on the left.
The inputs configuration grid will be displayed on the right. Select the input you wish to set up
from the list. Then, KIBe-E will show the configuration data of such input.
Change any values, as necessary.
Press “Send” for the equipment to accept the new configuration of that input.
Repeat the process for each input.
Figure 17 - Input Selection
Figure 18 - Input Configuration
2.2.3.1 Message Configuration
KIBe-E stores 128 (numbered from 0 to 127) e-mail messages. The following can be configured:
Recipients
Message Subject
Message Body
www.exemys.com
Rev. 3.2.0
Page22
KIBe-E User’s Manual
Exemys
On the web page:
Select “E-Mails” from the menu on the left. The message configuration grid will be displayed on
the right.
Enter the message number you want to configure (from 0 to 127) and KIBe-E will display the
configuration data for that e-mail message.
Change any values, as necessary.
Press “Send” for the equipment to accept the new message configuration.
Repeat the process for each message you wish to configure.
Figure 19 - E-Mail Number selection
Figure 20 - E-Mail Message Configuration
Messages can be configured from the command console by using the following commands: TOn,
SUBJECTn and BODYn. You can force transmission of a message by entering the SENDn command
(where n is in the range fron 0 to 127 ).
2.2.3.2 Keep Alive Message
KIBe-E can be set to send a certain message at a certain interval. Thus, you can realize that KIBe-E
has lost communication if the message was not sent.
This option can be enabled or disabled. If you decide to enable it, you can set an interval in
minutes and KIBe-E will send one of the 128 e-mail messages at the set interval.
www.exemys.com
Rev. 3.2.0
Page23
KIBe-E User’s Manual
Exemys
On the web page:
Select “General Setup” from the menu on the left. KIBe-E general setup grid will appear on the
right and the keep-alive message parameter configuration will appear below it.
Change any values, as necessary.
Press “Send” for the equipment to accept the new configuration.
Figure 21 - Keep Alive configuration
2.2.3.3 Message Queue Management
KIBe-E manages a message queue for e-mail message transmission. The user can execute
commands that will allow him to see the contents of the queue and manage the same.
Message queue management commands are located in the command console.
Viewing the contents of the message queue:
Message queue contents can be viewed from the console, by entering the MAILBOX command.
KIBe-E will show you a list of pending outgoing messages.
>mailbox
E-mail
To
Timestamp
Status
----------------------------------------------------0
[email protected]
25/07/02 07:56:50
S
1
[email protected]
25/07/02 07:56:50
Q
>
The timestamp shows the date and time at which the message was added to the outgoing queue,
which coincides with the time of occurrence of the event. As you can observe, the message
number is also included.
The message status can be:
S: Sending. It means that the message is being sent.
Q: Queued. The message is in queue to be sent.
R: Retrying. It is retrying to send the message.
www.exemys.com
Rev. 3.2.0
Page24
KIBe-E User’s Manual
Exemys
Eliminating the contents of the outgoing queue:
At any time, the user can eliminate all the messages of the outgoing queue by using the EMPTY
command.
>empty
Ok, no messages in the queue
>_
Forcing transmission of a message:
If you wish to force delivery of one of the 128 messages you can use the SEND:n command.
>mailbox
E-mail
To
Timestamp
Status
----------------------------------------------------0
[email protected]
25/07/02 07:56:50
S
1
[email protected]
25/07/02 07:56:50
Q
>send:5
Queued Message 5
>mailbox
E-mail
To
Timestamp
Status
----------------------------------------------------0
[email protected]
25/07/02 07:56:50
S
1
[email protected]
25/07/02 07:56:50
Q
5
[email protected] 25/07/02 07:58:50
Q
>_
2.2.4
E-Mail Reception
KIBe-E receives e-mail messages to execute commands. After a configurable interval, KIBe-E
connects to a POP mail server and checks if an e-mail message has been received. There is a set
of commands that can be entered in the message subject field. KIBe-E executes the command as
soon as the message arrives and it can send another message notifying the success or failure of
the operation.
Figure 22 - Sending an E-Mail message to KIBe-E from an E-mail Client
www.exemys.com
Rev. 3.2.0
Page25
KIBe-E User’s Manual
Exemys
To this end, KIBe-E has a POP3 client account that has to be duly configured.
2.2.4.1 POP3 Client Configuration
KIBe-E POP client is fully configurable.
POP client configuration parameters are included in table 7.
Table 7 - POP3 Client Configuration
Parameter
Description
Console Command
POP Enabling
If the POP client is enabled, it will connect to the
server and check any incoming mail.
POPENABLE:(E|D)
POP Server
KIBe-E will connect to this POP server to receive
e-mail messages.
POPSERVER:(server)
Maximum Timeout
If the message fails to be received in this period
of time, KIBe-E considers that the message
reception attempt has failed.
POPTIMEOUT:(5..200)
POP Server Check Interval
Period of time KIBe-E allows to elapse before
making a new query to the POP server.
POPINTERVAL:(10..10000)
POP User
It is the POP user of the e-mail account that
KIBe-E will check on the server.
POPUSER:(username)
POP Password
Password of the POP account on the server.
POPPASSWORD:(password)
On the web page:
Select “POP Setup” from the menu on the left. KIBe-E POP server configuration grid will appear on
the right.
Change any values, as necessary.
Press “Send” for the equipment to accept the new configuration.
Figure 23 - POP Client Configuration page
www.exemys.com
Rev. 3.2.0
Page26
KIBe-E User’s Manual
Exemys
2.2.4.2 General Syntax of POP Commands
Commands received in messages to be executed by KIBe-E must appear in the subject field. These
commands follow a certain syntax. If the command is misspelled or the syntax is incorrect KIBe-E
can not execute it.
The general syntax of commands is as follows: [response,]password COMMAND
KIBe-E administrator password, if configured.
response: Add this word if you want KIBe-E to send the response to this message to the
sender’s address. If the word “response” is not included, KIBe-E will only answer to the
administrator, provided it has been configured.
command: The command itself.
password:
2.2.4.3 Changing the status of an output
If you want to change the status of an output, you can send an e-mail message to KIBe-E entering
the OUT command in the subject field. The OUT command syntax is as follows: OUTn:S
n:
S:
KIBe-E output, whose status is required to be changed.
New status of the output (0 or 1).
Table 8 shows some examples of the use of this command.
Table 8 - Changing the status of an output
Command
Description
response,FgH12 out0:1
Administrator password is “FgH12”.
KIBe-E is requested to send a response to the sender of the
original e-mail message and to the administrator.
After execution, the status of output 0 will be high.
FgH12 out2:0
Administrator password is “FgH12”.
KIBe-E will only send the response to the administrator.
After execution, the status of output 2 will be low.
2.2.4.4 Sending a pulse to an output
You can enter the PULSE command to send a pulse to a KIBe-E output during a certain period of
time. The syntax of the PULSE command is as follows: PULSEn:t
KIBe-E output number you want to send a pulse to
t: time, in tenths of a second, of duration of the pulse.
n:
www.exemys.com
Rev. 3.2.0
Page27
KIBe-E User’s Manual
Exemys
2.2.4.5 Obtaining a report
You can use the STATUS command if you want KIBe-E to send you a report on the status of the
equipment inputs / outputs. The syntax of the command is as follows: STATUS
The supervisor and/or the original sender of the message with the command will receive a
message with a detailed report on the status of the inputs and outputs.
Inputs 0..7
0 0 1 0 1 1 0 1
Outputs 0..2
0 1 0
25/08/02 7:50:16
2.2.5
Other Operation Features
Certain basic operations can be carried out from the console, such as setting the time on KIBe,
stopping the transmission and reception of messages and forcing the transmission of a dynamic
e-mail message, among others.
2.2.5.1 Obtaining Help on Commands
To obtain help on a command, enter the command name followed by a question mark (“?”). The
console will provide help on the command, the syntax and a description of the same.
>dynsend?
DYNSEND:... Forces transmission of the dynamic message
>_
In addition, there is a HELPn command that provides help on all commands. You must enter the
help screen number you want to view.
>help3
SMTP configuration
FSTSMTP:...
SMTPENABLE:...
SMTPAUTH:...
SMTPTIMEOUT:...
SMTPRETRIES:...
SMTPRETRYINT:...
FROM:...
commands
First SMTP Server (max 49 char.)
SMTP Enabling (E=Enable,D=Disable)
SMTP Authentication (E=Enable,D=Disable) (*)
SMTP Timeout in seconds (10..150)
SMTP Retries (3..10)
SMTP Retries Interval in seconds(1..150)
E-mail sender (max 49 char.)
(*) Only available in versions 2.1.9 and higher.
www.exemys.com
Rev. 3.2.0
Page28
KIBe-E User’s Manual
Exemys
2.2.5.2 Date and Time
There are two commands to set the time and date on KIBe: TIME and DATE.
You can also change this settings from the web page. To change date and time setting from the
web configuration page:
Select “General State” from the menu on the left.
Change any values, as necessary.
Press “Send” for the equipment to accept the new settings.
Figure 24 - Date and Time settings
Enter the commands in the console with the following syntax:
Table 9 - TIME and DATE commands
Parameter
Description
Command Console
Time
KIBe´s time
TIME:(hh:mm:ss)
Date
KIBe´s date
DATE:(MM/DD/YY)
KIBe-E will respond by sending a confirmation message notifying that the date/time has been
changed.
If the DATE command is entered without specifying the date, KIBe-E will show the current date on
the equipment. The same is applicable to the TIME command.
>time:15:02:00
Ok, Changed Time
>date 12/05/02
Ok, Changed Date
>date
12/05/02
>time
15:02:12
>_
www.exemys.com
Rev. 3.2.0
Page29
KIBe-E User’s Manual
Exemys
2.2.5.3 KIBe-E Stop and Run
At any time, the user can stop message transmission and reception by means of the STOP and
RUN commands. You can also make the KIBe-E run or stop from the configuration web page:
Select “General State” from the menu on the left.
Check the box to make KIBe-E run. Uncheck it to make KIBe-E stop.
Press “Send” for the equipment to accept the new settings.
Figure 25 - Run / Stop KIBe-E operation.
To stop KIBe, simply enter the stop command in the command console. To restart operation, enter
run.
>stop
Ok, stopped
>stop
The equipment it´s already stopped
>run
Ok, running
Dynamic Message Transmission
2.2.5.4 Dynamic Message Transmition
KIBe-E provides a means for the user to write an e-mail message and send it at any time, without
the need for modifying one of the 128 configured messages.
First, you must configure the message using the DYNTO, DYNSUBJECT and DYNBODY commands.
Then, the message is sent with the DYNSEND command, that places the dynamic message in the
outgoing queue. The dynamic message is unique, and the user has to wait until it has been sent
in order to send another message.
>dynto:[email protected]
Recipient: [email protected]
>dynsubject: This is the subject of our message.
Subject: This is the subject of our message.
>dynbody: Dynamic message body.
Message body: Dynamic message body.
>dynlist
Recipient
[email protected]
Subject
This is the subject of our message.
Message body.
www.exemys.com
Rev. 3.2.0
Page30
KIBe-E User’s Manual
Exemys
Dynamic message body.
>dynsend
Queued dynamic message.
>_
2.2.5.5 Viewing KIBe-E Configuration
The console has several commands that will enable you to visualize all the settings of KIBe. The
commands that show the configuration are listed in table .
>list
MAC
00-90-C2-80-0B-CA
IP
192.168.0.105
Netmask
255.255.255.0
Gateway
192.168.0.200
First DNS 192.168.0.200
Second DNS 0.0.0.0
Mode
STANDARD
>_
Table 10 - Viewing KIBe-E Configuration
www.exemys.com
Command
Description
list
Lists the general configuration of the equipment
poplist
Shows the POP client configuration
smtplist
Shows the SMTP client configuration
inputlist
Displays the inputs configuration and status chart
outputlist
kalist
Shows outputs status
Lists the keep-alive message configuration
superlist
Shows the Administrator configuration
maillist
Shows the configuration of an e-mail message
dynlist
Shows dynamic e-mail data
mailbox
Shows the outgoing queue status
Rev. 3.2.0
Page31
KIBe-E User’s Manual
Exemys
Appendix A
Appendix
A.Appendix
A.1.
Device Locator Application
The Exemys Device Locator Application Program is intended to use for the basic configuration of
any Exemys device over your ethernet network. It allows to search, identify and configure the
basic network parameters.
This simple application program is distributed with any Exemys product in the accompanying CD.
You can also download the latest version of this program from the Exemys Web Site
(www.exemys.com).
The Device Locator application must be running from any PC within the network where the
Exemys devices to configure are installed.
Figure 26 - Exemys Device Locator
When the Device Locator is run for the first time it will search any Exemys device within the
network. If there is an Exemys device in the network it will be shown in Device Locator Grid:
Device: Device name, such as SSE232-ST or KIBe-E.
Version: Firmware version it is running in that device.
MAC Address: Hardware Ethernet Address of the device.
IP: IP Address configured in the device
www.exemys.com
Rev. 3.2.0
Page32
KIBe-E User’s Manual
Exemys
Netmask: Subnet mask configured in the device
Gateway: Gateway IP Address configured in the device.
DHCP Lease: if “Yes”, then the device network parameters where obtained from a DHCP
server.
It is not necessary for the device to be properly configured. If the device is correctly connected
and working, it will be found by the Device Locator Application Program.
To refresh the grid, click on the “Query Network” button. This action will make the device Locator
to search any Exemys device in the network again.
You can change any of these basic network parameters within the Device Locator program.
To configure any Exemys device founded by the Device Locator:
Select the device in the grid and click on the
“Properties” button, or open the “Actions”
menu and select the “Properties” command.
You will see the Properties dialog box.
All Exemys devices provides a Remote
Configuration Password. This password is
used for the Web configuration page and
remote command Console in the device. Enter
this password in the “Enter current password”
box if the device has a configured password.
You can type an IP Address, Netmask and
Gateway IP Address or you can click on the
“Use DHCP” check box to make the device
search a DHCP Server.
Click on the “Ok” button so the Device
Locator sends this information to the device.
If the password is not correct, the Device Locator will show a “Error Response from MAC
Address 00-0B-FA-XX-XX-XX”. The device will not respond any message send by the Device
Locator software within the first 5 seconds after an incorrect password configuration
attempt. This is to avoid any brute force method to change the network parameters of the
device.
If the device does not respond, the Device Locator will show a “No Response from Device”
message. Make sure the device is turned on and connected to the ethernet network.
The Exemys device will reset so the changes in the configuration take effect.
Click on the “Close” button to close the Properties dialog box.
www.exemys.com
Rev. 3.2.0
Page33
KIBe-E User’s Manual
Exemys
After a few seconds the device being reset will answer again to the requests of the Device Locator
software. Click on the “Query network” button to refresh the grid and make sure the parameters
were changed.
2.3 Indicator Leds Codes
KIBe-E features two indicator LEDs: A and B.
LED A is green and it shows the general working order of the equipment.
LED B is yellow and it indicates the general status of the outgoing message queue and the
reception of e-mail messages.
Table 11 - Indicator Leds Codes
LED A (Yellow)
LED B (Green)
Description
It flashes alternately with LED B
It flashes alternately with LED A
Critical failure.
It is steady on
KIBe-E is searching for a DHCP server on the
network.
It is ½ second on and ½ second
off.
KIBe-E is waiting for an IP address
configuration ping.
It blinks like a beacon, 90% of a
second off and the remaining
10% on.
KIBe-E has an IP address and a carrier (link)
on the connection. This is the normal
operation status.
It is 90% of a second on and the
remaining 10% off
It has no IP address and it could not find a
DHCP server. It will search the DHCP server
at 60-second intervals.
It blinks very fast.
Absence of carrier on the link.
It is steady off
No messages in the outgoing queue.
It is steady on
There are messages in the outgoing queue
and they are being sent.
It blinks very fast during two
seconds
www.exemys.com
Rev. 3.2.0
KIBe-E received an e-mail message.
Page34
KIBe-E User’s Manual
A.2.
Exemys
Wall mounting
Remove the wall-mounting adapter (included) from the device.
Then mount the adapter to the wall using two screws, as shown in figure 27.
76 mm
2,795 inches
Figure 27- Wall-mounting adapter
Last, attach the device to the fixed adapter, as shown in Figure 28.
Figure 28 – Wall mounting
A.3.
Console Commands
A.3.1. General Configuration Commands
FACTRESET
Description:
It resets the KIBe´s configuration to the factory default. It must be entered twice.
Syntax:
FACTRESET
www.exemys.com
Rev. 3.2.0
Page35
KIBe-E User’s Manual
Exemys
IP
Description:
It changes the KIBe-E IP address. You must execute the END command to accept the new
configuration.
Syntax:
IP:aaa.bbb.ccc.ddd
Example:
ip:192.168.0.101
NETMASK
Description:
It changes the KIBe-E netmask. You must execute the END command to accept the new
configuration.
Syntax:
NETMASK:aaa.bbb.ccc.ddd
Example:
netmask:255.255.255.0
GATEWAY
Description:
It changes the IP address of the network gateway. You must execute the END command to accept
the new configuration.
Syntax:
GATEWAY:aaa.bbb.ccc.ddd
Example:
gateway:192.168.0.200
FSTDNS
Description:
It changes the IP address of the first DNS server. KIBe-E will resolve the names using this server
first.
Syntax:
FSTDNS:aaa.bbb.ccc.ddd
Example:
fstdns:192.168.0.200
www.exemys.com
Rev. 3.2.0
Page36
KIBe-E User’s Manual
Exemys
SNDDNS
Description:
It changes the IP address of the second DNS server. If KIBe-E failed to resolve the name using the
first DNS server, it will try to resolve it with this second server.
Syntax:
SNDDNS:aaa.bbb.ccc.ddd
Example:
snddns:192.168.0.150
END
Description:
It ends a command console session. If the IP, netmask and/or gateway were changed, the
equipment will be restarted. If the command console is run from Telnet, communication with the
equipment will be interrupted.
Syntax:
END
A.3.2. Input Configuration Commands
INPUTMODE
Description:
It changes the mode in which KIBe-E reads the inputs and triggers the e-mail messages. The mode
may be standard or coded.
Syntax:
INPUTMODE:(S|C)
S = Standard
C = Coded
Example:
inputmode:c
INPUTTYPE
Description:
It changes an input type. It may be high-level active or low-level active.
Syntax:
INPUTTYPEn:(H|L)
n = Input number (0..7)
H = High-level active
L = Low-level active
Example:
inputtype2:H
www.exemys.com
Rev. 3.2.0
Page37
KIBe-E User’s Manual
Exemys
INPUTSTARTEM
Description:
It changes the e-mail message to be triggered when an upward trend is detected at a high-level
activated input or a downward trend is detected at a low-level activated input.
Syntax:
INPUTSTARTEMn:m
n = Input number
m = E-mail number (0..127)
Example:
inputstartem2:12
INPUTACTEM
Description:
It changes the e-mail message to be triggered after a delay at that input, provided the input
remains active.
Syntax:
INPUTACTEMn:m
n = Input number
m = E-mail number (0..127)
Example:
inputactem2:14
INPUTENDEM
Description:
It changes the e-mail message to be triggered when a positive edge is detected at a low-level
activated input or a negative edge is detected at a high-level activated input.
Syntax:
INPUTENDEMn:m
n = Input number
m = E-mail number (0..127)
Example:
inputendem2:16
www.exemys.com
Rev. 3.2.0
Page38
KIBe-E User’s Manual
Exemys
INPUTDELAY
Description:
It changes an input delay to trigger a message due to the active status of an input.
Syntax:
INPUTDELAYn:D
n = Input number
D = Delay in tenths of second (0..10000)
Example:
inputdelay2:10
A.3.3. Keep Alive Configuration Commands
KAENABLE
Description:
It enables or disables the keep-alive e-mail message transmission.
Syntax:
KAENABLE:(E|D)
E = Enable
D = Disable
Example:
kaenable:e
KAEMAIL
Description:
It changes the number of message to be sent as keep-alive message.
Syntax:
KAEMAIL:m
m = E-Mail message number (0..127)
Example:
kaemail:120
KAINT
Description:
It changes the interval at which KIBe-E will send the keep-alive message. The interval is set in
minutes.
Syntax:
KAINT:i
i = Keep Alive interval in minutes (1..30)
Example:
kaint:25
www.exemys.com
Rev. 3.2.0
Page39
KIBe-E User’s Manual
Exemys
A.3.4. Administrator Configuration Commands
ADMINEMAIL
Description:
It changes the administrator’s e-mail address.
Syntax:
ADMINEMAIL:(E-mail address)
Example:
adminemail:[email protected]
ADMINPASS
Description:
It changes the password of KIBe-E supervisor.
Syntax:
ADMINPASS:(New supervisor password)
Example:
adminpass:FgH12w
A.3.5. POP3 Client Configuration Commands
POPENABLE
Description:
It enables or disables KIBe-E POP3 client.
Syntax:
POPENABLE:(E|D)
E = Enable
D = Disable
Example:
popenable:d
POPSERVER
Description:
It changes KIBe-E POP3 server.
Syntax:
POPSERVER:(POP3 Server)
Example:
popenable:popserver.domain.com
www.exemys.com
Rev. 3.2.0
Page40
KIBe-E User’s Manual
Exemys
POPTIMEOUT
Description:
It changes the maximum time out KIBe-E will wait for the POP server to send an e-mail message.
The time is set in seconds.
Syntax:
POPTIMEOUT:t
t = Pop Timeout in seconds (5..200)
Example:
poptimeout:60
POPINTERVAL
Description:
It changes the interval at which KIBe-E checks if a new e-mail message has arrived at the POP
Server. The time is set in seconds.
Syntax:
POPINTERVAL:i
i = Interval in seconds (10..10000)
Example:
popinterval:60
POPUSER
Description:
It changes the POP mail account user.
Syntax:
POPUSER:(User name)
Example:
popuser:user
POPPASSWORD
Description:
It changes the POP account password.
Syntax:
POPPASSWORD:(POP account password)
Example:
poppassword:Xbridge67
www.exemys.com
Rev. 3.2.0
Page41
KIBe-E User’s Manual
Exemys
A.3.6. SMTP Client Configuration Commands
SMTPENABLE
Description:
It enables or disables the transmission of e-mail messages.
Syntax:
SMTPENABLE:(E|D)
E = Enable
D = Disable
Example:
smtpenable:e
SMTPAUTH (*)
Description:
Enables or disables SMTP authentication. Username and password required are those configured
in the POP3 section.
Syntax:
SMTPAUTH:(E|D)
E = Enable
D = Disable
Example:
smtpauth:e
(*) Only available in versions 2.1.9 and higher.
SMTPSERVER
Description:
SMTP Server for outgoing e-mail.
Syntax:
SMTPSERVER:(SMTP Server)
Example:
smtpserver:smtp.domain.com
SMTPTIMEOUT
Description:
Maximum Time out allowed by KIBe. Once this time has elapsed, KIBe-E will consider that a
transmission attempt has failed. The time is set in seconds.
Syntax:
SMTPTIMEOUT:t
t = SMTP Timeout in seconds (10..150)
Example:
smtptimeout:20
www.exemys.com
Rev. 3.2.0
Page42
KIBe-E User’s Manual
Exemys
SMTPRETRIES
Description:
Maximum number of retries to send a message.
Syntax:
SMTPRETRIES:n
n = Number of Retries (3..10)
Example:
smtpretries:3
SMTPRETRYINT
Description:
Interval between retries. The time is set in seconds.
Syntax:
SMTPRETRYINT:t
t = Interval between retries in seconds (1..150)
Example:
smtpretryint:5
FROM
Description:
Sender’s e-mail address for outgoing messages.
Syntax:
FROM:(E-mail address)
Example:
from:[email protected]
A.3.7. E-Mail Messages Commands
TO
Description:
It changes the recipient of an e-mail message.
Syntax:
TOn:(E-mail address)
n = Message number (0..127)
Example:
to5:[email protected]
www.exemys.com
Rev. 3.2.0
Page43
KIBe-E User’s Manual
Exemys
SUBJECT
Description:
It changes the subject of an e-mail message.
Syntax:
SUBJECTn:(Message subject)
n = Message number (0..127)
Example:
subject5:Subject of this message
BODY
Description:
It changes the body of an e-mail message.
Syntax:
BODYn:(Body of the message)
n = Message number (0..127)
Example:
body5:This is the body of message number 5
SEND
Description:
It forces the transmission of an e-mail message.
Syntax:
SEND:n
n = Message number (0..127)
Example:
send:5
DYNTO
Description:
It changes the recipient of the dynamic message.
Syntax:
DYNTO:(E-mail address)
Example:
dynto:[email protected]
DYNSUBJECT
Description:
It changes the subject of the dynamic message.
Syntax:
DYNSUBJECT:(Message subject)
Example:
dynsubject:Message Subject
www.exemys.com
Rev. 3.2.0
Page44
KIBe-E User’s Manual
Exemys
DYNBODY
Description:
It changes the body of the dynamic message.
Syntax:
DYNBODY:(Message body)
Example:
dynbody:Message Body
DYNSEND
Description:
It forces the transmission of the dynamic message.
Syntax:
DYNSEND
A.3.8. Operation Commands
DATE
Description:
It shows / changes the date on KIBe.
Syntax:
DATE:MM/DD/YY
Example:
date:02/15/02
TIME
Description:
It shows / changes the time on KIBe.
Syntax:
TIME:hh:mm:ss
Example:
time:18:10:00
RUN
Description:
It runs KIBe.
Syntax:
RUN
www.exemys.com
Rev. 3.2.0
Page45
KIBe-E User’s Manual
Exemys
STOP
Description:
It stops KIBe.
Syntax:
STOP
EMPTY
Description:
It empties the outgoing queue.
Syntax:
EMPTY
OUT
Description:
It changes the status of an output.
Syntax:
OUTn:m
n = Output number
m = New status of the output (1|0)
Example:
out1:0
PULSE
Description:
It sends a pulse to an output.
Syntax:
PULSEn:m
n = Output number
m = Pulse duration, in tenths of a second (1..1000)
Example:
pulse1:10
A.3.9. List Commands
HELP
Description:
It shows a command help screen.
Syntax:
HELPn
n = Help screen number (1..9)
Example:
help3
www.exemys.com
Rev. 3.2.0
Page46
KIBe-E User’s Manual
Exemys
LIST
Description:
It shows the general configuration of the equipment.
Syntax:
LIST
POPLIST
Description:
It shows the POP client configuration.
Syntax:
POPLIST
SMTPLIST
Description:
It shows the SMTP client configuration.
Syntax:
SMTPLIST
INPUTLIST
Description:
It shows the configuration and status of the inputs.
Syntax:
INPUTLIST
OUTPUTLIST
Description:
It shows the status of the outputs.
Syntax:
OUTPUTLIST
KALIST
Description:
It shows the keep-alive message configuration.
Syntax:
KALIST
MAILBOX
Description:
It shows the contents of the outgoing queue.
Syntax:
MAILBOX
www.exemys.com
Rev. 3.2.0
Page47
KIBe-E User’s Manual
Exemys
ADMINLIST
Description:
It shows the Administrator’s data configuration.
Syntax:
ADMINLIST
MAILLIST
Description:
It shows an e-mail message configuration.
Syntax:
MAILLIST:n
n = Message number (0..127)
Example:
maillist:8
DYNLIST
Description:
It shows the dynamic e-mail message.
Syntax:
DYNLIST
A.4.
Default Configuration
This is the factory default configuration.
Table 12 - Default Configuration
www.exemys.com
Parameter
Value
IP
Netmask
Gateway
First DNS
Second DNS
Input Mode
POP Server
POP Enable
POP Timeout
POP Check Interval
POP User
POP Password
SMTP Server
SMTP Enable
SMTP Timeout
SMTP Retries
SMTP Retry Interval
SMTP From Address
Administrator Password
Administrator E-Mail
Keep Alive Enable
0.0.0.0
0.0.0.0
0.0.0.0
0.0.0.0
0.0.0.0
Standard
None
Disabled
30 seconds
60 seconds
None
None
None
Disabled
10 seconds
3
5 seconds
None
None
None
Disable
Rev. 3.2.0
Page48
KIBe-E User’s Manual
Exemys
Keep Alive E-Mail
Keep Alive Interval
Inputs Type
Start E-Mail Number
Activity E-Mail Number
End E-Mail Number
Input Activity Delay
A.5.
0
30 minutes
Active High (for all inputs)
Disabled (for all inputs)
Disabled (for all inputs)
Disabled (for all inputs)
0 (for all inputs)
Connectors Pinout
1
2
3
VDC GND GND
4
5
V-
6
7
8
9
10
11
12
13
14
15
OØ
O1
O2
Figure 29 - KIBe-E Connector Pinout
TxD
GND
1
5
9
6
RxD
Figure 30 - RS-232 Connector Pinout
Rx + (1)
1
8
Rx - (2)
Tx + (3)
Tx - (6)
Figure 31 - Ethernet Connector
www.exemys.com
Rev. 3.2.0
Page49
KIBe-E User’s Manual
Exemys
A.6.
Technical Specifications
• Network Protocols:
TCP / IP, UDP, TELNET, HTTP, SMTP, POP3, DHCP,
ICMP, ARP, DNS.
• Network Interface:
Ethernet 10 BaseT, RJ45 connector.
• Serial Interface:
RS232, Male DB9 connector (DTE)
Additional RS232/485/422/ serial ports in pluggable
terminal blocks.
• Operation Modes:
Standard (up to 24 e-mails), Codified (128 e-mails),
Dynamic (unlimited).
• Digital Input Report:
Via Serial, Telnet or e-mail.
• Digital Output Control: Via Serial, Telnet or e-mail.
www.exemys.com
• Outbox Size:
400 e-mails.
• Flow Control:
RTS / CTS.
• Inputs / Outputs:
Inputs: 3.5 to 28 Volts DC, 1 to 11mA max.
Outputs: High drive, open collector, 3 to 45 Volts
DC, 130 mA max. per channel.
Industrial plugabble terminal blocks.
• Management:
HTTP Server, password protected.
TELNET Console, password protected.
Serial RS232 Console.
• System Firmware:
Downloadable via programming cable (optional).
• Indicators:
Status Led, Data/Link Led.
• Dimension / Weight:
1.70 x 6.82 x 3.31 in. (HxWxL).
(43 x 173 x 84 mm).
0.52 Lbs (0.235 Kg).
• Power supply:
Must be from a Class 2 or LPS source.
9 to 26 Volts AC.
9 to 30 Volts DC.
200 mA max.
• Environmental:
Operating temperature: 23 to 149 ºF (-5 to 65 ºC).
Storage temperature: -40 to 167 ºF (-40 to 75 ºC).
• Optional Accessories:
Programming cable.
• Guarantee / Support:
1-year guarantee. Technical Support included.
Rev. 3.2.0
Page50