1
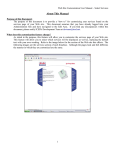
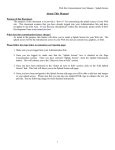
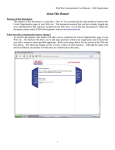
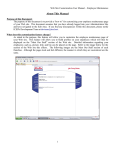
Web Site Customization User Manual – Edit Equipment
About This Manual
Purpose of this Document:
The purpose of this document is to provide a “how to” for adding any equipment you use at your center
to the Owner's Network Equipment Database. This tool is used by center owners to search for centers
that have specific equipment. The feature can assist owners who are thinking about purchasing specific
equipment. This document assumes that you have already logged into your Administration Site and
have navigated to the Edit Area. If you find any discrepancies within this document, please notify
ICED's Development Team at [email protected].
What does this customization feature change?
As stated in the purpose, this feature will allow you to add equipment in your center to the Owner's
Network Equipment Database for research purposes by other center owners.
Please follow the steps below to add your equipment to the Owner's Network Equipment Database:
1. Make sure you are logged into your Administration Site.
2. Once you are logged in, click the Update Information button. This will redirect you to the “Select an
Area to Edit” section.
3. Once you have been redirected to the “Select an Area to Edit” section, click on the “Edit Equipment
List” link. This link will direct you to the Edit Equipment customization section.
4. Once you have been navigated to the Edit Equipment page, you will be able to add, edit, or remove
any equipment to the Owner's Network Equipment Database. See the following image for more
detailed instructions.
1
Web Site Customization User Manual – Edit Equipment
Add Equipment:
Select Add New Equipment from the drop-down menu and click the continue
button.
Edit/Delete Equipment:
Select the piece of equipment from the drop-down menu and click the
continue button.
Add Equipment:
5. Once you have clicked the continue button you will be able to use the drop-down menu to select the
piece of equipment you wish to add. Choose the piece of equipment and click the “Continue” button.
6. The next step in this process is to select the equipment model to add. Use the drop-down menu to
select the correct model, enter you comments (not required) and click the “Continue” button.
7. Once you click the “Continue” button, your request to add the equipment to the database will be sent
via e-mail to ICED. From this point you can choose to go “Back to Page Edit,” “Back to Customize
Page,” or “Close Administration Site.”
Edit Equipment:
8. Once you have navigated to the screen shown above, you can use the drop-down menu to select a
piece of equipment that has been previously added. Once you have selected the piece of equipment,
click the “Continue” button.
9. After clicking the continue button you will be navigated to a section to specify any comments about
2
Web Site Customization User Manual – Edit Equipment
the piece of equipment; as well as, rate the equipment. Once you have finished editing the equipment
entry, click the “Save” button.
10.After clicking the “Save” button you will be notified that the save was successful. From this point
you can choose to go “Back to Page Edit,” “Back to Customize Page,” or “Close Administration
Site.”
Delete Equipment:
11.Once you have navigated to the screen shown above, you can use the drop-down menu to select a
piece of equipment that you wish to delete. Once you have selected the piece of equipment, click the
“Continue” button.
12.After clicking the continue button you will be navigated to a section that will allow you to delete the
piece of equipment. Click the “Delete” button to delete the piece of equipment.
13.After clicking the “Delete” button you will be notified that the save was successful. From this point
you can choose to go “Back to Page Edit,” “Back to Customize Page,” or “Close Administration
Site.”
Conclusion:
If you have any questions regarding this manual, please contact the ICED Development Team at
[email protected].
3