1
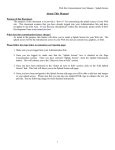
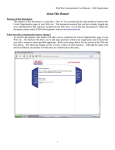
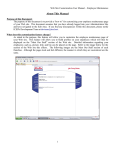
Web Site Customization User Manual – Select Services
About This Manual
Purpose of this Document:
The purpose of this document is to provide a “how to” for customizing your services found on the
services page of your Web site. This document assumes that you have already logged into your
Administration Site and have navigated to the Edit Area. If you find any discrepancies within this
document, please notify ICED's Development Team at [email protected].
What does this customization feature change?
As stated in the purpose, this feature will allow you to customize the services page of your Web site.
This feature will allow you to select which services will be displayed; as well as, replacing the default
text with your own wording. Refer to the image below for the section of the Web site this effects. The
following images are the services section of each franchise. Although the pages look and feel different,
the manner in which they are customized are the same.
1
Web Site Customization User Manual – Select Services
2
Web Site Customization User Manual – Select Services
Please follow the steps below to customize your services page:
1. Make sure you are logged into your Administration Site.
2. Once you are logged in, make sure that the “Select Services” box is checked on the Page
Customization section. Once you have selected “Select Services”, click the Update Information
button. This will redirect you to the “Select an Area to Edit” section.
3. Once you have been redirected to the “Select an Area to Edit” section, click on the “Select Services”
link. This link will direct you to the Services.
4. Once you have been navigated to the Services page you will be able to select which services to
display; as well as, enter your own wording to replace the text defaulted by ICED. Please note that
the default text does not appear in the customization section and any changes in the text areas
provided will overwrite ICED defaults. See the following image for more detailed instructions.
Checked boxes indicate that this service will appear
on the Services section of the Web site
The text area provided is where you can change
the default text found on the Services section of
the Web site. For example, any text you type into
the text box provided will appear on the Services
page of your Web Site.
Helpful Hints!!
The text boxes provided will allow you to utilize some basic HTML type tag
editing to add flair to your Services page. For more information on HTML tags
visit www.w3schools.com. Here are some example tags you can utilize:
<b> - this will bold whatever is within the opening and closing tags. For
example:
<b>Hello</b> would render Hello on the page
<u> - this will underline whatever is within the opening and closing tags. For
example:
<u>Hello</u> would render Hello on the page
You can also combine tags. For example:
<b><u>Hello</u></b> would render Hello on the page.
3
Web Site Customization User Manual – Select Services
5. Once you have selected which services you would like displayed (all are selected by default), click the
“Update Services” button found at the bottom of the page. Once you have clicked the button you will
be navigated to a confirmation page informing you that you Services have been updated. At this point
you can choose you go “Back to Page Edit,” “Back to Customize Page,” or “Close Administration
Site.”
Conclusion:
If you have any questions regarding this manual, please contact the ICED Development Team at
[email protected].
4