1
V03
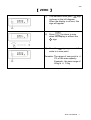
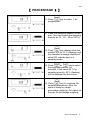
【PRECAUTIONS】
The scale or indicator should always be used in an environment which is
free from excessive air currents, corrosives, vibrations, temperatures and
humidity extremes. These factors will affect displayed weight readings.
DO NOT use the scale or indicator
Next to open windows or doors causing drafts or rapid temperatures changes!
A temperature between 0 ~ 40 degree Celsius is recommended.
Near air conditioning or heat ventilations!
Near vibrating, rotating or reciprocating equipment!
Near magnetic fields or equipment that generates magnetic fields.
On a rough work surface!
Leveling the scale
(when the indicator is connected to a platform)
Always adjust the scale to a level position with level adjusters until the
bubbles appear in the center circle of the level indicator!
Battery
Recharged the battery whenever the symbol
is flashing; this
indicates that battery level is low. Charge the battery with the DC 9V / 1A
adaptor attached. And when the battery is charging, the LED is red and
when is fully charged the LED turns green. (it takes approximately 6
hours to charge battery completely)
JIK-6 User Manual 1
V03
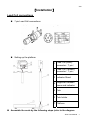
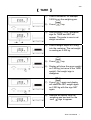
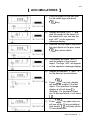
【Installation】
Load Cell connections
7 pin Load Cell connections
Setting up the platform
1
Load Cell (male)
connector(7 pin)
2
Load Cell ( female )
connector(7 pin)
3 Indicator Stand
4
Supporter between
frame and indicator
5 Pole
6 Pole holder
7 Platform
Assemble the scale by the following steps (refer to the diagram
JIK-6 User Manual 2
V03
above)
1. Pull the load cell cable through pole holder (6) up.
Install pole (6) into
the pole holder (5), and fix the pole with cross-headed screws.
2. Pull load cell cable through indicator supporter (4) to connect to the
indicator.
3. Install Indicator supporter (4) and indicator stand (3) together.
4. Adjust the indicator to adequate viewing angle and tighten the screws
located on each side of the Indicator.
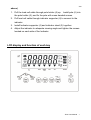
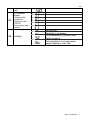
LCD display and function of each key
JIK-6 User Manual 3
V03
LCD display and explanation
LCD display
Explanation
Weighing unit in Kilograms or Grams
“ ZERO ” sign
Stable sign when the weight reading is stable
Piece counting function
Percentage function
Indication sign for insufficient unit weight, net weight,
tare, pre-tare, Hi-Lo limits.
Operation message display
HI, OK and LO limits indication
Additional weighing units
Battery Power is weak
Explanation of each key
PosiKeys
tion
Main function
Secondary functions
Turns the indicator on
or off
1
1. change the digit when in
parameter mode ( decreased)
To delete the accumu2. change the number when in
lation weights or
HI-LO checking mode
certain number of
accumulated weight 3. setting of serial number
4. setting of date & time
JIK-6 User Manual 4
V03
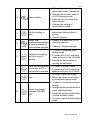
2
3
4
5
6
7
8
1. Change the digit when in
parameter model (increased)
2. Change the number when in
HI-LO checking mode
Accumulation
3. Press this key to enter the
testing mode
4. Change the setting of
accumulation mode.
1. Press to escape from
parameter setting without
Set the display to
saving.
zero
2. Cancel function
1. Enable or disable the HI-LO
Recall total
checking function
accumulation weights
or certain number of
accumulated weights 2. Capacity / division setting
Switch the weighing
unit from one to
another
1. To enter to weighing units
setting mode
2. To enter into HI-LO checking
mode and key in the LO limits
3. Setting the space when in
printing format mode
Send the data stored 1. To enter to printer mode
in memory to PC or 2. To enter into HI-LO checking
printer when pressed
mode and for key in HI limits
1. To enter to pre-tare mode
Tare
2. Move the cursor to left when
in parameter setting mode
1. To enter to internal parameter
setting
2. Sample storing mode when in
Switch the weight
piece counting mode
between GROSS/
3. Reset the serial number when
NET
in serial number mode
4. To enter to print format setting
mode
JIK-6 User Manual 5
V03
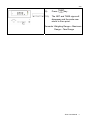
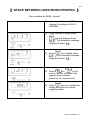
【 ZERO 】
(1). The indicators zero point
sign
is shown in the left diagram.
When the display is at zero, this
sign will appear.
(2). Press
to return to zero
when the display is without the
sign.
(3). Now, the
sign appear and the
scale is in zero point.
Remarks: The range of zero point is +/2% of the max capacity.
Example : the zero range of
60kg is +/- 1.2kg
JIK-6 User Manual 6
V03
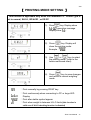
【 TARE 】
(1). Place a container, for example
0.500 kg on the weighing pan.
(2). Press
key.
(3). After pressing TARE, indication
sign for TARE and NET will
appear. The scale is now in net
weight condition.
TARE
NET
(4). Place a weight object of 2.00kg
into the container. The net weight
is reading as 2.000 kg.
(5). Press
key.
(6). Display will show the gross weight
as 2.500kg (inclusive of the TARE
weight). Net weight sign is
disappear.
(7). Press
again and display
will show the NET weight again
as 2.000 kg with the sign NET
again.
(8). Remove all objects from the
weighing pan and wait for the
zero
sign to appear.
JIK-6 User Manual 7
V03
(9).
Press
key .
(10).
The NET and TARE signs will
disappear and the scale now
return to Zero point.
Remarks:Weighing Range = Maximum
Range – Tare Range
JIK-6 User Manual 8
V03
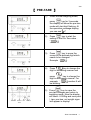
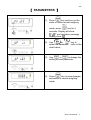
【 PRE-TARE 】
(1). Under normal weighing mode,
press
key for 3 seconds,
the display will show the pre-tare
mode with last digit flashing. At
the operation message display,
you can see " "
(2). Press
key to start the
setting of the Pre-Tare value .
(3). Press
key to move the
cursor to the desired digit which
needs to be changed .
Example:
.
(4). Press
key to change the
digit in increasing manner and
key to change the
press
digit in decreasing manner. For
,number 5 will
example :
be blinking .
TARE
PRESET NET STABLE
TARE
(5). Press
key to save the
pre-tare changes and return to
weighing mode .Now the display
will show –5.000kg and zero point
\, tare, pre-tare, net weight signs
\will appear in display!
JIK-6 User Manual 9
V03
(6). Place the container (5.000kg) and
weight mass(20.000kg) to the
weighing pan. The display will
show 20.000kg, the zero sign will
disappear and this 20.000kg will
be the Net weight .
(7). Press
key and now the
display will show 25.000kg, arrow
pointing to NET disappear. This
25.000kg will be the gross weight
of the weight object with the
container.
(8). Remove the container and weight
object, display will show –5.000kg
again.
(9). Press
key and all the
arrows pointing to NET, TARE,
Pre-Tare will disappear. The scale
returns to normal weighing mode
with the zero sign on.
Remarks:Weighing Range = Maximum
Range – Tare Range
JIK-6 User Manual 10
V03
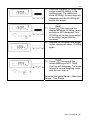
【 SELECTION OF WEIGHING UNIT 】
key to select the weighing
Press
unit in sequence as shown on the left
diagram.
Remarks:When using division ≧1g,
the unit will be shown as kg
when using division < 1g,
the unit will be shown as g.
JIK-6 User Manual 11
V03
【 INITIAL WEIGHING UNIT SETTING】
key and turn of the
(1). Press
scale at the same time. Display
will show
key for selection of
(2). Press
different weighing unit, there are 4
weighing units:kg、lb、pcs、﹪.
key to select the
(3). Use
weighing unit to be ON (in used)
or OFF (not in used)
(4). Press
key to save
changes and display will now
show
as the initial weighing unit.
key to choose the
(5). Press
desired Unit as the initial weighing
unit when turn on the scale.
Remark:The selected weighing unit
must be ON(in used) when
select for initial weighing unit
JIK-6 User Manual 12
V03
key to save
(6). Press
changes and return to normal
weighing mode.
JIK-6 User Manual 13
V03
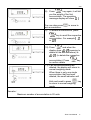
【 ACCUMULATIONS 】
(1). Place an object on the pan wait
for the stable sign and press
key.
(2). Display will show “ACC 1”, and
also the weight of the object. At
the same time, you can see the
sign “A01” on the operation
message display.
(3). Remove the first object and place
the next object on the pan, press
key when stable.
(4). The display will show “ACC 2”
and the weight of the second
object. The sign “A02” will appear
on the operation message display.
(5). Repeat procedures(3)and (4),
for the desired accumulations
key now, display
(6). Press
will show the weight of the last
object. The operation message
display at left will show ××
(flashing). For example if there
are 10 accumulations, it will show
.
key again and you
(7). Press
will see all the 10 accumulations’
total weight.
indicates all the
10 accumulations!
JIK-6 User Manual 14
V03
(8). Press
key again, it will tell
you the weight of the first
accumulation. The operation
message display will show
.
to move to
One can also press
last accumulation.
(9). To delete accumulations, press
key to recall the respective
accumulation. For example
or
.
(10). Press
and when the
display show
(meaning to
delete all the accumulations) or
(to delete the respective
key
accumulation). Press
to confirm delete
(11). If all the accumulations are
deleted, the display will return to
normal weighing mode.
When there is only one single
accumulation that has been
deleted, the small indication will
blink and need to press
to return to normal weighing
mode.
key
Remarks:
Maximum number of accumulation is 20 units.
JIK-6 User Manual 15
V03
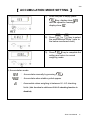
【 ACCUMULATION MODE SETTING 】
(1). While the pan is empty press
key, display show
and the operation message
display show
.
or
key to select
(2). Press
the accumulation mode. (refer to
the below mentioned chart)
(3). Press
key to complete the
setting and return to normal
weighing mode.
※ Accumulation mode
: Accumulate manually by pressing
: Accumulate when stable symbol appear
: Accumulate when weighing is between HI –LO checking
limits. (this function is valid even if HI-LO checking function is
disabled)
JIK-6 User Manual 16
V03
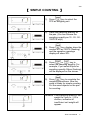
【 SIMPLE COUNTING 】
(1). Press
key to select the
PCS as weighing unit.
(2). Place the sampling quantity on
the pan. (You can choose the
sampling quantity as 10、25、50、
100PCS only!)
(3). Press
key, display show the
number of it as 10PCS (flashing)
and the operation message
display will show SPL.
or
key to
(4). Press
select the sampling quantity. For
example, if you select 50pcs for
sampling quantity 50pcs (flashing)
will be displayed on the screen.
key to complete the
(5). Press
sampling procedures. Now the
scale is ready for simple counting.
Put the same objects on the pan
for counting.
Remarks:If the sampling quantity’s unit
weight for 1pcs is ≦0.8 x
division, indication of
insufficient unit weight will
appear.
UW
JIK-6 User Manual 17
V03
【 PERCENTAGE ﹪】
(1). Press
key to select ﹪as
weighing unit .
(2). Place the sampling quantity on the
pan. (You can choose the sampling
quantity as 10、25、50 or 100 %)
(3). Press
key, display show the
number of it as 10 % (flashing) and
the operation message display will
show SPL indicate now is in
sampling mode.
or
key to select
(4). Press
the sampling quantity. For
example, if you select 50 % for
sampling quantity; 50 % (flashing)
will be displayed on the screen.
(5). Press
key to complete the
sampling procedures. Now the
scale is ready for simple
percentage weighing. Put object on
the pan for percentage weighing.
JIK-6 User Manual 18
V03
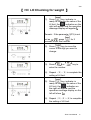
【 HI / LO Checking for weight 】
key, indicator is
(1). Press
ready for entering the value of the
HI limit, the
indication on the
right will appear and the operation
message display will appear
Remark : If the parameter 3(P3) is not
set as
, press
for 3
seconds to set this function.
(2). Press
key to move the
cursor to the digit you want to
change.
or
(3). Press
enter the number.
key to
(4). Repeat (2)
、
(3)to complete the
setting of HI limit.
key, indicator is
(5). Press
ready for entering the value of the
LO limit, the
indication on
the right will appear and the
operation message display on the
left will show
.
(6). Repeat (2)
、
(3)
、
(4)to complete
the setting of LO limit.
JIK-6 User Manual 19
V03
HI
LO
key to enable the
(7). Press
checking function and the scale
returns to the normal weighing
mode. The arrow pointing to HI,
LO will appear and the HI, LO
function is ready for operation.
(8). To cancel the function of HI-LO
key when
checking, press
the indication of HI-LO indication
signs is on the LCD.
(9). Followed by pressing
key . HI、LO indication signs will
disappear and this function is
disabled.
Remarks:LO limits must be ≦ HI limits
JIK-6 User Manual 20
V03
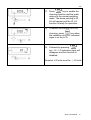
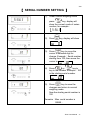
【SERIAL NUMBER】
(1). Press
key display will
show
(flashing) and
operation message display will
show
.
(2). Press
or
, to select
the desired serial number mode.
Please refer to below diagram.
key to
(3). After select, press
return to weighing mode, display
will now show
for serial
number, except if the setting is in
mode.
※ Mode of serial number:
: No action.
: The serial number plus 1 (+1 ) when the stable sign appear.
: Serial number plus 1 (+1) when the weights is in between
HI –LO checking limits this function is valid even if the HI-LO
checking function is disabled.
: Pause! No adding of serial number but display will still show
the last serial number when there is nothing on the pan.
JIK-6 User Manual 21
V03
【 SERIAL NUMBER SETTING 】
(1). Under normal weighing mode
key, display will
press
show the current mode of series
number, for example :
(2). Press
key, display will show
key to move the
(3). Press
cursor to selected digit for
change. Example:Serial number
starting from 100, then move the
cursor to
.
(4). Press
or
key to
key in the number. Example:100
is the starting serial number
(5). Press
key to save the
changes and return to normal
weighing mode.
Now the starting serial number is
100
Remarks:Max. serial number is
99999。
JIK-6 User Manual 22
V03
【 TIME SETTING 】
(1). Under normal weighing mode
key for 3 seconds
press
and display will show the time.
(2). Press
or
to switch
to DATE / MONTH or YEAR
display.
Remark : To escape press
or
(3). Press
key to enter to time
setting mode. Last digit is
flashing.
(4). Press
key to move the
cursor and press
or
key to change the digits.
Remark : Now can also press
or
and switch to setting of DATE /
MONTH or YEAR.
(5).
Press
key to complete the
setting and display the current
TIME.
(6).
Press
to return to normal
weighing mode.
JIK-6 User Manual 23
V03
Remarks:After switching off the
indicator, the date/time will
be erased unless if this
indicator is equipped with
RTC + Rs232.
JIK-6 User Manual 24
V03
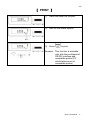
【 PRINT 】
(1). Place the object on the pan.
(2). Wait for the stable symbol.
(3). Press
to print.
Remarks:This function is workable
only with the purchased of
RS-232 interface and
compatible printer.(P3
should also be set to
compatible printer)
JIK-6 User Manual 25
V03
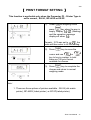
【 PRINT FORMAT SETTING 】
This function is applicable only when the Parameter P3 - Printer Type is
set to normal , SH-24 , BP-443D or EZ-2P.
(1). Under normal weighing mode
key when the pan is
press
empty. Display
, (flashing)
and the operation message
display will show
.
Remark : If P3 was set to
, the
scale will then enter to HI limit setting.
(2). Press
key to move the
or
cursor and use
key to key in number. In total
there are 100 print format
available for choose.
(3). Press
key to complete the
chosen and return to normal
weighing mode.
Note:
1. There are three options of printers available : SH-24( dot-matrix
printer), BP-443D( Label printer ) or EZ-2P(Label printer).
JIK-6 User Manual 26
V03
【 SPACE BETWEEN LINES WHEN PRINTING 】
Only available for SH24 / normal
(1). In parameter for printer(P3)
choose the setting to SH-24 /
NORMAL.
(2). While the pan is empty press
key and display shows
. The operation message
display will show
。
(3). Press
key, display show
. The operation message
display will show
.
(4). Press
or
key to
set the number of empty lines
(space) when printing.
{minimum =0, maximum=9}
(5). Press
key to complete the
setting and return to normal
weighing mode.
JIK-6 User Manual 27
V03
【 PRINTING MODE SETTING 】
* This function is applicable only when the Parameter P3 - Printer Type is
set to normal, SH-24 , BP-443D , or EZ-2P.
key. Display show
, operation message
display show
.
(1). Press
key. Display will
(2). Press
show the printing mode.
Example:
(3). Use
or
key to select
the printing mode. (refer to the
below mentioned chart)
key to save changes
(4). Press
and return to normal weighing
mode.
: Print manually by pressing PRINT key.
: Print continuously when connecting to PC or large LED
Display.
: Print after stable symbol appear
: Print when weight is between HI-LO limits (this function is
valid even if HI-LO checking function is disabled)
JIK-6 User Manual 28
V03
【 SAMPLES OF BP-443D / EZ-2P PRINTING
FORMAT】
prt-00
2004/11/25
12:27:58
N.W.:
1. 000 kg
T.W.:
G.W.:
0. 500 kg
1. 500 kg
prt-01
2004/11/25
2:28:11
1. 000 kg
prt-05
Tw: 0. 500 kg
GW: 1. 500 kg
1. 000 kg
2004/11/25
12:29:04
1 2 3
rate □ □ □
prt-06
Tw: 0. 500 kg
GW: 1. 500 kg
1. 000 kg
2004/11/25
12:29:14
ABC COMPANY
0981-123456
prt-02
2004/11/25
12:28:26
1. 000 kg
prt-07
Tw: 0. 500 kg
1. 000 kg
2004/11/25
prt-03
2004/11/25
12:28:26
N.W.: 1. 000 kg
GW: 1. 500 kg
12:29:39
prt-08
2004/11/25
12:29:50
1. 000 kg
T.W.: 0. 500 kg
#
#0
0
prt-04
2004/11/25
12:28:50
1. 000 kg
prt-09
N.W. 1.000 kg
T.W. 0.500 kg
G.W. 1.500 kg
* 10 Print formats are preset in printer by Jadever *
Note:(1)
Please contact your supplier/-dealer for additional EZ-2P &
BP-443D print formats.
(2) A memory card has to be installed in EZ-2P.
(BP-443D memory card is standard)
(3) The print formats are installed into the printers through PC. Please
email your specific requirement to us and we will make the
requested print format for you.
JIK-6 User Manual 29
V03
【 SAMPLES OF SH-24 PRINTING FORMATS 】
When
press
appear under display of accumulation,
key the print-out will like as following.
JIK-6 User Manual 30
V03
【 PARAMETERS 】
(1). Press
key and turn on the
scale or under normal weighing
mode, press
key for 3
seconds. Display will show
”
” and operation message
display show
.
or
key to
(2). Use
select the parameter (refer to the
chart below)
or
to change the
(3). Use
setting of each parameter
(4). Press
key to save changes
and return to normal weighing
mode.
JIK-6 User Manual 31
V03
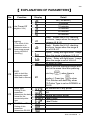
【 EXPLANATION OF PARAMETERS】
No
PO
Function
Display
Auto Power Off
(weights < 20d )
☆
☆
Beeping
P1
(The effect of this
parameter is to
determine when to
have beep sounds
during HI/OK/LO
checking.)
☆
Detail
Off ( No action )
5 minutes
10 minutes
30 minutes
60 minutes
90 minutes
Scale:Enable the HI-LO checking
functions , beeps when the range is
between HI & LO
Scale:Enable the HI-LO checking
functions, beeps when the range is
out of HI & LO
Option:Relay with light tower:beeps
when the range is between HI & LO
Option:Relay with light tower:beeps
when the range is out of HI & LO
No action of Hold
Able to hold the displayed weight and
print at the same time after pressing
HOLD
P2
Printer type
P3
print key
(able to hold the
displayed weight
after load is remove)
( when there is
loading ). Press key
to clear.
*This function will work only when
P3-Printer Type is set as NORMAL or
SH-24.
☆
Setting of this
parameter
determines the data
format for the
connected printer
type
No connection to any printer
N/A
Normal dot-matrix printer
Label Printer
Label Printer
P4 RS-232 Baud Rate
Setting of this
parameter
determines RS-232 ☆
JIK-6 User Manual 32
V03
data transmission
rate.
RS-232Data
Format
P5
☆
Setting of this
parameter
determines the
RS-232
transmission data
format.
P6 Backlight
☆
No Backlight
Backlight is on always
Off automatically 5 seconds after
stable weighing
Auto (backlight is actuated when
weight loading is over 20d)
JIK-6 User Manual 33
V03
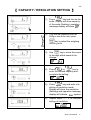
【 CAPACITY / RESOLUTION SETTING 】
(1). Press
key and turn on the
scale. Display will show capacity
of the scale (flashing), operation
message display will show
(2). If to use low capacity such as
600g or use lb as unit, press
key to select the weighing
unit as g or lb.
key to move the cursor
(3). Use
to the digit which needs to be
change.
(4). Press
or
key to
enter the desired capacity and
complete the setting
key and enter into
(5). Press
setting of resolution mode.
Display will show the resolution
(flashing) and operation message
display will indicate
symbol.
(6). Repeat steps(3)
、
(4)to complete
setting of resolution.
JIK-6 User Manual 34
V03
key and display will
(7). Press
show the internal self checking
value and stop. This means that
setting of capacity/resolution is
completed.
Example:
Turn off the scale and turn on
again.
Note:
Maximum capacity to be set for this indicator is 400000kg.
Minimum division to be set for this indicator is 0.01g.
Whenever the capacity / resolution is set or changed, be sure to
re-calibrate according to calibration procedure on service manual.
JIK-6 User Manual 35
V03
【 DIVISION CONFIGURATION CHART 】
Kg
Max
5000kg
g
Max
5000g
lb
Max
500lb
2000kg
2000g
200lb
1000kg
1000g
100lb
500kg
500g
50lb
200kg
200g
20lb
100kg
100g
10lb
50kg
50g
5lb
20kg
20g
2lb
10kg
10g
1lb
5kg
5g
0.5lb
2kg
2g
0.2lb
1kg
1g
0.1lb
0.5kg
0.5g
0.05lb
0.2kg
0.2g
0.02lb
0.1kg
0.1g
0.01lb
0.05kg
0.05g
0.005lb
0.02kg
0.02g
0.002lb
0.01kg
0.01g
0.001lb
JIK-6 User Manual 36
V03
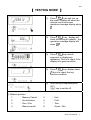
【 TESTING MODE 】
(1). Press
key and turn on
the scale. Display will show the
internal count value and
operation message display show
.
key , display will
(2). Press
show the setting of capacity , the
operation message display will
show
.
(3). Press
key and all
segments in display are
appearing. This is to check if the
display is in good condition.
(4). Press
key, display show
, this is to check the key
function condition.
(5). After testing completed press
key to switch off.
※ Relative position:
1
: Memory Cancel
5
: Unit
6
3
: Accumulation
: Zero / Esc
7
: Print
: Tare
4
: Memory recall
8
: Gross / Net
2
JIK-6 User Manual 37
V03
【ERROR MESSAGES】
Error
Message
Solutions
Reasons / Possible Caused
E0
The CPU unable to read the
EEPROM
Contact the manufacturer or
nearest agent
E1
Unable to read the 3 points
calibration range
Refer to “service manual” for
calibration procedures
(1)
E2
Zero Point is too high
(2)
(1)
E3
Zero Point is too Low
(2)
(1)
E4
Unstable zero point
E5
(1)
(1)Load cell spec. not
compatible.
(2)
(2)calibrating weights mistake
E6
Load cell read out always the
same
E7
E8
(2)
Make sure the pan is empty
when turn on the scale or
perform the 3 points
calibration.
Check the connections of
wires
Make sure the pan is on the
scale or perform the 3
points calibration.
Check the connections of
wires.
Make sure there is no winds
or vibration .
Check the connections of
wires.
Replace with a compatible
load cell.
Change with correct
calibrating weights.
(1)Check if load cell wire are
connected correctly.
key twice to clear
Press
The last accumulation is more
all the accumulation or press
than the preset accumulation
allowed.
key to return to normal
weighing mode.
(1). Load cell specification is
(1). Choose the compatible load
out of the ADC range
cell.
(2). Wrong setting for
(2). Re-calibrate the scale.
calibration
JIK-6 User Manual 38
V03
Optional RS-232(RTC)
batteries run out
E10
Replace the batteries
Press
Unable to accumulate. Two
objects are with different units. accumulation data or press
and return to normal weighing
mode.
E11
Press
E12
E13
twice to clear all
XX
Accumulation data exceed
preset maximum
Hi / Lo setting incorrect
twice to clear all
accumulation data or press
and return to normal weighing
mode.
Press
value.
key and reset Hi / Lo
External division over
E20 XXXXX Maximum (XXXXX is external Press
and reset Capacity
resolution)
/ Resolution
E21
Capacity / Resolution Setting
XX inaccurate.
Overload
(Maximum display=
max .capacity + 9e )
Remove the object from the
weighing pan.
Indicator unable to Switch On
when pressing
and redo
Press
Calibration (make sure the
calibrate weight is correct).
key
Use a tool to press the RESET
key located at the back of the
indicator to turn on the scale
and clear the problem.
JIK-6 User Manual 39
V03
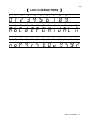
【 LCD CHARACTERS 】
0
1
2
3
4
5
6
A
B
C
D
E
F
G
N
O
P
Q
R
S
T
7
H
U
8
9
I
J
K
L
M
V
W
X
Y
Z
JIK-6 User Manual 40
V03
【CONNECTER】
Scale To Printer
Connecter for EZ-2P/BP-443D
Connecter for SH-24
Scale To PC
When you want a scale to transmit data to PC continuously.
(1) Using a cable as following to connect Scale and PC
(2) Set printer mode as continue
(3) Scale data will be sent to PC continuously. (of course, you must have the receiving
software on the PC)
Only pin 2,3 and 5 are used.
【DATA PROTOCOL】
z
Output Data when Print Mode set as Continue
( header1: ST=STABLE
( header2: NT=NET
For example :
US=UNSTABLE)
GS=GROSS)
ST /NT□+□12.350□kg
header1
z
header2
weight
(8digits)
unit
Input commands
“T”=perform TARE function
“Z”=perform ZERO function
JIK-6 User Manual 41
V03
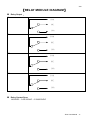
【RELAY MODULE DIAGRAM】
Relay Output:
Alarm
COM
N.C.
N.O.
HI
COM
N.C.
N.O.
OK
COM
N.C.
N.O.
LO
COM
N.C.
N.O.
Relay Contact Spec
1A/24VDC,0.5A/125VAC,0.25A/250VDC
JIK-6 User Manual 42
V03
【PRODUCT SPECIFICATIONS】
1. General
S/S
ABS
Enclosure
Demensions
230(W) * 150(H) * 90(D) mm
Display
6digit 30mm(H) & 3digit 10mm(H)
Units
LCD(include EL backlight)
kg or g , lb , 台斤.兩 , 港斤.兩 , pcs , %
Power
Adaptor 9V/1A
Recharging Battery 6V/3Ah
Adaptor 9V/1A
Recharging Battery 6V/3Ah can
be selected
Weight(include
Battery)
Approx. 2.5kg
Approx. 2.8kg
2. ADC and Loadcell
Model
Transform Mode
ADC
Internal
Resolution
External
Resolution
Conversion Speed
System Linearity
Loadcell
Basic
Δ - Σ
Approx. 1,000,000 counts
Max. 30,000d(non-OIML)
10 times/sec
Within 0.01% of FS
Excitation
5VDC ± 6% , 120mA(drives up to 8 * 350 L.C. )
Full Scale
-2 ~ 18mV(include dead load)
Input Sensitivity
Min. 0.16uV/d(non-OIML)
JIK-6 User Manual 43
V03
【ASSEMBLY MANUAL OF JIK INDICATOR
AND SUPPORT STAND】
1. Using adjustable screw to pass through mounting hole. (illustrator I)
2. Put M6 washer onto adjustable screw. (illustrator II)
3. Rotating the star turning button into adjustable screw. (illustrator III)
4. Adjust the indicator to the best view, and then rotate it tight via star turning button.
(illustrator VI)
JIK-6 User Manual 44
V03
【 FIXING SCREW INSTRUCTION FOR JIK-XSX 】
z After connecting load cell and optional devices (RS-232, RELAY), fix all screws
attached fallow the above numeric sequence.
z If using an electric screwdriver, set the torque range to 5-7 kgf.cm.
z Sealing screws are to be located at sequence 10 and 11.
JIK-6 User Manual 45
V03
【 SINGLE POINT CALIBRATION FOR WEIGHT】
Step I
(Enter into calibration mode)
Turn on the scale by holding down
key until CAP is shown on the lower left screen, i.e. the
Step VI (Single-point Calibration) Note: If to perform three-point calibration, skip this
scale has entered into the calibration mode.
step.
Note: If the calibration unit, capacity, and resolution have been set, you may skip Steps II~IV and
key and the flickering digit will shift to the right; press
,
to adjust the
Press
press
key to enter into Step V to perform zero point calibration.
value; input the weight value to be calibrated, and put the correct weight onto the weighing pan,
then II
press(Select Calibration
key to save Unit)
and confirm, once PASS is shown, take away the weight on the
Step
weighing pan and restart the machine for normal use.
You may select calibration unit (kg, g) by use of
key.
Step VII (Three-point Calibration)
Step III (Capacity Setting)
Press
Press
key
seconds
untildigit
C-1 will
is shown
left corner.,
key for
and3the
flickering
shift at
to the
the lower
right; press
key to set any
First
C-1:
Press
keypress
and the flickering
digit into
will the
shiftnext
to the
right; press
value Point
between
1-9;
after setting,
key to enter
step.
,
key to set values; input the weight value to be calibrated, and put the correct weight onto the
Step IV (Resolution Setting)
weighing pan, press
key to confirm and perform calibration.
Press Pointkey
andPut
thethe
flickering
digit
shift toonto
the the
right;
press pan,, the weight
key value
to set will
any
Second
C-2:
weight to
be will
calibrated
weighing
value
between
1-9; after on
setting,
press press key tokey
savetoand
showand
the perform
offset-value;
press the
confirm
calibration.
be shown
automatically
the screen;
weighing
panC-3:
gently,
theweight
value changes,
it’s normal.
Third Point
Putifthe
to be calibrated
onto the weighing pan, the weight value will be
Note: If you don’t want to perform calibration, just power off and the setting are completed.
shown automatically on the screen; press
key to confirm and perform calibration. Once
PASS
take away
the weight on the weighing pan and restart the machine for normal
Step Vis shown,
(Zero Point
Calibration)
use.
Press
key to perform zero point calibration; when CAL on the lower left stops flickering,
zero point calibration
is completed
with CAL
**kg press
shown.
Recalibration:
If any error
occurs during
calibration,
key to return to zero point
calibration mode and perform calibration according to the calibration procedures.
Note:
If theweight
show value
value in
is very
unstable,
press shallkey
to enter
Note: The
three-point
calibration
comply
withinto
C-1stb
< adjustment
C-2 < C-3. function,
use
key to extend the range of stb (it is recommended to adjust one segment each
time), after confirmation, press
key to save setting and the zero point calibration will
be performed automatically.
JIK-6 User Manual 46