1
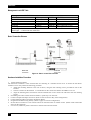
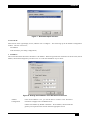
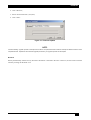
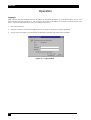
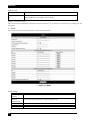
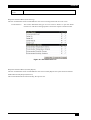
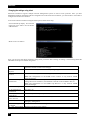
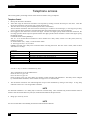
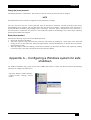
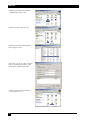
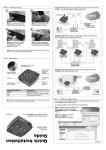
SEPTEMBER 2004
PSE606/PSE608
ServPower Freelancer
SUPPORT
FREE technical support
PSE606/608
Contents
Contents ................................................................................................................................................................................ 3
Safety instructions: read before use!..................................................................................................................................... 4
Introducing ServPower Freelancer ....................................................................................................................................... 5
What is ServPower Freelancer.............................................................................................................................................. 5
Contents of Your ServPower Freelancer Package ................................................................................................................ 5
ServPower Freelancer Features ............................................................................................................................................ 5
Hardware setup ..................................................................................................................................................................... 7
Front and Back Panels .......................................................................................................................................................... 7
Outlet LED Table.................................................................................................................................................................. 7
Management card LED Table ............................................................................................................................................... 8
Basic Connection Scheme .................................................................................................................................................... 8
Hardware Installation Procedure .......................................................................................................................................... 8
Daisy chain setup procedure................................................................................................................................................. 9
Device configuration .......................................................................................................................................................... 10
Installing Netility ................................................................................................................................................................ 10
Using Netility for IP Configurations .................................................................................................................................. 10
Network Selection .............................................................................................................................................................. 10
Configure IP ....................................................................................................................................................................... 11
Firmware Update ................................................................................................................................................................ 12
Refresh................................................................................................................................................................................ 13
Operation ............................................................................................................................................................................ 14
Logging in .......................................................................................................................................................................... 14
The web interface ............................................................................................................................................................... 15
Information ......................................................................................................................................................................... 15
Configuration...................................................................................................................................................................... 17
Log Information.................................................................................................................................................................. 25
Changing the settings using telnet ...................................................................................................................................... 26
Telephone access ................................................................................................................................................................ 28
Telephone Control .............................................................................................................................................................. 28
Change the phone password. .............................................................................................................................................. 29
Reset phone password ........................................................................................................................................................ 29
Appendix A – Configuring a Windows system for safe shutdown ..................................................................................... 29
Appendix B – Troubleshooting........................................................................................................................................... 32
3
PSE606/608
Safety instructions: read before use!
Remark: In the following instructions, the term "ServPower Freelancer” designates all the
products that hold the name ServPower Freelancer.
The ServPower Freelancer devices can only be installed by qualified people with the
following installation and use instructions. The vendor disclaims all responsibility in case
of an improper utilisation of the ServPower Freelancer devices and particularly any use
with equipments that may cause personal injury or material damage.
This equipment is designed to be installed on a dedicated circuit that must have a circuit
breaker or fuse protection.
The electrical power sockets used to plug the power cords of the ServPower Freelancer
devices must be close to the ServPower Freelancer devices and easily accessible.
Check that the power cords, plugs and sockets are in good condition.
The ServPower Freelancer devices can only be connected to three-wire 220-230 VAC /
50Hz sockets.
Always plug the Power Switch devices into properly grounded power sockets (two poles
plus ground).
Never exceed the maximum total load as indicated in the technical specifications or the
datasheet of the ServPower Freelancer device.
The ServPower Freelancer devices are intended for indoor use only. Do NOT install
them in an area where excessive moisture or heat is present.
Always disconnect the power cord(s) of the ServPower Freelancer device if you want to
intervene on the ServPower Freelancer device or on the equipment powered from the
ServPower Freelancer device.
The power outlets of the ServPower Freelancer devices are not circuit breakers! If you
want to intervene on equipment connected to a ServPower Freelancer device you must
disconnect this equipment from the ServPower Freelancer device.
The ServPower Freelancer devices contain potentially hazardous voltages. Do NOT
attempt to disassemble them.
The Power Switch devices contain no user serviceable parts and repairs are to be
performed by factory trained service personnel only.
4
PSE606/608
Introducing ServPower Freelancer
What is ServPower Freelancer
The ServPower Freelancer is an Internet ready device designed to allow administrators to remotely and individually
control the AC power for up to eight connected devices, such as: servers, workstations, routers, switches, PBXs, etc. By
daisy chaining (cascading) up to 16 client units, administrators can control a total of 128 devices from the same
management interface.
The ServPower Freelancer offers easy configurable and user-friendly communication and control methods. The most
common connection of all is using a standard HTTP connection. Once the unit is powered and properly set up, the
administrator can manage the power of the devices from anywhere in the world via a web browser.
The other option is to connect an external modem to the built in RS 232 port to allow dialing up of the Internet.
The superiority of the ServPower Freelancer over other power management products is the control over a telephone
connection (DTMF tone signals) with no need of modem. So even if networks lock up or Internet crashes, there is
always a back up telephone control option for administrators to control devices. With such powerful features,
administrators can be sure that they will always gain access to their devices no matter where they are in the world.
Contents of Your ServPower Freelancer Package
The standard ServPower Freelancer package contains a Remote Power Manager Unit with supporting hardware and
software. The components of your package are:
• 1 ServPower Freelancer Unit
• 1 pair of rackmount brackets
• 1 piece of IEC320 C13 / C14 AC Power Cord.
• 8 pieces of 1.8m RJ-11 to DB9/RS232 cables for PC communication.
• 1 piece of 10cm RJ-11 cascade cable for ServPower Freelancer daisy chaining
• CD-ROM (only for Master models)
• Configuration tool: Configure management card’s IP address and upgrade firmware.
• MIB: Management Information Base for Network.
• User’s Guide (PDF document)
• Adobe Acrobat Reader.
• 1 terminator for the cascading port
ServPower Freelancer Features
• Turns ON/OFF any AC powered device via network, modem and phone.
• Supports manually turning on or off connected equipment
• Single (PSE606) or dual (PSE608) 7A input circuits
• Integrated 10/100Base-T Ethernet port for connection to your TCP/IP network.
5
PSE606/608
• Address-Specific IP security masks prevent unauthorized sources from accessing the ServPower Freelancer through
the network.
• Supports NMS to control ServPower Freelancer through MIB. User also can use MIB to develop their application
interface.
• Downloads data and events log list to server.
• Daisy chain expandable up to 16 units.
• When events occur, ServPower Freelancer can notify user by email and trap according to the preset conditions.
• Configurable sequence in which power is turned on or off for each outlet. This helps avoid in-rushes at start-up,
which can cause overloaded circuits and dropped loads. Sequencing also allows to predetermine which piece of
equipment is turned on first so other equipment depending on that unit will function properly.
• Supports Windows NT, 2000 and XP to execute safe shutdown and reboot.
• Scheduled turn on and off of the connected equipment.
6
PSE606/608
Hardware setup
This section will guide you through the quick installation of the ServPower Freelancer.
Front and Back Panels
Phone control ports
Cascade ports
Ethernet port
Modem port
Manual buttons
Circuit breaker
Outlets
Power switch
RJ11 shutdown ports
Figure 1 - Front and back views
The rear-panel contains eight server ports from A-H. These ports provides controlled shutdown for a Windows host.
(Port A controls receptacle A; Port B controls receptacle B, etc…)
Outlet LED Table
ServPower Freelancer LED Table
LED
ON
GREEN
The momentary switch is
disabled and the output
receptacle is programmed
for remote control.
RED
The receptacle is on and
providing power to devices
YELLOW
Indicate the ServPower
Freelancer ID number. The
master one-plugged with
SNMP card, will display all
the connected ServPower
Freelancer ID numbers
OFF
The momentary
switch is active and
the receptacle may be
turned on or off by
pressing and
releasing the switch
The receptacle is off
and doesn’t provide
power.
FLASHING
Pressing and holding the
momentary switch for three
seconds will change the state
from remote to local control.
The receptacle has internal
fault.
7
PSE606/608
Management card LED Table
Management card LED Table
YELLOW
RED
Solid Off
Solid Off
Flashing
Solid On
Solid On
Solid Off
Solid On
Flashing
Flashing
Flashing
Green Light : Power state
Red Light : Connection state with UPS
GREEN
Solid On
Solid On
Solid On
Solid On
Solid On
STATUS
Power ON
System initial
Normal Operation
No Connection to UPS
Writing data to flash memory
Basic Connection Scheme
Cascade
Back view
Front view
Figure 2 - Basic connection scheme
Hardware Installation Procedure
1. Install mounting brackets.
The ServPower Freelancer comes with brackets for mounting in a standard 19-inch rack. To mount the ServPower
Freelancer into a rack perform the following procedure:
• Attach the mounting brackets to the unit as shown, using the four retaining screws provided for each of the
brackets.
• Choose a location for the brackets. A notched hole on the vertical rail denotes the middle of a U slot.
• Align the mounting holes of brackets with the notched hole on the vertical rail and attach with the retaining
screws.
2. If installing more than one ServPower Freelancer, repeat step 1 for each unit.
3. Connect all input and output connectors. (Refer to next section for daisy chain configuration)
4. Connect Ethernet cable to ServPower Freelancer Master.
5. Program the IP address using Netility. (Refer to pages 9-12 for IP configuration).
6. Set ServPower Freelancer’s front control buttons for Internet/remote or manual control. (Please check LED Table
above for the operation)
7. Use browser, modem or phone connection to monitor and control the outlets.
8
PSE606/608
Daisy chain setup procedure
The ServPower Freelancer can be daisy chained up to a maximum of sixteen units (1 Master and up to 15 Satellites).
Each unit in the chain must have its own unique identification number. The default ID# is “01“. The first unit must be a
Master model (PSE606MA or PSE608MA) and must be configured before you can begin daisy chaining any additional
Satellite units. Please follow the procedure below to daisy chain the ServPower Freelancer units:
Figure 3 - First ServPower Freelancer
1.
2.
3.
4.
5.
Make sure that the terminator is plugged into the first ServPower Freelancer's cascade port (see Figure 3).
Plug the first ServPower Freelancer's power cord into utility power.
Turn the power switch on.
Setup the ServPower Freelancer (see Hardware Installation Procedure above).
Configure the first ServPower Freelancer's ID number (each unit must have it's own unique ID#, the default ID# is
"01").
Figure 4 - Cascading two units
6.
7.
8.
9.
10.
11.
12.
Make sure that the second unit has the terminator plugged into the cascade port (see Figure 4).
Connect the first and second unit together with the cascade cable.
Plug the second ServPower Freelancer's power cord into utility power.
Turn its power switch on.
Configure the second unit's ID number (each ServPower Freelancer must have it's own unique ID#, the default ID#
is "01").
If there are only two units required for this application, then this completes the daisy chaining procedure and the
ServPower Freelancers are ready for use.
If your application requires additional ServPower Freelancers, then continue on with the daisy chaining procedure.
Figure 5 - Cascading three units
13.
14.
15.
16.
17.
18.
19.
20.
Make sure that the third ServPower Freelancer has the terminator plugged into the cascade port (see Figure 5).
Remove the terminator from the second ServPower Freelancer.
Connect the second and third units together with the cascade cable.
Plug the third unit's power cord into utility power.
Turn the power switch on.
Configure the third unit’s ID number (each ServPower Freelancer must have it's own unique ID#, the default ID#
is "01").
If there are only three units required for this application, then this completes the daisy chaining procedure and the
ServPower Freelancers are ready for use.
If your application requires additional ServPower Freelancers (maximum of sixteen), then repeat steps 13-19 of the
Daisy Chaining procedure.
9
PSE606/608
Device configuration
Installing Netility
1. Insert the Utility CD into the CD-ROM driver, change to directory “Setup” and execute “Netility.exe”
2. After installation is completed, ‘Netility’ group will appear in Windows program groups list. Click “Netility” to start
the program.
Using Netility for IP Configurations
The Netility main menu is shown below. The selection menu is located on the left. The device, hardware, firmware and
IP addresses of all ServPower Freelancer connected to the LAN are displayed on the right.
Figure 6 - Configuration utility main window
NETWORK SELECTION
Once Netility starts up, it will automatically search for the computer’s network card (If not, click on “Network Selection”
on the main menu to start the search). A pop-up window will show the available Network Adapter(s).
Next, select the Network Adapter which is connected to the internet and click ‘OK’ to return to the main menu. The
ServPower Freelancer’s current IP address will now appear in the main menu display area.
10
PSE606/608
Figure 7 - Network Adapter selection
CONFIGURE IP
Select the IP on the right display screen, and then click “Configure”. This will bring up the IP Address Configuration
window. The user can now set;
• IP Address
• Advanced (for port setting configuration)
1. IP Address
This section determines ServPower Freelancer’s IP Address. When using ServPower Freelancer for the first time, the IP
address, subnet mask and gateway will have to be set. Enter the IP Address of your choice.
Figure 8 - Setting the IP address of the ServPower Freelancer
Address
Configuration
Once the IP address is set, you will be able to connect to the ServPower
Freelancer webpage from a standard browser.
Obtain an IP address by DHCP or BOOTP – the IP address, subnet mask and
gateway are acquired via the network from the appropriate servers
11
PSE606/608
2. Advanced
In order to increase security to ServPower Freelancer, Netility offers two additional security features:
Password
Use this to set an access password for Netility.
NOTE:
Do not lose this password. If the password is lost, the SNMPUtility will not be able to perform future firmware upgrades.
Management Protocol
The administrator can determine the parameter settings when providing access via HTTP (web) or Telnet to ServPower
Freelancer. For security reasons, the administrator can choose to use either the standard or a custom port setting to
control the access. Alternately, these services can be enabled/disabled independently to match your security policy.
Figure 9 - Advanced settings
The default values are set to port number 80 for HTTP and 23 for Telnet Function.
If set to other port values, the full IP Address must be entered in order to Telnet or access the Website. For example:
a) Set a value of 81 as the HTTP port number, then
http://192.168.0.177:81
must be typed as the web address in order to access the ServPower Freelancer website.
b) Set a value of 24 as Telnet port number, then
telnet 192.168.0.177 24
must be typed in order to access the ServPower Freelancer Telnet screen.
FIRMWARE UPDATE
Netility offers a convenient firmware upgrade. When a new firmware is available;
1. Click “Download Firmware” from the Netility main menu,
12
PSE606/608
2. Click “Browser”,
3. Select new firmware file (*.bin) and,
4. Click “Start”.
Figure 10 - Firmware update
NOTE:
If the downloading / upgrade process is interrupted or the data is corrupted, ServPower Freelancer will keep its default firmware to avoid
complete data loss. Repeat the above firmware upgrade procedure if your upgrade process was interrupted.
REFRESH
Netility automatically searches for any ServPower Freelancer connected to the LAN. However, the user can do a manual
search by clicking the “Refresh” icon.
13
PSE606/608
Operation
Logging in
After you have setup the hardware and set an IP address for ServPower Freelancer, you will then be able to go to its web
site to monitor and control the devices. All you have to do is enter the IP address or hostname (if entered into the hosts
table or registered with a DNS server) into any standard web browser.
1.
Start the web browser
2.
Enter the ServPower Freelancer IP Address that was set earlier using Netility and press [ENTER]
3.
A login screen will appear, press [ENTER]. By default the username and password are left blank.
Figure 11 - Login window
14
PSE606/608
The web interface
The ServPower Freelancer’s webpage main menu is divided into two sections: the selection menu on the left and display
menu on the right.
The selection menu consists of the following options:
•
Information
•
Configuration
•
Log Information
•
Device Selection
When using ServPower Freelancer for the first time, you must first set the necessary parameters in the “Configuration”
menu. This will ensure that the ServPower Freelancer will work properly.
Figure 12 - ServPower Freelancer Main Menu
INFORMATION
This tab displays the System Information and ServPower Freelancer Status. The information is either provided by
ServPower Freelancer or comes from the values set in the “Configuration” section. Click on “System Status” to view the
information.
1.
Outlet Status
This section gives you remote control over the ServPower Freelancer unit and its individual outputs. Click on the
individual power input icon to switch on, off, or reboot the device.
15
PSE606/608
Figure 13 - ServPower Freelancer Status Menu
2.
Env. Status
This option is available only if the external optional environmental control unit is connected to the ServPower
Freelancer. It will show the current readings for the measured parameters (temperature, humidity)
3.
System status
This section shows you the System Information and Network Status, such as the Firmware Version, the system
name, uptime, IP Address, Gateway, PPP Server, Login IP and the like.
16
PSE606/608
CONFIGURATION
Please ensure that each of the following option is set correctly. Otherwise, ServPower Freelancer may not work
properly.
•
Device settings
•
Env. settings
•
Email
•
PPP
•
Web/Telnet
•
System Time
•
ServPower Freelancer Setting
•
ServPower Freelancer Schedule
1. Device settings
This section determines the settings of the ServPower Freelancer.
Select ServPower
Freelancer
Address Change
Identification
Outlet
Name
Phone
Controllable
Control Type
Power off Delay
Power Resume
Delay
Select the ServPower Freelancer that is currently connected and switched on
Use this to assign a new number or change the currently assigned number for the
ServPower Freelancer unit. You have a choice of 01 to 16.
Note: You cannot choose a number that is already assigned to another ServPower
Freelancer.
To give a unique name for the ServPower Freelancer.
Indicate outlets A-H
To set a unique name for the Outlets
Option of “Yes” or ”No”
Select a control type for the outlet. Option of;
Safe shutdown
Safe reboot, and
Instant shutdown
(refer to Control Type Table for examples)
Sets the power off delay time in seconds (value from 0 to 9999)
Sets the power resume/on delay time in seconds (value from 0 to 9999)
17
PSE606/608
Figure 14 - Device settings
Power Mode
ON-OFF
ON-OFF
ON-OFF
ON-OFF
OFF-ON
OFF-ON
OFF-ON
OFF-ON
ON-OFF
ON-OFF
ON-OFF
ON-OFF
OFF-ON
OFF-ON
OFF-ON
OFF-ON
ON-OFF
ON-OFF
ON-OFF
ON-OFF
Table of Control Type and Resulting ServPower Freelancer Action:
Power Off Power Resume
Control Type
Action By ServPower Freelancer
Delay (sec) Delay (sec)
Instant Shutdown
0
0
Instant Shutdown
Instant Shutdown
10
0
Instant Shutdown
Instant Shutdown
0
10
Instant Shutdown
Instant Shutdown
10
10
Instant Shutdown
Instant Shutdown
0
0
Instant ON
Instant Shutdown
0
10
On within 10 sec.
Instant Shutdown
10
0
Instant ON
Instant Shutdown
10
10
On within 10 sec.
Safe Shutdown
0
0
Instant Shutdown
Safe Shutdown
10
0
Shutdown in 10 sec.
Safe Shutdown
0
10
Instant Shutdown
Safe Shutdown
10
10
Shutdown in 10 sec.
Safe Shutdown
0
0
Instant ON
Safe Shutdown
0
10
On within 10 sec.
Safe Shutdown
10
0
Instant ON
Safe Shutdown
10
10
On within 10 sec.
Safe Reboot
0
0
Inst S/D, reboot in 10
Safe Reboot
10
0
S/D in 10, reboot in 10
Safe Reboot
0
10
Inst S/D, reboot in 20
Safe Reboot
10
10
S/D in 10, reboot in 20
Note
If the Control Type were changed from Instant or Safe Shutdown to Safe Reboot and for the first time only, the following will occur
2.
18
Power Mode
Control Type
OFF-ON
OFF-ON
Safe Reboot
Safe Reboot
Env. Settings
Power Off
Delay (sec)
0
10
Power Resume
Delay (sec)
10
0
Action By ServPower Freelancer
Starts in 20 sec.
Starts in 10 sec.
PSE606/608
This option is visible only if the external optional environmental monitoring device is connected to the ServPower
Freelancer.
3. Users
This section is to set the user list for ServPower Freelancer. Once set, a user will have to enter the given username and
password in order to access ServPower Freelancer webpage.
Figure 15 - Users
User Account
User Name
Password
Permission
IP Filter
4.
This section is to set a user name for web access. You can define up to 8 users.
This section is to set a password for the user.
Determine the user’s authorization type. The user can either “Read only” or “Read
and Write” after gaining entry to the webpage.
An additional security feature. Once specified, the user can only login from the
specified IP address. Leave blank to allow user to login from any place.
Network
Figure 16 - Network
This option determines the ServPower Freelancer network settings. Once you changed the IP Address, you will have to
redirect your browser to the new IP address manually. In addition, changing the option between “manually” and “using
DHCP” to “Obtain an IP Address” will cause the unit to reset once you click the <Apply> button.
19
PSE606/608
DNS Server IP
Primary DNS Server IP
Secondary DNS Server
IP
This is to set the primary DNS Server IP address.
This section is to set the secondary DNS Server IP address. This is used when the
Primary DNS Server IP address is not working
Ethernet: Connection Type
This item sets the communication speed of the network connection. If you change the Connection Type settings, the unit
will reboot.
5. E-mail
This option sets the following Email details for ServPower Freelancer
Figure 17 - Email
E-mail Settings
E-mail Server
Sender’s Email
Address
Email Server
Requires
Authentication
Account Name
Password
Send Email
20
This is to set the email server
This item determines ServPower Freelancer Email address
If set to “YES”, the user will have to provide the account name and password in
order to access the Email server. Otherwise, enter “NO”.
Enter the account (login) name for the email server.
Enter the password for the above account name
If set to “YES”, ServPower Freelancer will send an email to the recipient’s email
PSE606/608
When Event
Occurs
address (set below) when an event occurs.
Recipient’s Email Address (for Event Log)
The user can determine which 8 email addresses will receive warning email when an event occurs.
Event Selection
This section determines the type of event. Click on “Select” to open the “Select
Events List” and choose the appropriate event for the respective email accounts.
Figure 18 - Event Selection List
Recipient’s Email Address (for Daily Report)
The user can determine which 4 email addresses will receive a Daily Report sent by ServPower Freelancer.
Send Email for Daily Report (hh:mm:ss)
This section determines the time of the day, the report is sent.
21
PSE606/608
6. SNMP
This page is to configure the SNMP settings so that the ServPower Freelancer can be used by a NMS (Network
Management System). (Eg: HP OpenView, SUN SunNet Manager, IBM Tivoli, etc…)
Figure 19 -SNMP
MIB System
System Name
22
Give a name to the unit.
System Contact
Name the administrator.
System Location
Name unit location.
PSE606/608
Access Control
Manager IP
Address
This section is to fix the IP address from which the administrator can access the
Environment Control Management webpage. You can set up to 8 IP addresses.
To access this webpage from any IP address leave this space as *.*.*.* (default)
Community
This section is to set a Community name for NMS.
Note: The community name has to be the same as the setting in NMS.
Permission
This section is to set the authorities of accessing administrator. There is an option of
Read, Read/Write, and No Access (for banning / restricting access from certain IP
Address).
Description
This section is for an administrator to make notes.
Trap Notification
Receiver IP
Address
This section is to set receivers IP address for receiving traps sent by ServPower
Freelancer. It is valid for up to 8 IP Addresses.
Community
This section is to set a Community name for NMS. The community name has to be as
the same as the setting in NMS.
Severity
This section is to set Trap receiver levels. There are three levels of Trap receiver:
Information: To receive all traps.
Warning: To receive “warning” and “severe” traps.
Severe: To receive only “severe” traps. (Please refer to NMS manual for Trap
levels).
Acceptance
Determines if the IP will receive a trap or not.
Description
This section is for an administrator to make notes.
Event
This section is to select events for ServPower Freelancer to send traps. Clicking on
Select will open a “Select Events List”. Event Traps may be selected from this list.
23
PSE606/608
7. PPP
This section determines the modem dial-in settings for ServPower Freelancer.
Figure 20 - PPP
PPP Dial-in
Login Name
Login
Password
PPP Server IP
Login IP
Modem Script
Determine the username of visitors who can log in.
Set a password for the visitor’s account
Default set at 10.0.0.1
Default set at 10.0.0.2
Default / Standard modem script.
8. System Time
This section is to set ServPower Freelancer System Time. You can provide ServPower Freelancer with up to two time
servers or alternatively you can set the time zone yourself.
Internet Time Setting
Time Between Automatic
Updates
Primary / Secondary Time
Server
Time Zone (Relative to
GMT)
System Time (Manually)
System Time
(mm/dd/yyyy hh:mm:ss)
24
This section is to set an interval for the time synchronization. Select either
nil, 1, 3, 12 hours or 1, 10 & 30 days.
Set the primary and secondary time servers for ServPower Freelancer.
Select the appropriate time zone for your area.
This section is to set ServPower Freelancer System Time manually. The
format is pre-determined to: mm/dd/yyyy hh:mm:ss
PSE606/608
9. Scheduler
Use this section to manage your ServPower Freelancer schedules. You can choose to add a new schedule, Edit the
existing schedule or delete a schedule.
Click on [New] to enter a new schedule event.
Figure 21 - Scheduler
10. Autopilot
This option is visible only if the external optional environmental monitoring device is connected to the ServPower
Freelancer.
LOG INFORMATION
This section keeps track of device events. It will record the time and date, device, ServPower Freelancer unit, and details
of the event that occurred. You can also opt to save the event log. Up to 99 events can be logged. When the limit is
reached the device will delete the earliest record and continue logging new events.
ServPower Freelancer Events List:
• ServPower Freelancer Communication Lost
• Outlet On
• Outlet Off
• Outlet Reboot
• Outlet Fault
25
PSE606/608
Changing the settings using telnet
ServPower Freelancer supports multiple network management systems as well as LAN protocols. Once you have
finished the hardware installation and have assigned an IP to the ServPower Freelancer, you will be able to use Telnet to
configure the ServPower Freelancer.
To access ServPower Freelancer using the telnet option, follow these steps;
Successful link-up display. For first time
login only, press <Enter> for User Name
and Password.
Main screen is as follows
Once you can access ServPower Freelancer using telnet you will be able to change its settings. The following details the
individual menu option available using telnet.
1. Set IP Address
2. Set SNMP MIB
System
3. Set SNMP Access
Control
4. Set SNMP Trap
Notification
5. Set UPS Properties
6. Set UPS Devices
Connected
7. Set System Time &
Time Server
8. Set Web and Telnet
User Account
9. Set E-mail
a. Reset Configuration
to Default
b. Set Environment
26
This function allows you to setup IP Address, Gateway Address and Subnet Mask
parameters. Similar to that on the webpage.
This function allows you to set the MIB system group parameters.
This function allows you to set the Manager IP, Community, Access Permission.
Note: The configuration of ‘Set SNMP Access Control’ is only used for SNMP
Network Manager.
If you want to use a PC and perform the ‘Trap’ function of SNMP manager to
manage ServPower Freelancer, the IP address of the PC must be added in this list.
Note: The configuration of ‘Set SNMP Trap Receiver’ is only used for SNMP
Network Manager.
For future use
For future use.
This allows you to setup the System date, time and two time servers.
This is allows to set users account’s authority.
This is allows to set e-mail accounts to receive power event notification for
emergency management.
Set all values to their default settings.
Set the Environment group settings
PSE606/608
Group
c. Save & Reboot
0. Exit Without Saving
Save the current configuration data, including any changes you have made, and reset
the SNMP card.
All changes will be lost.
27
PSE606/608
Telephone access
This section guides you through control of ServPower Freelancer using a telephone.
Telephone Control
1.
2.
3.
4.
Dial up the ServPower Freelancer.
After three rings the ServPower Freelancer will respond by sending out three short beeps to the caller. Then the
ServPower Freelancer waits for the user to enter the password.
The user enters an access password (default password is 123456789#).
The ServPower Freelancer will send out three short beeps to confirm a successful login, or one long beep to deny
access. The ServPower Freelancer will disconnect after three unsuccessful access password attempts.
Once logged in, the remote user can enter 4-8 digits. The first two digits specify which ServPower Freelancer, the
next digit specifies which output receptacle and the next digit specifies which command. The last four digits specify
the amount of time:
Command format: XXNA[DDDD]#:
XX: 01 - 16 is the ServPower Freelancer’s device number for a daisy chain, if there is no daisy chain, then any
number is accepted.
N: Outlet number 1(A)—8(H), 9 controls all the outlets.
A: Action type 0=off, 1=on, 2=reboot
[DDDD]: optional, sets a delay time in minutes before executing the action. The max value is 9999, which is about
166 hours or 6.94 days.
Examples:
Command
0111#
0120#
0212#
01113600#
01103600#
01123600#
Effect
ServPower Freelancer #01 turn on Outlet A.
ServPower Freelancer #01 turn off Outlet B
ServPower Freelancer #02 reboot Outlet A
ServPower Freelancer #01 turn on Outlet A after 3600 minutes
ServPower Freelancer #01 turn off Outlet A after 3600 minutes
ServPower Freelancer #01 reboot Outlet A after 3600 minutes
Use the "*" key to cancel a command at any time.
The 9 command set is for the administrator:
0190# to turn every port off.
0191# to turn every port on.
0192# to reboot every port with a delay of 8 minutes, which will allow safe shutdowns. The delay can be changed
by command 888911XXXX#, where XXXX can range from 1 to 9999 minutes.
5.
The ServPower Freelancer will acknowledge the receipt of the commands by issuing 2 short beeps. A long beep
indicates a failure or a non-recognizable command.
NOTE
The ServPower Freelancer is in a waiting loop to receive the command string. Each command string should be entered within 20
seconds. After 180 seconds without any user input, the ServPower Freelancer will logout the user.
6.
Hang up to close any access.
NOTE
The user can enter 000# to force breaking the connection with ServPower Freelancer.
28
PSE606/608
Change the phone password.
The default password is 123456789#. The user has to enter the current password in order to change it.
NOTE
The Password has to have a minimum of 7 digits and can have a maximum of 10 digits.
The user must first enter the current password, then the ServPower Freelancer responds with three short beeps
acknowledging access granted. The user then enters the new password as follows: <old password><new password> #,
and the ServPower Freelancer acknowledges with 2 short beeps. Then user inputs <old password><new password> #
the second time to confirm the new password. The ServPower Freelancer acknowledges with 4 short beeps, indicating
that the password has been changed.
Reset phone password
Please do the following steps to restore the default password.
1. Dial up the ServPower Freelancer.
2. After three sequence rings, the ServPower Freelancer will respond by sending out 3 short beeps to the caller and
waiting for user to enter password. Then pressing the button A and H simultaneously on the ServPower Freelancer
within twenty seconds.
3. When the LEDs A and H are blinking, release the two buttons, the ServPower Freelancer will respond by sending
out 4 short beeps to the caller. The password will be restored to default.
Appendix A – Configuring a Windows system for safe
shutdown
For Windows shutdown setup, please use the RJ11 to DB9 serial cable to connect with the host and use the following
instruction to configure the UPS service.
Open your Windows Control Panel by
clicking on “Start”, “Setting”, “Control
Panel”.
29
PSE606/608
Double-click on the Control Panel’s
“Administrative Tools” icon.
Double-click the “Services” icon.
Double-click on the Uninterruptible
Power Supply service
Select the “Log On As: This Account”
button, input the appropriate account
information, and then click “OK”.
Double-click on the Control Panel’s
“Power Options” icon
30
PSE606/608
Select the UPS page, and then click on
“Select…”
Choose the correct manufacturer from
the “Select manufacturer” pull-down list,
choose the correct COM port, and then
click on “Next”
Click on the boxes, as shown, and then
choose “Negative” for the three voltage
settings. Click on “Finish” to keep these
settings.
Click “OK” at bottom of the “Power Options Properties” window to finish.
31
PSE606/608
Appendix B – Troubleshooting
Question
Answer(s)
All the LEDs are off and all of the output Turn the master power switch ON.
receptacles are dead
Reset the AC circuit breaker.
All the LEDs are off and all of the output The ServPower Freelancer needs to be reset. Turn the ServPower
receptacles are on
Freelancer off and wait for approximately one minute, then turn the
ServPower Freelancer back on.
The
ServPower
Freelancer
will
not There has been a collision of the packets. The ServPower Freelancer
communicate and all of the LEDs on the web needs to be reset. Turn the ServPower Freelancer off and wait for
card are ON
approximately one minute, then turn it back on.
Cannot connect to the ServPower Freelancer Make sure the network connection to the ServPower Freelancer is good
web management page
(cable, port speed and mode).
Make sure the IP settings are correct and try to ping the unit.
Check if the web server is enabled and the port setting is non-standard
(different from 80), using the configuration utility on the setup CD.
The connected server shuts down immediately Verify that the RJ-11/DB9 cable between the ServPower Freelancer and
after it boots up
the server is properly secured.
Boot the server in safe mode and check if the UPS signal polarity is
correct (see Appendix A)
I forgot my Supervisor’s name/password
32
The ServPower Freelancer needs to be serviced.