1
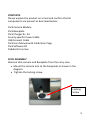
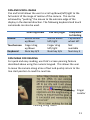
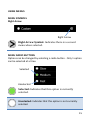
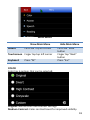
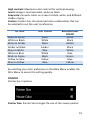
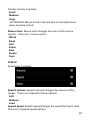
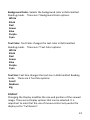
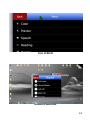
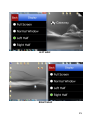
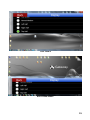
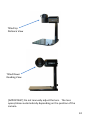
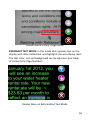
USER MANUAL Flick 1.1 Multifunction Camera with OCR Reader Software support: [email protected] Camera support: [email protected] www.Flickcamera.com AND TABLE OF CONTENTS INTRODUCTION .......................................................................... 4 CONTENTS.................................................................................. 5 FLICK ASSEMBLY......................................................................... 5 FLICK BATTERY CARE .................................................................. 6 SYSTEM REQUIREMENTS ............................................................ 7 FLICK CAMERA SET-UP ............................................................... 7 FLICK SOFTWARE INSTALL ............................................................. 7 FIRST TIME FLICK IS CONNECTED ................................................... 9 CALIBRATION ................................................................................ 9 TO SHUT DOWN FLICK ................................................................. 10 BASIC OPERATIONS .................................................................. 10 ZOOM IN AND OUT ...................................................................... 10 PAN AND SCROLL IMAGE ............................................................. 11 PAN IMAGE FOR READING ........................................................... 11 TEXT READING ............................................................................. 12 USING OCR TO READ ................................................................... 13 FLICK MENUS ........................................................................... 13 MENU NAVIGATION .................................................................... 14 MOVE UP/DOWN IN MENUS ....................................................... 14 ENTER/LEAVE SUBMENUS ........................................................... 14 SELECT MENU OPTION ................................................................ 14 USING MENUS.......................................................................... 15 MENU SYMBOLS .......................................................................... 15 MENU RADIO BUTTONS .............................................................. 15 HIGHLIGHTED OPTION ................................................................ 16 MENU BUTTONS.......................................................................... 16 MENU SLIDER .............................................................................. 16 BACK BUTTON ............................................................................. 17 MAIN MENU ............................................................................ 17 SHOW/HIDE MAIN MENU ........................................................... 17 COLOR ......................................................................................... 18 2 POINTER ...................................................................................... 19 SPEECH ........................................................................................ 20 READING ..................................................................................... 21 DISPLAY ....................................................................................... 23 HOTKEY LIST ................................................................................ 27 SUPPORT ..................................................................................... 28 CLOSE FLICK ................................................................................. 28 MINI MENU .............................................................................. 29 SHOW/HIDE MINI MENU ............................................................. 29 TOGGLE COLOR ........................................................................... 30 TOGGLE CAMERA POSITION ........................................................ 31 ROTATE VIDEO ............................................................................ 33 FREEZE FRAME ............................................................................ 34 SAVE PICTURES ............................................................................ 34 READER MENU ......................................................................... 34 SHOW/HIDE READER MENU [REAL IMAGE MODE] ...................... 34 REAL IMAGE MODE ..................................................................... 35 REFORMAT TEXT MODE .............................................................. 36 SAVE PAGE .................................................................................. 37 OPTIMAL READING HINTS ........................................................... 37 WARRANTY .............................................................................. 38 3 INTRODUCTION Flick is the next-generation of multifunction distance and near camera devices that allow the user to operate this fully motorized camera from a touch screen, keyboard or with a mouse. The user is immersed in the image at both distance or near viewing, on a tablet, laptop or desktop and can control all functions from within that view without the distraction of manual camera manipulation Flick has many special features: Portability: Weighs only 1.65kg (3.5 lbs) Minimal assembly: Two components slot together using high contrast parts. A USB cable connects to your computer. Auto Focus camera: both distance and near viewing with settings saved. Excellent low light capabilities: Excels in dark environments such as lecture halls. Customization: The Color, Contrast, Brightness and many other settings can be customized to fit your personal needs. Compatibility: Compatible with Windows and Macintosh (coming Summer 2012) operating systems. Interactive OCR Capabilities: Can read and store a page of text. Built-in Battery: operates approx. 8 hours on battery and will not draw power from your tablet or PC. iZoom: Shipped with iZoom magnifier and reader software to use if required 2 year warranty 4 CONTENTS Please unpack the product on arrival and confirm that all components are present as described below: Flick Camera Module Flick Baseplate Flick Charger 9v. 2A County-specific Power Cable USB Connect Cable Flick User Manual with Calibration Page Flick Software CD Padded Carry Case FLICK ASSEMBLY Remove Flick camera and Baseplate from the carry case. Mount the camera arm to the baseplate as shown in the diagram. Tighten the locking screw. Locking Screw 5 FLICK BATTERY CARE Plug in Flick charger as shown – power connection LED lights Power connection NOTE: Please ONLY use the Flick charger provided with your unit Charge Flick before initial use Orange LED is LIT during charging Orange LED is OUT when battery is fully charged Flick will operate approximately 8 hours before re-charging is required A full charge will require approx. 8 hours Flick can be used while charging Flick automatically regulates battery charging, so overcharging is not an issue. Important Reminder! Your Flick camera is designed to move using motor drives when the camera is ON. Only move the camera manually when the unit is turned OFF. 6 SYSTEM REQUIREMENTS The system requirements for Flick are: CPU Memory Disk Space Video Card USB Port Operating System Minimum 1.6 GHz Dual Core 1 GB 690 MB Optimal 2.4 GHz Dual Core 2 GB N/A USB 2.0 *REQUIRED Windows XP/Vista/7 FLICK CAMERA SET-UP Plug in USB cable and connect to laptop, tablet or desktop computer USB connection FLICK SOFTWARE INSTALL Insert Flick software CD. The files will self-extract and commence the installation. On completion of the install a Flick icon will be placed on your desktop and in the START MENU. Here are the steps to guide you through the installation process. If your 7 computer does not have a CD drive, you will need to copy files from the CD to a flash drive for installation. Warning message appears “Do you want to allow the following program from an unknown publisher to make changes to your computer”- Flick setup.exe. Select “YES” Issist License Agreement dialog box appears. Select “I Agree” Dialog box “Choose Components” appears with all items highlighted by default. Select “Next” Dialog box “choose Install Location” appears. Select default or Browse for preferred location. Select “Install” and files will unzip and begin installing. This step takes about 7 minutes depending on the speed of your computer. Dialog box “Microsoft .NET Framework 4 Maintenance” appears. Default is “Repair”. Select “Next”. Dialog box “Please wait while .Net Framework is being installed“. This step may take up to 20 minutes if .Net Framework has never been installed, but only a minute or two if it is just being updated. Dialog box “Repair is Complete”. Click “Finish” Dialog box “You must restart your computer Now or Later”. Select “Later”. This will allow you to exit from the install once the installation is complete. Please wait a few minutes before launching your Flick camera software to ensure time for drivers to complete loading. The installer will have placed a Flick icon on the desktop and in the START MENU. Turn Flick power switch ON – green LED light is now ON. Please wait a few minutes to ensure that Double click the Flick icon to start Flick. 8 FIRST TIME FLICK IS CONNECTED When Flick is first connected to a new computer, you will be prompted to enter the SOFTWARE Serial Number. This number is printed on the back of your software CD case and on the front of the Quick Start Manual. Once the serial number is entered, the software will launch. This step will only be required when you initially connect Flick to your pc and when connecting to a different PC. CALIBRATION The Flick calibration is set at the factory and will not normally need to be changed. However if a new version of the software is installed the camera may need to be re-calibrated. The calibration basically positions the camera to the center of the reading page to obtain full page reading. The following process describes how to reset the calibration if needed. Open MAIN MENU (see MENU SECTION for details) Select SUPPORT > CALIBRATION > CALIBRATION “ON” Press BACK to image and note there is a red + in the centre of the screen Take the Flick Calibration sheet found with the User Manual and align in the centre of the Flick baseplate Move the black X using the keyboard arrows, mouse or touchscreen so it aligns with the red + on the screen. Press CTRL + SHIFT + F9 on the keyboard. Verify message “Calibration Set” appears on the display. Return to MAIN MENU Select SUPPORT > CALIBRATION > CALIBRATION “OFF” Press BACK to return to image. Camera will now be able to sweep the entire page. 9 TO SHUT DOWN FLICK Close Flick software: Select Menu > Close Flick > OK. Flick will “park” the camera and close the lens. All other applications will still be running. Turn “OFF” the Flick camera Unplug Flick camera USB cable from the computer and pack in carry case If the Camera is powered “OFF” for any reason with the Lens still OPEN the lens can be closed as follows. Gently rotate the camera to the down (reading) position Switch the camera ON and let the lens close automatically. Switch the camera OFF and pack the camera in carry case. It is important that you do not attempt to close the lens manually or force the motor drives to extreme camera positions. This can cause damage to the camera mechanisms requiring return of the camera for service. Any resulting damage is not covered by the warranty. BASIC OPERATIONS ZOOM IN AND OUT Flick provides magnification levels of approx. 40 x. Depending on the display, text can be viewed at up to 80x. Zoom In Mouse Right-click + Scroll up Zoom Out Touchscreen 2-Finger reverse pinch Right-click + Scroll down 2-Finger pinch Keyboard Press “-” Press “+” 10 PAN AND SCROLL IMAGE Pan and Scroll allows the user to scroll up/down/left/right to the full extent of the range of motion of the camera. This can be achieved by “pushing” the mouse to the extreme edge of the display in the desired direction. The following keyboard and touch commands can also be used. Scroll Up/Down Mouse Touchscreen Keyboard Mouse wheel up/down Finger drag up/down Num key 8/2 Pan Left/Right Mouse wheel left/right Finger drag left/right Num key 4/6 Jump Back to Starting Tap Mouse wheel left Not available Num key 5 PAN IMAGE FOR READING For quick and easy reading, use Flick’s screen panning feature described above using the numeric keypad. This allows the user to move the camera along a line of text and quickly return to the line start position to read the next line. Finger Locator Panning Using Touch 11 Mouse Pointer Panning Using Mouse Pan Up/Down Mouse Left-click drag up/down Pan Left/Right Touchscreen Finger drag up/down Left-click drag left/right Finger drag left/right Keyboard Arrow key left/right Arrow key up/down TEXT READING Although Flick can be used for manually reading magnified text images it can also be used for OCR text reading. The following describes how to read text placed on the Flick table (Camera Down. Note that Flick will not read text viewed in distance mode (Camera UP). Reading manually can be accomplished using pan and scroll controls (see Table of Contents for page number). There is a fast way to read using the numeric keypad by positioning the text at the start of the line with the “4” key and using the “6” key to 12 move to the end of the line of text. Pressing the”5” key will bring the camera back to the start of the line. This can significantly reduce the effort to move from line to line. USING OCR TO READ Flick will read aloud the text that is displayed on screen. It will commence reading at any selected point by double clicking at the start point. The camera will scan the text and reading will commence after 10-20 seconds. For ease of viewing it is best to start the reading at the beginning of the page or the beginning of a paragraph. If viewing an item that is smaller than a full page it is best to place a clean piece of white paper under the item to be read. That avoids the reader attempting to read material under the item to be read. FLICK MENUS There are 3 menus provided, the MAIN MENU is located on the left of the screen and provides access to all the customization features in the camera. The MINI MENU is located on the right of the screen and provides quick access to the operational features. There is an additional READ MENU that will appear on the right of the screen once OCR Reading has been selected. The Main and Mini Menus can be accessed by selecting the top right or top left of the screen with mouse, touchscreen, and by pressing M or U on the keyboard. 13 MENU NAVIGATION Flick has 3 methods to navigate the Menus. Mouse Keyboard Touch Screen MOVE UP/DOWN IN MENUS The inputs are: Moving Up/Down Mouse Rotate Mouse wheel to move up/down Touchscreen Finger drag up/down on touch screen Keyboard Press up/down arrow keys ENTER/LEAVE SUBMENUS To enter/leave submenus the inputs are: Enter Submenu Mouse Left-click Touchscreen Finger tap Keyboard Press “Enter” Leave Submenu Left-click “Back” button Finger tap “Back” button Press “Backspace” SELECT MENU OPTION To select menu options the inputs are: Select Option Mouse Left-click Touchscreen Finger tap Keyboard Press “Enter” 14 USING MENUS MENU SYMBOLS Right Arrow Right Arrow Right Arrow Symbol: Indicates there is a second menu when selected. MENU RADIO BUTTONS Options can be changed by selecting a radio button. Only 1 option can be selected at a time. Selected Unselected Selected: Indicates that this option is currently selected. Unselected: Indicates that this option is not currently selected. 15 HIGHLIGHTED OPTION Highlighted Not Highlighted Highlighted Option: Indicates that this option can be interacted with. Not Highlighted Option: Indicates that this option cannot be interacted with. MENU BUTTONS Flick main menu bar has 2 buttons and 9 menu options: Menu Slider Back Button MENU SLIDER Slides the Menu to the right as shown in Figure 1. This feature is used to preview changes made in the menus. 16 Figure 1 Slide Menu Mouse Left-click + drag right Touchscreen Finger drag right Keyboard Press “T” BACK BUTTON Allows the user to go back to the previous screen. MAIN MENU SHOW/HIDE MAIN MENU Flick allows you to show/hide the Main Menu using the Keyboard, Mouse, or Touch screen. 17 MAIN MENU Show Main Menu Mouse Left-click top left corner Touchscreen Finger tap top left corner Keyboard Press “M” Hide Main Menu Left-click “Back” button Finger tap “Back” button Press “Esc” COLOR Color has 6 options that can be selected: Original: Normal color and contrast settings. Medium Contrast: Color contrast boost for improved visibility. 18 High contrast: Maximum color contrast for optimal viewing. Invert: Image is reversed video, white on black. Greyscale: Converts colors on screen to black, white, and different shades of gray. Custom: Custom has 10 customized color combinations that can be selected to suit the user’s preference. OPTION Black on White White on Black Black on Amber Amber on Black Blue on White White on Blue Black on Green Yellow on Blue Blue on Yellow TEXT COLOR Black White Black Amber Blue White Black Yellow Blue BACKGROUND COLOR White Black Amber Black White Blue Green Blue Yellow By selecting your color preference in the Main Menu enables the Mini Menu to access this setting quickly. POINTER Pointer has 2 options: Pointer Size: Pointer Size changes the size of the mouse pointer. 19 Pointer size has 3 options: Small Medium Large [ATTENTION: Mouse Pointer Size will also increase/decrease when zooming in/out] Mouse Color: Mouse color changes the color of the mouse pointer. There are 7 mouse colors: White Black Red Green Blue Purple Cyan SPEECH Speech has 3 options: Speech Volume: Speech Volume changes the volume of the reader. There are 3 Speech Volume options: Soft Medium Loud Speech Speed: Speech Speed changes the speed the text is read. There are 3 Speech Speed options: 20 Slow Medium Fast Speech Voice: Speech Voice changes the voice of the reader. There is 1 voice option available: Ivona/Kendra READING Reading has 3 options: Reading Mode: Reading Mode changes the way Flick reads text. There are 2 Reading Modes. Real Image Real Image Mode 21 Real Image Options Highlighter Color: Highlighter Color changes the highlighted color surrounding the text. There are 7 Highlighter Color options: Black White Green Blue Yellow Cyan Reformatted Text Reformatted Text Mode Reformat Options 22 Background Color: Selects the background color in Reformatted Reading mode. There are 7 Background Color options: White Black Red Green Blue Purple Cyan Text Color: Text Color changes the text color in Reformatted Reading mode. There are 7 Text Color options: White Black Red Green Blue Purple Cyan Text Size: Text Size changes the text size in Reformatted Reading mode. There are 3 Text Size options: Small Medium Big DISPLAY Changing the Display modifies the size and position of the viewed image. There are 6 Display options that can be selected. It is important to note that the use of mouse control only works the display set to “Full Screen”. 23 FULL SCREEN NORMAL WINDOW 24 LEFT HALF RIGHT HALF 25 TOP HALF BOTTOM HALF 26 HOTKEY LIST Hotkeys (also known as shortcut keys) allow the Flick camera to be controlled through the keyboard. Flick uses the following Hotkeys shown in Figure 3 by default. Hotkeys can be reset to any preferred key by changing the identified key in the menu. Use just the Keyboard or use both the Keyboard and Mouse to highlight and re assign keys. Changing Hotkeys: Keyboard Keyboard & Mouse Enter > Press any key to assign key. Left Click > Press any key to assign key. Default Hot Key Settings Show Main Menu (Left) Zoom In Zoom Out Toggle Color Rotate Video Toggle Camera Position Read Page Save Picture Freeze Image Show Mini Menu (Right) Figure 1 M + C V P R S F U 27 SUPPORT Support menu has 3 options: About: About shows what Flick software version is being run on the system (i.e. Flick 1.1). Calibration: Calibration is used only to reset the camera after a software update is installed – See section FLICK CAMERA SET UP. Remote Support: Remote Support provides Flick personnel with remote access for technical support. CLOSE FLICK Close Flick shuts down Flick. There are 2 Close Flick options: OK: Closes the program and leaves all other applications running. Cancel: Brings you back to the Menu. 28 MINI MENU The Mini Menu is a quick action menu that has 5 preloaded shortcuts for easy access to operational settings. SHOW/HIDE MINI MENU: To show/hide the Mini Menu using the Keyboard, Mouse and Touch the inputs are: Show Mini Menu Mouse Left-click top right corner Touchscreen Finger tap top right corner Keyboard Press “U” Video Stream Hide Mini Menu Left-click anywhere outside mini menu Finger tap anywhere outside mini menu Press “U” Mini Menu 29 Mini Menu Toggle Color: Toggles colors between 6 preloaded Color Settings – Original video, Medium Contrast, High Contrast, Invert, Greyscale, and Custom Color. Toggle Camera: Toggles between 2 camera positions: Tilt Up and Tilt Down. Rotate Video: Rotates the video displayed onscreen by 180 degrees. Freeze Frame: Freezes the current image displayed on screen. Save Pictures: Saves the current image displayed onscreen to your hard drive. TOGGLE COLOR Toggle Color switches between 5 preloaded viewing settings: Original: Normal color and contrast settings. Medium contrast: Moderate contrast image enhancement. High Contrast: Maximum contrast image enhancement. Invert: Colors on the screen are inverted. 30 Greyscale: Converts colors on screen to black, white, and different shades of gray. Custom: Selects one of the preconfigured color options that are set in the Main Menu. Toggle Color Mouse Show “Mini Menu” > Left-click “Toggle Color” icon Touchscreen Show “Mini Menu” > Finger tap “Toggle Color” icon Keyboard Press “T” TOGGLE CAMERA POSITION Toggle Camera Mouse Show “Mini Menu” > Left-click “Toggle Camera” Touchscreen Show “Mini Menu” > Finger tap “Toggle Camera” Keyboard Press “P” Flick has 2 camera positions to allow for both distance and near viewing. When switching from distance (camera UP) to near (camera DOWN) Flick retains its last settings for position, magnification, and contrast/color settings. This allows the user a very quick transition in viewing modes by eliminating resetting of the camera. 31 Tilted Up Distance View Tilted Down Reading View [IMPORTANT] Do not manually adjust the lens. The lens opens/closes automatically depending on the position of the camera. 32 ROTATE VIDEO Rotate Video rotates the video stream displayed onscreen. It is used primarily when reading books where the left hand page is displayed and the book is rotated 180 degrees to read the right hand page. Selecting the “Rotate Video” option reverses all the positioning and reading functions. Original Rotated Video Rotate Video Mouse Show “Mini Menu” > Left-click “Rotate Video” Touchscreen Show “Mini Menu” > Finger tap “Rotate Video” Keyboard Press “V” 33 FREEZE FRAME Freeze frame is selected when an image is required to be stable for viewing even if there is movement in the viewing area. It is especially useful if a “save picture” is to be initiated to ensure there is no unwanted information in the scene. SAVE PICTURES This feature saves an image of whatever is displayed onscreen onto your hard drive in “my-pictures”. A Flick directory in “mypictures” is automatically created and the pictures are saved in that directory with a date and time label. Save Pictures Mouse Show “Mini Menu” > Left-click “Save Picture” Touchscreen Show “Mini Menu” > Finger tap “Save Picture” Keyboard Press “S ” READER MENU The Read Menu is a mini menu displayed on the right of the screen that has 4 preloaded commands for control of the read process. It is used to control reading in both Reformatted and Real Image mode. The menu will automatically appear in Reformatted mode. SHOW/HIDE READER MENU [REAL IMAGE MODE]: This is required to activate any of the reader controls. To show/hide the Reader Menu once real image reading has been initiated the inputs are. 34 Show Mini Menu Mouse Left-click top right corner Touchscreen Finger tap top right corner Keyboard Press “U” Hide Mini Menu Left-click anywhere outside Mini Menu Finger tap anywhere outside Mini Menu Press “U” Scroll Up: Scrolls up the screen to select a new start point for the reader. Scroll Down: Scrolls down the screen to select a new start point for the reader. Play/Pause: Starts or pauses the reader in Reformatted Text Mode. Play: Starts the reader in Real Image Mode. [IMPORTANT: Reader automatically pauses in Real Image Mode when Reader Menu is open.] Exit Reader: Exits out of the Reader in both Real Image and Reformatted Text Mode. REAL IMAGE MODE: A colored box that surrounds the word being spoken is displayed on the original image as the reading progresses. 35 Reader Menu in Real Image Mode REFORMAT TEXT MODE: In this mode Flick replaces text on the display with reformatted text and highlights the word being read. The text color, size and background can be adjusted. (see Table of Contents for Page Number). Reader Menu in Reformatted Text Mode 36 SAVE PAGE Every time the reader is invoked, a copy of the scanned page is saved in My-Pictures\Flick, with a filename beginning with “Page Scan” followed by the date/time created. This directory can grow quite large so must be maintained on a regular basis to minimize unnecessary files. CAUTION: If OCR does not find any text to read, you will hear “Nothing to Read!” and no picture will be saved in “mypictures\Flick”. OPTIMAL READING HINTS Before starting reader: Ensure the document is straight and text is aligned Position of text on screen should be: 1” Margin 1” Margin Read Page Mouse Double left-click at starting read point Touchscreen Double finger tap at starting read point. Keyboard Press “R” to read from top of page. 37 FLICK SPECIFICATIONS PHYSICAL Size: 11” x 10.5” x 12 High (Assembled) (280mm x 265mm x 350mm (Assembled)) Weight: 3.6 lbs (1.65 KG) Power: 7.2v Li-ion Battery – Approx. 8 hours operation Charger: 9v 2 AMP Output 2.5mm Jack Centre Positive 110-240v Input 50.60Hz. Charge time Approx. 8 hours. FUNCTIONAL Horizontal View Vertical View Magnification Lens Open/Close Time Lens Control TECHNICAL System Requirements: Input Control: WARRANTY = = = = = 120° 160° 1x – 80x (depends on display) 2 Seconds Approx. Automatic Win XP, Vista, Win7 Mouse, Keyboard or Touch Screen The Flick Camera is covered by a 2-year parts and labour warranty on manufacturer’s defects. The warranty does not cover cables or damage due to mishandling. Contact [email protected] for more details. 38 www.Flickcamera.com 39