1
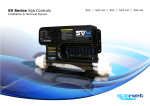
SV SERIES USER MANUAL
TABLE OF CONTENTS
SYSTEM OPERATING MANUAL
Time/Date and Water Chemistry Warning............................
SV2.T Overview ...................................................................
SV3.T Overview ...................................................................
SV4.T Overview ...................................................................
Water Priming Mode ...........................................................
Display Modes .....................................................................
3
4
5
6
7
8
KEYPAD OPERATION
Setting the time and day ......................................................
Adjusting set temperature point ..........................................
Heater Operating Mode .......................................................
Heating Control Protection ..................................................
Pump Operation ..................................................................
Air Blower Operation ...........................................................
Light Operation (SV2.T models) ..........................................
Light Operation (SV3.T / SV4.T models) ..............................
Sanitise Cycles .....................................................................
Special Function Buttons .....................................................
Keylock ...............................................................................
9
10
11
12
13
14
15
16
17
18
19
ADVANCED CONFIGURATION SETTINGS
Setup Menu ........................................................................
Sleep Timers [SNZE] ..........................................................
Power Save Setting [P.SAV] ...............................................
Error Codes / Troubleshooting ............................................
Heat Pump Error Codes ……………………………………………...
Contact Us .........................................................................
SV Series Spa Controls
20
23
24
25
27
28
1
WARNINGS
RISK OF ELECTRICAL SHOCK
Please read the following before installing or connecting this appliance
All electrical connections must be performed by a licensed electrician and must confirm
to all national, state and local electrical codes in effect at the time of installation.
Parts incorporating electrical components must be located or fixed so that they cannot
fall into the bath or spa.
The appliance should be supplied through a residual current device (RCD) having a rated
residual operating current not exceeding 30mA.
Parts containing live parts, except parts supplied with safety extra-low voltage not
exceeding 12V must be inaccessible to a person in the bath or spa.
The appliance must be connected to a suitable rated and weather protected power
supply. The supply line should be a dedicated power circuit and means for disconnection
must be incorporated in the fixed wiring in accordance with your local wiring regulations.
Means for disconnection from the supply mains should have a contact separation in all
poles that provide full disconnection under over voltage Category III conditions.
This appliance must not be installed in proximity o highly flammable materials.
o
Water temperature in excess of 38 C may cause hyperthermia (heat stress).
It is the spa manufacturer's and/or installer's responsibility to select suitable loads and
configure load shed settings (if required) to ensure the system does not exceed its rated
maximum total load.
Earthed appliances must be permanently connected to fixed wiring (European models
only).
The appliance contains no serviceable parts. Do not attempt service of this control pack.
Contact your dealer or authorized service agent for assistance.
It is the installer's responsibility to ensure the floor is capable of supporting the expected
load of the bath or spa and an adequate drainage system has to be provided to deal with
overflow water.
Turn the mains power OFF before servicing appliance or modifying any cable
connection.
A whirlpool spa should incorporate a water filtration system where the required level of
water purity can be achieved.
Suitable for indoor use only or when installed under a weatherproof spa skirt. The
appliance should be installed in an enclosure such that all electrical connections cannot
be accessible to the user without the use of a tool.
An adequate drainage system has to be provided if the equipment is to be installed in a
pit.
Low voltage or improper wiring may cause damage to this appliance. Read and follow all
wiring instructions when connecting to power supply.
This appliance is not intended for use by persons (including children) with reduced
physical, sensory or mental capabilities, or lack of experience and knowledge, unless
they have been given supervision or instruction concerning use of the appliance by a
person responsible for their safety.
Any damaged cable must be replaced immediately.
Children should be supervised to ensure that they do not play with the appliance.
To prevent electric shock hazard and/or water damage to this appliance, all unused
receptacles must have a water proof seal in place.
SV Series Spa Controls
2
SET THE DATE AND TIME
BEFORE USING THE SPA
Be sure to set the date and time before operating the spa (refer to page 9).
Vital control functions require the time and date to be set correctly.
WATER CHEMISTRY
MAINTENANCE
It is your responsibility to regularly check and maintain the chemical water
balance of the spa pool to ensure it remains within reasonable pH (acid/alkaline)
limits (7.4 - 7.6 pH). Unbalanced water chemistry greatly accelerates corrosion
and may lead to early product or component failure. Product or component
failures caused as a result of poor water chemistry maintenance will NOT be
covered by the SpaNET Product Warranty.
SV Series Spa Controls
3
SV2.T Keyad Overview
Buttons and indicator LEDs
UP BUTTON
Short single presses toggle through the three
display modes: W.TMP = Water Temperature,
S.TMP = Set Temperature, TIME = Clock.
Holding the button will force the controller to
begin adjusting the set temperature and will raise
the set temperature point.
Also used for adjusting settings.
AUTOMATIC INDICATOR LED
SANITISE BUTTON
This LED will turn on whenever the
filtration pump is in automatic mode.
Press once to activate a 20 minute sanitisation
and clean up cycle to refresh water quality after
spa use. A second press will cancel the cycle if
already running.
HEATER INDICATOR LED
This LED will turn on when the
heater or heat pump (if fitted)
is operating.
OK BUTTON
Used to confirm and save setting adjustments
or to enter setting adjustment menus.
SANITISER INDICATOR LED
This LED will turn on to indicate
that the ozone or uv sanitiser unit
is operating (if fitted).
WATER TEMP / TIME BUTTON
A shortcut key designed to quickly toggle
between actual water temp and time display
modes.
SLEEP TIMER
INDICATOR LED
This LED will turn on
when the controller is
in a sleep mode.
SV Series Spa Controls
DOWN BUTTON
PUMP A BUTTON
PUMP B BUTTON
BLOWER BUTTON
LIGHT BUTTON
Used to toggle the
filtration pump
on / off / auto
Used to toggle any
additional jet pump
on / off (if fitted).
Press to toggle blower
on/off. A single press
turns blower on in
vari-speed mode. Use
up & down buttons to
vary speed. A double
press activates the
ramping mode.
Press to toggle spa
lights on / off. When
light is first turned
on the user has the
ability to adjust the
light effect mode or
colour via the up,
down & OK buttons.
4
Short single presses toggle through the three display
modes: W.TMP = Water Temperature, S.TMP = Set
Temperature, TIME = Clock.
Holding the button will force the controller to begin
adjusting the set temperature and will lower the set
temperature point.
Also used for adjusting settings.
SV3.T Keyad Overview
Buttons and indicator LEDs
UP BUTTON
Short single presses toggle through the three
display modes: W.TMP = Water Temperature,
S.TMP = Set Temperature, TIME = Clock.
Holding the button will force the controller to
begin adjusting the set temperature and will raise
the set temperature point.
Also used for adjusting settings.
LIGHT (ON / OFF) BUTTON
AUTOMATIC INDICATOR LED
Press to toggle spa lights on / off.
This LED will turn on whenever the
filtration pump is in automatic mode.
LIGHT (MODE) BUTTON
HEATER INDICATOR LED
Press to activate light mode menu & use up &
down buttons to select one of five different
lighting effect modes.
This LED will turn on when the
heater or heat pump (if fitted)
is operating.
OK BUTTON
Used to confirm and save setting adjustments
or to enter setting adjustment menus.
A
SANITISER INDICATOR LED
B
C
This LED will turn on to indicate
that the ozone or uv sanitiser unit
is operating (if fitted).
LIGHT (SPEED / COLOUR) BUTTON
Press to activate light speed or user colour
selection menus. Use up & down buttons to
adjust.
SLEEP TIMER
INDICATOR LED
This LED will turn on
when the controller is
in a sleep mode.
DOWN BUTTON
INVERT SCREEN
BUTTON
Press to flip screen
o
180 for easy viewing
when spa in use.
SV Series Spa Controls
PUMP (A,B,C) BUTTONS
BLOWER BUTTON
SANITISE BUTTON
Used to toggle filtration
pump and / or any
additional jet pump(s)
on / off (if fitted).
Press to toggle blower
on/off. A single press
turns blower on in
vari-speed mode. Use
up & down buttons to
vary speed. A double
press activates the
ramping mode.
Press once to
activate a 20 minute
sanitisation and
clean up cycle to
refresh water quality
after spa use. A
second press will
cancel the cycle if
already running.
.
5
Short single presses toggle through the three display
modes: W.TMP = Water Temperature, S.TMP = Set
Temperature, TIME = Clock.
Holding the button will force the controller to begin
adjusting the set temperature and will lower the set
temperature point.
Also used for adjusting settings.
SV4.T Keyad Overview
Buttons and indicator LEDs
UP BUTTON
Short single presses toggle through the three
display modes: W.TMP = Water Temperature,
S.TMP = Set Temperature, TIME = Clock.
Holding the button will force the controller to
begin adjusting the set temperature and will raise
the set temperature point.
Also used for adjusting settings.
LIGHT (ON / OFF) BUTTON
AUTOMATIC INDICATOR LED
Press to toggle spa lights on / off.
This LED will turn on whenever the
filtration pump is in automatic mode.
LIGHT (SPEED / COLOUR) BUTTON
HEATER INDICATOR LED
Press to activate light speed or user colour
selection menus. Use up & down buttons to
adjust.
This LED will turn on when the
heater or heat pump (if fitted)
is operating.
OK BUTTON
Used to confirm and save setting adjustments
or to enter setting adjustment menus.
SANITISER INDICATOR LED
A
B
C
D
This LED will turn on to indicate
that the ozone or uv sanitiser unit
is operating (if fitted).
INVERT SCREEN BUTTON
o
Press to flip screen 180 for easy viewing
when spa in use.
SLEEP TIMER
INDICATOR LED
This LED will turn on
when the controller is
in a sleep mode.
DOWN BUTTON
PUMP (A,B,C,D)
BUTTONS
Used to toggle the filtration pump and / or
any additional jet pump(s) on / off (if fitted).
SV Series Spa Controls
BLOWER BUTTON
SANITISE BUTTON
Press to toggle blower
on/off. A single press
turns blower on in
vari-speed mode. Use
up & down buttons to
vary speed. A double
press activates the
ramping mode.
Press once to
activate a 20 minute
sanitisation and
clean up cycle to
refresh water quality
after spa use. A
second press will
cancel the cycle if
already running.
.
6
Short single presses toggle through the three display
modes: W.TMP = Water Temperature, S.TMP = Set
Temperature, TIME = Clock.
Holding the button will force the controller to begin
adjusting the set temperature and will lower the set
temperature point.
Also used for adjusting settings.
Water Priming Mode
Every time the power is turned on the SV controller will initiate a water priming
sequence on start up. During a priming sequence the filtration pump will run for up to 20
seconds at a time in an attempt to purge air from the plumbing. The keypad display will
scroll PRIMING during this sequence.
Purge air from plumbing system
TIPS ON FILLING SPA
If the spa controller is successful in clearing all of the air from the heater tube the system
will begin normal operation. However if air is still detected the spa controller will shut
down and latch on fault code (ER3-Water Prime).
Before filling remove spa skirt and be sure that all valves in the plumbing
system are fully open to maximise the amount of air that can escape the pipe
work during filling
How do I solve ER-3 WATER PRIME:
Remove filter cartridge(s) before filling and be sure to fill the spa through the
filter itself to flood the pipe work with water and minimise the chance of air
pockets forming in the plumbing during the filling process.
Press Pump A
Check spa is filled to correct operating level as advised by spa manufacturer
(refill if necessary)
DO NOT fill spa by placing hose in the foot well. Filling a spa this way will create
a large number of air pockets in the pipe work and may cause difficulty when
priming. Always fill spa through the filter area.
Remove filter cartridge(s) and retry water prime
With mains power turned OFF, bleed airlock from pipe work by slightly
loosening couplings on front of filtration pump and allowing air to escape
Once the spa is filled to the correct level attempt to power up the spa with the
filter cartridges still removed. Verify that the spa controller completes its
priming sequence and begins normal operation. Once normal operation has
been verified turn mains power off, re-install filter cartridge(s) and restart spa.
With filter cartridge(s) removed use hose to flush water down pipe work in an
attempt to clear the air pockets from the plumbing
IMPORTANT NOTE
WARNING
Do not allow the filtration pump to continue to run after five (5) x failed priming attempts.
Operating a pump without water for extended periods may cause damage to the pump.
Turns power off, wait ten (10) minutes and then try again later.
RESTRICTION OF WATER FLOW DUE TO DIRTY FILTER CARTRIDGES IS THE MOST
COMMON CAUSE OF ER-3 FAULTS. IF THE SPA POOL HAS BEEN OPERATING
NORMALLY THEN INTERMITTENT ER-3 FAULTS START TO OCCUR THE FILTER
CARTRIDGE(S) WILL REQUIRE SERVICING.
The in-heater water sensor constantly monitors the presence of water in the heater tube. If
at any time air bubbles are detected the spa controller will automatically cancel all current
operations and force a water priming sequence to begin. This will occur whether the spa is
in automatic mode or manual use. If the priming sequence is successful in clearing the air
pockets from the plumbing normal spa operation will resume in automatic mode. If
unsuccessful the spa controller will shut down and latch on fault code ER-3 Water Prime.
DEPENDING ON TYPE OF FILTER CARTRIDGE(S) INSTALLED THE FILTERS WILL EITHER
REQUIRE CLEANING, SOAKING IN A FILTER CARTRIDGE DEGREASER SOLUTION OR
REPLACING. REFER TO SPA RESELLER / MANUFACTURER FOR DETAILS ON TYPE OF
CARTRIDGE INSTALLED AND RECOMMENDED CLEANING FREQUENCY & METHODS.
SV Series Spa Controls
button to retry water priming sequence
7
Display Modes
The SV keypads feature three different display modes to select from:
Water Temperate / Set Temperature / Time
Mode
Icon
Description
W.TMP
Water Temperature
S.TMP
Set Temperature
TIME
Clock (Time & Day)
Default display mode for SV2 models is S.TMP Set Temperature. Default
display mode for SV3/SV4 models is W.TMP Water Temperature.
A short single press of the
or
button will navigate through the
different display modes (refer illustrations aside).
The purpose of the different display modes is to allow the user to check the
water temperature and time on SV2 models, and to allow set temperature
point and clock adjustment on all SV2/SV3/SV4 models.
Please note the display mode icon at the top of the screen. These icons denote
what display mode is currently being viewed.
Other Display Icons
Filtration Cycle
The spa is performing a filtration cycle
Sanitise Cycle
IMPORTANT NOTES
The spa is performing an automatic or manual sanitisation cycle
Keypad Locked
A ten (10) second idle time out period exists on non-default display modes. If the display
mode is changed the screen will time out and return to the default display after ten seconds
of idle activity has elapsed (i.e. no button presses).
The keypad has been locked
System Error
At times the WTMP display mode icon will not appear and the temperature reading may
seem frozen. This is normal and results from the SV control updating and performing
dynamic thermal tuning to your spa and its environment. The WTMP readout will at all
times display the most recent accurately sensed water temperature.
SV Series Spa Controls
A fault has been detected. The system has halted operation so that
corrective action can be taken. Take note of scrolling error code and
consult trouble shooting section of this manual.
8
Setting the Date and Time
Be sure to set the date and time before operating the spa. Vital functions such as
filtration, sanitisation cycles and power saving settings depend on the time and date
being set correctly.
How to program the clock
Press
to select TIME display mode
Press the
Press
button to change display mode to TIME
to enter clock adjustment
The settings appear in the following order:
DATE
Press
Year
(yyyy)
Month
(mm)
Day
(dd)
Weekday (mon - sun)
to enter adjustment
TIME
Year
Format
Hours
Minutes
Month
Press the
Day
or
(24 hr / 12 hr)
(xx:00)
(00:xx)
button
to set year, month, day, hours and minutes
Weekday
to change between 24-hour format and 12-hour format
Press the
Format
button to save each setting and move to the next setting
IMPORTANT NOTES
Hours
Leap years are taken into account
Minutes
Daylight savings times are NOT taken into account. The clock will not
automatically adjust. It must be changed manually
Press
SV Series Spa Controls
The real time clock will continue to operate when mains power is off for a period up
to 16 hrs
to confirm & save
9
Adjusting Set Temperature Point
The SV series spa controllers have been designed with simplicity in mind. The intelligent software
constantly monitors the spa water, automatically controlling the heater and/or heat pump (if
fitted) to ensure the desired set water temperature is maintained and required level of daily
filtration achieved.
How to program the desired water temperature
Press and hold
With set-and-forget technology, the spa user simply selects their desired water temperature
o
o
o
(Range: 10 C - 41 C; Default: 38 C) and thereafter the SV controller will automatically heat to and
maintain that selected water temperature. This is called demand heating - the filtration pump and
heater will be activated as required to maintain the set water temperature. The time spent heating
the spa and running the pump under normal operation will be taken into account and where
required the filtration pump will run for additional periods throughout the day to maintain the
minimum level of daily filtration.
OR
Dependant on the amount of normal spa use, set water temperature, daily filtration times, and
climatic conditions being experienced, the SV controller will engage the heater and/or heat pump
(if fitted) for differing periods of time, at differing times of day. The advanced software constantly
monitors and recalculates after each heating / filtration cycle to ensure the correct daily filtration
time is achieved and desired set water temperature is maintained.
Unless adjusted the SV controller will automatically heat to and maintain the default temperature
o
o
o
o
of 38 C. The water temperature set point can be adjusted from 10 C to 41 C in steps of 0.2 C
increments.
Press and hold
or
to begin set temperature point adjustment
The keypad numbers will flash during temperature adjustment
Once desired set temperature point has been selected press
to confirm
IMPORTANT NOTES
o
During a heating cycle the SV controller may raise the water temperature up to 0.6 C above
set temperature point to provide an average water temperature of set point at most times.
To avoid the possibility of hyperthermia (heat stress) occurring it is recommended that the
o
average temperature of the spa pool should not exceed 40 C.
If an optional heat pump is NOT fitted the spa controller has NO ability to cool the spa
water. Lowering the set temperature point will NOT cause the water to cool.
Press
SV Series Spa Controls
If an optional heat pump IS fitted the spa water can be cooled as well as heated.
Lowering the set temperature point will ensure the heat pump engages/disengages a
cooling cycle (if required) to maintain the desired set water temperature.
to confirm & save
10
Heater Operating Modes
Heater Operating Mode
Normal / Economy / Away / Week Modes
The SV controllers feature four different operating modes that effect demand heating
and filtration behaviour (refer table below).
Item
Press and hold
Press
+
Mode
Notes
NORM Normal
Normal operation for demand heating and filtration
ECON
Economy
Demand heating can only occur when filtration pump is running
AWAY
Away
Demand heating is DISABLED. Filtration is fixed at 1 hour
per day (the keypad will scroll “AWAY MODE” every 60 secs)
WEEK
Week
Monday to Thursday: Demand heating is DISABLED and filtration
fixed at 1 hour per day. Friday to Sunday: Normal Operation
to enter adjustment
Press and hold
Press
and
buttons together until [MODE] is displayed
Press
button to enter operating mode (MODE) adjustment
Press
or
Press
button to confirm and save setting
to select desired operating mode
to confirm & save
IMPORTANT NOTES
The Week mode is ideal for spas used only on weekends or located at weekend
holiday homes. To minimize operating costs during the week (when the spa will
not be used) demand heating is disabled and filtration is reduced to 1 hour per day.
During Friday, Saturday and Sunday the spa controller will operate as if in normal
mode.
IMPORTANT NOTES
If Economy mode is selected and daily filtration time is set too low the spa water
may not have sufficient heating time to reach set temperature point.
If Week mode is selected, the spa controller will obey all programmed values (set
temperature, sleep timers, power save timers, filtration etc) on Friday, Saturday
and Sunday. Depending on current season and ambient temperatures the spa
water temperature may fall significantly during Monday to Thursday when
demand heating is disabled. The spa user must take into consideration all
programmed settings including sleep timers and power save timers for the spa to
have sufficient time to reheat to set temperature point on Friday (refer page20
Setup Menu for further details on programmable settings).
If Away mode is selected all heating is completely disabled. The heater will not
o
engage unless the water temperature falls below 4 C and freeze protection
activates.
If a heat pump is fitted and demand cooling is required to maintain the set
water temperature, the demand cooling will also be governed by the heating
operating modes in the same way that demand heating is.
SV Series Spa Controls
11
Heating Control & Protection
At the end of each 10 minute “WARM” cycle the water temperature is checked. If it is
o
above 4 C freeze protection stops and the controller returns to its prior state. If the
o
temperature is not above 4 C another cycle will run.
Fast Heat Cycle / freeze and overheat protection
Note: Freeze protection overrides sleep time or power save times – if the water
o
temperature drops below 4 C and the controller is in a sleep period it will wake up. So
even if high amounts of sleep time, power save time and a low set temperature point
have been programmed, the SV controller will always maintain the water temperature
o
at least above 4 C.
Fast Heat Cycle
After initial mains power on the SV controller will perform a fast heat up cycle that
enables continuous demand heating regardless of programmed sleep times and
whether Economy (ECON) or Normal (NORM) modes are in use. Once the set
temperature has been reached the fast heat up cycle is cancelled and normal operation
resumes.
Defrost Cycle (Heat Pump models only)
The purpose of a fast heat up cycle is to help the spa reach set temperature as soon as
possible after it has been powered up. For new spas or spas refilled with cold water it is
desirable not to have sleep time or economy mode delay the time to takes for the spa to
reach set temperature point.
During periods of low ambient temperatures defrost cycles may be required to prevent
the heat pump’s condenser from freezing. Ambient and condenser temperatures are
constantly monitored and defrost cycles will be automatically activated if certain
conditions are met. Defrost cycles run for a minimum of 3 minutes to a maximum of 10
minutes.
Note: AWAY mode disables a fast heat up cycle.
Note: Defrost cycles override sleep time or power save times – the controller will wake
from a sleep period and perform a heat pump defrost cycle if required.
IMPORTANT NOTES
A fast heat up cycle is cancelled by manually forcing the filtration pump to OFF via the keypad.
For new spas or when a spa has just been refilled it is common for spa owners to test the
operation of each pump when the power is first turned on. This process will effectively
cancel the fast heat up cycle. After completing testing of spa functions remember to reset
mains power if you wish to reactivate the fast heat up cycle.
Overheat Protection
All SV controllers feature three forms of overheat protection:
If sensed water temperature within the heater unit exceeds safe working limits
the heating element will be disabled and the controller will shut down and latch
fault code (ER4 - Thermal Trip). Normal operation will not resume until heater
element has cooled and mains power is reset
Freeze Protection
o
Freeze protection will be activated whenever the water temperature drops below 4 C. It
runs back to back 10 minute sanitise cycles and displays “WARM” on the LCD. It also
runs each spa accessory (ie. jet pumps and blower) in sequence to run water through the
pipe work whilst running the filtration pump and heater. During the “WARM” cycle the
heater and heat pump (if fitted) will operate however heater load shedding may occur
when accessory pumps are running depending on controller settings.
SV Series Spa Controls
o
If sensed water temperature exceeds 42 C filtration is cancelled (for the day) to
prevent heat rise from pump operation
o
If sensed water temperature exceeds 45 C the controller will shut down and
latch fault code (Er5 - Pool too hot). Normal operation will not resume until
mains power is reset
12
Pump Operation
Keypad pump button assignments
Pump Buttons
The jet pumps and/or filtration pump are controlled
via the pump buttons on the keypad. The functions
of the pump buttons change depending on pump
configuration, however Pump-A button is mostly
used to control the filtration pump.
The intention is to make best possible use of these
buttons for all possible pump configurations. For
every press of a pump button the display will
temporarily show the selected pump state:
ON / OFF / LOW / HIGH / AUTO
and then revert to the default display mode. The
most common pump configurations and button
assignments are referenced in the table aside.
IMPORTANT NOTES
In configurations where a pump button controls
the filtration pump and the heater is ON and pump
is to be turned OFF; the pump will turn OFF after a
5 second delay to allow the heater to cool down.
If left running, pumps will turn off after a 30
minute time out period. Time out period can be
adjusted from 10 to 60 minutes via the Setup
Menu item T.OUT (refer page 20).
IMPORTANT NOTE
In some configurations if heater is ON, activating multiple pumps may cause the heater to load shed and turn OFF, or reduce
element power (model dependent). This is to keep the system within its maximum current limit. The heater will be re-engaged
or returned to full capacity as soon as the number of pumps running is reduced.
SV Series Spa Controls
13
If after manual spa use filtration pump is left OFF,
controller will revert to automatic mode 15
minutes after the expiry of the T.OUT period.
Air Blower Operation
Blower Button
Blower button functions
The blower button is used to toggle the air blower ON/OFF and allow adjustment of the blower
speed. The selected speed is saved and will be restored the next time the blower is turned on, for
future ON/OFF use. Two modes of operation are provided:
Variable Speed Mode
Press
once for variable speed mode
In this mode the blower speed can be manually adjusted to one of five (5) x different speed
settings.
Press
button once to activate blower in variable speed mode
Display will flash VARI mode then present b.SPD (blower speed) adjustment menu
(refer illustration aside)
Press
or
buttons to increase or decrease the blower speed
(note: bar graph segments adjust with blower speed)
Press
Press
to save and exit menu
Press
button to exit menu or wait for 10 second display time out
Press
button a second time to turn blower off
Ramping Mode
again to turn blower OFF
In this mode the blower speed gradually increases and decreases through the blower speed range
in a ramping manner.
Press
button twice to activate blower in ramping mode
Display will flash RAMP mode and blower operates in a ramping manner
Press
twice for ramping mode
Press
button a second time to turn blower off
IMPORTANT NOTES
Press
When blower is turned on it runs at maximum speed for 3-4 seconds before changing to
preset speed (this is normal)
again to turn blower OFF
If left running, blower will turn off after a 30 minute time out period. Time out period can be
adjusted from 10 to 60 minutes via the Setup Menu item T.OUT (refer page 20).
SV Series Spa Controls
14
Spa Light Operation (SV2.T Models)
Light Button
Multi-colour LED lighting effect modes
Press
The light button is used to toggle the spa light(s) ON / OFF and to access the light mode
menus. The features that can be adjusted are the light colour, light effect mode, light
effect transition speed, and light brightness. All light settings are saved and will be
restored the next time the light is turned ON, for future ON / OFF use.
to turn light(s) ON
Press
button to turn light(s) on / off
When light is turned on keypad will display light mode menu showing current
light mode in use (refer illustration aside)
Press
or
WHTE
UCLR
FADE
STEP
Press
button to navigate through choice of light modes:
White Light
User Colour
Fade Effect
Step Effect
button to confirm light mode selection
Dependant on light mode selected the keypad will then display one of three
light mode option screens (refer aside)
L.BRT
CL:xx
L.SPD
Light Brightness
User Colour Number (CL:00 - CL:20)
Light Effect Transition Speed
Press
or
button to adjust each setting
Press
button to save each setting and move to the next setting
IMPORTANT NOTES
Press
SV Series Spa Controls
to confirm & save
If left switched on, light(s) will turn off 15 minutes after the expiry of the
pump/blower time out periods.
15
Spa Light Operation (SV3.T / SV4.T Models)
Light Button
Multi-colour LED lighting effect modes
Press
The light buttons are used to toggle the spa light(s) ON / OFF and to access the light
mode menus. The features that can be adjusted are the light colour, light effect mode,
light effect transition speed, and light brightness. All light settings are saved and will be
restored the next time the light is turned ON, for future ON / OFF use.
to turn light(s) ON
SV3.T only
Press
button to turn light(s) on / off
SV4.T models go straight to the next step
SV3.T models => press
to access light mode menu
When light is turned on keypad will display light mode menu showing current
light mode in use (refer illustration aside)
Press
or
WHTE
UCLR
FADE
STEP
button to navigate through choice of light modes:
White Light
User Colour
Fade Effect
Step Effect
Press
button to confirm light mode selection
Press
to access light speed / colour menu
Dependant on light mode selected the keypad will then display one of three
light mode option screens (refer aside)
L.BRT
CL:xx
L.SPD
Light Brightness
User Colour Number (CL:00 - CL:20)
Light Effect Transition Speed
Press
or
button to adjust each setting
Press
button to save each setting and move to the next setting
IMPORTANT NOTES
Press
to confirm & save
If left switched on, light(s) will turn off 15 minutes after the expiry of the
pump/blower time out periods.
SV Series Spa Controls
16
Sanitise Cycles
Sanitise Button
Automatic and manual water clean cycles
Press
The sanitise button activates a twenty (20) minute sanitisation cycle that runs the
filtration pump and ozone / uv (if fitted) to filter the pool water to restore and refresh
water quality. With circ pump systems jet pump1 will also run for the full 20 minute
cycle. Where 2-speed filtration pumps are used the pump will run in high speed for the
duration of the cycle. In addition, at the start and end of the cycle, the controller will
sequentially (one at a time) run any additional pumps (pump2, pump3, pump4 if fitted)
and the blower for one minute each to purge the plumbing and clear any unfiltered
water trapped in those lines.
to activate sanitise cycle
Press
button to activate a 20 minute sanitise cycle
Press
button again to cancel cycle (if desired)
IMPORTANT NOTES
When the cycle is started automatic mode is enabled and if running any additional
jet pumps and the blower are turned off.
If the controller falls within a designated sleep or power save period during a
sanitise cycle, the controller will not sleep until the sanitise cycle is finished.
Automatic Daily Sanitise Cycle
The controller will automatically run a 10 minute sanitise cycle every day at a user
adjustable time (Default = 9:00am). The automatic sanitise cycle works in the same
manner as a manual sanitise excepting that the cycle only runs for 10 minutes. This
feature cannot be disabled – only the time this cycle is activated may be changed via the
Setup Menu item W.CLN (refer page 18).
IMPORTANT NOTES
Whilst the cycle is running the display alternates
between the W.CLN (water clean) title screen and
the minutes remaining in the cycle (refer above).
If the controller is in a sleep period at the specified automatic sanitise cycle time, it
will wait until the sleep period ends before the sanitise cycle runs.
If the spa pool is in manual use at the time the automatic sanitise cycle is set to run
the cycle will be cancelled for that day (ie. the loads have not timed out and the
spa has not returned to auto mode).
SV Series Spa Controls
17
Special Function Buttons
Model specific function buttons
SV2 Models
Water Temp / Time Toggle Button
Featured on SV2 models only, this button is a shortcut key designed to quickly toggle
the display mode between [W.TMP] Water Temperature or [TIME] Time & Day display
modes.
Water Temperature
Time and Day
SV3 / SV4 Models
Invert Display
On SV3 and SV4 model controllers the orientation of the keypad display can be inverted
o
(flipped 180 ) for easy reading in and out of the spa.
Press
Normal Orientation
button to invert display orientation
Inverted Orientation
IMPORTANT NOTES
The operation of the
display orientation.
and
buttons also reverse to match the current
If the display is left in the inverted orientation, the display will change back to the
default direction 15 minutes after the pump/blower time out period has elapsed
and controller returns to automatic mode.
SV Series Spa Controls
18
Keylock Function
How to set full or partial keylock
The keypad buttons can be locked to prevent accidental key presses or to limit access to
certain controller functions. This feature is particularly helpful when spa covers are used
or where children are present.
There are two types of keylock:
up
down
pump a
Full Lock
all buttons are disabled
Partial Lock
allows use of pumps, blower, light and sanitise buttons
however prevents adjustment of set temperature and other
programmable settings
Full Lock
Press and hold
+
up
ALL buttons disabled
+
down
until LOCK appears on the display
pump a
Once locked if any button is pressed the key stroke will be ignored and
display will show LOCK (refer aside).
up
down
To unlock keypad press and hold
pump b
+
up
+
down
pump a
Partial Lock
Press and hold
+
up
+
down
until LOCK appears on the display
pump b
Once locked only pumps, blower, light and sanitise buttons can be used.
Access to all other buttons is disabled.
Buttons work OK
To exit partial lock mode press and hold
Buttons disabled
+
up
SV Series Spa Controls
19
+
down
pump b
Setup Menu
How to program advanced configuration settings
Setup Menu
The SV controllers feature an advanced setup menu which allows customisation of the
adjustable controller settings. Menu item options are detailed in the list below.
Press and hold
Press
Press
To enter menu press and hold
is displayed
+
to enter adjustment
to confirm & save
IMPORTANT NOTES
The setup menu item settings are stored in non volatile memory (EEPROM) and
are remembered when power is turned off. No need to reprogram settings when
power is restored.
A ten (10) second idle menu time out period exists. If a button press is not detected
for 10 seconds the menu will time out and the screen will return to the default
display mode.
or
to navigate through menu item list
Press
to enter menu item adjustment
Press
or
Press
to confirm setting and exit menu
to adjust setting
Setting
Notes
MODE
Operating Mode
Normal / Economy / Away / Week Modes
FILT
Hours of filtration per day
1 to 24 hours
F.CYC
Filtration cycle blocks
Set filtration to run every 1,2,3,4,6,8,12 or 24 hrs
SNZE
Sleep time menu
1.SNZ
Sleep timer 1
2.SNZ
Sleep timer 2
R.SET
Reset sleep timers
EXIT
Exit sleep time submenu
[1.DAY] Days of week, [1.BGN] Begin Time, [1.END] End
Time
[2.DAY] Days of week, [2.BGN] Begin Time, [2.END] End
Time
Reset sleep timers to factory defaults
P.SAV
Power save settings
Off, Low (off-peak filtration), High (off-peak filtration & heating)
W.CLN
Automatic sanitise time
Daily run time of automatic sanitise cycle (00:00 - 23:59)
D.DIS
Default display mode
Water Temp (W.TMP), Set Temp (S.TMP) or Clock (TIME)
T.OUT
Load time out period
Heat pump with
SV element boost
Exit setup menu
Pump / Blower time out period (10 to 60 minutes)
On = Heat pump + SV element combined for heating
Off = Heat pump only
H.ELE
20
Press
buttons until [MODE]
Menu
Item
EXIT
SV Series Spa Controls
and
Setup Menu
Setup menu item details
F.CYC Filtration Cycle Blocks (how often filtration cycles occur)
This setting allows the user to adjust the frequency of the filtration cycle(s). The user can
set filtration blocks to occur every hour, right down to once a day, or somewhere in
between.
MODE Operating Mode
The SV controllers feature four different operating modes that effect demand heating
and filtration behaviour (refer table below).
Item
NORM
*
Mode
Notes
Normal
Normal operation for demand heating and filtration
Select filtration to occur every 1 / 2 / 3 / 4 / 6 / 8 / 12 or 24 hours
Default setting = 4 hrs (ie a filtration block will run every 4 hours)
ECON
Economy Demand heating can only occur when filtration pump is running
SNZE
Sleep Timers
AWAY
Away
Demand heating is DISABLED. Filtration is fixed at 1 hour
per day (the keypad will scroll “AWAY MODE” every 60 secs)
Programmable feature to disable automatic heating and filtration to stop all spa activity
during certain times of day or night (refer detailed notes on page 23).
WEEK
Week
Monday to Thursday: Demand heating is DISABLED and filtration
fixed at 1 hour per day. Friday to Sunday: Normal Operation
Default Setting = Sleep Timer 1 (Sat – Fri; Sleep period 22:00 – 07:00)
* Default Setting = NORM
P.SAV Power Save Setting (off peak filtration and heating)
FILT
Filtration (hours per day)
Lower daily operating costs by programming either filtration only (LOW), or both
filtration and heating (HIGH) to occur during off-peak power periods when the electricity
rates are cheaper (refer detailed notes on page 24).
Automatic filtration is provided to ensure that the pool water is filtered for at least a
minimum time each day after considering how often the pool has had manual use or
how long the filtration pump runs for water temperature maintenance. All time spent
running the pump under normal operation (manual use, water temperature
maintenance, sanitisation cycles) will be taken into account and where required the
pump will run for additional periods throughout the day to maintain the minimum level
of daily filtration as specified by the user. SV controllers support two different types of
pump for heating and filtration. The default filtration hours and adjustment limits differ
for each pump type as follows:
Minimum filtration hrs p/day
Maximum filtration hrs p/day
Default filtration hrs p/day
SV Series Spa Controls
Small circ pump
(2A or less)
Jet pump
(2spd or 1spd)
1
24
4
1
8
3
The setting choices are: OFF / LOW (off-peak filtration) / HIGH (off-peak filtration & heating)
Default Setting = OFF
W.CLN Automatic Daily Sanitise Cycle Run Time
SV controllers are automatically programmed to activate a 10 minute daily sanitisation
cycle at a given time, where each pump/blower is operated to purge pipe work whilst
operating the filtration pump. This setting allows adjustment of the start time of the
automatic daily sanitise cycle.
Setting ranges from 00:00 to 23:59
Default = 09:00 (9AM)
21
Setup Menu
Setup menu item details
D.DIS
Default Display Mode
EXIT
This setting allows adjustment of the default display mode.
The d.DIS setting choices are:
W.TMP
S.TMP
TIME
Water Temperature
Set Temperature
Time & Day
IMPORTANT NOTES
(Default on SV3/SV4 models)
(Default on SV2 models)
o
If the ambient temperature is below the operational limit of the heat pump (-10 C)
the in-built SV electric heating element will automatically be enabled regardless of
the H.ELE setting.
T.OUT Adjustable Load Time Out
All accessory loads (ie. jet pumps and/or air blower) automatically turn off after a time
out period has elapsed. Fifteen (15) minutes later the lights will switch off and the pool
will return to automatic mode. This setting allows the length of the time out period to be
adjusted.
The T.OUT setting ranges from: 10 to 60 minutes
Default = 30 minutes
H.ELE Heat Pump with SV Element Boost
This setting defines how the in-built SV electric heating element operates with a heat
pump (if fitted). Set to OFF to disable electric heating. Set to ON to allow the SV electric
o
element to boost heat pump heating if the water temperature is 2 C or more below set
temperature point or the heat pump has been operating for more than 1 hour.
The H.ELE setting choices are:
OFF
ON
SV element disabled (heat pump only)
SV element + Heat Pump for heating
SV Series Spa Controls
Exit setup menu
22
[SNZE] Sleep Timer Menu
Accessed via the Setup Menu, Sleep timers are a very handy feature that enables the
user to stop all spa activity during certain times of day or night. While the controller is
sleeping NO automatic heating or filtration maintenance will occur, however the spa can
still be operated by manual use without the need to adjust sleep time settings.
How to program sleep timers
Press and hold
+
There are two individual sleep timers that can be set, each of which can operate on one
or more specified weekdays. This enables the user to program different sleep times for
different days (ie. weekdays vs weekends), as well as custom settings on a particular
day/time where the user may want the spa silenced.
Press and hold
Press
and
buttons together until [MODE] is displayed
to enter adjustment
Press
button until [SNZE] is displayed
Press
button to enter sleep timers (SNZE) adjustment
Press
or
to select from [1.SNZ] Sleep Timer 1; [2.SNZ] Sleep
Timer 2; [R.SET] Reset sleep times to default; [EXIT] Exit sleep menu
Press
button to confirm and move to the next setting
Each sleep time setting consists of a week day setting, start time and stop time (refer
table below).
1.DAY
Days of week
2.DAY
Days of week
Item
Description
Notes
1.BGN
Begin time
2.BGN
Begin time
#.DAY
Selected day of operation
Sat / Sun / Mon / Tue / Wed / Thu / Fri
Sat-Sun / Mon-Fri / Sat-Fri / :
Default = Sat-Fri (Note : = disabled)
1.END
End time
2.END
End time
#.BGN
Begin Time
Sleep time period begins
Adjustable: 00:00 - 23:59
Default = 22:00 (10PM)
#.END
End Time
Sleep time period ends
Adjustable: 00:00 - 23:59
Default = 07:00 (7AM)
Press
to confirm & save
Press
or
to adjust each setting
Press
button to confirm setting and move to the next setting
IMPORTANT NOTE S
There is a default sleep timer pre-programmed into each SV controller. By default: Sleep Timer 1 [1.SNZ] is set to operate every day of the week (Sat – Fri) with sleep period between 22:00 (10PM) and 07:00 (7AM)
Sleep Timers will override any programmed PowerSAVE [P.SAV] times. Spa users must consider cancelling the default sleep timer when programming P.SAV times for off-peak heating and filtration (refer page 24).
SV Series Spa Controls
23
[P.SAV] PowerSAVE Menu (off-peak)
Power utilities in some regions offer household power meters that can track power
usage during different times of the day. This allows the utilities to offer greatly reduced
power pricing during off peak power times. The Power Save (P.SAV) function allows the
user to program in the peak power period so the spa control knows not to perform
filtration and/or heating during those expensive hours. Instead the controller will take
advantage of the competitively priced off peak hours, and run the filtration and/or
heating during the off peak hours.
How to program off-peak filtration and heating
Press and hold
+
Press and hold
Press
BGN
Begin Time
END
End time
END
End time
buttons together until [MODE] is displayed
Press
button until [P.SAV] is displayed
Press
button to enter power save (P.SAV) adjustment
The power save setting consists of a choice of mode, peak power period start time and
peak power period end time (refer table below).
to enter adjustment
BGN
Begin Time
and
Item
Description
Notes
P.SAV
Power Save Mode
Functions disabled during peak
power periods
OFF = P.SAV disabled (default)
LOW = Filtration disabled
HIGH = Filtration & Heating disabled
BGN
Begin Time
Peak power period begins
Adjustable: 00:00 - 23:59
Default = 14:00 (2PM)
END
End Time
Peak power period ends
Adjustable: 00:00 - 23:59
Default = 20:00 (8PM)
Press
or
to adjust each setting
Press
button to confirm each setting and move to the next setting
IMPORTANT NOTE
Press
SV Series Spa Controls
If P.SAV function is to be used the spa user MUST consider any sleep timers [SNZE] and
adjust them accordingly. Sleep timer settings will OVERIDE any P.SAV settings. All SV
controllers have a default sleep timer (Sat – Fri; Sleep period 22:00 – 07:00). If P.SAV is set
and the default sleep timer is not adjusted the spa controller may have insufficient awake
hours for water temperature maintenance. Refer to page 23 for further details regarding
sleep timers.
to confirm & save
24
Error Codes & Troubleshooting Problems
ER-3 WATER PRIME
How to troubleshoot spa problems
SV spa controllers feature self diagnostics and scrolling error messages to quickly
troubleshoot possible problems. Should the spa control encounter a problem the error
code / message will scroll across the topside panel screen until the problem is resolved. If
an error condition is experienced all spa functions are shut down and the spa should not
be used until the error condition has been resolved. A list of error codes with
descriptions of problems and possible solutions is detailed below for your reference.
Problem:
Water prime failed – air detected in heater tube
Cause:
Airlock in pipe work, low water level, dirty filter cartridges
Solutions:
Press Pump A button to retry water prime
Check spa water level (refill if necessary)
Remove filter cartridges and press Pump A button to retry prime
Bleed airlock from pipe work by slightly loosening couplings on front of
filtration pump
IMPORTANT NOTE
For most error codes mains power to the spa control must be turned
OFF and then back ON before the error condition will be cleared.
Remove filter cartridges and flush water down pipe work with a hose
Heartbeat LED
ER-4 THERMAL TRIP
All SV model spa packs feature a red flashing heartbeat LED light. The heartbeat LED is
located on the front right hand side of the spa pack itself (installed underneath spa skirt).
Problem:
The heartbeat LED flashes to indicate the current health/status of the spa pack. When
the spa pack is functioning correctly with no errors to report the heartbeat LED emits a
single flash in a constant pulse much like a heartbeat (ON, OFF, ON, OFF). If the spa
pack encounters a fault the heartbeat LED will begin flashing in sequence with the error
code number being experienced (ie. ER2 = ON,ON; OFF ON,ON; OFF).
Heater thermal trip activated. Heater has been active and has had
insufficient water flow over the element. Low or no water flow has
caused the heater temperature to exceed its maximum limits and the
spa control has shut down operation to prevent any damage to the
heater unit
Cause:
Low water level, airlock in pipe work, closed shut-off valves, dirty
filter cartridges, filtration pump failed or operation intermittent
Solutions:
Turn mains power OFF and wait 10-15 minutes for element to cool
and thermal cut-out device to reset. Then turn power back ON
If the keypad display is ever blank a spa user can still determine the health / status of the
SV controller by removing a panel from the spa skirt and checking the heartbeat LED on
the front of the spa pack itself.
Check spa water level (refill if necessary)
Remove filters and clean as per manufacturer’s recommendations or
replace cartridges if required
ER-2 HEATER PLUG
Problem:
No heater sensor communication
Cause:
Internal heater sensor communication problem
Solutions:
Turn mains power OFF, wait 5 minutes then restart spa
Check under spa cabinet to ensure all shut-off valves are in the OPEN
position
Bleed airlock from pipe work by slightly loosening couplings on front of
filtration pump or by removing filters and flushing water down pipe
work with a hose.
Contact spa reseller if problem is not resolved with power reset
SV Series Spa Controls
25
Error Codes & Troubleshooting Problems
How to troubleshoot spa problems
ER-5 POOL TOO HOT
ER-8 CTRL FAULT HVS
o
Problem:
Pool over temperature. Temperature sensor reading ≥ 45 C
Problem:
Heater relay is on when it should be off
Cause:
High ambient temperatures (especially in summer months) have
caused water temperature to rise above set temp point, Excessive
filtration time, Jet pumps have been operating for extended periods
with the spa cover still on
Cause:
Power surge, periods of low or high voltage, water on spa pack
terminal block, relay problem
Solutions:
Turn mains power OFF and back ON again to see if spa control
recovers from ER8 fault
Solutions:
Turn mains power OFF, remove spa cover, allow spa to cool then turn
power back ON
Inspect under spa cabinet for evidence of water leaking onto spa
control. If water present, turn mains power OFF and isolate, then
resolve leak, dry up excess water, and allow spa control to dry out
before restoring power.
Check daily filtration time (refer filtration section) and reduce daily
filtration time if required
Check spa cover is not resting on topside panel buttons causing jet
pumps to start when cover is on. Use keylock function to lock keypad
buttons when spa not in use.
Contact your spa reseller if problem persists
ER-10 OVER CURRENT
ER-6 12V OVERLOAD
Problem:
Mains (230V) current draw above current limit (C.LMT) detected
Problem:
12V (port) current draw over 1A limit
Cause:
Cause:
Total 12V current drawn by keypad(s), light(s), expansion ports and in
pool temp sensor is excessive, 12V power supply is overloaded, too
many LED light bulbs installed, faulty LED light
Accessory devices current draw is too large for the C.LMT setting,
faulty jet pump or air blower drawing excessive current, current
limit (C.LMT) settings are not configured to match circuit breaker
rating, load shed (L.SHD) and/or load limit (L.LMT) settings incorrect
Solutions:
Turn mains power OFF and back ON again
Solutions:
Turn mains power OFF and restart spa to see if problem reoccurs
Reduce number of LED lights being installed
Check operation of each pump => attempt to identify problematic
pump or blower causing ER10 to occur
Systematically unplug lights, in pool temp sensor, keypads and
expansion port loads from spa pack (one by one) to identify faulty part
Contact your reseller to check controller settings are configured to
match available power and circuit breaker rating
Contact your spa reseller if problem persists
SV Series Spa Controls
26
Heat Pump Error Codes
Understanding heat pump error codes
HEAT PUMP ERROR CODES
If an optional heat pump is fitted and a heat pump fault condition is detected a warning
message is scrolled across the touch pad LCD every 60 seconds and the heat pump is
disabled.
Spa operation will continue however the spa will now heat with the inbuilt SV heating
element and there will be no ability to cool the water. The heat pump warning message
will continue to scroll every 60 seconds, and the heat pump will remain disabled until the
mains power is turned OFF and back ON again.
If after resetting mains power the fault condition persists please contact your spa
reseller and report the warning message that is shown. A list of the fault conditions and
warning messages are detailed below for reference.
WARNING MESSAGE
DESCRIPTION
“HEAT PUMP AMB”
Ambient thermistor temperature sensor error
“HEAT PUMP COND”
Condenser thermistor temperature sensor error
“HEAT PUMP FLOW”
Water flow not detected
“HEAT PUMP LOW P”
Compressor low pressure switch open
“HEAT PUMP HIGH P”
Compressor high pressure switch open
“HEAT PUMP COMP”
Compressor thermal cut out open
“HEAT PUMP EXCH”
Heat exchanger thermal cut out open
IMPORTANT NOTE
If a heat pump encounters an error the heat pump will remain disabled until
the mains power is turned OFF and back ON again. The heat pump warning
message will continue to scroll every 60 seconds until the power is reset
SV Series Spa Controls
27
Contact Us
Spa Net Head Office Contact Details
Spa Net Pty Ltd
Unit 4
103 Railway Road North
Mulgrave NSW 2756
Australia
Phone:
Fax:
+61 2 4587 7766
+61 2 4587 8766
www.spanet.com.au
Technical Support & Service
[email protected]
Accounts Department
[email protected]
Sales Department
[email protected]
SV Series Spa Controls
28