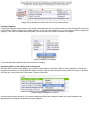
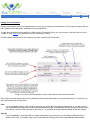
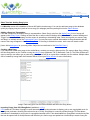
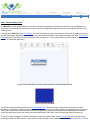
1
help center contents • search
Help Center Contents
Updated: Mon, Jan 16, 2006
Version 1.2 • Version History
Search Help Center
Introduction
System Requirements
Purchase/Registration
Installation
Legal
Window Layout
Panel Names and Changing the Layout
Toolbar
Slide Group Panel
Presentation Panel
Media Panel
Library Panel/Categories Panel
Preview Panel
Slide Edit Panel
Using LiveWorship
Building a Presentation, a Quick Start GuideBasics
Building a Slide
Saving
Exporting
Importing
Media, Adding/Removing Scripture Modules
Text Objects (Slide Text vs. Group Text)
Editor Window, Dividing Text into Slides
Displaying a Presentation
Search Features
Preferences
Size, Image, Slide, Copyright, Alert, Find, Misc
Advanced Topics
Short Tutorials
Adding a Background
Adding Scripture
Adding Song Lyrics
Adding Text
Adding Audio or Video
Adding a Slide Show
Reference
Version History
FAQ
Keyboard Shortcuts
Words and Terminology
Troubleshooting
help center contents • search
System Requirements
Windows System Requirements
●
Windows 2000/XP
Apple's Quicktime: QT 6.5 min, QT 7 recommended
Processor: 1.2 GHz PIII min, 1.8 Ghz P4 recommended
Motion backgrounds (v1.2+): 3.2 GHz P4 recommended
Processor requirements based on second screen resolution set to 800x600
RAM: 384 MB min, 512 MB recommended
100 MB of available disk space
Presenting to Screen 2 requires:
Video Card with dual monitor support (extended desktop)
Second display (projector or monitor)
❍
●
❍
❍
●
●
●
❍
❍
Macintosh System Requirements
●
Mac OS X (10.3 or higher)
Apple's Quicktime: QT 6.5 min, QT 7 recommended
Processor: 500 MHz G4 min, 1 GHz G4 recommended
Motion backgrounds (v1.2+): 1.33 GHz G4 min, 2 GHz Dual G5 recommended
Processor requirements based on second screen resolution set to 800x600
512MB RAM recommended
100 MB of available disk space
Presenting to Screen 2 requires:
PowerBook or PowerMac (with dual display support)
Second display (projector or monitor)
❍
●
❍
❍
●
●
●
❍
❍
You can use LiveWorship to build and edit presentations (without a projector or second monitor attached) but you will not be
able to see the transitions or how the show will be presented or use any of the toolbar items (bail buttons) that are designed to
work with the second screen. One of the advantages of using LiveWorship is that you can present a slide to the second
screen while still seeing the LiveWorship control interface on your primary screen. In the future, we have plans to add a
floating window so that you can preview a presentation without a projector or second monitor. Your computer specifications
may not allow a second screen to be used for displaying a presentation.
If you are using a Macintosh iBook or iMac, neither of these models are designed to have dual display (only mirroring of the
desktop on both monitors). PowerBooks and most PowerMacs have the ability to "turn off mirroring" so that you can have
multiple display windows. While not recommended or supported, some users have indicated they have found a way (a "hack")
to allow an iBook or iMac to have dual screen functionality. See installation instructions for more information on configuring
the second screen display.
On Windows, you can right-click on the desktop and select Properties, then select the Settings Tab. See the installation
instructions for a screen shot and how to establish if you can "extend your desktop" to have separate display capabilities.
LiveWorship was designed for a primary screen resolution of 1024x768 and the second screen set at 800x600 for optimal
performance.
There is a known issue if you have plugged in a second monitor/projector after the program has been started. Try quitting and
restarting the program to recognize that a second screen has been added to your system. For more information about
installing and setting up your computer to recognize the second screen, see the help page on installing LiveWorship.
Help Home Page
help center contents • search
Help Center Contents
Purchase and Registration
LiveWorship can be purchased online in the store. MasterCard, Visa, American Express and Discover cards are accepted.
If you are located in Ohio and are tax exempt, you must send us a copy of your tax-exempt status information before we can
process your order without tax being added. Contact us for more information.
There is an additional charge if you would like us to send you a physical copy of the software. The download available on the
website is the full version of the software but will only function for 30 days without a registration code. Once you enter in the
registration code, the software will not prompt you each time it is launched.
If you have a discount code, redeem this coupon on the Payment Information screen. You will not see the discounted price
until you reach the "confirm your order" page.
You should receive your registration code by email within 15 minutes of completing the transaction. Please contact us if you
have any difficulties with the online transaction.
LiveWorship has a license that allows for multiple computers to be used for building and editing presentations. The limitation
is that you can only have one computer presenting at a time. If your organization is presenting in multiple rooms at the same
time (such as a youth room and main sanctuary) or if you have multiple campuses, we would expect that you have the
resources to purchase multiple copies of LiveWorship. See our End User License Agreement for more information.
Your registration code is linked to your Name and Organization name that you used when purchasing. You must enter in this
information exactly (including capitalization) as it appears on your confirmation email.
Print, save and protect your license code in a way that works best for you.
To enter the registration code on a Macintosh:
1.
2.
3.
4.
Pull down the LiveWorship menu and select preferences.
Select the "Misc" tab.
Click on the Registration Information button
Enter your registration exactly (including capitalization) as it appears on your confirmation email.
To enter the registration code on Windows:
1.
2.
3.
4.
Pull down the Edit menu and select preferences.
Select the "Misc" tab.
Click on the Registration Information button
Enter your registration exactly (including capitalization) as it appears on your confirmation email.
Visit the LiveWorship Store
Help Center Contents
help center contents • search
Installing LiveWorship
Windows 2000/XP
Win XP SP2 users: You may see a Windows “Security Warning” dialog box warning you that “The publisher could not be verified. Are
you sure you want to run this software?” The publisher may be listed as: “Unknown Publisher”. Windows XP Service Pack 2 verifies
the authenticity of files downloaded from the web by checking that they have a digital signature attached. Live Worship does NOT have
a digital signature.
FULL INSTALL: Double-click on the .exe installer icon and follow the directions.
UPDATED APPLICATION: If you are only downloading an update, you would have needed to have a previously
installed full version of LiveWorship. To install the updated application, double-click on the .exe installer icon
and follow the directions.
NOTE: Requires installation of Apple's latest QuickTime release
Windows Font Smoothing
(Improved font display quality in Windows is turned off by default)
Right-click on your Desktop (not on an icon, but in a blank area) and select Properties
Select the Appearance tab and press the Effects button
Select the checkbox to Smooth Edges
Windows XP: There is a drop down box to choose ClearType enhanced font smoothing
Apply the new settings and close the "Appearance" window
Enabling Screen 2
(Without a second screen or projector, you can only build presentations)
In versions prior to v1.2b2, do not launch or start LiveWorship until you have connected Screen 2. Starting
LiveWorship and then connecting a second screen or projector may require quitting and restarting the
LiveWorship application to recognize a second screen is available.
Right-click on your Desktop (not on an icon, but in a blank area) and select Properties
Select the Settings tab
When your second monitor ( or projector ) is plugged in, you should see two desktops labeled "1"
and "2"
Click on the box labled number 2
Select the checkbox "Extend my Windows Desktop onto this Monitor" (by default, this box is not
checked)
Apply the new settings and close the "Display Preferences" window
For maximum performance, we recommend setting the resolution of Screen 2 to 800x600 pixels.
You will also need to make sure that this setting is also set inside LiveWorship's Size Preference.
If you are having difficulties, see our troubleshooting page for more directions.
Macintosh
WARNING! By customizing the install (choosing not to install in the default location) may overwrite existing
database library! Please backup your media folder before updating.
FULL INSTALL (version 1.2+): Double-click on the installer icon and follow the directions.
Prior to v1.2: After downloading a full installation (see downloads page for more information), you will be
prompted to drag the LiveWorship folder into your Applications folder.
UPDATED APPLICATION (version 1.2+): If you are only downloading an update, double-click on the installer
icon and follow the directions.
Prior to v1.2: You would have needed to have a previously installed full version of LiveWorship and will be
prompted to drag the updated application into the LiveWorship folder.
NOTE: Requires installation of Apple's latest QuickTime release
Enabling Screen 2
(Without a second screen or projector, you can only build presentations)
In versions prior to v1.2b2, do not launch or start LiveWorship until you have connected Screen 2. Starting
LiveWorship and then connecting a second screen or projector may require quitting and restarting the
LiveWorship application to recognize a second screen is available.
With a second screen or projector connected, pull the Apple menu to System Preferences and select Displays.
Select the Arrangements tab and make sure "mirror displays" is UNchecked.
If you do not see an "Arrangements" tab, click the "detect displays" button.
If you are using a Macintosh iBook or iMac: Neither of these models were designed to have dual display (only
mirroring of the desktop on both monitors). PowerBooks and most PowerMacs have the ability to "turn off
mirroring" so that you can have multiple display windows which is required for using LiveWorship to "present".
You can still use LiveWorship to build and edit presentations (without a projector or second monitor attached)
but you will not be able to see the transitions or how the show will be presented or use any of the toolbar items
(bail buttons) that are designed to work with the second screen. One of the advantages of using LiveWorship is
that you can present a slide to the second screen while still seeing the LiveWorship control interface on your
primary screen. In the future, we have plans to add a floating window so that you can preview a presentation
without a projector or second monitor. Your computer specifications may not allow a second screen to be used
for displaying a presentation. While not recommended or supported, some users have indicated they have found
a way (a "hack") to allow an iBook or iMac to have dual screen functionality.
For maximum performance, we recommend setting the resolution of Screen 2 to 800x600 pixels.
You will also need to make sure that this setting is also set inside LiveWorship's Size Preference.
If you are having difficulties, see our troubleshooting page for more directions.
Help Center Contents
help center contents • search
Legal
LiveWorship End User License Agreement
Please read this End User License Agreement, hereafter referred to as the "Agreement" in its entirety before running the
LiveWorship application, hereafter referred to as the "Software”.
By running this Software you agree to be bound by the terms and conditions of this Agreement. By installing and/or running
the software, you agree to be bound by the terms of this Agreement. If you do not agree to these terms and conditions, do not
run or install this software.
Grant of License
This Software is licensed and not sold. Subject to the terms of this agreement, Horizon Technology, a wholly owned
subsidiary of Horizon Telcom Inc., grants you the non-exclusive right to install and run the Software. This Software is licensed
for use on a single machine. You may install this Software on multiple machines at the same physical location, but you may
only run the Software on one machine at a time.
This license Agreement and/or use of this Software does not grant any rights to use of trademarks or logos of Horizon
Technology or its subsidiaries.
Restrictions
You may not copy or reproduce this Software in any manner except for normal installation as granted by this Agreement or the
sole purpose of backup.
You may not disassemble, decompile, or reverse engineer the Software. You may not alter the Software in any way.
You may not resell, distribute, rent, lend, or sublicense this Software. You may transfer this Software provided that all copies
not transferred, including backups and installations on computers, are destroyed. In such case, the transferee must agree to
be bound by the terms of this Agreement.
Termination
Failure to abide by this Agreement shall cause immediate termination of the license to run this software. Upon termination of
the license, you are required to cease use of the software and destroy all copies of the Software and its component parts,
both on external media and installed media.
Warranty
The Software is delivered "as is." Horizon Technology warrants that, in cases where distribution is on physical media, the
media on which the software is delivered will be free from defect for 90 days from the date of purchase. Horizon Technology
makes no other warrantee, express or implied in regard to the Software. Horizon Technology does not warrant that the
Software will operate uninterrupted or that the Software will be error free. Any advice or statements given by Horizon
Technology, whether oral or written, do not constitute a warrantee.
Liability and Indemnification
You agree that the use of the Software is at your sole risk. You agree to indemnify and hold Horizon Technology, and its
affiliates, officers, agents, minions, employees, or other partners, not responsible for any claim or demand, including
reasonable attorneys' fees made by any third party due to or arising out of your use of the Software.
You agree that under no circumstances shall Horizon Technology's liability to you, no matter what the circumstances,
including negligence, exceed the amount of charges paid by you for the use of the Software.
Export
You agree that this software shall not be shipped, transferred, downloaded, or in any way exported in any manner that violates
the U.S. Export Administration Act or any other applicable export law. Such violations include, but are not limited to, export to
or download to any nation or by citizen or resident thereof which is under a U.S. trade embargo.
General Provisions
In no event shall Horizon Technology be liable for loss of profits, indirect, special, and consequential of other similar damages
arising out of any breach of this Agreement.
If any provisions of this Agreement are held to be illegal, invalid, or unenforceable, such provision(s) shall be deemed to be
“null and void” without invalidating the remaining provisions within the agreement.
This Agreement shall be governed and constructed in accordance with the laws of the State of Ohio.
Copyright information
© 2005 Horizon Technology Inc. LiveWorship is a trademark of Horizon Technology Inc.
Apple®, iTunes®, QuickTime® and Macintosh® are registered trademarks of Apple Computer, Inc.
Windows® is a registered trademark of Microsoft, Inc.
New Revised Standard Version (NRSV)
"The Scripture quotations contained herein are from the New Revised Standard Version of the Bible, copyright © 1989 the
National Council of the Churches of Christ in the USA, and are used by permission. All rights reserved."
Authorized Standard Version ( ASV )
No copyright information available.
Bible in Basic English ( BBE )
Distribution pending permission.
Darby ( DAR )
No copyright information available.
Douay-Rheims ( DRB )
This edition of the text has been converted from the 1899 edition of the John Murphy Company, Baltimore, Maryland.
King James Version ( KJV )
No copyright information available.
The Message ( MSG )
This edition issued by contractual arrangement with NavPress, a division of The Navigators, U.S.A. Originally published by
NavPress in English as THE MESSAGE: The Bible in Contemporary Language copyright 1993, 1994, 1996, 2000, 2002
by Eugene Peterson. All rights reserved.
New International Version ( NIV )
The Holy Bible, New International Version® Copyright © 1973, 1978, 1984 by Internation Bible Society. Used by permission of
Zondervan. All rights reserved.
The "NIV" and "New International Version" trademarks are registered in the United States Patent and Trademark Office by
International Bible Society. Use of either trademark requires the permission of the International Bible Society.
New King James Version ( NKJV )
New King James Version®, Copyright © 1982, Thomas Nelson, Inc. Bible text from the New King James Version® is not to
be reproduced in copies or otherwise by any means except as permitted in writing by: Thomas Nelson, Inc., 501 Nelson
Place, Nashville, Tennessee, 37214-1000.
New Century Version ( NCV )
New Century Version®, Copyright © 2005, Thomas Nelson, Inc. All rights reserved.
Bible text from the New Century Version® is not to be reproduced in copies or otherwise by any means except as permitted in
writing by: Thomas Nelson, Inc., 501 Nelson Place, Nashville, Tennessee, 37214-1000.
Revised Standard Version ( RSV )
"The Scripture quotations contained herein are from the Revised Standard Version of the Bible, copyright © 1946, 1952, and
1971 the National Council of the Churches of Christ in the United States of America, and are used by permission. All rights
reserved."
Webster ( WB )
No copyright information available.
Youngs Literal Translation ( YLT )
No copyright information available.
Help Center Contents
help center contents • search
Window Layout, Panels and Controls
The LiveWorship window is organized into panels that either display information or allow you to modify and change
presentations.
Image: Layout of Panels (click on a panel for more information)
Adjusting the Layout
You can adjust the size of panels using the sliders. Note that the font view will change with the setting of preferences for the
Preview Panel size.
Image: Changing the Layout; the type of font controls will depend upon the size of the LiveWorship window and Preview
Panel
For more information, select an area of the window:
Toolbar
Group Panel
Presentation Panel
Media Panel
Category and Library Panels
Preview Panel
Slide Edit Panel
Help Center Contents
help center contents • search
The Toolbar
Image: Toolbar buttons in v1.2
Image: Toolbar buttons in v1.0 and v1.1
Save (Presentation)
Clicking this button is a shortcut for pulling the File menu to Save
New Song
Clicking this button is a shortcut for pulling the File menu to New Song
Transition
This button is a drop down menu to set the global transition (or type of crossfade) when changing one slide to the next.
When a second screen is enabled and when you select a slide in the Presentation Panel, this transition will occur as
the selected slide appears on the second screen. If you hover your mouse over this button it will show a shortcut that
indicates the current setting.
Speed (of Transition)
This button is a drop down menu to set the global speed of how quickly the transition takes place between slides on
the second screen. This is how fast or slow the selected global transition will take between the two slides when you
select a slide in the Presentation Panel. If you hover your mouse over this button it will show a shortcut that indicates
the current setting. (Note: There is also a Slide Delay Speed below the Preview Panel that will determine how many
seconds to display a slide on the second screen BETWEEN transitions, when you have engaged the automated play
function).
View Group/View All
This button toggles between displaying in the Presentation Panel either all slides from all groups or only the currently
selected group that is highlighted in the Slide Group Panel list.
Screen 2 Off/On
While a second screen (monitor or projector) is attached, pressing this toolbar button toggles whether or not
LiveWorship is displaying (controlling) the second screen. If you have another presentation program, such as
PowerPoint or Keynote, that is also presenting to the second screen this will allow you to transfer control back and
forth between which program is displaying on the second screen.
Bail to Logo
When Screen 2 is enabled, pressing this toolbar button will toggle between displaying the current slide and the image
that you have set in the Image Preferences as your Logo Slide. In versions 1.2+, the Bail buttons use the selected
transition unless you click with the right mouse button (or with single button Macintosh mice, hold the control key while
clicking with the mouse) which will change without a transition (cut).
Bail to Black
When Screen 2 is enabled, pressing this toolbar button will toggle between the current slide and displaying black to the
second screen. This is useful if you need to get out of a presentation quickly. In versions 1.2+, the Bail buttons use
the selected transition unless you click with the right mouse button (or with single button Macintosh mice, hold the
control key while clicking with the mouse) which will change without a transition (cut).
Bail to Background
When Screen 2 is enabled, pressing this toolbar button toggles between displaying the current slide and the
background image of the current slide (without any text). An example of when to use this would be when displaying the
lyrics of a song (with a background image behind the lyrics on the slide group) and there is an interlude with
instruments only. In versions 1.2+, the Bail buttons use the selected transition unless you click with the right mouse
button (or with single button Macintosh mice, hold the control key while clicking with the mouse) which will change
without a transition (cut).
Loop (only in versions 1.2+)
When Screen 2 is enabled, pressing this toolbar button will begin playing the currently selected group. If you click with
your right mouse button (or with single button Macintosh mice, hold the control key while clicking with the mouse) on
the Loop button the entire presentation will be played. The loop will continue until either the Stop button in the Toolbar
is pressed or a slide in the Presentation Panel is selected to be displayed. Slides will change from one to another
based upon the selected transition (and transition speed) and will pause on each slide for the duration of time set in the
Slide Delay control below the Preview Panel. An example of when this would be useful might be automatically playing a
presentation of slides containing announcements before a service.
Play (automated) (In versions 1.2+, the Play button has been removed)
When Screen 2 is enabled, pressing this toolbar button will begin an automated slide play feature which will display one
slide after another on the second screen. In versions 1.0 and 1.1, this will begin with the FIRST slide in your
presentation regardless of which group is selected. Slides will change from one to another based upon the selected
transition (and transition speed) and will pause on each slide for the duration of time set in the Slide Delay control
below the Preview Panel. Pressing this toolbar button while the automated slide play feature is active will stop and
begin playing from the initial slide. (Note: You can also envoke this feature for only one group of slides by clicking with
the right mouse button (or with single button Macintosh mice, hold the control key while clicking with the mouse) on the
title of the slide group in the Slide Group Panel). An example of when this would be useful might be automatically
playing a presentation of slides containing announcements before a service. To stop the automated Play, press the
Stop toolbar button.
Stop
When Screen 2 is enabled with the automated Play feature active (or a video or audio clip is playing), pressing this
toolbar button will stop the automated displaying of slides to the second screen and pause on the current slide.
Alert On/Off
When Screen 2 is enabled, pressing this toolbar toggles the display of an alert message on Screen 2. This is useful for
sending a message to someone who might be watching without disrupting the presentation, such as for nursery calls or
to alert someone about a car with lights left on, etc. The location and font can be adjusted in the Alert Preferences.
When you select this toolbar button, you will be prompted for the text of the alert. See Show Alert page for more
information.
Help
This button will open the LiveWorship Help files in your Web Browser.
Help Center Contents
help center contents • search
Slide Group Panel
Image: The Slide Group Panel
The Slide Group Panel is located in the top left corner of the LiveWorship window. This panel displays the groups of slides
that are contained within a presentation. Groups can be one slide (such as an announcement) or many slides (such as the
lyrics of a song on different slides). As you build your presentation, you will see groups being listed in this panel.
If this panel is empty and no groups are listed, there is no presentation opened or being created. Either select a saved
presentation using the Media Panel or begin dragging objects into the Presentation Panel to start creating a new presentation.
The Slide Group Panel can be used to organize and maneuver through your presentation. You can change the order of groups
by dragging and dropping their names up or down in the panel list. You can rename groups to make them more easily
recognizable. As you select the name of a group from this panel, you will see the slides in that group visible in the
Presentation Panel.
There are two different view options (these are toggled back and forth using the View Group button in the Toolbar) for how
slides are displayed in the Presentation Panel. If you are viewing all groups, the group of slides will be highlighted (and the
Presentation Panel will scroll to show the group if not visible). If you are viewing individual groups, you will only see that group
of slides in the Presentation Panel.
Image: Toolbar button to toggle between showing all groups or just the selected Group in the Presentation Panel
Image: View All: All groups will be visible in the Presentation Panel
Image: View Group: Only the selected group will be visible in the Presentation Panel
Image: While Viewing All Groups, all the unselected groups will be shaded
Organizing and Modifying the Slide Group Panel
To change the order of groups in the Slide Group Panel, simply click on the name of the group, drag up or down the panel and
drop where you want the group to be located in the list.
Contextual Menu Options
Clicking with the right mouse button (or with single button Macintosh mice, hold the control key while clicking with the mouse)
on the name of the group to bring up a "contextual menu" with options for that group.
Image: You can modify groups by using the contextual menu
Add a Slide (from Slide Group Panel)
You can add a new Slide to a Group in the current Presentation by clicking with the right mouse button (or with single button
Macintosh mice, hold the control key while clicking with the mouse) on the name of the Group in the Slide Group Panel and
select "Add Slide" from the menu. If you click in a blank area of the Slide Group Menu, adding a Slide will create a new
Group.
Add a Slide Group
Selecting this option, you will create a new Slide Group in this Presentation. Initially there will be no slides in this new Group.
To add slides to this Slide Group, click with the right mouse button (or with single button Macintosh mice, hold the control key
while clicking with the mouse) on the title of this new Group and select "Add Slide" from the contextual menu.
Rename Slide Group
To rename a Slide Group in the Presentation, click with the right mouse button (or with single button Macintosh mice, hold the
control key while clicking with the mouse) on the name of the group in the Slide Group Panel and select "Rename Slide
Group" from the contextual menu.
Duplicate Slide Group
To duplicate a Slide Group within the Presentation, click with the right mouse button (or with single button Macintosh mice,
hold the control key while clicking with the mouse) on the name of the group in the Slide Group Panel and select "Duplicate
Slide Group" from the contextual menu.
Remove Slide Group
To remove a Slide Group from the Presentation, click with the right mouse button (or with single button Macintosh mice, hold
the control key while clicking with the mouse) on the name of the group in the Slide Group Panel and select "Remove Slide
Group" from the menu.
Play (automated) Slide Group
When Screen 2 is enabled, you can engage the automated playing of a Slide Group (displays each slide from beginning to end
of the Slide Group using the transition/speed setting in the Toolbar and and will pause on each slide for the duration of time
set in the Slide Delay control in the Slide Edit Panel). To play the Slide Group, click with the right mouse button (or with single
button Macintosh mice, hold the control key while clicking with the mouse) on the name of the Group in the Slide Group Panel
and select "Play Slide Group" from the menu. To stop, press the Stop button in the Toolbar or select another slide to display
in the Presentation Panel.
Loop (Play) Slide Group
When Screen 2 is enabled, you can loop a Slide Group in the Presentation. To begin the loop, click with the right mouse
button (or with single button Macintosh mice, hold the control key while clicking with the mouse) on the name of the Slide
Group in the Slide Group Panel and select "Loop Slide Group" from the menu. To stop the loop, press the Stop button in the
Toolbar or select a slide thumbail in the in the Presentation Panel to display another slide.
Help Center Contents
help center contents • search
Presentation Panel
Image: The Presentation Panel
The Presentation Panel is located in the top center of the LiveWorship window. This panel can display slides thumbnail
images from all groups or an individual group within a Presentation. Each slide is a part of a Slide Group (groups of slides are
listed in the panel directly to the left, called the Slide Group Panel). Slide Groups can contain none, one or many slides.
If this panel is empty and no groups are listed in the Slide Group Panel, there is no Presentation opened or being built. Either
select a saved Presentation using the Media Panel or begin dragging objects into the Presentation Panel to start creating a
new Presentation.
The Presentation Panel can be used to display, organize and edit your Presentation. You can reorder slides within a group by
dragging and dropping the thumbnail image of a slide inside this panel. You can rename, remove, or duplicate slides from this
panel. The size of the thumbnail images can be changed in the Size Preferences.
Image: The border of a slide thumbnail image indicates if the slide is being displayed on the second screen and/or edited
While you have Screen 2 enabled and you select a slide thumbnail, this slide will be displayed on Screen 2 (monitor or
projector). The slide that is currently being displayed will be indicated by a green border around the slide thumbnail in the
Presentation Panel. If you do not have a second screen attached, selecting a slide will select it for editing and you will see
this slide thumbnail marked with a red border. While Screen 2 is enabled, you can edit slides using your right mouse button (or
with single button Macintosh mice, hold the control key while clicking with the mouse) and selecting "Edit Slide" from the
contextual menu that appears. A slide that is being edited while also being displayed on Screen 2 will have both a red and
green border around the thumbnail image. Changes made to this slide will not be visible on Screen 2 until you re-select the
thumbnail image in the Presentation Panel which will re-display this slide with any changes.
There are two different view options (these are toggled back and forth using the View button in the toolbar) for how slides
thumbnails are displayed in the Presentation Panel. If you are viewing all groups, all slides that are not part of the highlighted
group will be shaded. The Presentation Panel will scroll to show the selected group of slides if not currently visible in the
Presentation Panel. If you have the toolbar button toggled to View Group, you will only see the group of slides that are
selected in the Slide Group Panel list in the Presentation Panel.
Image: Toolbar button to toggle between showing all groups or just the selected Group in the Presentation Panel
Image: While Viewing All Groups, all the unselected groups will be shaded
Image: When you have toggled the View Group button in the toolbar to show only one group,
the one group that is selected be the only group visible in the Presentation Panel.
Organizing and Modifying Slides in the Presentation Panel
To change the order of a slide within a Slide Group, simply drag and drop the slide into it's new position.
Contextual Menu Options
Clicking with the right mouse button (or with single button Macintosh mice, hold the control key while clicking with the mouse)
on a slide thumbnail image will bring up a "contextual menu" with options for that slide. If you click inside the Presentation
Panel but not on a slide, you will be able to either create a new slide or a new Slide Group.
Image: You can modify slides by using the contextual menu
Select a slide to Edit
You can edit a slide in the Presentation Panel by clicking with the right mouse button (or with single button Macintosh mice,
hold the control key while clicking with the mouse) on the slide thumbnail image in the Presentation Panel and select "Edit
Slide" from the menu. This slide will then have a red border to indicate that it's the slide that is being edited. You can also
select the Edit tab from the Preview Panel to see which slide is currently being edited. NOTE: When a second screen is
enabled, clicking with your mouse on a slide thumbnail in the Presentation Panel will display that slide image on the second
screen.
Duplicate a Slide
To duplicate a slide within the Presentation, click with the right mouse button (or with single button Macintosh mice, hold the
control key while clicking with the mouse) on the slide thumbnail image in the Presentation Panel and select "Duplicate Slide"
from the menu.
Remove Slide
To remove a slide from the Presentation, click with the right mouse button (or with single button Macintosh mice, hold the
control key while clicking with the mouse) on the slide thumbnail image in the Presentation Panel and select "Remove Slide"
from the menu.
New Slide
To create a new slide to the current selected Slide Group, click with the right mouse button (or with single button Macintosh
mice, hold the control key while clicking with the mouse) on the slide thumbnail image in the Presentation Panel and select
"New Slide" from the menu and a blank slide will appear at the end of the current group.
Editor Window
Selecting this option will open up a window that allows you to edit text on a slide. For more information, see Text Objects and
the Editor Window.
Rename Slide
To rename a slide in the Presentation, click with the right mouse button (or with single button Macintosh mice, hold the control
key while clicking with the mouse) on the slide thumbnail image in the Presentation Panel and select "Rename Slide" from the
menu. Slide names show up in the tooltips while hovering over the slide thumbnails and can be useful when you have your
thumbnail image set to smaller sizes.
Help Center Contents
help center contents • search
Media Panel
Image: The Media Panel
The Media Panel is located in the bottom left corner of the LiveWorship window. This panel will show you the various items or
media that can be used to build presentations. The Media Panel works with the Categories and Library Panels to display the
objects. When you select an object title in the Media Panel, you will see associated objects displayed in the Library Panel.
The Media Panel Objects
Browse (folder)
This allows you to look at files outside the LiveWorship library. Initially, the default is to display files that are located on the
desktop of your computer. If you have no media files on your desktop, the Library Panel may be empty. To change the
directory or location of where you would like to browse for media files, click on the Browse title in the Media Panel (if not
highlighted, you may need to select and then click again on the title) and a dialog box will open so you can choose a folder to
"browse" for media items. Once you select a folder, image previews of files that LiveWorship recognizes will appear in the
Library Panel (this may take some time to scan all the files if you have several items in the folder). You can drag a media
item (such as a graphic or audio file) into the Presentation Panel. If you drop the item in a blank area of the Presentation
Panel a new slide will be created. This newly imported object will not appear in the Backgrounds, Audio, Video or Text
libraries until you save the Presentation and name the object. For more information on how LiveWorship stores media, see
Advanced Topics.
Backgrounds
These are background images stored in the LiveWorship library. When you select the Background title, you will see
background images displayed in the Library Panel. To use a background image, position your mouse over the image, click
and drag this image into the Presentation Panel. If you drop this image in a blank area, a new slide group and slide will be
created with this background image. If you drop this image onto an existing slide, the background will be changed. If you want
to change all the backgrounds for a group of slides, drag and drop the image onto the title of the group in the Slide Group
Panel. See Adding a Background for more information or to see a movie clip of this in action.
Song Lyrics
You can insert the lyrics of a song into a presentation by dragging and dropping a song into the Presentation Panel. When you
select the Song Lyrics title in the Media Panel, you will see a list of the songs that have been stored in the LiveWorship
library displayed in the Library Panel. Songs can be sorted by name, author or (in version 1.2+) by modification date by simply
clicking with your mouse on the column titles in the Library Panel. When a song is added to the presentation, it is it's own
slide group and the title will appear in the Slide Group Panel.
Any changes or modifications you make to the song (such as adding a background, reordering or adding slides, adding or
changing the song text) will be considered changes to the file. When you save the presentation, you will then be prompted to
either save the changes (modifying the song already in the song lyrics media library) or to "save as..." where you can rename
the song to distinguish it from the other song already in the library. (Note: LiveWorship will allow duplicate names in the song
library but you can always modify a song's information after it has been saved, too.)
If you click with the right mouse button (or with single button Macintosh mice, hold the control key while clicking with the
mouse) on the title of a song in the Library Panel, you have some options.
Export: You can save this file outside the LiveWorship library as a separate file that could then be imported
into another LiveWorship program. LiveWorship song files carry the .lws extension and depending upon your
operating system on your computer may or may not be affiliated with LiveWorship, so double-clicking on an
LiveWorship song file may or may not open the file in LiveWorship. For more information, see Exporting,
Importing and for more detail on how LiveWorship stores media, see Advanced Topics.
Remove: You can remove a song from the LiveWorship library by selecting this option. If this song is used in a
presentation, you will be prompted. Removing a song will also remove it from any saved presentations.
Category Properties: Categories are keywords that can be used to quickly find songs that have been
associated with that keyword. Use this option to select different keyword categories that you would like to
associate with this song. If there are no categories listed, you may not have created any yet. Create new
categories by clicking with your right mouse button (or with single button Macintosh mice, hold the control key
while clicking with the mouse) inside the Categories Panel. For more information, see the Category and Library
Panels.
Advanced: Songs have a title, author, Copyright that can be edited from this pop-up window. In the Copyright
Preferences, there are several options for how and if these items appear when a song is being displayed.
Scriptures
You can insert Bible scripture into a presentation by dragging and dropping the verses into the Presentation Panel. When you
select the Scriptures in the Media Panel, you will see a list of the different translations that have been added to the
LiveWorship library listed in the top left of the Library Panel (see Scripture Modules for more information). Once you select a
translation, you will see the books of the Bible listed in the top-center panel of the Library. After you select a book, the
chapters will appear in the top-right panel and the verses will be listed in the bottom of the Library Panel.
Group Text
As opposed to "slide text", Group Text is typed information that can be spanned over several slides (similar to song
lyrics/verses) but be created, edited and stored as one group of slides in the LiveWorship library. Using the Text Editor
window, you can use blank lines to indicate where new slides begin (the number of blank lines is a preference setting). Group
Text is indicated by the "T" icon in the lower left hand corner of the slide thumbnail in the Presentation Panel.
Group Text can be converted into Slide Text by editing the Text Editor window and then selecting the Slide Text button. See
Text Objects for more information.
Group text would be useful when creating a series of slides that are all associated with each other, such as a sermon/lesson
or quotation from a book that would not fit onto one slide. The entire group of slides would be saved under a common title and
placed into a presentation as a whole group.
If you click with the right mouse button (or with single button Macintosh mice, hold the control key while clicking with the
mouse) on the title of a song in the Library Panel, you have some options.
Export: You can save this file outside the LiveWorship library as a separate file that could then be imported
into another LiveWorship program. LiveWorship Group Text files use the .lwg extension. Depending upon your
operating system, double-clicking on an LiveWorship file may or may not launch LiveWorship or load the file
into LiveWorship. You may need to have LiveWorship running and then use the Load LiveWorship Media
selection under the File menu to bring files into the program. For more information, see Exporting, Importing and
for more detail on how LiveWorship stores media, see Advanced Topics
Remove: You can remove a group text object from the LiveWorship library by selecting this option. If this
object is used in a presentation, you will be prompted. Removing this object will also remove it from any saved
presentations.
Category Properties: Categories are keywords that can be used to quickly find group text that have been
associated with that keyword. Use this option to select different keyword categories that you would like to
associate with this group text. If there are no categories listed, you may not have created any yet. Create new
categories by clicking with your right mouse button (or with single button Macintosh mice, hold the control key
while clicking with the mouse) inside the Categories Panel. For more information, see the Category and Library
Panels.
Advanced: Group Text can have a title, author and Copyright that can be edited from this pop-up window.
Slide Text
As opposed to "group text", Slide Text is typed information on one slide and saved as an individual group in the library. Slide
text can be saved "internally" (only be available in the current presentation) or using "Save As..." (adds an object to the "Slide
Text" media library which is available for using in other presentations). When you create an individual slide and begin typing
on it, this text is "slide text". Slide Text does not extend over multiple slides without first being converted into Group Text.
Slide Text can be converted into Group Text by editing the text using the Text Editor window and then selecting the Group
Text button. See Text Objects for more information.
Examples of when slide text would be preferred might be having a presentation of slides for announcements that are not
related (e.g. Vacation Bible School announcement, reminder to turn off cell phones, upcoming Bible study group meeting
times). You would want to be able to create, edit, store and retrieve these slides individually when building presentations.
If you click with the right mouse button (or with single button Macintosh mice, hold the control key while clicking with the
mouse) on the title of a song in the Library Panel, you have some options.
Export: You can save this file outside the LiveWorship library as a separate file that could then be imported
into another LiveWorship program. LiveWorship Slide Text files carry the .lwt extension and depending upon
your operating system on your computer may or may not be affiliated with LiveWorship, so double-clicking on
an LiveWorship file may or may not open the file in LiveWorship. For more information, see Exporting,
Importing and for more detail on how LiveWorship stores media, see Advanced Topics.
Remove: You can remove a slide text object from the LiveWorship library by selecting this option. If this object
is used in a presentation, you will be prompted. Removing this object will also remove it from any saved
presentations.
Category Properties: Categories are keywords that can be used to quickly find slide text that have been
associated with that keyword. Use this option to select different keyword categories that you would like to
associate with this slide text. If there are no categories listed, you may not have created any yet. Create new
categories by clicking with your right mouse button (or with single button Macintosh mice, hold the control key
while clicking with the mouse) inside the Categories Panel. For more information, see the Category and Library
Panels.
Advanced: Slide Text can have a title, author and Copyright that can be edited from this pop-up window.
Audio
These are audio files stored in the LiveWorship library. When you select the Audio title in the Media Panel, you will see a list
of audio files displayed in the Library Panel. To use an audio file, position your mouse over the title, click and drag this file
name into the Presentation Panel. If you drop this file in a blank area of the Presentation Panel, a new slide group will be
created that has this audio file attached to a new slide. If you drop this image onto an existing slide, the audio file will be
attached to that slide. This audio file will play when the slide that has the audio file attached is played on the second screen.
While editing this slide, you can remove the audio file by clicking on the "No Audio" button under the Preview Panel. When
audio has been added to a slide, you will see the musical notes icon in the lower left hand corner of the slide thumbnail in the
Presentation Panel.
Export: You can save this file outside the LiveWorship library as a separate file that could then be imported
into another LiveWorship program. For more information, see Exporting, Importing and for more detail on how
LiveWorship stores media, see Advanced Topics.
Remove: You can remove an audio file from the LiveWorship library by selecting this option. If this audio file is
used in a presentation, you will be prompted. Removing an audio file will also remove it from any saved
presentations.
Category Properties: Categories are keywords that can be used to quickly find group text that have been
associated with that keyword. Use this option to select different keyword categories that you would like to
associate with this group text. If there are no categories listed, you may not have created any yet. Create new
categories by clicking with your right mouse button (or with single button Macintosh mice, hold the control key
while clicking with the mouse) inside the Categories Panel. For more information, see the Category and Library
Panels.
Advanced: You can rename the audio file from this dialog box.
Video
These are video files stored in the LiveWorship library. When you select the Video title in the Media Panel, you will see a list
of video files displayed in the Library Panel. To use a video file, position your mouse over the title, click and drag this file
name into the Presentation Panel. If you drop this file in a blank area of the Presentation Panel, a new slide group will be
created that has this video file attached to a new slide. If you drop this image onto an existing slide, the video file will be
attached to that slide. Note that video files can be used as backgrounds on slides with text in versions 1.2+. In previous
versions (v1.0 or v1.1), you will not be able to drop video clips onto files that also have text. This video file will play when this
slide is displayed on the second screen. While editing this slide, you can remove the video file by clicking on the "No
Background" button under the Preview Panel. When video has been added to a slide, you will see the "film reel" icon in the
lower left hand corner of the slide thumbnail in the Presentation Panel.
Export: You can save this file outside the LiveWorship library as a separate file that could then be imported
into another LiveWorship program. For more information, see Exporting, Importing and for more detail on how
LiveWorship stores media, see Advanced Topics.
Remove: You can remove a song from the LiveWorship library by selecting this option. If this song is used in a
presentation, you will be prompted. Removing a song will also remove it from any saved presentations.
Category Properties: Categories are keywords that can be used to quickly find group text that have been
associated with that keyword. Use this option to select different keyword categories that you would like to
associate with this group text. If there are no categories listed, you may not have created any yet. Create new
categories by clicking with your right mouse button (or with single button Macintosh mice, hold the control key
while clicking with the mouse) inside the Categories Panel. For more information, see the Category and Library
Panels.
Advanced: You can rename the video file from this dialog box.
Presentations
As you save presentations, they are stored in the LiveWorship library. When you select Presentations in Media Panel, you
will see saved presentations listed in the Library Panel. This list of presentations can be sorted by the name, date created or
last modified by clicking with your mouse on the column titles in the Library Panel. Clicking on a presentation in the Library
Panel will open that presentation. Only one presentation can be open. If you click on another presentation, the current
presentation will close. If you have a presentation open that has unsaved changes, you will be prompted to save the changes
before opening another presentation.
If you click with the right mouse button (or with single button Macintosh mice, hold the control key while clicking with the
mouse) on the title of a Presentation in the Library Panel, you have some options.
Export: You can package this Presentation along with all associated files that are stored in the LiveWorship
library into one file that could then be imported into another registered copy of the program. LiveWorship
Presentation files carry the .lwp extension and depending upon your operating system on your computer may or
may not be affiliated with LiveWorship, so double-clicking on an LiveWorship file may or may not open the file
in LiveWorship. For more information, see Exporting, Importing and for more detail on how LiveWorship stores
media, see Advanced Topics.
Rename Presentation: Change the name of the presentation.
Duplicate Presentation: Create a copy of this presentation inside the LiveWorship library.
Remove: You can remove a presentation from the LiveWorship library by selecting this option.
Category Properties: Categories are keywords that can be used to quickly find presentations that have been
associated with that keyword. Use this option to select different keyword categories that you would like to
associate with this presentation. If there are no categories listed, you may not have created any yet. Create new
categories by clicking with your right mouse button (or with single button Macintosh mice, hold the control key
while clicking with the mouse) inside the Categories Panel. For more information, see the Category and Library
Panels.
Help Center Contents
help center contents • search
The Category and Library Panels
Image: The Category and Library Panels
The Library and Category Panels are located at the bottom center of the LiveWorship window, between the Media Panel and
the Text Editor Panel. This panel directly linked to the selection that is made in the Media Panel. When you select an object
title in the Media Library, you will see associated objects displayed in the Library Panel. The Category Panel is used to either
show all items or narrow the list in the Library Panel based upon categories that have been assigned to objects. If no
categories have been created, you will only see the "<All>" category. If you create a category and select it and see no objects
in the Library Panel, you have not assigned any objects to this category. See below for more information on how to assign
objects to categories.
How the Category Panel works
Image: Using Categories to narrow list of items in the Library Panel
Creating Categories
Clicking with the right mouse button (or with single button Macintosh mice, hold the control key while clicking with the mouse)
in the Category Panel will bring up a "contextual menu". If you click on a Category item, you can rename, delete or add a new
category. If you click on a blank area of the panel, you will only have the option to create a new category.
Image: Creating a new category
You will be then be prompted for the name of this new category.
Assigning Objects in the Library Panel to Categories
Once you have created a new category, you can then assign objects in the Library Panel to these categories. Clicking with
the right mouse button (or with single button Macintosh mice, hold the control key while clicking with the mouse) on an object
will bring up a "contextual menu", then select "Category Properties".
Image: Assigning categories to objects
A window will pop open and all of your custom categories will be listed. Assign this object to as many categories as
appropriate by selecting the check boxes for each category.
Image: Select which categories this object will be assigned
Now when you select one of the categories in the Category Panel that was assigned to this object, you will see this object
listed in the Library Panel. These custom categories can be used to organize or quickly access frequently used objects in the
Library Panel.
Note: If NO items show up in the Library Panel, you may have zero objects assigned to the selected category yet. Select the
<All> category and assign a category to at least one of the objects (see above).
Help Center Contents
help center contents • search
Preview Panel
Image: The Preview Panel
The Preview Panel is located at the top right of the LiveWorship window. This panel has two tabs across the top which will
allow you to view a slide to edit or show what is currently being displayed on Screen 2 (along with the next slide to be
displayed). The "Edit" tab shows you the slide that is currently marked for editing (indicated by the red border around the slide
thumbnail in the Presentation Panel). When a second screen is enabled, the "Screen 2" tab at the top will display the slide
that is currently being displayed on the second screen (indicated by the green border around the slide thumbnail in the
Presentation Panel) and the slide that will come after the currently presented slide in the Presentation Panel. A slide can be
both marked for both display and editing at the same time (indicated by both red and green borders around the slide thumbnail
in the Presentation Panel), but if you click on the preview window while on the Screen 2 tab you will be moved to the Edit tab
and the currently displayed image will be marked for editing. The changes you make will not be displayed until you re-select
the slide in the Presentation Panel.
Image: Border colors around slides in the Presentation Panel indicate
which slide is being edited (red), which slide is being presented (green)
or both displayed and being edited (red and green)
The Slide Next and Slide Back buttons along the bottom left of the Preview Panel allow you to change the focus of which
slide is currently being edited (indicated by the red border around the slide thumbnail in the Presentation Panel). The Play and
Stop buttons on the bottom right of the Preview Panel are controls for controling slides that have audio or video while they are
shown in the Preview Panel.
Image: Controls for the Preview Panel
While also located below the Preview Panel, the Slide Delay Speed control is a setting for the automated Play function and is
a part of the Slide Edit Panel controls.
Presentation Mode (or the Screen 2 tab)
The "Screen 2" tab (enabled what we call Presentation Mode) will allow you see what is being presented on the second screen
along with the next slide preview. You can use LiveWorship to build and edit presentations without a projector or second
monitor attached, but you will not be able to see the transitions or how the show will be presented or use any of the toolbar
items (bail buttons) that are designed to work with the second screen. One of the advantages of using LiveWorship is that
you can present a slide to the second screen while still seeing the LiveWorship control interface on your primary screen. In
the future, we have plans to add a floating window so that you can preview a presentation without a projector or second
monitor. Your computer specifications may not allow a second screen to be used for displaying a presentation, so see system
requirements for more information.
Keyboard Shortcuts
Using the Presentation Mode allows you to see the current slide that is being displayed on the second screen along with the
slide that follows in the Presentation Panel. If you need to edit either of these slides during a presentation, just click on the
preview and that slide will be pushed into the Slide Edit Panel. While the Presentation Mode (Screen 2 tab) is selected, the
Slide Edit Panel is disabled which allows you to use the keys on the keyboard to control your presentation. Pressing the
Space Bar or the Right Arrow key will advance slides (the Left Arrow key will show the previous slide). You will notice that the
slide thumbnails in the Presentation Panel also have a character in the bottom right corner which is a keyboard shortcut to
display that slide while you are in the Presentation Mode. See keyboard shortcuts for more information.
Image: While the Screen 2 tab (Presentation Mode) is selected,
you can use keyboard shortcuts to control the presentation.
Recording Slide Delays (v1.2+ only)
This is a useful feature that allows slide delays to be set while selecting slides for a group (in order, beginning to end). One
use for this feature is dropping an audio file of a praise song onto the first slide and then use the recording feature to set the
automatic timings so that the lyrics display along with the music. Click on the Record button in the Preview Panel (only
displayed when you are editing the first slide in a group).
Image: Press the Record button (only visible when editing
the first slide in a group) to begin the recording slide delays
After you have begun recording, the current slide will be displayed in the Preview Panel and the next slide (your target) will be
highlighted in the Presentation Panel. When you click onto the target slide, the slide delay time will be set for the previous
slide.
Image: Current slide is displayed in the Preview Panel
Click on the "target slide" highlighted to change to the next slide
After selecting the last target (and last slide in the group), the next click will be on the Stop button in the Preview Panel (next
to the Record/Play buttons). After you stop the recording, you will be prompted with the slide delay timings and asked whether
or not to save those slide delays.
Image: After clicking the Stop button in the Preview Panel, a dialog box
will prompt the user to discard or keep the recorded slide delays
After selecting the third slide in a group, if you mistakenly click the target slide you can reset the target by selecting the
previous slide. This will help if you trigger a slide too soon or by mistake, you can click on the slide before the target and it will
move the target back one step.
The slide delays will be used when automating a group or presentation using either the Loop button in the Toolbar or rightclicking on a group in the Slide Group Panel and selecting "play" or "loop" group.
Help Center Contents
help center contents • search
Slide Edit Panel
Image: The Slide Edit Panel
The Slide Edit Panel is located at the bottom right of the LiveWorship window. If you have the smaller Preview Panel
selected, you will have WYSIWYG or "What You See Is What You Get" font selection controls. The size of the Preview Panel
is set in the Image Preferences. You may also see the drop down menus for font selection and size if you have reduced the
overall size of your LiveWorship window.
Depending upon the tab selected above the Preview Panel, the Slide Edit Panel allows you to see and edit either the slide
marked for editing, the slide currently being displayed on Screen 2 or the next slide to be displayed. The slide that is marked
for editing is indicated by a red border around the slide thumbnail in the Presentation Panel. The slide that is currently being
displayed on Screen 2 is indicated by a green border around the slide thumbnail in the Presentation Panel. The next slide to
be displayed comes to the right of the current slide in the Presentation Panel.
Image: Border colors around slides in the Presentation Panel indicate
which slide is being edited (red) and which slide is being presented (green)
Select a Slide to Edit (Second Screen Enabled)
When Screen 2 is enabled, editing a slide other than the one being displayed requires that you click with the right mouse
button (or with single button Macintosh mice, hold the control key while clicking with the mouse) on the slide thumbnail in the
Presentation Panel and select "Edit Slide" from the pop up contextual menu. Alternatively, you can also use the Slide Back
and Slide Next buttons that are just below the Preview Panel to select the slide for editing.
Using the Presentation Mode (having the "Screen 2" tab selected in the Preview Panel) allows you to see the current slide
that is being displayed on the second screen along with the slide that follows in the Presentation Panel. If you need to edit
either of these slides during a presentation, just click on the preview and that slide will be pushed into the Slide Edit Panel.
The changes will not be displayed until you have re-selected the currently displayed slide in the Presentation Panel.
Selecting a Slide to Edit (Second Screen Disabled)
If you have no second screen attached or it has been disabled, you can use your mouse to click on slides in the Presentation
Panel to select them for editing (indicated by the red border around the slide thumbnail).
Slide Edit Canvas
At the bottom of the Slide Edit Panel, the Slide Edit Canvas is where you will enter, edit or highlight typed text on the slide
being edited. If you have just created a slide, you can click with your mouse in this canvas and begin typing text. If you have
a slide that already has text, just click inside the canvas to place your cursor and begin editing or typing. Highlight all or some
text and use the controls above the canvas to adjust the font, style, color and size.
Image: The Slide Edit Canvas
The slider control just above the Canvas can be used to adjust the background color of the Canvas, this will allow you to see
lighter or darker fonts against the background of the Canvas.
Image: The Canvas background color can be adjusted to see different colors of text while working in the Canvas
Pulling the sliders on the right or left of the Canvas will allow you to quickly change the margins of the text on a slide. Just
grab the slider at the right or left edge of the Canvas and drag. Perhaps you have a background image and you want the left or
right side more visible, this will allow you to quickly and easily move text around on the slide.
Image: Pull the sliders on the left or right of the Canvas to change the margins for text on a slide
Changing Font, Style, Color, or Alignment of Text
Similar to a word processor, you can either set your attributes before you type or highlight and change the attributes of
existing text. The defaults for these attributes can be set in the Slide Preferences window.
Image: Controls to change the font, style, color and alignment of text
Select the font type and size using the controls in the Slide Edit Panel. You can toggle Bold, Italics, or Underline styles by
clicking on the buttons labeled B for Bold, I for Italics and U for Underline. A button for the style Shadow will help so that your
text will stand out and not get lost over various colors in background images. The Shadow style will create a slight, dark edge
(or shadow) behind the text. Use the Shadow Offset slider control (or click the button to enter a value) to change how close
the shadow is to the text. Click on the color swatches to change the font color or the color of the text shadow.
Working with Slide Backgrounds
Slides have a background color which is determined by the "background" color swatch on the right hand side of the Slide Edit
Panel. Once you have added a background image (see Building a Slide), you have some controls to adjust the image as it
appears on the slide. If you want the same background (or color) to appear every time you create a new slide, set this in the
Image panel of the preferences.
Image: Controls to adjust how a background image will appear on a slide
If you have a background image on a slide, you can remove a background image (or a video clip) by clicking the "No
Background" button. If you have added audio, you can remove the audio clip from a slide by clicking the "No Audio" button. A
drop down menu will give you three choices for how a background image is displayed on the slide.
Scale to Full Screen
The image is reduced or enlarged until either the image has fit into the screen either horizontally or vertically.
Unless your image matches the same aspect ratio of the second screen resolution, you may see some of the
background color behind your image.
Stretch to Fill Screen
The image is pulled horizontally and vertically to completely fill the screen without being able to see the
background color of the slide. This may distort your image.
Custom Size
With this selection, you can change the size of the image using the slider control (or click on the Size button to
enter in a value) and the pan control. Clicking on the nine directional control, you can move the image left, right,
up, down, diagonally or center the image. If you click and hold on a directional control, it will snap the image to
that edge of the slide.
Apply to Group Button
After you have made changes to any of the attributes of a slide (font, size, color, style, alignment, background image position,
slide delay, etc.) you can easily apply these changes to all slides in the same group by clicking on the "Apply to Group"
button located just below the font and size controls. In version 1.2+, you can customize what attributes are applied to the
other slides in the group by clicking with the right mouse button (or with single button Macintosh mice, hold the control key
while clicking with the mouse) on the Apply to Group button. The settings that you use will be remembered the next time you
use the Apply to Group button.
Image: In version 1.2+, you can control the Apply to Group settings
Slide Delay Control
The Slide Delay Speed at the top of the Slide Edit Panel will set how many seconds to display a slide on the second screen
BETWEEN transitions, when you have engaged the automated play function. This setting only applies to the current slide
being edited, but you can apply to all the slides in a group using the "apply to group" button.
Help Center Contents
help center contents • search
Building a Presentation
a Quick Start Guide
Step 1: Selecting a background image
In the Lower left hand corner of the window, select the Backgrounds in the Media Panel (overview of panel locations). In the
Library Panel, you will see images that are stored in the library.
Later: If you would like to use your own images, see Import Media for how to add those to the LiveWorship library.
Choose a background by positioning the cursor over the image, hold down your mouse button and drag and drop the image
into the Presentation Panel. This will create a slide thumbnail in the Presentation Panel and a new group name has been
added to the Slide Group Panel.
Image: Step 1: Dragging an image from the Library Panel into the Presentation Panel
Step 2: Adding Text to a Slide
Adding text to your newly created slide is easy, just start typing. The slide that is currently being edited, has a red border
around the slide image in the Presentation Panel. The Slide Edit Panel is located in the bottom right hand corner and the
canvas where you enter text is located at the bottom of the panel.
Pressing the Enter key (Windows) or the Return key (Macintosh) creates a line feed to force text to the next line.
Let's try putting in these four lines of text:
Welcome
To
Our
Church
Notice that the text is automatically centered on the slide thumbnail and in the Preview Panel. Try adding another slide to the
Presentation Panel by dragging and dropping a different background image. We'll use this new slide in the next step to add a
song to our presentation.
Step 3: Adding a Song Group
LiveWorship comes with a database of almost 400 public domain songs. Adding your own songs to the library is very easy.
Let's add a song to the second slide you just added to your presentation.
Select Song Lyrics from the Media Panel. A list of songs will appear in the Library Panel. Select a song with your mouse, drag
and drop it onto the last slide thumbnail you just created in the Presentation Panel. After you drop the song onto the slide, you
may see several additional slides added to the presentation. If the song has six verses, each verse will create it's own slide
using the same background as the first. You can change a background on an individual slide by simply dragging and dropping
a different background image onto that slide thumbnail. You can change the background for the entire group of slides all at
once by dropping a background image onto the title of the group in Slide Group Panel.
Step 4: Adding Scripture Text
LiveWorship comes with different versions of the Bible. To add scripture, select Scriptures from the Media Panel. In the
Library Panel, you will see the different bible versions that are loaded into LiveWorship. Select a version, then select a book
and then a chapter. Finally, you will see verses listed in the bottom of the Library Panel. Click with your mouse, drag and drop
(but NOT onto an existing slide) into the Presentation Panel. This will create a new slide with your scripture text. Do not worry
if your scripture does not fit onto the slide, we'll learn how to split text into multiple slides next when we drag in multiple
verses.
You can also highlight and drag multiple verses. Use your shift key to highlight several adjoining verses (click with your
mouse on the first verse, hold down your shift key and click with your mouse on the last verse). To highlight non-adjoining
verses, use the command key (Macintosh) or control key (Windows) while clicking with your mouse on multiple verses. Select
several verses so that we have too much text for one slide.
Sometimes there will be too much text to display on just one slide, so you can split the text into multiple slides. Drag and drop
your multiple verses into the Presentation Panel to create a new slide. Click with the right mouse button (or with single button
Macintosh mice, hold the control key while clicking with the mouse) on the slide with too much text. A pop up menu (called a
contextual menu) will show you several options for the selected slide. Select "Editor Window" and a window will open with the
text from the slide.
Use your mouse or arrow keys to move your cursor to locations where you would like to split the text and press the Enter key
(Windows) or the Return key (Macintosh) twice to create a blank line between the lines of text. Each blank line will indicate
where a new slide will be created when we exit the Editor Window. Select "Group Text" to leave the Editor Window and
observe the slides that have been created.
Step 5: Edit a Slide
Let's go back to the first slide we created and make some changes. Click with the right mouse button (or with single button
Macintosh mice, hold the control key while clicking with the mouse) on the slide and choose "Edit Slide" from the pop-up
contextual menu that appears.
Image: To select a slide to edit, select "Edit Slide" from the contextual menu
Notice that the slide will now have a red border around the slide thumbnail which indicates that this is the slide in the
Presentation Panel that is being edited. The text from this slide will appear in the canvas of the Slide Edit Panel. The text will
be highlighted, so be careful not to type anything on the keyboard or it will replace the text on the slide. Above the canvas,
you will find text controls that will allow you to change the font, size, style, alignment and even the color of the text. Play with
a few of these controls and see what you can do to change the look of your text.
Image: Controls in the Slide Edit Panel to change the attributes of the text
Background Images
There are also controls for working with the background image that have been added to the slide.
Image: Controls in the Slide Edit Panel to work with the background image
Step 6: Saving your Presentation
Saving a presentation takes a few steps because not only are you saving the presentation, but also each new object that you
have created so that they will be available to future presentations.
To save the presentation we are working on either pull the File menu to Save, use your mouse to click the Save icon in the
Toolbar or use a shortcut key (Windows: Ctrl+S or Macintosh: Cmd+S).
The first thing that we'll see is a list of all the objects we created in the Save dialog window.
.
Image: You need to choose an option for each media object to save the presentation
There may be several lines but do not be overwhelmed. Each object that needs to be saved will be listed. For each one, you
will need to select one of the options.
Save
If you only save an object, it will overwrite the previously saved object that has the same name. If you add a song to
your presentation and change the words or add a background image, using save will actually change the saved version
in the library. Use this option carefully or use Save As... to preserve the original objects already stored in the library.
Save As
If you use save as, a new object will be created in the library (so you can also give this object a different name if
another one exists). If you add a song to your presentation and change the words, using save as will add another
version of that song to the library. Once you check the box for save as, the name of the object can be changed.
Within Presentation
Some objects have the option to be saved "within the presentation" and will not appear in the Media Library. This might
be useful for simple objects that you do not plan to use again and again and would clutter your library.
Go through each line of the Save window and select one of the checkboxes. Once you finish and press OK you will be
prompted for a name of your presentation. Saved presentations in the library can have duplicate names and are identified by
their creation date.
You have just finished creating your first presentation!
Help Center Contents
help center contents • search
Help Center Contents
Basics
LiveWorship is software that creates Presentations to display on a second screen. Each Presentation consists of slides that
are organized into groups of slides.
Image: A presentation contains groups of slides
Typically, a Presentation will be made up of all the slides that are going to be used for an event (such as a church service).
Slides might include announcements, song lyrics, scripture references, and/or text slides with notes for sermons. Groups are
used to keep the slides organized and quickly accessible.
Image: Groups used to organize a Presentation
These names of the Groups are listed on the left and slides are arranged by their groups.
Image: Groups are listed on left and slides are arranged by their group
Selecting a Group name from the list on the left will highlight the group of slides. Often a Presentation will consist of many
groups and slides that make it difficult to display them all at once in the window, so this makes it easy to jump to a group and
the panel will scroll to show that selected group of slides.
Image: Select a group name in the list on the left and the group will be selected
Image: Location of presentation, groups and slides on the LiveWorship window
If you have a second screen attached (such as a second monitor or projector), selecting a slide thumbnail image will display
that slide on Screen 2.
Image: Selecting a slide thumbnail image will display that slide on Screen 2
(indicated by a green border around the thumbnail)
Help Center Contents
help center contents • search
Saving Your Presentation
Saving a presentation takes a few steps because not only are you saving the presentation, but also each new object that you
have created so that they will be available to future presentations.
To save the presentation we are working on either pull the File menu to Save, use your mouse to click the Save icon in the
Toolbar or use a shortcut key (Windows: Ctrl+S or Macintosh: Cmd+S).
The Save dialog window lists of all the objects that were created since the last save.
.
Image: You need to choose an option for each media object to save the presentation
There may be several lines but do not be overwhelmed. Each object that needs to be saved will be listed. For each one, you
will need to select one of the options.
Save
If you only save an object, it will overwrite the previously saved object that has the same name. If you add a song to
your presentation and change the words or add a background image, using save will actually change the saved version
in the library. Use this option carefully or use Save As... to preserve the original objects already stored in the library.
Save As
If you use save as, a new object will be created in the library (so you can also give this object a different name if
another one exists). If you add a song to your presentation and change the words, using save as will add another
version of that song to the library. Once you check the box for save as, the name of the object can be changed.
Within Presentation
Some objects have the option to be saved "within the presentation" and will not appear in the Media Library. This might
be useful for simple objects that you do not plan to use again and again and would clutter your library.
Go through each line of the Save window and select one of the checkboxes. Once you finish and press the Next button you
will be prompted for a name of your presentation. You must save your presentation in order for the objects to be saved into
the library. Saved presentations in the library can have duplicate names and are identified by their creation date.
Help Center Contents
help center contents • search
Exporting
LiveWorship allows you to export Presentations and Media (backgrounds, song lyrics, slide and group text, audio and video).
Exporting a Presentation
Select the item Presentations in the Media Library. Click with the right mouse button (or with single button Macintosh mice,
hold the control key while clicking with the mouse) on the name of a Presentation and select "Export". You will be prompted
for the name and location of where you would like to save the Presentation. Presentation files will have an LiveWorship file
extension (.lwp).
Exporting a Presentation will bundle all items from the LiveWorship library that go along with this presentation (background
images, songs, etc.) into one single file. This single file can then be copied and moved between registered copies of
LiveWorship (including moving between Macintosh and Windows platforms).
Exporting Media items
You can also export individual media items, such as just a song or background, that can then be imported into another copy
of LiveWorship. In the Library Panel, click with the right mouse button (or with single button Macintosh mice, hold the control
key while clicking with the mouse) on the name of a items and select "Export". You will be prompted for the name and
location of where you would like to save the file. Song files will have an LiveWorship song file extension (.lws).
Help Center Contents
help center contents • search
Importing
LiveWorship allows you to import many different types of media (images, video and audio) as well as Presentations and
Media items (backgrounds, song lyrics, slide and group text, audio and video) that have been exported from another copy of
LiveWorship.
Importing a Presentation
Pull the File menu to Import and select Presentation. Navigate to the item and select the name of the Presentation to import.
All the items that were bundled together when exporting from LiveWorship (song lyrics, images and other media items) will be
imported and placed into the Media Library. When you select the name of the Presentation under the Media Panel, the
Presentation will be displayed in the Presentation Panel. The names of groups will appear in the Slide Group Panel and slide
thumbnails will appear in the Presentation Panel.
Importing Media
Individual objects (such as background images, song files that have been exported from LiveWorship, audio and video files)
can be imported into the Media Library. Pull the File menu to Import and select Media. Navigate to the item and select the file
that you would like to import. Files will be placed into the media library under appropriate areas (images in Backgrounds, MP3
files in Audio, etc.).
Because LiveWorship is designed to be used in both Windows and Macintosh environments, file names will need to have
proper extensions (e.g. JPEG files should end with .jpg and TIFF files should end in .tiff) in order to be recognized as
importable files.
Importing CCLI/SongSelect files (in version 1.2+)
See adding song lyrics
Importing PowerPoint or Apple's Keynote files (in version 1.2+)
See adding song lyrics
Browse (Folder) and Import
This allows you to look at files outside the LiveWorship library. Initially, the default is to display files that are located on the
desktop of your computer. If you have no media files on your desktop, the Library Panel may be empty. To change the
directory or location of where you would like to browse for media files, click on the Browse title in the Media Panel (if not
highlighted, you may need to select and then click again on the title) and a dialog box will open so you can choose a folder to
"browse" for media items. Once you select a folder, image previews of files that LiveWorship recognizes will appear in the
Library Panel (this may take some time to scan all the files if you have several items in the folder). You can drag a media
item (such as a graphic or audio file) into the Presentation Panel. If you drop the item in a blank area of the Presentation
Panel a new slide will be created. This new object will not be imported (or appear in the Backgrounds, Audio, Video or Text
libraries) until you save the Presentation and name the object.
TYPE OF MEDIA
Image Formats
Video Formats
Format
BMP
GIF
JPEG/JPG
PDF
PNG
TIF/TIFF
AVI
MPG
Audio Formats
MPEG
MOV
SWF
AAC
MID (Windows)
MP3
WAV
Adding/Removing Bible Modules
LiveWorship comes with several Scripture or Bible Modules loaded. Some users may want to remove extra modules that
they are not going to use or to save storage space. Adding or removing modules is not a quick task, so plan on having some
free time while LiveWorship is re-indexing the database. Pull the File menu to Bible Module and select Add or Remove
Module.
NOTE: Depending upon your processor speed, the Adding or Removing process can take as much as 60 minutes or as little
as 5 minutes. To make searching scripture within the program as fast as possible, the database goes through an indexing
procedure which is time intensive. When adding or removing scriptures, please set aside plenty of time for the process to
complete. If the process is interrupted (power failure, force quitting or ending task), the scripture database may not be
searchable. Remove the scripture and add the module again.
For more information on how LiveWorship stores media, see the Advanced Topics page.
Help Center Contents
help center contents • search
Text Objects
(Slide Text vs Group Text)
LiveWorship uses two different kinds of text groups because sometimes you need text to act like a song, extending over
many slides, and sometimes you need text to be more like an independent object that can be combined with others to form
various groups. Slide Text was designed so that individual slides, that are saved as individual objects in the library, could be
mixed and matched when building a group (such as for a group of slides that are used for announcements). Slide Text has no
icon on the slide thumbnail image in the Presentation Panel. Group Text is similar to a song, a block of text that extends over
many slides, that is saved as one object in the library and is useful for sermon notes or quotes from a book that would extend
over multiple slides. Group Text has a "T" icon in the bottom left of the slide thumbnail image in the Presentation Panel.
While it's possible to use both of these and not have a complete understanding of how they are different, Group and Slide Text
can be best understood by how each are created (and how the Editor Window works) and how they are handled by the
program.
Group Text Definition
Group Text is typed information that can be spanned over several slides (similar to song lyrics/verses) but be saved
as one group. Group Text is saved into the library file and, like the collection of songs, will be available when you build
another presentation. Group Text can be identified by a "T" icon in the bottom left corner of the slide thumbnail image
in the Presentation Panel.
Group Text would be useful when creating a series of slides that are all associated with each other, such as a
sermon/lesson or quotation from a book that would not fit onto one slide.
Image: Group Text is saved as one object
Group Text can be identified by the "T" icon
Slide Text Definition
Slide Text is typed information on one slide and saved as an individual object in the library. This allows Slide Text
objects to be mixed and matched when building groups (as opposed to Group Text which is more like a song, text
extended over several slides under one group name). Slide Text has no icon in the bottom left corner of the slide
thumbnail image in the Presentation Panel.
Slide Text is also different in how it is saved. It can be saved like other objects or it can be saved "within the
presentation" where it was created. This is an advantage because you may have a slide that is not needed beyond the
presentation and this will save space in the LiveWorship library file. By saving it within the presentation, the Slide
Text object will not be available for use in other presentations.
Examples of when slide text would be preferred might be having a presentation of slides for announcements that are
not related (eg. Vacation Bible School announcement, reminder to turn off cell phones, upcoming Bible study group
meeting times). You would want to be able to create, edit, store and retrieve these slides individually when building
presentations.
Image: Slide Text is individually saved text objects
(note that there is NO indicator icon)
Creating Text Slides
LiveWorship creates Slide Text when you drag text (from a file outside the program using Browse) or Scripture text from the
Scripture media library into the Presentation Panel or just begin typing on a blank slide. Slide Text can also be created when
you have text in the Editor Window and you select the "Slide Text" button. Using this technique, you could convert Group
Text or a Song into Slide Text.
Group Text is created (like a song) through the Editor Window. To create Group Text, select "New Group Text" from the File
menu. When you exit the Editor Window, clicking the "Group Text" button will create Group Text slides.
Converting between Slide Text, Group Text and Song Lyrics
The Editor Window can be used to convert text between the Slide Text, Group Text and Song formats. Simply click with the
right mouse button (or with single button Macintosh mice, hold the control key while clicking with the mouse) on a slide and
select "Editor Window" from the contextual menu that pops up. The Editor Window will appear with the text from that group.
See below for more information about the Editor Window, but if you select a button with a different format, the object will be
converted into a different format. If the object you are converting has not been saved, you will simply change the format. If the
object already has been saved to the LiveWorship library, you will be creating a new, separate object that you will be
prompted to save into the library.
The Editor Window
The Editor Window is where text can be created, easily edited, divided into multiple slides or converted between text
formats. When you create a new song or Group Text, the Editor Window will appear and you can type or paste text. You can
also click with the right mouse button (or with single button Macintosh mice, hold the control key while clicking with the
mouse) on a slide and select "Editor Window" from the contextual menu that pops up.
You can change the text attributes, such as font, size, style or alignment in the Slide Edit Panel.
Image: Editor Window
Dividing Text into Slides
Image: The Editor Window is used to divide text (slide, group, songs) into slides
While you are editing text in the Editor Window, the blank lines in between blocks of text will be used to determine where new
slides will be created after you exit the editor. This allows text to be quickly converted into multiple slides and very useful
when you paste in song lyrics (maybe a message/sermon from a website). The preference setting for one blank line to
indicate where slides should be divided will work in most circumstances unless you need to have one or more blank lines on a
slide (in which, you would change this preference setting and increase the number of blank lines needed to indicate where
slides are divided).
Example: Text with One Blank Line
Kum ba yah, my Lord,
Kum ba yah.
Kum ba yah, my Lord,
Kum ba yah.
Kum ba yah, my Lord,
Kum ba yah.
O Lord, kum ba yah.
Someone's prayin' Lord,
Kum ba yah.
Someone's prayin' Lord,
Kum ba yah.
Someone's prayin' Lord,
Kum ba yah.
O Lord, kum ba yah.
One blank line within the text
If the preference setting for dividing slides is "One Blank Line to Create New Slide", then two slides would be created:
Image: Results of having the preference setting "One Blank Line to Create New Slide"
If the preference setting for dividing slides is "Two Blank Lines to Create New Slide", then one slide would be created:
Image: Results of having the preference setting "Two Blank Line to Create New Slide"
Example: Text with One Blank Line and then Two Blank Lines
Building relationships is effective youth ministry
Quality youth ministry is built on the foundation of meaningful relationships.
Beyond all the hype and flashy programs, it's the relationships with kids that measure
an outstanding youth group.
One blank line and then two blank lines within the text
If the preference setting for dividing slides is "One Blank Line to Create New Slide", then three slides would be created:
Image: Results of having the preference setting "One Blank Line to Create New Slide"
If the preference setting for dividing slides is "Two Blank Line to Create New Slide", then two slides would be created:
Image: Results of having the preference setting "Two Blank Line to Create New Slide"
Editor Window Buttons, Slides and Groups
Depending upon which button you select to exit the Editor Window, LiveWorship will divide the slides and create the selected
object(s) for the library.
Selecting the Slide Text Button
Each slide that is created will become an individual object. Each of these objects can be saved within the presentation (only
available to this presentation) or as an object within the Slide Text media library.
Image: Each text block becomes an individual object that needs to be saved individually
Selecting the Group Text Button
Each slide that is created will be a part of a group. When you save, this group will be saved to the Group Text media library.
Image: Each text block is divided into slides, but all the slides are still one group and saved under one name
Selecting the Song Button
Each slide that is created will be a part of a group. When you save, this group will be saved to the Song Lyrics media library.
Image: Each text block is divided into slides, but all the slides are still one group and saved under one name
Help Center Contents
help center contents • search
Displaying a Presentation
If you have a second screen attached (such as a second monitor or projector), selecting a slide thumbnail image in the
Presentation Panel will display that slide on Screen 2. This slide that is being displayed will be indicated by a green border
around the thumbnail image in the Presentation Panel. If you have no slides in the Presentation Panel, you will either need to
open a previously saved presentation (select Presentations in the Media Panel and select a presentation from the list in the
Library Panel) or began building a new presentation (follow the Quickstart Guide to make a small presentation).
Image: Selecting a slide thumbnail image will display that slide on Screen 2
(indicated by a green border around the thumbnail)
Using the Preview Panel
Image: While a second screen is attached, use the "Screen 2" tab
in the Preview Panel to view the slide being displayed
While a second screen is attached and enabled, you can use the Screen 2 tab on the Preview panel to see the slide currently
selected to display on the second screen. In version 1.1, the screen 2 tab was changed to show a "live" view of what is being
displayed on the second screen along with the "next" slide to be displayed. Clicking on the preview panel or the "next" preview
will switch you to the edit tab and change the "edit" focus to that slide (indicated by a red border around the slide thumbnail in
the Presentation Panel).
You can continue to select other slides to display on Screen 2 while on the Edit tab. You can still edit this slide by clicking on
the Preview panel which will switch the tab to edit and If you bail to black, a pre-set logo, or the current background image
without any text or the color bars, you can also still be editing slides using the Edit tab. To present a slide that has been
edited, just re-select the thumbnail image in the Presentation Panel.
Presentation Panel Auto-scroll
Image: If the Presentation panel is not sized to show all slides,
selecting a group will automatically scroll the Presentation
panel to show the currently selected group.
While you can change the size of the thumbnail images of slides in the preferences, often the thumbnail image will be larger
so that you can visually identify individual slides. When you have more slides in a presentation than are visible at one time in
the Presentation panel, clicking on a group name will automatically scroll the Presentation panel window so that the selected
group is visible in the Presentation panel.
Slide Thumbnail Keyboard Keys
Image: On Slide thumbnail images in the Presentation Panel,
the character in the bottom right corner can be used to display slides
In the bottom right corner of the slide thumbnail images in the Presentation Panel, you will see a character. This character is
tied to your keyboard and can be used to select slides when you have the Screen 2 tab selected in the Preview Panel.
Hide Media and Library Panels
Image: Presenting and need more space? Drag the divider to hide the media and library panels
The size of the slide thumbnail images can be changed in the Size Preferences. However, you may prefer thumbnail images
that are easy to read and want to maximize your view while displaying a presentation without needing to use the Media and
Library panels for editing. Click with your mouse on the divider between the panels and drag the divider to the bottom of the
window to hide the Media and Library panels which will increase the viewing area of the slide thumbnails.
Help Center Contents
help center contents • search
Search Features
Before searching, select an area to search from the Media Panel:
Image: Select one of the areas of the media panel to search
At the top of the Library Panel, there is an entry box next to a Search button. Type in what you are searching for in the title of
the media object and click the Search button.
Image: Search box at the top of the Library Panel
How searching works in LiveWorship can be changed in the Find Preferences. The default for searching is looking for words
that start with the same text that you enter into the search, matches all the words that you enter and is not case sensitive.
Image: Find preferences that can customize how LiveWorship searches
Searching Scriptures
When you select Scriptures in the Media Library, a drop down menu will appear above the Category and Library Panels and
next to the search box. These search options allow you more selectively search through the Bible modules that have been
loaded into LiveWorship.
Image: Scripture search options
Easy View
This view allows you to quickly locate a passage by selecting a version, the book and then chapter. The verses will appear in
the bottom of the Library Panel. This allows you to "drill" down to what you are looking for quickly.
Image: Using the Easy View, select a version, then book then chapter...verses appear in the bottom panel.
You can use the search drop down menu to limit the search (search more quickly and narrow the results).
Categories
Categories allow you to "tag" media items (Backgrounds, Song Lyrics, Text Objects, Audio/Video) to quickly find them or
narrow your search. While you have selected a media type, the Category Panel appears between the Media and Library
Panels.
Image: The Category and Library Panels
For more information on how to create and use categories, see Library and Categories Panels.
Help Center Contents
help center contents • search
Preferences Settings
There are various settings that can be changed to adapt how the LiveWorship program functions.
To open the Preferences, pull the (Windows: Edit menu, Macintosh: LiveWorship menu) to Preferences or use the shortcut
key (Windows: Ctrl+, (comma key), Macintosh: Cmd+, (comma key)). The tabs across the top will allow you to choose which
set of preferences you would like to view or change.
Image: Tabs in the Preferences Window
Preferences: Size
Screen Two Resolution Setting
NOTE: LiveWorship does NOT change the resolution of your second screen or monitor, these settings are made by the user
in your computer's Display Control Panel. The resolution setting of the second screen in the LiveWorship preferences should
MATCH the setting of the computer. If you experience the second screen image not matching (LiveWorship image on your
second screen is smaller or larger than the screen) then you may need to check the settings of the second screen in your
Display Control Panel preferences on your computer and make sure you set LiveWorship's resolution preferences to match
(or set LiveWorship to Auto for the resolution size and LiveWorship will attempt to discover the settings of your second
screen).
LiveWorship was designed for a primary screen resolution of 1024x768 and the second screen set at 800x600 for optimal
performance.
When you adjust the resolution that LiveWorship is using for the second screen image, the Preview Panel and Slide Edit
Panel will be adjusted to match these resolution sizes. This may affect the position of the Canvas margin sliders and
potentially skew margins and text on a slide. Readjust the margin sliders and apply the changes to the current group (you may
also need to restart LiveWorship if you see abnormal images on the second screen). Also, LiveWorship may not recognize a
second screen (monitor or projector) if it is plugged in after LiveWorship is already running. Quit and relaunch the
LiveWorship program if this happens.
Image: Size Preferences
Match the resolution of your computer's Display Control Panel settings for the second screen (monitor or projector) that has
been attached. If you select Auto, LiveWorship will try to discover the resolution settings and use those for LiveWorship's
second screen image.
Preview Scale Setting
The Preview setting is a percentage of the resolution setting of your second screen image. If you choose a smaller Preview
Panel setting, you will see WYSIWYG (stands for "What You See Is What You Get") font controls. Otherwise, you will have
drop down menus for the font and size controls in the Slide Edit Panel. If you select the "Detect Best" button, LiveWorship
will look at your monitor resolution and suggest a size for your screen.
Slide Thumbnail Size
This slider control allows you to adjust how large or small the thumbnail images of slides will appear in the Presentation Panel.
You can manually enter in the value by selecting the "Slide Thumbnail Size" title above the slider control and enter in the
number of vertical pixels (25 to 400 pixels).
Library Thumbnail Size
This slider control allows you to adjust how large or small the thumbnail images will appear in the Library Panel. You can
manually enter in the value by selecting the "Library Thumbnail Size" title above the slider control and enter in the number of
vertical pixels (25 to 400 pixels).
Preferences: Image
Image: Image Preferences
The Logo Background image is what will appear on your second screen when you click on the "Bail to Logo" button on the
Toolbar. The Default Slide Background is the image or settings (background color and scale/stretch) that will be used when
creating new slides in the Presentation Panel. You can change either of these default images by clicking on the "Select..."
button and navigating to the image on your computer. If an image does not cover the entire screen, use the color swatch
below each preview to set the background color. The "Use Color" checkbox will override any selected images and use the
selected color as the slide background image.
Scale to Full Screen
The image is reduced or enlarged until either the image has fit into the screen either horizontally or vertically.
Unless your image matches the same aspect ratio of the second screen resolution, you may see some of the
background color behind your image.
Stretch to Fill Screen
The image is pulled horizontally and vertically to completely fill the screen without being able to see the
background color of the slide. This may distort your image.
Custom Size
With this selection, the image will be centered at it's original resolution.
Preferences: Slide
Set the default preferences for how text will appear on new slides.
Image: Font Preferences for text on new slides
Use the controls to set the attributes of text as it will appear on new slides that you create. You can choose to set the Bold,
Italics, Underline or Shadow styles on or off. Set the default color of the font and text shadow, the font and size of text. The
nine direction alignment tool can center or align the text at the top, bottom, right, left or any of the four corners. Of course, you
can always edit each slide or slide group after it has been created and change any of these settings.
Preferences: Copyright
Set the default preferences for how information, such as the CCLI#, appears on slides.
Image: Preferences for song information that appears on a slide
When a song appears, you may want information such as the title, author, copyright or the CCLI# (Christian Copyright
Licensing International number that allows organizations to freely reproduce songs for worship purposes) to appear on the
second screen. Use the controls to set the attributes of text as it will appear on the second screen. You can choose to set the
Bold, Italics, Underline or Shadow styles on or off. Set the default color of the font and text shadow, the font and size of text.
The nine direction alignment tool can center or align the text at the top, bottom, right, left or any of the four corners. There is
also an alignment control so you can center, left or right align the column of text. If you would like a background block of color
to help highlight this information, select the "Block" checkbox and use the color swatch to set this color.
Use the checkboxes to select whether or not each type of information will appear on a slide. To change this information for
each song, click with the right mouse button (or with single button Macintosh mice, hold the control key while clicking with the
mouse) on the song title in the Library Panel and choose Advanced from the contextual menu that appears.
You have an option for whether or not this information will appear on the first slide of a song, all slides, the last slide or none
of the slides.
Preferences: Alert
Change the preferences for how Show Alert messages will be displayed on the second screen. When a second screen is
attached and enabled, clicking on the Show Alert button on the toolbar will display text at the bottom of the screen. See Show
Alert for more information.
Image: Preferences for alert information that appears on the screen
Use the controls to set the attributes of the alert text as it will appear on the second screen. You can choose to set the Bold,
Italics, Underline or Shadow styles on or off. Set the default color of the font and text shadow, the font and size of text. Use
the alignment control to place the alert text at the center, left or right of the bottom edge of the second screen. If you would
like a background block of color to help highlight this information, select the "Block" checkbox and use the color swatch to set
this color.
Preferences: Find
Change the preferences for search settings. The search box at the top of the Library Panel will use these settings for
searching.
Image: Preferences for alert information that appears on the screen
Search
Starts With
This is the default setting. Starts With means that if you search for "his", you would find any matching words that
begin with the characters "his" including History or hiss. This will NOT find words that have the word "his" in the middle
of the word such as Thistle (in addition to the word his because it also begins with the search word.
Contains
This setting will search for all words that contain your search word. So if you search for "he" it would find titles or files
that include "the" or "Shelia". This is the most liberal of the searches and likely to find the most matches.
Exact Match
This setting will match your search word exactly with the same word in titles or files. This is the most restrictive search
criteria and will return the fewest results. Searching for "his" you only find matches that include the word "his".
Case
Case Insensitive
This setting is the default. Searching will match file names or titles regardless of whether or not they include any
capitalization, upper or lower case characters. Searching for "His" would find His, his and HIS.
Case Sensitive
Using this setting, the seach would have to match the same capitalization. Searching for "His" would find His but NOT
his or HIS.
Find Results
All Words
This is the default settings. When searching for more than one word, this will find matches that include all the words
used in the search. For example, when searching Scripture, if you type "Love Faith" into the Search textbox, you will
find all verses of Scripture with both love AND faith in them, but not just one of these words by itself. This is a more
restrictive search.
At Least One Of The Words
When searching for more than one word, this will find all matches where either one of the search words is contained.
For example, when searching Scripture, if you type "Love Faith" into the Search textbox, you will find all verses of
Scripture that have EITHER love OR faith in the verse. This is a more liberal search.
Preferences: Misc
Image: Preferences for Miscellaneous items in versions 1.0 and 1.1
Scripture Titles
This feature controls how text heading are created for new slides when dragging multiple Scripture verses into the
Presentation Panel.
Include Version
This checkbox indicates whether or not you would like the version information to appear along with scripture verses.
For example if this box was checked and you drag a scripture from the New International Version you would see: (NIV)
included with the scripture.
Summary
This will summarize multiple Scripture references. For example, if John chapter 3 verses 1,3, 5, and 6 are chosen the
heading will display as Jn. 3:1, 3, 5-6 above the entire group of verses. If you have the "include version" checkbox
marked you will also see the version abbreviation in parenthesis.
Detailed
Every verse of Scripture displayed is headed with its own verse reference. If you have the "include version" checkbox
marked you will also see the version abbreviation in parenthesis.
None
No Scripture reference headings are generated or displayed.
Same scripture passage with different version preferences:
Summary
preference
Rom. 3:5-7
But if our
unrighteousness
commends the
righteousness of God,
what will we say? Is God
unrighteous who inflicts
wrath? I speak like men
do. May it never be! For
then how will God judge
the world? For if the
truth of God through my
lie abounded to his
Detailed
preference
Rom. 3:5
But if our
unrighteousness
commends the
righteousness of
God, what will we
say? Is God
unrighteous who
inflicts wrath? I
speak like men do.
Rom. 3:6
May it never be!
For then how will
God judge the
world?
Rom. 3:7
None preference
But if our
unrighteousness
commends the
righteousness of God,
what will we say? Is God
unrighteous who inflicts
wrath? I speak like men
do. May it never be! For
then how will God judge
the world? For if the
truth of God through my
lie abounded to his
glory, why am I also still
glory, why am I also still
judged as a sinner?
For if the truth of
God through my lie
abounded to his
glory, why am I
also still judged as a
sinner?
judged as a sinner?
Table: Changing the Misc Preference on how scripture passages are labeled
Scan for Duplicate Files Under: (combined with "auto import files" in versions 1.2+)
When you add external files to LiveWorship, the files are copied into LiveWorship's library. To avoid having multiple files,
LiveWorship can check to make sure it's not adding files if they already exist in the library. Larger files will take longer to
check, so you can set a file size limitation to keep the import time reasonable. Setting the Duplicate Check to always would
be Always would be safer, but very slow. Setting the Duplicate Check to "never" would be faster, but risk having multiple
copies of the same file in the library and bloating the space of the library file. The default setting for the Duplicate Files Scan
is 16 Mb. For more information about the Media Library, see Advanced Topics.
Auto Import Files Under:
When you add external files to LiveWorship, the files are either duplicated, renamed and copied into LiveWorship's library or
linked to the external file. To avoid importing files that would be excessively large, such as a video file, LiveWorship is
initially set to prompt you for files that are larger than a particular size. Files that are not imported will be externally linked.
Having files imported into the LiveWorship library means they are more likely to be available to the presentations that you
have built and more portable since they can be moved along with the entire library folder. Files that are not imported and only
linked are more likely to be disconnected and not available to a presentation. Setting all files to be imported might bloat the
size of the LiveWorship library file, especially with large files. Setting all files to not be imported or just linked means that if
files are moved or deleted, a presentation will be altered. If you import a file that exceeds this Preference setting,
LiveWorship will prompt you to see if you would like to import or only link the file. The default setting for the Auto Importing is
256Mb. For more information about the Media Library, see Advanced Topics.
Resample Large Images
This setting helps keep the library smaller by allowing LiveWorship to resize an imported image to the current resolution
settings used by LiveWorship. If the resolution of an imported image is greater than the setting specified here, LiveWorship
will 'resample' the image and import it at this specified resolution so that it is more easily used by the application. It is NOT
recommended that you specify 'Never' since this will cause your library to potentially become bloated and larger images may
slow down the program performance. For more information about the Media Library, see Advanced Topics.
Blank lines for Creating Slides (in the Editor Window)
Image: The Editor Window is used to divide text (slide, group, songs) into slides
While you are editing text in the Editor Window, the blank lines in between blocks of text will be used to determine where new
slides will be created after you exit the editor. This allows text to be quickly converted into multiple slides and very useful
when you paste in song lyrics or even a message/sermon. The preference setting for one blank line to indicate where slides
should be divided will work in most circumstances unless you need to have one or more blank lines on a slide (in which, you
would change this preference setting and increase the number of blank lines needed to indicate where slides are divided).
Example: Text with One Blank Line
Kum ba yah, my Lord,
Kum ba yah.
Kum ba yah, my Lord,
Kum ba yah.
Kum ba yah, my Lord,
Kum ba yah.
O Lord, kum ba yah.
Someone's prayin' Lord,
Kum ba yah.
Someone's prayin' Lord,
Kum ba yah.
Someone's prayin' Lord,
Kum ba yah.
O Lord, kum ba yah.
One blank line within the text
If the preference setting for dividing slides is "One Blank Line to Create New Slide", then two slides would be created:
Image: Results of having the preference setting "One Blank Line to Create New Slide"
If the preference setting for dividing slides is "Two Blank Lines to Create New Slide", then one slide would be created:
Image: Results of having the preference setting "Two Blank Line to Create New Slide"
Example: Text with One Blank Line and then Two Blank Lines
Building relationships is effective youth ministry
Quality youth ministry is built on the foundation of meaningful relationships.
Beyond all the hype and flashy programs, it's the relationships with kids that measure
an outstanding youth group.
One blank line and then two blank lines within the text
If the preference setting for dividing slides is "One Blank Line to Create New Slide", then three slides would be created:
Image: Results of having the preference setting "One Blank Line to Create New Slide"
If the preference setting for dividing slides is "Two Blank Line to Create New Slide", then two slides (but note the line break on
the first slide) would be created:
Image: Results of having the preference setting "Two Blank Line to Create New Slide"
Registration Information button
Allows you to view or change the registration settings for LiveWorship.
View EULA (End User License Agreement) button
View the End User License Agreement.
Help Center Contents
help center contents • search
Show Alert
The Show Alert button allows you to post an alert on the bottom of the second screen (font, color and alignment can be edited
in the alert preferences). Click on the Show Alert button in the Toolbar to enter in your text message. The Show Alert button
works as a toggle for displaying or removing the message from the second screen.
The Show Alert tool can be used for displaying messages for parents with children in the nursery or perhaps a car in the
parking lot with their lights left on along with a license plate number.
Help Center Contents
help center contents • search
Advanced Topics
How the Media Library Works
As you build presentations, you will likely want to add external files (such as background images and media files that are not
in the Media Library). These files will either need to be copied into the internal LiveWorship Media Library or "linked" so
LiveWorship can find the file outside the library when needed to edit or display the presentation. The initial settings for
LiveWorship is to create a link to files larger than 256 Mb and then duplicate, rename and copy files that are smaller into the
Media Folder (within the LiveWorship folder). While these settings can be adjusted, these default settings allow LiveWorship
to manage media files most efficiently.
Why link larger files and import smaller files?
When files are imported they are duplicated, renamed and copied into the Media Folder that resides inside the LiveWorship
Folder on the computer's harddrive. By putting all these files in one location (the Media Folder) means that they are not as
likely to be disconnected from the Presentations and other media objects that you construct within LiveWorship. The default
is to only import files under 256 Mb because duplicating larger files (such as a large video clip) will not only take time, but
very likely consume valuable disk space.
If you change the Auto Import Preference setting to "never prompt" (in version 1.2+ this option has been removed), all files
would be automatically imported into the Media Library. The advantage would be better management of the files, but the
disadvantage would be large files that are slow to import and consume valuable disk space because they are duplicated and
copied into the Media Folder. If you change the Auto Import Preference setting to "always prompt" (in version 1.2+ this option
has been removed), you would need to make a decision for every file whether or not it was imported or only linked. Linking
files can reduce disk space (since files would not be duplicated), but files may then be scattered among various folders and
storage devices and that puts them at a greater risk of being moved or deleted and therefore, disconnected from any
presentations that were built with the objects.
Help Center Contents
help center contents • search
Short Tutorials: Adding Backgrounds
Backgrounds are images (or video in v1.2+) that have been added to a slide.
Viewing Backgrounds Images in Media Library
In the lower left corner of the LiveWorship window, select the Backgrounds item in the Media Panel (overview of panel
locations). Once you select Backgrounds, you will see images displayed in the Library Panel.
[Later: If you would like to use your own images, see Import Media for instructions on how to add files to the LiveWorship
library.]
Creating a New Slide with a Background Image
Choose a background by positioning the cursor over the image, hold down your mouse button and drag and drop the image
into a blank area of the Presentation Panel. This will create a slide thumbnail in the Presentation Panel and a new group name
will appear in the Slide Group Panel.
Image: Drag an image from the Library Panel into the Presentation Panel
Changing the Background Image of a Slide
Choose a background by positioning the cursor over the image in the Library Panel, hold down your mouse button and drag
and drop the image onto an existing slide in the Presentation Panel.
Changing the Background Image of an entire Group
Choose a background by positioning the cursor over the image in the Library Panel, hold down your mouse button and drag
and drop the image onto the name of the group in the Slide Group Panel.
NOTE that the group name does NOT HIGHLIGHT when you drag an image over the group names. The background image will
drop where the tip of the arrow cursor is located when you let go of the mouse button. Watch the animation below to see this
in action.
LiveWorship supports the following file formats: JPG/JPEG, GIF, BMP, TIF/TIFF, PNG, PDF
Animation: Click the Play button to download video of adding a song and changing the background image
Help Center Contents
help center contents • search
Short Tutorials: Adding Scripture
Image: After Selecting Scriptures in the Media Library,
select translation, book and chapter in the Library Panel then select a verse.
LiveWorship comes with several versions of the Bible. To add scripture, select Scriptures from the Media Panel. In the
Library Panel, you will see Books and Chapters of the Bible listed. Select a book, then a chapter and finally click with your
mouse on a scripture verse and drag this into the Presentation Panel and drop (but not onto an existing slide). This will create
a new slide with your scripture text.
Dragging Multiple Verses
You can also highlight and drag multiple verses. Use your shift key to highlight adjoining verses (click with your mouse on the
first verse, hold down your shift key and click with your mouse on the last verse). To highlight non-adjoining verses, use the
command key (Macintosh) or control key (Windows) while clicking with your mouse on multiple verses. In the miscellaneous
preferences, you have an option to include the version abbreviation and also specify how the LiveWorship will put in the
references for multiple verses. You can select between having the reference summarized at the top of the selection or each
verse will have a reference at the beginning.
Splitting Text Over Multiple Slides
When you are building a slide, you may have too much text on one slide so you can use the Editor Window to split the
information onto multiple slides. Click with the right mouse button (or with single button Macintosh mice, hold the control key
while clicking with the mouse) on the slide. A pop up menu will show you options for that slide. Select "Editor Window" and a
dialog box will open to display the text on the slide. Use your mouse or arrow keys to move your cursor to locations where you
would like to split the text and press the Enter key (Windows) or the Return key (Macintosh) twice to leave a blank line (the
number of blank lines needed to indicate where a new slide begins can be changed in the miscellaneous preferences so that
you can allow for blank lines on slides). Once you leave the Editor Window, the blank lines will be used to determine how to
divide this text over multiple slides. See Editor Window for more information.
If you are having trouble locating a certain passage of Scripture, you may use the Search function for one or both versions of
the Bible to find what you are looking for.
Help Center Contents
help center contents • search
Short Tutorials: Adding Song Lyrics
LiveWorship comes with a database of almost 400 public domain songs. You can also add new songs to the database
quickly by copying song text (such as from a song lyric webpage) and then pasting this into the Editor Window.
Adding a Song to a Presentation
Let's add a song from the Media Library to a presentation. Select Song Lyrics from the Media Panel. A list of songs will
appear in the Library Panel. Clicking on either the title or author column headings will sort the files. The column headings are
"toggle" buttons and will alternately sort the column in ascending or descending order. Select a song with your mouse, drag
and drop it on a blank area of the Presentation Panel. You may see one or several slides added to the presentation and the
name of the song will appear in the Slide Group Panel. If the song is divided into verses, each verse will create a slide.
[Later: Add a background to your song slides. Adjust the text attributes in the Slide Edit Panel.]
Creating a New Song
If you would like to add more songs to the media library, create a new song by either pull the File menu to New Song, clicking
the New Song button on the Toolbar or using the shortcut keys (Windows: Ctrl G, Macintosh: Cmd G). The Editor Window will
open up and you can either type or paste song lyrics (from a text file or copied from a website) into the window. Multiple slides
will be created by having blank lines between blocks of text (see Editor Window for more information).
Image: Paste song lyrics into the Editor Window and select the Song button
Importing Songs from CCLI/SongSelect (available in v1.2+)
CCLI stands for "Christian Copyright License International". Churches who want to display, print or use copyrighted music for
worship can purchase a license (often referred to as a CCLI#). SongSelect is a service provided through CCLI that allows
subscribers to download (or print) lyrics for copyrighted worship music. Files downloaded from SongSelect are simple text files
that can be opened with a word processor and then the lyrics can be copy and pasted into LiveWorship to create a song file.
LiveWorship also allow storing of CCLI data such as Title, Artist, Copyright and CCLI# for each song. To access these fields,
right click on the song title in the media library and choose "Advanced" from the menu.
In version 1.2+ there is an import feature for files that have been downloaded from the CCLI/Song Select site. These files will
be recognized as SongSelect when you import them into LiveWorship and the CCLI data will be automatically entered for each
song.
Link to CCLI's web site
Importing Songs from PowerPoint (or Apple's Keynote) slides (available in v1.2+)
LiveWorship plays nicely with PowerPoint so you can run the two programs side by side and toggle back and forth between
them. The "disable screen 2" button on the toolbar will surrender control of the second screen so that another program such
as PowerPoint, Keynote or another presentation software can be used side by side with LiveWorship.
If you have already created PowerPoint files that have song lyrics, you might try to convert those into LiveWorship slides. In
version 1.2+, if you import a PowerPoint file LiveWorship attempts to launch PowerPoint (you must have PowerPoint
installed on the same computer) and then tries to strip the text and background images and recreate the slides in
LiveWorship.
To import Keynote presentations, first export from Keynote as a PowerPoint file format and then follow the instructions for
importing a PowerPoint presentation.
Help Center Contents
help center contents • search
Short Tutorials: Adding Text
LiveWorship uses two different kinds of text groups because sometimes you need text to act like a song, extending over
many slides, and sometimes you need text to be more like an independent object that can be combined with others to form
various groups.
Let's add some Slide Text (see Text Objects for more information on types of text objects). Click with the right mouse button
(or with single button Macintosh mice, hold the control key while clicking with the mouse) on a blank area in the Presentation
Panel and select "New Slide" from the contextual menu that pops up. You may also need to provide a name for a new group
in which this new slide will belong.
Image: Select "Add Slide" from the contextual menu in the Presentation Panel
Image: New slide thumbnail
You will see a slide thumbnail created in the Presentation Panel. Observe the color of the border around this new slide
thumbnail. If this border contains red (this indicates that this slide is currently being edited), you can begin typing text on the
slide. (If the border does not contain red, click with the right mouse button (or with single button Macintosh mice, hold the
control key while clicking with the mouse) on the slide and select "Edit Slide" from the contextual menu that pops up.)
The text you type will appear on the slide thumbnail in the Presentation Panel, in the Preview Panel in the top right corner
(showing you how this slide will look on the second screen) and also in the Canvas at the bottom right in the Slide Edit Panel.
The cursor will be in the Canvas and you can move the cursor, highlight and edit or change the attributes of the text.
Help Center Contents
help center contents • search
Short Tutorials: Adding Audio or Video
An Audio file or Video file can be added to a slide. While presenting to the second screen, the audio or video file that is
attached to a slide is triggered to play when you display that slide to Screen 2. Video files act like background images when
added to a slide (they will replace any current background image) and are removed the same way as a background image (see
image controls in the Slide Edit Panel).
Select the Audio or Video item from the Media Panel in the bottom left of the LiveWorship Window. A list of these files will be
displayed in the Library Panel. The file names and the date the file was created will show in columns and clicking on either of
these column headings will sort the files. The column headings are "toggle" sort buttons and will alternately sort the entries in
ascending or descending order. Select a file by positioning your mouse cursor over it, holding the mouse button down, then
drag and drop the file in a blank area of the Presentation Panel. Video files slides will display the first frame of the video as
the background and audio files slides will use the default background image. You may also need to provide a name for a new
group in which this new slide will belong.
You will see a slide thumbnail created in the Presentation Panel. Observe the color of the border around this new slide
thumbnail. If this border contains red (this indicates that this slide is currently marked for editing), you can "play" this media in
the Preview Panel. (If the border does not contain red, click with the right mouse button (or with single button Macintosh mice,
hold the control key while clicking with the mouse) on the slide and select "Edit Slide" from the contextual menu that pops
up.) In the Preview Panel (make sure the Edit tab is selected), use the Play and Stop buttons directly under the Preview
Panel to start and stop the video/audio file.
When you click on the slide in the Presentation Panel, the video or audio file will start playing.
LiveWorship supports the following audio file formats: WAV, MP3, AAC, MID (Windows)
LiveWorship supports the following video file formats: MPG, MPEG, AVI, MOV, SWF
Help Center Contents
help center contents • search
Short Tutorials: Adding a Slide Show
This adds a folder of images as a group to your presentation with a five second delay between each image.
To add a slide show group, pull the File menu to Create Slideshow or use the shortcut key (Windows: Shift+Ctrl+C,
Macintosh: Shift+Cmd+C) and an open file dialog box will open. Navigate to a folder and highlight multiple files (Windows:
Shift-click for adjacent files; Ctrl-click for non-adjacent files, Macintosh: Shift-click for adjacent files, Cmd-click for nonadjacent files). After highlighting the files, click the "Create" button and these files will be added internally to your presentation
as a group.
To play this slide show group of slides, click with the right mouse button (or with single button Macintosh mice, hold the
control key while clicking with the mouse) on the name of the group in the Slide Group Panel and select "Play this group",
which will play through once, or "Loop this group", which will continue to play the group over and over until you click the Stop
button on the Toolbar or select another slide to be displayed.
Help Center Contents
help center contents • search
Version History
Version 1.2
Released publicly on January 10, 2006
Beta 1.2b6 limited release on CD on December 30, 2005
Beta 1.2b4 released publicly on December 22, 2005
Beta 1.2b2 released publicly on December 16, 2005
Beta 1.2b1 released publicly on November 17, 2005
Changes in v1.2 include:
Feature: Text over video
Video (or motion) files can now be used as background for slides with text (song lyrics, slide text or group text objects).
Just drag a video file onto a slide and it will become the background image. Transitions will be cuts while using text
over video. See system requirements for details on hardware requirements for using motion backgrounds. In v1.2b2,
video clips that have no text on the same slide will play through once while video clips that are used with slides that
have text continuously loop.
Feature: PowerPoint Import
Convert PowerPoint slides into LiveWorship slides. This feature requires PowerPoint be installed on the same
computer. When you import a PowerPoint file, LiveWorship will launch PowerPoint to complete the import. Options
include importing the presentation as flattened jpeg images (text embedded, and thus uneditable, into background
image), attempting to strip the text only (gives the ability to edit the text in LiveWorship) or attempting to strip both the
background image and the text (ability to edit the text and background image will be added to the LiveWorship
backgrounds library) to re-create the slides in LiveWorship. See Importing for more detail on how to import files.
Feature: SongSelect Import
Text files downloaded from CCLI's SongSelect will be recognized when you import them into LiveWorship. See
Importing for more detail on how to import files.
Feature: Apply to Group button
Selecting "apply to group" in the Slide Edit Panel now can be customized. Right-click on the "Apply to Group" button
and you can now select whether this key will apply the following settings: Slide Delay, Background Image, Background
Settings (color, size, scaling, alignment), Font Settings (font, style, size), Text Alignment (margins, positioning). These
settings can be applied once to the group, once to the entire presentation or applied and saved so when you use the
Apply to Group button without the right-click, it will use the last settings. The Apply to Group button is part of the Slide
Edit Panel controls.
Feature: Recording Slide Delay feature
This is a useful feature that allows slide delays to be set while selecting slides for a group (in order, beginning to end).
One use that we've found for it is to drop an audio file of a praise song onto the first slide and then use the recording
feature to set the automatic timings so that the lyrics display along with the music. Click on the Record button in the
Preview Panel (only displayed when you are editing the first slide in a group). See Preview Panel for more details on
how to record the slide delays.
Feature: Bail to Buttons with transitions
The Bail to Buttons now use the global transition (Fade to...) unless you right-click on the bail button, which will "cut" to
the logo/black/background. The Bail to Buttons are in the Toolbar.
Feature: Slide Delay now supports decimals
This change was made to help with the recording slide delays more accurate. The Slide Delay for each slide is visible
in the Slide Edit Panel controls, just below the Preview Panel.
Feature/Bug Fix: Support for curly quotes
Files or text that is imported or copied and pasted now have better support for "curly" quotation marks. This was very
noticeable in Microsoft files.
Feature: Last Date Modified Column
This column was added to the Library Panel window for songs, slide text and group text.
Feature: Loop button replaces the Play button in the toolbar.
Pressing the Loop button will begin the automated playing of the currently highlighted group in the Slide Group Panel.
This automated playing of slides uses the slide delays that are associated with each slide. If no slide delay has been
set (delay is zero) the user will be prompted to enter in a slide value greater than zero to adjust those slides before the
automation will begin. Automated playing of the slides will continue until the Stop button on the Toolbar is pressed or
another slide is selected to be displayed.
Feature: Check for QuickTime Version 7.0.3
If the required version of QuickTime is not detected (currently 7.0.3), LiveWorship will not run and inform the user to
upgrade/install the current version of QuickTime.
Modification: Misc Preferences: Auto Import Files Under/Check for Duplicates
The parameters for auto-importing have been modified and Check For Duplicates was merged into this setting.
Bug Fix: Disappearing thumbnails
If more than 200 media items were in the library, the thumbnail images would sometimes not appear in the Library
Panel. This has been fixed in v1.2.
Bug Fix: Margins reset after adding background image
This is now fixed in v1.2.
Bug Fix: Screen 2 not recognized if connected after LiveWorship has started
If you connect a second screen (monitor or projector) after LiveWorship has been started, use the "Enable Screen 2"
button on the Toolbar to regain control of the second screen.
Version 1.1
Released publicly on September 28, 2005
Feature: Combined "Screen 2" and "Next" Tabs
A major change in the interface that created a "presentation mode" when the Screen 2 tab is selected. This allows
users to see in the Screen 2 preview window what is being presented on the second screen. The next slide preview is
also displayed at the same time. Clicking on either the Screen 2 or the Next preview image will force that slide into the
Edit tab so you can quickly change what is on the screen. This also solved the focus issue for using the keyboard to
control slides. In the previous version, there was always a focus issue between the presentation or the edit window
having focus of the keyboard strokes. Now when the "Screen 2" tab is selected, the presentation always has the focus.
Bug Fix: New slides not respecting defaults set in preferences
Fixed in v1.1
Bug Fix: Cosmetic changes and several small functional fixes
Fixed in v1.1
Version 1.0
Released on CD, September 28, 2005
Help Center Contents
help center contents • search
Frequently Asked Questions (FAQ)
Features
Can video be used as a background for text?
How do I use PowerPoint (or Apple's Keynote) with LiveWorship?
How can I use LiveWorship with CCLI/SongSelect?
What versions of scripture are available?
How can I back up the library?
Troubleshooting
LiveWorship does not start or error messages appear (runtime errors or "media library can't be found") when starting.
The program says "Screen 2 was not detected", but I have one plugged in.
I'm having trouble importing media using a Macintosh.
The display on Screen 2 doesn't fill the entire screen.
When playing a video clip, the video appears on Screen 2 but also covers up my primary screen so that I can't see
LiveWorship. Even though the clip ends it still appears and covers the screen.
I'm using the crossfade transition and no matter how slow or fast I set the speed it just cuts to the next slide.
Can I use audio files from Apple® Computer's iTunes® Music Store since they are copyright protected?
I've changed the text in the Slide Edit Panel Canvas to another font, but on the slide preview the font hasn't
changed...what's going on?
The main window is too large to fit onto my computer screen...but I can't seem to fix it.
When I drag a background image over the Slide Group Panel, the names of slide groups are not highlighted.
When I drag multiple scriptures onto a slide, the text is too much for the one slide. Do I have to build many slides
one at a time?
When I select a slide to display on the second screen, there is a pause and then the transition seems to be very, very
slow.
Error messages on computer with multiple user accounts.
Licensing/Registration
Can I install LiveWorship on multiple computers?
Are updates free to license holders?
Demo expires before the end of 30 days.
My demo for an earlier version has expired but I would like to try a demo of a newer version.
Frequently Asked Questions (FAQ)
Features
Can video be used as a background for text?
LiveWorship v1.0 and v1.1 do not allow text over video. However, we have a beta version of v1.2 that does have this feature.
You must have a full version (v1.0 or v1.1) installed before downloading the v1.2b (see version history for more details)
application file. Please watch our website as we continue to work on finalizing the v1.2 update. If you would like to try the
beta, visit our download page. We recommend that you also install the latest version of Apple's QuickTime before using the
beta. Using text over video will increase the demand on your computer's processor and we have posted updated system
requirements for using this feature.
How do I use PowerPoint (or Apple's Keynote) with LiveWorship?
LiveWorship plays nicely with both PowerPoint and Apple's Keynote so you can run the two programs side by side and toggle
back and forth between them. The "disable screen 2" button on the toolbar will surrender control of the second screen so that
another program such as PowerPoint can be used side by side with LiveWorship. When you play a slideshow in Apple's
Keynote (or PowerPoint for the Mac), Keynote will actually take control of the second screen and present over LiveWorship's
show.
We have a beta version of version 1.2 that does have a feature that attempts to import the text and background images from
PowerPoint files (you need PowerPoint installed on your computer). You must have a full version (v1.0 or v1.1) installed
before downloading the v1.2b (see version history for more details) application file. Please watch our website as we continue
to work on finalizing the v1.2 update. If you would like to try the beta, visit our download page. We recommend that you also
install the latest version of Apple's QuickTime before using the beta.
To import Keynote presentations, first export from Keynote as a PowerPoint file format and then follow the instructions for
importing a PowerPoint presentation.
How can I use LiveWorship with CCLI/SongSelect?
CCLI stands for "Christian Copyright License International". Churches who want to display, print or use copyrighted music for
worship can purchase a license (often referred to as a CCLI#). SongSelect is a service provided through CCLI that allows
subscribers to download (or print) lyrics for copyrighted worship music. Files downloaded from SongSelect are simple text files
that can be opened with a word processor and then the lyrics can be copy and pasted into LiveWorship to create a song file
(see Adding Song Lyrics for more information).
LiveWorship also allow storing of CCLI data such as Title, Artist, Copyright and CCLI# for each song. To access these fields,
right click on the song title in the media library and choose "Advanced" from the menu.
We have a beta version of v1.2 that does have an import feature. Importing files that have been downloaded from the
CCLI/Song Select site will be recognized and the CCLI data will be automatically entered. You must have a full version (v1.0
or v1.1) installed before downloading the v1.2b (see version history for more details) application file. Please watch our website
as we continue to work on finalizing the v1.2 update. If you would like to try the beta, visit our download page. We recommend
that you also install the latest version of Apple's QuickTime before using the beta.
Link to CCLI's web site
What versions of scripture are available?
Authorized Standard Version ( ASV )
Darby ( DAR )
Douay-Rheims ( DRB )
King James Version ( KJV )
New King James Version (NKJV)
The Message ( MSG )
New International Version ( NIV )
New King James Version ( NKJV )
New Revised Standard Version ( NRSV )
Revised Standard Version ( RSV )
Webster ( WB )
Youngs Literal Translation ( YLT )
World English Bible
Coming Soon:
Bible in Basic English ( BBE ) approved, coming soon
New Living Translation ( NLT ) approved, coming soon
New Century Version ( NCV ) approved, waiting for text from publisher
How can I back up the library?
The media library is contained within the LiveWorship folder in a folder called "Media Library". We recommend that you make
backup copies of your media library periodically and also before upgrading.
Troubleshooting
LiveWorship does not start or error messages appear when starting.
LiveWorship requires the most recent version of QuickTime and this may prevent the program from launching. Go to
www.quicktime.com and install the latest version.
If you are using version 1.0 and your demo expires before the end of 30 days, upgrade to v1.1 or higher.
If you see a message about the "Media Library is missing" you may have installed an updated application without having the
full application previously installed. Visit our download page to download the full install, which contains a media library, then
download and install the updated application.
If you are still having problems: Please contact us and include (or if calling, be prepared to share):
●
detailed description of the problems you are experiencing and include:
what you doing
if the problem can be repeated
any text that may be displayed from error messages
version of LiveWorship
computer platform (Windows or Macintosh)
specifications about your computer
processor speed
amount of memory installed
type of video card (or model of Macintosh)
version of QuickTime installed
any other information that you believe may help us solve your problem
phone number and email address where you can be contacted
❍
❍
❍
●
●
●
❍
❍
❍
❍
●
●
eMail [email protected] or call us toll-free at 1-866-400-1791
The program says "Screen 2 was not detected", but I have one plugged in.
You can use LiveWorship to build and edit presentations (without a projector or second monitor attached) but you will not be
able to see the transitions or how the show will be presented or use any of the toolbar items (bail buttons) that are designed to
work with the second screen. One of the advantages of using LiveWorship is that you can present a slide to the second
screen while still seeing the LiveWorship control interface on your primary screen. In the future, we have plans to add a
floating window so that you can preview a presentation without a projector or second monitor. Your computer specifications
may not allow a second screen to be used for displaying a presentation.
If you are using a Macintosh iBook or iMac, neither of these models are designed to have dual display (only mirroring of the
desktop on both monitors). PowerBooks and most PowerMacs have the ability to "turn off mirroring" so that you can have
multiple display windows. While not recommended or supported, some users have indicated they have found a way (a "hack")
to allow an iBook or iMac to have dual screen functionality. See installation instructions for more information on configuring
the second screen display.
On Windows, you can right-click on the desktop and select Properties, then select the Settings Tab. See the installation
instructions for a screen shot and how to establish if you can "extend your desktop" to have separate display capabilities.
There is a known issue (on versions prior to v1.2b2) if you have plugged in a second monitor/projector after the program has
been started. Try quitting and restarting the program to recognize that a second screen has been added to your system. For
more information about installing and setting up your computer to recognize the second screen, see the help page on installing
LiveWorship.
I'm having trouble importing media using a Macintosh.
Because LiveWorship is designed to be used in both Windows and Macintosh environments, file names will need to have
proper extensions (e.g. JPEG files should end with .jpg and TIFF files should end in .tiff) in order to be recognized as files that
can be imported.
The display on Screen 2 doesn't fill the entire screen.
LiveWorship does NOT change the resolution of your second screen or monitor, these settings are made by the user in your
computer's Display Control Panel. The resolution setting of the second screen in the LiveWorship preferences should MATCH
the setting of the computer. If you experience the second screen image not matching (LiveWorship image on your second
screen is smaller or larger than the screen) then you may need to check the settings of the second screen in your Display
Control Panel preferences on your computer and make sure you set LiveWorship's resolution preferences to match (or set
LiveWorship to Auto for the resolution size and LiveWorship will attempt to discover the settings of your second screen). For
more information about setting your computer's second screen resolution, see the help page on installing LiveWorship.
When playing a video clip, the video appears on Screen 2 but also covers up my primary screen so that I can't see
LiveWorship. Even though the clip ends it still appears and covers the screen.
This is a known issue with nVidia GeForce video cards on Windows. If this happens, you may be able to use the keyboard
shortcut to dismiss the video clip and regain control of the primary screen without restarting the computer. To prevent this
from happening, right-click on your desktop and choose Properties from the menu. Select Advanced and then
Troubleshooting, then drag the hardware acceleration slider to a slower speed (less than half) and this should prevent this from
occuring.
I'm using the crossfade transition and no matter how slow or fast I set the speed it just cuts to the next slide.
You need to install the latest version of Apple's QuickTime®.
If you have the resolution of screen 2 at a high resolution (most projectors use 800x600), this can also affect the quality of
transitions. Change both the resolution of your second monitor and the Screen 2 resolution setting in LiveWorship to 800x600.
If you are using the v1.2 beta, there will be no transitions while using text over video.
Can I use audio files from Apple® Computer's iTunes® Music Store since they are copyright protected?
Yes, if you are using the audio file on a computer that is authorized through Apple® iTunes® with the same account that was
used to purchase the audio file.
I've changed the text in the Slide Edit Panel Canvas to another font, but on the slide preview the font hasn't
changed...what's going on?
This is a known issue. You may find some non-common fonts that will not render on the second screen or in the previews.
Even though you will see the font displayed in the Canvas, the text in the Preview Panel and slide thumbnail images will be
displayed using the default system font.
The main window is too large to fit onto my computer screen...but I can't seem to fix it.
The LiveWorship main window was designed for a 1024x768 pixel screen (the second screen is optimal at 800x600). If your
primary screen resolution is set lower, you may need to increase the dimensions. Try pulling the Window menu to Zoom. This
will attempt to resize the window to fit your screen. If this does not work, open up the Preferences and select the Size tab at
the top. Try setting the Preview Scale to 25%. The resolution of your Preview Panel is a percentage of your Presentation
resolution. The resolution of your second screen is not controlled by LiveWorship, but is determined by the Display Control
Panel of your computer. LiveWorship's Presentation resolution should MATCH the settings in your computer. Lastly, if you
have copied LiveWorship from another computer along with their configuration you may need to erase the "config" file that
resides inside your LiveWorship folder on your harddrive. This will RESET ALL preferences.
When I drag a background image over the Slide Group Panel, the names of slide groups are not highlighted.
The group name will not highlight because the group list only hightlights the selected group in the list. Even though the group
name is not highlighted, if you position the tip of the cursor over the name of the group the background will drop into the
appropriate group.
When I drag multiple scriptures onto a slide, the text is too much for the one slide. Do I have to build many slides
one at a time?
Click with the right mouse button (or with single button Macintosh mice, hold the control key while clicking with the mouse) on
a slide and select "Editor Window" from the contextual menu that pops up. This will open up the Editor Window and will allow
you to split the text into multiple slides. See Dividing Text Into Slides for more information on how this works.
When I select a slide to display on the second screen, there is a pause and then the transition seems to be very, very
slow.
Short of upgrading your computer to one with a faster processor (see System Requirements for recommended processor
speeds), we would recommend that you set your computer's second screen display to no more than 800 x 600 resolution (and
then match that setting in LiveWorship's Size Preference). If you are still experiencing slow transitions, try setting the
transition (icon on the Toolbar) to "No Transition". You might also make sure that you have the most recent version of Apple's
QuickTime installed.
Error messages when running LiveWorship on a computer with multiple user accounts.
If you have installed LiveWorship on a computer with multiple users, you may encounter errors when launching the program
when logged in as a user who did not install the program. Your options include having only the user who installed the program
be capable of using LiveWorship, installing the program for each user, or changing the permissions to allow all users to "read
and write" these four items found inside the LiveWorship folder: LiveWorship.config, directory (or folder) where the config file
resides, Ebenezer000400.vbs file inside the media folder and the directory (or folder) where the Ebenezer000400.vbs file
resides.
Licensing/Registration Issues
Can I install LiveWorship on multiple computers?
LiveWorship has a license that allows for multiple computers to be used for building and editing presentations. The limitation
is that you can only have one computer presenting at a time. If your organization is presenting in multiple rooms at the same
time (such as a youth room and main sanctuary) or if you have multiple campuses, we would expect that you have the
resources to purchase multiple copies of LiveWorship. See our End User License Agreement for more information.
Are updates free to license holders?
All 1.x updates are free to license holders. Please contact us with suggestions as we continue to refine the program and add
versatility.
Demo expired before the end of 30 days.
This is a bug in version 1.0, update to v1.1 or higher.
My demo for an earlier version has expired but I would like to try a demo of a newer version.
If you have NO interest in preserving any of the library from your previous demo, delete the previous LiveWorship folder and
reinstall (the LiveWorship folder resides in the Program Files on Windows and the Applications Folder on Macintosh).
If you want to save the contents of your library from a previous demo (which can be retrieved later after you register), either
backup the contents of the "Media Library" folder (found within the LiveWorship folder) or simply change the name of the
LiveWorship folder. Next, reinstall the application. For more complete directions for recovering your previous work after
registering, drop us an email at [email protected]
Help Center Contents
help center contents • search
LiveWorship Keyboard Shortcuts
(updated for versions 1.2b2+)
Command Key on the Macintosh is the Apple Key
Menu
Function
Windows
Macintosh
File Menu
New Presentation
Ctrl+N
Command+N
File Menu
New Song
Ctrl+G
Command+G
File Menu
New Group Text
Ctrl+T
Command+T
File Menu
Browse Folder...
Ctrl+O
Command+O
File Menu
Load Presentation...
Ctrl+L
Command+L
File Menu
Load LiveWorship Media...
Ctrl+Shift+L
Ctrl+Command+L
File Menu
Import Media...
Ctrl+Shift+I
Ctrl+Command+I
File Menu
Import PowerPoint
Ctrl+Shift+W
Shift+Ctrl+W
File Menu
Create Slideshow
Ctrl+Shift+C
Shift+Command+C
File Menu
Save
Ctrl+S
Command+S
File Menu
Save As...
Ctrl+Shift+S
Shift+Command+S
File Menu
Add Bible Module
Ctrl+Shift+A
Shift+Command+A
File Menu
Remove Bible Module
Ctrl+Shift+R
Shift+Command+R
File Menu (Win),
LiveWorship Menu (Mac)
Quit
Ctrl+Q
Command+Q
Edit Menu
Undo
Ctrl+Z
Command+Z
Edit Menu
Redo
Ctrl+Shift+Z
Shift+Command+Z
Edit Menu
Cut
Ctrl+X
Command+X
Edit Menu
Copy
Ctrl+C
Command+C
Edit Menu
Paste
Ctrl+V
Command+V
Edit Menu (Win)
LiveWorship Menu (Mac)
Preferences
Ctrl+, (comma)
Command+, (comma)
Window Menu
Zoom
Ctrl+Alt+Z
Option+Command+Z
Window Menu
Minimize
Ctrl+M
Command+M
Presentation Menu
Play Presentation
Ctrl+Shift+P
Shift+Command+P
Presentation Menu
Loop Presentation
Ctrl+Shift+U
Shift+Command+U
Presentation Menu
Stop Presentation
Ctrl+Shift+X
Shift+Command+X
Presentation Menu
Bail to Background
Ctrl+Shift+K
Shift+Command+K
Presentation Menu
Bail to Black
Ctrl+Shift+B
Shift+Command+B
Presentation Menu
Bail to Logo
Ctrl+Shift+G
Shift+Command+G
Presentation Menu
Bail to Color Bars
Help Menu
Help Contents
Ctrl+Shift+T
Shift+Command+T
Help Menu
Help Online
Ctrl+Shift+O
Shift+Command+O
Stop automation
Esc
Esc
Function
Windows
Macintosh
Advance Slide
Spacebar or Right-arrow Spacebar or Right-arrow
Previous Slide
Left-arrow
Left-arrow
Present Slide
0-9, A-Z
0-9, A-Z
Presentation Mode
("Screen 2" tab selected)
Keyboard shortcut displayed
on bottom right-corner of
thumbnail image in
Presentation Panel
Help Center Contents
help center contents • search
Words and Terminology
Alert
A text message that is displayed on the second screen that can be used as a nursery call or to communicate a
message to those in the congregation/audience. See Show Alert for more information.
Background
An image that becomes a backdrop of a slide onto which various text objects (Song lyrics, Scripture, or text) can be
placed. Background images that are saved in the LiveWorship library file can be viewed by selecting "Backgrounds" in
the Media Panel. In version 1.2+, video files can also be used as a background for slides with text. See Adding
Backgrounds for more information.
Browse
A selection in the Media Panel that shows the contents of a folder from the computer's hard drive or other connected
storage devices. After selecting Browse, supported files will be visible in the Library Panel as thumbnail images. To
import these files into LiveWorship, drag and drop the thumbnail into the Presentation Panel. To view a different
directory/folder, click on the highlighted Browse title in the Media Panel and navigate to the desired folder.
Categories Panel
Located in the lower left of the LiveWorship window between the Media Panel and the Library Panel, the Categories
Panel allows you to the create and assign user-defined keywords to help organize media objects in the library. See
Category and Library Panels for more information.
Editor Window
When you create a song or text object (Slide Text or Group Text) or right-click on a slide and choose "Editor Window",
this window will open. This editor is used is used for editing the contents and how songs and text objects are divided
into different slides. The Editor Window can also be used to convert between the song and text objects formats. See
Text Objects for more information about using the Editor Window.
Group Text
As opposed to "Slide Text", Group Text is typed information that can be spanned over several slides (similar to song
lyrics/verses) but be saved as one group. See Text Objects for more information about how Slide Text and Group Text
can be used in presentations.
Library Panel
Located in the lower center of the LiveWorship window, the Library Panel will display the contents of the selected
Media Library item. See Library Panel for more information.
Media Panel
Located in the lower left corner of the LiveWorship window, the Media Panel is used to view the various media objects
(backgrounds, saved presentations, Scriptures, song lyrics, text, audio, video) used by LiveWorship. See Media Panel
for more information.
Preferences
There are various settings that can be changed to adapt how the LiveWorship program functions. To open the
Preferences, pull the (Windows: Edit menu, Macintosh: LiveWorship menu) to Preferences or use the shortcut key
(Windows: Ctrl+, (comma key), Macintosh: Cmd+, (comma key)). See Preferences for more information about the
various options and settings.
Presentation
A presentation is a group of slides that can be displayed on an external monitor or projected onto a screen. A
presentation contains groups and groups contain slides. See Basics for more information.
Presentation Panel
Located in the upper center of the LiveWorship window, the Presentation Panel is where slide thumbnails, which make
up a presentation, are displayed. The Presentation Panel is where slides thumbnails are selected to either be edited or
displayed on Screen 2. You can construct slides by dragging and dropping media objects into the Presentation Panel.
See Basics and Presentation Panel for more information.
Preview Panel
Located in the upper right of the LiveWorship window, the Preview Panel shows a preview of either the slide selected
to be edited or in Presentation Mode (Screen 2 tab selected) the slide being displayed and the next slide to be
displayed can be viewed. You can also preview video clips that have been added to slides as backgrounds using the
Play and Stop in this panel. See Preview Panel for more information.
Slide
An object designed for display on the second screen. Slides can have background images, text, song lyrics, scripture,
audio or video.
Slide Edit Panel
Located in the lower right of the LiveWorship window, the Slide Edit Panel is used to change the attributes and layout
of the slide selected to be edited. See Slide Edit Panel for more information.
Slide Group
A collection of slides that have been combined together with one title that are a part of a presentation. Group names
are displayed in the Slide Group Panel. See Slide Group Panel for more information about how Slide Groups work.
Slide Group Panel
Located in the upper left of the LiveWorship window, the Slide Group Panel displays the titles of slide groups that are
a part of the open presentation. See Slide Group Panel for more information about how Slide Groups work.
Slide Show
Create a group of images with a common slide delay with the Create Slide Show function. See Adding a Slide Show for
more information.
Slide Text
As opposed to "Group Text", Slide Text is typed information on one slide and saved as an individual object in the
library. See Text Objects for more information about how Slide Text and Group Text can be used in presentations.
Toolbar
Located at the top of the window, these buttons give you control over some basic functions in LiveWorship. See
Toolbar for more information and descriptions of each button and their use.
Help Center Contents
help center contents • search
Troubleshooting
Make sure that you have installed the latest version of Apple's QuickTime (free download)
Read the FAQ for frequently asked questions.
Check online support for the latest help files, up-to-date FAQ and our community forums.
Please include (or if calling, be prepared to share):
●
detailed description of the problems you are experiencing and include:
what you doing
if the problem can be repeated
any text that may be displayed from error messages
version of LiveWorship
computer platform (Windows or Macintosh)
specifications about your computer
processor speed
amount of memory installed
type of video card (or model of Macintosh)
version of QuickTime installed
any other information that you believe may help us solve your problem
phone number and email address where you can be contacted
❍
❍
❍
●
●
●
❍
❍
❍
❍
●
●
eMail [email protected] or call us toll-free at 1-866-400-1791
Help Center Contents