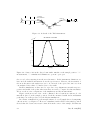
1
Risø–R–1416(EN)
User and Programmers Guide to the
Neutron Ray-Tracing Package
McStas, Version 1.8
Peter Willendrup, Emmanuel Farhi, Kim Lefmann,
Per-Olof Åstrand, Marc Hagen and Kristian Nielsen
Risø National Laboratory, Roskilde, Denmark
May 2004
Abstract
The software package McStas is a tool for carrying out Monte Carlo ray-tracing
simulations of neutron scattering instruments with high complexity and precision. The
simulations can compute all aspects of the performance of instruments and can thus
be used to optimize the use of existing equipment, design new instrumentation, and
carry out virtual experiments. McStas is based on a unique design where an automatic
compilation process translates high-level textual instrument descriptions into efficient
ANSI-C code. This design makes it simple to set up typical simulations and also gives
essentially unlimited freedom to handle more unusual cases.
This report constitutes the reference manual for McStas, and, together with the
manual for the McStas components, it contains full documentation of all aspects of
the program. It covers the various ways to compile and run simulations, a description of the meta-language used to define simulations, and some example simulations
performed with the program.
This report documents McStas version 1.8, released January 29th, 2004
The authors are:
Kim Lefmann <[email protected]>
Materials Research Department, Risø National Laboratory, Roskilde, Denmark
Peter Kjær Willendrup <[email protected]>
Materials Research Department, Risø National Laboratory, Roskilde, Denmark
Emmanuel Farhi <[email protected]>
Institut Laue-Langevin, Grenoble, France
Mark Hagen <[email protected]>
Australian Nuclear Science and technology Organization, Sydney, Australia
as well as authors who left the project:
Per-Olof Åstrand <[email protected]>
Materials Research Department, Risø National Laboratory, Roskilde, Denmark
Kristian Nielsen <[email protected]>
Materials Research Department, Risø National Laboratory, Roskilde, Denmark
Present address: Sifira A/S, Copenhagen, Denmark,
ISBN 87–550–3230–3
ISBN 87–550–3231–1 (Internet)
ISSN 0106–2840
Pitney Bowes Management Services Denmark A/S · Risø National Laboratory · 2004
Contents
Preface and acknowledgements
1 Introduction to McStas
1.1 Background . . . . . . . . .
1.1.1 The goals of McStas
1.2 The design of McStas . . .
1.3 Overview . . . . . . . . . .
6
.
.
.
.
.
.
.
.
.
.
.
.
.
.
.
.
.
.
.
.
.
.
.
.
.
.
.
.
.
.
.
.
.
.
.
.
.
.
.
.
.
.
.
.
.
.
.
.
.
.
.
.
.
.
.
.
.
.
.
.
.
.
.
.
.
.
.
.
.
.
.
.
.
.
.
.
.
.
.
.
.
.
.
.
.
.
.
.
.
.
.
.
.
.
.
.
7
7
8
8
10
2 New features in McStas version 1.8
2.1 Kernel . . . . . . . . . . . . . . . .
2.2 Run-time . . . . . . . . . . . . . .
2.3 Components and Library . . . . .
2.4 Tools, installation . . . . . . . . . .
2.5 Future extensions . . . . . . . . . .
.
.
.
.
.
.
.
.
.
.
.
.
.
.
.
.
.
.
.
.
.
.
.
.
.
.
.
.
.
.
.
.
.
.
.
.
.
.
.
.
.
.
.
.
.
.
.
.
.
.
.
.
.
.
.
.
.
.
.
.
.
.
.
.
.
.
.
.
.
.
.
.
.
.
.
.
.
.
.
.
.
.
.
.
.
.
.
.
.
.
.
.
.
.
.
.
.
.
.
.
.
.
.
.
.
.
.
.
.
.
.
.
.
.
.
11
11
12
13
14
15
.
.
.
.
.
.
.
.
.
.
.
.
3 Installing McStas
3.1 Licensing . . . . . . . . . . . . . . . . . . . .
3.2 Installing support Apps . . . . . . . . . . . .
3.2.1 C compiler . . . . . . . . . . . . . . .
3.2.2 Gui tools (Perl + Tk) . . . . . . . . .
3.2.3 Plotting backends (All platforms) . . .
3.3 Getting McStas . . . . . . . . . . . . . . . . .
3.4 Source code build . . . . . . . . . . . . . . . .
3.4.1 Windows build . . . . . . . . . . . . .
3.4.2 Unix build . . . . . . . . . . . . . . .
3.5 Binary install, Linux . . . . . . . . . . . . . .
3.6 Binary install, Windows . . . . . . . . . . . .
3.7 Finishing and Testing the McStas distribution
.
.
.
.
.
.
.
.
.
.
.
.
.
.
.
.
.
.
.
.
.
.
.
.
.
.
.
.
.
.
.
.
.
.
.
.
.
.
.
.
.
.
.
.
.
.
.
.
.
.
.
.
.
.
.
.
.
.
.
.
.
.
.
.
.
.
.
.
.
.
.
.
.
.
.
.
.
.
.
.
.
.
.
.
.
.
.
.
.
.
.
.
.
.
.
.
16
16
16
16
17
17
18
18
18
19
20
20
21
4 Running McStas
4.1 Brief introduction to the graphical user interface . . . . . . . .
4.1.1 New releases of McStas . . . . . . . . . . . . . . . . . .
4.2 Running the instrument compiler . . . . . . . . . . . . . . . . .
4.2.1 Code generation options . . . . . . . . . . . . . . . . . .
4.2.2 Specifying the location of files . . . . . . . . . . . . . . .
4.2.3 Embedding the generated simulations in other programs
.
.
.
.
.
.
.
.
.
.
.
.
.
.
.
.
.
.
.
.
.
.
.
.
.
.
.
.
.
.
.
.
.
.
.
.
.
.
.
.
.
.
22
22
24
26
26
27
28
Risø–R–1416(EN)
.
.
.
.
.
.
.
.
.
.
.
.
.
.
.
.
.
.
.
.
.
.
.
.
.
.
.
.
.
.
.
.
.
.
.
.
.
.
.
.
.
.
.
.
.
.
.
.
.
.
.
.
.
.
.
.
.
.
.
.
.
.
.
.
.
.
.
.
.
.
.
.
.
.
.
.
.
.
.
.
.
.
.
.
.
.
.
.
.
.
.
.
.
.
.
.
.
.
.
.
.
.
.
.
.
.
.
.
3
4.3
4.4
4.5
5 The
5.1
5.2
5.3
5.4
4
4.2.4 Running the C compiler . . . . . . . . . . . . . . . . . . . . . . . . .
Running the simulations . . . . . . . . . . . . . . . . . . . . . . . . . . . . .
4.3.1 Choosing a data file format . . . . . . . . . . . . . . . . . . . . . . .
4.3.2 Basic import and plot of results . . . . . . . . . . . . . . . . . . . . .
4.3.3 Interacting with a running simulation . . . . . . . . . . . . . . . . .
4.3.4 Optimizing a simulation . . . . . . . . . . . . . . . . . . . . . . . . .
Using simulation front-ends . . . . . . . . . . . . . . . . . . . . . . . . . . .
4.4.1 The graphical user interface (mcgui) . . . . . . . . . . . . . . . . . .
4.4.2 Running simulations with automatic compilation (mcrun) . . . . . .
4.4.3 The gscan front-end . . . . . . . . . . . . . . . . . . . . . . . . . . .
4.4.4 Graphical display of simulations (mcdisplay) . . . . . . . . . . . . .
4.4.5 Plotting the results of a simulation (mcplot) . . . . . . . . . . . . . .
4.4.6 Plotting resolution functions (mcresplot) . . . . . . . . . . . . . . . .
4.4.7 Creating and viewing the library and component/instrument help
(mcdoc) . . . . . . . . . . . . . . . . . . . . . . . . . . . . . . . . . .
4.4.8 Translating McStas components for Vitess (mcstas2vitess) . . . . . .
4.4.9 Translating McStas results files between Matlab and Scilab formats
Analyzing and visualizing the simulation results . . . . . . . . . . . . . . . .
44
44
45
45
McStas kernel and meta-language
Notational conventions . . . . . . . . . . . . . . . . . . . .
Syntaxical conventions . . . . . . . . . . . . . . . . . . . .
Writing instrument definitions . . . . . . . . . . . . . . . .
5.3.1 The instrument definition head . . . . . . . . . . .
5.3.2 The DECLARE section . . . . . . . . . . . . . . . . .
5.3.3 The INITIALIZE section . . . . . . . . . . . . . . .
5.3.4 The TRACE section . . . . . . . . . . . . . . . . . .
5.3.5 The SAVE section . . . . . . . . . . . . . . . . . . .
5.3.6 The FINALLY section . . . . . . . . . . . . . . . . .
5.3.7 The end of the instrument definition . . . . . . . .
5.3.8 Code for the instrument vanadium example.instr
Writing component definitions . . . . . . . . . . . . . . . .
5.4.1 The component definition header . . . . . . . . . .
5.4.2 The DECLARE section . . . . . . . . . . . . . . . . .
5.4.3 The SHARE section . . . . . . . . . . . . . . . . . .
5.4.4 The INITIALIZE section . . . . . . . . . . . . . . .
5.4.5 The TRACE section . . . . . . . . . . . . . . . . . .
5.4.6 The SAVE section . . . . . . . . . . . . . . . . . . .
5.4.7 The FINALLY section . . . . . . . . . . . . . . . . .
5.4.8 The MCDISPLAY section . . . . . . . . . . . . . . .
5.4.9 The end of the component definition . . . . . . . .
5.4.10 A component example: Slit . . . . . . . . . . . . .
5.4.11 McDoc, the McStas library documentation tool . .
48
48
49
50
52
52
53
53
55
55
56
56
58
58
60
60
61
61
62
64
64
65
65
67
.
.
.
.
.
.
.
.
.
.
.
.
.
.
.
.
.
.
.
.
.
.
.
.
.
.
.
.
.
.
.
.
.
.
.
.
.
.
.
.
.
.
.
.
.
.
.
.
.
.
.
.
.
.
.
.
.
.
.
.
.
.
.
.
.
.
.
.
.
.
.
.
.
.
.
.
.
.
.
.
.
.
.
.
.
.
.
.
.
.
.
.
.
.
.
.
.
.
.
.
.
.
.
.
.
.
.
.
.
.
.
.
.
.
.
.
.
.
.
.
.
.
.
.
.
.
.
.
.
.
.
.
.
.
.
.
.
.
.
.
.
.
.
.
.
.
.
.
.
.
.
.
.
.
.
.
.
.
.
.
.
.
.
.
.
.
.
.
.
.
.
.
.
.
.
.
.
.
.
.
.
.
.
.
.
.
.
.
.
.
.
.
.
.
.
.
.
.
.
.
.
.
.
.
.
.
.
.
.
.
.
.
.
.
.
.
.
.
.
.
.
.
.
.
.
.
.
.
.
.
28
29
30
30
32
32
34
34
39
40
40
42
43
Risø–R–1416(EN)
6 Monte Carlo Techniques and simulation strategy
6.1 The neutron weight, p . . . . . . . . . . . . . . . . . . . . .
6.1.1 Statistical errors of non-integer counts . . . . . . . .
6.2 Weight factor transformations during a Monte Carlo choice
6.2.1 Focusing components . . . . . . . . . . . . . . . . . .
6.3 Transformation of random numbers . . . . . . . . . . . . . .
.
.
.
.
.
.
.
.
.
.
.
.
.
.
.
.
.
.
.
.
.
.
.
.
.
.
.
.
.
.
.
.
.
.
.
.
.
.
.
.
.
.
.
.
.
69
69
70
71
71
72
7 The component library
74
7.1 A short overview of the McStas component library . . . . . . . . . . . . . . 74
8 Instrument examples
8.1 A test instrument for the component V sample . . .
8.1.1 Scattering from the V-sample test instrument
8.2 The triple axis spectrometer TAS1 . . . . . . . . . .
8.2.1 Simulated and measured resolution of TAS1 .
8.3 The time-of-flight spectrometer PRISMA . . . . . .
8.3.1 Simple spectra from the PRISMA instrument
.
.
.
.
.
.
.
.
.
.
.
.
.
.
.
.
.
.
.
.
.
.
.
.
.
.
.
.
.
.
.
.
.
.
.
.
.
.
.
.
.
.
.
.
.
.
.
.
.
.
.
.
.
.
.
.
.
.
.
.
.
.
.
.
.
.
.
.
.
.
.
.
.
.
.
.
.
.
79
79
79
79
81
83
85
A Libraries and conversion constants
A.1 Run-time calls and functions . . . . . . . . . . . . . .
A.1.1 Neutron propagation . . . . . . . . . . . . . . .
A.1.2 Coordinate and component variable retrieval .
A.1.3 Coordinate transformations . . . . . . . . . . .
A.1.4 Mathematical routines . . . . . . . . . . . . . .
A.1.5 Output from detectors . . . . . . . . . . . . . .
A.1.6 Ray-geometry intersections . . . . . . . . . . .
A.1.7 Random numbers . . . . . . . . . . . . . . . . .
A.2 Reading a data file into a vector/matrix (Table input)
A.3 Monitor nD Library . . . . . . . . . . . . . . . . . . .
A.4 Adaptative importance sampling Library . . . . . . . .
A.5 Vitess import/export Library . . . . . . . . . . . . . .
A.6 Constants for unit conversion etc. . . . . . . . . . . . .
.
.
.
.
.
.
.
.
.
.
.
.
.
.
.
.
.
.
.
.
.
.
.
.
.
.
.
.
.
.
.
.
.
.
.
.
.
.
.
.
.
.
.
.
.
.
.
.
.
.
.
.
.
.
.
.
.
.
.
.
.
.
.
.
.
.
.
.
.
.
.
.
.
.
.
.
.
.
.
.
.
.
.
.
.
.
.
.
.
.
.
.
.
.
.
.
.
.
.
.
.
.
.
.
.
.
.
.
.
.
.
.
.
.
.
.
.
.
.
.
.
.
.
.
.
.
.
.
.
.
.
.
.
.
.
.
.
.
.
.
.
.
.
.
.
.
.
.
.
.
.
.
.
.
.
.
87
87
87
88
89
90
90
91
91
91
93
93
93
94
B The McStas terminology
95
Bibliography
96
Index and keywords
96
Risø–R–1416(EN)
5
Preface and acknowledgements
This document contains information on the Monte Carlo neutron ray-tracing program
McStas version 1.8, an update to the initial release in October 1998 of version 1.0 as
presented in Ref. [1]. The reader of this document is supposed to have some knowledge of
neutron scattering, whereas only little knowledge about simulation techniques is required.
In a few places, we also assume familiarity with the use of the C programming language
and UNIX/Linux.
It is a pleasure to thank Prof. Kurt N. Clausen for his continuous support to this
project and for having initiated McStas in the first place. Essential support has also been
given by Prof. Robert McGreevy. We have also benefited from discussions with many
other people in the neutron scattering community, too numerous to mention here.
This project has been supported by the European Union, initially through the “XENNI”
network and “Cool Neutrons” RTD program, later through the “SCANS” network, and
today the “MCNSI“ network package.
In case of any errors, questions, or suggestions, contact the authors at [email protected]
or consult the McStas WWW home page [2].
If you appreciate this software, please subscribe to the [email protected] email
list, send us a smiley message, and contribute to the package.
6
Risø–R–1416(EN)
Chapter 1
Introduction to McStas
Efficient design and optimization of neutron spectrometers are formidable challenges.
Monte Carlo techniques are well matched to meet these challenges. When McStas version
1.0 was released in October 1998, except for the NISP/MCLib program [3], no existing package offered a general framework for the neutron scattering community to tackle
the problems currently faced at reactor and spallation sources. The McStas project was
designed to provide such a framework.
McStas is a fast and versatile software tool for neutron ray-tracing simulations. It is
based on a meta-language specially designed for neutron simulation. Specifications are
written in this language by users and automatically translated into efficient simulation
codes in ANSI-C. The present version supports both continuous and pulsed source instruments, and includes a library of standard components with in total around 90 components.
These enable to simulate all kinds of neutron scattering instruments (diffractometers,
triple-axis, reflectometers, time-of-flight, small-angle, back-scattering,...).
The McStas package is written in ANSI-C and is freely available for down-load from
the McStas web-page [2]. The package is actively being developed and supported by Risø
National Laboratory and the Institut Laue Langevin. The system is well tested and is
supplied with several examples and with an extensive documentation, including a separate
component manual.
1.1
Background
The McStas project is the main part of a major effort in Monte Carlo simulations for
neutron scattering at Risø National Laboratory. Simulation tools were urgently needed,
not only to better utilize existing instruments (e.g. RITA-1 and RITA-2 [4–6]), but also
to plan completely new instruments for new sources (e.g. the Spallation Neutron Source,
SNS [7] and the European Spallation Source, ESS [8]). Writing programs in C or Fortran
for each of the different cases involves a huge effort, with debugging presenting particularly
difficult problems. A higher level tool specially designed for the needs of simulating neutron
instruments is needed. As there was no existing simulation software that would fulfill our
needs, the McStas project was initiated. In addition, the ILL required an efficient and
general simulation package in order to achieve renewal of its instruments and guides. A
significant contribution to both the component library and the McStas kernel itself was
Risø–R–1416(EN)
7
developed at the ILL and included in the package, in agreement with the original McStas
authors.
1.1.1
The goals of McStas
Initially, the McStas project had four main objectives that determined the design of the
McStas software.
Correctness. It is essential to minimize the potential for bugs in computer simulations.
If a word processing program contains bugs, it will produce bad-looking output or may
even crash. This is a nuisance, but at least you know that something is wrong. However,
if a simulation contains bugs it produces wrong results, and unless the results are far off,
you may not know about it! Complex simulations involve hundreds or even thousands of
lines of formulae, making debugging a major issue. Thus the system should be designed
from the start to help minimize the potential for bugs to be introduced in the first place,
and provide good tools for testing to maximize the chances of finding existing bugs.
Flexibility. When you commit yourself to using a tool for an important project, you need
to know if the tool will satisfy not only your present, but also your future requirements.
The tool must not have fundamental limitations that restrict its potential usage. Thus the
McStas systems needs to be flexible enough to simulate different kinds of instruments (e.g.
triple-axis, time-of-flight and possible hybrids) as well as many different kind of optical
components, and it must also be extensible so that future, as yet unforeseen, needs can
be satisfied.
Power. “Simple things should be simple; complex things should be possible”. New ideas
should be easy to try out, and the time from thought to action should be as short as
possible. If you are faced with the prospect of programming for two weeks before getting
any results on a new idea, you will most likely drop it. Ideally, if you have a good idea at
lunch time, the simulation should be running in the afternoon.
Efficiency. Monte Carlo simulations are computationally intensive, hardware capacities
are finite (albeit impressive), and humans are impatient. Thus the system must assist in
producing simulations that run as fast as possible, without placing unreasonable burdens
on the user in order to achieve this.
1.2
The design of McStas
In order to meet these ambitious goals, it was decided that McStas should be based on
its own meta-language, specially designed for simulating neutron scattering instruments.
Simulations are written in this meta-language by the user, and the McStas compiler automatically translates them into efficient simulation programs written in ANSI-C.
In realizing the design of McStas, the task was separated into four conceptual layers:
8
Risø–R–1416(EN)
1. Modeling the physical processes of neutron scattering, i.e. the calculation of the
fate of a neutron that passes through the individual components of the instrument
(absorption, scattering at a particular angle, etc.)
2. Modeling of the overall instrument geometry, mainly consisting of the type and
position of the individual components.
3. Accurate calculation, using Monte Carlo techniques, of instrument properties such
as resolution function from the result of ray-tracing of a large number of neutrons.
This includes estimating the accuracy of the calculation.
4. Presentation of the calculations, graphical or otherwise.
Though obviously interrelated, these four layers can be treated independently, and this
is reflected in the overall system architecture of McStas. The user will in many situations
be interested in knowing the details only in some of the layers. For example, one user may
merely look at some results prepared by others, without worrying about the details of the
calculation. Another user may simulate a new instrument without having to reinvent the
code for simulating the individual components in the instrument. A third user may write
an intricate simulation of a complex component, e.g. a detailed description of a rotating
velocity selector, and expect other users to easily benefit from his/her work, and so on.
McStas attempts to make it possible to work at any combination of layers in isolation by
separating the layers as much as possible in the design of the system and in the metalanguage in which simulations are written.
The usage of a special meta-language and an automatic compiler has several advantages over writing a big monolithic program or a set of library functions in C, Fortran,
or another general-purpose programming language. The meta-language is more powerful;
specifications are much simpler to write and easier to read when the syntax of the specification language reflects the problem domain. For example, the geometry of instruments
would be much more complex if it were specified in C code with static arrays and pointers.
The compiler can also take care of the low-level details of interfacing the various parts of
the specification with the underlying C implementation language and each other. This
way, users do not need to know about McStas internals to write new component or instrument definitions, and even if those internals change in later versions of McStas, existing
definitions can be used without modification.
The McStas system also utilizes the meta-language to let the McStas compiler generate
as much code as possible automatically, letting the compiler handle some of the things
that would otherwise be the task of the user/programmer. Correctness is improved by
having a well-tested compiler generate code that would otherwise need to be specially
written and debugged by the user for every instrument or component. Efficiency is also
improved by letting the compiler optimize the generated code in ways that would be timeconsuming or difficult for humans to do. Furthermore, the compiler can generate several
different simulations from the same specification, for example to optimize the simulations
in different ways, to generate a simulation that graphically displays neutron trajectories,
and possibly other things in the future that were not even considered when the original
instrument specification was written.
The design of McStas makes it well suited for doing “what if. . . ” types of simulations.
Once an instrument has been defined, questions such as “what if a slit was inserted”,
Risø–R–1416(EN)
9
“what if a focusing monochromator was used instead of a flat one”, “what if the sample
was offset 2 mm from the center of the axis” and so on are easy to answer. Within minutes
the instrument definition can be modified and a new simulation program generated. It
also makes it simple to debug new components. A test instrument definition may be
written containing a neutron source, the component to be tested, and whatever detectors
are useful, and the component can be thoroughly tested before being used in a complex
simulation with many different components.
The McStas system is based on ANSI-C, making it both efficient and portable. The
meta-language allows the user to embed arbitrary C code in the specifications. Flexibility
is thus ensured since the full power of the C language is available if needed.
1.3
Overview
The McStas system documentation consists of the following major parts:
• A short list of new features introduced in this McStas release appears in chapter 2
• Chapter 3 explains how to obtain, compile and install the McStas compiler, associated files and supportive software
• Chapter 4 includes a brief introduction (section 4.1) as well a section (4.2) on running
the compiler to produce simulations. Section 4.3 explains how to run the generated
simulations. A number of front-end programs are used to run the simulations and
to aid in the data collection and analysis of the results. These user interfaces are
described in section 4.4.
• The McStas meta-language is described in chapter 5. This chapter also describes a
set of library functions and definitions that aid in the writing of simulations. See
appendix A for more details.
• Chapter 6 concerns Monte Carlo techniques and simulation strategies in general
• The McStas component library contains a collection of well-tested, as well as user
contributed, beam components that can be used in simulations. The McStas component library is documented in a separate manual and on the McStas web-page [2],
but a short overview of these components is given in chapter 7.1 of the Manual.
• A collection of example instrument definitions is described in chapter 8 of the Manual.
A list of library calls that may be used in component definitions appears in appendix A,
and an explanation of the McStas terminology can be found in appendix B of the Manual.. Plans for future extensions are presented on the McStas web-page [2] as well as in
section ??.
10
Risø–R–1416(EN)
Chapter 2
New features in McStas version
1.8
Many new features have been implemented in McStas version 1.8 since version 1.5 (no
version 1.6. manual was written, the most important being that McStas can now compile
and run in a Windows enviroment. The list of changes given here may be particularly
useful to experienced McStas users who do not wish to read the whole manual, searching
only for new features. A global upward compatibility exists for all changes, and thus all
previous components and instruments should work as before. Changes are labelled as 1.7
or 1.8 to indicate in which McStas version they appeared.
2.1
Kernel
The following changes concern the ’Kernel’ (i.e. the McStas meta-language and program).
See the dedicated chapter in the User manual for more details.
• McStas can now compile for Windows!
• Instrument parameters may now have default values, the same way as components
do (appeared in 1.8).
• An instrument source file may contain EXTEND %{ . . . }% C blocks just after the
usual AT . . . ROTATED . . . keywords, to extend the behaviour of existing components,
without touching their code. All local component variables are available. This may
for instance be used to add a new ’color’ to neutrons, i.e. assign a new characteristic
variable to the neutron (appeared in 1.7).
• Component instances in an instrument file may be GROUP’ed into exclusive assembly,
i.e. only one component of the group will intercept the neutron ray, the rest will be
skipped. This is useful for multi monochromators multi detectors, multiple collimators, etc. After the ROTATED keyword, the keyword GROUP should be added followed
by a group name (e.g. GROUP MyGroup) (appeared in 1.7).
• The instrument and components may have string (char*) setting parameters. For
components, their length is limited to 1024 characters (appeared in 1.7).
Risø–R–1416(EN)
11
• In both components and instruments, the FINALLY section, that is executed at the
end of simulations, has been supplemented with a new SAVE section. This latter is
executed at simulation end (just before the FINALLY section), but also each time an
intermediate save is required (e.g. when a ’kill -USR2 $pid’ is used under Unix, see
section 2.2) (appeared in 1.7).
• Components may have a SHARE section, which is imported only once per type of
component. SHARE has the same role as DECLARE, but is useful when several instances
of the same component is used in a single simulation (appeared in 1.7).
• The component files may have some %include inside ’%{ }%’ DECLARE or SHARE
C blocks. The files to include are searched locally, and then in the library. If an
extension is found, only the specified file is included, else both .h and .c are embedded
unless the –no-runtime has been specified. As in previous releases, the instrument
files can embed external files, both in C blocks and in the instrument parts (DECLARE,
etc.) (appeared in 1.7).
• The PREVIOUS keyword, to be used after RELATIVE in place of component instance
names refers to the preceeding component, and does not require to actually know its
name. Similarly the PREVIOUS(n) keyword refers to the n-th preceeding component
(appeared in 1.8).
2.2
Run-time
Some important modifications were done to the ’Run-time’ library (i.e. the functions used
in the instrument program). Some details may be found in Running chapter of the User
manual as well as in the appendix A.
• A global gravitation handling is now available, by setting the -g flag.
• Many output formats are available for data. Use the --format="format" flag, e.g.
--format="Scilab". The default format is McStas/PGPLOT, but may be specified
globally using the MCSTAS_FORMAT environment variable. See section 4.3.2 for details
(appeared in 1.7).
• It is possible to save 3D data arrays, by calling the DETECTOR OUT 3D macro.
(handled as 2D by mcplot by ignoring the 3rd dimension) (appeared in 1.7).
• The C type of the ’number of events’ array in monitors (usually named L_N) was
changed from int to double, to avoid overflow. All ’home-made’ monitors should
be updated accordingly (appeared in 1.7).
• The USR2 signal generates an intermediate save for all monitors, during the simulation (executes the SAVE section). The USR1 signal still gives informations (appeared
in 1.7).
• New randvec_target_rect and randvec_target_rect_angular functions now focus on a rectangle (more efficient than the former randvec_target_sphere) (appeared in 1.7).
12
Risø–R–1416(EN)
2.3
Components and Library
We here list some of the new components (found in the McStas lib directory) which are
detailed in the Component manual, also mentioned in the Component Overview of the
User Manual.
• All components now have a valid header for mcdoc automatic documentation, as well
as usage example.
• contrib This directory now contains contributed components. Those that will
be found to be highly stable will then go into the other component categories.
Contributed components (Guide_honeycomb, Guide_tapering, Guide_curved) have
been placed there (appeared in 1.7 and 1.8).
• data This directory now contains example data files mainly for Laue diffraction,
transmission and reflection files.
• doc The documentation is now included in the doc directory.
• example A new example directory contains instrument examples, available from the
mcgui ’Neutron site’ menu Tool.
• misc Updated Vitess_input and Vitess_output components according to Vitess
¿= 2.3 Neutron structure.
• misc A Progress_bar component may be positioned anywhere in the simulation and
displays the simulation percentage. It may also save temporary data files regularly
so that one can have a look (using mcplot) at the results on-the-fly before the end
of the simulation.
• monitors The Monitor_nD component may be used as a replacement for all monitors.
It may have automatic limits mode for either all or selected monitored variables. It
may also plot banana monitors for mcdisplay and monitor something else than the
intensity, e.g. the mean energy on a XY psd (appeared in 1.7). A bug (atan2) was
corrected in PSD_monitor_4PI.
• obsolete Some components were renamed by categories for better sorting. Old
components are still available, but not maintained anymore. We highly encourage
to avoid using these when writing new instrument definitions.
• optics components were renamed by categories, starting with Guide . . . , Monochromator . . . , Filter . . . etc so that sorting is easier (appeared in 1.7).
• optics Monochromator curved can read reflectivity and transmission tables (appeared in 1.7).
• optics Guide gravity can handle a 2D array of channels, and has options for subdivisions in length, chamfers and wavyness.
• optics Filter gen can read a table from a file and affect the neutron beam (replaces
the obsolete Flux_adapter). It may act as a filter or a source (appeared in 1.7).
Risø–R–1416(EN)
13
• optics Bugs were corrected in the following components: Bender, Chopper, Guide channeled.
Some similar components were gathered. New components were added: Guide gravity,
Guide wavy, Filter gen.
• samples can now target towards any component, given its index (no need to compute
target_x|y|z vector, use e.g. target_index=1). Position an Arm at the focusing
position when targetting to centered components (appeared in 1.7).
• samples Rectangular focusing has been implemented (instead of circular) in most
components. More sample shapes are available. A bug has been corrected in Single crystal. A Powder2 component (2 rings) has been added. Sans spheres is a new
sample component for small angle scattering (appeared in 1.8).
• share Many dedicated libraries are now available as shared code for reading tables,
handling data files and monitors. These are C functions to be %included into
components (see e.g. MCSTAS/monitors/Monitor_nD.comp) (appeared in 1.7).
• sources The Source_gen and Source_Maxwell_3 components may now simulate all
kinds of continuous neutron sources. Some bugs were corrected in most sources in order to have an isotropic neutron emission. The Virtual_input and Virtual_output
may load and save neutron event files (beware the size of the generated files !). Format may be text or binary (appeared in 1.7).
2.4
Tools, installation
A renewal of most McStas Tools, used to edit and display instrument or results, has
been undertaken, aiming at proposing alternatives to the Perl+PerlTk+PGPLOT+PDL
libraries.
Quite a lot of work was achieved in order to solve the installation problems that
have been encoutered so far. A fully working McStas distribution now only requires a C
compiler, perl, perl-Tk and one of Matlab, Scilab and (PGPLOT, perl-DL). The Plotlib
Scilab library has been included in the package, and does not need to be installed separately
anymore.
This has improved significantly the portability of McStas and thus simplified the installation of the package. Details about the installation and the available tools are given
in the Installing McStas chapter of the User Manual.
• The list of required packages for a complete McStas installation is now a C compiler,
Perl, PerlTk and Scilab or Matlab.
• Matlab, Scilab and IDL may read directly McStas results if the simulation was
executed with the --format="..." option (see 2.2 changes). The former PGPLOT
interface is still supported (appeared in 1.7).
• mcgui can now perform mcrun-like parameter scans directly from the gui (appeared
in 1.8).
• mcgui has now a ’Neutron site’ menu which enables to load directly one of the
instrument examples (appeared in 1.8).
14
Risø–R–1416(EN)
• mcrun can generate scan results in all formats (appeared in 1.8).
• mcrun has a McStas self test procedure available (appeared in 1.8).
• mcplot, mcdisplay, mcgui are now less dependent on the perl/PDL/pgplot installed
versions and fully work with Matlab/Scilab (appeared in 1.7).
• mcplot can plot a single simulation data file.
• mcplot, mcresplot, mcdisplay can output GIF, PS and color PS files. They also
have integrated help (-h options), and may generate output files in a non interactive
mode (read data, create output file, exit) (appeared in 1.7).
• mcplot and mcdisplay work with Matlab, PGPLOT and Scilab plotters (depends
on the MCSTAS_FORMAT environment variable, or -pPLOTTER option, or PGPLOT
if not set) (appeared in 1.7).
• mcplot may display parameter scan step results in all formats (appeared in 1.8).
• mcstas2vitess enables to convert a McStas component into a Vitess [9] one (appeared in 1.7).
• mcresplot can plot projections of the 4D resolution function of an instrument obtained from the Res_sample and Res_monitor components. In version 1.8, it only
works with the McStas/PGPLOT format, but a port for Scilab/Matlab is under way
(appeared in 1.7).
• mcdoc can now display the pdf version of the manual, an HTML catalog of the
current library, as well as help for single components. The mcdoc functions have
been closely integrated into mcgui (appeared in 1.7).
• mcdoc can document automatically instruments in the same way as components
(appeared in 1.8).
• mcconvert is a new tool to convert McStas result text files from Matlab to Scilab,
and from Scilab to Matlab formats (appeared in 1.8).
2.5
Future extensions
The following features are planned for the oncoming releases of McStas:
• Support for Matlab and Scilab in mcresplot.
• Support for MPI (parallel processing library) in the runtime
• Language extension ’JUMP’ for enabeling loops, ’teleporting’ etc. in instrument
descriptions.
• Concentric components.
• Polarised components and magnetic field computation components.
• Optimize a set of parameters for a better flux and/or resolution on a given monitor.
Risø–R–1416(EN)
15
Chapter 3
Installing McStas
The information in this chapter is also available as a separate html/ps/pdf document in
the install docs/ folder of your McStas installation package.
3.1
Licensing
The conditions on the use of McStas can be read in the files LICENSE and LICENSE.LIB
in the distribution. Essentially, McStas may be used and modified freely, and copies of
the McStas source code may be distributed to others. New or modified component and
instrument files may be shared by the user community, and we shall be glad to include
user contributions in the package.
3.2
Installing support Apps
To get a fully functional McStas installation, a few support applications are required.
Essentially, you will need a C compiler, Perl and Perl-Tk, as well as a plotter such as
Matlab, Scilab or PGPLOT (which we do not support but is still functional). These
should better be installed before McStas.
Under Windows, we recommand to avoid using spaces when specifying the location of
packages during their installation.
3.2.1
C compiler
The C compiler is used for building the instrument simulation executable, which does the
hard job. It is called transparently by the mcgui and mcrun McStas tools.
• Win32: Bloodshed Dev-C++ (Win32). To install Bloodshed Dev-C++, download
the installer package from
http://www.bloodshed.net/dev/devcpp.html.
When installed, add the C:\Dev-Cpp\bin directory to your PATH using
’Start/Settings/Control Panel/System/Advanced/Environment Variables’.
16
Risø–R–1416(EN)
• Unix/Linux: standard C compiler. Most Unix/Linux systems come with a system
C compiler, usually named ’cc’ or ’gcc’. In case this would not be the case, install
such a compiler from Linux packages (RedHat, SuSe or Debian), or compile it from
scratch.
3.2.2
Gui tools (Perl + Tk)
The McStas tools are written using the Perl language, with calls to the perl-Tk library.
• Win32:
– Get and install the ActivePerl package from
http://www.activestate.com/Products/Download/Register.plex?id=ActivePerl
(Registration not required) This package provides Perl and Perl-Tk.
– Optionally, get and install the ActiveTcl package from
http://www.activestate.com/Products/Download/Register.plex?id=ActiveTcl
(Registration not required) This package provides Tcl/Tk.
– You may need to update/install the Microsoft Windows Installer. Get it from
Windows Support Downloads at http://www.microsoft.com/.
– Make sure that during installation, you have requested to attach the .pl and
.tcl extensions to Perl and Tcl, and the C:\Perl\bin is in the PATH.
• Unix/Linux:
– Install Perl, Tcl/Tk and perl-Tk. Prebuilt packages exist for most Linux distributions and also most other Unix-like operating systems. You will find these
packages at http://freshmeat.net/, http://www.rpmfind.net/linux/RPM/ (for
SuSe and RedHat) and using Fink Commander (for Mac OS X). Some Linux
like system do not provide perl-Tk as an RPM/Debian file. You will then have
to compile it from the source code (with ./configure; make; make install).
– Consult the McStas webpage at http://mcstas.risoe.dk for updated links to the
source code distributions.
3.2.3
Plotting backends (All platforms)
For plotting with McStas, different support packages can be used:
• PGPLOT/PDL (perl-PDL)/pgperl (perl-PGPLOT) (Unix only) - Binary builds of
the packages exist for various Linux distributions (for instance Debian comes with
prebuilt versions). Prebuilt versions also exist for some commercial Unix’es. Refer to
distributor/vendor for documentation. The packages can also be built from source
using some (in many cases much) effort. See the PGPLOT documentation for further
details. You may need to define the PGPLOT_DIR variable to the location of the Pgplot
library.
• Matlab (Some Unix/Win32) - refer to http://www.mathworks.com. Matlab licenses
are rather costly, but discount programmes for university and research departments
exist.
Risø–R–1416(EN)
17
• Scilab (Unix/Win32/Mac...) - a free ’Matlab-like’ package, available from http://wwwrocq.inria.fr/scilab/.
On Windows systems, Scilab should be installed in a directory such as C:\Scilab
(do NOT use spaces in names) and you should then add the C:\Scilab\bin directory to your PATH using
’Start/Settings/Control Panel/System/Advanced/Environment Variables’.
3.3
Getting McStas
The McStas package is available in three different distribution packages, from the project
website at http://mcstas.risoe.dk, e.g.
• mcstas-1.8-src.tar.gz
Source code package for building McStas on (at least) Linux and Windows 2000.
This package should compile on most Unix platforms with an ANSI-c compiler. Refer to section 3.4
• mcstas-1.8-i686-unknown-Linux.tar.gz
Binary package for Linux systems, currently built on Debian GNU/Linux 3.0 ’woody’.
Should work on most Linux setups. - Refer to section 3.5
• mcstas-1.8-i686-unknown-Win32.zip
Binary package for Win32 systems, currently built on Microsoft Windows 2000 professional, using the gcc 2.95 compiler from Bloodshed Dev-C++ 5 Beta 7 - Refer to
section 3.6
3.4
Source code build
The McStas package is beeing co-developed for mainly Linux and Windows systems, however the Linux build instructions below will work on most Unix systems, including Mac
OS X). For an updated list of platforms on which McStas has been built, refer to the
project website.
3.4.1
Windows build
• Start by unpacking the mcstas-1.8-src.tar.gz package using e.g. Winzip.
• Compile the McStas package using the build.bat script of the mcstas-1.8 directory
you just unpacked. Follow the on screen instructions.
• When the build has been done (e.g. mcstas.exe has been produced), proceed to
install (Section 3.6).
18
Risø–R–1416(EN)
3.4.2
Unix build
McStas uses autoconf to detect the system configuration and creates the proper Makefiles
needed for compilation. On Unix-like systems, you should be able to compile and install
McStas using the following steps:
1. Unpack the sources to somewhere convenient and change to the source directory:
gunzip -c mcstas-1.8-src.tar.gz — tar xf cd mcstas-1.8/
2. Configure and compile McStas:
./configure
make
3. Install McStas (as superuser):
make install
The installation of McStas in step 3 by default installs in the /usr/local/ directory, which
on most systems requires superuser (root) privileges. To install in another directory, use
the –prefix= option to configure in step 2. For example,
./configure –prefix=/home/joe
will install the McStas programs in /home/joe/bin/ and the library files needed by McStas
in /home/joe/lib/mcstas/.
In case ./configure makes an incorrect guess, some environment variables can be set
to override the defaults:
• The CC environment variable may be set to the name of the C compiler to use (this
must be an ANSI C compiler). This will also be used for the automatic compilation
of McStas simulations in mcgui and mcrun.
• CFLAGS may be set to any options needed by the compiler (eg. for optimization or
ANSI C conformance). Also used by mcgui/mcrun.
• PERL may be set to the path of the Perl interpreter to use.
To use these options, set the variables before running ./configure. Eg.
setenv PERL /pub/bin/perl5
./configure
It may be necessary to remove configure’s cache of old choices first:
rm -f config.cache
If you experience any problems, or have some questions or ideas concerning McStas, please
contact [email protected] or the McStas mailing list at [email protected].
Risø–R–1416(EN)
19
You should try to make sure that the directory containing the McStas binaries (mcstas,
gscan, mcdisplay, etc.) is contained in the PATH environment variable. The default directory is /usr/local/bin, which is usually, but not always, included in PATH. Alternatively,
you can reference the McStas programs using the full path name, ie.
/usr/local/bin/mcstas my.instr
perl /usr/local/bin/mcrun -N10 -n1e5 mysim -f output ARG=42
perl /usr/local/bin/mcdisplay --multi mysim ARG=42
This may also be necessary for the front-end programs if the install procedure could
not determine the location of the perl interpreter on your system.
If McStas is installed properly, it should be able to find the files it needs automatically.
If not, you should set the MCSTAS environment variable to the directory containing the
runtime files ”mcstas-r.c” and ”mcstas-r.h” and the standard components (*.comp). Use
one of
MCSTAS=/usr/local/lib/mcstas; export MCSTAS # sh, bash
setenv MCSTAS /usr/local/lib/mcstas
# csh, tcsh
3.5
Binary install, Linux
Should be very easy, simply start from ’make install’ in Section 3.4.
3.6
Binary install, Windows
• Start by unpacking the mcstas-1.8-i686-unknown-Win32.zip package using e.g.
Winzip.
• Execute the install.bat installation script. Follow the on screen instructions.
• Set the required (see output of install.bat) environment variables using
’Start/Settings/Control Panel/System/Advanced/Environment Variables’
– PATH Append e.g. C:\mcstas\bin
– MCSTAS Create it as e.g. C:\mcstas\lib
It is important that Perl is correctly installed to execute all the McStas tools (e.g. mcdoc.pl, mcrun.pl, mcgui.pl, . . . ). Create a shortcut of the C:\mcstas\bin\mcgui.pl on
your Desktop (the icon should be a yellow dot). Whenever launched from the Windows
Command window (cmd), you must specify the .pl extension to all McStas Perl script
commands (e.g. ’mcrun.pl’ and ’mcgui.pl’, not ’mcrun’ or ’mcgui’) except for mcstas
itself.
Actually, the modifications to your environnement variables should be
20
Risø–R–1416(EN)
• PATH Append e.g.
C:\mcstas\bin;c:\Program Files\Scilab-2.7.2\bin;C:\Perl\bin\;C:\Dev-Cpp\bin;
• MCSTAS Create it as e.g. C:\mcstas\lib
using menu item ’Start/Settings/Control Panel/System/Advanced/Environment Variables’.
On some Windows systems, it may be necessary to logout/login (no need to restart the
computer) to make these changes active for the whole session.
3.7
Finishing and Testing the McStas distribution
The examples directory of the distribution contains a set of instrument examples. These
are used for the McStas self test procedure, which is executed with
mcrun --test
This test takes a few minutes to complete, and ends with a short report on the installation
itself, the simulation accuracy and the plotter check.
You should now be able to use McStas. For some examples to try, see the examples/
directory. Start ’mcgui’ (mcgui.pl on Windows), and select one of the examples in the
’Neutron Sites’ menu.
Risø–R–1416(EN)
21
Chapter 4
Running McStas
This chapter describes usage of the McStas simulation package. Refer to Chapter 3 for
installation instructions. In case of problems regarding installation or usage, the McStas
mailing list [2] or the authors should be contacted.
To use McStas, an instrument definition file describing the instrument to be simulated
must be written. Alternatively, an example instrument file can be obtained from the
examples/ directory in the distribution or from another source.
The structure of McStas is illustrated in Figure 4.1.
The input files (instrument and component files) are written in the McStas metalanguage and are edited either by using your favourite editor or by using the built in
editor of the graphical user interface (mcgui).
Next, the instrument and component files are compiled using the McStas compiler
using the FLEX and Bison facilities to produce a C program 1 .
The resulting C program can then be compiled with a C compiler and run in combination with various front-end programs for example to present the intensity at the detector
as a motor position is varied.
The output data may be analyzed in the same way as regular experiments are analyzed
by using Matlab, Scilab [10] or IDL or by using the Perl routines included in McStas.
4.1
Brief introduction to the graphical user interface
This section gives an ultra-brief overview of how to use McStas once it has been properly installed. It is intended for those who do not read manuals if they can avoid
it. For details on the different steps, see the following sections. This section uses the
vanadium_example.instr file supplied in the examples/ directory of the McStas distribution.
To start the graphical user interface of McStas, run the command mcgui (mcgui.pl
on Windows). This will open a window with some menus etc., see figure 4.2.
To load an instrument, select “Tutorial” from the “Neutron site” menu and open the
file vanadium_example. Next, check that the current plotting backend setting (select
“Choose backend” from the “Simulation” menu) corresponds to your system setup. The
default setting can be adjusted as explained in Chapter 3
1
22
Note that since release 1.7 of McStas, FLEX and Bison need not be installed on your computer.
Risø–R–1416(EN)
Graphical User Interface
(Perl)
Input
(Meta-language)
Analysis
(PGPLOT +
pgperl + PDL)
Output data
(multi-format File)
Compilation
(mcstas, c-compiler)
Analysis
(Matlab)
Analysis
(Scilab)
Analysis
(Browser)
Executable (binary)
Analysis
(IDL)
Figure 4.1: An illustration of the structure of McStas .
Figure 4.2: The graphical user interface mcgui.
• by editing the tools/perl/mcstas_config.perl setup file of your installation
• by setting the MCSTAS_FORMAT environment variable.
Next, select “Run simulation” from the “Simulation” menu. McStas will translate the
definition into an executable program and pop up a dialog window. Type a value for
the “ROT” parameter (e.g. 90), check the “Plot results” option, and select “Start”.
The simulation will run, and when it finishes after a while the results will be plotted in a
window. Depending on your chosen plotting backend, the presented graphics will resemble
Risø–R–1416(EN)
23
one of those shown in figure 4.3. When using the Scilab or Matlab backends, full 3D view
[vanadium_psd] vanadium.psd: 4PI PSD monitor [*10^−9]
−0.90
0.00
Lattitude [deg] [*10^2]
Intensity
0.230
0.407
0.584
0.90
Longitude [deg] [*10^2] 0.00
1.80
−1.80
[vanadiumpsd] vanadium.psd: 4PI PSD monitor
80
60
40
Lattitude [deg]
20
0
−20
−40
−60
−80
−150
−100
−50
0
Longitude [deg]
50
100
150
Figure 4.3: Output from mcplot with PGPLOT, Scilab and Matlab backends
of plots and different display possibilities are available. Use the attached McStas window
menus to control these. Features are quite self explanatory. For other options, execute
mcplot --help (mcplot.pl --help on windows) to get help.
To debug the simulation graphically, repeat the steps but check the “Trace” option
instead of the “Simulate” option. A window will pop up showing a sketch of the instrument.
Depending on your chosen plotting backend, the presented graphics will resemble one of
those shown in figures 4.4-4.6.
For a slightly longer gentle introduction to McStas, see the McStas tutorial (available
from [2]). For more technical details, read on from section 4.2
4.1.1
New releases of McStas
Releases of new versions of a software can today be carried out more or less continuously.
However, users do not update their software on a daily basis, and as a compromise we
have adopted the following policy of McStas .
24
Risø–R–1416(EN)
Figure 4.4: Output from mcdisplay with PGPLOT backend. The left mouse button starts
a new neutron, the middle button zooms, and the right button resets the zoom. The Q
key quits the program.
Figure 4.5: Output from mcdisplay with Scilab backend. Display can be adjusted using
the dialogbox (right).
• A version 1.8.x will contain bug fixes and new functionality. A new manual will,
however, not be released and the modifications are documented on the McStas webpage. The extensions of the forthcoming version 1.8.x are also listed on the web,
and new versions may be released quite frequently when it is requested by the user
community.
Risø–R–1416(EN)
25
/home/fys/pkwi/Beta0/mcstas−1.7−Beta0/examples/vanadium_example
1
0.9
0.8
0.2
0.7
y/[m]
0.6
0.1
0.5
0.4
0
0.3
0.2
0.2
0.1
0.1
0
z/[m]
0
x/[m]
Figure 4.6: Output from mcdisplay with Matlab backend. Display can be adjusted using
the window buttons.
• A version 1.9 will contain an updated manual. It will typically be released once or
twice a year in connection to for example a McStas workshop.
4.2
Running the instrument compiler
This section describes how to run the McStas compiler manually. Often, it will be more
convenient to use the front-end program mcgui (section 4.4.1) or mcrun (section 4.4.2).
These front-ends will compile and run the simulations automatically.
The compiler for the McStas instrument definition is invoked by typing a command of
the form
mcstas name.instr
This will read the instrument definition name.instr which is written in the McStas metalanguage. The compiler will translate the instrument definition into a Monte Carlo simulation program provided in ANSI-C. The output is by default written to a file in the
current directory with the same name as the instrument file, but with extension .c rather
than .instr. This can be overridden using the -o option as follows:
mcstas -o code.c name.instr
which gives the output in the file code.c. A single dash ‘-’ may be used for both input
and output filename to represent standard input and standard output, respectively.
4.2.1
Code generation options
By default, the output files from the McStas compiler are in ANSI-C with some extensions
(currently the only extension is the creation of new directories, which is not possible in
pure ANSI-C). The use of extensions may be disabled with the -p or --portable option.
With this option, the output is strictly ANSI-C compliant, at the cost of some slight
reduction in capabilities.
26
Risø–R–1416(EN)
The -t or --trace option puts special “trace” code in the output. This code makes it
possible to get a complete trace of the path of every neutron through the instrument, as
well as the position and orientation of every component. This option is mainly used with
the mcdisplay front-end as described in section 4.4.4.
The code generation options can also be controlled by using preprocessor macros in the
C compiler, without the need to re-run the McStas compiler. If the preprocessor macro
MC_PORTABLE is defined, the same result is obtained as with the --portable option of
the McStas compiler. The effect of the --trace option may be obtained by defining the
MC_TRACE_ENABLED macro. Most Unix-like C compilers allow preprocessor macros to be
defined using the -D option, eg.
cc -DMC_TRACE_ENABLED -DMC_PORTABLE ...
Finally, the --verbose option will list the components and libraries beeing included in
the instrument.
4.2.2
Specifying the location of files
The McStas compiler needs to be able to find various files during compilation, some
explicitly requested by the user (such as component definitions and files referenced by
%include), and some used internally to generate the simulation executable. McStas looks
for these files in three places: first in the current directory, then in a list of directories
given by the user, and finally in a special McStas directory. Usually, the user will not
need to worry about this as McStas will automatically find the required files. But if users
build their own component library in a separate directory or if McStas is installed in an
unusual way, it will be necessary to tell the compiler where to look for the files.
The location of the special McStas directory is set when McStas is compiled. It defaults to /usr/local/lib/mcstas on Unix-like systems and C:\mcstas\lib on Windows
systems, but it can be changed to something else, see section 3 for details. The location
can be overridden by setting the environment variable MCSTAS:
setenv MCSTAS /home/joe/mcstas
for csh/tcsh users, or
export MCSTAS=/home/joe/mcstas
for bash/Bourne shell users. For Windows Users, you should define the MCSTAS from the
menu ’Start/Settings/Control Panel/System/Advanced/Environment Variables’ by creating MCSTAS with the value C:\mcstas\lib
To make McStas search additional directories for component definitions and include
files, use the -I switch for the McStas compiler:
mcstas -I/home/joe/components -I/home/joe/neutron/include name.instr
Multiple -I options can be given, as shown.
Risø–R–1416(EN)
27
4.2.3
Embedding the generated simulations in other programs
By default, McStas will generate a stand-alone C program, which is what is needed in
most cases. However, for advanced usage, such as embedding the generated simulation
in another program or even including two or more simulations in the same program, a
stand-alone program is not appropriate. For such usage, the McStas compiler provides
the following options:
• --no-main This option makes McStas omit the main() function in the generated
simulation program. The user must then arrange for the function mcstas_main()
to be called in some way.
• --no-runtime Normally, the generated simulation program contains all the run-time
C code necessary for declaring functions, variables, etc. used during the simulation.
This option makes McStas omit the run-time code from the generated simulation
program, and the user must then explicitly link with the file mcstas-r.c as well as
other shared libraries from the McStas distribution.
Users that need these options are encouraged to contact the authors for further help.
4.2.4
Running the C compiler
After the source code for the simulation program has been generated with the McStas
compiler, it must be compiled with the C compiler to produce an executable. The generated C code obeys the ANSI-C standard, so it should be easy to compile it using any
ANSI-C (or C++) compiler. E.g. a typical Unix-style command would be
cc -O -o name.out name.c -lm
The -O option typically enables the optimization phase of the compiler, which can make
quite a difference in speed of McStas generated simulations. The -o name.out sets the
name of the generated executable. The -lm options is needed on many systems to link in
the math runtime library (like the cos() and sin() functions).
Monte Carlo simulations are computationally intensive, and it is often desirable to
have them run as fast as possible. Some success can be obtained by adjusting the compiler
optimization options. Here are some example platform and compiler combinations that
have been found to perform well (up-to-date information will be available on the McStas
WWW home page [2]):
• Intel x86 (“PC”) with Linux and GCC, using options gcc -O3.
• Intel x86 with Linux and EGCS (GCC derivate) using options egcc -O6.
• Intel x86 with Linux and PGCC (pentium-optimized GCC derivate), using options
gcc -O6 -mstack-align-double.
• HPPA machines running HPUX with the optional ANSI-C compiler, using the options -Aa +Oall -Wl,-a,archive (the -Aa option is necessary to enable the ANSI-C
standard).
• SGI machines running Irix with the options -Ofast -o32 -w
28
Risø–R–1416(EN)
A warning is in place here: it is tempting to spend far more time fiddling with compiler
options and benchmarking than is actually saved in computation times. Even worse, compiler optimizations are notoriously buggy; the options given above for PGCC on Linux and
the ANSI-C compiler for HPUX have been known to generate incorrect code in some compiler versions. McStas actually puts an effort into making the task of the C compiler easier,
by in-lining code and using variables in an efficient way. As a result, McStas simulations
generally run quite fast, often fast enough that further optimizations are not worthwhile.
Also, optimizations are higly time and memory consuming during compilation, and thus
may fail when dealing with large instrument descriptions (e.g. more that 100 elements).
The compilation process is simplified when using components of the library making use of
shared libraries (see SHARE keyword in chapter 5).
4.3
Running the simulations
Once the simulation program has been generated by the McStas compiler and an executable has been obtained with the C compiler, the simulation can be run in various ways.
The simplest way is to run it directly from the command line or shell:
./name.out
Note the leading dot, which is needed if the current directory is not in the path searched
by the shell. When used in this way, the simulation will prompt for the values of any
instrument parameters such as motor positions, and then run the simulation. Default
instrument parameter values (see section 5.3), if any, will be indicated and entered when
hitting the Return key. This way of running McStas will only give data for one spectrometer setting which is normally sufficient e.g. for a time-of-flight spectrometer, but not for a
triple-axis spectrometer where a scan over various spectrometer settings is required. Often
the simulation will be run using one of several available front-ends, as described in the
next section. These front-ends help manage output from the potentially many detectors
in the instruments, as well as running the simulation for each data point in a scan.
The generated simulations accept a number of options and arguments. The full list
can be obtained using the --help option:
./name.out --help
The values of instrument parameters may be specified as arguments using the syntax
name=val. For example
./vanadium_example.out ROT=90
The number of neutron histories to simulate may be set using the --ncount or -n option,
for example --ncount=2e5. The initial seed for the random number generator is by default
chosen based on the current time so that it is different for each run. However, for debugging
purposes it is sometimes convenient to use the same seed for several runs, so that the same
sequence of random numbers is used each time. To achieve this, the random seed may be
set using the --seed or -s option.
By default, McStas simulations write their results into several data files in the current
directory, overwriting any previous files stored there. The --dir=dir or -ddir option
Risø–R–1416(EN)
29
causes the files to be placed instead in a newly created directory dir (to prevent overwriting
previous results an error message is given if the directory already exists). Alternatively,
all output may be written to a single file file using the --file=file or -ffile option (which
should probably be avoided when saving in binary format, see below).
The complete list of options and arguments accepted by McStas simulations appears
in table 4.1.
4.3.1
Choosing a data file format
Data files contain header lines with information about the simulation from which they
originate. In case the data must be analyzed with programs that cannot read files with
such headers, they may be turned off using the --data-only or -a option.
The format of the output files from McStas simulations is described in more detail in
section 4.5. It may be chosen either with --format=FORMAT for each simulation or globally
by setting the MCSTAS FORMAT environment variable. The available format list is
obtained using the name.out --help option, and shown in table 4.2. McStas can presently
generate many formats, including the original McStas/PGPLOT and the new Scilab and
Matlab formats. All formats, except the McStas/PGPLOT, may eventually support binary
files, which are much smaller and faster to import, but are platform dependent. The
simulation data file extensions are appended automatically, depending on the format. For
example:
./vanadium_example.out ROT=90 --format="Scilab_binary"
or more generally (for bash/Bourne shell users)
export MCSTAS_FORMAT="Matlab"
./vanadium_example.out ROT=90
4.3.2
Basic import and plot of results
The previous example will result in a mcstas.m file, that may be read directly from Matlab
(using the sim file function)
matlab> s=mcstas;
matlab> s=mcstas(’plot’)
The first line returns the simulation data as a single structure variable, whereas the second
one will additionally plot each detector separately. This also equivalently stands for Scilab
(using the get_sim file function, the ’exec’ call is required in order to compile the code)
scilab> exec(’mcstas.sci’, -1); s=get_mcstas();
scilab> exec(’mcstas.sci’, -1); s=get_mcstas(’plot’)
and for IDL
idl> s=mcstas()
idl> s=mcstas(/plot)
See section 4.4.5 for an other way of plotting simulation results using the mcplot front-end.
30
Risø–R–1416(EN)
-s seed
--seed=seed
Set the initial seed for the random number generator. This may
be useful for testing to make each run use the same random
number sequence.
Set the number of neutron histories to simulate. The default is
1,000,000.
Create a new directory dir and put all data files in that directory.
Write all data into a single file file. Avoid when using binary
formats.
Do not put any headers in the data files.
-n count
--ncount=count
-d dir
--dir=dir
-f file
--file=file
-a
--data-only
-h
--help
-i
--info
-t
--trace
--no-output-files
-g
--gravitation
--format=FORMAT
param=value
Show a short help message with the options accepted, available
formats and the names of the parameters of the instrument.
Show extensive information on the simulation and the instrument definition it was generated from.
This option makes the simulation output the state of every
neutron as it passes through every component. Requires that
the -t (or --trace) option is also given to the McStas compiler
when the simulation is generated.
This option disables the writing of data files (output to the
terminal, such as detector intensities, will still be written).
This option toggles the gravitation handling for the whole neutron propagation within the instrument.
This option sets the data format for result files from monitors
Set the value of an instrument parameter, rather than having
to prompt for each one.
Table 4.1: Options accepted by McStas simulations
McStas
PGPLOT
Scilab
Scilab binary
.sim
Matlab
Matlab binary
.m
.sci
IDL
IDL binary
.pro
XML
HTML
.xml
.html
Original format for PGPLOT plotter (may be used with -f and
-d options)
Scilab format (may be used with -f and -d options)
Scilab format with external binary files (may be used with -d
option). Also toggles -a option.
Matlab format (may be used with -f and -d options)
Matlab format with external binary files (may be used with -d
option). Also toggles -a option.
IDL format. Must be used with -f option.
IDL format with external binary files (may be used with -d
option). Also toggles -a option.
XML/NeXus format (may be used with -f and -d options).
HTML format (generates a web page, may be used with -f and
-d options).
Table 4.2: Available formats supported by McStas simulations.
Risø–R–1416(EN)
31
4.3.3
Interacting with a running simulation
Once the simulation has started, it is possible, under Unix, Linux and Mac OS X systems,
to interact with the on-going simulation.
McStas attaches a signal handler to the simulation process. In order to send a signal to
the process, the process-id pid must be known. Users may look at their running processes
with the Unix ’ps’ command, or alternatively process managers like ’top’ and ’gtop’. If a
file.out simulation obtained from McStas is running, the process status command should
output a line ressembling
<user> 13277 7140 99 23:52 pts/2
00:00:13 file.out
where user is your loggin name. The pid is there ’13277’.
Once known, it is possible to send one of the signals listed in table 4.3 using the ’kill’
unix command (or the functionalities of your process manager), e.g.
kill -USR2 13277
This will result in a message showing status (here 33 % achieved), as well as the position
in the instrument of the current neutron.
#
#
#
#
#
McStas: [pid 13277] Signal 12 detected SIGUSR2 (Save simulation)
Simulation: file (file.instr)
Breakpoint: MyDetector (Trace) 33.37 % ( 333654.0/ 1000000.0)
Date
: Wed May 7 00:00:52 2003
McStas: Saving data and resume simulation (continue)
followed by the list of detector outputs (integrated counts and files). Finally, sending a
kill 13277 (which is equivalent to kill -TERM 13277) will end the simulation before the
initial ’ncount’ preset.
A typical usage example would be, for instance, to save data during a simulation, plot
or analyze it, and decide to interupt the simulation earlier if the desired statistics has been
achieved. This may be done automatically using the Progress_bar component.
Whenever simulation data is generated before end (or the simulation is interupted), the
’ratio’ field of the monitored data will provide the level of achievement of the computation
(for instance ’3.33e+05/1e+06’);
Additionally, any system error will result in similar messages, giving indication about
the occurence of the error (in which component ? in which section ?). Whenever possible,
the simulation will try to save the data before ending. Most errors appear when writing
a new component, in the INITIALIZE, TRACE or FINALLY sections. Memory errors usually
show up when C pointers have not been allocated/unallocated before usage, whereas
mathematical errors are set when, for instance, dividing per zero.
4.3.4
Optimizing a simulation
There are various other ways to speed-up a simulation
• Optimize the compilation of the instrument, as explained in section 4.2.4.
32
Risø–R–1416(EN)
USR1
USR2
INT, TERM
Request informations (status)
Request informations and performs an intermediate saving of
all monitors (status and save). This triggers the execution of
all SAVE sections (see chapter 5).
Save and exit before end (status)
Table 4.3: Signals supported by McStas simulations.
• Divide simulation into parts using a file for saving or generating neutron events.
This way, a guide may be simulated only once, saving the neutron events getting out
from it as a file, which is being read quickly by the second simulation part. Use the
Virtual input and Virtual output components for this technique.
• Use source optimizers like the components Source adapt or Source Optimizer. Such
component may sometimes not be very efficient, when no neutron importance sampling can be achieved, or may even sometimes alter the simulation results. Be careful
and always check results with a non-optimized computation.
• Complex components usually take into account additional small effects in a simulation, but are much longer to execute. Thus, simple components should be prefered
whenever possible, at least to start with.
Additionally, the user may wish to optimize the parameters of a simulation (e.g. find
the optimal curvature of a monochromator, or the best geometry of a given component).
The user should write a function script or a program that
• inputs the simulation parameters, which are usually numerical values such as T T in
the prisma2 instrument from the examples directory of the package.
• builds a command line from these parameters.
• execute that command, and waits until the end of the computation.
• reads the relevant data from the monitors.
• outputs a simulation quality measurement from this data, usually the integrated
counts or some peak width.
For instance, for the prisma2 instrument we could write a function for Matlab (see
section 4.5 for details about the Matlab data format) in order to study the effects of the
T T parameter:
function y = instr_value(p)
TT = p(1);
% p may be a vector/matrix containing many parameters
syscmd = [ ’mcrun prisma2.instr -n1e5 TT=’ num2str(TT) ...
’ PHA=22 PHA1=-3 PHA2=-2 PHA3=-1 PHA4=0 PHA5=1’ ...
’ PHA6=2 PHA7=3 TTA=44 --format="Matlab binary"’ ];
system(syscmd); path(path) % execute simulation, and rehash files
s = mcstas;
% get the simulation data, and the monitor data
Risø–R–1416(EN)
33
s = s.prisma2.m_mcstas.detector.prisma2_tof.signal;
eval(s);
% we could also use the ’statistics’ field
y = -Mean;
% ’value’ of the simulation
Then a numerical optimization should be available, such as those provided with Matlab,
Scilab, IDL, and Perl-PDL high level languages. In this example, we may wish to maximize
the instr_value function value. The fminsearch function of Matlab is a minimization
method (that’s why we have a minus sign for y value), and:
matlab> TT = fminsearch(’instr_value’, -25)
will determine the best value of TT, starting from -25 estimate, in order to minimize
function instr_value, and thus maximize the mean detector counts.
The choice of the optimization routine, of the simulation quality value to optimize and
the initial parameter guess all may have a large influence on the results. Be cautious and
wise when interpreting the optimal guess.
4.4
Using simulation front-ends
McStas includes a number of front-end programs that extend the functionality of the
simulations. A front-end program is an interface between the user and the simulations,
running the simulations and presenting the output in various ways to the user.
The list of available McStas front-end programs may be obtained from the mcdoc --tools
command:
McStas Tools
mcstas
Main instrument compiler
mcrun
Instrument maker and execution utility
mcgui
Graphical User Interface instrument builder
mcdoc
Component library documentation generator/viewer
mcplot
Simulation result viewer
mcdisplay
Instrument geometry viewer
mcresplot
Instrument resolution function viewer
mcstas2vitess McStas to Vitess component translation utility
mcconvert
Matlab <-> Scilab script conversion tool
When used with the -h flag, all tools display a specific help.
SEE ALSO: mcstas, mcdoc, mcplot, mcrun, mcgui, mcresplot, mcstas2vitess
DOC:
Please visit http://neutron.risoe.dk/mcstas/
An extended set of front-end programs is planned for future versions of McStas, including
a NeXus data format option [11].
4.4.1
The graphical user interface (mcgui)
The front-end mcgui provides a graphical user interface that interfaces the various parts
of the McStas package. It is started using simply the command
mcgui
34
Risø–R–1416(EN)
The mcgui (mcgui.pl on Windows) program may optionally be given the name of an
instrument file.
When the front-end is started, a main window is opened (se figure 4.2). This window
displays the output from compiling and running simulations, and also contains a few
menus and buttons. The main purpose of the front-end is to edit and compile instrument
definitions, run the simulations, and visualize the results.
The menus
The “File” menu has the following features:
Open instrument selects the name of an instrument file to be used.
Edit current opens a simple editor window for editing the current instrument definition.
This function is also available from the “Edit” button to the right of the name of
the instrument definition in the main window.
Spawn editor This starts the editor defined in the environment variable VISUAL or
EDITOR on the current instrument file. It is also possible to start an external editor
manually; in any case mcgui will recompile instrument definitions as necessary based
on the modification dates of the files on the disk.
Compile instrument forces a recompile of the instrument definition, regardless of file
dates. This is for example useful to pick up changes in component definitions, which
the front-end will not notice automatically. See section 3 for how to override default
C compiler options.
Clear output erases all text in the window showing output of compilations and simulations.
Quit exits the graphical user interface front-end.
The “Simulation” menu has the following features:
Read old simulation prompts for the name of a file from a previous run of a McStas
simulation (usually called mcstas.sim). The file will be read and any detector data
plotted using the mcplot front-end. The parameters used in the simulation will also
be made the defaults for the next simulation run. This function is also available
using the “Read” button to the right of the name of the current simulation data.
Run simulation opens the run dialog window, explained further below.
Plot results plots (using mcplot) the results of the last simulation run or loaded.
Choose backend selection of plotting backend (PGPLOT/Matlab/Scilab). Opens the
choose backend dialog shown in figure 4.7. All formats are chosen as full text, but a
’Use binary files’ option is possible.
The “Neutron Site” menu contains a list of template/example instruments as found in the
McStas library, sorted by neutron site. When selecting one of these, a local copy of the
instrument description is transfered to the active directory (so that users have modification
Risø–R–1416(EN)
35
Figure 4.7: The choose backend dialog in mcgui.
rights). One may then view its source (Edit) and use it directly for simulations/trace (3D
View).
The “Help” menu has the following features, through use of mcdoc and a web browser.
To customize the used web browser, set the BROWSER environment variable. If BROWSER is
not set, mcgui uses netscape on Unix and the default browser on Windows.
McStas web page calls mcdoc --web, brings up the McStas website in a web browser.
McStas User manual calls mcdoc --manual, brings up the local pdf version of this
manual, using a web browser.
McStas Component manual calls mcdoc --comp, brings up the local pdf version of
the component manual, using a web browser.
Component doc index displays the component documentation using the component
index.html index file.
Generate component index (re-)generates locally the component index.html.
Test McStas installtion launches a self test procedure to check that the McStas package
is installed properly, generates accurate results, and may use the plotter to display
the results.
single menu point, “McStas web-page”, which attempts to open a Netscape window with
the McStas web-page. This obviously requires that Netscape is properly installed on the
computer.
The run dialog
The run dialog is used to run simulations. It allows the entry of instrument parameters as
well as the specifications of options for running the simulation (see section 4.3 for details).
It also allows to run the mcdisplay (section 4.4.4) and mcplot (section 4.4.5) front-ends
together with the simulation.
The meaning of the different fields is as follows:
36
Risø–R–1416(EN)
Figure 4.8: The run dialog in mcgui.
Instrument parameters allows the setting of the values for the input parameters of
the instrument. The type of each instrument parameter is given in parenthesis after
each name. Floating point numbers are denoted by (D) (for the C type “double”),
(I) denotes integer parameters, and (S) denotes strings.
Output to allows the entry of a directory to store the resulting data files in (like the
--dir option). If no name is given, the results are put in the current directory, to
be overwritten by the next simulation.
Neutron count sets the number of neutron histories to simulate (the --ncount option).
Distribute mcrun scans (grid) is an experimental option to distribute scan steps on
a set of machines using ssh connexions.
Plot results – if checked, the mcplot front-end will be run after the simulation has
finished, and the plot dialog will pop up (see below).
Random seed/Set seed to selects between using a random seed (different in each simulation) for the random number generator, or using a fixed seed (to reproduce results
for debugging).
Simulate/Trace selects between running the simulation normally, or using the mcdisplay
front-end.
Inspect component will trace neutron trajectories that only reach a given component
(e.g. sample or detector).
First component seletcs the first component to plot (default is first) in order to define
a region of interest.
Last component seletcs the last component to plot (default is first) in order to define a
region of interest.
Risø–R–1416(EN)
37
Start runs the simulation.
Cancel aborts the dialog.
Before running the simulation, the instrument definition is automatically compiled if
it is newer than the generated C file (or if the C file is newer than the executable). The
executable is assumed to have a .out suffix in the filename.
The plot dialog
This dialog only shows-up when using the McStas/PGPLOT plotter. Other plotters have
attached menus to control graphics and file exports.
Monitors and detectors lists all the one- and two-dimensional detectors in the instrument. By double-clicking, one plots the data in the plot window.
Plot plots the selected detector in the plot window, just like double-clicking its name.
Overview plot plots all the detectors together in the plot window.
B&W postscript prompts for a file name and saves the current plot as a black and white
postscript file. This can subsequently be printed on a postscript printer.
Colour postscript creates a colour postscript file of the current plot.
Colour GIF creates a colour GIF file of the current plot.
Close ends the dialog.
The editor window
The editor window provides a simple editor for creating and modifying instrument definitions. Apart from the usual editor functions, the “Insert” menu provides some functions
that aid in the construction of the instrument definitions:
Instrument template inserts the text for a simple instrument skeleton in the editor
window.
Component. . . opens up a dialog window with a list of all the components available for
use in McStas. Selecting a component will display a description. Double-clicking
will open up a dialog window allowing the entry of the values of all the parameters
for the component (figure 4.9). See section 5.3 for details of the meaning of the
different fields.
The dialog will also pick up those of the users own components that are present
in the current directory when mcgui is started. See section 5.4.11 for how to write
components to integrate well with this facility.
Type These menu entries give quick access to the entry dialog for the various components
available.
38
Risø–R–1416(EN)
Figure 4.9: Component parameter entry dialog.
To use the mcgui front-end, the programs Perl and Perl/Tk must be properly installed
on the system.
Additionally, if the McStas/PGPLOT back-end is used for data format, PGPLOT,
PgPerl, and PDL will be required. It may be necessary to set the PGPLOT_DIR and
PGPLOT_DEV environment variable; consult the documentation for PGPLOT on the local system in case of difficulty.
4.4.2
Running simulations with automatic compilation (mcrun)
The mcrun front-end (mcrun.pl on Windows) provides a convenient command-line interface
for running simulations with the same automatic compilation features available in the
mcgui front-end. It also provides a facility for running a series of simulations while varying
an input parameter, thereby replacing the old gscan front-end.
The command
mcrun sim args ...
will compile the instrument definition sim.instr (if necessary) into an executable simulation sim.out. It will then run sim.out, passing the argument list args
The possible arguments are the same as those accepted by the simulations themselves
as described in section 4.3, with the following extensions:
• The -c or --force-compile option may be used to force the recompilation of the
instrument definition, regardless of file dates. This may be needed in case any
component definitions are changed (in which case mcrun does not automatically
recompile), or if a new version of McStas has been installed.
Risø–R–1416(EN)
39
• The -p file or --param=file option may be used to specify a file containing assignment of values to the input parameters of the instrument definition. The file should
consist of specifications of the form name=value separated by spaces or line breaks.
Multiple -p options may be given together with direct parameter specifications on
the command line. If a parameter is assigned multiple times, later assignments
override previous ones.
• The -N count or --numpoints=count option may be used to perform a series of count
simulations while varying one or more parameters within specified intervals. Such
a series of simulations is called a scan. To specify an interval for a parameter X, it
should be assigned two values separated with a comma. For example, the command
mcrun sim.instr -N4 X=2,8 Y=1
would run the simulation defined in sim.instr four times, with X having the values
2, 4, 6, and 8, respectively.
After running the simulation, the results will be written to the file mcstas.dat by
default. This file contains one line for each simulation run giving the values of the
scanned input variables along with the intensity and estimated error in all detectors.
Additionally, a file mcstas.sci (when using Scialb format) is written that can be
read by the mcplot front-end to plot the results on the screen or in a Postscript file,
see section 4.4.5.
• When doing a scan, the -f file and --file=file options make mcrun write the output
to the files file.dat and file.sim instead of the default names.
• When doing a scan, the -d dir and --dir=dir options make mcrun put all output
in a newly created directory dir. Additionally, the directory will have subdirectories
1, 2, 3,. . . containing all data files output from the different simulations. When the
-d option is not used, no data files are written from the individual simulations (in
order to save disk space).
• The mcrun --test command will test your McStas installation, accuracy and plotter.
The -h option will list valid options. The mcrun front-end requires a working installation of Perl to run.
4.4.3
The gscan front-end
The front-end gscan is obsolete from version 1.3 of McStas, and is included only for
backwards compatibility. The front-end mcrun (section 4.4.2) includes all the functionality
of the old gscan front-end and should be used instead.
4.4.4
Graphical display of simulations (mcdisplay)
The front-end mcdisplay (mcdisplay.pl on Windows) is a graphical debugging tool. It
presents a schematic drawing of the instrument definition, showing the position of the
40
Risø–R–1416(EN)
components and the paths of the simulated neutrons through the instrument. It is thus
very useful for debugging a simulation, for example to spot components in the wrong
position or to find out where neutrons are getting lost.
To use the mcdisplay front-end with a simulation, run it as follows:
mcdisplay sim args . . .
where sim is the name of either the instrument source sim.instr or the simulation program sim.out generated with McStas, and args . . . are the normal command line arguments for the simulation, as explained above. The -h option will list valid options.
The drawing back-end program may be selected among PGPLOT, Matlab and Scilab
using either the -pPLOTTER option or using the current MCSTAS_FORMAT environment
variable. For instance, calling
mcdisplay -pScilab ./vanadium_example.out ROT=90
or (csh/tcsh syntax)
setenv MCSTAS_FORMAT Scilab
mcdisplay ./vanadium_example.out ROT=90
will output graphics using Scilab. The mcdisplay front-end can also be run from the mcgui
front-end. Examples of plotter appearence for mcdisplay is shown in figures 4.4-4.6.
McStas/PGPLOT back-end This will view the instrument from above. A multidisplay that shows the instrument from three directions simultaneously can be shown
using the --multi option:
mcdisplay --multi sim.out args . . .
Click the left mouse button in the graphics window or hit the space key to see the
display of successive neutron trajectories. The ‘P’ key saves a postscript file containing
the current display that can be sent to the printer to obtain a hardcopy; the ‘C’ key
produces color postscript. To stop the simulation prematurely, type ‘Q’ or use control-C
as normal in the window in which mcdisplay was started.
To see details in the instrument, it is possible to zoom in on a part of the instrument
using the middle mouse button (or the ‘Z’ key on systems with a one- or two-button
mouse). The right mouse button (or the ‘X’ key) resets the zoom. Note that after
zooming, the units on the different axes may no longer be equal, and thus the angles as
seen on the display may not match the actual angles.
Another way to see details while maintaining an overview of the instrument is to use the
--zoom=factor option. This magnifies the display of each component along the selected
axis only, e.g. a Soller collimator is magnified perpendicular to the neutron beam but
not along it. This option may produce rather strange visual effects as the neutron passes
between components with different coordinate magnifications, but it is occasionally useful.
When debugging, it is often the case that one is interested only in neutrons that reach
a particular component in the instrument. For example, if there is a problem with the
sample one may prefer not to see the neutrons that are absorbed in the monochromator
Risø–R–1416(EN)
41
shielding. For these cases, the --inspect=comp option is useful. With this option, only
neutrons that reach the component named comp are shown in the graphics display.
The mcdisplay front-end will then require the Perl, the PGPLOT, and the PGPerl
packages to be installed. It may be necessary to set the PGPLOT_DIR and PGPLOT_DEV
environment variable; consult the documentation for PGPLOT on the local system in
case of difficulty.
Matlab and Scilab back-ends A 3D view of the instrument, and various operations
(zoom, export, print, trace neutrons, . . . ) is available from dedicated Graphical User
Interfaces. The --inspect option may be used (see previous paragraph), as well as the
--first and --last options to specify a region of interest.
The mcdisplay front-end will then require the Perl+PGPLOT, and either Scilab or
Matlab to be installed.
See section 5.4.8 for how to make new components work with the mcdisplay front-end.
4.4.5
Plotting the results of a simulation (mcplot)
The front-end mcplot (mcplot.pl on Windows) is a program that produces plots of all the
detectors in a simulation, and it is thus useful to get a quick overview of the simulation
results.
In the simplest case, the front-end is run simply by typing
mcplot
This will plot any simulation data stored in the current directory, which is where simulations put their results by default. If the --dir or --file options have been used (see
section 4.3), the name of the file or directory should be passed to mcplot, e.g. “mcplot
dir ” or “mcplot file”. It is also possible to plot one single text (not binary) data file from
a given monitor, passing its name to mcplot.
The drawing back-end program may be selected among PGPLOT, Matlab and Scilab
using either the -pPLOTTER option (e.g. mcplot -pScilab file) or using the current
MCSTAS_FORMAT environment variable. Moreover, the drawing back-end program will also
be set depending on the file extension (see table 4.2).
It should be emphasized that mcplot may only display simulation results with the
format that was chosen during the computation. Indeed, if you request data in a given
format from a simulation, you will only be able to display results using that same drawing
back-end. Anyway, the mcconvert utility may convert a McStas data file between Matlab
and Scilab formats (see section 4.4.9).
The mcplot front-end can also be run from the mcgui front-end.
The initial display shows plots for each detector in the simulation. Examples of plotter
appearence for mcplot is shown in figures 4.4-4.3.
McStas/PGPLOT back-end Clicking the left mouse button on a plot produces a fullwindow version of that plot. The ‘P’ key saves a postscript file containing the current plot
that can be sent to the printer to obtain a hardcopy; the ‘C’ key produces color postscript.
The ‘Q’ key quits the program (or CTRL-C in the controlling terminal may be used as
normal).
42
Risø–R–1416(EN)
To use the mcplot front-end with PGPLOT, the programs Perl, PGPLOT, PgPerl,
and PDL must all be properly installed on the system. It may be necessary to set the
PGPLOT_DIR and PGPLOT_DEV environment variable; consult the documentation for PGPLOT on the local system in case of difficulty.
Matlab and Scilab back-ends A dedicated McStas/Mcplot Dialog or menu attached
to the plotting window is available, and provides many operations (duplication, export,
colormaps, . . . ). The corresponding ’mcplot’ Matlab and Scilab functions may be called
from these language prompt with the same method as in section 4.3, e.g:
matlab> s=mcplot;
matlab> help mcplot
scilab> s=mcplot();
matlab or scilab> s=mcplot(’mcstas.m’);
matlab or scilab> mcplot(s);
A full parameter scan simulation result, or simply one of its scan steps may be displayed
using the ’Scan step’ menu item. When the +nw option is specified, a separate Matlab
or Scilab window will appear (instead of being launched in the current terminal). This
will then enable Java support under Matlab and Tk support under Scilab, resulting in
additional menus and tools.
To use the mcplot front-end, the programs Perl, and either Scilab or Matlab are
required.
4.4.6
Plotting resolution functions (mcresplot)
Figure 4.10: Output from mcresplot with PGPLOT backend. Use P, C and G keys to
write hadrcopy files.
The mcresplot front-end is used to plot the resolution function, particularly for tripleaxis spectrometers, as calculated by the Res sample component. It requires to have a
Res monitor component further in the instrument description (at the detector position).
This front-end has been included in the release since it may be useful despite its somewhat
rough user interface.
Risø–R–1416(EN)
43
The mcresplot front-end is launched with the command
mcresplot file
Here, file is the name of a file output from a simulation using the Res monitor component.
This front-end currently only works with the PGPLOT plotter, but ports for Matlab
and Scilab may be written in the future.
The front-end will open a window displaying projections of the 4-dimensional resolution
function R(Q, ω). The covariance matrix of the resolution function, the resolution along
each projection axis and the resulting resolution matrix are also shown, as well as the
instrument name and parameters used for the simulation. This is mainly useful for tripleaxis spectrometers.
To use the mcresplot front-end, the programs Perl, PGPLOT, PgPerl, and PDL must
all be properly installed on the system.
4.4.7
Creating and viewing the library and component/instrument help
(mcdoc)
McStas provides an easy way to generate automatically an HTML help page about a given
component or instrument, or the whole McStas library.
mcdoc
mcdoc comp—instr
mcdoc -l
The first example generates an index.html catalog file using the available components and
instruments (both locally, and in the McStas library. When called with the --show or
-s option, the library catalog of components is opened using the BROWSER environment
variable (e.g. netscape, konqueror, nautilus, MSIE, mozilla, . . . ).
Alternatively, if a component or instrument comp is specified, it will be searched within
the library, and an HTML help will be created for all available components matching comp.
When using the -s, the help will be opened. If the BROWSER is not defined, the help is
displayed as text in the current terminal. This latter output may be forced with the -t
or --text option.
The last example will list the name and action of all McStas tools (same as --tools
option).
Additionally, the --web, --manual and --comp options will open the McStas web site
page, the User Manual (this document) and the Component Manual, all requiring BROWSER
to be defined. Finally, the --help option will display the command help, as usual.
See section 5.4.11 for more details about the McDoc usage and header format. To use
the mcdoc front-end, the program Perl should be available.
4.4.8
Translating McStas components for Vitess (mcstas2vitess)
Any McStas component may be translated for usage with Vitess (starting from version
2.3). The syntax is simply
mcstas2vitess file.comp
This will create a Vitess module of the given component. To use the mcstas2vitess
front-end, the program Perl should be available.
44
Risø–R–1416(EN)
4.4.9
Translating McStas results files between Matlab and Scilab formats
If you have been running a McStas simulation with Scilab output, but finally plan to look
at the results with Matlab, or the contrary, you may use
mcconvert file.m—sci
to simply translate one file format the other. This works only for the text files of course.
The binary files need not be translated.
4.5
Analyzing and visualizing the simulation results
To analyze simulation results, one uses the same tools as for analyzing experimental data,
i.e. programs such as IDL, Matlab and Scilab. The output files from simulations are
usually simple text files containing headers and data blocks. If data blocks are empty they
may be accessed refering to an external file indicated in the header. This file may also be
a binary file (except with the original McStas/PGPLOT format), which does not contain
any header (except if simulation is launched with +a option), but are in turn smaller in
size and faster to import.
In order for the user to choose the data format, we recommand to set it via the
MCSTAS FORMAT environment variable, which will also make the front-end programs
able to import and plot data and instrument consistently. The available format list is
shown in table 4.2.
Note that the neutron event counts in detectors is typically not very meaningful except
as a way to measure the performance of the simulation. Use the simulated intensity instead
whenever analysing simulation data.
McStas and PGPLOT format The McStas original format, which is equivalent to
the PGPLOT format, is simply columns of ASCII text that most programs should be able
to read.
One-dimensional histogram detectors (time-of-flight, energy-sensitive) write one line
for each histogram bin. Each line contains a number identifying the bin (i.e. the time-offlight) followed by three numbers: the simulated intensity, an estimate of the statistical
error as explained in section 6.1.1, and the number of neutron events for this bin.
Two-dimensional histogram detectors (position sensitive detectors) output M lines of
N numbers representing neutron intensities, where M and N are the number of bins in the
two dimensions. The two-dimentional detectors also store the error estimates and event
counts as additional matrices.
Single-point detectors output the neutron intensity, the estimated error, and the neutron event count as numbers on the terminal. (The results from a series of simulations
may be combined in a data file using the mcrun front-end as explained in section 4.4.2).
Both one- and two-dimentional detector output by default start with a header of comment lines, all beginning with the ‘#’ character. This header gives such information as the
name of the instrument used in the simulation, the values of any instrument parameters,
the name of the detector component for this data file, etc. The headers may be disabled
Risø–R–1416(EN)
45
using the --data-only option in case the file must be read by a program that cannot
handle the headers.
In addition to the files written for each one- and two-dimensional detector component,
another file (by default named mcstas.sim) is also created. This file is in a special
McStas ASCII format. It contains all available information about the instrument definition
used for the simulation, the parameters and options used to run the simulation, and the
detector components present in the instrument. It is read by the mcplot front-end (see
section 4.4.5). This file stores the results from single detectors, but by default contains
only pointers (in the form of file names) to data for one- and two-dimensional detectors.
By storing data in separate files, reading the data with programs that do not know the
special McStas file format is simplified. The --file option may be used to store all data
inside the mcstas.sim file instead of in separate files.
Matlab, Scilab and IDL formats These formats write automatically scripts containing the data as a structure, as well as in-line import and plot functions for the selected
language. Usage examples are given in section 4.3. Thus, it is not necessary to write a
load routine for each format, as the script is itself a program that knows how to handle
the data. Alternatively, using mcplot with Matlab and Scilab plotters provide additional
functionalities from menus and dialogs (see section 4.4.5).
When imported through the data generated script (see section 4.3), or using mcplot
(see section 4.4.5), a single variable may be created into the Matlab, Scilab or IDL base
workspace. This variable is a structure constituting a data tree containing many fields,
some of them being themselves structures. Field names are the initial names from the
instrument (components, files, . . . ), transformed into valid variable names, e.g containing
only letters, digits and the ’ ’ character, except for the first character which may only be a
letter, or the ’m’ letter2 . In this tree, you will find the monitor names, which fields contain
the monitored data. The usual structure is
s.instrument.simulation.comp name.file name
For instance, reading the data from a ’test’ instrument using Matlab format will look
like
matlab> s=mcstas; % or mcplot mcstas.m from the terminal
matlab> s
s =
Format: ’Matlab with text headers’
URL: ’http://neutron.risoe.dk’
Editor: ’farhi on pcfarhi’
Creator: ’test (test.instr) McStas 1.7 - May. 14, 2003 simulation’
Date: 1.0529e+09
File: ’./mcstas’
test: [1x1 struct]
EndDate: 1.0529e+09
class: ’root’
2
46
For instance in most case, the simulation location is ’./mcstas.m’ which turns into field ’m mcstas’.
Risø–R–1416(EN)
matlab> s.test.m_mcstas.monitor1.monitor1_y_kz
ans =
...
Date:
1.0529e+09
File:
’monitor1.y_kz’
type:
’array_2d(20, 10)’
...
ratio:
’1e+06/1e+06’
signal:
’Min=0; Max=5.54051e-10; Mean= 6.73026e-13;’
statistics: ’X0=0.438302; dX=0.0201232; Y0=51019.6; dY=20557.1;’
...
matlab> eval(s.test.m_mcstas.monitor1.monitor1_y_kz);
matlab> dX
ans =
0.0201232
The latter example accesses the data from the ’monitor1.y kz’ file written by the ’monitor1’
component in the ’test’ instrument during the ’./mcstas’ simulation. You may evaluate
directly the ’signal’ and ’statistics’ fields of the structure to obtain useful informations.
HTML, XML/NeXus and NeXus formats Both HTML and XML/NeXus formats
are available. The former may be viewed using any web browser (Netscape, Internet
Explorer, Nautilus), while the latter may be browsed for instance using Internet Explorer
(Windows and Mac OS) or GXMLViewer and KXMLEditor (under Linux).
A future version of McStas will support output in the NeXus format [11].
Risø–R–1416(EN)
47
Chapter 5
The McStas kernel and
meta-language
Instrument definitions are written in a special McStas meta-language which is translated
automatically by the McStas compiler into a C program which is in turn compiled to
an executable that performs the simulation. The meta-language is custom-designed for
neutron scattering and serves two main purposes: (i) to specify the interaction of a single
neutron with a single optical component, and (ii) to build a simulation by constructing a
complete instrument from individual components.
For maximum flexibility and efficiency, the meta-language is based on C. Instrument
geometry, propagation of neutrons between the different components, parameters, data
input/output etc. is handled in the meta-language and by the McStas compiler. Complex
calculations are written in C embedded in the meta-language description of the components. It is possible to set up an instrument from existing components and run a simulation
without writing a single line of C code, working entirely in the meta-language. On the
other hand, the full power of the C language is available for special-purpose setups in
advanced simulations, and for computing neutron trajectories in the components.
Apart from the meta-language, McStas also includes a number of C library functions
and definitions that are useful for neutron ray-tracing simulations. The definitions available for users coding components are listed in appendix A. The list includes functions for
computing the intersection between a flight-path and various objects (such as cylinders
and spheres), functions for generating random numbers with various distributions, functions for reading or writing informations from/to data files, convenient conversion factors
between relevant units, etc.
The McStas meta-language was designed to be readable, with a verbose syntax and explicit mentioning of otherwise implicit information. The recommended way to get started
with the meta-language is to start by looking at the examples supplied with McStas,
modifying them as necessary for the application at hand.
5.1
Notational conventions
Simulations generated by McStas use a semi-classical description of the neutron to compute the neutron trajectory through the instrument and its interaction with the different
48
Risø–R–1416(EN)
y
x
z
Figure 5.1: conventions for the orientations of the axis in simulations.
components. The effect of gravity is taken into account either in particular components,
or more generaly when setting an execution flag (-g) to perform gravitation computation.
An instrument consists of a list of components through which the neutron passes
one after the other. The order of components is thus significant since McStas does not
automatically check which component is the next to interact with the neutron at a given
point in the simulation.
The instrument is given a global, absolute coordinate system. In addition, every
component in the instrument has its own local coordinate system that can be given any
desired position and orientation (though the position and orientation must remain fixed
for the duration of a single simulation). By convention, the z axis points in the direction
of the beam, the x axis is perpendicular to the beam in the horizontal plane pointing left
as seen from the source, and the y axis points upwards (see figure 5.1). Nothing in McStas
enforces this convention, but if every component used different conventions the user would
be faced with a severe headache! It is therefore recommended that this convention is
followed by users implementing new components.
In the instrument definitions, units of length (e.g. component positions) are given in
meters and units of angles (e.g. rotations) are given in degrees. The state of the neutron
is given by its position (x, y, z) in meters, its velocity (v x , vy , vz ) in meters per second,
the time t in seconds, and the two parameters s 1 and s2 that are obsolete and should not
be used. A three-component representation of the spin, (s x , sy , sz ), normalized to one,
is used. In addition, the outgoing neutron has an associated weight p which is used to
model fractional neutrons in the Monte Carlo simulation. p = 0.2 means that a single
neutron following this path has a 20% chance of reaching the present position without
being absorbed or scattered away from the instrument. Alternatively, one may regard a
ray of neutrons and p is the fraction of neutrons following the considered path.
5.2
Syntaxical conventions
Comments follow the normal C syntax “/* ... */”. C++ style comments “// ...” may
also be used.
Risø–R–1416(EN)
49
Keywords are not case-sensitive, for example “DEFINE”, “define”, and “dEfInE” are all
equivalent. However, by convention we always write keywords in uppercase to distinguish
them from identifiers and C language keywords. In contrast, McStas identifiers (names),
like C identifiers and keywords, are case sensitive, another good reason to use a consistent
case convention for keywords. All McStas keywords are reserved, and thus should not be
used as C variable names. The list of these reserved keywords is shown in table 5.1.
It is possible, and usual, to split the input instrument definition across several different
files. For example, if a component is not explicitly defined in the instrument, McStas will
search for a file containing the component definition in the standard component library (as
well as in the current directory and any user-specified search directories, see section 4.2.2).
It is also possible to explicitly include another file using a line of the form
%include "file"
Beware of possible confusion with the C language “#include” statement, especially when
it is used in C code embedded within the McStas meta-language. Files referenced with
“%include” are read when the instrument is translated into C by the McStas compiler, and
must contain valid McStas meta-language input (and possibly C code). Files referenced
with “#include” are read when the C compiler generates an executable from the generated
C code, and must contain valid C.
Embedded C code is used in several instances in the McStas meta-language. Such code
is copied by the McStas compiler into the generated simulation C program. Embedded C
code is written by putting it between the special symbols %{ and %}, as follows:
%{
. . . Embedded C code . . .
%}
The “%{” and “%}” must appear on a line by themselves (do not add comments after).
Additionally, if a “%include” statement is found within an embedded C code block, the
specified file will be included from the ’share’ directory of the standard component library
(or from the current directory and any user-specified search directories) as a C library,
just like the usual “#include” but only once. For instance, if many components require
to read data from a file, they may all ask for “%include "read_table-lib"” without
duplicating the code of this library. If the file has no extension, both .h and .c files will
be searched and included, otherwise, only the specified file will be imported. The McStas
’run-time’ shared library is included by default (equivalent to “%include "mcstas-r"”
in the DECLARE section). For an example of %include, see the monitors/Monitor nD
component.
5.3
Writing instrument definitions
The purpose of the instrument definition is to specify a sequence of components, along with
their position and parameters, which together make up an instrument. Each component
is given its own local coordinate system, the position and orientation of which may be
specified by its translation and rotation relative to another component. An example is
given in section 5.3.8 and some additional examples of instrument definitions can be found
on the McStas web-page [2] and in the example directory.
50
Risø–R–1416(EN)
Keyword
ABSOLUTE
AT
Scope
I
I
DECLARE
DEFINE
- INSTRUMENT
- COMPONENT
DEFINITION
I,C
I,C
END
EXTEND
I,C
I
FINALLY
I,C
GROUP
%include
I
I,C
INITIALIZE
MCDISPLAY
I,C
C
C
OUTPUT
C
PARAMETERS
POLARISATION
PREVIOUS
RELATIVE
C
C
C
I
ROTATED
I
SAVE
SETTING
I,C
C
SHARE
C
STATE
TRACE
C
I,C
Meaning
Indicates that the AT and ROTATED keywords are in the absolute coordinate system.
Indicates the position of a component in an instrument definition.
Declares C internal instrument or component variables.
Starts an instrument or component definition.
(each associated parameter may have default values)
Defines component parameters that are constants (like C #define).
Ends the instrument or component definition.
Extends the TRACE section of a component in an instrument
definition.
Embeds C code to execute when simulation ends (also executes
the SAVE section).
Defines an exclusive group of components.
Imports an instrument part, a component or a piece of C code
(when within embedded C).
Embeds C code to be executed when starting.
Embeds C code to display a geometric representation of a component.
Defines internal variables to be public and protected symbols
(usually all those of DECLARE).
Defines a class of component parameter.
Defines neutron polarisation coordinates.
Refers to a previous component position/orientation.
Indicates that the AT and ROTATED keywords are relative to
an other component.
Indicates the orientation of a component in an instrument definition.
Embedded C code to execute when saving data.
Defines component parameters that are variables (double, int,
char*).
Declares global functions and variables to be used by all components.
Defines neutron state coordinates.
Lists the components or embedded C code to execute during
simulation.
Table 5.1: Reserved McStas keywords. Scope is ’I’ for instrument and ’C’ for component
definitions.
Risø–R–1416(EN)
51
5.3.1
The instrument definition head
DEFINE INSTRUMENT name (a1 , a2 , . . .)
This marks the beginning of the definition. It also gives the name of the instrument
and the list of instrument parameters. Instrument parameters describe the configuration
of the instrument, and usually correspond to setting parameters of the components. A
motor position is a typical example of an instrument parameter. The input parameters of
the instrument constitute the input that the user (or possibly a front-end program) must
supply when the generated simulation is started.
By default, the parameters will be floating point numbers, and will have the C type
double (double precision floating point). The type of each parameter may optionally be
declared to be int for the C integer type or char * for the C string type. The name string
may be used as a synonym for char *, and floating point parameters may be explicitly
declared using the name double. The following example illustrates all possibilities:
DEFINE INSTRUMENT test(d1, double d2, int i, char *s1, string s2)
Here d1 and d2 will be floating point parameters of C type double, i will be an integer
parameter of C type int, and s1 and s2 will be string parameters of C type char *.
The parameters of an instrument may be given default values. Parameters with default
values are called optional parameters, and need not be given an explicit value when the
instrument simulation is executed. When executed without any parameter value in the
command line (see section 4.3), the instrument asks for all parameter values, but pressing
the Return key selects the default value (if any). When used with at least one parameter
value in the command line, all non specified parameters will have their value set to the
default one (if any). A parameter is given a default value using the syntax “param =
value”. For example
DEFINE INSTRUMENT test(d1 = 1, string s2="hello")
Here d1 is an optional parameter and if no value is given explicitly, “1” will be used.
Optional parameters can greatly increase the convenience for users of instruments for
which some parameters are seldom changed or of unclear signification to the user. Also,
if all instrument parameters have default values, then the simple command mcdisplay
test.instr will show the instrument view without requesting any other input, which is
usually a good starting point to study the instrument design.
5.3.2
The DECLARE section
DECLARE
%{
. . . C declarations of global variables etc. . . .
%}
This gives C declarations that may be referred to in the rest of the instrument definition.
A typical use is to declare global variables or small functions that are used elsewhere
in the instrument. The %include ’’file’’ keyword may be used to import a specific
component definition or a part of an instrument. The DECLARE section is optional.
52
Risø–R–1416(EN)
5.3.3
The INITIALIZE section
INITIALIZE
%{
. . . C initializations. . . .
%}
This gives code that is executed when the simulation starts. This section is optional.
5.3.4
The TRACE section
The TRACE keyword starts a section giving the list of components that constitute the
instrument. Components are declared like this:
COMPONENT name = comp(p1 = e1 , p2 = e2 , . . .)
This declares a component named name that is an instance of the component definition
named comp. The parameter list gives the setting and definition parameters for the
component. The expressions e1 , e2 , . . . define the values of the parameters. For setting
parameters arbitrary ANSI-C expressions may be used, while for definition parameters
only constant numbers, strings, names of instrument parameters, or names of C identifiers
are allowed (see section 5.4.1 for details of the difference between definition and setting
parameters). To assign the value of a general expression to a definition parameter, it is
necessary to declare a variable in the DECLARE section, assign the value to the variable in
the INITIALIZE section, and use the variable as the value for the parameter.
The McStas program takes care to rename parameters appropriately in the output
so that no conflicts occur between different component definitions or between component
and instrument definitions. It is thus possible (and usual) to use a component definition
multiple times in an instrument description.
The McStas compiler will automatically search for a file containing a definition of the
component if it has not been declared previously. The definition is searched for in a file
called “name.comp”, “name.cmp”, or “name.com”. See section 4.2.2 for details on which
directories are searched. This facility is often used to refer to existing component definitions in standard component libraries. It is also possible to write component definitions in
the main file before the instrument definitions, or to explicitly read definitions from other
files using %include (not within embedded C blocks).
The position of a component is specified using an AT modifier following the component
declaration:
AT (x, y, z) RELATIVE name
This places the component at position (x, y, z) in the coordinate system of the previously declared component name. Placement may also be absolute (not relative to any
component) by writing
AT (x, y, z) ABSOLUTE
Any C expression may be used for x, y, and z. The AT modifier is required. Rotation is
achieved similarly by writing
Risø–R–1416(EN)
53
ROTATED (φx , φy , φz ) RELATIVE name
This will result in a coordinate system that is rotated first the angle φ x (in degrees) around
the x axis, then φy around the y axis, and finally φz around the z axis. Rotation may also
be specified using ABSOLUTE rather than RELATIVE. If no rotation is specified, the default
is (0, 0, 0) using the same relative or absolute specification used in the AT modifier. The
position of a component depends on its definition. Usually, it will be the input window
position (e.g. for guide-like components), or the center position for cylindrical/spherical
components. Thus, the next component position will be most of the time set to the
previous component AT position increased by its size/radius along the z axis.
The PREVIOUS keyword is a generic name to refer to the previous component in the
simulation. Moreover, the PREVIOUS(n) keyword will refer to the n-th previous component,
starting from the current component, so that PREVIOUS is equivalent to PREVIOUS(1).
This keyword should be used after the RELATIVE keyword, but not for the first component
instance of the instrument description.
AT (x, y, z) RELATIVE PREVIOUS ROTATED (φ x , φy , φz ) RELATIVE PREVIOUS(2)
Invalid PREVIOUS references will be assumed to be absolute placement.
The order and position of components in the TRACE section does not allow components
to overlap, except for particular cases (see the GROUP keyword below). Indeed, many
components of the McStas library start by propagating the neutron event to the begining
of the component itself. Anyway, when the corresponding propagation time is found to be
negative (i.e. the neutron is already after the component, and has thus passed the ’active’
position), the neutron event is ABSORBed, resulting in a zero intensity and event counts
after a given position. Such situations may arise e.g. when positioning some components
not one after the other (nested, in parallel, or overlapping), for instance in a multiple
crystal monochromator (they are then side by side). One would then like the neutron to
interact with one of the components and then continue after this group of components. In
order to handle such arrangements, groups are defined by appending the GROUP modifier
GROUP name
to all involved component declarations. All components of the same named group are
tested one after the other, until one of them interacts (uses the SCATTER macro ). The
selected component acts on the neutron, and the rest of the group is skipped. Such groups
are thus exclusive (only one of the elements is active). If no component of the group could
intercept the neutron, it is ABSORBed. If you wish not to absorb these neutrons, you
may end each group by a large monitor, which will eventually catch neutrons that were
not caught by previous components of the group.
It is sometimes desirable to slighlty modify an existing component of the McStas
library. One would usually make a copy of the component, and extend the code of its TRACE
section. McStas provides an easy way to change the behaviour of existing components in
an instrument definition without duplicating files, using the EXTEND modifier
EXTEND
%{
. . . C code executed after the component TRACE section . . .
%}
54
Risø–R–1416(EN)
The embeded C code is appended to the component TRACE section, and all its internal
variables (as well as all the instrument variables) may be used. This component declaration
modifier is of course optional. Within a GROUP, all EXTEND sections of the group are
executed. In order to discriminate components that are active from those that are skipped,
one may use the SCATTERED flag, which is set to zero when entering each component
or group, and incremented when the neutron is SCATTERed, as in the following example
COMPONENT name0 = comp(p1 = e1 , p2 = e2 , . . .)
AT (0, 0, 0) ABSOLUTE
COMPONENT name1 = comp(. . .)
AT (x, y, z) RELATIVE name0
ROTATED (φx , φy , φz ) RELATIVE name0
GROUP GroupName EXTEND
%{
if (SCATTERED) printf("I scatter"); else printf("I do not scatter");
%}
COMPONENT name2 = comp(. . .)
AT (x, y, z) RELATIVE name0
ROTATED (φx , φy , φz ) RELATIVE name0
GROUP GroupName
Components name1 and name2 are at the same position. If the first one intercepts the
neutron (and has a SCATTER within its TRACE section), the SCATTERED variable becomes true, the code extension will result in printing ”I scatter”, and the second component
will be skipped. Thus, we recommand to make use of the SCATTER keyword each time
a component ’uses’ the neutron (scatters, detects, . . . ).
5.3.5
The SAVE section
SAVE
%{
. . . C code to execute each time a temporary save is required . . .
%}
This gives code that will be executed when the simulation is requested to save data, for
instance when receiving a USR2 signal (on Unix systems), or using the Progress_bar
component with intermediate savings. This section is optional.
5.3.6
The FINALLY section
FINALLY
%{
. . . C code to execute at end of simulation . . .
%}
This gives code that will be executed when the simulation has ended. When existing, the
SAVE section is first executed. This section is optional. A simulation may be requested to
Risø–R–1416(EN)
55
end before all neutrons have been traced when recieving a TERM or INT signal (on Unix
systems), or with Control-C.
5.3.7
The end of the instrument definition
The end of the instrument definition is marked using the keyword
END
5.3.8
Code for the instrument vanadium example.instr
An instrument definition taken from the examples directory is given as an example.
/*******************************************************************************
*
* McStas, neutron ray-tracing package
*
Copyright 1997-2002, All rights reserved
*
Risoe National Laboratory, Roskilde, Denmark
*
Institut Laue Langevin, Grenoble, France
*
* Instrument: vanadium_example
*
* %Identification
* Written by: KN and KL
* Date: 1998
* Origin: Risoe
* Release: McStas 1.1
* Version: 0.1
* %INSTRUMENT_SITE: Tutorial
*
* A test instrument using a vanadium cylinder
*
* %Description
* This instrument shows the vanadium sample scattering anisotropy.
* This is an effect of attenuation of the beam in the cylindrical sample.
*
* Example: mcrun vanadium_example.instr ROT=0
*
* %Parameters
* INPUT PARAMETERS:
* ROT: (deg) Rotation angle of the PSD monitor
*
* %Link
* The McStas User manual
* The McStas tutorial
*
* %End
*******************************************************************************/
/* The line below defines the ’name’ of our instrument */
/* Here, we have a single input parameter, ROT
*/
DEFINE INSTRUMENT vanadium_example(ROT=0)
/* The DECLARE section allows us to declare variables */
/* in c syntax. Here, coll_div (collimator divergence) */
/* is set to 60 degrees...
*/
DECLARE
56
Risø–R–1416(EN)
%{
double coll_div = 60;
%}
/* Here comes the TRACE section, where the actual
/* instrument is defined....
TRACE
*/
*/
/* The Arm() class component defines reference points */
/* in 3D space. Every component instance must have a
*/
/* unique name. Here, arm is used. This Arm() component*/
/* is set to define the origin of our global coordinate*/
/* system (AT (0,0,0) ABSOLUTE)
*/
COMPONENT arm = Arm() AT (0,0,0) ABSOLUTE
/* Next, we need some neutrons. Let’s place a neutron */
/* source. Refer to documentation of Source_flat to
*/
/* understand the different input parameters.
*/
/* The source component is placed RELATIVE to the arm */
/* component, meaning that modifying the position or
*/
/* orientation of the arm will also affect the source */
/* component (and other components after that one...
*/
COMPONENT source = Source_flat(radius = 0.015, dist = 1,
xw=0.024, yh=0.015, E0=5, dE=0.2)
AT (0,0,0) RELATIVE arm
/* Here we have a collimator - or Soller - placed to
/* improve beam divergence.
/* The component is placed at a distance RELATIVE to
/* a previous component...
COMPONENT collimator = Collimator_linear(len = 0.2,
divergence = coll_div, xmin = -0.02, xmax = 0.02,
ymin = -0.03, ymax = 0.03)
AT (0, 0, 0.4) RELATIVE arm
*/
*/
*/
*/
/* We also need something to ’shoot at’ - here a sample*/
/* made from vanadium - an isotrope scatterer. Options */
/* are available to restrict the solid angle in which */
/* neutrons are emitted (no need to simulate anything */
/* that we know for sure will not gain us more insight)*/
/* Other options for smart targeting are available */
/* refer to component documentation for info.
*/
COMPONENT target = V_sample(radius_i = 0.008, radius_o = 0.012,
h = 0.015, focus_r = 0, pack = 1,
target_x = 0, target_y = 0, target_z = 1)
AT (0,0,1) RELATIVE arm
/* Here, a secondary arm - or reference point, placed
/* on the sample position. The ROT parameter above
/* defines rotation of this arm (and components
/* relative to the arm)
COMPONENT arm2 = Arm()
AT (0,0,0) RELATIVE target
ROTATED (0,ROT,0) relative arm
*/
*/
*/
*/
/* For data output, let us place a detector. This
*/
Risø–R–1416(EN)
57
/* detector is not very realistic, since it is sphere */
/* shaped and has a 10 m radius, but has the advantage */
/* that EVERYTHING emitted from the sample will be
*/
/* picked up. Notice that this component changes
*/
/* orientation with the ROT input parameter of the
*/
/* instrument.
*/
COMPONENT PSD_4pi = PSD_monitor_4PI(radius=10, nx=101, ny=51,
filename="vanadium.psd")
AT (0,0,0) RELATIVE target ROTATED (ROT,0,0) RELATIVE arm2
END
5.4
Writing component definitions
The purpose of a component definition is to model the interaction of a neutron with the
component. Given the state of the incoming neutron, the component definition calculates
the state of the neutron when it leaves the component. The calculation of the effect of the
component on the neutron is performed by a block of embedded C code. One example
of a component definition is given in section 5.4.10, and all component definitions can be
found on the McStas web-page [2].
There exists a large number of functions and constants available in order to write efficient components. Look at the appendix A for neutron propagation functions, geometric
intersection time computations, vector operators, random number and vector generation,
physical constants, coordinate retrieval and operations, file generation routines (for monitors), data file reading, . . .
5.4.1
The component definition header
DEFINE COMPONENT name
This marks the beginning of the definition, and defines the name of the component.
DEFINITION PARAMETERS (d1 , d2 , . . .)
SETTING PARAMETERS (s1 , s2 , . . .)
This declares the definition and setting parameters of the component. The parameters define the characteristics of the component, and can be accessed from the SAVE, FINALLY, and
MCDISPLAY sections (see below), as well as in EXTEND sections of the instrument definition
(see section 5.3).
Setting parameters are translated into C variables usually of type double in the generated simulation program, so they are usually numbers. Definition parameters are translated into #define macro definitions, and so can have any type, including strings, arrays,
and function pointers.
However, because of the use of #define, definition parameters suffer from the usual
problems with C macro definitions. Also, it is not possible to use a general C expression
for the value of a definition parameter in the instrument definition, only constants and
variable names may be used. For this reason, setting parameters should be used whenever
possible.
There are a few cases where the use of definition parameters instead of setting parameters makes sense. If the parameter is not numeric, nor a character string (i.e. an array, for
58
Risø–R–1416(EN)
example), a setting parameter cannot be used. Also, because of the use of #define, the
C compiler can treat definition parameters as constants when the simulation is compiled.
For example, if the array sizes of a multidetector are definition parameters, the arrays can
be statically allocated in the component DECLARE section. If setting parameters were used,
it would be necessary to allocate the arrays dynamically using e.g. malloc().
Setting parameters may optionally be declared to be of type int and char *, just as
in the instrument definition (see section 5.3).
OUTPUT PARAMETERS (s1 , s2 , . . .)
This declares a list of C identifiers that are output parameters for the component. Output
parameters are used to hold values that are computed by the component itself, rather than
being passed as input. This could for example be a count of neutrons in a detector or a
constant that is precomputed to speed up computation. Output parameters will typically
be declared as C variables in the DECLARE section, see section 5.4.2 below for an example.
The OUTPUT PARAMETERS section is optional.
STATE PARAMETERS (x, y, z, vx , vy , vz , t, s1 , s2 , p)
This declares the parameters that define the state of the incoming neutron. The task of
the component code is to assign new values to these parameters based on the old values
and the values of the definition and setting parameters. Note that s 1 and s2 are obsolete
and cannot be used.
POLARISATION PARAMETERS (sx , sy , sz )
This line is necessary only if the component handles polarisation of neutrons and thus
modifies the spin vector. For an instrument to handle polarisation correctly, it is only
required that one of the components contains this line.
Optional component parameters
Just as for instrument parameters, the definition and setting parameters of a component
may be given a default value. Parameters with default values are called optional parameters, and need not be given an explicit value when the component is used in an instrument
definition. A parameter is given a default value using the syntax “param = value”. For
example
SETTING PARAMETERS (radius, height, pack = 1)
Here pack is an optional parameter and if no value is given explicitly, “1” will be used 1 .
Optional parameters can greatly increase the convenience for users of components with
many parameters that have natural default values which are seldom changed. Optional
parameters are also useful to preserve backwards compatibility with old instrument definitions when a component is updated. New parameters can be added with default values
that correspond to the old behavior, and existing instrument definitions can be used with
the new component without changes.
1
In contrast, if no value is given for radius or height, an error message will result.
Risø–R–1416(EN)
59
However, optional parameters should not be used in cases where no general natural
default value exists. For example, the length of a guide or the size of a slit should not be
given default values. This would prevent the error messages that should be given in the
common case of a user forgetting to set an important parameter.
5.4.2
The DECLARE section
DECLARE
%{
. . . C code declarations (variables, definitions, functions). . .
. . . These are usually OUTPUT parameters to avoid name conflicts . . .
%}
This gives C declarations of global variables etc. that are used by the component code.
This may for instance be used to declare a neutron counter for a detector component.
This section is optional.
Note that any variables declared in a DECLARE section are global. Thus a name conflict
may occur if two instances of a component are used in the same instrument. To avoid this,
variables declared in the DECLARE section should be OUTPUT parameters of the component
because McStas will then rename variables to avoid conflicts. For example, a simple
detector might be defined as follows:
DEFINE COMPONENT Detector
OUTPUT PARAMETERS (counts)
DECLARE
%{
int counts;
%}
...
The idea is that the counts variable counts the number of neutrons detected. In the
instrument definition, the counts parameter may be referenced using the MC_GETPAR C
macro, as in the following example instrument fragment:
COMPONENT d1 = Detector()
...
COMPONENT d2 = Detector()
...
FINALLY
%{
printf("Detector counts: d1 = %d, d2 = %d\n",
MC_GETPAR(d1,counts), MC_GETPAR(d2,counts));
%}
5.4.3
The SHARE section
SHARE
%{
60
Risø–R–1416(EN)
. . . C code shared declarations (variables, definitions, functions). . .
. . . These should not be OUTPUT parameters . . .
%}
The SHARE section has the same role as DECLARE except that when using more than one
instance of the component, it is inserted only once in the simulation code. No occurence
of the items to be shared should be in the OUTPUT parameter list (not to have McStas
rename the identifiers). This is particularly useful when using many instances of the
same component (for instance guide elements). If the declarations were in the DECLARE
section, McStas would duplicates it for each instance (making the simulation code bigger).
A typical example is to have shared variables, functions, type and structure definitions
that may be used from the component TRACE section. For an example of SHARE, see the
samples/Single crystal component. The %include ’’file’’ keyword may be used to
import a shared library. The SHARE section is optional.
5.4.4
The INITIALIZE section
INITIALIZE
%{
. . . C code initialization . . .
%}
This gives C code that will be executed once at the start of the simulation, usually to
initialize any variables declared in the DECLARE section. This section is optional.
5.4.5
The TRACE section
TRACE
%{
. . . C code to compute neutron interaction with component . . .
%}
This performs the actual computation of the interaction between the neutron and the component. The C code should perform the appropriate calculations and assign the resulting
new neutron state to the state parameters.
The C code may also execute the special macro ABSORB to indicate that the neutron
has been absorbed in the component and the simulation of that neutron will be aborted.
When the neutron state is changed or detected, for instance if the component simulates
multiple events (for example multiple reflections in a guide, or multiple scattering in a
powder sample), the special macro SCATTER should be called. This does not affect the
results of the simulation in any way, but it allows the front-end programs to visualize
the scattering events properly, and to handle component GROUPs in an instrument definition (see section 5.3.4). The SCATTER macro should be called with the state parameters
set to the proper values for the scattering event. For an example of SCATTER, see the
optics/Channeled guide component.
Risø–R–1416(EN)
61
5.4.6
The SAVE section
SAVE
%{
. . . C code to execute in order to save data . . .
%}
This gives code that will be executed when the simulation is requested to save data, for
instance when receiving a USR2 signal (on Unix systems, see section 4.3). This might be
used by monitors and detectors in order to write results.
In order to work properly with the common output file format used in McStas, all
monitor/detector components should use standard macros for outputting
in the SAVE
Pdata
0 to denote the
or FINALLY section, as explained below.
In
the
following,
we
use
N
=
p
i i
P
count of detected neutron
events,
p
=
p
to
denote
the
sum
of
the
weights
of detected
i
i
P 2
neutrons, and p2 = i pi to denote the sum of the squares of the weights, as explained
in section 6.1.1.
Single detectors/monitors
the following macro:
The results of a single detector/monitor are written using
DETECTOR OUT 0D(t, N , p, p2)
Here, t is a string giving a short descriptive title for the results, e.g. “Single monitor”.
One-dimensional detectors/monitors The results of a one-dimensional detector/
monitor are written using the following macro:
DETECTOR OUT 1D(t, xlabel, ylabel, xvar, x min , xmax , m,
&N [0], &p[0], &p2 [0], filename)
Here,
• t is a string giving a descriptive title (e.g. “Energy monitor”),
• xlabel is a string giving a descriptive label for the X axis in a plot (e.g. “Energy
[meV]”),
• ylabel is a string giving a descriptive label for the Y axis of a plot (e.g. “Intensity”),
• xvar is a string giving the name of the variable on the X axis (e.g. “E”),
• xmin is the lower limit for the X axis,
• xmax is the upper limit for the X axis,
• m is the number of elements in the detector arrays,
• &N [0] is a pointer to the first element in the array of N values for the detector
component (or NULL, in which case no error bars will be computed),
• &p[0] is a pointer to the first element in the array of p values for the detector
component,
62
Risø–R–1416(EN)
• &p2 [0] is a pointer to the first element in the array of p2 values for the detector
component (or NULL, in which case no error bars will be computed),
• filename is a string giving the name of the file in which to store the data.
Two-dimensional detectors/monitors The results of a two-dimensional detector/
monitor are written to a file using the following macro:
DETECTOR OUT 2D(t, xlabel, ylabel, x min , xmax , ymin , ymax , m, n,
&N [0][0], &p[0][0], &p2 [0][0], filename)
Here,
• t is a string giving a descriptive title (e.g. “PSD monitor”),
• xlabel is a string giving a descriptive label for the X axis in a plot (e.g. “X position
[cm]”),
• ylabel is a string giving a descriptive label for the Y axis of a plot (e.g. “Y position
[cm]”),
• xmin is the lower limit for the X axis,
• xmax is the upper limit for the X axis,
• ymin is the lower limit for the Y axis,
• ymax is the upper limit for the Y axis,
• m is the number of elements in the detector arrays along the X axis,
• n is the number of elements in the detector arrays along the Y axis,
• &N [0][0] is a pointer to the first element in the array of N values for the detector
component,
• &p[0][0] is a pointer to the first element in the array of p values for the detector
component,
• &p2 [0][0] is a pointer to the first element in the array of p2 values for the detector
component,
• filename is a string giving the name of the file in which to store the data.
Note that for a two-dimensional detector array, the first dimension is along the X axis
and the second dimension is along the Y axis. This means that element (i x , iy ) can be
obtained as p[ix ∗ n + iy ] if p is a pointer to the first element.
Risø–R–1416(EN)
63
Three-dimensional detectors/monitors The results of a three-dimensional detector/
monitor are written to a file using the following macro:
DETECTOR OUT 3D(t, xlabel, ylabel, zlabel, xvar, yvar, zvar, x min , xmax , ymin ,
ymax , zmin , zmax , m, n, p
&N [0][0][0], &p[0][0][0], &p2 [0][0][0], filename)
The meaning of parameters is the same as those used in the 1D and 2D versions of
DETECTOR OUT. The available data format currently save the 3D arrays as 2D, with
the 3rd dimension specified in the type field of the data header.
5.4.7
The FINALLY section
FINALLY
%{
. . . C code to execute at end of simulation . . .
%}
This gives code that will be executed when the simulation has ended. This might be used
to free memory and print out final results from components, e.g. the simulated intensity
in a detector.
5.4.8
The MCDISPLAY section
MCDISPLAY
%{
. . . C code to draw a sketch of the component . . .
%}
This gives C code that draws a sketch of the component in the plots produced by the
mcdisplay front-end (see section 4.4.4). The section can contain arbitrary C code and may
refer to the parameters of the component, but usually it will consist of a short sequence of
the special commands described below that are available only in the MCDISPLAY section.
When drawing components, all distances and positions are in meters and specified in the
local coordinate system of the component.
The MCDISPLAY section is optional. If it is omitted, mcdisplay will use a default
symbol (a small circle) for drawing the component.
The magnify command This command, if present, must be the first in the section. It
takes a single argument: a string containing zero or more of the letters “x”, “y” and “z”.
It causes the drawing to be enlarged along the specified axis in case mcdisplay is called
with the --zoom option. For example:
magnify("xy");
The line command
The line command takes the following form:
line(x1 , y1 , z1 , x2 , y2 , z2 )
It draws a line between the points (x 1 , y1 , z1 ) and (x2 , y2 , z2 ).
64
Risø–R–1416(EN)
The multiline command
The multiline command takes the following form:
multiline(n, x1 , y1 , z1 , ..., xn , yn , zn )
It draws a series of lines through the n points (x 1 , y1 , z1 ), (x2 , y2 , z2 ), . . . , (xn , yn , zn ). It
thus accepts a variable number of arguments depending on the value of n. This exposes
one of the nasty quirks of C since no type checking is performed by the C compiler. It
is thus very important that all arguments to multiline (except n) are valid numbers of
type double. A common mistake is to write
multiline(3, x, y, 0, ...)
which will silently produce garbage output. This must instead be written as
multiline(3, (double)x, (double)y, 0.0, ...)
The circle command
The circle command takes the following form:
circle(plane, x, y, z, r)
Here plane should be either "xy", "xz", or "yz". The command draws a circle in the
specified plane with the center at (x, y, z) and the radius r.
5.4.9
The end of the component definition
END
This marks the end of the component definition.
5.4.10
A component example: Slit
A simple example of the component Slit is given.
/*******************************************************************************
*
* McStas, neutron ray-tracing package
*
Copyright 1997-2002, All rights reserved
*
Risoe National Laboratory, Roskilde, Denmark
*
Institut Laue Langevin, Grenoble, France
*
* Component: Slit
*
* %I
* Written by: Kim Lefmann and Henrik M. Roennow
* Date: June 16, 1997
* Version: $Revision: 1.18 $
* Origin: Risoe
* Release: McStas 1.6
*
* Rectangular/circular slit.
*
* %D
* A simple rectangular or circular slit. You may either
Risø–R–1416(EN)
65
* specify the radius (circular shape), or the rectangular bounds.
* No transmission around the slit is allowed.
*
* Example: Slit(xmin=-0.01, xmax=0.01, ymin=-0.01, ymax=0.01)
*
Slit(radius=0.01)
*
* %P
* INPUT PARAMETERS
*
* radius: Radius of slit in the z=0 plane, centered at Origo (m)
* xmin: Lower x bound (m)
* xmax: Upper x bound (m)
* ymin: Lower y bound (m)
* ymax: Upper y bound (m)
*
* %E
*******************************************************************************/
DEFINE COMPONENT Slit
DEFINITION PARAMETERS ()
SETTING PARAMETERS (xmin=0, xmax=0, ymin=0, ymax=0,radius=0)
STATE PARAMETERS (x,y,z,vx,vy,vz,t,s1,s2,p)
INITIALIZE
%{
if (xmin == 0 && xmax == 0 && ymin == 0 & ymax == 0 && radius == 0)
{ fprintf(stderr,"Slit: %s: Error: give geometry\n", NAME_CURRENT_COMP); exit(-1); }
%}
TRACE
%{
PROP_Z0;
if (((radius == 0) && (x<xmin || x>xmax || y<ymin || y>ymax))
|| ((radius != 0) && (x*x + y*y > radius*radius)))
ABSORB;
else
SCATTER;
%}
MCDISPLAY
%{
double xw, yh;
magnify("xy");
xw = (xmax - xmin)/2.0;
yh = (ymax - ymin)/2.0;
multiline(3, xmin-xw, (double)ymax, 0.0,
(double)xmin, (double)ymax, 0.0,
(double)xmin, ymax+yh, 0.0);
multiline(3, xmax+xw, (double)ymax, 0.0,
(double)xmax, (double)ymax, 0.0,
(double)xmax, ymax+yh, 0.0);
multiline(3, xmin-xw, (double)ymin, 0.0,
(double)xmin, (double)ymin, 0.0,
(double)xmin, ymin-yh, 0.0);
66
Risø–R–1416(EN)
multiline(3, xmax+xw, (double)ymin, 0.0,
(double)xmax, (double)ymin, 0.0,
(double)xmax, ymin-yh, 0.0);
%}
END
5.4.11
McDoc, the McStas library documentation tool
McStas includes a facility called McDoc to help maintain good documentation of components and instruments. In the component source code, comments may be written that
follow a particular format understood by McDoc. The McDoc facility will read these comments and automatically produce output documentation in various forms. By using the
source code itself as the source of documentation, the documentation is much more likely
to be a faithful and up-to-date description of how the component/instrument actually
works.
Two forms of documentation can be generated. One is the component entry dialog in
the mcgui front-end, see section 4.4.1. The other is a collection of web pages documenting
the components and instruments, handled via the mcdoc front-end (see section 4.4.7), and
the complete documentation for all available McStas components and instruments may
be found at the McStas webpage [2], and in the McStas library (see 7.1). This latter is
accessible from the mcgui ’Help’ menu.
Note that McDoc-compliant comments in the source code are no substitute for a good
reference manual entry. The mathematical equations describing the physics and algorithms
of the component should still be written up carefully for inclusion in the component
manual. The McDoc comments are useful for describing the general behaviour of the
component, the meaning and units of the input parameters, etc.
The format of the comments in the library source code
The format of the comments understood by McDoc is mostly straight-forward, and is
designed to be easily readable both by humans and by automatic tools. McDoc has
been written to be quite tolerant in terms of how the comments may be formatted and
broken across lines. A good way to get a feeling for the format is to study some of the
examples in the existing components and instruments. Below, a few notes are listed on
the requirements for the comment headers:
The comment syntax uses %IDENTIFICATION, %DESCRIPTION, %PARAMETERS, %LINKS,
and %END keywords to mark different sections of the documentation. Keywords may be
abbreviated, e.g. as %IDENT or %I.
• In the %IDENTIFICATION section, author: (or written by: for backwards compatibility with old comments) denote author; date:, version:, and origin: are also
supported. Any number of Modified by: entries may be used to give the revision
history. The author:, date:, etc. entries must all appear on a single line of their
own. Everything else in the identification section is part of a ”short description” of
the component.
• In the %PARAMETERS section, descriptions have the form “name: [unit] text” or
“name: text [unit]”. These may span multiple lines, but subsequent lines must
Risø–R–1416(EN)
67
be indented by at least four spaces. Note that square brackets [] should be used
for units. Normal parenthesis are also supported for backwards compatibility, but
nested parenthesis do not work well.
• The %DESCRIPTION section contains text in free format. The text may contain HTML
tags like <IMG> (to include pictures) and <A>. . . </A> (for links to other web pages,
but see also the %LINK section). In the generated web documentation pages, the text
is set in <PRE>. . . </PRE>, so that the line breaks in the source will be obeyed.
• Any number of %LINK sections may be given; each one contains HTML code that
will be put in a list item in the link section of the description web page. This
usually consists of an <A HREF="..."> ... </A> pointer to some other source of
information.
• Optionally, an %INSTRUMENT_SITE section followed by a single word is used to sort
instruments by origin/location in the ’Neutron Site’ menu in mcgui.
• After %END, no more comment text is read by McDoc.
68
Risø–R–1416(EN)
Chapter 6
Monte Carlo Techniques and
simulation strategy
This chapter explains the simulation strategy and the Monte Carlo techniques used in McStas. We first explain the concept of the neutron weight factor, and discuss the statistical
errors in dealing with sums of neutron weights. Secondly, we give an expression for how
the weight factor should transform under a Monte Carlo choice and specialize this to the
concept of focusing components. Finally, we present a way of generating random numbers
with arbitrary distributions.
6.1
The neutron weight, p
A totally realistic semi-classical simulation will require that each neutron is at any time
either present or not (it might be ABSORB’ed or lost in another way). In many setups, e.g. triple axis spectrometers, only a small fraction of the initial neutrons will ever
be detected, and simulations of this kind will therefore waste much time in dealing with
neutrons that get lost.
An important way of speeding up calculations is to introduce a neutron weight for
each simulated neutron and to adjust this weight according to the path of the neutron. If
e.g. the reflectivity of a certain optical component is 10%, and only reflected neutrons are
considered in the simulations, the neutron weight will be multiplied by 0.10 when passing
this component, but every neutron is allowed to reflect in the component. In contrast,
the totally realistic simulation of the component would require in average ten incoming
neutrons for each reflected one.
Let the initial neutron weight be p0 and let us denote the weight multiplication factor
in the j’th component by πj . The resulting weight factor for the neutron after passage of
the whole instrument is equal to the product of all the contributions
p = p0
n
Y
πj .
(6.1)
j=1
For convenience, the value of p is updated within each component.
Simulation by weight adjustment is performed whenever possible. This includes
Risø–R–1416(EN)
69
• Transmission through filter.
• Transmission through Soller blade collimator (in the approximation which does not
take each blade into account).
• Reflection from monochromator (and analyser) crystals with finite reflectivity and
mosaicity.
• Scattering from samples.
6.1.1
Statistical errors of non-integer counts
In a typical simulation, the result will consist of a count of neutrons with different weights. 1
One may write the counting result as
X
(6.2)
I=
pi = N p,
i
where N is the number of neutrons in the detector and the vertical bar denote averaging.
By performing the weight transformations, the (statistical) mean value of I is unchanged.
However, N will in general be enhanced, and this will improve the statistics of the simulation.
To give some estimate of the statistical error, we proceed as follows: Let us first for
simplicity assume that all the counted neutron weights are almost equal, p i ≈ p, and
that we observe a large number of neutrons,
√ N ≥ 10. Then N almost follows a normal
distribution with the uncertainty σ(N ) = N 2 . Hence, the statistical uncertainty of the
observed intensity becomes
√
√
σ(I) = N p = I/ N ,
(6.3)
as is used in real neutron experiments (where p ≡ 1). For a better approximation we
return to Eq. (6.2). Allowing variations in both N and p, we calculate the variance of
the resulting intensity, assuming that the two variables are independent and both follow
a Gaussian distribution.
σ 2 (I) = σ 2 (N )p2 + N 2 σ 2 (p) = N p2 + N 2 σ 2 (p).
(6.4)
Assuming that the individual weights, p i , follow a Gaussian
distribution (which in many
P
cases is far from the truth) we have N 2 σ 2 (p) = σ 2 ( i pi ) = N σ 2 (pi ) and reach
σ 2 (I) = N p2 + σ 2 (pi ) .
(6.5)
P
The statistical variance of the pi ’s is estimated by σ 2 (pi ) ≈ (N − 1)−1 ( i p2i − N p2 ). The
resulting variance then reads
!
X
N
2
2
2
pi − p .
(6.6)
σ (I) =
N −1
i
1
The sum of these weights is an estimate of the mean number of neutrons hitting the monitor (or
detector) in a “real” experiment where the number of neutrons emitted from the source is the same as the
number of simulated neutrons.
2
This is not correct in a situation where the detector counts a large fraction of the neutrons in the
simulation, but we will neglect that for now.
70
Risø–R–1416(EN)
For large values of N , this is very well approximated by the simple expression
X
σ 2 (I) ≈
p2i .
(6.7)
i
In order to compute the intensities
the detector
components in
P and uncertainties,
P
P
McStas thus must keep track of N = i p0i , I = i p1i , and M2 = i p2i .
6.2
Weight factor transformations during a Monte Carlo
choice
When a Monte Carlo choice must be performed, e.g. when the initial energy and direction
of the neutron is decided at the source, it is important to adjust the neutron weight so
that the combined effect of neutron weight change and Monte Carlo probability equals the
actual physical properties of the component.
Let us follow up on the example of a source. In the “real” semi-classical world, there is a
distribution (probability density) for the neutrons in the six dimensional (energy, direction,
position) space of Π(E, Ω, r) = dP/(dEdΩd 3 r) depending upon the source temperature,
geometry etc. In the Monte Carlo simulations, the six coordinates are for efficiency reasons
in general picked from another distribution: f MC (E, Ω, r) 6= Π(E, Ω, r), since one would
e.g. often generate only neutrons within a certain parameter interval. However, we must
then require that the weights are adjusted by a factor π j (in this case: j = 1) so that
fMC (E, Ω, r)πj (E, Ω, r) = Π(E, Ω, r).
(6.8)
For the sources present in version 1.4, only the (Ω, r) dependence of the correction factors
are taken into account.
The weight factor transformation rule Eq. (6.8) is of course also valid for other types
of Monte Carlo choices, although the probability distributions may depend upon different
parameters. An important example is elastic scattering from a powder sample, where the
Monte-Carlo choices are the scattering position and the final neutron direction.
It should be noted that the πj ’s found in the weight factor transformation are multiplied
by the πj ’s found by the weight adjustments described in subsection 6.1 to yield the final
neutron weight given by Eq. (6.1).
6.2.1
Focusing components
An important application of weight transformation is focusing. Assume that the sample
scatters the neutrons in many directions. In general, only neutrons flying in some of
these directions will stand any chance of being detected. These directions we call the
interesting directions. The idea in focusing is to avoid wasting computation time on
neutrons scattered in the uninteresting directions. This trick is an instance of what in
Monte Carlo terminology is known as importance sampling.
If e.g. a sample scatters isotropically over the whole 4π solid angle, and all interesting
directions are known to be contained within a certain solid angle interval ∆Ω, only these
solid angles are used for the Monte Carlo choice of scattering direction. According to
Eq. (6.8), the weight factor will then have to be changed by the (fixed) amount π j =
Risø–R–1416(EN)
71
|∆Ω|/(4π). One thus ensures that the mean simulated intensity is unchanged during a
”correct” focusing, while a too narrow focusing will result in a lower (i.e. wrong) intensity,
since one cuts away neutrons that would otherwise have counted.
One could also think of using adaptive importance sampling, so that McStas during
the simulations will determine the most interesting directions and gradually change the
focusing according to that. A first implementation of this idea is found in the Source adapt
component.
6.3
Transformation of random numbers
In order to perform the Monte Carlo choices, one needs to be able to pick a random
number from a given distribution. However, most random number generators only give
uniform distributions over a certain interval. We thus need to be able to transform between
probability distributions, and we here give a short explanation on how to do this.
Assume that we pick a random number, x, from a distribution φ(x). We are now
interested in the shape of the distribution of the transformed y = f (x), assuming f (x) is
monotonous. All random numbers lying in the interval [x; x + dx] are transformed to lie
within the interval [y; y+f 0 (x)dx], so the resulting distribution must be φ(y) = φ(x)/f 0 (x).
If the random number generator selects numbers uniformly in the interval [0; 1], we
have φ(x) = 1, and one may evaluate the above expression further
φ(y) =
By indefinite integration we reach
Z
1
f 0 (x)
=
d −1
f (y).
dy
φ(y)dy = f −1 (y) = x,
(6.9)
(6.10)
which is the essential formula for finding the right transformation of the initial random
numbers. Let us illustrate with a few examples of transformations used within the McStas
components.
The circle For finding a random point within the circle of radius R, one would like
to choose the polar angle from a uniform distribution in [0; 2π] and the radius from the
normalised distribution φ(r) = 2r/R 2 . The polar angle is found simply by multiplying a
random number with 2π. For the radius, we like to find Rr = f (x), where
again x is the
R
generated random number. Left side of Eq. (6.10) gives φ(r)dr = 2r/R2 dr = r 2 /R2 ,
√
which should equal x. Hence r = R x.
Exponential decay In a simple time-of-flight source, the neutron flux decays exponentially after the initial activation at t = 0. We thus want to pick an initial neutron
emission time from the normalised distribution φ(t) = exp(−t/τ )/τ . Use of Eq. (6.10)
gives x = − exp(−t/τ ), which is a number in the interval [−1; 0]. If we want to pick a
positive random number instead, we will have to change sign by x 1 = −x and thus reach
t = −τ ln(x1 ).
72
Risø–R–1416(EN)
The sphere For finding a random point on the surface of the unit sphere, one needs to
determine the two angles, (θ, ψ). As for a circle, ψ is chosen from a uniform distribution
in [0; 2π]. The probability distribution of θ should be φ(θ) = sin(θ) (for θ ∈ [0; π/2]),
whence θ = cos−1 (x).
Risø–R–1416(EN)
73
Chapter 7
The component library
This chapter has been removed from the manual and will instead be published in a separate
manual describing the McStas components. The McStas component manualis edited by
the McStas authors and it will include contributions from users writing components. As
a complement to the McStas component manual, you may use the mcdoc -s command to
obtain the on-line component documentation and refer to the McStas web-page [2] where
all components are documented using the McDoc system.
7.1
A short overview of the McStas component library
This section gives a quick overview of available McStas components provided with the
distribution, in the MCSTAS library. The location of this library is detailed in section 4.2.2.
All of them are thought to be reliable, eventhough no absolute guaranty may be given
concerning their accuracy.
The contrib directory of the library contains components that were given by McStas
users, but are not validated yet.
Additionally the obsolete directory of the library gathers components that were renamed, or considered to be outdated. Anyway, they still all work as before.
The mcdoc front-end (section 4.4.7) enables to display both the catalog of the McStas
library, e.g using:
mcdoc --show
as well as the documentation of specific components, e.g with:
mcdoc --text name
mcdoc --show file.comp
The first line will search for all components matching the name, and display their help
section as text, where as the second example will display the help corresponding to the
file.comp component, using your BROWSER setting, or as text if unset. The --help
option will display the command help, as usual.
74
Risø–R–1416(EN)
MCSTAS/sources
Adapt check
ESS moderator long
ESS moderator short
Moderator
Monitor Optimizer
Source Maxwell 3
Source Optimizer
Source adapt
Source div
Source flat
Source flat lambda
Source flux
Source flux lambda
Source gen
Virtual input
Virtual output
Description
Optimization specifier for the Source adapt component.
Parametrised pulsed source for modelling ESS long pulses.
A parametrised pulsed source for modelling ESS short pulses.
A simple pulsed source for time-of-flight.
To be used after the Source Optimizer component.
Source with up to three Maxwellian distributions
A component that optimizes the neutron flux passing through
the Source Optimizer in order to have the maximum flux at the
Monitor Optimizer position.
Neutron source with adaptive importance sampling.
Neutron source with Gaussian divergence.
A circular neutron source with flat energy spectrum and arbitrary flux.
Neutron source with flat wavelength spectrum and arbitrary
flux.
An old variant of the official Source flux lambda component.
Neutron source with flat wavelength spectrum and userspecified flux.
Circular/squared neutron source with flat or Maxwellian energy/wavelength spectrum (possibly spatially gaussian).
Source-like component that generates neutron events from an
ascii/binary ’virtual source’ file (for Virtual output).
Detector-like component that writes neutron state (for Virtual input).
Table 7.1: Source components of the McStas library.
Risø–R–1416(EN)
75
MCSTAS/optics
Arm
Beamstop
Bender
Chopper
Chopper Fermi
Collimator linear
Description
Arm/optical bench
Rectangular/circular beam stop.
Models a curved neutron guide (shown straight).
Disk chopper.
Fermi Chopper with curved slits.
A simple analytical Soller collimator (with triangular transmission).
Filter gen
This components may either set the flux or change it (filterlike), using an external data file.
Guide
Neutron guide.
Guide channeled
Neutron guide with channels (bender section).
Guide gravity
Neutron guide with gravity. Can be channeled and focusing.
Guide wavy
Neutron guide with gaussian waviness.
Mirror
Single mirror plate.
Monochromator curved Double bent multiple crystal slabs with anisotropic gaussian
mosaic.
Monochromator flat
Flat Monochromator crystal with anisotropic mosaic.
Selector
A velocity selector (helical lamella type) such as V selector
component.
Slit
Rectangular/circular slit.
V selector
Velocity selector.
Table 7.2: Optics components of the McStas library.
MCSTAS/samples
Powder1
Powder2
Res sample
Sans spheres
Single crystal
V sample
Description
General powder sample with a single scattering vector.
General powder sample with a two scattering vectors.
Sample for resolution function calculation.
Sample for Small Angle Neutron Scattering - hard spheres in
thin solution, mono disperse.
Mosaic single crystal with multiple scattering vectors.
Vanadium sample.
Table 7.3: Sample components of the McStas library.
76
Risø–R–1416(EN)
MCSTAS/monitors
DivLambda monitor
DivPos monitor
Divergence monitor
EPSD monitor
Description
Divergence/wavelength monitor.
Divergence/position monitor (acceptance diagram).
Horizontal+vertical divergence monitor.
A monitor measuring neutron intensity vs. position, x, and
neutron energy, E.
E monitor
Energy-sensitive monitor.
Hdiv monitor
Horizontal divergence monitor L monitor Wavelength-sensitive
monitor.
Monitor
Simple single detector/monitor.
Monitor 4PI
Monitor that detects ALL non-absorbed neutrons.
Monitor nD
This component is a general Monitor that can output 0/1/2D
signals (Intensity or signal vs. [something] and vs. [something]
...).
PSD monitor
Position-sensitive monitor.
PSD monitor 4PI
Spherical position-sensitive detector.
PSDcyl monitor
A 2D Position-sensitive monitor. The shape is cylindrical with
the axis vertical. The monitor covers the whole cylinder (360
degrees).
PSDlin monitor
Rectangular 1D PSD, measuring intensity vs. vertical position,
x.
PreMonitor nD
This component is a PreMonitor that is to be used with one
Monitor nD, in order to record some neutron parameter correlations.
Res monitor
Monitor for resolution calculations.
TOFLambda monitor Time-of-flight/wavelength monitor.
TOF cylPSD monitor Cylindrical (2pi) PSD Time-of-flight monitor.
TOF monitor
Rectangular Time-of-flight monitor.
TOFlog mon
Rectangular Time-of-flight monitor with logarithmic time binning.
Table 7.4: Monitor components of the McStas library.
MCSTAS/misc
Progress bar
Vitess input
Vitess output
Description
A simulation progress bar. May also trigger intermediate
SAVE.
Read neutron state parameters from VITESS neutron file.
Write neutron state parameters to VITESS neutron file.
Table 7.5: Miscellaneous components of the McStas library.
Risø–R–1416(EN)
77
MCSTAS/contrib
Al window
Collimator ROC
Guide curved
Guide tapering
FermiChopper
Filter graphite
Filter powder
Guide honeycomb
He3 cell
Monochromator 2foc
SiC
Description
Aluminium window in the beam.
Radial Oscillationg Collimator (ROC).
Non focusing continuous curved guide (shown curved).
Rectangular tapered guide (parabolic, elliptic, sections ...).
Fermi Chopper with rotating frame.
Pyrolytic graphite filter (analytical model).
Box-shaped powder filter based on Single crystal (unstable).
Neutron guide with gravity and honeycomb geometry. Can be
channeled and focusing.
Polarised 3He cell.
Double bent monochromator with multiple slabs.
SiC multilayer sample for reflectivity simulations.
Table 7.6: Contributed components of the McStas library.
MCSTAS/share
adapt tree-lib
mcstas-r
monitor nd-lib
read table-lib
vitess-lib
Description
Handles a simulation optimisation space for adatative importance sampling. Used by the Source adapt component.
Main Run-time library (always included).
Handles multiple monitor types.
Used by Monitor nD,
Res monitor, . . .
Enables to read a data table (text/binary) to be used within
an instrument or a component.
Enables to read/write Vitess event binary files. Used by
Vitess input and Vitess output
Table 7.7: Shared libraries of the McStas library. See Appendix A for details.
MCSTAS/data
*.lau
*.trm
*.rfl
Description
Laue pattern file, as issued from Crystallographica or FullProf.
Data: [ h k l Mult. d-space 2Theta F-squared ]
transmission file, typically for monochromator crystals and filters. Data: [ k (Angs-1) , Transmission (0-1) ]
reflectivity file, typically for mirrors and monochromator crystals. Data: [ k (Angs-1) , Reflectivity (0-1) ]
Table 7.8: Data files of the McStas library.
MCSTAS/examples Description
*.instr
This directory contains example instruments,
throught the mcgui “Neutron site” menu.
accessible
Table 7.9: Instrument example files of the McStas library.
78
Risø–R–1416(EN)
Chapter 8
Instrument examples
Here, we give a short description of three selected instruments. We present the McStas
versions of the Risø standard triple axis spectrometer TAS1 (8.2) and the ISIS timeof-flight spectrometer PRISMA (8.3). Before that, however, we present one example of
a component test instrument: the instrument to test the component V sample (8.1).
These instrument files are included in the McStas distribution in the examples/ directory.
All the instrument examples there-in may be executed automatically throught the McStas
self-test procedure (see section 3.7). It is also our intention to extend the list of instrument
examples extensively and perhaps publish them in a separate report.
8.1
A test instrument for the component V sample
This instrument is one of many test instruments written with the purpose of testing the
individual components. We have picked this instrument both because we would like to
present an example test instrument and because it despite its simplicity has produced
quite non-trivial results, also giving rise to the McStas logo.
The instrument consists of a narrow source, a 60’ collimator, a V-sample shaped as a
hollow cylinder with height 15 mm, inner diameter 16 mm, and outer diameter 24 mm at
a distance of 1 m from the source. The sample is in turn surrounded by an unphysical
4π-PSD monitor with 50 × 100 pixels and a radius of 10 6 m. The set-up is shown in
figure 8.1.
8.1.1
Scattering from the V-sample test instrument
In figure 8.2, we present the radial distribution of the scatting from an evenly illuminated
V-sample, as seen by a spherical PSD. It is interesting to note that the variation in the
scattering intensity is as large as 10%. This is an effect of attenuation of the beam in the
cylindrical sample.
8.2
The triple axis spectrometer TAS1
With this instrument definition, we have tried to create a very detailed model of the
conventional cold-source triple-axis spectrometer TAS1 at Risø National Laboratory. UnRisø–R–1416(EN)
79
PSfrag replacements
Vanadium
Collimator
Source
4π PSD
Figure 8.1: A sketch of the test instrument for the component V sample.
1.6
1.55
1.5
1.45
1.4
60
100
40
50
20
0
0
Figure 8.2: Scattering from a V-sample, measured by a spherical PSD. The sphere has
been transformed onto a plane and the intensity is plotted as the third dimension. A
colour version of this picture is found on the title page of this manual.
80
Risø–R–1416(EN)
fortunately, no neutron scattering is performed at Risø anymore, but it still serves as a
good example. Except for the cold source itself, all components used have quite realistic
properties. Furthermore, the overall geometry of the instrument has been adapted from
the detailed technical drawings of the real spectrometer. The TAS 1 simulation is the first
detailed work performed with the McStas package.For further details see reference [12].
At the spectrometer, the channel from the cold source to the monochromator is asymmetric, since the first part of the channel is shared with other instruments. In the instrument definition, this is represented by three slits. For the cold source, we use a flat energy
distribution (component Source flat) focusing on the third slit.
The real monochromator consist of seven blades, vertically focusing on the sample. The
angle of curvature is constant so that the focusing is perfect at 5.0 meV (20.0 meV for
2nd order reflections) for a 1×1 cm2 sample. This is modeled directly in the instrument
definition using seven Monochromator components. The mosaicity of the pyrolytic
graphite crystals is nominally 30’ (FWHM) in both directions. However, the simulations
indicated that the horisontal mosaicities of both monochromator and analyser were more
likely 45’. This was used for all mosaicities in the final instrument definition.
The monochromator scattering angle, in effect determining the incoming neutron energy, is for the real spectrometer fixed by four holes in the shielding, corresponding to the
energies 3.6, 5.0, 7.2, and 13.7 meV for first order neutrons. In the instrument definition,
we have adapted the angle corresponding to 5.0 meV in order to test the simulations
against measurements performed on the spectrometer.
The exit channel from the monochromator may on the spectrometer be narrowed down
from initially 40 mm to 20 mm by an insert piece. In the simulations, we have chosen the
20 mm option and modeled the channel with two slits to match the experimental set-up.
In the test experiments, we used two standard samples: An Al 2 O3 powder sample and
a vanadium sample. The instrument definitions use either of these samples of the correct
size. Both samples are chosen to focus on the opening aperture of collimator 2 (the one
between the sample and the analyser). Two slits, one before and one after the sample, are
in the instrument definition set to the opening values which were used in the experiments.
The analyser of the spectrometer is flat and made from pyrolytic graphite. It is placed
between an entry and an exit channel, the latter leading to a single detector. All this has
been copied into the instrument definition, where the graphite mosaicity has been set to
45’.
On the spectrometer, Soller collimators may be inserted at three positions: Between
monochromator and sample, between sample and analyser, and between analyser and
detector. In our instrument definition, we have used 30’, 28’, and 67’ collimators on these
three positions, respectively.
An illustration of the TAS1 instrument is shown in figure 8.3. Test results and data
from the real spectrometer are shown in Appendix 8.2.1.
8.2.1
Simulated and measured resolution of TAS1
In order to test the McStas package on a qualitative level, we have performed a very
detailed simulation of the conventional triple axis spectrometer TAS1, Risø. The measurement series constitutes a complete alignment of the spectrometer, using the direct
beam and scattering from V and Al2 O3 samples at an incoming energy of 20.0 meV, using
Risø–R–1416(EN)
81
Focusing
monochromator
Analyser
Slits
Collimator 3
Collimator 1
Source
Slits
Slits
Detector
Collimator 2
Sample
Figure 8.3: A sketch of the TAS1 instrument.
2T scan on 1 mm slit
4
12
x 10
10
intensity
8
6
4
2
0
−1.5
−1
−0.5
0
0.5
2T [deg]
1
1.5
2
Figure 8.4: Scans of 2θs in the direct beam with 1 mm slit on the sample position. ”×”:
measurements, ”o”: simulations Collimations: open-30’-open-open.
the second order scattering from the monochromator. In the instrument definitions, we
have used all available information about the spectrometer. However, the mosaicities of
the monochromator and analyser are set to 45’ in stead of the quoted 30’, since we from
our analysis believe this to be much closer to the truth.
In these simulations, we have tried to reproduce every alignment scan with respect to
position and width of the peaks, whereas we have not tried to compare absolute intensities.
Below, we show a few comparisons of the simulations and the measurements.
Figure 8.4 shows a scan of 2θs on the collimated direct beam in two-axis mode. A 1
mm slit is placed on the sample position. Both the measured width and non-Gaussian
peak shape are well reproduced by the McStas simulations.
In contrast, a simulated 2θa scan in triple-axis mode on a V-sample showed a surprising
offset from zero, see Figure 8.5. However, a simulation with a PSD on the sample position
showed that the beam center was 1.5 mm off from the center of the sample, and this was
82
Risø–R–1416(EN)
−6
3
x 10
2.5
intensity
2
1.5
1
0.5
0
−0.5
−4
−3
−2
−1
0
2TA [deg]
1
2
3
4
Figure 8.5: First simulated 2θa scan on a vanadium sample. Collimations: open-30’-28’open.
important since the beam was no wider than the sample itself. A subsequent centering
of the beam resulted in a nice agreement between simulation and measurements. For a
comparison on a slightly different instrument (analyser-detector collimator inserted), see
Figure 8.6.
The result of a 2θs scan on an Al2 O3 powder sample in two-axis mode is shown in
Figure 8.7. Both for the scan in focusing mode (+ − +) and for the one in defocusing
mode (+ + +) (not shown), the agreement between simulation and experiment is excellent.
As a final result, we present a scan of the energy transfer E a = ~ω on a V-sample. The
data are shown in Figure 8.8.
8.3
The time-of-flight spectrometer PRISMA
In order to test the time-of-flight aspect of McStas, we have in collaboration with Mark
Hagen, ISIS, written a simple simulation of a time-of-flight instrument loosely based on
the ISIS spectrometer PRISMA. The simulation was used to investigate the effect of using
a RITA-style analyser instead of the normal PRISMA backend.
We have used the simple time-of-flight source Tof source. The neutrons pass through
a beam channel and scatter off from a vanadium sample, pass through a collimator on
to the analyser. The RITA-style analyser consists of seven analyser crystals that can be
rotated independently around a vertical axis. After the analysers we have placed a PSD
and a time-of-flight detector.
To illustrate some of the things that can be done in a simulation as opposed to a real-life
experiment, this example instrument further discriminates between the scattering off each
individual analyser crystal when the neutron hits the detector. The analyser component
is modified so that a global variable neu_color keeps track of which crystal scatters the
Risø–R–1416(EN)
83
700
600
intensity
500
400
300
200
100
0
−3
−2
−1
0
2TA [deg]
1
2
3
Figure 8.6: Corrected 2θa scan on a V-sample. Collimations: open-30’-28’-67’. ”×”:
measurements, ”o”: simulations.
800
700
intensity
600
500
400
300
200
100
32
32.5
33
33.5
34
2T [deg]
34.5
35
35.5
Figure 8.7: 2θs scans on Al2 O3 in two-axis, focusing mode. Collimations: open-30’-28’-67’.
”×”: measurements, ”o”: simulations. A constant background is added to the simulated
data.
84
Risø–R–1416(EN)
140
120
intensity
100
80
60
40
20
0
−2
−1.5
−1
−0.5
0
0.5
EA [meV]
1
1.5
2
Figure 8.8: Scans of the analyser energy on a V-sample. Collimations: open-30’-28’-67’.
”×”: measurements, ”o”: simulations.
neutron. The detector component is then modified to construct seven different time-offlight histograms, one for each crystal (see the source code for the instrument for details).
One way to think of this is that the analyser blades paint a color on each neutron which
is then observed in the detector. An illustration of the instrument is shown in figure 8.9.
Test results are shown in Appendix 8.3.1.
Moderator
Sample
Collimator
Monitor
Slit
Slit
Slit
PSD
Detector
7-blade
analyser
Figure 8.9: A sketch of the PRISMA instrument.
8.3.1
Simple spectra from the PRISMA instrument
A plot from the detector in the PRISMA simulation is shown in Figure 8.10. These results
were obtained with each analyser blade rotated one degree relative to the previous one.
The separation of the spectra of the different analyser blades is caused by different energy
Risø–R–1416(EN)
85
−9
7
x 10
PRISMA with RITA backend
6
Intensity
5
4
3
2
1
0
5500
6000
6500
time [usec]
7000
7500
Figure 8.10: Test result from PRISMA instrument using “coloured neutrons”. Each graph
shows the neutrons scattered from one analyser blade.
of scattered neutrons and different flight path length from source to detector. We have
not performed any quantitative analysis of the data at this time.
86
Risø–R–1416(EN)
Appendix A
Libraries and conversion constants
The McStas Library contains a number of built-in functions and conversion constants
which are useful when constructing components. These are stored in the share directory
of the MCSTAS library.
Within these functions, the ’Run-time’ part is available for all component/instrument
descriptions. The other parts (see table 7.7) are dynamic, that is they are not pre-loaded,
but only imported once when a component requests it using the %include McStas keyword.
For instance, within a component C code block, (usually SHARE or DECLARE):
%include "read_table-lib"
will include the ’read table-lib.h’ file, and the ’read table-lib.c’ (unless the --no-runtime
option is used with mcstas). Similarly,
%include "read_table-lib.h"
will only include the ’read table-lib.h’. The library embedding is done only once for
all components (like the SHARE section). For an example of implementation, see the
Res monitor component.
Here, we present a short list of both each of the library contents and the run-time
features.
A.1
Run-time calls and functions
Here we list a number of preprogrammed macros which may ease the task of writing
component and instrument definitions.
A.1.1
Neutron propagation
• ABSORB. This macro issues an order to the overall McStas simulator to interrupt
the simulation of the current neutron history and to start a new one.
• PROP Z0. Propagates the neutron to the z = 0 plane, by adjusting (x, y, z) and t.
If the neutron velocity points away from the z = 0 plane, the neutron is absorbed. If
component is centered, in order to avoid the neutron to be propagated there, use the
_intersect functions to determine intersection time(s), and then a PROP_DT call.
Risø–R–1416(EN)
87
• PROP DT(dt). Propagates the neutron through the time interval dt, adjusting
(x, y, z) and t.
• PROP GRAV DT(dt, Ax, Ay, Az). Like PROP DT, but it also includes gravity
using the acceleration (Ax, Ay, Az). In addition, to adjusting (x, y, z) and t also
(vx, vy, vz) is modified.
• SCATTER. This macro is used to denote a scattering event inside a component,
see section 5.4.5. It should be used e.g to indicate that a component has ’done
something’ (sctattered or detected). This does not affect the simulation at all, and
is mainly used by the MCDISPLAY section and the GROUP modifier (see 5.3.4 and 5.4.8).
See also the SCATTERED variable (below).
A.1.2
Coordinate and component variable retrieval
• MC GETPAR(). This may be used in the finally section of an instrument definition to reference the output parameters of a component. See page 60 for details.
• NAME CURRENT COMP gives the name of the current component as a string.
• POS A CURRENT COMP gives the absolute position of the current component. A component of the vector is referred to as POS A CURRENT COMP.i where
i is x, y or z.
• ROT A CURRENT COMP and ROT R CURRENT COMP give the orientation of the current component as rotation matrices (absolute orientation and
the orientation relative to the previous component, respectively). A component of a
rotation matrice is referred to as ROT A CURRENT COMP[m][n], where m and n
are 0, 1, or 2.
• POS A COMP(comp) gives the absolute position of the component with the name
comp. Note that comp is not given as a string. A component of the vector is referred
to as POS A COMP(comp).i where i is x, y or z.
• ROT A COMP(comp) and ROT R COMP(comp) give the orientation of the
component comp as rotation matrices (absolute orientation and the orientation relative to its previous component, respectively). Note that comp is not given as a string.
A component of a rotation matrice is referred to as ROT A COMP(comp)[m][n],
where m and n are 0, 1, or 2.
• INDEX CURRENT COMP is the number (index) of the current component
(starting from 1).
• POS A COMP INDEX(index) is the absolute position of component index.
POS A COMP INDEX (INDEX CURRENT COMP) is the same as
POS A CURRENT COMP. You may use POS A COMP INDEX
(INDEX CURRENT COMP+1) to make, for instance, your component access the
position of the next component (this is usefull for automatic targeting). A component
of the vector is referred to as
88
Risø–R–1416(EN)
POS A COMP INDEX(index).i where i is x, y or z. POS R COMP INDEX
works the same, but with relative coordinates.
• STORE NEUTRON(index, x, y, z, vx, vy, vz, t, sx, sy, sz, p) stores the current neutron state in the trace-history table, in local coordinate system. index is usually INDEX CURRENT COMP. This is automatically done when entering each component
of an instrument.
• RESTORE NEUTRON(index, x, y, z, vx, vy, vz, t, sx, sy, sz, p) restores the neutron state to the one at the input of the component index. To ignore a component
effect, use RESTORE NEUTRON (INDEX CURRENT COMP,
x, y, z, vx, vy, vz, t, sx, sy, sz, p) at the end of its TRACE section, or in its EXTEND
section. These neutron states are in the local component coordinate systems.
• SCATTERED is a variable set to 0 when entering a component, which is incremented each time a SCATTER event occurs. This may be used in the EXTEND sections (always executed when existing) to branch action depending if the component
acted or not on the current neutron.
• extend list(n, &arr, &len, elemsize). Given an array arr with len elements each of
size elemsize, make sure that the array is big enough to hold at least n elements, by
extending arr and len if necessary. Typically used when reading a list of numbers
from a data file when the length of the file is not known in advance.
• mcset ncount(n). Sets the number of neutron histories to simulate to n.
• mcget ncount(). Returns the number of neutron histories to simulate (usually set
by option -n).
• mcget run num(). Returns the number of neutron histories that have been simulated until now.
A.1.3
Coordinate transformations
• coords set(x, y, z) returns a Coord structure (like POS A CURRENT COMP) with
x, y and z members.
• coords get(P, &x, &y, &z) copies the x, y and z members of the Coord structure
P into x, y, z variables.
• coords add(a, b), coords sub(a, b), coords neg(a) enable to operate on coordinates, and return the resulting Coord structure.
• rot set rotation(Rotation t, φx , φy , φz ) Get transformation for rotation first φ x
around x axis, then φy around y, then φz around z. t should be a ’Rotation’ ([3][3]
’double’ matrix).
• rot mul(Rotation t1, Rotation t2, Rotation t3) performs t3 = t1.t2.
• rot copy(Rotation dest, Rotation src) performs dest = src for Rotation arrays.
Risø–R–1416(EN)
89
• rot transpose(Rotation src, Rotation dest) performs dest = src t .
• rot apply(Rotation t, Coords a) returns a Coord structure which is t.a
A.1.4
Mathematical routines
• NORM(x, y, z). Normalizes the vector (x, y, z) to have length 1.
• scalar prod(ax , ay , az , bx , by , bz ). Returns the scalar product of the two vectors
(ax , ay , az ) and (bx , by , bz ).
• vecprod(ax , ay , az , bx , by , bz , cx , cy , cz ). Sets (ax , ay , az ) equal to the vector product
(bx , by , bz ) × (cx , cy , cz ).
• rotate(x, y, z, vx , vy , vz , ϕ, ax , ay , az ). Set (x, y, z) to the result of rotating the vector
(vx , vy , vz ) the angle ϕ (in radians) around the vector (a x , ay , az ).
• normal vec(&nx , &ny , &nz , x, y, z). Computes a unit vector (nx , ny , nz ) normal
to the vector (x, y, z).
A.1.5
Output from detectors
• DETECTOR OUT 0D(...). Used to output the results from a single detector.
The name of the detector is output together with the simulated intensity and estimated statistical error. The output is produced in a format that can be read by
McStas front-end programs. See section 5.4.7 for details.
• DETECTOR OUT 1D(...). Used to output the results from a one-dimentional
detector. See section 5.4.7 for details.
• DETECTOR OUT 2D(...). Used to output the results from a two-dimentional
detector. See section 5.4.7 for details.
• DETECTOR OUT 3D(...). Used to output the results from a three-dimentional
detector. Arguments are the same as in DETECTOR OUT 2D, but with the additional z axis (the signal). Resulting data files are treated as 2D data, but the 3rd
dimension is specified in the type field.
• mcheader out(FILE *f,char *parent, int m, int n, int p, char *xlabel, char *ylabel,
char *zlabel, char *title, char *xvar, char *yvar, char *zvar, double x1, double x2,
double y1, double y2, double z1, double z2, char *filename) appends a header file
using the current data format setting. Signification of parameters may be found in
section 5.4.7. Please contact the authors in case of perplexity.
• mcinfo simulation(FILE *f, mcformat, char *pre, char *name) is used to append
the simulation parameters into file f (see for instance the Res monitor component).
Internal variable mcf ormat should be used as specified. Please contact the authors
in case of perplexity.
90
Risø–R–1416(EN)
A.1.6
Ray-geometry intersections
• box intersect(&t1 , &t2 , x, y, z, vx , vy , vz , dx , dy , dz ). Calculates the (0, 1, or
2) intersections between the neutron path and a box of dimensions d x , dy , and dz ,
centered at the origin for a neutron with the parameters (x, y, z, v x , vy , vz ). The
times of intersection are returned in the variables t 1 and t2 , with t1 < t2 . In the
case of less than two intersections, t 1 (and possibly t2 ) are set to zero. The function
returns true if the neutron intersects the box, false otherwise.
• cylinder intersect(&t1 , &t2 , x, y, z, vx , vy , vz , r, h). Similar to box intersect,
but using a cylinder of height h and radius r, centered at the origin.
• sphere intersect(&t1 , &t2 , x, y, z, vx , vy , vz , r). Similar to box intersect, but
using a sphere of radius r.
A.1.7
Random numbers
• rand01(). Returns a random number distributed uniformly between 0 and 1.
• randnorm(). Returns a random number from a normal distribution centered around
0 and with σ = 1. The algorithm used to get the normal distribution is explained
in [13], chapter 7.
• randpm1(). Returns a random number distributed uniformly between -1 and 1.
• randvec target circle(&vx , &vy , &vz , &dΩ, aimx , aimy , aimz , rf ). Generates a
random vector (vx , vy , vz ), of the same length as (aimx , aimy , aimz ), which is targeted
at a disk centered at (aimx , aimy , aimz ) with radius rf (in meters), and perpendicular
to the aim vector.. All directions that intersect the sphere are chosen with equal
probability. The solid angle of the sphere as seen from the position of the neutron is
returned in dΩ. This routine was previously called randvec target sphere (which
still works).
• randvec target rect angular(&vx , &vy , &vz , &dΩ, aimx , aimy , aimz ,height, width, Rot)
does the same as randvec target circle but targetting at a rectangle with angular
dimensions height and width (in radians, not in degrees as other angles). The rotation matrix Rot is the coordinate system orientation in the absolute frame, usually
ROT A CURRENT COMP.
• randvec target rect(&vx , &vy , &vz , &dΩ, aimx , aimy , aimz ,height, width, Rot) is
the same as randvec target rect angular but height and width dimensions are given
in meters. This function is useful to target at a guide entry window.
A.2
Reading a data file into a vector/matrix (Table input)
The read_table-lib provides functionalities for reading text (and binary) data files.
To use this library, add a %include "read_table-lib" in your component definition
DECLARE or SHARE section. Available functions are:
Risø–R–1416(EN)
91
• Table Init(&T able) and Table Free(&T able) initialize and free allocated memory
blocks
• Table Read(&T able, f ilename, block) reads numerical block number block (0 for
all) data from text file f ilename into T able. The block number changes when
the numerical data changes its size, or a comment is encoutered (lines starting by
’# ; % /’). If the data could not be read, then T able.data is NULL and T able.rows =
0. You may then try to read it using Table Read Offset Binary.
• Table Rebin(&T able) rebins T able rows with increasing, evenly spaced first column
(index 0), e.g. before using Table Value.
• Table Read Offset(&T able, f ilename, block, &of f set, n rows ) does the same as
Table Read except that it starts at offset of f set (0 means begining of file) and reads
nrows lines (0 for all). The of f set is returned as the final offset reached after reading
the nrows lines.
• Table Read Offset Binary(&T able, f ilename, type, block, &of f set, n rows , ncolumns )
does the same as Table Read Offset, but also specifies the type of the file (may be
”float” or ”double”), the number nrows of rows to read, each of them having n columns
elements. No text header should be present in the file.
• Table Info(T able) print information about the table T able.
• Table Index(T able, m, n) reads the T able[m][n] element.
• Table Value(T able, x, n) looks for the closest x value in the first column (index 0),
and extracts in this row the n-th element (starting from 0). The first column is thus
the ’x’ axis for the data.
The format of text files is free. Lines starting by ’# ; % /’ characters are considered to
be comments. Data blocks are vectors and matrices. Block numbers are counted starting
from 1, and changing when a comment is found, or the column number changes. For
instance, the file ’MCSTAS/data/BeO.trm’ (Transmission of a Berylium filter) looks like:
# BeO transmission, as measured on IN12
# Thickness: 0.05 [m]
# [ k(Angs-1) Transmission (0-1) ]
# wavevector multiply
1.0500 0.74441
1.0750 0.76727
1.1000 0.80680
...
Binary files should be of type ”float” (i.e. REAL*32) and ”double” (i.e. REAL*64), and
should not contain text header lines. These files are plateform dependent (little or big
endian).
The f ilename is first searched into the current directory (and all user additional locations specified using the -I option, see section 4.2.2), and if not found, in the data
92
Risø–R–1416(EN)
sub-directory of the MCSTAS library location. This way, you do not need to have local
copies of the McStas Library Data files (see table 7.8).
A usage example for this library part may be:
t_Table rTable;
char file="BeO.trm";
double x,y;
% declares a t_Table structure
% a file name
Table_Init(&rTable); % initialize the table to empty state
Table_Read(&rTable, file, 1); % reads the first numerical block
Table_Info(rTable);
% display table informations
...
x = Table_Index(rTable, 2,5); % reads the 3rd row, 6th column element
% of the table. Indexes start at zero in C.
y = Table_Value(rTable, 1.45,1); % looks for value 1.45 in 1st column (x axis)
% and extract 2nd column value of that row
Table_Free(&rTable); % free allocated memory for table
Additionally, if the block number (3rd) argument of Table Read is 0, all blocks will
be catenated. The Table Value function assumes that the ’x’ axis is the first column
(index 0). Other functions are used the same way with a few additional parameters, e.g.
specifying an offset for reading files, or reading binary data.
You may look into, for instance, the Monochromator curved component, or the Virtual input component for other implementation examples.
A.3
Monitor nD Library
This library gathers a few functions used by a set of monitors e.g. Monitor nD, Res monitor,
Virtual output, . . . . It may monitor any kind of data, create the data files, and may display many geometries (for mcdisplay). Refer to these components for implementation
examples, and ask the authors for more details.
A.4
Adaptative importance sampling Library
This library is currently only used by the components Source adapt and Adapt check. It
performs adaptative importance sampling of neutrons for simulation efficiency optimization. Refer to these components for implementation examples, and ask the authors for
more details.
A.5
Vitess import/export Library
This library is used by Vitess input, Vitess output components, as well as the mcstas2vitess
utility (see section 4.4.8). Refer to these components for implementation examples, and
ask the authors for more details.
Risø–R–1416(EN)
93
A.6
Constants for unit conversion etc.
The following predefined constants are useful for conversion between units
Name
DEG2RAD
RAD2DEG
MIN2RAD
RAD2MIN
V2K
K2V
VS2E
SE2V
FWHM2RMS
RMS2FWHM
MNEUTRON
HBAR
PI
Value
2π/360
360/(2π)
2π/(360 · 60)
(360 · 60)/(2π)
1010 · mN /~
10−10 · ~/mN
mN /(2e)
p
2e/mN
Conversion from
Degrees
Radians
Minutes of arc
Radians
Velocity (m/s)
k-vector (Å−1 )
Velocity squared (m2 s−2 )
Square root of neutron energy (meV1/2 )
Full width half maximum
p
8 log(2)
Root mean square (standard deviation)
Neutron mass
Planck constant
π
1/
p
8 log(2)
1.67492E − 27kg
1.05459E − 34Js
3.14159265358979323846
Conversion to
radians
degrees
radians
minutes of arc
k-vector (Å−1 )
Velocity (m/s)
Neutron energy (meV)
Velocity (m/s)
Root mean square
(standard deviation)
Full width half maximum
Further, we have defined the constants PI= π and HBAR= ~.
94
Risø–R–1416(EN)
Appendix B
The McStas terminology
This is a short explanation of phrases and terms which have a specific meaning within
McStas. We have tried to keep the list as short as possible with the risk that the reader
may occasionally miss an explanation. In this case, you are more than welcome to contact
the authors.
• Arm A generic McStas component which defines a frame of reference for other
components.
• Component One unit (e.g. optical element) in a neutron spectrometer.
• Definition parameter An input parameter for a component. For example the
radius of a sample component or the divergence of a collimator.
• Input parameter For a component, either a definition parameter or a setting
parameter. These parameters are supplied by the user to define the characteristics of
the particular instance of the component definition. For an instrument, a parameter
that can be changed at simulation run-time.
• Instrument An assembly of McStas components defining a neutron spectrometer.
• McStas Monte Carlo Simulation of Triple Axis Spectrometers (the name of this
project).
• Output parameter An output parameter for a component. For example the counts
in a monitor. An output parameter may be accessed from the instrument in which
the component is used using MC_GETPAR.
• Run-time C code, contained in the files mcstas-r.c and mcstas-r.h included in
the McStas distribution, that declare functions and variables used by the generated
simulations.
• Setting parameter Similar to a definition parameter, but with the restriction that
the value of the parameter must be a number.
Risø–R–1416(EN)
95
Bibliography
[1] K. Lefmann and K. Nielsen. Neutron News, 10, 20–23, 1999.
[2] See http://neutron.risoe.dk/mcstas/.
[3] See http://strider.lansce.lanl.gov/NISP/Welcome.html.
[4] T. E. Mason, K. N. Clausen, G. Aeppli, D. F. McMorrow, and J. K. Kjems. Can. J.
Phys., 73, 697–702, 1995.
[5] K. N. Clausen, D. F. McMorrow, K. Lefmann, G. Aeppli, T. E. Mason, A. Schröder,
M. Issikii, M. Nohara, and H. Takagi. Physica B, 241-243, 50–55, 1998.
[6] K. Lefmann, D. F. McMorrow, H. M. Rønnow, K. Nielsen, K. N. Clausen, B. Lake,
and G. Aeppli. Physica B, 283, 343–354, 2000.
[7] See http://www.sns.gov/.
[8] See http://www.ess-europe.de.
[9] See http://www.hmi.de/projects/ess/vitess/.
[10] See http://www-rocq.inria.fr/scilab/.
[11] See http://www.neutron.anl.gov/nexus/.
[12] A. Abrahamsen, N. B. Christensen, and E. Lauridsen. McStas simulations of the TAS1
spectrometer. Student’s report, Niels Bohr Institute, University of Copenhagen, 1998.
[13] W. H. Press, S. A. Teukolsky, W. T. Vetterling, and B. P. Flannery. Numerical
Recipes in C. Cambridge University Press, 1986.
96
Risø–R–1416(EN)
Index
Code generation options, 24
Comments, 47
Components, 11, 51
Coordinate system, 47
Data format, 10, 28, 43, 44
Embedded C code, 48, 50, 51, 53
Environment variable
BROWSER, 42, 72
EDITOR, 33
MCSTAS, 25, 72, 85, 90
MCSTAS CC, 14
MCSTAS CFLAGS, 14
MCSTAS FORMAT, 10, 14, 21, 28,
39, 40, 43
PGPLOT DEV, 37, 40, 41
PGPLOT DIR, 37, 40, 41
Gravitation, 47
Installing, 12, 14, 38
Instruments, 48
Kernel, 9, 46
Keyword, 48
%include, 25, 48, 85
ABSOLUTE, 51
AT, 51
COMPONENT, 51
DECLARE, 10, 50, 58
DEFINE
COMPONENT, 56
INSTRUMENT, 50
DEFINITION PARAMETERS, 56
END, 54, 63
EXTEND, 9, 52, 86
FINALLY, 10, 53, 62
Risø–R–1416(EN)
GROUP, 9, 52, 86
INITIALIZE, 51, 59
MCDISPLAY, 62, 86
OUTPUT PARAMETERS, 57, 58
POLARISATION PARAMETERS, 57
PREVIOUS, 10, 52
RELATIVE, 51
ROTATED, 51
SAVE, 10, 53, 60
SETTING PARAMETERS, 56
SHARE, 10, 59, 85
STATE PARAMETERS, 57
TRACE, 51, 59
Library, 85
adapt tree-lib, 91
Components, 11, 25, 42, 52, 72
contrib, 11, 72, 76
data, 11, 76, 90
doc, 11
misc, 11, 75
monitors, 11, 75
obsolete, 11, 72
optics, 11, 12, 74
samples, 12, 74
share, 12, 46, 48, 76, 85
sources, 12, 73
Instruments, 11, 76
mcstas-r, see Library/Run-time
monitor nd-lib, 91
read table-lib (Read Table), 48, 89
Run-time, 10, 26, 46, 48, 76, 85
ABSORB, 59, 85
DETECTOR OUT, 10, 60
MC GETPAR, 58, 86
NAME CURRENT COMP, 86
POS A COMP, 86
POS A CURRENT COMP, 86
97
PROP DT, 85
PROP GRAV DT, 85
PROP Z0, 85
randvec target rect, 10
RESTORE NEUTRON, 86
ROT A COMP, 86
ROT A CURRENT COMP, 86
SCATTER, 52, 53, 59, 85
SCATTERED, 53, 86
STORE NEUTRON, 86
Shared, see Library/Components/share
vitess-lib, 42, 91
Neutron state and units, 47
Parameters
Definition, 51, 56
Instruments, 9, 27, 37, 50
Optional, default value, 9, 27, 50, 57
Scans, 37
Setting, 9, 51, 56
Signal handler, 30
INT signal, 54
TERM signal, 54
USR1 signal, 10
USR2 signal, 10, 53
Simulation optimization, 26, 30
Testing the distribution, 14
Tools, 12, 20
gscan (obsolete), 38
IDL, 12, 28, 44
Matlab, 12, 28, 40, 41, 43, 44
mcconvert, 13, 43
mcdisplay, 38
mcdoc, 13, 42, 65, 72
mcgui, 20, 24, 32, 39, 40
mcplot, 11, 13, 28, 38, 40
mcresplot, 13, 41
mcrun, 13, 24, 37
mcstas2vitess, 13, 42, 91
Perl libraries, 12, 37, 40–42
Scilab, 12, 28, 40, 41, 43, 44
98
Risø–R–1416(EN)
Risø–R–1416(EN)
99
Bibliographic Data Sheet
Risø–R–1416(EN)
Title and author(s)
User and Programmers Guide to the Neutron Ray-Tracing Package McStas, Version 1.7
Peter Kjær Willendrup, Emmanuel Farhi, Kim Lefmann, Per-Olof Åstrand, Mark Hagen
and Kristian Nielsen
ISBN
ISSN
87–550–2929–9; 87–550–2930–2 (Internet)
0106–2840
Dept. or group
Date
Materials Research Department
January 29th, 2004
Groups own reg. number(s)
Project/contract No.
—
—
Pages
Tables
Illustrations
References
100
2
15
10
Abstract (Max. 2000 char.)
The software package McStas is a tool for carrying out Monte Carlo ray-tracing simulations
of neutron scattering instruments with high complexity and precision. The simulations can
compute all aspects of the performance of instruments and can thus be used to optimize the
use of existing equipment, design new instrumentation, and carry out virtual experiments.
McStas is based on a unique design where an automatic compilation process translates
high-level textual instrument descriptions into efficient ANSI-C code. This design makes it
simple to set up typical simulations and also gives essentially unlimited freedom to handle
more unusual cases.
This report constitutes the reference manual for McStas, and, together with the manual
for the McStas components, it contains full documentation of all aspects of the program. It
covers the various ways to compile and run simulations, a description of the meta-language
used to define simulations, and some example simulations performed with the program.
Descriptors
Neutron Instrumentation; Monte Carlo Simulation; Software
Available on request from:
Information Service Department, Risø National Laboratory
(Afdelingen for Informationsservice, Forskningscenter Risø)
P.O. Box 49, DK–4000 Roskilde, Denmark
Phone +45 4677 4004, Telefax +45 4677 4013