1
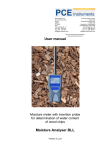
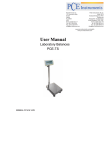
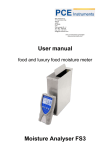
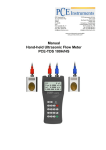
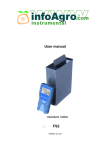
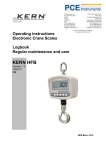
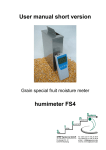
PCE Americas Inc. 711 Commerce Way Suite 8 Jupiter FL-33458 USA From outside US: +1 Tel: (561) 320-9162 Fax: (561) 320-9176 [email protected] PCE Instruments UK Ltd. Units 12/13 Southpoint Business Park Ensign way Hampshire / Southampton United Kingdom, SO31 4RF From outside UK: +44 Tel: (0) 2380 98703 0 Fax: (0) 2380 98703 9 [email protected] www.pce-instruments.com/english www.pce-instruments.com User manual Pellets moisture meter Moisture Analyser BP1 Version 2.1_en Design of the device Filling assistance Optional: PC Interface Measuring chamber Moisture content Name of calibration curve POWER Button Change the calibration curve wechseln Batteries slot (flipside) Page 2 version 2.1_en Measuring procedure 1. Place the empty provided cup (0.5 litre) on the scale and turn the scale on. It shows 0,0 gram. 2. Fill up the cup with 280g sample material. (+/- 1,0g) 3. Make sure that the measuring chamber is completely empty. It is important that no material is left in the measuring chamber when you turn on the device. 4. Switch on the moisture analyser BP1 by pressing the power button ( ) for 3 sec. 5. As the next step, please do the self calibration. The word “calibrate” will show up on your display. Accept by pressing the button. 6. Select the calibration curve „280g wood pellets“ using the buttons or . version 2.1_en Page 3 7. Fill up the measuring device with the sample pellets. The filling needs to be done slowly and constantly to ensure reproducible results. 8. The display shows the measuring result. 9. To save the results in the storage menu press the ( button). The storage was successful when the number in front of the symbol increased. To reach the storage menu please press ( ) until the appears. 10. To name the saved results press the button. 11. Empty the moisture analyser and ensure that no pellets rests are accumulated in the measuring chamber. Measuring range: If the measure value is blinking, the valid measuring range is exceeded (limits see list on page 5). In this case the accuracy will be decreasing. Page 4 version 2.1_en Calibration curves Name of calibration curve Fill quantity Measuring range 280g wood pellet 280g 3 up to 20% 250g spec.pell. 1 250g 3 up to 20% 250g spec.pell. 2 250g 3 up to 20% 250g spec.pell. 3 250g 3 up to 20% reference ------- ------- Explanation of the curves: 280g wood pellet: To analyze the moisture of Ø6 and Ø8 mm wood pellets with a maximum length of 30mm. According to norm CEN/TS 14961 If you do not want to measure wood pellets (or wood pellets with smaller bulk density), you have to determine the moisture according to CEN/TS 14774 once per sort and assign these to a sort calibration curve (special pellets 1 to 3). Fill up the BP1 and switch through all curves. The characteristic with the smallest deviation is the correct one for this sort of pellets! Filling quantity 250g Reference: To test the humimeter BP1. Do not use for measuring the moisture! List of calibration curves Press in the measuring window the or key for at least 3 seconds and a list with all available sorts will appear. Select your sort by pressing or and confirm it with the key. The measurement will continue automatically. version 2.1_en Page 5 Menu level overview Keypad symbols Measuring window: Rolling Menu Power ON / OFF Switch upper Switch lower Save Hold Watch the saved data Suppliers data can be added Type selection menu Next calibration curve Previous calibration curve Power off (3 sec.) Store menu Watch the saved data (logs) Save new value (log) Power off (3 sec.) Main menu Switch lower Switch upper Open this menu / Enter Overview main menu Edit Logs Manual Logs Clear Logs Print Logs Last Log All Logs Clear Logs Send Logs Manual Logs Clear Logs Options Options Date / Time Log Time Language Unlock °C / °F o Userlevel BL On Time Auto Off Time o Online Send o Online Print Password Reset Menu: Enter Switch upper Switch lower Exit Enter numbers Enter letters Next or right Left Yes No Shift OK Status Page 6 version 2.1_en Changing batteries Your new device is provided with batteries. Change of batteries: 1.) Press with your finger onto the arrow of the battery cap und pull it back. 2.) Remove the empty batteries 3.) Put four new batteries in the device. Make sure the position of the battery poles is correct. 4.) Press down the batteries and close the cap. If the battery symbol appears in the measuring window resp. if a critical charge of battery is shown in the status, the batteries have to be changed IMMEDIATELY. If you do not use your humimeter device for a longer period, remove the batteries. For eventual resulting damages we cannot provide any warranty. Determination of the material reference moisture The principle is a comparison measurement with the dehydration method according to CEN/TS 14774. Take the measured sample and weigh it. Dry it out in an oven and weigh it again. %F version 2.1_en Mn Mt 100 Mn Mn: Mass with average moisture content Mt : Mass of the dried sample %F: Calculated moisture content Page 7 Transfer saved data to the PC To send your saved logs to the PC, connect the humimeter device to your PC using the USB cable that was delivered with your device. Carefully loose the protection cap on your humimeter and plug in the USB mini B connector. The bigger connector has to be connected to a USB slot on your PC. Start the LogMemorizer software on your PC and switch on your humimeter. The data transfer can be started on your humimeter or on the software. Starting the data transfer on the humimeter: Press the key until you reach the menu (see image on the right). Then choose „Send Logs“ and confirm by pressing the key. Now choose „Manual Logs“ and confirm with again. All saved logs will be sent to your PC. Starting the data transfer on your PC: Press the button „remote control“ in the LogMemorizer software. A drop-down menu with several options opens (see image below). For transferring the data you can select „Import last manual log“ (the last saved measuring series is transferred) or „Import all manual logs“ (all saved logs are transferred). If you click on one of these menu items, the transfer starts immediately. For the basic adjustments of the software please look through the instructions on the LogMemorizer CD. Page 8 version 2.1_en Print saved data To print your saved data, connect the device to the printer using the printer cable that was delivered with your device. Carefully loose the protection cap on the humimeter. At first plug in the side of the connector with the close plastic casing at the humimeter. Then switch on the device. Not till then the other side of the cable has to be plugged in at the printer. Switch on the printer by pressing . Now the green LED is blinking. If it does not blink, please change the batteries and try again. Press the button at your humimeter until you reach the menu (see image on the right). Choose „Print Logs“ and confirm by pressing . Now you can select if you want to print the last saved measuring series or all saved measuring series (logs). Confirm by pressing again. The selected logs are printed out now. To save paper, please think of clearing the data storage regularly. Online Print and Online Send Your device supports the function “Online Print” and “Online Send”, this can be activated in the menu „Options“. If an option is active, every newly recorded log will immediately be printed or transferred to the PC after pressing key. version 2.1_en Page 9 Exemption from liability For miss-readings and wrong measurements and of this resulting damages we refuse any liability. This is a device for quick determination of moisture. The moisture depends on multiple conditions and multiple materials. Therefore we recommend a plausibility check of the measuring results. Each device includes a serial number and the guarantee stamp. If those are broken, no claims for guarantee can be made. In case of a faulty device, please send your device back to PCE or your dealer. Include a short description of the failure. Use a protected package for shipping. Activation of the “super user” function 2 times - Options – Unlock Enter the 4-digit password by using the button (standard is the 4-digit serial number) and confirm by pressing the button. Changing the Userlevel Changing from advanced user to single user: Make sure that you have activated the “super user” functions according to the instructions above. Afterwards change to the menu and choose „Options“. In the submenu please select „o Userlevel“ (2 times o Userlevel) Confirm by pressing the - Options – button. Now the single user is activated. Changing from single user to advanced user: Keep both the buttons and pressed directly after switching on the device. Your humimeter automatically starts the main menu. Activate the the “super user” functions according to the instructions above. Navigate to “Options – o Userlevel” and confirm by pressing the button. Page 10 version 2.1_en Technical data Resolution of the Display 0.1% moisture content 0.5°C temperature Measuring range 3 up to 20 % moisture content Operation temperature 0°C up to 40°C Storage temperature -20°C up to 60°C Temperature compensation Automatically Power supply 4 pcs. 1,5Volt AA Alkaline batteries (900 measurements) Automatically turn Off After 6 minutes Current consumption 55 mA (with light) Display 128 x 64 matrix display, lighted Dimensions 260 x 70 x 250 mm Weight app. 1,3 kg (with batteries) Degree of protection IP 40 Scope of supply BP1 incl. plastic case digital scale (max.500g, 0,1g) measuring cup 0,5 liter 4 x 1,5Volt AA Alkaline batteries Optionally accessories USB interface for PC transfer USB cable Software LogMemorizer portable thermo printer version 2.1_en Page 11 ! IMPORTANT ! please read Most common reasons for miss readings Product temperature out of application range Pellets below 0°C resp. above 40°C (32 to 104 °F) may cause faulty measurements. The storage of cold pellets in a warm storage area usually creates condensed water which may lead to major measuring errors. Not adjusted pellets Let your moisture analyser BP1 adjust to the surrounding temperature of the pellets for approx. half an hour. A very high temperature difference has a negative effect on the stability of the measurement results. Wrong calibration curve Before you measure your sample, doublecheck the correct selection of the calibration curve. Wrong filling quantity Fill in exactly 280 gram (± 1,0g) of wood pellets in the measuring chamber. Wet or mouldy material leads to wrong values!! Measuring frozen material leads to wrong values!! Device maintenance instructions To provide a long life of your device please do not expose it to strong mechanical loads or heat e.g. dropping it or direct sunlight exposure. Clean your device using a dry cloth. The measuring chamber needs to be cleaned with a dry and soft brush. Any kind of wet cleaning damages the device. The instrument is not rainproof. Keep it in dry areas. We recommend an interval ISO-conforming device check with the drying method. PCE Instruments also provides a test with a calibration certificate for a fee. Page 12 version 2.1_en