1
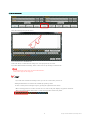
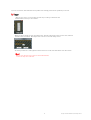
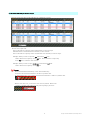
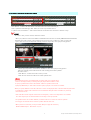
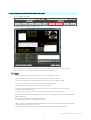
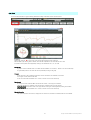
GPS Data & Video Synthetic Tool
User’s Manual
VER.2.0.7
1-Jan-15
Copyright© 2013 SPEC PLANNING Corporation All Rights Reserved.
Contents
1. Preface ..................................................................................................1
1.1 Features.........................................................................................1
2. Directions for software movements .................................................2
2.1 Basic flow of operation ...................................................................2
2.2 Chart ...............................................................................................12
2.3 Detailed settings ...........................................................................13
2.4 Wizard operation ...........................................................................14
2.5 Read-in and saving of setup files ...............................................14
2.6 LAP data print ...............................................................................14
3. FAQ ..........................................................................................................15
4. Applied software license and GPL license .......................................17
Copyright© 2011 SPEC PLANNING Corporation All Rights Reserved.
1. Preface
Thank you for the purchase of our “GPS Data & Video Synthetic Tool.” We are
certain that this software will support your motor sport life. Please read the
instructions before use.
1.1 Features
You can synthesize a driving data based on GPS data and a video from car-mounted camera.
You can make sure of a driving line, G’s work, the best lap and comparison with the best sector, in a video file.
and save them
You can record in a DVD and distribute. You can also share in a video sharing site and make use for better
driving of the next time.
1
Copyright© 2013 SPEC PLANNING Corporation All Rights Reserved.
2. Directions for software movements
2.1 Basic flow of operation
The operation flow of this software is as follows.
1. Select GPS data
2. Set control line
3. Select LAP data you want to output
4. Select a video of the car-mounted camera
5. Arrangement of synthesized information on the screen
6. Preview
7. Video output
【Note!】
As there is not a course in the case of gumkhana or rally, GPS track will be a course map automatically.
From the next page, each process will be explained.
We also offer the operation services by wizard. (Refer to “2.2 Wizard operation.”)
2
Copyright© 2013 SPEC PLANNING Corporation All Rights Reserved.
2.1.1 Select GPS data
Click “Browse...” button of the main screen of GPS data, and select GPS data you want
to synthesize. GPS data you can specify is either M&Scam+GPS.
POINT
・When selected only GPS data:
A course map to be synthesized on a video is an indicated driving track.
When specified a course data file, a course map can be indicated on a video.
【Note!】
When selected a course data file which does not match with GPS data, a driving
track or a course map might not be displayed adequately.
・When selected another GPS data for comparison:
Driving comparison can be made by choosing GPS data as for the sub screen.
【Note!】
When selected GPS data acquired in a different course, a control line cannot be
recognized well and GPS track may not be displayed properly.
・When you want to cancel the choice of GPS data and a course data:
Click “Clear” button in each file.
3
Copyright© 2013 SPEC PLANNING Corporation All Rights Reserved.
2.1.2 Set control line
Click “Line Setting” and open the screen.
Set a control line or a start/finish line.
Select each line by a radio button for setting a line, and specify directly on a track.
If you click “Read Control Line Setting” button, a line can be set by choosing a control line file.
【Note!】
If a control line file read-in does not match with GPS data,
a control line might not be displayed.
POINT
・If you click “Save Control Line Setting” button, you can save a control line you have set.
・Enlargement/reduction of a track is also available by operating a slider.
To move a track you have enlarged, drag it by pressing the right button of the mouse.
・When a starting position on a track is not clear in a case such as rally, tick “Display stop position” check box.
Then a stop position will be shown with “o”, and a starting position will be easily found.
4
Copyright© 2013 SPEC PLANNING Corporation All Rights Reserved.
If you set a sector line, time indication and a synthetic video starting position can be specified by sector unit.
POINT
・There are two ways to set a sector line; the same way as setting a control line/ start
line/finish line, and a way to set a distance.
・When you want to change an order of specified sector, click the right end of a sector line on a track, and click
“Reorder sector line” button. Then input a new order on a sector order change screen.
・To delete specified sector, click right the end of sector line on a track, and click “Delete sector line” button.
【Note!】
When a sector line file read- in does not match with GPS data,
a sector line may not be indicated.
5
Copyright© 2013 SPEC PLANNING Corporation All Rights Reserved.
2.1.3 Select LAP data you want to output
LAP data speed selected here and G indication are synthesized on a video.
Select output LAP you want to output.
How to select output LAP:
Select a check box of “output lap” of the head LAP data you want to output.
GPS data LAP are all selected after the LAP data you have selected.
Select a check box of “output lap” of the next LAP data to the last LAP you want to output.
Example) When you want to output the 4th LAP from the 2nd LAP:
Click a check box of “output lap” on the 2nd line. Click a check box of “output lap”
on the 5th line to cancel the choice selected.
Example) When you want to output all the lap on and after the 3rd LAP:
Click a check box of “output lap” on the 3rd line.
POINT
・When the head LAP is formation lap, select “with formation lap.”
In this case the first LAP is indicated as 0 LAP on a synthetic video.
If “with formation lap” is not selected, the first LAP is indicated as 1 LAP on a synthetic video.
・When a sector line is set, you can select sector to start synthesis. When sector
specified, a synthetic video will start at the point of passing by the sector.
6
Copyright© 2013 SPEC PLANNING Corporation All Rights Reserved.
2.1.4 Select a video of the car-mounted camera
Click “Browse...” button of the main frame on the main video, and select a video file you
want to synthesize with GPS logger data. When you want to wipe another video in
a synthetic video, click “Browse...” button of the sub-frame on the main video and select a video file to wipe.
POINT
・To cancel a video you have selected, click “Clear” button.
・When you synthesize a video with a different combination from the video recorded by M&Scam+GPS and GPS data,
GPS data and a video you have selected might not be lapped over well. In this case, click “set video” and
open a video set screen, and adjust LAP starting position to output and a video replay starting position.
・Operate play/stop button, rewind button, and slider to set a video replay starting position.
This video starting position will become the video starting position after synthesis.
・To reselect video:
Click “Browse...” button and reselect a video you want.
・Click “Preview” button to confirm in an actual synthetic video.
【Note!】
・If specified video Codec is not installed and you cannot replay it on a media player,
a video is not displayed and you cannot operate play/stop button and slider. Codec
to replay a specified video needs to be installed. Check if a specified video can be
replayed by Media Player. Some videos cannot be partly replayed, even if Codec is installed.
・When you specify ASF file as video file, and when a video is not displayed under a situation that adequate Codec
is installed,try to change video extension to asx. situation that adequate Codec is installed, try to change
video extension to asx.
・Some video files cannot recognize video frame rate adequately. In this case, 25fps will be set as default.
If a video output by the car-mounted camera is not 25fps, convert fps by hand.
・If a specified video’s size is under 320x240, you cannot select it as a video to be used for synthesis.
Use a bigger car-mounted camera video for synthesis than the above size.
・When you choose a video file, you may be asked, “Will you replay the contents by
Windows Media Player?” Then choose ” Y(yes.)”
7
Copyright© 2013 SPEC PLANNING Corporation All Rights Reserved.
2.1.5 Arrangement of synthesized information on the screen
Free arrangement is available.
Click “Layout Setting” button and open the screen.
You can change indicated positions by drag and drop of each information.
You can change the size of indicated information when you drag and drop the four corners of each information.
You can choose set or not of indicated information by checking boxes of indication set.
POINT
・Regarding speed meter, G indication, and lap time, three-step adjustment is available.
・When you watch synthetic images on TV, each information might be hidden at the edge
By storing each information inside the dotted line on the screen, it will not be hidden at the edge.
・If you tick “Fixed image scale,” optional images will not be enlarged or reduced.
Automatic enlargement/reduction of this tool will prevent fuzzy images.
・Information of indicated position will be preserved in the tool. If you click “Reflect Def”, information will be
rearranged at the indicated position.
If you click “Save As Def”, present information of indicated position will be preserved in the tool.
・If you select a video with low resolution after you have selected a video with high resolution, layout information
might be fallen apart.
If so, click “Init Setting” button to initialize the format.
Or, click “reflect regulation” to rearrange the information.
・When you want to set information of indicated position of a sub-video, you will be able to follow the main video.
Click “Fit in main” button, and you can take
over the information of the main video indicated position (except video title and optional images).
8
Copyright© 2013 SPEC PLANNING Corporation All Rights Reserved.
2.1.6 Preview
Click “Preview” button.
Output video is as follows:
Video Title
TRIP
G indication
Speed meter
Course map
Graph
Sector
Corner speed
Title Image
LAP Time
Sub-frame
(sub-camera)image
Speed meter:
It indicates instantaneous speed.
Speed meter design can be selected from set(T) – speed meter change.
Speed meter design can be added-on. Indicate “set in detail” screen from set(T) –
set in detail, and specify a folder with obtained meter add-on file. After specified,
select added-on design from set(T) – speed meter change.
G indication:
A vertical line shows acceleration and deceleration G, and horizontal line shows cornering G.
When accelerated, ● moves downwards, and when decelerated, it moves upwards. The more G is loaded,
the more it moves.moves downwards, and when decelerated, it moves upwards. The more G is loaded, the more it moves.
G display shows the afterimage, so you can make sure the transitions of acceleration, deceleration and cornering.
As you see the video above, it shows he is turning to the right, and G is loaded to the left.
G indication has two types; maximum 2 G indication and maximum 4 G indication. It can be selected from
set(T) – G indication meter change.
G indication design can be added-on. Indicate “set in detail” screen from set(T) – set in detail, and specify a folder with
obtained meter add-on file. After specified, select added-on design from set(T) –G indication.
Sub-frame (sub-camera) image:
It is indicated when you select a video by sub-frame.
The video can show in the left-right reversal display (mirror display.)
9
Copyright© 2013 SPEC PLANNING Corporation All Rights Reserved.
Course map:
If a course data file is selected, a course map will be shown like the images above.
If it is not, a driving track will be shown.
LAP time:
They show LAP time.
1st step shows LAP number and total time from 0 LAP as total LAP information.
2nd step shows the best LAP among the total LAP. It shows the best time and the LAP.
3rd step shows the time difference from the best LAP. It is displayed for three minutes after the LAP has finished.
4th step shows the present LAP number and time as current LAP information.
Video title:
If you input video titles, a few titles can be displayed on a screen.
Five titles are available at most.
Corner speed:
It shows corner speed.
When the speed difference of indicated threshold value of corner speed is detected, When the speed difference of indicated
threshold value of corner speed is detected, Indicated threshold value and indication time are available to set any value.
Indicate “set in detail” screen from set(T) – set in detail, and input indicated threshold value and indication time.
If indicated threshold value and indication time are not set, indicated threshold value of 40 km/h will be shown
as default for 5 minutes.
Graph:
The horizontal axis shows a distance and the vertical axis shows a speed in the graph.
The graph shows the current LAP as pink and the best lap as green for 1LAP.
When the LAP is switched, the graph is also changed.
In the case of 2GPS data display, the comparison LAP of 2GPS is shown in green.
The current traveling position is shown in ●, so you can make sure the difference with the comparison data.
Sector time Gap:
Sector time Gap:
Gap time for Best Lap Sector will be shown.
Title image:
It shows optional images. Enlargement or reduction of images is available.
TRIP indication:
A distance from the starting point will be shown in meters.
Two GPS data indication:
If you specify two GPS data and each video, two synthetic videos can be shown side by side.
10
Copyright© 2013 SPEC PLANNING Corporation All Rights Reserved.
2.1.7 Video output
In case of output video file, press "Output Movie" button.
Specify an output folder, put an optional name and press OK button.
Make sure of the icon below on the taskbar, and wait until it goes out.
It may take a long time depending on the size of video.
11
Copyright© 2013 SPEC PLANNING Corporation All Rights Reserved.
2.2 Chart
It can be confirmed without a graph indicating GPS data and doing composition with the animate cartoon.
The output LAP of LAP which it wants to indicate is chosen, and it clicks on グラフ表示 button, and a 【 graph indication 】 screen is opened.
The state of running can be confirmed by clicking.
Speed graph, G sensor, ● in each screen of the running path A position can be confirmed.
Data are piled up by choosing LAP to indicate, and it can be compared from the sub-side time list as well.
An animate cartoon speed can be adjusted by clicking on the radio button of /2, x1, x2, x4, x8.
Speed graph
A graph for 1LAP is indicated. It can cut it down with Scroll Button of a + button, a -button or the mouse extensively.
A regenerated position on the main side can be specified by clicking on the graph.
G sensor
In the same way as the G indication of Preview, G of the acceleration, the slowdown, vertical axis.
Cornering G is shown with the side shaft.
It can cut it down with Scroll Button of a '+ button, a -button or the mouse extensively.
Running path
A running line can be confirmed. When course data are chosen, a course figure is indicated.
I have the indication/non-indication of the course figure changed by clicking on the C button.
The position of the course figure and the running line can be adjusted by clicking on the button.
It can cut it down with Scroll Button of a '+ button, a -button or the mouse extensively.
Running information
The speed of a position to confirm it, mileage from the control line, LAP that it is indicated, LAP time are indicated.
12
Copyright© 2013 SPEC PLANNING Corporation All Rights Reserved.
2.3 Set in detail
Tool setting is available on “set in detail” screen.
You will reach “set in detail” screen from “set”(T) – “set in detail.
Corner Speed Settings:
Click “Preview” button or “Output Movie” button, and you can set indicated threshold
value and indicated time of the corner speed shown on a video.
Sector Time Setting:
Click “Preview” button or “Output Movie” button, and you can set indicated time of
sector time shown on a video.
Movie Timing Setting:
Click “Preview” button or “Output Movie” button, and you can set a starting position and a finishing position
of video indication. Then you can replay a video before and after the specified LAP data.
Meter add-on Folder:
Click “Preview” button or “Output Movie” button, and you can set the indicated speed
meter shown on a video, and an add-on file of G indication design.
Temporary folder:
If you use a Japanese user’s name, you will have some trouble in operation of this tool.
In this case, you can escape from an error by specifying a folder without folder.multibyte character as a temporary
Or, if you do not use a Japanese user’s name and you still fail to produce a preview and a video, you can also
escape from an error by specifying a temporary folder.
13
Copyright© 2013 SPEC PLANNING Corporation All Rights Reserved.
2.4 Wizard operation
If you follow the wizard, you can make a setting along with
“2.1 Basic flow of operation.”
Click “Start Wizard” button.
2.5 Read-in and saving of setup files
You might want to adjust the setup contents later. If you want,
you can save the information used to synthesize to “Setting file.” And then you will read in “Setting file” if necessary.
After setting each item, click “Save Setting File” button.
When you click “Read Setting file” button, the setup file you have stored will be shown on the main
window and you can read it.
2.6 LAP data print
You can print all the lap data indicated on a list.
Click “file”, and then “Print LAP List”
14
Copyright© 2013 SPEC PLANNING Corporation All Rights Reserved.
3. FAQ
◆General
Q: Can I operate another GPS logger except M&Scam+GPS?
A: No, you cannot.
Q: Is it possible to use another computer except Windows?
A: We are afraid to say, but only Windows can do at present.
Q: What level of specification is required?
A: Even any computer with not so high specs can operate, but replay quality might go down.
◆Select GPS logger data / Course data
Q: I want to cancel(change) the GPS logger data I have selected.
A: Click “clear” button next to “reference” button on the GPS logger data, and cancel a course data.
Q: I want to change the course data I have selected.
A: Click “reference” button, and select the right file again.
Q: I want to cancel the course data I have selected.
A: Click “clear” button next to “reference” button on the course data, and cancel the course data.
◆Set Control line
Q: GPS driving line is not displayed properly.
A: GPS logger data got in a different course might be intermingled. If you specify some GPS logger data,
pay attention not mix GPS logger data got different courses.
Q: GPS driving line and course map are not well displayed.
A: You might specify a course data which does not match with GPS logger data.
Select a right course data.
Q: I cannot save the control line and the sector line that I have set.
A: Under the environment after Windows Vista, an access to the installed folder (folder under Program Files) is
limited. Try to save them in other folder. (If you really want to save them in the installed
in other folder, and then copy the saved file to the installed folder by Explorer and so on.)
folder, first save them
15
Copyright© 2013 SPEC PLANNING Corporation All Rights Reserved.
◆Select output LAP
Q: When I want to output LAP with no sequence on GPS course line, the GPS course line and course map
are not well displayed.
A: You can output only a sequence of LAP.
◆Select a video of the car-mounted camera
Q: After I have selected a video, images cannot be displayed.
A: Proper Codec suitable for the selected video has not been installed.
Install Codec.
Some videos cannot be partly displayed, even though Codec is installed.
Under Windows 8, Media Center Pack needs to be installed.
Q: After I have selected a video, images without frame rate are not displayed.
A: Some videos take time until frame rate and replay positions are indicated.
Or, if you reselect a video file, they might be well displayed.
◆About output images
Q: A video and information from GPS logger data are out of synch.
A: Most adjustment is automatically done based on a date in GPS logger data and a time stamp from a video file.
But subtle adjustment is should be done by hand.
Q: A video and information from GPS logger data are moving over a little.
A: Frame rate of selected video might be wrong. Especially when you specify asf file, default 25fps will be set,
without getting frame rate.
Make sure of a video frame rate output by your car-mounted camera, and right frame rate.
Q: Indicated movement differs from actual images.
A: Indicated information is based on calculated figure from the information recorded by GPS logger, therefore,
it is not correct. And, incorrect figure sometimes might get in depending on poor radio wave reception.
Q: When two videos are displayed, sound is cut off on a preview.
A: It may happen, depending on your computer’s specification.
*Sound is never cut off on a video output “video output.”
Q: LAP time 1/1000 second remains 0.
A: Indicated information is based on calculated figure from the information recorded by GPS logger, therefore,
it is not correct. Indicated LAP time resolution capacity differs depending on selected video frame rate
and GPS logger rate.
Q: A message “a temporary file has failed to output” is shown.
A: A temporary file to synthesize a video somehow cannot output once in a while. In this case, make an
optional folder. Then indicate “set in detail” screen from set(T) – set in detail, and specify the new folder you
have made in a temporary folder.
16
Copyright© 2013 SPEC PLANNING Corporation All Rights Reserved.
4. Applied software license and GPL license
The products use the following software. A part of the product links with the
software approved by GNU General Public License Version 2, its source code is
free software. Customers are allowed to redistribute or change these source
codes under the conditions of GNU General Public License Version 2 provided
by Free Software Foundation.
We think that these source codes are useful, but regarding distribution there is
no guarantee, including tacit guarantee on marketability and compatibility for
particular purpose. For more detailed information, refer to GNU General Public
License.
If you want source codes, make a contact through the inquiry form of our
website. You are supposed to cover distributing costs.
◆NOTE◆These source codes are out of our support services. We cannot
answer any questions. Thank you.
The products use the following software.
The products without ※ are under GPL license. The products with ※ are free ware.
Name of products
Date of release or version
VirtualDub
v1.9.11
Avisynth
V258
Media Player Classic Home Cinema
v1.5.0.2827
x264vfw
2013/03/18
ffdshow
v1.2.4422
※Haali Media Splitter
2011/3/3
※Win7DSFilterTweaker
v4.1
※Haali Media Splitter license clause
Copyright (c) 2004-2009 Mike Matsnev. All Rights Reserved.
Redistribution and use in binary form, without modification, is permitted provided that the following
conditions are met:
1. Redistributions in binary form must reproduce the above copyright notice, this list of conditions and the
following disclaimer in the documentation and/or other materials provided with the distribution.
2. Absolutely no warranty of function or purpose is made by the author Mike Matsnev.
THIS SOFTWARE IS PROVIDED BY THE AUTHOR ``AS IS'' AND ANY EXPRESS OR IMPLIED
WARRANTIES, INCLUDING, BUT NOT LIMITED TO, THE IMPLIED WARRANTIES OF MERCHANTABILITY
AND FITNESS FOR A PARTICULAR PURPOSE ARE DISCLAIMED. IN NO EVENT SHALL THE AUTHOR
BE LIABLE FOR ANY DIRECT, INDIRECT, INCIDENTAL, SPECIAL, EXEMPLARY, OR CONSEQUENTIAL
DAMAGES (INCLUDING, BUT NOT LIMITED TO, PROCUREMENT OF SUBSTITUTE GOODS OR
SERVICES; LOSS OF USE, DATA, OR PROFITS; OR BUSINESS INTERRUPTION) HOWEVER CAUSED
AND ON ANY THEORY OF LIABILITY, WHETHER IN CONTRACT, STRICT LIABILITY, OR TORT
17
Copyright© 2013 SPEC PLANNING Corporation All Rights Reserved.