1
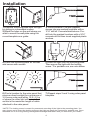
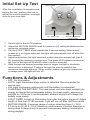
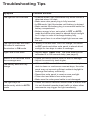
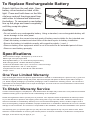
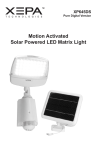
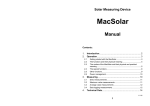
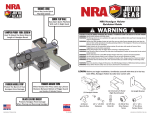
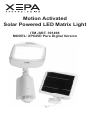
Motion Activated
Solar Powered LED Matrix Light
ITM./ART. 391498
MODEL: XP645D Pure Digital Version
Please do not return this item to the store.
For service or questions about your solar light, call our
customer service at (866) 427-3946. (8am-8pm daily, Pacific time)
Important Safety Information
• Never look directly into the light or shine in another person’s eyes.
• Do not expose the light to fire or intense heat.
• Do not dispose of battery in fire.
• Do not immerse in water.
• Do not dispose the rechargeable battery in a regular waste system,
waterway, stream or any other body of water.
• Preserve the environment by disposing battery in accordance with local,
state and federal regulations
• Consult your local construction safety guidelines for installing the light
fixture on a building.
• Use Xepa Technologies rechargeable batteries only.
FCC Part 15 Class B
CAUTION: Modifications are not approved by the party responsible for
compliance could void user’s authority to operate the equipment.
NOTE: This equipment has been tested and found to comply with the limits
for Class B digital device, pursuant to part 15 of the FCC Rules. These limits
are designed to provide reasonable protection against harmful interference
in a residential installation. This equipment generates, uses and can radiate
radio frequency energy and, if not installed and used in accordance with the
instructions, may cause harmful interference to radio or television reception,
which can be determined by turning the equipment off and on, the user is
encouraged to try to correct the interference by one or more of the following
measures:
•
Reorient or relocate the receiving antenna.
•
Increase the separation between the equipment and the receiver.
•
Connect the equipment into an outlet on a circuit different from that to
which the receiver is connected.
•
Consult the dealer or an experienced radio/TV technician for help.
2
Introduction
Thank you for purchasing the XP645D security light. With its easy setup and
lightweight design, the XP645D conforms to most of your lighting needs.
Using next generation pure digital technology, it provides up to 14 hours of
continuous light when switched to the ON mode. A full charge will require 2-3
days of direct sun exposure.* While in AUTO mode (normal operation setting)
the light illuminates when it is dark and motion is detected. Intelligent motion
detection protects areas around your home, business or recreation areas with
a coverage area of 15 - 60 ft / 4.5 - 18 m at 180 degrees!
For portable use, simply disconnect the solar panel cable from the light.
*NOTE: Charging time results may vary depending upon weather conditions,
season and your geographic location.
What’s Inside the Package
• LED matrix solar light with rechargeable
lithium polymer battery
• Solar charging panel with 15 ft / 4.5 m
cable
• User manual
• Screws and wall anchors
(8 sets)
• Locking screw (1)
• Quick Installation /
Mounting Template
Installation Recommendations
• The XP645D light fixture should be installed on a flat and stable surface.
The higher the installation the larger the area of illumination.
• Avoid positioning the motion sensor head towards street traffic or where
other movements may trigger the light needlessly and therefore drain the
battery prematurely.
• Avoid installing near an air conditioner, heater or high voltage system as
quick changes in temperature may cause the motion detection system to
produce false triggers and illuminate the light needlessly
• The solar panel should be installed in a sunny area facing the sky where
direct sunlight can shine on the panel for at least 3-5 hours per day.
3
Installation
1) Remove mounting plate from the light
by sliding in a downward motion.
2) Mark the holes on the wall where you
wish to mount the wall plate using the
mount template as a guide.
3) Wood surfaces: Pre-drill supplied
screws into pre-marked locations with a
1/16” drill bit. Concrete/brick/stucco: Predrill into the marked locations with a 3/16”
concrete drill bit then insert supplied plastic
anchors.
4) Place the mounting plate on the wall
and secure with screws.
5) Slide the light onto the mounting plate.
Then secure the light with the locking
screw. *For portable use, see note below.
6) Find a location for the solar panel that
receives direct sunlight for a minimum of
3-5 hours a day and within 15 ft / 4.5 m
of where the solar light will be installed
as this is the maximum length of cable
attached to the solar panel.
7) Repeat steps 2 and 3 using solar panel
template.
*NOTE: The locking screw is meant for permanent mounting of the light to the mounting plate. You
may choose not to insert the locking screw so the light can easily be removed for portable use. Once
detached use it as a long-lasting rechargeable flashlight and take it with you whenever you need it.
4
Installation (Cont’d)
8) Place the solar panel on the wall and
secure with screws.
9) Tilt the solar panel towards the sun
and wrap the excess cable using the
cable-tie behind the panel.
10) Completely insert the cable plug from
the solar panel into the INPUT located at
the bottom of the light.
11) Adjust the motion detection sensor
towards the desired coverage area.
5
Initial Set Up Test
LIGHT TIMER
MOTION RANGE
After the installation is complete and
before first use, perform this test to
adjust the motion detection coverage
area for your new light.
OFF AUTO ON
SOLAR CHARGING
PANEL INPUT
1. Switch light to the AUTO position.
2. Adjust the MOTION RANGE knob to maximum (H) setting to determine the
maximum coverage range.
3. Set the LIGHT TIMER knob towards the 5 second setting (After motion
ceases or is no longer detected, the light will automatically turn off after this
time period).
4. Adjust and position the light head and motion detection sensor ball (pan &
tilt) towards the desired coverage area. The green LED indicator located on
the front of the light will illuminate when motion is detected.
5. Walk through the desired coverage area to trigger the light to illuminate
when motion is detected. Continue through the area to establish the
maximum coverage distance. When motion ceases or you are outside the
coverage area, the light will turn off.
Functions & Adjustments
• OFF: No illumination.
• AUTO: Light illuminates when motion is detected. Recommended for
normal use.
• ON: Light illuminates continuously until the battery is exhausted.
• CHARGING THE BATTERY: The solar panel converts direct sunlight into
energy to charge the rechargeable battery. For best results, exposure to
sunlight for 3-5 hours is recommended; ambient daylight will charge the
battery more slowly.
• LIGHT TIMER: Length of illumination time after the light is triggered. Adjust
length of time from 5-180 seconds. Light will turn off after this time period.
• MOTION RANGE: Coverage range of motion detection from (L) 15 ft /
4.5 m up to (H) 60 ft / 18 m. Maximum performance of motion detection is
during dusk to dawn hours to prevent unnecessary battery consumption
during daylight.
6
Troubleshooting Tips
Symptom
Possible Solution
The light will not illuminate
•In AUTO mode, light illuminates only when motion is
detected when it is dark.
•Make sure solar panel plug is fully inserted.
•In ON mode, light illuminates until battery is drained.
•Make certain the battery plug is connected inside the
battery compartment.
•Battery energy is low; set switch to OFF or AUTO
mode and allow solar panel to absorb direct sunlight
for 2+ days in order to recharge battery fully.
•Make sure there is no other bright light source near
the unit.
The light provides less than
14 hours of continuous
illumination in ON mode
• Battery is at less than 100% full charge; set switch
to OFF mode and allow solar panel to absorb direct
sunlight for two days in order to recharge.
LightTimer is too short
•Adjust LIGHT TIMER knob. The knob allows for an
estimated 5 to 180 second delay (see page 6).
Motion is not detected within
the coverage area
•Check the motion sensor lens for dust or damage.
•Adjust the sensitivity knob higher.
The battery does not fully
charge
•While in AUTO mode, if there is frequent activity from
dusk to dawn or continuous overcast days, the solar
panel may not convert sufficient ambient daylight to
recharge the battery sufficiently.
•Reposition solar panel to receive more sunlight.
•Clean dust and debris from solar panel.
•Make sure the solar panel cable is not damaged.
The light stays on
continuously while in AUTO
mode
•Check the motion detector sensor head to ensure that
it is not directed towards street traffic or where other
movements may trigger the light needlessly.
7
To Replace Rechargeable Battery
Detach light from the wall plate. Open
battery cover located on back of the
light. Press and hold down on the little
clip lever and pull the plugs apart from
each other to release and disconnect
the battery. To reconnect a new battery,
line up the plugs and insert completely
until they snap into place.
CAUTION:
•Do not install a non-rechargeable battery. Using a standard, non-rechargeable battery will
cause damage to the solar panel.
•Always purchase the correct size and grade of battery most suitable for the intended use.
•Clean the battery contacts and also those of the device prior to battery installation.
•Ensure the battery is installed correctly with regard to polarity (+ and -).
•Remove battery from equipment which is not to be used for an extended period of time.
•Remove used battery promptly.
Specifications
Motion Detection Range: 180 degrees; up to 60 ft /18 m
Matrix Light: 45 super bright LEDs
Rechargeable Battery: 7.4V 1.5Ah lithium-polymer battery
Solar Charging Panel: 10VDC/2.5W Monocrystalline
Continuous Illumination Time: Up to 14 hours on a 100% full charge
Operation Temperature: -25F to +125F degrees
Complies with FCC Part 15 Class B and ICES-003:2004
Weight: 1.3 lbs.
One Year Limited Warranty
Xepa Technologies warrants this product against defects in material or workmanship for a period of one (1) year from
the date of original purchase. During this period, Xepa Technologies will replace a defective part without charge to
you. Retain original packaging or provide like packaging in order to facilitate the warranty process. The consumer is
responsible for the transportation cost to Xepa Technologies. You must receive a return authorization number before
sending a unit in for service.
To Obtain Warranty Service
Contact Customer Support, call (866) 427- 3946 between 8am and 8pm daily, Pacific time. Have pertinent information
available including proof of purchase and an understanding of the complaint.
Retain the original bill of sale to provide proof of purchase. Your shipment will be accepted after an RA# is provided
to you and attached or printed to the shipping carton along with a copy of the bill of sale. Warranties extend only to
defects in materials or workmanship. Warranty is not covered when damaged by misuse, accident, neglect, acts of
God, such as lightning, improper installation, improper maintenance or modification. Warranties do not cover cosmetic
damage or lost accessories. The consumer is responsible for the installation, removal and reinstallation of the product.
This warranty gives you specific rights and you may also have these rights that may vary from state to state. Some
states do not allow limitation on how long the warranty lasts or exclusions or limitation of incidental or consequential
damages, so the above may not apply to you.
8