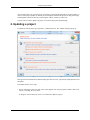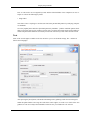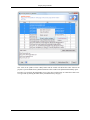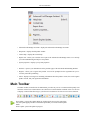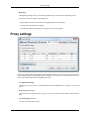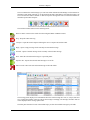
1
Advanced Link Manager User Guide
Advanced Link Manager User Guide
Copyright © 2005 - 2012 Caphyon Ltd. All Rights Reserved.
While every precaution has been taken in the preparation of this document, Caphyon Ltd. assumes no responsibility for errors or omissions, or for
damages resulting from the use of the information contained herein.
Table of Contents
1. Introduction ............................................................................................................ 1
Frequently Asked Questions .................................................................................................. 1
2. Step-by-Step Tutorials .............................................................................................. 2
Getting Started ................................................................................................................... 2
Basic Tutorial ..................................................................................................................... 6
Advanced Tutorial ............................................................................................................... 8
Find new link partners ........................................................................................................ 14
Find new link partners by backlinks ...................................................................................... 24
3. The User Interface ................................................................................................. 29
Main Menu ...................................................................................................................... 29
Main Toolbar ................................................................................................................... 38
Left-Side Panels ................................................................................................................ 39
Quick actions panel ........................................................................................................... 40
4. Managing Projects ................................................................................................. 46
Project Manager ................................................................................................................ 46
Project Details .................................................................................................................. 46
Reports ........................................................................................................................... 46
Scheduled Tasks ............................................................................................................... 46
Events ............................................................................................................................. 46
Backups .......................................................................................................................... 46
Creating a New Project ...................................................................................................... 46
Project Settings ................................................................................................................. 47
Renaming a Project ........................................................................................................... 47
Deleting a Project .............................................................................................................. 47
Duplicating a Project ......................................................................................................... 47
Backup ........................................................................................................................... 47
Restore ........................................................................................................................... 48
Remove data .................................................................................................................... 49
Address Book ................................................................................................................... 49
FTP Profiles ..................................................................................................................... 50
5. Updating Projects .................................................................................................. 52
Updating a Project ............................................................................................................. 52
Gather links from Search Engines ........................................................................................ 52
Gather only number of links from Search Engines ................................................................... 53
Gather indexed pages from Search Engines ............................................................................ 54
Import links from file ......................................................................................................... 54
Verify Link Status ............................................................................................................. 54
Gather rank ...................................................................................................................... 55
Update reciprocal links ....................................................................................................... 55
Verify Link Status (Forced) ................................................................................................. 55
Update Multiple Projects .................................................................................................... 55
Manually add referrers ....................................................................................................... 56
The Update Progress Tab .................................................................................................... 57
Current Updates ................................................................................................................ 59
Current Multiple Updates ................................................................................................... 59
History ............................................................................................................................ 59
Find link partners .............................................................................................................. 61
Search Engine and Keywords .............................................................................................. 61
Refining the results ............................................................................................................ 62
Find link partners by backlinks ............................................................................................ 65
Search Engine and Keywords .............................................................................................. 65
Refining the results ............................................................................................................ 65
Competitive Analysis ......................................................................................................... 66
iv
Advanced Link Manager User Guide
6. Project Settings ..................................................................................................... 68
Managing Domains ........................................................................................................... 68
Selecting Search Engines .................................................................................................... 72
Keywords ........................................................................................................................ 73
Preferences ...................................................................................................................... 74
Proxy settings ................................................................................................................... 77
Email Settings .................................................................................................................. 78
Client emails .................................................................................................................... 80
7. Scheduler ............................................................................................................. 82
The scheduler wizard ......................................................................................................... 82
Scheduling a project update ................................................................................................. 82
Scheduling report generation ............................................................................................... 84
Scheduling backups ........................................................................................................... 84
View Scheduled Tasks ....................................................................................................... 84
8. Interactive Reports ................................................................................................. 87
Domain Information .......................................................................................................... 87
Domain Details ................................................................................................................. 90
Email Composer ............................................................................................................... 91
Message History ............................................................................................................... 92
Reciprocal Details ............................................................................................................. 92
Unverified Referrers .......................................................................................................... 92
Referrers ......................................................................................................................... 97
Backlinks Evolution ........................................................................................................ 104
Search Engine Evolution .................................................................................................. 108
Link Text ...................................................................................................................... 113
The Keyword Analysis Tool .............................................................................................. 116
Compare View ............................................................................................................... 117
Overview View .............................................................................................................. 119
The Email Client ............................................................................................................. 119
The Broken Links report ................................................................................................... 121
The Indexed Pages report .................................................................................................. 122
Reciprocal linking ........................................................................................................... 123
9. Printable Reports ................................................................................................. 124
Input ............................................................................................................................. 125
Output .......................................................................................................................... 125
Destination .................................................................................................................... 128
Summary ....................................................................................................................... 130
10. The Event Logger .............................................................................................. 132
The Event Logger ........................................................................................................... 132
Detailed Event Information ............................................................................................... 133
11. Generate Link Pages ........................................................................................... 135
Link Page HTML Layout .................................................................................................. 136
Link Categories .............................................................................................................. 138
12. User Profiles and Access Groups ........................................................................... 139
User Profiles .................................................................................................................. 139
Access groups ................................................................................................................ 139
13. Header and Footer .............................................................................................. 140
The Header .................................................................................................................... 140
The Footer ..................................................................................................................... 141
14. Global Preferences ............................................................................................. 143
Application .................................................................................................................... 143
Email Settings ................................................................................................................ 146
FTP settings ................................................................................................................... 149
Performance ................................................................................................................... 150
Proxy Settings ................................................................................................................ 154
Report preferences .......................................................................................................... 155
Keyword Analysis ........................................................................................................... 156
15. Proxy servers manager ........................................................................................ 159
v
Advanced Link Manager User Guide
Proxy servers manager .....................................................................................................
16. Website Crawler ................................................................................................
Website Crawler .............................................................................................................
17. Google Maps Webpages Importer .........................................................................
Google Maps Webpages Importer ......................................................................................
18. Webpage Analyzer .............................................................................................
Webpage Analyzer ..........................................................................................................
19. Notes ...............................................................................................................
Notes ............................................................................................................................
20. Search Engines Additional Parameters ...................................................................
Search Engines Additional Parameters ................................................................................
21. Analyze Domain Quality .....................................................................................
Analyze Domain Quality ..................................................................................................
22. Referrer Categories ............................................................................................
Referrer Categories .........................................................................................................
Referrer Subcategories .....................................................................................................
23. Install Server Edition Guide .................................................................................
Windows .......................................................................................................................
Mac OS X .....................................................................................................................
Linux ............................................................................................................................
Red Hat Distributions ......................................................................................................
Debian Distributions ........................................................................................................
Server Configuration .......................................................................................................
Connect Advanced Link Manager client to server ..................................................................
vi
159
160
160
162
162
164
164
166
166
167
167
168
168
169
169
171
173
173
173
173
173
174
175
177
Chapter 1. Introduction
Welcome to the Advanced Link Manager User Manual. This chapter provides an overview of the features and benefits of Advanced Link Manager as well as the organization of this book.
Advanced Link Manager is a tool that will help you check your web site link popularity on all major
search engines. It saves you long hours of tedious work, while tracking down web pages linking to your
site. Advanced Link Manager generates tabular and graphical reports that will help you to quickly check
where you stand in terms of link popularity in comparison to your competitors as well as other major online players.
Advanced Link Manager is the tool of choice for SEOs, webmasters and site owners that demand highquality reports measuring the volume and quality of web pages linking to them.
Frequently Asked Questions
We have compiled a list of Frequently Asked Questions on our website:
http://www.advancedlinkmanager.com/faqs.html
If you encounter a problem with Advanced Link Manager it is recommended that you first consult this
list before adding a ticket on our support center:
http://www.advancedlinkmanager.com/support-center.html
1
Chapter 2. Step-by-Step Tutorials
When launching Advanced Link Manager for the first time, its features, settings and capabilities may
seem a little overwhelming. That is why we have created this tutorial, an intuitive, concise but, nevertheless, comprehensive manual which is intended to ease you in, to help you quickly get started on monitoring web pages that link to you in one or multiple search engines, according to your preferences. As a
user, you will be given a wide range of possibilities, as Advanced Link Manager can easily be adjusted
to your particular needs, without its precision and transparency being affected.
The tutorial requires some interaction between you and the application. However, this may not be always possible at the same time you are reading the tutorial. You can either switch between the Help tab
and the application, or you can download the PDF version of this user guide and follow it from there.
You can also print the page you are interested in from the PDF document. Please visit our website
download page for the PDF version of this manual:
http://www.advancedlinkmanager.com/user-guide/pdf/en/alm_en.pdf
Getting Started
1. Creating a New Project
Creating a new Advanced Link Manager project involves having a clear image of its utility and functionality on the part of the user. Therefore, you first need to know the exact domain of the website you
are interested in. As an example, we have chosen for this tutorial the news service field as the starting
point.
Go to [Project] -> [New Project] and the "New Project Wizard" dialog will pop up displaying the "Domain Setup" screen. Here we'll type in "www.bbc.com" as being "our" site (which we'll refer to here as
target domain). It is its link popularity we want to monitor.
2
Step-by-Step Tutorials
Click the [Next >>] button to proceed to the last screen in "New Project Wizard", then click on the
[Finish] button to complete "New Project Wizard" and load the project in Advanced Link Manager.
Next, the application prompts with a dialog, asking to enter the name of the project. The default project
name is the domain of the website, but it can be manually changed.
3
Step-by-Step Tutorials
After clicking [OK], our project has been successfully created and the application will ask whether we
want to start a project update. By default, the search engines added to the project are Bing and Google,
and the update will run for these two search engines, and our website www.bbc.com.
The next time we want to update our project we need to bring up the "Update dialog".
2. Updating a project
To update the current project go to [Update] -> [Start] menu item. The "Update" dialog will pop up.
We'll get into more details about what this dialog does later. For now, just click the [Start] button to start
the update.
The update consists of two steps:
• First it will look for pages (in each of the search engines from our project) that contain a link to our
website, excluding our own website.
A "Progress" tab will show up, where we can follow the update's progress.
4
Step-by-Step Tutorials
• Next it will check whether the web pages found are actually linking to our website. Once the update is
complete you will be able to see all the information gathered in the Interactive Reports. We will discuss more about the reports in the next tutorial.
3. Monitoring our competition
Now let's say we also want to monitor some of our competitors. Let's go to [Project] -> [Project Settings]. The Project Settings dialog will pop up with the Domains tab selected by default. Let's add two
more websites to the list: "www.cnn.com" and "news.google.com". What we need to do is simply write
the domain names and click [Add].
Click on the [OK] button to save the new changes. We have just added the competition's domains in our
5
Step-by-Step Tutorials
project, but there is currently no data gathered for these new domains. So we need to update the project
using the "Start update" icon from the toolbar. This second update will only update the data for the two
new domains we just added. When the update is complete, we can monitor the referrers of both our site
and our competitors' sites on the chart views and reports.
Next, check out the Basic Reporting tutorial to learn how to read the data from the reports.
Basic Tutorial
1. Checking the quality of our referrers
Almost all major search engines that exist today, rank a web page based on the number and the quality
of links that point to that web page. The quality of the links directly affects the position of our website
for relevant keyword searches. It is thus very important to keep track of the quality links we already
have while trying to get more quality links in the meantime.
The Unverified Referrers report gives us a comprehensive view of our referrers as they are reported by
the search engines.
It is very important to understand that the referrers listed in this report may not have a link to our website. The referrers displayed here are reported by the search engines to have a link to our website. The
search engines crawled the page at some point in time and found a link to our website, but that link may
have since been removed or more links may have been added meanwhile. That is the reason why they
are called Unverified Referrers. In the next tutorial, we will talk about the Referrers report, which will
provide us with accurate information about our existing links.
The Unverified Referrers report allows you to sort the referrers which will make identifying them an
easy task:
• Sort referrers by importance.
Using the "Rank" column we can sort the referrers by their rank. We can now easily see the most important referrers. Referrers with high rankings will cast a more powerful "vote" to our pages increas6
Step-by-Step Tutorials
ing their relevance in search engine results.
Click on the "Rank" column header to sort referrers by their Rank.
• Sort referrers by IP.
Click on the "IP Address" table column header to sort referrers by their IP address. You now can easily see the referrer domains with the same IP address. This is a valuable indicator of the quality of
your referrers. If one of your pages is linked from multiple websites or webpages with the same IP address, it will not rank as well as if it were linked from multiple IP addresses.
2. Filtering referrers
Sometimes the number of web pages reported by the search engines as linking to your website can be
overwhelming. Filtering these web pages using a certain criteria will help in most cases. Here are some
of the filters that can help you with this task:
• Filter referrers by rank.
Using the "Rank filter" we can filter out the referrers that have a lower rank. We can thus limit
ourselves to monitoring only the important referrers.
If you are not interested in monitoring referrers that have a low rank, you can safely delete them. Just
filter them by rank below 3 (for example) and then right click on the report and choose [Remove] ->
[Selected].
• Filter invalid referrers.
The referrer information in the search engines can sometimes be outdated. As a result, we will have a
lot of referrers that are invalid (the referrer web page no longer exists). The "NotFound" filter from
the Display drop down will help us with this task. Once we select this filter, we are presented with the
list of invalid referrers. If you see a website that is supposed to be linking to yours in this list, you
may want to get in touch with the webmaster and tell him about that. Otherwise we can safely delete
these referrers, to unclutter the list.
• Filter referrers by domain.
Let's say you want to see only the links linking to you from a certain referrer domain.
It's pretty easy, just:
• 1) select your website's domain in the left panel,
• 2) choose the "Domains" value in the "Filter by:" list box,
• 3) type in the domain of your choice in the "Filter by:" text box.
Now you can see all web pages with matching domain names that were reported as linking to your
web site.
Next, check out the Referrers Tutorial to learn how you can manage the real referrers of your website.
7
Step-by-Step Tutorials
Advanced Tutorial
This tutorial will guide you through some more advanced features of Advanced Link Manager and will
explain in more detail the ones you've been introduced to so far in the Basic Reporting tutorial.
The Referrers Report
The Referrers Report is a tabular report that displays the web pages that actually point to your target domain along with a lot of related useful information.
The quality of both your referrers and the links pointing to your website (which are also known as backlinks) are powerful factors that affect the position of your website for relevant keyword searches. The
Referrers report will show you a comprehensive view of your backlinks and how their importance is
ranked in the search engines.
Note
The information contained in this report will only be available after the second step of the update has been
completed. This step is the one that checks whether your referrers are actually linking back.
The Referrers report is tied to a date: the date when the update was made. Thus the report will display
(for each selected domain) the backlinks information for the date when the update took place.
When an update is currently running, you can still access the old data by going back to a previous date.
The "Date" drop-down list box in the top right corner of the Referrers report allows you to select the
date for which the information is displayed:
8
Step-by-Step Tutorials
The first drop-down selects the date you wish to compare to, referred to from now on as the previous
date. The second drop-down selects the current date that the information is displayed for.
1. Checking the quality of your referrers and the number
of backlinks
With the Referrers report you can easily spot out the referrers casting the most valuable "votes" for you.
Identifying those important referrers will be a lot easier if you sort the referrers using the available criteria:
• Sort referrers by rank.
Click on the "Rank" table column header to sort referrers by their Rank. You now can easily see referrer domains with high rankings.
This is a valuable indicator of the quality of your referrers because referrers with high rankings will
cast a more powerful "vote" to your pages thus increasing their relevance in search engine results.
• Sort referrers by Alexa rank.
Click on the "Alexa Rank" table column header to sort referrers by their Alexa traffic rank value. This
information is collected through the Alexa Toolbar from the users.
The lower the Alexa traffic rank, the more powerful the "vote" casted to your page is. This is because
a lower Alexa traffic rank for a referrer (indicating a greater number of visitors and page views for
that website) will increase the chance of getting more traffic to your web pages.
• Sort referrers by the number of outbound links.
9
Step-by-Step Tutorials
This is the overall number of links to other websites from the referrer URL/domain.
Click on the "Outbound Links" table column header to sort referrers by their outbound links number.
You now can easily spot referrer domains with fairly big outbound links number.
The greater the overall numbers of outbound links, the least powerful the "vote" casted to your page
is. This is because having many outbound links decreases the power of the "vote" casted by a web
page.
• Sort referrers by the number of backlinks.
Click on the "Backlinks" table column header to sort referrers by the number of their backlinks (these
are the links pointing to your website). You can now easily see referrer domains with high number of
links pointing to your website.
The Referrers report also gives you information about how the number of backlinks change between two
updates. This information is presented in the following columns:
• Added.
The "Added" column contains the number of links (pointing to your domain from a web page) that
have not been detected in the currently selected previous update.
• Removed.
The "Removed" column contains the number of links (pointing to your domain from a web page) that
have been detected in the currently selected previous update, but not in the currently selected date.
• Normal.
The "Normal" column contains the number of links (pointing to your domain from a web page) that
were detected in both the currently selected date and the previous one.
Monitoring the changes of the number of backlinks between two given dates allows you to easily figure
out whether your efforts to increase the link popularity of your website have proven to be successful.
2. Checking the quality of your backlinks
The Referrers report can also display detailed information about each of your backlinks. Just select a referrer and see its backlink details displayed in the lower right panel.
For each backlink you have comprehensive information available:
• Link Text.
10
Step-by-Step Tutorials
This is the text contained in the hyperlink. This is a valuable indicator of the quality of your backlinks. This is because search engines consider the text contained in a backlink very important. If this
text contains keywords you are trying to compete for, your relevance in search engine results will definitely improve.
• URL Title.
This is the title of the referring page. This is a valuable indicator of the quality of your backlinks. This
is because the title of the page is very important for search engines. Having a link from a web page
that has a title which contains keywords you are trying to compete for, may bring you more traffic
from people searching for these keywords.
• No follow.
A "Yes" value indicates that the link to your website is not going to be considered by search engines
in rank calculations, although traffic is not prevented to be referred to you.
The value "Yes" appears only if:
• a given backlink from a referrer page has a rel="nofollow" hyperlink attribute set or
• a given referrer page has the content="nofollow" META tag attribute set in the header.
• Status.
This is the status of the backlink. It can be one of the following values: "Added", "Removed" or "Normal", allowing you to monitor the dynamics of the backlink.
• Type.
This is the type of the link. It can be either "Text" or "Image".
3. Filtering backlinks
Sometimes the number of backlinks to a website can be overwhelming. Filtering the backlinks using a
certain criteria will help in most cases.
One of the filters that you can use is the status of a backlink:
11
Step-by-Step Tutorials
Examples:
• Filter your "No follow links" .
Let's say you want to spot the websites having "no follow" links to you.
It's easy, just:
• - select your website's domain in the left panel and
• - choose the "No follow links" value in the display filter.
Now you can see who is linking to you using "No follow" attribute in links.
You may be interested to get in touch with those websites about that. This is because when a search
engine sees a 'no-follow' attribute in a hyperlink, it will not follow it, nor consider the destination page
in page rank calculations.
• Filter your "Removed links".
Let's say you want to find out which of your referrers has removed links to you since the currently selected previous update.
It's easy, just make sure your website is selected the left panel and choose the "Removed" value in the
display filter.
Now you if you see any such websites you may be interested to get in touch with those websites about
that.
12
Step-by-Step Tutorials
Additionally you can filter the backlinks by domain name, URL or link text. Just select one of the three
criteria available, enter the text you are looking for and Advanced Link Manager will filter out the referrers and links that do not match the given text.
Examples:
• Filter your links by text.
Let's say that one of your most important keywords are "latest news". Since the link text affects your
search engine rankings, you may be interested in finding who's linking to you using those keywords in
link text.
It's pretty easy, just:
• - select your website's domain in the left panel,
• - choose the "Link Text" value in the "Filter by:" list box and
• - type in the "latest news" in the "Filter by:" text box.
Now you can see who is linking to you using these keywords in links text.
However, you may also want to find out who's linking to your competitors using the "latest news"
keywords in link text. Just change the selection in the left panel to the competitor's websites you are
interested in.
Some of the websites that are linking now just to your competitors could also be linking to you. In this
regard, you may consider contacting such prospective referrer and suggest the text you want in the
link and also which page you want the link from.
• Filter your "Text" links from a referrer domain .
Let's say you want to see only the "Text" (as opposed to "Image") links from a certain referrer domain.
It's pretty easy, just:
• - select your website's domain in the left panel,
• - choose the "Domains" value in the "Filter by:" list box,
13
Step-by-Step Tutorials
• - type in the domain of your choice in the "Filter by:" text box and
• - choose the "Text" value in the display filter.
Now you can see the "Text" links pointing to you from the matching domain.
Find new link partners
This tutorial will guide you though the steps that will help you promote your website by getting more
link partners.
As an example we will presume for this tutorial that we have a software product, let's say an image editor.
First we need to have an idea where we can get links from. Because we have a software product we can
get new links from:
• Download websites
• Software review websites
Having the places from where we can get links in mind, now we need to brainstorm some keywords to
use when searching for new link partners.
These keywords will help us retrieve a list from search engines with potential link partners. We will use
the Find link partners wizard to retrieve a list of URLs from search engines.
When looking to find download and software review websites as potential link partners we can start with
these two keywords:
• image editor download
• image editor review
Now that we have everything that we need let's start find some potential link partners.
Go to the [Update] menu and select [Find link partners...] and the "Find link partners" wizard will open
in a new window. The first step is to choose the search engine used to gather potential link partners that
match the selected keywords. Then enter the keywords in the "Search" section.
Note
Some of the search engines available in the list will allow you to set advanced settings, like: "Advanced
Search" and "Language".
14
Step-by-Step Tutorials
After pressing the [Next] button, Advanced Link Manager starts gathering results from search engines.
15
Step-by-Step Tutorials
When the update finishes retrieving the results from search engines, we need to see which of the sites
gathered from we can contact to propose them to add a link on their website.
16
Step-by-Step Tutorials
In order to filter the potential link partners we will first use the [Visibility] column. The visibility
column will tell us how much exposure these websites get. The higher the visibility score, the more exposure they get.
You can also decide which website is relevant to you by retrieving additional information, like the number of outbound links, onsite links or page size.
17
Step-by-Step Tutorials
In order to keep these websites separated from the other websites from our project, we will assign them
to a referrer category, for example [Important]. You can also create a new referrer category for this task
from the [Project menu] -> [Manage referrer categories] dialog. We will create for our example a new
category called [Potential link partners].
18
Step-by-Step Tutorials
Now click on the [Finish] button and the wizard will add all the URLs found in the projects as Unverified Referrers and their domains will be visible in the Domain Information report.
19
Step-by-Step Tutorials
At this moment we can apply the category filter to the Domain Information report in order to see the domains that we just added. So, select the [Potential link partners] category from the category filter.
20
Step-by-Step Tutorials
Now that we have the list of domains, the next step is contact them. In this way we will get in touch and
let them know our intentions. But to do that, we need contact information.
To get contact information, all we need to do, is to select the domains that we want to retrieve the domain information for, right click over one of the domains and select the [Update domain information]. In
the status bar of the application you will see the progress of the domain information retrieval.
21
Step-by-Step Tutorials
When the update finishes and we have the contact information, we can write emails to the webmasters of
the new websites added. Just select the domain and switch to the email composer tab in the lower section of the report.
22
Step-by-Step Tutorials
Here you can write the emails by hand or use the predefined email templates available. You can also
create your own email templates and use them in future. Just click the Email template button and choose
one of the available templates or click on Manage email templates in order to create a new one.
A link exchange discussion can have many stages, so in order to know exactly where we stand in our relation with the wanted link partner, we will set a contact status for this possible referrer. Just check the
"and set status to" option next to the send button and select one of the predefined statuses, or create your
own status using the [Project menu] -> [Manage status information] dialog.
23
Step-by-Step Tutorials
Click the [Send] button in order to send your email, and continue to the next domain.
By switching to the [Message history] you can see all the messages sent to the webmaster of the selected
domain.
At this moment you should be able to successfully search for new link partners, retrieve contact information and build relationships with your potential link partners.
Find new link partners by backlinks
This tutorial will guide you though the steps that will help you promote your website by getting more
link partners by analyzing the backlinks of your competitors.
As an example we will presume for this tutorial that we have a software product, let's say an image editor. We will use our targeted keywords to find our competitors and then get information about their backlinks.
24
Step-by-Step Tutorials
First we will need to use our targeted keywords and check the backlinks of our competitors. In our example we will use the following keywords:
• Image editor
Now that we have everything we need let's start find some potential link partners by analyzing competitor's backlinks.
Go to the [Update] menu and select [Find link partners by backlinks...] and the "Find link partners backlinks" wizard will open in a new window. The first step is to choose the search engine used to gather potential link partners that match the selected keywords. Then enter the keywords in the "Search" section.
Note
Some of the search engines available in the list will allow you to set advanced settings, like: "Advanced
Search" and "Language".
After pressing the [Next] button, Advanced Link Manager starts gathering results from search engines.
When the update finishes retrieving the results from search engines, we need to see which of the sites
gathered we can use to analyze their backlinks. Delete the one you consider not to be relevant.
25
Step-by-Step Tutorials
To gather backlinks only for some URLs, select the ones you do not need and then use the [Delete selected] button to delete them.
Select the [Next] button and the [Find link partners by backlinks] wizard will gather the backlinks from
the pages you selected on the previous step and the relation with them.
26
Step-by-Step Tutorials
Once the update finishes a list with all the backlinks from the pages you selected will be displayed. Select the [Gather additional information] button and the [Outbound links], [Onsite links] and [Page size]
will be added to the list.
By selecting an website URL you will see to which pages that URL links. Those targets may be your
competitors and if that URL link to them it may be possible to link also to you.
To filter the websites gathered we will first use the number of [Links] column. The links column will tell
us what chances we have to get a link from that URL. The higher the number of links, the more chances
we have to get a link.
You can also decide which website is relevant to you by retrieving additional information, like the number of outbound links, onsite links or page size.
From the list you can open the URL in browser, copy link address, delete selected URLs or assign URLs
to a referrer category.
In order to keep these websites separated from the other websites from our project, we will assign them
to a referrer category, for example [Important]. You can also create a new referrer category for this task
from the [Project menu] -> [Manage referrer categories] dialog. We will create for our example a new
category called [Found directories].
27
Step-by-Step Tutorials
Now click on the [Add as referer URLs] button and the wizard will add all the URLs found in the
projects as [Unverified Referrers] and their domains will be visible in the [Domain Information] report.
From here you can check the added URLs to see if they have a submit page or contact the website owners to get a link by filtering the URLs in the [Found directories] category.
28
Chapter 3. The User Interface
Main Menu
The main menu provides access to all the functions of Advanced Link Manager.
Project menu
• New Project - pops up the New Project Wizard which allows you to easily create a new Advanced
Link Manager project.
• Project Settings - pops up the Project Settings dialog where you can set your domains, search engines,
and the preferences related to the link gathering process.
• Manage project lists - allows you to group project under a single name and then use this list of
29
The User Interface
projects when you update or backup projects.
• Manage referrer categories - allows you to group the referrers by your own categories.
• Manage status information - allows you to create your own status information about the answers you
receive from webmasters.
• Manage trigger templates - allows you to define an action template which will execute an action on
the referrer URL that match the selected filters after each project update.
• Project Manager - allows you to see an overview of all the projects.
• Rename project - allows you to rename the current project.
• Delete Project - allows you to delete the current project.
• Duplicate Project - saves the current project and all the data associated with it under a different name.
• Backup - creates a backup copy for the active project. See the Backup page for more details.
• Restore - replaces the current project with an existing backup copy. See the Restore page for more details.
• Remove Data - removes data from the current project for the selected time range.
Update menu
30
The User Interface
• Start - displays the Update dialog where you can choose how you want to update your project.
• Pause/Resume - pauses/resumes the currently running update.
• Stop - terminates the current update.
• Manually add referrers - pops up the Manually add referrers dialog to allow you to enter referrers
manually, import them from a file or from a website.
Find link partners - allows you to find potential partners on search engines results, using their most
advanced search criteria.
• Gather links from Search Engines - starts to gather the referrers from the search engines for you target
domains.
• Gather only number of links from Search Engines - starts to gather only the estimated backlink count
31
The User Interface
from the search engines.
• Verify Link Status - starts to check the previously gathered referrer URLs for backlinks to your target
domains, but only for those referrers that were not already updated on the current date.
• Verify Link Status (Forced) - starts to check the previously gathered referrer URLs for backlinks to
your target domains, ignoring whether they were updated or not on the current date.
• Update selected domains - updates only the currently selected domains; the information for the other
domains that have not been updated is taked from the last update. The domain selection is on the left
side panel.
• Update selected URLs - it works just like the one above, the only difference is that only updates the
selected URLs not the entire domain.
• Update multiple projects - allows you to select multiple projects to update.
Scheduler
• New scheduled task - allows you to schedule a new task. See the Scheduler chapter for more details.
• View scheduled tasks - displays a dialog with all the scheduled tasks created so far. Here you can add
or edit an existing task. You can also change the authentication for the Windows scheduler.
Reports
32
The User Interface
• Generate multiple reports - allows you to specify one or more reports to be generated immediately.
• Report Name - When you click on the name of a report, the application will generate that report immediately.
Edit reports
33
The User Interface
• New report - starts the report wizard to create new report.
• Manage reports - displays a list of all reports that you created so far, and allows you to see a summary
description for each of them.
• Report Name - When you click on the name of a report, the report wizard will open so you can edit its
properties.
Bookmarks
• Bookmarks this report - Bookmark a customized report.
• Manage Bookmarks - Manager bookmarked reports.
Tools
34
The User Interface
• Update Progress - Displays information about the progress o a current update.
• Website crawler - Opens the Website crawler tool
• Google Maps Webpages Importer - Opens the Google Maps Webpages Importer tool.
• Webpage Analyzer - Opens the Webpage Analyzer tool.
• Analyze Domain Quality - Opens the Analyze Domain Quality tool.
• Event Log Viewer - Opens the Event Log Viewer.
• Notes - Opens the Notes tool.
• Generate Link Pages - Opens the Generate Link Pages tool.
Options
35
The User Interface
• Preferences - allows you to set the global preferences of the project. See the Global Preferences page
for more details.
• Address Book - allows you to add and edit the email addresses in your address book. See the Address
Book page for more details.
• FTP Profiles - allows you to add, remove and edit your FTP profiles. See the FTP Profiles page for
more details.
• Headers and Footers - allows you to add customized headers and footers to your reports.
• Manage link page HTML layout - allows you to customize the HTML layout for yourlink pages.
• Manage link categories - allows you create link categoriesfor your referrers.
• Manage access groups - allows you to add, remove or edit Access Groups
• Manage proxy servers - allows you to add, remove or edit the Proxy servers
• Browser manager - allows you set the default browser that will open the HTML reports.
• Reports layout - allows you to choose a restricted set of UI reports that will be displayed.
• Layout - Default. The Default layout cannot be deleted and it contains all the reports available in
Advanced Link Manager
36
The User Interface
• Layout - Manage layouts. Opens the layout manager where you can add, remove and edit your layouts
• User profiles - allows you to select and manage the user profiles
• Edit contact details - allows you to edit your contact details.
Help
37
The User Interface
• Advanced Link Manager Assistant - displays the Advanced Link Manager Assistant.
• Help Index - displays the help index window.
• Context help - displays the context help.
• Report error - allows you to send an error report to the Advanced Link Manager team so we can help
you with troubleshooting and improve our product.
• System properties - displays your system properties.
• Purchase - opens in your default browser the purchase page of the Advanced Web Ranking Website.
• Register - allows you to register this product. You will be prompted for the registration ID you received by email after purchasing.
• About - displays a message box containing information about the product version, the search engines
update versions, and your registration information.
Main Toolbar
The Main Toolbar, located below the Main Menu, provides easy access to common and frequently used
functions. Each icon is a button that acts as a shortcut to a related function. Hold the cursor over an icon
to display a context label that will give you a hint as to its function. Click on an icon to use its function.
Start Update - pops up the Update dialog. By clicking on the arrow to the right of this
icon, the Update popup will show with all the options that you can also find in Update
Menu.
Pause Update - pauses the update in progress.
38
The User Interface
Stop Update - stops the update in progress.
Add referrers manually - allows you to add referrers manually.
Find link partners - allows you to add referrers using the full power of advanced search
from the search engines.
New Project - creates a new project.
Delete Project - deletes the current project.
Duplicate Project - duplicates the current project.
Project Settings - changes the settings for the current project.
New Report - brings up the report wizard that will allow you to specify exactly which
data you want to appear in the report as well as the report type, data range and destination of the report. By clicking on the arrow to the right, a list with all available reports is
displayed. See the report wizard for more details.
Scheduler - displays a dialog that allows you to see and manage all the scheduled tasks
that you have created.
Global Preferences - pops up the Global Preferences dialog.
Address Book - here's where you can add, edit or remove the contacts that you need to
send emails to.
FTP Profiles - here's where you can add, remove or modify the FTP profiles that you upload reports to.
Help - clicking on this icon will bring up this Help window.
Project - here's where you can choose your active project in the workspace. You can also search for a
project by clicking on the name of the project and typing the text that should be contained in the project
name that you are looking for.
Left-Side Panels
The Panels placed on the left side of the screen allow you to interact with the currently selected interactive report and customize them in real time.
You can edit the information contained in each panel by clicking on the button in the upper right corner of the panel.
You can select all the items contained in a panel by clicking on the icon.
39
The User Interface
The Domains panel
This panel allows you to select which target domain you want to be used for the current report. It is
available for all interactive reports.
The Referrers panel
This panel allows you to select which referrers you want to be used for the current Backlinks Evolution
chart. It is available only in the Referrers Evolution report.
In the Referrers panel, you can select one or more URLs by clicking on them while pressing the Control
or the Shift key. If you want to select all the referrers, just click on the small button from the top-right of
the panel.
The Search Engines panel
This panel allows you to select which Search Engines you want to be graphically represented in the
"Search Engine Evolution" report.
In the "Search Engines panel", you can select one or more search engines by clicking on them while
pressing the Control or the Shift key. If you want to select all the search engines, just click on the small
button from the top-right of the panel.
Quick actions panel
The Quick actions panel provides quick access to important functions of Advanced Link Manager.
Domain Information quick action
40
The User Interface
Domains
• Update domain information - Updates the information for a domain, selected from the referrer domain
list, in order to display additional information in the Domain details panel.
• Show reciprocal details - Displays reciprocal details for two selected domains.
• Check reciprocal status - Checks the reciprocal status for two selected domains.
• Ignore links from this domain - Deletes all the links from the selected domain.
• Do not ignore links from this domain - Keeps the links from a selected domain.
Items
• Show all items - Displays every potential link partner website and status available.
• Show contacted - Displays the domains that have been contacted before (as part of your link exchange
campaign).
• Show contact available - Displays only the domains for which contact information is available.
• Show drafts - Displays the domains that have an email composed but not sent.
• Show reciprocal linking - Displays the domains that you've exchanged links with.
41
The User Interface
• Select all - Select all the domains available in the Domain Information report.
Unverified Referrers quick actions
Domains
• Ignore links from this domain - Deletes all the links from the selected domain.
• Do not ignore links from this domain - Keeps the links from a selected domain for future updates.
Updates
• Update selected referrers - Manually updates the selected referrers.
• Update new referrers - Updates only the new referrers.
Items
• View contact details - Display the Domain details from the Domain Information report.
• Show all items - Displays every potential link partner website and status available.
Referrers quick actions
42
The User Interface
Items
• Compare link popularity - This view displays a comparison between your website and a competitor
website. You can see the links that you have in common, or the links that only your competitor has.
• Export to CSV - Exports the current report into a CSV file that can be opened later with a CSV compatible software.
• Copy link address - Copies the selected link address to clipboard.
Backlinks Evolution quick actions
Chart
• Show All Data in Range - Displays all the data in the selected range
• Save as... - Saves the chart view into a .png or JPEG file. Note that the files will contain only the current view of the chart (so be sure to save the right section of your chart).
Search Engine Evolution quick actions
43
The User Interface
Items
• Show search engine references - When the Referrers by Search Engine option is selected displays the
search engine references for a selected link text.
• Show comparison data - When the Search Engines Overview option is selected shows the comparison
data.
• Hide comparison data - When the Search Engines Overview option is selected hides the comparison
data.
• Group by search engines - Groups the data from the report by search engines as columns and the
URLs as rows.
• Group by Domains - Groups the data from the table by URLs as columns and the search engines as
rows.
Link text quick actions
Items
• Show search engines references - Displays the search engine references for a selected link text.
Help quick actions
44
The User Interface
Link popularity
• View my links - This view displays the referrers that are linking to your site. It will also show you the
links that were recently added or removed.
• Analyze links evolution - This chart displays a time evolution of the number of links to your website.
• Analyze links text - This view displays all the links to your website grouped by the link text.
• Compare link popularity - This view displays a comparison between your website and a competitor
website. You can see the links that you have in common, or the links that only your competitor has.
• View search engine statistics - This view displays all the links to your website grouped by the search
engine that reported them. The chart allows you to see how many links are reported by each search
engine in time.
Link campaign
• Find link partners - This wizard allows you to easily find new link partners using data from the major
search engines. It displays the highest ranking websites for the keywords you are targeting allowing
you to add them to your project as potential partners.
• Send link exchange requests - This view allows you to send link exchange requests using the integrated email composer.
• Add referrers - This dialog allows you to add new referrers. You can add them manually, import them
from a file or import them from a website. These mew referrers will be added to the Unverified Referrers list and you can see them using the Manually Added filter.
45
Chapter 4. Managing Projects
Project Manager
The Project Manager can show you an overview of all the projects that you created so far, allowing you
to assign them to categories. It will also give you important information about your projects such as the
creation date, last backup date, last update date and project size.
You can also see at a glance whether the project you are interested in has been updated and when. If it
hasn't been updated, you can look in the Events section and see whether something went wrong, or
whether the update was never started at all.
The Project Manager is only available in the Enterprise version. You can access it from the Project menu
while in the application, or you can have it start before the application by unchecking the [Choose
project at startup] option in the Application section of the global preferences.
Project Details
The Details panel shows you all the details about your project, such as keywords, search engines, and
websites. It also tells you the current project preferences such as the search depth, the location of the reports, or whether or not you use a proxy for this project.
Reports
The Reports section of the Project Manager displays all the reports created within this project along with
detailed information about each of them such as input data (search engines, keywords, websites), output
data (format, chart, legend, filters, sorting, columns, etc.), destination (folder, emails and FTP servers)
and deployment information.
Scheduled Tasks
The Scheduled Tasks section displays all the tasks created within this project along with detailed information about each of them, such as status, type, kind, start date, time, repeat and next run date.
Events
The Events section displays all the events created within this project. It will tell you the event type, the
source of the event, and the date and time it appeared. The events help you stay on top of everything that
happens within Advanced Link Manager. It will tell you whether the update went fine, or whether that
report you scheduled was sent to the client successfully. It can even send you an email automatically
when certain event types occur.
Backups
The Backups section displays all the backups for the currently selected project. It will tell you the date
the backup was created, the starting date and the end date for the data contained in the backup.
Creating a New Project
When working with Advanced Link Manager, you are concerned with various entities like Search Engines, Target Domains, Referrers and backlinks. Within the application, these are grouped together un46
Managing Projects
der a Project.
You can create a new project using the [Project] -> [New Project] menu. This will start
the New Project Wizard.
Project Settings
The Project Settings menu enables you to edit the list of domains, modify the list of the search engines
used for your project and setup other data gathering related options.
Renaming a Project
You can rename a project by using the [Project] -> [Rename Project] menu. After you
finished entering the name, please use the OK button and the project will be immediately renamed and its new name will take the place of the old one in"Project" drop
down.
Deleting a Project
You can delete a project by using the [Project] -> [Delete Project] menu or by clicking
on the associated toolbar button. After the project is removed, the next available project
is loaded. If no other project exists, the New Project Wizard is started automatically.
Duplicating a Project
You can duplicate a project by using the [Project] -> [Duplicate Project] menu. This feature allows you to quickly create a project that is similar to a different project that you
have already created.
Note
If a project with the same name as your chosen name already exists you will be asked if you wish to overwrite. Overwriting a project will cause the loss of all the data within it.
Backup
You can access the Backup dialog box by selecting [Project] -> [Backup...] from the
Main Menu.
47
Managing Projects
The Backup dialog box allows you to backup the current project or all projects.
You can select which folder to save backups to by pressing the [Browse] button. This folder will be remembered and all the scheduled backups will be saved there. This will also be the default folder where
the backups are restored from.
Restore
You can access the Restore Backups dialog box by selecting [Project] -> [Restore...]
from the Main Menu.
The Restore Backups dialog box allows you to manage your backups by either restoring them or removing them completely from your computer.
48
Managing Projects
You can choose to restore projects from a different folder than the backup folder by pressing the
[Browse] button. This folder will only be remembered while this dialog box is open. The backup folder
will always be the default restore folder.
Remove data
This dialog allows you to remove data from the current project for the selected time range.
Click on the [Set date] buttons to choose the start or end day. The Begin checkbox automatically sets the
time range to start on the day the project was created. The Today checkbox automatically sets the time
range to stop on the current day.
Address Book
The Advanced Link Manager Address Book is the place where you can store all the names and email addresses of the people you want to send reports to. You can use the contacts you enter here when specifying the destination of a report.
You can access the Address Book from the toolbar button, or by selecting [Options] ->
[Address Book...] from the Main Menu.
In the Address Book dialog box you can add, remove and modify contacts.
To Add a contact, press the [Add] button. The Add Contact dialog box will appear and you can enter the
First Name, Last Name, Email and Company for a contact.
49
Managing Projects
To Remove a number of contacts, first select them, then press the [Remove] button.
To Modify a contact, first select it, then press the [Modify] button.
FTP Profiles
The Advanced Link Manager FTP Profiles is the place where you can store all the profiles of the FTP
servers that you want to upload reports to.
You can access the FTP Address Book from the toolbar button, or by selecting [Options]
-> [FTP Profiles] from the Main Menu.
In the FTP Profiles dialog you can add, remove or modify profiles.
To Add a profile press the [Add] button. The "Add FTP profile" dialog will appear and you can enter the
Name of the profile, the FTP Server and Port, the User, the Password, the Remote folder and the Connection mode. If your machine connects to the Internet through a proxy server, you are allowed to enter
the proxy settings in the same dialog, by enabling the "Use a Proxy Server" option.
50
Managing Projects
In order to Remove a profile, first select it and then press the [Remove] button.
In order to Modify a profile, first select it and then press the [Modify] button.
51
Chapter 5. Updating Projects
Updating a Project
Advanced Link Manager gathers and stores link data every time a project is updated. You can initiate an
update either from the "Update" menu or by clicking on the Update toolbar button.
The Update dialog allows you to tell the application what type of data you wish to update. The following
options are available:
• Gather links from Search Engines
• Gather only number of links from Search Engines
• Import referrers from a local file
• Verify Link Status
• Gather rank
• Update reciprocal links
Gather links from Search Engines
The "Gather links from Search Engines" option tells the application to look for web pages that may be
pointing to your domain pages. After the update is complete the Unverified Referrers report will show
52
Updating Projects
the pages that the search engines report as linking to you.
All the search engines that are checked in the Project Settings are selected by default. If you want to
change that, just press the "Select..." button and select only the desired search engines. Deselecting all
search engines will automatically select all of them.
The referrers that are found in this update stage are the ones that are reported by the search engines to
link to you. These referrers come straight from the search engine index. And since the search engines do
not always have their index up to date, these referrers may no longer link to you. You can see the list of
referrers gathered at this stage in the Unverified Referrers report.
Advanced Link Manager also verifies each and every referrer to see if they actually link to you. This is
done in the Verify Link Status update stage. To see the real (verified) referrers look at the Referrers report instead.
Note
The referrers added to your project by the "Gather links from Search Engines" update method have their
status set to "Automatically added".
Gather only number of links from Search Engines
The "Gather number of links from Search Engines" can be used whenever you want to check only the
search engine estimated number of backlinks. If you click on the Search Engine Evolution tab, you can
see a graphical representation of the evolution of the estimated number of backlinks over time.
This type of update will not gather any referrers from the search engines. It is only useful for tracking
the estimated number of backlinks as reported by the search engines without having to go through the
exhaustive search for the referrers as reported by the search engines.
53
Updating Projects
Gather indexed pages from Search Engines
The "Gather indexed pages from Search Engines" can be used whenever you want to check the indexed
pages from search engines. If you click on the Indexed Pages tab, you can see the pages from your
project websites that have been found in the search engine's index (for the search engines that support
this feature).
This type of update will gather any referrers from the search engines. When you select this option, the
"Gather only number of links from Search Engines" one is disabled.
Import links from file
If you have a text file with referrers this option will help you import them into your project. Just press
the "Select..." button and the "Import links from files" dialog will pop up.
Here you can select the files you want to import links from.
Note
The imported URLs are added to your project as referrers for all the target domains in your project.
If the imported URLs are already present in the project as referrers you will be able to see them in the Unverified Referrers report by means of filters. They will be now shown when applying the "Manually added"
filter (event it they were previously after applying the "Manually added" filter).
Verify Link Status
The "Verify Link Status" option enables the application to collect the following information:
• The number of backlinks.
This is the number of incoming links from each referrer page.
54
Updating Projects
• The type of each backlink.
A backlink can be either a text link or an image link.
• Total number of outbound links (links leading offsite) for each referrer page.
The number of outbound links can be useful to show the link relevance. Let's say that you have one
referrer with 3 outbound links of which one of them links to you and some another referrer that has
100 outbound links and one of them links to you. The relevance of the first backlink is much higher
than the second one due to the high number of links leading offsite from the second referrer.
• The "No Follow" status of every backlink.
This is a very important piece of information. The links that have this status set to "Yes" are ignored
by the search engines when they crawl that referrer web page, hence it will not be taken into account
in search engine ranking calculations.
Gather rank
The "Gather rank" option instructs the application to collect the rank of the referrer page from the search
engines that support this feature.
This option is available only if you have the "Site Rank" plugin installed on your computer. If you do
not have the plugin installed and try to enable this option Advanced Link Manager will prompt you to
download the plugin. Enabling the plugin requires an application restart.
Update reciprocal links
This option tells the application to determine whether the links between your website and a partner website are reciprocal. After the update is complete the Domain Information report will display the actual reciprocal link status.
This option also instructs the application to parse the link pages from your domain looking for outbound
links to your partners. You only need to enable this option if you add or remove links from your link
pages and you would like the application to parse them again.
Verify Link Status (Forced)
Normally Advanced Link Manager verifies only the links from the referrers that were not already updated for the current date. However with this update you can force Advanced Link Manager to verify all
the referrer links, regardless if they have been updated or not in the current day.
Update Multiple Projects
Using this feature, you can select multiple projects to automatically update one after another. You can
either use a "Project list" or just select the projects you want to update from a list containing all your
available projects.
55
Updating Projects
• Project list.
You can use any of the "Project lists" available.
• Time gap between projects.
You can change the sleep time period used by the process between every project update.
Manually add referrers
When you click on the "Manually add referrers" item, you will be presented with a dialog box. This dialog box can be used to manually add referrers for the one, more or all target domains.
56
Updating Projects
You can add referrers for the desired target URL by selecting it in the lower panel. Not selecting any target in the lower panel will cause the referrer to be added to all target domains.
• Add - adds the URL from the text box to the referrers list
• Remove - removes the referrer URL from the list
The Update Progress Tab
The "Update Progress" tab is displayed in the main window when an update is started. When the "Gather
links from search engines" is in progress, it lists the pairs of domains and the search engines used to
gather the referrers data. When the "Verify Link Status" update is running, the " Update Progress" tab is
showing the current progress of the analyzed referrer links.
57
Updating Projects
Either the "Gather links from search engines" or "Check Links" is running, the following items may appear in the "Update Progress" tab:
• Waiting.
No page has been retrieved yet.
• Receiving data...(NN% complete).
Shows the percentage of received pages.
• Received NN of NN (100% complete).
Reached end of results" -shows the total number of results retrieved at the end of the search for a particular search engine-target URL combination.
• Checking for links.
The application is analyzing the referrer to extract the links information needed to update the Referrers report.
• Done.
The analysis of the page has been completed.
• Failed to gather results.
The search engine did not respond with the requested data. Advanced Link Manager will retry to interrogate it as many times as you entered in the "Number of retries if a connection fails" text box located in the [Preferences]->[Performance] tab.
58
Updating Projects
• Sleeping between pages.
Advanced Link Manager is sleeping between the searches performing a search engine friendly request
to the search engines.
During the update, progress information is displayed containing: the start time, the estimated stop, the
time remaining and the percentage of completed searches. At the end there is displayed: the total time,
the number of retrieved pages and the number bytes retrieved.
When the update is complete Advanced Link Manager checks again all the searches and retries those
that have not been completed successfully. The number of retries is specified in the Performance tab of
the Preferences.
Current Updates
The [Current Updates] tab displays real time update information about manual or scheduled updates.
Current Multiple Updates
The [Current Multiple Updates] tab displays real time update information about multiple updates.
History
The [History] tab displays information about all the updates done in Advanced Link Manager for all
projects.
59
Updating Projects
To make the browsing easier through the history, Advanced Link Manager allows you to use a couple of
useful filters:
Date. The [Date] filter allows you to select different update dates from the drop-down list:
• All - displays the updates done in Advanced Link Manager from all dates
• Today - displays all the updates done today
• Yesterday - displays all the updates done yesterday
• Last Week - displays all the updates done last week
• Last Month - displays all the updates done last month
• Specific update dates - displays the updates done in a selected day
Status. The [Status] filter allows you to select different states of an update:
• All - displays all the updates done in Advanced Link Manager for all their statuses
• Not Started - displays only the updates not started
• Complete - displays only the updates which are completed
• Incomplete - displays only the updates which are not completed yet
• Manually Stopped - displays only the updates which are manually stopped
Launched From. The [Launched From] filter allows you to select how the update was started:
• All - displays all the updates done in Advanced Link Manager for all the started types
• Manual Update - displays single updates manually started
• Scheduled Update - displays single updates started by the Scheduler
• Multiple Manual Update - displays multiple updates manually started
• Multiple Scheduler Update - displays multiple updates started by the Scheduler
Name. The [Name] filter allows you to select the updates by Project Name (single updates) or Project
List (multiple updates):
• All - displays all the updates, even if they were single or multiple.
• Project Name - displays a list with single updates
• Project List - displays a list with multiple updates
Note
60
Updating Projects
To display all the updates done in Advanced Link Manager on all periods, please make sure that you have
for all filters the [All] option selected.
Resume incomplete updates
In the [History] tab you can resume Multiple Updates with the status [Incomplete]. To do this, just right
click on the name of the Project list and select the [Update remaining projects] option.
Note
The projects updated on the day you resume the update will appear in the Update History with the date
when the resume is selected.
Note
This option is available only for Multiple Update which have the status [Incomplete].
Find link partners
The Find link partners wizard will help you gather more referrers using the most advanced search from
each of the available search engines. The wizard is available via the [Update] -> [Find link partners...]
menu item.
Nowadays, only a few search engines still tell you who your referrers are. And even those that do, they
can't give you the entire list of your referrers. That's where the Find link partners wizard comes to help.
It allows you to search any of the available search engines, using their most advanced search criteria, to
look for additional referrers that may already link to you, or for future partners that you may want to exchange links with.
But the best way to understand how the Find link partners can help is probably to see an actual example:
Search Engine and Keywords
The first step of the Find link partners wizard gathers information about what you wish to find. It will
ask you for the search engine and the keywords you are looking for and the details of the search:
61
Updating Projects
For this example, let's choose Google as the search engine. We are looking to find websites that could
link to us. Therefore we will search Google for "sport news". Let's set the search depth to 20 as we are
only interested in the top 20 search engine results.
Then we tell Google to search using "The exact phrase" so we don't get results from "news" or "sport",
and we are looking for the pages that have the keyphrase in the title of the page so we set the option "Occurences appear:" to "In the title of the page".
Refining the results
The second step of the Find link partners wizard is preceded by an intermediary stage in which Advanced Link Manager connects to the search engine and retrieves the results we asked for.
62
Updating Projects
After the urls have been retrieved, the wizard will show us the top 20 results found on the search engine.
The URLs are shown in the order the search engine displayed the results.
63
Updating Projects
Now we have the results we asked for, but it may not be exactly what we need. So we need to eliminate
any unwanted results before we add the good ones into our project. To help us with this task, the application lets us order the referrers by rank (if the SiteRank plugin is installed). If we're not interested in
pages that have a very low rank, we can select these websites and click the "Delete selected" button to
remove them from the list. Alternatively, we can exclude the sites that have a low rank using the "Filter
by rank" filter and selecting "above 4" to select all the pages with the rank higher than 4.
There is also a text filter available. This can be used when you choose to gather many referrers from the
search engine. Let's say you choose a search depth of 500. After all the results are retrieved, you may
want to exclude your competitors. You just type a part of their name in the filter textbox and only the referrers matching the criteria will be shown. Now you can select all of them and remove them from the
list by pressing "Delete selected".
You can also exclude referrers that you have filtered out using the "Delete filtered items" button.
Once you are satisfied with the results, all you need to do is press "Finish" and the new potential link
partners will be added to the project. You can always see these new potential referrers in the Unverified
Referrers report by selecting the "Potential" option in the "Display" drop down.
64
Updating Projects
Find link partners by backlinks
The Find link partners by backlinks wizard helps you gather potential link partners using advanced
search and backlinks check. The wizard is available from the [Update] menu, [Find link partners by
backlinks...]
By analyzing your competitor's backlinks you can find new potential resources of links, so this is why
you can use [Find link partners by backlinks...] to conduct competitive analysis.
Search Engine and Keywords
The first step in getting new link partners is similar with [Find link partners] and requires you to select
the search engine that will be used to gather results and the keywords for which you are looking to find
new link partners.
Refining the results
The second step of the [Find link partners by backlinks] wizard is preceded by an intermediary stage in
which Advanced Link Manager connects to the search engine and retrieves the results we asked for.
After the URLs have been retrieved, the wizard will show us the number of results found in the search
engine set from the [Search Depth] option. The URLs are shown in the order the search engine displayed
the results.
65
Updating Projects
By selecting Gather additional information, Advanced Link Manager will display additional information
about the links gathered from search engines like [Outbound links], [Onsite links] and [Page size]
When you finish analyzing and press the [Next] button, the [Find link partners by backlinks] wizard will
gather the backlinks from the pages you selected on the previous step and the relation with them.
Competitive Analysis
Once the update finishes you will see a list with all the backlinks from the pages you selected. If you select the [Gather additional information] button then [Outbound links], [Onsite links] and [Page size] will
be added to the list.
If you select an website URL you will see to which pages that URL links. Those targets may be your
competitors and if that URL link to them it may be possible to link also to you.
From the list you can open the URL in browser, copy link address, delete selected URLs or assign URLs
to a referrer category. When you decided which of those URLs can be potential link partners assign
them to a referrer category to help you later when trying to contact them.
66
Updating Projects
After you assign URLs to a specific referrers category and finish analyzing them, select the [Finish] button and all the URLs will be added to the [Unverified referrers] interactive report. If you have added
some of the URLs to a specific referrer category, then you can filter them in the [Unverified referrers]
report.
Following this step, you can start now contacting potential new link partners.
67
Chapter 6. Project Settings
You can change the settings of a project from the Project -> Project Settings menu. Here you can edit
the list of domains, search engines and other settings that are associated with the current project.
Managing Domains
In the Domains tab of the Project Settings dialog box you can add, remove and import domains.
Domains can be sorted by website or by position. While the [Sort by website] option displays the domains alphabetically, [Sort by position] displays the domains in the order they are added. You can
change this order by moving a domain up or down in the list. To do this, select the [Sort by position] option, then the domain and use the arrows from the bottom of the window to move them.
In order to Add a domain, first input it in the edit box, then press the [Add] button. To remove a domain,
just select it from the list and click on the "Remove" button.
When you add a new domain, the [Index] page is added by default. But you can add more pages later by
clicking on the "Domain Pages..." button.
68
Project Settings
Each page has two attributes that you can set from this list:
• Link Page.
If this attribute is set, the application treats this page as a link page and parses it for external links to
your partners. This counts when calculating the reciprocal link status.
• Exclude.
If this attribute is set, the application will no longer search for links to this page in the search engines.
This is useful in case you have a link page that does not have incoming links and you do not wish to
look for referrers that point to this page.
Additionally you can set Advanced Link Manager to automatically add new found URLs for each domain and you can choose from three available options:
• Project Settings.
This option uses the project default settings from the [Preferences] tab
• Always add.
This option will always add new found URLs for your selected domain
• Never add.
69
Project Settings
This option will never add new found URLs for your selected domain
A domain can have one or more pages. If you have more than one name that points to the same website,
then you need to add this name to the domain aliases list.
• Domain Pages.
This is the place where you can edit the pages that you wish to track incoming links for. If you wish to
track a certain web page separately, you need to add it to this list.
The index page of the domain is added by default. This is regarded as a special page, and will appear
as [Index Page] in the list. If you remove the index page, you can add it later by adding a new page
with the name "/" (forward slash).
• Domain Aliases.
This is the place where you can add aliases to your website. The most well known case is when a
website can be refered as its domain name or with the www prefix. Example:
• www.domain.com
• domain.com
This special case is handled by default in Advanced Link Manager so you don't have to add it yourself.
• Index Aliases.
This is the place where you can add aliases of your main index page of your website. The Index Aliases list contains all the possible names of the [Index Page], so if any of these pages will be found in
70
Project Settings
the link URL, they will treated as [Index Page]. If your index page has a name that is not part of the
[Index Aliases] list, just add it to the list and the next update will show it correctly.
Note
The Index Aliases features can be exclusively used for the project domains.
The Import button is used to import web pages into an existing domain. There are two ways to import
these pages:
• Import from a web page.
Enables you to import all the pages that are linked from a certain web page. The wizard spiders the
web page you provide and finds all the links to other web pages.
• Import from a search engine.
Enables you to import all the pages from your domain that a search engine is aware of.
71
Project Settings
When you are presented with the result as a list of pages, you can edit them before importing them into
your project by removing the ones that you don't need. Adding an already existing page to a domain will
not cause the page to be duplicated.
Selecting Search Engines
72
Project Settings
In the Search Engines tab of the Project dialog box you can select which search engines you are interested in. This panel is similar to the one in the New Project wizard. It will display all the available engines with a check box next to them indicating their selection status. Only the selected engines will be
available in the main frame for data gathering or viewing.
You can temporarily deactivate search engines from a project. The data for the inactive search engines is
not removed, but rather hidden from the reports. Also, when updating the project, the inactive search engines are skipped from the update. Reactivating a search engine simply makes it visible and updatable
again.
In order to deactivate or activate a search engine, go to the "Search Engines" tab of the "Project Settings" dialog box and left click on a Search Engine. Press OK when you have finished.
Keywords
In the Keywords tab of the Project Settings window, you can select the keywords you are targeting and
look to improve rankings in search engines.
The keywords you are selecting here are used to filter your referrers in the [Referrers] report and link
texts in the [Link text] report.
73
Project Settings
• Add. Adds the keyword you enter in the Keywords input.
• Edit. Let's you change the color of the keyword and the filter method by choosing [Contains] or
[Exact match].
• Import. Let's you import a list of keywords from a file.
• Remove. Removes the selected keywords.
To filter the referrers which contain or have the exact match of your keywords select the [Keywords] filter, previous to the [Category] selection in the [Referrers] and [Link text] reports.
Preferences
74
Project Settings
The "Preferences" tab of the "Project Settings" dialog box allows you to locally override some of the
global Advanced Link Manager settings in your current project. These settings are by default inherited
from the global preferences.
• Search Depth.
Using the "Search depth" category, you can uncheck the "Use global search depth" check box and the
"Indexed pages search depth" to specify your custom preference in the "Search Depth (number of results)" text box. These settings will be used only for this project.
• Report Location .
The "Report Location" is the folder where all the reports from this project will be saved.
75
Project Settings
• Update settings.
Here you can also specify a list of reports to be generated after each update by clicking on the [Select
templates].
You can do the same thing from the Output section of a report by checking the "Generate report after
each update" option.
• Advanced Preferences.
To exclude your internal links from being seen as referrers by Advanced Link Manager, select "Exclude internal links(from within your website)"
The "Use global settings. Maximum workers per domain" option allows you to set the maximum
number of simultaneous connections when verifying the incoming links from a domain.
Note
Our "Be friendly" policy recommends only one worker per domain.
76
Project Settings
• Reporting.
The Reporting settings allows you to use the global settings or tailor them for individual projects.
From here you can set Advance Link Manager to:
• Ignore URLs with non-web extensions when gathering from search engines
• Assume non-web extensions as linking
• Automatically add new found pages to the project, when verifying links
Proxy settings
The "Proxy settings" tab of the "Project Settings" dialog box allows you to select a list of proxy servers
from the global Advanced Link Manager proxy settings list to be used in your current project. These settings are by default inherited from the global preferences.
• Use application settings.
Check this box if you wish to use the global Advanced Link Manager proxy settings in your current
project.
• Do not use proxy servers.
Check this box if you do not want to use proxy server. The connection to the internet will be done directly.
• Use selected proxy servers.
Use only the selected proxy servers
77
Project Settings
Email Settings
These settings can be used to send and receive link exchange emails and send reports to your clients.
This email account is available in both Domain information report and the integrated Email client
SMTP settings
• Email Address.
Enter your email address here.
• SMTP Server.
Enter your SMTP server, either using its name or its IP address.
• SMTP Port.
Enter the SMTP port. The default value is 25 for no secure connection and 465 for SSL connection.
78
Project Settings
SMTP Authentication
If your SMTP server requires authentication, you need to enter your user name and password here.
Advanced Link Manager can use a secure connection when sending emails through the SMTP server.
For this you can use either the TLS or SSL encryption, depending on what your SMTP server requires.
Email aliases
If you have more than one contact person for this email address you need to enter their names here, each
on a new line.
Use global email settings for sending reports
This option inherits the settings for sending reports from Global Preferences. If you want to configure
different email accounts for different projects, uncheck this option.
Note
Advanced Link Manager will use the same settings for sending reports as for sending link requests.
POP3 and IMAP
Here you can setup your project POP3 or IMAP incoming email account. This account will be available
in the Email Client report where you can receive email using it.
• POP3.
Selecting this option will make this account use the POP3 protocol to retrieve emails
• IMAP.
79
Project Settings
Selecting this option will make this account use the IMAP protocol to retrieve emails
• Mail server.
Specify the mail server this account connects to retrieve emails
• Username.
Specify the user name used to connect to the mail server
• Password.
Specify the password needed to authenticate the selected user on the mail server
• Use secure connection.
If your server requires a secure connection check this option and SSL will be used to connect to the
server
Client emails
80
Project Settings
The client emails settings help you to keep track and manage all your clients email addresses used to
send printable reports for the project. To use these email addresses you need to add the "Client emails"
item to the to list when selecting to send a report by email. In this way you will not need to manually
enter the email addresses of the clients that you want to receive specific reports.
Note
A report will be sent to all email addresses added in the "Client emails" list.
When adding emails to the Client emails list you have three options available:
• Manually add the name and email address for each client.
• Automatically import the contacts from your Address Book.
• Import the contacts from a file.
81
Chapter 7. Scheduler
The scheduler wizard
Once you've updated your project a few times and generated a few reports, you may wish to do this
automatically at specified intervals. That's when the scheduler comes to help. It helps you automate the
update of your projects and the generation of the reports. It can also backup your projects periodically so
you don't have to worry about loosing your data.
You can create a new scheduled task from the [Scheduler] -> [New scheduled task] menu. To see all the
existing scheduled tasks, use the [Scheduler] -> [View scheduled tasks] menu or click on the scheduler
icon in the toolbar.
The scheduler wizard helps you automate the following tasks:
• Update projects
• Generate reports
• Backup projects
Scheduling a project update
82
Scheduler
The scheduler can help you automate the update of your project at a specified interval. When you choose
to create an update task in the scheduler wizard, you have three options:
Updating a single project
Updating a single project is pretty straight forward. You select the type of the update, the date and time,
and how frequently you wish to update this project. You then have the option of generating reports immediately after the update is complete. For this, you can either select the reports you wish to generate
from a list or instruct the application to generate all the reports that you specified to be generated after
each update. (This list can be edited in the Preferences tab of the Project Settings.)
The final step of the Scheduler wizard presents you with a summary of all the options that will be used
to create the scheduled task. Just verify that everything is correct and press the Finish button to create
the task. (You can view and edit the task later using the [Scheduler] -> [View scheduled tasks] menu.)
Updating multiple projects
The updating of multiple projects automatically using the scheduler is one of the most powerful features
of Advanced Link Manager. It allows you to specify a list of projects to be updated one after another,
and generate reports for each of them as needed.
When you update multiple projects, you are asked to choose which project list you wish to update. This
is the list of projects that you wish to update. By default, there is only one predefined list called "All
Projects", but you can create your own list of projects using the "Manage project lists" button.
Note
83
Scheduler
The "All projects" list is a virtual list that cannot be edited or removed. It will always contain all your existing projects.
Just like in a simple update task, you have the option of generating reports immediately after the update
is complete. But since you are updating multiple projects, you are now able to specify the reports that
should be generated for each of the projects in the list. In the tree that appears, the parent items are the
projects, and the reports are their children.
You also have the option to generate all the reports that you specified to be generated after each update.
(This list can be edited for each of the projects separately in the Preferences tab of the Project Settings.)
Scheduling report generation
The scheduler can help you automate the generation of the reports at a specified interval. When you
choose to create a "generate report" task in the scheduler wizard, you have three options:
• generate reports for the current project
• generate reports for a specified project
• generate reports for multiple projects
The wizard will take you through the same steps as when updating a project. The only difference is that
there is will be no update. Only the reports that you select will be generated. This is useful in case you
wish to update your project every day but generate the reports only once a week.
Scheduling backups
The scheduler can also backup your projects for you automatically, so you can rest assured that you always have a backup copy in case of emergency. When you choose to create an "backup" task in the
scheduler wizard, you have three options:
• backup the current project
• backup a specified project
• backup multiple projects
The wizard will take you through the same steps as when updating a project. The only difference is that
instead of an update, your project will be archived to take less space and then stored in a special folder
called "backup", inside the data folder.
View Scheduled Tasks
You can view all the scheduled tasks by clicking on this toolbar button or by selecting
the [Scheduler] -> [View Scheduled Tasks...] menu.
84
Scheduler
This dialog allows you to see all the scheduled tasks generated by Advanced Link Manager. If you want
to modify a scheduled task, just double click on it or select it and press the "Modify" button.
If you want to remove one or more tasks from the scheduler, select them and press the "Remove" button.
If you want to schedule a new task, just press the "New" button and select the type of the task.
A filter is available for the "Scheduled Tasks" dialog which allows you to sort the scheduled tasks by three criteria:
• Scheduled Name
• Scheduled Type
• Project Name
Calendar
The Calendar allows you to see all the scheduled tasks for a selected month. The daily tasks will be
shown in red, weekly in green, monthly in blue and on time tasks in black.
85
Scheduler
86
Chapter 8. Interactive Reports
Advanced Link Manager presents the information gathered from search engines in a set of interactive,
easy to use reports. Each report can be viewed by clicking on the corresponding tab in the upper side
panel of the main frame.
There are six tabular reports: Domain Information, Unverified Referrers, Referrers, Backlinks
Evolution, Search Engine Evolution and Link Text. For three of them (Backlinks Evolution, Search Engine Evolution and Link Text) a graphical rank evolution chart is also available.
In the tabular reports, you can sort the table rows by clicking on the column headers and you can reorder
the columns by grabbing and dragging them by their headers.
An empty report usually means that there is no data available for the selected domain(s).
Domain Information
This report displays contact and reciprocal link information for all potential partner websites available in
your project. For each domain, the following information is available:
• Rank.
This is the rank associated with each web page by the Google search engine. It enables you to see
which are your most important referrers. It can take values from 0 to 10, where 10 is the highest
value. The N/A status means that the referrer is not ranked by Google.
• Alexa Rank.
This is the traffic rank associated with each web page by the Alexa search engine. It enables you to
see which are your most important referrers. It can take any value from but 1 is the highest value. The
N/A status means that the referrer is not ranked by Alexa.
87
Interactive Reports
• Reciprocal status.
Displays the reciprocal status between the selected website domain and the referrer domain that is displayed in the current line. The status may have one of the following values:
• Not Linking.
There is no link from you to your partner website, and the partner web site does not link to your
website.
• Link to.
One or more of your web pages are pointing to the partner website.
• Link from.
One or more of the partner web pages are pointing to your website.
• Reciprocal.
There is a link from one or more of your web pages to your partner website and there is also a link
from one or more of the partner web pages to your website.
• Contact status.
Displays the status that is currently assigned to describe the current progress of your link exchange
campaign.
• Domain age.
This is the age of the domain computed from the date the domain was registered until today. N/A
means that the domain information was not gathered for this domain. You can gather information
about a domain trough the context menu "Update domain information" menu item.
• Compete rank. This is the rank gathered from Compete.com for a selected domain. It can help you
see how valuable are your existing referrers or potential link partners. The lower the rank is, the more
valuable the referrer/potential link partner is.
• Compete visits. Represents the total number of visits returned by Compete.com for a specific domain.
• Compete visitors. Represents the total number of visitors returned by Compete.com for a specific
domain.
The "Display" drop-down list box in the top left corner of the Domains view allows you to filter the data
by using the criteria you are interested in.
Filters
The following filters are available to help you find the domains you are interested in:
• All items.
Displays everything, every potential link partner website and status available.
• Contact available.
88
Interactive Reports
Displays only the domains for which contact information is available.
• Contact not available.
Displays only the domains for which contact information is not available.
• Contacted.
Displays the domains for which contact information is available and have been contacted (as part of
your link exchange campaign) at least once.
• Not contacted.
Displays the domains for which contact information is available but have never been contacted.
• Link to.
Displays only the domains that one or more of your web pages are linking to.
• Link from.
Displays only the domains having having at least one web page linking to your website.
• Reciprocal linking.
Displays only the domains that you've exchanged links with by placing a link to each other on each
site.
• Not linking.
Displays only the domains that have no links to your website and that you do not link to.
• Has draft.
Displays the domains for which you have started composing an email message but it was never sent.
The "Filter by" dynamic filters can be set to filter by domain name, contact email or contact name. Just
select one of there three criteria available, enter a text in the text box and Advanced Link Manager will
filter out the domains that do not match the given criteria.
Last rank change
The last rank change filter shows only the domains with their rank changed in the selected period of
time.
89
Interactive Reports
Domain Details
The Domain Details panel displays the following information for the selected link partner website:
• Last updated.
The most recent date when you have updated the domain information for this particular partner website.
• Last contacted.
The most recent date when you have contacted this website (as part of your link exchange campaign).
• Status.
The status describes the current progress of your link exchange campaign. You can use the Status
drop down list to change it whenever you see fit. For example, after you send your first link request
email to a potential link partner you may set the status to "Waiting for answer to link request mail". If
you wish to change/add/delete a status message, use the [Project]->[Manage contact statuses...] menu.
• Description.
The description of your link partner website as provided by Alexa.
• Link from DMOZ directory.
Shows the categories in which the link partner website is included in the DMOZ directory.
• Link from Yahoo directory.
Shows the categories in which the link partner website is included in the Yahoo directory.
• Registered.
The date when the link partner domain was registered.
• Updated.
The most recent date when the link partner domain was updated.
• Expires.
The date when the link partner domain expires.
Most whois servers provide information about the Registered/Updated/Expires dates. If this is the case,
then the dates are retrieved automatically by Advanced Link Manager. If this information is not available from the whois server, the word "Never" appears and you can set this date yourself by clicking on
it. You can only edit these dates manually if they haven't already been fetched automatically from a
90
Interactive Reports
whois server.
To refresh the whois information for a potential link partner domain just right click the domain in the
Domain Information table and select the "Update domain information" option.
Email Composer
The Email Composer allows you to send link request emails to the webmaster of the selected referrer
domain.
You can choose the recipient email from the "To:" list, which is automatically populated from the whois
server. You can edit the contact information anytime by clicking on the Address Book icon on the right
side.
The Email Composer was designed to save you precious time when editing the link exchange emails.
Here are some of the features that will help you with this task:
• Email template.
This button will open a popup menu that will allow you to select an email template. To manage the
email templates select the "Manage email templates" item instead.
• Quick text.
This button will insert a previously saved text that you often use when writing emails. To manage the
quick texts select the "Manage quick text" item instead.
• Insert variable.
This button will allow you to insert the value of a commonly used term like Name or Address into the
email composer. These variables have default values that you need to change the first time you use
them. To edit these variables later just go to [Options]->[Edit contact details].
• Send and set status to:
When you send an email, you can also change the status to a new value using this option.
91
Interactive Reports
Message History
The message history tab shows all the emails you sent as part of your link exchange campaign.
Reciprocal Details
If you click on the reciprocal status column for the selected referrer, a dialog will pop up with detailed
information about the links between you and the selected referrer.
A green arrow shows a link from the referrer page to your page and a red arrow shows a link from your
page to the referrer page. When both arrows appear, the link is reciprocal between the same pages.
First of all, this will help you understand why Advanced Link Manager has assigned that reciprocal
status. Secondly, you will see all the links from you to your referrer or the other way around.
You also have the ability to see the links from your perspective or from the perspective of your referrer
by switching betwen the two tabs.
Unverified Referrers
The "Unverified Referrers" report displays the web pages that have been reported by the search engines
to have a link to your website.
These referrers come straight from the search engine index. And since the search engines do not always
have their index up to date, these links may no longer exist. To see the real (verified) referrers look at
the Referrers report instead.
92
Interactive Reports
For each referrer, the following information is displayed in the corresponding column:
• Rank.
This is the rank associated with each web page by the Google search engine. It enables you to see
which are your most important referrers. It can take values from 0 to 10, where 10 is the highest
value. The N/A status means that the referrer is not ranked by Google.
• Alexa Rank.
This is the traffic rank associated with each web page by the Alexa search engine. It enables you to
see which are your most important referrers. It can take any value from but 1 is the highest value. The
N/A status means that the referrer is not ranked by Alexa.
• Quality ratio.
This is the referrer quality ratio computed using the formula selected by you in the Application preferences
• Outbound links.
This is the number of outgoing links found in the referrer URL.
• Date Added.
This is the date that the referrer was added to your project.
• Status.
Enables you to see the update status of each referrer. It can have the following values: Updated or
Never Updated, Redirect, Exceeded Size, Unauthorised, Timed Out and Not Found.
93
Interactive Reports
• Last Updated.
This is the date that the referrer was last updated and the status has been changed.
• IP Address.
This is the IP address associated with the referrer website.
The "Display" drop-down list box in the top left corner of the Unverified Referrers Report allows you to
filter the data by using the criteria you are interested in.
Filters
The following filters are available:
• All items.
Displays everything, every URL and change available.
• Potential.
Displays the referrers found with the Find link partners wizard.
• Linking back.
Displays the referrers that link back to the selected domain or URL.
• Not linking back.
Displays the referrers that do not link back to the selected domain or URL.
• Never Updated.
94
Interactive Reports
Only displays the URLs that have not been checked.
• Previously Updated.
Displays only URLs that have been already analyzed. The ones that are not found will be omitted.
• Not Found.
It displays all the URLs that have been checked and not found to be existent.
• Automatically added.
Displays only the URLs that have been automatically found by the search engines you selected for
your current project
• Manually added.
Displays only the URLs that have been manually added by the user using the Manually add referrers...
from the "Update" menu item or the "Add" context menu item from the "Referrers" tab.
• Removed.
Displays a list containing the manually removed URLs. These URLs are kept within the project's data
to exclude them from future search results. They can be restored by right-clicking on them and choose
the "Restore" menu item
There is also a "Filter by" filter which can be used to filter your referrers list.
Type one of the active URLs of your project in the filter box and the chart will display only the line for
the specified URL.
The Unverified Referrers report was also designed to be a manager for referrers. If you right click on
any referrer a context menu will appear that will give you access to all the actions required for managing
the referrers.
95
Interactive Reports
The context menu contains the following features:
• View contact details. Opens the Domain Information report.
• Add referrer. Adds the referrer for all domains.
• Copy link address. It copies the selected referrer address into your clipboard.
• Ignore links from this domain. Ignores all the links from the selected domain.
• Update Selected URLs. It analyzes the selected referrers.
• Update Visible URLs . It analyzes all the referrers.
• Remove. Removes the selected referrer from the referrers list.
• Assign to referrer category. Assigns the selected referrer to one of the categories you have.
• Whois. It opens up a web browser page with URL information, collected from the WHOIS database.
• Whois DMOZ. It opens up a web browser page with URL information, collected from the DMOZ
database.
• Whois Yahoo Directory. It opens up a web browser page with specific URL information, collected
from the Yahoo Directory.
• Web Archive. It opens up a web browser page with the visual history of the selected website.
• Google Cache. It open us a web browser page and displays the selected URL directly from the
Google cache system.
• Google Cache (no images). It open us a web browser page and displays the text version of the selected URL directly from the Google cache system.
96
Interactive Reports
• Detailed WHOIS. It opens up a web browser page and displays detailed information about the selected URL. This information is collected from the WHOIS database.
Note
The referrers that will appear in the "Unverified Referrers Report" may not link to the target referrer they
were gathered for. You can know if they do link after a Verify Link Status update in the Referrers Report
Last rank change
The last rank change filter shows only the unverified referrers with their rank changed in the selected
period of time.
Referrers
The Referrers Report
The "Referrers Report" displays the web pages that have been verified and are definitely linking to your
website. This information is only available after you've ran an update that had the "Verify Link Status"
option enabled.
97
Interactive Reports
The Referrers Report is tied to a date: the date when a Verify Link Status update was run for the project.
That means that the report will display the related information for the date when the update took place.
When a new "Verify Link Status" update is executed, you can still access the old data by going back to a
previous date (when the update was done). The "Date" drop-down list box in the top right corner of the
Referrers Report allows you to select the date for which the information is displayed.
For each referrer domain/URL you have the following information available:
• Rank.
This is the rank of the referrer domain/URL and can take values between 0 and 10. The higher the better.
• Alexa Rank.
This is the Alexa Traffic Rank that Alexa is collecting through the Alexa Toolbar from the users. The
lower the better.
• Quality ratio.
This is the referrer quality ratio computed using the formula selected by you in the Application preferences
98
Interactive Reports
• Outbound links.
This is this is the overall number of off site links for the referrer URL/domain.
• Backlinks.
This is the number of links from the referrer URL page pointing to one of your target URLs.
• Added.
This is the number of links from the referrer URL page pointing to one of your target URLs in this update, but not in the previous one.
• Removed.
This is the number of links from the referrer URL page pointing to one of your target URLs in the
previous update, but not in this one.
• Normal.
This is the number of links from the referrer URL page pointing to one of your target URLs for both
this update and the previous one.
Detailed information on the referrers pointing to your target domain is shown in the lower right panel in
Referrers Report. This panel displays information concerning the selected referrer domain/URL in the
upper right panel.
For each link you have the following information available:
• Link Text.
This is the text contained in the anchor tag of the link.
• URL Title.
This is the title of the referrer page.
• No follow.
This indicates - by means of a "Yes" value - whether either:
• a given backlink from a referrer page has a rel="nofollow" hyperlink attribute set or
• a given referrer page has content="nofollow" "META" tag attribute set in header
This means that the search engines are instructed not to consider such a backlink in rank calculations
and to ignore backlinks from such a referrer page.
99
Interactive Reports
• Status.
This is the status of the backlink. It can be one of the following values: "Added", "Removed" or "Normal".
• Type.
This is the type of the link. It can be either text or image.
Filters
The filters in the Referrers Report can be:
• Display filters.
• Dynamic filters.
Display Filters
The display filters can be:
• All.
Displays everything, all the referrer URLs and backlinks.
• Normal.
100
Interactive Reports
Displays only the referrers that contain backlinks with a "Normal" status.
• Added.
Displays only the referrers that contain backlinks with an "Added" status.
• Removed.
Displays only the referrers that contain backlinks with a "Removed" status.
• Text links.
Displays only the referrers containing backlinks with text as the anchor content.
• Image links.
Displays only the referrers containing backlinks with images as anchor content.
• No follow links.
Displays only the referrers containing backlinks that have a rel="nofollow" hyperlink attribute set.
• Removed all links.
Displays only the referrers that have only removed links.
Dynamic Filters
The dynamic filters can be set to filter by domain name, URL or link text. Just select one of there three
criteria available, enter a text in the text box and Advanced Link Manager will filter out the referrers and
links that do not match the given text.
You can also sort the data available by all the information available, just by clicking on the column
header.
The context menu
The context menu contains the following items:
• Collapse all nodes. - collapse the Referrers report to show only the referrer domains.
101
Interactive Reports
• Expand all nodes. - expands all referrer domains, showing all the referrer URLs from all the domains.
• Open URL in browser. - opens the selected referrer URL in the system default browser.
• Copy link address. - copies in the system clipboard the address of the selected referrer URL.
• Export to CSV. - exports the Backlinks data to CSV format
Referrer operations
One of the most powerful features of the Referrers Report is the referrers operations.
In the "Operation" drop down we have the following operations available:
• Union.
The union operation will display a set of referrers which contains the referrers that link to the domains
selected in the "Primary domains" and the referrers that link to the domains selected in the "Secondary
domains".
• Difference.
The difference operation will display a set of referrers which contains the referrers that link only to
the domains selected in the "Primary domains" and do not link to the domains selected in the "Secondary domains".
This operation is useful when you want to see which referrers you have to your domains and your
competitors do not.
• Intersection.
The intersection operation will display a set of referrers which contains the referrers that link to both
the domains selected in the "Primary domains" and the domains selected in the "Secondary domains"
at the same time.
This is useful when you want to see which referrers link to you and your competitors (i.e. web directories)
Referrers views
Advanced Link Manager allows you to view the Referrers report in different ways.
The Referrers report has the following views available:
• Referrers by domain. - displays for each domain selected the Referrers report grouped by domain
• Referrers by URL. - displays for each domain selected the Referrers report sorted by the exact URL
that has a link to your website
• Referrers Overview. - displays for a selected domain the Referrers and checks if another domain
from your project has a link from the same referrer
102
Interactive Reports
• Referrers by category and rank. - displays for a selected domain the Referrers grouped by category
and page rank
• Referrers by IP address. - displays for a selected domain the Referrers grouped by the IP address
block
Last rank change
The last rank change filter shows only the referrers with their rank changed in the selected period of
time.
103
Interactive Reports
Backlinks Evolution
The Advanced Link Manager "Backlinks Evolution" allows you to track the evolution of your links in
time via a chart.
This chart will contain information about the number of referrers of the selected URL collected from all
the active search engines of your project, for the selected period of time.
In the Chart view, the number of referrers is represented on the vertical axis, while time is represented
on the horizontal one.
The Legend at the bottom of the chart allows you to better understand the information depicted in the
chart. The Legend displays a color for every selected domain. This color is used to draw the graphical
evolution (lines or dots) of that specific domain.
Note that in the Backlinks Evolution chart there is a line for each one of the selected domains. You can
select as many domains as you want to compare their progress over time. Each selected domain will be
represented by a unique color, automatically assigned by the Advanced Link Manager.
If you select more than one referrer URL, each line of the chart will represent the sum of links from the
referrer URLs selected for each of the selected target domains/URLs
The "Backlinks Evolution" report contains two filters which can be used to better understand the progress of your targeted domains:
• Position Range. The "Position Range" filter can be used to zoom on a customized position range:
104
Interactive Reports
• "1 To 10","1 To 50", "1 To 100", "1 To 500" and "1 To 1000". Displays the selected position
range
• Custom Range. Displays a dialog window where you can enter the minimum and the maximum
position values which will be used by the vertical axis of the chart.
• Date Range. It can be used to select the time range used to represent the graphical data. You have 7
options to select from:
105
Interactive Reports
• All Data. The horizontal axis of the chart will contain all the available dates.
• Last Week. The horizontal axis of the chart will contain only the last week's available dates.
• Last Month. The horizontal axis of the chart will contain only the last month's available dates.
• Last Three Months. The horizontal axis of the chart will contain only the available dates from the
last three months.
• Last Six Months. The horizontal axis of the chart will contain only the available dates from the
last six months.
• Last Year. The horizontal axis of the chart will contain only the available dates from the last year.
• Custom Range. Displays the "Date Range" dialog box where you have the possibility to customize the dates where the evolution chart starts and/or ends:
• Begin. If you check it, your chart evolution will start with the date when you made your first update.
106
Interactive Reports
• Today. If you check it, your chart evolution will end with today's date.
• Set Date. You can use the calendar to select either the begin or the end date for the evolution
chart.
A context menu is available for the chart, with the following options:
• Save As.
Saves the chart view into a .png or JPEG file. Note that the file will contain only the current view of
the chart (so be sure to save the right section of your chart).
• Print.
Allows you to print the chart view.
• Zoom In .
You can magnify the chart view on both axes. The area that will be zoomed in has its center in the
point where you click with your mouse.
If you want to magnify only a certain area, click with the left button of your mouse to specify the top
left point and drag it to select the desired area.
• Zoom Out .
107
Interactive Reports
You can decrease the chart view on both axes. The area that will be zoomed out has its center in the
point where you click with your mouse.
• Show All Data In Range.
Redraws the chart so it fits all the data into the view. The same effect can be achieved by doubleclicking on the chart, or by drag and dropping with your mouse from a lower position to a higher one.
Search Engine Evolution
This report allows you to track the estimated number of referrers (the number of pages reported by a
search engine to have a link to your website). There are three views available in this report:
• Search Engines Overview.
• Referrers by Search Engine.
• Search Engines Evolution Chart.
Switching between the views is done from the toolbar at the top-left corner of the tab.
Search Engines Overview
The Search Engines Overview has two views:
• Order by Search Engines
• Order by URLs
These views can be switched from the drop-down combo from underneath the tab toolbar. These views
are not like the chart view. Instead they compare two selected dates and show the changes, if any.
On both views you will have the display filter with the following items available:
• All - this is the default filter which will show all items
• Moved up - shows only the items that have moved up.
• Moved down - shows only the items that have moved down.
• Changed - shows only the items that have moved up or down.
Order by Search Engines
In this view, the data will be organized with the search engines as columns and the URLs as rows.
108
Interactive Reports
For this view there is some extra information available. This information is used for comparison only, it
does not concern the current project. This information can be found in the Advanced Link Manager data
folder, the "data" folder, in the "comparedata.xml". You can customize this file at your will..
Order by URLs
In this view, the data will be organized with the URLs as columns and the search engines as rows.
Referrers by Search Engine
This view displays the referrers for the selected domain grouped by the search engine that reported
them.
You can select all the search engines, in which case you will see all the links to your website, or you can
select one or more search engines to restrict the referrers to those that were reported by the selected
search engines.
By default, you will see all unique referrers from all the selected search engines. If you wish to see the
common referrers that were reported by two or more search engines, just change the display mode to
show only the common referres. This can be done from the first button above the Search Engine input
panel.
Search Engines Evolution Chart
This chart displays a time evolution of the estimated number of referrers reported by the selected search
engines.
In the Chart view, the number of search engine results is represented on the vertical axis, while time is
represented on the horizontal one.
The Legend at the bottom of the chart allows you to better understand the information depicted in the
chart. The Legend displays a color for every selected search engine used in your project. This color is
used to draw the graphical evolution (lines or dots) of that specific search engine.
Note that in the "Search Engine Evolution" Chart view there is a line for each one of your project's
search engines. Each search engine will be represented by a unique color, automatically assigned by the
Advanced Link Manager.
109
Interactive Reports
The "Search Engine Evolution" report contains two filters which can be used to better understand the
progress of your estimated number of results:
• Position Range. The "Position Range" filter can be used to zoom on a customized position range:
• "1 To 500","1 To 1000", "1 To 5000", "1 To 10000", "1 To 50000" and "1 To 100000". Displays the selected position range
• Custom Range. Displays a dialog window where you can enter the minimum and the maximum
position values which will be used by the vertical axis of the chart.
• Date Range. It can be used to select the time range used to represent the graphical data. You have 7
options to select from:
110
Interactive Reports
• All Data. The horizontal axis of the chart will contain all the available dates.
• Last Week. The horizontal axis of the chart will contain only the last week's available dates.
• Last Month. The horizontal axis of the chart will contain only the last month's available dates.
• Last Three Months. The horizontal axis of the chart will contain only the available dates from the
last three months.
• Last Six Months. The horizontal axis of the chart will contain only the available dates from the
last six months.
• Last Year. The horizontal axis of the chart will contain only the available dates from the last year.
• Custom Range. Displays the "Date Range" dialog box where you have the possibility to customize the dates where the evolution chart starts and/or ends:
• Begin. If you check it, your chart evolution will start with the date when you made your first update.
111
Interactive Reports
• Today. If you check it, your chart evolution will end with today's date.
• Set Date. You can use the calendar to select either the begin or the end date for the evolution
chart.
A context menu is available for the chart, with the following options:
• Save As.
Saves the chart view into a .png or JPEG file. Note that the file will contain only the current view of
the chart (so be sure to save the right section of your chart).
• Print.
Allows you to print the chart view.
• Zoom In .
You can magnify the chart view on both axes. The area that will be zoomed in has its center in the
point where you click with your mouse.
If you want to magnify only a certain area, click with the left button of your mouse to specify the top
left point and drag it to select the desired area.
• Zoom Out .
You can decrease the chart view on both axes. The area that will be zoomed out has its center in the
112
Interactive Reports
point where you click with your mouse.
• Show All Data In Range.
Redraws the chart so it fits all the data into the view. The same effect can be achieved by doubleclicking on the chart, or by drag and dropping with your mouse from a lower position to a higher one.
Search Engine Evolution views
The application allows you to view the Search Engine Evolution report in three different ways.
The Search Engine Evolution report has the following views available:
• Search Engines Overview. - displays an overview of the number of incoming links for each search
engine, and the total number of incoming links summed up for all search engines, for a selected period of time
• Referrers by Search Engine. - displays the referrers for a selected domain and search engine
• Search Engine Evolution Chart. - displays a chart with the evolution of incoming links over a selected period of time
Link Text
The Link Text Report shows an overview of the text contained in the anchor tag of a backlink. This report has two views:
• The Tree View.
This is a hierarchical view that shows the link text as parent and the referrers as chilidren.
113
Interactive Reports
The lower panel of this view shows detailed information about the links such as the link type, the position of the link in page, and whether or not it has the no follow attribute set. There is also information
about the referrer contained, such as the page title and the number of outbound links in that page.
The following display filters are available:
• All links.
Displays all the links regardless of their nature.
• Text links.
Displays only the links with text as the anchor content.
• Image links.
Displays only the links with images as anchor content.
• No follow links.
Displays only the links that have a rel="nofollow" hyperlink attribute set.
The dynamic text filters can also be used for additional filtering of the URLs and the Link Text.
114
Interactive Reports
• The Chart.
This is a pie chart that shows the link text that is used more often when linking to your page. It shows
the share of the pie for each link text from the total number of links that point to your website.
In the lower panel there is a legend of the above pie chart. Selecting an item in the legend will cause
the slice that belongs to that item to detach from the chart for more visibility.
The following display filters are available:
• Top 5.
Displays only the first 5 link texts that and groups all others in a single section called "Others".
• Top 10.
Displays only the first 10 link texts that and groups all others in a single section called "Others".
• Top 15.
Displays only the first 15 link texts that and groups all others in a single section called "Others".
115
Interactive Reports
Link Text views
Advanced Link Manager allows you to view the Link Text report in different views.
The Link Text report has the following views available:
• Link Text Tree. - displays the Referrers grouped by the link text used in the referrers link for a selected domain
• Link Text Overview. - displays all the link text used by the referrers for a selected domain
• Link text Chart. - displays a pie chart showing the percentage of each link text used by the referrers
Last rank change
The last rank change filter shows only the referrers with their rank changed in the selected period of
time.
The Keyword Analysis Tool
The Keyword analysis tool is useful for finding out various keywords related information like keyword
density, occurrences in the page, occurrences in the anchor text and the word count of each phrase
found. Before seeing any results you should analyze your websites. To do that you need to press the
"Analyze websites" button from the upper region of the report
Pressing the down arrow button next to the "Analyze websites" button will show an update context
menu with the following options:
• Analyze all websites. This will start an update of the current day for all the websites in the project.
• Import history for all websites from WayBackInTimeMachine. This will start an update for all
the websites in the project that will import from WayBackInTimeMachine all the available change
dates.
• Analyze selected websites. This will start an update of the current day for the websites selected in
both left side input panels.
116
Interactive Reports
• Import history for the selected websites from WayBackInTimeMachine. This will start an update
for the selected websites from both left side input panels that will import from WayBackInTimeMachine all the available change dates.
Compare View
This panel contains two sections for each selected URL. In the upper section you will see an analysis of
the general URL information. The information presented here contains the URL title, IP address, parent
domain, page size and a meta information analysis. The lower section displays the words and phrases
found in the page text along with the time they occurred in the text, anchors and their densities
The Keyword Analysis tool has two ways of displaying the analysis data. The first is a side by side comparison of two different web pages. To do that, select two different web pages in the left side input panels.
The second way is to compare two different analysis dates of the same domain. In this mode the
Keyword Analysis tool will display the differences between the two selected days.
The Keyword Analysis tool allows you to set up various parsing parameters. You can set these parameters by pressing the Options button.
117
Interactive Reports
In the Options panel you can specify the maximum number of words in a phrase. You can also specify
the maximum and minimum density percent that will determine the coloring of the density column.
Definitions
Occurrences. Represents the number of times a keyword is present in the selected page.
Density. The density represents the appearance percent of a keyword or phrase compared with the total
number of words present on that web page. So if a word appears 10 times in the page and the page contains 100 words, the density is 10%. The same goes for phrases(groups of words). If a phrase appears 10
times and contains 3 words, the words appear 30 times, and if the page contains 100 words, the density
of the 3 words phrase is 30%.
Prominence. The prominence represents how well a keyword or phrase is placed in a sentence. If a
keyword is the first word in a sentence, it has 100% prominence. If the keyword is in the middle of the
sentence then it has 50% prominence and if it is the last it has 0% prominence. In the case a keyword appears two times in the same sentence, then the prominence is the average of those two occurrences. For
example, if the keyword appears first and last in the sentence, then the prominence is (100% + 0%)/2 =
50%.
What text is considered for Keyword Analysis
118
Interactive Reports
Entire text. The Entire text view displays as keywords and phrases, the content of title tag, meta description and keywords tags, anchor tags, ALT tags, H tags and body copy.
Title. The title tag is extracted from the web page and it's content is displayed as keywords and phrases.
Links. The anchor tags are extracted from the web page and their contents is displayed as keywords and
phrases.
Img ALTs. The ALTs attributes are extracted from the img tags and their contents is displayed as
keywords and phrases.
Meta keywords/description. The content attribute of the meta tag with the attribute name equal to
keywords/description is extracted, and it's content is displayed as keywords and phrases.
Headings. The H tags are extracted from the web page and their contents are displayed as keywords
and phrases.
Overview View
This view displays an overview of the changes made to specific pages of your website or your competitors websites.
The Keyword Analysis Overview lets you select what changes you want to be displayed in the report,
being them for the entire text, changes made for the title, link, Img ALTs meta information or headings.
The Email Client
The email client provides POP3 and IMAP email retrieving connectivity and SMTP email sending for
your configured accounts. There are three incoming (POP3 or IMAP) configurations available: the global settings available via Options menu->Preferences->Email panel, the project settings available via
Project menu->Project settings>Email panel and the contact details settings available via the Options
menu->Edit contact details->Email panel.
Pressing the "Retrieve emails" button will start retrieving the emails from your configured email accounts. To stop retrieving the emails just press the "Stop" button next to the "Retrieve emails" button.
The Folders panel contains a folder for each incoming email settings, one for the Sent emails and a
Trash folder. This panel will also show which folder contains unread emails and how many they are.
119
Interactive Reports
The sent contains the email messages you sent from within Advanced Link Manager via the Domain information report Email composer or via the Email client Write email dialog. Note that all messages can
be moved from one folder to another or deleted except the messages that were sent from the Domain information report Email composer.
The Toolbar contains buttons for the following action:
Retrieve emails - Retrieves the emails from the configured POP3 or IMAP accounts.
Stop - Stops the email retrieving.
Compose - Opens the email composer allowing the user to compose and send an email.
Reply - Opens a reply message for the currently selected email message.
Forward - Opens a forward message for the currently selected email message.
Print - Prints the selected email message to a specified printer.
Export to file - Exports the selected email message to a text file.
Move to trash - Moves the selected email message to the trash folder.
The message panel displays brief information about the email message like from, to, subject, date and
size. Clicking the columns of this list will sort the message accordingly. The message selected in this list
will be displayed in the message panel below.
The filter panel from the left side of the toolbar helps you filter the available messages by all fields.
120
Interactive Reports
The message panel displays the content of the email message along with the all header information
available: from, to, subject, cc, bcc and date.
Note
The integrated email client reads only the plain text from within your messages. To see or download the attachments of your emails you must use another email client.
To setup periodical checks for new mail use the global email settings
The Broken Links report
The Broken Links report helps you if your pages contain broken or invalid links. This retrieves the links
from your project pages and checks if the URLs they point to still exists. If it does not exist it will consider it a broken link.
The report presents the following columns:
• The Project URL. This is the URL contained in your project that was checked for links validity
• The External link. This is the URL that one of the links from your Project URL links to
• The status. The status can be broken or normal
121
Interactive Reports
The check for broken links is done on demand, by pressing the green button "Check for broken links".
You also have the ability to filter the links by three criteria:
• All. All links will be displayed regardless of their status.
• Normal. This filter will show only the links that have been found valid.
• Broken. This filter will show only the links that have been found broken or invalid.
The dynamic text filter will show the links who have at least one of their URLs (project URL or external
link) matching the text filter.
The Indexed Pages report
This report presents the pages from your project websites that have been found in the search engine's index (for the search engines that support this feature). Basically this is a site:www.domain.com search on
the search engines that support this command and it returns the pages that the search engines indexed
from your website.
The columns presented by the report are:
• The URL. The page found in the search engine index
122
Interactive Reports
• The Search engine. The search engine that returned that page
A dynamic text filter is available that will remove from the display the URLs that do not contain the filter text.
Indexed pages views
Advanced Link Manager allows you to view the Indexed pages report in different views.
The Indexed pages report has the following views available:
• Indexed Pages. - displays the URL of the indexed page and the search engine where that specific
page is indexed for a selected domain
• Indexed Pages Overview. - displays the total number of indexed pages and the number of indexed
pages for each search engine for a selected domain
• Indexed Pages Evolution. - displays a chart with the evolution of indexed pages over a selected period of time
Reciprocal linking
The Reciprocal linking report evaluates multiple way link exchange between you and your link exchange partners.
This helps you keep track of your link exchange campaigns, when having three way, four way link exchange, or more.. Let's say that you own two domains, domainA.com and domainD.com, and one of
your link exchange partners owns domainB.com and domainC.com. A three way link exchange would
look like this:
• domainA.com links to domainB.com.
domainB.com links to domainD.com.
A four way link exchange would look like this:
• domainA.com links to domainB.com.
domainC.com links to domainD.com.
The reciprocal linking report displays the status of this kind of link exchange, if the link exchange chain
is OK or if it is broken somewhere. In this way you can see at any time if one of you partners removed
the link from their website.
123
Chapter 9. Printable Reports
Advanced Link Manager can also present the information gathered from search engines as printable reports in the following formats: HTML, PDF, CSV and XML . There following reports are created by default in any new project: Domain Information Report, Unverified Referrers Report, Referrers Report,
Referrers Overview Report, Link Text Report, Link Text Overview Report, Referrers Information Report, Referrers by Search Engine Report and Search Engines Report. To create a new report, you can use
the Report wizard which will help you create printable reports customized to your own needs.
The first step of the wizard allows you to choose one of the three types of reports available:
• Domain Information Report.
This report shows only the referrer domains from your project and various information about them
such as: IP, Rank, Alexa Rank, Domain age
• Unverified Referrers Report.
This report shows the referrers as they were gathered from the search engines. These referrers may
not link back to your website.
• Referrers Report.
This report shows only the referrers that link back to your website, with detailed information about
them.
• Referrers Overview Report.
This report shows only the referrers that link back to your website, with a side-by-side comparison of
your competititon.
• Search Engines Report.
This report shows the evolution of the number of links to your targets as provided by the search engines.
• Link Text Report.
This report shows the top link texts and the referrers they come from.
• Link Text Overview Report.
This report shows an overview of the links count for each link text and each website in your project
• Referrers by Search Engine Report.
This report shows the referrers verified by the Verify link status update and the Search Engines that
reported them
• Referrers Information Report.
This report displays detailed information about the referrers from you project such as: IP, URL title,
Page Rank, Referrer Category, Tag and Meta information
124
Printable Reports
Input
The second step of the report wizard allows you to set the input data needed to generate the report.
First of all we need to select a date as the report current date. Here we can choose an exact date when an
update was made. For convenience, a "Last update" date is also available so you can generate the report
for the day the last update was made.
If we want to compare the curent day data with the data from an earlier date, all we need to do is check
the "Show changes compared to" option and select a date from the drop down list. Here too you can
choose "Previous update" and the report will always consider the previous update date as the comparison date.
There are two types of input data: Domains and Search Engines. By default all the domains and search
engines are included in the report. To choose only some of them, uncheck the "Include all domains" option for example and use the "Select..." button that appears on the right side to select only the domains
you are interested in.
Output
The next step of the wizard allows us to edit the output settings of the report:
125
Printable Reports
Here we can set the the format the report will be generated. On the right side of the format drop down
list, we have a "Preview" button that allows us to see exactly how the report will look like. Try changing
any option or a filter and press the "Preview" button to see how Advanced Link Manager will display
the report.
Filters and Sorting
In this section you can choose the column the report will be ordered by as well as the order (ascending
or descending). You can also filter out the referrers you don't need using the rank, status or any other filter available. The "Exclude empty sections" option will prevent the report to display sections that are
empty because the filter excluded all data from them.
Layout
The "Insert charts" option allows you to include the graphical evolution charts in the report. When this
option is enabled, the "Setup..." button on the right side will allow you to change additional options for
the charts.
126
Printable Reports
Here you can select the date range you wish to see in the charts as well as the range of the links count.
The "Show legend" options lets you add a legend at the end of the chart.
Unckeching the "Show all columns" option will enable the "Select..." button on it's right side that will
allow you to select the columns you wish to appear in the report..
127
Printable Reports
Check the "Use header footer template" option if you want to use a "Header and Footer" template with
this report. When the option is checked, the header and footer templates drop list will be enabled and
you can choose one of the templates available. You can press the "Setup..." button on the right side of
the list to manage your header and footer templates.
If the "Color URLs in reports" option is enabled, all the URLs from the report will be colored with their
designated colors from the project settings.
Destination
The next step of the wizard allows us to edit the destination of the report:
128
Printable Reports
Report Description
In the Report Description section you can choose the title of the report and the report name. The report
will be saved to your hard disk using this name and it can be set to a certain name, or it can be a templetized name formed of the name of the template, the name of the project and the date it was created. If you
wish to set a custom name for the report just uncheck the "Use default name" checkbox. Unchecking the
"Append date" checkbox will also exclude the date from the name of the report.
Destination Settings
In this section you can choose the destination of the generated report. You can select one or more destinations from the three available destinations:
• Local folder.
To save the report to a local folder just check the "Save to folder" option. To create separate folders
for report type, year and month check the "Create separate folders for report type, year and month"
option. The text field above this option will show you the report save folder path. This path is used by
all the report templates from this project. If you want to change this path, just press the "Select..." button which will take you to the "Project settings" dialog where you can choose the desired folder.
• Email.
To send the report to a list of emails select the "Send by email" option. When you press the Next but129
Printable Reports
ton, the wizard will take you to an additional step where you can choose the contacts you wish to send
this report to.
• FTP Server.
To upload the report to a list of FTP servers, select the "Upload report to FTP server" option. When
you press the Next button, the wizard will take you to an additional step where you can choose the
FTP profiles you wish to upload this report to.
Summary
The final step of the Report wizard is where you can see an overview of the report data, before you save
any changes you made to the report template:
130
Printable Reports
If you wish to generate the report after creation, make sure the "Generate the report when the wizard finishes" option is checked before you press the "Finish" button.
131
Chapter 10. The Event Logger
If you happen to use Advanced Link Manager every day and you have many projects that are updated
regularly using the scheduler, you may lose track of what's happening behind the scene. That's where the
Event Logger comes to help. It will tell you exactly what happened, at what time, and whether
everything went fine or not. It can even send you an email automatically when certain event types occur.
The Event Logger
There are many events that are logged by the Event Logger. Here's a list of actions that can add an entry
to the list:
• Scheduled Updates
• Multiple Scheduled Updates
• Sending Emails
• FTP Uploads
• Generating Reports
• Application Errors
All the events are presented to you in the Event Log Viewer:
Knowing what happens is especially useful when running updates from the scheduler because the update
is done in the background, so you have no way of knowing what actually happened.
As you can see from the picture above, you have the option to display all the logged events, or you can
132
The Event Logger
filter them by selecting a specific year and month.
You can also have certain events sent to you by email. Just click on the Edit button to select which event
types you wish to receive. If your email preferences are not set, you will be prompted and a new dialog
will appear that will allow you to set them.
The events have been broken down in three separate categories, depending on their status:
• Error - This usually means something wrong has happened and needs your immediate attention.
• Warning - This may be a possible problem, or a setting that has been set incorrectly.
• Information - This is used for notification of an action that has been done.
Detailed Event Information
If you double click on an event in the "Event Log Viewer", a dialog will pop up, with details about that
particular event. You can copy this information to the clipboard by pressing the "Copy" button.
133
The Event Logger
134
Chapter 11. Generate Link Pages
Advanced Link Manager gives you the ability to generate web pages with links to your partners and upload them automatically to your website.
Generating link pages in Advanced Link Manager is easy. All you need to do is assign links to a category and then go to the [Tools] -> [Generate link pages] menu to access the wizard.
To assign a link to a category just right click on a link in the Unverified Referrers report and choose Assign to link category. If no category is created, or if you want to create a new category, choose New in
the above menu.
It is important to understand that there are two types of categories in Advanced Link Manager. Therefore you need to assign the link to a link category, and not to a referrer category, which is used for other
purposes.
Once you have assigned the links to your categories you can begin generating your link pages.
Access the link page generator wizard by going to the [Tools] -> [Generate link pages] menu. The first
step of the wizard allows you to select an existing template, or create a new one if none exists.
If you need to create a new template, select "New Template" and click on Next. The following step allows you to define the layout of the link page. Once you define a template, you can use it later to generate your link pages.
Defining a link page layout consists of selecting how the categories will be shown (all in one page, or
each category in its own page), how many links you want to show on each page, and how the HTML
page should look when generated.
135
Generate Link Pages
For the HTML page layout, you also have the ability to define templates. A default template exists that
can help you get started right away, but you can always create a new one to customize the look and feel
of your link pages.
The next step of the wizard allows you to specify how the links and their respective categories will be
sorted.
The final step of the wizard allows you to define the location of your link page(s). By default they are
saved in a folder, but you can upload them to your website using a predefined FTP template.
When the wizard finishes, the link pages are generated. You are then presented with a dialog that allows
you to generate the link pages again in case you wish to change something, or edit the HTML template,
to match the same look and feel as your website.
Link Page HTML Layout
The link pages HTML layout can be customized and the changes can be saved in a template for later
use. To access the link page HTML layout manager, go to [Options] and click on the [Manage link page
HTML layout] menu.
136
Generate Link Pages
There are two templates created by default, one for each type of layout: all categories in one page and
each category in its own page. When you create a new template, you can begin with one of these templates and then customize them to your needs.
To customize the HTML code, click on the section you wish to change. An HTML editor will open
where you can edit your changes. Click OK to save the changes and then Preview to see if everything
looks as it should.
There are two HTML sections that you can customize: Index page and Category page. These are two
separate entities when you create the link pages with one category per page. However, when you choose
to display all categories in the same page, these two entities combine to give you the same result in one
page.
137
Generate Link Pages
Link Categories
To generate link pages you need to assign the links to a category first. If that category is not already created, you can create it from the categories manager. Go to the [Options] menu and then click on
[Manage link categories] to access it.
The link categories manager shows detailed information about the selected category in the main view.
Here you can create a new category, edit or remove the selected one.
To assign links to a category use the context menu from the Unverified Referrers report.
138
Chapter 12. User Profiles and Access
Groups
User Profiles
Advanced Link Manager allows you to have a custom profile for each user. Along with the added security coming from the authentication window, you also have the ability to manage what rights the users
have to the stored data.
Each user is assigned to an Access Group and inherits the rights defined in the access group.
The most important feature that comes with the addition of user profiles is the ability to store each user's
preferences separately, such as proxy and email server, API keys and all other global settings that are
available within the application.
You can access the user profiles manager from the [Options] menu.
Access groups
The access groups allow the Administrator to define groups of users that have the same rights.
The users can be restricted from updating projects, changing the project preferences and many other operations. A full list with the restrictions allowed by Advanced Link Manager is available within the New
Access Group dialog.
You can access the manager from the [Options] menu.
Note
Upon an Access Group removal, all the users belonging to that group must be moved to another access
group. Advanced Link Manager will prompt the Administrator for the new access group.
139
Chapter 13. Header and Footer
The Header and Footer template allows you to add custom headers and footers to your reports.
To create a header and footer template select [Options] -> [Headers and Footers] -> [New Header and
Footer...].
The Header
The Default header contains:
• The name of your Company
• The address of your Company
• The web address of your Company
140
Header and Footer
• Your Company logo
And data about your client:
• The name of your client
• The web address of your client
The HTML Header may contain an HTML code that will determine the personalized image of the header in your report.
The Footer
141
Header and Footer
The custom footer may contain any information you want to add to the report.
• You can add your company's web address by checking the option at the bottom.
• You can put a default text in your footer by pressing the [Default Footer Text] button.
• If you want to preview your Header and Footer template in HTML format, press the [Preview] button.
The HTML footer may contain an HTML code that will determine the personalized image of the footer
in your report.
142
Chapter 14. Global Preferences
The Advanced Link Manager Preferences allows you to specify settings that apply to the entire application, changing and customizing the behaviour in accordance with your requirements.
You can access the Global Preferences from the toolbar button, by using the keyboard
shortcut Ctrl+P or by selecting [Options] -> [Preferences...] from the Main Menu.
Application
Application Settings
• Data Folder.
This tab allows you to change the location of the folder where Advanced Link Manager keeps its data.
When you press the [OK] button, the path to the old data folder is renewed by the path of the new data
folder.
143
Global Preferences
• Reports folder.
This setting allows you to select the application default reports saving folder.
• Choose project at startup.
If you want the next time Advanced Link Manager starts to be prompted with the available project
from your data folder, check this option.
• Display success message on FTP upload.
Check this option if you want to be notified when the reports set to be uploaded on FTP servers finish
uploading.
• Show Advanced Link Manager Assistant after loading a project.
Check this option if you want to be prompted with the Advanced Link Manager Assistant each time a
project is loaded.
• Show Advanced Link Manager Assistant after an update is done.
Check this option if you want to be prompted with the Advanced Link Manager Assistant each time a
project finishes updating.
• Use Java look and feel.
Use the default Metal Java look and feel.
Note
This option requires Advanced Link Manager restart.
• Display the view description on the view buttons.
Check this option if you want to see the description of the report views next to the view's icon.
144
Global Preferences
Reporting
Ignore URLs with non-web extensions when gathering from search engines. By selecting this option Advanced Link Manager will ignore, when gathering the results from search engines, any URLs
with non-web extension. This type of URLs will not be present in any report.
Assume non-web extensions as linking. This option will make Advanced Link Manager assume that
all non-web extensions are linking to your website and will see all of them as referrers.
Automatically add new found pages to the project, when verifying links. By selecting this option
Advanced Link Manager will automatically add to your project any new page of your website found
when verifying links from referrers.
Chart settings
Exclude search engines with 0 links count from the charts. This option will cause Advanced Link
Manager to ignore the 0 links count search for the search engines chart. This option is useful if a search
engine fails due to a parsing error and the link count drops from a high value to 0. After the search engine is fixed the chart will no longer show a drop spike for that search engine if this option is checked.
Referrers quality ratio
Here you can select which formula will be used to determine the referrers quality ratio from the Referrers Report.
145
Global Preferences
Use PR divided by the total number of outbound links. Since the PR is the higher the better, the
higher the ratio is, the better the referrer is.
Use Alexa Rank divided by the total number of outbound links. Since the Alexa Rank is the lower
the better, the lower the ratio is, the better the referrer is.
Rank color
In this section you can choose the colors you want for the Rank columns all over the application and in
the printable reports.
Color foreground. Use this option if you want the text to be colored in the Rank column
Color background. Use this option if you want the background to be colored instead of the text in the
Rank column
Email Settings
146
Global Preferences
The following fields have to be filled in if you wish to receive emails with the reports:
SMTP settings
• Email Address.
Enter your email address here.
• SMTP Server.
Enter your SMTP server, either using its name or its IP address.
• SMTP Port.
Enter the SMTP port. The default value is 25 for no secure connection and 465 for SSL connection.
SMTP Authentication
If your SMTP server requires authentication, you need to enter your user name and password here.
Advanced Link Manager can use a secure connection when sending emails through the SMTP server.
For this you can use either the TLS or SSL encryption, depending on what your SMTP server requires.
147
Global Preferences
POP3 and IMAP
Here you can setup your global POP3 or IMAP incoming email account. This account will be available
in the Email Client report where you can receive email using it.
• POP3.
Selecting this option will make this account use the POP3 protocol to retrieve emails
• IMAP.
Selecting this option will make this account use the IMAP protocol to retrieve emails
• Mail server.
Specify the mail server this account connects to retrieve emails
• Username.
Specify the user name used to connect to the mail server
• Password.
Specify the password needed to authenticate the selected user on the mail server
148
Global Preferences
• Use secure connection.
If your server requires a secure connection check this option and SSL will be used to connect to the
server
• Check for mail every X minutes.
Set Advanced Link Manager to automatically check for new mails every X minutes
• Check for mail on application startup.
Set Advanced Link Manager to automatically check for new mails each time it starts
FTP settings
Here you can setup some of the FTP connection parameters.
• Number of times to retry if FTP server busy.
If the FTP server is busy try to reconnect for the specified number of times. The FTP connection
timeout will be respected on each retry.
149
Global Preferences
• Delay between retries (seconds).
Wait for the specified number of seconds before retrying on a busy server. This is useful to prevent
hammering the FTP server.
• FTP connection timeout.
Consider the connection to a FTP server has timed out after the specified number of seconds.
• FTP connection read timeout.
Consider the connection to a FTP server has timed out after not being able to read from the connected
FTP server for the specified number of seconds.
Performance
Maximum number of simultaneous connections
This preference controls how many HTTP connections to search engines will be made simultaneously.
A higher number will mean a faster update, while a smaller number a slower one.
You should set this option carefully, based on the bandwidth and performance of your computer. We
150
Global Preferences
strongly recommend a conservative setting. A higher setting may easily consume all the bandwidth of
your Internet connection and/or your CPU cycles.
Maximum connections per domain
Increase this option if your projects include referrer domains with large numbers of referrers.
Search depth
This preference controls the number of referrers downloaded by Advanced Link Manager for each of the
project URLs. Note that higher settings may significantly slow down your updates .
Indexed pages search depth
This preference controls the number of search results downloaded by Advanced Link Manager from the
list of indexed pages, for each project domain in selected search engines. Note that higher settings may
significantly slow down your updates.
Number of retries if a connection fails
This preference controls the number of times the application tries to connect to a search engine in the
event of a connection failure or timeout.
Limit page size when gathering link details
This preference controls the maximum size a single web page is allowed to have. If the page exceeds
this size, the download will stop and only the data downloaded so far will be taken into account. The
links will only be searched for in the part that is downloaded, the rest of the page will be ignored.
Connection timeout
This preferences controls the timeout of a connection attempt to either a search engine or an URL.
Read timeout
This preferences controls the timeout of a read attempt to either a search engine or an URL.
Get rank only for newly found URLs
This option tells Advanced Link Manager to gather the Page Rank only for new Unverified Referrers
found in the search engines.
Retrieve rank on sequenced connections
This option is strongly recommended if you have selected more that 5 maximum simultaneous connections or if you are updating the rank for multiple URLs by selecting them in the Unverified Referrers report.
151
Global Preferences
Be nice to Search Engines
When this preference is on, Advanced Link Manager will exercise the lightest possible load on the
search engines resources by mimicking a human action as close as possible. For that, it will avoid simultaneously sending two different queries to the same search engine and it will make pauses between
downloading two pages from an engine.
It is very important to keep this preference checked. Because automated querying can impose a very
high load on the search engines, some of them may take action against users abusing their services.
Random delay between queries
If the "Be nice to Search Engines" option is selected, you can specify here the upper and the lower limits
of a random time interval that Advanced Link Manager will wait in between two consecutive queries.
Sleep after a number of searches
If the "Sleep [number] minutes after [number] searches" option is selected the application will stop gathering data from the search engines for the specified number of minutes after the specified number of
searches. A search means a keyword looked up on a search engine, with the specified number of results
retrieved.
Sleep after a number of failed connections
152
Global Preferences
If the "Sleep [number] minutes if a search engine fails [number] times" option is selected, the application will stop gathering data from the search engines for the specified number of minutes after the specified number of failed connections. Note that each failed connection is made up of the above mentioned
number of retries. Only the querying of the search engines that fail to retrieve data will sleep for the desired number of minutes.
Google AJAX API
Click on the "Use Google AJAX API" option and then enter the one or more keys that you received
from Google. As long as this option is enabled, all searches made on the Google search engine will use
the Google AJAX API.
Important
You have the possibility to use more than one Google AJAX API key. After you finish entering your first
Google AJAX API key, just press on the "+" button and enter another one. Don't forget to press on the "+"
every time you want to insert a key. Use the "-" to remove the selected key from the combo box.
Yahoo API
Click on the "Use Yahoo API" option and then enter one or more keys that you received from Yahoo.
As long as this option is enabled, all searches made on the Yahoo search engine will use the Yahoo API.
153
Global Preferences
Important
You have the possibility to use more than one Yahoo API key. After you finish entering your first Yahoo
API key, just press on the "+" button and enter another one. Don't forget to press on the "+" every time you
want to insert a key. Use the "-" to remove the selected key from the combo box.
The Yahoo API is still in Beta stage so its parameters could change over time until a stable version is released.
Proxy Settings
Some organizations require their users to use a proxy server to access the Internet. If this is your case,
154
Global Preferences
then you need to fill in the fields below:
• Use a Proxy Server.
Check this box if you want to use a proxy server.
• Manage proxy servers.
This button will display the Proxy servers manager where you can add, remove or edit your application proxy servers. Advanced Link Manager can connect to the search engines using multiple proxy
servers. This way the speed of the update process increases by the number of diffent proxy servers
specified, without interfering with the search engine friendly policy.
When connecting via a proxy server you have three additional options available:
• Do not use direct connection.
If this option is selected, Advanced Link Manager will use only the proxy servers for all connections.
• If proxy fails use direct connection.
When Selecting this option Advanced Link Manager will use direct connection only if the configured
proxies fail.
• Add direct connection to the proxy list.
This option adds direct connection to the proxy list and Advanced Link Manager uses it simultaneously along with the configured proxy servers.
Report preferences
155
Global Preferences
CSV separator
This separator will be used to separate the values in rows in a CSV report. The most commonly used
separator for the CSV format is the Tabulator.
CSV extension
This option is useful if you want to import the CSV reports in a spreadsheet office application. Some of
these applications will display a separator selection wizard only if the file that will be imported is considered a text file, so you will need to change the extension from the default "csv" extension to "txt" extension
Trim spaces from the file names
By default the reports are saved in files that contain spaces in their names (i.e. Search Engine Evolution). Since many users want to upload their reports on web servers this option gives a better compatibility with the file naming convetions.
Keyword Analysis
156
Global Preferences
Keyword analysis data storage
Select the folder where Advanced Link Manager will store the keyword analysis data.
Note
The keyword analysis data is compatible with Advanced Link Manager so you can share this folder if you
have Advanced Link Manager installed on your computer.
Word/Phrase
• Maximum words in phrase. Set the maximum length of a phrase. Phrases with lengths larger than
the specified number (except when in Original content mode) will not be displayed.
• Maximum density percent. Set the maximum percent of optimal density
• Minimum density percent. Set the minimum percent of optimal density
Note
The phrases that have densities contained within the maximum and minimum density percents will be
colored in green, the phrases that go below the minimum density percent will not be colored and the ones
157
Global Preferences
that exceed the maximum density percent (considered spam) will be shown colored in red.
Options
• Show suggestions. Sometimes the size of a page is too large, the number of characters contained in a
meta tag is too big or a meta tag is missing. Enabling this option will show you our advice regarding
this issues.
Note
This is only our opinion on these subjects and should be regarded as such
• Display only words with more than X characters. Do not display the words that contain less than
the specified number of characters.
Note
Even if these words are not shown they are still take into consideration when the density and proeminence
percents are computed.
Diff settings
Select which of these criteria should be considered as a phrase change.
• Occurences. Consider that a phrase has changed if the number of occurences in the page has
changed.
• Density. Consider that a phrase has changed if it's density in the page has changed.
• Proeminence. Consider that a phrase has changed if it's proeminence in the page has changed.
Note
These settings can be locally overridden from the Keyword analysis tool.
158
Chapter 15. Proxy servers manager
Proxy servers manager
The proxy servers manager allows you to define one or more proxy servers that will be used by Advanced Link Manager when retrieving results from the search engines.
The following actions are available:
• Add. Shows the new proxy settings dialog where you can add a new proxy server to the application
• Edit. Shows the edit proxy server dialog where you can change the settings of the currently selected
proxy server
• Remove. Removes the selected proxy server from the application
• Set default. Sets the currently selected proxy server as the default application proxy server
Note
The default proxy settings are used to download new search engine updates, and any other connections besides the connections to the search engines
159
Chapter 16. Website Crawler
Website Crawler
The Website Crawler tool allows you crawl your entire website or pages until reaching a specific level
and provide information about each crawled page:
• Page Rank
• HTTP Response
• Page Title
• Outbound links - which represent the number of external links
• Onsite links - which represent the total number of internal links
• Size of the page
• Meta Description
• Meta Robots
• Meta Keywords
• Meta author
• Robots no follow
160
Website Crawler
Once retrieved and analyzed the results, they can be exported as Google Sitemap(XML) or Yahoo
Sitemap(TXT).
Additionally, you can add selected crawled URLs to a list from where you can add as project URLs, referrer URLs or export to a file. You can do this by selecting one of the buttons from the bottom of Website Crawler.
161
Chapter 17. Google Maps Webpages
Importer
Google Maps Webpages Importer
Google Maps Webpages Importer helps you get the web pages displayed in Google Maps when looking
for additional information about a local business.
Web Pages are citations of that listing from other websites and represent an important ranking factor in
local search. By getting and having a good idea about your competitor's web pages, you can then try obtaining listings from the same websites as your competitors.
To start getting information about your competitor's citations enter the keywords and select the search
depth of web pages. Additionally you can select to retrieve the page rank for the web pages found. Then
simply select the [Start] button.
Once the update starts, you can display the results by selecting [Show Google ten pack].
Note
162
Google Maps Webpages Importer
[Show Google ten pack] will display the same results you see in Google Maps after you click [Local business results for ...] in Google Web Search.
When the update finishes Google Maps Webpages Importer can display additional information about the
retrieved URLs if the [Gather additional information] button is selected:
• Page Rank
• HTTP Response
• Page Title
• Outbound links - which represent the number of external links
• Onsite links - which represent the total number of internal links
• Size of the page
• Meta Description
• Meta Robots
• Meta Keywords
• Meta author
Once analyzed the URLs gathered from Google Maps, you can select the ones you consider valuable
and worth trying to get a listing from and then add them to the [Selected URLs] list. From here you can
add as project URLs, referrer URLs or export to a file. Just select one of the buttons from the bottom of
Google Maps Webpages Importer.
163
Chapter 18. Webpage Analyzer
Webpage Analyzer
The Webpage Analyzer let's you analyze pages of your website or potential link partner's websites. It
can be also used to analyze your competitor's websites.
To analyze the pages you can manually enter their URLs, import them from a file or by parsing an URL.
The last option will import all the existing links in the page from the specified URL.
Once the URLs are added to the list, press the [Gather additional information] button and Webpage Analyzer will automatically start to gather information about your URLs which you can analyze.
When the update finishes Webpage Analyzer will display the additional information gathered from
search engines:
• Page Rank
• HTTP Response
• Page Title
• Outbound links - which represent the number of external links
• Onsite links - which represent the total number of internal links
• Size of the page
• Meta Description
• Meta Robots
• Meta Keywords
• Meta author
• Robots no follow
164
Webpage Analyzer
Once you finish analyzing and refining the URLs, you can add them as project URLs, as referrer URLs
or export to a file by selecting one of the buttons at the bottom of Webpage Analyzer.
165
Chapter 19. Notes
Notes
You can add notes to your project to remind you for some actions you took in the past or that you wish
to take in the future. These notes appear in the charts as vertical lines on the date they are set.
To add a note, go to the Tools -> Notes dialog menu and add a new note. Alternatively, you can add a
note by right clicking on any chart.
Notes can also have a priority such as Normal, To Do and Important:
• Normal Notes.
Normal notes show up as a black vertical lines in charts.
• Important Notes.
Important notes show up as a red vertical lines in charts.
• To Do Notes.
To Do Notes show up as blue vertical lines in chart. The difference between To Do notes and the other notes is that if you launch the application on the day the note was set, you will be presented with a
dialog that will show you the contents of the note.
166
Chapter 20. Search Engines Additional
Parameters
Search Engines Additional Parameters
Search Engines Additional Parameters allows you to improve the search engines queries by adding additional parameters which will tailor the search engine results.
To add new search engine parameters go to the [Options] menu and select [Setup search engines parameters]. A new window will appear which contains a list with all the search engines available in Advanced Link Manager. To add new parameters select the specific search engine and edit the parameters
from the [Additional parameters] column.
Important
Please use this feature carefully because entering wrong parameters for search engines may affect the results returned by search engines.
167
Chapter 21. Analyze Domain Quality
Analyze Domain Quality
Analyze Domain Quality lets you analyze the quality of one or multiple domains you owe or domains of
your potential link partners. It helps you discover which domains are worth getting links from and which
are not.
Columns like Page Rank, Links count average or Ranking average can help you see the differences
between the domains you are analyzing.
To access the Analyze Domain Quality tool go to the [Tools] menu and select [Analyze Domain Quality]. A new window will open which will let you add one or multiple domains to be analyzed. You can
add domains manually, import them from a file or by parsing an URL.
When you finish entering your domains, just press the [Analyze domains quality] button and Advanced
Link Manager will start gather information about the domains you entered. It lets you see important information about a domain including page rank, meta information, indexed pages average, the average of
total links, ranking average, search engine/keywords hits and Compete rank, visits and visitors.
Once you finish analyzing the domains you entered, you can add them as project URLs, as referrer domains or export them to a file.
168
Chapter 22. Referrer Categories
Referrer Categories
Referrers categories allow you to assign domains, unverified referrers or referrers to a specific category.
This can later help you filter and see in your reports only domains and referrers from a specific category.
For each category you can set up colors and priorities.
To assign a domain/referrer to a category simply right click on the domain/referrer, select the [Assign to
referrer category] option and finally select the respective category.
169
Referrer Categories
To create a category, first select from the [Project] menu the [Manage referrer categories] option. A new
window will appear which allows you to add, edit or remove categories. The referrer categories manager
also allows you to import or export categories. This option is useful when you create categories for a
project and later want to import them to another project.
170
Referrer Categories
Click on the [Add] button to add a new category and tailor it for your needs:
• Parent category. Use this option when you want to create a subcategory
• Name. Select a name for your category
• Color. Assign to your category a color so it can be easily identifiable
• Priority. Select the priority of your category from 0 to 10, 0 having the highest priority in the referrer
categories manager
When you finish, just press the [OK] button to save your settings and create a new category.
Referrer Subcategories
When you add a category just select as a parent category an existing one and the new category will be
created as a subcategory of the existing one.
171
Referrer Categories
172
Chapter 23. Install Server Edition Guide
Windows
When you install Advanced Link Manager, you need to do a "Custom" install and select the [ALM Server] option. This way, the Advanced Link Manager server will be installed too. It will be automatically
registered as a service and started by the installation package. There is no action required from you to
start the service.
Once you finnish setting up the server use the following instructions to connect your client license to the
server: Connect Advanced Link Manager client to server.
Mac OS X
The Advanced Link Manager installation package contains three options: the Advanced Link Manager
client, the Advanced Link Manager server and Advanced Link Manager. To install the server make sure
that option is checked in the installation wizard.
If the Advanced Link Manager server is installed, it will be automatically registered as a service and
started by the installation package. There is no action required from you to start the service.
Once you finish setting up the server use the following instructions to connect your client license to the
server: Connect Advanced Link Manager client to server.
Linux
The Advanced Link Manager linux distribution contains three options: the Advanced Link Manager client, the Advanced Link Manager server and Advanced Link Manager. All of them will be installed automatically, but the server is not started automatically after the installation is complete. However, the linux
distribution comes with a script that will allow you to easily start the server. The script is called 'almserver.sh' and is located in the folder where Advanced Link Manager is installed.
If you wish to start the server at the system startup, you need to add this script to the startup sequence in
initd. This is accomplished differently on different Linux distribution, so we have included two examples below.
Important
The following commands are examples of how you can register/start/stop/unregister the 'almserver' service
with your system. You need to be logged in as root for these commands to work.
Red Hat Distributions
The Red Hat distributions use the 'chkconfig' command to activate and deactivate services. To register
the 'almserver' service with your system so that it starts up every time your computer starts, use only the
following sequence of commands. You only need to do this once.
• Create Symbolic Link in /etc/init.d:
ln -s /path/to/Advanced Link Manager/almserver.sh /etc/init.d/almserver
173
Install Server Edition Guide
• Register the service:
chkconfig --add almserver
• Start the service:
/etc/init.d/almserver start
To stop, restart, turn off or unregister almserver use the respective command from the list below:
• Stop the almserver service (stop the service temporarily):
/etc/init.d/almserver stop
• Restart the almserver service:
/etc/init.d/almserver restart
• Turn the service off (do not start the service at computer start up):
chkconfig almserver off
• Unregister the service (remove the service from your system)
chkconfig --del almserver
Debian Distributions
The Debian distribution uses the 'update-rc.d' command to activate and deactivate services. To register
the 'almserver' service with your system so that it starts up every time your computer starts, use only the
following sequence of commands. You only need to do this once.
• Create Symbolic Link in /etc/init.d:
ln -s /path/to/Advanced Link Manager/almserver.sh /etc/init.d/almserver
• Register the service:
update-rc.d almserver defaults
174
Install Server Edition Guide
• Start the service:
/etc/init.d/almserver start
To stop, restart or unregister almserver use the respective command from the list below:
• Stop the almserver service (stop the service temporarily):
/etc/init.d/almserver stop
• Restart the almserver service:
/etc/init.d/almserver restart
• Unregister the service (remove the service from your system)
update-rc.d -f almserver remove
Once you finnish setting up the server use the following instructions to connect your client license to the
server: Connect Advanced Link Manager client to server.
Server Configuration
There are two ways to configure the Advanced Link Manager Server, one using the ALM Server interface and the second one by editing the [server.xml] file.
The [server.xml] file can be found under the [ALM User Data] directory.
By default [server.xml] looks like this:
<?xml version="1.0" encoding="UTF-8"?>
<CONFIG>
<HOST>Host IP address</HOST>
<PORT>7777</PORT>
<LOG_FILE_LEVEL>INFO</LOG_FILE_LEVEL>
<PERMISSIONS/>
</CONFIG>
From this file you can set the IP address of your server as the host, the listen port and the log file level.
If you later need to start/stop the service manually, or change any of its configuration properties, here is
what you need to do:
175
Install Server Edition Guide
Windows
Go to Program Files -> Caphyon -> Advanced Link Manager and click on the Server Configuration
shortcut. From the same shortcut, you can configure the Server port and the location of the Server data
folder.
Important
The service will automatically restart when you change any of the configuration parameters.
Mac OS X
Go to Applications -> Advanced Link Manager Server Management and click on the "Server Configuration" application.
Important
You need to run the "restart.command" every time you change the server settings using the "Server Configuration".
The "uninstall.command" is used to remove the Advanced Link Manager server from your services list,
so that it will no longer start when the system starts up.
Linux
Go to the folder where you installed Advanced Link Manager and run the ALMServerConfig.sh shell
script to launch the Server Configuration application.
176
Install Server Edition Guide
You need to restart the almserver service in order for the changes to take effect:
/etc/init.d/almserver restart
Important
Once you finish setting up the server use the following instructions to connect your client license to the
server: Connect Advanced Link Manager client to server.
Connect Advanced Link Manager client to server
To connect the Advanced Link Manager client to the server, open the client application and go to Options -> Preferences and select the Application tab. Here, select "Remote Connection" and enter the
server name or IP address of the server and click on OK to connect. If this is the first time you connect
to this server, use Administrator with no password when prompted to log in.
Each new user that will need to connect to the Server data base, needs to do the same steps (go to Options -> Preferences menu, Application tab and select the "Remote connection" option).
177
Install Server Edition Guide
Note
Each additional user will require an additional license.
178