1
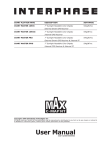
FlexiPOS Basic
User Manual
INDEX
1. MASTERS
1.1.
Pay In / Pay Out ……..………………………………………………………3
1.2.
Payment Mode Master………………………………………………………4 - 5
1.3.
Unit of Measurement (UOM)………………………………………….……6
1.4.
TAX Master……………………………………………………………….…7
1.5.
Department Master ……………………………………………………….. 8 - 9
1.6.
Category Master…………………………………………………………….10-11
1.7.
Stock Keeping Unit ( SKU )………………………………………………....12-14
1.8.
Declaration Master …………………………………………………………15
1.9.
Reason Master ………………………………………………………………..16
1.10.
Barcode Label Printing….……………………………………………………17
1.11.
Multiple MRP for Single SKU………………………………………………..18
1.12.
Multiple EAN for Single SKU ………………………………………………..19
2. BILLING / SALES
2.1.
Billing / Sales…………..…….………………………………………………21
2.1.1. Add SKU /Scan ……………..………………………………………….……22
2.1.2. Quantity Override……..………………………………………………….…23
2.1.3. Void /Cancel………………………………………………………..……….. 24
2.1.4. Close /Tender…….…………………………………………………………. 25-26
2.1.5. Suspend / Resume…………………………………………………………....27
2.1.6. Price Override/ Manual Discount ……………..……………………………28
eRetail Cybertech Pvt. Ltd.
Page 1 of 48
FlexiPOS Basic
User Manual
3. REPORTS
3.1.
Hourly Sales Report…..…….………………………………………………..30
3.2.
Bill Summary Report………..………………………………………….……30
3.3.
Pay In /Pay Out Report..……….………………………………………….…31
3.4.
X-Reading (Shift End) Report ..……………………………………………..32
3.5.
Z-Reading (Day End) Report.………………………………………….……33
3.6.
Sales Report…………….………………………………………………….…34
3.7.
Media Report………….…….………………………………………………..35
3.8.
Tax Report………..………………….………………………………….……35
4. CONFIGURATION
4.1.
System Setup…………..…….………………………………………………..37
4.1.1. Company Setup………………………………………………………..37
4.1.2. Bill Configuration……………………………………………………..38
4.1.3. Bill Receipt Format..…………………………………………………..39
4.1.4. Weighing Scale Barcode Identifiers ..………………………………..40
4.2.
POS Functions Key Mapping….……………………………………….……41
4.3.
Payment Mode Key Configuration …...………………………………….…42
4.4.
Hot Keys Configuration ……….……………………………………….……43
4.5.
Define Users …………………………....………………………………….…44
4.6.
Access Level.…………………………....………………………………….…45-46
eRetail Cybertech Pvt. Ltd.
Page 2 of 48
FlexiPOS Basic
User Manual
1.1. Pay In /Pay Out Master
Pay In/Out module is used to make a transaction entry of the Pay Out and Pay In’s during the
course of Billing other than the Sales/Refunds done in the system. These transaction details will be
shown in the Dayend Report.
Add New Pay In /Pay Out
Click on the <Master> on the main menu and click the <PayIn/Out> from the drop down menu list.
Click on the <New> button
Country
Key in the Currency or select from the browser by pressing the <F4> or
clicking on the
button. (Currency Sign will be displayed)
Pay-In/Out
Select the Pay Mode from the drop down list provided by clicking on the
down arrow.
Amount
Enter the Amount for which you doing the transaction & press <Enter> key.
Reason
Enter the reason for which you are doing the Pay In or OUT.
To save the Transaction, click on the <Save> button. (system will print a receipt for the same).
How to Print a Pay-In/Out
Click on the <Master> on the main menu and click the <Pay-In/Out>.from the drop down menu
list.
Click on the <Print> button and a list of Pay-In/Out is printed
eRetail Cybertech Pvt. Ltd.
Page 3 of 48
FlexiPOS Basic
User Manual
1.2. Payment Modes Master
Payment Mode is used to create the different type of Payment you would accept in the tendering
process during billing. Each Payment type could have different action that needs to be performed
during the tender process and those actions can be defined now. For example during a Cash mode of
tender you would want the cash drawer to open, and for a Credit Card mode you might want to
capture the card details of a customer.
Add New Payment Mode
Click on the <Master> on the main menu and click the <Payment Modes>.from the drop down
menu list.
Click on the <New> button.
Key in payment code you wish to create. The payment code can be of maximum 2 characters.
Name key in the payment name you wish to create. The name can be of maximum 8 characters.
Currency Code
FlexiPos Basic supports only one currency code which is the base
currency of the country where it is in use and is create by default during the
installation process
Minimum Amount Define the minimum amount that can be accepted in this payment
mode. The impact of this will be during the tendering process of the sales
transaction wherein unless the tender amount is equal or > than the amount
defined. The transaction will not be successful. For example if the minimum
amount is 250.00, the sales transaction will have to be equal to or > than
250.00 to complete the transaction.
Pay Group
key in the name of the pay group you wish to create. The pay group can be of
minimum 5 characters. The purpose of this is to group all similar payment
modes as one for the purpose of MIS. For example there could be multiple
credit card payment modes the you may create, but, in MIS you would like to
see the same clubbed as CR Card.
Open drawer
enable this to option to open the cash drawer at the time of tender.
eRetail Cybertech Pvt. Ltd.
Page 4 of 48
FlexiPOS Basic
User Manual
In active
Enable this to option to de-activate this payment mode.
Change
Enable this to option to display change in case the tendered is greater than the
sales transaction amount
Approval Code
Enable this option to capture the approval code of the credit card transaction
from the payment gateway.
Over Tender
Enable this option to allow tender in excess of the sales transaction.
Denomination
Enable this option to accept the denomination of the payment mode. This is
generally useful to capture details of SodexHo & Ticket restaurant coupons
Change Code
This option is enabled only if the Over Tender option is enabled. You can
select the payment mode in which the change is to be paid.
To save the changes click on the <Save> button.
How to edit a Payment Modes
Click on the <Master> on the main menu and click the <Payment Modes>.from the drop
down menu list.
Click on the <Edit> button
Key in the Payment code or select the same from the browser by pressing the <F4> or
clicking on the
button all the details are displayed.
The Payment code is non-editable. All other fields can be edited by clicking on the
respecting fields and making the necessary changes. Once the changes are made click on the
<Save> button to confirm the changes
How to Print a Payment Mode List
Click on the <Master> on the main menu and click the <Payment Mode>.from the drop
down menu list.
Click on the <Print> button and a list of Payment Modes is printed.
eRetail Cybertech Pvt. Ltd.
Page 5 of 48
FlexiPOS Basic
User Manual
1.3. Unit of Measurement (UOM)
UOM stands for Unit of Measurement. UOM is used to identify what is the measurement being used
for selling the product. For example the product can be sold in terms of Numbers, KGS and Litres
etc.
Add New UOM
Click on the <Master> on the main menu and click the <UOM>.from the drop down menu list.
Click on the <New> button
UOM code: Enter UOM code, The UOM code can be of maximum 7 characters.
UOM Name
key in the UOM name you wish to create. The UOM name can be of
maximum 25 characters.
Accept Decimal in Billing: If this option is checked while defining the UOM, all the products
which are assigned this UOM can sell the product in decimal quantity while
billing.
How to edit a UOM
Click on the <Master> on the main menu and click the <UOM>.from the drop down menu list.
Click on the <Edit> button
Key in the UOM Code or select the same from the browser by pressing the <F4> or clicking on
the
button all the details are displayed.
The UOM code is non-editable. All other fields can be edited by clicking on the respecting fields
and making the necessary changes. Once the changes are made click on the <Save> button to
confirm the changes
How to Print a UOM List
Click on the <Master> on the main menu and click the <UOM>.from the drop down menu list.
Click on the <Print> button and a list of UOM is printed
eRetail Cybertech Pvt. Ltd.
Page 6 of 48
FlexiPOS Basic
User Manual
1.4. TAX Master
Tax details can be maintained by creating all types of taxes which are applicable in the said business.
Using Tax master different Tax with Tax % can be created and the same can be linked to a product
at the time of product creation.
Add New Tax
Click on the <Master> on the main menu and click the <Tax>.from the drop down menu list.
Click on the <New> button
Tax code: Enter Tax code, The TAX code can be of maximum 1 character.
Tax Name
key in the Tax name you wish to create. The Tax name can be of
maximum 10 characters.
Tax %
Enter the Tax percentage which is applicable.
How to edit a Tax
Click on the <Master> on the main menu and click the < Tax >.from the drop down menu list.
Click on the <Edit> button
Key in the Tax Code or select the same from the browser by pressing the <F4> or clicking on
the
button all the details are displayed.
The Tax code is non-editable. All other fields can be edited by clicking on the respecting fields
and making the necessary changes. Once the changes are made click on the <Save> button to
confirm the changes
How to Print a Tax List
Click on the <Master> on the main menu and click the < Tax >.from the drop down menu list.
Click on the <Print> button and a list of Tax is printed
eRetail Cybertech Pvt. Ltd.
Page 7 of 48
FlexiPOS Basic
User Manual
1.5. Department Master
A department is the top most classification which signifies major groups of your store which can be
broken down into further smaller units. A proper demarcation of your department is very useful for
MIS.
Add New Department
Click on the <Master> on the main menu and click the <Department>.from the drop down menu
list.
Click on the <New> button
Department code
If the Auto code generation is selected for Department in the
**configuration module** the Department code will be generated and
displayed.
In case Auto code generation has not been selected, please key in
department code you wish to create. The department code can be of
maximum 8 characters.
Department Name
key in the department name you wish to create. The department name
can be of maximum 30 characters.
Discount %
A discount percentage can be defined at the department level, which
will be applicable to all SKU’s grouped under this department. A
maximum discount that can be assigned, again depends on the profile
of the user creating this department and the maximum percentage
assigned to him. In any case the discount cannot exceed 99.00% unless
the same is created by the Admin, who can assign 100.00% discount.
To save the changes click on the <Save> button.
Note: Effect in POS: even though you can assign a 100.00% discount the bill value cannot be zero,
hence it is mandatory that any SKU with only 100.00% discount cannot be tendered since the bill
value will be zero. There has to be a value greater than zero to tender the bill.
The discount will be applicable only if the Discountable check box is enabled in the SKU master.
eRetail Cybertech Pvt. Ltd.
Page 8 of 48
FlexiPOS Basic
User Manual
How to edit a Department
Click on the <Master> on the main menu and click the <Department>.from the drop down
menu list.
Click on the <Edit> button
Key in the Department Code or select the same from the browser by pressing the <F4> or
clicking on the
button all the details are displayed.
The Department code is non-editable. All other fields can be edited by clicking on the
respecting fields and making the necessary changes. Once the changes are made click on the
<Save> button to confirm the changes
How to Print a Department List
Click on the <Master> on the main menu and click the <Department>.from the drop down
menu list.
Click on the <Print> button and a list of Department is printed
eRetail Cybertech Pvt. Ltd.
Page 9 of 48
FlexiPOS Basic
User Manual
1.6. Category Master
A Category is one more level of classification which is below the Department. A proper demarcation
of your Category is very useful for the better MIS.
Add New Category
Click on <Master> on the main menu and click the <Category>.from the drop down menu list.
Click on the <New> button
Category code
Enter Category code, The Category code can be of maximum
7 characters.
Category Name
key in the Category name you wish to create. The Category name can
be of maximum 25 characters.
Department code
In Category master you need to link the Department by clicking the
browser button of the Department Code
To save the changes click on the <Save> button.
How to edit a Category
Click on the <Master> on the main menu and click the <Category>.from the drop down
menu list.
Click on the <Edit> button
Key in the Category Code or select the same from the browser by pressing the <F4> or
clicking on the
eRetail Cybertech Pvt. Ltd.
button all the details are displayed.
Page 10 of 48
FlexiPOS Basic
User Manual
The Category code is non-editable. All other fields can be edited by clicking on the
respecting fields and making the necessary changes. Once the changes are made click on the
<Save> button to confirm the changes
How to Print a Category List
Click on the <Master> on the main menu and click the <Category>.from the drop down
menu list.
Click on the <Print> button and a list of Category is printed
eRetail Cybertech Pvt. Ltd.
Page 11 of 48
FlexiPOS Basic
User Manual
1.7. SKU Master
A SKU is also known as Stock Keeping Unit/Item or a product. An SKU will have a unique code to
identify easily in all the transactions.
Add New SKU
Click on the <Master> on the main menu and click the <SKU>.from the drop down menu list.
Click on the <New> button
SKU code
If the Auto code generation is selected for SKU in the **configuration
module** the SKU code will be generated and displayed.
In case Auto code generation has not been selected, please key in SKU code
you wish to create. The SKU code can be of maximum 15 characters.
Short Description key in the short description of the SKU name you wish to create. The Short
description is used to print in the bill/receipt at the time of billing. The short
description can be of maximum 30 characters.
Long Description Key in the Long Description of the SKU name you wish to create.
The Long description is used to print in the reports. The Long description
can be of maximum 70 characters.
Actual Cost Price Actual Cost Price is the price before Tax if any. The same will be calculated
based on the tax code selected while creating the SKU.
Tax Code
eRetail Cybertech Pvt. Ltd.
Tax Code needs to be selected using the browser if the item being created is
taxable. The Tax will be automatically calculated by the system.
Page 12 of 48
FlexiPOS Basic
User Manual
Cost Price
Enter the Cost of the SKU. The Cost Price is exclusive of tax amount.
MRP
Enter the Maximum Retail Price of the SKU.
Selling Price
Enter the Selling Price at which you want to bill the Customer.
EAN Code
EAN (European Article Number) or Barcode Number. Most of the brought
out products will carry the EAN code. On scanning the EAN of the said
product in the billing the application will automatically display all the
necessary details of the product like SKU Code, Price etc.
Best Before
Enter the number days for the product in which it has to be Used/Consumed.
Pack Size
Enter the Pack Size of the product. This can be printed on barcode.
UOM
Select the UOM by clicking the browser to identify the unit of measurement
in which the SKU will be sold.
Open Rate
If this option is checked while creating an SKU the application will allow
the authorized User to change the SKU price at the time of billing.
Discountable
If this option is checked while creating an SKU the application will allow
the authorized User to give discount for the SKU at the time of billing.
Read WT from
WT Scale
If this option is checked, then the application will automatically search for
the weight from the connected weighting scale.
Category Code
Select the respective Category Code to be linked to the said SKU by
clicking the browser.
Department Code Select the respective Department Code to be linked to the said SKU by
clicking the browser.
To save the changes click on the <Save> button.
You can use the Key Board Button for the data entry if you are using a Touch Pos System.
eRetail Cybertech Pvt. Ltd.
Page 13 of 48
FlexiPOS Basic
User Manual
How to edit a SKU
Click on the <Master> on the main menu and click the <SKU>.from the drop down menu list.
Click on the <Edit> button
Key in the SKU Code or select the same from the browser by pressing the <F4> or clicking on
the
button all the details are displayed.
The SKU code is non-editable. All other fields can be edited by clicking on the respecting fields
and making the necessary changes. Once the changes are made click on the <Save> button to
confirm the changes
How to Print a SKU List
Click on the <Master> on the main menu and click the <SKU>.from the drop down menu list.
Click on the <Print> button and a list of SKU is printed
eRetail Cybertech Pvt. Ltd.
Page 14 of 48
FlexiPOS Basic
User Manual
1.8. Declaration Master
Declaration is used to create the different denominations of the currency in use. This is useful
during the close of shift to enable the cashier to declare the various denominations available with
him and arrive at the total value of sales done during his shift.
Add New Declaration Master
Click on the <Master> on the main menu and click the <Payment Modes>.from the drop down
menu list.
Click on the <New> button
SL. No.
This is an auto generated number and is only for display.
Payment Mode
key in the payment mode code or select the Payment mode from the browser
by pressing <F4> the following is displayed
[Currency Code /Currency Name /Country]
Denomination
key in the denomination of the currency you want to create.
To save the details click on the <Save> button.
How to edit a Declaration Master
Click on the <Master> on the main menu and click the <Declaration Master>.from the drop
down menu list.
Click on the <Edit> button
Key in the Sl No. or select the Sl No. from the browser by pressing the <F4> or clicking on the
button all the details are displayed. Except the Denomination all other’s are non –editable.
How to Print a Declaration List
Click on the <Master> on the main menu and click the <Declaration Master>.from the drop
down menu list.
Click on the <Print> button and a list of Declaration Master is printed.
eRetail Cybertech Pvt. Ltd.
Page 15 of 48
FlexiPOS Basic
User Manual
1.9. REASON MASTER
Reason Master is used to define all the Reasons for your Sales Returns. This is used in the
billing/Sales application when ever a Customer returns back the items which he has purchased. On
doing the refund in Sales the application will prompt to select a valid Reason for the sales returns.
Add New Reason
Click on the <Master> on the main menu and click the < Reason >.from the drop down menu list.
Click on the <New> button
Reason code
Enter Reason code, Reason code can be of maximum 2 characters.
Reason Name
key in the Reason name you wish to create. The Reason name can be
of maximum 20 characters.
How to edit a Reason
Click on the <Master> on the main menu and click the <Reason>.from the drop down menu list.
Click on the <Edit> button.
Key in the Reason Code or select the same from the browser by pressing the <F4> or clicking
on the
button all the details are displayed.
The Reason code is non-editable. All other fields can be edited by clicking on the respecting
fields and making the necessary changes. Once the changes are made click on the <Save> button
to confirm the changes
How to Print a Reason List
Click on the <Master> on the main menu and click the < Reason >.from the drop down menu
list.
Click on the <Print> button and a list of Reason is printed.
eRetail Cybertech Pvt. Ltd.
Page 16 of 48
FlexiPOS Basic
User Manual
1.10. Barcode Label Print.
This module is used to print barcodes labels for non-barcoded items and for the grocery item packed
at the store.
To print Barcode Labels, Click on the <Masters> on the main menu and select <Barcode Printer>
option, then the following screen is displayed.
Here, you need to set the Barcode printer settings initially for the first time, there after you can
directly print the required barcodes.
Barcode Printer Setting
Port
: Select the Port to which the barcode printer is connected from the dropdown
list provided.
Design Type : Select the Barcode Design type which is defined while integration of
barcode PRN file.
Lable Ups
: Select the Lable type used. (it used in 2ups /3 Ups/4ups)
After the settings are completed, click on the <Save>
button. The setting get saved and the following
confirmation message will be display.
Barcode Label Printing
SKU Code
: Key In the SKU Code or select from the browser by click on it or by
pressing <F4> key, and select the required code. And press <Enter> key,
the cursor will highlight at[Nos] & it will display all details of the SKU.
NOs
: Enter the quantity for the labels to be printed and press <Print Labels>
button or press <Alt+P> key.
Use the Key Board short cut key for the Data Entry if you are using the TOUCH POS.
eRetail Cybertech Pvt. Ltd.
Page 17 of 48
FlexiPOS Basic
User Manual
1.11. Multiple MRP for Single SKU
This is used to update multiple MRP’s for single SKU, this is useful for maintaining multiple mrps
which will be useful while billing. This will get updated from SKU Master also.
To update MRP, Click on the <Master> in the main menu and select <Multiple MRP> option, then
the following screen will be displayed.
Key In the SKU Code or select from the browser by clicking on it or by pressing <F4> key, and
select from the list and press <Enter> key.
Then available Sale Prices /MRP’s will be displayed in the screen, to enter a new MRP click at the
[MRP] field and Key In the new MRP.
Save
:
Click on the save button to get the MRP Updated.
Delete Row
:
Use this button, if you wish to delete a single row from the list,
select the line and click on the <Delete Row> button.
Delete All Rows
:
Use this button, if you wish to delete all the rows from the list.
Use the Key Board short cut key for the Data Entry if you are using the TOUCH POS.
eRetail Cybertech Pvt. Ltd.
Page 18 of 48
FlexiPOS Basic
User Manual
1.12. Multiple EAN for Single SKU
This is used to update multiple EAN’s for single PLU, this is useful for maintaining multiple EANs
which will be useful while billing.
To update EAN, Click on the <Master> in the main menu and select <Maintain Multiple EAN>
option, then the following screen will be displayed.
Key In the SKU Code or select from the browser by clicking on it or by pressing <F4> key, and
select from the list and press <Enter> key.
Then available [PLU Code /EAN Code] will be displayed in the screen, to enter a new EAN. click
at the [PluCode]
PLUCode
:
Key in the PLU Code or Select from the browser by clicking on it or
by pressing <F4> key, and select from the list and press <Enter> key.
EAN Code
:
Key in the new EAN Code or Scan the same, and press <Enter> key.
Click on the <Save> button to get the new EAN Code Updated.
Save Row
:
Delete Row
:
Clear Entry :
Key in the (PluCode/ EANCode) and click on <Save Row>, it will
get added to the list above.
Use this button, if you wish to delete a single row from the list, select
the line and click on the <Delete Row> button.
Use this button, if you wish to clear the entered details.
Use the Key Board short cut key for the Data Entry if you are using the TOUCH POS.
eRetail Cybertech Pvt. Ltd.
Page 19 of 48
FlexiPOS Basic
User Manual
SALES (Billing)
eRetail Cybertech Pvt. Ltd.
Page 20 of 48
FlexiPOS Basic
User Manual
2.1. BILLING
After logged in to the application, you will find the Billing button on the screen.
To start billing click on the <Billing> button the following welcome screen is displayed
Click on the <Continue> button to proceed for billing and the following Sales Menu is displayed, as
shown below…
eRetail Cybertech Pvt. Ltd.
Page 21 of 48
FlexiPOS Basic
User Manual
2.1.1. How to add SKU’s for billing
The details displayed in the billing screen as shown above are as follows:
1. Line # the line number
2. SKU/PLU Code Displays the SKU code
3. SKU/PLU Description Displays the SKU description
4. Sale Price Displays the Sale Price
5. Qty Displays the Quantity.
[By default when selecting a SKU the Quantity will be 1]
6. Amount Displays the sum of Sale Price * Qty
7. EAN Displays the EAN number
There are different ways of adding a SKU as mentioned follows:
•
Scanner mode - Scan the barcode of the SKU and if it is a valid code the details are
displayed
•
Enter SKU Code-Type the SKU code and press the <Enter> key and if it is a valid code
the details are displayed
•
Search Mode - Here again we have two modes, in the first mode, type the first few
characters of the SKU and press the <Enter> key, all SKU’s starting
with the characters typed will be displayed on the screen, using the
<Arrow> keys you can select the desired SKU and press the <Enter>
key and the details are displayed.
Alternatively you can press on the <Search> button or the <Pre configured key assigned for
search> in Key Mapping Module the default key for <Search> is the <F4> key. Once you
have selected <Search> AS MENTIONED ABOVE THE QUANTITY WILL BE 1
WHEN SKU IS SCANNED OR SELECTED.
eRetail Cybertech Pvt. Ltd.
Page 22 of 48
FlexiPOS Basic
User Manual
2.1.2. Quantity Override
How to enter additional Quantity to last SKU scanned
1. Scan the SKU multiple times till the QTY is up to the desired quantity.
2. Alternatively you can click on the <Quantity Override> button or the press <Pre
configured key assigned for Quantity Override> in Key Mapping Module the default key
for <Quantity Override> is the <F12> key, then the following screen is displayed.
Key in the desired Quantity and click on the <Ok> button and the quantity is changed.
How to enter additional Quantity previously scanned SKU
In case you want to change the Quantity of a previously scanned SKU other than the last
scanned SKU, first key in the Line No of the desired SKU. at the SKU/PLU box and then
follow the first or second method mentioned above.
eRetail Cybertech Pvt. Ltd.
Page 23 of 48
FlexiPOS Basic
User Manual
2.1.3. VOID /CANCEL
How to Void/Cancel a scanned SKU
To Void last scanned SKU, click on the <Void> button or press the <Pre configured key
assigned for Void> in Key Mapping Module the default key for <Void> is the <F11> key.
Once done the last scanned SKU is Voided and you can see the <Void> in the Amount column
of the last scanned SKU as displayed in the below screen.
In case you want to void a previously scanned SKU (other than the last scanned SKU), then
key in the desired Line No SKU at the SKU/PLU box and then follow the step mentioned
above.
To Un-Void the voided item, follow the same process as explained above only for the voided
SKUs.
eRetail Cybertech Pvt. Ltd.
Page 24 of 48
FlexiPOS Basic
User Manual
2.1.4. CLOSE /TENDER
How to Close/Tender a Bill
On scanning all SKU’s you can Close the bill in two ways
•
Direct Tender Single payment mode
In this mode the payment is tendered on the default payment mode (generally Cash mode)
defined in the System Setup module. Key in the amount received in the SKU/PLU box and
click on the <Direct Tender> button or the <Pre configured key assigned for Direct Tender> in
Key Mapping Module the default key for <Direct Tender> is the <**> key, in case the
tendered amount is more than the bill the Change is displayed and the bill is printed.
•
Multiple mode of payment or non default mode of payment
Within a single bill 6 modes of payment can be made accepted. To do the multiple tender click
on the <Close> button or the <Pre configured key assigned for Close> in Key Mapping
Module the default key for <Close> is the <F10> key. On selecting the <Close> button the
following screen is displayed.
The default payment mode is displayed (Cash)
Paying - By default it will display the bill value, the actual amount tendered can be keyed in
here.
Balance - Display the balance amount to be paid back to the customer.
eRetail Cybertech Pvt. Ltd.
Page 25 of 48
FlexiPOS Basic
User Manual
The bill can be tendered as it is with the default payment mode by pressing the <OK> button. Or if
the default payment is not going to be use in this transaction press on the <Cancel> button and the
following screen is displayed.
From the above screen, click on <Forex> or press <F8> button to select the mode of payment you
want to tender. From the list displayed as shown in the below screen select the payment mode and
click on the <OK> button and enter the amount to be tendered for this mode of payment and again
press the <OK> button.
In case you need to select multiple mode, repeat the above process until the tender amount is equal
or greater than the Bill amount
The below screen shows a example of 2 modes of payments. Once the tendered is equal to or
greater than the bill amount, press the <Close> key to print the bill and proceed to the next
transaction.
eRetail Cybertech Pvt. Ltd.
Page 26 of 48
FlexiPOS Basic
User Manual
2.1.5. SUSPEND /RESUME
How to Suspend a Transaction
Some time it is required that a running transaction has to be suspended for the time being and
resumed at a later time during the business day.
Press on the <Suspend> button or the <Pre configured key assigned for Suspend> in Key
Mapping Module the default key for <Suspend> is the <F2> key. Once you have selected
<Suspend> the following screen is displayed..
You can give a reference number by which it can be resumed at a later stage and press on the
<OK> button.
NOTE: as suspend slip can be printed if the same has been configured in the System setup
module
How to Resume a Suspended bill
Press on the <Resume> button or the <Pre configured key assigned for Resume> in Key
Mapping Module the default key for <Resume> is the <F3> key. Once you have selected
<Resume> the following screen is displayed.
It displays all the bills which have been suspended. Select the bill to be resumed and click on
the <OK> button and the bill is resumed and ready for further scanning of SKU’s or for
tendering.
eRetail Cybertech Pvt. Ltd.
Page 27 of 48
FlexiPOS Basic
User Manual
2.1.6. PRICE OVERRIDE / MANUAL DISCOUNT
How to Change Price of SKU (Price Override)
The price of an SKU can be changed only if the Open Rate has been enabled in the SKU
Master
Press on the <Price Override> button or the <Pre configured key assigned for Price
Override> in Key Mapping Module the default key for <Price Override> is the <F9> key.
Once you have selected <Price Override> the following screen is displayed.
Key in the new price and click on the <OK> button.
How to give Line Item (Manual Discount)
A discount can be given to an SKU only if the Discountable has been enabled in the SKU
Master
Press on the <Manual Discount> button or the <Pre configured key assigned for Manual
Discount> in Key Mapping Module the default key for <Manual Discount> is the
<Ctrl+M> key. Once you have selected <Manual Discount> the following screen is
displayed.
There is an option to give either a percentage discount or value discount, select the one you
want to use and press the <Enter> key and keyin the % or value and again press the <Enter>
key and click on the <OK> button.
(In the sample shown below, is of a percentage discount was given for line item no 2.)
eRetail Cybertech Pvt. Ltd.
Page 28 of 48
FlexiPOS Basic
User Manual
3. REPORTS
eRetail Cybertech Pvt. Ltd.
Page 29 of 48
FlexiPOS Basic
User Manual
3.1. Hourly Sales Report
The Hourly Sales Report displays the Sales data on an hourly basis. This report will help the
management in analyzing sales position of each item sold.
Click on the <Reports> on the main menu and click the <Hourly Sales Report>.from the
drop down menu list.
Click on the <Print> button to get the report printed.
3.2. Bill Summary Report
Click on the <Reports> on the main menu and click the <Bill Summary Report>.from the
drop down menu list
Select the day, month and year for which you need to view the report.
Click on the <Print> button to open the view the report.
This report can be generated based on the payment mode wise also.
eRetail Cybertech Pvt. Ltd.
Page 30 of 48
FlexiPOS Basic
User Manual
3.3. Pay In Pay Out Report
Pay In / Pay Out report is generated to know the details of Payment /Receipts done during the
day other then the sales.
Click on the <Reports> on the main menu and click the <Pay In/ Pay Out>.from the drop
down menu list
Select the Day, Month and Year for which you need to view the report.
Click on the <Print> button to open the view the report.
eRetail Cybertech Pvt. Ltd.
Page 31 of 48
FlexiPOS Basic
User Manual
3.4. X Reading (Shift End) Report
Click on the <Reports> on the main menu and click the <X Reading>.from the drop down
menu list.
The below currency declaration screen will be displayed. Here you need to click the
collection column row to enter the denomination details as per the collections done
during the said shift.
Click on the <End Shift> button to close the shift and the application will generate a report
giving the details of sales happened during this particular shift.
You can also view the shift end report before ending the shift. For this you need to
click<View>.
The above report will be generated only at the time of performing the shift end.
eRetail Cybertech Pvt. Ltd.
Page 32 of 48
FlexiPOS Basic
User Manual
3.5. Z Reading (Day End) Report
Click on the <Reports> on the main menu and click the <Z Reading>.from the drop down
menu list.
Click on the <End Day> button to close the day and the application will generate a report
giving the details of sales happened during the entire day.
You can also view the day end report before doing the Dayend. For this you need to
click<View>.
The above report will be generated only at the time of performing the end day process..
Once you do the day end the business date gets changed to next business date.
eRetail Cybertech Pvt. Ltd.
Page 33 of 48
FlexiPOS Basic
User Manual
3.6. Sales Report
Click on the <Reports> on the main menu and click the <Sales Report>.from the drop down
menu list.
Sales reports are of two types. They are “Summary” and “Detail”. Select the one you need
to view.
The report can be viewed using the “Filter By” option. Need to select the filter by clicking
the drop down arrow.
Select the “From” date and “To” date.
Click on the <Print> button to open and view the report.
eRetail Cybertech Pvt. Ltd.
Page 34 of 48
FlexiPOS Basic
User Manual
3.7. Media Report
Click on the <Reports> on the main menu and click the <Media Report>.from the drop
down menu list
Select the “From” date and “To” date for which you need to view the report. Click on the
<Print> button to open the view the report. This report can be generated based on the
payment mode wise sales amount.
3.8. Tax Report
Click on the <Reports> on the main menu & select <Tax Report>.from the drop down
menu list.
Tax reports are of four types. They are “Summary” and “Detail” and Tax Group and
Group. Select the one you need to view.
The report can be viewed using the “Filter By” option. Select the filter by clicking the drop
down.
The above report will display all the Tax details with respect to the sales happened for the
selected dates.
Select the “From” and “To” date. Click on the <Print> button to open and view the report.
eRetail Cybertech Pvt. Ltd.
Page 35 of 48
FlexiPOS Basic
User Manual
Configuration
eRetail Cybertech Pvt. Ltd.
Page 36 of 48
FlexiPOS Basic
User Manual
4.1. SYSTEM SETUP
4.1.1. COMPANY SETUP
To make changes to the company settings click on the Configuration on the main menu panel and
select System Setup options. In the System Setup by default Company Details screen is displayed.
Shop Name
: You can key in your Shop name here. The shop name cannot be changed
once the license is registered.
Address
: You can key in the address of the shop. A maximum of 3 lines with up to 40
characters per line can be entered. This can be changed as and when
required. This will also be printed on the bill.
POS No.
: This is the number you have SET for the POS counter & can not be changed.
Shift No.
: This displays the current shift no and cannot be changed.
Location
: This is the Location Code and name created at the time of installation and
cannot be changed
Receipt Message
: This is the message that will be printed at the end of the bill. You can define
3 lines as standard message. In case you want to additional lines to be
printed for the footer there is an option in the Bill configuration module.
Receipt No
: This is a system generated running bill no. cannot be changed
Business Date
: This displays the current business date and cannot be changed. This will
change when you do the Z-reading (Dayend )
Suspend No
: This is again a system generated number and cannot be changed.
LST Number
: The Local Sales Tax No. can be stored here which will be printed on the bill.
CST Number
: The Central Sales Tax can be stored here and the same is printed on the bill
Auto Generate Code :
Department : Enable this to generate auto code for department code
Category
: Enable this to generate auto code for Category code
SKU
: Enable this to generate auto code for SKU code
NOTE : Auto code should be enabled before creating any DEPARTMENT, CATEGORY or SKU. And
once Enabled, it cannot be Disabled. Please ensure before you enable the option .
Maintain Multiple MRP
: Enable this to Maintain Multiple MRP for single SKU.
Maintain Multiple EAN for : Enable this to Maintain Multiple EAN for single SKU/PLU.
Single PLU
We can link multiple EAN to a single PLU.
Maintain Unique EAN
eRetail Cybertech Pvt. Ltd.
: Enable this to maintain Unique EAN, like you can give same EAN to
multiple SKU’s.
Page 37 of 48
FlexiPOS Basic
User Manual
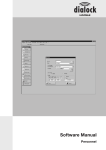
4.1.2. BILL CONFIGURATION
To make changes to the Bill configuration click on the Configuration on the main menu panel and
select System Setup options. In the System Setup click on the Bill configuration tab to make
changes
OPOS Peripherals
: Enable this if your peripherals are OPOS compatible. {If enable
ensure the OPOS drivers have been installed.}
Check Cash Drawer
: Enable this if a cash drawer is connected to the POS
Print Suspend Slip
: Enable this to print a Slip when a bill is being put on hold.
Allow X-Reading with
Suspended bills
: Enable this if X-reading is to be allowed with bill still in suspended
mode
Print Exceptional Details
: Enable this to print exceptional transactions like Refund, Void and
discount in the X-Reading report. It will print the bill No, Time &
Value.
Print Cancelled Receipts
: Enable this to print a receipt when a cashier uses the <Cancel>
button after starting a transaction in the billing mode. This option is
to ensure that any bill canceled without the transaction being
completed is captured for validation purpose. The no. of such
transactions are also printed in the X-reading report.
eRetail Cybertech Pvt. Ltd.
Page 38 of 48
FlexiPOS Basic
User Manual
Print Sales Summary:
Hourly Sales
: Enable this to print the Hourly sales summary in Z-reading report
SKU Sales
Department Sales
: Enable this to print the SKU sales summary in Z-reading report
: Enable this to print the Dept sales summary in Z-reading report.
Category Sales
: Enable this to print the Category sales summary in Z-reading report
Default Payment Mode
: You can define the default payment mode for billing in the system
settings. This is captured during the product installation stage and can
be changed here. When the <Direct Tender> is enabled and used
during billing it will use the default payment mode set here.
Receipt format
: Key In the receipt format number which you want to configure from
the following 3 different type of formats:
1- This format will print 1 line per line item with the following details
--------------------------------------------Description
Rate Qty Amount
--------------------------------------------1111
555.00 1.000 555.00
--------------------------------------------2- This format will print 2 line per line item with the following details
------------------------------------------------Description
Code
Qty Rate Amount
------------------------------------------------SOAP
0000010001
1.000 555.00 555.00
-------------------------------------------------
3- This format will print 2 line per line item with the following details
----------------------------------------------SKU
Description
Rate
MRP
Qty
Amount
----------------------------------------------0000010001
SOAP
555.00 800.00
1.000
555.00
-----------------------------------------------No. of Bill copies
eRetail Cybertech Pvt. Ltd.
: Set the number of bill copies to be printed during Tendering.
Page 39 of 48
FlexiPOS Basic
User Manual
Direct Tender
: Enable this to allow direct tender in billing
Bill Skip Lines
: Key In the number of lines you want skip after bill print.
Dos Reports Skip Lines
: Key In the number of lines you want skip after report print in
dos related reports.(Eg : Bill Summary /Pay In-Out /X & Z
Readings)
Read Wt from Weight Scale
Last Characters
PORT Number
Comm Setting
: Key In the last Characters to get the weight.
: Key In the port number to which it is connected.
: Key In the Comm Buad Rate of the port. (Ex: 9600,n,8,1 )
Print Bill on 2” Printer
: Enable this to compress bill print to 2” from 3” & set the
Compress escape sequence given by manufacturer.
Paper Cut Esc Sequence
: Key in the Cut Sequence given by the manufacturer & set the
port to which the printer is connected.
Printer Port
Auto X & Z Mode
: Select the appropriate port to which the printer is connected
from the drop down list of ports. If you want to Key In port
manually, then select <Not Found> option then the field will
be editable.
: Enable to do the day closing directly without X & Z Reading.
Print Extra Header/Footer in Bill : Enables this to print extra line in the footer apart from the
default 3 line allowed. A maximum of 5 extra lines can be
printed along with the 3 default lines
Connect Non OPOS Line Display : Enable this if you are connected a Non-OPOS Line Display.
Port No./Comm Setting
: Key In the PORT number and Comm Port Buad Rate and
also the MAX Characters of the display.
Show Description Details
: Enable this option if you want the SKU Description to be
displayed on the pole display at the time of billing. And also
set the following settings [& Clear Display] in the respective
fields.
ASCII code for Carriage return
: Key in the Ascii code for enabling carriage return at the end
of the line.
ASCII code for Clear Display
: Key in the Ascii code for clearing the display
Idle Text
eRetail Cybertech Pvt. Ltd.
: Set the Message which you want to show in the pole display
if the POS is Idle
Page 40 of 48
FlexiPOS Basic
Cash Drawer Esc Sequence
User Manual
: Key in the Esc Sequence to Open Drawer given by the
manufacturer.
Set Screen Resolution
: Enable this to configure the screen resolution as per the
System resolutions, select the appropriate setting from the
options. If not clear click on “None of the above”
SKU Search with TS
: Enable this to get the search mode in the Touch Screen POS.
Show VAT Info in Bill
: Enable this to get printed the VAT details as shown in the
bill print. Select the required format options as briefed below.
VAT Breakup
: Tick this to print the Tax Breakup in the BILL.
Only VAT Amount : Tick this to print only Total VAT Amount in the Bill.
Only Message
: Tick this to print only the Message as (Inclusive of Taxes)
Use OPOS Escape Sequence : Tick this to use the OPOS Escape Sequence for the POS
Peripherals.
Use Batch File Process
: Tick this to enable the Batch file Process for the POS
Peripherals.
OPOS Peripherals LDN
: Set the LDN Name defined in the OPOS settings for the
[Printer / Line Display / Cash Drawer /MSR]
eRetail Cybertech Pvt. Ltd.
Page 41 of 48
FlexiPOS Basic
User Manual
4.1.4. Weighing Scale Barcode Identifiers
Identifier
: The identifier could be a character or special character and should be the
1st digit of the barcode. Using this identifier it will be recognized as a
weighing scale bar code. Example #
Weight Identifier
: This identifies the UOM of the item as Kilogram and this has to be the
second digit of the barcode. It could be character or special character.
Example “K”
Piece identifier
: This identifies the UOM of the item as numbers and this has to be the
second digit of the barcode. It could be character or special character.
Example “P”
Weighing scale interface
There are 2 ways to interface from weighing scale, interface weighing scale and capture
weight or scan bar code generated from weighing scale.
Capture weight from weighing scale
To capture weight of SKU from weighing scale you must ensure that “Prompt for weighing
scale” is enabled when creating the SKU. To configure the Interface follow the steps
mentioned below.
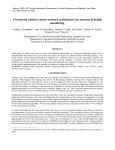
To scan from barcode generated from weighing scale
To capture the barcode generated from a weighing scale you have to ensure that the SKU
code is 6 digits (should be exactly 6 digits). The following have to set which will identify the
bar code is related to the weighing scale
1 2
3
4
5
1. Identifier
2. Weight or piece identifier
3. SKU code
4. Weight or piece as captured from weighing scale
5. Rate
eRetail Cybertech Pvt. Ltd.
Page 42 of 48
FlexiPOS Basic
User Manual
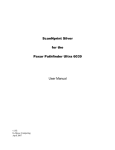
4.2. POS Functions Keys Mapping
For those who are using non touch POS machines, there is an option to configure the keyboard with
various functions used in the billing like Quantity override, void, direct tender etc. The product
comes with default key mappings as shown below
To configure the keys as per your individual needs to click on the Configuration on the main menu
panel and select Mappings options and from the drop down select Key Mapping. The default
mapping as shown in the above screen will be displayed. To make changes to any of the functions
click on the particular function and press on the key to which you want to link this function. For
example if you want to map Void function to F12 function key, click on the Void function, the hand
icon is displayed near the Void function now you press the function key F12 and the function is
mapped.
In case of duplicate key mapping both the functions to which you have allotted the key will be
highlighted in Red Colour (as shown above) and you need to change one of the key assignment. To
save the setting click on the <Save Configuration> button and click on the <Close> button.
eRetail Cybertech Pvt. Ltd.
Page 43 of 48
FlexiPOS Basic
User Manual
4.3. Payment Mode Key Configuration
For those who are using non touch POS machines, there is an option to configure the Payment
mode as hot keys.
To configure the Payment modes as hot keys.
Click on the <Configuration> in the main menu and select <Mapping> and <Payment Mode Key
Mapping>, you can see the following screen.
The above screen displays all the Payment modes that have been created in the Payment Mode
Master.
To Assign a Hot Key for a given payment mode, click on the payment mode and press the key you
want to assign as hot key.
In the above screen you can see the payment mode [Cash Mode] is not assigned with any key, but
the [CCard Mode] has been assigned <ALT> key as the hotkey.
Once the hot keys are assigned, To save the setting click on the <Save Configuration> button and
click on the <Close> button.
eRetail Cybertech Pvt. Ltd.
Page 44 of 48
FlexiPOS Basic
User Manual
4.4. Hot Keys Configuration
There are certain regular and fast moving Non Bar-Coded SKU’s which can be assigned with hot
keys, so that at the press of a single hot key the SKU can be selected without remembering or
entering the SKU code.
To configure the Hot keys, click on Configuration in the main menu and select <Configure
Settings> and click on the <Hotkey Configuration> option. The following screen is displayed.
To configure hot key to a SKU. Key In the SKU code or select from a list by pressing <F4>
Function key or by clicking on the browser button.
Once you select a SKU the same will be listed in the flex above. Now Click or Select the SKU from
the list above and press a key which you want to assign as hot key for this selected SKU and the key
will be assigned as hot key.
In the billing module when you press on the assigned hot key the SKU will be selected for billing.
There is also an option to remove a given SKU from the Hot key list. From the displayed list, click
on the SKU to be deleted and click on the <Delete Row> button.
To save the setting click on the <Save Configuration> button and click on the <Close> button.
eRetail Cybertech Pvt. Ltd.
Page 45 of 48
FlexiPOS Basic
User Manual
4.5. USER MASTER
All those who are going to use FlexiPos Basic need to be created as Users to access the various
modules assigned to them.
Add New User
Click on the <Configuration> on the main menu and click the <User>.from the drop down menu
list.
Click on the <New> button
User ID
: Each user needs to be identified uniquely, and the recommended way is to
give a unique number to each user as his ID
User Name
: Key In the Name of the User.
Password
: It can be a combination of Numbers, Alphabets and Special Characters.
Level
: Select the level you want to assign, On selecting level Desc is displayed.
Max-Disc(%)
: You can also define the maximum discount the user can give during
billing.
To save the details click on the <Save> button.
How to EDIT a User
Click on the <Configuration> on the main menu and click the <User>.from the drop down menu
list. Click on the <Edit> button
Key in the User ID or select the User ID from the browser by pressing the <F4> or clicking on
the
button all the details are displayed. Except the User Id all others are editable.
How to Print a Users List
Click on the <Configuration> on the main menu and click the <User>.from the drop down menu
list. Click on the <Print> button and a list of Users is printed.
eRetail Cybertech Pvt. Ltd.
Page 46 of 48
FlexiPOS Basic
User Manual
4.6. ACCESS LEVEL
How to Create Different User Access Level
A User Access Level defines the various modules and functions which a user can access.
FlexiPos Basic comes with a 6 role hierarchy as defined below
1. Admin
2. Manager
3. Asst Manager
4. Sub Asst Manager
5. Supervisor
6. Cashier
Each of the above roles can be linked to multiple access levels. For example : if you have to have 2
different sets of Cashier levels, say one level with access only for Sales Option and another level
with Sales Option and Reports. Taking the above example let us create the two access level.
To create a User level, click on Configuration in the main menu panel and select <Access level>
and you can see the following screen
To create a new level key in the level number & press <Enter> key. Incase any level has already
been created with that number the Level Desc and the rights given will be displayed. We shall
create a level with the number 1. Let us key the number 1 and press the <Enter> key.
At the Level Desc select the Role from the
browser by pressing the <F4> or clicking on the
button the following screen in displayed. Let us select option 6 Cashier and press the
<Enter> key. The screen will be displayed with
all options unselected.
eRetail Cybertech Pvt. Ltd.
Page 47 of 48
FlexiPOS Basic
User Manual
Now, As per our example let us give only “Sales” ( ) and under Sales select “Billing” ()
Option and tick [] “Select All” option to level 1 Cashier and click on the <Save> button. The
selected options will be as shown in the below screen.
Now let us create the user level 2 for Cashier, with the [Sales /Reports & Select All options] and
save the same. The selected options will be as shown in the below screen.
To enable the Reports, click on Reports and press the <Space> key. The <Space> key is used to
enable or disable the option. To enable or disable various sub options under Reports double click on
Reports or click on the + to the right side of Reports. After enabling the required options, click on
<Save> button to save the level.
In this example we have enabled all the sub options under Reports.
Now that we have learnt how to create User Level we can proceed to create the Users.
eRetail Cybertech Pvt. Ltd.
Page 48 of 48