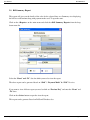
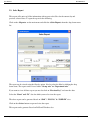
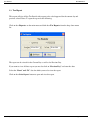
1
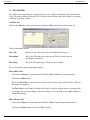
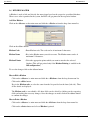
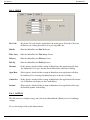
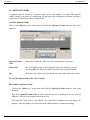
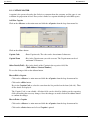
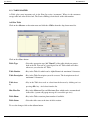
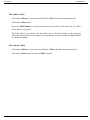
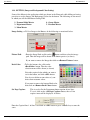
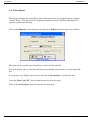
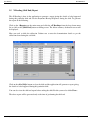
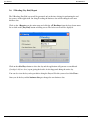
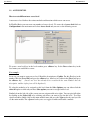
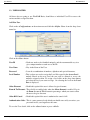
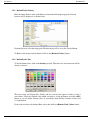
User Manual
FlexiFnB Basic
INDEX
1. MASTERS
1.1.
Payment Mode.. ……..………………………………………………………3-4
1.2.
Discount Master……..………………………………………………….……5
1.3.
Group Master………………..………………………………………….……6
1.4.
Department Master……….……………………………………………….…7
1.5.
Tax Master ………………………..……………………………………….. 8
1.6.
Kitchen Master……………………………………………………………....9
1.7.
Menu Master…………….…………………………………………………..10-11
1.8.
Optional Combi …..…………………………………………………………12
1.9.
Combi Master …………………………….…………………………………13
1.10.
Rider Master….……………………………………………………………...14
1.11.
Captain Master………………………………………………………………15
1.12.
Waiter Master………………………………………………………………..16
1.13.
Table Master …………………………….…………………………………..17-18
1.14.
Reason Master….……………………………………………………………19
1.15.
Declaration Master…………………………………………………………..20
1.16.
Button Settings……………………………………………………………….21
2. REPORTS
2.1.
Bill Summary Report..…….………………………………………………...23
2.2.
Sales Report……………..………………………………………….……..…24
2.3.
Tax Report……..………………………………………………….…………25
2.4.
Waiter Report………………………………………………………..………26
eRetail Cybertech Pvt. Ltd.
Page 1 of 40
User Manual
FlexiFnB Basic
2.5.
X-Reading Report…………………………………………………………..27
2.6.
Z-Reading Report…………………………………………………………..28
3. CONFIGURATION
3.1.
Access Level …………..…….………………………………………………30-31
3.2.
User Master….……………………………..………………………….……32-33
3.3.
System Setup…...……………………………………………………………34
3.4.
System Functions Flag……….……………………………………….…….35
3.5.
Bill Configuration Flags ….…………....…………………………………..36-37
3.6.
Access Level.…………………………....…………………………………...38
eRetail Cybertech Pvt. Ltd.
Page 2 of 40
User Manual
FlexiFnB Basic
1.1. Payment Modes Master
Payment Mode is used to create the different type of Payment you would accept in the tendering
process during billing. Each Payment type could have different action that needs to be performed
during the tender process and those actions can be defined now. For example during a Cash mode of
tender you would want the cash drawer to open, and for a Credit Card mode you might want to
capture the card details of a customer.
Add New Payment Mode
Click on the <Master> on the main menu and click the <Payment Modes>.from the drop down
menu list.
Click on the <New> button.
Payment Code
: Key in payment code you wish to create. The payment code can be of
maximum 10 characters.
Payment Name
: Key in the payment name you wish to create. The name can be of maximum
10 characters.
Pay Group
: Select the appropriate Group which you want to link into. The purpose of
this is to group all similar payment modes as one for the purpose of MIS.
For example there could be multiple credit card payment modes the you
may create, but, in MIS you would like to see the same clubbed as CR Card.
Open Drawer
Popup FX
Change
: Enable this option to open the cash drawer at the time of tender.
: Enable this option to list the payment mode in billing tendering.
: Enable this to option to display change in case the tendered is greater than
the sales transaction amount
: Enable this option to capture the approval code of the credit card transaction
from the payment gateway.
: Enable this option to allow tender in excess of the sales transaction.
Approval Code
Over Tender
To save the changes click on the <Save> button.
eRetail Cybertech Pvt. Ltd.
Page 3 of 40
User Manual
FlexiFnB Basic
How to edit a Payment Modes
Click on the <Master> on the main menu and click the <Payment Modes>.from the drop
down menu list.
Click on the <Edit> button
Key in the Payment code or select the same from the list provided on the form (left side).
Then all the details are displayed.
The Payment code is non-editable. All other fields can be edited by clicking on the
respecting fields and making the necessary changes. Once the changes are made click on the
<Save> button to confirm the changes
How to Print a Payment Modes List
Click on the <Master> on the main menu and click the <Payment Modes>.from the drop
down menu list.
Click on the <Print> button and a list of Payment Modes is printed.
eRetail Cybertech Pvt. Ltd.
Page 4 of 40
User Manual
FlexiFnB Basic
1.2. Discount Master
Discount is used to create Pre-Defined discounts instead of providing access to cashiers to give
manual discount. With this the cashier has not option but to use only the pre-defined discounts.
Add New Discount
Click on the <Master> on the main menu and click the <Discount>.from the drop down menu list.
Click on the <New> button
Discount Code
: Enter Discount code, The code can be of maximum 5 characters.
Discount Name
: Key in the Discount name you wish to create. The Discount name can be of
maximum 20 characters.
Discount (%)
: Key In the discount percentage, which you wise to define.
To save the changes click on the <Save> button.
How to edit a Discount
Click on the <Master> in main menu and click the <Discount>.from the drop down menu list.
Click on the <Edit> button.
Key in the Discount code or select the same from the list provided on the form (left side). Then
all the details are displayed.
The Discount code is non-editable. All other fields can be edited by clicking on the respecting
fields and making the necessary changes. Once the changes are made click on the <Save> button
to confirm the changes
How to Print a Discount List
Click on the <Master> in main menu and click the <Discount>.from the drop down menu list.
Click on the <Print> button and a list of Discount is printed
eRetail Cybertech Pvt. Ltd.
Page 5 of 40
User Manual
FlexiFnB Basic
1.3. GROUP MASTER
A Group is the top most classification which signifies major groups of your store which can be
broken down into further smaller units. A proper demarcation of your store in very useful MIS.
Add New Group
Click on the <Master> on the main menu and click the <Group>.from the drop down menu list.
Click on the <New> button
Group Code
: Enter Group code, The code can be of maximum 10 characters.
Group Name
: Key in the Group name you wish to create. The Group name can be of
maximum 25 characters.
To save the changes click on the <Save> button.
How to Edit a Group
Click on the <Master> in main menu and click the <Group>.from the drop down menu list.
Click on the <Edit> button.
Key in the Group code or select the same from the list provided on the form (left side). Then all
the details are displayed.
The Group code is non-editable. All other fields can be edited by clicking on the respecting
fields and making the necessary changes. Once the changes are made click on the <Save> button
to confirm the changes
How to Print a Group
Click on the <Master> in main menu and click the <Group>.from the drop down menu list.
Click on the <Print> button and a list of Group is printed
eRetail Cybertech Pvt. Ltd.
Page 6 of 40
User Manual
FlexiFnB Basic
1.4. DEPARTMENT MASTER
A Department is one more level of classification which is below the Group. The menu items in the
billing screen are shown based on the Departments. A proper demarcation of your Department is
very useful for the better MIS.
Add New Department
Click on the <Master> on the main menu and click the <Department>.from the drop down menu
list.
Click on the <New> button, There are two Tabs [1. General ] [ 2. Button ]
Department Code
: Enter Department code, The code can be of maximum 5 characters.
Department Name
: Key in the Department name you wish to create. The Department name can
be of maximum 25 characters.
To save the changes click on the <Save> button.
How to Edit a Department
Click on the <Master> on the main menu and click the <Department>.from the drop down menu
list.
Click on the <Edit> button.
Key in the Department code or select the same from the list provided on the form (left side).
Then all the details are displayed.
The Department code is non-editable. All other fields can be edited by clicking on the
respecting fields and making the necessary changes. Once the changes are made click on the
<Save> button to confirm the changes
How to Print a Department
Click on the <Master> in main menu and click the <Department>.from the drop down menu
list.
Click on the <Print> button and a list of Department is printed
eRetail Cybertech Pvt. Ltd.
Page 7 of 40
User Manual
FlexiFnB Basic
1.5. TAX MASTER
Tax details can be maintained by creating all types of taxes which are applicable in the said business.
Using Tax master different Tax with Tax % can be created and the same can be linked to a product
at the time of product creation.
Add New Tax
Click on the <Master> on the main menu and click the <Tax>.from the drop down menu list.
Click on the <New> button
Tax Code
: Enter Tax code, The code can be of maximum 5 characters.
Description
: Key in the Tax name you wish to create. The Tax name can be of
maximum 15 characters.
Percentage
: Key In the Tax percentage, which you wise to define.
To save the changes click on the <Save> button.
How to Edit a Tax
Click on the <Master> in main menu and click the <Tax>.from the drop down menu list.
Click on the <Edit> button.
Key in the Tax Code or select the same from the list provided on the form (left side). Then all
the details are displayed.
The Tax Code is non-editable. All other fields can be edited by clicking on the respecting fields
and making the necessary changes. Once the changes are made click on the <Save> button to
confirm the changes
How to Print a Tax
Click on the <Master> in main menu and click the < Tax >.from the drop down menu list.
Click on the <Print> button and a list of Tax is printed
eRetail Cybertech Pvt. Ltd.
Page 8 of 40
User Manual
FlexiFnB Basic
1.6. KITCHEN MASTER
A Kitchen is used to link and classify the menu items based on the respective specialized kitchens.
When ever a order is punched in the system, the KOT will get printed in the respective kitchen.
Add New Kitchen
Click on the <Master> on the main menu and click the < Kitchen >.from the drop down menu list.
Click on the <New> button
Kitchen Code
: Enter Kitchen code, The code can be of maximum 5 characters.
Kitchen Name
: Key in the Kitchen name you wish to create. The Kitchen name can be of
maximum 15 characters.
Kitchen Printer
: Select the appropriate printer which you want to attach to the selected
kitchen. (This will get printed only if the Kitchen Printing is enabled in the
Bill configuration )
To save the changes click on the <Save> button.
How to Edit a Kitchen
Click on the <Master> in main menu and click the < Kitchen >.from the drop down menu list.
Click on the <Edit> button.
Key in the Kitchen code or select the same from the list provided on the form (left side). Then
all the details are displayed.
The Kitchen code is non-editable. All other fields can be edited by clicking on the respecting
fields and making the necessary changes. Once the changes are made click on the <Save> button
to confirm the changes
How to Print a Kitchen
Click on the <Master> in main menu and click the <Kitchen>.from the drop down menu list.
Click on the <Print> button and a list of Kitchen is printed
eRetail Cybertech Pvt. Ltd.
Page 9 of 40
User Manual
FlexiFnB Basic
1.7. MENU MASTER
A Menu Master is the most important master. A menu master will have a unique code to identify
easily in all the transactions. And it is linked with various attributes which are helpful in MIS
Generation.
Add New Menu Master
Click on the <Master> on the main menu and click the <Menu Master>.from the drop down menu
list.
In Menu Master you have 3 Tabs [ 1.Name / 2. Price / 3.Button], start with Tab No.1.
Tab- 1 NAME
Menu code
: Key in the Menu code you wish to create. The Menu code can be of
maximum 10 characters.
Short Name
: Key in short name of the Menu item you wish to create. The Short name is
used to print in the Bill/Receipt, the name can be of maximum 30 characters.
Long Name
: Key in Long name of the Menu item you wish to create. The long name is
used to print the Reports, can be of maximum 60 characters.
Kitchen Code
: Key In the Kitchen code to which the menu item belongs to or Select the
Code from the Browser by clicking the browser or by pressing <F4> key.
Group Code
: Key In the Group code to which you want the Menu to be linked or Select
the Code from the Browser by clicking the browser or by pressing <F4>
key.
Department Code
eRetail Cybertech Pvt. Ltd.
: Key In the Department code to which you want the Menu to be linked or
Select the Code from the Browser by clicking the browser or by pressing
<F4> key.
Page 10 of 40
User Manual
FlexiFnB Basic
Tab- 2 PRICE
Tax Code
: Key In the Tax code which is applicable to the menu item or Select the Code from
the Browser by clicking the browser or by pressing <F4> key.
Dine In
: Enter the Menu Price for Dine In Service.
Take Away
: Enter the Menu Price for Take Away Service.
Delivery
: Enter the Menu Price for Delivery Service.
Pick Up
: Enter the Menu Price for Pick Up Service.
Discount
: If this option is checked while creating an Menu Item, then application will allow
the authorized User to give discount for the Menu Item at the time of billing.
Open Rate
: If this option is checked while creating an Menu Item, then application will allow
the authorized User to change the Menu Item price at the time of billing.
Combo Set
: If this option is checked while creating an Menu Item, then application will consider
it as Combi Item and displays in the Combi Master.
Decimal
: If this option is checked while creating an Menu Item, then application will accept
the Decimal quantity in the billing.
Tab- 3 BUTTON
This Tab consist of setting the image and color for the Menu Buttons.(Kindly refer to Color/Image
settings)
To save the changes click on the <Save> button.
eRetail Cybertech Pvt. Ltd.
Page 11 of 40
User Manual
FlexiFnB Basic
1.8. OPTIONAL COMBI
A Optional combi is created as an alternate item for the items defined in a combi. This optional
combi is linked to the items of a combi item. So that at the time of billing the customer can choose
an alternative item instead of the pre-defined item.
Add New Optional Combi
Click on the <Master> on the main menu and click the <Optional Combi>.from the drop down
menu list.
Optional Combi
Code
: Enter Opt Combi code, The code can be of maximum 5 characters.
Menu Code
: Key in the Menu Code or select from the browser by clicking on it or by
pressing <F4> key. The code which you want to link in optional combi.
Qty
: Key In the Qty of the menu item which you want to offer in optional combi.
To save the changes click on the <Save> button.
How to Edit a Optional Combi
Click on the <Master> in main menu and click the <Optional Combi>.from the drop down
menu list.
Key in the Optional Combi Code or select from the browser by clicking on it or by pressing
<F4> key. And select the required code from the list.
The Optional Combi Code is non-editable. You can delete /add Menu item and change the
Quantity. Once the changes are made click on the <Save> button to confirm the changes
eRetail Cybertech Pvt. Ltd.
Page 12 of 40
User Manual
FlexiFnB Basic
1.9. COMBI MASTER
A Combi means a set of item clubbed together and offered at a special price, this is like promotional
offers. And you can also link the Optional Combi to the combi items.
Add New Combi
Click on the <Master> on the main menu and click the <Combi>.from the drop down menu list.
Combi Code
: Key in the Menu Code or select from the browser by clicking on it or by
pressing <F4> key. Then select the required combi code.
Note : here the system will display only the menu codes for which the
“Combi Set” option is ticked in the Menu master. And the Combi Item Sale
Price cannot be more than the sum of menu items linked.
Menu Code
: Key in the Menu Code or select from the browser by clicking on it or by
pressing <F4> key. The code which you want to link in Combi.
Qty
: Key In the Qty of the menu item which you want to offer in optional combi.
Optional Combi
: Select the Optional Combi’s for the Menu item if required from the drop
down list of Optional combi.
To save the changes click on the <Save> button.
How to Edit a Combi
Click on the <Master> in main menu and click the < Combi>.from the drop down menu list.
Key in the Combi Code or select from the browser by clicking on it or by pressing <F4> key.
And select the required code from the list.
The Combi Code is non-editable. You can delete /add Menu item and change the Quantity. Once
the changes are made click on the <Save> button to confirm the changes
eRetail Cybertech Pvt. Ltd.
Page 13 of 40
User Manual
FlexiFnB Basic
1.10. RIDER MASTER
A Rider is used for the delivery service where the order delivery is assigned to these riders. The rider
delivers the items to the customer and collect the Payment.
Add New Rider
Click on the <Master> on the main menu and click the <Rider>.from the drop down menu list.
Click on the <New> button
Rider Code
: Enter Rider code, The code can be of maximum 5 characters.
Rider Name
: Key in the Rider name you wish to create. The Rider name can be of
maximum 25 characters.
Other Details(Tab2) : Key in the details of the rider in the respective field, like
[Full Address / Contact Number]
To save the changes click on the <Save> button.
How to Edit a Rider
Click on the <Master> in main menu and click the <Rider>.from the drop down menu list.
Click on the <Edit> button.
Key in the Rider Code or select the same from the list provided on the form (left side). Then all
the details are displayed.
The Rider Code is non-editable. All other fields can be edited by clicking on the respecting fields
and making the necessary changes. Once the changes are made click on the <Save> button to
confirm the changes
How to Print a Rider
Click on the <Master> in main menu and click the < Rider >.from the drop down menu list.
Click on the <Print> button and a list of Rider is printed
eRetail Cybertech Pvt. Ltd.
Page 14 of 40
User Manual
FlexiFnB Basic
1.11. CAPTAIN MASTER
A captain is the person who takes the Order in a restaurant from the customer, and the same is sent
to kitchen for preparation of food. Every order is linked to a captain which helps in the MIS reports.
Add New Captain
Click on the <Master> on the main menu and click the <Captain>.from the drop down menu list.
Click on the <New> button
Captain Code
: Enter Captain code, The code can be of maximum 5 characters.
Captain Name
: Key in the Captain name you wish to create. The Captain name can be of
maximum 25 characters.
Other Details(Tab2) : Key in the details of the Captain in the respective field, like
[Full Address / Contact Number]
To save the changes click on the <Save> button.
How to Edit a Captain
Click on the <Master> in main menu and click the <Captain>.from the drop down menu list.
Click on the <Edit> button.
Key in the Captain Code or select the same from the list provided on the form (left side). Then
all the details are displayed.
The Captain Code is non-editable. All other fields can be edited by clicking on the respecting
fields and making the necessary changes. Once the changes are made click on the <Save> button
to confirm the changes
How to Print a Captain
Click on the <Master> in main menu and click the <Captain>.from the drop down menu list.
Click on the <Print> button and a list of Captain is printed
eRetail Cybertech Pvt. Ltd.
Page 15 of 40
User Manual
FlexiFnB Basic
1.12. WAITER MASTER
A waiter is the person who gets the food prepared and serves the customer in the restaurant. Each
waiter is assigned to a set of tables which he takes care of and which helps in the MIS reports.
Add New Waiter
Click on the <Master> on the main menu and click the <Waiter>.from the drop down menu list.
Click on the <New> button
Waiter Code
: Enter Waiter code, The code can be of maximum 5 characters.
Waiter Name
: Key in the Waiter name you wish to create. The Waiter name can be of
maximum 25 characters.
Other Details(Tab2) : Key in the details of the Waiter in the respective field, like
[Full Address / Contact Number]
To save the changes click on the <Save> button.
How to Edit a Waiter
Click on the <Master> in main menu and click the < Waiter >.from the drop down menu list.
Click on the <Edit> button.
Key in the Waiter Code or select the same from the list provided on the form (left side). Then
all the details are displayed.
The Waiter Code is non-editable. All other fields can be edited by clicking on the respecting
fields and making the necessary changes. Once the changes are made click on the <Save> button
to confirm the changes
How to Print a Waiter
Click on the <Master> in main menu and click the <Waiter>.from the drop down menu list.
Click on the <Print> button and a list of Waiter is printed
eRetail Cybertech Pvt. Ltd.
Page 16 of 40
User Manual
FlexiFnB Basic
1.13. TABLE MASTER
A Table plays most important role in the Dine In service (restaurant). Where in the customers
occupy table and order for the food, The Service /Billing is done based on the table number.
Add New Table
Click on the <Master> on the main menu and click the <Table>.from the drop down menu list.
Click on the <New> button
Table Type
: Select the appropriate type [AC /NonAC] of the table which you want to
book order for. You can set a special price for AC Table which will effect
when ever you select the AC Table.
Table Number
: Key in the Table No.which can be Alpha/Numeric & maximum 5 characters.
Table Description
: Key in the Table Description you wish to create. The description can be of
maximum 15 characters.
Table Area
by
: Key in the Table Area code or select from the browser by clicking on it or
pressing <F4> key. And select from the list.
Min /Max Pax
: Key in the Minimum Paxs and Maximum Paxs which can be accommodated
in the table. (system will popup message if it exceed the pax size)
Table Phone
: Key in the Table extension phone number if available.
Table Status
: Select the table status at the time of table creation.
To save the changes click on the <Save> button.
eRetail Cybertech Pvt. Ltd.
Page 17 of 40
User Manual
FlexiFnB Basic
How to Edit a Table
Click on the <Master> in main menu and click the <Table>.from the drop down menu list.
Click on the <Edit> button.
Key in the Table Number or select the same from the list provided on the form (left side). Then
all the details are displayed.
The Table Code is non-editable. All other fields can be edited by clicking on the respecting
fields and making the necessary changes. Once the changes are made click on the <Save> button
to confirm the changes
How to Print a Table
Click on the <Master> in main menu and click the < Table >.from the drop down menu list.
Click on the <Print> button and a list of Table is printed
eRetail Cybertech Pvt. Ltd.
Page 18 of 40
User Manual
FlexiFnB Basic
1.14. CANCELLATION REASON MASTER
Reason Master is used to define all the Reasons for Bill Cancellations. This is used in the
billing/Sales application when ever a Customer cancels the items which he has orders. On doing the
cancellation in Sales the application will prompt to select a valid Reason for the cancellation.
Add New Reason
Click on the <Master> on the main menu and click the < Reason >.from the drop down menu list.
Click on the <New> button
Code
: Enter Reason code, The code can be of maximum 5 characters.
Reason
: Key in the Reason description you wish to create. The Reason can be of
maximum 30 characters.
To save the changes click on the <Save> button.
How to Edit a Reason
Click on the <Master> in main menu and click the < Reason >.from the drop down menu list.
Click on the <Edit> button.
Key in the Reason code or select the same from the list provided on the form (left side). Then all
the details are displayed.
The Reason code is non-editable. All other fields can be edited by clicking on the respecting
fields and making the necessary changes. Once the changes are made click on the <Save> button
to confirm the changes
How to Print a Reason
Click on the <Master> in main menu and click the <Reason>.from the drop down menu list.
Click on the <Print> button and a list of Reason is printed
eRetail Cybertech Pvt. Ltd.
Page 19 of 40
User Manual
FlexiFnB Basic
1.15. DECLARATION MASTER
Declaration is used to create the different denominations of the currency in use. This is useful
during the close of shift to enable the cashier to declare the various denominations available with
him and arrive at the total value of sales done during his shift.
Add New Declaration Master
Click on the <Master> on the main menu and click the <Declaration Master>.from the drop down
menu list.
Click on the <New> button
Serial. No.
: This is an auto generated number and is only for display.
Payment Mode
browser
: Key in the payment mode code or select the Payment mode from the
by pressing <F4> the following is displayed
[Currency Code /Currency Name /Country]
Denomination
: Key in the denomination of the currency you want to create.
To save the details click on the <Save> button.
How to edit a Declaration Master
Click on the <Master> on the main menu and click the <Declaration Master>.from the drop
down menu list.
Click on the <Edit> button
Key in the Sl No. or select the Sl No. from the browser by pressing the <F4> or clicking on the
button all the details are displayed. Except the Denomination all other’s are non –editable.
How to Print a Declaration List
Click on the <Master> on the main menu and click the <Declaration Master>.from the drop
down menu list.
Click on the <Print> button and a list of Declaration Master is printed
eRetail Cybertech Pvt. Ltd.
Page 20 of 40
User Manual
FlexiFnB Basic
1.16. BUTTON (Image and Background Color Setting)
Some of the Master in the application which are shown in the Front-end while billing are having
provision to set the Images and Background Colors for the button. The following are the master
in which you will find the Button Setting TAB.
1. Payment Mode Master
2. Department Master
3. Menu Master
4. Group Master
5. Discount Master
Image Setting -> To Set a Image to the Button, do the following as mentioned below.
Picture Path
: Enter the Image Path or click on the
button, and then select the image
path. Then the image will be shown in the button preview (as above).
If you want to remove the Image then click on <Remove Picture> button.
Back Color
: To Set the button color, click on the
<BackColor> button. Then the color
selection menu will be shown (as shown)
Select the required color which you want to
set for the button, and click <OK> button.
You also can define custom colors of y our
choice from customer colors.
If you want to remove the buttons Back color,
then click on <Remove Back Color> button.
Set Dept Caption :
This is used to Set the Department button caption of two lines.
To set it, click on the <Set Dept Caption> button, then a 2 line
caption menu will be displayed. As below
Enter the Caption Line-1 & Line-2 and click on <OK> button or press <Alt+O> key to same the
same.
eRetail Cybertech Pvt. Ltd.
Page 21 of 40
User Manual
FlexiFnB Basic
2. Reports
eRetail Cybertech Pvt. Ltd.
Page 22 of 40
User Manual
FlexiFnB Basic
2.1. Bill Summary Report
This report will give you the details of the sales for the selected date on a Summary wise displaying
the bill wise with amount along with payment mode used. To open the same.
Click on the <Reports> on the main menu and click the <Bill Summary Report>.from the drop
down menu list.
Select the “From” and “To” date for which you need to view the report.
The above report can be generated based on “Shift” / “Payment Mode” & “POS” No wise.
If you want to view old dates report you need to click on “Previous Day” and enter the “From” and
“To”dates.
Click on the <Print> button to open the view the report.
This report can be generated based on DOS and Windows also.
eRetail Cybertech Pvt. Ltd.
Page 23 of 40
User Manual
FlexiFnB Basic
2.2. Sales Report
This report will consist of all the information with respect to the Sales for the current day and
previous selected dates. To open the report do the following.
Click on the <Reports> on the main menu and click the <Sales Report>.from the drop down menu
list.
The report can be viewed using the filter by option. Need to select the filter by clicking the drop
down arrow. The report can be viewed either “Group wise” or “Department wise”.
If you want to view old dates report you need to click on “Previous Day” and enter the dates
Select the “From” and “To” date for which you need to view the report.
The above report can be generated based on “Shift” / “POS No.” & “USER ID” wise.
Click on the <Print> button to open and view the report.
This report can be generated based on DOS and Windows also.
eRetail Cybertech Pvt. Ltd.
Page 24 of 40
User Manual
FlexiFnB Basic
2.3. Tax Report
This report will give all the Tax Details with respect to the sales happened for the current day and
previous selected dates. To open the report do the following.
Click on the <Reports> on the main menu and click the <Tax Report>.from the drop down menu
list
The report can be viewed for the Current Day as well as for Previous Day.
If you want to view old dates report you need to click on “Previous Day” and enter the dates
Select the “From” and “To” date for which you need to view the report.
Click on the <Print Report> button to open and view the report.
eRetail Cybertech Pvt. Ltd.
Page 25 of 40
User Manual
FlexiFnB Basic
2.4. Waiter Report
This report will display the entire Waiter details with respect to the sales happened for the respective
selected ‘Waiter”. This report will also display the commission details with Sales information. To
open the report do the following.
Click on the <Reports> on the main menu and click the < Waiter >.from the drop down menu list
The report can be viewed for the Current Day as well as for Previous Day.
Key In the Waiter code or select from the browser by clicking on the browser or by pressing <F4>
key.
If you want to view old dates report you need to click on “Previous Day” and enter the dates
Select the “From” and “To” date for which you need to view the report.
Click on the <Print Report> button to open and view the report.
eRetail Cybertech Pvt. Ltd.
Page 26 of 40
User Manual
FlexiFnB Basic
2.5. X Reading (Shift End) Report
This X-Reading is done in the application to generate a report giving the details of sales happened
during this particular shift and also the Payments /Receipt /Expenses during the shift. To generate
the report do the following.
Click on the <Reports> on the main menu and click the <X Reading>.from the drop down menu
list or click on the [Shift End] button on billing screen. The below currency declaration screen will
be displayed.
Here you need to click the collection Coolum row to enter the denomination details as per the
collections done during the said shift.
Click on the <End Shift> button to close the shift and the application will generate a report giving
the details of sales happened during this particular shift.
You can also view the shift end report before ending the shift. For this you need to click<View>.
The above report will be generated only at the time of performing the shift end.
eRetail Cybertech Pvt. Ltd.
Page 27 of 40
User Manual
FlexiFnB Basic
2.6. Z Reading (Day End) Report
The Z-Reading (Day End) report will be generated only at the time closing for performing the end
day process in the application. On doing Z-reading the business date will be changed to the next
business date.
Click on the <Reports> on the main menu and click the <Z Reading>.from the drop down menu
list or click on the [Day End] button on billing screen. The below screen will be displayed.
Click on the <End Day> button to close the day and the application will generate a consolidated
(if multiple shift are done) report giving the details of sales happened during the entire day.
You can also view the day end report before doing the Dayend. For this you need to click<View>.
Once you do the day end the business date gets changed to next business date.
eRetail Cybertech Pvt. Ltd.
Page 28 of 40
User Manual
FlexiFnB Basic
3.Configuration
eRetail Cybertech Pvt. Ltd.
Page 29 of 40
User Manual
FlexiFnB Basic
3.1. ACCESS LEVEL
How to create different user access level
A user access level defines the various modules and functions which a user can access.
In FlexiPos Basic you can create any number of access levels. To create the a Access level click on
Configuration in the main menu and select Access levels and you can see the following screen
To create a new level key in the level number press <Enter> key. In the Desc column key in the
level name you would like to create.
For example :
Let us say you want to create access level 10 and the description as Cashier. For this First key in the
number 10 in the [Level No] and press the <Enter> key, then key in Cashier in the [Desc] and press
the <Enter> key.
(Incase any level has already been created with the same Number then the
description and the rights given will be displayed.)
To select the modules to be assigned to this level from the Sales Options you can either click the
select all option or click only on those Sales option you want to assign for this level.
Similarly from the left side of the screen you can assign module wise rights. You can give full rights
by clicking on the [Select All] or by selecting only those you want to give for this level. To assign
specific modules double click on the main module name and press the <Space> bar key and you can
see the main module. The <Space> bar key acts as a toggle to enable and disable a module.
eRetail Cybertech Pvt. Ltd.
Page 30 of 40
User Manual
FlexiFnB Basic
For example if you want to enable the Reports module, double click on the Reports and you will
see the sub module as below
Now press the <Space> bar key at [Reports, Bill Summary, Sales Summary, Shift-End, Dayend]
and you will see the above screen (Left Side) changes as the screen shown in (Right Side)
On completing all selection click on the <Save> button and then the <Close> button.
Now let us create the user level 2 for Cashier with the Sales Option and reports and save the same.
The selected option will be as shown in the below screen. To enable the Reports click on Reports
and press the <Space> key. The <Space> key is used to enable or disable the option. To enable or
disable various sub options under Reports double click on Reports or click on the + to the right side
of Reports. In this example we have enabled all the sub options under Reports.
Now that we have learnt how to create User Level we can proceed to create the Users.
eRetail Cybertech Pvt. Ltd.
Page 31 of 40
User Manual
FlexiFnB Basic
3.2. USER MASTER
All those who are going to use FlexiF&B Basic, should have a individual User ID to access the
various modules assigned to them.
Add New User
Click on the <Configuration> on the main menu and click the <Define User>. from the drop down
menu list.
Click on the <New> button
User ID
: Each user needs to be identified uniquely, and the recommended way is to
give a unique number to each user as his ID
User Name
: Key in the Name of the User.
Password
: It can be a combination of numbers, alphabets and special characters.
Level Number
: This is where we need to assign the Level No created in the Access Level
module. Based on the user level the user will be allowed to access the
modules assigned to him. To assign a level click on the drop down button
and select the level you want to assign. On selecting the level no the Level
Desc is displayed.
Allow Discount
: Enable this option if the user is allowed to give discount.
From & To Discount : These fields are enabled only when the Allow discount is enabled. Key in
the From discount & TO discount in percentage, which you want to allow
the user to be give discount.
Allow Bill Cancel
: Enable this option if the user is authorized to cancel a bill.
Authentication Code : This is a auto generated code which you should store safely to retrieve you
password in case you forget/loose the same.
To save the User details, click on the <Save> button or press <Alt+S>.
eRetail Cybertech Pvt. Ltd.
Page 32 of 40
User Manual
FlexiFnB Basic
How to EDIT a USER
Click on the <Configuration> on the main menu and click the <Define User>.from the drop
down menu list.
Click on the <Edit> button
Key in the User ID or select the User ID from the browser by pressing the <F4> or clicking
on the
button all the details are displayed. Except the User Id all others are editable.
How to Print a User List
Click on the <Configuration> on the main menu and click the <User>.from the drop down
menu list.
Click on the <Print> button and a list of Users is printed.
eRetail Cybertech Pvt. Ltd.
Page 33 of 40
User Manual
FlexiFnB Basic
3.3. SYSTEM SETUP
To make changes to the company settings click on the Configuration on the main menu panel and
select System Setup option.
The above setting are already done at the time of installing software & most of them can only be
viewed.
The following details are currently set and are displayed directly & cannot be modified.
[Pos No. / Payment Mode / Shift No / Bill No. / Business Date / User Id ]
Company Name
: Displays the Company Name
Address 1,2& 3
: Displays the address and allows you to edit the same if required.
Zip
: Displays the Zip/postal code and can be edited
Phone
: Displays the phone number and can be edited
CST / LST No.
Logo
Running message
: Displays the CST No. and can be edited
: Displays the current logo path and can be edited
: Displays the current idle running message for the customer display
and can be edited
Once you have done the required changes click on the <Save> button and then click on the <Yes>
button. The system will log out for the changed setting to take effect. You need to again login into
the application.
eRetail Cybertech Pvt. Ltd.
Page 34 of 40
User Manual
FlexiFnB Basic
3.4. System Function Flag
To make changes to the System Function Flag settings, click on the Configuration on the main
menu and select [System Function Flag] option.
The Captions of the <Buttons> in the main screen as displayed in the image which appears on the
right side of the main screen can be changed by the user. Apart from changing the caption you can
also add an image and back ground color for the <Buttons>.
From the above screen you can click on the Code of the Caption you want to edit.
For example : if you want to make changes in [Dine In], click on DI and you can see all the details
of (Dine In) in the Caption Settings on the right side of the screen as displayed below
From the above you can change the caption as required. Also you can enable or disable the button.
eRetail Cybertech Pvt. Ltd.
Page 35 of 40
User Manual
FlexiFnB Basic
3.4.1. Button Picture Setting
Enter the Image Path or click on the Browser button the following image path selection
browser will be displayed, as shown below.
From the browser select the image path. Then the image will be set to the Service Button.
To Remove the image from the button, Click on the [Remove Picture] button.
3.4.2. Button Back Color
To Set the button color, click on the button provided. Then the color selection menu will be
shown (as shown)
The basic colors and displayed by default, and also you have the option to define a color o
your choice. Select the required color which you want to set for the button, and click <OK>
button or you can define custom colors of your choice from [Define Customer Colors] and
set to the button.
If you want to remove the buttons Back color, then click on <Remove Back Color> button.
eRetail Cybertech Pvt. Ltd.
Page 36 of 40
User Manual
FlexiFnB Basic
MORE SETTINGS
Enable Shift end Validation
: Enable this to perform shift end validations to check if any
KOT’s are pending. If enabled will not allow shift end until
the pending KOT’s are billed
Enable Quantity entry for
(Non Touch Screen)
: Enable this for quantity entry option in Non Touch screen
Enable Print KOT No. in Bill
: Enable this option to print KOT numbers in Bill.
Print User Id & POS No.
& Waiter on Top of Bill
: Enable this to Print User Id, Pos No and Waiter code on the
header portion of the bill.
Enable RoundOff Value in Bill
: Enable this to round of bill value at the time of tendering
Enable Dos Printing in Billing Tirumala to explain
Enable Manual VAT Caption
At Bill Print
: Enable this to change the VAT Caption in the bill print.
Ex : by default (VAT) will be printed, if you want to change
the caption from VAT to Service TAX, can be changed.
To save the settings, click on <SAVE> button.
eRetail Cybertech Pvt. Ltd.
Page 37 of 40
User Manual
FlexiFnB Basic
3.5. Bill Configuration Flags
This option is used to enable/disable various options related to billing and related modules. Click on
the Configuration in the main menu panel and select Bill configuration Flag option and you will
see the following screen. There are 3 tabs in this screen, each of it mentioned in the following few
pages.
3.5.1 General POS & Print Settings
Currency Declaration Mandatory : Enable this option if the currency declaration has to be done
at Shift End
at the time of shift end.
Enable Network Printing
: Enable this option to allow Network Printing. You can select
the shared printer from the Network Printer Share Name
by clicking on the drop down list.
Running Message(Line Display)
: Please key in the message to be displayed on the customer
line display, This will be used during idle time and display
the message.
No. of Copies Per Bill
: Key In the number of copies of the bill to be printed.
eRetail Cybertech Pvt. Ltd.
Page 38 of 40
User Manual
FlexiFnB Basic
PRINT SETTINGS
Enable KOT Print
: Enable this option if you want to print the KOT every time a
order is keyed in
Enable KOT Print in Take Away : Enable this option to print KOT for Take Away service. By
default KOT is printed only for Dine in/Delivery and Pick up
Enable Dept Wise KOT Print
: Enable this if you want to print KOT department wise. This
is generally applicable for food courts where in the POS is at
one location and items have to be collected in different
counters.
Enable Kitchen Wise KOT Print
: Enable this if you want to print KOT kitchen wise. This is
generally applicable for outlets having different kitchens for
Food, Bar, Deserts etc.,
Confirm Bill Printing on Tender
: Enable this if you to have a confirmation to print the bill
during check out and tendering. Using this option you can
save on printing stationery and Saving Nature.
Print Message on Bill
: Enable this to Print Footer Message in the Bill.
Footer Messages
: You have a option to enter 3 lines of message that can be
printed in the footer of the bill. The message is automatically
centered as you key in the message.
Skip Lines
: Key in the number of lines to skip after printing the bill. This
is generally use at the time of setting the printer to ensure that
optimum number of lines are skipped.
Service and Printer Settings
Accept Waiter Code
: Enable this if you want to capture the Waiter Code in the
Dine In Service while doing the KOT.
Accept Captain Code
: Enable this if you want to capture the Captain Code in the
Dine In Service while doing the KOT
Accept Number of PAX
: Enable this if you want to capture the No.of PAX in the Dine
Service while selecting the Table
Enable Bill Print at Tender : Enable this if you want to Print a Bill when you tender in the
Dine In Service. A bill is already printed when you check
out the table, hence if you want to print the tender details and
generate the bill again enable this option
Print Bill at Check Out
eRetail Cybertech Pvt. Ltd.
: Enable this if you want to print direct bill without tendering,
Auto Tender on Checkout.
Page 39 of 40
User Manual
FlexiFnB Basic
Options Related to Delivery
Minimum Order Value
: Define the value minimum value at which you accept orders
for delivery.
Maximum Delivery Time
: Define the Maximum Delivery Time in terms of minutes.
Delivery Charge
: Define the Delivery Charge. Once defined the same will be
printed in the bill.
Max Order to Rider per Delivery : Define the Maximum Order a rider can delivery in one
delivery cycle
Configure General Printer Settings
Enable this option to configure the general printer settings. Enable this ONLY if you do not
have OPOS enabled. The following setting needs to done when you have enabled this option
Bold Font Start Code
: To enable bold printing you need to enter the code to enable
bold printing. This is given by the manufacturer.
For example : Epson code for this is 27+33+48
Bold Font End Code
: For Example : 27+33+8
Printer Cutter Code
: To enable the printer to cut you again need to key in the
manufacturer code.
For example : Epson code for this is 27+100+48
Cash Drawer Open Code
: To enable the Cash Drawer to be opened, you need to key in
the manufacturer code.
For example : Epson code for this is 27+112+48+64+80
Enable 2 inch Printer
: Enable this option if your printer is 2 inch printer.
NOTE: When this option is selected the BOLD printing will be disabled and you
need to key in the manufacturer code for compress mode printing
Compressed Mode Code
: Key in the Compressed Mode Code as given by the
manufacturer. This will be enabled only when you select the
Enable 2 inch Printer.
Configure OPOS enable this option if your POS hardware is compatible with OPOS standards. For
further clarification please get in touch with you POS vendor. You need to key in the LDN names of
the peripherals that are connected. Please contact you dealer or the manufacturer for further details
Apply service charges
eRetail Cybertech Pvt. Ltd.
: Enable this if you want apply service charges in the bill in
addition to VAT.
Page 40 of 40