1
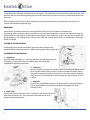
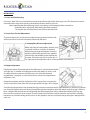
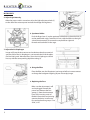
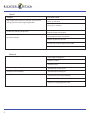
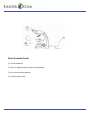
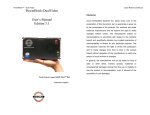
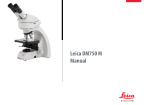
Richter Optica
[email protected]
Instructions for Models:
U2B, U2T, U2-LCD, U2D
University Laboratory Biological Microscope
Trinocular Port
Interpupillary
Adjustment Scale
Eyepieces
Diopter
Adjustment
Ring
Binocular Eyepiece
Tube
Revolving
Nosepiece
Specimen
Holder
Objective
Stage
Condenser
Focusing Knob
Fine Focus Knob
Coarse Focus
Knob
Light Intensity
Control
Stage Y-Axis
Travel Knob
Stage X-Axis
Travel Knob
Lamp Housing
Illumination on/off
switch
Thank you for your purchase of a Richter Optica microscope. The information in this manual is provided to answer most
questions that can arise when operating your microscope and to help you avoid unneccesary maintenance expenses in
the future.
Please carefully read instructions before operating microscope. Nomenclature used to describe components and
controls are identified on opposite page.
UNPACKING
Do not discard styrofoam container or packing materials until you are sure shipment is complete and
undamaged (retain styrofoam shipping container to store your microscope when it is not in use). Remove all tape and
packing material used to protect microscope during shipment. Make certain lens surfaces do not come in contact with
dirt, fingerprints or oil. Damage of lens surfaces occur when they come in contact with such contaminants, and image
quality is reduced.
SETTING UP THE INSTRUMENT
Avoid placing the instrument in locations exposed to direct sunlight, dust,
vibration, high humidity and where it is difficult to unplug the power supply cord.
ASSEMBLING THE MICROSCOPE
1. Objectives
Lower the stage completely (1). Screw the objectives into the revolving turret
nosepiece (2) so that each clockwise rotation brings the next highest
magnification objective into position.
2. Condenser
Raise the stage by turning the coarse focus knob (1). Raise the condenser carrier
by turning the condenser focus knob (2). Insert the condenser into the mount
with aperture scale facing forward towards the user. Secure with the condenser
clamp screw (3). Turn the condenser focus knob to raise the condenser as far as
it will go.
3. Eyepieces
Use the same magnification eyepieces for both eyetubes. To lock the eyepiece,
insert each eyepiece into the eyetube completely and tighten the small
clamping screws.
4. Power Cord
Connect the socket of the power cord (1) into the AC inlet on the rear of the
base of the microscope (2). Plug in the other end of the cord to an AC
outlet with ground conductor.
1
MICROSCOPY
1. Coarse and Fine Focusing
Focusing is done with coarse and fine focus knobs at the left and right of the microscope stand. The direction of vertical
movement of the stage corresponds to the direction the focus knobs are turned.
Never attempt either of the following actions, since doing so will damage the focus mechanism:
- Rotate the left or right knob while holding the other stationary
- Turning the coarse and fine focus knobs further than their limit.
2. Coarse Focus Tension Adjustment
To increase the tension, turn the tension adjustment ring located on the inside
of the coarse focus knob in the direction indicated by the arrow.
3. Interpupillary Distance Adjustment
Before adjusting the interpupillary distance, bring
a specimen into focus using the 4x objective.
While looking through the eyepieces move the
eyetubes either further apart or closer together
until the right and left field of view become one.
On either side of the scale (2) line up the dots (1) .
This adjustment will enable the user to see the specimen with both eyes.
4. Diopter adjustment
Diopter adjustment will compensate for the differences in vision between the left
and right eyes. In addition to making observation with both eyes easier, it will
also help reduce the extent to which focusing is lost when the objective
magnification is changed. In particular, this occurs when a low magnification
objective is used.
Rotate the nosepiece until the 4x objective “clicks” into position. Using the fine
and/or coarse focus knobs, focus the microscope until the image is at its sharpest.
The left and right eyepieces have separate focusing provisions to compensate for slight differences in the focusing of each
eye. Using the right eye only and viewing through the right-hand eyepiece, adjust the diopter until the image is clearly in
focus. Using the left eye only and viewing through the left-hand eyepiece with its independent diopter-focusing ring,
focus until the specimen is at its sharpest. The microscope should now be ready for binocular viewing. When switching
between users, note the setting on the scale (2) on the eyepieces and you can quickly change the proper setting back for
each user.
2
MICROSCOPY
5. Adjust Light Intensity
When the power switch is turned on, adjust the light adjustment knob (1)
on the side of the microscope to increase the voltage and brightness.
6. Specimen Holder
Push the finger lever (1) on the specimen holder back to place the slide (2)
on the mechanical stage. Control the X-Y axis with the knobs on the right
side of the microscope (3) to move the sample left-to-right and
forward-and-backward on the stage.
7. Adjust the Iris Diaphragm
Images will have the best contrast and resolution when the numerical
aperture (NA) of the iris diaphragm is set to match the NA of the objective lens being used. Move the lever (3) on the iris diaphragm so that it
lines up with the corresponding objective setting (4).
8. Using the Filter
Place the filter over the illuminator (see image at left) to increase contrast
or change the background lighting of your microscopy image.
9. Replacing the Fuse
Make sure the microscope is off
and unplugged. Remove the
power cord. Remove the fuse
groups (1) from the microscope
base (2) by inserting a coin or
flathead screwdriver and twisting
counter-clockwise. Install a new
fuse and replace fuse groups. Fuse:
250V, 3.15A.
3
TROUBLESHOOTING
Optical
Problem
Possible Cause
Dust or dirt in field of view.
Dust or dirt on objective, filter, condenser or eyepiece
Poor image (low contrast or resolution)
Condenser is set too low or too high
Aperture diaphragm closed too far
No cover glass
Too thick or thin cover glass
Immersion oil not used on immersion procedure
Air bubbles in immersion oil
Immersion oil used on a dry objective
Greasy residue on eye lens
Incorrect illumination
Uneven Focus
Specimen holder not fixed securely on stage
Specimen not secured in position
Specimen tilted on stage
Image tinged yellow
Lamp voltage is set too low
Blue filter is not being used
Focusing is not possible with high magnification objectives
Slide is upside down
Cover glass is too thick
Eyepiece diopter not adjusted
Insufficient pafocality of objectives
Eyepiece diopter not adjusted
No cohesion of binocular image
Magnification or field of view of left and righ eyepiece
differ
Interpupillary distance not adjusted
Eyepiece diopter not adjusted
4
Optical
Problem
Possible Cause
High magnification objectives strike the specimen when
changing over from low to high magnification
Slide is upside down
Cover glass is too thick
Insufficient parfocality of objectives
Eye strain or fatigue
Eyepiece diopter not adjusted
Interpupillary distance not adjusted
Diopter adjustment not made
Field of view of left and right eyepiece differ
Inadequate illumination
Electrical
Lamp does not light
Power supply not plugged in
Lamp not installed
Lamp burned out
Inadequate brightness
Specified lamp not being used
Lamp blows out immediately
Specified Lamp not being used
Lamp flickers
Connectors are not securely connected
Lamp near end of service life
Lamp not securely plugged into socket
5
CARE AND MAINTENANCE
Do not disassemble
1. Disassembly may significantly affect the performance of the instrument, and may result in electric shock or injury and
will void the terms of the warranty.
2. Never attempt to dismantle any parts other than described in this manual. If you notice any malfunction, contact your
Richter Optica representative.
Cleaning the microscope
1. Do not use organic solvents such as ether; alcohol or paint thinner on painted surfaces or plastic components. Doing so
could result in discoloration of painted or plastic surfaces.
2. When cleaning lenses do not use any solvents other than absolute alcohol, as they may damage lens bonding cement.
3. Do not use petroleum benzene when cleaning components such as filters or lenses.
4. Absolute alcohol and petroleum benzene are highly flammable. Keep away from open flames and when turning power
switch on and off.
5. For stubborn dirt, dampen a piece of gauze with diluted neutral detergent and wipe lightly.
Disinfecting the Microscope
Follow the standard procedures for your laboratory.
When not in Use
1. When not in use, cover instrument with dust cover and store in a place in low humidity where mold is not likely to form.
2. Proper handling of the microscope will ensure years of trouble free service.
3. If repair becomes necessary, please contact Richter Optica directly at [email protected].
6
Quick Assembly Guide:
(1) Install condenser.
(2) Screw in objective lenses into turret nosepiece.
(3) Insert and secure eyepieces.
(4) Connect power cord.