1
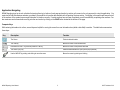
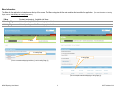
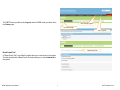
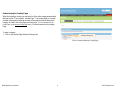
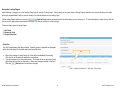
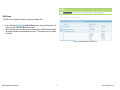
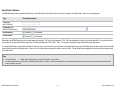
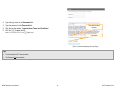
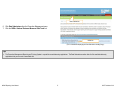
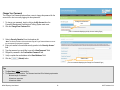
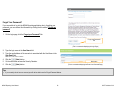
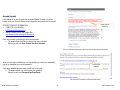
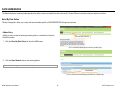
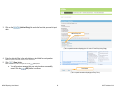
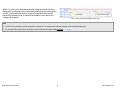
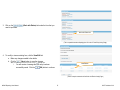
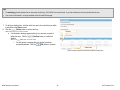
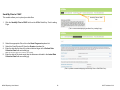
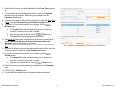
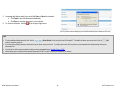
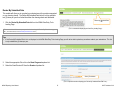
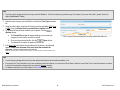
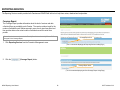
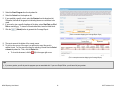
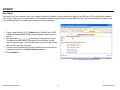
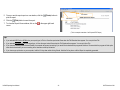
NOMs Reporting
National Outcome Measures Data Tools
USER MANUAL
VERSION 1.5
APRIL 2011
Ph: 888.348.4248
Fax: 412.366.7199
[email protected]
KIT Solutions®, LLC
5700 Corporate Dr
Suite 530
Pittsburgh, PA 15237
TABLE OF CONTENTS
Introduction............................................................................................................................................................................................................................................................... 3
Tips for Using the Application Effectively.................................................................................................................................................................................................................. 4
Recommended Computer Settings ...................................................................................................................................................................................................................... 4
Application Navigating.......................................................................................................................................................................................................................................... 5
Menu Information............................................................................................................................................................................................................................................. 6
Understanding the Landing Pages................................................................................................................................................................................................................... 8
Using the Listing Pages ................................................................................................................................................................................................................................... 9
Edit Forms ..................................................................................................................................................................................................................................................... 11
Advanced Search .......................................................................................................................................................................................................................................... 12
Data Fields & Buttons ........................................................................................................................................................................................................................................ 13
Edit Form Buttons .......................................................................................................................................................................................................................................... 14
Additional Feature Buttons............................................................................................................................................................................................................................. 14
Login Procedure ..................................................................................................................................................................................................................................................... 15
Change Your Password ..................................................................................................................................................................................................................................... 18
Forgot Your Password? ..................................................................................................................................................................................................................................... 20
Account Locked.................................................................................................................................................................................................................................................. 22
Data Submissions................................................................................................................................................................................................................................................... 23
Enter My Data Online......................................................................................................................................................................................................................................... 23
Add an Entry .................................................................................................................................................................................................................................................. 23
Work With Entries .......................................................................................................................................................................................................................................... 26
Send My Files to CSAP...................................................................................................................................................................................................................................... 30
Review My Data Submissions............................................................................................................................................................................................................................ 33
Revise My Submitted Data................................................................................................................................................................................................................................. 37
Reporting Services ................................................................................................................................................................................................................................................. 39
Coverage Report................................................................................................................................................................................................................................................ 39
Appendix ................................................................................................................................................................................................................................................................ 41
Error Report ....................................................................................................................................................................................................................................................... 41
NOMS Reporting User Manual
2
© KIT Solutions® 2011
INTRODUCTION
What is the purpose of the National Outcome Measures (NOMs)?
NOMs are a set of domains and measures that the Substance Abuse and Mental Health Services Administration (SAMHSA) will use to accomplish its vision and to meet all of
its Federal reporting requirements, thus reducing burden and redundancy for grantees.
SAMHSA’s vision is “Life in the Community for Everyone: Building Resilience and Facilitating Recovery.” Within this vision are three goals: accountability, capacity and
effectiveness for all agency initiatives. NOMs are SAMHSA’s means to address its accountability goal and performance-monitoring approach. The NOMs will be used for
GPRA and PART Reporting.
NOMS Reporting User Manual
3
© KIT Solutions® 2011
TIPS FOR USING THE APPLICATION EFFECTIVELY
Recommended Computer Settings
Screen Resolution
You will get the best screen layout if you set your PC monitor settings to 1024 X 768 pixels or larger. If your screen resolution is smaller (i.e., 800 X 600 pixels), everything on
the screen will appear larger. But, if you use 800 X 600 pixels, you will have to scroll more both up & down and left & right to access all the data fields.
To change your PC monitor settings, right click on the Desktop background and select Properties. Next, click on the Settings tab and move the Screen Resolution scroll
bar to the right (towards “more”) to select 1024 X 768 resolution. Click the OK button at the bottom of the window to make the change effective.
Web Browser
The web browser supported by NOMs Reporting is Microsoft Internet Explorer (IE). Mozilla Firefox, Netscape, Safari and other browsers may not be supported by NOMs
Reporting. They may function but not to design specifications. We recommend users have the latest version of IE installed on their computer along with the updates provided
by Microsoft (which are released periodically).
Pop-Up Blocker
Modern computer security technology and usability features development have lead to pop-up blocking. Although this new feature of internet browsers, toolbars, and other 3rd
party managing software blocks hazardous and annoying pop-ups, sites like NOMs Reporting require pop-ups to be able to function. If your pop-up blocker is enabled, there is
a possibility that NOMs Reporting may not function or appear properly. You should either disable the pop-up blocker while using NOMs Reporting while remembering to
enable it, if desired, when not in NOMs Reporting or create exceptions for the pop-up blocker. This is cumbersome, but may be easier than making exceptions to the pop-up
blocker.
To create exceptions for the pop-up blocker, open your Internet Explorer browser window. Once the browser is open, click the top toolbar option “Tools” and then go to
“Internet Options”. After the “Internet Options” window is available, you will want to click on the “Privacy” tab at the top of the window. You will notice while on the “Privacy”
tab, at the bottom will be a section on Pop-Up Blockers. If your “Block Pop-Ups” checkbox is checked then click on the “Settings” button. You can now add the NOMs
Reporting link to the “Allowed Sites” list which the pop-up blocker will ignore when trying to block pop-ups from NOMs Reporting.
*Note: These are instructions for Internet Explorer 6.0 and may be different for other Internet Explorer versions.
NOMS Reporting User Manual
4
© KIT Solutions® 2011
Application Navigating
NOMs Reporting is set up in such a fashion that moving from top to bottom of each page and section to section on the menu is the only approach to using the application. You
must start at Data Submissions and enter your data if you would like to have the data available in the Reporting Services section. Continuing in this manner will ensure that all
of the sections of the system have enough information to function correctly. If certain sections have not been completed, you will have difficulty completing other sections. You
also must save each screen before moving onto the next section by clicking on the SAVE button located at the bottom of the page.
Computer Keys
While entering information into a form, several keys are helpful for moving the cursor from one information box (called a data field) to another. The table below summarizes
those keys:
Key
Description
Function
The Cursor
Points to desired location
The TAB key
Moves the cursor to the next data field
Hold down the SHIFT key and then press the TAB key
Moves the cursor to the previous data field
The Control (Ctrl) key
Enables blocked material to open (due to pop-up blocker)
Use the MOUSE by pointing and clicking to move the cursor
Moves the cursor by pointing and clicking
NOMS Reporting User Manual
5
© KIT Solutions® 2011
Menu Information
The Menu for the application is located across the top of the screen. The Menu categories list the main modules that are within the application. (For more information on Landing
Pages, see the Understanding the Landing Page section.)
1. Menu
Constant (unchanging). Available at all times.
2. Landing Page
Varies depending on which Menu category is selected.
3. Listing Page
Varies depending on which Menu category is selected.
1. Menu
2. Landing Page
3. Listing Page
(This is a screenshot displaying the Menu (1) and a Landing Page (2))
(This is a sample screenshot displaying a Listing Page (3))
NOMS Reporting User Manual
6
© KIT Solutions® 2011
The PMRTS menu provides a link (Log out) and the NOMS menu provides a link to
the (Home) page.
User currently logged in
Link to Home page
Link to Log Out
Bread Crumb Trail
Bread Crumb Trail
A “Bread Crumb Trail” is provided to indicate where you currently are in the system.
The links provided in the Bread Crumb Trail also allows you to move backwards in
the system.
NOMS Reporting User Manual
7
© KIT Solutions® 2011
Understanding the Landing Pages
When first entering a module you may see a list of the entire categories associated
with that module. This is called a “Landing Page”. The Landing Page of a module
provides a description of what can be done in that module as well as listing each
category as a link to the Listing Page and entry forms. (For more information on the
Listing Pages, see the Using the Listing Page section.) No data is entered on the Landing
Page.
To open a category:
• Click on the Landing Page Submenu Category link.
Submenu Category link
(This is a screenshot displaying a Landing Page.)
NOMS Reporting User Manual
8
© KIT Solutions® 2011
Using the Listing Pages
After selecting a category from the Landing Page you will see the “Listing Page”. When going into an area where a Listing Page is available, the service allows you to select
previously entered data to edit or view its content. No data is entered on the Listing Page.
Those Listing Pages that do not have an
(Add an Entry) button automatically list the information you are working on. To add information to these forms, click the
link next to the appropriate name listed in the table. No data is entered on a Listing Page.
There are three types of Listing Pages:
1. Grid View
2. Hierarchy View
3. Single Form View
Grid View
The Grid View displays the data in tables. Specific pieces of data will be displayed
within the Grid based on the fields within the entry/edit form.
•
•
link
When first viewing a Listing Page, all of the data is available for Searching.
Click the link of the data you would like to edit/view.
You will be taken to the entry/edit screen. This page will be in edit mode (most
data fields will be open for data entry). Make any changes needed to the form.
Click the
(Save) button to save the changes.
(This is a sample screenshot of a “Grid View” Listing Page.)
NOMS Reporting User Manual
9
© KIT Solutions® 2011
Hierarchy View
A Hierarchical View is used to review data that has previously been submitted within
the application.
•
When viewing the Listing Page, you can click the (+) or (-) sign to display or
hide the related content.
(This is a sample screenshot of a “Hierarchy View” Listing Page.)
Single Form View
The Single Form View is used when the data is entered one time. The single form
view is used to collect data related to a file being uploading.
•
The form can be edited at any time, but you must click the
button to update the data.
(Submit)
(This is a partial screenshot of a “Single Form View” Listing Page.)
NOMS Reporting User Manual
10
© KIT Solutions® 2011
Edit Forms
The Edit Form contains the fields for entering and editing data.
•
•
If you clicked the
(Add an Entry) link to enter new information into
a form, the Edit Form data fields will be blank.
When clicking the link to select and view existing data, the Edit form data fields
will display the data entered/selected previously. These fields may be modified,
if needed.
(This is a partial screenshot of an Edit Form.)
NOMS Reporting User Manual
11
© KIT Solutions® 2011
Advanced Search
The Advanced Search feature allows you to set more specific specification on the
searches within the application. Each Listing Page includes a search feature which
allows you to find a particular record by using the Advanced Search feature.
To begin using the Advanced Search feature:
1. Enter the term you wish to search for in the
2. Click the
(Go) button.
Advanced Search field
(Search) field.
3. The results of your Search will be displayed. To access the section containing
that Search term, click the link of the name of that section.
a. If there is more than one page of results, click the Next Page or
Previous Page links to navigate through the pages.
Next Page link
(This is a sample screenshot of the Search Listing Page.)
NOMS Reporting User Manual
12
© KIT Solutions® 2011
Data Fields & Buttons
In NOMs Reporting there are several fields, boxes, and buttons that are used to collect, store, print, organize and delete data. Here are some examples:
Type
Preview/Description
Text Field
(aka ‘Text Box’)
Dropdown List
(aka ‘Pull Down Menu’)
Radio Buttons
Selected
Not Selected
Check Boxes
Selected
Not Selected
Enter data into NOMs Reporting can be made easier by using the “Tab” key on the keyboard. The “Tab” key advances the cursor to the next data field. You can go from the
current field to the previous field by holding the “Shift” key and pressing “Tab” (Shift + Tab). You can also navigate through the fields by using the mouse.
If a required field does not have data entered into it and you try to save the form, you will receive a message that informs you of the field vacant of data and you will not be able
to save that form until that field has data. Some or all of the fields may be required in order to save the form. Those fields that are required are bold and with an asterisk next
to the field name.
Tips
•
•
You must click the
(Save) button before moving on to the next section in the system.
To select multiple data at one time from a Multiple Selector Box or List Box, hold the control (Ctrl) key on the keyboard and left click the mouse on any of the data options that you’d
like to include in your entry.
NOMS Reporting User Manual
13
© KIT Solutions® 2011
Edit Form Buttons
Information is entered and edited through the Edit Forms. The table below summarizes the buttons used to enter/edit information into an Edit Form.
Must be pressed first to add new information to an Edit Form
Cancels the Add or Edit without saving any information entered
Removes the information currently on an Edit Form from the NOMs Reporting database
or
Downloads the selected file into the desired format.
Adds the information on an Edit Form to the NOMs Reporting database
Forwards the approved information to the appropriate parties for further consideration.
Allows the Edit Form fields to be “open” for modifications
Additional Feature Buttons
Within the NOMs Reporting Application are these icons offering additional help to the user. Click on one of the icons to receive the help needed.
Shows additional details regarding data
NOMS Reporting User Manual
14
© KIT Solutions® 2011
LOGIN PROCEDURE
Connect to the Internet using your Internet browser. In the Address (Location) box, type in the following address and press enter:
https://www.pmrts.samhsa.gov/pmrts/
To access NOMs Reporting, you will login through the Prevention Management
Reporting and Training System website.
1. Click the
Login link
(Login) link located in the top right hand corner of the screen.
(This is a partial screenshot displaying the Home Page.)
NOMS Reporting User Manual
15
© KIT Solutions® 2011
2.
3.
4.
5.
Type the login name in the Username field.
Type the password in the Password field.
Click the box that states: ‘I agree to these Terms and Conditions’.
Click the
(Log In) button.
*Note: To cancel the login process, click the
Terms and Conditions
checkbox
(Cancel) button.
Login button
(This is a screenshot displaying the Login Page.)
Tips
•
•
The User Name IS NOT case sensitive.
The Password IS case sensitive.
NOMS Reporting User Manual
16
© KIT Solutions® 2011
Data Submissions
6. Click Data Submissions from the Prevention Management menu.
7. Click the NOMs - National Outcome Measures Data Tools link.
NOMs link
(This is a screenshot displaying the Data Submissions Landing Page.)
Tips
•
The Prevention Management Reporting and Training System is a portal for several data entry applications. The Data Submissions section lists all of the available data entry
applications that your account is associated with.
NOMS Reporting User Manual
17
© KIT Solutions® 2011
Change Your Password
The Change Your Password feature allows a user to change the password for the
account he or she is currently logging into the system with.
Change Your Password
link
1. To change your password, begin by clicking the My Account from the
Prevention Management Reporting and Training System main menu.
2. Click the Change Your Password link.
(This is a screenshot displaying the My Account Landing Page.)
3. Select a Security Question* from the dropdown list.
*Note: The Security Question will be used when using the Forgot Password feature to ensure
the user requesting a password is legitimate.
4. Enter your answer to the selected security question in the Security Answer*
field.
5. Type the password you would like to use in the New Password* field.
6. Retype the password in the Confirm New Password* field.
7. Verify or update the email address in the Email Address* field.
8. Click the
(Submit) button.
Submit button
(This is a screenshot displaying the Change Your Password Page.)
Tips
•
•
The User Name IS NOT case sensitive.
The Password IS case sensitive. The Password must also fill the following requirements:
Minimum length: 8 characters
At least one upper case
At least one number
NOMS Reporting User Manual
18
© KIT Solutions® 2011
•
At least one of the special characters: !@#$%^&
You will be required to change your password every 90 days.
NOMS Reporting User Manual
19
© KIT Solutions® 2011
Forgot Your Password?
If you are unable to log into the NOMs Reporting application due to forgetting your
password, you can retrieve this information by clicking the link entitled “I forgot my
password”
1. On the Login page, click the Forgot your Password? link.
Forgot your Password?
link
(This is a screenshot displaying the Login Page.)
2. Type the login name in the User Name field.
3. Type the email address of the user who is associated with the User Name in the
User Email field.
*Note: This must be a valid email address.
4. Click the
(Next) button.
5. On the next screen answer the Security Question.
6. Click the
(Next) button.
Next button
(This is a screenshot displaying the Reset Your Password Page.)
Tips
•
If you currently do not have an account you will not be able to use the Forgot Password feature.
NOMS Reporting User Manual
20
© KIT Solutions® 2011
7. A new temporary password will be sent to the email address that is associated
with the User Name.
(This is a screenshot displaying the Reset Your Password Page.)
Tips
•
•
If you do not receive a new temporary password first check your junk mail and spam folders. If you still did not receive a temporary password, contact Support at 1-888-DITIC-4-U
(348-4248). The following reasons may be the cause: your email address has changed since the account was created, you mistyped the email address, or you are unable to receive
emails from Support.
Please add the following domain to your safe list: @kitsolutions.net to ensure you receive emails from Support.
NOMS Reporting User Manual
21
© KIT Solutions® 2011
Account Locked
If you attempt to log into the system unsuccessfully three (3) times, you will be
locked out of your account. Please contact Support to have your account unlocked.
Contact Support
information
SUPPORT CONTACT INFORMATION:
• 1-888-DITIC-4-U (348-4248)
• [email protected]
• Use the Contact Form on the Support Site:
http://kitusers.kithost.net/support/diticsupport
Once your account is unlocked you will receive an email:
• The email informs you that your account has been unlocked.
Subject line will read: User Account has Been Unlocked
(This is a screenshot displaying the Login Page when the account has been locked.)
When your account is unlocked you can request Support to reset your password if
you do not remember your current password.
Link to change
password
Once your password has been reset you will receive an email:
• The email provides you a link to reset your password.
Subject line will read: Password Has Been Reset
(This is a sample screenshot of a Password Reset email.)
NOMS Reporting User Manual
22
© KIT Solutions® 2011
DATA SUBMISSIONS
The Data Submissions module provides grantees the ability to enter and submit their data online and for Project Officers to review the data and reports in real time.
Enter My Data Online
This link is designed to allow you to enter, edit and save data specific to NOMS REPORTING through various forms.
Add an Entry
Adding an entry consists of entering and saving data on a selected form from the
Data Entry screen.
Enter My Data Online link
1. Click the Enter My Data Online link from the NOMs menu.
(This is a screenshot displaying the Data Entry Landing Page.)
2. Click the Grant Number that you are entering data for.
*Note: Only the Cohort(s) you work with will be displayed.
Grant Number
(This is a sample screenshot displaying the Data Entry Landing Page.)
NOMS Reporting User Manual
23
© KIT Solutions® 2011
3. Click on the
data.
(Add an Entry) link under the form that you need to input
Add an Entry link
(This is a partial screenshot displaying the HIV cohort 7 Data Entry Listing Page.)
4. Enter the data by filling in the radio buttons or text fields for each question.
*Note: Each question must have an answer in order to save the form.
5. Click
(Save) button.
*Note: To exit the screen without saving the data, click the
(Cancel) button.
a. You will receive a message that your entry has been successfully
saved. Click the
(OK) button to continue.
Save button
(This is a partial screenshot displaying an Entry Form.)
NOMS Reporting User Manual
24
© KIT Solutions® 2011
*Note: For some cohorts, the questionnaires will include Intervention drop down
menus that are pre-filled with active Interventions previously saved by the grantee in
the MRT > Implemented Interventions module. If the grantee doesn’t have any
interventions previously saved, no values will be available to select and an error
message will be display.
Error Message
Interventions from MRT
(This is a partial screenshot displaying an Entry Form.)
Tips
•
You will receive a message if you left any question unanswered. The message will include the number(s) of the unanswered question(s).
•
If a participant left a question blank on the paper version, select the radio button entitled Left Blank.
NOMS Reporting User Manual
25
© KIT Solutions® 2011
Work With Entries
The Work with Entries section allows you to view or modify saved data, delete
saved date, or submit data to CSAP.
Enter My Data Online link
1. Click the Enter My Data Online link from the NOMs Data Entry Tools Landing
Page.
(This is a screenshot displaying the Data Entry Landing Page.)
2. Click the Grant Number that you are entering data for.
Note: Only the Cohort(s) you work with is displayed.
Grant Number
(This is a sample screenshot displaying the Data Entry Landing Page.)
NOMS Reporting User Manual
26
© KIT Solutions® 2011
3. Click on the
need to input data.
(Work with Entries) link under the form that you
Work with Entries link
(This is a partial screenshot displaying the HIV cohort 7 Data Entry Listing Page.)
4. To modify or view an existing form, click the View/Edit link.
a. Make any changes needed to the details.
b. Click the
(Save) button to save the changes.
*Note: To exit the screen without saving the data, click the
i.
(Cancel) button.
View/Edit link
You will receive a message that your entry has been
(OK) button to continue.
successfully saved. Click the
(This is a sample screenshot of the Work with Entries Listing Page.)
NOMS Reporting User Manual
27
© KIT Solutions® 2011
checkbox
5. To submit an existing form to CSAP, click the check box next to the entries that
you which to submit from the Select column.
6. Click the
(Submit) button to submit the selected forms.
Submit button
(This is a sample screenshot of the Work with Entries Listing Page.)
a. Enter the date of the first day the data collection began in the Earliest
Data Collection Data field as mm/dd/yyyy.
*Note: The date should only apply to the data you are submitting.
b. Enter the date of the most recent day the data was collected in the
Latest Data Collection Date field as mm/dd/yyyy.
c. If desired, enter any comments regarding the submissions in the
Comments field.
d. Click the
(Confirm) button.
*Note: To cancel the submission, click the
i.
(Cancel) button.
You will receive a message that your entries have been
successfully submitted. Click the
(OK) button to
continue.
Confirm button
(This is a sample screenshot of the Work with Entries Listing Submission Page.)
NOMS Reporting User Manual
28
© KIT Solutions® 2011
Tips
•
•
The mm/dd/yyyy format indicates that you must enter the date (e.g. 03/15/2009) in the correct format. If you enter the date any other way the data will not save.
Once a form is submitted it is no longer available on the Work with Entries page.
7. To delete an existing form, click the check box next to the entries that you which
to submit from the Select column.
(Delete) button to remove the form.
8. Click the
checkbox
*Note: If deleted, the form will no longer be available.
a. A confirmation message appears asking if you are sure you want to
(Confirm) button to confirm the
delete the entry. Click the
deletion.
*Note: click the
i.
(Cancel) button to cancel the deletion.
You will receive a message that your entries have been
successfully deleted. Click the
(OK) button to continue.
Delete button
(This is a sample screenshot of the Work with Entries Listing Page.)
NOMS Reporting User Manual
29
© KIT Solutions® 2011
Send My Files to CSAP
This module allows you to upload your data files.
Send My Files to CSAP
link
1. Click the Send My Files to CSAP link from the NOMs Data Entry Tools Landing
Page.
(This is a screenshot displaying the Data Entry Landing Page.)
2. Select the appropriate Cohort from the Grant Program dropdown list.
3. Select the Grant/Contract ID from the Grantee dropdown list.
4. Enter the date the first day of the data collection began in the Earliest Data
Collection Date field as mm/dd/yyyy.
*Note: The data should apply only to the data you are submitting.
5. Enter the date of the most recent day the data was collected in the Latest Data
Collection Date field as mm/dd/yyyy.
(This is a partial screenshot displaying the Send My Files to CSAP Edit Form.)
NOMS Reporting User Manual
30
© KIT Solutions® 2011
6. Select the type of survey you will be uploading from the Form Type dropdown
list.
7. If you selected to upload a Questionnaire (Adult or Youth), the Population
dropdown list will be available. Select the type of population from the
Population dropdown list.
8. Using the radio buttons, select the file format you will be uploading (CSV, Excel,
or XML.) from the Choose the file you would like to upload section.
9. To upload a file that has been saved to your computer, click the
(Browse) button.
a. The Choose File window will appear allowing you to browse your
computer to locate the file you wish to upload.
(Open) button.
b. Once you have selected the file, click the
c. The desired file’s location will appear in the text field.
10. If the Excel (.xls) radio button was selected as the file format, a new field will
appear: Please enter the name of the excel sheet that contains the
resources. Enter the sheet name in the text box.
Browse button
Submit button
*Note: The excel sheet refers to the tabs located at the bottom of an excel spreadsheet. This field is defaulted to say
Sheet1.
(This is a partial screenshot displaying the Send My Files to CSAP Edit Form.)
11. If you wish to upload a document other than questionnaire/form files, select the
file type you wish to upload from the File Contents dropdown list.
12. To upload a file that has been saved to your computer, click the
(Browse) button.
a. The Choose File window will appear allowing you to browse your
computer to locate the file you wish to upload.
b. Once you have selected the file, click the
(Open) button.
13. If desired, enter any comments regarding the submissions in the Comments
field.
14. Click the
(Submit) button.
15. You will receive a message that your submission has been processed.
NOMS Reporting User Manual
31
© KIT Solutions® 2011
Tips
•
•
•
•
•
•
•
You will receive a message at the top of the screen whether the document was uploaded successfully or not.
The mm/dd/yyyy format indicates that you must enter you date (e.g. 03/15/2009) in the correct format, if you enter the date any other way the data will not save.
To access a list of questionnaires, codebooks and administrative guides for the surveys, select the Tools link. (This link will display the grant/cohort type. For example, if you are an
HIV cohort 7 grantee, the link will display as HIV Cohort 7 Tools.)
For some cohorts, an Intervention ID List link will be displayed, allowing users to view a report of Interventions added in MRT for determining available IDs to use in the
questionnaires.
You will only be able to upload one (1) Data Submission at a time and up to four (4) additional files.
If the wrong Form Type is selected or any of your variables do match the Codebook, you will receive an Error Report. Select the correct Form Type or make the necessary corrections
to your file and re-upload the document until you receive the Success message.
For additional instructions on the Error Report, the Error Report section for help.
NOMS Reporting User Manual
32
© KIT Solutions® 2011
Review My Data Submissions
This module includes all submissions (data entry and uploaded) to be viewed and
exported.
Review My Data
Submissions link
1. Click the Review My Data Submissions link from the NOMs Data Entry Tools
Landing Page.
(This is a screenshot displaying the Data Entry Landing Page.)
2. Select the type of entries you would like to view from the View Entries by radio
buttons.
a. Individual Batch Submission: lists each individual batch submission
submitted using the Enter My Data Online form or Send My Files to
CSAP
b. All Submitted Entries: provides all data submitted using the Enter My
Data Online form or Send My Files to CSAP, regardless of the batch it
was submitted with
View Entries radio buttons
Cleaned NOMs Data
(This is a partial screenshot displaying the Review/Download My Data Submissions Edit Form.)
Tips
•
Click the
(Cleaned NOMs Data) button to view or download the cleaned NOMs data file for the Grant Program and Grantee selected. Cleaned data files will be made
available to download twice a year, for the first and then second half of the previous fiscal year. If your grant didn’t submit data during this period, there will be no cleaned data
available. Note: Some data sets exceed the number of columns allowed in Excel 2003 and earlier versions. If Excel 2007 is not available, you will need to save the file and
open/import it in another program.
NOMS Reporting User Manual
33
© KIT Solutions® 2011
3. If Individual Batch Submission is selected:
a. Select the appropriate Cohort from the Grant Program dropdown list.
b. Select the Grant/Contract ID from the Grantee dropdown list.
c. You may view a single submission record or view a list of submission
records by using the Search by radio buttons.
d. Single Date: Select a single submission record from the Date
Submitted (Receipt ID) dropdown list.
e. Date Range: Enter a date range in the Begin Date and End Date fields
as mm/dd/yyyy.
f. Click the
(View) button.
Search by radio buttons
View button
(This is a partial screenshot displaying the Review/Download My Data Submissions Edit Form.)
radio button
g. To view a submission, click the radio button next to the submission that
you which to view from the Export column.
*Note: You will only be able to export one (1) submission record at a time.
h. Select the format you would like to export the submission to (CSV or
XML) from the Export Format: dropdown list.
(Export Data) button.
i. Click the
Export Data button
(This is a partial screenshot displaying the Review/Download My Data Submissions Edit Form.)
Tips
•
Exporting by Individual Batch Submission will only find files submitted post 12/5/2008. If you need to correct surveys prior to 12/5/2008, use the All Submitted Entries option.
NOMS Reporting User Manual
34
© KIT Solutions® 2011
4. If All Submitted Entries is selected:
a. Select the appropriate Cohort from the Grant Program dropdown list.
b. Select the Grant/Contract ID from the Grantee dropdown list.
c. Select the type of survey you would like to view from the Form Type
dropdown list.
d. Select the type of record you would like to view from the Record Type
dropdown list.
e. You may view a submission date or view a list of submission dates by
using the Search by radio buttons.
i. Single Date: Select a submission date from the Date
Submitted (Receipt ID) dropdown list.
ii. Date Range: Enter a date range in the Begin Date and End
Date fields as mm/dd/yyyy.
f. Click the
(Export Data) button.
Search by radio buttons
Export Data button
(This is a partial screenshot displaying the Review/Download My Data Submissions Edit Form.)
NOMS Reporting User Manual
35
© KIT Solutions® 2011
5. A message will display asking if you would like Open or Save the document.
a. Click Open to open the document immediately.
b. Click Save to save the document to your computer.
6. To close the document, click the (X) in the upper right corner.
(This is a partial screenshot displaying the Review/Download My Data Submissions Edit Form.)
Tips
•
•
•
•
To show additional details about the file, click the
(Show Details) link to the right of the file Receipt ID. The details will show up as a new form. Click the
(OK)
button to close the new form.
If you are having difficulty opening a document it may be due to a pop-up blocker. Try holding the control (Ctrl) key down on your keyboard while simultaneously clicking the
submission link.
You will not be able to export any data that was previously uploaded through Send My Files to CSAP.
When making your corrections to the exported document, DO NOT correct or remove the AnswerSet_ID column.
NOMS Reporting User Manual
36
© KIT Solutions® 2011
Revise My Submitted Data
This module will allow you to re-upload your submissions with corrections requested
on your cleaning sheets. The Revise My Submitted Data link will only be available
two (2) times per year for a limited time when the cleaning sheets are distributed.
Revise My Submitted Data
link
1. Click the Revise My Submitted Data link from the NOMs Data Entry Tools
Landing Page.
(This is a screenshot displaying the Data Entry Landing Page.)
*Please note: You will have to export your submissions using the Review My Submissions page
first. (For additional details, see the Review My Data Submissions section.)
Tips
•
If the Revise My Submitted Data link is not displayed on the NOMs Data Entry Tools Landing Page you will not be able to upload any corrections made to your submissions. This link
is only available two (2) times per year.
2. Select the appropriate Cohort from the Grant Program dropdown list.
3. Select the Grant/Contract ID from the Grantee dropdown list.
Survey Tools button
(This is a partial screenshot displaying the Revise My Submitted Data Edit Form.)
NOMS Reporting User Manual
37
© KIT Solutions® 2011
Tips
•
To access a list of questionnaires for the surveys, select the Tools link. (This link will display the grant/cohort type. For example, if you are an HIV cohort 7 grantee, the link will
display as HIV Cohort 7 Tools.)
4. Select the type of survey you would like to view from the Form Type dropdown
list.
5. Using the radio buttons, select the file format you will be uploading (CSV, Excel,
or XML.) from the Choose the file you would like to upload section.
6. To upload a file that has been saved to your computer, click the
(Browse) button.
a. The Choose File window will appear allowing you to browse your
computer to locate the file you wish to upload.
b. Once you have selected the file, click the
(Open) button.
c. The desired file’s location will appear in the text box.
7. If the Excel (.xls) radio button was selected as the file format, a new field will
appear: Please enter the name of the excel sheet that contains the
resources. Enter the sheet name in the text box.
Browse button
Submit button
(This is a partial screenshot displaying the Revise My Submitted Data Edit Form.)
*Note: The excel sheet refers to the tabs located at the bottom of an excel spreadsheet. This field is defaulted to say
Sheet1.
Tips
•
•
•
You will receive a message at the top of the screen whether the document was uploaded successfully or not.
If the wrong Form Type is selected or any of your variables do match the Codebook, you will receive an Error Report. Select the correct Form Type or make the necessary corrections
to your file and re-upload the document until you receive the Success message.
For additional instructions on the Error Report, the Error Report section for help.
NOMS Reporting User Manual
38
© KIT Solutions® 2011
REPORTING SERVICES
The Reporting Services module provides both Grantees and CSAPS Staff with tools to help them review, download and analyze data.
Coverage Report
The Coverage Report provides information about the level of services and data
collection follow-up provided by each Grantee. The report provides a target for the
number of individuals each Grantee expects to serve over a given time period and
then provides data on the actual number of individuals served at certain time
periods.
*Note: Only data that was submitted under Enter My Data Online or Submit My Files to CSAP
will appear on the Coverage Report.
Coverage Reports link
1. Click Reporting Services from the Prevention Management menu.
(This is a screenshot displaying the Reporting Services Landing Page.)
2. Click the
(Coverage Report) button.
Coverage Report button
(This is a screenshot displaying the View Coverage Report Listing Page.)
NOMS Reporting User Manual
39
© KIT Solutions® 2011
3. Select the Grant Program from the dropdown list.
4. Select the Cohort from the dropdown list.
5. If you specified a specific cohort, select the Grantee from the dropdown list.
Otherwise, this field will be grayed out indicating there are no selections to be
made.
6. If you want to view a specific timeframe of the data, enter a Start Date and End
Date as mm/dd/yyyy. To view all of the submitted date, leave the fields blank.
7. Click the
(Submit) button to generate the Coverage Report.
Submit button
(This is a screenshot displaying the Coverage Report Page.)
Export link
8. The report opens at the bottom of the current screen.
9. To print or save a copy of the report, you will have to export the report in
another format. You can export the report by selecting a format from the Select
a format dropdown list. Then, click the Export link.
a. To close the document, click the (X) in the upper right corner.
(This is a sample screenshot displaying the Coverage Report.)
Tips
•
If you are a grantee, you will only see the programs you are associated with. If you are a Project Officer, you will see all of your grantees.
NOMS Reporting User Manual
40
© KIT Solutions® 2011
APPENDIX
Error Report
If the wrong Form Type is selected or any of your variables do match the Codebook, you will receive an Error Report in Send My Files to CSAP and Revise My Submitted
Data. The Error Report opens in a pop-up window. You should either disable the pop-up blocker while using NOMs Reporting. Then you must remember to enable it, when
not in NOMs Reporting. You could also create exceptions for the pop-up blocker.
Export link
1. Once you have clicked the
(Submit) button in Send My Files to CSAP
or Revise My Submitted Data, an Error Report will appear if there are errors in
your file.
2. Click these buttons
to maneuver to other pages in the report.
The single arrow either forward or backward, will move the view to the next
page or the previous page. The arrows with the bar can move the report view to
either the first or last page of the report.
3. The report cannot be printed from this screen. Select the format you would like
to export the report to from the Select a format dropdown list.
4. Click the Export link.
Select a format dropdown
list
(This is a sample screenshot of the Report Viewer.)
NOMS Reporting User Manual
41
© KIT Solutions® 2011
5. Once you see the report open in a new window, click the
print the report.
6. Click the
(Disk) button to save the report.
7. To close the Report Viewer window, click on the
corner.
Print button
(Printer) button to
Save button
in the upper right-hand
(This is a sample screenshot of an Exported PDF Report.)
Tips
•
•
•
•
If you selected MS Excel or MS Word as your export type, to Print or Save the report select Save when the File Download box appears. You can print from File.
If you selected Acrobat (PDF) as your export type, to Save the report select Save when the File Download box appears. You can print from File.
If you have not installed Adobe Acrobat Reader, the computer will prompt you asking if you would like to download the program at that time. Be aware that the program will take quite
some time to download if you are connecting to the internet on a dialup connection.
If you have a pop-up blocker on your computer, hold the Ctrl key down while clicking Submit. Hold the Ctrl key down until the Report is completely generated.
NOMS Reporting User Manual
42
© KIT Solutions® 2011