1
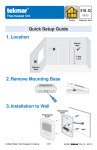
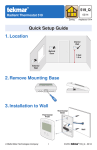
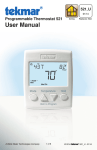
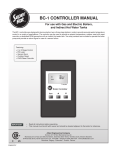
U538
12/11
tekmarNet®4 Thermostat 538
Zoning
Replaces: 08/10
User Manual
1 of 12
© 2011
U 538 - 12/11
This brochure will provide you with the information you need to benefit the most
from your tekmarNet® thermostat. Please visit www.tekmarcontrols.com for more
detailed information on this or any other tekmar product.
This thermostat provides heating for one zone in your building. It will maintain your
air temperature with an on board ROOM sensor, but may also have an auxiliary
ROOM, FLOOR, or OUTDOOR sensor attached. A ROOM sensor will allow control
of a location other than the one in which the thermostat is installed. An outdoor
sensor will allow this and all other tekmarNet® thermostats in your building to display
the outdoor temperature on their displays. A floor sensor will allow this thermostat
to control your floor temperature. This thermostat can maintain floor temperature
only, air temperature only, or floor and air temperature together.
With the addition of one of tekmar’s energy saving accessories, this thermostat can
also lower its temperature setting at night or when you are away from the house.
Temperature Adjustment
This thermostat can operate at day
or night
temperatures (see “Day
or
Night
Temperatures” section) for ROOM or FLOOR settings. The temperature
can be adjusted as follows:
Step 1:
Press the
Step 2:
Release all buttons and wait for the display to return to normal operation.
The adjusted settings will be saved in memory.
or
button until the desired temperature is displayed.
ROOM or FLOOR
displays depending
on configuration
Indicates
whether the day
or night
temperature is
being set
(if available).
Adjustment Buttons
Adjust the temperature
You will be adjusting the temperature of the current operating mode. To adjust
temperature settings that are not shown on the screen, you must enter into the
Adjust Menu as described in the “Adjust Menu” section. There may be other symbols
on the screen that affect thermostat operation. Please see the “Display Symbols”
section for a description of each symbol.
© 2011
U 538 - 12/11
2 of 12
Adjust Menu
This thermostat has an Adjust Menu that allows adjustment of all of its settings. The
following items can be adjusted or viewed:
•
•
•
•
•
Day
and night
temperatures (if available)
Floor temperatures
Backlight on-time
Temperature units °F or °C
Thermostat type (view only)
The Adjust Menu can be accessed as follows:
Step 1:
Press and hold the and buttons until the desired setting is shown
(a new screen will appear every 2 seconds).
Step 2:
Press the
Step 3:
Press and hold the
and
buttons again to advance to the next
adjustable setting. Repeat steps 1 and 2 until all adjustments have
been made.
Step 4:
Release all buttons and wait for the display to return to normal operation.
The adjusted settings will be saved in memory.
or
button to adjust the temperature setting.
Indicates setting
is in the Adjust menu
Indicates the
name of the
setting being
adjusted
Indicates
whether the day
or night
temperature is
being set
(if available).
Press and Hold
and
together
This thermostat has access levels. It will typically be installed and programmed
by a heating professional and then locked in a “User” access level. System critical
settings will not be available for adjustment. For more information on these settings,
please consult your installing contractor or this product’s Installation and Operation
Manual. The following pages describe the settings available to the “User”.
3 of 12
© 2011
U 538 - 12/11
Day
and Night
Temperatures
This thermostat is capable of running at a lower temperature setting when you are
asleep or out of the building. An energy saving accessory can be added to your
tekmarNet® system in order to activate these energy saving setback temperatures.
If one is connected, day
and night temperature settings will be available. They
are adjusted as follows:
Step 1:
Press and hold the
and
buttons to enter the Adjust Menu, and
wait until the desired setting is shown with the day
symbol on the
screen (a new setting will appear every 2 seconds).
Step 2:
Press the
Step 3:
Press and hold the
and
buttons until the same setting is shown
with the night
symbol on the screen.
Step 4:
Press the
Step 5:
Release all buttons and wait for the display to return to normal operation.
The adjusted settings will be saved in memory.
or
or
button to adjust the temperature setting.
button to adjust the temperature setting.
Setting
Day
or Night
Press and
Hold
and
together
tekmarNet ® Energy Saving Accessories ---------------------------------479 User Switch
With the touch of a button,
tell every thermostat in
your house to operate at
their night setback or
Away temperature.
033 Timer
Program a night
setback schedule for
all of your thermostats
with one device.
Examples of these settings are as follows:
Mode of Operation
day
night
ROOM example:
70°F (21°C)
65°F (18°C)
FLOOR MINIMUM example:
72°F (22°C)
OFF
Note: The presence of a schedule is indicated by the
© 2011
U 538 - 12/11
4 of 12
clock symbol.
Floor Temperatures
If your thermostat has a floor sensor connected to it, floor temperature can be
maintained. This allows you to have warm floors even during milder times of the year
when the air temperature is warm enough or when your air conditioning is on.
Floor temperature can be maintained in two ways. Air temperature can be ignored
and the thermostat will maintain Floor Temperature Only. Or, air temperature can be
considered and the thermostat will maintain Floor and Air Temperatures together.
Floor Temperature Only -------------------------------------------------------------------If the air sensor has been disabled, the thermostat will only maintain floor temperature
and ignore air temperature. In this mode, the desired floor temperature can be
adjusted as described in the “Temperature Adjustment” section.
Floor and Air Temperature---------------------------------------------------------------If the air sensor is turned on and their is a floor sensor connected, the thermostat
will maintain your desired air temperature as well as a minimum floor temperature.
However, the floor minimum temperature will override the air temperature, and if set
too high, may overheat the room. The FLOOR MINIMUM temperature is adjusted
through the Adjust Menu as follows:
Step 1:
Press and hold the
and
buttons to enter the Adjust Menu, and
wait until the FLOOR MIN setting is shown as well as the desired day
or night
symbol (a new screen will appear every 2 seconds).
Step 2:
Press the
Step 3:
Release all buttons and wait for the display to return to normal operation.
The adjusted settings will be saved in memory.
or
button to adjust the temperature setting.
Setting
Day
or Night
Press and
Hold
and
together
5 of 12
© 2011
U 538 - 12/11
Floor Temperature Settings ---------------------------------------------------------Setting a floor temperature is a way of enhancing the comfort of your living space.
Radiant floors heat the air by raising the floor temperature. During milder times of
the year when the air temperature is warm enough without the need for heating,
floors can cool off. A floor minimum setting can ensure that the floors stay warm
during these periods, or even in the summer when the air conditioning is on.
Sun shining into a room can keep it warm without the need for heat. This can allow
the floors to cool off. And when the sun goes down, it can sometimes take a long
time for the floors to get warm again. This may cause the room to cool off too much
in the early evening. A floor minimum setting can help with this condition.
The following are some typical floor temperature settings that have been used with
tekmar thermostats.
NOTE: Setting a floor temperature that is too high can damage floors or make the
room uncomfortably warm. If a FLOOR MIN is set, the thermostat will maintain the
floor at this temperature regardless of the air temperature. And the air temperature
may exceed that to which it is set.
90°F (32°C)
Feels hot to the touch
Suggested maximum for all floor
types other than wood.
80 to 85°F (26 to 30°C)
Feels warm to the touch
Bathrooms and kitchens. Suggested
maximum for wood floors.
70°F (21°C)
Feels cool to the touch
Rooms with large windows preventing
underheating in the evening.
40 to 45°F (5 to 7°C)
Feels cold to the touch
Freeze protection for garages.
Wood Floors ----------------------------------------------------------------------------------------Rapidly changing or excessively high temperatures can cause damage to wood
flooring. Ask your heating professional about setting the floor maximum if your
flooring is a type that can be damaged by heat.
© 2011
U 538 - 12/11
6 of 12
Changing the Backlight
This thermostat has an LED backlight that can be configured as follows:
Off
Permanently Off.
30
Temporary on for 30 seconds (when a button is pressed)
On
Permanently On
On +
On during
and off during
Press and
Hold
and
together.
Step 1:
Press and hold the
and
buttons to enter the Adjust Menu, and
wait until this screen appears (a new screen will appear every 2
seconds).
Step 2:
Press the
Step 3:
Release all buttons and wait for the display to return to normal operation.
The adjusted setting will be saved in memory.
or
button to adjust the backlight operation.
7 of 12
© 2011
U 538 - 12/11
Changing the Units (°F or °C)
This thermostat can display temperatures in °F or °C.
Press and
Hold
and
together.
Step 1:
Press and hold the
and
buttons to enter the Adjust Menu, and
wait until this screen appears (a new screen will appear every 2
seconds).
Step 2:
Press the
Step 3:
Release all buttons and wait for the display to return to normal operation.
The adjusted setting will be saved in memory.
© 2011
or
U 538 - 12/11
button to adjust the units.
8 of 12
Display Symbols
In addition to the features described in this manual, there may be others operating
in the background. Among others, this thermostat will display symbols on its screen
in order to indicate what mode it is in, what temperature it is operating at, or what
equipment it is trying to turn on. This section describes each of those symbols.
Schedule Symbols
These symbols appear when a Schedule Master or User Switch is connected to the
system. Those devices will tell this thermostat what temperature setting to operate
at (day , night , or
). Refer to the “Day
and Night
Temperatures”
section for more information.
A Schedule Master is present in the system and this thermostat is
following that Master’s programmable schedule.
Operating at the Day temperature. If there is no Schedule Master or User
Switch in the system, the thermostat will always be in this mode.
Operating at the Night temperature. A setback enabling accessory or
Schedule Master thermostat has enabled setback.
Operating at the Away temperature. If flashing, the temperature
cannot be adjusted by pressing the up or down arrows. Consult the
Installation and Operation Manual for this product for more information
on this feature.
If flashing, the system is in Warm Weather Shut Down. The outdoor
temperature is above the WWSD setting. No heating will take place
while in WWSD. However, if a floor sensor is attached and a minimum
floor temperature is set, it will be maintained.
9 of 12
© 2011
U 538 - 12/11
Equipment Operating Symbols
These symbols indicate the current status of the system.
Heating is turned on.
The thermostat is part of an Air Group (a group of heating zones within a
commonly ducted air-conditioning system) and the air-conditioning within
that group is on. This thermostat will be locked out of heating when this
symbol is displayed, which will save energy.
Communication Symbols
These symbols appear when this thermostat is part of a network and/or when
there is something wrong in the system.
The thermostat is part of a network and is communicating with other
devices in the network.
There is something wrong with the thermostat or the tekmarNet® system.
This usually occurs if a control component has failed or is set up incorrectly.
Contact your installing contractor for more information or consult the
Installation and Operation Manual for this product.
© 2011
U 538 - 12/11
10 of 12
Frequently Asked Questions
Symptom
Look for...
H1 Symbol
No heat or not
enough heat
and pressing
button does
not increase
temperature
Flashing
WWSD
H1 symbol indicates heat is on. If the H1
symbol is displayed and you still have no
heat, you may have an issue with your
heating appliance. Consult your heating
professional.
Increase WWSD setting on tekmarNet®
reset control.
Flashing Away
Press a user switch button other than
Away (typically
or
) or go to your
Scenes page on your gateway and change
the scene to Occ or Unocc
Flashing MAX
The thermostat has a maximum floor or
air temperature set that is preventing the
heating system from providing a higher
temperature. Call your installer or refer to
the Installation and Operation Manual for
information on how to adjust maximum
room and floor temperature settings.
Optimum start “learns” the heat up and
cool off rate of the room and starts the
heating or cooling early so that the room is
comfortable at the scheduled time.
Heat on before
scheduled time
Pressing
button does
not decrease
temperature
Corrective Action
Flashing MIN
There may be a minimum room or floor
temperature set. Consult your heating
professional.
More Information
This User Brochure contains standard information on how to make adjustments
to an installed product. More detailed information can be found in this product’s
Installation and Operation Manual (D538) at www.tekmarcontrols.com
11 of 12
© 2011
U 538 - 12/11
Save Even More Energy - the Easy Way
Great Accessories for Your
tekmarNet® System
Day
(Comfort)
User Switch 479
With the touch of one button, every part of
your home can switch between Day, Night
& Away temperature settings. While Away
on vacation, domestic water heating can
be suspended to save even more.
Night
(Economy)
Away
(Best
Economy
& DHW
Suspend)
Timer 033
Let the system automatically switch between
Day and Night temperatures to match your
schedule. The Timer 033 can manage setback
for all of the thermostats in your system from
a central location.
Ask your installer about
adding a tekmarNet® User
Switch or Timer to add more
energy saving convenience
to your system.
tekmar Control Systems Ltd., Canada
tekmar Control Systems, Inc., U.S.A.
Head Office: 5100 Silver Star Road
Vernon, B.C. Canada V1B 3K4
(250) 545-7749 Fax. (250) 545-0650
Web Site: www.tekmarcontrols.com
All specifications are subject
to change without notice
12 of 12
Product design, software and literature
are Copyright © 2011 by:
tekmar Control Systems Ltd. and tekmar
Control Systems, Inc.
U 538 - 12/11.