1
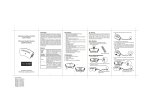
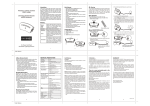
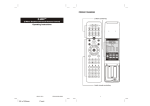
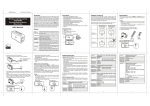
ZRC-100 Quick Setup Guide
The ZRC‐100 is a portable Z‐Wave remote controller with multi‐
channel support; also it is a Z‐Wave Enabled Security Controller. It can control the secured door locks when it is in the security network. Also, it can be configured as a primary or secondary controller within a Z‐
Wave home automation network. It works with almost every Z‐Wave enabled devices, binary switches, dimmers, curtains, thermostats, secured door locks, binary or multi‐level sensors. Users can control their Z‐Wave enabled devices individually or through “Scene” control. Scene is a collection of Z‐Wave devices configured to a user‐preferred settings, levels, modes or operating conditions. The ZRC‐100 also equipped with a backlit LCD screen, users can setup and operate their Z‐Wave devices through the LCD user interface by using their ZRC‐100, and enjoy a networked, wireless home automation system anywhere at home. User Manual download: http://www.remotec.com.hk/zaspx/support.aspx QUICK SETUP STEPS EXAMPLE Step 1 Connect a Z‐Wave device (for example, a light switch) to power supply. 1
Step 2 Step Setup Key LCD Indication Press and hold ef keys simultaneously for 3 seconds under the Home page. Home
Device
>
Scene
>
Comfort
>
OK to Enter
i)
⇓ ii) iii) Setup
Add Device
>
Delete Device
>
Add to Scene
>
OK to Enter
Select “Add Device". Add Device
>
Delete Device
>
Add to Scene
>
key to add Press the device into Z‐Wave network. Setup
OK to Enter
Add Device
Press PROG on target
>>>>
Press the program button on the target device. Add Device
Press PROG on target
>>>>
Saving Data …
iv) ⇓ Add Device
Press PROG on target
2
>>>>
OK
If you can’t add your Z-Wave device, this device might have been
included in another Z-Wave network. In this case, please delete this
device following the steps in the [Deleting Device from the Network]
section then add this device again.
Step 3 After adding devices to your ZRC‐100, you can turn the device using the corresponding Device Control function. Step Setup Key LCD Indication Select “Device"and press key to confirm. A corresponding Device control page will be displayed. Home
Device
>
Scene
>
Comfort
>
OK to Enter
i) ⇓ Devices List
Switch 001
Off
Dimmer 002
Off
Curtain 003
Off
e Off and On f
For on/off switches, press f key to turn on Devices List
ii) the device and e key to turn off the device. Switch 001
Off
Dimmer 002
Off
Curtain 003
Off
e Off and On f
For dimmer device,
Press and hold the f key to adjust the dimming value then release the key to increase the dimmer intensity. iii) Press and hold the e key to adjust the dimming value then release the key to reduce the dimmer intensity. 3
Devices List
Switch 001
Off
Dimmer 002
Off
Curtain 003
Off
e Off and On f
For motorized curtain,
Press and hold the f key to adjust the curtain (Up or Open) position then release the key after reached to your desired level. Devices List
Switch 001
Off
Dimmer 002
Off
Curtain 003
Off
eOff,OK Stop,Onf
Press f key once to fully open the curtain. iv) Press and hold the e key to adjust the curtain (Down or Close) position then release the key after reached to your desired level. Press e key once to fully close the curtain. key to stop Press the curtain operation. Note 1: The screen will display LOCK /UNLK if this is a secured door
lock device.
Note 2: You can rename your device, please refer to user manual [step
of B6 - Device Config.]. 4
ZRC‐100 USER INTERFACE LAYOUT Control
menu
or
• Press c ord keys to select control category.
• Press BACK key to go back to previous page.
• Press and hold BACK key for 2 seconds to go
back to root menu.
Home (A1)
Device (A2)
Devices List (A2.1)
Scene (A3)
Scenes List (A3.1)
Comfort (A4)
Comforts List (A4.1)
Sensor (A5)
Sensors List (A5.1)
All Off (A6)
5
Setup
menu
+
• Press and hold ef keys simultaneously for 3
seconds to enter Setup menu.
• Press BACK key to go back to previous page.
• Press and hold BACK key for 2 seconds to go
back to root menu.
Setup (B1)
Add Device (B2)
Delete Device (B3)
Add to Scene (B4)
Select Scene (B4.1)
Remove fr. Scene (B5)
(remove from scene)
Select Scene (B5.1)
Device Config. (B6)
Device Configure (B6.1)
Scene Config. (B7)
Scene Configure (B7.1)
Comfort Config. (B8)
Comfort Configure (B8.1)
Sensor Config. (B9)
Sensor Configure (B9.1)
Shortcut Key (B10)
Shortcut Key (B10.1)
Advanced Setup (B11)
Config. Assoc. (B11.1)
Configuration (B11.2)
Reset to Default (B11.3)
System Settings (B12)
LCD Contrast (B12.1)
B.L. Brightness (B12.2)
Sleep Timer (B12.3)
About (B13)
6
Network
Setup
menu
• Press and hold cd keys simultaneously for 3
seconds to enter Network Setup menu.
• Press BACK key to go back to previous page.
• Press and hold BACK key for 2 seconds to go
back to root menu.
+
Network Setup (C1)
Learning Mode (C1)
Scan Devices (C2)
Create Pri. (C3)
(Create primary)
Create Sec. (C4)
(Create secondary)
Rediscover N.W. (C5)
(Rediscover network)
Delete Dead Node (C6)
Listening Mode (C7)
FREQUENTLY ASKED QUESTIONS Q If my Z‐Wave devices had already added into my Z‐Wave gateway (primary controller) network, what should I do for my ZRC‐100? How to copy my scenes settings to my ZRC‐100? A Your ZRC‐100 can act as a secondary controller with network information about other devices and scenes setting acquired from your gateway (primary controller). Please refer to user manual with below steps: i) ZRC‐100 should enter the “Learning Mode"[step of C1] (Replicating All Network and Device Information from a Primary Controller to your ZRC‐100), for details please refer to ZRC‐100 user manual. ii) Make sure the gateway scenes were mapped to your Scene ID number and activated event for Scene Controller. You may need to setup the trigger settings on gateway before next steps. 7
iii) Gateway should enter the “Inclusion Mode"to add the ZRC‐100 into the network and replicating all network and device information from a primary controller to your ZRC‐100, please refer to gateway user manual. iv) Now, ZRC‐100 will act as a secondary controller. All scenes and device node information will transfer from gateway to ZRC‐100, you can On/Off the scene through ZRC‐100 [step of A3.1]. v) Your ZRC‐100 will acquire scene configuration and node information only. That means you have scene copied from gateway but you need to include individual Z‐Wave device by ZRC‐100 if you want to use ZRC‐100 to control them individually. Q Can I include all Z‐Wave devices from the network by ZRC‐100 and no need to click the PROG button for each device? A Yes! ZRC‐100 provides a useful function which is “Scan Devices” that allows rediscovering all Z‐Wave devices from the network. Please refer to user manual with below steps: i) Assume all Z‐Wave devices have been added by gateway. ii) ZRC‐100 should act as a secondary controller [step of C1]. iii) Execute the “Scan Devices” function [step of C2]. ZRC‐100 will rediscover Z‐Wave devices from the network, discovered devices will be re‐assigned to their default categories (Devices, Comforts and Sensors), and names will be re‐assigned with default naming in ascending order. - This action may take few minutes to 1 hour depends on
how many devices are in your network, and it will erase
all previously stored device names!
- Please make sure batteries are full before proceed!
iv) Now, all Z‐Wave devices will appear on the Device, Comfort and Sensor categories. You can rename your device individually if needed. Printed in China
F820-8380-0000
8