1
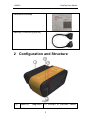
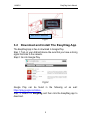
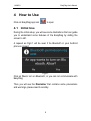
EasyDiag User’s Manual
Issued:2013-11-11
LAUNCH
EasyDiag User’s Manual
Precautions on operating vehicle’s ECU
z Do not disconnect the vehicle inner consume when the ignition
switch is on, so as to avoid the sensors or the ECU damage.
z Do not place the magnetic object near the ECU in order to
avoid the failure of the circuitry and components.
z Do cut off the power supply of ECU system before welding on
the vehicle.
z Pay more attention to the ECU and the sensors when the
operation is next to them.
z Ground yourself when you disassemble PROM, otherwise
ECU and sensors will be damaged by static electricity.
z Do connect ECU harness connector firmly, otherwise
electronic elements, such as IC inside ECU, will be damaged.
Precautions on operation
z The instrument is a precision electronic instrument. Pay more
attention when in use, do not have it dashed.
z The equipment power is supplied by 12v battery voltage; do
not use other voltage power.
z Turn off the ignition switch when connect or disconnect the
diagnostic connector.
z Do not keep EasyDiag Pin Connector plugged into your
vehicle overnight, be sure to always remove connector once
testing and/or diagnosis is complete. Failure to do so may
result in drained or weakened battery.
z The illustrations herein are for reference only and are subject
to change based on the Smart Device you are using and/ or
software updates.
i
LAUNCH
EasyDiag User’s Manual
Contents
1
Overview ......................................................................................1
1.1
1.2
1.3
1.4
Product Introduction .............................................................1
Parameters...........................................................................1
Features ...............................................................................2
Accessories..........................................................................2
2
Configuration and Structure ......................................................3
3
Connection and Installation .......................................................4
3.1
3.2
4
EasyDiag Connection...........................................................4
Download and Install The EasyDiag App .............................5
How to Use...................................................................................6
4.1
Initial Use .............................................................................6
4.2
Register Connector ............................................................11
4.3
Acquire the Diagnostic Software ........................................12
4.4
My Data..............................................................................22
4.5
What’s New ........................................................................26
4.6
Account ..............................................................................27
4.6.1 Register Connector........................................................28
4.6.2 Modify Personal Information..........................................28
4.6.3 Change Password .........................................................29
4.6.4 Setup Security Questions ..............................................30
4.6.5 Forgot Password ...........................................................30
4.6.6 Theme ...........................................................................31
4.6.7 Select Serial Number.....................................................31
4.6.8 Connector Firmware Upgrade File Download ...............31
4.6.9 One Key Upgrade..........................................................31
4.6.10
Only display available brand .....................................31
4.7
More ...................................................................................32
4.7.1 Quick Guide...................................................................32
4.7.2 User Manual ..................................................................32
4.7.3 Purchase Instruction......................................................32
4.7.4 Version Update ..............................................................32
ii
LAUNCH
4.7.5
EasyDiag User’s Manual
About .............................................................................32
5
IM ................................................................................................32
6
How to Diagnose .......................................................................33
6.1
6.2
Preparation.........................................................................33
Diagnosis ...........................................................................34
iii
LAUNCH
EasyDiag User’s Manual
1 Overview
1.1
Product Introduction
EasyDiag, based on iOS/Android operation system design, research
and development, is an internet vehicle trouble diagnosis tester
designed specifically for automotive repair technicians, students and
DIY users. After being connected with a mobile terminal through the
internal Bluetooth, it achieves for x-431 serial product the full
diagnostic functions, including Read DTCs, Clear DTCs, Read Data
Stream, Action Test and Special Functions,Meanwhile, through your
intelligent mobile terminal, you can access internet to get your
required information, or share and exchange information, etc.
Fig1.1
1.2
z
z
Parameters
Working voltage: 9~15V
Working average current: about 35mA
1
LAUNCH
z
z
z
z
z
z
1.3
z
z
z
z
z
z
1.4
EasyDiag User’s Manual
Static current: about 25mA
Working temperature: -20 to 55℃(-4 to 131°F)
Storage temperature: -30 to 70℃(-22 to 158°F)
Storage humidity: <80%
Working humidity: <60%
Net weight: about 26g
Features
Most of the electronic system of vehicle, including Europe,
Asia, America and domestic models, can be detected;
Applies to iOS and Android system, simple interface, elegant
and easy to operate;
Bluetooth communication;
Online download diagnostic software (single vehicle model or
combined software models). Many ways to pay.
Online share and communicate diagnostic technology with
core of community concept and service.
One-key upgrade
Accessories
EasyDiag
2
LAUNCH
EasyDiag User’s Manual
Password Envelope
Auxiliary Connector(optional)
2 Configuration and Structure
①
OBD-16
Fig2.1
diagnostic To connect to vehicle’s OBD2
3
LAUNCH
EasyDiag User’s Manual
connector
diagnostic socket
②
Power indicator
③
Communication
indicator
④
Micro USB port
It will light up once EasyDiag is
plugged into OBD2 diagnostic
socket.
It will flash when EasyDiag is
communicating with mobile
device or EasyDiag is resetting.
To connect on PC for data
transmission or upgrade via USB
cable
3 Connection and Installation
3.1
EasyDiag Connection
NOTE:
1. Remove connector once testing and/or diagnosis is
complete.
2. Maybe it is difficult to plug or unplug connector in
some vehicles because of the varied position of the
DLC, you can use auxiliary connector to help you
avoid this problem.
3. Please turn off the ignition switch before connecting
or disconnecting EasyDiag.
Step 1: Locate the vehicle’s DLC socket, which is usually located
under the dashboard, towards the driver’s left knee area.
Step 2: Plug the EasyDiag connector into the DLC socket. The
connector’s power indicator will light up to signify communication
and you will hear an audible beep.
4
LAUNCH
EasyDiag User’s Manual
Near center of dashboard
Fig3.1
3.2
Download and Install The EasyDiag App
The EasyDiag App is free to download in Google Play.
Step 1: Turn on your Android device. Be sure that you have a strong
signal that links to the network.
Step 2: Go into Google Play.
Fig3.2
Google Play can be found in the following url as well:
https://play.google.com/store .
Step: 3: Search for EasyDiag and then click the EasyDiag app to
download.
5
LAUNCH
EasyDiag User’s Manual
4 How to Use
Click on EasyDiag app icon
4.1
to open
Initial Use
During the initial setup, you will see some illustrations that can guide
you to understand some features of the EasyDiag by sliding the
screen to left.
A request as Fig4.1 will be seen if he Bluetooth in your Android
phone is closed,
Fig4.1
Click on Yes to turn on Bluetooth, or you can not communicate with
EasyDiag
Then you will see the Disclaimer that contains some precautions
and warnings, please read it carefully.
6
LAUNCH
EasyDiag User’s Manual
Fig4.2
When reading is finished, click on I have read it to enter login
interface, see Fig4.3. If you don’t want to read this again, choose
Don’t show this again and it will not appear next time.
Fig4.3
Click on Login on the upper right corner.
7
LAUNCH
EasyDiag User’s Manual
Fig4.4
For existing users, input your Account and Password to login
directly.
For new users, click on Register to register.
Fig4.5
Input the required information, and then click on Register and
Login to proceed.
8
LAUNCH
EasyDiag User’s Manual
Fig4.6
If you have more than one connector, it is suggested to select
Register Connector to add the serial number of the connector to
your account, which can also be done in “4.2 Register Connector”
as well.
If not, click on No Connector to login directly.
NOTE: When registration is successful, a confirmation
letter will be sent to your registered Email.
Then the interface as below will pop up.
Fig4.7
Click on Read to open Quick Start Guide.
See the illustrations of the main interface, see Fig4.8.
9
LAUNCH
EasyDiag User’s Manual
Fig4.8
:Function menu,
:Vehicle origin selection
:Car model selection area, the icon
means this diagnostic
software for this make has not been downloaded.
:Partial display button
:Chat tool
to
If you don’t have a EasyDiag, you can click DEMO icon
get into the demo function interface, and experience the vehicle
diagnosis function
10
LAUNCH
EasyDiag User’s Manual
If you have already got an EasyDiag, please continue the
registration.
4.2
Register Connector
Each new connector must be registered before using.
Plug the EasyDiag into DLC socket and turn on the ignition switch.
Go into Account and click on Register Connector。
Fig4.9
Input the Serial Number and Verification Code, which can be found
in the Password Envelope, then click on Register to complete
registration.
11
LAUNCH
EasyDiag User’s Manual
Fig4.10
See the illustrations of the Password Envelope.
Product SN
Product SN
Verification Code
Fig4.11
4.3
Acquire the Diagnostic Software
Before diagnosis, you need to download the specific software of
vehicle.
means the diagnostic software for this make has not
The icon
been downloaded, if you want to diagnose this car, please click it to
12
LAUNCH
EasyDiag User’s Manual
download the diagnostic software.
First, select a Serial Number of your connector, see Fig4.12.
Fig4.12
Click on the vehicle brand icon which you want.
Take GM as an example.
Click on GM to see the software message, see Fig4.13.
13
LAUNCH
EasyDiag User’s Manual
Fig4.13
If only this software to be purchased, click Add to Shopping Cart.
Or click on Software Package to purchase software in packages or
individually.
NOTE: Software package only supplies to individual
regions.
When the selection is completed, click on Create Order.
Fig4.14
14
LAUNCH
EasyDiag User’s Manual
Order list will be created, see Fig4.15
Fig4.15
After you click the space which marked in red circle in Fig4.15, it
would provide some useful information as in the Fig4.16, such as
diagnosis soft order name, order number, product serial number,
total price, order status, and order time.Please comfire those
information, and take a note about the order number which is the
most important.
15
LAUNCH
EasyDiag User’s Manual
Fig4.16
PAYMENT: You can select pay with PayPal or pay on website; here
we choose the latter to illustrate how to pay. As for PayPal method,
you can follow the on-screen instructions to complete.
After click button, the browser will automatic jump into LAUNCH
16
LAUNCH
EasyDiag User’s Manual
user center login page.
Use the Login name and password, which you have registered
before, which is same as EasyDiag app login account.
Fig4.17
After login successfully, the web page will include order information.
Please confirm the order information, especially for the order
number. See Fig4.18
Fig4.18
Click on PAY then confirm to pay.
17
LAUNCH
EasyDiag User’s Manual
Fig4.19
In the Fig4.20, there are two options, one is called 支付宝,which
is use for Chinese currency. The other one is PayPal, which for
USD. If you use USD to pay, Please select PayPal.
Fig4.20
You must have a PayPal account before you made the payment.
18
LAUNCH
EasyDiag User’s Manual
Fig4.21
In Fig4.21, login your PayPal account, which is your email address,
and password, and click on Continue. See Fig4.22.
Fig4.22
Pay sucess, see Fig4.23.
19
LAUNCH
EasyDiag User’s Manual
Fig4.23
DOWNLOAD: After made payment, please move back to EasyDiag
app. And click the diagnosis software icon which have already paid.
See Fig4.24
Fig 4.24
Take EOBD as an example, click on Check Download. See Fig4.25
20
LAUNCH
EasyDiag User’s Manual
Fig 4.25
Select the order and click on Download to start download. See
Fig4.26
Fig4.26
Download until completed.
21
LAUNCH
EasyDiag User’s Manual
Fig4.27
Click on Return to return to the main interface when diagnosis
software download is completed, the icon on the right bottom
will disappear. See Fig4.28.
Fig4.28
4.4
My Data
In My Data you can see Diagnosis Report, Operation Record, My
Order and Shopping Cart;
22
LAUNCH
EasyDiag User’s Manual
Fig4.29
Diagnose Playback
For playback of the video recorded during the performance of Read
Data Stream. First, select the desired Data Stream, and then select
the playback mode to play.
23
LAUNCH
EasyDiag User’s Manual
Fig4.30
If exist an unpaid order, you can also go into Shopping Cart to
generate the order, and then complete the payment in My Order
24
LAUNCH
EasyDiag User’s Manual
Fig4.31
25
LAUNCH
EasyDiag User’s Manual
Fig4.32
4.5
What’s New
Here you can see the latest news of our company, market, product
and upgrade, etc.
NOTE: Marketing information can not be seen until the
corresponding SN is selected.
26
LAUNCH
EasyDiag User’s Manual
Fig4.33
4.6
Account
See Fig4.34
27
LAUNCH
EasyDiag User’s Manual
Fig4.34
4.6.1 Register Connector
See Fig4.2.
4.6.2 Modify Personal Information
For modifying personal information.
28
LAUNCH
EasyDiag User’s Manual
Fig4.35
4.6.3 Change Password
Here you can change your password
F4.36
29
LAUNCH
EasyDiag User’s Manual
4.6.4 Setup Security Questions
These questions would be used in the event you forget your
password.
Fig4.37
4.6.5 Forgot Password
When you forgot your password, you can retrieve your password
through verifying the security questions or through your registered
mailbox.
30
LAUNCH
EasyDiag User’s Manual
Fig4.38
4.6.6 Theme
For changing display style
4.6.7 Select Serial Number
For selecting the serial number of the connector in advance before
diagnosis or downloading.
4.6.8 Connector Firmware Upgrade File Download
For downloading connector firmware file.
4.6.9 One Key Upgrade
This function is designed for upgrade convenience; you can select
all software which have latest version to upgrade simultaneously.
4.6.10 Only display available brand
When the switch is set to ON, the initial interface will display the
manufacturer which had already download diagnostic software.
31
LAUNCH
4.7
EasyDiag User’s Manual
More
4.7.1 Quick Guide
You can view Quick Start Guide here.
4.7.2 User Manual
You can view User’s Manual here.
4.7.3 Purchase Instruction
You can view purchase instruction here. In the document you can
get a help for using and purchasing software.
4.7.4 Version Update
If there is a latest EasyDiag app issued on the internet, you can
check and update your EasyDiag app here.
4.7.5 About
Show some information such as version No. and websites.
5 IM
Click on your user name to enter IM page, see Fig5.1. As a social
tool, here you can find some new friends, send SMS, audio
messages, photos, publish your latest state in Microblog. Meanwhile,
you can build some circle where you can exchange ideas about
maintenance or communicate with your customer, etc.
32
LAUNCH
EasyDiag User’s Manual
Fig5.1
6 How to Diagnose
The purpose of the illustrations here just for introducing the
diagnostic function, not for diagnosis itself, if you are not familiar to
diagnose, please refer to the repair manual of the vehicle published
by manufactures, or ask for vehicle repair technicians help, etc.
6.1
Preparation
Before diagnosis, please confirm the following word has completed
1. The connector has been registered, see 4.2;
2. Diagnostic software has downloaded. see 4.3;
3. The connector has been installed in the vehicle, see 3.2;
33
LAUNCH
EasyDiag User’s Manual
5. The ignition switch is ON position.
6.2
Diagnosis
Here we take Demo as an example.
Select Demo In Diagnostics, you will be prompted to select serial
number in order to build a Bluetooth communication.
NOTE: Bluetooth pair can skip when performing Demo.
Fig6.1
NOTE: The serial number of the connector can not be
seen until the ignition switch is on.
After connected, select the brand again, you will be prompted to
34
LAUNCH
EasyDiag User’s Manual
choose software version, in here you can also check the latest
version.
Fig6.2
Select the version to proceed. See Fig6.3,
NOTE: the following diagnosis operation would be
varying with different vehicle model, please follow the
on-screens instructions to operate.
Fin6.3
35
LAUNCH
EasyDiag User’s Manual
Select Demo to go into vehicle’s system selection.
Click on
to quit Demo.
Fig6.4
Select the desired system. Here we take engine as an example.
Fig6.5
A. Read Trouble Code
Click on Read Trouble Code, the screen will display diagnostic
results, see Fig6.6
36
LAUNCH
Click on
EasyDiag User’s Manual
to return to function selection interface.
Fig6.6
Generate Current Text Reports: Save the current diagnostic
results in text form to My Data.
Generate Screenshot Reports: Save the current diagnostic results
in screenshot form to My Data.
B. Clear Trouble Code
Click on Clear Trouble Code, the system will automatically delete
the Current exist trouble code. See Fig6.7.
37
LAUNCH
EasyDiag User’s Manual
Fig6.7
Note: the trouble code would not clear until the trouble
was ruled out.
C. Read Data Stream
Click on Read Data Stream, the screen will display DataStream
item, see Fig6.8; click the circle before the item you desired then
click on Confirm, If you want to select all, Click on Select All.
Click to
to return to the previous interface
Fig6.8
When communication is completed, the system will display real-time
data of the selected item, see Fig6.9
38
LAUNCH
EasyDiag User’s Manual
Fig6.9
: Pause
: Play
: Return the main interface.
Start to Record: The system will record the real-time data, this will
generates a video;
Generate Current Text Reports: Save the current time data in text
form;
39
LAUNCH
EasyDiag User’s Manual
Generate Screenshot Reports: Save the current time data in
screenshot form;
Data Stream: Display max 4 waveforms in chart form
simultaneously. See Fig6.10, Fig6.11.
Fig6.10
Fig6.11
40
LAUNCH
EasyDiag User’s Manual
Statement: LAUNCH reserves the rights to make any change to
product designs and specifications without notice. The actual object
may differ a little from the descriptions in the manual in physical
appearance, color and configuration. We have tried our best to
make the descriptions and illustrations in the manual as accurate as
possible, and defects are inevitable, if you have any question,
please contact local dealer or after-sale service center of LAUNCH,
LAUNCH does not bear any responsibility arising from
misunderstandings.
41