1
Mixman StudioPro 4.0
®
PC USER GUIDE
™
Mixman StudioPro 4.0
TABLE OF CONTENTS
Table of Contents
Welcome . . . . . . . . . . . . . . . . . . . . . . . . . . . . . . . . . . . . . . . 1
Chapter 1: Installing Mixman StudioPro . .
System Requirements . . . . . . . . . . . . . . . . . . . . . . . . . . . . . . . . .
Installation Instructions . . . . . . . . . . . . . . . . . . . . . . . . . . . . . . .
Getting the best performance from your PC . . . . . . . . . . . . . .
2
2
2
2
Chapter 2: Concepts . . . . . . . . . . . . . . . . . . . . . . . . 3
Chapter 3: Interface and Workflow . . . . . . 5
Chapter 4: Quickstart . . . . . . . . . . . . . . . . . . . . . . . 7
Chapter 5: The Control Room . . . . . . . . . . . .
Creating a new Mix . . . . . . . . . . . . . . . . . . . . . . . . . . . . . . . . . .
Opening a saved Mix . . . . . . . . . . . . . . . . . . . . . . . . . . . . . . . .
Saving your work . . . . . . . . . . . . . . . . . . . . . . . . . . . . . . . . . . . .
Archiving your work . . . . . . . . . . . . . . . . . . . . . . . . . . . . . . . . .
Exporting your music (various formats) . . . . . . . . . . . . . . . . .
Options . . . . . . . . . . . . . . . . . . . . . . . . . . . . . . . . . . . . . . . . . . . . .
Auto-panning . . . . . . . . . . . . . . . . . . . . . . . . . . . . . . . . . . . . . . .
Long release . . . . . . . . . . . . . . . . . . . . . . . . . . . . . . . . . . . . . . . .
Default folders . . . . . . . . . . . . . . . . . . . . . . . . . . . . . . . . . . . . . .
Latency Setting . . . . . . . . . . . . . . . . . . . . . . . . . . . . . . . . . . . . .
11
11
11
12
12
12
14
14
14
14
14
Chapter 6: The Remixing Studio . . . . . . . . .
Included Track files (.trk) . . . . . . . . . . . . . . . . . . . . . . . . . . . . .
Loading Sounds . . . . . . . . . . . . . . . . . . . . . . . . . . . . . . . . . . . . .
Understanding the auto-beat matching settings . . . . . . . . .
Recording custom sounds . . . . . . . . . . . . . . . . . . . . . . . . . . . .
Keyboard controls . . . . . . . . . . . . . . . . . . . . . . . . . . . . . . . . . . .
Performing a Mix . . . . . . . . . . . . . . . . . . . . . . . . . . . . . . . . . . . .
Triggering a sound . . . . . . . . . . . . . . . . . . . . . . . . . . . . . . . . . . .
Locking a sound . . . . . . . . . . . . . . . . . . . . . . . . . . . . . . . . . . . . .
Unlocking a sound . . . . . . . . . . . . . . . . . . . . . . . . . . . . . . . . . . .
Soloing a sound . . . . . . . . . . . . . . . . . . . . . . . . . . . . . . . . . . . . .
Realtime FX W.A.R.P. . . . . . . . . . . . . . . . . . . . . . . . . . . . . . . . . .
Change and load different W.A.R.P presets . . . . . . . . . . . . .
Adjusting pitch, panning and volume . . . . . . . . . . . . . . . . . . .
Adjusting tempo . . . . . . . . . . . . . . . . . . . . . . . . . . . . . . . . . . . . .
Macros . . . . . . . . . . . . . . . . . . . . . . . . . . . . . . . . . . . . . . . . . . . .
Customizing sounds with FX processing . . . . . . . . . . . . . . . .
Using the crossfader . . . . . . . . . . . . . . . . . . . . . . . . . . . . . . . . .
Recording a performance . . . . . . . . . . . . . . . . . . . . . . . . . . . .
Advanced settings . . . . . . . . . . . . . . . . . . . . . . . . . . . . . . . . . . .
15
15
15
16
16
17
17
17
17
17
17
17
19
19
19
18
18
18
19
19
Using the metronome . . . . . . . . . . . . . . . . . . . . . . . . . . . . . . . .
Recording using the microphone and line inputs . . . . . . . .
Recording from CD . . . . . . . . . . . . . . . . . . . . . . . . . . . . . . . . . .
Editing the recording . . . . . . . . . . . . . . . . . . . . . . . . . . . . . . . . .
Auto-Trim . . . . . . . . . . . . . . . . . . . . . . . . . . . . . . . . . . . . . . . . . . .
Auto-Normalize . . . . . . . . . . . . . . . . . . . . . . . . . . . . . . . . . . . . .
21
22
22
22
22
23
Chapter 8: The FX Studio . . . . . . . . . . . . . . . . .
What is an FX algorithm? . . . . . . . . . . . . . . . . . . . . . . . . . . . . .
What is an FX preset? (.fx) . . . . . . . . . . . . . . . . . . . . . . . . . . . .
What is a multi-FX preset? (.mfx) . . . . . . . . . . . . . . . . . . . . . .
Loading sounds into the FX Studio . . . . . . . . . . . . . . . . . . . . .
Loading FX presets . . . . . . . . . . . . . . . . . . . . . . . . . . . . . . . . . .
Signal Flow . . . . . . . . . . . . . . . . . . . . . . . . . . . . . . . . . . . . . . . . .
Changing FX settings . . . . . . . . . . . . . . . . . . . . . . . . . . . . . . . . .
Changing FX parameter units . . . . . . . . . . . . . . . . . . . . . . . . .
Changing FX slider ranges . . . . . . . . . . . . . . . . . . . . . . . . . . . .
Creating custom FX presets . . . . . . . . . . . . . . . . . . . . . . . . . . .
Creating multi-FX presets . . . . . . . . . . . . . . . . . . . . . . . . . . . . .
Saving processed sounds . . . . . . . . . . . . . . . . . . . . . . . . . . . .
24
24
24
25
25
25
25
25
25
26
26
26
26
Chapter 9: Editing Studio . . . . . . . . . . . . . . . . .
Understanding Performance Data . . . . . . . . . . . . . . . . . . . . .
The meaning of the different colored bars . . . . . . . . . . . . . .
Zooming . . . . . . . . . . . . . . . . . . . . . . . . . . . . . . . . . . . . . . . . . . . .
Navigating . . . . . . . . . . . . . . . . . . . . . . . . . . . . . . . . . . . . . . . . . .
Selecting and editing . . . . . . . . . . . . . . . . . . . . . . . . . . . . . . . .
Using the editing tools . . . . . . . . . . . . . . . . . . . . . . . . . . . . . . .
Quantizing . . . . . . . . . . . . . . . . . . . . . . . . . . . . . . . . . . . . . . . . . .
Controlling volume, pitch, panning and tempo . . . . . . . . . . .
Creating a volume fade . . . . . . . . . . . . . . . . . . . . . . . . . . . . . . .
Creating a pitch ramp . . . . . . . . . . . . . . . . . . . . . . . . . . . . . . . .
Panning a sound . . . . . . . . . . . . . . . . . . . . . . . . . . . . . . . . . . . .
Using song markers . . . . . . . . . . . . . . . . . . . . . . . . . . . . . . . . . .
27
27
28
28
28
28
28
29
30
30
30
30
30
Appendix 1: Keyboard Commands . . . . . 31
Appendix 2: The FX Algorithms . . . . . . . . . 33
Appendix 3: Troubleshooting . . . . . . . . . . . . 39
Appendix 4: Track Indicator Legend . . . . 40
Appendix 5: Creating Your Own Tracks . 41
Appendix 6: My Mixzone . . . . . . . . . . . . . . . . . 42
Chapter 7: The Recording Studio . . . . . . . 21
Setting the volume controls . . . . . . . . . . . . . . . . . . . . . . . . . . . 21
Appendix 7: Mixman Radio . . . . . . . . . . . . . . . 43
Mixman StudioPro 4.0
WELCOME
Welcome
Welcome to the Mixman StudioPro User’s Manual. StudioPro is
a powerful music creation, remixing and performance system,
with the tools and special FX needed to create professional
sounding music on your computer.
If you have questions that remain unanswered in this manual,
or need up-to-the-minute technical information, visit
www.mixman.com where there is technical information 24
hours a day, 7 days a week. The tips and tricks section of
the web site is a valuable source of new information, and the
Mixzone is a great way to connect with other StudioPro users.
If you want to hear music made with Mixman software, that was
produced by other Mixman enthusiasts, go to Mixman Radio.
(www.mixman.com/radiomixman)
We hope you enjoy Mixman StudioPro!
1
2
Mixman StudioPro 4.0
INSTALLING MIXMAN STUDIOPRO
Chapter 1: Installing Mixman StudioPro
System Requirements
Getting the best performance from your PC
Before installing StudioPro, please take a moment to consider
the following minimum system requirements.
Mixman StudioPro is a real-time, high-performance application
that uses all the power of the PC. For those interested in getting
the most out of their computer, we have included a list of the
different components of the computer system, and how they
effect StudioPro’s performance.
• Windows 95 / 98 / 2000
• Pentium II 233 MHz Or faster
• 32 MB of RAM (64 MB or more recommended)
• 40 MB available hardrive space (300 MB to install with
sounds)
Installation Instructions
We strongly encourage registering your copy of Mixman
StudioPro. It is an invaluable way for us to learn about our users
and allows us to continue creating the best possible music
software on the market.
Processor Speed
The speed of the computer’s processor is most dramatically
seen when engaging W.A.R.P. The time it takes to add complex
FX processing to sound is directly related to the speed of the
processor. Processor speed also effects the number of voice
channels available. Depending on processor speed, up to 256
voice channels are available.
RAM
All sounds that are loaded into StudioPro are stored in RAM.
The amount of available RAM determines how much sound can
be loaded in at any given time. Longer sounds require more
RAM. Applying certain FX processing, for example, reverb and
delay, increase the size of a sound.
ASCII keyboard
Each ACSII keyboard manufacturer makes their keyboards
slightly different. Each keyboard has a different physical limit
to the number of keys that may be held down simultaneously.
This can be frustrating at times, so to help with this problem,
duplicate keys for the most important real-time key commands
have been added. As well, there are easy to use macros. For a
list of keyboard commands, see Appendix 1 on page 31.
SCSI vs IDE disk drives
fig. 1
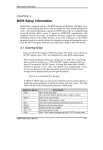
To install Mixman StudioPro: (fig. 1)
1. Insert the Mixman StudioPro CD-ROM into your
computer’s CD-ROM drive
2. Wait for the Installation program to autorun
3. Click “Install StudioPro”. Follow the instructions in the
Setup program.
StudioPro is constantly accessing the computer’s hard disk
while loading files, adding FX processing, and exporting Mixes.
Using SCSI disk drives can drastically speed up system
performance.
3
Mixman StudioPro 4.0
CONCEPTS
Chapter 2: Concepts
What is a PC wave file? (.wav)
What is a Mix? (.mix)
PC wave files are the industry standard format for storing and
playing back digital audio on a PC computer. Wave files store
audio signals as digital data. StudioPro has the ability to both
import and export PC .wav files.
One of the things that makes StudioPro different than a
traditional electronic music studio setup is the ability to store all
of your work in one convenient file. The Mix file stores all of the
necessary information for a StudioPro session. So what exactly
does it store? Mix files store the names and locations of every
sound used in a Mix. They also store any FX processing settings
that have been applied to a sound, as well as any real-time
performance data that has been created.
What is a Mixman Track file? (.trk)
One of the challenges in creating truly interactive digital audio
performance software is deciding what format of audio to use.
The industry standard format for playing back CD quality audio
is the .wav file. The problem with .wav files is that they contain
only one sound. Take for example, a recording of a bass line.
It does not contain the individual notes in the bass line but
rather, the whole bass line is part of one .wav file. There is no
information in a .wav file about when the bass notes actually
occur, or what tempo is implied. These are severe limitations
and that is why we have created our own file format, called a
Track file (.trk).
Track files are the building blocks of sound in StudioPro. Just
like a .wav file, Track files contain digital audio, but that is
where the similarities end. In the bass line example, the Track
version of the bass line actually has a different piece of digital
audio for each bass note. We call these pieces of digital audio
“slices” . Embedded in each Track file is also the equivalent of
a MIDI file that knows the tempo and exactly how and when to
play each “slice”. This enables StudioPro to load Tracks created
at different tempos and effortlessly pitch shift and time-stretch
them to match any tempo.
The way Track files respond to being triggered by the computer
keyboard can also be customized. It is possible to hear a
triggered “slice” in its entirety regardless of when the key is
released. As well, the minimum length of time, between when
a sound is triggered and when the next available “slice” is
heard, can be precisely controlled. If this is starting to sound
complicated…don’t worry. Tracks are designed to do all the
work for you. It is not required to edit or change settings on
a Track file in order to create incredible music in StudioPro,
nor is it required that users understand how the automatic
tempo adjustments (beat matching) occur. These descriptions
are mentioned simply to let users know that there is a lot of
hidden power “under the hood” of the StudioPro engine!
Since Mix files are only storing control information, and not
actual audio data, they are much smaller than the audio files
they are able to generate. For example, a Mix file representing
a five minute song, may only be 100k, while the five minute .wav
file version of the song would be close to 50 Megabytes. This
is a huge difference. The small size of Mix files makes them a
great way to archive music, since hundreds of Mixes will fit in
the disk space taken up by just one minute of digital audio.
Another great benefit to the small size of Mix files is their
ability to enable sharing music with other people over the
internet. As long as the person at the receiving end has the
same set of sounds as the sender, the Mix file will play back
exactly the same for both users. From this tiny file, anyone
can recreate the audio on their computer by opening the
Mix file in StudioPro. Mixman users worldwide have already
started exchanging Mixes. To exchange Mixes with other
Mixman users, just visit the Mixzone on the Mixman website:
www.mixman.com.
What is a Remix?
In recent years there has been a significant amount of
hype about electronic music, remixes and DJ culture. Record
companies have always remixed versions of songs to breathe
new life in to them or make them appeal to a specific music
market. A slow ballad might be turned into a stylish dance
song. But what is a remix? A remix in its truest sense is the
art of taking elements from an existing song and adding new
musical elements in order to augment or change the feel of
the original song. It is quite common today to find artists that
alter the original parts of a song to the point at which the line
between remixing and composing is significantly blurred. In this
new millenium, with software like StudioPro, the definition of
DJ, artist, remixer and producer will continue to change and
grow. We hope this will yield new styles of music.
Mixman StudioPro 4.0
CONCEPTS
What is beat matching?
Beat matching is a term used by DJs to generically describe
the art of seamlessly transitioning from one record to another.
Sounds simple, but it definitely is not. It is actually a very
unforgiving bit of turntable magic, that requires years of
practice to do properly. What is actually happening when a DJ
smoothly transitions from one song to another? First, there is the
song that is currently being played. To add a sound or song on
top of it, the new material must be at the same tempo as the
currently playing music. Since no two records (or turntables)
are ever the same, the DJ is constantly adjusting the tempo of
the music that is playing. The way a DJ changes tempo is by
changing the speed at which the turntable rotates. The faster
the rotation, the faster the song plays, the slower the rotation
the slower the song plays. This speeding up or down of the song
has artifacts, it effects the overall pitch of the song. Making it
faster, makes it sound higher. Making it slower, makes it sound
lower.
StudioPro allows you to seamlessly add beats and other musical
sounds to your Mix regardless of their tempo, and utilizes
powerful algorithms to automatically match the tempos. The
method of beat matching is also customizable. Pitch shifting
is still an option, but tempo can also be changed using
time-stretching. This auto beat-matching happens automatically
while loading Tracks into StudioPro.
The next chapter explains the StudioPro interface and its
various components. Before jumping in and actually starting to
use the program, take a moment and get familiarized with the
different studios and their unique features.
4
5
Mixman StudioPro 4.0
INTERFACE AND WORKFLOW
Chapter 3: Interface and Workflow
Program overview
Mixman® Singles™
StudioPro blurs the lines between traditional sequencing and
sampling products by combining them into one system. The
different parts of the program encompass the most important
features found in a conventional electronic music setup.
From the Mixman website, you can download Mixman Singles,
which are remixmable songs by artists and producers.
Mixman® Soundiscs™
For instance, a conventional setup might include:
1. Sampler, for digitally recording and playing back sounds
2. MIDI keyboard to trigger the sounds in the sampler
StudioPro comes with a library of Track files to use right out of
the box. When more sounds are needed, we have an extensive
library of Soundiscs™ with Tracks in many different styles.
3. MIDI sequencer to record the MIDI information
4. Audio mixer to combine all the signals
5. Rack of FX processors to process the sound
This kind of setup is both costly and has a tremendously steep
learning curve. We have tried our best to cover as many of the
features in such a setup, while keeping it intuitive enough so
that the music making process can still be enjoyable.
The Recording Studio
To help record custom .wav files, there is a Recording Studio to
make the process quick and easy. After making a recording, edit
it using a digital audio editing program.
The Remixing Studio
The heart of it all is the Remixing Studio. It can be thought of
as the “sampler” (16 part multi-timbral, 256 voices) component
of StudioPro. Here, up to sixteen tracks of digital audio can be
loaded and triggered live. The sounds can be either traditional
.wav files, or the Mixman format called Track files (.trk) which
provide much more control and flexibility than standard .wav
files.
The FX Studio
Once sounds are loaded, they may be altered using FX
processing. For those familiar with the more traditional method
of adding FX processing to a sound by sending a signal to
an FX box and returning the altered signal back to a mixer,
things may seem a little different here. We use more of a sound
design approach. Instead of running the different FX processes
live (which takes up considerable CPU power), we allow each
sound to be processed with up to five unique FX algorithms.
The sounds are processed out of real-time and the result is
stored in RAM. The original sound is not altered in any way
and each of the FX parameters can be modified at any time,
Mixman StudioPro 4.0
6
INTERFACE AND WORKFLOW
making this a totally non-destructive environment. The benefit
to this system is that it functions like having 80 independent FX
processors, a feat that would not be possible with even today’s
fastest computers (for Real-time FX, see W.A.R.P. below).
Performing a Mix
Once each sound is sculpted to sonic perfection in the FX
Studio, it’s time to go back to the Remixing Studio. This is where
live performances are created. The computer keyboard takes
the place of a traditional MIDI keyboard in this instance. Each
sound is triggered by a different key on the computer keyboard.
While playing live, the Remixing Studio also provides the
functionality of a mixer, allowing independent control of the
volume and panning of each sound. The pitch of each sound
may be adjusted up or down two octaves.
The W.A.R.P. feature allows you to apply real-time effects over
your entire mix. While tracks are playing or being triggered,
click and drag with your mouse in the oval shape in the mix
display. By dragging the cursor up-and-down or right-and-left
you can get dramatic modifications to your sound.
The live performance aspect of the Remixing Studio promotes
combining and layering digital audio in a much more musically
intuitive fashion than just using a graphic editor to lay sounds
out on a timeline. We encourage learning the keyboard
commands and practice playing live, it will be worth the effort.
The Editing Studio
The Editing Studio is the equivalent of a “sequencer”. It enables
graphic editing of the timings in a recorded performance.
The keys that were held down during a live performance are
represented by different colored bars. Volume fades, panning,
pitch and tempo changes may all be automated. When your mix
is perfected, export it as a CD quality .wav file, Real Audio file,
SoundFont bank, Windows® media™ audio, Beatnik® RMF™, or
Mixman .trk file.
7
Mixman StudioPro 4.0
QUICKSTART
Chapter 4: Quickstart
This quickstart is designed to take the new StudioPro user through
the basic functions of StudioPro. More detailed information about
using the different studios is presented in later chapters.
3. Click “Preview” to hear the sound.
4. Click “Load Track” to load the sound into the Mix.
Help System
To learn more about any aspect of the program, turn on expanded
bubble help by clicking the “Help” button. Mouse over any part of
the screen and an explanation will be displayed.
Step 1: Launch StudioPro
From the Windows Start Bar, select StudioPro from the Mixman
StudioPro folder.
Step 2: Go to the Remixing Studio
Click the Remixing Studio button from the Control Room.
Remixing Studio
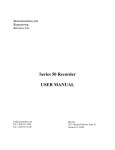
Step 4: Performing a Mix (fig. 2)
The computer keyboard is used to trigger the sounds that are
loaded into the Remixing Studio. Each sound is triggered by a
different key.
To view a graphic overlay that shows which keys trigger
which tracks:
1. Click the “Help” button.
To trigger a sound:
1. Click the “Play” button.
Step 3: Loading sounds (fig. 2)
The sixteen X shaped track indicator lights around the two
turntables represent the sixteen slots into which sounds are
loaded.
To load a sound into a slot:
1. Double-click on a track indicator light for one of the
sixteen slots.
2. Browse the folders to find the desired sound.
2. To hear a sound, press its corresponding key. When the
key is released, the sound stops.
To lock a sound:
1. Simultaneously press the sound’s triggering key together with
either the “Spacebar” or the “+” key on the number pad.
2. Once a sound is locked, it no longer needs to have its key
depressed, and its indicator light turns green.
3. Sounds may also be locked by clicking them with the
mouse.
8
Mixman StudioPro 4.0
QUICKSTART
Tracks
Options
FX Studio
Recording Studio
Editing Studio
Master Volume
Copy
Cut
Delete
Paste
New Mix
Mix Display
W.A.R.P.
Help
Quit
fig. 2
Stop
Play
Record Volume
To unlock a sound:
1. Simultaneously press the sound’s triggering key together with
either the “Spacebar” or the “+” key on the number pad.
2. Sounds may also be unlocked by clicking them with the
mouse.
To solo a sound:
1. Simultaneously press the sound’s triggering key together
with either the “Ctrl” key or the “-” key on the number
pad.
2. When the solo key is released, the previously locked
tracks will return. Create a break by pressing the solo key
without pressing any other keys.
Pan
Pitch
Open
Save Back Tempo
4. While continuing to hold the left mouse button down, drag
the mouse around the screen to change the effect.
Step 5: Changing parameters in the Mix
Display (fig. 2)
The Mix Display provides control over the pitch, panning and
volume of each track. To change the setting of one of these
parameters for a track, make sure the name of the track you
wish to change is displayed in the track name area. The track
name area displays the name of the track you last activated.
To display the name of a track without making it sound, press
the “Alt” key and the key that activates the track you want to
display.
To add real-time FX (W.A.R.P.):
1. Make sure there is one or more sounds playing (manual
or locked).
2. Select a W.A.R.P. preset by clicking on one of the 12
preset buttons.
3. Click and hold down the left mouse button over the
W.A.R.P. controller.
Step 6: Adding FX (fig. 2)
Each sound in your Mix can be drastically altered by adding
different kinds of FX processing.
9
Mixman StudioPro 4.0
QUICKSTART
To add FX processing to a sound:
1. Click the track to which you want to add FX processing.
2. Click the “FX” button on the left side of the screen.
2. The colored bars represent the keys that were held down.
Cut, copy and paste performance data until the perfect
performance has been achieved.
3. The sound is now loaded into the FX Studio.
4. Right mouse click on the first FX slot to load an FX preset.
5. Click the Play button to hear the processed sound.
6. To load the FX processed sound back into the Mix, click
the “Load to Mix” button.
Step 9: Exporting a Mix
To Export a mix as a CD quality .wav file:
1. Return to the Control Room.
2. Click the Export Mix button.
Step 7: Recording a performance (fig. 2)
Now that you have some sounds loaded, the next step is to
record a performance. Performance data includes information
on which sounds to trigger, when to trigger them and real-time
pitch, panning, tempo and volume changes.
To record a performance:
1. Click the Record button, perform your Mix when finished,
click the Stop button.
2. To play back your Mix, click the play Mix button.
Step 8: Editing a performance
The Editing Studio works much like a spreadsheet program.
The working area is comprised of a large grid broken into
individual cells. Using the drawing tool allows for the creation of
a performance that would not otherwise be possible. Dynamic
parameter changes like fade outs or pitch changes are easily
added to the performance.
To edit a recorded performance:
1. Click the “Editing” button on the left side of the bezel in
the Remixing Studio. (fig. 2)
3. Select “To a file...” and click OK.
4. Select .wav from the list of export options; click save.
This will create a CD quality (44.1 Khz, 16 Bit, Stereo) .wav
file of your recorded performance. (remember that a 10
minute performance will take up about 100 megs of hard
disk space).
5. To export to MP3, RealAudio G2, Windows Media Audio
or any of the other formats, just select the format in the
selection dialog.
Mixman StudioPro 4.0
QUICKSTART
Step 10: Create your own CD
If you have a CD writer and the software needed to create audio
CD’s (included with most CD writers) you can make a custom
CD with your own music on it. Most CD writers/software allow
you to create audio CD’s from your .wav files. Use the Export
function in StudioPro to generate several .wav files. Write the
audio to a CD and then you can listen to the music you make in
StudioPro from any CD player.
10
11
Mixman StudioPro 4.0
THE CONTROL ROOM
Chapter 5: The Control Room
Remixing Studio
Recording Studio
FX Studio
Editing Studio
fig. 3
Help
Overlay
New
Mix
Open
Mix
Save
Mix
Export
Mix
Options
Quit
Overview (fig. 3)
Opening a saved Mix
Every session begins in the Control Room. From here you can
open and save mixes, set options and export your music to
different audio formats.
Opening a Mix resets StudioPro to the state it was in when the
Mix was last saved. Sounds are re-loaded and re-processed
with any saved FX processing. Mix files may also contain
performance data, which can be cleared in the Remixing Studio.
This will leave your sounds and FX processing untouched, while
clearing any previously saved performance.
Creating a new Mix (fig. 3)
This function allows you to start a song with a clean slate.
Creating a new Mix will erase any previously loaded sounds,
performance data and FX settings.
To create a new Mix:
1. Click the “New Mix” button. If the currently loaded
Mix has not already been saved, you will be given an
opportunity to do so.
12
Mixman StudioPro 4.0
THE CONTROL ROOM
To open a previously saved Mix: (fig. 3)
1. Click the “Open Mix” button. If the currently loaded
Mix has not already been saved, you will be given an
opportunity to do so.
store a Mix file and its associated sounds all in one convenient
location. Sounds are saved in their original “dry” state, before
undergoing any FX processing. This method of saving takes
considerably more space than a Mix file alone since copies of
all sounds are being created.
Exporting music to other formats
Saving your music as a Mix file is the most flexible option if
you want to use your music solely in the StudioPro environment.
However, to use the music made in StudioPro in other ways, such
as creating your own audio CD or making music for the web
you will need to export your finished music in another format.
StudioPro provides the ability to export your music in a variety of
formats. These formats include: PC Wave (.wav), RealAudio (.rm),
SoundFont (.sf2), MPEG 3 (.mp3), Windows Media™ Audio (.wma),
Beatnik (.rmf), and Mixman Track (.trk) format.
Saving your work
One major problem in traditional studio environments is
returning the studio back to the state it was in last time you
worked on a particular song. StudioPro’s integrated system has
a distinct advantage with its ability to store all the information
about a song in one file, called a Mix file. Mix files store the
names and locations of all loaded sounds, the FX algorithms and
their parameter settings, any pitch, panning, volume and tempo
automation and any recorded performance.
To save the currently loaded Mix: (fig. 3)
Exporting your music (fig. 4)
To export a saved Mix file, performance data is needed. To
verify whether or not a Mix contains performance data open
it in the Editing Studio. If there are any colored track bars
displayed then there is performance data present.
To Export a Mix:
1. From the Control Room, open the Mix file to export.
1. Click the “Save Mix” button
2. Click the “Export Mix” button. (fig. 3)
2. Type in a name and click the “Save” button
3. Select “To a file...” and click OK.
4. Select the desired export format from the pull down menu.
Archiving your work
In the Save Mix dialog there is a checkbox labeled “Copy
Sounds to this Directory”. When checked, all of the sounds
loaded in the Remixing Studio will be saved into one folder. This
is useful for making backups of your music because you can
13
Mixman StudioPro 4.0
THE CONTROL ROOM
Exporting as a PC wave file (.wav)
The industry standard format for audio on a PC is the .wav file.
If you plan to produce custom audio CDs or import the music
created in StudioPro into another program, it is necessary to
first export it as a .wav file.
To export as a .wav file, a saved Mix with performance data is
needed. A Mix file without performance data is nothing more
than a list of sounds and therefore there is nothing yet to export.
Make sure you have a recorded performance before exporting
a Mix file to .wav. The .wav files exported by StudioPro are
CD quality (44.1KHz, 16 bit, stereo). Before exporting, make sure
there is enough disk space. Wav files take up 10 Megabytes for
every minute of music.
Exporting as a RealAudio™ file (.rm)
RealAudio is one of the most popular formats today for
delivering music over the internet. Different levels of
compression are selectable during the export process. In order
to hear the Real Audio files (.rm) created by StudioPro, a
copy of the Real Audio player is required. A free copy can be
downloaded from: www.real.com. You will need to export your
mix in this format to upload your mix to Mixman Radio.
Exporting as a Beatnik Rich Music Format
file(.rmf)
Beatnik Rich Music Format is the leading format for interactive
audio over the internet or for web sonification. Different levels
of compression are selectable during the Export process.
Compression can be equal for the entire sound file or on a
per track basis. Click the RMF Export Details button to make
individual track compression settings.
To audition exported RMF files, drag them into a Web Browser
with the Beatnik Player installed. The Beatnik Player is included
with the StudioPro CD and is installed automatically with
StudioPro 4.0. To learn more about Beatnik technology and RMF
format, go to www.beatnik.com.
SoundFont allows the sounds and music created in StudioPro
to be used with any Creative Labs SoundFont enabled sound
card, such as the Sound Blaster Live! and AWE-64. Once the
SoundFont bank is loaded into the sound card, the MIDI file
can be used to trigger the sounds from any MIDI sequencer,
allowing integration into a larger studio setup.
Exporting as a MPEG3 (.mp3)
MP3 files are near CD quality compressed sound files. Their
small size makes them an excellent choice for giving high quality
previews of your music over the Internet. The highest quality MP3
file is 1/10th the size of the same music saved as a WAV file. You
can use your MP3 exported mix with any MP3 player.
There are a number of choices for the quality of the MP3 file
to export. Choose the quality that best suits your needs. The
choices are:
• Archiving with CD-quality (128 Kpbs/44KHz Stereo)
• Portable MP3 Player (80 Kpbs/22KHz Stereo)
• 56 Kbps Internet Streaming (56 Kpbs/44KHz Stereo)
• 24 Kbps Internet Streaming (24 Kpbs/44KHz Mono)
Exporting as a Windows Media™ Audio (.wma)
This new format is another high quality smaller sized solution
created by Microsoft.
There are a number of choices for the quality of Windows
Media Audio file to export. Choose the quality that best suits
your needs. The choices are:
• Good quality sound (128 Kpbs/Stereo)
• Stereo audio for the Internet (80 Kpbs/Stereo)
• Stereo audio for the Internet (48 Kpbs/Stereo)
• Mono audio for the Internet (22 Kpbs/Stereo)
Exporting as a Mixman Track file (.trk)
™
Exporting as a SoundFont Bank and MIDI File
SoundFonts are specially formatted audio files for Creative Labs
Sound Blaster family of sound cards. To learn more about
SoundFonts visit: www.soundblaster.com
When exporting a Mix as a SoundFont (.sf2), a SoundFont bank
is created with each of the sixteen sounds converted into
a separate SoundFont instrument. Along with the SoundFont
bank, a companion MIDI file is also generated. Exporting as a
One of the most powerful features in StudioPro is the ability to
create your own Track files. This feature significantly expands
the creative possibilities of the system. All of the sounds and
performance data in a Mix can be exported into one Track
file. This means that unique bass lines, drum loops and other
musical patterns can be sequenced and turned into custom
Track files.
14
Mixman StudioPro 4.0
THE CONTROL ROOM
Please note, that using the Mix to Track feature can be very
powerful, however, it will not turn a drum loop loaded as a .wav
file into a fully interactive Track file.
Options
There are a number of options that determine they way in which
StudioPro operates.
To change option settings:
1. Click the “Options” button in the Control Room Make any
desired changes and click the “OK” button.
Auto-panning (Audio Tab)
When checked, this option gives an initial panning value to
sounds as they are loaded in to the Remixing Studio. The
panning values given are based a sound’s relative position in a
turntable. When unchecked, all sounds are panned in the center
as they are loaded.
Long release (Audio Tab)
When checked, any sounds that are playing when a Mix is
stopped continue to play until they fade out naturally. When
unchecked, all sounds stop immediately when the Mix is
stopped.
Default folders (Directories Tab)
These radio buttons allow default folders for the loading of
sounds to be chosen. Each radio button corresponds to a
turntable position. It is also possible to set default folders for
exporting and opening Mix files.
Latency Setting (Sound Card Tab)
This option enables changes in the overall system performance
to be made. These settings should not be changed unless
advised to do so by Mixman technical support. These settings
can drastically alter the performance of StudioPro. If you
experience stuttering while playing a Mix, contact Mixman
technical support.
15
Mixman StudioPro 4.0
THE REMIXING STUDIO
Chapter 6: The Remixing Studio
Tracks
Options
FX Studio
Recording Studio
Editing Studio
Master Volume
Copy
Cut
Delete
Paste
New Mix
Mix Display
W.A.R.P.
Help
Quit
fig. 4
Stop
Play
Record Volume
Pan
Pitch
Open
Save Back Tempo
Overview (fig. 4)
Loading Sounds
The Remixing Studio is the live performance part of StudioPro.
This is where sounds are loaded and music is performed in realtime. Notice how the computer keyboard takes on instrument
like qualities.
The two turntable interface is where sounds are loaded. Each
of the 16 X shaped track indicator lights is a slot into which a
sound can be loaded. Sounds can either be Mixman Track (.trk)
or PC wave (.wav) format. The advantage to track files is that
their tempo is automatically matched to the tempo of the current
Mix as well as providing superior live performance control.
Included Track files (.trk)
StudioPro comes with a large library of Tracks to get you
started. High quality music can be made, performed and created
right out of the box. Take a moment to listen to some of the
included sounds.
To load a sound into a slot:
1. Double-Click on a track indicator light. (fig. 4)
2. Browse folders to find tracks or waves.
3. Select the sound you want.
The included sounds are sorted into folders according to
musical style like [House] and [Hip Hop]. Within each folder are
subfolders sorted according to instrument families like [bass]
and [drum loops]. Finally, inside each instrument family folder are
the tracks themselves. To see how individual sounds are used in
a Mix, first try opening one of the included Mix templates.
4. Click “Preview” to hear the sound.
5. Click “Load Track” to load it into your Mix.
16
Mixman StudioPro 4.0
THE REMIXING STUDIO
drive from the pull down menu.
3. Navigate to the various instrument families and preview
or load a track.
Understanding the auto-beat matching
settings
When loading Tracks, their tempos are automatically matched
to fit the tempo of the current Mix. StudioPro automatically
matches tempo by changing a Track’s pitch, or through the use
of time stretching algorithms.
To control how a track is loaded:
1. Double-click on a sound slot, the Load Dialog will appear.
2. Click the “Track Settings” button.
3. If Auto-Pitch is checked, pitch shifting is used to match
the tempo of incoming tracks to the tempo of the current
Mix.
Using Mixman Singles™
Mixman Singles are downloadable, remixable songs from
artists, remixers and producers around the world. Individual
sound elements from the master tape of a song are converted
into Mixman TRK (track) files and packaged together as one
downloadable file. Each Mixman Single comes with a complete
set of at least sixteen TRKs (tracks) ready to use in any Mixman
software.
3. If Auto-Time is checked, time stretching is used to match
the tempo of incoming Tracks to the tempo of the current
Mix.
4. To change the time stretch or pitch shift value manually,
uncheck the appropriate check box and type in a value.
5. Interesting effects can also be created by manually
setting a value for one parameter, and checking the Auto
box for the other.
Generally, Mixman Singles will be downloaded from the
Internet. They will come as self-executing files that will place
the new tracks in your Tracks directory. Note: many of these
tracks are not “royalty free” and only for personal use. Mixman
Singles are available at www.mixman.com.
Using Mixman Soundiscs™
Although your own .wav files can be loaded into StudioPro, they
lack the same level of interactivity as Mixman Track files. To
enable users to create music in a variety of styles, Mixman has
an extensive library of Soundiscs with Tracks in a wide range of
musical styles. These Tracks have been specially produced just
for the Mixman family of music remixing products.
Since sounds use large amounts of hard disk space, it is
possible to load sounds directly from Soundiscs. Soundiscs can
be purchased from the Mixman Website.
To load a Track from a Soundisc:
1. Double-click on a track indicator light. (fig. 4)
2. In the load track dialog, select the letter of your CD-ROM
Recording custom sounds
To give your music a personal touch, record custom vocal or
instrumental sounds. Sound recordings made in StudioPro are
saved as 44.1 KHz mono .wav files. Once recorded, the .wav
files may be edited using a .wav editor.
17
Mixman StudioPro 4.0
THE REMIXING STUDIO
Remember, large recordings take up lots of space. StudioPro
puts all of the sounds into RAM, if you record a sound that is too
long, it might not fit in the available RAM.
Macros
F1
esc
~
!
1
‘
Cap Lock
1. Select a sound slot by double clicking the track indicator
light.
2. Click the “Record a Sound” button from the load dialog to
enter the Recording Studio.
@
2
Q
Tab
To record a new sound:
Right Turntable
Stop Left Turntable
Ctrl
F4
#
3
$
4
%
5
E
S
X
Alt
Pitch
F3
W
A
Z
Shift
F2
R
D
C
^
6
T
F
V
Parameters
F5
&
7
Y
G
F6
*
8
U
H
B
F7
(
9
I
J
N
F8
M
Space Bar
Lock
O
K
<
,
_
-
)
0
{
[
P
L
>
.
+
=
:
;
Backspace
}
]
"
’
insert
page
up
delete
page
down
Enter
?
/
Alt
Ctrl
Play
/
*
—
+
7
8
9
4
5
6
1
2
3
0
Pitch
Solo
Lock / Unlock
Enter
.
Play
Solo Parameters
3. Click the “Record” button in the Recording Studio to begin
recording.
Performing a Mix (fig. 4)
4. When finished, click the “Stop” button. To hear the
recorded .wav file, click the “Play” button.
Once sounds are loaded in to the two turntables, it’s time to
perform live.
5. Click “Save” to save the recorded sound.
6. To automatically load the .wav file into your default .wav
editing program, click the “Edit .wav” button on the bezel.
7. When finished editing, close the .wav editing program and
save any changes.
8. To load the recorded .wav into the Remixing Studio, click
the “Load to Mix” button.
To trigger a sound:
1. Press the “Play” button to engage play mode.
2. To hear a sound, press its corresponding key. When the
key is released, the sound stops. Notice the light turns
orange while the key is depressed.
To lock a sound:
1. Simultaneously press both the sound’s triggering key
together with either the “Spacebar” or the “+” key on the
number pad. Once a sound is locked, it no longer needs
to have its key depressed, and its indicator light turns
green. Sounds may also be locked by clicking them with
the mouse.
To unlock a sound:
1. Simultaneously press both the sound’s triggering key with
either the “Spacebar” or the “+” key on the number pad
Sounds may also be unlocked by clicking them with the
mouse.
To solo a sound:
Stop
Record
Load to
Mix
Save
Edit Wav File
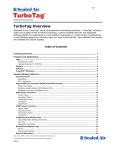
The Keyboard Controls
Each sound loaded into the Remixing Studio is triggered by a
different key on the computer keyboard. The sounds on the left
turntable are triggered by the eight keys surrounding the “D”
key. The sounds on the right turntable are triggered by the eight
keys surrounding the “5” key on the number pad. For those with
laptops, the sounds on the right turntable may also be triggered
by the eight keys surrounding the “K” key. For a graphic overlay
showing which keys trigger each track, click the “Help” button.
1. Simultaneously press both the sound’s triggering key with
either the “Ctrl” key or the “-” key on the number pad.
This mutes all other locked tracks.
2. When the solo key is released, the previously locked
tracks will return.
3. Create a break by pressing the solo key without pressing
any other keys.
To add real-time FX (W.A.R.P.):
1. Make sure there is one or more sounds playing (manual
or locked).
2. Select a W.A.R.P. preset by clicking on one of the 12
preset buttons.
18
Mixman StudioPro 4.0
THE REMIXING STUDIO
3. Click and hold down the left mouse button over the
W.A.R.P. controller.
Macros
1. Make sure the current mix is stopped.
Sometimes while performing a Mix it is necessary to lock four
or five sounds at once while immediately unlocking others.
Depending on the complexity, certain performance moves may
not be physically possible, this is where macros come in handy.
Macros store a snapshot of the state of the Remixing Studio.
They store which tracks are locked, their pitch, panning and
volume settings as well as the tempo of the mix.
2. Right mouse click on the W.A.R.P. preset number you want
to change.
To create a macro:
4. While continuing to hold the left mouse button down, drag
the mouse around the screen to change the effect.
To change and load different W.A.R.P. presets:
3. Select the desired preset from the pop-up menu.
Adjusting pitch, panning and volume
The Mix Display provides knobs for real-time control of four
different sound parameters. While performing a Mix, the pitch,
panning and volume of each track may be adjusted. The Pitch
knob controls whether the pitch of a sound is high or low. The
Panning knob controls a sound’s positioning between the left and
right speaker. The Volume knob controls a sound’s overall loudness.
The knobs in the Mix display effect the currently active sound.
The currently active sound is the sound with its name in the
track name display. To make a particular sound active, press
the key that triggers that sound. To do so without hearing any
sound, hold down the “Alt” key while pressing the sound’s
triggering key.
To adjust a Mix parameter: (fig. 4)
1. Click and drag the knob representing the paramter.
Adjusting tempo
The tempo of a Mix can be adjusted in real-time without
effecting its pitch. When a new Mix is created, the tempo
defaults to 120 BPM (beats per minute). This default tempo
of 120 BPM is changed automatically to the tempo of the
first sound loaded. To achieve the best possible audio quality,
we recommend not changing the tempo of a Mix after the
first sound is loaded. If artifacts are introduced later, when
changing the tempo of a Mix, re-load the sounds and they will
automatically match the new tempo.
To adjust the tempo of a Mix: (fig. 4)
1. Click and drag the tempo knob.
1. While performing a mix, simultaneously press the shift key
and one of the first eight function keys F1-F8.
2. To retrieve a macro while performing a Mix, press the
function key in which the desired macro was stored.
3. To start a Mix with more than one locked track, trigger a
macro instead of clicking “Play”.
Customizing sounds with FX processing
Sounds loaded into the Remixing Studio may be altered using FX
processing. Up to five unique FX algorithms may be applied to
each sound allowing for a wide range of sonic possibilities.
To load a sound into the FX Studio:
1. Click the sound in the Remixing Studio to be processed,
then click the “FX Studio” button. (fig. 4)
2. For instructions with using the FX Studio see page 24.
3. For a listing of available FX algorithms and their
descriptions, see Appendix: 2 on page 33.
Using the crossfader
Crossfaders are a common feature in most of today’s DJ mixers.
For a DJ, the primary use of the crossfader is to gradually fade
from one record to the next. As DJ styles have evolved, the
function of the crossfader has expanded. It is no longer just
used for transitioning between songs, in fact, in the hands of a
skilled DJ, it can be used to produce a variety of effects.
In StudioPro, the crossfader controls the relative volumes of
the sounds on each turntable. When the crossfader is in its
center position, the volumes of all sounds are 100% of their
set volumes. When the crossfader is all the way to either
the left or right side, sounds on the turntable closest to the
crossfader knob are 100% of their set volumes, while sounds
on the opposite turntable are all silent, regardless of their set
volume. Remember, 100% of a low volume is still a low volume.
19
Mixman StudioPro 4.0
THE REMIXING STUDIO
Crossfader performance data translates to specific volume
changes in the Editing Studio. When playing back a Mix in the
Editing Studio, tracks that were locked while the Crossfader
was at 0% will be silent.
Pitch Shift
To use the crossfader:
When “Auto-pitch shift” is checked, pitch shifting is used as the
method for matching the tempo of the selected track with the
tempo of the current Mix.
1. While performaing a Mix, lock sounds on both turntables.
This setting transposes the pitch of each “slice” of digital audio
in a track by the number of half-steps in the pitch field. To
transpose a sound down, use negative numbers.
2. Click and drag the crossfader back and forth. (fig. 4)
3. Double Click the crossfader to return to the center.
Recording a performance
Everything done in the Remixing Studio while performing may be
recorded, edited and saved as part of a Mix file. If the knobs
in the Mix Display are adjusted while recording a performance,
these real-time adjustments will also be recorded.
To record a performance:
1. Click the “Record” button. (fig. 4)
2. Perform a Mix.
3. When finished, click the “Stop” button.
Time-Scale
This setting scales the length of each “slice” of digital audio in
a track by the ratio in the time-scale field. Numbers greater than
1 increase the duration of each “slice”. Numbers less than 1
decrease the length of each “slice”. For example, a value of 2.0
would double the length of each “slice” and a value of .5 would
half the duration of each “slice”. When “Auto time-scale” is
checked, time scaling is used as the method for matching the
tempo of the selected track with the tempo of the current Mix.
Time Shift
This setting shifts the starting time of a track earlier or later in
time. The value for time shift is in ticks. There are 480 ticks per
beat in StudioPro.
4. To learn how edit your performance data, see page 27.
Loop Length
Advanced settings
The way in which a track is loaded into a Mix may be
customized to better integrate sounds and create unique
effects. The settings for each track are accessible from the
Load Dialog.
To view the settings for a track:
1. Double-click a track, the Load Dialog will appear.
This setting changes the loop length in “beats” for the selected
track. The smallest loop length allowed is 1 beat. If the loop
length for a track is set greater than its original loop length, then
there will be silence for the extra beats.
Long Release
When Long Release is on, sounds ring out for their full duration.
When Long Release is off, sounds stop when their key is
released.
2. Click the “Track Settings” button.
3. Click “Preview” to hear any changes.
Minimum Spacing
When a track is manually triggered (pressing its key on the
computer keyboard), after the initial sound is triggered, no other
“slice” will be heard for the length of time in the minimum
spacing filed. The time for minimum spacing is in ticks.
Adding your own .wav loops
Adding custom .wav file loops in a Mix is great way to add an
original touch to your music. Loops are most effective when
they are one or two bars long, of course any length (RAM
limited) loop may be used. Effectively adding loops requires a
bit more knowledge about the sounds your are working with
than using Track files, but if these basic guidelines are followed
things should go smoothly.
Mixman StudioPro 4.0
THE REMIXING STUDIO
Preparing your loop
Before trying to add a loop to a Mix, make sure that it is edited
properly. Using a .wav file editing program, edit the .wav file
so that it loops perfectly. Some .wav file editors have a loop
playback mode, which makes this process even easier. If your
.wav file editing program does not have a loop playback mode,
just make sure that the last thing heard at the end of the loop is
right before the downbeat of the desired loop point.
Specific settings for .wav files
One your loop is properly edited, load it into a Mix by following
the previous steps for loading a sound and accessing Track
settings. There are special settings, available only when loading
.wav files.
Tempo
In order to properly load a .wav file loop, the loop’s tempo and
loop length must be known. For best results, leave this box
unchecked and let the program derive the tempo precisely by
calculating it by using the loop length and duration of the loop.
If a loop has not been edited, but its tempo is known, it may be
entered here by checking the box and entering the tempo value.
Synchronized Start
When checked, triggered loops play in sync with the other
tracks. For example, if a loop is triggered on the 3rd beat, it will
start on the 3rd beat. Use this option when loading loops. If this
box is not checked, loops will always start from the beginning
no matter when they are triggered, regardless of what else is
going on with the other tracks. Leave this box unchecked when
loading “one hit” type sounds like a crash cymbal.
Compute Tempo from beats
When checked, the program will compute the exact tempo of
a loop using the loop length parameter and the duration of the
.wav file. Use this option if your .wav file has been properly
edited as discussed previously. If a loop has not been edited
properly, leave this box unchecked.
Loop Length
If a loop has been properly edited, as discussed previously,
check the box and enter the length of the loop in beats. Also,
for best results, check the compute tempo from beats box and
leave the tempo box unchecked.
20
21
Mixman StudioPro 4.0
THE RECORDING STUDIO
Chapter 7: The Recording Studio
CD Player Controls
Metronome
Auto Trim
Edit Wav File
Volume Control
Auto Normalize
Help
Quit
fig. 5
Stop
Play
Record
Overview (fig. 5)
The Recording Studio is designed to enable quick recording of
.wav files for use in StudioPro. Sounds may be recorded from
many sources, including microphone, line input and CD. After
recording, a sound may be edited using the computer’s default
.wav editor.
Setting the volume controls
To make a recording, it is important to first check to see that
everything is setup properly. The proper sound source must be
plugged into either the line or microphone input of the sound
card, and the appropriate input activated. Each sound card
comes with a volume control program that aids in the setup
process.
Load to
Mix
Save
Back
To access the volume control program:
1. Click the “Volume Controls” button. (fig. 5)
2. Since the features of each sound card differ, for detailed
instructions on setting up your particular sound card,
refer to the sound card’s documentation.
3. To help keep time while making a recording, there are
two types of metronomes available while recording. The
tempo of the metronome is the same as the tempo of the
current Mix. The first, is a click that comes through the PC
speaker. The second blinks the “Record” button light.
22
Mixman StudioPro 4.0
THE RECORDING STUDIO
3. Click the “Record” button.
4. Click the “Pause” button on the CD Player controls to
resume playing.
5. Click the “Stop” button when finished.
To control the different metronomes:
1. Click-drag the “Metronome” button. (fig. 5)
2. Select either of the metronomes to make them active.
Recording using the microphone and line
inputs (fig. 5)
Use the microphone input for recording voice and other
acoustic sounds. Use the line input for recording from an analog
source.
To record a sound:
1. Make some sound to verify that there is a signal to record.
Editing the recording
A proper graphic sound editing program is a serious tool
with many useful features for editing and processing sound
files. Rather than create a basic .wav editor in StudioPro, our
decision was to let you use your own .wav editing program to
edit the recordings made in the Recording Studio.
To edit a recording:
1. Click the “Stop” button to make sure that the sound is not
playing back.
2. Click the “Edit .wav File” button. (fig. 5)
2. If there is a signal, the meters will move.
3. The default .wav editor will launch, and the recorded
sound will be automatically loaded.
3. Click the “Record” button to begin recording. Click “Stop”
when finished.
4. Edit the recording as usual.
5. Save any changes and close the .wav editing program.
To audition the recording:
1. Click the “Play” button.
6. Upon returning to the Recording Studio, the sound will be
updated with the newly edited version.
2. When finished, click the “Stop” button.
Auto-Trim
Recording from CD
Recording sounds using the computer’s CD-ROM drive as a CD
player is simple. In order to record from CD, the audio output
of the CD-ROM drive must be properly connected to the sound
card. This connection is inside the computer and should not be
changed except by a computer repair person.
To record a sound from CD:
1. Click the “CD Player Controls” button to launch the
computer’s CD player. (fig. 5)
2. Cue the CD player to the desired location and click the
pause button.
When making recordings quickly, sometimes having to edit
manually may be time consuming and throws an unneeded
wrench into the creative process. When speed is important,
StudioPro can handle the task of basic editing. The dead space
between the time the “Record” button is clicked and when
you make you first sound may be automatically trimmed by the
program. When auto-trim is on, any sound that falls below the
silence threshold level in the start and end of the recording will
be automatically trimmed.
To turn auto-trim on:
1. Click the “Auto-Trim” button. (fig. 5)
2. Check the box to turn it on.
Mixman StudioPro 4.0
THE RECORDING STUDIO
3. The silence threshold can be set by typing in a number,
lower numbers are softer in volume.
Auto Normalize
To ensure the best possible signal-to-noise ratio when making
recordings, it is best to turn auto-normalize on. Normalizing
boosts the sound level so that it is as loud as it can be without
distorting. Generally it is recommended to use the default
settings. Higher values yield louder sounds.
To turn auto-normalize on:
1. Click the “Auto-Normalize” button. (fig. 5)
2. Check the “Auto-Normalize” box.
3. The normalize level can be set be typing in a number.
23
24
Mixman StudioPro 4.0
THE FX STUDIO
Chapter 8: The FX Studio
FX Preset Name
FX Slot
Loop Length
Selected Track
Location
Save FX Preset
Load FX Preset
Help
Quit
fig. 6
Stop Preview Load to
with FX Mix
Overview (fig. 6)
The FX Studio is designed to provide the tools and flexibility
necessary to customize sounds with ease. StudioPro enables
effortless combining of sounds from many different styles of
music. The results can sometimes be a bit rough around the
edges. The FX Studio helps smooth those edges and gives
Mixes a personal twist.
For those familiar with the more traditional method of adding
FX processing by sending a signal to an FX box and returning
the altered signal back to your mixer, things may seem a little
different in StudioPro. StudioPro uses more of a “sound design”
approach to FX processing. Instead of running the different FX
processors live (which takes up considerable CPU power), we
allow each sound to be processed out, with up to five unique
FX algorithms.
Sounds are processed out of real-time and the result is
stored in RAM. Original sounds are not altered and each FX
Load
Sound
Save Back
Track
with FX
parameter can be changed at any time, making this a totally
non-destructive environment. The result is the functionality of
80 independent FX processors, a feat that would be impossible
with even today’s fastest computers and would cost thousands
of dollars to duplicate in hardware.
What is an FX algorithm?
The FX Studio is a collection of sound processing functions,
called algorithms. These algorithms contain the instructions
necessary for StudioPro to carry out their desired effect.
There are 15 available FX algorithms, each designed to provide
maximum sound quality and intuitive control.
What is an FX preset? (.fx)
Each FX algorithm has one or more parameters that can be
25
Mixman StudioPro 4.0
THE FX STUDIO
changed to control its precise function. The specific settings
of each parameter in an FX algorithm can be stored as an FX
preset (.fx). FX presets can be loaded individually into the FX
Studio at any time.
3. Double-click the desired FX preset.
There are 99 available FX presets. The presets are organized
according to which FX algorithm is being used. For example,
“Dark Hall” is the name of an FX preset that uses the “REVERB”
FX algorithm to simulate the sound of a dark concert hall
environment.
6. Processed sounds in the Remixing Studio may be loaded
back into the FX Studio and their settings changed at any
time.
4. Press the “Play” button to hear the processed sound.
5. To keep the changes and load the processed sound back
into the Mix, press the “Load to Mix” button.
Signal Flow
What is a multi-FX preset? (.mfx)
An FX preset stores the settings for one FX algorithm, a multi-FX
preset (.mfx) stores the settings for up to five different FX
algorithms. Which FX algorithms are loaded, their order and
individual parameter settings are all stored in a multi-FX preset.
This makes it easy to identically process different sounds.
In order to get the most out of the FX Studio it is important to
understand the audio signal flow. Sounds are processed by the
first FX algorithm (the one on top), the output is then passed to
the second FX algorithm, and so on. FX algorithms connected
this way are said to be “chained” together.
The parameters of any of the five loaded FX algorithms are
changeable at any time. The original sounds are never altered
or “destroyed” during processing, so it is referred to as nondestructive processing.
Loading sounds into the FX Studio
FX processors are common tools in today’s modern music
studios. They are used to add reverb to vocals, add crunch to
a drum loop or even change a guitar pluck into the sound of an
alien invasion. Each of the sounds loaded in the Remixing Studio
can be customized using FX processing.
Changing FX Settings
The FX presets are a great starting point, but in order to take
full advantage of the FX Studio, try customizing the settings that
are included with the FX preset. Click the Save Preset button to
store additional custom presets.
To load a sound into the FX Studio from the Remixing Studio:
1. Click the sound you wish to process.
2. Click the “FX Studio” button.
To load a sound directly from the FX Studio: (fig. 6)
To change an FX parameter:
1. Click and drag the slider for that parameter. (fig. 6)
2. Click the “Play” button to hear the processed sound.
1. Click the “Load Sound” button.
2. Browse and select a sound to process .
Changing FX parameter units
The architecture of the FX Studio is simple yet powerful. Each
sound in a Mix may be individually processed with up to five FX
algorithms. There are 25 FX algorithms and over 100 FX presets
from which to choose. Processing is handled one sound at a
time. To control which sound is being processed, use the sound
selector to choose between the different sounds loaded in the
Remixing Studio.
Some of the FX algorithms have time or speed as one or more
of their parameters. Parameters like delay time and LFO speed
can be expressed as either musical values, like beats and ticks,
or as specific time values like seconds or milliseconds. The
advantage to specifying time in musical values is that the tempo
of a sound is taken into account when calculating the actual
delay and LFO times as opposed to specifying a value that has
nothing to do with a sound’s tempo. The units used by some
of the FX parameter sliders can be changed to a number of
different units.
To load an FX preset:
To change the units for an FX parameter slider:
Loading FX presets
1. Double-click on the first “Empty FX” slot. (fig. 6)
2. Double-click the desired FX algorithm.
1 Click the name of an FX parameter slider (green text above
the slider). (fig. 6)
26
Mixman StudioPro 4.0
THE FX STUDIO
2. Select the desired units from the pull down menu.
Creating multi-FX presets
3. If no pull down menu is present, the units for that
parameter cannot be changed.
Multi-FX presets allow a complex, multi-FX algorithm processing
set to be applied to different sounds.
To create a custom multi-FX preset:
1. Click the “Save FX” button with two or more FX algorithms
loaded. (fig. 6)
2. If only one FX algorithm is loaded, a single FX preset is
created.
Changing FX slider ranges
The range for each FX parameter slider is stored as part of an
FX preset. If the resolution of the slider is not precise enough,
or the minimum or maximum value desired is not selectable, the
slider range needs to be changed.
To change the range for an FX parameter slider:
1. Click the name of the desired FX parameter (green text
above the slider). (fig. 6)
2. Type in the desired minimum and maximum values.
Saving processed sounds
If the available five FX algorithms do not provide enough power
to create the desired effect, processed sounds may be saved
out and loaded back in for more processing. Once re-loaded, it
may be processed with up to five more FX algorithms.
To save a processed sound:
1. Click the “Save as” button. (fig. 6)
2. This will save the sound with the processing applied.
Once saved, it is not possible to return the sound to its
original state.
3. To avoid permanently altering an original track or .wav, it
is best to save sounds with FX processing under a new
name. All original Mixman Track files can be reloaded
from the original CD-ROM.
Creating custom FX presets
FX presets may be modified by moving any of the available
parameter sliders. The current settings for an FX algorithm may
be saved as a custom FX preset that may be re-loaded at any
time. Since presets are customizable, the number of FX presets
is endless.
To create a custom FX preset:
1. Click the “Save FX” button with one FX algorithm loaded
into the FX Studio. (fig. 6)
2. If multiple FX algorithms are loaded, the set is saved as a
multi-FX preset (.mfx).
27
Mixman StudioPro 4.0
THE EDITING STUDIO
Chapter 9: The Editing Studio
Select Tool
Undo
Draw Tool
Copy
Eraser Tool
Cut
Paste
Insert Marker
Scrolling
Quantize
Pitch
Pitch
Panning
Volume
Tempo
Quantize
Zoom Slider
Quit
Help
fig. 7
Stop Play
Skip
Skip
Previous Next
Overview (fig. 7)
StudioPro was created with real-time performance in mind so
it was necessary to provide a method for editing all aspects
of the performance data. The Editing Studio is a graphical
representation of a performance and has been designed to be
easy to use, yet powerful enough to create a finished piece
of music. In addition to editing recorded performance data,
new performance data can be created from scratch using the
drawing tools. The ability to “draw” in performance data, opens
the door for Mixes to be created that would not otherwise have
been physically possible to play.
Open
Save
Back
Moving an audio file’s start time can have an adverse effect
on the overall musical synchronization. In StudioPro, a different
approach is utilized. Instead of moving audio files around,
users create or modify performance data. What exactly is
performance data? To understand this concept, it is necessary
to review the way in which the Remixing Studio functions.
Understanding Performance Data
In the Remixing Studio, sounds are loaded into the various slots
on the two turntables. The physical act of pressing specific
keys on the computer keyboard is what actually triggers these
sounds. In this way the sounds are “performed”, and thus the
term “performance data”. A live recording of a performance
will often capture complex movements that might otherwise be
impossible to devise or take hours to create from scratch. These
performances reflect when sounds were started and stopped,
and how they may have been modified in real-time.
Most multi-track audio editing programs allow audio files to be
laid out graphically over time. This approach is very precise, but
in order for it to work well, the files must be pre-edited just right.
The same real-time synchronization employed in the Remixing
Studio carries over to the Editing Studio. Because only
28
Mixman StudioPro 4.0
THE EDITING STUDIO
performance data (when and how a Mix was performed)
is edited, not actual audio files, disrupting the musical
synchronization of a Mix is not an issue. When track bars
are moved to earlier locations, the sound is not being moved,
only the timing of when the key for that sound is being
“pressed” is altered. This method of editing sound allows more
intuitive control during the editing process, maintaining rock
solid synchronization the whole time.
The meaning of the different colored bars
Performance data is displayed as different colored bars, called
track bars. The performance data for each sound is represented
by a different track bar in the edit area. This area is arranged
in a grid format. Each track bar represents how the sound
will be performed during playback. The color coding of the
different track bars is the same as that used in the Remixing
Studio. Orange track bars represent sounds that are “manually”
triggered. Green track bars represent sounds that are “locked”.
Blue track bars represent sounds that are locked and contain
pitch shift settings that are non-zero. Red track bars represent
sounds that are soloed. Gray bars represent the sounds that are
muted during solo.
Zooming (fig. 7)
The zoom slider provides an easy way to change how much
musical time is displayed in the edit area. Next to the zoom
slider, is the zoom ratio indicator. This number reflects the
current zoom level. When the zoom ratio is 1:1, each cell is
one measure long. To zoom out, move the slider to the left. The
maximum size of a cell is 128 measures. To zoom in, move the
slider to the right. When completely zoomed in, each cell is a
1/128th of a beat.
2. Use the “Del” key on the number pad to switch fields,
then press the “Enter” key.
Selecting and editing (fig. 7)
The editing model used in StudioPro is similar to that of
a spreadsheet program. This style of editing presents some
unique possibilities and ease of use. The edit area is comprised
of 16 available tracks. Each track is then divided into eight
“cells”. The smallest amount of data that can be selected is one
whole cell. The visual size of a cell remains constant, however,
how much information a cell contains changes depending on
the chosen zoom level. The way to control the amount of actual
performance data in a given cell is by changing the zoom level
of the edit area. When completely zoomed in, each cell is
1/128th of a beat in length. When completely zoomed out, each
cell is 128 measures long. This cell based editing makes it very
easy to clean up performance data and quickly create complex
musical structures.
Using the editing tools
The editing tools are the buttons located on the left and right
sides of the user interface. Each tool performs a different
function. Some tools have multiple options. To select the
different options for a tool, click the button and hold it down for
a moment (like a pull down menu). To change options, just hold
the mouse down and select the desired option.
Select (fig. 7)
Use this tool for selecting performance data to be edited.
Editing functions, operate on whatever cells are currently
selected (highlighted with a white border).
Navigating (fig. 7)
There are a number of methods provided to navigate around
the Editing Studio. A Mix may be played starting from any point.
The play line is the white blinking line in the edit area. When a
Mix is played, it always starts from the current position of the
play line. To jump to a specific point in a Mix, move the play
line to the desired location. There are several ways to move
the play line.
To move the play line to a new location:
1. Click a measure marker to move the play line to that
location or, click the counter, type a measure number,
press the “Enter” key or, press the “0” key on the number
pad, type the desired measure number.
Draw Tool (fig. 7)
Allows performance data to be drawn in using a pencil. Both
orange and green bars may be drawn.
The difference between orange (manual) & green (locked)
Track Bars.
When creating performance data from scratch using the
drawing tools, it is important to understand the distinction
between orange and green tracks bars.
Orange track bars represent sounds that are manually
triggered in the Remixing Studio. When sounds are
manually triggered, they are heard immediately. This
29
Mixman StudioPro 4.0
THE EDITING STUDIO
introduces the possibility of momentarily losing musical
synchronization.
Green track bars represent tracks that are locked
in the Remixing studio. When tracks are locked, the
audio “slices” in the Track file are not always heard
immediately, but are triggered according to the timing
information embedded in the Track.
As a general rule, use orange bars if a sound should
play exactly where drawn, and green bars when perfect
musical synchronization is more important. For example,
use green bars for things like bass and drum loops and
use orange bars for “one hit” sounds like crash cymbals
and vocals.
Eraser Tool (fig. 7)
Paste (fig. 7)
Pastes the performance data that is currently stored in the copy
buffer, to the selected area. If performance data from only one
track is being pasted, then it is pasted to the whichever track
is currently selected. If multiple tracks of performance data are
pasted at one time, then only the starting location is taken into
account.
If performance data is pasted at a location where other
performance data already exists, then the new data is written
over the previous data.
To paste performance data:
1. Click the cell into which the performance data should be
copied.
2. Click the “Paste” button.
Use the tool to erase unwanted performance data.
Paste and Ripple (fig. 7)
Cut (fig. 7)
Cuts the performance data from the selected area. This leaves a
“hole” where the data that was cut used to be.
Pastes the performance data that is currently stored in the copy
buffer to the current location and then ripples over later in
time, remaining performance data. This is useful for inserting a
section without deleting what is already there.
To cut performance data:
1. Zoom to a level that reveals the targeted performance
data in one cell.
Merge (fig. 7)
2. Select the cell by clicking on it with the mouse.
Functions exactly like paste, but performance data pasted on
other performance data is merged, not overwritten.
3. Click the “Cut” button.
Cut and Ripple (fig. 7)
Quantizing (fig. 7)
Cuts the performance data from the selected area and ripples
to the left the remianing data. This has the effect of “sewing
together” two sections on either side of the cut. This is useful
when “chopping out” a section of unwanted data, instead of
leaving a hole with no performance data, the remaining data
moves over.
To get the maximum benefit from StudioPro’s real-time
performance capabilities we recommend recording performances
live in the Remixing Studio, and then editing them in the Editing
Studio. There is a musical quality that comes with playing a Mix
live that is difficult to duplicate by creating it from scratch using
the drawing tools. However, nobody has robotic timing.
Copy (fig. 7)
The quantize feature helps correct any timing in a recorded
performance. Quantizing works by snapping all performance
data to a musical timing grid.
Copies the selected performance data into the copy buffer so
that it can be pasted elsewhere.
To copy performance data:
1. Zoom to a level that reveals the targeted performance
data in one cell.
2. Select the cell by clicking on it with the mouse.
3. Click the “Copy” button.
To quantize performance data:
1. Select the desired performance data by clicking or dragselecting it with the mouse. Click the quantize button.
2. The quantizing value determine the resolution of the grid.
30
Mixman StudioPro 4.0
THE EDITING STUDIO
Controlling volume, pitch, panning and tempo
To pan a sound:
One of the most powerful features of the Editing Studio is
the ability to automate the pitch, panning, volume and tempo
settings over time. This can be used to create volume fades,
pitch ramps and other effects.
1. Select the performance data to pan by drag-selecting it
with the mouse.
Creating a volume fade (fig. 7)
4. A constant value for panning may also be set by clicking
the appropriate button.
Volume fades are useful when trying to bring sounds in and out
smoothly. They can also be applied to all tracks at once to fade
in the beginning or fade out the ending of a song.
To create an volume fade:
1. Select the performance data to fade by drag-selecting it
with the mouse.
2. Click the volume icon. Type in a starting and ending
volume. The selected performance data will fade from the
starting volume to the ending volume.
3. To fade completely in or out, click the appropriate “Fade
In” or “Fade Out” button.
4. A constant value for volume may also be set by clicking
the appropriate button.
Creating a pitch ramp (fig. 7)
Pitch ramps are especially useful on drum sounds. Changing the
pitch of a drum sound over time produces interesting effects.
To create an pitch ramp:
1. Select the performance data to pitch ramp by dragselecting it with the mouse.
2. Click the pitch button.
3. Type in a starting and ending pitch. The selected
performance data will ramp from the starting pitch to the
ending pitch.
4. A constant value for pitch may also be set by clicking the
appropriate button.
Panning a sound (fig. 7)
Panning sounds creates a sense of space in a Mix. Panning can
be used both statically and dynamically. Static panning can be
used, for example, to have a tambourine play only out of the left
speaker. Dynamic panning can be used to have the tambourine
automatically pan from the left to right speaker.
2. Click the panning button.
3. Type in a starting and ending panning value. The selected
performance data will pan from the starting value to the
ending value.
Using song markers (fig. 7)
Sometimes it is necessary to skip to different sections of a
song during the editing process. This is particularly useful when
Mixes become longer, or a Mix has very distinct sections. This
skipping is achieved using song markers. Song markers may be
inserted at any point in a Mix.
To insert a song marker:
1. Place the play line the location to mark by clicking the
appropriate measure marker.
2. Click the “Insert Song Marker” button.
3. To skip back and forth between the different markers, use
the skip buttons.There is no limit to the numbers of song
markers allowed.
31
Mixman StudioPro 4.0
APPENDIX 1: KEYBOARD COMMANDS
Appendix 1: Keyboard Commands
Control Room
Go to the Remixing Studio . . . . . . . . . . . . . . . . . . . . . . . Ctrl + M
Go to the Recording Studio . . . . . . . . . . . . . . . . . . . . . . .Ctrl + R
Go to the Editing Studio . . . . . . . . . . . . . . . . . . . . . . . . . . Ctrl + E
Go to the FX Studio . . . . . . . . . . . . . . . . . . . . . . . . . . . . . . Ctrl + F
Quit StudioPro . . . . . . . . . . . . . . . . . . . . . . . . . . . . . . . . . Ctrl + Q
Activate Onscreen Help System . . . . . . . . . . . . . . . . . . .Ctrl + H
Open Mix . . . . . . . . . . . . . . . . . . . . . . . . . . . . . . . . . . . . . . .Ctrl + O
Export Mix . . . . . . . . . . . . . . . . . . . . . . . . . . . . . . . . . . . . . .Ctrl + X
New Mix . . . . . . . . . . . . . . . . . . . . . . . . . . . . . . . . . . . . . . Ctrl + N
Save Mix . . . . . . . . . . . . . . . . . . . . . . . . . . . . . . . . . . . . . . .Ctrl + S
Recording Studio
Quit StudioPro . . . . . . . . . . . . . . . . . . . . . . . . . . . . . . . . . Ctrl + Q
Activate Onscreen Help System . . . . . . . . . . . . . . . . . . .Ctrl + H
Record a .wav . . . . . . . . . . . . . . . . . . . . . . . . . . . . . . . . . . Ctrl + R
Play current recorded .wav . . . . . . . . . . . . . . . . . . . . . . . . Enter
Stop playback . . . . . . . . . . . . . . . . . . . . . . . . . . . . . . . . . . . . . ESC
Back to Control Room . . . . . . . . . . . . . . . . . . . . . . . . Backspace
Save new .wav file . . . . . . . . . . . . . . . . . . . . . . . . . . . . . .Ctrl + S
Load .wav to Mix . . . . . . . . . . . . . . . . . . . . . . . . . . . . . . . . Ctrl + L
Remixing Studio
Engage Play Mode . . . . . . . . . . . . . . . . . . . . . . . . . . . . . . . . Enter
Lock/Unlock Tracks . . . . . . . . . . . . . . . . . . . . . . . . . . . Spacebar
Engage Break Mode (Solo) . . . .Ctrl or (-) on the number pad
Record a Performance . . . . . . . . . . . . . . . . . . . . . . . . . . .Ctrl + R
Go to the Editing Studio . . . . . . . . . . . . . . . . . . . . . . . . . . Ctrl + E
Go to the FX Studio . . . . . . . . . . . . . . . . . . . . . . . . . . . . . . Ctrl + F
Quit . . . . . . . . . . . . . . . . . . . . . . . . . . . . . . . . . . . . . . . . . . . .Ctrl + Q
Activate Onscreen Help System . . . . . . . . . . . . . . . . . . .Ctrl + H
Open Mix . . . . . . . . . . . . . . . . . . . . . . . . . . . . . . . . . . . . . . .Ctrl + O
New Mix . . . . . . . . . . . . . . . . . . . . . . . . . . . . . . . . . . . . . . Ctrl + N
Save Mix . . . . . . . . . . . . . . . . . . . . . . . . . . . . . . . . . . . . . . .Ctrl + S
Clear Performance Data . . . . . . . . . . . . . . . . . . . . . . . . . .Ctrl + B
Copy Track . . . . . . . . . . . . . . . . . . . . . . . . . . . . . . . . . . . . .Ctrl + C
Paste Track . . . . . . . . . . . . . . . . . . . . . . . . . . . . . . . . . . . . .Ctrl + V
Delete Track . . . . . . . . . . . . . . . . . . . . . . . . . . . . . . . . . . . .Ctrl + X
Undo Record . . . . . . . . . . . . . . . . . . . . . . . . . . . . . . . . . . . . Ctrl + Z
Launch the Load Track Dialog . . . . . . . . . . . . . . . . . . . . . Ctrl + I
Store Macro . . . . . . . . . . . . . . . . . . . . . . . . Shift + F1 through F8
Back to Control Room . . . . . . . . . . . . . . . . . . . . . . . . Backspace
Select Pitch Knob . . . . . . . . . . . . . . . . . . . . . . . . . . . . . .Page Up
Select Volume Knob . . . . . . . . . . . . . . . . . . . . . . . . . Page Down
Select Panning Knob . . . . . . . . . . . . . . . . . . . . . . . . . . . . . . Insert
Select Tempo Knob . . . . . . . . . . . . . . . . . . . . . . . . . . . . . . Delete
Change Parameter Values . . . . . . . . . . . Up/Down Arrow Keys
Select Paramater Knob Left/Right . . . . . . . . . . . . .Arrow Keys
Select Track Without Making Sound . . . Alt + the Track’s Key
Clear Track Copy Buffer . . . . . . . . . . . . . . . . . . . . . . . . . .Ctrl + K
Track Settings . . . . . . . . . . . . . . . . . . . . . . . . . . . . . Ctrl + Shift + I
3.0 style Load dialog . . . . . . . . . . . . . . Alt + Double-click track
Cross Fader Hard Left . . . . . . . . . . . . . . . . . . . . . . . . . . . . . . . . . .[
Cross Fader Hard Right . . . . . . . . . . . . . . . . . . . . . . . . . . . . . . . . .]
Cross Fader Center . . . . . . . . . . . . . . . . . . . . . . . . . . . . . . . . . . . “
Load Dialog
Preview Track . . . . . . . . . . . . . . . . . . . . . . . . . . . . . . . . Spacebar
Load Track to Mix . . . . . . . . . . . . . . . . . . . . . . . . . . . . . . . . Enter
Change Active Button . . . . . . . . . . . . . . . . . . . . . . . . . . . . . . . Tab
Scroll through Folders or Tracks Up/Down . . . . . .Arrow Keys
Track Settings Shortcut . . . . . . . . . . . . . . . . . . . . . . . . . . Alt + S
Editing Studio
Back to Control Room . . . . . . . . . . . . . . . . . . . . . . . . Backspace
Quantize Selection . . . . . . . . . . . . . . . . . . . . . . . . . . . . . . .Ctrl + G
Select Tool . . . . . . . . . . . . . . . . . . . . . . . . . . . . . . . . . . . . . . Ctrl + 1
Draw Orange Bar . . . . . . . . . . . . . . . . . . . . . . . . . . . . . . . . Ctrl + 2
Draw Green . . . . . . . . . . . . . . . . . . . . . . . . . . . . . . . . . . . . . Ctrl + 3
Eraser . . . . . . . . . . . . . . . . . . . . . . . . . . . . . . . . . . . . . . . . . . Ctrl + 4
Go to the Remixing Studio . . . . . . . . . . . . . . . . . . . . . . . Ctrl + M
Go to the FX Studio . . . . . . . . . . . . . . . . . . . . . . . . . . . . . . Ctrl + F
Set Zoom Ratio 1:1 . . . . . . . . . . . . . . . . . . . . . . . . . . . . . . . . . . . . S
Zoom to Entire Mix . . . . . . . . . . . . . . . . . . . . . . . . . . . . . . . . . . . F
Zoom Out . . . . . . . . . . . . . . . . . . . . . . . . . . . . . . . . . . . . . . . . . . . . A
Zoom In . . . . . . . . . . . . . . . . . . . . . . . . . . . . . . . . . . . . . . . . . . . . . D
Scroll Left One Cell . . . . . . . . . . . . . . . . . . . . . . . . . . . . . . . . . . W
Scroll Right One Cell . . . . . . . . . . . . . . . . . . . . . . . . . . . . . . . . . . E
Scroll Left Whole Screen . . . . . . . . . . . . . . . . . . . . . . . . . . . . . . Q
Scroll Right Whole Screen . . . . . . . . . . . . . . . . . . . . . . . . . . . . . R
Quit StudioPro . . . . . . . . . . . . . . . . . . . . . . . . . . . . . . . . . .Ctrl + Q
Activate Onscreen Help System . . . . . . . . . . . . . . . . . . .Ctrl + H
Open Mix . . . . . . . . . . . . . . . . . . . . . . . . . . . . . . . . . . . . . . .Ctrl + O
New Mix . . . . . . . . . . . . . . . . . . . . . . . . . . . . . . . . . . . . . . Ctrl + N
Save Mix . . . . . . . . . . . . . . . . . . . . . . . . . . . . . . . . . . . . . . .Ctrl + S
Copy Selected Cells . . . . . . . . . . . . . . . . . . . . . . . . . . . . . .Ctrl + C
Paste Selected Cells . . . . . . . . . . . . . . . . . . . . . . . . . . . . .Ctrl + V
Delete Selected Cells . . . . . . . . . . . . . . . . . . . . . . . . . . . .Ctrl + X
Undo last Edit (multiple undos) . . . . . . . . . . . . . . . . . . . . Ctrl + Z
Mixman StudioPro 4.0
APPENDIX 1: KEYBOARD COMMANDS
Select All/Highlight All Cells . . . . . . . . . . . . . . . . . . . . . .Ctrl + A
Skip Backwards . . . . . . . . . . . . . . . . . . . . . . . . . . . . . . . . . Ctrl + J
Skip Forwards . . . . . . . . . . . . . . . . . . . . . . . . . . . . . . . . . . . Ctrl + L
Type Position In Counter . . . . . . . . . . . . . . . . . . . . . . . . . . . . . . 0
FX Studio
Preview Sound with FX . . . . . . . . . . . . . . . . . . . . . . . . . . . . Enter
Stop Preview . . . . . . . . . . . . . . . . . . . . . . . . . . . . . . . . . . . . . .ESC
Load Sound with FX to Mix . . . . . . . . . . . . . . . . . . . . . . . Ctrl + L
Launch Load Dialog . . . . . . . . . . . . . . . . . . . . . . . . . . . . . . Ctrl + I
Back to Control Room . . . . . . . . . . . . . . . . . . . . . . . . Backspace
Save Track with FX as a New Track File . . . . . . . . . . . .Ctrl + S
Quit StudioPro . . . . . . . . . . . . . . . . . . . . . . . . . . . . . . . . . .Ctrl + Q
Activate Onscreen Help System . . . . . . . . . . . . . . . . . . .Ctrl + H
Delete Currently Selected Effect . . . . . . . . . . . . . . Delete Key
Change Currently Selected FX SlotUp/Down . . . . . . . .Arrows
Go to the Remixing Studio . . . . . . . . . . . . . . . . . . . . . . . Ctrl + M
Go to the Recording Studio . . . . . . . . . . . . . . . . . . . . . . .Ctrl + R
Go to the Editing Studio . . . . . . . . . . . . . . . . . . . . . . . . . . Ctrl + E
32
33
Mixman StudioPro 4.0
APPENDIX 2: THE FX ALGORITHIMS
Appendix 2: The FX Algorithms
Auto Pan
Speed: Speed of auto pan
Panning reflects a sound’s relative positioning between the left
and right speakers in a stereo field.
parameters. The number of delays (echos) you hear depends on
the feedback setting. The higher the feedback, the more delays
your will hear. Since StudioPro process all of your sound in
RAM, keep in mind that adding delay can increase the size of
your sounds.
Auto panning a sound automates the movements from right to
left or vice a versa, over time.
Adjusting the speed parameter will effect how fast the sound
travels between the two speakers.
Band Pass Filter
Freq: Center frequency of the band pass filter
Resonance: Amplitude boost around the center frequency
Gain: Gain of the input to the band pass filter
A band pass filter allows only a band of frequencies to pass
through. Frequencies not included in the band are eliminated. A
band pass filter creates an effect that is similar to a telephone.
When you talk normally, your voice has low, mid and high
frequencies. When your voice passes over a telephone the
person on the other end hears only the mid range of frequencies
coming through. The telephone acts as a band pass filter, only
letting pass the midrange frequencies of your voice.
Adjusting the center frequency changes the center of the band
of frequencies that are passed through the filter. Increasing the
resonance creates a distinctive ringing sound as the center
frequency is amplified. Since adding resonance can increase
the amplitude of your signal, a gain control is provided to
eliminate unwanted distortion. If you hear distortion, bring the
gain down.
Delay
Time: Delay time
Fine: Fine adjustment for the delay time
Feedback: Amount of signal from the output to be fed
back into the delay algorithm
Delay, sometimes referred to as echo, is one of the most widely
use FX algorithms. The delay algorithm takes any sound that
comes in and passes it through so you can hear it immediately,
but also sends a digital copy of the sound some time later,
producing a delay effect. The time it takes for the first delay
to be heard is controlled by the delay time and fine adjust
Distortion
Drive: Amount of distortion
Gain: Gain adjustment for the output of the distortion
algorithm
Distortion is most commonly used by guitarist to create that
classic electric guitar sound. It turns your clean signal into a
distorted mess. Used cleverly, distortion can be useful for a
variety of sounds. Using it is simple, to add more distortion,
crank up the drive. Since increasing the drive effects the
amplitude of the signal, there is also a gain adjust on the output
of the distortion algorithm. Using the gain control, you can have
something sound distorted, but not have it be overpowering in
volume.
Envelope Follower
Min Freq: The minimum Freq for the selected filter
Max Freq: The maximum Freq of the selected filter
Resonance: Amplitude boost around the center or cutoff
frequency of the selected filter
Gain: Gain adjustment to the input to the selected filter
Type: Selects which filter type to use (low pass, band
pass, high pass)
The envelope follower algorithm uses the sound that is being
processed as a way to automate changing the Freq parameter
of a selected filter type over time. The effect is the same as
someone changing the Freq parameter of the selected filter type
following the rhythm of the incoming sound.
First, select one of the three available filter types low pass,
band pass or high pass. Instead of setting the cutoff or center
frequency for the selected filter type, you set a possible
minimum and maximum value. The algorithm analyzes the sound
you are processing and records the volume of the signal over
time. This analysis produces a map that changes up and down
over time, like the waveform of an EKG machine. The louder
the signal, the higher the waveform. Now for the fun part, the
34
Mixman StudioPro 4.0
APPENDIX 2: THE FX ALGORITHIMS
map that is created be analyzing the incoming sound is used
to control the Freq parameter of the selected filter. When the
signal is at its loudest, the Freq parameter will be as high as the
Max Freq. When the signal is at its softest, the Freq parameter
of the selected filter will be as low as the Min Freq.
Filter Sweep
Start Freq: Starting center/cutoff frequency of the
selected filter type
End Freq: Ending center/cutoff frequency of the selected
filter type
Type: Selects which filter type to use (low pass, band
pass, high pass)
Resonance: Amplitude boost around the center or cutoff
frequency of the selected filter
Feedback: Amount of the signal that is fed back into the
flange algorithm
The flange algorithm is similar to the delay algorithm however
with an important difference. Flange has an added feature that
allows changes to the delay over time. The sound of the flange
is distinctive and this processing can generate results in that
are quite subtle as well as results that end up “obliterating” the
sound you are processing.
The maximum delay time is set in the delay parameter. This
delay time is changed (or modulated) over time by a low
frequency oscillator (LFO). The speed of the LFO determines the
rate of change of the delay time. The variance of the delay time
is controlled by the depth parameter. The greater the depth,
the more the delay time changes over time. When the depth
parameter is set to 100, the delay time changes from the delay
time to 0 delay time at the rate set by the LFO. The lower the LFO
setting, the faster the change will occur.
Gain: Gain adjustment to the input to the selected filter
Multi-Trigger: Sweep each “slice” of audio or over the
entire sound file
The Filter sweep algorithm automates changing the center/
cutoff frequency of the selected filter over time. Depending
on the settings, this algorithm can alter your sounds beyond
recognition. The filter sweep algorithm is also one of the FX
algorithms that takes distinctive advantage of the Track (.trk)
format.
The starting frequency and ending frequency set the center/
cutoff frequency of the selected filer type at the beginning and
ending of the sweep. With the multi-trigger slider set to off, the
selected filter will sweep from the starting freq to the ending
freq for the loop length of the sound or the loop length set in
the FX Studio display, which ever is shorter. If you have a 2
measure loop, and multi-trigger is off, the selected filter type
will smoothly sweep from the starting frequency to the ending
frequency over the two measure period. To take advantage of
the face that Track (.trk) files are individual slices of audio,
turn multi-trigger on. When multi-trigger is on, the selected filter
will sweep from the starting frequency to the ending frequency
for each “slice” of the Track (.trk) file. This is effect is unique
to StudioPro. With multi-trigger turned on and resonance set
around 8.0, you can turn drum sounds into rhythmic synthesizer
like sounds.
Flange
LFO Time: Speed of the LFO
Depth: Depth of the LFO modulation of delay time
Delay: Maximum delay time
Low Pass Filter
Freq: Cutoff frequency of the filter
Resonance: Amplitude boost around the cutoff frequency
of the filter
Gain: Gain adjustment of the input to the filter
The low pass filter algorithm passes all frequencies below the
cutoff frequency. Frequencies above the cutoff frequency are
blocked. Low pass filters are normally used to take the high end
(treble) away from a sound. They are useful for taking the high
and mid range frequencies of a drum loop away so that all that’s
left are the low frequencies. This help create space in the high
end, while keeping the feel of the original loop.
The Freq parameter controls the cutoff frequency of the low
pass filter. The lower the value, the more bottom end you will
hear. Since filtering a sound can drastically alter its over all
loudness, there is a gain parameter to help boost the signal.
High Pass Filter
Freq: Cutoff frequency of the filter
Resonance: Amplitude boost around the cutoff frequency
of the filter
Gain: Gain adjustment of the input to the filter
The high pass filter is the opposite of the low pass filter. All
frequencies above the cutoff frequency are passed through,
and the frequencies below the cutoff frequency are blocked.
High pass filters are normally used to take the bass away from
a sound. They are useful for taking the bass and mid range
35
Mixman StudioPro 4.0
APPENDIX 2: THE FX ALGORITHIMS
frequencies of a drum loop away so that all that’s left are the
high frequencies. This helps create space in the bottom end,
while keeping the feel of the original loop.
The Freq parameter controls the cutoff frequency of the high
pass filter. The higher the value, the less bottom end you will
hear. Since taking the bass away from a sound can drastically
alter its overall loudness, there is a gain parameter to help boost
the signal.
only lets a narrow band of frequencies through. It has one more
parameter that makes it a bit more flexible that the band pass
filter. The width of the passed band can be changed by the
width parameter.
Pitch Shift
Steps: Number of half step to shift the pitch
Cents: 1/100 th of a half step values for changing pitch
Multi-Trigger
Time: Delay time
Repeats: Total number of triggers
Volume Mode: The velocity curve for the multiple triggers
(None, Random, Ramp)
Stretch: Controls whether or not to time stretch the shifted
sound to its original length
The pitch shifting algorithm allows you to alter the pitch of a
given track. Since pitch shifting a sound alters its playback
speed and thus its duration, an option to time stretch the sound
back to it original length is available once pitch shifting has
been completed.
Delay Mode: Modulation of the delay time (Normal,
Random)
The multi-trigger algorithm is similar to the delay algorithm, in
that it takes a sound and delays the output. The difference is
that the multi-trigger algorithm creates the delays by actually
triggering the slices in a track file more times than is specified
in the track file. This does not take up any more RAM than the
original sound. Since this effect actually creates more slices
in a track, its interaction with other effects can be drastically
different than the delay algorithm. For an interesting effect,
place a multi-trigger before an auto pan with a speed of 127 in
the same sound.
Reverb
The time sets the delay time between the multiple triggers. The
number of repeats is how many total triggers will be heard. The
volume mode deals with the volumes of the subsequent triggers.
When set to none, the volumes of all additional triggers will be
the same as the first. When the volume mode is set to random,
the volumes for additional triggers are randomized. When the
volume mode is set to ramp, additional triggers decrease in
volume. The delay mode determines if there is to be any change
to the additional triggers’ delay times. When set to normal,
there is no change, when set to random, the delay times are
randomized, creating a unique stuttering effect.
The reverb algorithm is designed to simulate the sound of a
reverberant environment. Since sound doesn’t occur in a vacuum,
environment plays a big part of how we as humans perceive
sound. Whether a sound is loud or soft tells you something about
a sound. It is interesting to imagine what the same sound would
come out like in a bathroom or a concert hall.
Mid Pass Filter
Freq: Center frequency of the mid pass filter
Width: Width of the passed band of frequencies
Resonance: Amplitude boost around the center frequency
of the filter
Gain: Gain adjustment of the input to the filter
The mid pass filter is similar to the band pass filter in that it
Size: The size of the environment
Surface: The reflective properties of the surface in the
environment
Mix: Controls the balance of wet to dry signal
Cutoff: Cutoff frequency of the low pass filter
Diffusion: The detail level of the reverb algorithm
Gate: Maximum allowed time for the reverb tail
The reverb algorithm can be used to simulate many different
environments. Resultant sounds are dependent on all of the
various parameters and how they interact. Try using the
same sound with all of the different presets to gain a better
understanding of how the parameters effect a sound.
The size parameter controls the overall size of the environment,
the larger the number, the larger the environment.
The surface parameter controls the reflectivity of the surfaces
in the environment. The higher the value, the more reflective
the surface will be. More reflective surfaces cause sounds to
take longer to subside. The cutoff parameter controls the cutoff
of a low pass filter that the reverberated sound passes though.
Setting the cutoff frequency lower has the effect of making the
environment sound more muffled, like a room full of drapes.
The diffusion parameter controls the resolution of the reverb
36
Mixman StudioPro 4.0
APPENDIX 2: THE FX ALGORITHIMS
calculation. The higher the diffusion, the smoother the reverb
will sound, but the calculation will also take more time. Finally,
the gate parameter, controls the maximum allowed duration for
the reverb tail. Setting this parameter shorter than the natural
reverb tail will cut the tail off, creating what is commonly called
a gated reverb.
Time Stretch
Factor: Amount of time stretching
Quality: Selects from four time stretching algorithms
The time stretch algorithm allows you to change the length
of a sound without altering its pitch. The time stretch factor,
changes the resultant length of a sound. For example, a two
second sound with a time stretch factor of 2.0 will end up being
4 seconds long. The quality slider selects between four different
time stretch algorithms. Algorithms from one to four are in order
of processing time. Algorithm number four takes the longest
and algorithm number one takes the shortest amount of time to
complete the processing.
Chopper
Chunk Size: Sets the size of the chopped audio chunks
Envelope: Selects the amplitude shape for each chunk
(Slow, Med, Fast)
Silence: Adjusts the amount of silence between each
chunk of chopped audio
Chopper takes sounds and chops them into smaller chunks.
Each chunk is part sound and part silence, this is what creates
the classic on/off gated "chopping" sound. The amount of
silence in each chunk is controlled by the silence parameter.
When silence is large, the chunks of sound have more silence.
When silence is small, the chunks have more sound. The speed
of the chopping effect is controlled by adjusting the chunk size.
The smaller the chunks, the faster the chopping effect.
The Envelope parameter controls the volume shape of the
chunks. When the envelope is at its lowest, each chunk fades in
and out. When the envelope is at its highest, each chunk comes
in and out with a sharp edge.
Try using chopper on long sustained sounds like pads or to cut
up vocals.
Wah Wah
LFO: Speed of the filter center frequency/cutoff
modulation
Max Freq: The maximum center/cutoff frequency of the
selected filter type
Resonance: Amplitude boost around the center/cutoff
frequency of the selected filter
Chopper Sweep
Start Size: Sets the starting size of the chopped audio
chunks
End Size: Sets the ending size of the chopped audio
chunks
Gain: Gain adjustment to the input of the selected filter
Envelope: Selects the amplitude shape for each chunk
(Slow, Med, Fast)
Depth: The amount of modulation of the center/cutoff
frequency of the selected filter
Silence: Adjusts the amount of silence between each
chunk of chopped audio
Type: Selects one of three filter types (low pass, band
pass, high pass)
Wah wah allows you to modulate the center/cutoff frequency of
a selected filter type over time using a low frequency oscillator
(LFO). It gets its name from the classic sound it creates. When
the filter type is set to low pass the effect is similar to the
human voice saying “wah, wah, wah”.
The LFO speed of the LFO determines the rate of the filter’s
center/cutoff frequency modulation. The lower the number, the
faster the change. The Max Freq parameter is the maximum
center/cutoff frequency for the selected filter type. The depth
determines how far from the max frequency to modulate.
Chopper sweep automates changing chopper’s chunk size of
over time. This gives the effect of speeding up or slowing down
the rate of the chopping effect. Start size and end size set the
chunk size for the beginning and end of the sweep. Each chunk
is part sound and part silence, this is what creates the classic
on/off gated "chopping" sound. The amount of silence in each
chunk is controlled by the silence parameter. When silence is
large, the chunks of sound have more silence, when silence is
small there is more sound then silence.
The Envelope parameter controls the shape of the chunks.
When the envelope is at its lowest, each chunk fades in and out.
When the envelope is at its highest, each chunk comes in and
out with a sharp edge.
Try using chopper on long sustained sounds like pads.
37
Mixman StudioPro 4.0
APPENDIX 2: THE FX ALGORITHIMS
Chordinator
Freq 1: The pitch of the first resonator
Freq 2: The pitch of the second resonator
the difference between the current tempo of the mix and the
new tempo of the processed track is corrected.
Use Time Adapter to bring a jungle beat into a trip hop mix.
Freq 3: The pitch of the third resonator
Freq 4: The pitch of the fourth resonator
Feedback: The amount of signal fed back into the
chordinator algorithm
Gain: Controls the input gain
Chordinator has four independent resonators, each at a
different pitch. Any sound that goes through one of the four
resonators "rings" at its set pitch. Using four resonators, each
set to a different pitch, you can create chords. The amount of
the ringing can be controlled by adjusting the feedback. The
higher the feedback, the more "ring" will be heard.
Random Pitch
Pitch Down: The range of random pitch shifting above the
natural pitch of the sound
Pitch Up: The range of random pitch shifting below the
natural pitch of the sound
Random pitch randomizes the pitch of each "slice" of a Track
(.trk) file. This randomization is done in real-time while the track
is playing, so the pattern will never repeat. Since the pitch
shifting occurs in real-time, slices of sounds with delay or other
time based processing will sound slower or faster.
Try using on drum loops to add harmony to a beat.
Comb Filter
Freq 1: The center frequency of the first band pass filter
Freq 2: The center frequency of the second band pass
filter
Freq 3: The center frequency of the third band pass filter
Width: The bandwidth of the band pass filters
Resonance: Amplitude boost around the center
frequencies of each band pass filter
Gain: Controls the input gain
The Comb Filter has three independent band pass filters, each
set to a different pitch. Each band pass filter creates a whistling
sound at its set pitch. The whistling sound can vary from a noisy
ring to one pure tone, depending on the width setting.
Time Adapter
Factor: Amount of time scaling
Pitch Shift: Turns the auto pitch correction on
Time Stretch: Turns the auto time stretch on
Time Adapter is designed to bring fast loops into slow mixes
and slow loops in fast mixes without changing their feel. This is
sometimes referred to as half-time or double-time.
Reverse
Slice: Reverses the individual slices of audio
Order: Reverses the order the playback of slices
Align Attacks: Aligns the ends of reversed slices to their
start times
Reverse allows you reverse the individual slices of audio in
a TRK file. You can also independently reverse the order in
which the slices playback. This creates the unique option to
play the slices in reverse order, while leaving the their sound
unchanged.
When a loop is reversed, the percussive starts of slices are
moved later in time. This can make the loop sound like it’s
lagging in the mix. In order to solve this problem turn align
attacks on. This moves each slice so that the ends are moved in
time to the previous start points.
Beat Twister
Shuffle Slices: Randomly shuffles individual slices to
trigger times of other slices
Random Time: Randomly moves the start times of
individual slices earlier or later
Pitch Up: The maximum upper range for random pitch
shifting
In order to use this effect properly, it’s best to load sounds with
no pitch shifting or time stretching.
Pitch Down: The maximum lower range for random pitch
shifting
The pitch shift and time stretch parameters work the same as
the checkboxes in the load track dialog. When either is used,
Min Volume: The minimum random volume for each slice
Time Stretch: Time stretch slices to correct duration
changes after pitch shifting
Mixman StudioPro 4.0
APPENDIX 2: THE FX ALGORITHIMS
The Beat Twister is an extremely powerful effect that takes
advantage of the TRK file format. It allows you to twist your
beats and musical loops into entirely new ones.
When Shuffle Slices is on, individual slices are randomly
re-mapped to the start time of a different slice. Pitch up and
down set the range for random pitch shifting of each slice.
Min Volume sets the minimum range for random volumes for
each slice.
Time stretch corrects any duration changes caused by pitch shifting.
Volume Sweep
Start: Starting volume of each “slice” of audio
End: Ending volume of each “slice” of audio
Shape: The speed and contour of the volume change
The Volume Sweep algorithm automates the amplitude of the
audio “slices” over time. The Start volume sets the starting
volume of the sound. The End volume sets the ending volume of
the sound. The Shape determines how the volume changes over
time. Set Shape to Slow and each slice will go from the Start
volume to the End volume, creating either a fade in/out on each
“slice” depending on the settings. Set Shape to Fast and each
slice will go from the Start volume to the End volume in half the
duration of each “slice”. Set the Shape to UpDn and the volume
of each slice will go from the Start volume to the End volume
and then back to the Start volume.
Multi-Filter Sweep
Start Freq: Starting center frequencies of the four band
pass filters
End Freq: Ending center frequencies of the four band pass filters
Resonance: Amplitude boost around the center
frequencies of the filters
Spread: Different patterns of varying the center
frequencies over time
Mix: The amount of dry versus processed signal
Multi-Sweep: Sweep each “slice” of audio or over the
entire sound file
The Multi-Filter Sweep algorithm automates the changing of
the center frequencies of four band pass filters over time. The
signal is first split into four parts and each part individually
processed with a band pass filter. The center frequencies
of the band pass filters change over time. The exact center
frequencies of the band pass filters are calculated based on the
spread parameter.
38
Mixman StudioPro 4.0
APPENDIX 3: TROUBLE SHOOTING
Appendix 3: Troubleshooting
Mixman website
The Mixman website, www.mixman.com is an invaluable
resource for troubleshooting. In our technical support area,
there are links to the different sound card companies where
technical information about a particular sound card may be
found. There is also a link to Microsoft for getting the latest
DirectX information.
Frequently Asked Questions
The frequently asked questions (FAQ) section of the Mixman
website contains a continuously updated list of the most asked
questions and answers from our users. It is the first place to
look when trying to solve a problem or look for an answer.
Tips and Tricks
The tips and tricks section of the Mixman website is the place to
go for using some of StudioPro’s hidden features and as well as
learning more about audio in general.
Chat board
The Mixman online discussion group may be found by visiting
www.mixman.com and going to the Mixzone.
39
Mixman StudioPro 4.0
APPENDIX 4: TRACK INDICATOR LEGEND
Appendix 4: Track Indicator Legend
When creating or playing a mix, a track can be in any of
a number of states. The Track Indicator shape or color will
change depending on which state you are in. This way, you can
tell visually what is happening with a track.
Stop Mode
----X . . . . . . . . . . . . . . . . . . . . . . . . Unlit X: means track is empty
---- . . . . . . . . . . . . . . . . . . Unlit Circle: means track is loaded
----X . . . . . . . . . . . . Red X: means track is empty and selected
---- . . . . . Green Circle: means track is loaded and enabled
•
•
Play Mode
•
•
•
•
•
---- . . . Yellow Light: means playing manually from keyboard
---- . . . . . . . . . . . . . . . . . . . Green Light: means track is loaded
---- . . . . . . . . . . . . . . . Red Light: means break mode engaged
---- . . . . . . . . . . . . . . . . Blue Light: means pitch shift engaged
----X . . . . . . . . . . . . . . . . . . . . . . .Unlit X: means no track loaded
---- . . . . Unlit Circle: means track loaded but not being played
40
41
Mixman StudioPro 4.0
APPENDIX 5: CREATING YOUR OWN TRACKS
Appendix 5: Creating Your Own Tracks
Mixman StudioPro comes with a large set of TRKs (tracks) in a
variety of styles to get you started, but for those people wanting
to take their music to the next level, this appendix explains how
to create custom sounds to use in Mixes.
Exporting a Mix as a TRK (Editing Studio)
Make a Mix using short WAV files such as individual drum
sounds and export the Mix as a TRK file. All the WAVs and
performance data are joined and and saved as a single TRK file.
See page 12 for more details.
Mixman Singles™
Mixman Singles are remixable digital songs. Each Mixman
Single comes with 16 or more TRK files from a particular song.
They are available online at www.mixman.com.
Record your own WAV files
Use the Recording Studio to record your voice or any other
sound. Make sure that you are plugged into the correct input on
your soundcard and that it is properly enabled before recording.
Mixman Soundiscs™
Soundiscs are the easiest way to build your Mixman Sound
Library. Each Soundisc has 175 or more TRK files by a
specific artist or in particular style specially produced to
work seamlessly with StudioPro. They are available at
www.mixman.com and musical instrument shops.
Convert WAVs into TRKs
To convert WAV file loops into proper Mixman TRK files you
need to convert them using a program specially designed for
that purpose. ReCycle 1.7 and Wave Surgeon are currently
the third party programs that export to TRK. Check
www.mixman.com for availability.
Save a TRK with FX (FX Studio)
By altering TRKs in the FX Studio, sounds that are
unrecognizable from their source can be created. For example:
the Beat Twister can rearrange the individual samples, alter
the timing and randomize the pitch of a loop making it into
something completely different.
If you create a masterpiece in the FX Studio, save it and use
it as a new TRK. Once TRKs are saved from the FX Studio, the
processing cannot be removed. This allows you to reprocess
them again by loading them and adding even more FX in the
FX Studio.
Importing existing WAV files
Mixman StudioPro supports importing stereo and mono WAV files.
Try using the internet as a source for finding unusual WAV files.
Using any standard WAV editing program you may edit sounds
and import them. For better control of loops while playing in the
Remixing Studio, convert WAVs into TRKs using WaveSurgeon
or ReCycle 1.7
42
Mixman StudioPro 4.0
APPENDIX 6: MY MIXZONE™
Appendix 6: My Mixzone
™
My Mixzone is your own custom homepage at www.mixman.com.
It is a place to upload mixes for others to listen to and remix online.
Step 5: Custom Tabs
Each My Mixzone page has three areas to display custom text.
Each will have a Tab.
Select a Tab name, or create a custom one by typing in the Tab
name field.
Write a custom message in the large scrollable “Text Area”.
Repeat this procedure for all the Tabs.
Note: If “Links” is chosen, web sites listed will appear as active
links online.
Step 6: Choose a Color Scheme
Choose a color scheme for page from the pull-down menu.
Step 1: Make a Mix
Step 7: Mix Info
To utilize the My Mixzone feature, you first must create a mix
in Mixman StudioPro. Use any of the mixes provided or create
a custom.
Fill in all requested Mix info. These include Artist, Title, Category
and comments.
Step 8: Uploading the Mix
Step 2: Export the Mix
From the Control Room, click the Export Mix button. Select
“Upload to My Mixzone” and click “OK”.
There are two choices for Uploading. Uploading a remixable
version and uploading a preview. Choose one or both and click
“Upload.”
Uploading a Preview will enable others to listen to your music
online.
Step 3: Creating an Account
Type in your email address and choose a password. Click Next.
Note: A valid email address is required. Your account will not be
established without a valid email. Authentication will be sent to
the provided email address.
Step 4: Personal Info
Fill in the fields with appropriate information.
Note: This info will actually be displayed online.
Note: Pictures must be submitted in JPEG format.
Uploading a Remixable version will enable others to remix your
music online.
Note: Preview files are RealAudio G2 and remixable files are
Beatnik RMF.
43
Mixman StudioPro 4.0
APPENDIX 7: MIXMAN RADIO™
Appendix 7: Mixman Radio
™
Mixman Radio is an Internet based radio that plays music
submitted by users of Mixman software from around the world.
Step 4: Personal Info
Fill in the fields with appropriate information.
Note: This info will actually be displayed online.
Step 5: Mix Info
Type your Artist Name, Title of your Mix, seclect the style of
music from the pull-down menu and type in any description or
comments. Click Upload to submit your Mix.
Step 1: Make a Mix
To upload to Mixman Radio, you must first create a Mix
in Mixman StudioPro. Mixes for Mixman Radio must contain
performance data. To record a performance, click the Record
Mix button in the Remixing Studio and perform your mix. You
may also use the Draw tool in the Editing Studio to draw in
performance data.
Step 2: Export the Mix
From the Control Room, click the Export Mix button. Select
“Upload to Mixman Radio” and click “OK”.
Step 3: Creating an Account
Type in your email address and choose a password. Click Next.
Note: A valid email address is required. Your account will not be
established without a valid email. Authentication will be sent to
the provided email address.