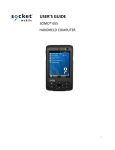
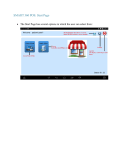
1
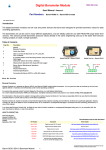
SpotLighter™ User Manual
Lead Retrieval System for Tradeshows
Scan or swipe attendee badges.
Review and update missing/additional attendee
information during and after attendee visit.
Qualify attendee with pre-set qualifiers.
Add custom notes to record attendee specific
follow-up needs.
If you have a Wi-Fi connection, you can process
leads immediately after the show finishes to
receive Excel formatted reports by email.
For detailed help, tap
button.
Please keep SpotLighter box for returning
equipment after the show completion.
Checklist and return shipment envelope are
inside the box.
VarIT Inc.
25107 Bottle Brush Terrace
Stone Ridge, VA 20105
Important
Details must be visible on iPod screen
after scanning attendee badge.
Otherwise, call SpotLighter support.
(703) 665-6607
(651) 248-0769
(612) 220-7618
Copyright © 2007-2013 VarIT Inc. All Rights Reserved.
1
Power Button
Use this
scanner for
Bar-coded
badges ONLY
Use this reader ONLY
for Magcard badges
SpotLighter
ICON
SpotLighter
Shipment
Contents
iPod Device
with charge
cable
2
Bluetooth Scanner (Socket CHS 7xi)
Use This for Bar-coded Badges ONLY
Scan Button
Press the button to scan
the badge keeping 3
inches distance between
the scanner and the
badge.
Power Button
Press and hold to turn
scanner ON/OFF. After
turning ON, status light
should start blinking and
in few seconds, iPod home
screen should show
reader connected.
Status Light
When scanner is ready,
this LED blinks blue. It
blinks red when it needs
to be charged or while
charging. Steady blue
light indicates scanner is
fully charged.
Charging port
Scanner will hold charge for
complete day of use.
However, needs to be fully
charged every night.
Immediately connect to
charger when status light is
red or scanner does not
turn ON.
To start using, charge scanner and turn it ON.
3
Using SpotLighter
SpotLighter™ supports Barcode and Magnetic stripe badges. Please choose
appropriate reader depending on the attendee badge type.
Attendee badge appearance
Barcoded badge
Start with next page.
Mag-Stripe badge like a credit
card.
Badge reader to be used
The Bluetooth badge scanner is
paired with iPod prior to shipment.
Simply press and hold Power button
to turn ON the reader. If multiple
SpotLighter units were ordered,
paired scanner and iPod units will
have matching labels.
Turn this scanner OFF, if badges
are Mag-Stripe as shown below:
The reader inserts at the bottom of iPod.
Do not connect this reader when reading
barcode badges.
1. Go to page 15.
2. Then pages 7 through 10.
Any other type
Contact SpotLighter support team @
703-665-6607
4
SpotLighter Home Screen for Barcode badge
Show Name
SpotLighter Setup
Exhibitor Name
Scanner ready status.
Go ahead, scan badge
Scanner Icon
To enter details of
attendee that does not
have machine readable
badge.
If scanner status indicates
Change user name
Change question set
Tap to get Help
To review captured leads
Count of captured leads
go to ‘Troubleshooting’ section- Page 11.
5
Scanning the Bar-coded badge
Status Light
Scan Button
Important: On successful scan,
lead details should appear on
iPod screen and scanner must
vibrate to confirm lead transfer
to iPod. If required fields (Email
or Phone) are not found then
scanner doesn’t vibrate, it gives
error beep and status light blinks
red.
To scan the badge, distance between scanner and
the badge should be 3 inches. After pressing scan
button, light emitted by scanner should be aimed at
the barcode on the badge as shown. The badge
does not need to be removed from plastic holder as
long as the barcode is fully visible.
6
Lead Details Screen
View and edit lead details using
this screen. Tap ‘Next’ button to
qualify attendee. Pressing ‘Back’
button will save attendee details
and return to home screen.
If you do not see attendee details
filled in proper fields, tap on any
button text to get list of values
from the badge and select
appropriate one.
7
Qualifiers Screen
Comments & Notes Screen
Next
Back
‘Done’ button
completes
qualification
and returns to
Home screen.
Tap to
view/edit lead
details
Tap on the qualification text to
check/uncheck. Tapping on ‘Back’
button goes to ‘Lead Details’
screen and ‘Next’ button goes to
‘Comments and Notes’ screen.
Enter free-format notes to
qualify attendee. Tap on ‘Done’
button to save the details and go
to home screen.
8
SpotLighter Home Screen
Lead Lookup Screen
Most recent visitor is
shown at the top in
this list. Tap the lead
entry to re-visit lead
details, update
information and
qualification as
needed.
Tapping on ‘Lead
Lookup’ button goes
to captured leads
screen to revisit.
Tap on this to get ‘Lead
Settings’ screen.
9
Lead Settings Screen
Lead settings decide what is needed from attendee badge. Some attendees do not
provide email address during registration. Sometimes, show organizers decide not to
provide them on the badge. However, without email or phone, it is extremely hard
to follow-up with the booth visitor. As a result, SpotLighter sets email as required
field on attendee badge and prompts you when attendee badge does not have it.
The settings screen allows you to change these decisions.
When attendee badge is
scanned, badge details are
presented on screen by
default. However, you can
change the setting so that
the details screen is not
presented. You can always,
view lead details by tapping
on attendee icon on qualifier
screen to review/update the
details.
ON indicates, missing
email value on badge will
bring up attendee details
screen with message. An
OFF value will not perform
the check.
ON will bring up Lead
details screen after every
badge scan. An OFF value
will directly present
qualification screen.
10
Troubleshooting
For detailed help, tap
Fixing
button.
condition
1. A power cycle works most of the time. Turn OFF iPod device by pressing and holding
power button (about 5 seconds. You will see iPod screen turning black with activity and
then complete black).
Once it turns OFF, press same button again to turn it ON. Turn OFF scanner power and
then turn it ON. Ensure the scanner blinking status light is blinking blue. Unlock screen
by sliding switch on iPod screen. Tap on SpotLighter icon to show its home screen. At
this point, scanner should be detected by SpotLighter and paired. If not, try next steps.
Power Button
Status Light
Scan Button
Power Button
SpotLighter
ICON
Home
Button
11
2. Tap ‘Settings’ icon and then select Bluetooth. Turn on Bluetooth and see device list.
If any iOS Socket device is shown as Not Connected or Not Paired then tap on it to
pair. The following screens show the sequence:
12
3.
If the scanner shows as ‘Not Connected’, then tap on
to forget the
‘Not Connected’ scanner. Press Scan and Power buttons of the scanner
simultaneously for few seconds. Scanner will emit some tones indicating that it
has forgotten its past pairing and it is ready to pair again with iPod. Turn
Scanner on again, it should appear on next screen as ‘Not Paired’.
Bluetooth Screens
4. If Socket scanner is shown as ‘Not paired’, tap on it to proceed with pairing.
Scanner will get paired. Ignore message ‘Connection Unsuccessful’. However,
scanner status should show as connected.
13
5. Press device home button and tap on SpotLighter icon to
invoke
SpotLighter. Scanner should show connected now.
6. If you had acquired scanner on your own or somehow had done ‘factory
reset’ to it, you need to reset its mode by scanning the following barcode. It
will make unique sounds after scanning it. If you are not able to scan, it
implies that it is already in the iPod mode.
14
SpotLighter Home Screen with Magnetic Reader Connected
Badge reader is connected. You can swipe badge either way to read badge data.
SpotLighter Setup
Show Name
Exhibitor Name
Change user name
Scanner Status
Change question set
Tap to get Help
Reader Icon
To enter attendee
information that does
not have machine
readable badge.
To review captured leads
Count of captured leads
Magcard Badge
VarIT Inc.
www.varit.com
15
How to upload leads after the show?
Firstly, you need to have Wi-Fi connection that should be connected to your iPod. To
connect Wi-Fi to your iPod, you need to follow the steps below.
Tap on ‘Settings’ icon
from Home screen of
iPod and then tap on
Wi-Fi option.
Turn ON Wi-Fi if it is
OFF. It will show Wi-Fi
networks available in
that particular area. Tap
on a network which
needs to connect.
Enter password of
your network and tap
on ‘Join’.
16
Your network is
connected to the iPod.
Note that Wi-Fi icon in
the upper left corner
shows when the
device is connected to
a Wi-Fi network.
Go to home screen by
tapping on ‘Home’ button at
bottom side of the iPod and
tap on ‘SpotLighter’ icon.
Then tap on ‘Properties’
button. It will navigate to
‘Properties’ screen.
Tap on ‘Process Report’
from above screen.
17
In the above screen, you
can see total lead count,
total answer count etc.
Pending count indicates
that those are not uploaded
yet on the server. Tap on
‘Process’ button to upload
leads on the server.
It starts uploading leads
and shows failed count if
any. Note that there are
seven steps that will be
completed. Steps three and
four take the longest and
are dependent on the
number of leads and the
number of answers present
to process. Wait for all
steps to complete.
Once uploading is
completed, it gives a
message ‘Report processing
completed successfully’.
Tap on ‘OK’ button of the
message and tap on
‘Cancel’ button to go to
‘Properties’ screen and then
tap ‘Back’ to go to home
screen.
18