1
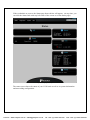
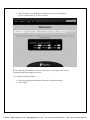
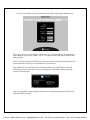
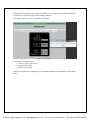
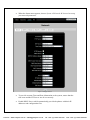
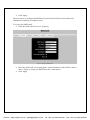
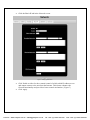
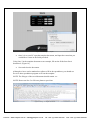
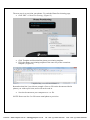
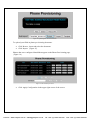
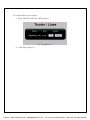
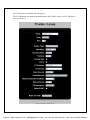
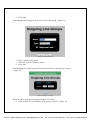
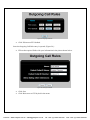
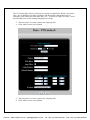
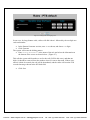
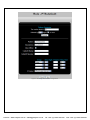
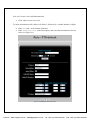
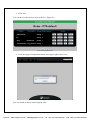
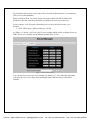
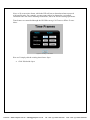
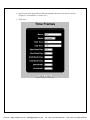
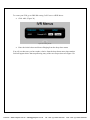
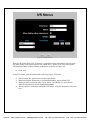
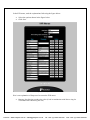
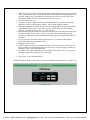
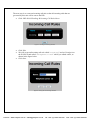
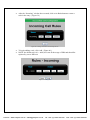
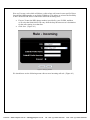
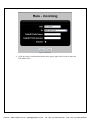
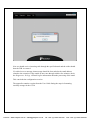
Positron G-320 Business Phone System
Setup Guide
5101 Buchan Street, Suite 200
Montreal, Quebec – H4P 2R9
Phone: (514)-345-2220
Support: (514)-664-4719
July 2011
VoIPon www.voipon.co.uk [email protected] Tel: +44 (0)1245 808195 Fax: +44 (0)1245 808299
Steps
•
Once your Positron G-320 unit hardware has been powered up and is connected
via a computer to Ethernet Port 1, use the Web Browser (Firefox, IE, Safari) to
log onto the G-320 at the default address: 192.168.1.2.
Figure 1: Login screen for Web UI
At the login screen: {Figure 1}
• Enter the default username: admin
• Enter the password: password.
• Click Enter
Note: If you have difficulties with any of the steps in this document, please contact our
Customer Support department at the phone number listed on the cover of this document.
VoIPon www.voipon.co.uk [email protected] Tel: +44 (0)1245 808195 Fax: +44 (0)1245 808299
If the credentials are correct, the Status page shown below will appear. (At any time, you
can click the Status link at the top left corner of the screen to see the Status page.)
Figure 2: Navigating Status Page
The status screen shows the status of your G-320 unit as well as its system information
and networking configuration.
VoIPon www.voipon.co.uk [email protected] Tel: +44 (0)1245 808195 Fax: +44 (0)1245 808299
•
The first step is to setup the date and time of the unit by clicking on:
System Maintenance Date and Time.
Figure 3: Setting up Date and Time
Be sure that the date and time is correct on the unit as you begin so that all log
information and time stamps are correct.
To set the time of day and date:
•
•
Select the appropriate information from the drop-down menus.
Click Apply
VoIPon www.voipon.co.uk [email protected] Tel: +44 (0)1245 808195 Fax: +44 (0)1245 808299
•
Next, click on the Logs tab located at the top of the same page (Maintenance).
Figure 4: Setting up Logs
At the Logs screen you can enable or disable services. You also specify the media type
onto which the logs will be written. The G-320 supports both USB and Compact Flash
media storage.
Note: If you do not log to a media device then logs will be stored in RAM and they will
be deleted in the event of power interruption or system reset.
Note: Media devices will require to be formatted before use. If the Media is already
formatted correctly, then once inserted it will appear as such under Status Storage
section as shown below.
Figure 4a: Storage Section from Status Screen
Note: The appendix to this document contains a more detailed description of the steps
required to format media
VoIPon www.voipon.co.uk [email protected] Tel: +44 (0)1245 808195 Fax: +44 (0)1245 808299
Once all the changes have been selected and the Save selected you are then prompted by
to perform a reset and to apply all the changes thus far.
You must restart the G-320 to apply these changes.
Figure 5: Apply Configuration
To perform a System Restart:
• Click on System Restart.
• Confirm the restart
• Wait a few seconds.
Once the reset has been completed, you’ll be automatically re-directed back to the Status
menu.
VoIPon www.voipon.co.uk [email protected] Tel: +44 (0)1245 808195 Fax: +44 (0)1245 808299
•
When the Status menu appears, choose System Network Network to set up
your network parameters.
Figure 5: Setting up Network
•
To provide accurate Time and Date information to the system, ensure that the
time zone and the NTP server are all set correctly.
•
Enable DHCP Server which automatically provide the phones with their IP
addresses and configuration files.
VoIPon www.voipon.co.uk [email protected] Tel: +44 (0)1245 808195 Fax: +44 (0)1245 808299
•
Click Apply.
The next step is to configure the SMTP mail system which will be used to send email
attachments containing voicemail to users.
To set up your SMTP mail:
• Click the SMTP tab in Network. {Figure 6}
Figure 6: Setting up SMTP Mail.
•
•
Fill in the fields with your organization’s email information in the fields as shown
above {Figure 6} using your SMTP Provider’s information.
Click Apply.
VoIPon www.voipon.co.uk [email protected] Tel: +44 (0)1245 808195 Fax: +44 (0)1245 808299
•
Click the Block IP tab in the Network screen.
Figure 7: Setting up Blocked IP
•
•
Click Enable to allow for the eventual control of which which IP addresses can
and cannot connect to the unit from the Internet. This feature enhances the
firewall functionality and provides a better control mechanism. {Figure 7}
Click Apply.
VoIPon www.voipon.co.uk [email protected] Tel: +44 (0)1245 808195 Fax: +44 (0)1245 808299
Once networking has been set up we can configure the extensions.
•
The extension (users) page is located at: PBX User User.
Figure 8: Setting up Extensions
Positron has developed several spreadsheet templates to simplify system configuration.
One such template allows for the entry of telephone extensions.
To download the extensions template:
• Click Template. {Figure 8}
Choose to open the template file immediately, or save the file on the path of your
choosing, then open the file. The file is in Comma Separated Values format (CSV), and
is meant to be opened in a spreadsheet program. It can also be opened in a standard text
editor as shown here, however the column arrangement will not be visible.
In each of the Positron spreadsheet template files, line 5 is an example of how each
subsequent line is to be filled out. Line 5, itself will be disregarded by the system when
the file is read in, so do not replace it with actual information, as that line will be lost.
VoIPon www.voipon.co.uk [email protected] Tel: +44 (0)1245 808195 Fax: +44 (0)1245 808299
Figure 9: Downloading the Template
•
Once it is on your PC open the template document, and input the extensions you
would like to create in the fields provided.
Using Line 5 in the template document as an example, fill out the fields from line 6
downward. {Figure 10}
•
Save and close the document.
Although we have used a standard text editor to fill in the spreadsheet, you should use
Excel or other spreadsheet program to fill out the template.
NOTE: The filetype of the saved document should remain .csv
NOTE: Do not use line 5 to fill out a phone to provision
Figure 10: Filling out Template Document
VoIPon www.voipon.co.uk [email protected] Tel: +44 (0)1245 808195 Fax: +44 (0)1245 808299
To import the Excel Template document: {Figure 11}
• Click the Browse button,
Figure 11: Uploading Template
•
•
Locate the saved template document on your computer, select it and click OK
Click Import.
VoIPon www.voipon.co.uk [email protected] Tel: +44 (0)1245 808195 Fax: +44 (0)1245 808299
The Users table will be filled with the extension information you specified in the
template. {Figure 12}
Figure 12: Uploaded Template
VoIPon www.voipon.co.uk [email protected] Tel: +44 (0)1245 808195 Fax: +44 (0)1245 808299
The next step is to provision your phones. To reach the Phone Provisioning page,
• Click PBX -> Phone Provisioning. {Figure 13}
Figure 13: Creating Phone Provisions
•
•
Click Template and download the phone provisioning template.
Fill in the phone provisioning template in the same way as the extensions
template. {Figure 14}
Figure 14: Filling out Phone Provisions document
Remember that line 5 provides an example of how to fill out the document with the
phones you wish to provision, and it will not be read in.
•
Save the document on your computer as a .csv file.
NOTE: Do not use line 5 to fill out an actual phone to provision
VoIPon www.voipon.co.uk [email protected] Tel: +44 (0)1245 808195 Fax: +44 (0)1245 808299
Figure 15: Uploading Phone Provision document
To upload your filled-in phone provisioning document:
•
•
Click Browse, locate and select the document
Click Import. {Figure 15}
Phones that were configured should then appear on the Phone Provisioning page.
{Figure 16}
Figure 16: The new Phone provisions
•
Click Apply Configuration in the upper right corner of the screen.
VoIPon www.voipon.co.uk [email protected] Tel: +44 (0)1245 808195 Fax: +44 (0)1245 808299
To set up a trunk for your system:
•
Click PBX Trunks/Lines Trunks/Lines
Figure 17: Setting up Trunk/Lines
•
Click Edit. {Figure 17}
VoIPon www.voipon.co.uk [email protected] Tel: +44 (0)1245 808195 Fax: +44 (0)1245 808299
The Trunks/Lines creation menu will appear.
The E1-PRI trunks are authenticated through the Port. Please ensure your E1-PRI port is
selected on the 1st.
Figure 18: Creating a E1-PRI Trunk
VoIPon www.voipon.co.uk [email protected] Tel: +44 (0)1245 808195 Fax: +44 (0)1245 808299
•
•
•
•
Here we will give the Trunk the name Telephone Lines. {Figure 18}
We’ll make sure the type is E1-PRI, and leave the rest of the boxes filled out as
the default settings.
Set Music on Hold to DefaultMoH.
Click Save.
Once the configuration has been saved the Trunks /Lines page appears once more.
{Figure 19}
Figure 19: Created Trunks
The next step is creating an outgoing line group and assign your trunk to it.
•
Click the PBX Trunks / Lines Outgoing Line Groups sub-tab.
This will present the Outgoing Line Groups page. {Figure 20}
Figure 20: Outgoing Line groups
VoIPon www.voipon.co.uk [email protected] Tel: +44 (0)1245 808195 Fax: +44 (0)1245 808299
•
Click Add
The Outgoing Line Groups menu lets you create a line group. {Figure 21}
Figure 21: Creating a line group
•
•
•
Enter a Name for the group
Select the Type and Trunk as shown.
Click Save.
The Outgoing Line Group menu will now show the newly created group “Analog.”
{Figure 22}
Figure 22: Creating a Line Group
The next step is to create an outgoing call Rule. To do this:
• Click on PBX Call Handling Outgoing Call Rules. {Figure 23}
VoIPon www.voipon.co.uk [email protected] Tel: +44 (0)1245 808195 Fax: +44 (0)1245 808299
Figure 23: Outgoing Call Rules
•
Click Edit next to PTS-default.
Once the Outgoing Call Rule entry is opened {Figure 24}:
•
Fill out the required fields with your information in the places shown below.
Figure 24: Editing PTS-default
•
•
Click Save
Click Rules next to PTS-default in the menu
VoIPon www.voipon.co.uk [email protected] Tel: +44 (0)1245 808195 Fax: +44 (0)1245 808299
The G-320 unit ships with two call rule sets already configured by default, each with 2
rules, one for dialing local calls by dialing 9 and the number, and another rule for
emergency calls where the caller dials only “911,” as shown in Figure 26 below. All of
these default rules use the Analog Outgoing Line Group.
•
•
The next step is to create a pattern for outgoing calls:
Click Add to create a new pattern
•
•
The next step is to create a pattern for outgoing calls:
Click Add to create a new pattern
VoIPon www.voipon.co.uk [email protected] Tel: +44 (0)1245 808195 Fax: +44 (0)1245 808299
Figure 26: Creating a Rule for Outgoing Calls
In our case, for long distance calls, callers will dial 9 then 1 followed by the ten digit area
code and number.
• In the Pattern Generator section, enter 91 as shown, and choose 10 digits
• Click Generate
The system will create the dialing pattern.
• Enter “Long-Distance” as the name of the rule and select the information at
the bottom of the screen as shown below. {Figure 27}.
This tells the system which trunks to use for the call (VoIP in this case), and that one
digit (9) should be removed from the number when it is sent to the trunk. If there is no
answer within 40 seconds, the call will be abandoned, and the caller will hear the IVR
recorded message chosen in the If Failed field.
•
Click Save
VoIPon www.voipon.co.uk [email protected] Tel: +44 (0)1245 808195 Fax: +44 (0)1245 808299
Figure 27: Generating a Rule Pattern for Long Distance
VoIPon www.voipon.co.uk [email protected] Tel: +44 (0)1245 808195 Fax: +44 (0)1245 808299
Now we’ll create a rule called International.
•
Click Add to create a new rule
To make international calls, callers will dial 011 followed by a variable number of digits.
•
•
Enter 011 and 1 in the Pattern Generator
Enter International in the Description, and select the information as shown
below in {Figure 28}.
Figure 28: Generating Pattern for International
VoIPon www.voipon.co.uk [email protected] Tel: +44 (0)1245 808195 Fax: +44 (0)1245 808299
•
Click Save
You can then see the two new rules in the list. {Figure 29}
Figure 29: Rules for PTS-default
•
Click the Apply Configuration button in the upper right of the screen.
Figure 30: Apply Configuration
Now we should be able to make outgoing calls.
VoIPon www.voipon.co.uk [email protected] Tel: +44 (0)1245 808195 Fax: +44 (0)1245 808299
For incoming calls, in most cases, calls will be directed to an Interactive Voice Response
(IVR ) tree or auto attendant.
When creating an IVR, it is best to begin with a plan which will tell us which voice
prompts are needed, when they should occur and how the call is to be directed.
In our example, we’ll first start with making sure we have all the necessary voice
prompts.
• Click PBX Settings Sound Manager IVR.
In {Figure 31} below, you’ll see a list of voice prompts which will be available for use in
IVRs. These voice prompts are included by default in the G-320.
Figure 31: Viewing all sound prompts
You can also record your own voice prompts by dialing *95, or by manually uploading
.gsm files. Be sure to give these files meaningful names that accurately reflect their
contents.
VoIPon www.voipon.co.uk [email protected] Tel: +44 (0)1245 808195 Fax: +44 (0)1245 808299
Next, we’ll create a time frame, which the IVR will use to determine when to proceed
with specific rules. For example, you may want calls to be directed to a voicemail
extension if the call comes in during closed hours, but to an IVR tree during open hours.
Time frames are controlled through the PBXIncoming Call FeaturesTime Frames
Menu.
Figure 32: Creating a Time Frame
Here we’ll simply edit the existing time frame: Open.
•
Click Edit beside Open
VoIPon www.voipon.co.uk [email protected] Tel: +44 (0)1245 808195 Fax: +44 (0)1245 808299
•
Specify your own open and closed hours using the 24-hour clock for the exercise.
{Figure 33} Note that the * means “any.”
•
Click Save.
Figure 33: Saving a new Time Frame
VoIPon www.voipon.co.uk [email protected] Tel: +44 (0)1245 808195 Fax: +44 (0)1245 808299
To create your IVR, go to PBXIncoming Call FeaturesIVR Menus.
•
Click Add. {Figure 34}
Figure 34: Creating an IVR
•
Enter the initial values and choose Ringing from the drop-down menu.
You will see that once you have made a choice from the drop-down menu, then another
field will appear below that step allowing entry of the next step as shown in Figure 35a.
VoIPon www.voipon.co.uk [email protected] Tel: +44 (0)1245 808195 Fax: +44 (0)1245 808299
Figure 35a: Creating a new IVR
Because the menu choices for “Parameter” sometimes require information such as using
the menu being created itself (in this case ‘Main-IVR’), Please click Save at this point
and edit I6000 Main-IVR to continue with entries as shown in Figure 35b.
•
Click Save
In the IVR menu, read the explanations following Figure 35b below.
•
•
•
•
Start selecting the options shown in the figure below.
When entering the Parameter for GototimebasedRule, choose Main-IVR.
When you have created the label “open_hours” you should see “open_hours”
added to the Parameter beside GototimebasedRule.
When you have reached the end of the IVR menu, verify the parameters and click
Save
VoIPon www.voipon.co.uk [email protected] Tel: +44 (0)1245 808195 Fax: +44 (0)1245 808299
In the IVR menu, read the explanations following the figure below:
•
•
Select the options shown in the figure below.
Click Save.
Figure 35b: The Complete IVR
Here’s an explanation of Steps used to create the IVR menu:
•
Ringing: Play Ringing sound to the caller (Used in combination with Wait to ring for
X seconds before answering the call).
VoIPon www.voipon.co.uk [email protected] Tel: +44 (0)1245 808195 Fax: +44 (0)1245 808299
•
•
•
•
•
•
•
•
•
•
Wait: Wait for X seconds. X being the parameter specified to the box to the right side
before continuing to the next step. When used in combination with Ringing, the caller
will hear Ringing for X seconds before continuing on to the next step. Please note
that during “Wait”, the IVR will not listen for any key presses.
Answer: Answer the call.
Language: Sets the Language for the specified channel. Any system level prompts
played to a caller, on this specific channel, will be in the language chosen.
GotoTimebasedRule: Transfers the caller to an existing IVR or an IVR:Group:Label
if the selected Time Frame is currently in effect. Time Frames are defined under
PBX Incoming Call Features Time Frames.
Background: Plays the sound file selected in the parameter field and at the same time
listens for DTMF or key presses. If a key is pressed, the sound file that is being
played is stopped and the steps configured for the key press (or group/IVR table) are
executed.
LeaveVoicemail: The caller will be invited to leave a voicemail in the mailbox
extension defined in the parameter field.
Hangup: Terminate call.
Label: Tags the previous step with a label name. This is used to allow entry into the
IVR, such that execution begins at the previous step. Useful in skipping a number of
preliminary steps in an IVR application.
WaitExten: Play silence and listen for any DTMF or key presses. If a key is pressed,
the steps configured for that key is are executed.
Click Save, to see the menu below.
It indicates that the IVR is ready to be used for all calls that are directed to it. {Figure 36}
Figure 36: Saved IVR
VoIPon www.voipon.co.uk [email protected] Tel: +44 (0)1245 808195 Fax: +44 (0)1245 808299
The next step is to create an incoming call rule so that all incoming calls that are
governed by this rule will be sent to the IVR.
•
Click PBX Call Handling Incoming Call Rules Menu.
Figure 37: Creating an Incoming Call Rule
•
•
•
Click Edit
We will create an Incoming call rule called “Incoming” and we’ll assign it to
the E1-PRI Trunk called “Telephone Lines” which you edited earlier, as
shown in the figure below.
Click Save.
Figure 38: Saving the new Incoming Call Rule
VoIPon www.voipon.co.uk [email protected] Tel: +44 (0)1245 808195 Fax: +44 (0)1245 808299
•
After the “Incoming” rule has been created, click on its Rules button to create a
rule for the entry. {Figure 39}
Figure 39: Creating a rule on the new Incoming call rule
•
•
To begin adding a rule, click Add. {Figure 40}
NOTE: the default rule All -> 6000, does not fit the usage of PRIs and should be
replaced by a new DID rule
Figure 40: Creating rules
VoIPon www.voipon.co.uk [email protected] Tel: +44 (0)1245 808195 Fax: +44 (0)1245 808299
Here we’ll create a rule which will direct a caller whose call came in on a specific Direct
Inward Dial (DID) number to our I6000 IVR Menu. This allows us to have the flexibility
to have different IVR menus connected to different incoming lines.
•
•
First we’ll enter the DID (phone number) provided by your E1-PRI, and then
we’ll select the I6000 Main-IVR entry from the drop-down menu as a destination
for the calls coming in on that line.
Click Save. {Figure 41}
Figure 41: Setting up the Rule
We should now see the following menu with our new incoming call rule. {Figure 42}
VoIPon www.voipon.co.uk [email protected] Tel: +44 (0)1245 808195 Fax: +44 (0)1245 808299
Figure 42: Created Rules
•
Click the Apply Configuration button in the upper right of the screen to make the
IVR Menu active.
VoIPon www.voipon.co.uk [email protected] Tel: +44 (0)1245 808195 Fax: +44 (0)1245 808299
Figure 43: Created Rules
Now we should receive incoming calls through the specified trunk and the caller should
hear the IVR we created.
If a caller leaves a message, that message should be forwarded to the email address
related to the extension. If the emails do not come through within a few minutes, check
the Diagnostics Logs Email log for information about the processing of the email.
This concludes the configuration exercise.
The appendix contains a reprint from the User Guide listing the steps in formatting
auxiliary storage for the G-320
VoIPon www.voipon.co.uk [email protected] Tel: +44 (0)1245 808195 Fax: +44 (0)1245 808299
Appendix 1 Formatting
Storage
System -> Maintenance -> Storage Tab
Used to format and test the Compact Flash and USB storage used for voicemail, recordings and log data
storage.
NOTE: If a USB or CF storage device is specified, and that storage device is not present, then the
associated file will be stored on the system’s memory. The information will be lost in the event of
a system restart, or if there is insufficient memory available.
Format Compact Flash Button, Test Compact Flash Button
These controls are useful when first installing a Compact Flash card, or when the Status screen shows
that the Compact Flash card is installed but not recognized.
NOTE: Estimated time for a CF card format is approximately 1.5 minutes/GB but can be
dependent on the size of the CF card.
NOTE: All data on the CF card will be lost when it is formatted using this command.
A restart (System -> Restart) must be done after formatting in order to recognize the
newly-formatted compact flash card. Any telephone calls in progress will be dropped.
To Install and Format Compact Flash (CF) Storage:
•
Unplug the power to the G-Series Gateway
•
Insert the CF card into the CF slot
•
Plug the power back into the G-Series Gateway
VoIPon www.voipon.co.uk [email protected] Tel: +44 (0)1245 808195 Fax: +44 (0)1245 808299
•
Log into the Web Interface and navigate back to the System ->
Maintenance -> Storage tab.
•
Click Format Compact Flash
•
Warnings may be presented to the effect that any existing data on the
device will be erased when formatting
•
In the event that error messages are presented during formatting, see:
Diagnostics -> Logs -> GUI for details
•
If the CF storage is to be put into service after testing, the system
must be restarted.
To restart the system
•
See:System -> Restart Link
•
Test the CF storage after formatting by clicking Test Compact
Flash. A message will appear on the Web Interface to indicate the
success or failure of the test.
Once the installed CF memory has been successfully formatted and installed, a message similar to the
following will be shown in the Status Screen:
Format USB Storage Button, Test USB Storage Button
These controls are useful when first installing a USB drive, or when the Status screen shows that the
USB drive is installed but not recognized.
NOTE: It is recommended that a USB drive greater than 100 GB be formatted on
computer systems rather than on the Gateway unit due to time constraints.
It is recommended to format large storage devices (e.g. 100 GB+ disk drives) using
utilities available on the Internet such as GParted Live available for download at:
http://gparted.sourceforge.net/download.php
NOTE: Unlike CF storage, a system restart is not necessary when USB storage is added
or removed.
NOTE: If the USB storage device is formatted on the system, once the formatting is
complete, a notification will ask for the device to be removed and reinserted in order for
it to be recognized by the system.
VoIPon www.voipon.co.uk [email protected] Tel: +44 (0)1245 808195 Fax: +44 (0)1245 808299
To Format USB Storage:
•
Remove any existing USB devices such as a 3G data adapter from
the G-Series Gateway unit.
•
Insert the USB storage into an available USB port on the G-Series
Gateway unit.
•
Click Format USB Storage
•
Warnings may be presented to the effect that any existing data on the
device will be erased when formatting
•
In the event that error messages are presented during formatting, see:
Diagnostics -> Logs -> GUI for details
•
When formatting is complete, remove and re-insert the USB storage
in order to have the system recognize it.
•
Test the USB storage after formatting by clicking Test USB Storage.
A message will appear on the Web Interface to indicate the success
or failure of the test.
•
If any other USB devices such as a 3G data adapter had been
removed, they should be replaced
•
Once the USB storage has been successfully formatted, the Status
screen will present storage information:
VoIPon www.voipon.co.uk [email protected] Tel: +44 (0)1245 808195 Fax: +44 (0)1245 808299