1
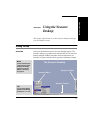
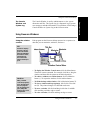
NeoStation User Manual Intranets Version # Windows-based Terminal Quick Reference Guide To... Press.... Display the Neoware desktop CTRL + ALT + END Display the next/previous connection CTRL + ALT + ↑ or ↓ Display the most recent connection CTRL + ALT + HOME Raise or lower the audio volume1 CTRL + ALT + PLUS or MINUS2 1On audio-equipped NeoStations only. 2Use the Plus or Minus keys near the numeric keypad. i © 1999 by Neoware Systems, Inc. 400 Feheley Drive King of Prussia, PA 19406 610.277.8300 E-mail:[email protected] Web: http://www.neoware.com Copyright 1999 by Neoware Systems, Inc. This manual is copyrighted by Neoware Systems, Inc. All rights are reserved. This document may not, in whole or in part, be copied, photocopied, reproduced, translated, or reduced to any electronic medium or machine-readable form without prior consent, in writing, from Neoware Systems, Inc. Neoware, @work, and @workStation are trademarks of Neoware Systems, Inc. Java is a registered trademark of Sun Microsystems, Inc. Windows is a registered trademark of Microsoft Corporation. MetaFrame, WinFrame, and ICA are registered trademarks of Citrix Systems, Inc. Other trademarks used in this manual are the property of their respective owners. Disclaimer: The information provided in this manual is intended for instructional purposes only and is subject to change without notice. Neoware Systems, Inc., accepts no responsibility or liability for errors, omissions, or misleading information that may be contained in this manual. Production note: This manual was entirely designed, written, edited, and illustrated on Neoware thin client computers using netOS software. Printed in the U.S. MN-USER-INET3 ii 8.25.99 Radio Frequency Interference Statement U.S. FEDERAL COMMUNICATIONS COMMISSION The United States Federal Communications Commission (in Subpart J, of Part 15, Docket 20780) has specified that the following notice be brought to the attention of the users of this product. WARNING This equipment generates, uses, and can radiate radio frequency energy and if not installed and used in accordance with the instructions manual, may cause interference to radio communications. It has been tested and found to comply with the limits for a Class A computing device pursuant to Subpart J of Part 15 of FCC rules, which are designed to provide reasonable protection against such interference when operated in a commercial environment. Operation of this equipment in a residential area is likely to cause interference in which case the user at his own expense will be required to take whatever measures may be required to correct the interference. Shielded cables must be used to insure compliance with the Class A limits. Neoware Hardware Warranty Neoware Systems, Inc. (Neoware) warrants each Neoware hardware product to be free of material hardware defects for 12 months from the date of shipment to the original customer, and will, at its option, repair or replace any such defect according to the terms of this limited warranty, and Neoware’s liability under this warranty shall be limited to such repair or replacement. Monitors sold by Neoware are warranted directly by and through the monitor manufacturers, not by Neoware. Under this warranty, Neoware will repair or, at its option, replace any defective hardware or hardware components. Normally, Neoware will not ship replacement equipment until the defective hardware or hardware component is received (freight prepaid by customer) at the Neoware factory or service depot. Neoware, at its option, may ship replacement equipment prior to receipt of the defective equipment. The model and serial number of the equipment must be furnished by the customer at the time of request for warranty service. A Return Authorization Number must be obtained from the Neoware Service Department prior to returning the hardware to the factory. This warranty shall be invalid if, in Neoware’s sole judgment, the hardware or hardware component has been subjected to misuse, abuse, neglect, accident, acts of God, external electrical fault, power surges or failure, damage occurred in shipment, or from improper service or modification by anyone other than an Neoware authorized service center. This warranty shall also be invalid if the serial number has been removed, defaced or altered in any way. This limited warranty does not cover other manufacturers computer hardware, components, accessories or expansion items unless authorized by Neoware. The sole and exclusive remedy, under this limited warranty, shall be the repair or replacement of defective parts as provided above. Under no circumstances shall Neoware be liable, under any legal theory, tort, contract or otherwise, in any way for damages, including but not limited to, any loss or inaccuracy of data, business or profits, or any other direct or indirect special, incidental, or consequential damages arising from the use of this Radio Frequency Interference Statement iii product. In no event will Neoware be liable for any damages in excess of the amount Neoware received from you for the purchase of the hardware product, even if Neoware shall have been informed of the possibility of such damages, or for any claim by any other party. Some states do not allow the exclusion or limitation of incidental or consequential damages so in this case the above exclusion may not apply to you. There are no express warranties other than those on the face hereof and described above. Except for the foregoing warranties, Neoware does not warrant the merchantability or fitness for a particular purpose of the products or performance or non-infringement thereof, and does not make any warranty, express or implied, with respect to the products or anything else. Neoware has not authorized anyone to make any representation or warranty other than as provided above. Some states do not allow limitations on how long an implied warranty lasts so in this case the above limitation may not apply to you. This limited warranty applies to this Neoware hardware. However, the procedure for obtaining service may vary outside the Continental United States. Contact Neoware for such warranty service information. This warranty gives you specific legal rights and you may have other rights that vary from state to state. iv Neoware Hardware Warranty Contents Contents Using the On/Off Switch 8 Using the Front Panel 9 Setting the Monitor Timing 10 Do you need to set the timing? Selecting a setting 10 Setting the timing 11 Radio Frequency Interference Statement Neoware Hardware Warranty Introduction iii iii Overview 1 Purpose and intended readers Topics covered 1 2 CHAPTER 3 Getting More Information 3 Printed documentation 3 The Internet 3 Technical support 4 Connecting the Network Cable 8 20 Using Accessories and Other Features 21 Using the Accessories menu 21 Adjusting the audio 22 Redrawing the desktop 22 The Console Window and System Log 23 5 Connecting the Components 6 Back panel connectors 6 Connecting the cables and monitor Connecting peripheral devices 7 Using the Neoware Desktop 19 Getting Started 19 Overview 19 Using the toolbar 20 Using the Desktop Divider Using the taskbar 20 Setting up Your NeoStation 5 Unpacking Your NeoStation Packaging contents 5 Configuring Your NeoStation 13 Selecting the Settings 13 Do you need to configure? 13 Quick configuration procedure 13 Selecting keyboard and mouse settings 18 1 What is a Windows-based Terminal? A new way to use Windows 2 NeoStations 2 Intranets version 2 CHAPTER 1 Arranging Your Work Area 12 Getting comfortable 12 CHAPTER 2 1 10 7 Using Neoware Windows 23 Using the window controls 23 Using the Window Ops menu 24 Ending Your Session 24 v Contents CHAPTER 4 Using Windows Connections 25 CHAPTER 7 Changing Advanced Settings 41 Starting a Windows Connection 25 The WINConnect dialog box 25 Viewing and Changing Settings 41 Using the Advanced tab 41 Switching and Closing Connections 27 Using Windows programs 27 Switching connections 27 Closing connections 28 Changing User Preferences 43 Using the Setup menus 43 Screen settings 44 Audio output settings 45 Keyclick and bell settings 46 Screen saver settings 46 CHAPTER 5 Using Other Connections 29 Connecting to UNIX-based Servers 29 Starting a Telnet connection 29 Appendix A: Optional Terminal Emulations 47 Using Netscape Navigator 30 Selecting access settings 30 Printing Web pages 32 teemTC Emulation Suite 47 Supported emulations 47 Starting a terminal emulation Printing text screens 50 Making a Dial-up Connection 33 To remote networks 33 Using the modem dialer 33 Selecting a DNS resolver 34 Appendix B: Token Ring Settings 51 Configuring Your NeoStation 51 Using the Token Ring tab 51 Using Terminal Emulations 35 TN3270 connection 35 VT320 emulation 36 teemTC emulation suite 36 CHAPTER 6 Printing Printing from Local Programs 37 Adding printers 37 Changing printers 39 Overriding local printers 40 vi Index 53 37 Printing from Server-based Programs 48 37 NeoStation User Manual Introduction This chapter describes the purpose and main topics of this manual, as well as basic features of NeoStation Windows-based terminals. Overview Purpose and intended readers This manual explains how to use NeoStations that are running the Intranets version of Neoware Windows-based Terminal Software, with netOS technologies. It’s intended primarily for end users, although administrators, evaluators, and others will find it helpful, too. Topics covered We recommend that you read the chapters in this manual in order. The main topics covered are: • Unpacking and setting up your NeoStation. • Configuring your NeoStation for your network. • Starting connections to servers, mainframes, and intranets. • Changing settings on your NeoStation. The appendixes cover additional topics that you may need to know, such as making dial-up and Token Ring connections. 1 Introduction What is a Windows-based Terminal? A new way to use Windows Windows-based terminals are computers that provide access to programs running on network servers. Once a connection is made to a server, you can use your favorite Windows programs such as Microsoft Office or Adobe Photoshop in the familiar, full-screen Windows desktop. As you work, your terminal sends keystrokes and mouse clicks to the server, which responds with screen updates for your monitor. Most of the processing occurs on the server. Due to the speed of modern computer networks, this exchange happens as fast, if not faster, than processing on a personal computer. Windows-based terminals aren’t difficult to use. If you know how to use a personal computer, or even if you don’t, you can use a Windows-based terminal. NeoStations NeoStations are sleek Windows-based terminals from Neoware that use standard VGA-type monitors, PS/2 mouses, and pointing devices. On its back panel, your NeoStation may have a parallel port and one or more serial ports for peripheral devices such as printers, modems, and bar code scanners. Audio-equipped NeoStations can use the microphone and stereo headphone jacks on their front panels. Your NeoStation can connect to 10BaseT or 100BaseT Ethernet networks, as well as make serial port connections with or without a modem. With a PC Card Token Ring adapter, it can even be used on Token Ring networks. Intranets version Your NeoStation uses the Intranets version of Neoware Windowsbased terminal software for its operation. This software can be installed on a server or in the local memory (for example, flash memory or hard drive) of your NeoStation. The Intranets version provides powerful and flexible computing capabilities for networks that have many types of servers as well as 2 What is a Windows-based Terminal? Introduction web pages. Using the Intranets version, your NeoStation can start simultaneous, multiple connections to Windows NT-based servers, UNIX-based servers, mainframes, minicomputers, intranets, and the Internet. FYI To make Windows connections using ICA, the server must be running Citrix MetaFrame‚, WinFrame‚, or Citrix Device Services (CDS). Connections to Windows NT-based servers are made via Citrix’s Independent Computing Architecture (ICA) or NTRIGUE network protocols. Access to UNIX-based servers can be made by Telnet and rlogin connections. In addition, a TN3270 emulator and a VT320 emulation are included, and the optional teemTC suite provides more than 30 other terminal emulations. The Intranets version supports the DHCP, BOOTP, and RARP remote configuration services, and the CIFS, NFS, FTP, and TFTP file transfer protocols. It also includes a local Netscape Navigator browser. Getting More Information Printed documentation Neoware provides other printed documentation for your instruction: • The Neoware Software Installation Guide explains how to install Neoware software on servers and NeoStations. • The Neoware System Administrator’s Guide provides comprehensive technical information about setting up and operating NeoStations and Neoware software on a network. • Hardware upgrade guides, available by request, explain how to upgrade Neoware terminals with more memory and other options. The Internet You can find current and archival information about Neoware products, including the latest software updates, at: http://www.neoware.com In addition, this user manual and other Neoware documentation are available on the Neoware Web site as for reading or downloading. Getting More Information 3 Introduction Technical support 4 For technical support, call Neoware at 610.277.8300, or send an email message to [email protected]. Getting More Information NeoStation User Manual CHAPTER 1 Setting up Your NeoStation This chapter describes how to unpack and set up your NeoStation. Unpacking Your NeoStation Your NeoStation typically is shipped in two cartons, containing these items: NeoStation • A power supply for your NeoStation. • A keyboard with cable attached. • A mouse with cable attached. • A monitor video cable (attached to some monitors). • End-user documentation. Monitor • A monitor power cable (attached to some monitors). • A tilt/swivel base, attached or unattached. To unpack your NeoStation, open the cartons carefully, remove the components, and save the packing materials in case you need to repack your NeoStation. 5 Setup Packaging contents Setting up Your NeoStation Connecting the Components Back panel connectors This diagram shows the back panel connectors of NeoStation 2000 series models. The position and number of connectors on other NeoStation models are slightly different. • PWR is a 2.5 mm, 5-volt DC, 2 amp, cen- ter-positive power jack. • MONITOR is a monitor port for a stanPC CARD dard DB-15, high-density, VGA-type connector. • PRINTER is a standard DB-25 parallel port for printers, floppy disk drives, and other parallel port devices. SERIAL 2 • MOUSE is a PS/2-type mouse port. • ETHERNET is RJ-45 jack for a 10BaseT, SERIAL 1 • KEYBD is a PS/2-type keyboard port. MOUSE ETHERNET twisted-pair Ethernet connector. • SERIAL 1 is a DB-9, RS-232 port for ! devices such as modems, personal digital assistants (PDAs), and bar code readers. • SERIAL 2 is another DB-9, RS-232 port • PC CARD is a PCMCIA slot for PC Card hard drives and Fast Ethernet and Token Ring adapters. You can use Type 1, 2, or 3 PC Cards. Warning Insert only 5-volt PC Cards from Neoware in the PC CARD slot. 3.3volt PC Cards and PC Cards from other sources can be damaged if inserted. MONITOR KEYBD for peripheral devices. PWR To use serial port devices connected to your NeoStation, the Windows NT communication (COM) ports must be correctly mapped. Ask your system administrator. PRINTER FYI NeoStation 2000 back panel 6 Connecting the Components Setting up Your NeoStation Connecting the cables and monitor 1 Connect the keyboard cable to the KEYBD port. 2 Connect the mouse cable to the MOUSE port. 3 Connect the monitor video cable to the MONITOR port. Tip The arrows on the keyboard and mouse cable connectors should point left, toward the curved side of your NeoStation. Don’t overtighten the connector screws. The video cable to the monitor varies. Some monitors have attached video cables. 4 Connect the monitor power cable to a power source. If you’re using a monitor not supplied by Neoware, you may need to set its timing. To learn how, see page 10. 5 Connect the power adapter cable to the PWR socket. ! Warning To avoid damaging your NeoStation, use only the 5volt, 2.4-amp power adapter provided by Neoware. 6 Connect the power cord of the adapter into a 5 VDC SELV ! power source. Warning Use only 5 VDC SELV power sources. NeoStations can operate in 100-240 Volt/50- 60 Hz power installations. 7 Arrange your NeoStation and monitor in your work area. Be careful not to block the ventilation areas on your NeoStation or on monitor. Connecting peripheral devices You can connect a modem, printer, floppy disk drive, bar code scanner, or other external devices to your NeoStation, if it has the necessary back panel connectors. 1 If your NeoStation is turned on, log off all its open connec- tions, and then turn off the NeoStation. To use a serial port device with Windows connections, your NeoStation serial (COM) ports must be mapped on the Windows NT-based server. Ask your system administrator. 2 If you have a local printer or an external floppy disk drive, connect its cable to the parallel PRINTER port. You can’t connect a printer and a floppy drive at the same time, even if they’re connected to one another. Setup FYI 3 If you have an external modem, bar code scanner, or other serial device, connect its cable to a serial port. To learn how to make a dial-up connection, see page 33. Connecting the Components 7 Setting up Your NeoStation Connecting the Network Cable Now you’re ready to connect a network cable to your NeoStation. • To connect to a 10BaseT Ethernet network, insert a twisted- FYI Your NeoStation can use only one Ethernet connection at a time, but it can be connected to both an Ethernet and a Token Ring network. pair Ethernet cable into the ETHERNET jack on the back panel of your NeoStation. • To connect to a 100BaseT Ethernet network, first install a Fast Ethernet PC Card adapter from Neoware in a PC Card slot in your NeoStation. Then select the correct duplex mode in the Connection box of the Neoware Control Panel Network tab. To learn how, see page 14. • To connect to a Token Ring network, first install a Token Ring PC Card adapter in a PC Card slot. Then enter the correct settings in the Neoware Control Panel Token Ring tab. To learn how, see page 51. Using the On/Off Switch • To turn on your NeoStation, push in the round, purple on/off switch on its front panel. • To turn off your NeoStation, push the on/off switch again so that it returns to its extended position. 8 Connecting the Network Cable Setting up Your NeoStation Using the Front Panel Here are the indicators, connectors, and switches on the NeoStation front panel. Not all may be functional on your NeoStation model. • The optional internal microphone is installed in audio-equipped NeoStations. When an external microphone or line input is connected to the microphone/line in jack, the internal microphone is disabled. • The network activity indicator internal microphone (optional) network activity indicator power indicator lights when your NeoStation is sending data through a network. • The power indicator lights when your NeoStation is connected to a power source and is turned on. • The on/off switch turns your Neo- Station on or off. Push it in for on, out for off. • The optional microphone/line in jack on audio-equipped NeoStations is for standard PC-type microphones and other audio sources. on/off switch • The optional headphone/line out jack on audio-equipped NeoStations is a standard stereo mini-jack for headphones or powered speakers. When a plug is connected to this jack, the internal speaker is disabled. headphone/line out (optional) NeoStation front panel Using the Front Panel 9 Setup microphone/line in (optional) Setting up Your NeoStation Setting the Monitor Timing Do you need to set the timing? The monitor timing sets the screen resolution and horizontal and vertical frequencies of your monitor. When you purchase a monitor from Neoware, its timing is preset before shipment. However, if you’re not using a monitor from Neoware, its screen may appear at an incorrect resolution, out of sync, or blank when you first try to use it with your NeoStation. In that case, you need to set the monitor timing. This section describes how to set the monitor timing for most monitors. If you have questions, ask your system administrator. Selecting a setting Before you set the monitor timing on your NeoStation, select a setting. 1 Determine the desired screen resolution (for example, 1024 x 768) for your monitor. 2 Using Table 1, find the pair of horizontal and vertical fre- quencies that most closely match your monitor specifications. If needed, refer to your monitor documentation. 3 Note the appropriate monitor setting in the left column. TABLE 1. Monitor Timing Settings Monitor Setting 20 640x480 800x600 1024x768 1152x864* 1280x1024* H=31.5KHz V=60Hz 21 H=37.9KHz V=60Hz 22 H=46.8KHz V=75Hz H=48.4KHz V=60Hz 23 H=53.7KHz V=85Hz H=60KHz V=75Hz 24 H=53.7KHz V=85Hz H=68.7KHz V=85Hz H=67.5KHz V=75Hz H=64KHz V=60Hz 25 H=53.7KHz V=85Hz H=68.7KHz V=85Hz H=67.5KHz V=75Hz H=80KHz V=75Hz H=64KHz V=60Hz Bold indicates default frequencies. *NeoStation 2000 series with 2 MB of video RAM only. 10 Setting the Monitor Timing Setting up Your NeoStation ! Setting the timing Warning Connecting your monitor to a signal source that exceeds its maximum specified horizontal and vertical synchronization frequencies can damage the monitor. Before changing its timing, carefully check your monitor’s specifications. Once you’ve selected a monitor setting (for example, 22), you’re ready to set the timing on your NeoStation. Because the monitor timing is incorrect during this procedure, nothing may appear on screen. 1 Reboot your NeoStation by turning it off and then on. 2 When the keyboard lights flash, press the Pause key to inter- rupt the boot process. Your NeoStation indicates the pause by a short beep. A quick way to set the monitor timing is to first try the 22 setting. If 22 doesn’t work with your monitor, try settings of 21 and then 20 in turn. 3 Type 22, and then press the Enter key. A short beep acknowledges your entry. 4 Type 22 again, and then press the Enter key. Two short beeps indicate matching entries. One long beep indicates mismatched entries and that you must start again at Step 1. 5 Press the Pause key to resume booting. Two beeps indicate the new setting is saved in nonvolatile memory of your NeoStation. No beeps indicate the setting wasn’t saved. After the two beeps, your NeoStation reboots. Once you’ve set the monitor timing, you can change it, without using the above procedure, by using the Neoware Control Panel Advanced tab. To learn how, see page 41. Setup Tip Setting the Monitor Timing 11 Setting up Your NeoStation Arranging Your Work Area Getting comfortable These tips will help reduce eye strain and body fatigue when using your NeoStation: • Adjust your chair seat level so that your feet are flat on the floor, • • • • 12 your legs form a right angle with the floor, your knees are free of the chair seat, and your lower back is fully supported. Adjust the chair height the keyboard and mouse are at elbow height so your wrists are straight and supported. Maintain a neutral neck posture with the top of the monitor no higher than your eye level. Adjust the monitor and lighting to reduce glare on the screen and to place the monitor at a correct distance for your vision. Take periodic breaks to stretch your arms and wrists and rest your eyes. Arranging Your Work Area NeoStation User Manual CHAPTER 2 Configuring Your NeoStation This chapter describes how to initially configure your NeoStation for your network. Do you need to configure? FYI DHCP and BOOTP automatically supply the IP address and other setting for your NeoStation when it starts up. Quick configuration procedure To use your NeoStation on a network, it must be assigned a unique Internet Protocol (IP) address for identification. Your network may also require a few other settings. If your network uses a remote configuration service such as the Dynamic Host Configuration Protocol (DHCP) or the Bootstrap Protocol (BOOTP), and your NeoStation loads its system software from its own local memory, your NeoStation may not need to be configured. In that case, all you do is turn on your NeoStation. Ask your system administrator if your network uses DHCP or BOOTP. 1 Open the Neoware Control Panel: • Click Cancel in the Loading Software screen as your Neo- Station boots. • Or click Settings in a WINConnect dialog box. • Or press CTRL + ALT + END, and then click Neoware | Settings | Control Panel. 13 Configuration Selecting the Settings Configuring Your NeoStation 2 In the Network tab, select the Ethernet settings: If your network uses DHCP or BOOTP, select DHCP/BOOTP. If it doesn’t, select Internal. • Client IP Address: If your network uses DHCP or BOOTP, leave Tip You can move to the next box on a tab by pressing the Tab key. To move to the previous box, press SHIFT + TAB. • • • • this box blank. If it doesn’t, type the IP address for your NeoStation in dotted-decimal format (for example, 10.10.10.10). Netmask: If needed, type a dotted-decimal netmask number. The netmask distinguishes your local network from a larger network. Get IP From: If your network uses DHCP or BOOTP, select DHCP/BOOTP. If it doesn’t, select Internal, which tells the network to use the IP address in the Client IP Address box. Network Type: Select Auto Sense, which automatically selects the correct type for your network. Connection: For a 10BaseT Ethernet connection, select Thin/ 10BaseT. For 100BaseT Ethernet, select Thin/10BaseT for half duplex mode, or Thick(MAU) for full duplex. 3 If needed, select general network settings: • Default Gateway: If your NeoStation and the logon server are on different networks, type the IP address of the router or gateway computer that connects them. 14 Selecting the Settings Configuring Your NeoStation FYI The Domain Name Service (DNS) is a serverbased program that translates server names into IP addresses. • DNS Resolver: If needed, type the IP address of a DNS server on your network. • Net Timeout: Normally select the default, 15 seconds. If your network is frequently busy, select a higher setting. • Broadcast IP: Specify how broadcast requests are sent from your NeoStation to the network. Typically the setting is 255.255.255.255 or 0.0.0.0. Ask your system administrator. 4 If your network uses DNS but isn’t supplying the domain Configuration name, click the Advanced tab, type setup.domain_server.suffix in the Setting Name box, type your domain name in the Setting Value box, and then click Modify. Type this setting name. Type your domain name here. Ask your system administrator for it. Then click Modify. 5 If your NeoStation loads its netOS from a server, click the FYI Tip The netOS server is the You canonreset your server which theNeoStation to its default setnetOS system software tings, which are DHCP/ is installed. BOOTP ready, by clickThe netOS directory is ing Factory Reset in the the directory containing Advanced tab. the netOS software. Remote Boot tab, and then type the netOS Server and Directory settings: • Server IP Address: If your network uses DNS, type the DNS name of the netOS server. If it doesn’t, type the IP address of the netOS server. If your NeoStation loads system software from its local memory, keep the default, 0.0.0.0. Selecting the Settings 15 Configuring Your NeoStation Type the IP address or DNS name of the netOS server. Type path to the netOS directory • netOS Directory: If you typed a DNS name in the Server IP Caution Be sure to type the slashes in the netOS Directory box in the right direction for your access method, and don’t type a slash after the path. The path shouldn’t include the netOS subdirectory. 16 Address box, type the netOS directory share name (for example, netOS_I). If you typed an IP address in the Server IP Address box, type the path up to and including the netOS directory. The syntax of the netOS directory path depends on the access method: Windows: \\<NetBIOS server name>\<netOS directory share name> NFS: /<drive letter>/<netOS directory path> FTP: <drive letter>:/<netOS directory path> TFTP: /<netOS directory path> • Access Method: Select Windows (that is, CIFS or SMB) for access to Windows NT-based servers. For UNIX-based servers, normally select NFS. If your NeoStation loads system software from its local memory, select TFTP. Selecting the Settings Configuring Your NeoStation Windows and FTP usually require a user name and password to connect to the server. Click Permissions, type them, and then click OK. • Server Type: Unless the netOS server is a VMS computer, select NT/UNIX. 6 If needed, change the netOS Config and Boot Config files. 7 Click Save. Your settings are saved in your NeoStation’s memory. 8 Click Yes and then Reboot Now. As of Release 4.0.2, if a client IP address wasn’t correctly configured, a pop-up dialog box appears during the boot sequence. Click Configure, check and correct your client IP address settings in the Neoware Control Panel, and then reboot your NeoStation. Selecting the Settings 17 Configuration ! Warning Don’t change these settings unless instructed to do so by your system administrator. Most networks use the default, /%netOSdir%/netOS/config/default.cfg. Configuring Your NeoStation Selecting keyboard and mouse settings If your network uses international keyboards, you can select a keyboard language in the Kbd/Mouse tab. You can also select a mouse port type. 1 In the Neoware Control Panel, click the Kbd/Mouse tab. Select the keyboard type here. 2 In the netOS Keyboard box, select a keyboard language. This setting selects the keyboard language that is in effect after your NeoStation boots. 3 If needed, select a boot keyboard language. This setting applies only when your NeoStation is booting. For most networks, the netOS and boot keyboard languages should be the same. 4 If needed, select a mouse port type. If your mouse or pointer device is connected to the MOUSE port on the back of your NeoStation, select PS/2. If it’s connected to a serial port, select serial 1 or serial 2. 5 Click Save, Yes, and then Reboot Now. 18 Selecting the Settings CHAPTER 3 Neoware Desktop NeoStation User Manual Using the Neoware Desktop This chapter explains how to use the Neoware desktop to manage your NeoStation sessions. Getting Started Overview After your NeoStation starts, the Neoware desktop appears. The Neoware desktop is a graphical user interface that lets you start and manage multiple Windows and other network connections, use Netscape Navigator and other local programs, and change settings. Note The Neoware Desktop You may need to log into a network server before the Neoware desktop appears on your NeoStation. To learn how, see page 25. Neoware Toolbar Neoware Menu Neoware Taskbar Tip You can always display the Neoware desktop by pressing CTRL + ALT + END. 19 Using the Neoware Desktop Using the toolbar The Neoware toolbar is a floating palette from which you can start Windows and other connections and manage your Neoware desktops. By default, the Neoware toolbar is located at the bottom right of the Neoware desktop, but it can be moved, resized, and hidden. • To select a toolbar item, click its button. To learn how to start connections from the toolbar, read the other chapters of this manual. • To move the toolbar, middle-click and drag its edge. • To resize the toolbar, left-click and drag an edge to enlarge the toolbar. To reduce the toolbar, drag an edge to enlarge it, and then drag the edge inward to reduce it. • To hide or display the toolbar, click Settings | Hide Toolbar or Show Toolbar on the Neoware menu. Using the Desktop Divider The Desktop Divider at the bottom of the Neoware toolbar is a miniature representation of four desktops in which you can open and move Neoware windows. In effect, the Desktop Divider quadruples the work space available on the Neoware desktop. • To display a Neoware desktop, left-click one of the quadrants in the Desktop Manager. • To move windows between Neoware desktops, middle-click and drag a window icon in the Desktop Divider from one quadrant to another. For example, in the accompanying illustration a window icon is being dragged from the upper left quadrant. Using the taskbar The Neoware taskbar is a movable control bar. Every open Windows connection and Neoware window has a taskbar button. • To open the Neoware menu, click the Neoware button on the taskbar. Then click a menu item to select it. To open the Neoware menu, click the Neoware button. 20 Getting Started To select a window, click its taskbar button. Note Your system administrator can hide the Neoware taskbar so that it appears as a thin line. When you point to this line, the taskbar appears. When you point away from taskbar, the taskbar hides again. • To select a window or connection, even when it isn’t on the cur- rent Neoware desktop, left-click its taskbar button. To learn how to use Neoware windows, see page 23. • To move the taskbar, middle-click and drag the edge of the taskbar beyond the middle of the desktop. Then release the mouse button, and the taskbar moves to the top or bottom. • To resize the taskbar, left-click and drag an edge of the taskbar. As you open more windows, you may want to enlarge the taskbar to make its buttons more readable. • To display the window properties, right-click its taskbar button. To close a Properties box, click it. Using Accessories and Other Features Using the Accessories menu Caution A low memory warning appears when nearly all the RAM in your NeoStation is in use. To correct this problem, close some windows and local programs, or reboot. The Accessories menu includes calculators, clocks, and other useful programs. To open the Accessories menu, click Programs | Accessories on the Neoware menu. • Calculator and Calculator - HP style are two calculators. • Clock Analog and Clock Digital are two clocks. • Editor opens the netOS Editor, used by administrators to view and edit system files. • Memory Usage gauges how much random access memory (RAM) is in your NeoStation and how much is available (that is, isn’t being used). • MPEG2 Player plays MPEG-2 video files. It starts automatically whenever Netscape Navigator finds an MPEG2 file in a web page. Using Accessories and Other Features 21 Neoware Desktop Using the Neoware Desktop Using the Neoware Desktop Adjusting the audio If you have an audio-equipped NeoStation, you can adjust the play and record volume and balance, and select audio input and output devices. 1 On the Neoware menu, click Settings | Audio Control. 2 Drag the Play Volume, Tip You can also adjust the audio play volume by pressing CTRL + ALT + PLUS key to increase it by ten percent or CTRL + ALT + MINUS key to decrease it. Use the Plus and Minus keys near the numeric keypad, not the letters. Play Balance, Record Volume, or Record Balance slide bars to adjust the volume or stereo balance. Monitor Volume controls the amount of audio input sent to the audio out device. Its normal value is zero (0). 3 Click the Audio Out Device or Audio In Device drop-down menu, and then click a device. 4 Click the Audio Con- trol’s Close (X) button. The Audio Control also displays the sample rate and other statistics. Redrawing the desktop • To redraw the Neoware desktop, click Settings | Refresh Screen on the Neoware menu. • To restart the desktop if it isn’t functioning properly, click Settings | Restart Window Manager on the Neoware menu. You can also redraw or restart the Neoware desktop by right-clicking the Neoware desktop, and then clicking a Shortcuts menu command. 22 Using Accessories and Other Features The Console Window and System Log The Console Window is used by administrators to view system directories and files. The System Log is a diagnostic log of system error messages and other information. To open them, click Settings | Console Window or System Log on the Neoware menu. Using Neoware Windows Using the window controls Each program on the Neoware desktop operates in a separate window that you can maximize, minimize, and move. FYI The title bar displays the name of the program in the window. When it’s highlighted, the window is active, meaning the keyboard and mouse interact with that program. • To display the Window Control menu, click the Menu button. • Caution Killing a window causes the program(s) in it to abruptly terminate. For programs such as Netscape Navigator, killing their window(s) may cause corrupted files. • • • • Then click a menu command. For example, click Move, drag the window, and then click the pointer at the desired position. To reduce a window to a taskbar button, click its Minimize button (-). To reopen the window, click its taskbar button. To fill the desktop with a window, click its Maximize button (❒). To close a window and its program(s), left-click its Close button (X). The pointer changes to a skull and crossbones. To move a window, left-click and drag its title bar. Or middleclick and drag a window edge or corner. To resize a window, left-click and drag an edge or corner. Using Neoware Windows 23 Neoware Desktop Using the Neoware Desktop Using the Neoware Desktop Using the Window Ops menu The Windows Ops menu is another way to control Neoware windows. To open the Windows Ops menu, middle-click the background of the Neoware desktop. • Move lets you left-click and drag a window. • Resize lets you left-click and drag a window edge. • Raise and Lower lets you left-click in a window to move it in front of or behind other open windows. • (Un)Stick enables you to left-click a window to make it stick (that is, appear) or unstick on all four Neoware desktops. The title bars of “sticky” inactive windows are green. • Switch to lists the all the open Neoware windows. You may want to use this command when the Neoware taskbar is hidden. • Properties lets you left-click a window to display its properties. To close the Properties box, click it. Ending Your Session • To end your NeoStation session, click End Session | Close All Connections on the Neoware menu. Once you’ve closed the connections, you don’t need to turn your NeoStation off, but you can if you want to. If your monitor is in sleep mode, you may need to move the mouse or press a key to reactivate its screen. • To reboot your NeoStation, click End Session | Reboot Station. 24 Ending Your Session NeoStation User Manual CHAPTER 4 Using Windows Connections This chapters explains how to start, switch, and close Windows connections on your NeoStation. Starting a Windows Connection The WINConnect dialog box You can start multiple, simultaneous connections to Windows NTbased servers in order to use Windows programs. You can also save your connection options so that you don’t need to type your user name and password each time you connect, or so that connections start automatically when your NeoStation does. 1 If the Neoware desktop isn’t on screen, press CTRL + ALT + END. 2 Click the Windows button on the Neoware toolbar. Or click Windows Connection or Programs | Connections | Windows Connection on the Neoware menu. Windows Connections To display the previous connections, click the down arrow. To find a server, click Browse. 3 Select a server: 25 Using Windows Connections • If you know the server DNS name or IP address, type it in the FYI The drop-down server list can hold up to seven server names or IP addresses. If you make more than seven connections, it saves the most recent ones. Server box. • If you want to use a previous connection, click the down arrow button, and then click a server. • If you want to find a server, click Browse, click a server or published application in the WINConnect Server menu, and then click Accept. To select a server, click it and then click Accept. 4 If you want to save FYI A domain is a group of servers with shared access privileges. When you connect to a server in a domain, you have access to the other servers in that domain. If your network has only one server, a domain name usually isn’t required. 26 options for this connection, click Options. Saving options isn’t typically required. If you don’t want to save options, go to Step 7. 5 Enter your options: • Type your user name, password, and a domain name if needed. Starting a Windows Connection Using Windows Connections FYI You can select more than one automatically starting Windows connection. Your network may require you to logon before automatic connections start. • Select ICA as the protocol for most servers and 256 as the cor- rect maximum color depth for most connections. • Select an audio quality setting other than Off only if your NeoStation is audio-equipped. • Select Yes for Auto Start if you want this connection to automatically start when your NeoStation boots. 6 Click Save. 7 In the WINConnect dialog box, click Connect. If you saved a user name, password, and other options for this connection, a full-screen Windows desktop appears. If you didn’t save options, a server logon dialog box appears. Enter your user name, password, and other information if needed, and then click OK to connect. When you’re connected, you can display the Neoware desktop and start another Windows connection by pressing CTRL + ALT + END. Using Windows programs Once you’ve started a Windows connection, you can use and print from its programs just as you would on a networked personal computer. The Windows program files (for example, a Microsoft Word document) are normally saved and stored on servers. To learn how to use the Windows desktop and programs, read their documentation and help messages. Switching connections Once you’ve started more than one Windows connection, you can easily switch between them: • To display the next or previous Windows connection, press CTRL + ALT + ↑ or ↓. • To display the most recently viewed Windows connection from a Neoware desktop, press CTRL + ALT + HOME. Switching and Closing Connections 27 Windows Connections Switching and Closing Connections Using Windows Connections You can also display a Windows connection from a Neoware desktop by clicking its button on the Neoware taskbar. Or left-click the background of a Neoware desktop, and then click a connection on the Windows Sessions pop-up menu. Closing connections • To close a Windows connection, click Disconnect or Logoff from its Start menu. If you disconnect rather than log off, when that connection is restarted its desktop and programs appear as you left them. • To close all the connections, click End Session | Close All Connections on the Neoware menu. Then you can turn off your NeoStation, or leave it turned on. If your monitor is in sleep mode, you may need to move the mouse or press a key to reactivate the screen. • To reboot your NeoStation, click End Session | Reboot Station on the Neoware menu. 28 Switching and Closing Connections NeoStation User Manual CHAPTER 5 Using Other Connections This chapter explains how to start and use Telnet, Netscape, terminal emulation, and dial-up connections on your NeoStation. Starting a Telnet connection Telnet is a protocol you can use to access programs running on UNIX-based servers, mainframes, and other host computers. 1 To start a Telnet connection, do one of the following: • On the Neoware toolbar, click the Telnet button. • Or click Telnet Connection on the Neoware menu. • Or click Programs | Connections | Telnet Connection on the Neoware menu. 29 Other Connections Connecting to UNIX-based Servers Using Other Connections 2 Click a host on the Host List. Or type a host IP address or host name in the Selected Host box. 3 Click the Telnet or rlogin button. To start an X Window connection from the UNIX-based server, set your screen to the local display by pressing Alt+F12 when using C shell or Alt + F11 when using Bourne shell. To close a Telnet connection, click the Close (X) button on its window. Using Netscape Navigator Selecting access settings Netscape Navigator is the local Web browser that runs on your NeoStation. It can be used to access intranets or the Internet. Navigator can display HTML pages, including frames, tables and JavaScript elements, as well as GIF, JPEG, and XBM graphics. 1 On the Neoware menu, FYI To store your bookmarks, you must have a shared or exported home directory on a Windows NT- or UNIXbased server, or on your NeoStation hard drive. Ask your system administrator. click Programs | Internet | Netscape Access Settings. The Netscape Access dialog box also appears the first time that you start Navigator. 2 Click Local Storage or Tip Even if you select the Don’t ask me about this again checkbox, you can open the Netscape Access dialog box by clicking Programs | Internet | Netscape Access Settings on the Neoware menu. 30 Server on LAN (local area network) for storing your Navigator bookmarks. 3 Click LAN or Dial-up to access the Internet through your network or a dial-up connection. 4 To save your settings and suppress the Netscape Access dialog Using Netscape Navigator Using Other Connections box, click the Don’t ask me about this again box. 5 Click Continue. • If you selected Local Storage and LAN access, Navigator starts. • If you selected Local Storage and Dial-up access, and no dialup connection has been set up, the modem dialer appears. To learn how to use the modem dialer, see page 33. If a dial-up connection has been set up, the modem dialer dials the number, and then Navigator starts. • If you selected Server on LAN storage and LAN access, the NETLogin dialog box appears. To select a previous login server, click the down arrow button. Type your user name and password, and then select a server (that is, host). To find a server, click Browse, click a server on the NETLogin Host menu, and then click Accept. When you’re done, click OK in the NETLogin dialog box, and Netscape will start. • If you selected Server on LAN storage and Dial-up access, the NETLogin dialog box appears. To start Navigator, first log onto a server. Then, if no dial-up connection has been made, complete the modem dialer. Once you’ve started Navigator, you can use all its browsing features. To learn how to use Navigator, click Help on its menu. Using Netscape Navigator 31 Other Connections To find a server, click Browse. Using Other Connections Printing Netscape pages The local Netscape Navigator browser prints to PostScript printers only. Before printing Netscape pages, a printer for local programs must be added and selected. To learn how, see page 37. If you’re using a local printer (that is, one directly connected to your NeoStation) to print Netscape pages, make sure the printer is turned on and not currently printing other files. • To print Netscape pages, click File | Print from the Netscape menus, and then click Print. When you’re printing from the local browser, the default printer on your Printer List is used unless your override it. Tip • To override the default printer, type a printer name after the If a default local or network printer has been selected for your NeoStation, you can type default in place of its printer name. print command, using this syntax: print -P <printer name> For example, to print to MyPrinter rather than to the default printer, you would enter: print -P MyPrinter Type the overriding printer name in the Print Command box. 32 Using Netscape Navigator Using Other Connections Making a Dial-up Connection To remote networks If a modem is connected to a serial port on your NeoStation, you can PPP is a communication protocol that lets you make network connections over a telephone line. Using the modem dialer To use the modem dialer to connect to an ISP, no special configuration is needed on your NeoStation. However, to connect to other remote servers, you may need to enter a DNS resolver or to enable ICA browsing. 1 On the Neoware Other Connections FYI use the Neoware modem dialer to dial an Internet service provider (ISP) or a remote network that uses the Point-to-Point Protocol (PPP). Once the dial-up connection is made, you can start Windows and other connections to the remote servers. menu, click Programs | Connections | Modem Dialer or Programs | Internet | Modem Dialer. 2 In the Remote Net- work dialog box, type your user name and password for the ISP or remote server. 3 Type the phone num- ber of the ISP or remote server. Don’t type hyphens, spaces, or the command string (for example, ATDT). If needed, include the long distance digit and area code (for example, 1,610). Commas indicate short pauses. 4 To save the password for subsequent dial-up connections, click Save password. 5 Click Modem Setup. Making a Dial-up Connection 33 Using Other Connections 6 On the Modem Name drop-down list, click your modem type. Tip If you can’t find your modem on the Modem Name list, select a similar one. You can also type the initialization strings and other settings for your modem in the Extra Settings box. 7 Select the serial port (1 or 2) to which the modem is connected. 8 If needed, select a maximum speed for the connection. As of Release 4.0.2, the modem dialer supports speeds up to 56 Kb. However, your ISP or remote server must be set up for 56 Kb communication. 9 If needed, select or clear modem properties. 10 Click OK, and then click Connect. The settings are saved in the nonvolatile memory of your NeoStation. Once a dial-up connection is made, its duration appears in the Remote Network dialog box. For subsequent dial-up connections, simply click Connect in the Remote Network dialog box. Selecting a DNS resolver To use the modem dialer to start Windows connections on a remote server, you need to select a primary and/or secondary DNS resolver to be able to type remote server names in a WINConnect dialog box. 1 On the Neoware menu, click Settings | Control Panel. 2 In the Neoware Control Panel Network tab, type the IP address of the primary DNS resolver in the DNS Resolver box. 34 Making a Dial-up Connection Using Other Connections • If your NeoStation loads its system software from a server, type the DNS resolver of your local network. • If your NeoStation loads software from its own local memory, type the primary DNS resolver of the remote network. 3 Click Save, and then reboot your NeoStation. To select a secondary DNS resolver, use the Setup | Setup Options | Domain Name Servers menu. TN3270 connection The Neoware menu includes a TN3270 emulator that provides IBM 3278 terminal emulation. 1 On the Neoware menu, click Programs | Connections | TN3270 Connection. 2 Enter the requested information: FYI The TN3270 emulator doesn’t support international keyboards. The host computer is typically a server or mainframe. The model specifies the size of the 3278 emulation: • Model 2 is 80 x 24. • Model 3 is 80 x 30. • Model 4 is 80 by 43. • Model 5 is 132 x 27. Using Terminal Emulations 35 Other Connections Using Terminal Emulations Using Other Connections You can use the Port box to enter the TCP port and the Initialization String box to enter a string to send to TCP connection. The Keymap box can be used to specify a keyboard type. 3 Click OK to connect. VT320 emulation The Neoware menu also includes a term emulator that provides DEC VT320 emulation through a serial port connection. To learn more about term, read the Neoware System Administrator’s Guide. 1 On the Neoware menu, click Programs | Connections | Serial Connection. 2 Click Serial Port 1 or 2. If you’re connected to the appropriate network type, you can enter VT320 commands now. teemTC emulation suite 36 teemTC is a suite of more than 30 terminal emulations from Pericom Software PLC that is an optional upgrade for the Intranets version of netOS. If your NeoStation is using the teemTC option, a Terminals button appears on the Neoware toolbar and a Terminal Emulation item is listed on the Neoware menu. To learn how to use teemTC emulations, see page 47. Using Terminal Emulations NeoStation User Manual Printing Printing CHAPTER 6 This chapter explains how to print files from server-based and local programs from your NeoStation. Printing from Server-based Programs When you’re using a Windows or Telnet connection, you can print program files to network printers just as if you were using a personal computer. For example, if you’re using a Windows connection, use the print commands in the Windows-based programs, and select printers and options in Windows. Read your Windows and program documentation for details. Printing from Local Programs Adding printers FYI Your writable home directory can be in local flash memory, shared on a Windows NT-based server, or exported on a UNIX-based server. Directories on servers must have the correct access privileges. Before you can print files from the local Netscape Navigator browser, teemTC terminal emulations, and other programs running on your NeoStation, the printer(s) to be used must be selected. To add a printer for local programs, your NeoStation must be able to locate your home directory, either in its local storage or on a server that you logged onto at startup. If it can’t find a writable home directory, you have to use network printers for local programs. 1 On the Neoware menu, click Settings | Printers. If your NeoStation found a writable home directory, the Add Printer dialog box appears. If it didn’t, the Printer List appears. 37 Printing 2 In the Add Printer dia- log box, type a printer name. • If you’re adding a network printer, the name must match its assigned network name. To find a network printer name, click View Existing Printers. • If you’re adding a local printer, its name must be different from any network printer. Two printers can’t have the same name on a network. 3 Select a server type. Local indicates a printer connected directly to your NeoStation. 4 Select whether this is the default printer. FYI You should select only one default printer for local programs. If more than one printer is selected as the default, the printer with the alphabetically first name is used. 5 Click Next. 6 If you selected Win- dows or UNIX as the server type, type the server name or IP address, and a user name and password on the server. • For a server using Domain Name Service, type its DNS name. • For a UNIX server without DNS, type its IP address. • For a Windows NT-based server without DNS, type its IP address followed by its NetBIOS name using this syntax: [IP address]/[NetBIOS name] For example, if the server IP address was 10.10.10.10. and its NetBIOS name was mainserver, you would type: 38 Printing from Local Programs Printing 10.10.10.10/mainserver 7 If you selected Local as Printing the server type, select a port type in the Local Printer dialog box. The default port type is Parallel. To learn if your printer needs a text input filter, read its manual. 8 Click Next, and then click Yes to add the printer to the list. To test the printer, click Print Test Page. The printer must be turned on and, if it’s a local printer, not currently printing other files. 9 Click Finish. Changing printers Once one or more printers for local programs have been added at your NeoStation, you can delete them and edit their settings. However, you can’t edit or delete printer settings set up by your system administrator on a server. 1 On the Neoware menu, click Settings | Printers. 2 If the Add Printer dialog box appears, click View Existing Printers. To change a printer’s settings, first click Edit. Printing from Local Programs 39 Printing 3 Click a printer name, and then do one of the following: • To test the printer, click Print Test Page. • To change its settings, click Edit. To edit the settings, don’t change the printer name in the Add Printer dialog box. To add another printer with the same settings, change the printer name. To learn more about printer settings, see page 37. • To delete the printer, click Delete, and then click Yes. Overriding local printers FYI The default printer in your Printer List overrides the default printer for your network. 40 When you’re printing from local programs, the default printer on your Printer List is used unless your override it. You can override the default printer by editing the print command in the local program’s print dialog box. To learn how to override the default printer in the local Netscape Navigator browser, see page 32. To learn how to override the default printer in a teemTC terminal emulation, see page 36. Printing from Local Programs NeoStation User Manual CHAPTER 7 Changing Advanced Settings This chapter explains how change the advanced settings using the Neoware Control Panel and Setup menus. Viewing and Changing Settings Using the Advanced tab Using the Neoware Control Panel Advanced tab, you can view and change the settings saved in the nonvolatile memory of your NeoStation. You can also reset them to their factory default values. 1 In the Neoware Control Panel, click the Advanced tab. Tip Advanced Settings You can configure your NeoStation to browse for ICA servers across subnets by typing ica.servers in the Setting Name box, entering the server IP address(es) or DNS name as the setting value(s), and then clicking Modify. Separate the addresses or names with commas. 41 Changing Advanced Settings Tip You can also find your current monitor setting(s) by entering hwconfig at the command prompt in a Console window. 2 Type a setting name. In the above example, we typed scr for the monitor timing setting. To learn about other settings you can view and change, ask your system administrator. 3 To view the setting’s current value, click Query. 4 To change the value, type a new value, and then click Modify. 5 In this example, the monitor setting is 22 (mon=22). 6 To save the setting in nonvolatile memory. To exit without saving, click Cancel. 42 Viewing and Changing Settings Changing Advanced Settings Changing User Preferences Using the Setup menus You can also change settings on your NeoStation using the Setup menus. In general, you should use the Neoware Control Panel to change settings related to starting up your NeoStation, but the Setup menus are a convenient way to change your screen resolution, audio output, and other settings. This section explains how to change only some of the settings in the Setup menus. To learn about other settings, ask your system administrator. 1 To open the Setup main menu, click Settings | Advanced Setup on the Neoware menu, or press ALT + PRINTSCRN. Tip Advanced Settings To display a gauge of the random access memory(RAM) available in your NeoStation, click Memory. To open a Console window, click Console. 2 Click Setup Options. To learn how to change your user preferences, read the following sections. Changing User Preferences 43 Changing Advanced Settings Screen settings You can change the screen resolution and color depth of your NeoStation using the Screen Settings item. 1 In the Setup main menu, click Setup Options | User Prefer- ences. 2 Click Screen Settings until the desired setting appears. The screen setting values are determined by these factors: • Your monitor timing. • The color depth and video memory of your NeoStation. • The netOS release your NeoStation is using. • The programs and protocols you’re using. 3 Click Save, and then click Restart. 44 Changing User Preferences Changing Advanced Settings Audio output settings If you have an audio-equipped NeoStation, you can change its audio output so that audio plays through its internal speaker, headsets, or other devices. 1 In the Setup main menu, click Setup Options | User Prefer- ences. 2 Click Audio Device Settings. 3 Click Audio Output Device until the desired setting appears. FYI Tip If you’re using the internal microphone, select External Speakers to avoid feedback. Advanced Settings The Audio In Device setting doesn’t apply to your NeoStation. Leave it at its default setting, Unspecified. Your options are: • Internal Speaker, the default, selects the internal speaker and disables the Headphone/Line Out jack . • External Speakers disables the internal speaker and directs audio to the Headphone/Line Out jack. • Headset disables the internal speaker and directs audio to the Headphone/Line Out jack. Changing User Preferences 45 Changing Advanced Settings • CallPort Spkr/Mic disables the internal speaker and directs audio to the Headphone/Line 47 Out jack. 4 Click Apply, and then click OK. Keyclick and bell settings You can change the keyclick volume and the bell volume, pitch, and duration. A keyclick is the sound made when a key is pressed. 1 In the Setup main menu, click Setup Options | User Prefer- ences. 2 Click Keyboard and Bell Settings. Tip If you’re using the internal microphone, set the keyclick volume to 0% and disable the internal speaker to reduce ambient noise. Screen saver settings 3 Click a keyclick or bell item until the desired setting appears. • Keyclick volume from 0% (no sound) to 100% (loudest). • Bell volume from 0% (no sound) to 100% (loudest). • Bell pitch from 100-to-10,000 Hz. • Bell duration from 10-to-1,000 milliseconds. 4 Click Apply, and then click OK. You can also change the screen saver type and timeout period. 1 In the Setup main menu, click Setup Options | User Prefer- ences. 2 Click Screen Saver Settings. 3 Click a setting to change it. • Screen Saver timeout sets how many seconds without key- board or mouse device activity must pass before the screen saver appears. • Screen Saver interval sets the refresh rate for the X Logo screen saver method. • Screen saver method lets you select the type of screen saver. For Energy Star compliant monitors, select Energy Star. For monitors that aren’t Energy Star compliant, select X Logo. 4 Click Apply, and then click OK. 46 Changing User Preferences NeoStation User Manual Appendix A: Optional Terminal Emulations This appendix introduces how to use the optional teemTC suite of terminal emulations. teemTC Emulation Suite Supported emulations teemTC from Pericom Software PLC is a suite of more than 30 alphanumeric and graphics terminal emulations that enables your NeoStation to access mainframe and minicomputers. The emulations include: Alphanumeric Emulations • ADDS A2. • ANSI BBS. • AT&T 5510. • Data General DG410. • DEC VT52, VT100, VT101, VT102, VT125, VT131, VT132, VT220, VT240, VT320, VT340, VT400-7, VT400-8, VT420. • DOC 18. • Hazeltine 1500. • Hewlett Packard 2392A, 2622A, 700/92. • IBM 3151, 3270 2, 3, 4, 5 NVT Mode, 3270E, and 5250. • ICL 7561. • • • • • • • • • • McDonnell Douglas Prism-8, -9. Microcolor 2200. Prime PT250. SCO Console. Siemens 97801. Stratus V102. Tandem 6526, 6530. Televideo 910, 925. Viewdata 40, 80, Split. WYSE 50, 50+, 60. Graphics Emulations • DEC VT340 (ReGIS). • IBM 3270. • Retrographics VT640. • Tektronix 4010, 4014. • Westward 2119. 47 Appendix A: Optional Terminal Emulations This section is only an introduction to teemTC. To learn more about using teemTC emulations, ask your system administrator. For complete information, order Neoware Thin Client: teemNC Terminal Emulation Suite and the teemX User’s Guide from Neoware. Starting a terminal emulation If you’re using teemTC, a Terminals button appears on the Neoware toolbar, and Terminal Emulation appears on the Neoware menu. 1 On the Neoware toolbar, click the Terminals button. Or click Terminal Emulation on the Neoware menu. 2 In the Telnet Host dialog box, click a host, and then click OK. 48 teemTC Emulation Suite Appendix A: Optional Terminal Emulations 3 Log into a host computer. Normally you must type your network user name at the login prompt and then your password. 4 On the top menu bar, click Settings | Emulation. 5 Select an alphanumeric or graphics emulation and other set- tings, and then click OK. A terminal emulation starts, with a terminal designation (for example, VT320) on its status bar. 6 To save its settings for future sessions, click File | Save Set- tings. 7 To end the emulation, click Quit. teemTC Emulation Suite 49 Appendix A: Optional Terminal Emulations Printing text screens You can print teemTC text screens to a network printer or to a printer directly attached to your NeoStation. If you’re using a network printer, you don’t need to be logged onto a server, but the printer must be shared on your network. If using a local printer, it must be turned on and not currently printing other files. • To print a text screen, click Print Screen on the File menu, select the normal graphic print mode, and then click Print Text Screen. • To override the default printer, click File | Print Setup | Text, and then type the name of an available printer in the Printer Driver box using this syntax: printer -p [printer name] Don’t type anything in the Use Printer box. 50 teemTC Emulation Suite NeoStation User Manual Appendix B: Token Ring Settings This appendix describes how to configure your NeoStation for a Token Ring connection. Configuring Your NeoStation Using the Token Ring tab Caution Use only PC Cards from Neoware in your NeoStation. 1 Insert a Token Ring adapter from Neoware into the PC Card slot in your NeoStation, and then connect a Token Ring cable to the PC Card. 2 Turn on your NeoStation, and then click Cancel in the Load- ing Software screen. 3 In the Neoware Control Panel, click the Token Ring tab. Enter your settings in this section of the Token Ring tab. 51 Appendix B: Token Ring Settings 4 In the external PCMCIA slot section of the Token Ring tab, Caution You should rarely change the MAC address setting, and then only with extreme care. 52 enter the appropriate settings: • IP Address: Type an IP address for your NeoStation on the Token Ring network. Because your NeoStation can be connected to an Ethernet network and a Token Ring network at the same time, the Client IP Address box in the Network tab and the IP Address box in the Token Ring tab should have different values. You can connect to two Token Ring networks if you use a unique IP address for each. Important When your NeoStation is connected to a Token Ring network, the Client IP Address box in the Neoware Control Panel Network tab must have either a valid Ethernet IP address or a 1.1.1.1 setting. Your NeoStation won’t work with the default 0.0.0.0 setting. • Netmask: If needed, type a netmask setting for the Token Ring network. To learn about netmask settings, see page 14. • MTU Size: Select a Maximum Transmission Unit (MTU) size between 516 and 17800. • MAC Address: If absolutely needed, enter a Locally Administered Address (LAA) in the MAC Address box. A Media Access Control (MAC) address is burned into each Token Ring PC Card adapter by its manufacturer. However, you can override the MAC address by typing a LAA in this box. 5 Click Save, Yes, and then Reboot Now. Configuring Your NeoStation Index Index Symbols configuring for 14 configuring NeoStations for 14 understanding 13 Broadcast IP setting 15, 17 browsing for servers 26, 41 (Un)Stick item (Window Ops menu) 24 C Numerics 100BaseT Ethernet Connection setting 14 connector 8 10BaseT Ethernet Connection setting 14 connector 8 A accessories 21 active windows, defined 23 Add Printer dialog box 38 ADDS A2 47 adjusting the audio volume and balance 22 Advanced tab setting the domain 15 viewing and changing settings 41 alphanumeric emulators (teemNC) 47 Alt+ PrintScrn 43 ANSI BBS 47 AT&T 5510 47 audio balance 22 changing the output device setting 45 changing the volume 22 NeoStation jacks 9 selecting the quality for a connection 27 Audio Control 22 autostart options 27 available memory 43 B back panel connections 6 balance 22 bar code readers 6 bell settings 46 Boot Config setting 17 Boot Keyboard setting 18 BOOTP (Bootstrap Protocol) calculators 21 CallPort Spkr/Mic setting 46 CDS (Citrix Device Services) 3 changing audio settings 45 bell settings 46 keyboard languages using the Neoware Control Panel 18 using the Setup menus 46 mouse port 18 Neoware toolbar 20 screen resolution 44 screen saver settings 46 CIFS (Common Internet File System) 3 selecting as access method 16 Citrix Device Services 3 Client IP Address setting 14 Token Ring networks 52 clocks 21 closing Neoware windows 23 Telnet connections 30 Windows connections 28 color depth for a connection 27 for your NeoStation session 44 configuration for BOOTP 14 for DHCP 14 for Ethernet 14 resetting 15 configuring NeoStations for Ethernet networks 13 NeoStations for Token Ring networks 51 connecting back panel ports 6 monitors 7 network cables 8 peripherals 7 53 Index to a remote server (using the modem dialer) 33 to a UNIX server 29 to a Windows NT server 25 to mainframe computers (using terminal emulation) 35 to the Internet using Netscape Navigator 30 using the modem dialer 33 to Windows server 25 Connection setting (Network tab) 14 Console window function of 23 opening from the Neoware menu 23 from the Setup main menu 43 Control Panel (Neoware) Advanced tab 41 Kbd/Mouse tab 18 modem dialer connections 34 Network tab 14 Token Ring tab 51 Ctrl + Alt + End 25, 27 Ctrl + Alt + Home 27 Ctrl + Alt + Plus or Minus key 22 Ctrl + Alt + Up or Down Arrow key 27 D Data General DG410 47 DEC 47 DEC VT52, VT100, VT101, VT102, VT125, VT131, VT132, VT220, VT240, VT320, VT340, VT400-7*, VT400-8*, VT420 47 Default Gateway setting 14 default printer naming in Netscape print dialog box 32 overriding 40 selecting 38 default settings, resetting 15 default.cfg file 17 Desktop Divider 20 DHCP (Dynamic Host Configuration Protocol) configuring NeoStations for 14 defined 13 dialing modems 33 display 20 54 DNS resolver Ethernet networks 16 modem dialer connections 34 DNS Resolver setting 15 DNS. See Domain Name Service DOC 18 47 Domain Name Service (DNS) defined 15 DNS server name 15 domains, defined 26 Don’t ask me about this again checkbox 30 E Editor (netOS) 21 End Session menu item 28 Ethernet 100BaseT 8, 14 10BaseT 8, 14 external microphone 9 external speakers connecting 9 settings 45 F Factory Reset button 15 Fast Ethernet (100BaseT) PC Card adapters 8 PC Card slots 6 feedback. See microphone. FTP (File Transfer Protocol) 3 G Get IP From setting 14 GIF graphics 30 graphics emulators 47 H Hazeltine 1500 47 headphone location of jack 9 selecting the Headset setting 45 Headset setting 45 Hewlett Packard 2392A, 2622A, 700/92 47 hiding Neoware taskbar 21 Neoware toolbar 20 Index home directory for local printers 37 storing Netscape bookmarks 30 writable 37 Host list 30 HTML (Hypertext Markup Language) Netscape 30 hwconfig command 42 I IBM 3151 47 IBM 3270 Models 2, 3, 4, 5 NVT Mode 47 IBM 3278 35 IBM 5250 47 ICA (Independent Computing Architecture) protocol browsing for servers 41 enabling for modem dialer connections 35 overview 3 selecting for Windows connections 26 ICL 7561 47 internal microphone 9 internal speaker setting 45 international keyboards 18, 46 IP address client setting assigned by DHCP or BOOTP 13 configuring 14 if not configured 17 server setting 15 Token Ring networks 52 J JPEG graphics 30 K Kbd/Mouse tab (Control Panel) 18 key combinations i, 27 KEYBD port, location 6 Keyboard and Bell Settings menu 46 keyboards connecting 6, 7 international changing on the Control Panel 18 changing on the Setup menus 46 keyclicks changing volume 46 defined 46 Kill command 23 L LAA (Locally Administered Address) 52 Loading Software screen 13 Local Printer dialog box 39 logging off 28 low memory warning 21 M MAC (Media Access Control) box 52 maximizing Neoware windows 23 McDonnell Douglas Prism-8, Prism-9 47 memory gauge opening from the Neoware menu 21 opening from the Setup menus 43 local, settings for 15 memory gauge 43 Menu button (Neoware windows) 23 MetaFrame 3 Microcolor 2200 47 microphone external 9 internal avoiding feedback 45 disabling 9 setting the keyclick volume 46 Minimize button (Neoware windows) 23 minimizing Neoware windows 23 modem dialer connecting 33 enabling remote IC browsing 35 ISP dialup 33 saving a password 33 selecting a DNS resolver 34 setup 33 using DNS resolver 34 Modem Name list 34 Modem Setup dialog box 33 modems connecting 6 55 Index dialing 33 selecting in modem dialer 34 Modify button (Advanced tab) 42 monitors connecting 7 resolutions 44 setting the timing 10 ventilation 7 mouse devices changing the port type setting 18 connecting 6 PS/2 type 6 MPEG-2 player 21 MTU Size setting 52 N NeoStations closing connections 28 configuring 13 connecting cables and monitor 7 connecting to a network 8 front panel 9 headphone jack 9 modem connections 6 monitor connector 6 power adapters 7 rebooting 17, 24, 28 resetting 15 restarting 44 turning on or off 8 unpacking 5 work area 12 Neoware technical support 4 Web site 3 Neoware desktop elements of 19 redrawing 22 restarting 22 using 19 viewing most recent Windows connection 27 Net Timeout setting 14, 15 NetBIOS computer name 16 NETLogin dialog box 31 NETLogin Host menu 31 Netmask setting 56 Network tab 14 Token Ring tab 52 Netmask setting (Network tab) 14 netOS accessories 21 Control Panel 41, 43 Editor 21 taskbar 20 toolbar 20 windows 23 netOS Config setting 17 netOS Directory box 43 netOS Directory setting 15 netOS Keyboard setting 18 netOS server 15 netOS subdirectory. 16 Netscape Access dialog box opening 30 suppressing 31 Netscape Navigator graphics supported 30 home directories 30 printing pages 32 selecting access settings 30 setting up printers 37 using the browser 31 network activity LED indicator 9 Network Printer dialog box 38 Network tab (Neoware Control Panel) 14 Network Type setting 14 NFS (Network File System) protocol 16 NTRIGUE protocol 3, 26 O on/off switch location 9 using 8 Options dialog box 26 overriding local printers 40 P parallel port 6 passwords logon 26 saving in modem dialer 33 PC Cards Index compatibility warning 6 Fast Ethernet (100BaseT) 6, 8 NeoStation 200 series slot 6 Token Ring adapter 51 Permissions button 17 personal digital assistants (PDAs) 6 power indicator LED 9 power jack 6 power supply 7 PPP (Point-to-Point Protocol) 33 Prime PT250 47 Printer List 39 printing changing printers for local programs 39 default printers 32, 38, 40 local program files 37 Netscape pages 32 overriding local printers 40 parallel port 6 server-based program files 32 teemNC text screens 50 Properties box from Neoware taskbar 21 from Window Ops menu 24 protocols CIFS 3, 16 FTP 3 ICA 3, 26 NFS 16 NTRIGUE 3, 26 PPP 33 SMB 16 Telnet 29 TFTP 3 PS/2 mouse changing the setting 18 connecting 6 PWR connector 6 Q Query button (Advanced tab) 42 R Raise and Lower items (Windows Ops menu) 24 raising and lowering Neoware windows 24 RAM (random access memory) 21, 43 rebooting 24 using the Neoware Control Panel 17 using the Neoware menu 28 redrawing the Neoware desktop 22 Remote Network dialog box 33 resetting. See configuration. resizing Neoware windows 23, 24 resolution (screen) 44 restarting the Neoware desktop 22 your NeoStation from the Neoware menu 28 from the Setup menus 44 Retrographics VT640 47 RJ-45 Ethernet jack 6 S Save password checkbox (modem dialer) 33 SCO Console emulation 47 screen resolution 44 screen saver 46 serial connections direct 36 mouse devices 18 serial ports, location 6 Serial Window accessory 23 Server IP Address setting 15 server list capacity 26 displaying 26 Setting Name box quick configuration 15 understanding 42 Setting Value box quick configuration 15 understanding 42 Setup menus 41, 43 Audio Device Settings menu 45 audio settings 45 keyboard and bell settings 46 memory gauge 43 opening 43 User Preferences menu 44, 45, 46 Shortcuts menu 22 Siemens 97801 47 skull and crossbones pointer 23 57 Index SMB (Server Message Block) protocol 16 speakers 9 external 9 internal 46 Start menu (Windows) 28 starting Telnet connections 29 Windows connections 25 sticky windows 24 Stratus V102 47 Switch to item (Window Ops menu) 24 synchronization frequencies 10 T Tandem 6526, 6530 47 taskbar (Neoware) hiding 21 moving 21 opening active windows 20 technical support 4 teemNC alphanumeric emulators 47 graphics emulators 47 overview 47 printing text screens 50 selecting an emulation 49 starting 48 starting a connection 48 starting a session 48 terminal emulations supported 47 upgrade option 3 Tektronix 4010, 4014 47 Televideo 910, 925 47 Telnet 30 telnet 30 Telnet connections closing 30 starting 29 terminal emulation IBM 3278 35 teemNC suite 3, 47, 48 TN3270 35, 47 VT320 36 TFTP (Trivial File Transfer Protocol) 3 Thick(MAU) setting 14 Thin/10BaseT setting 14 58 title bar (Neoware windows) 23 TN3270 emulator 35, 47 Token Ring networks PC Card adapters connecting 6, 8 overriding the MAC address 52 selecting settings 51 selecting settings 51 Token Ring tab (Control Panel) 51 toolbar (Neoware) moving, resizing, and hiding 20 overview 20 teemNC button 48 turning on or off 8 U UNIX closing a connection 30 connecting to a server 29 Host list 30 user name 26 User Preferences menu 44, 45, 46 V video RAM 44 Viewdata 40, 80, Split 47 VT320 emulation 36 W Westward 2119 47 WINConnect dialog box 25 modem dialer 34 Windows connection 25 WINConnect Server menu 26 Window Ops menu 24 windows (netOS) (un)sticking 24 active 23 buttons 23 closing 23 killing 23 maximizing 23 minimizing 23 moving 23, 24 properties 24 Index raising and lowering 24 resizing 23, 24 using the controls 23 Windows connections automatically starting 27 browsing for servers 26 closing 28 returning to the most recent 27 selecting options 26 starting 25 switching 27 Windows Sessions pop-up menu 28 Windows-based terminals 2 WinFrame 3 work area 12 WYSE 50, 50+, 60 47 X XBM graphics 30 59