1
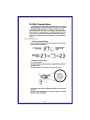
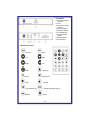
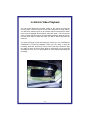
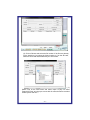
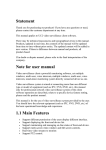
Mobile Digital Video System
User Manual (102sd)
Please read this user manual completely before
operating this DVR system and keep it in a safe
place for future reference.
-1-
CD-ROM
The CD below contains the viewer software needed for
playback on your computers. The default login and
password has not been set. When running the program,
just click ‘OK’. Once in the program, you can assign a
login and password if desired. Also on the CD is a copy
of all manuals. The first time you insert the CD it will
automatically run the install for the software. Once installed, if you need to access the manuals, just click
cancel at the install prompt. You can then access the
files on the CD through your file manager like you
would any other CD.
-2-
Caution!
You, as the driver, are solely responsible for the safe operation of
your vehicle and the safety of your passengers according to the US
and local traffic regulations. Do not use any features of this system
to the extent it distracts you from safe driving. Your first priority
while driving should always be the safe operation of your vehicle.
10-8 Video cannot accept any responsibility whatsoever for
accidents resulting from failure to observe these precautions or
safety instructions:
1. This product utilizes high voltage. Any unauthorized
modifications or damage to the products may result in electrical
shock. Handle all components with care. Inspect regularly for
damage to components and cabling.
2. You shall be responsible to ensure that the installation of this
product does not void or affect the vehicle manufacturer’s
warranty. 10-8 Video, or its branches are not liable in full or in part
for improper installation resulting in loss or damage to your
property, or for voiding all or part of the vehicle manufacturer’s
warranty.
3. Do not apply excessive force to any of the components
contained within this kit. Excessive force used before, during or
after installation that results in a damaged or non-functional part
shall void all warranties.
4. Please follow the procedures from this installation manual.
Improper installation or modification of this product shall void all
warranties.
-3-
Section 1: Installation
Power Distribution Block
The power distribution block is included for your convenience and is not
required that you use it. It may make for a cleaner installation by
requiring only one power and one negative lead from the vehicle and will
then power the 4 components in our system. It uses ¼” male spades for
the input and ¼” female spades for the output.
Use at your own risk. 10-8 Video is not responsible for it’s use or
misuse. If you decide to use it, be mindful of polarity with each
connection!
-4-
DVR Installation
The installation of the 10-8 Patrol Car video system breaks down to
some very simple steps. The basic connection for video and audio
are very similar to a VCR or DVD player. The one area that differs
from what you may have done in the past is the connections for the
alarm inputs .
You will need a 12v power source for the system. 10-8 video
includes a power distribution block for your convenience. It
simplifies the installation and makes for a cleaner install, since just
1 power and 1 ground will be needed. We recommend that the
power source be from switched power that is only hot when the
vehicle key is in the 'ON' position.
Digital Video Recorder Unit (DVR)
The first thing you will want to do is locate where you want to install
the DVR. The small size of the unit makes that much easier than
just a few short
years ago. Your
first choice should
be in your main
equipment console
if you have one. If
there is no room in
the console, the
next areas to
consider are on
either side of the
console, in the
dash or under the dash. Try to keep the unit in sight of the driver
where they will be able to use the I/R remote more easily. If
needed, the DVR ships with 2 small brackets for mounting. Connect
the red/black power connector to the back of the unit by inserting
into the square receptacle on the rear of the DVR. Insert until
locked. The Black lead needs to be connected to a chassis ground
and the Red lead will connect to 12v ‘ignition on’ power source.
-5-
Emergency Lights & Manual Activation Setup
There are 3 leads coming from the sensor harness. Each lead will activate
the record function when 12v is applied to any of the 3 leads. In a typical
patrol car installation, 2 of these leads will be used. Connect the green lead
to the output side of you control box for your pursuit lights. This lead will
simply detect when 12v is present and activate the recorder. You can simple
connect it to any of the lights that are used for emergency traffic. This way
the recorder will start anytime you are running emergency traffic. Depending
on the type of switch box used, there may be a place to connect at the back
of the switch box. If not, simply connect to any lead that goes to a 12v light
that is activated when you turn on the emergency/pursuit lights.
The orange lead can now be connected to a manual switch that you will
activate when you want to start the recorder without lights activated. You can
use any switch of your choosing that will provide 12v to the lead. Many of the
newer control boxes used by departments will have a blank switch that is not
being used. These are a great choice for the manual switch. If none are
available, a simple toggle or rocker switch mounted in a convenient location
works well. These wires are very sensitive and care must be taken that you
do not connect to a wire that has low voltage all the time. The recorder will
detect voltage and activate the recorder.
Wireless Mic Receiver:
Once you have a location for the DVR, locate a convenient spot for the
Wireless mic receiver. That is the small box with the collapsible antenna.
This will not have to be readily accessible once it is installed so you may
want to put it under a seat, under the dash, in the trunk, or since it is so
small and light, just Velcro it to the firewall or anywhere else that is
convenient for you. It is recommended that it be in the front ½ of the vehicle
for the best reception. Once mounted, plug in the power lead and connect
the red to your 12v power source and negative to chassis ground source.
There is a black cable in your kit that has a phono plug on 1 end and RCA
on the other. The phone plug will plug into the back of the receiver, and the
RCA will plug into the matching RCA plug on the Audio/Video input cable
from the back of the DVR. As a final step, be sure the volume adjustment on
the receiver is turned clockwise as far as it will go.
-6-
Mirror/Monitor Install:
Now mount the mirror/monitor over the existing mirror. A good place to run
the wires for the mirror is to tuck them in the front edge of the headliner
and down the passenger side pillar post. The covers on most modern pillar
posts snap in to place and are easily removed with plenty of room. Run the
wires down along the door edge and under the glove box to the location of
the DVR. Connect the RED spade connector to your 12v power source and
the BLACK to your chassis ground. Now plug the yellow RCA connector
labeled ‘Video1’ to the yellow RCA female connection of the 2 leads
coming from the A/V Output port. The Audio out is generally not used as
audio playback is not usually needed in the vehicle. If you wish to use the
audio out, you will need to connect to a powered speaker with volume
control.
Camera Install:
Mount the camera high and just right of center on the windshield. This is
normally to the rear and slightly to the right of the rear view mirror/monitor,
as in the picture below. Leave just enough room for the camera to rotate
180 degrees in either direction. The mount is an excellent commercial
mount and is very strong when properly attached to the windshield. Make
sure the glass is clean and press in on the center button of the mount.
While pressing in, pull the locking lever up and over the center button to
lock it in place. Now run the included cable along side the mirror/monitor
cable to the DVR. Plug the BNC video connector from the camera to the
BNC video-in cable from the DVR. Run the power leads from the camera to
the power distribution point you are using with RED going to your 12v
power source and the BLACK to the chassis ground.
-7-
Basic Wiring Diagram
1. DC power input socket
2. Delay time select switch
3. Sensor port
4. A/V input connecting port (camera & Wireless Mic)
5. Function expansion I/O port
6. A/V output port (mirror/monitor) Optional Spkr.
7. Alarm trigger wires connecting port
8. G-sensor connecting port
9. External signal connecting port (not used)
-8-
-9-
- 10 -
- 11 -
After Install Set-up
Be sure the SD card is properly inserted in the DVR unit and start the car or
turn the key to the accessory position to power up the system. After
approximately 5 seconds, the system will come on and go through a brief self
test. The SD will automatically be formatted if not already formatted. If the
monitor is turned on, you should now see a picture from the camera. Take a
moment and align the camera for the proper view. We recommend a slightly
right of center view. This allows for a centered view of a vehicle during a traffic
stop if you use a left offset during your stops. If not, align the camera to your
personal preference.
ENTER YOUR Unit ID: Press ‘Menu’ on the remote and using the arrow keys
scroll down to ‘Sub Menu' and press the ‘enter’ key (the key centered between
the arrows on the remote). Scroll to the DVR ID section and enter your unit or
badge #. This is the ID that will be displayed in recordings to identify which
unit made the recording. Up to 8 characters can be used here. After putting in
your ID #, press the ‘Menu’ key until you are out of the menu system.
SET DATE/TIME: Press the menu key and use the arrow keys to scroll down
to 'Date/Time Setup'. Using the arrow keys you can scroll down to each
section you need to change. You will then use the keys on the right side of the
remote to change values. When everything is set for your location, press the
'menu' key until you return to the live view.
Admin Options: There are a couple of things that administration will need to
decide as a matter of policy for the department in regards the camera
systems:
1st. There is an option in the main menu that will lock out the individual
officers from making changes in the system options. It will still allow them to
playback videos in the vehicle, but will not allow them to call up the system
menu.
2nd. Also in the menu is the option to automatically record for 30 seconds
each time the vehicle is started or the key turned on.
3rd. If you opted for the GPS and G sensor options, you can set the G force
level that the recorder will automatically begin recording. We recommend
around 2Gs. And if you have the GPS option, there is a GPS menu setting
that allows you to set a vehicle speed that the recorder will automatically
activate at. Some departments will set this at state maximum or a little over.
Your system is now '10-8' and should begin recording when you activate your
lights or the manual switch. The system is set to pre-record for 30 seconds.
This means that system is always recording in a 30 second loop. When you
activate your lights or use the manual switch, it actually began recording 30
seconds prior to activation.
- 12 -
Front Panel
1. IR remote control
receiver
2. Lock
3. IR remote control
receiver
4. Power indicator
5. Record indicator
6. A/V output port
7. G-sensor reset
button
8. Record button
9. SD card slot
I/R Remote Control
Record
Menu
Up
Down
Right
Left
Enter
Value Up
Select
Value down
Stop
Sound
Play (Number 9)
Rewind
F Forward (Number key 0)
Pause
- 13 -
In-Vehicle Video Playback
You can watch previously recorded events in the vehicle by using the
remote control. Point the remote at the DVR and press the 'play' button.
You will see a search screen on the monitor and will now press the 'down
arrow' once to highlight 'Event Search' and press 'enter'. You will now see
a list of events that have been recorded starting with the latest at the top.
Use the arrow keys to select the event you wish to watch and press the
enter key.
You video will begin to play and using the remote you can FastForward,
FastRewind or Pause the playback. When you are ready to stop the
recording, press the 'stop' key to return to the event list or press the stop
key again to return to the live view. Keep in mind that if you are currently
recording an event, you can still playback an event without interrupting the
recording.
- 14 -
10-8 PC Player Software
Install the 10-8 Player software by installing the CD supplied with your
system. If the CD is not available, you may download it from the 10-8
Video web site by entering the following address in your browser:
http://www.10-8video.com/downloads.html
Scroll to the bottom section and look for the link to the 10-8 Player.
When asked, select ’run’ and the software will install. Double click on
the 10-8 player icon to load the player. After it has downloaded, run
the program to install on your PC. Double click on the new icon on
your desktop to run the program.
If a box appears asking for a password, the default login and
password are both 'root' without the quotes and all lowercase. You
can then go into 'Account Management' to change the login and
password.
How to play back a recording:
(1) Click on ‘New File Search’ Button
- 15 -
(2) Click on Browse and select the file location. If the files are already
on the hard drive, just select the folder location or if on the SD card,
select the drive letter associated with your card reader.
(3)
Select a file on the next screen and select ‘Open’ to play. Or select
‘Search All Event’ to bring up a screen with all events that were recorded
sorted by date and time.
- 16 -
Select the event you wish to play and select
‘Open’.
You will now be in the main playback window:
- 17 -
The Play back panel at the bottom of the screen works similar to a
DVD or VCR panel. You can speed up, slow down, and view frame by
frame with this panel. You can also use the slider button under the
video to quickly go forward or backward in the video. The 2 arrows on
either side of the pause button will play the video in slow motion.
Repeated use of the pause button when paused will advance frame
by frame.
At the bottom left of the screen, the ‘Time Line’ buttons will allow you
to select the scale that is displayed at the bottom of the video window.
This timeline will display recorded events in red.
The calendar at the lower right of the screen will display the days in
red that have recorded events. Clicking on one of the red days will
bring up the videos of that 24 hr period.
On the right side of the screen ‘All Event Search’ will display a list of
all of the events on that SD card or folder. ‘Current Event Search’ will
bring up the events of the 24hr period currently being viewed.
The GPS related buttons will only apply if you have the GPS receiver
option installed in your vehicle. If you have the GPS option installed,
you should see your GPS coordinates displayed on the top left and
your vehicle speed on the bottom left.
- 18 -
If you have another program that reads GPS data, you can use the
‘GPS Data Export’ button to create a file that can then be read by your
program.
Pressing the ‘GPS Overlay Button’ will bring up a Google Map and a
vehicle icon on the map that will move along with the video you are
playing. This map and icon will display the exact positions of the
vehicle that made the recording. The +/- buttons on the map will allow
you to zoom in or out as needed.
Using your mouse, you can click and drag the overlay window to a
different area of the screen. The text box that follows the vehicle icon
on the screen is displaying the date and time along with the speed of
the vehicle at the time of the recording. To close the overlay window
select the red X in the top right corner. NOTE: Your computer must
have access to the internet to use this feature, as the map data is
pulled from the Google server in real time.
Saving Events to a File:
Before discussing the ways you can save an individual event, it is
important to understand how the file will be used later. If you are saving
an event for court, it is highly recommended that you use the ‘Create
File’ option to do so. The reason for this is that the 10-8 System
records video in a proprietary format. This is done to maintain evidence
integrity. There is no commercially available software to manipulate the
videos in any way and this is the reason you want to keep videos in
their original format.
- 19 -
Create File: Before using either the ‘Create File’ or ‘Create Media’ options, you will first need to write down the exact times that you want to
record. When the event you wish to save begins to play, make a note
of the exact date/time of the beginning of the vent. Now move the
slider over or use the FF or FR buttons to get to the end of the event
and make another note of the time it ends. Now select the ‘Create File’
option and the following window will appear:
Starting at the top of the window ‘Select Path’ you will put in the path to
the drive and folder you wish to save your file to. To make it easier, you can
you the ‘Browse’ button on the right. When the path is correct go to the next
box ;
‘File Name’. Here you will want to name the file so that is easily recognizable later when you want to find it. For example, if you are saving a DUI
event where ‘JONES’ is the suspect. You might want to name it something
like ‘Jones DUI’. By default, the system will name it based only on the date
and time of the event.
Just below the window next to ‘Start Time’ you will notice a long grey box
with a slider on the left. As you click and drag on the slider you will see the
date and time change next to ‘Start Time’. When you get it close to where
the start time is, you can use the arrows at each end of the slider box to
move in small increments.
When you have got the Start Time where it needs to be, repeat the process
on the next slider box to set the ‘End Time’ window to where it needs to
be.
After you have double checked that the times in both Start Time and End
Time widows are correct, press the large ‘Backup File to PC’ button to save
the file to the folder you selected in the path window.
- 20 -
Create Media: This option is best used for in-house training or sharing
videos with others. It is not recommended for court for the reasons explained on pg15. Like the ‘Create File’ option, make a note of the date/
time of the beginning and end of the event you wish to save. Select the
‘Create Media’ option and the following screen will appear:
The process to create a Media File is very similar to the Create File process
on the preceding page. As you are using a single camera system, leave the
mode set to ‘Channel 1’. The next step is to select the file format you wish to
create: WMV, AVI or JPEG. WMV and AVI files are both popular formats
and can be played on most any other computer. (Be very careful with the
JPEG option! This option will create individual .jpg images from each frome
ot the video. It is best used for a time span of just a few seconds when you
wish to pick out detail from a segment of the video. Use the ‘Set Convert
Quality’ slider to set the quality of the video file. 75% is a good starting
point. As you set the quality higher, it will create a larger file and take longer
to save. Likewise, a lower setting will create a smaller file and take less time
to convert.
Now use the ‘Browse’ button to select the folder where you wish the file to
be saved. You can then type a file name in the next box for the name you
wish to give to the saved video. You can now use the sliders under ‘Set Start
Time’ and ‘Set End Time’ to match the times you noted for your event.
When the times in these windows match with the event you wish to save,
select the ‘Convert File’ button to save the file where you selected in the
path option.
- 21 -
Password: Selecting this option will bring up the following
window:
From here you can select the
drive letter where your videos
generally originate.
At the bottom of the box is where
you can set a login and password
for the software. This is the window that appears when you start
the software. If you wish to not
have a password required, make
sure that all of the boxes are left
blank and select ‘Confirm’. This
will set the account and password
to blanks. When you start the
program the next time, the box
will still come up asking you to put in your account and password, but selecting ‘OK’ will start the program.
Snapshot: This option will allow you take a still frame from
the video and save it as a .jpg image. This is beneficial when
you wish to preserve a frame from the video. This could be a
suspect image or other evidence you wish to view and print
later. If needed, you can press the ‘Show Text’ button to remove the text from the screen before saving.
- 22 -
Archiving Your Videos
Department policies on archiving videos vary a great deal. From departments with no policies to departments with archiving requirements of 30 days to 1 year to forever! In today’s digital environment,
archiving videos is much less expensive and easier than it was a few
short years ago with tape based systems. As of this writing, 1 terabyte drives are less than $100 and will store a great many videos
from a lot of officers. Regardless of the actual time frame you wish to
keep your videos, we will outline below 1 recommendation that has
worked well for many departments. Of course, you are free to modify
or come up with a way that works best for your department.
Decide which PC will be used for archiving. Bring up the file system
of that computer. On many systems that can easily be done by holding down the key with the 4 little squares that look like the Windows
logo and pressing the ‘E’ key. Click on the drive letter that will store
the videos and you will see the folders currently on that drive. You
will now want to create a ‘New Folder’ and then give it a name;
maybe something like ‘Patrol Videos’.
Now, inside that folder create a new folder for each officer that has
the 10-8 System in their vehicle. A good name for each folder would
be their vehicle or badge number. With each officer now having a
folder for their videos only, you can now establish a policy for when
they archive. We recommend that you have your officer bring in their
card or notify you when their system displays that they have about
10% remaining.
When you have their card in hand, put it in your SD card reader and
bring up the file system again. Go to that officer’s folder and create a
new folder and name it with the current date. For example ‘051510’
for May 15, 2010. This will make it easy to find a video later on when
needed. As each officer’s folder grows, you can easily locate the
time frame of the video by the folder name.
Now that you have the folder named, use your files system to drag
ALL of the files on the SD card into that new folder. Do not delete or
format the SD card. Just return it to the officer’s vehicle and insert it
back in the DVR. It will still be at 10%, but when it reaches 0% it will
start back at 99% and overwrite the oldest events first. This gives
you an additional backup until the files are overwritten. When it gets
back down to 5-10%, just repeat the process in a new folder of that
date.
- 23 -
301 Market St. E. Suite F
Fayetteville, TN. 37334
Fax 931-233-1263
Go To www.10-8video.com for the latest information and
products from 10-8 Video; Your ‘Digital Evidence Solutions’
Headquarters!
- 24 -