1
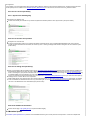
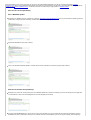
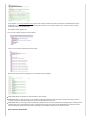
My favorites ▼ | Sign in
gbif-indexingtoolkit
Search projects
The GBIF Harvesting and Indexing Toolkit (HIT)
Project Home
Search
Downloads
Current pages
Wiki
Issues
Source
Export to GitHub
for
Search
UserManual
User Manual aimed at end-users
Featured, Phase-Support
Updated Nov 8, 2010 by [email protected]
1.0 Background Information
Available here
2.0 General Specifications
Available here
3.0 Installation and Configuration
Available here
4.0 Introduction for First-Time Users
Before any harvesting and indexing (H&I) can take place, please ensure that you have properly installed and configured your installation.
Although it is not completely necessary, some knowledge of the various harvesting protocols would be valuable. For more information on each of
the supported protocols, you can check the Supporting Information on Protocols page. In this manual, each of the HIT's different operations is
described in brief. For a more technical description, you could refer to this page.
Ultimately, it is only when things go wrong (during debugging) that an intimate knowlege of the protocols would be beneficial. Otherwise, expert
knowledge of how the HIT works (i.e. what requests are being sent, what responses are expected, the files that should be written, and so on) will
prove most useful, as the HIT hides the nitty-gritty details from the user, presenting the same set of operations to the user regardless of which
protocol is being used.
Once you're ready to begin, it's recommended that you step through each of the following sections slowly, while carefully observing that things are
running smoothly. For testing, it's important to pick a data publisher that you're confident works and that publishes using a protocol and encoding
that the HIT is capable of supporting (See the Specifications page for information on those protocols and encodings that are supported).
5.0 User Instructions
5.1 Overview
In essence, there are four major sections that group one or several separate operations together. Each section is then divided into four additional
parts:
1.
2.
3.
4.
How to run the operation(s)
How to monitor the operation(s)
How to debug the operation(s) (if necessary)
Some additional information
5.3 Registry Synchronisation
5.3.1 How to run the operation(s)
5.3.1.1 Synchronise with Registry
5.3.2 How to monitor the operation
5.3.3 How to debug the operation(s)
5.3.4 How to monitor the operation
5.3.5 Some additional information
5.4 Metadata Update
5.4.1 How to run the operation(s)
5.4.1.1 Metadata Update
5.4.2 How to monitor the operation
5.4.3 How to debug the operation(s)
5.4.4 How to monitor the operation
5.4.4 Some additional information
5.5 Harvesting
5.5.1 How to run the operation(s)
5.5.1.1 Inventory
5.5.1.2 Process inventoried
5.5.1.3 Harvest
5.5.1.4 Process harvested
5.5.2 How to monitor the operation
5.5.3 How to debug the operation(s)
5.5.4 How to monitor the operation
5.5.4 Some additional information
5.6 Indexing
5.6.1 How to run the operation(s)
5.6.1.1 Synchronise
5.6.1.2 Extract
5.6.2 How to monitor the operation
5.6.3 How to debug the operation(s)
5.6.4 How to monitor the operation
5.6.4 Some additional information
5.2 Quick Start Guide
Once a (Step #1) 5.3.1.1 Synchronise with Registry has been done with the GBIF Registry,
and the full list of endorsed and available access points have been registered as Metadata Updater (BioDatasources), the user must perform a
(Step #2) 5.4.1.1 Metadata Update against one or more access points of interest.
This discovers all the available datasets that are available behind a given access point, and registers them all as Operator (BioDatasource). Then,
for one or more datasets of interest, you can begin to harvest and index them running through the following operations in order:
(Step #3)
(Step #4)
(Step #5)
(Step #6)
(Step #7)
(Step #8)
5.5.1.1 Inventory
5.5.1.2 Process inventoried
5.5.1.3 Harvest
5.5.1.4 Process harvested
5.6.1.1 Synchronise
5.6.1.2 Extract
The order of these operations is important, and for all protocols (DiGIR, BioCASe, and TAPIR) each operation must be run sequentially in the
order above!
5.3 Registry Synchronisation
Synchronising with the GBIF Registry populates a list of Metadata Updater (BioDatasources) from the list of available endorsed access points that
are registered.
In the Registry you have Organisations (that represent data publishers), Resources (that represent datasources), and Services (that represent
access points). The HIT creates a new Metadata Updater (BioDatasource) for each service, and saves it to the bio_datasource table.
5.3.1 How to run the operation(s)
5.3.1.1 Synchronise with Registry
Navigate to the "Registry" tab.
Choose which Node you would like to synchronise for (default is all Nodes) and then click "Synchronise" (See picture below)
5.3.2 How to monitor the operation
Navigate to the "Console" tab.
Until the synchronisation finishes, log messages will display information about newly created/updated BioDatasources, files containing
provider contact information that are written, as well as any error or warning messages that should be brought to the user's attention. (See
picture below)
5.3.3 How to debug the operation(s)
When synchronisation with the Registry finishes, all the Metadata Updater (BioDatasource) that have been created should be available from
the Dashboard ("Datasources" tab). This type of BioDatasource is colored orange to differentiate them from the Operator (BioDatasource)
which is colored green. (See picture below: Note that no Operator (BioDatasource) will appear at this stage, as they only get created following
a metadata update which is explained in the next section)
If there is a particular access point that hasn't been converted into a Metadata Updater (BioDatasource) then you could check the output log
messages in the "Console" tab for some explanation.
USER TAKE NOTE: Care should be taken when deleting BioDatasources. If a Metadata Updater (BioDatasource) gets deleted, it is flagged
in the HIT database as deleted and will not be re-synchronised again. To see a list of all BioDatasources that have been deleted, the user
can click on the deleted link on the "Dashboard" (See picture below)
5.3.4 Some additional information
Please visit this page: http://gbrds.gbif.org to explore the GBIF Registry.
5.4 Metadata Update
A Metadata Updater (BioDatasource) asks for all the metadata behind the given access point that it corresponds to. If there are multiple data
resources behind a given access point (such as can be the case with DiGIR and BioCASe), they all get converted into separate Operator
(BioDatasource) which can be harvested independently. Information such as descriptions, record counts, and contact information is gathered and
saved for each Operator (BioDatasource). The whole of this work is carried out by a single operation Metadata Update.
5.4.1 How to run the operation(s)
5.4.1.1 Metadata Update
Navigate to the "Datasources" tab, and filter for a particular Metadata Updater (BioDatasource) that you are interested in harvesting. (See the
picture below, using the provider "Academy of Natural Sciences" as an example)
Expand the BioDatsource (See picture below)
Click on the operation "Metadata Update", and then click the button "Schedule" to submit the job (See picture below)
5.4.2 How to monitor the operation(s)
Navigate to the "Jobs" tab, and see that a job for the metadata update has in fact been created (If you're too slow though, the job might have
run and finished, in which case it will disappear from the Jobs list.(See picture below)
From the expanded BioDatasource, click on the link "Logs" which will take you to the "Console" tab with output log messages for only this
BioDatasource (This is preferable to referring to the "Console" tab when several different jobs are running concurrently, and all output log
messages will get written to this page in the order they are written) (See picture below)
The end result of a successful metadata update is the creation (or update in the case that they already existed) of one or more Operator
(BioDatasource). Filter the BioDatasource list once again by the name of the provider for example (in the "Datasources" tab) to see the list of
Operator (BioDatasource) that are now available to harvest! (See picture below)
5.4.3 How to debug the operation(s) (if necessary)
If the job (metadata update) has completed, there are several problems that might have occurred. In most cases, the output log messages
will be descriptive enough to inform you what interrupted a successful metadata update. Note that behind the scenes, the activity can vary
greatly between protocols. For a descriptive account of how metadata updates are carried out for each of the different protocols, you could
refer to the Operations and Procedures - Metadata Updater section.
5.4.4 Some additional information
Imagine that any metadata that you'd like to synchronise with your indexing database would get collected at this stage. Currently the
application is configured to harvest only that metadata that fits into the GBIF portal database's data structure. For information on how to
modify the metadta that gets harvested, the process is quite simple and information on how to do so can be found on the Extensions and
Customisations - Modifying a Metadata Mapping section.
5.5 Harvesting
Harvesting is the act of act of gathering records from data publishers. Harvested information is gathered and stored as raw XML, and then
processed into intermediary text files which are later used in indexing. Harvesting always operates on individual data resources, with statistics and
log messages presented to the user so that they can better manage their network of data publishers.
5.5.1 How to run the operation(s)
For brevity, all the operations mentioned in this section are run in a similar fashion to the Metadata Update operation, except that they are
run via a Operator (BioDatasource): "tick the checkbox & schedule".
In one go, the user can schedule any number of operations, across any number of BioDatasources, at the same time. There are four
operations relating to harvesting: [UserManual5.5.1.1_Inventory Inventory], Process Inventoried, [UserManual5.5.1.3_Harvest Harvest],
and Process Harvested. Each of these operations is explained separately, executing them one after the other in the exact order they
appear.
USER TAKE NOTE: Usually for new data publishers, it's a good idea to run through the operations separately, carefully watching the
responses and generated files for any irregularities. For well behaving data publishers, it's much more convenient to dispatch the operations
in bulk (for example, dispatching an inventory & processInventoried & harvest & processHarvested at the same time)
5.5.1.1 Inventory
In this operation, an Operator (BioDatasource) requests a list of all the scientific names that are contained in the dataset/resource that it
corresponds to. In the same request, it also requests information about the count of each scientific name - that is the number of unique
records that exist for each scientific name.
The outputs from this operation are:
1. One or more inventory requests (see picture below)
2. One or more inventory responses (see picture below)
(Picture below shows output log messages from a successful inventory operation)
USER TAKE NOTE: For BioCASe no count information is ever collected.
DEBUGGING HINT 1: Often the reason no inventoried list could be generated is because the inventory response was empty. From the
"Console" tab, the xml requests and responses can be checked directly from the browser.
DEBUGGING HINT 2: The integrity of the inventoried list is paramount to the success of subsequent harvesting operations. Ideally the list of
scientific names in the inventoried file will contain no duplicates, and arrange the scientific names alphabetically. If the list does not have
these characteristics, double check the inventory response(s) to ensure that the names are in fact returned in order.
5.5.1.2 Process inventoried
In this operation, an Operator (BioDatasource) reads the file outputted from the inventory operation (inventoried.txt) and generates name
ranges composed of lower and upper scientific names. The range is later used to restrict the search requests sent during the (Harvest)
operation. This strategy of requesting records by name ranges has been found to be the most efficient way of harvesting all of a data
publisher's records. This is explained in more detail in the Harvest section following below.
The outputs from this operation is:
1. A single file containing the list of scientific names and their counts: inventoried.txt (see picture below)
2 A single file containing all the name ranges that were contructed: nameRanges.txt Wherever possible, the size of the name range (that
is the number of records that it represents) is included beside each name range. (see picture below)
(Picture below shows output log messages from a successful process inventoried)
USER TAKE NOTE: With TAPIR and DiGIR, it's possible for publishers to specify an attribute in their metadata that limits the number of
records that can be requested for at one time. The value of this attribute is taken into account when determining the size of name ranges.
Otherwise, the system default name ranges to 200 records for both TAPIR and BioCASe, and 900 records for DiGIR.
DEBUGGING HINT 1: The only reason that the name ranges file couldn't be generated is if the inventoried list of scientific names was empty,
or all scientific names were invalid. Note that scientific names containing SQL breaking characters such as "&" are still included, but the
breaking characters are replaced automatically. Therefore at this level there is a data quality check on scientific names, and any errors are
outputted as log messages to the "Console".
DEBUGGING HINT 2: Often the reason a harvest does not retrieve 100% of a dataset/resource's records is that not all records are covered
by the name ranges that have been generated. From the expanded BioDatasource in the BioDatasources list in the "Datasources" tab, you
can view the name ranges file directly from within the browser. Compare this file against the inventoried.txt file for any inconsistencies.
5.5.1.3 Harvest
In this operation, an Operator (BioDatasource) reads the name ranges file outputted from the Process Inventoried operation
(nameRanges.txt) and dispatches a search request for all records greater than or equal to the lower name range, and less than or equal
to the upper name range. Where a single request fails to bring back all records for a particular name range, the system automatically
generates additional requests asking for the next records until all records for that range have been harvested. Name ranges are iterated
over one after the other, from start to finish, until all name ranges have been covered. It is in this way that a data publisher's whole
dataset/resource gets harvested.
The outputs from this operation are:
1. One or more search requests (with enumerated extensions corresponding to the order in which they were dispatched, i.e.
search_request.000)
2. One or more search responses (with enumerated extensions corresponding to the order in which they were dispatched, i.e.
search_response.000). Often, there will only be a single response per request, but sometimes there can be multiple responses for a
single request!)
While this operation runs, two files are constantly being generated and regenerated:
1. failedNameRanges.txt maintains a list of all name ranges that couldn't finish successfully. The existence of this file allows the system
to re-run the harvest particularly for those ranges that have failed and need extra attention.
2. pendingNameRanges.txt maintains a list of all name ranges that have yet to be read. The existence of this file allows the system to
pick up where it left off, in the event that harvesting gets interrupted for some reason (i.e. the machine on which the HIT is running
goes down).
(Picture below shows output log messages from a successful harvest operation)
USER TAKE NOTE 1: For large datasets the harvest can take an extremely long time. For example, a TAPIR dataset having 3 million records
would take a week to complete, varying of course according to connectivity speed, etc).
USER TAKE NOTE 2: The user can monitor all harvest operations which have been started, and are still running, by paying attention to the
"Harvested Start" column in the BioDatasources list on the "Datasources" page. (see picture below)
DEBUGGING HINT 1: The most common reason that a search response is invalid, is that it contains an XML breaking character. When a
name range representing 500 records fails, for example, it could be due to a single invalid record and as a result the other 499 records do not
get harvested. In an effort to harvest as many records as possible, and help the user identify where the breaking characters are found, the
system will break a request that fails into several smaller requests. Keep a careful eye on the output log messages for which responses are
invalid, and provide feedback to the data publisher which will help them improve the quality of their dataset.
DEBUGGING HINT 2: With thousands of output log messages being generated, sometimes it's more convenient to look at a BioDatasource's
rolling log file for aggregated view of its activity. This file is available from a link underneath the available options in an expanded
BioDatasource in the BioDatasources list.
5.5.1.4 Process harvested records
In this operation, an Operator (BioDatasource) will collect all the search responses, parse them, and write the parsed values to file.
Mapping files identify which XML elements are to be parsed. The file(s) written are then used during indexing to synchronise the
harvested records with the database.
The outputs from this operation depend on which encoding was used to wrap the response.
If the response was encoded using DwC, there is a single output file:
1. harvested.txt - a 'flat' tab delimited text file containing a header line with column names (See picture below)
If the response was encoded using ABCD, there is one core file:
1. unit_records.txt - a tab delimited text file containing a header line with column names, with each line representing a single Unit
(record) element.
and six additional files all relating back to the core file, and thus handling for the hierarchical structure of ABCD responses (versus the
flat structure of DwC responses):
1. image_records.txt - a tab delimited text file containing a header line with column names, with each line representing a multimedia
record relating to a given Unit (record) element.
2. identifier_records.txt - a tab delimited text file containing a header line with column names, with each line representing an identifier
record (i.e. GUID) relating to a given Unit (record).
3. identification_records.txt - a tab delimited text file containing a header line with column names, with each line representing an
Identification element relating to a given Unit (record) element.
4. higher_taxon_records.txt - a tab delimited text file containing a header line with column names, with each line representing higher
taxon elements relating to an Identification element, which ultimately relates to some Unit (record) element.
5. link_records.txt - a tab delimited text file containing a header line with column names, with each line representing a link record (i.e.
URL) relating to a given Unit (record) element.
6. typification_records.txt - a tab delimited text file containing a header line with column names, with each line representing a
typification record (i.e. type status) relating to a given Unit (record) element.
USER TAKE NOTE 1: Out of the box, the HIT is configured for parsing only those elements that are of interest to GBIF, or in other words, that
fit into the GBIF Portal data structure. If wanting to index into a different data structure, and thus parse a different set of elements of interest,
you could refer to the sections Adding a New Synchroniser and Modifying an Index Mapping .
USER TAKE NOTE 2: The user can monitor all harvest operations which have completed by paying attention to the "Last Harvested" column
in the BioDatasources list on the "Datasources" page. In addition, the "Dropped", "Harvested", and "Max Harvested" columns will get updated
reflecting the harvesting statistics. (See picture below)
DEBUGGING HINT 1: Simply put, the reason no (or not all) records are processed and the output harvested file(s) are empty (or incomplete)
is that not all response files could be processed, or they didn't actually contain any records. The reasons for this may vary greatly, and you
should analyse the output log messages on the "Console" tab carefully.
5.5.2 How to monitor the operation(s)
Similar to advice that has been reiterated before - check the "Console" tab, filtered by BioDatasource.
5.5.3 How to debug the operation(s) (if necessary)
The order of operations is important. And because one operation usually depends on one preceding it, it's usually best practice to start
checking for problems from the bottome up: first with the inventory, then the process inventory, then the harvest, and then the process
harvested.
5.5.4 Some additional information
5.6 Indexing
Indexing is the act of synchronising the processed harvested records (stored as intermediary text files) with a database, and performing the
necessary data quality checks and processing to get the information into an appropriate format. Out of the box, the HIT is capable of indexing into
the GBIF Portal data structure. The whole indexing process is divided into two parts which will be explained below: Synchronise and Extract.
5.6.1 How to run the operation(s)
For brevity, all the operations mentioned in this section are run in a similar fashion to the Metadata Update operation, except that they are
run via a Operator (BioDatasource): "tick the checkbox & schedule".
5.6.1.1 Synchronise
In this operation, an Operator (BioDatasource) reads the harvested record file(s) output from the Process Harvested operation. For each
(core) record, the system checks whether it already exists or not. The check for uniqueness is based on three required fields that each
record must have: collection code, institution code, and [http://rs.tdwg.org/dwc/terms/#catalogNumber catalog number . If the record does
not exist, it gets added. If the record is found to exist, however, the corresponding record is updated with the new record's information.
At this level there is some data quality checking taking place. Namely:
date fields such as the collection date and identification date will get will get validated.
existence of none, multiple preferred, or multiple unpreferred higher taxonomic identifications will get flagged.
usage of an invalid type status will be ignored.
etc, ...
(Picture below shows output log messages from a successful synchronise operation)
USER TAKE NOTE 1: In terms of the information that gets stored in the GBIF Portal database, a core record can also have multiple images,
identifiers, typifications, or links associated to it. Here is a breakdown of the various tables that could get populated during synchronisation,
depending on the information that's associated to each record:
portal.raw_occurrence_record: core record information, i.e. scientific name, country, etc.
portal.image_record: multimedia information associated to a core (raw_occurrence_record) record, i.e. an image URL
portal.identifier_record: identifier information associated to a core (raw_occurrence_record) record, i.e. a GUID or LSID
portal.typification_record: typification information associated to a core (raw_occurrence_record) record, i.e. its type status
portal.link_record: links associated to a core (raw_occurrence_record) record, i.e. some species page URL
5.6.1.2 Extract
In this operation, an Operator (BioDatasource) will extract the "raw" records that were stored during the synchronisation operation,
performing further data quality validation and classifying the record against the GBIF nub taxonomy (please see this page for more
information on the GBIF nub taxonomy. Successfully passing through this stage, a record ends up in a state where it's ready for
accession via the GBIF Portal.
The data quality checks taking place here include:
longitude/latitude coordinates are checked against the specified country to ensure that the record is georeferenced accurately.
the scientific name and taxonomic information are all validated in the aforementioned classification.
the basis of record name is validated against a controlled vocabulary
etc, ...
(Picture below shows output log messages from a successful extract operation)
USER TAKE NOTE: Here is a breakdown of the various tables that could get populated during extraction, depending of course on the
information that has been stored for each "raw" record.
portal.occurrence_record: core record information, having been classified now against the GBIF nub taxonomy.
5.6.2 How to monitor the operation(s)
While synchronisation runs, log messages are being output to the HIT's "Console" tab so that the process can be monitored. Note that for
very large data resources, synchronisation can take quite a while (approximately 1 million records/hour). In addition, log messages are
also being written to a table in the GBIF Portal database called portal.gbif_log_message. Such log messages are those that will appear
in the GBIF Portal for example, and provide back information to the data publisher about the success of the attempt to index their data
resource.
5.6.3 How to debug the operation(s) (if necessary)
If information is not being synchronised with the database correctly, it is suggested that you check:
Did the data get harvested correctly into the intermediate text file(s) generated during the Process Harvested operation?
If some data is misrepresented, i.e. it falls into the wrong columns in the table, you could check to see that the right index mapping
file is getting used, and that its mappings are in fact correct.
If some record's term/concept isn't getting synchronised at all with the raw_occurrence_record table, ensure again that the correct
index mapping file is being used, and that the term/concept of interest is mapped and that the corresponding XPath is correct (used
to parse the XML response for that term/concept)
If information is getting synchronised with the database correctly, but it is not getting exposed in the Portal sitting atop the GBIF Portal
database, it is suggested you check the indexing history page, available by data resource in the Portal.
5.6.4 Some additional information
Harvested records information is not the only information that gets indexed! At the beginning of indexing, the following metadata also
gets synchronised:
data publisher contact information - synchronised with the portal.agent and portal.data_provider_agent tables.
data resource contact information - synchronised with the portal.agent and portal.data_resource_agent tables.
data publisher information - synchronised with the portal.data_provider table.
data resource information = sycnchronised with the portal.data_resource table.
additional resource access point information for that data resource - synchronised with the portal.resource_access_point table.
It is in this way that each contact is assigned a unique agent identifier, each data publisher is assigned a unique data_provider identifier,
each data resource is assigned a unique data_resource identifier, and each data_resource's access point url is assigned a unique
unique resource_access_point identifier.
►
Sign in to add a comment
Terms - Privacy - Project Hosting Help
Powered by Google Project Hosting