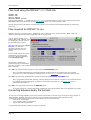
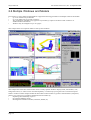
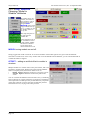
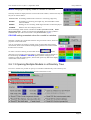
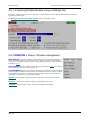
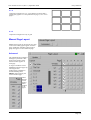
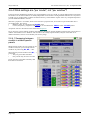
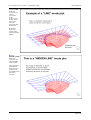
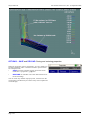
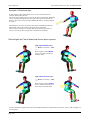
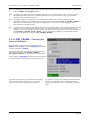
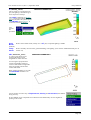
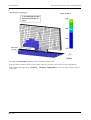
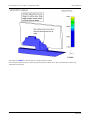
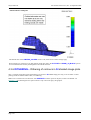
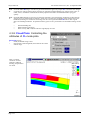
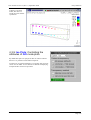
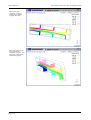
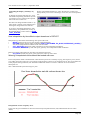
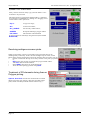
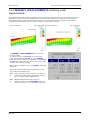
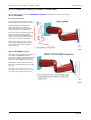
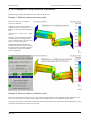
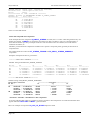
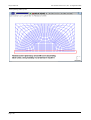
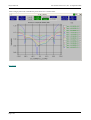
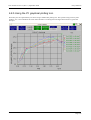
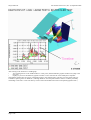
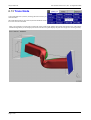
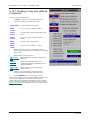
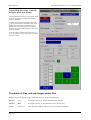
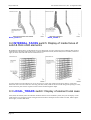
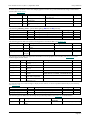
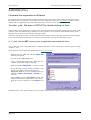
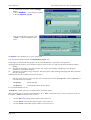
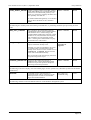
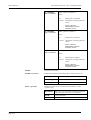
1
For help and support from OASYS please contact:
UK
Arup Group Ltd
The Arup Campus
Blythe Gate
Blythe Valley Park
Solihull
West Midlands
B90 8AE
United Kingdom
Tel:
+44 (0) 121 213 3399
Fax:
+44 (0) 121 213 3302
Email: [email protected]
Web: www.oasys-software.com/dyna
China
Arup
39/F-41/F
Huai Hai Plaza
Huai Hai Road (M)
Shanghai
China 200031
Tel:
+86 21 6126 2875
Fax:
+86 21 6126 2882
Email: [email protected]
Web: www.oasys-software.com/dyna
India
Arup
Plot 39, Ananth Info Park
Opp. Oracle Campus
HiTec City
Madhapur Phase II
Hyderabad 500081
India
Tel:
+91 40 4436 9797/98
Email: [email protected]
Web: www.oasys-software.com/dyna
or contact your local Oasys distributor
LS-DYNA, LS-OPT and LS-PrePost are registered trademarks of Livermore Software Technology Corporation
User manual Version 9.3, Rev. 0, September 2008
0 Preamble
Acknowledgements
Abstract
Host computers
Memory requirements
Output devices
New Features for Version 9.3RC1
New Features for Version 9.2
New Features for Version 9.0
New Features for Version 8.3
New Features for Version 8.2
New Features for version 8.1
New Features for version 8.0a
Manual Revision History
Text conventions used in this manual
1 LS-DYNA FEATURES SUPPORTED BY D3PLOT
1.1 Element Types
1.2 Types of results processed by D3PLOT
1.3 D3PLOT Representation of Elements and Other Entities
1.4 LS-DYNA output files processed.
Permitted gaps in family member sequences
2 RUNNING D3PLOT
2.1 Starting the code
2.2 Selecting a graphics device.
2.3 If D3PLOT will not open a window on your display
2.4 Client/server graphics using X-Windows and OpenGL
2.5 Memory Management
2.6 Multiple Windows and Models
2.7 Checkpoint Files
3 USING THE D3PLOT SCREEN MENU SYSTEM
3.1 Basic screen menu layout
3.2 Mouse and keyboard usage for screen-menu interface
3.3 Dialogue input in the screen menu interface
3.4 Window management in the screen interface
3.5 "QUICK PICK" Options.
3.6 "Tabs" for multiple graphics windows.
3.7 Customising the User Interface
3.8 Shortcut Keys
4 BASIC DATA EXTRACTION AND PLOTTING
4.1 Reading results from an analysis.
4.2 Displaying geometry and results.
4.3 Controlling contouring of data plots: CONTOUR
4.4 Animation How to display, control, store and retrieve animation sequences.
4.5 STATUS Listing programme status
5 VIEWING CONTROL
5.1 Dynamic Viewing (Using the mouse to change views).
5.2 Viewing Control Buttons
5.3 Options under Viewing menu
5.4 Special 3D graphics driver options (OpenGL).
6 USING "TOOLS" OPTIONS
6.0 Introduction to main menu commands
6.1 BLANK “Blanking” controls the visibility of nodes and elements.
6.2 VOLUME_CLIPPING
6.3 DEFORM Deforming geometry.
6.4 CUT_SECTIONS
6.5 ENTITY Switching the display of entity categories on/off.
6.7 WRITE Listing numerical data to screen and/or file.
6.8 XY_DATA Drawing numerical data as XY plots and/or writing it to file
6.9 UTILITIES Miscellaneous utility functions
6.10 GROUPS:
6.11 Coarsen
6.12 T/HIS the D3PLOT <=> T/HIS link
6.13 Trace Node
6.14 User Data
7 IMAGES
7.0 Creating static images and movies
7.1 Static file formats supported
7.2 Animation file formats supported and their attributes
7.3 LASER PLOTTING
7.4 Reading static images and movies
7.5 Watermarks
Oasys D3PLOT
0.1
0.1
0.1
0.1
0.1
0.1
0.2
0.2
0.3
0.3
0.4
0.4
0.4
0.5
0.5
1.1
1.1
1.3
1.4
1.6
1.10
2.1
2.1
2.2
2.3
2.4
2.5
2.6
2.20
3.1
3.1
3.2
3.5
3.5
3.7
3.9
3.9
3.13
4.1
4.1
4.14
4.57
4.76
4.94
5.1
5.1
5.3
5.6
5.13
6.1
6.1
6.5
6.10
6.19
6.37
6.56
6.62
6.79
6.101
6.136
6.140
6.145
6.154
6.161
7.1
7.1
7.5
7.7
7.11
7.20
7.24
Page i
Oasys D3PLOT
User manual Version 9.3, Rev. 0, September 2008
7.6 Print ... option (Windows platforms only)
8 COMMAND AND SESSION FILES
8.0 Introduction to Command and Session Files.
8.1 CFILE Invoking the command-file launcher box.
8.2 Recording “session” files.
8.3 Playing back “command” files.
8.4 Using the “launcher” box during recording and playback
8.5 More information about command and session files
8.6 Associating command files with Function keys
8.7 Running command files from the command line.
9 DISPLAY_OPTIONS:
9.1 BACK_FACES switch: Display of “back” faces of solid and thick shell elements
9.2 INTERNAL_FACES switch: Display of inside faces of solid & thick shell elements
9.3 LOCAL_TRIADS switch: Display of element local axes
9.4 MODEL_BOX switch: Displaying the model external dimensions
9.5 UNDEFORMED... menu Displaying the undeformed geometry
9.6 SPRING_SYMBOLS... menu: Setting the drawing style for springs and dampers
9.7 BEAM_SYMBOLS... menu: Setting the drawing style for beams.
9.8 BELT_SYMBOLS... menu: Setting the sizes of seat-belt and related symbols.
9.9 SPH Symbols. Managing SPH element display.
9.10 AB Pcle Symbols: Managing Airbag Particle display
9.11 Other Symbols: controlling further symbols
9.12 HIDDEN_OPTIONS... menu: Setting hidden-line display options.
9.13 FREE_EDGES... menu: Controlling free edge display of element borders
9.14 WINDOW_DRESSING... menu: Controlling screen appearance.
9.15 Graphics text factor
10 PART TREE
10.1 Part Tree Behaviour
10.2 Part tree top menu bar
11 The Javascript Interface
11.0 Introduction
11.1 Using Javascript in D3PLOT.
11.2 The D3PLOT Javascript API
12 MORE ABOUT DATA AND DATA COMPONENTS
12.0 Introduction to this section on data and data components.
12.1 Format of the LS-DYNA databases processed by D3PLOT
12.2 Contents of the LS-DYNA database files processed by D3PLOT
12.3 Global (whole model) data components
12.4 Part ("material") data components
12.5 Contact Surface summary components
12.6 Nodal data components
12.7 Solid element data components.
12.8 Thin Shell element results.
12.9 Thick shell element results
12.10 Beam element results
12.11 Contact segment results
12.12 Smooth Particle Hydrodynamic (SPH) Data components
12.13 Airbag Particle (ABP) data components
12.14 Data components for other entity types
12.15 Theory and Formulae
13 D3PLOT USE OF GRAPHICS HARDWARE
13.1 The "X" (X_Windows) 2-D protocol.
13.2 3D protocol: OpenGL.
13.3 Summary of capabilities of each graphics protocol
14 PROBLEM SOLVING
14.1 Problems reading files:
14.2 General graphics problems:
14.3 Memory consumption problems.
14.4 Graphics problems peculiar to X_Windows devices.
14.5 Graphics problems peculiar to OpenGL
14.6 Miscellaneous problems.
14.7 MEMORY Viewing and controlling the memory usage for this process, and the whole machine.
Appendices
APPENDIX I PROGRAMME LIMITATIONS
APPENDIX II OA_PREF FILE: SETTING USER PREFERENCES
APPENDIX III CHANGED DEFAULTS THAT AFFECT APPEARANCE
APPENDIX IV COMMAND LINE OPTIONS AND WINDOWS FILE ASSOCIATIONS
APPENDIX V ENVIRONMENT VARIABLES USED BY D3PLOT
APPENDIX VII DIALOGUE COMMAND SYNTAX
APPENDIX VI JAVASCRIPT API
Page ii
7.25
8.1
8.1
8.2
8.2
8.5
8.6
8.7
8.8
8.8
9.1
9.1
9.2
9.2
9.3
9.4
9.6
9.6
9.7
9.8
9.9
9.10
9.11
9.15
9.20
9.22
10.1
10.1
10.3
11.1
11.1
11.1
11.5
12.1
12.1
12.2
12.6
12.13
12.15
12.16
12.17
12.21
12.25
12.32
12.36
12.37
12.41
12.42
12.44
12.45
13.1
13.1
13.2
13.3
14.1
14.1
14.3
14.4
14.4
14.7
14.8
14.8
A.1
A.1
A.2
A.11
A.13
A.17
A.26
A.47
User manual Version 9.3, Rev. 0, September 2008
Oasys D3PLOT
0 Preamble
Acknowledgements
The names LS-DYNA, LS-PREPOST and LS-OPT are all registered trademarks of the Livermore Software
Technology Corporation (LSTC) and are used in this manual by permission.
Abstract
Transient analyses make much more sense when one is able to see how the results change with time. Most existing
post-processors only allow you to draw one image at a time and, while it is possible to assemble a sequence, producing
a set of results can be very tedious.
This code allows you to access the LS-DYNA database directly and to draw line, hidden-line, continuous-tone, line
contour, velocity arrow, greyscale and shaded-image plots for any results state in the file. It also allows you to store
these images in the display device memory and to redraw them in sequence and so to produce animated graphics.
Host computers
The code is available for all commonly used operating systems: Windows, Unix and Linux in 32 and 64 bit modes. It is
available on all common work-stations and mainframes.
Memory requirements
Memory is allocated dynamically, so the amount required rises in proportion to the problem size. However machines
with less than 64 MBytes of physical memory (RAM) are unlikely to function satisfactorily.
Output devices
The code supports the following graphics devices:
OpenGL
3-D, hardware assisted graphics
X_Windows
2-D unaccelerated graphics
Images may be captured in the following formats:
Animated "movie" formats:
AVI
MPEG
AVI animation files
MPEG animation files
Static "image" formats
BMP
JPEG
PNG
GIF
BMP (bitmap) static image files
JPEG static image files
PNG (Portable Network Graphics) static image files
GIF (Graphics Interchange Format) static image files
Postscript
PDF
Colour and greyscale laser plotting
Colour and greyscale Portable Document Format (PDF) output
External animations and static images may also be imported for display in the following formats:
BMP }
JPEG } For display of static images
PNG }
GIF
Page 0.1
Oasys D3PLOT
User manual Version 9.3, Rev. 0, September 2008
AVI For display of animated images
New Features for Version 9.3RC1
Static and Movie "image" output has been greatly enhanced:
•
PNG and GIF formats have been added to the library of static image formats that may be written
•
The MJPEG codec has been added to AVI movie output format, giving smaller and better quality files.
•
Colour palette optimisation has been added for 8 bit image output, giving better colour distribution
•
Images can be captured at 2x and 4x screen resolution if desired.
Laser file plotting has been improved and extended.
•
Laser images are now captured directly from the display (like GIF, JPEG, etc), rather than by generating a 2D
vector-style plot.
•
As well as traditional Postscript (.ps) format it is now possible to write Portable Document Format (.pdf) format
files.
New capability to read in static and movie images for display have been added:
•
BMP, GIF, JPEG and PNG format static images may be displayed as static window background.
•
AVI files may be displayed as animated window background, or in separate windows, synchronised with model
animations.
•
A "watermark" capability to display transparent images on top of the current image has been added.
A new capability to define, store, compute and display "user-defined" data components has been added.
•
Any number of nodal or element user-defined data components may be created.
•
These may be scalar, vector or tensor; and they may have arbitrary names.
•
They may come from any permuation of the following sources:
•
Read from externally generated data file
•
Calculated internally from existing components via "simple formulae"
•
Calculated externally from existing components or other data via a Javascript interface
•
The simple formulae and Javascript files can be saved and re-used across different analyses
The ability to select display via contour bands has been added:
•
Clicking on a contour band will display just results for that band
•
It is also possible, via a right-click popup menu, to display by other functions of contour band.
External data ("blob") plots can now be defined at nodes as well as at [x,y,z] coordinates.
Vectors of displacement and acceleration can now be displayed. (Previously this was only possible for velocities)
In addition if user-defined vector components are created at nodes these too may be displayed as vector arrows.
New Features for Version 9.2
The user interface has been completely redesigned to be more consistent with other Oasys products, giving a common
"look and feel", in particular:
•
Most common function panel function now occupy a tabbed working area on the right of the screen
•
Keyboard short-cuts have been added for many functions
•
The "entity" panel has been completely redesigned to conform to Oasys PRIMER layout
•
Screen selection has been improved with many unnecessary button clicks eliminated.
•
In general fewer button clicks should be needed to drive the software.
A "Part tree" has been added, giving a tree-style display of model contents, and most graphics functions may be
invoked from the tree. If a .ztf file (from Oasys PRIMER) is present then this tree will also show information about
include files and assemblies.
The cut-section function has been enhanced as follows:
•
The main panel layout has been condensed and simplified, making it much quicker and easier to define cut
sections.
•
Dragging of sections has also been simplified, with rapid access to the most common operations.
•
Optional dynamic feedback of current section forces when dragging has been added.
•
A new "LS Dyna Method" way of defining sections has been added, with input identical to the
*DATABASE_SECTION card
•
If a .ztf file is present cut section definitions may be imported directly from the LS-DYNA model input deck.
•
The force calculation method for "basic space" sections has been revised to use LS-DYNA’s approach.
Automatic mesh coarsening has been added to speed up the display of large shell element models. If used the process is
Page 0.2
User manual Version 9.3, Rev. 0, September 2008
Oasys D3PLOT
fully automatic, and graphics speed increases of 2x to 3x or better can be achieved at the expense of a slight degradation
of image quality.
Rendering has also been speeded up internally to give faster performance on some hardware where long runs of
contiguous "mesh strips" can be processed quickly.
A new "external data" function has been added which will superimpose externally generated data on current images.
This is normally used to add information such as externally calculated model parameters as discrete symbols on plots.
A new "trace nodes" function has been added to allow the historical path of nodes to be plotted through the states in an
analysis.
A new "Iso surface" plotting mode has been added which plots contours of constant value in 2D and 3D meshes.
A new "Cloud" plotting mode has been added to represent data by point symbols on items.
The existing "SI" (Shaded Image) plotting mode now defaults to solid banded contours with lighting, but the original
gouraud shaded ("fuzzy") contouring method is still available.
The XY plotting panel has been enhanced as follows:
•
A new "Data vs Data" extraction and plotting mode is provided, plotting X vs Y components over time.
•
A data sorting function has been added for the "Composite" plotting mode, allowing curve points to be
re-ordered
•
Control over filenames (.cur files) has been improved.
•
The XY plotting tool itself has been improved, with better file saving syntax and a sorting tool for curves.
•
Curve data transfer to linked T/HIS (when active) has been speeded up.
Data transfer via the ".ztf" file (ex Oasys PRIMER) has been enhanced to give:
•
The ability to visualise node-based contacts (only segmented contact geometry appears in the .ctf file)
•
The ability to extract and draw "true" beam sections
Limited support for ALE analyses has been added, with the ability to process components by name and also to visualise
the surface geometry of ALE parts. This is work in progress ...
The Oasys T/HIS interface has been improved. It is now far more robust and better integrated with D3PLOT and, in
particular, can handle multiple models in a more compatible way.
New Features for Version 9.0
The ability to display multiple models in windows is added, removing the "one model per window" limitation in V8.3.
Significant changes to the user interface have been made to accomodate multiple model handling.
The general ability to process multiple models is greatly enhanced, and in particular models may be overlaid or
artificially separated in a window, and they may be given different colours and display styles to distinguish them.
The ability to compare results across models (reference model/state) is added, allowing the differences between models
to be computed and displayed. Models that are compared in this way do not have to be identical, but they do need to be
reasonably similar if the results are to make sense.
Groups have been totally rewritten, removing the limit of 30 groups and provided automatic storage of those defined. A
new ascii group file format, which is common to T/HIS and Primer, is also added. Backwards compatibility with old
group files is retained.
Extra options have been added to the user interface making it more configurable, in particular font sizes, type face and
left-handed support are now all configurable.
New Features for Version 8.3
Ability to display multiple windows added: up to 20 windows may be displayed concurrently.
Ability to handle multiple models added: up to 20 models may be processed concurrently.
Link with Oasys T/HIS added: automatically opens T/HIS, extracts time history data and permits full T/HIS processing.
Time-history items can be visualised.
Native PC graphics: both 3D (OpenGL) and 2D graphics now use native Windows drivers, no longer any need for X11
Page 0.3
Oasys D3PLOT
User manual Version 9.3, Rev. 0, September 2008
emulators.
Improvements to cut-sections: better capping display of 2D elements, and sections may be dragged interactively with
the mouse.
Programme start-up speed improved: time to first plot and first run through animation sequence approximately halved.
"Settings" file added: saves and retrieves layout and settings of multiple windows.
Function keys F1 .. F12 may be programmed with command files.
Optional automatic read of model properties file at model input time.
"Checkpoint" file added: saves all commands verbatim for replay, and aids crash recovery.
New Features for Version 8.2
Results database modified and improved:
•
Reduced memory usage on Unix/Linux platforms via optional caching of data
•
Data extraction and averaging speed improved.
•
Animation speed improved.
Shell integration point data extraction and plotting now includes min/max/magnitude over all points through thickness
JPEG (still image) and MPEG (animations) file output added, and dithering added to 8 bit-plane BMP files to improve
quality.
User manual (this manual) converted to HTML, with direct access via links in the HELP messages in the code itself.
"Feature" lines added as wireframe, hidden-line and overlay option.
More "oa_pref" and command-line options added - see appendices II and IV.
New Features for version 8.1
New static database added that contains the following data items. 1.4
Nodes on NODE_TO_SURFACE contacts
Spotweld Beams (section 6.4.7)
Nodal constaints and restraints (sections 6.5.1-6.5.2)
New Features for version 8.0a
Description
Section
"Quick-pick" blanking and attribute change has been added.
3.6
The blanking menu has been revised.
6.1
The properties file (prp file) in the props menus is now model independent.
3.1
Changes to the layout and appearance of the d3plot window have been made.
The viewing "zoom" command now uses the "one-touch" method.
Command line options and windows file associations App IV
Page 0.4
User manual Version 9.3, Rev. 0, September 2008
Oasys D3PLOT
Manual Revision History
Date Revision Description
May 2001 0 Original release of Version 8.1 manual
Nov 2002 1 Manual updated for Version 8.3 Beta 3
Nov 2003 2 Manual updated for Version 9.0
May 2006 3 Manual revised and updated for Version 9.2
May 2007 4 Manual revised and Updated for Version 9.3RC1
Text conventions used in this manual
TYPEFACES:
Three different typefaces are used in this manual:
Manual text
This typeface is used for text in this manual.
Computer type This one is used to show what the computer types. It is also used
for equations etc.
Operator type
This one is used to show what you must type.
Button text
This one is used for screen menu buttons (eg APPLY)
NOTATION: -
Triangular, round and square brackets have been used as follows:
Triangular
To show generic items, and special keys. For example:
<list of integers> <filename> <data component>
<return> <control Z> <escape>
Round
To show optional items during input, for example:
<command> (<optional command>) (<optional number>)
And also to show defaults when the computer prompts you, eg:
Square
Give new value (10) :
Give data component (FX_AXIAL_FORCE) :
To show advisory information at computer prompts, eg
Give terminal type [M for list] :
D3PLOT_MANAGER >>> [H for Help] :
Also to show implicit commands, eg
[WRITE] SCAN <entity> <number of values>
Page 0.5
Oasys D3PLOT
Page 0.6
User manual Version 9.3, Rev. 0, September 2008
User manual Version 9.3, Rev. 0, September 2008
Oasys D3PLOT
1 LS-DYNA FEATURES SUPPORTED BY
D3PLOT
1.1 Element Types
The following entity types in LS-DYNA can be processed in D3PLOT:
Solid Elements
8 noded "bricks" (hexahedra), and the elements they degenerate to: "wedges" and
tetrahedra.
Thin Shells
4 noded quadrilaterals and 3 noded triangles.
Thick Shells
8 noded shells.
Beams
2 noded beams.
Discrete elements
Springs, dampers, lumped masses.
Seat-belt elements
Belts themselves, slip-rings and retractors.
SPH elements
Smooth Particle Hydrodynamic "sphere" elements (V9.3 onwards)
Airbag Particles
The particles used in the Airbag Particle inflator method (V9.3 onwards)
Contact surfaces
LS-DYNA models impact, friction, sliding, etc by the use of contact surfaces that can
be thought of as two-dimensional elements overlaying the surfaces of solid and/or shell
models.
These are not true elements, but rather sub-areas, so to prevent confusion they will be
referred to as interface "segments" from now on.
Using the .XTF file from
LS-DYNA
In LS-DYNA joint, lumped-mass and stonewall geometries are sent to the .XTF file
and so may be recovered for plotting in D3PLOT. However results from these are not
available for plotting in D3PLOT: they may be viewed in XY plot form in Oasys
T/HIS.
Alternatives to
the .XTF file when
using MPP LS-DYNA
MPP LS-DYNA, and also SMP versions from ls970 onwards can also generate a
"binout" (or LSDA) file; and the MPP version cannot generate a .XTF file. D3PLOT
does not read this file directly, but from V90 onwards the information previously
extracted from the .XTF file is now available from the .ZTF file - see below.
Page 1.1
Oasys D3PLOT
Using the .ZTF
file
User manual Version 9.3, Rev. 0, September 2008
Oasys PRIMER can generate a pseudo-database .ZTF file directly from the input deck.
This is intended to contain extra information not in the normal LS-DYNA database
files, and also to replace the .ZTF file.
In V8.3 the ZTF file allows you to visualise:
•
Nodes on "nodes_to_..." contacts.
•
Nodal constraints and restraints
•
Spotweld beams.
From V9.0 onwards you may also visualise the following even when the .XTF file is
missing:
•
Stonewalls (rigid walls)
•
Springs and dampers
•
Seatbelt elements, retractors, slip-rings and pre-tensioners
•
Joints
•
Lumped masses
In addition the names of parts and contacts, previously stored in the .XTF file, are also
available.
From V9.2 onwards you may also visualise:
•
Beam "true" sections
•
Part tree: organised by include files, assemblies and sub-assemblies (as in Oasys
PRIMER)
From V9.3 onwards:
•
Discrete and Seatbelt elements can be processed by PART
•
Part, Part_composite and Section data are available
In addition ls-dyna cut-section definitions (*DATABASE_CROSS_SECTION) may
be used to defined D3PLOT cut sections
If the T/HIS link is invoked then elements and nodes in time-history blocks can be
displayed, and screen picked for time-history plotting.
Data for other entities are not sent to any database files, so they are not displayed.
D3PLOT is primarily for post-processing results from LS-DYNA, but results from TOPAZ3D (thermal analysis) and
NIKE3D (implicit structural analysis) may also be processed. Both codes write a subset of the entity types listed above.
Page 1.2
User manual Version 9.3, Rev. 0, September 2008
Oasys D3PLOT
1.2 Types of results processed by D3PLOT
LS-DYNA is a three-dimensional non-linear analysis code which models the transient behaviour of structures in the
time domain. The output you may process graphically in D3PLOT is shown by category below, together with the
intrinsic coordinate system in which it is written by LS-DYNA.
ENTITY TYPE
DATA GENERATED
COORDINATE SYSTEM
Nodes:
Coordinates
Velocities
Accelerations
Temperatures
Global cartesian
""
""
[none]
Solids: (1)
Stress tensor
Plastic strain
Strain tensor (optional)
Global cartesian
[none]
Global cartesian
Thin shells: (2)
Stress tensor
Strain tensor (optional)
Forces and moments
Plastic strain
Thickness
Strain energy density
Global cartesian
""
Element local
[none]
[none]
[none]
Thick shells: (2)
Stress tensor
Plastic strain
Strain tensor (optional)
Global cartesian
[none]
Global cartesian
Beams: (3)
Forces and moments
Plastic data (optional)
Stress/strain data (optional)
Element local
""
""
SPH elements:
(4)
Airbag particles:
Contact surfaces
(4)
Stress tensor
Plastic strain
Strain tensor
Density
Pressure
Internal energy
Radius of influence
Also:
#neighbours
Global cartesian
[none]
Global cartesian
[none]
""
""
""
Mass
Also:
Radius
Spin energy
Gas ID
Trans energy
Leakage state
Distance to nearest segment
Coordinates
Velocities
[none]
""
""
""
""
Global cartesian
Global cartesian
Contact stresses
Contact forces
Segment local
Global cartesian
(1) Results for solids are written by LS-DYNA at the element centre only, even if an element formulation with > 1
integration point is used. Solid results from NIKE3D are written at all 8 integration points.
(2) By default shell stress and strain tensor results are written at top and bottom integration points, and stresses also
at the neutral axis. Data output at more than these 3 points through the element thickness may be selected, and
will be available for display if present. Fully integrated shells in ls-dyna with more than 1 integration point on
plan still only write (averaged) data at the element centre.
(3) As well as basic forces and moments extra "plastic" data from resultant beams, and data at integration points for
integrated beams are supported.
(4) SPH and Airbag particle data are only processed from D3PLOT release 9.3 onwards.
D3PLOT will generate derived data components, (eg von Mises, principal, etc) from the above, and will also transform
results from global to local coordinate systems if required.
In addition the following written output may be generated for more "global" model data.
Page 1.3
Oasys D3PLOT
User manual Version 9.3, Rev. 0, September 2008
ENTITY TYPE
DATA COMPONENT
COORDINATE SYSTEM
Whole model
Average velocity & momentum
Kinetic and internal energies
Mass
Global cartesian
[none]
[none]
Each material
Average velocity & momentum
Kinetic and internal energies
Mass
Global cartesian
[none]
[none]
Contact surfaces
Summary forces
Global cartesian
Airbags (of Airbag particles) Volume
[none]
Stonewalls
Normal force
Local vector
Any data component written for nodes or elements that is actually present in the database files may be plotted
graphically, presented as an X-Y plot of <data> vs <time> (or vs <data>), and written out in tabular form. This is also
true of components derived from the basic ones.
In addition many geometric and topological attributes of nodes and elements (eg material number, elements connected
to nodes) may be tabulated.
Any scalar data component may be "scanned" for maximum / minimum values, and tables of the top and bottom values
produced.
Although their topology is extracted and they are displayed visually the results for springs, joints, seat-belts etc, are not
available for plotting in D3PLOT. This is because these data are not currently available in the appropriate database files.
1.3 D3PLOT Representation of Elements and Other Entities
The three figures below show examples of how each of these types appear as drawn by Oasys D3PLOT. They also
show the labelling conventions used:
Entity Type
Labelled
Solids
Thin Shells
Thick Shells
H...
S...
T...
Beams
Springs / Dampers
Seat-belts
Slip-rings
Retractors
Lumped-masses
B...
SP..
SB..
SR..
RT..
LM..
SPH Elements
Airbag Particles
These elements may be drawn as points, cubes or spheres.
This is controlled in Display Options
HP..
AP..
Contact Segments
Stonewalls
Joints
I...
W...
J...
Nodes
N...
Note the following:
a) Arbitrary numbering of nodes, elements and materials in LS-DYNA is supported. This covers nodes, solids,
shells, beams, springs, seat-belt types and lumped-masses. Joints, stonewalls and contact segments are all
numbered sequentially from 1.
b) Springs, seat-belt types, lumped-masses, joints and stonewalls are only recovered and drawn if an "extra
time-history" (.XTF) file is found - this file is optional. Only the topologies of these elements are extracted: use
Oasys T/HIS to extract and plot time-history results for these elements.
c) Contact segments are only recovered and drawn if a "contact force" (.CTF) file is found - this file is optional.
Page 1.4
User manual Version 9.3, Rev. 0, September 2008
Oasys D3PLOT
d) These figures show the symbols used on 2D devices. When 3D graphics is used some symbols are slightly
different: springs become a spiral, damper symbols become a three-dimensional dashpot, joint circles become
spherical, "thick" beams have rectangular sections. This is done to make symbols meaningful regardless of how
the view is oriented in 3D space.
Solids shells and thick shells
Springs, beams, lumped masses and seatbelt elements
Page 1.5
Oasys D3PLOT
User manual Version 9.3, Rev. 0, September 2008
Contacts, stonewalls and joints
The next section describes in more detail which element categories are found in which files.
1.4 LS-DYNA output files processed.
D3PLOT reads the Oasys LS-DYNA binary database files directly. No intermediate translation is required and results
can be viewed while an analysis is running.
The database files processed are (see Section 12.2 for more details):
Complete state (plot) file
<name>.ptf
This file contains the undeformed geometry of the model, followed by complete dumps of its current geometry. It
contains information about:
Nodes:
Coordinates, velocities, accelerations, temperatures.
Solids:
Stresses, strains, (extra data).
Beams:
Forces, moments, plastic rotations, plastic strains.
Thin shells:
Stresses, strains, force & moment resultants, strain energy density, thickness, (extra data).
Thick shells:
Stresses, strains, (extra data).
"Global" data:
Material energies, masses and velocities; normal force on stonewalls.
The file also contains information about deleted elements if the relevant material models and/or contact surfaces are
used.
Page 1.6
User manual Version 9.3, Rev. 0, September 2008
Oasys D3PLOT
Extra time-history file
<name>.xtf (See also under T/HIS link below)
This file contains miscellaneous "time-history" data about the
model. D3PLOT reads only the following basic topology and
coordinates from it:
Springs:
Spring, damper & seat-belt geometry.
Seat-belt types:
Seat-belt, retractor and slip-ring
geometry.
Lumped-masses:
Geometry and mass.
Joints:
Geometry and type.
Stonewalls:
Geometry, mass and topology.
This file also contains the names of parts and contacts, which
will be displayed in menus if available.
Contact force file
<name>.ctf
This file contains information about contact
surfaces:
Contact facets:
Topology, contact
stress.
Nodes on facets: Contact forces.
Extra “static” database file
<name>.ztf
This file is not generated by LS-DYNA itself, but rather by running Oasys PRIMER on the relevant input deck. (This
can be done automatically from the Oasys shell).
It is a "static" file (ie no time-history data) that contains information about:
Nodes on
NODE_TO_...
contacts
The nodes on the "nodal" side of these contacts will become visible as "diamond" symbols.
However no force data is recovered on these nodes.
Nodal restraints
& constraints
For each of the six degrees of freedom of every node any restraint or constraint due to SPCs,
*CONSTRAINED items, rigid bodies, inclusion on TIED or CONSTRAINT contacts, etc is
stored. These DoFs can be displayed.
Beam section data By storing beam element section data it becomes possible for D3PLOT to "know" which beams
are spotwelds (ie section type 9 using *MAT_SPOTWELD) and to draw them as spotwelds.
Part and Section
data
From V9.3 onwards the *PART(_xxx) and *SECTION_xxx cards are written verbatim to the
.ZTF file, making it possible to extract thickness and layer information. In addition it becomes
possible to associate the Part ids of Springs and Seatbelt elements with those used by solids,
shells and beams making it possible to operate on these "by part".
From V9.0 onwards, where the .XTF may not be present, this file also contains all the information previously stored
in the .XTF file so that there is no loss of functionality.
Page 1.7
Oasys D3PLOT
User manual Version 9.3, Rev. 0, September 2008
Files read using the D3PLOT <=> T/HIS link
<name>.thf
<name>.xtf
<ascii files>
<binout(LSDA) files>
If the optional D3PLOT <=> T/HIS link (see section 6.12) is used then D3PLOT gains access to the time-history data
embedded in these files. (Ordinarily access to the .XTF file above only extracts geometry data).
The link permits nodes and elements in time-history blocks to be visualised and selected graphically for time-history
processing.
Files required for D3PLOT to run.
D3PLOT must have a complete state (.ptf) file in order to function. If any of the other files (.xtf,.ctf and
.ztf) are missing then the entities within them will not be processed.
You can choose whether or not
read the xtf, ctf and ztf files
by checking the relevant boxes on
the front file selection panel.
Here the contact force file ("Read
CTF file", etc) has been
de-selected, but the other two
database files will be read if
present.
In V9.3 a ztf file can be created
automatically if required if the
input (.key) deck is available by
ticking Create if req’d.
Three further, optional files
generated from previous D3PLOT
runs may be read in: (none of these
files is required)
The "PRP" file contains model properties, written from the PROPERTIES panel.
This is a model-independent file of element and node properties that can be applied to the current model.
"Properties" are colour, transparency, blanking status, etc. See section 6.9 for more information about this file.
The "SET" file containing saved D3PLOT settings written from the UTILITIES, SETTINGS panel.
This is programme-specific data, allowing virtually all the options on the user interface to be saved and restored.
For example the number and layout of windows, current data components, etc. See section 6.9 for more
information about this file.
The "ASC" ascii groups file written from the GROUPS panel.
An ascii groups file is a compact and human readable file of group information that can be applied to any model.
Converting between binary file formats.
In version 8.0 onwards of D3PLOT conversion of binary file formats to the native type of the processing computer is
fully automatic: database files may be generated on one computer and post-processed on another with an
incompatible binary format and/or precision. Specifically the conversions between:
•
64 to 32 bit word lengths.
•
Cray to IEEE numeric representation.
•
Big to little endian organisation
are performed automatically without any input from the user.
Page 1.8
User manual Version 9.3, Rev. 0, September 2008
Oasys D3PLOT
Database filename syntax
D3PLOT supports all the following database filename syntax options from current and previous releases of Oasys
LS-DYNA:
"Old" syntax (pre release
6.0)
"New" syntax, release 6.0
onwards
Default filenames if none
defined
Database filenames <name>.ptf, .p01
<name>.xtf, .x01
<name>.ctf, .c01
<name>.ptf,
<name>.xtf,
<name>.ctf,
<name.ztf>,
d3plot, d3plot01
xtfile, xtfile01
(none)
ztfile, n/a
Permitted #chars
4 in <name>
3 in <ext>
<name> + <ext> any
number less than 80
n/a
Max #family
members
99
999
999
Pathname
permitted
No
Yes
Yes
.ptf01
.xtf01
.ctf01
(n/a)
Binary file family member size
In D3PLOT 8.0 onwards the determination of binary file family member size is automatic by default. D3PLOT takes
the actual size of files, rounded up to the nearest Mbyte, as being the effective size for a given family and no further
intervention by the user is required.
This can be overridden by giving an explicit size when the file is opened, or subsequently, or by setting the
environment variable FAM_SIZE to an explicit size in MB. For example on a UNIX system:
setenv FAM_SIZE 1
(1MByte family, C shell syntax)
FAM_SIZE=9, export FAM_SIZE
(9MByte family, Bourne shell syntax)
Any family size is legal, but it is suggested that it be a multiple of 1MByte on single precision machines. On machines
generating double precision (64 bit) output files the same numbers (ie 1 and 9 in the examples above) should be used,
but the actual file sizes will be 2 and 18 MBytes respectively. This is covered in more detail in Section 12.1.2
Page 1.9
Oasys D3PLOT
User manual Version 9.3, Rev. 0, September 2008
Permitted gaps in family member sequences
It is possible to skip over gaps in file family member sequences. The "file skip" variable may be set when files are read
in, and when the code is running. This is covered in more detail in Section 12.1.3.
It is also possible to change this globally on UNIX systems by setting the FILE_SKIP environment variable. For
example:
setenv FILE_SKIP 5
(Skip 5 files, C shell syntax)
FILE_SKIP=9, export FILE_SKIP
(Skip 9 files, Bourne shell syntax)
On some installations these variables are set globally for all users in the Oasys_81 shell - consult your system
manager.
Hint: On UNIX systems you can list all environment variables in the current shell with:
printenv
On Windows systems use Control Panel, System to view and set environment variables.
If they seem to be set correctly, but don’t seem to be affecting your process, remember that such variables
must be set before the process starts. This is because a child process inherits properties of its parent when it
starts, but thereafter is autonomous. You may need to exit and restart the process to make them take effect.
Page 1.10
User manual Version 9.3, Rev. 0, September 2008
Oasys D3PLOT
2 RUNNING D3PLOT
2.1 Starting the code
For users on a device with a window manager D3PLOT is run from the D3PLOT button in the OASYS_93 shell:
Users who are running on a device without a window manager should use the PL option in the command-line
OASYS_93 shell.
Users on Windows platforms may associate the filetype ".ptf" with D3PLOT if they wish, so that double-clicking on a
.ptf file starts the code. The way to do this is defined in Appendix IV.
If your system has been customised locally you may have to use some other command or icon: consult your system
manager in this case.
Page 2.1
Oasys D3PLOT
User manual Version 9.3, Rev. 0, September 2008
2.1.1 The Checkpoint File panel.
A "Checkpoint" file saves all
commands and mouse actions
during a D3PLOT session. It is
deleted when the code terminates
normally, but is left on disk if a
crash, system failure or some other
abnormal termination occurs.
If you see the checkpoint file panel
when the code starts this means
that a previous D3PLOT run has
crashed, and recovery is possible.
Checkpoint files are described in
section 2.7
2.2 Selecting a graphics device.
You will not see this panel on a Windows platform, where OpenGL is automatically selected.
On a Unix/Linux platform if your installation has been customised with a graphics device specified on the
command-line ("-d=<device>") you will also not see this panel.
To customise startup see Appendix IV.
When D3PLOT starts you will see the device selection panel:
The actual devices available will depend on your machine type and the graphics options that have been installed. The
graphics drivers available are:
Page 2.2
User manual Version 9.3, Rev. 0, September 2008
Oasys D3PLOT
X8
2D X-Windows graphics at 8 bit-planes depth. This will be faster to animate than X24 below, but
shaded image quality will be mediocre (using only 256 colours).
X24
2D X-Windows graphics at 24 bit-plane depth. Slower to animate than X8, but shaded image quality
will be good (using 16M colours).
XMENU...
2D X-Windows under a user-defined visual. (See below)
OpenGL
3D OpenGL rendering, using hardware acceleration if available.
Scale
Brightness
Saturation
Fonts
Controls the effective
scale of the display used
for the menu interface.
Controls colour
brightness in the menu
interface
Controls colour
saturation in the menu
interface
Controls the fonts used
in the menu interface.
In D3PLOT release 9.2 these display attributes can all be modified
interactively using the Options > Menu Attributes popup panel, and this
is the preferred method as the effects of changes can be viewed instantly and
settings can be stored automatically in the "oa_pref" file.
This is described in section 3.7
Which graphics option should I use?
The simple answers are:
You should use OpenGL if:
•
Your machine supports it with hardware acceleration. Graphics will be faster than X-windows, and special
features such as shading, lighting and transparency are also much better
You should use an X-Windows option if:
•
OpenGL is not available (button greyed out).
•
Your model requires too much memory to be processed under OpenGL (2D graphics are much less
memory-hungry).
•
You are working in client/server mode over a slow network. (The network traffic generated by 2D graphics is
less)
From release 9 onwards the X driver is no longer being developed, and it will increasingly be the case that new
features are not supported in it.
An alternative, using the MESA OpenGL emulator under X11 is available: please contact Oasys if you would like to
use this option.
There are more complex answers to this question which depend upon:
•
Model size vs. memory available.
•
The rendering method chosen.
•
The number of frames you plan to animate.
•
Whether image quality or speed is more important.
•
Local/remote machine types if in client/server modeNetwork performance in
client/server mode
There is a longer discussion in Section 13, refer to this if you have problems.
2.3 If D3PLOT will not open a window on your display
If you get a message stating:
Could not open display <hostname>:0
and no window appears, you have failed to make a connection with the X11 server.
(Note that OpenGL also uses the X11 server, so this section is equally applicable to both X-windows and OpenGL
graphics.)
Page 2.3
Oasys D3PLOT
User manual Version 9.3, Rev. 0, September 2008
This is almost certainly because of one or both of the following setup errors:
The DISPLAY environment variable has not been set up, or has been set incorrectly, on the "client" machine
(1) (where the D3PLOT process is running).
This environment variable tells the X11 window manager on the client machine where to place windows, and it
must be set to point to the screen you plan to use. Its generic Unix setup string is:
setenv DISPLAY <hostname>:<display number> ( C shell syntax)
Where <hostname> is your machine’s name or internet address, for example:
setenv DISPLAY :0
(Default display :0 on this machine)
setenv DISPLAY tigger:0
(Default display :0 on machine "tigger")
setenv DISPLAY 69.177.15.2:0
(Default display :0, address 69.177.15.2)
You may have to use the raw network address if the machine name has not been added to your /etc/hosts
file, or possibly the "yellow pages" server hosts file.
(2) The machine on which you are attempting to open the window, the X11 "server", has not been told to accept
window manager requests from remote clients.
This is often the case when you are trying to display from a remote machine over a network, and you get a
message on the lines of:
Xlib: connection to "<hostname>" refused by server
Xlib: Client is not authorised to connect to server
In this case go to any window on the server with a Unix prompt and type:
xhost +
Which tells its window manager to accept requests from any remote client. It will produce a confirmatory
message, which will be something like:
access control disabled, clients can connect from any host
Networked graphics are a complex topic: see Section 13 for more detailed advice if the remedies here don’t work.
Alternatively see your system manager, or contact Oasys for advice and help.
2.4 Client/server graphics using X-Windows and OpenGL
It is relatively common to display 2D X-windows graphics from remote hosts on a local server. However it is less well
known that exactly the same mechanism can also be used to display 3D graphics under OpenGL.
This can be a very efficient solution to the problem of rapid display of large datasets since the tasks of computing and
displaying the graphics and, just as importantly, the memory consumption, are split over two machines. Both machines
must be OpenGL compatible for this to work.
To do this:
Set the DISPLAY environment variable on the client to point to the server (2.1 above).
Start D3PLOT in the normal way and read in the model.
Select OBJECT display mode (States Box, ANIM >, DISPLAY MODE, OBJECT)
This will have the effect of storing all graphics as OpenGL "objects" in the server, making animation and redraw speed
extremely fast. However keep an eye on memory consumption of the server: objects may be fast but they use a
horrendous amount of memory.
Page 2.4
User manual Version 9.3, Rev. 0, September 2008
Oasys D3PLOT
2.5 Memory Management
Do I need to worry about this? Unless your machine is showing signs of running out of memory the answer is no.
There is a simple way to tell if this is the case:
If the Memory button bars are both green you have no
problems. If either turn dark orange you may need to take
some action.
The top one shows this D3PLOT process size as a proportion of available physical memory on the machine. If this
exceeds about 85% (and goes dark orange) the performance of the code may start to degrade as it starts to page (use
virtual memory, or "swap"), although it will continue to run.
The lower one shows swap space usage (by all applications) as a proportion of total swap space available on the
machine. If this exceeds about 90% you may have to take action to free some space from elsewhere. (A machine with
no free swap space will simply stop, and may need rebooting!)
There are alarms built into the code which will warn you if you are approaching either of these limits, so you don’t
have to keep checking memory consumption.
If a memory alarm pops up ...
•
The memory use of this process can be managed by controlling how much data is stored in the results
database, and also by changing the animation display method.
•
Swap space is used by all processes on your computer, and it may be possible to free space by shutting down
other processes.
A more detailed description of memory management, and the functions available under the description of the
MEM(ory) button.
Click here for the next section
Page 2.5
Oasys D3PLOT
User manual Version 9.3, Rev. 0, September 2008
2.6 Multiple Windows and Models
From release 9.3 (Nov 2008) onwards D3PLOT supports the following permutation of multiple windows and models.
•
Up to 32 windows may be defined.
•
Up to 32 models may be current in memory.
•
Any permutation of model(s) may appear in any window(s), subject to the limit of 100 "instances" of
window/model combinations.
•
Windows may be arranged on up to 32 "pages".
This example shows four separate models in four separate windows.
This example also shows how each window can have totally separate attributes: display mode, state number, view,
background colour, etc. These can be controlled separately or collectively by using the "tabs" on each menu panel.
Where a window contains multiple models all that models in that window are given the same attributes (component,
surface, etc); however it is possible to distinguish between models by:
•
Separating them artificially in space
•
Giving them different colours
•
Drawing them in different modes (wireframe, shaded, etc)
Page 2.6
User manual Version 9.3, Rev. 0, September 2008
Oasys D3PLOT
2.6.1 FILE > Popup: Opening, Closing and Rereading Models
The OPEN NEW MODEL command maps the standard input file selection panel
(see section 4.1)
Each new model will be opened in a new window. Up to 20 models may be held
concurrently in the database, but you should note that they all compete for the
same memory resources in the computer and that performance may be badly
affected if you try to read in too much data.
When you CLOSE a model all windows that display it only will also be closed,
and the model’s storage deleted from memory. You are warned before this
happens.
RESCAN should be used when an analysis is still running and you want to search
for more states.
REREAD is equivalent to a Close/Reopen sequence: it completely rereads a
model from scratch, and should be used if a model has been rerun. It should also be
used when an adaptively remeshed file family has been extended
2.6.1.1 Choosing which window(s) to read a new model into.
The first model opened is always read into window 1, but models after that may choose which windows they will
become active in.
By default they are read into a new window, the "next" one,
but you can select any other window(s) as destinations using
the "In Window" buttons.
Any permutation of buttons may be selected, and the new
model will become active in those windows.
You can subsequently activate and de-activate models in any window at will by using the EDIT WINDOW popup
menu described below. This also allows you to separate models, set their drawing mode and also their colour.
Page 2.7
Oasys D3PLOT
User manual Version 9.3, Rev. 0, September 2008
2.6.1.2 EDIT WINDOW
Changing "Model in
Window" attributes
The models active in a
window, and some of
their attributes, can be
changed at any time
using the EDIT
WINDOW option in the
popup linked to the top
left [-] button, or from
the window menu on
the top bar.
This maps the panel to
the right, here for
window W1.
In this example 2 out of
the 3 models are active
in this window. Model
M2 has been offset in
screen space and is
drawn wireframe in red.
MODEL turning models on and off.
Simply toggle each model on and off. To see more attributes of the model right click to get its title and filename.
Note that if a model is not active in any window then it will be deleted from the database, you are warned and made to
confirm this before it happens.
OFFSET... adding an artifical offset to models in
windows.
Multiple models in a window often overlay one another, and it can
be useful to separate them. Right-click on the relevant OFFSET...
button to map this panel, then choose offsets in one of:
•
Model Space. Shifts the model in its own space system.
•
Screen Space. Shifts the model in the plane of the
screen.
You can visualise the difference between these two by considering
how two dancers on a stage would react to rotation by 180 degrees
when separated. In model space they would effectively swap sides
of the stage; whereas in screen space they would each pirouette
about their own toes, staying in the same positions.
Page 2.8
User manual Version 9.3, Rev. 0, September 2008
Oasys D3PLOT
MODE changing the display mode of a model in a window
Normally models are displayed in the current mode of the window, whatever that may be,
but you can restrict them to:
WIREFRAME No shading, hidden-surface removal or contouring; edges only.
HIDDEN
No shading or contouring, and edges only, but with hidden surface
removal enabled
SHADED
Shading, but no contouring. Both edges and and lit surfaces displayed
CURRENT
Whatever the current display mode is.
The actual display mode used for a model will be min(current mode, mode
selected here). In other words selecting SHADED here will only produce a
WIREFRAME plot if the current mode is only WIREFRAME (eg LI)
COLOUR setting a constant colour for a model in a window.
Normally a window in a model will be drawn using its normal colours, which are
properties of the model itself.
You can override this by setting a constant colour for the model which will be
used instead, which can be useful for distinguishing between two similar models
that have been overlaid.
To return to normal colouring for the model use the
button.
(Note that you can achieve the same effect by changing the colour of elements in
the model using the PROPs or COLOUR panels, but this will apply to all
windows in which the model appears, whereas this option only affects the display
of the model in this window.)
2.6.1.3 Opening Multiple Models in a Directory Tree
From V9.3 onwards it is possible to open up to 32 models simultaneously from a directory tree.
See Search Directories Recursively for more information on this.
Page 2.9
Oasys D3PLOT
User manual Version 9.3, Rev. 0, September 2008
2.6.1.4 Opening Multiple Models using a Settings File
From V9.3 onwards it is also possible to open up to 32 individually chosen models with the attributes and layout
specified in a Settings file.
See Settings file including window layout for more information on this.
2.6.2 WINDOW > Popup: Window management.
NEW WINDOW creates new windows. If there is more than one model in memory you
have to choose the model to be placed in the new window. The newly created window
will always be numbered as the next free one in the labelling sequence, and positioned in
its default "layout".
EDIT WINDOW raises the window content editing panel described above once you have
selected which window you want to operate on.
CLOSE WINDOW allows you to close any permutation of windows. If you close all the
windows used by a model then that model is also deleted from memory. When a window
in the middle of a sequence is closed the remaining windows above it are renumbered
downwards so that there are no gaps in the sequence.
SELECT > is the "global" window tab selector. This topic is covered in more detail
below.
LAYOUT... controls how multiple windows are organised on the screen.
OPTIONS... controls further aspects of window management and display.
Page 2.10
User manual Version 9.3, Rev. 0, September 2008
Oasys D3PLOT
2.6.2.1 Window LAYOUT...
Windows can be laid out using a number of
different formats and can be organised into
’Pages’.
Automatic Page Layout
If an Automatic page layout is used and the
layout is set to 1 x 1, 2 x 2, 3 x 3 or X x Y
D3PLOT will automatically create multiple
pages and position the windows on each
page if required.
Tile Wide
All of the graphs are positioned on a single page.
Page 2.11
Oasys D3PLOT
Tile Tall
All of the graphs are positioned on a single page.
Cascade
All of the graphs are positioned on a single page
1x1
Each graph is positioned on it’s own page.
2x2
Graphs are arranged in a 2 by 2 grid. If there are more than 4
graphs then graphs 1 to 4 are positioned on page 1, 5 to 8 on page
2 ...
Page 2.12
User manual Version 9.3, Rev. 0, September 2008
User manual Version 9.3, Rev. 0, September 2008
Oasys D3PLOT
3x3
Graphs are arranged in a 3 by 3 grid. If there are more than 9
graphs then graphs 1 to 9 are positioned on page 1, 10 to 18 on
page 2 ...
XxY
Graphs are arranged in a X by Y grid.
Manual Page Layout
Manual page layout can be used to give more
control over which graphs appear on which
page. Unlike the Automatic page layouts a
graph can appear on more than one page.
Advanced
The Advanced option displays
the Page Layout menu. This
menu can be used to select
which windows appear on
each page.
A range of windows can be
added/removed from pages by
selecting the first
window/page combination
and then holding down
SHIFT while selecting the
second window/page.
These
buttons
can be
used to
add a
window
to all
pages.
Page 2.13
Oasys D3PLOT
User manual Version 9.3, Rev. 0, September 2008
These buttons can be used to add all windows to a page.
The Layout options work in exactly the same way as the Automatic Page Layout options,
except they only position the graphs defined on each page.
If for example D3PLOT has 6 windows defined and windows 2,3,4,5 are defined on page 1
and windows 1 and 6 are on page 2 then the different window layout options would produce
the following.
Page 1
Tile Wide
Tile Tall
Page 2.14
Page 2
User manual Version 9.3, Rev. 0, September 2008
Oasys D3PLOT
Cascade
1x1
(stacked on top of
each other)
2x2
3x3
XxY
Layout depends on X and Y
Layout depends on X and Y
Page 2.15
Oasys D3PLOT
User manual Version 9.3, Rev. 0, September 2008
2.6.2.2 Window
Options...
"Auto-hide graphics button
bar" automatically maps the button
bar at the top of each window when
the cursor enters that window, and
hides it again when the cursor leaves.
This can be useful when you have
many windows, or a small display, as
it maximises the amount of space
available for graphics. By default
auto-hide is off, and the button bar is
permanently displayed in all graphics
windows.
"Show window tabs on panels"
controls whether or not the W1, W2,
... "tabs" for multiple graphics
windows are displayed at the top of
menu panels. If these are suppressed
you will not be able to control the
application of commands to windows
on a per-panel basis. Window "tabs"
are discussed in more detail below.
2.6.3 Controlling how commands apply to Windows.
When there is only one graphics window current then there is no ambiguity about where commands issued in menu
panels apply, but once two or more windows are current the situation becomes more complicated. For example you may
want to contour X stress in window 1, but Y stress in window 2.
Page 2.16
User manual Version 9.3, Rev. 0, September 2008
Oasys D3PLOT
To handle this problem D3PLOT automatically adds "tabs" (W1, W2, ...) for each
graphics window to most menu panels when two or more graphics windows are
present.
Using Wn tabs on menu panels.
Commands in menu panels will only apply to those graphics windows for which the Wn tab buttons are pressed. In the
example above all four windows will be affected when commands are given in this panel. If a tab buttons is deselected
then subsequent commands in this panel will not apply to that graphics window.
Some further rules apply:
•
Each top level menu panel tabs selection is independent. Deselecting a tab button in one panel will not affect any
other top level panels on the display.
•
Selections propagate downwards to newly mapped children. For example if the Component panel is invoked
from the Current Operations one it will initially inherit its parent’s tab selection. However it is not limited to
this and can subsequently be changed.
•
The current status of a menu panel is influenced by its tabs setting as follows:
•
Where only one status word is displayable (eg component, shell surface) the first active window’s value is
shown.
•
Where status button is mixed (eg ON in window 1, OFF in window 2) then "ON" will be shown, but on a
grey rather than coloured background.
•
If no tabs are active then the whole panel will be de-activated.
Propagating settings for a panel: the ==> button.
Sometimes you may want to propagate settings from one window to others. This can be done in a limited way on a "per
menu panel" basis using the ==> button, which:
•
Takes the settings for the first active window in that panel;
•
Copies them to all subsequent active windows.
This is mostly commonly used in the View Control panel to make all windows have the same view as W1.
Using the Wn buttons on graphics windows.
Each graphics window has its number given in the Wn button at its top left corner. which can
be used to toggle on/off that window’s tabs in all current menu panels.
When the Wn button is toggled OFF:
•
The border round the graphics window changes from light blue to grey
•
The Wn tab in all active menu panels is toggled off, and the panels updated.
Here the W1 button for
window #1 is shown.
When it is toggled on again the opposite occurs.
This is simply a quick way of changing the tab status of all active menu panels: the window is
not de-activated in any way, it can still be drawn in, and the local tab for this window can still
be changed on any menu panel.
WINDOW > Select ... (De-)Selecting all windows.
It is possible to select and deselect all windows.
This is equivalent of toggling the Wn buttons on all graphics windows on
(ALL) or off (NONE), and all menu panels will be affected.
Page 2.17
Oasys D3PLOT
User manual Version 9.3, Rev. 0, September 2008
2.6.4 What settings are "per model", not "per window"?
It will be obvious that different windows may present different views of a model, or contour different data components;
but windows on the same model are not totally independent of one another. Storing detailed attributes for every item in
a model on a per window basis would be wasteful of memory, and would also require some very complicated panels to
provide detailed feedback to the user.
Therefore "properties" of a model, which can be stored in a properties file, are stored on a per-model rather than a
per-window basis. This means:
•
Blanking status; as controlled in the BLANK panel.
•
Colour, transparency, brightness and shininess; as controlled in the PROPs and/or COLOUR panels.
"Properties" files are described in more detail under Properties.
If it is necessary to have multiple windows with different blanking or element attribute properties then you will have to
read the same model in twice. D3PLOT will treat this as two totally separate models, and you will be able to set
different attributes, however it will double your memory usage.
2.6.4.1 Swapping between
models in model-specific
panels
Model-specific panels can only operate on one
model at a time, but you can swap between
models at any time using M1, M2, ... tabs.
These function just like window tabs (W1, ...)
except that:
•
They are green rather than blue
•
Only one tab may be active at a time
If you only have one model in memory then
these tabs are not drawn.
Page 2.18
User manual Version 9.3, Rev. 0, September 2008
Oasys D3PLOT
2.6.5 Handling multiple models and multiple windows
Where multiple windows exist on a single model there is no possibility for conflicts between windows when commands
are applied. However when multiple models have been read in lots of potential problems arise, to name just a few:
•
Models may have different numbers of states, at different times.
•
Some models may contain data components that don’t appear in others
•
Models may contain different types of element
D3PLOT has to protect itself against internal conflicts arising from attempts to impose invalid settings on windows, and
also has to allow the user to manipulate multiple model settings in a simple way. So the following rules apply where
multiple, dissimilar models are current:
•
Where a panel would apply an invalid setting to a model no action is taken. For example turning on spring labels
in a model that contains no springs will have no effect. Note that the feedback in a menu panel is generally for
the first active window, so to see the status of the 2nd or subsequent models it may be necessary to adjust the
tabs so that the model in question is the "first active" one for that panel.
•
The State Number slider will show the highest state number of all the current models. If it is set to a state that
doesn’t exist in a given model then no action will occur in the windows of that model. Selecting state #n with this
slider will make state #n in each window current, regardless of whether or not the times of this state in different
models match.
•
Contexts implying selection, eg BLANK, WRITE, XY_DATA, will force you to specify which model you plan
to select from. The tabs in that panel which apply to other models will be deselected, and any attempt to select
them will fail with "mixed model" error messages. Therefore you cannot pick or select from multiple models at
the same time.
2.6.5.1 How models with dissimilar states are animated.
By default models are animated in numerical state sequence, with no attempt being made to synchronise models or
windows by time. A summary of behaviour is:
•
Multiple models in separate windows
Each window animates in step from frames 1 to <n>, but no window will "loop back" to frame 1 until the
window with the greatest number of frames has finished. Therefore those windows with fewer frames will wait
at the end of each cycle for the window with longest sequence to complete. This "stepping together" by frame
does not take into account the clock time of each frame, so windows that are "in step" by frame number will not
necessarily be synchronised in time.
•
Multiple models in the same window:
Each model in the window starts animating at state #1, and continues until the last state in that model is
encountered. If one model has fewer states than another one then it remains at its last state until the other model
reaches its last state. Then all models start in synchronisation at state #1 again. Again, synchronisation is "by
frame" not "by time", so frames in different models may not have the same analysis time.
•
Synchronising models in time.
It is possible to interpolate between states, and by stipulating a fixed time interval you can synchronise animation
of multiple models in time. This can be done both for models within a window, and for models across multiple
windows.
This topic is covered in more detail under the SET_STATES command, which describes how to select what is to be
animated.
2.6.6 Comparing results between models.
It is possible to derive results in one model with respect to another - essentially by subtracting data in Model B from
that in Model A. This is done in the DEFORM, REFERENCE STATE/MODEL panel. Briefly:
•
You can plot data and coordinates relative to a state in the current model.
•
You can also plot relative to a state (or the current state) in a different "reference" model.
For example you can plot the difference between two analyses where you have changed a section property, or remeshed
an area.
Data is compared using labels, for example the data for node 100 in Model B is subtracted from that for node 100 in
Model A. Therefore the models need not be identical, but they do need to be topologically similar for this to work. In
particular comparisons in regions which have been remeshed are likely to be unsatisfactory.
In future releases we hope to perform "geographically" based comparison, where the node or element in Model B
Page 2.19
Oasys D3PLOT
User manual Version 9.3, Rev. 0, September 2008
nearest to that in Model A is used, removing the dependency upon identical labels.
2.6.7 Some special multiple window cases.
The IMAGES and MOVIES panel
Images may be made from one or more windows, according to which tabs are selected, see Images for more
information.
2.7 Checkpoint Files
From V8.3 onwards D3PLOT automatically records every command and mouse action in a "checkpoint" file. If the
session terminates normally this is deleted, but if a crash occurs this file will be left on disk giving you the opportunity
to recover your work.
Checkpoint files have the name "cp_D3PLOT_9.3_<pid>" where <pid> is the current process id, ensuring that the
filename is unique. They are normally written in the current directory, but if this is read-only they are written in
$HOME or, failing that, in $TMP.
2.7.1 Selecting a checkpoint file.
When D3PLOT is restarted after a crash it automatically detects any checkpoint files in the current directory (or, if this
is read-only, in $HOME or $TMP). These are displayed at startup in the special Checkpoint Files panel:
All checkpoint files found are listed in date/time order, with the most recent file at the top of the list. To use a
checkpoint file:
•
Select the file to run by clicking on its row.
•
Optionally delete some or all files using the DELETE > option.
•
Optionally reduce the "#commands to execute" to a smaller value, perhaps to omit the last command(s)
which caused a crash.
•
Click on APPLY to run the file.
In this example the user has selected the oldest file and is about to delete the remainder using the DELETE >
ALL_BUT_SELECTED option.
If you want to ignore all checkpoint files and run interactively just DISMISS this panel.
2.7.2 What happens when a checkpoint file runs.
Each command in the file is repeated verbatim, as if you had typed or mouse clicked it, until either the end of the file or
Page 2.20
User manual Version 9.3, Rev. 0, September 2008
Oasys D3PLOT
the "#commands to execute" value are reached. Thereafter the session returns to being interactive in the normal way. A
new checkpoint file is written which, initially, will be a copy of the one being played back, but will then contain any
further interactive commands.
2.7.3 Limitations of checkpoint files.
Although they are a powerful tool for recovering from crashes checkpoint files are not perfect. In particular they do not
include any information about elapsed time between commands, which can lead to differences during playback in two
situations:
•
When D3PLOT animates each frame is displayed in the "dead" time between user commands. In effect the code
says "Has the user given a command? No? Good, let’s animate another frame while he is thinking." Animation
will not actually commence during checkpoint file playback, even if PLAY > has been recorded, as there is no
"dead" time between successive commands in which to execute it.
Therefore if the session included animation the image which is on the screen may be different to that when the
checkpoint file was recorded, and this may affect the outcome of any screen picking operations. Some more
subtle consequences may also arise: for example contour bands may be different because the code has not yet
decided to autoscale bands over all frames in an animation sequence.
•
When the T/HIS <=> D3PLOT link is used this too may not play back correctly. The reason is that the two codes
run independently and talk to one another via inter-process communication. Because checkpoint file playback
leaves no intervals between successive commands, the remote programme (T/HIS) may not have had time to
perform the operations requested, and return results, so the sequence of stored commands may "run ahead" of
what is actually happening on the display and effectively give answers to questions that have yet to be asked.
Therefore checkpoint file playback of all but the simplest "linked" sessions is likely to fail because of the
asynchronous way in which the two codes are running.
We hope to address the issue of asynchronous behaviour in future releases, but for the time being these limitations
apply.
2.7.4 Sending checkpoint files back to Oasys for debugging.
We hope that you won’t experience crashes but, if you do, checkpoint files can help us to find and fix the problem as
they answer the question "can you tell us what you did to make it crash?".
However environment variables, settings in your oa_pref file, and any "settings" files can all influence how D3PLOT
runs; and we need these to replicate the status of the code when it crashed. So when you send us crash information
please could you include as much of the following as possible:
•
The checkpoint file(s) themselves.
•
A copy of all your "oa_pref" files: in $OASYS, $HOME and $cwd. (See Appendix II for details)
•
Any "settings" files (d3plotnnn.set)
•
Any environment variables that have been set (eg MENU_AUTO_CONFIRM, see Appendix IV for a list of these)
2.7.5 Preventing the reading and writing of checkpoint files
When performing batch (non-interactive) post-processing, for example driven by FAST-TCF or PRESENTER, you
are relying on running scripts of commands that assume a given programme state. These can be upset if checkpoint files
exist on disk since they will have no mechanism for dealing with them.
Therefore the environment variable SUPPRESS_CHECKPOINT may be set, with the following result:
•
Any existing checkpoint files will be ignored, and no questions asked about them
•
No checkpoint file will be written during this session.
This and other environment variables are explained in Appendix IV.
Page 2.21
Oasys D3PLOT
Page 2.22
User manual Version 9.3, Rev. 0, September 2008
User manual Version 9.3, Rev. 0, September 2008
Oasys D3PLOT
3 USING THE D3PLOT SCREEN MENU
SYSTEM
3.1 Basic screen menu layout
D3PLOT runs within a single window, owned by the window manager, which has several sub-windows inside it. A
typical D3PLOT session will look like this:
The various sub-windows always exist within the master window, and may be moved and resized at will inside it. They
will keep their relative size and position as the master window is changed in size and/or shape, and will reappear after
the main window is de-iconised.
Their exact location and size will depend on the size and resolution of the display: you can use the DISPLAY_FACTOR
variable (see Section 2.2) to override default sizes and resolution.
The TIDY button in the icons box may be used at any time to restore this default layout: any unwanted sub-windows
will be closed and the screen will be restored to the appearance here.
Page 3.1
Oasys D3PLOT
User manual Version 9.3, Rev. 0, September 2008
The default layout of the main sub-windows is as follows:
Main Menu
Options
Provides access to the majority of the commands and options available in D3PLOT through a
series of sub menus
Graphics area
Is where graphics are drawn.
Dialogue & list
Allows "command-line" input and output, also provides a listing area for messages.
Menu Area
Displays the commands and options associated the current selection from the main menu
options.
Global
Commands
Gives access to commonly used commands
Animation
Controls states and what is displayed during animation
Controls
While you are free to re-position these master windows it is recommended that you keep to this default layout. This is
because when further sub-windows appear their position and size is designed assuming this layout, and aims to obscure
as little useful information as possible.
3.2 Mouse and keyboard usage for screen-menu interface
All screen-menu operations are driven with the left mouse button, with the following exceptions:
Text in the dialogue area and text boxes requires keyboard entry;
Text strings saved in the cursor "cut" buffer may be "pasted" into dialogue areas and text boxes using the middle
mouse button.
Popup" menus are invoked using the right mouse button.
The primitive "widgets" in the menu interface are used as follows:
Page 3.2
User manual Version 9.3, Rev. 0, September 2008
Oasys D3PLOT
BUTTONS:
Screen buttons are depressed by clicking on them, but
action only takes place when the mouse button is
released, so it is safe to drag the (depressed) mouse
around the screen.
Buttons may be set (ie depressed) by D3PLOT itself, for
example the Solids & Shells one above, to indicate that
this option is in force. They may also be greyed out, for
example the Cont Surfs one above, to indicate that the
option is not currently available. Some buttons repeat
automatically when held depressed: this depends on
context. Buttons with "..." after them will invoke
sub-menus.
SLIDERS:
Sliders are moved by clicking on the slider button itself, and then
dragging it to a new position. They may also be moved automatically by
clicking on, and holding down, one of the arrows at either end.
TEXT BOXES:
To enter text in a text box: first make it "live" by clicking on it, then type in
text, then type <return> to enter the string. Clicking on a "live" box for
a second time is exactly the same as typing <return>, so clicking twice
on a box effectively enters its current contents. You can use the left and
right arrow keys for line editing within a box: text entry takes place after the
current cursor position.
RADIO BOXES:
A "radio" set is provided where only one selection is possible from a range of options. In
this example the laser postscript output has been set to a single image per page. To select
click anywhere on the row of the relevant option, any previously selected item will be
deselected.
MENU LISTS:
Menus of items are used when you need to make one or more selections from a
(potentially) long list. Click on the row you want to select: clicking on a row that is
already selected will have the effect of unselecting it. When the list is too long to
display in the window you can use the vertical scroll-bars to move up and down it.
Page 3.3
Oasys D3PLOT
User manual Version 9.3, Rev. 0, September 2008
POPUP MENUS:
Where a button has a "right arrow" > symbol it means that a popup menu
is available.
Click the right mouse button and the menu will appear. Holding down
the right mouse button drag it onto the item you want.
Popup menus can be nested to any depth.
Note that popup menus can be invoked both from "clickable" buttons
and from"non-clickable" ones: it makes no difference to their
functionality.
Popup menu invoked from "clickable" OPTIONS> button
Popup menu invoked from "non-clickable" DEF> (colours) button
Page 3.4
User manual Version 9.3, Rev. 0, September 2008
Oasys D3PLOT
3.3 Dialogue input in the screen menu interface
The full command-line capability is preserved when D3PLOT is running in screen-menu mode, and you are free to
mix command-line and mouse-driven input at will. There are some situations in which command-line input is more
efficient: for example when entering lists of explicit entities.
Commands are entered in the dialogue box:
As this example shows the dialogue box is also used for listing messages, warnings and errors to the screen. It can be
scrolled back and forth (its buffer is 200 lines long) to review earlier messages. The following colours are used:
Normal messages and prompts
Yellow
Text typed in by you
White
Warning messages
Magenta
Error messages
Red
There is a minor limitation when mixing command-line and screen-menu mode: you cannot perform the same
function simultaneously in both modes. If you attempt to do so you will get the message:
WARNING: recursive access attempted
And you will not be permitted to continue. To clear this situation either close down the menu-based operation, or
return to the main menu ("/" command) in the dialogue box.
3.4 Window management in the screen interface
Moving, resizing and scrolling of windows is based on the conventions used in the Motif Window Manager.
To move a
window:
Click down on its title bar, then drag the window to where you want it to be. A
"rubber-band" outline moves to show the window’s current position. Where a window
does not have a top title bar click anywhere on its grey background and drag it.
To resize a
window:
Either Click on a border bar to move just that side, or on a corner bar to move both sides
attached to that corner. Again, a rubber-band outline shows you the new shape.
or
To scroll a
window:
Use the MAXIMISE
button in the top right hand corner of the window to
increase the size of the window to the largest required size.
If a window has got too small for its contents then horizontal and/or vertical scrollbars will
appear. Click on a scrollbar slider and move it to the desired position, the window contents
will scroll as you do so. Alternatively click on the arrows at either end of the scrollbar for
timed motion in that direction.
Page 3.5
Oasys D3PLOT
User manual Version 9.3, Rev. 0, September 2008
To iconise a
window:
Click on the ICONISE
To restore a
window:
Iconised windows may be restored by clicking on the icon in the ICON area.
Further
options:
Page 3.6
Click on the OPTIONS
button in the top right hand corner of the window.
button to get the drop-down menu of window management options:
RESTORE
Restores an iconised window
ICONISE
Iconises this window (see below for iconisation)
RAISE
Raises this window to the top of the stacking order.
LOWER
Lowers this window to the bottom of the stacking
order.
SAVE->BITMAP
Generates a windows bitmap (.bmp) file of the
sub-window. This is an uncompressed file with a
depth matching the number of bit-planes of the
window. (This often doesn’t work for the graphics
window, since it uses mixed "visuals": use the IMAGE
option instead for this.)
User manual Version 9.3, Rev. 0, September 2008
Oasys D3PLOT
3.5 "QUICK PICK" Options.
Across the top of the graphics area is a block of 2 buttons. These are referred to as the QUICK PICK ENTITY button
and the QUICK PICK OPERATION button in the following section.
By default the ENTITY and OPERATION buttons are set to PART and BLANK.
Possible operation types are:
BLANK (default)
Section 6.1
UNBLANK
Section 6.1
ONLY
Section 6.1
COLOUR
Section 4.2.2.2
TRANSPARENCY
Section 4.2.2.4
DISPLAY MODE
Section 4.2.2.2
LABEL
Section 6.4
OVERLAY MODE
Section 4.2.2.2
OVERLAY COLOUR
Section 4.2.2.2
BRIGHTNESS
Section 4.2.3
SHININESS
Section 4.2.3
LOCATE IN TREE
Section 10
PROPERTIES
Section 4.2.2.3
Whenever these buttons are visible in a graphics window "quick picking" is active, and the cursor is live. Mouse buttons
have the following functions:
Left
"Do" the operation. For example blank the entity if in BLANK mode, change its colour if in COLOUR
mode, etc. Drag across the screeen using the left mouse button to selecet multiple entities by area.
Middle
"Undo" the most recent operation. Thus unblank the last pick, etc.
Right
Raise the full options menu for the selected object type, giving the option of performing any of the
"quick" operations on it, regardless of the current mode.
In all cases the effect is immediate, for example clicking on a part to blank it results in the image being redrawn.
The ENTITY button can be used to access a popup
via the right mouse button to change the default
selection category from PART to any of the generic
element classes that the model contains ( PARTS,
NODES, SOLIDS, SHELLS, THICK SHELLS
BEAMS, SPRINGS etc).
Page 3.7
Oasys D3PLOT
User manual Version 9.3, Rev. 0, September 2008
PARTs are a special case:
The default setting for PART picking is to pick parts
of any eligible element type.
But because the default screen picking process will
tend to pick 2D and 3D elements (because they have
a finite area), it can be difficult to pick BEAM parts
if they overlay 2D or 3D mesh.
Therefore it is possible to restrict the type of part to
be picked by underlying element type.
In addition to being able to BLANK items the
OPERATION menu can be used to select the
operations listed above to apply to the items selected.
The OPTION button can then be used to select the
colour, transparency level, display mode etc that is
applied to the item when it is selected on the screen.
(Not all options will be available for parent item
types.)
All operations carried out using these options and the mouse are stored and can be undone using the MIDDLE mouse
button. Furthermore all of these options can be used while animating. To indicate which operation is currently active the
mouse symbol will change as is appropriate.
Page 3.8
User manual Version 9.3, Rev. 0, September 2008
Oasys D3PLOT
Labelling
Any permutation of of the following items can be selected for labelling, but note that
some can only apply to nodes and some to elements.
Item
Label
Draws the node or element label
Part
Number
Draws the number of the part the item belongs to
Nodal
coords
Draws the current [X,Y,Z]coorrdinates to the left of the node
Data
value
Draws the data value associated with the currently visible plot data(eg
CT,SI) to the left of the node position or element centre. A value of 0.0 is
used if the currently visible plot does not imply data (eg LI,HI,SH
drawing modes) or if there is an entity type/data plotting mismatch (eg
beam element data froma contact surface data plot).
Nodes
on elem
Draws the labels of all nodes on the selected element
Elems
Draws the labels of all elements attached to the selected node
on node
The labels persist during animation and redrawing, until the the Clear Labels option is
selected.
3.6 "Tabs" for multiple graphics windows.
When more than one graphics window is in use most menu
panels will have a "tab" button for each graphics window:
W1, W2, etc. In this example there are four graphics
windows.
These tabs control the graphics windows to which the
commands issued in this panel apply: here any command
would apply to all four windows.
The ==> button takes the settings of the first active window
in this panel and copies them to all other active windows. In
this example the view current in Window #1 would be
propagated to windows #2 to #4.
Multiple graphics windows are discussed in more detail in
section 2.6.
3.7 Customising the User Interface
3.7.1 Customising Menu size, fonts, colour and handedness
As mentioned in section 2.2 the scale of the menu interface, the font typeface and size, and also the left-handedness of
the menu interface may be customised interactively using Options > Menu Attributes.
Page 3.9
Oasys D3PLOT
User manual Version 9.3, Rev. 0, September 2008
Gives the menu attributes panel:
Page 3.10
User manual Version 9.3, Rev. 0, September 2008
Oasys D3PLOT
Display Factor Is a factor on the overall scale of the display, lying in the range 0.5 to 2.0, default 1.0.
Larger values make the display seem bigger to the software, resulting in smaller menu panels and
fonts.
Smaller values increase the size of menu panels, buttons and fonts, and can be useful for the visually
impaired.
This factor can be especially useful on "wide screen" displays with very asymmetric horizontal and
vertical resolutions.
The operating system *should* determine the physical size of the display correctly. However we
have observed a few instances where this does not happen, the symptoms being that fonts and menus
appear either far too big or too small and cannot be corrected by using Display Factor. In this
situation you may need to tell the Oasys software the physical dimensions of your display, and this
process is described under "Setting the correct physical resolution for your display" in section 3.2 of
the extra section on graphics in the Primer manual.
Font size
Controls the size of fonts used in the menu interface (but not for graphics).
This works independently of the Display Factor, allowing further fine-tuning of the appearance of
the user interface.
Font Typeface For most applications the default Helvetica (Arial on Windows) will suffice. But you can also choose
Times or Courier, and Bold variants of all of these.
Brightness
Saturation
These affect the overall brightness and also the colour saturation of the user interface. They both lie
in the range 0.0 to 1.0, default 1.0.
Left-Handed
support
By default D3PLOT is set up for right-handed usage, which has influence on both mouse buttons
and the keyboard "meta" keys: <shift> and <ctrl>. (The left and right meta keys have different
functions during dynamic viewing: see dynamic viewing )
You can swap the handedness of mouse and/or meta keys, which will reverse them in the left <=>
right sense.
Note: This swapping is local to D3PLOT, and is applied after any system user interface
configuration. So if you configure your computer to swap mouse buttons globally, then swap them
here, the net effect will be to have unswapped buttons again!
Saving Menu Attributes settings
The attributes above may be saved in the "oa_pref" file by using Save_Settings. Subsequent sessions of D3PLOT
will pick these up and re-apply them. The "oa_pref" file is described in more detail in Appendix II.
For backwards compatibility these attributes may also be set using environment variables as described in Appendix
XIII. Where conflicting settings exist those in the "oa_pref" file generated by the panel above (or by hand) will "win".
Note: Oasys software potentially reads three "oa_pref" files when an application starts, in the following order:
(1) The $OASYS directory
(2) Your "home" directory ($HOME on Unix/Linux, $USERPROFILE on Windows - typically c:\Documents and
Settings\user_id)
(3) The current directory (typically "Start in" directory on windows)
Save_Settings in this panel update the file (#2) above in $HOME / $USERPROFILE, on the principle that you will
have write permission there and - usually - it will not affect other users. However all "oa_pref" file settings are applied
on the "last found wins" basis, so if you have file in your current directory with different settings these, being the last to
be found, will "win".
3.7.2 Screen Refresh: Controlling graphics window redraws
Normally graphics images in D3PLOT redraw at an acceptable speed, and the delay when refreshing "holes" left by
menus popped up in front of the graphics window are not objectionable.
However if you are running a large model on a slow machine this may become a problem, and it is possible to turn off
screen refreshes using Options > Screen Refresh. This will leave black holes when menu panels are unmapped, and
you will have to issue an explicit redraw command to get rid of these. You can turn the refresh switch on again at any
time.
Page 3.11
Oasys D3PLOT
User manual Version 9.3, Rev. 0, September 2008
You can save the graphics refresh status in the
"oa_pref" file with the line:
primer*graphics_refresh: off |
on
The default is "On".
Note: Unlike Oasys PRIMER no "backing store" drawing is used in D3PLOT, so issues such as Bitmaps, Pixmaps and
PBuffers do not arise.
3.7.3 Menu "Auto Expansion"
A few of the menus in D3PLOT are too narrow when first mapped to show all the columns of their data, so by default
"auto expansion" is enabled. This causes the menus to widen themselves, typically to 90% of the enclosing width
available, after a brief delay. You can control this behaviour using Options > Expand Menus as follows:
By default manu auto-expansion is ON, but
you can suppress it by turning it OFF.
Controlling the speed and delay:
You can also control:
DELAY the time interval between the mouse entering a
window, and the window starting to expand.
The delay time is controlled as a factor on the default
behaviour.
The actual delay time will vary from system to system
depending upon the Window system and underlying
speed, but a typical delay will be approximately 0.5
seconds.
SPEED (Not shown here) is the rate at which the
menu expands and contracts.
As above it is controlled as a factor on the default
speed.
Page 3.12
User manual Version 9.3, Rev. 0, September 2008
Oasys D3PLOT
Saving Menu Auto Expansion Settings
The menu expansion parameters may be saved for future PRIMER sessions by setting the "oa_pref" file options:
d3plot*menu_expand:
ON | OFF
d3plot*menu_expand_delay: Floating value in the range 0.1 ... 5.0
d3plot*menu_expand_speed: Floating value in the range 0.1 ... 5.0
Full details of all "oa_pref" file options and environment variables are given in Appendix II
3.8 Shortcut Keys
Some panels and actions have shortcut keys
assigned to them:
Plotting Modes
H - Hidden mode
plot
S - Shaded mode plot
L - Line mode plot
F - "Fringe" (SI plot)
View Controls
A - Autoscale current image 3 - +XZ view
V - View control panel
4 - +ISO view
Z - Zoom using cursor
5 - -XY view
"+" - Zoom in (factor 2.0)
6 - -YZ view
"-" - Zoom out (factor 0.5) 7 - -XZ view
1 - +XY view
8 - -ISO view
2 - +YZ view
0 - "Exports" the view of the current graphics window to all other active windows
Blanking
B - Blanking control panel
R -
Reverse blanking of image
U - Unblank all
Panels
C - Close all panels
O - Overlay and Display panel
D - Drag cut plane
P - Properties panel
E - Entity panel
W - Write image file panel
M - Measure panel (node ->
node)
X - Cut sections panel
Page 3.13
Oasys D3PLOT
User manual Version 9.3, Rev. 0, September 2008
N - Pick cut plane node(s)
State Selection
-> - Forward one state
<SHIFT> + -> - Forward one frame
<- - Backward one state
<SHIFT> + <- - Backward one frame
<HOME> - Jump to first
state
<SPACE> - Toggle animation
<END> - Jump to last state
Windows
G - Open new
window
I - Iconise windows
T - Tidy all windows
<DEL> - In a graphics window erases dynamic labels
Miscellaneous
Q - Quit current pick action
<PAGE DOWN> - Move down a page
<PAGE UP> - Move up a page
If the mouse is in a graphics window, commands that imply a graphical change apply to that window only; otherwise
they apply to all active graphic windows.
Page 3.14
User manual Version 9.3, Rev. 0, September 2008
Oasys D3PLOT
4 BASIC DATA EXTRACTION AND
PLOTTING
This section describes how to extract data from disk, and how to display them graphically. Screen menu usage is
assumed, although brief references will be made to equivalent command-line instructions where appropriate.
4.1 Reading results from an analysis.
4.1.1 Reading plot and other files at initial programme startup
The standard filename input panel is:
By default this panel will allow you to select a single model and open it.
Alternatively this panel can be used to either search directories for results and open open multiple models (see Section
4.1.2) or a setting file containing model information can be loaded (see Section 4.1.3).
Page 4.1
Oasys D3PLOT
User manual Version 9.3, Rev. 0, September 2008
You can type a filename into the text entry box (after File:), or use the
filter box .
button to obtain a standard file
The File filter button controls what extension will be used to search for file types in the file filter box. See below.
*.ptf
Finds normal complete state files
*.rlf
Finds dynamic relaxation files
d3*
Finds unnamed default files (d3plot, d3drlf, etc)
*
Finds all files
QUIT aborts the file opening operation.
REREAD allows you to re-open the current file.
Open Model in Window:
By Default D3PLOT will open each model in a new
Graphics Window.
If a second or subsequent model is opened D3PLOT will
offer the choice of opening the model in a new Window
(Next) or one of the existing Windows (W1, W2 ...).
If more than one Window is selected then D3PLOT will add
the model to each of the Windows.
Family size (MB):
The binary output files written by LS-DYNA form "families". Each family has a root member and may have
children. The maximum size of any member of a family is set when LS-DYNA runs, the default being 7MB,
however any size > 1MB can be used.
By default D3PLOT determines the family member size automatically (the Auto setting shown here), but you
can override this by entering a size in MB. This is almost never necessary: read Section 9.1 before doing this.
File skip:
File families should form a contiguous sequence (root, member #1, member #2, ...) But it is sometimes the case
that members are missing: intermediate members be deleted to save disk space, and occasionally LS-DYNA
skips members.
The File skip value (here zero) is the number of missing members that D3PLOT will skip before giving up its
search and deciding that it has found the end of a file family. See Section 9.1.3 for further information.
Title swap:
It is unfortunately the case that some versions of LS-DYNA have been compiled with numeric conversion flags
which endian swap their output. This works fine for numbers, but scrambles the title (the string ABCDEFGH
becomes DCBAHGFE).
If your title looks like garbage try changing this field to Y(es) to see if this fixes the problem. (Note that you can
do this at any time during a D3PLOT session: see Section 4.1.7).
MEMORY...
Maps the standard memory management box (see Section 11.7). This allows you to set database memory limits
and display mode before opening the file, which may be necessary in exceptional circumstances.
Page 4.2
User manual Version 9.3, Rev. 0, September 2008
Oasys D3PLOT
Read CTF, XTF and ZTF files
By default these three files are read if they exist, but you may suppress the reading of any if you wish. In a model
with many contact surfaces omitting the CTF file can speed up graphics and save memory, since contact
segments will be ignored.
Omitting the XTF file contents will not give similar savings, and is not generally recommended. MPP versions of
LS-DYNA do not write a XTF file, so from V9.0 onwards the equivalent data is also present in the ZTF file.
It is recommended that both XTF and ZTF files should always be read if present.
Details of the contents of all these files are given in section 9.2
Read PRP, SET and ASC files:
PRP (Property) files, <filename>_nnn.prp, contain model-related information such as colour,
transparency, overlay, etc that has previously been written from the PROPS panel. These files will be reread if
found so that all this status information is automatically restored.
SET (Settings) files, d3plotnnn.set, contain information about programme settings on a per-window basis,
such as background colour, cut-sections, data component, etc. These will be read if found and will automatically
create new windows if required, and set them up as they were before.
Settings and Properties files are described more fully under UTILITIES, SETTINGS_FILE .
ASC (Ascii groups) files, group001.asc, contain optional group information in a human-readable form
which matches that used by Primer in the keyword input deck. If such a file is read it will supersede those groups
currently stored for this model.
Group handling in release 9.0 of D3PLOT has been extensively modified and improved, and it is described more
fully under GROUPS.
File filter
(Maps the standard file selection filter box -
D3PLOT requires a complete state, or equivalent, file in order to run. Under Oasys conventions this will have the
filename format <name>.ptf, but any name is acceptable so long as the contents are recognisable.
The default filter box "pattern" is set to *.ptf. Some other naming conventions you may encounter are given below.
(See Section 4.1.12 for a list of supported file types and names.)
d3plot
Default complete state filename chosen by LS-DYNA if no user-defined name is
given (ie G=xxx is missing from the input line).
d3drlf
Default dynamic relaxation filename chosen by LS-DYNA if no user-defined
name is given (ie B=xxx is missing from the input line).
<name>.rlf Dynamic relaxation output file using normal naming conventions.
d3eigv
Default eigenvalue analysis filename from LS-NIKE.
n3plot
Default transient analysis filename from LS-NIKE.
To make using the standard file filter box easier you can pre-select the "pattern" that will be used for scanning files on
disk using the options shown here. Of course any pattern can still be typed into the file filter box itself.
Adaptively remeshed analysis filenames
D3PLOT supports LS-DYNA adaptive remeshing, in which a series of families are generated with a mesh that is
progressively refined (see Section 4.1.11).
If the "base" <name>.ptf (or d3plot) file is selected then all successive familes (.ptfaa, .ptfab, etc) are read in
and their states are concatenated internally.
Page 4.3
Oasys D3PLOT
User manual Version 9.3, Rev. 0, September 2008
To read in a given family only select is base member (eg <name>.ptfad) explicitly and only that remesh family will
be read.
Eigenvalue (modal analysis) files.
D3PLOT supports output files from modal analyses. They are treated in exactly the same way as transient analyses
except that:
•
Each "state" is a modeshape, and the States Slider moves between these.
•
Animation works on the currently selected state only, oscillating it through +/- 180 degrees.
Domain Decomposition files from MPP analyses
The MPP version of LS-DYNA can write a pseudo PTF file that shows the domains into which a model has been
decomposed for parallel analysis. It contains undeformed geometry only.
This is not a true PTF file and, in particular, each domain is a part that contains elements of all types in its region.
Strictly this is illegal: parts can only contain elements of one type, so D3PLOT handles this automatically as follows:
•
The special file type is diagnosed automatically from its contents
•
The composite parts of each domain are split into separate solid, beam, shell and thick shell element parts
•
These are given labels that make them the same colour in D3PLOT’s default colouring scheme
•
Groups of each domain, containing all parts in that domain, are automatically constructed.
In this way the technically illegal domain decomposition file can be processed normally, and the use of groups makes
the sketching and (un)blanking of domains very straightforward.
Echo of file contents.
Once you have given a filename its contents are scanned and checked for integrity. If an .XTF and/or .CTF file is
found (and flagged for input) it too is scanned for any extra information it may contain.
You are given a summary of the file contents.
Assuming that these are acceptable click on OK to continue with reading in all the basic data from the file. If all goes
well the basic nodal coordinates and element topology are read in, and you can start plotting. Various things can go
wrong, however:
The title is
garbled
The files are
corrupt
The files are
incomplete
Use the SWAP_TITLE button to see if this will fix it. If it doesn’t then the file is probably the
wrong format, corrupt, or not a complete state file.
If the job crashed, or is still running and has not finished its initialisation phase, the files may be
incomplete and/or full of garbage. D3PLOT tries to check for this by checking file integrity, and
it may reject the files if they are found to be too corrupt to handle.
Sometimes you will get the message that "arbitrary numbering tables are
corrupt, sequential numbering will be used throughout." This is not fatal:
the node and element arbitrary numbering tables are the last things written during the
initialisation phase, and may not yet have been written from system buffers to disk if the job has
just started. You can plot the undeformed geometry, but node & element labels will be shown in
internal sequential order.
Binary format
mismatch
The exact format of older files cannot be determined automatically, for example Cray and IEEE
64 bit formats can get confused. This can be fixed with the FILE_TYPE_64 and _32
environment variables. See Section 9.1 for more details.
PTF/CTF/XTF
mismatch
If the contents of the .CTF and/or .XTF files do not match those of the .PTF file, (ie they are
leftovers from an earlier analysis), you are warned and their contents are rejected. The plot
(.PTF) file is always taken to be the truth.
ZTF file
mismatch
Because the ZTF file is generated from the input deck (.key) it may not match exactly the other
output files. This is tolerated: un-matched items are simply ignored.
Page 4.4
User manual Version 9.3, Rev. 0, September 2008
Oasys D3PLOT
4.1.2 Search Directories Recursively
Multiple models can be opened by using the option to search directories recusively.
After a directory has been specified D3PLOT will display a list of all the models it can find in the directory structure
and each file can be selected
If the user selects more than 32 models or if the number selected + any models already loaded into D3PLOT is greater
than 32 then D3PLOT will open the models selected until the limit of 32 is reached.
The list of models can be sorted by either alphabetically by directory name or by date into either ascending or
decending order.
Page 4.5
Oasys D3PLOT
User manual Version 9.3, Rev. 0, September 2008
When multiple models are read each model can either be
read into a separate Window or all of the models can be
loaded into an existing Window.
4.1.3 Settings File Including Window Layout
From version 9.3 onwards a D3PLOT settings file contains information on the number of models that were open when
the file was saved along with the window and page layout. The filenames for the models are not stored in the settings
file, just the number of models and which model (M1, M2 ...) was located in each window.
If the setting file was saved while the D3PLOT->T/HIS link (see Section 6.12) was running then the setting file will
also contain information of the number of T/HIS graphs and it will contain a T/HIS FAST-TCF script which will
regenerate the graphs contents.
Page 4.6
User manual Version 9.3, Rev. 0, September 2008
Oasys D3PLOT
This option can be used to reload a version 9.3 settings file and to restore the model and Window layout.
After a settings file is selected it’s contents will be scanned to see how many models are required and D3PLOT will
then display a list to allow the models to be selected.
Page 4.7
Oasys D3PLOT
User manual Version 9.3, Rev. 0, September 2008
If models have already been read into D3PLOT they will be automatically selected for the models to use when
replaying the settings file.
Any of the pre-selected models can be changed by using the popup menu to select a different model.
4.1.4 Open New Model Opening a new model
file
From version 9.3 onwards D3PLOT supports up to 32 concurrent models.
You can open a new model file at any time using the FILE> popup which is located at
the top left of the top options (Main Menu) box, OPEN NEW MODEL command.
This creates a new graphics window to contain the model, then reads a new filename in
exactly the same way as described in Section 4.1.1 above.
If this is a second or subsequent model its window will inherit those attributes of the
first window that can legitimately be transferred to this new one: background colour,
data component, cut-sections, etc. Where attributes cannot be transferred, for example
a data component that doesn’t exist in the new model, then the programme defaults will
be used.
4.1.4.1 Close Model Closing an existing model.
You can close a model at any time using this command. The model will be removed from any window in which it
appears, and if it was the only model in such a window then the window will also be deleted and any remaining
windows renumbered downwards to close the window numbering gap.
(Note that in D3PLOT V92 models may reside in the database without being displayed in any window, however they
will continue to consume memory and models should be deleted if unneeded to free memory for other purposes.)
4.1.4.2 Rescan Model Scanning a running analysis for more states.
If an analysis is still running you can scan the file family for any further states that may have been written since you
opened the model (or last scanned it).
Because of the way that computers work it is possible that the most recent state written from a running analysis may not
be completely debuffered to disk. It this case D3PLOT will usually detect that the state is incomplete and offer you
options for dealing with this, however it is usually best to ignore such states as attempting to read corrupt or incomplete
data can lead to problems.
Page 4.8
User manual Version 9.3, Rev. 0, September 2008
Oasys D3PLOT
4.1.4.3 Reread Model Closing and reopening a model.
The Reread Model command differs from Rescan in that it closes a model completely then reopens it again (in the
same window(s) that it occupied previously). It is the equivalent of Close Model followed by Open New Model.
You should use this instead of a Rescan when:
•
An analysis file that is currently open in D3PLOT has been rerun from scratch using the same filenames, and
needs to be reread in its entirety.
•
You have an adaptive remesh analysis running and you want to scan for further family members (Rescan will
only look within the current family member).
4.1.5 Basic animation, the "current state", and selecting states.
The programme maintains the concept of a "current state" for each window, which is that being displayed at the
moment. When an animation is halted the state at which it stops becomes the current state, and any state selected
explicitly by the user subsequently becomes the current state in its place.
Each graphics window is independent, and each may show different states. To provide both independent and
collective control the following mechanisms are used:
The master STATE NUMBER slider applies to all windows for which its Wn tabs are active.
Moving this slider to a new state will cause all these windows to jump to this state. PLAY
selected windows animate, and STOP
makes all
halts them.
This range of this slider is 0 to the highest state in all models, and it can be the case that it permits selection of a state
that doesn’t exist in a given model. Selecting such a state is legal and leaves the window(s) of that model unchanged.
The local state slider and associated controls in the button bar at the top of each graphics window applies to this
window only.
Moving the slider, or using <<, |<, etc, lets you move between the animation states currently defined for this
window.
By default all states in a model are selected for animation; but this can be limited to restricted states, or extra states
can be displayed by interpolation.
Therefore these controls move between what has been selected for this window (or for modal analyses through the
+/- 180 degree phase angle for the current modeshape).
All animation and static state selection is carried out in the State Display box. Its basic controls are described here,
with more detail in the following sections.
Page 4.9
Oasys D3PLOT
User manual Version 9.3, Rev. 0, September 2008
To start animating
To initiate an animation simply press PLAY
, and to halt it press STOP
.
By default all states in the model will be animated at full speed in the current display mode. More information on
animation is given in Section 4.4.
To select an explicit state by number
Either: Move the STATE NUMBER slider to the state you want, or use the arrows at its ends to scroll it left or
right. When you release the mouse button the selected state becomes current and will be drawn.
Or:
Type an explicit state number into the State: box. This will become the current state and will be drawn.
To select an explicit state by time
Type the required time into the Time: box. If a state with that time exists it will be used, otherwise the state with the
closest time after that you have specified is used. This becomes the current state and is drawn.
The programme "knows" about all states in a file, they are scanned as part of the initialisation process, and it can jump
directly to any state. Data required for plotting are read in selectively on as "as needed" basis.
States at interpolated times
The current (static) state shown in this box cannot be at an interpolated time between two explicit states: defining an
intermediate time will result in the next highest state being used. However the sliders and state manipulation controls in
each window can be used to move between interpolated states.
For more information on interpolation see Section 4.4.2.1.
Selecting and animating mode-shapes.
Most analyses are transient, and each state will show successive times. Modal (eigenvalue) analyses are performed in
the frequency domain, and each "state" is a different modeshape at some frequency.
D3PLOT operates in much the same way except that:
•
The "States" slider now moves between modeshapes (state 1 = mode 1, etc)
•
Animation is performed by oscillating a single state through +/- 180 degrees
•
The slider at the top of each window moves through the +/- 180 deg cycle.
Using keyboard "short cut" keys to cycle through states
You can use the following keyboard keys to select states:
<-- and --> arrow keys step backwards and forwards respectively. They loop round when they reach the limits of their
respective directions.
<Home> jumps to the first state
<End> jumps to the last state
As with all short cut keys the windows upon which they act are determined as follows:
•
If the mouse is in a graphics window then they act only upon that window.
•
If the mouse is in some other menu window then they act upon all active graphics windows.
To cycle through animation frames, as opposed to states, use <shift> + left/right arrow keys. In most cases the only
difference will be in data-bearing plots with contour levels set to "auto":
•
Cycling through states will autoscale each image.
•
Cycling through frames will use the envelope of contour values for the whole animation.
Click here for the next section
Page 4.10
User manual Version 9.3, Rev. 0, September 2008
Oasys D3PLOT
4.1.7 The FILE > popup menu options
You can manage many aspects of your database using the FILE > popup menu.
Some of these options can only apply to one model at a time. When this is the case the
operation will be applied to the first active model as selected by the Wn tabs in this
panel.
SHOW_STATES - List all states in the file
If you think that you cannot see all the states that should be there you should consider the following possible reasons:
•
Analysis is still running: You may need to RESCAN_FILE for newly created states.
•
Missing family members: You may need to adjust the FILE_SKIP value.
•
Wrong family member size: You may need to adjust the FAM_SIZE value.
RESCAN_FILE - Scan the file for any new states.
If your analysis is still running D3PLOT will not know about any states that may have been written since its initial
scan of the file. RESCAN_FILE will search the file for new states and update the internal tables to show them.
DATABASE - Displaying and managing the results storage database D3PLOT loads results from file on as "as
needed" basis, and may supersede unwanted results in memory to save space. The process is automatic and can
normally be ignored, however users with big models may need to intervene to economise on memory usage.
FILE_SKIP - Jumping over gaps in family member sequence
Sometimes the family member sequence <name>.ptf, <name>.ptf01, ... <name>.ptfnn may contain gaps.
This can be due to deliberate deletion of intermediate members to save disk space, or because LS-DYNA has skipped
a member.
D3PLOT will skip over <FILE_SKIP> gaps before giving up its search for new members and deciding that it has
reached the end of the file family. <FILE_SKIP> may be zero (no gaps) or any positive integer, but bear in mind
that large values will slow down disk scanning as many non-existent files are searched for. If you change this value
the family will be re-scanned automatically to detect any new members this may have made visible.
FAM_SIZE - Setting the file family size to use.
The file family size from LS-DYNA defaults to 7MBytes, but is sometimes set to some other value (using the X=
parameter on the input line). D3PLOT can determine the member size of each family automatically by taking the
larger of the first two members rounded up to the nearest Mbyte.
However you can override this value if, for some reason, the automatic method does not give the correct answer.
Doing so causes the file family to be re-scanned automatically to detect any changes. Setting the value to zero
effectively returns it to "automatic" mode.
SWAP_TITLE - Unscrambling endian-swapped titlesIf the analysis title appears to have every 4 letters reversed (ie
ABCDEFGH = DCBAHGFE) then it has probably been (incorrectly) endian-swapped by your version of
LS-DYNA. You can correct this by swapping between reversed and normal modes.
Setting these parameters externally
The parameters on this page may be set externally (or in the OASYS shell) with
the following environment variables:
setenv FILE_SKIP 10
FILE_SKIP=5, export FILE_SKIP
(Unix, C shell syntax)
(Unix, Bourne/Korn shell syntax)
setenv FAM_SIZE 7
FAM_SIZE=0; export FAM_SIZE
Page 4.11
Oasys D3PLOT
User manual Version 9.3, Rev. 0, September 2008
setenv SWAP_LSTC_TITLE true
SWAP_LSTC_TITLE=false; export SWAP_LSTC_TITLE
Windows users may set these variables in the System, Environment panel.
4.1.8 The Animation options popup menu
The ANIM > popup menu provides access to the options which control the
extent, speed, and many other attributes of animation.
These, and many other aspects of animation, are described in Section 4.4.
4.1.9 The drawing vs. state selection
menu.
The DRAW > popup menu controls how often (and if) the current state
gets drawn when a new state is selected using the STATE NUMBER
slider..
NONE
The newly selected current state is not redrawn at all.
RELEASE The new state is drawn when you release the slider.
SLIDE
As you move the slider between states each one you pass
gets drawn.
The default is RELEASE since this reduces drawing time for large
models when selecting states.
Note that SLIDE can be used to scroll through (visually) an animation, but the same effect is achieved more easily
using the frame slider bar on top of the graphics window: see Section 4.4.
4.1.10 The meaning of “fake” state #0
You may have noticed in some of the examples above that there is a state #0. This is a special state assembled within
D3PLOT from the undeformed geometry with all displacements, stresses, etc set to zero. It is given the time 0.0. It
exists for the following reasons:
•
"Real" complete states in database files normally range from #1 to #n; but it is possible to create a database
that only contains geometry, and has no complete states. Since all plotting commands within D3PLOT require
a current state to be present a file with no states needs the "fake" state #0 be synthesised to permit plotting.
•
State #1 may have the time 0.0, but may not contain the "undeformed" configuration: for example if an
analysis started with a dynamic relaxation or from pre-defined displacements. In this situation reading in
"fake" state #0 allows you to plot the undeformed configuration in all modes.
State #0 is ignored for purposes other than static plotting: it cannot be included in an animation, or used for
time-history output
Page 4.12
User manual Version 9.3, Rev. 0, September 2008
Oasys D3PLOT
4.1.11 Support for analyses using “Adaptive Remeshing”
The adaptive remeshing facility in LS-DYNA, used primarily for metal-forming, generates output files in a sequence
that is different to those from "normal" analyses.
Each remesh effectively constitutes a new analysis in which the quantity (and labelling) of nodes and elements in the
remeshed parts will have changed. A new file family is generated at each remesh, and LS-DYNA flags these by
appending "aa", "ab", etc to the output filenames for the 1st, 2nd, and so on families.
D3PLOT is able to detect this, so long as you give the name of the original analysis as the input file, and will
automatically scan all the file families extracting their times, so that remeshed states are detected and made available.
Thereafter you may use the programme in the usual fashion: selecting a new state automatically uses results from the
correct file family, and capabilities such as animation work in the normal way.
There are a few minor limitations:
•
•
•
•
•
Since each file family is a new analysis (it has different topology and geometry) D3PLOT has to maintain
separate internal tables for each family. This requires extra memory, and you will find that overall memory
consumption for adaptive analyses is greater than for a "normal" analysis of equivalent size.
If you run out of memory trying to process all the remesh files together you may need to open its families
individually. (See the MEMORY button for more information about viewing and modified database memory
usage.)
Blanking, colour, transparency, and related "property" changes are propagated through all families in an
analysis sequence. However the situation can arise that an element in analysis A does not exist in analysis B.
This is not an error, but it may lead to patchy looking plots. Therefore when changing visual properties of
remeshed parts it is best to operate at the PART level (which will exist in all families), rather than on individual
elements (which may not). Elements of parts that are not remeshed do not suffer from this restriction.
Operations in XY_PLOT which imply collecting data across families will not work. It is not possible to
extract "time-history" data in a consistent fashion across remesh (ie file family) boundaries.
Using time interpolation for animation will only work within a remesh family: it is not possible to interpolate
across remesh boundaries since the process requires nodal and element values to be interpolated between
adjacent states. If you attempt to do this you will get a warning message, and the animation will "jump" to the
first state in the new family.
Reference geometry will not work in conjunction with adaptive remeshing, for the same reasons that
interpolation will not: reference between two incompatible states is invalid
4.1.12 Support for file types other than “d3plot” transient analyses
from LS-DYNA
D3PLOT is capable of reading the following file types and formats:
<name>.ptf Transient analysis data from Dyna3d, including coupled thermal/structural and implicit analyses.
d3plot
("d3drlf" files are generated by dynamic relaxations.)
d3drlf
<name>.ctf Contact force database from Dyna3d
ctfile
<name>.xtf "Extra" time-history file from Dyna3D. Only extra topological information is extracted from this
xtfile
file, no results are read from it.
<name>.htf Thermal only output file (ex Topaz3D)
d3eigv
Eigenvalue (modal) analyses from Nike3D
n3plot
Transient analyses from Nike3d
D3PLOT can also read analyses from Nastran for a range of solution sequences (static, modal, forced response, etc) if
they have been converted to ".ptf" files via a proprietary piece of software. At present this capability is under
development - contact Oasys if you require more information.
Click here for the next section
Page 4.13
Oasys D3PLOT
User manual Version 9.3, Rev. 0, September 2008
4.2 Displaying geometry and results.
4.2.1 Drawing commands that do not plot data
These commands are always available in all plotting "modes" since they do not
display any data. They form the top row in this figure.
DR (alias
DRAW) Draws
the undeformed
geometry in
wire-frame
mode, the
current in-core
state is
irrelevant.
No time is
shown since
none is
associated with
the undeformed
geometry.
"Wire-frame"
displays do not
obscure hidden
lines.
Page 4.14
User manual Version 9.3, Rev. 0, September 2008
Oasys D3PLOT
LI (alias LINE)
Draws the
current in-core
state in
wire-frame
mode.
A time is now
shown (in this
case 4.6ms)
since this
represents data
at that time.
Wire-frame
mode still
exposes lines
which should be
hidden.
HI (alias
HIDDEN_LINE)
Draws the
current in-core
state in hidden
surface mode.
This plot shows
the deformed
shape at 4.6ms
as before, but
now hidden lines
have been
removed .
Page 4.15
Oasys D3PLOT
User manual Version 9.3, Rev. 0, September 2008
SH (alias
SHADED)
Draws the
current in-core
state in lit and
shaded
"greyscale"
mode, implicitly
with hidden
surfaces
removed. The
command-line
equivalent
command is
[Greyscale]
GO.
Shading has
been applied,
assuming a light
source at the
observer, and
hidden-surface
mode is
implicit: any
hidden lines will
be removed.
4.2.2 Visual Controls
4.2.2.1 COLOUR: Controlling the colours used for the
display
Note that changing element and part colours can also be achieved, usually more easily, using:
•
The Properties panel, where all visual properties can be changed, saved and restored.
•
"Quick Pick" screen selection, which is by far the quickest method.
The COLOUR command controls general colour usage in
D3PLOT except the assignment of contour (see Section
4.3) and hidden-line overlay (see Section 4.2.4.6) colours.
Note: In release 8.0 onwards many of its Node/Element
colour functions are duplicated in the more
user-friendly and capable PROPS box (see
Section 4.2.2.3 below).
"General settings" commands that affect all plotting modes are:
Page 4.16
User manual Version 9.3, Rev. 0, September 2008
SATURATION...
Oasys D3PLOT
Controls the saturation of all colours in the range 0% (grey) to 100% (fully saturated).
Normally all colours are fully saturated (ie 100%) to give the brightest possible display, but
you may need to desaturate colours in some circumstances, for example when capturing
frames for a video.
DARK_COLOURS... Is used to lighten colours for colour printers. Most colour printers use cyan, magenta, yellow
and black inks and they tend to render darker colours such as blue and magenta too darkly.
This command lightens these colours preferentially so that colour plots look better, even
though the display may look strange. Its default value is 0% (ie no lightening), and it may
range to 100% (which will turn blues into white). You will need to experiment with your
plotter to find the best value, a suggested starting point is 50%.
BACKGROUND...
Sets the graphics window background colour. By default this is black, but you can choose
from a range of standard colours, or make your own user-defined shade using the colour
PALETTE (see below).
TEXT_COLOUR...
Controls the colour used for text (ie clock, header, etc). By default this is white but, as with
the background, you can make this a standard colour or a user-defined shade using the
colour PALETTE.
Text and background colours may be chosen from one of the 16 standard
colours shown here. Alternatively you can use:
Resets the relevant colour to its default. That is white for text, and
black for the screen background.
To create any colour that your hardware can support using the
colour mixing PALETTE.
Node/Element colours: Setting the colour of nodes, elements and other items.
A default colour is assigned to every entity type in D3PLOT as follows:
Standard 14 colour sequence: #1#2#3 #4 #5 #6 #7
#8#9#10#11#12#13#14
1, 2 & 3D
elements
} Use the element part number or segment surface number to obtain colour from the standard
sequence here on a modulo 14 basis.
Contact
segments
}
By default these colours are used only in plots that do not imply data plotting, that is:
DRAW & LINE (Wireframe), HIDDEN (Hidden wireframe) and SHADED ( Solid shaded and lit)
Joints
Stonewalls
Lumped-masses
Nodes
Use their type number (#1 = spherical ... #7 = locking) to give a colour in the standard sequence
above
Use
Use
Use White
In all other plotting modes the element "overlay" colour (controlled by the OVERLAY option) is used instead. You
can change these colours as follows:
Page 4.17
Oasys D3PLOT
User manual Version 9.3, Rev. 0, September 2008
SET_COLOUR...
Lets you define a new colour for a range of entities. To use it first define a colour from
the options given, then select the range of entities to which these are to apply. Note that
colours can also be changed using Quick-Pick (see section 3.5)
SHADED_SAT...
This has the effect of desaturating "shaded" images, which gives them a more pleasant
appearance. It has no effect on data plotting modes (eg SI, CT) or on wireframe/hidden
element borders.
Note also that the "global" SATURATION control remains. It may be used to desaturate
all images. The effects of the "global" and "shaded" saturation controls are additive.
RESET_TO_DEFAULT Resets all entity colours to their standard D3PLOT defaults.
REV BACK&TXT
Reverses Text and Background colours.
4.2.2.2 OVERLAY... Controlling the hidden-line overlay of element borders
on data plots.
This figure shows the hidden-line overlay control panel.
This panel controls whether or not a hidden-line overlay is superimposed on plots, and its attributes (when drawn).
Overlay
Display
Controls whether and how element overlay is drawn. It does not affect the current attributes.
Overlay
Colour
Obviously sets the colour to be used. The default is white, but other standard colours can be chosen.
ELEMENT colour means use the Overlay colour of each element - see the PROPS box in Section
4.2.2.3.
Hidden-line overlays apply as follows:
•
Overlays affect all data plotting display modes, and
also SH shaded (GREYSCALE) plots.
•
Their colour is normally fixed, but using the
ELEMENT option, in conjunction with the PROPS
panel, permits any permutation of overlay colours to
be used.
•
The display of edges may be one of:
OFF
No element overlay is drawn
Free edge
The topological free edges are drawn
Feature edge Free and "feature" edges are drawn
All edges
All element borders are drawn
The Edge Angle is the angle between adjacent facets at which an "edge" is deemed to occur. It affects both Feature
edges and also smooth shading. The default of 60 degrees is satisfactory in most cases, but to obtain more edges
reduce this value. Values approaching 180 degrees will eliminate edges altogether.
The effect of these various edge drawing options is shown in the four images below.
Page 4.18
User manual Version 9.3, Rev. 0, September 2008
This image has no overlay at all
This image has only free edge overlay,
which is drawn only at the element
edges at the back of the head.
Oasys D3PLOT
This image has feature line overlay with
an "edge angle" of 20 degrees, showing
detail around the mouth, nose and eyes.
This image shows all element
borders.
Controlling overlay quality in 3D mode.
Hidden-line removal in Z-buffered 3D graphics presents a problem to the programmer because the edges round
elements will look "patchy" if they are drawn (correctly) co-planar with the element infill. Therefore overlay has to
be raised slightly towards the observer (in the screen space Z dimension) to lift it above the surrounding elements,
and the algorithm which calculates this "Z lift" dimension is usually satisfactory for all normal viewing parameters.
However there are a few cases in which it can go wrong:
Page 4.19
Oasys D3PLOT
User manual Version 9.3, Rev. 0, September 2008
This image demonstrates
the "patchy" overlay that
can occur if the "Z lift"
dimension is insufficient to
raise it above the
surrounding element infill.
This does not normally
happen, but it can occur if:
•
Perspective is
turned on
•
And the perspective
distance is very
small
To fix this problem use <right ctrl> + <mouse button>. Moving the mouse up the screen will raise the
overlay towards you, moving it down away. The mouse button used controls the speed of "Z lift" change:
<Left mouse>
Produces slow change
<Middle mouse> Moves it more quickly
<Right mouse>
Makes large changes
If you subsequently revert to a more "normal" viewing distance you may need to reset the "Z lift" to get an
acceptable image quality.
4.2.2.3 Properties: Controlling colour, drawing style,
transparency, lighting attributes and overlay of entities.
It is important to understand the distinction between "Properties" and "Settings" in
D3PLOT:
Properties Are attributes of a model, for example part colours.
Settings
Are attributes of the programme and menu interface, for example data
component.
A fuller description of these differences is given below.
The PROPS box duplicates the colour setting capabilities of the COLOUR command above (which is kept for
backwards compatibility), but provides many more capabilities for improving the visual properties of plots:
•
Explicit visibility (blanking and entity switch) control.
•
Mixed display modes (contoured/shaded/hidden/wireframe).
•
The ability to label items selectively.
•
Colour setting.
•
Transparency setting.
•
Lighting attributes (diffuse brightness and shininess).
•
Overlay colour and style (solid/free edge/omitted).
These properties may also be changed using Quick-Pick.All of these capabilities are available at <model>, <category
(eg part)> and <individual item> level; which makes it possible to tune plots for presentation to any degree. Model
properties can be saved and restored, and even applied to different models: see below. Due to the width of the menu,
the option is provided to UNDOCK the menu. This moves it from being docked in the menu area to floating in the
Grahics area. DOCK will reverse this process.
Page 4.20
User manual Version 9.3, Rev. 0, September 2008
Oasys D3PLOT
Selecting the level at which to operate: <Model> <Category> <Entity>
The PROPS box operates at two levels: the top one applies to the whole model, and all its constituent categories; the
lower one applies to individual items in a category. In this example the user has chosen to operate on individual parts.
Selecting PART at
the top level...
...results in the
PARTs sub-panel
being displayed.
It is also possible
to SELECT any
permutations of
items, using the
standard D3PLOT
selection process or
by clicking on their
id button. Selected
items have their
background
changed to green
(here parts 1, 3 and
4 have been
selected).
Operations applied
to the top row
buttons are then
applied to all
selected items .
Columns.. Controls which attributes columns are shown
Because the Properties box can be configured to contain a lot of information, which can look confusing, the
Page 4.21
Oasys D3PLOT
User manual Version 9.3, Rev. 0, September 2008
Columns... menu can be used to control which columns of attributes are shown. There are four of these, which may be
turned on/off independently:
Entity/Label Switches
At Top level the Entity switch controls whether or not that category is drawn at all. (See Section 6.6) The Label
switch controls whether or not it is labelled at all. (See Section 6.5) At sub-panel level the "Entity" column is replaced
by BLANK: each element may be (un) blanked individually. (See Section 6.1) Similarly the LABEL switch may be
applied individually to each element.
Display Modes
At top level each category, or the whole model, may be set via its popup menu to one of WIREFRAME, HIDDEN,
SHADED (See 4.2.1 for what these mean) or Current (Elements are drawn in the currently selected display mode,
whatever that may be). At sub-panel level each entity can be set separately in a similar way. It is possible to select any
mode for any element, and to display them in combination. For example you could have a mixture of shaded, wireframe
and contoured display in different areas of a mesh.
Solid-filled (ie CT or SI) contours are not shown on elements rendered in wire, hidden or shaded modes. However
vector data (LC, VEL, VEC, Criterion) is superimposed on the current display mode of elements. For example
velocity vectors may be drawn on shaded elements.
Object Attributes
As before changes may be applied to whole categories at the top level, and to individual or selected items at the
sub-panel level. There are four "attributes":
Colour: Select an explicit colour, or return to default.
Transparency: Transparency only applies to 2D and 3D objects, and by default they are all totally opaque. However
you may set any such entity’s transparency on the range 0% (opaque) to 100% (fully see-through) in increments of
10%.
Brightness: Setting diffuse brightness
Shininess: Setting specular brightness
Lighting is discussed in more detail in Section 4.2.3 below.
Overlay Attributes
Overlay Colour: Select an explicit overlay colour, or default.
Each entity maintains a separate overlay colour, distinct from its "current" colour. The Default overlay colour is the
same as the native element colour, but the two are stored separately and may be quite changed independently.
Overlay Mode:
Overlays may be drawn in one of three styles:
NO_OVERLAY: Not drawn at all.
FREE_EDGE: Only free edges are drawn.
ALL_EDGES: All edges are drawn.
When drawing the more restrictive of the main DISPLAY_OPTIONS, FREE_EDGE switch and the "local" element
ones is applied: if either eliminates edges they will not be drawn. See section 4.2.2.2 for more detail.
So what does all this mean? Here is an example which combines transparency, different modes of plotting, selective
labelling and various overlays to show what can be achieved.
Page 4.22
User manual Version 9.3, Rev. 0, September 2008
Oasys D3PLOT
Here is another example which shows how "vector" mode plots (here LC, but also VEL, VEC & Criterion) can be
superimposed on shaded and wire-frame rendering.
Page 4.23
Oasys D3PLOT
User manual Version 9.3, Rev. 0, September 2008
OPTIONS... SAVE and RELOAD: Saving and restoring properties.
Setting up properties (colour, transparency, etc) for a model can
be time-consuming, and it is useful to be able to preserve them
for subsequent runs.
•
SAVE writes the complete property list for the whole
model into a "properties" (.prp) file.
•
RESTORE can read this in at a later date and restore all
the saved settings.
You can create any number of property files, each will save the
current status, and these may be read in at any time to update the
current display.
Page 4.24
User manual Version 9.3, Rev. 0, September 2008
Oasys D3PLOT
Property files can be applied to different (but similar) models:
•
•
•
•
All information in a property file is written using external item labels.
When read back in these labels are mapped onto the items in the current model that have these labels.
If an external label is encountered that has no internal counterpart it is ignored.
Similarly those items in the current model which don’t appear in the properties file are left unchanged.
Therefore you can apply a properties file to any model and, provided that it is not too dissimilar to the model from
which the file was written, the effect should be to restore your settings almost completely.
Reading and writing properties files elsewhere in D3PLOT
Properties files can also be written and read back in from the UTILITIES, SETTINGS_FILE panel. This is described
in section 6.9.10.
They can also be read in at the same time as the model is input if the Read PRP file box is checked on the file input
panel - see section 4.1.1
What is the difference between a Properties file and a Settings file?
A properties file contains information about the model properties: colour, transparency, labelling, visibility, display
modes, etc. It is window independent.
A settings file contains information about the D3PLOT window settings: background colour, data component, contour
levels, etc. It is model independent.
Properties and Settings files are forwards, but not backwards, compatible.
Both of these file types evolve with successive releases of D3PLOT. A newer format file will not read into an older
version of the code, however an older format file may be read into a newer version of the programme and - usually will function normally.
There are some minor exceptions: some overlay attributes in a properties file from release 9.0 of D3PLOT may not
translate properly to a newer release. This is not so much because of file incompatibility, but rather because of changes
to the inner workings of the code itself which make the "old" attributes invalid.
If you have problems with incompatibility please contact Oasys for help and advice.
Click here for the next section
Page 4.25
Oasys D3PLOT
User manual Version 9.3, Rev. 0, September 2008
4.2.3 The LIGHT panel.
The lighting model in D3PLOT is a simplified version of the
diffuse and specular models found in most graphics
hardware(1), and in standard computer graphics texts(2). It is
a compromise between speed and appearance that is
adequate for rendering engineering plots and simple
presentational material, but its results fall short of those
from a ray-tracing package: shadows and reflections are not
provided, and surface properties are crude.
Geometry can be exported to external rendering packages
via the UTILITIES, VISUALISATION menu for those
cases where higher quality images are required.
The lighting model is best thought of as having three parts:
1.
The light sources.
2.
The way in which the objects are shaded.
3.
The “material” properties of the lit objects.
The Light panel ontrols the following lighting and shading
attributes:
Lighting
switch:
Global on/off for lighting.
Point light
sources:
On/off switch, position, intensity, space
system (model/screen).
Ambient light: Intensity.
Shading type: Flat / Smooth / Dithered.
Edge angle:
Angular difference limit for smooth
shading across adjacent facets.
Lighting Switch
Global lighting on/off switch
Page 4.26
User manual Version 9.3, Rev. 0, September 2008
Oasys D3PLOT
By default lighting is ON, and a plot implying lighting will use the current attributes. If lighting is turned OFF all
formerly lit elements will be drawn at the full colour intensity with no shading effects.
Turning the switch on/off does not change stored lighting or shading attributes in any way.
Lighting Switch ON
Lighting Switch OFF
These two examples show how a hemisphere, half SI contoured and half SH shaded, responds to the lighting switch.
Note how turning lighting off destroys any perception of shape or depth.
(The effect on the right could also be achieved with lighting ON by setting the Ambient light to 100% and having no
point light sources active.)
Ambient light
The %age of "black body" light.
If only point light sources are used this simple lighting model produces images reminiscient of pictures from space:
strongly directional lighting with no detail in shadow areas. Therefore the concept of Ambient light, analagous to
"black-body" radiation coming from the universe at large, is added to fill on lowlight areas.
This is not realistic in itself, but in practice most scenes have their shadow and low-light areas filled in by reflected
light from walls, floors, etc; and it provides a good approximation to this.
Page 4.27
Oasys D3PLOT
User manual Version 9.3, Rev. 0, September 2008
This image has a single directional light to the right, and
has the Ambient light set to 0%.
Here is the same image with the Ambient light set to
40%.
Note how the lowlight areas are extremely dark and
contain no detail.
This has filled in the lowlight areas to some degree, but a
higher value still is needed to illuminate some areas.
Why bother with ambient light? Why not just use more (and more realistic) point light sources?
The short answer is speed and simplicity. Ambient light is cheap to compute and easy to define, whereas adding point
lights slows down image redraw speed. And, as any photographer will testify, getting the position and intensity of
multiple light sources correct is not as simple as it seems. However you have 8 light sources to experiment with: feel
free! (But note that some graphics hardware may not operate correctly, or may run slowly, with more than two light
sources.)
The default in D3PLOT is a single directional light above and to the right of the observer’s position, and an Ambient
light level of 40%.
Point light sources (positional &
directional)
Up to 8 point light sources may be defined, each of which is
independently controllable. At the top level of the lighting panel
they may be turned on/off and have their intensity set from 0 100%. To change any other attributes use the SET... button.
Page 4.28
User manual Version 9.3, Rev. 0, September 2008
Oasys D3PLOT
SET... Setting detailed light attributes
The following detailed attributes for each light may be set:
OFF/ON Turns this light on or off.
Brightness Sets the light brightness in the range 0 - 100%. (nb: it is
more efficient to turn a light OFF than to use 0% Brightness.)
PRESETS >
Provides some pre-computed positions
for lights.
These may not give exactly the locations
you want, but they can form a good
starting point.
(The default light in D3PLOT, light 1, is
positioned at "Right Shoulder".)
Definition Method Positional or Directional (by vector)
Example of Positional light.
A "positional" light is defined by its location in space, and this method is
generally used for lights close to the object.
This example shows a dummy with a positional light in its lap. (The light
itself has been added artificially here, it would not normally be visible on a
plot.)
Because the light is "local" it (correctly) does not illuminate the tops of the
arms or the front of the legs.
Positional lighting is slightly more expensive than directional to compute,
but is necessary if the true effects of lights close to the object are to be
simulated.
Page 4.29
Oasys D3PLOT
User manual Version 9.3, Rev. 0, September 2008
Example of Directional light.
A "directional" light is defined only by its vector, and assumed to be
infinitely distant (like the sun).
This is the same model as above, but now the light is directional, defined by
a vector pointing through the previous light source position towards the
dummy. (The vector arrow has been added artificially, it would not appear
on a plot.)
The differences are clear: the whole of the front of the dummy has been
illuminated, as have the surfaces which previously were dark.
This is a little bit cheaper to compute than the positional equivalent, as
"local" vectors from facet to light source need not be computed.
Defined lights as Tied to Model and Screen space systems
Light Tied to Model space
<== Before ..transform .. After
==>
When a light is tied to Model
space it is transformed along
with the object.
Light Tied to Screen space
<== Before ..transform .. After
==>
When a light is tied to Screen
space it remains fixed in space
as the object is transformed.
(In these examples the light sources have been added artificially to illustrate their positions. They would not appear on
an actual plot.)
Page 4.30
User manual Version 9.3, Rev. 0, September 2008
Shading type:
Oasys D3PLOT
Flat, Smooth and Dithered.
This controls how facets are shaded, which in turn
affects the appearance of curved surfaces.
FLAT shading
The outward normal of each element face is calculated and used to
determine a single lighting value. This is applied to the whole face
giving the faceted appearance shown here.
This is quick to compute and, with a fine enough mesh, gives
acceptable image quality.
(The mesh overlay has been added here to emphasise that each facet
has a single flat shade.)
SMOOTH shading
The outward normals at each vertex are averaged, making it possible
to vary lighting smoothly across a surface. This technique is known as
"Gouraud shading", and is only available in 3D graphics mode.
DITHERED shading (2D graphics mode only)
Because gouraud shading is not provided by 2D graphics drivers (or
laser plotters) the technique of "dithering" has to be used to produce
genuinely smooth shading under 2D graphics. This is done by drawing
adjacent pixels in different colours to achieve an intermediate shade trading of spatial against colour resolution.
Dithered shading is ignored in 3D mode, and should only be used in
2D mode if you are prepared to accept the longer computation and
display times involved.
What dithering actually does, and how to fix problems that may arise from its use: (2D
mode only)
Page 4.31
Oasys D3PLOT
User manual Version 9.3, Rev. 0, September 2008
On the left is an enlarged area of the
dithered equivalent of the image above
showing the bottom tip of the nose.
The dither pattern is just visible in the
image on the left, and if magnified further
(right) it becomes obvious.
There are only five different colours used
in this image, yet it has been possible to
show a wide range of shades. However
spatial resolution has been lost in favour
of colour range.
Dithering can occasionally cause problems when images are captured from the screen or laser-plotted. In particular
there can occasionally be a "heterodyning" (beating) between the spatial resolution used for dithering on the screen and
that used by the subsequent display device. This can show up as an apparent chessboard of large lighter and darker
squares on the image, or as light/dark bands. Some software packages for manipulating bitmaps may show similar
effects.
If this happens you may be able to fix it with one of the following:
•
Try generating the image with a different screen window size, and hence a different scale. This may be enough
to stop the "beating" effect.
•
If you have been working at 8 bit-plane resolution, but your screen supports 24 bit-plane "true colour", then use
that instead. At 24 bit-plane depth all possible colours that the human eye can resolve (224 = 16,777,216) are
available, and dithering is not required. The image will look better too.
Edge angle:
The angle at which smooth edges become sharp.
Page 4.32
User manual Version 9.3, Rev. 0, September 2008
Oasys D3PLOT
When smooth shading it makes sense to preserve some "sharp" angles, since most real-life
objects have sharp as well as smooth edges.
This is done by computing the angle between the outward normals of adjacent facets at vertices,
and only averaging if this is less than the current Edge angle. This effect is evident in the
images of the head above: the ridge of the nose is "sharp" whereas the rest of the face is
"smooth".
Edge angle can lie in the range 0 - 180 deg, (values > 90 deg are significant for 3D elements).
The default of 60 degrees looks reasonably natural for most objects. 0 degrees is equivalent to
Flat shading, and 180 degrees will eliminate all sharp edges.
The light sources themselves.
Up to 8 point light sources may be defined, each of which is independently controllable. At the top level of the
lighting panel they may be turned on/off and have their intensity set from 0 - 100%. The OpenGL standard requires
all implementations to handle 8 light sources, although it is often the case that only one or two cab be handled in
hardware: don’t be surprised if setting up many lights causes a sudden and dramatic reduction in graphics speed!
To change any other attributes use the SET... button. There are various preset options, and you can also specify your
own light source positions or vectors.
Each may be "positional" (located at a specific point in space), or "directional" (infinitely distant along a vector).
"Positional" light sources are more expensive for the hardware to calculate, and will slow down drawing, so only use
them if you need to simulate the effects of a light close to your model.
Light sources can be fixed in screen space (stay fixed when the model moves), or attached to model space (move with
the model). There is no significant difference in graphics speed between the two options.
All lights are white.
Page 4.33
Oasys D3PLOT
User manual Version 9.3, Rev. 0, September 2008
The “material” properties of the lit objects
Brightness and Shininess
Brightness Controls how light or dark the colour of the object is when illuminated, but the effect is to add matt
colour (not whiteness, which would make it look shiny).
Shininess
Adds white highlights, but no colour, to make the object look shiny.
These attributes (of the object, not the lights) are set in the PROPS box - see Section 4.2.2.3.
1. OpenGL Programming Guide. Neider, Davis, Woo (ISBN 9 780201 632743)
2. Computer Graphics Principles and Practice. Foley, van Dam, Feiner, Hughes (ISBN 0 201 12110 7)
Click here for the next section
Page 4.34
User manual Version 9.3, Rev. 0, September 2008
Oasys D3PLOT
4.2.4 Solids & Shells: Plotting
results on solids and shells (2D
and 3D elements)
The figure (right) shows the Data panel in Solids and
Shells plotting mode (in this case displaying the
Components sub-menu).
This is the default data plotting mode in D3PLOT. It is
available even if your model has no 2D or 3D elements since
it contains the velocity vector plotting option (which is
effectively data at nodes), although in this case some plotting
options will be greyed out.
From release 9.3 onwards this mode also displays data for
Smooth Particle Hydrodyanics (SPH) and Airbag Particle
(ABP) elements.
4.2.4.1 COMPONENT... Choosing a
data component to plot
This figure shows all the generic data components available
for solid and shell plotting. If some are unavailable in your
data-base they will be greyed out (for example the EXTRA
components here).
Select the generic category, and then the specific component.
(For more information on selecting data components, and a
more detailed description of what they mean, see Section 12).
Page 4.35
Oasys D3PLOT
User manual Version 9.3, Rev. 0, September 2008
4.2.4.2 SURFACE... Choosing a thin shell “surface” (intg pnt)
This figure shows the shell integration point selection box, which applies to stress and strain
tensor derived results.
By default shells write results at 3 "surfaces":
Top
Middle
Is the outermost (most Note that when using the default Gaussian integration
+ve local Z) integration rules in LS-DYNA the inner and outer integration
point.
points of shells are NOT the "outer fibres" of the
element.
Is the neutral axis, ie
For a fuller explanation see the WARNING below.
mid-plane.
Bottom Is the innermost (most
-ve local Z) integration
point.
In this example shell output has been defined with <maxint> = 8, giving the option of each of
the eight integration points in the element. In the conventional case, <maxint> = 3, the
"Layer" column will not be shown. (See note 2 below.
Normally you will be interested in results at a given integration point, but it is also possible to extract the following
values scanned from all integration points through the thickness of the element:
MAX_ALL
Finds the maximum (most +ve) value
MIN_ALL
Finds the minimum (most -ve) value
MAG_ALL Finds the +ve or -ve value with the greatest magnitude. Result may be +ve or -ve since the
calculation is:
if ( |val| > |curr| ) curr = val
Shell integration point data written from LS-DYNA
There are two issues to be considered here:
1.
The number of through thickness integration points in the shell element formulation.
2.
How many integration points worth of data are written to the database files.
Unfortunately these two parameters are not directly related in LS-DYNA, and have to be set independently:
•
Shell element through-thickness integration points are controlled on the *SECTION_SHELL card. (Composites
are different)
•
The number of "surfaces" output is controlled by parameter <maxint> on the
*DATABASE_EXTENT_BINARY card
By default (<maxint> = 3) data at three "surfaces" (top, middle and bottom) are written for all shell elements,
regardless of the actual number of integration points in any element formulation. Normally this is satisfactory, since in
most models with significant plastic strain the detailed distribution of stress and strain through element thickness is not
that important, but where models remain mainly elastic or where composites are used it may be necessary to set a
different value. See Section 11.8.2.2 for a fuller discussion of these parameters and how they affect output.
Page 4.36
User manual Version 9.3, Rev. 0, September 2008
Oasys D3PLOT
WARNING: In LS-DYNA analyses the top and bottom shell "surfaces" are not the outer fibres of the element if
the default Gaussian integration scheme is used: they are located some way in from the outer fibres.
The following table shows the location of the outermost integration points, as a function of shell half
thickness (t/2), for the most commonly used numbers of points.
No of Points
1
2
3
4
5
6
Distance from neutral axis as a proportion of t/2 (Gaussian integration)
0.0 (membrane)
0.577
0.775
0.861
0.906
0.932
Where you have written an odd number of integration points to the output file the "mid surface" will
be the mid point.
Where you have written an even number of points it will be the average if the two "middle" values.
For example if you write 6 points it will be averaged from #3 and #4.
Note
1:
While thick shells write results at surfaces too, this flag has no effect when they are plotted since their (visual)
thickness permits all three surface results to be displayed simultaneously on their respective faces.
Note
2:
The Shell Surface figure above is exceptional in that it also demonstrates Layer selection for shells. You will
not normally see this: it is the result of a non-default output option in LS-DYNA, intended for composites
analysis, which writes results at multiple integration points. This is discussed further in Section 11.8.2.2.
Note
3:
Historically LS-DYNA has reverted to trapezoidal integration for 6+ integration points, although this is
undocumented and the author has a sneaking suspicion that more recent versions of LS-DYNA may use
gaussian integration for up to 11 points. Examine such results with care!
A more detailed description of shell output, with particular reference to "surfaces", "layers" and integration schemes, is
given in Section 9.8.
Page 4.37
Oasys D3PLOT
User manual Version 9.3, Rev. 0, September 2008
4.2.4.3 ENVELOPE...
Envelope plotting can be used to plot either the minimum,
maximum or the absolute maximum data values within a range
of states.
In addition to plotting the minimum or maximum values the
times of the states that the values occurred at can also be
plotted.
If envelope plotting is turned on for an element based data
component (i.e strain) then element averaging is automatically
turned off (see Section 4.2.4.6).
When envelope plotting is turned on Line Contours (see
Section 4.2.4.8) are only available for node based data
components (i.e velocity).
Envelope plotting may also be used with the WRITE option
(see Section 6.7) but it is not available during ANIMATION
(see Section 4.4.1) or when the REFERENCE_STATE
option (see Section 6.3.5.1) is being used.
Note: At present ENVELOPE plotting only functions in 2D
mode. Users running in 3D under OpenGL will be temporarily
swapped back to 2D mode for the duration of an envelope
plotting operation.
4.2.4.4 AVERAGING... Controlling data
averaging across adjacent elements.
By default data for contour plots is averaged across adjacent elements of the
same type, regardless of their material, etc.
These settings allow you to modify this behaviour.
The averaging control settings have the following meanings:
Averaging
Switches averaging on or off, (default on). If turned off then no data averaging occurs for contour
plots: this results in a "patchwork quilt" effect for area contour plots, and no results at all for line
contour plots.
Material
ignored
By default this is on, and the material type is not considered when averaging. If you switch this off
then averaging will not take place across adjacent elements if they are of different materials.
Blanking
ignored
By default this is on, and blanked elements are still included in the averaging process even though
they are not visible. This means that blanking elements will not change the values used for contouring
on those that remain. If you switch this off then results from blanked elements are not included when
results are averaged at nodes.
Clipping
ignored
By default this is on, and elements that have been volume-clipped from the display are still included
in the averaging process even though they are not visible. If you switch this off then results from
volume-clipped elements are not included when results are averaged at nodes (ie same logic as is
applied to blanked elements above).
Notes on data averaging:
Note Averaging of element data at nodes for contouring only takes place for element derived data, eg stresses.
1:
Where the data being plotted is nodally derived, eg velocity, then averaging is not used and the settings above
have no effect.
Page 4.38
User manual Version 9.3, Rev. 0, September 2008
Oasys D3PLOT
Note Averaging has an effect beyond plotting: it can also influence how element-derived scalar data is computed at
2:
nodes for WRITE and XY_DATA output.
Note Averaging never takes place over dissimilar element types. For example where a node is common to both a
3:
solid and a shell data at the node is computed separately for the "parent" element types, even if the data
component type is valid for both types.
Note Averaging is applied if requested, even if it might not be sensible to do so: this can be an issue when
4:
directional components are plotted in element local systems. For example if LOCAL X_DIRECT_STRESS is
used where two shells meet at a right angle (ie a flange meets a web) you may be averaging stresses in
directions that are 90 degrees apart.
Note A related error is to average across shells, using top or bottom surface data, when adjacent shells have inverted
5:
surfaces; ie their outward normals (local Z axes) point in opposite directions. This is usually the result of a
meshing error, and it can produce strange contours. (To check outward normals turn on the element local triads
with DISPLAY_OPTIONS, LOCAL_TRIAD; or do a continuous-tone (CT) plot of the element outward
normals using (geometric) component ON_OUTWARD_NORMAL.
4.2.4.5 REF_FRAME... Choosing the
frame of reference.
Directional data components may be plotted in model
Global, element Local or (global) Cylindrical coordinate
systems. The default is Global.
Directional components are basic stresses and strains from
their respective tensors, ie X_DIRECT_STRESS,
SX_DIRECT_STRAIN etc. See Section 9 for more details.
In this example a Cylindrical system has been used, and the
user has defined the origin and vector of the local Z’ axis.
The element local system is computed from its topology.
A four noded element is shown here, for a 3 noded
element Z’ is normal to the (flat) plane N1N2N3.
A cylindrical system is only suitable for elements that do
genuinely lie in the plane of a cylindrical wall. The Y’
vector is perpendicular to the Z’ axis through the element
centre.
Page 4.39
Oasys D3PLOT
User manual Version 9.3, Rev. 0, September 2008
Element local axes are calculated as follows:
[X’] (approx)
From vector N1N2
[Z’] (outward normal)
From cross product N1N3 x
N2N4
[Y’]
From cross product [Z’] x [X’]
[X’] (warping
correction)
From cross product [Y’] x [Z’]
Let [U] be the vector from the cylinder origin to the
element centre, then axes are calculated as follows:
[X’] (hoop) from cross product [U] x [Long axis]
[Y’] (radial) from cross product [Long axis] x [X’]
[Z’]
is the same as the [Long axis]
The data to which coordinate system transformations are applied
•
Element tensor derived data is transformed to Element Local or Cylindrical.
"Tensor derived" means Stress and Strain tensors, and any User-defined tensor components.
•
Nodal vector derived data is transformed to Cylindrical only. ("Local" has no meaning for nodes)
"Vector derived" means Displacement, Velocity and Accelerations vectors, and any User-defined vector
components.
One exception is that vector plots of nodal vector data are always presented in the global system in order to
show the "true" vector directions.
4.2.4.6 CONTOURS... Setting contouring attributes.
There are many attributes of contouring that can be set. This panel is the "generic" level giving access to specific
settings. It also shows the current settings of major parameters.
Since this panel has any sub-options and is common to all plotting modes so, to avoid repetition, it is described
separately in Section 4.3.
Page 4.40
User manual Version 9.3, Rev. 0, September 2008
Oasys D3PLOT
4.2.4.7 MAX & MIN Displaying max and
min values on plots
D3PLOT can calculate the maximum and minimum <n> values
on the current plot, and display it at the top of the graphics
window. Element-derived data components show element
values, and nodally-derived ones show nodes.
Not
computed
No max/min values computed or displayed
Shown on
data plots
Max/min values are computed, but only
displayed on data bearing plots (CT, SI,
etc)
Shown on
all plots
Max/min values are shown on all plot
types. For non data-bearing ones the
values shown are those of the currently
selected data component.
Number
of
values
shown
By default only 1 of each max and min is
shown. You can choose any number, but
space on the plot is limited and a practical
limit is about 30 pairs of values. Very large
numbers will also take longer to compute and
store.
List/label
options
By default values are both listed on the
plot, and the relevant elements/nodes are
labelled to identify them. Both are
switchable.
Export to XY Data
This option will calculate the max and min values for all states in the analysis, and export them as (x,y) data to the
XY_DATA tool for graphical plotting. The actual results sent depend on the settings below:
This frame
only.
Generates curves only for the <n> items that are the max and min in this frame. This will result
in <2n> curves.
All frame
items.
Generates curves for the <n> items that are the max/min in each state. This can result in up to 2
x #states x <n> curves if the max/min items in each state are different.
Envelope
This produces only two curves, a maximum and an minimum. The X axis is state time, and the
Y axis is the actual max/min value at each state regardless of the actual element/node it comes
from.
Export to WRITE
This option is similar to Export to XY Data, except that it builds the list of elements/nodes based on the options
selected, and exports them to the WRITE tool for numerical output at the current time.
Page 4.41
Oasys D3PLOT
User manual Version 9.3, Rev. 0, September 2008
Display on Data-bearing plots:
Draw all normally
Normal plotting with no restrictions
Draw max/min and rest
wireframe
The max and min <n> items are drawn in the current plotting mode, and
the rest in wireframe mode
Draw max/min only
Only the <n> max/min items are drawn in the current plotting mode.
4.2.4.8 Plotting commands for Solids and Shells.
There are six display modes for plotting data on solid and shell elements. (In all the examples below a
free-edge element overlay has been used to simplify plots).
CT (CT_CONTINOUS_TONE)
A continuous-tone plot draws bands
of contours in solid colours. No
account is taken of lighting.
LC (LC_LINE_CONTOURS)
A line-contour plot draws lines of
constant value across elements.
In this example the lines have been
labelled with their contour band
numbers: this is optional, and
controllable using the CONTOUR
command.
Note that the contour values, and
hence the lines, lie in the middle of the
equivalent solid bands above.
By default LC mode plots are drawn
as lines on a hidden-line element
mesh, but "mixed-mode" plotting
allows them to be superimposed on
shaded or wireframe meshes too. See
the PROPS box in Section 4.2.2.4.
Page 4.42
User manual Version 9.3, Rev. 0, September 2008
Oasys D3PLOT
SI (SHADED_IMAGE)
This is similar to a continuous-tone
plot, but lighting is included to give
more impression of shape.
The LIGHT command, see Section
4.2.3, controls the lighting aspects of
the plot; and there are special options
in CONTOUR, see Section 4.3, to
control the contouring aspects.
Two
options
are
provided:
Solid
Draws solid contour bands, exactly as in a CT plot, except that lighting is added.
Bands
(Default)
Fuzzy
bands
Draws smoothly varied colours, gouraud shading, with lighting. (This was the standard SI mode prior to
release 9.2)
VEL (VELOCITY_PLOT)
A velocity plot draws arrows
showing the direction and
magnitude of nodal velocities.
Arrow length is proportional to
velocity magnitude, and arrow
colour is also based on magnitude
using the normal contour band
colours and bands.
Both of these attributes are set with
the CONTOUR command - see
Section 4.3.
Vector plotting can select any of Displacement, Velocity and Acceleration; the default
being velocity.
If user-defined vector components for nodes have been defined they are also eligible for
plotting in this mode.
Page 4.43
Oasys D3PLOT
User manual Version 9.3, Rev. 0, September 2008
Like LC mode plots VELocity plots are drawn on a hidden-line mesh by default. However mixed-mode plotting
means that the underlying mesh may be rendered in shaded and/or wireframe modes - see the PROPS box in Section
4.2.2.4.
ISO
ISO surface plots draws surfaces at
constant values, with lighting added.
In 3D elements, as shown here, the
contours will show surfaces of constant
value through the body of the solid mass.
In 2D elements the effect is the same as a
Line Contour plot, drawing lines of
constant value.
Note that ISO plots of large solid meshes
can be many times slower than, for
example, SI plots of the outer surface.
This is due to the "cube /square" law: an
ISO plot has to consider all elements
inside the mesh, whereas an SI plot need
only consider external elements.
CL (CLOUD_PLOT)
A cloud plot produces points displaying
the value of the selected data component
at each node. These can been drawn as a
fixed size of the user’s choice or
proportionally to their value. This
property can be set with the CONTOUR
command - see Section 4.3.
CL plots are a far "cheaper" way of
seeing what is going on inside large solid
meshes than ISO plots (or cut sections).
This is because they don’t have to worry
about data averaging or complicated
graphics, making them much faster to
process.
This section has described the commands in the 2D/3D Solids and Shells plotting mode panel. But you should be aware
that there are further commands that can influence the appearance of all plots located in the top menu box:
Display_options, Label, Entity, Blank, Volume_Clip
These are described in Sections 6.1 et seq.
Click here for the next section
Page 4.44
User manual Version 9.3, Rev. 0, September 2008
Oasys D3PLOT
4.2.5 Beam Plots Plotting results
on beam elements
Beam elements cannot be contoured in the same way as 2 and
3D elements since they have no visual area on which to plot
results.
Therefore the special "Beam Plotting" data display mode must
be used to visualise results from beams.
Note: Results from other 1D elements: springs, dampers,
seat-belts, joints, etc are not currently written to database files
for plotting, and they cannot be displayed in this (or any other)
D3PLOT menu.
4.2.5.1 COMPONENT... Selecting a
beam data component
All beam types have the BASIC set of data components: 3
forces + 3 moments.
Belytschko-Schwer beams using a resultant plastic formulation
will have "extra" PLASTIC components.
Hughes-Liu (integrated) beams can optionally write "extra"
STRESS (and strain) values at integration points.
D3PLOT supports both basic and "extra" data components for
all these beam types.
However note that LS-DYNA contains many different beam formulations, and it is not possible to tell from the
database files what the data for a given beam actually mean. It is your responsibility to interpret your results
correctly, and you should read the notes in Section 12.10 before processing beam data.
4.2.5.2 INTG_POINT...
Selecting the integration point for results from "integrated" (Hughes-Liu etc) beams.
The "extra" INTEGRATED results for these beam types only are written at the specified integration points. Only one
can be plotted at a time, and this is selected here.
(This is analagous to defining the integration point for output of shell data.)
4.2.5.3 ENVELOPE...
Envelope plotting for beams works in exactly the same way as for other element classes. The selection of states, data
components and so on are identical. (See Section 4.2.4.4.)
Page 4.45
Oasys D3PLOT
User manual Version 9.3, Rev. 0, September 2008
4.2.5.4 ATTRIBUTES Setting the
attributes of beam plots
Beam results can be plotted in Continuous-tone and
Diagram-plot modes. These have special visual attributes that
are set in this panel.
The examples below all use a simple built-in beam with a
point load at its centre, and show the resulting
bending-moment diagram as affected by the settings here.
The "thick" line used will depend upon whether or not a .ZTF
file has been read in from Oasys Primer.
•
If it has been read then the beam’s "true" section
thickness will be used.
•
If no such file has been read a square section of the
"Thickness" given here will be used.
(D3PLOT V92 can reproduce a range of "true" section shapes
from the *SECTION_BEAM data encoded in the .ZTF file.
"Integrated" beams with explicit section shapes are drawn as
specified.
"Resultant" beams with section properties (A, Ixx, Iyy) have a
hollow rectangular or tubular sections inferred from their
properties.
Beam symbol display is discussed further under Display
Options
THICKNESS Setting continuous-tone plot image thickness.
Continuous-tone beam plots show the data values on a beam as thick bars of solid colour along the beam centre-line.
The thickness of these bars is set by default to 1% of the model’s longest dimension (in model space units), which
proves adequate for most models.
You can change this value with the THICKNESS command. The figure above demonstrates the effect of changing this
value by a factor of 3.
Page 4.46
User manual Version 9.3, Rev. 0, September 2008
Oasys D3PLOT
PROJECTION Using "local" or "screen" projection for diagram plots.
By default those data components which imply a local direction (ie shear and bending in/about beam local Y and Z
axes) are drawn in "diagram" plots projected onto their "local" plane. For example in the left hand side of the figure
above the bending moment Mzz is shown projected onto the plane of beam local XY. (The beam local axes have been
turned on for clarity.) This gives a visual indication of the direction and sign of the component.
You can choose instead to project results onto the "screen" plane, as shown in the right hand side of the figure above.
This draws results in the plane of the screen regardless of the beam’s orientation. This mode of display is used
unconditionally for components that do not have an implicit direction (eg axial force, torsion, etc)
DIAGRAM SIZE Setting the visual scale of diagram plots.
The size of diagram plots is set by default such that the largest vector is about 500 screen units. You can change this
at will: the figure above shows typical settings.
Page 4.47
Oasys D3PLOT
HATCHING
User manual Version 9.3, Rev. 0, September 2008
Setting the density of diagram plot hatching
LABEL_VALUES Labelling values on diagram plots.
The left hand figure above shows the default hatching density: at roughly every 100 screen space units. On
the right the hatching density has been increased by reducing its spacing to every 30 units.
Note: A "solid" diagram plot appearance can be achieved by reducing the hatching spacing to typically 10
units or below. The actual value will depend on the screen window size and device resolution. It requires a
lot of screen vectors to achieve this effect, so don’t use it where display speed or storage space are critical:
eg during animation.
The right hand figure above also shows the effect of turning on the LABEL_VALUES switch: values at beam end
points are shown. This option is only useful when there are relatively few beams on the display, with a lot of beams
being labelled the screen will become a mass of numbers. (The LABEL option, using "dynamic" labelling of beams
with the DATA_VALUE switch on, provides a more selective way of drawing element data values on the screen.)
REVERSE_END_2 Sign convention used for beam plot display.
The convention when drawing bending moment diagrams is to plot
the diagram on the tensile side of the element. However the
mathematics would suggest otherwise:
In the example used here (encastre beam, point load) the moments
at the two ends of this beam are clockwise (+ve) and
anti-clockwise (-ve) respectively, so at one end a +ve value must
be drawn on the tensile side but at the other end a -ve value.
Hence the need to reverse the sign of the "end 2" value for plotting
purposes only. The author has never seen plots drawn without this
reversal but, for completeness, the ability to produce them is
provided with the REVERSE_END_2 switch: turn it off to see
mathematically "pure" plots.
Page 4.48
User manual Version 9.3, Rev. 0, September 2008
Oasys D3PLOT
4.2.5.5 WARNINGS On-line warnings about beam-plotting pitfalls
There are several different beam formulations in LS-DYNA, the principal ones being:
Hughes-Liu
Standard/arbitrary section, integrated at mid-span
Belytschko-Schwer
Standard sections, integrated at two ends
Truss
Axial only Belytschko-Schwer beam
Discrete
Zero-length, generalised spring-like behaviour
Cable
Tension only
Spotweld
A variation on discrete
Various data output options exist depending on material type, beam formulation, number of integration points and
user-defined settings. Unfortunately the output files do not contain enough information to allow beam results to be
diagnosed unambiguously, so WARNINGS provides on-line guidance. You should also read Section 12.10 which
describes beam output.
Inconsistent sign conventions in LS-DYNA releases up to and including 970
Due to a bug in LS-DYNA versions up to and including LS970 exhibit the following inconsistent sign convention for
beam output:
•
"Resultant" (typically Belytschko-Schwer) elements use one sign convention
•
"Integrated" (typically Hughes-Liu) elements use the opposite sign convention for 4 of the 6 output components.
The following table shows the results from releases 970 and earlier:
ComponentMatching?
Fx
Same
Fy
Opposite
Fz
Opposite
Mxx
Opposite
Myy
Opposite
Mzz
Same
Which is right?
Sadly there is no "right" for beam output, as different users have different conventions.
The confusion arises because of the different ways in which the beam types work:
integrated beams have integration points at their centre, whereas resultant beams have
(potential) hinges at their ends. The former reports force in the beam, and the latter
reactions at the supports.
D3PLOT attempts to draw bending moment diagrams on the tensile side, but depending
on which beam type you have used this may or may not be the case.
Sign conventions are consistent from LS-DYNA release 971 onwards
At some stage during the development of LS971 this problem was fixed, and results now use the "integrated"
convention for all beam types.
Unfortunately D3PLOT cannot tell with certainty which LS-DYNA version was used to generate a set of results, so it
cannot correct for this automatically. This has consequences for cut-section force extraction from beams, described in
section 6.4.4
Interpreting beam results requires knowledge about the original beam and material formulations that is not available in
the database (.ptf) files. As a consequence there are some ambiguities in the interpretation of results, especially for
"extra" data, that D3PLOT is unable to resolve for you.
It is your responsibility to determine what your results mean,
and to interpret them correctly.
If you need advice or help please contact Oasys.
Page 4.49
Oasys D3PLOT
User manual Version 9.3, Rev. 0, September 2008
4.2.5.6 OPACITY_SWITCH Making overlying structure transparent
Beams are often buried inside a model which also contains shells and solids, and it can be difficult to see beam data
plots because of the intervening structure. Therefore D3PLOT allows you to make this overlying structure transparent
when performing beam plots.
This option is preserved for backwards compatibility. A more flexible method would be to adjust the visual
transparency of the overlying structure, using the "quick pick" option, or explicit settings in the PROPs panel.
Normally overlying structure will obscure (correctly)
any beams that are behind it.
This example shows a typical concrete column with
reinforcement and, clearly, it would be useful to
visualise forces in the enclosed area while still seeing
the external concrete outline.
When the OPACITY_SWITCH is turned off the
overlying structure is no longer opaque, (ie it becomes
transparent), and the results in the beams obscured
above become visible.
By default the OPACITY_SWITCH is off, ie beams which should not be visible are indeed obscured by the
overlying structure. It can be turned on/off at will.
Note: The OPACITY_SWITCH affects both beam and contact surface data plotting modes (the same switch in both
contexts). It has no effect in other contexts, or upon plotting modes that do not display data.
Page 4.50
User manual Version 9.3, Rev. 0, September 2008
Oasys D3PLOT
4.2.5.7 Data
plotting
commands for
Beams.
There are two data plotting
modes for the display of beam
results.
DP (DIAGRAM_PLOT)
This shows the DP option: a
"diagram" plot showing results
hatched on the beam.
Hatching size is proportional to
data magnitude, and colour also
follows the normal contour
band limits. Directional data is
displayed by default on the
relevant local beam axis.
Any data component can be
displayed this way, not just
bending moments.
CT (CONTINUOUS_TONE)
This CT continuous-tone plot
shows exactly the same results
as in the diagram plot above.
Now the results are drawn as
thick blocks of colour on the
beam centreline.
This can give less cluttered
plots, but no visual indication of
the data or beam orientation is
possible.
Click here for the next section
Page 4.51
Oasys D3PLOT
User manual Version 9.3, Rev. 0, September 2008
4.2.6 Contact Surface Plots
Plotting results on contact surface
(interface) segments
Visually contact surface segments have the same attributes as
thin shells, and data may be contoured on them in the same
way. To distinguish between the two element types contact
segments in D3PLOT are hatched by default.
This contact surface plotting mode must be used to display
contact stress and force on segments. The distinction between
this and normal 2D/3D element plotting is made to prevent
confusion between the two element types.
Note: If you have not read in a .CTF file D3PLOT will not
show any contact segments as being present.
The following data components may be plotted:
The STRESS... and FORCE... categories are described in
more detail in Section 12.11.
The GEOMETRIC... category allows segment outward normals
to be plotted.
Contact surfaces generate penalty forces at nodes, which are converted to "stresses" in LS-DYNA by dividing
contact force by segment area. Strictly this is "contact pressure", rather than "stress", and you should not expect these
values to be the same as the (genuine) stresses in the underlying elements.
The contact surface results are a sanpshot at a particular time. As contact forces are particularly noisy, there may be a
degree of randomness to the data plotted.
The OPACITY switch contols structure transparency, allowing the contact forces to be seen through the structure.
Data plotting commands for contact surfaces
There are four plotting commands for the display of contact surface results:
CT (CONTINUOUS_TONE)
Continuous-tone plots of contact
surface data are identical in concept to
those of 2D/3D data: solid contour
fill, no lighting effects.
Note, however, that elements which
are not contact segments are not
contoured at all (as distinct from
receiving zero values).
Page 4.52
User manual Version 9.3, Rev. 0, September 2008
Oasys D3PLOT
LC (LINE_CONTOURS)
As with continuous-tone plots a
Line-Contour plot of contact surface
data is identical in concept to that of
2D/3D data.
(This is the same model as above, but
with #contour levels increased to 13,
cross-hatching turned off for clarity,
and the scale increased to show
detail.)
SI (SHADED_IMAGE)
The shaded-image plotting mode is
identical in concept to that used for
2D/3D elements: 21 solid contours
with lighting taken into account.
Page 4.53
Oasys D3PLOT
User manual Version 9.3, Rev. 0, September 2008
VEC (VECTOR_PLOT)
Vector plots draw arrows of force at
nodes on contact surfaces.
Length is proportional to data
magnitude, and colour is assigned
using the current contour bar colours.
(This example shows two
spot-welded plates being pulled
apart. The nodes in the hatched area
form a welded contact-surface.)
This section has described contact surface data plotting, and the (graphical) similarities with solid and shell (2D/3D)
plotting in Section 4.2.4 will be apparent. As with that plotting mode there are further commands which influence the
appearance of plots:
Display_options, Label, Entity, Blank, Volume_Clip
These are described in Sections 6.1 et seq.
Click here for the next section
Page 4.54
User manual Version 9.3, Rev. 0, September 2008
Oasys D3PLOT
4.2.7 Principal Stress and Strain
vector plots
This panel controls the plotting of principal stress and strain
vector plots. (To contour these values use the normal 2D/3D
plotting commands described in Section 4.2.4)
These vectors can only be displayed on 2D and 3D elements
(solids and shells), so if you have none of these in your model
it will be unavailable.
4.2.7.1 COMPONENT Choosing a
principal stress/strain data component
This panel shows the generic data component types for principal
values. The STRESS and STRAIN categories are only made
available if their respective tensors are present in the database
file. See Section 9 for more details of element output and file
contents.
Note
1:
By default the strain tensor is not written by LS-DYNA, you must select it by setting STRFLG on the
*DATABASE_EXTENT_BINARY control card. If your model seems not to have directional strain terms
available this is probably the reason.
Note
2:
As well as the simple (scalar) components it is possible to plot multiple values simultaneously. For example
the component PMM_PRINC_MAX_&_MIN shown here plots vectors of both maximum and minimum
stress, and PALL will plot all three principal values.
Note
3:
If user-defined tensor components are available they too may be plotted using the components defined above.
The transformation to principal is applied on the assumption that the user-defined tensor is in the global
system.
4.2.7.2 SURFACE Selecting the thin shell intg point.
As with contouring 2D/3D data you must select the relevant thin shell surface for output. This is not necessary for
solids and thick shells.
See Section 4.2.4.2 for more details.
Page 4.55
Oasys D3PLOT
User manual Version 9.3, Rev. 0, September 2008
4.2.7.3 LENGTH, COLOUR, SYMBOL Setting principal stress/strain vector
plot attributes.
LENGTH: Setting vector length.
Vector symbols are scaled to data magnitude. LENGTH
sets the maximum symbol length in model space units.
COLOUR: Setting vector colour
By default vectors are coloured using "contour" bands
based on their data magnitude. This is the DATA option.
You can choose instead to use colour to distinguish
between the components of multi-valued plots, the
FIXED option.
SYMBOL: Vector symbol types
By default the vector symbols have a HIERarchy:
arrowhead for largest, inverted arrowhead for smallest,
plain bar for middle.
You can choose to have plain LINES instead if you
wish.
4.2.7.4 GO Executing principal stress/strain vector plots
The figure in Section 4.2.7.3 (above) shows examples of principal stress vector plots using the 3-valued component
PALL_PRINC_ALL (all 3 principal stresses), and the 2-valued one PMM_PRINC_MAX_&_MIN (max and min
principal stresses only). It also demonstrates the effects of the different SYMBOL settings. At present there is only
this single data plotting mode.
Click here for the next section
Page 4.56
User manual Version 9.3, Rev. 0, September 2008
Oasys D3PLOT
4.3 Controlling contouring of data plots: CONTOUR
All of the data plotting commands described in Section 4.2 use the CONTOUR command panel to control data
display.
The generic CONTOUR panel is shown
right. The various options in it are described
below.
Depending upon the plotting mode from
which it is called, and the hardware being
used, some options may be greyed out.
Click on the links here to jump straight to the
relevant sections:
4.3.1: Levels
4.3.2: Labels
4.3.3:
Resolution
4.3.4: Arrows
4.3.5: Limiting
values
4.3.6:
Dithering
4.3.7:
Gouraud
4.3.8: Cloud
plots
4.3.9: Iso
plots
4.3.1 LEVELS... Setting number of contour levels, their ranges
and colours
By default contouring is set to have:
•
6 levels
•
Automatically computed values
•
Colours from blue (low) to magenta (high)
These default settings are shown right, the LEVELS
sub-menu.
You can modify these settings as follows:
Page 4.57
Oasys D3PLOT
User manual Version 9.3, Rev. 0, September 2008
4.3.1.1 Setting contour levels. (Automatic, Max_&_Min, User_Defined)
By default contour levels are AUTOMATIC. This means that the maximum and minimum values are computed prior
to each plot, and the resulting bands spaced evenly between these.
In the figures above the contour levels have been set manually: the max and min values only are set in the left figure,
user-defined levels for each band are set in the right figure.
MAX_&_MIN levels have been selected, and the upper and
lower values defined. The intermediate values are
interpolated linearly and filled in for you, but you cannot
change them.
Page 4.58
User manual Version 9.3, Rev. 0, September 2008
Oasys D3PLOT
The figure (right) shows the same panel set up for the plot in
(b) above. USER_DEFined levels have been chosen, and all
contour bands filled in. Every level has to be defined: note
the uneven intervals.
Hint:
Choose MAX_&_MIN first, fill in upper and
lower-bound values, then switch to USER_
DEFINED. The interpolated intermediate values
are remembered and may save typing.
Computing contour bands over multiple windows and models.
Where there is more than one window, possibly showing a different component, on a model; or more than one model in
the database then contour levels are computed as follows:
AUTOMATIC
contours:
MAX & MIN
contours:
For each active window (Wn tab selected):
•
The max and min values of all visible elements in all models is computed
•
These become the max/min bounds for that window
•
Changing what is displayed in that window will update these bounds
•
Each window is independently calculated, regardless of the contents of other windows.
•
During animation exactly the same rules apply, except that the "envelope" of values from
all frames is used to calculate the max & min values.
For each active window (Wn tab selected):
•
The user-defined max and min values are applied to that window, regardless of contents.
Applying the same contour bands to all windows.
It is often the case that you have several windows, and you want to have the same contour bands in all of them. To do
this:
If you want to specify the bands to be used:
•
Make sure that the Wn tabs for all required windows are
selected.
•
Choose MAX_&_MIN levels
•
Set the required levels.
If you want to find the envelope of all windows,
•
Make sure that the Wn tabs for all required windows are
derive a max & min value from that, then set it in
selected.
all windows.
•
Choose AUTOMATIC levels.
•
Perform plots in all windows to update their local bands.
•
If you want values over an animation then animate all these
windows to force computation of the "envelope" max/min
values in each.
•
Then select MAX_&_MIN
The second method works because when you switch from AUTOMATIC to MAX_&_MIN D3PLOT computes the
"envelope" of max/min values from all active windows, and applies this as the default values for MAX_&_MIN mode.
It is important to understand the distinction between automatic contouring over animation frames, and automatic
contouring at a given state.
Automatic contour bands during Animation
Page 4.59
Oasys D3PLOT
User manual Version 9.3, Rev. 0, September 2008
During an animation, or when a particular frame of an animation is displayed statically:
•
For each window D3PLOT will scan all selected states and find the max and min contour values.
•
If the window contains more than one model the max and min over all models in the window is found.
These max and min values become the contour bounds used for the animation, or when any frame of the animation is
displayed, with the intention that contour bands in any frame will have the same values.
Commands which display animation frames are:
•
[ > ] Play to initiate an animation, either at the top of a graphics window or in the "States" panel.
•
Any of the << |< >| >> frame positioning commands either at the top of a graphics window or in the "States"
panel.
•
Using the state slider at the top of a graphics window.
•
Using the <shift> + <arrow key> short cut to toggle through frames.
Automatic contour bands during static state display.
During static display of a specific state:
•
For each window D3PLOT will find the max and min of all models in that window at that state only.
If you subsequently move on to another state then the contour bounds will change as the new max and min values for
that state are used instead.
Commands which display static states are:
•
Any explicit data plotting command (eg SI, CT, ..) while not animating.
•
Using the state slider in the "States" panel.
•
Setting an explicit state number or time in the "States" panel.
•
Using the <arrow keys> (no shift) to toggle through states.
A useful trick if you want to "animate" a series of states, but to autoscale contours to each state individually, is to use
the <arrow keys>: hold them down letting them auto-repeat and D3PLOT will cycle through states with specific
contour bands for each state.
Why is there a distinction between "frames" and "states"?
It is true that for most transient analyses "frames" will be equivalent to "states", however there are some cases where
this is not the case:
•
When plots are interpolated by time the frame vs state equivalence no longer holds, and typically there are many
more frames.
•
The user can choose to animate only a subset of the available states, reducing the number of frames.
•
In frequency domain (modeshape) analyses each "state" is a mode, and animation frames cycle through +/- 180
degrees at that mode.
•
Similarly "static" analyses with a series of loadcases use frames to animate each case in a quasi-modal fashion.
Preserving this distinction makes D3PLOT more flexible and provides more options for contouring animations.
For more details about animation, frames and states, and how to specify them, see section 4.4 on Animation.
4.3.1.2 Clicking on the contour bar to set levels.
As an alternative to the explicit methods of setting contour bands described above it
is also possible to set and restrict values by clicking on the contour band display
itself.
On a data-bearing plot hover the cursor over the contour level bands, and the cursor
symbol will change to CONT/OPTS, and the following options are then available:
•
Left mouse: limits the display to only those items within the selected band
•
Middle mouse: reverts to automatic contour levels
•
Right mouse: maps the options menu shown here
Page 4.60
User manual Version 9.3, Rev. 0, September 2008
Items in band
(left mouse)
Oasys D3PLOT
Restricts the display to those items in the selected band, but does not alter the overall
contour band limits.
The effect is based on the centre value of elements, so if contouring is on (the default) you
may see gradations of value outside the limits of the band chosen. To prevent this turn
averaging off, or select a plotting mode (such as CLoud plots) which shows centre values
only.
Scale to band
Resets contouring to max/min using the upper and lower values of the band chosen.
Display is not limited to this range, so items outside the range will still be drawn.
Limit to band
As Scale to band, but also sets limiting values to the original band’s max/min, so only
elements within the original band are shown.
Reset to auto
(middle
mouse)
Resets contouring to automatic, and turns off limiting values if switched on by one of the
options above.
Map contour
panel
Is the equivalent of selecting Contour > Levels.
Restriction to a band is carried out using the Contours > Limiting Values function described in section 4.3.5. In
effect the functions here set the upper and lower bounds, and turn on limiting. You can adjust these further by hand if
you wish.
4.3.1.3 Changing contour band colours.
By default colours range from blue (low value) to magenta (high
value), and the colour range is set up automatically. Internally
there are 15 standard colours to choose from, and any contour
band may be assigned any colour.
To change a colour click on its number (here band 5 has been
selected) then select an alternative standard colour from the panel,
or use Palette to define your own arbitrary colour.
RESET
Will reset contour colours to their default range
for this number of levels.
REVERSE Will reverse the current colour range for this
number of levels.
Note
1:
Contour bands define the upper and lower values of each discrete band. For solid contoured plots (ie CT, SI)
each band lies between these limits. For line contoured (LC) plots each line will lie at the mid-point of its
band.
Note
2:
Colour tables for contours are stored separately for each number of contour levels. So if you change colours
for (say) 6 contour levels this will not affect colours for any other number of levels.
Note
3:
During SI shaded-image plots the current number of contour levels is mapped onto 21 colour bands,
interpolating linearly, regardless of the actual number of bands selected. This is to improve the colour
resolution of plots. As a consequence colours are also interpolated within these 21 bands from the #levels set
here. Thus defining more contour levels will give finer control over the colours used in shaded-image plots.
Note
4:
Whichever way they are defined, contour bands must be in ascending, monotonic order. This is particularly
significant for USER_DEFINED mode: you will not be permitted to create bands that have zero or negative
intervals.
Page 4.61
Oasys D3PLOT
User manual Version 9.3, Rev. 0, September 2008
4.3.2 LABELS... Setting the labelling of line-contour plots.
By default LI line-contour plots on colour displays do not have the contour bands labelled, but it is possible to turn
this on, and to control labelling frequency.
This figure (right) shows the LABELS... control panel. Labels may be toggled on and off, and
the labelling frequency can be set.
Frequency must be an integer value between 1 and 1000 and means "label every nth line". So
lower values give more frequent labelling, and higher values sparser labelling. Its default value
is 10.
Note: Labelling is not necessary on colour devices, since line colour is sufficient to distinguish between contour
levels, however on monochrome and greyscale devices it is needed to tell lines apart. Therefore if you are
running on a monochrome display, or on any display with the laser switch on and the laser output set to be in
GREYSCALE mode, line labelling will be applied regardless of the switch setting above.
Click here for the next section
Page 4.62
User manual Version 9.3, Rev. 0, September 2008
Oasys D3PLOT
4.3.3 RESOLUTION... Setting contour resolution
The output from 2D & 3D elements in LS-DYNA is only written at element centres, implying
constant stress: no values are written at nodes on elements.
Therefore contouring, by displaying variations of data across elements, is an approximation
used to help visualisation of the data distribution.
Three levels of contour resolution are provided:
LOW
Data are averaged at nodes, then contour bands (or lines) are drawn linearly from edge to edge across
elements. The element centre values are not directly included so some smoothing of results occurs and
peak values may be lost: which is potentially unsafe.
MEDIUM The value with the greatest magnitude at each node is found, then contour bands (or lines) are drawn
linearly from edge to edge across elements. The element centre values are implicitly included since they
will qualify as maxima at nodes: a safe overestimate.
HIGH
Data are averaged at nodes as before, but elements are then split into sub-areas using centre and mid-side
values. This enables variations across elements to be seen, and peak centre values included. However it
requires up to eight times as much computation, graphics storage and drawing effort as the other two
modes.
The default mode is MED(ium) resolution since this is both "safe", (peak centre values are included, albeit smeared out
to element vertices), and quick (computation, graphics data storage and drawing effort are small).
To understand the effects of the three possible contour settings consider the following example:
Two sheets are
spot-welded
together, and are
then pulled apart.
The following plots (a - d) show the plastic bending strain in the top sheet as:
•
Unaveraged
•
LOW resolution
•
MEDIUM res
•
HIGH res
Page 4.63
Oasys D3PLOT
(a)
(b)
Page 4.64
User manual Version 9.3, Rev. 0, September 2008
User manual Version 9.3, Rev. 0, September 2008
Oasys D3PLOT
(c)
(d)
Page 4.65
Oasys D3PLOT
User manual Version 9.3, Rev. 0, September 2008
4.3.4 ARROWS... Setting arrow length in vector plots.
VEL velocity plots, and VEC vector plots of contact force, both use arrows to show the direction and magnitude of
the data.
Arrow length is set by default such that the maximum contour band value gives an arrow 200 screen units long, other
values being scaled in proportion. The figures below show examples of a velocity plot with default and double length
arrows.
This figure shows the ARROWS control panel.
Length is entered in screen units, here 400 has been used.
4.3.5 LIMITING_VALUES... Limiting what is contoured by value
range
By default all elements are contoured, regardless of whether or not they lie within the max & min range of the contour
bands specified. Elements lying outside these bands are given the highest or lowest contour band colour as
appropriate.
In some cases you may wish to contour only those elements which lie within a restricted range of values, and to omit
(or draw only in outline) those outside this range. This can be done with the LIMITING_VALUES option.
Page 4.66
User manual Version 9.3, Rev. 0, September 2008
Oasys D3PLOT
This figure shows the control panel for the LIMITING_VALUES
options.
When the Limiting switch is off, (default), the other options in
this panel are greyed out.
Lowerbound
value
is the value below which data are not
contoured.
Upperbound
value
is the value above which data are not
contoured.
Action for
defines what happens to excluded
excluded
elements, see below.
You need to consider what action is to be taken with elements
that are not contoured. There are three options, which it is
convenient to take in reverse order.
The Auto bands range options determine how Limiting Values interact with automatic contour bands when
limiting is active:
Temp max
+ min
Is used when the short cut "click on a contour band" option in section 4.3.1.2 has been used. This
temporarily sets contouring to enforced max/min values, which conflicts with this mode, and
should not be set manually.
Full
data
range
If automatic contour bands are in use then they will adjust themselves to the full range of data
available, ignoring the lower and upperbound values set here. Therefore the contour band
boundaries will not change as the upper and lowerbound values are changed here.
Clamp to
limits
Restricts automatic contour bands to the limits set here, changing as they change. Therefore
whatever is drawn on the plot will exploit the full range of contour bands and colours available,
making this suitable if you want the maximum colour and band discrimination for what is drawn.
The following three examples are a mould filling (fluids) analysis in which a plate comprised of solid elements is filled
from below. They show the effects of the three Action for excluded options, in particular note how this affects the
display of internal structure:
This figure uses DRAW_IN_BLACK for elements that lie outside the limiting values. (Black is reproduced as white
on a hardcopy as here.)
Here we are plotting "void fraction", ie %age fullness of fluid, and only values in the range 0.8 to 1.0 (ie 80% full or
more) are shown.
It is clear that no internal structure is visible since elements on the outside faces, which are not full, obscure it.
Page 4.67
Oasys D3PLOT
User manual Version 9.3, Rev. 0, September 2008
This figure uses OUTLINE for elements that lie outside the limiting values.
Only the outline of elements which are out of range is drawn, so that they do not obscure structure behind them.
In this example free edge display ([DISPLAY_ OPTIONS] FREE_EDGE) has also been used to remove clutter of
excess mesh.
Page 4.68
User manual Version 9.3, Rev. 0, September 2008
Oasys D3PLOT
This figure uses OMIT for elements that lie outside the limiting values.
Now only those elements that are within the specified limits are drawn at all, those outside them are effectively
blanked from the display.
Page 4.69
Oasys D3PLOT
User manual Version 9.3, Rev. 0, September 2008
The default state of the LIMITING_VALUES switch is off, so that none of these settings apply.
When turned on it will apply to any data plotting mode, but clearly the OUTLINE and DRAW_ IN_BLACK options
for excluded elements are only meaningful for 2D and 3D elements.
4.3.6 DITHERING... Dithering of contours in SI shaded-image plots
This is a simple switch that toggles the dithering of contours in SI shaded-image plots only, it has no affect on other
plotting modes. Its default state is OFF, ie no dithering.
Note: Users on 3D devices will do better with GOURAUD contours option for SI plots, which is the default: see
Section 4.3.7. and should ignore this option which is only relevant to legacy 2D graphics.
Page 4.70
User manual Version 9.3, Rev. 0, September 2008
Oasys D3PLOT
This figure shows an un-dithered shaded-image
plot.
Discrete contour bands are visible since they are
drawn as polygons.
This is much quicker to compute and draw than the
dithered image below, and laser files are smaller,
but the image quality is not so good.
This is the default mode since it is quick.
This figure shows the same model, but with
dithering turned on.
There are now no discrete contour bands, they have
been blended smoothly into one another by the
dithering process.
But this image takes much longer to compute and
draw, and any laser file will be much larger
because a value is written at every pixel.
4.3.7 GOURAUD... On 3D devices only: Gouraud shading of
contours on SI shaded-image plots.
This is a simple on/off toggle switch for the gouraud shading of contours on shaded-image plots.
It is on by default if the hardware support is available.
Gouraud shading applies:
•
Only on 3D devices, operating in 3D mode, which have hardware support for it;
•
Only to the contours of SI shaded-image plots in this situation.
It achieves a result similar to the dithered image in the dithered shaded-image plot, but does this using hardware
interpolation of shades rather than software generated dithering. If your hardware supports it you should use this in
preference to dithering: it will give better looking results, and will run about 100 times faster. For this reason it is the
default setting for shaded-image plots on 3D devices.
Note
1:
Hardware generated gouraud shading cannot be sent to laser plots, since laser images have to be generated in
software. Turning the laser on will cause the display to revert to 2D mode giving, by default, contour bands as
shown in the un-dithered shaded-image plot. To send a smoothly shaded SI image to a laser file you will
have to use dithering as described in Section 4.3.6.
Page 4.71
Oasys D3PLOT
User manual Version 9.3, Rev. 0, September 2008
Note
2:
Gouraud shaded SI images will often be generated faster than apparently simpler CT continuous-tone images
on 3D devices. This is because fewer polygons are generated (gouraud shading only requires facet vertex, ie
nodal, values). In addition 3D hardware is usually optimised to render smooth shaded and lit polygons
quickly.
Note
3:
Gouraud shaded images are also more economical of memory space than display modes that contain discrete
sub-polygons of contour bands in elements. Again, this is because only nodal data values need be sent to the
hardware (assuming low resolution contouring). For this reason gouraud shaded SI mode is often a good
choice for building animations. If speed and memory space are at a premium the recommended settings would
be:
•
•
•
Gouraud shading on;
Low resolution contouring;
Either overlay off; or on, but with free-edge display also turn
4.3.8: Cloud Plots: Controlling the
attributes of CL mode plots.
Point size may be:
•
Fixed, the default being 2 units
•
Proportional to data magnitude, autoscaled to the current
contour range.
Here is a simple
cantilever of solid
elements, loaded in
bending, and plotted in
CT mode.
Page 4.72
User manual Version 9.3, Rev. 0, September 2008
Oasys D3PLOT
And here is the same
model, this time as a
Cloud plot with variable
symbol size:
4.3.9: Iso Plots: Controlling the
attributes of ISO mode plots.
By default ISO plots are opaque, but this can osbcure internal
detail so it is possible to make them transparent.
Transparency on graphics hardware is not perfect and, moreover,
can be slow to render. So two alternative methods of displaying
transparent ISO contours are provided.
Page 4.73
Oasys D3PLOT
Here is the same
cantilever as above,
rendered as a default
(opaque) ISO plot:
This is the same model
using transparent
"stippled" contours, with
the lowest values (blue)
rendered as opaque.
Page 4.74
User manual Version 9.3, Rev. 0, September 2008
User manual Version 9.3, Rev. 0, September 2008
Oasys D3PLOT
And here is the same
image again, rendered
using "Alpha blending".
The quality of the
transparency is much
better although it would
be slower to draw with a
large model.
However ...
... using Alpha
transparency does not
always give the "right"
answers.
Here is the same image,
this time with the high
values opaque, and it is
clear that the lower
colours are not visible
when they are behind the
higher ones.
This is because "Alpha
blending" in the
hardware is not, in itself,
always a totally reliable
way of producing
realistic transparency
because the results
depend on the order in
which facets are drawn.
It may be necessary to
revert to stippling, which
will always give
"correct" precedence of
facets - albeit with a
poorer spatial resolution
- to get acceptable
results.
Click here for the next section
Page 4.75
Oasys D3PLOT
User manual Version 9.3, Rev. 0, September 2008
4.4 Animation How to
display, control, store and
retrieve animation
sequences.
In D3PLOT 8.0 there is no distinction between "static" and "animation" modes: a static plot can be thought of as a
frozen slice of a dynamic animation sequence. Any conventional display mode can be animated at any time by pressing
PLAY >, and halted again with STOP.
Virtually all menu functions such as blanking, component change, and so on can be used while animating, as can
dynamic viewing: it is not necessary to halt an animation in order to change the attributes of your image.
4.4.1 Basic animation controls.
As well as the PLAY > and STOP controls in the State Display box the graphics window has a set of controls at its
top left which can be used to control animation, and the state used for static display.
The master slider in the State Display panel controls all graphics windows for which its Wn tabs are active.
The slider and associated controls at the top of a graphics window control that window only.
Page 4.76
User manual Version 9.3, Rev. 0, September 2008
Oasys D3PLOT
STOPs the current animation.
Starts animation (same as PLAY >)
Jump straight to first or last frame
Single step backwards (|<) and forwards (>|)
The state slider allows you to scroll with the mouse to any state, and to slide dynamically through them.
If an animation is playing using any of these controls (other than PLAY) will automatically stop it in order to execute
the new commands.
4.4.2 ANIM > Controlling the
animation process.
The ANIM > popup menu gives access to the controls for
animation.
Each option has a set of standard sub-menus, and further
"custom" defaults for more complex settings.
4.4.2.1 SET_STATES > Selecting the states to be animated
By default all states are selected for animation. You can select from the pre-programmed
Every n options here, or use Custom... to define more precisely what is to be animated.
The ALL_STATES and Every nn options will apply to all windows with active Wn tabs in
this panel.
Where multiple models are present the Custom... states can only be selected for one model
at a time. You should set the Wn tabs to the window(s) of this model first: attempting to
select custom states for multiple models will generate warnings.
Interpolating animations by time
Normally animations are drawn at the states defined in your database(s), but it is possible to interpolate by time
between states: both to get a smoother progression through a sequence with too few states, and also to match multiple
models with dissimilar output frequencies. This is described under "custom" animation BY_TIME... below.
Animating Static and Eigenvalue (modeshape) analyses.
This section assumes the normal case of a transient analysis producing a series of states at successive times. However
it is also possible to animate a single static or eigenvalue state by cycling it through 0 - 360 degrees. This is described
in section 4.4.5.
Page 4.77
Oasys D3PLOT
User manual Version 9.3, Rev. 0, September 2008
Custom animation definition
You can select any permutation of states from the STATE LIST
menu. (In this example states 7, 8, 11, 12 have been
de-selected.)
(DE-)SELECT_ALL
(De-)selects all states in the STATE
LIST menu.
SHOW_TIMES
Lists all available states in the database
file.
LIST_SELECTED
Lists more details about the currently
selected states.
BY_STATE...
Allows you to select states via <start>
<increment> <end> syntax.
(Convenient for models with very
many states.)
BY_TIME ...
Interpolating between states by
defining time intervals.
Note that this "custom" panel can only apply to one model at a
time. When multiple models are present it will be restricted to the
window(s) of a single model.
How models with dissimilar states are animated.
The examples above consider the case of only one model. Where two or more models exist it is possible that they will
have a different number of states, at different time intervals.
Consider the following example of two models The SELECT STATES menu in this example will now show how the
states align by frame, as follows:
with dissimilar states:
Model 1
states
1.
T = 0.000
2.
T = 0.100
3.
T = 0.200
4.
T = 0.300
5.
T = 0.400
6.
T = 0.500
7.
T = 0.600
8.
T = 0.700
9.
T = 0.800
10.
T = 0.900
11.
T = 1.000
Page 4.78
Model 2
states
1.
T = 0.000
2.
T = 0.200
3.
T = 0.400
4.
T = 0.600
5.
T = 0.800
6.
T = 1.000
User manual Version 9.3, Rev. 0, September 2008
Oasys D3PLOT
Animation sequence when models have dissimilar numbers of states
In this situation a model with fewer states waits until the one with more states has finished its sequence before
looping back to zero. Using the example models above we now get:
Frame
1.
2.
3.
4.
5.
6.
7.
8.
9.
10.
11.
12.
13.
Model 1 shows
•
T = 0.000
•
T = 0.100
•
T = 0.300
•
T = 0.400
•
T = 0.500
•
T = 0.600
•
T = 0.700
•
T = 0.800
•
T = 0.900
•
T = 1.000
•
T = 0.000 <= Loop back to
state 1
•
T = 0.100
•
T = 0.200
Model 2 shows
•
T = 0.000
•
T = 0.200
•
T = 0.400
•
T = 0.600
•
T = 0.800
•
T = 1.000
•
T = 1.000 < = Hold last state
•
T = 1.000 < = Hold last state
•
T = 1.000 < = Hold last state
•
T = 1.000 < = Hold last state
•
T = 0.000 < = Loop back to
state 1
•
T = 0.200
•
T = 0.400
Note that the "holding" operation in M2 is based on state number, not time.
This "hold last state" logic applies whether the dissimilar models are in the same or different windows. (This is a change
of behaviour in D3PLOT V92, in previous versions there was no synchronisation between windows, and models were
only "held" if they were in the same window.)
What the "clock" in a graphics window shows with two or more models in a window.
Where there is only one model in a window then there is no ambiguity, and the clock at the bottom right shows the
current state’s time.
Where there are two or more models in a window then the clock shows:
•
max (Time of M1, Time of M2, ...)
•
If the times in the multiple models do not match within 0.1% then the clock’s colour is inverted, typically black
on white.
Synchronising animations by state across multiple windows.
From release 9.2 onwards animation in multiple windows is aligned by state number. Thus all animations will start at
state #1, and step forwards together through states #2, #3, .. #n. If a window has fewer states than one or more other
windows it will wait at its last state until the window with the highest number of states has reached its end, then they
will all loop back to state #1 together.
The STATE NUMBER slider will set the
selected state for all active windows (here W1
.. W4), stopping animation if it is currently
running.
If you subsequently restart animation with the
master PLAY > button in this panel then all
windows will commence from the same state
and, if they have the same number of frames,
will remain synchronised.
Synchronising animations by state when windows have different numbers of states.
If they do not have the same number of states, or their states have different time intervals, animations across multiple
windows may fall out of step in terms of "true" analysis time.
The remedy is to animate by explicit time interval, rather than by state number. This is done by interpolating "By Time"
as follows:
Page 4.79
Oasys D3PLOT
Use ANIM > SET_STATES > Custom... to
map the detailed state selection panel:
User manual Version 9.3, Rev. 0, September 2008
Then truncate the number of states in all windows so that they all have
the same number of states. In this example it has been limited to
12states.
BY_TIME... Synchronising
animation by time across dissimilar
models.
The "by state" animation behaviour above is
the default, chosen because it is simple and
minimises memory usage, but it has
disadvantages when models with different
state time intervals are processed.
It is possible to interpolate between states and
so to animate by user-defined time interval,
which has the side-effect of synchonising
models with dissimilar state times. This is
done by using the BY_TIME... option.
(Interpolation can be used on single models as
well, usually to give a smoother animation,
although this is less common.)
You define
<start time>
<time interval>
<end time>
And D3PLOT will interpolate states as required to achieve the specified intervals.
Interpolation is performed using a simple linear factor on the two "real" states that bound the required time.
You can control animation on a per frame basis using the slider and associated controls at the top of the window,
exactly as described in section 4.4.1 above.
Page 4.80
User manual Version 9.3, Rev. 0, September 2008
Controlling the display (statically) "by
state".
Oasys D3PLOT
During interpolated animation by "time" the state box controls will
always allow you to revert to showing a "true" state, not an interpolated
one.
To display the results (statically) at a "true"
state while interpolating animations by time
you need to revert to selecting the required
state in the state control box.
This does not change animation back to "by
state" mode, it simply reverts temporarily to
showing the image at the time selected.
To revert to controlling animation by state,
rather than by interpolated time, use any of
the methods above to select states (eg ANIM
> SET_STATES)
How interpolation by time affects output elsewhere in D3PLOT.
Interpolation by time affects the following other parts of the code:
•
WRITE output will be given at the currently interpolated time.
•
DEFORM options that use nodal coordinates (SHIFT_DEFORMED, FIX_NODE, REFERENCE_NODE(s))
will use the interpolated coordinates of the relevant nodes.
•
CUT_SECTIONs that follow nodes will likewise use the interpolated coordinates.
•
UTILITIES, MEASURE by node will report geometry from interpolated nodal coordinates.
However note that interpolation by time does not affect the following:
•
XY_DATA will still only report points at the time values of "true" states.
Warning: Interpolated values should be treated with care.
Linear interpolation tends to underestimate values between points on a smoothly varying, low frequency curve, and to
give wildly inaccurate results on a curve which is high frequency relative to its sampling interval. This is acceptable for
visual purposes during animation, but should be treated with caution if "written" values are to be extracted for
subsequent use.
This is demonstrated by the following two plots:
Interpolation of a low frequency curve
In this case the green shaded areas show how the linearly interpolated results (red) underestimate the true values
(black).
Page 4.81
Oasys D3PLOT
User manual Version 9.3, Rev. 0, September 2008
Interpolation of a high frequency curve
In this case, where the frequency of the curve is high relative to the sampling interval it is clear that linear interpolation
(as well as the original points) will miss significant values.
Warning: Interpolation can be memory intensive.
Interpolation by time requires more memory (to hold the interpolated data for display) which, combined with the
memory required to hold multiple models, can result in machine memory becoming exhausted. It is better to make sure
that models being compared have near identical output intervals, as this greatly simplifies post-processing.
Animation "frames" (as distinct from states)
The situation can arise in which the images to be animated are not explicit "states" in the database. This happens
when:
•
Transient analyses are animated at interpolated times. (eg BY_TIME... as described above)
•
A single loadcase of a static (ex-Nastran) analysis is animated in modeshape form.
•
An eigenvalue (ex-Nike/Dyna or Nastran) modeshape is animated.
(For more on static and eigenvalue animation see Section 4.4.5)
To handle this D3PLOT has the concept of animation "frames":
•
Each image in an animation is a frame, regardless of its origin.
•
In the normal (not interpolated) transient case there is an exact equivalence between animated states and
frames.
•
In other (interpolated, modeshape) cases there will be at least two frames in an animation, but usually many
more.
How does this affect you? Not very much, you only need to know the following:
Page 4.82
User manual Version 9.3, Rev. 0, September 2008
•
Oasys D3PLOT
The slider and other positioning controls at the top of the graphics window operate on "frames" not explicit
states, although in most cases these are the same.
Therefore in cases where you are animating something other than ALL_STATES the effects of scrolling this
slider (which navigates frames) and the state slider in the State Display box (which navigates states) will be
different.
•
You cannot stop an animation at a frame that is interpolated between explicit states.
D3PLOT will not permit you to operate statically on interpolated frames from a transient analysis. This is
because such results are potentially misleading: linear interpolation through non-linear data is inherently
inaccurate. When you STOP an interpolated animation the current (static) state will be the one with the time
closest to when you stopped the animation.
•
Interpolated animations can be a bit slower than those at explicit states.
Because you might choose a very large number of interpolated states D3PLOT does not store interpolated data
for each frame, although interpolated coordinates are stored if space is available. Therefore there is a slight
overhead as interpolated results are calculated "on the fly" during animation in these modes.
Click here for the next section
Page 4.83
Oasys D3PLOT
User manual Version 9.3, Rev. 0, September 2008
4.4.2.2 DISPLAY_MODE The display mode used for graphics
D3PLOT supports four possible display modes, which affect animation performance:
DIRECT
Frames are calculated from scratch each time, no data being stored, so animation memory consumption is
zero.
VECTOR The data to redisplay each frame is stored in "vector" form in the D3PLOT (client) process itself. This is
the default.
PIXMAP
2D X-Windows only. Each image is stored as a "pixmap" in the X11 server, no animation data being
stored in the client process.
OBJECT 3D OpenGL only. Each image is stored as graphical "objects" in the OpenGL server, no animation data
being stored in the client process.
Why so many different modes?
The answer is the trade-off of replay speed vs. memory use, and the need to optimise this in some cases. For a small
model this is not an issue, but as you start to approach the limits of your computer with larger models you may find that
you need to alter the animation method, or even move to using two computers in client/server mode. The following
table summarises this:
Display
mode
DIRECT
VECTOR
PIXMAP
OBJECT
2D X-windows 3D OpenGL Comments
Speed: Slow
Mem: Zero
Speed: Fast
Mem: Small
Speed:
Lightning
Mem: Huge
n/a
Speed: Slow Use if memory is short and you can tolerate slow speed.
Mem: Zero
Speed:
Best all-rounder, set as the programme’s default.
Medium
Mem: Medium
n/a
50+ frames/sec until you run out of memory, then dire! Runs well on
remote server.
Speed: Fast
Mem: Huge
Again fast until you run out of memory, then dire. Runs well on remote
server.
When do I need to change my display mode?
•
If you get warnings about running out of memory during animation you may need to switch to DIRECT
mode. Because of the way the operating systems on computers work it may be necessary to exit and restart
D3PLOT to clear memory usage, then switch to this mode before rebuilding animations. Advice is given
on-line about this if memory usage warnings are issued.
•
If the default mode (VECTOR) is not fast enough, and enough memory is available, you can switch to
PIXMAP (X-Windows) or OBJECT (OpenGL) mode.
What is meant by "runs well on a remote server"?
Under both X-Windows and OpenGL under X11 you are in fact using two processes:
•
The "client" is the D3PLOT session itself, computing what is to be drawn. It passes these drawing requests to
...
•
... the "server", which is the process on the machine responsible for turning drawing requests into raster
images on the display.
On a single machine the data transfer between the processes is fast - usually via shared memory - and OpenGL usage
is generally direct from D3PLOT to the display card.
However there are some obvious advantages to separating the tasks between two machines: the client process can use
all its host machine’s resources to generate graphical requests, while the server can devote all its resources to displaying
them. The disadvantage is that the data has to go down a piece of wire between the two machines, which may slow
down data transfer. Therefore the best of all worlds is to store the graphics data in the server, whereupon the client only
has to send a "draw this frame" request to render each frame of an animation.
Page 4.84
User manual Version 9.3, Rev. 0, September 2008
Oasys D3PLOT
Both PIXMAP and OBJECT display modes achieve this end in related, but different, ways.
PIXMAP mode (2D X-Windows only)
Is no slower to generate than VECTOR mode.
Its replay rate can be phenomenally fast, (> 50 frames/second is common), and is independent of image complexity
once the frames have been assembled. Smaller windows give faster replay rates and also use less memory.
Memory requirements and replay rate depend on window size and visual depth. Memory required for each frame
predictable: ([height x width x depth] bits / 8) bytes.
If you run the server out of memory it will slow down drastically, and ultimately lock up or even crash. D3PLOT sets
an initial limit of 32MBytes for Pixmap memory usage, but you can alter this limit, or choose to resize the window to
fit within it.
Being 2D any change to image content or viewing transform will require all frames to be rebuilt and re-transmitted to
the server from scratch.
OBJECT mode (3D OpenGL only):
Is no slower to compute in the client than VECTOR mode, but can take longer to draw during the first pass because
of the overhead of building "objects" in the server.
Is reasonably fast to redraw (usually about 1.5 - 2x VECTOR speed), but this is a function of the number and
complexity of the objects that make up the image.
Its memory requirements in the server are unquantifiable but large - typically up to 10 times that required for
VECTOR mode.
Since it cannot tell how much memory the server is using D3PLOT is unable to protect you from the ill-effects of
excessive memory consumption there. Ultimately it may lock up or crash if driven completely out of memory.
In 3D mode a viewing transform change imposes no speed penalty. All that is required is to send a new
transformation matrix to the server.
Page 4.85
Oasys D3PLOT
User manual Version 9.3, Rev. 0, September 2008
If the contents of an object change then only that object has to be re-computed and re-sent to the server. So the "cost"
of changes is proportional to the extent of the changes made.
Usually the memory consumption of OBJECT mode, and its less than phenomenal speed advantage over VECTOR
mode, make its use impractical if both client and server processes are on the same machine. However if you have two
machines available, or you are working from a remote host and want image transforms to be quick on your local
machine, it is worth trying.
Setting up a remote client/server connection: (This is only possible on machines running X11, ie Linux or Unix
hosts)
A description of how to display on a remote server is given in Sections 2.1 to 2.4, but briefly:
Prior to running the oasys shell to invoke D3PLOT:
On the client
machine:
Set the DISPLAY environment variable to point to <display>:0 on the server. (Eg setenv
DISPLAY server_name:0 )
On the server:
Make sure that windows can be opened by remote clients. (Under Unix the command is xhost
+ )
4.4.2.3 REPEAT > The number of times an animation is cycled through.
By default an animation is repeated continuously until you stop it explicitly.
You can limit the number of passes through it to the options here, or to any number of your own choosing using the
Custom... option.
If you limit the number of passes each PLAY request will result in that number of passes only. (The counter always
starts afresh, it doesn’t "remember" how many frames it displayed last time.)
Page 4.86
User manual Version 9.3, Rev. 0, September 2008
Oasys D3PLOT
4.4.2.4 DELAY > Delaying playback speed to achieve an explicit number of
frames/second.
By default an animation is replayed at the fastest speed that the computer can manage.
Sometimes, especially in PIXMAP animation mode, this can be too fast and some frames get skipped. Alternatively if
you are running multiple D3PLOT sessions, and you want animations to proceed simultaneously in several windows,
you may find that you need to set an explicit display rate to stop one process "racing" ahead of the others.
Therefore it is possible to specify how many frames per second are displayed using the preset definitions here, or by
using the Custom... option to select any frame rate.
Limitations of controlling playback speed.
On most computers it will be difficult to achieve controlled frame rates faster than about 60 frames per second since
60Hz tends to be the resolution of the average computer clock, and finer timing is not achievable.
In addition the refresh rate of your display is significant. Most liquid crystal displays (LCDs) run at 60 frames per
second (60Hz), and typical cathode ray tube monitors at between 60Hz and 100Hz. Attempting to animate at rates faster
than this not worthwhile, and can be counter-productive.
For small models it is possible that D3PLOT will deliver the frames at a rate faster than the display refresh speed, in
which case one of two things will happen.
1.
If the graphics adapter has "wait for vertical refresh before swapping buffers" set then the animation rate will
peak at the display’s refresh speed, giving good results. Signs of this are smooth animation and the cpu usage of
the D3PLOT process dropping as it waits before swapping buffers.
This is the best outcome you can achieve and you need not take any action.
2.
If the graphics adapter does not have "wait for vertical refresh" set the results can be "tearing" between
successive frames as an image is redrawn part way through a buffer swap and is thus made up of data from more
than one frame.
If this occurs then you should turn on "Wait for vertical refresh" on your graphics adapter.
On Windows platforms this is usually achieved by <Right click on background>, Settings, Advanced,
<graphics adapter name> and hunting through the options until you find the right setting.
On Unix / Linux platforms it is more difficult, and you may need to consult your hardware supplier for help.
4.4.2.5 STYLE > Setting playback to “sawtooth” or “modeshape” styles..
For transient analyses a "sawtooth" (1 => n, 1=>n) display generally looks more intuitive since it gives the impression
of "start to finish".
However you can opt for "modeshape" (1 => n =>1 => n ...) mode if you wish (this is the default for static and
eigenvalue analysis types).
Examples of the two different modes (from their Custom... panel) are
shown here in diagrammatic form.
4.4.2.6 DATA_SCAN > How states are scanned to find
max/min “automatic” contour levels during animation.
When you perform an animation of data with contours in "automatic" mode D3PLOT has to
scan through all candidate states to find their max and min data values so that it can set the
contour levels.
Page 4.87
Oasys D3PLOT
User manual Version 9.3, Rev. 0, September 2008
If you have a lot of states this can be slow, and in many cases you will know that your data values rise (or fall)
monotonically, and that using values from the first and last states only will bound all possible values in between.
Therefore you have a choice of:
EVERY
STATE
This is the rigorous approach: every state is checked, and the true max and min values will be
found. It can be slow if there are many states.
FIRST/LAST
Only the first and last states selected for animation are scanned for their max and min values. This
is the default.
In order to protect you from missing peaks and troughs if, during the assembly of an animation, a data value outside the
expected max/min values is found while in FIRST/LAST mode you will be warned and offered the chance to swap
back to EVERY STATE. However if you do swap back it will be necessary to rebuild any frames that have already
been computed in order to make them have contour bands representing the new max/min values.
4.4.2.7 SAVE/LOAD Saving animations to disk file. (X-windows only)
The use of this feature is deprecated: it only applies to 2D graphics using X11, and far better results will be achieved by
saving AVI, GIF or MPEG animations as described in section 7.2
Click here for the next section
Page 4.88
User manual Version 9.3, Rev. 0, September 2008
Oasys D3PLOT
4.4.3 Improving animation performance.
For small models this will not be a problem, but as the model size and number of states grows so you will see that
animation performance degrades. This section describes how to speed up animations by reducing the load on your
machine.
The key to fast animation is to reduce picture complexity, (simpler images have fewer vectors and so draw faster), and
to reduce memory consumption (forcing your machine to page-fault with virtual memory usage will cripple its
performance).
Under X-Windows the use of ’pixmap’ based animations will normally have a big effect on the animation performance
since, once the pixmaps have been assembled, the replay rate is independent of image complexity. If ’pixmap’
animations are being used then all of the following will have no effect except Section 4.4.3.5.
4.4.3.1 Choose an appropriate display mode.
Clearly the time taken to draw each frame will increase in direct proportion to the number and complexity of the
screen vectors used. Therefore you should aim only to display the minimum quantity necessary. The following table
gives an approximate "cost" on a scale of 1 to 10 for the various display modes on X-Windows and OpenGL devices:
Display Mode
Cost under X-Windows
Cost under OpenGL
LI
(LINE)
2
1
HI
(HIDDEN-LINE)
1
3
CT
(CONTINUOUS_TONE)
6
6
LC
(LINE_CONTOURS)
4
4
VEL/VEC (VECTOR/ARROW)
5
5
SH
(GREYSCALE SHADED)
5
2(1) or 4(2)
SI
(SHADED_IMAGE)
10
ISO
(ISO_SURFACE)
4
6
CL
(CLOUD)
1
1
Notes:
(1)
No wireframe hidden-line overlay.
(2)
With hidden-line overlay.
(3)
With gouraud shading is turned off. (See Section 4.3.7)
3(1) or 5(2) or 10(3)
The differences between "cost" on 2D and 3D devices in the table above are because of the fact that in 2D the effort is
put in initially when the images are computed, and redrawing speed is simply a function of the number of vectors.
Whereas in 3D mode effort has to be expended every time a frame is rendered, although some functions are much faster
because of the hardware assistance.
For example HI hidden-line are the fastest display mode in 2D since they contain the fewest vectors, but relatively
slower in 3D since each frame must be Z-buffered every time it is drawn. In contrast SI shaded image is slow in 2D
since many contour bands (each costing a polygon) are used, but fast in 3D when hardware gouraud shading is used.
4.4.3.2 Minimise contouring effort.
Contouring can be especially graphics intensive and memory consuming:
•
Turn the contour resolution to Medium or Low;
•
Use the minimum number of contour bands
•
Turn off labelling of line contours in LI plots;
•
Turn gouraud shading on for SI plots under OpenGL.
Page 4.89
Oasys D3PLOT
User manual Version 9.3, Rev. 0, September 2008
4.4.3.3 Reduce extraneous screen vectors.
Turn off any extra information that is not definitely needed:
•
Element and node labels;
•
Node symbols;
•
Element local triads.
Consider simplifying the display of entities. For example each 3D spring spiral contains about 70 vectors:
•
Use "line" symbols for springs and seat-belt elements;
•
Turn off contact segment hatching (broken lines are slow to render);
•
Use free-edge or no overlay on data plots (especially worthwhile under OpenGL);
•
Use flat shading for SH greyscale plots on 2D devices (no benefit under OpenGL).
If you are using cut-sections consider instead blanking the "unseen" parts of the model.
4.4.3.4 Consider using 2D mode for large animations under OpenGL.
Users with OpenGL will normally continue to use 3D mode for animation since it permits dynamic viewing and
clipping. However the amount of information that has to be stored for animations in 3D mode is typically 4 times
greater than for 2D mode. Consider switching to 2D mode (View Box, M2D command) if other measures fail.
4.4.3.5 Under X-Windows use a smaller window, and a visual with fewer
bit-planes.
Animation under X-Windows is achieved by writing the image to a "Pixmap" in memory, and then mapping it to the
screen. Clearly this involves moving a lot of data: the product of screen width, screen height and screen depth.
So reducing the window size will help, and indeed it is noticeable on most X displays how much animation speeds
up as the window size is reduced.
The "depth" of a screen is the number of bit-planes in the visual. Most X displays use an 8 bit-plane Pseudo or
TrueColor visual, and there is no benefit to be gained from reducing this. But some high-performance displays may
be set to a 24 bit-plane visual, which gives three times the depth resolution required by D3PLOT. (You will get this
if you used X24 mode instead of X8 when you started the code - see Section 2.2)
You can see what the depth of the screen is by looking at the text window from which D3PLOT was fired up, it
will contain a message like:
Acquired display: width =
height =
default #bit-planes =
1280
(This example shows an
1024
8 bit-plane visual)
8
If you are using a 24 bit-plane visual it may improve animation speed if you exit D3PLOT and restart it with an 8
bit-plane one. Use the X8 device.
4.4.4 Laser plotting during animation.
It is possible to save animation sequences in laser files. Each frame becomes a separate image, so multiple plots on a
page are recommended, and the current frame number and time replace the header on the plot.
Laser plotting requires graphics to be in 2D mode on a 3D device. So if you are running under OpenGL in 3D mode
you are warned that a switch to 2D mode is required, and you can choose to proceed or to abandon the laser plotting.
(For laser plotting generally see Section 7).
Page 4.90
User manual Version 9.3, Rev. 0, September 2008
Oasys D3PLOT
4.4.5 Animating static and eigenvalue (modal) analyses.
Recent versions of LS-DYNA incorporate the implicit solver, and this means that they can generate eigenvalue
results. In addition with suitable conversion software (contact Oasys for more information) it is possible to
post-process static, eigenvalue and other solution sequences from Nastran analyses.
Analyses of these types differ from conventional transient analyses in that each "state" is assumed to be:
•
Eigenvalue analysis: A given modeshape
•
Static analysis:The result of a given static loadcase combination.
Therefore when such analyses are animated it does not make sense to animate over states, rather a given "state" is
cycled through a sinewave function to produce a "modeshape" plot.
This has two implications for animation:
4.4.5.1 ANIM >, SET_FRAMES Setting the number of frames that are to
occupy 360º of the sine wave.
By default each 360 degree cycle of animation is split into 11 frames, which actually means 22 images, since the +ve
and -ve cycles are symmetrical about their respective peak values.
The SET_FRAMES command in the ANIM > popup menu (which replaces the SET_STATES command in this
context) allows you to choose a different number. More frames will give a smoother but slower animation.
The Custom... option permits
any number of frames to be
defined, and also defines the
period for the sine wave.
Normally the MAX->MIN option
will be used, as this reflects the
states internally to generate a 3600
animation from 1800 of frames.
The MAX->MIN->MAX option
is only required when generating
files for an external viewer that is
not capable of "reflecting" a 1800
sequence into a 3600 one. It looks
stupid on the screen, but will
duplicate the frames to produce a
full 3600 sequence in the file.
Page 4.91
Oasys D3PLOT
User manual Version 9.3, Rev. 0, September 2008
4.4.5.2 The frames slider cycles through the 0 - 360º cycle of frames, not
through states.
The frames slider, and other controls, at the top of the graphics window cycle through the modeshape phase angle, not
states. (See Section 4.4.1)
4.4.5.3 Factors on results when animated by "modeshape"
It is intuitively obvious that the factors on displacement to produce modeshapes need to be both +ve and -ve [factor =
cos(time)]. It is less obvious what the factors on the corresponding results should be: magnitude values (such as von
Mises stress) need a +ve/+ve, whereas direct stress tensor components (such a X direct stress) should be +ve/-ve, and
components such as thickness should not vary at all.
Thus factors on data components through the 0 - 360deg vary as follows:
Unity factors, f = 1.0
+ve/+ve factors, f = |cos(theta)|
+ve/-ve factors, f = cos(theta)
[Sx,Sy,Sz,Txy,Tyz,Tzx] stress tensor Everything not in the other two columns.Thickness
[Ex,Ey,Ez,Exy,Eyz,Ezx] strain tensor
Shell Area
Shell force & moment resultants
Volume
[<outer fibre>] derived stresses
Outward normal
[X,Y,Z] displacements
Basic [X,Y,Z] coordinates
Current [X,Y,Z] coordinates
Page 4.92
User manual Version 9.3, Rev. 0, September 2008
Oasys D3PLOT
Click here for the next section
Page 4.93
Oasys D3PLOT
User manual Version 9.3, Rev. 0, September 2008
4.5 STATUS Listing programme status
The STATUS command has no sub-menus or arguments, it simply lists the current programme status. The following
figure shows a typical listing:
The listing gives a cross-reference of the number of solid, beam, shell and thick-shell elements in each material; a
summary of other entity types; a listing of each contact-surface, and the overall model dimensions.
Lower down are also some key programme settings: blanking and volume-clipping switch status; the current in-core
state number and time, etc. These are useful when D3PLOT is operating in command-line mode.
Page 4.94
User manual Version 9.3, Rev. 0, September 2008
Oasys D3PLOT
5 VIEWING
CONTROL
Controlling all aspects of
viewing in the "Viewing
Control" box
"Viewing" refers to the
manipulation and presentation
of images, rather than their
actual generation. All viewing
commands live in the
"Viewing Control" box,
located at the bottom right
hand corner of the screen, and
this section describes their use.
5.1 Dynamic Viewing (Using the
mouse to change views).
"Dynamic" viewing is the name given to the process in which you perform
viewing transformations by moving the mouse around the screen. This is
the most useful way of controlling views.
5.1.0 Graphics modes during dynamic viewing
All dynamic viewing operations require a combination of two screen "meta" keys, (<left control> and <left
shift>), and mouse buttons. The meta key(s) used dictates the graphics mode in which the image is transformed as
follows:
<left
shift>
+
<mouse>
Transforms the image in the current graphics mode. For example if it is a
hidden-line plot, then dynamic viewing will take place in hidden-line mode.
<left
control>
+
<mouse>
Transforms the image in "wire-frame" mode for the duration of the drawing
operation. (ie no hidden-surface removal, or contours or lighting.)
<left
shift> &}
<left
control>}
+
<mouse>
Transforms the image in pre-computed free-edge mode for the duration of the
drawing operation. (ie wire-frame of free edges only, no hidden-surface removal,
contouring or lighting.)
In the latter two cases the original drawing mode is always returned to at the end of the dynamic viewing operation.
The wire-frame and free edge modes are provided to make transformations quicker for large models and/or slow
computers: free edge is very fast.
For the last case, with <left shift> & <left control> held down together, the order of pressing and
releasing the meta-keys matters: press <left shift> before <left control>, and release in the opposite
order, otherwise you will (correctly) get the image redrawn in wire-frame mode as the <left control> key is
pressed and released.
Page 5.1
Oasys D3PLOT
User manual Version 9.3, Rev. 0, September 2008
5.1.1 Dynamic Rotation.
Dynamic rotation uses<left mouse> + <left shift>
&/or <left control>
(The distinction between the keyboard meta-keys is explained in Section 5.1.0 above.)
Rotation always take place in the screen coordinate system, and may be about the XY axes
or Z: this depends upon the starting position of the mouse. This is shown in the next figure:
If the mouse initial position is inside the central circle
(radius (screen height/3)) then rotation is
about screen XY axes.
If the initial position is outside this circle then rotation
will be about screen Z.
You can tell which mode you are in by the cursor
symbol. This is red, and:
XY rotation uses [XY]
Z rotation uses:
[Z]
The relationship between mouse and image motion is intuitive in both modes. It is as if you had grabbed a point on
the object near you, (this side of the object centre plane), and used this to move the image about its centre:
XY mode
Moving the mouse left/right rotates about the screen Y axis;
Moving the mouse up/down rotates about the screen X axis.
Z mode
Moving the mouse in a circular direction rotates about the screen Z axis.
Rotation remains locked in its initial XY or Z mode for the duration of a dynamic viewing operation, regardless of
where you subsequently move the cursor to, until you release a mouse or keyboard button.
5.1.2 Dynamic Translation.
Dynamic translation uses <mid mouse> + <left shift>
&/or <left control>
(The distinction between the keyboard meta-keys is explained in Section 5.1.0 above.)
The cursor symbol is yellow, and looks like:
Translation always take place in the screen coordinate system, in the X and Y directions.
The relationship between mouse and image motion is intuitive: the object tracks the mouse motion in the screen XY
plane. The initial position of the mouse is irrelevant.
Page 5.2
User manual Version 9.3, Rev. 0, September 2008
Oasys D3PLOT
5.1.3 Dynamic Magnification (Scaling).
Dynamic scaling uses <right mouse> + <left shift>
&/or <left control>
(The distinction between the keyboard meta-keys is explained in Section 5.1.0 above.)
The cursor symbol is green, and looks like:
Mouse motion to the right and up makes the image larger, left and down smaller. The initial position of the mouse is
irrelevant.
Dynamic magnification using the mouse scroll-wheel
If your mouse is equipped with a scroll-wheel then it will also perform dynamic magnification in the graphics
window in which the cursor is present.
•
Magnification is centred at the current cursor position unless "CN Centre node" has been used to lock centring
on a node.
•
Scrolling towards you magnifies the image scale.
•
Scrolling away from you reduces the image scale.
By default each scroll wheel "click" will change the magnification factor by +/- 5%, but
this can be changed using the Options > Menu attributes panel, and altering the
Zoom factor.
5.1.4 Dynamic viewing during animation.
On 3D devices operating in 3D mode you can carry out dynamic viewing during animation in exactly the same way as
in static drawing. There should be no appreciable difference to the animation speed since all that is changed is the
image transformation matrix.
On 2D X-Windows, (or 3D devices operating in 2D mode), you can also update the view during animation, but this
will slow down animation dramatically as each frame will have to be recalculated at the new orientation.
5.2 Viewing
Control Buttons
Page 5.3
Oasys D3PLOT
User manual Version 9.3, Rev. 0, September 2008
+XY, +XZ,
+ISO etc
Pre-programmed view directions, also available from shortcut keys 1 through 8.
ZOOM
Zooms in by using the cursor to pick a rectangular screen area that is to be enlarged to fill the screen
- also available from shortcut Z.
CN
Picks a node about which dynamic rotation occurs. This remains active (with the CN button lit) until
disabled by pressing CN again.
AC
Calculates the correct scale and centre position required to make the current image fit neatly onto the
screen. This takes account of blanking, clipping, deformations, etc. Also available from shortcut
button A.
B <= and F
=>
D3PLOT maintains a "history" of the last 100 views. The "B <=" button toggles bakwards through
these and the "F =>" one forwards through them.
Views
Access to View manager (see section 5.3.1)
Lock
Prevent currently blanked entities being unblanked.
All
Unblank all entities not locked
Rev
Reverse blanking - also available from shortcut R
Ent
Access to the entity panel.(see section 6.5) - also available from shortcut E.
Command-line commands are also available (e.g.):
RM 30 0 0 - rotate (about model x,y,z axes) 30 degrees about the X-axis.
RS 30 0 0 - rotate (about screen x,y,z axes) 30 degrees about the X-axis.
5.2.1 Using the
“Compass Rose”
The "Compass Rose" provides
three sets of buttons that allow
the model to be rotated,
translated and scaled with
single mouse clicks.
Timed action of all of these is
possible if buttons are held
down, and the consequent
repeated actions can be stored
in command files making it
possible to programme and
record viewing sequences. Use
the Type drop-down menu to
switch between rotation,
translation and magnification
options.
Page 5.4
User manual Version 9.3, Rev. 0, September 2008
Oasys D3PLOT
5.2.1.1 Setting
compasss rose
attributes
This panel allows control of the
magnitude of transformation per
click, and the time delay bewtween
frames when a button is held down.
5.2.1.2 Programming transformations using the compass rose
The point has already been made that transformations using the compass rose are stored in command files just like any
other command. It is worth repeating that "continuous" operations (those with a button repeating when held down) are
also processed in this way: each repeat is stored like a separate "click" of the button. Thus a command file created in
this way will have a sequence of many (possibly hundreds) of commands that are identical representing a series of
repeated button presses.
You can use this to your advantage to make command files that rotate and/or translate the model automatically. For
example you could pre-programme a "walk-through" of a structure in this way by saving the commands necessary to
move your view point through and around and the model.
Click here for the next section
Page 5.5
Oasys D3PLOT
User manual Version 9.3, Rev. 0, September 2008
5.3 Options under Viewing menu
5.3.1 VIEW MANAGER... Storing and retrieving "view" information.
What is a view?
A "view" is all the information required to set up the current view of the object. In practice this means:
•
The current rotation matrix (3 direction cosines).
•
The current image centre location in space (x,y,z coordinate).
•
The current magnification scale.
•
The current perspective distance.
Up to 100 such views may be stored and retrieved at will from a file, and any number of such files may exist. The
default file name is plot.view. A view is given a name and number when it is stored, and these are used when retrieving
it. View files are binary compatible across platforms of the same word length (eg 32 bits), and are the same as those
used by Oasys PRIMER.
Views are stored parametrically.
What this means is that views are not tied to a particular model, they will work for any model of similar dimensions. So
if you are working on a set of variants of an analysis you can share the views on file between them: this is why they are
stored in a separate, model-independent file. It is only when the shape and/or size of a model differs wildly from the
original from which the view was created that this shareability fails.
Using views
D3PLOT always has a current "view" definition. This dictates how the image will appear when a drawing command is
issued. You can save the current view to file at any time. Likewise you can retrieve a stored view to replace the current
one at any time.
The current view only exists in memory, and changing it has no influence on any views stored on file. (Indeed you don’t
need to have a stored view file: the default is none.)
Commands
STORE
Stores current view both in memory and in a view file. Click on a green (unused) view and type a name.
Up to 100 views can be stored in a file, and views can be overwritten at will. If no explicit file has been
opened the default file plot.view is opened automatically and used.
GET
Retrive from memory an existing view.
RENAME Rename a stored view
DELETE You can delete any existing vies
LIST
You can list information about stored views to screen
FILE
Define a file name in which views are to be stored
Page 5.6
User manual Version 9.3, Rev. 0, September 2008
Oasys D3PLOT
5.3.2 PERSPECTIVE... Setting
Perspective Attributes.
Use this option to switch on and adjust perspective settings.
D3PLOT will calculate the "bounding box" round your model and
derive a default perspective distance of three times that value,
which give a typical viewing angle of around 37 degrees.
Use NEARER and AWAY to adjust this, or type in a new
Distance value.
If you get extremely close to the structure you may find that the
overlay of hidden and shaded plots starts to come away from the
underlying elements. This is a limitation of Z-buffered
hidden-surface removal and a solution is given in section 4.2.2.2
under "controlling overlay quality in 3D mode".
5.3.3 Match Image
Automatically aligns the current analysis image with the background
by calculating the transformation parameters required.
Lining up an image requires the calculation of 11 unknowns:
•
The camera position (3 coordinates)
•
The direction in which the camera is pointing (3 vector terms)
•
The "Up" axis of the camera (3 vector terms)
•
The distance of the object from the camera, ie perspective
distance (1 term)
•
The focal length of the camera lens, ie image scale (1 term)
(In the orthographic case, where the object is viewed in a parallel
sided frustrum, the perspective distance can be omitted leaving only
10 values to be computed.)
This calculation can be performed by D3PLOT if four or more nodes
on the model are matched to their corresponding points on the image.
Generally 5 or 6 points are required for a good match.
Page 5.7
Oasys D3PLOT
User manual Version 9.3, Rev. 0, September 2008
Add point(s) Defining <node : point> pairs for matching.
In the (artificial) example below the green image on the left has been read in as a background image, and the task is to
get the red analysis image on the right to lie on top of it.
The user has defined 3 points so far: the nodes, identified by yellow pick symbols on the right, correspond to their
matching points (red symbols and labels) on the left; the blue line shows which points and nodes are associated. These
are screen-picked by selecting first the node, and then the corresponding point, and so on for the next pair.
Calculate: aligning analysis with image.
Once four or more <node : point> pairs have been defined it is possible to calculate the revised view. This will calculate
the revised viewing parameters and update the image immediately. If the images can be matched and the points have
been well chosen then the analysis should lie exactly over the target image.
Page 5.8
User manual Version 9.3, Rev. 0, September 2008
Oasys D3PLOT
Edit...: correcting poorly chosen points.
In the example below points have deliberately been chosen badly to
obtain a poor match. (The error here is choosing points, ringed in
blue, that lie more or less in a plane, making it difficult to calculate
perspective distance correctly. In addition choosing only four points
is often inadequate, and more can be required for a good solution.)
To edit a point screen-pick either its node or point (or select it from
the menu), then repick its node or point.
Page 5.9
Oasys D3PLOT
User manual Version 9.3, Rev. 0, September 2008
Delete and Restart: Deleting points.
Delete allows you to delete individual points by selecting them as above. Each point is deleted immediately.
Restart deletes all points letting you make a fresh start.
You can Add, Edit and Delete points in any order. Here is the example above with 6 points (circled in blue) chosen
rather more judiciously, and it can be seen that the correspondence is now very good.
What is stored for matching.
<Node : point> data is stored on a per-window basis, so it is not possible to apply matching data in Window #1 directly
to windows #2, etc. However you can use the "Export view" function on the window’s [--] options popup menu to
export the current viewing parameters to all other active windows.
"Node" data is stored as a reference to a node in a model, and the current state’s coordinate is used for matching
purposes. Therefore if you need to match data during an animation you need to choose the state to be used for the
matching process.
"Point" data is stored as a parametric (x,y) screen space coordinate, so points will remain valid so long as the aspect
ratio of the window remains the same. However in most cases if a window is resized it is best to delete all the points and
start again if further matching is required.
Page 5.10
User manual Version 9.3, Rev. 0, September 2008
Oasys D3PLOT
Matching a model to a series of frames
of an animation.
At present image matching is "static". There is no provision
for matching views separately to each frame of an
animation. However, the model view can be matched to the
first frame of the animation, which sets the model viewpoint
at the real camera’s position. Given that the camera’s
position is fixed relative to a known position throughout the
animation, such as it moves with the model or is fixed to the
ground, we can fix the model viewpoint, too in the same
way.
In cases where the camera moves with the model you can
use Deform, Fixed Node or Shift Deformed to track
model movement.
In cases where the camera is fixed to the ground, you don’t
have to do anything because model viewpoint is fixed in the
global coordinates at default.
After you have matched the model view to the first frame
using the same technique as matching it to the background
image, you need to match the timing, too. In this example
we have a film with 0.002s per frame and a simulation
analysis with 0.005s per state. To synchronize them we need
every 5 frames of the film and every 2 states of the
simulation analysis. You can set this at Movie Options.
5.3.4 UPDATE Level... Controlling the View updating frequency.
D3PLOT has an UPDATE_LEVEL setting which dictates how often the view is updated following commands that
change it.
1:NONE
The plot is never updated automatically. Changes only become apparent when you issue an
explicit drawing command, eg DR, CT, etc.
2:MEDIUM
(default)
The plot is updated immediately when any view control command is given, or any quick-pick
command.
The current image is amended as necessary following blanking, clipping, etc if any viewing
command, including dynamic viewing, is used. In other words a viewing change command is
tantamount to an explicit redraw command in the current mode which would, of course, reflect
any changes in the model geometry.
3:FREQUENT
The plot is updated immediately as at level 2 above, but also following any menu-driven
blanking, clipping, etc, command that would change the image if explicitly redrawn.
Therefore the effects of blanking, etc are seen immediately.
Note
1:
Level 3 is only recommended if you have a very fast display and/or a small model since it requires frequent
redraws.
Page 5.11
Oasys D3PLOT
Note
2:
Users with slow devices and/or with large models may find that level 1 is preferable to decrease redrawing
effort.
Click here for the next section.
Page 5.12
User manual Version 9.3, Rev. 0, September 2008
User manual Version 9.3, Rev. 0, September 2008
Oasys D3PLOT
5.4 Special 3D graphics driver options (OpenGL).
Most of the information in this section is included for backwards compatibility. 2D graphics are only rarely used
nowadays, and the capabilities of the 2D graphics modes in D3PLOT are no longer being developed.
5.4.0 Brief description of 3D vs. 2D graphics.
In 2D mode D3PLOT treats the display device as a dumb 2D device on which lines, polygons and text can be drawn.
All coordinates are expressed in 2D integer space, ie [x,y] only, and all calculation of hidden-surface removal, lighting,
contouring, etc must be done in software. Dynamic viewing relies on the sofware recalculating and redisplaying images
quickly.
In 3D mode much more intelligence is available in the graphics driver, and much of the effort of computing images can
be shifted from the software to the hardware. In particular:
•
•
•
Graphics coordinates exist in 3D [x,y,z] space, and the hardware does the transformation and projection onto
the 2D screen. The software only has to provide the raw coordinates for an image once, and thereafter to
change the view only a new scale, centre and rotation matrix.
The hardware can compute shading, lighting and hidden-surface removal. So, again, the software only needs
to provide raw coordinates, topology, light source data, etc, and then just ask the hardware to render it.
The hardware can provide functions, such as Z-clipping, that are not available in softwar
So 3D devices, especially those with hardware acceleration, give much faster graphics.
However there are also drawbacks to using 3D graphics: more memory is required since the full scene has to be sent to
the driver using [x,y,z] floating-point coordinates, and this can cause problems during animation when many frames
have to be stored. In addition laser plots cannot be generated by the 3D driver, so the capability to switch temporarily
back to 2D mode has to be preserved.
Therefore there are options to control aspects of 3D graphics, and also the ability to switch back and forth between 3D
and 2D modes.
5.4.1 3D Graphics, 2D Graphics- Switching between 3D and 2D
modes.
You can switch explicitly between 2D and 3D modes using the M2D and M3D buttons.
Some other graphics options also cause a switch.
On a 3D graphics driver the default mode is 3D, ie M3D, but certain graphics operations will switch the mode back to
2D. These are:
•
Switching on dithering, either of contours or shading. See Sections 4.3.6 and 4.2.3. 2D mode continues until
you switch it back explicitly.
•
Plotting with laser output turned on. 2D mode is only transient during the course of the plotting operation, it
There are other circumstances when you might also want to switch explicitly to 2D mode:
•
•
•
When producing LC line-contour plots the result in 3D mode can be a bit patchy, with contour lines
dropping in and out of view. This is a function of the Z buffering in hardware, and software (2D) images
look much better.
When using the OPACITY switch for contact surface and beam plotting. This works after a fashion when in
3D mode, but the transparent structure overlay does not use proper hidden-surface removal. The results are
better in 2D mode where more control is available in the software.
When animating large models. The amount of data stored for a 2D animation can be far less than for 3D, and
can get round memory shortage problems. (However you would do better to use the X-Windows driver in
this situation: see Section 4.4.5.4.)
Page 5.13
Oasys D3PLOT
User manual Version 9.3, Rev. 0, September 2008
5.4.2 3D_OPTIONS... Further 3D
options
The 3D_OPTS... button gives a control panel for further 3D
options. These options are described below.
5.4.2.1 Soft clip Clipping graphics outside the current screen window.
If you are dealing with a very large model, but are only looking at a small part of it, the 3D graphics driver can work
unnecessarily slowly in its default mode of operation. This is because the whole model is sent to and manipulated by
the graphics driver, despite the fact that you are only looking at a small part of it, in anticipation of your wanting to
zoom out to see the whole of it.
If you turn Soft Clip on, and redraw the image, the graphics will run faster. This is because the software has
"clipped" (ie removed) those parts of the image not visible in the current window before sending it to the 3D graphics
driver, so the 3D driver has to process fewer graphics entities. However this also means that if you zoom out those
parts of the image outside the previous window will not be there. This is illustrated in the figures below.
In this example the user has zoomed in on the neck and upper chest region of a side-impact dummy (left hand image),
and then zoomed out to what should show the full dummy. This exposes the jagged edges left by the 3D clipping
algorithm.
To see the missing elements you need to issue an explicit drawing command at the new scale to recalculate the
clipping and send more elements to the 3D graphics driver.
5.4.2.2 SHOW_PROJ Showing the viewing frustrum
On 3D devices it is possible to show the current viewing "frustrum" at the bottom left
corner of the plot by turning SHOW_PROJ on.
This shows the information in the figure below (a copy of The D3PLOT viewing frustrum figure in Section 5.1).
Page 5.14
User manual Version 9.3, Rev. 0, September 2008
Oasys D3PLOT
The frustrum shown here assumes perspective projection.
The Z clipping plane locations are shown when SHOW_PROJ is on, and this can be very helpful when using Z
clipping, as otherwise it is easy to "lose" the clipping planes.
The default near and far plane positions are drawn in green, and the plane locations in blue. So you can visualise
movement relative to initial locations.
5.4.2.3 Using the Z clipping planes
The Z clipping planes are shown in the figure above. There are two planes: a "near" and a "far" one, which the
hardware uses to clip the image in the +/- screen Z axis.
By default they are set just outside the +/-Z limits of the structure (shown as green lines in the projection box), so
that no clipping takes place, but when the 3D options box is mapped you can move them (shown as blue lines in the
box) using the following mouse and keyboard meta-key combination:
<right shift> + <left mouse>
Moves the near clipping plane.
<right shift> + <right mouse> Moves the far clipping plane.
<right shift> + <mid mouse>
Moves the both clipping planes.
Cursor symbol is
Cursor symbol is
Cursor symbol is
(Note that when the 3D options box is not mapped then the <right shift> and <right control> keys act exactly like their
<left> equivalents, meaning that either side of the keyboard can be used for normal dynamic viewing.)
In all cases moving the mouse up moves the plane(s) away from you, and down moves towards you. This is a form of
dynamic viewing: the planes move and the image gets updated as the cursor moves. It is recommended that you turn the
SHOW_PROJ switch, described above, on as this will enable you to see the planes moving in the projection box.
To reset the planes to their default positions use the Reset Z clip NEAR and FAR buttons. This will reset them to
their initial positions (shown by the blue lines in the projection box).
Page 5.15
Oasys D3PLOT
Page 5.16
User manual Version 9.3, Rev. 0, September 2008
User manual Version 9.3, Rev. 0, September 2008
Oasys D3PLOT
6 USING "TOOLS" OPTIONS
This section acts as a brief introduction to the commands in the top (Main Menu) box.
6.0 Introduction to main menu commands
6.0.1 Commands invoked from here are mutually exclusive
The commands in this box are mutually exclusive.
Panels for these commands are mapped in the fixed area
below the main menu, stacked in order of invocation, and
the button of the current command is highlighted.
Click on a command below to jump to its detailed
description:
Blank
Deform
Measure
Utilities
Coarsen
Display
Options
Properties
Volume
Clipping
Colour
Entity
Trace
nodes
Write
Cut
Sections
Groups
User Data
XY Data
D3PLOT
T/HIS
Memory
6.0.2 Using standard display list
selections
Several of the functions in the main menu require you to input
<lists> of entities to be processed. The standard procedure for
this is:
(a) Select an entity type
This figure shows the standard entity type entry panel. All
possible entity types are always mapped, with those that are
unavailable greyed out.
(This example is from a [WRITE] ENTITY command.)
In some contexts some or all of the MATERIAL, GLOBAL,
SURFACE, MASTER & SLAVE options shown here may not
be present since they are not appropriate.
Page 6.1
Oasys D3PLOT
User manual Version 9.3, Rev. 0, September 2008
(b) Define a <list> of these entities
After you have chosen an entity type you must define a <list>
of entities to be processed
This figure shows a typical panel displayed after a command.
You can select a immediately by clicking on or dragging across
visible entities. Other options are:
Key in
To type in a range;
ALL
To select all entities;
ALL_VISIBLE
All currently visible entities;
SCREEN
Pick points defining a polygon within
POLYGON
which entities will be defined
Or select entities on material(s) using the menu (here headed
NODES ON).
Resolving ambiguous screen picks.
When screen-picking you may occasionally pick a point that does not lie
unambiguously on an entity. In this case the "ambiguous pick" menu, see the
figure (right), will be mapped, and you will be forced to choose an item. You can:
•
Choose a menu item: the top one is always nearest to the point you picked,
or:
•
REJect this pick: the pick is ignored and you get another chance.
•
Take ALL items from the menu list.
•
Show WHAT these items are by labelling them.
•
Abort the whole picking operation using QUIT.
Treatment of 3D elements during Area or
Polygon picking
Options, Area Pick controls how 3D elements are treated
during screen area type picking. (This does not affect single
picks, which will always take the nearest element only.)
Page 6.2
User manual Version 9.3, Rev. 0, September 2008
ALL All
eligible
elements
in area
Oasys D3PLOT
By default area picking of a
mesh that contains solids or
thick shells will include
elements that are eligible for
display, but which have not
actually been drawn because
they are interior to the mesh.
You can think of this as all
elements in the "tunnel"
behind the screen area:
blanking in this way will
punch a clear hole right
through the mesh as shown
in this example.
EXT Only Alternatively only those
external
elements which have actually
elements
been drawn, for a 3D mesh
the EXTernal surface, will be
selected: elements culled
from the display because
they are internal are not
selected.
The effect of a pick in this
mode is like peeling an
onion: only the outer layer is
removed in each selection
pass.
Contrast this example with
the image above: only the
outer layer of solids has been
removed.
6.0.3 Using command-line syntax for <lists> of entities
In some circumstances it can be much quicker to use command-line input (in the dialogue box) to define <lists> of
entities. A typical example might be when you want to process an explicit list of known elements, or a well defined
range.
Typical command-line syntax to perform an operation is:
Command (command) (command) <list of
entities>
for example:
/WRITE NODES 21 to 100
The valid syntax for a <list> of integers defining a range of entities is:
Single values
12
20 200 -1
Page 6.3
Oasys D3PLOT
User manual Version 9.3, Rev. 0, September 2008
a TO b (STEP c) 1 TO 100,
-20 TO 40 STEP 4,
1000 TO 100 STEP -2
All in context ALL or *
Range limits
FIRST and LAST
All of these input types above may be mixed at will on a single line. Continuation lines, using \, may be used in the
same way as for command words.
You can mix screen-menu and command-line input at will.
Next section.
Page 6.4
User manual Version 9.3, Rev. 0, September 2008
Oasys D3PLOT
6.1 BLANK “Blanking”
controls the visibility of nodes
and elements.
You can cut down what is displayed by "blanking" nodes and elements. (Unlike ENTITY display control blanking is
selective: you can blank and unblank individual elements.)
Each node and element in your model has an internal blanking flag, which is initially set to off (ie the entity is
visible). You can turn this flag on by blanking that entity, and in subsequent plots it will not be drawn until unblanked
again.
The BLANK panel operates on one model at a time.
If you have more than one model then you will be forced to choose which one the blanking panel operates on. You can
subsequently change this by using the M1 .. Mn tabs.
Blanking is "per model", not "per window".
The blanking status of items is stored at the model level, not at the window level. Therefore if something is blanked in
one window it will also disappear from any other windows in which it occurs once they are redrawn.
This is done for simplicity and to save memory. If you need to have two concurrent images of a model with different
blanking attributes then you will need to read that model in twice, treating it as two separate, albeit identical, models.
DYNAMIC ("Quick Pick") BLANKING
The BLANK panel is used when you want to exercise detailed control over what is blanked. The alternative method
of blanking, referred to as "quick pick" mode, which is more suitable for simple blanking is described in section 3.5.
The BLANK menu is split into 2 sections.
6.1.1 Selecting Items
The top half of the menu provides ways to select the
items to be blanked and unblanked while the bottom half
is used to choose the type of item that is going to be
blanked / unblanked.
ON
Turns blanking ON so that blanked items are
not drawn.
OFF Turns blanking OFF so that all items are drawn
even if they have been blanked. This option
does not reset the blanking status of items so
that when blanking is turned ON again items
that were previously blanked are still blanked.
These options can be used to modify the blanking status
of a complete category of elements. In addition these
option can also be used to BLANK / REVERSE /
UNBLANK the whole model.
Page 6.5
Oasys D3PLOT
User manual Version 9.3, Rev. 0, September 2008
PICK
Pick items individually to be blanked / unblanked, (see below for more details)
AREA
Pick items by area to be blanked / unblanked (see below for more details)
KEY IN
Type in the ID of items to be blanked/unblanked
UPDATE
PLOT
Redraw the image
STATUS
Lists the blanking status of all items
ATTACHED
With this option selected any item that shares a node with an item that is picked is also blanked or
unblanked along with that item
UPDATE
LEVEL
The UPDATE LEVEL controls whether items are blanked dynamically. If the UPDATE LEVEL
is set to 3 then dynamic blanking is turned on.
6.1.1.1 PICK Pick items to be
blanked / unblanked
If DYNAMIC blanking is turned on items are blanked as
they are picked. When picking items the mouse buttons
have the following function:
Left Mouse
Pick an item
Middle Mouse Reject the last item selected (Update Level 1 & 2)
Right Mouse
Deselect an item (Update Level 1 & 2)
Other Options :
REJECT
Reject the last item selected (Update Level 1 & 2)
ALL VISIBLE
Select all items currently visible on the screen. Items outside the curtrent screen area are not
selected.
QUIT
Quit without blanking/unblanking selected items (Update Level 1 & 2)
TOLERANCE
Define a screen tolerance for picking items.
BLANK
Items that are selected are blanked
UNBLANK
Items that are selected are unblanked
APPLY
Blank / Unblank selected items (Update Level 1 & 2) and then return to the main BLANK menu
(Update Level 1,2 & 3)
UPDATE
PLOT
Redraw the image with the currently selected items blanked / unblanked.
Page 6.6
User manual Version 9.3, Rev. 0, September 2008
Oasys D3PLOT
6.1.1.2 AREA Pick items by area to
be blanked / unblanked
If DYNAMIC blanking is turned on items are blanked as
they are picked. When picking items the mouse buttons
have the following function.
Left Mouse
Define a rectangle and select items within it.
Middle Mouse
Same as Left Mouse
Right Mouse
Define a rectangle and deselect items within it. (Update Level 1 & 2)
Other Options :
REJECT
Reject the first point selected
QUIT
Quit without blanking/unblanking selected items (Update Level 1 & 2)
BLANK
Items that are selected are blanked
UNBLANK
Items that are selected are unblanked
APPLY
Blank / Unblank selected items (Update Level 1 & 2) and then return to the main BLANK menu
(Update Level 1,2 & 3)
UPDATE
PLOT
Redraw the image with the currently selected items blanked / unblanked.
6.1.1.3 KEY IN Enter the ID of items
to be blanked / unblanked
END
SELECTION
Return to the main BLANK menu.
BLANK
Items that are selected are blanked
UNBLANK
Items that are selected are unblanked
APPLY
Blank / Unblank selected items (Update Level 1 & 2) and then return to the main BLANK
menu (Update Level 1,2 & 3)
UPDATE PLOT
Redraw the image with the currently selected items blanked / unblanked
Page 6.7
Oasys D3PLOT
User manual Version 9.3, Rev. 0, September 2008
6.1.1.4 UPDATE LEVEL Image
update frequency
The top half of the menu provides ways to select the
items to be blanked and unblanked while the bottom half
is used to choose the type of item that is going to be
blanked / unblanked.
1 (NONE)
The image is never updated
automatically to show the effect of
blanking. You must redraw the image
(eg DR, SH, etc) to see the effect of
changes. This is not recommended
unless you have a very slow
connection to your display.
2 (MEDIUM)
Default behaviour. (Un-)Blanking
something does not cause the display
to update, but any subsequent
viewing operation (eg zoom, dynamic
view, etc) will result in the image
being updated to show the effect of
changes.
3
Immediate update. Every time you
(FREQUENT) (un-)blank something the display
will be redrawn immediately to show
the effect of the change. Very large
models on slow displays may become
cumbersome if this is used.
It is recommended that you keep the default UPDATE
LEVEL of 2, and use the UPDATE PLOT button
explicitly to see the effect of changes. (The "Quick Pick"
blanking option provides "instant" blanking, and is a
better way of achieving this behaviour.)
6.1.2 Entity Types
The bottom section lists the generic entity types that the model contains and this section controls the type of items that
are selected by the PICK and AREA and KEY IN options.
By default this section shows a list of all the PARTs that the model contains. The blanking status of an item can be
changed by clicking on its entry in the list. The list of items is colour coded as follows :
Page 6.8
User manual Version 9.3, Rev. 0, September 2008
RED
Oasys D3PLOT
The whole of the item is blanked.
GREEN The whole of the item is
unblanked.
BLUE
Some of the item is blanked.
If a BLUE menu entry is clicked on the item will be
completely blanked. Clicking on the menu entry a second
time will then completely unblank the item - it is not
possible to return to the partially blanked state.
If an option other than PARTS is selected then the list is
automatically updated to list the appropriate items. To
reduce the number of generic entity types the
SEATBELT and SURFACE buttons are linked to
popups containing related entity types.
If DYNAMIC blanking is active then items are blanked /
unblanked as they are selected in the list. If DYNAMIC
blanking is not active the menu will be updated as items
are selected but the image will not be updated until either
the view is changed (rotated, zoomed etc) or the image is
explicitly redrawn (HI, CT, SH etc).
Next section
Page 6.9
Oasys D3PLOT
User manual Version 9.3, Rev. 0, September 2008
6.2 VOLUME_CLIPPING
By default no volume clipping or cut-sections are in
effect, and pressing the VOLUME CLIPPING button
will give the main panel in its basic state, as shown in the
figure (right).
Since in the initial volume-clipping state nothing is active
only the CREATE function, as shown here, is available.
Other options are greyed out.
Volume Clipping is a "per window" attribute.
Volume clipping definitions apply to all those windows which have their W1 .. Wn tabs set. Clipping takes place in
the specified space system in each window, and will apply to all models in that window.
If you use any of the "pick node" options to obtain coordinates you will have to specify which model you are picking
from, but thereafter the coordinate is stored independently of its source model (ie simply as a number) and can apply to
any models.
Page 6.10
User manual Version 9.3, Rev. 0, September 2008
Oasys D3PLOT
6.2.1 CREATE Creating a new
clipping volume
When creating a volume you must first define its type.
The options are Cartesian, Cylindrical and
Spherical as shown in the figure (right).
Pick a type, then hit APPLY to continue.
Defining a Cartesian
volume
A cartesian volume is defined by:
Corners:
Type in the coordinates of two
diagonally opposite corners at
Max/Min X,Y,Z, or use
PICK_2_NODES to locate corners
at nodal coordinates.
Page 6.11
Oasys D3PLOT
User manual Version 9.3, Rev. 0, September 2008
Defining a Cylindrical
volume
A cylindrical volume is defined by:
Origin:
Type in at Centre at, or use
PICK_ NODE to locate at a nodal
coord.
Radius:
Type in at Rad:
Height:
Type in the maximum and
minimum height at H min/max:
Align the long (height) axis on one of the global X, Y
or Z axes with the relevant button.
Defining a Spherical
volume
A spherical volume is defined by:
Centre:
Type in at Centre, or use
PICK_NODE to locate it at a nodal
coordinate.
Radius:
Type in at Radius:
Page 6.12
User manual Version 9.3, Rev. 0, September 2008
Oasys D3PLOT
6.2.2 ORIENT Defining a space
system for volume clipping
When you CREATE a volume, or ORIENT an existing
one, you must define a space system for it. This figure
shows the space system definition panel.
There are three options: BASIC, DEFORMED and
SCREEN space.
These have the following meanings:
6.2.2.1 BASIC
Clipping is based on undeformed
nodal geometry. So the same
elements are always visible
regardless of their deformations or
any changes of view.
Page 6.13
Oasys D3PLOT
6.2.2.2 DEFORMED
Clipping is based on the
deformed nodal geometry at each
state. So elements may pass in and
out of the clipping volume as they
move and deform.
6.2.2.3 SCREEN
Clipping is tied to screen
coordinate space. Thus rotation
and scaling operations, as well as
deformations, may move elements
in and out of the volume
Page 6.14
User manual Version 9.3, Rev. 0, September 2008
User manual Version 9.3, Rev. 0, September 2008
Oasys D3PLOT
6.2.3 Actions once a volume
has been created.
Once you have created a clipping volume then the other
options on the master panel become "live".
These are described below:
6.2.3.1 Clipping switch Turning
volume clipping on/off
By default volume clipping is OFF, even when you
have just created a volume. You must turn it ON for
clipping to take effect.
6.2.3.2 Discard what Discarding
entities inside or outside the
volume
By default entities OUTSIDE the volume are
discarded, but you can invert the effect so that
everything INSIDE the volume is discarded instead.
6.2.3.3 MODIFY... Modifying the existing volume
When a volume already exists you can MODIFY it. This takes you through the volume definition sequence described
in Section 6.2.1 for creating a new volume. (Note that this button is called CREATE if no volume exists.)
6.2.3.4 ORIENT...Change the space system of an existing volume
You can modify the space system (Basic, Deformed, Screen) of an existing volume, without changing its
geometry. This takes you through the space definition sequence described in Section 6.2.2.
6.2.3.5 DELETE Deletes the existing volume definition completely
You can DELETE the existing volume completely. This returns the clipping control panel to its initial state as shown
in the figure "Volume-clipping panel with no volume current". (To suppress, but not delete it, switch it OFF.)
Page 6.15
Oasys D3PLOT
User manual Version 9.3, Rev. 0, September 2008
6.2.3.6 SKETCH Sketch the volume on the current geometry
This figure shows a typical model with the current (Cartesian) clipping volume SKETCHed on it.
The outline of the current volume is drawn in dashed outline on the current screen image.
In this example the clipping switch has been turned OFF, so nothing is removed by clipping.
Page 6.16
User manual Version 9.3, Rev. 0, September 2008
Oasys D3PLOT
6.2.3.7 LOC_PLOT “Location” plots showing 4 views of the current volume
This figure shows the image above, with the volume-clipping switch turned on, drawn as a "location" plot. The
display mode used is that of the most recently issued drawing command.
This draws 3 standard views (on XY, YZ and XZ), and also the current view in the bottom right quadrant. The
GRATICULE (see DISPLAY_OPTIONS) is also turned on to give you numeric feedback.
Note: The SKETCHed outline of the volume, and all graphics in location plots, are treated as transient graphics, and
are not saved to a laser file if laser output is turned on.
Page 6.17
Oasys D3PLOT
User manual Version 9.3, Rev. 0, September 2008
6.2.3.8 Further notes on volume clipping
Note
1:
Clipping is calculated using the simple test: "is the element centre within the current volume?". Then either
the whole element is displayed, or it is not drawn at all. No interpolation across elements takes place.
This can give an effect rather like taking bricks out of a wall as shown in this figure.
Note
2:
Volume clipping does not work with stonewalls. This is because their geometry is at best strange, and often
has infinite dimensions, making it too hard to implement.
Note
3:
On 3D devices the graphics mode will be switched temporarily back to 2D when creating "location" plots.
Note
4:
You cannot screen-pick entities from "location" plots.
Note
5:
When a clipping volume exists you will find that the CV (Current Volume) button is live in entity <list> entry
panels. (See Section 6.0.2, and its accompanying figure .) This provides the option of selecting entities within
the current volume.
Note
6:
Volume clipping can affect other parts of D3PLOT, as shown in the following table:
Function affected by clipping
Averaging of element data at nodes
Calculation of free edges
Relevant D3PLOT commandSection
AVERAGING...
4.2.4.6
Clipping ignored switch
DISPLAY_OPTIONS
9.11
FREE_EDGES...
CLIPPING -> EDGES
Exclusion of elements from a "scan" for maxima/minimaWRITE
SCAN
Next Section
Page 6.18
6.7.2
User manual Version 9.3, Rev. 0, September 2008
Oasys D3PLOT
6.3 DEFORM Deforming
geometry.
The DEFORM command contains four functions which
"deform" geometry in various ways: exploding parts,
magnifying displacements, fixing a node in space and fixing
the model in space.
This figure shows the generic DEFORM panel, which gives
access to its functions.
EXPLODE_PARTS
Artificially separates parts by applying "explosion" vectors to them
MAGNIFY_DISPLACEMENTS
Allows scales other than 1.0 to be applied to graphical displacements.
FIX_NODE
Subtracts the displacement at a node from that at all others, effectively "fixing"
it in model space.
SHIFT_DEFORMED
Fixes three nodes, forming a local coordinate system, against which all
displacements are drawn.
REFERENCE_NODE(s)
Makes results relative to those at one or three nodes
REFERENCE STATE/MODEL
Makes results relative to a "reference" state in this or another model
DEFORM options apply at a mixture of "per window" and "per
model" levels.
All the options will apply to the windows selected by the W1 .. Wn tabs, but wherever node labels are used the
following rules apply:
•
Node labels will be mapped onto all relevant models.
•
If a node does not exist in a particular model then that feature will be disabled in that model.
•
If you screen-pick nodes you have to say which model they are to be picked from, but once picked the "label"
rules above apply.
Page 6.19
Oasys D3PLOT
User manual Version 9.3, Rev. 0, September 2008
6.3.1 EXPLODE_PARTS Separating (“exploding”) parts
"Exploding" a part is done by applying a [dx,dy,dz] vector to all nodes of that part, which has the effect of moving it
bodily to a new location. By default no explosion vectors are set, but you can define, modify and cancel vectors for
any part(s) at will. The figure below left shows an unexploded, and below right, an exploded dummy model:
This figure shows the basic "Explosion" control panel in its
initial state.
In this example no explosion vectors have been defined yet, as
can be seen in the status feedback area.
6.3.1.1 DEFINE Defining explicit explosion vectors for a <list> of parts.
If you know exactly which parts you want to "explode", and by how much, use DEFINE. This requires you to define a
<list> of parts, using the standard selection panel, then for each part it gives you the explosion vector definition panel
shown in the following figure:
For each part you can define:
dx,dy,dz
Explicit vectors;
AUTOMATIC
Let D3PLOT calculate vectors (based on
vector from model C.of.G to part C.of.G).
SET TO
ZERO
Reset all 3 vectors to zero.
Factors...
Provides a simple way to factor the
current vectors by known %age amounts.
You can use the definition methods above in any order: for example use AUTOMATIC to get an initial estimate, then
Factor them, or modify them by hand. The vectors are only stored when you give the DONE command. The vectors
you define will take effect the next time you issue a plotting command.
Page 6.20
User manual Version 9.3, Rev. 0, September 2008
Oasys D3PLOT
6.3.1.2 CANCEL Cancelling (resetting to zero) explosion vectors
Explosion vectors remain in force until you change or CANCEL them explicitly. Use CANCEL, then select a <list> of
parts to have their vectors zeroed. The effect will be seen the next time you issue a plotting command.
6.3.1.3 AUTOMATIC Automatically generated vectors for a <list> of parts
Typing in vectors for a long list of parts can get tedious, so it is possible to get D3PLOT to generate vectors for you
automatically. These are based on the vector from a defined position (by default the centre of the model) to the centre
of gravity (C.of.G) of each part, multiplied by a known factor.
This figure shows the AUTOMATIC
vector definition panel. You define the
centre from which vectors are
calculated from one of:
CENTROID Model centre of gravity
NODE
Nodal coordinate
ORIGIN
Coordinate [0,0,0]
MATL
C.of.G of a part
Pt used
Type in a coordinate
Then define a (non-zero!) Distance,
or apply a %age factor to the existing
value.
When you have defined the centre of explosion correctly press APPLY, and you will be asked to define a <list> of parts
to which to apply vectors. Vectors for each part will be calculated based on the distance from the part C.of.G to the
centre defined here, factored in proportion to the Distance value. The vectors generated are not usually ideal, but they
provide a good starting point from which they can be "tweaked" to give the required image.
6.3.1.4 Notes on explosion vectors.
Note
1:
Vectors only affect plots, they have no influence on nodal coordinates used for X-Y plotting, or in WRITE, or
upon the calculation of element volume etc.
Note
2:
Explosions are applied as vectors added to nodal coordinates. Where two parts share a common node there is
an ambiguity: should vectors be cumulative or, if not, which value whould be used? In this case D3PLOT uses
the vector of the lowest numbered part, and ignores the remainder. So try to avoid this situation or, if you
cannot, be prepared for elements on the border of two parts with dissimilar vectors to appear to be stretched.
Note
3:
Explosion can be used in conjunction with the other options in the DEFORM menu. Transformations to nodal
coordinates are applied in the order:
FIX_NODE or SHIFT_DEFORMED (Mutually exclusive)
MAGNIFY_DISPLACEMENTS
EXPLODE
Page 6.21
Oasys D3PLOT
User manual Version 9.3, Rev. 0, September 2008
6.3.2 MAGNIFY_DISPLACEMENTS Factoring nodal
displacements
By default D3PLOT plots nodal coordinates at their true positions: a displacement factor of 1.0. However there are
times when you may wish to factor displacements, for example when stresses are in the linear elastic range and
displacements hardly visible. The figure below left shows an example of unfactored, and below right, factored
(magnified by 50), displacements for a cantilever subject to a point load on its end.
The MAGNIFY_DISPLACEMENTS panel is shown in
the figure (right).
To enter factors type in [Fx,Fy,Fz], or use one of the
pre-programmed factors (x5, x10, etc). The CANCEL
button sets all factors back to the default of 1.0. The Factor
on Curr slider applies the given factor to the current values
- an easy way of setting any value.
When you have defined the factors use DONE to return and
apply them.
Factors take effect the next time you update the plot, and
stay in effect until changed again.
Note
1:
Factors only apply to plots. They have no effect on
written of X-Y data output, calculation of volumes
etc, or contoured values of displacement.
Note
2:
Magnified displacements may be used in
conjunction with the other DEFORM options: see
Note 3 in Section 6.3.1.4 for the order of operations.
Page 6.22
User manual Version 9.3, Rev. 0, September 2008
Oasys D3PLOT
6.3.3 FIX_NODE Fixing a node position despite displacements
In some circumstances a model may move a long way between successive states, and it can be inconvenient to have it
progressively disappearing off the screen.
This figure shows a few frames during the assembly of an animation of a dummy sled test analysis.
In these tests the sled is pulled backwards to mimic the deceleration during a crash, and it moves off the screen as a
consequence. So a simple translation to bring it back to the undeformed position will suffice.
This second figure shows what happens when a node in the dummy’s pelvis is fixed using FIX_NODE.
The FIX_NODE facility allows you to specify a node that remains fixed at its undeformed position, regardless of any
displacements that may occur. This is implemented by finding the displacement vector of the node at each complete
state, and subtracting that vector from the coordinates of every node in the model. In the example above one would fix a
node on the sled, which would then appear to be fixed in space, and simply see dummy motion within it.
(If a rotation as well as a translation is required you can use SHIFT_DEFORMED instead: see Section 6.3.4.)
Page 6.23
Oasys D3PLOT
User manual Version 9.3, Rev. 0, September 2008
This figure shows the FIX_NODE control panel in its
default state: no node is fixed.
To fix a node PICK it, or type in its label. Once defined this
mode can be switched on or off.
FIX_NODE applies a model space offset to what is drawn: it
is a translation of the model, updated for each state.
(It is not the same as VIEW, CN (Centre on node) which is a
purely graphical transformation that sets the viewing centre
for rotations.)
Note
1:
FIX_NODE (which applies a translation) and SHIFT_DEFORMED (which applies both a rotation and a
translation) are mutually exclusive: you can only have one or the other active at one time.
Note
2:
The node used in FIX_NODE (which affects the graphical displacements) is the same as that used as a
single REFERENCE_NODE (which affects the contoured and reported values). They may be used
separately or together.
Note
3:
FIX_NODE can be used at the same time as "explosion" vectors and magnified displacements: see Note 3
in Section 6.3.1.4 for the order of application.
6.3.4 SHIFT_DEFORMED Translating and rotating a model back
to its undeformed position.
Sometimes it is useful to be able to move a deformed structure back to its undeformed position, for example to
measure knock-back (crush) following an impact. In many cases this will involve applying a rotation as well as a
translation, and the FIX_NODE option described in Section 6.3.3 (which only applies a translation) will not be
adequate.
Consider the following example: a ship hits a concrete caisson, punches a hole through it with some damage to its
bow plates, and also pitches up as at tries to climb over the caisson. Measure the damage to the bow plates. The
situation is shown in the figure below left, and in the figure below right the deformed and undeformed shapes of the
ship are shown. Clearly the rotation the ship has undergone makes it hard to measure the deformation
Page 6.24
User manual Version 9.3, Rev. 0, September 2008
Oasys D3PLOT
By using SHIFT_DEFORMED to pick three nodes that are representative of the rigid body motion of the ship,
translation and rotation can be applied to bring the deformed geometry back to overlay the undeformed, making
measurement possible: see the figures left and right below).
The SHIFT_DEFORMED panel is shown right.
You can screen-PICK the nodes, or type them in directly.
Once defined this mode can be switched on or off at will.
Choosing sensible nodes for SHIFT_DEFORMED.
The three nodes you choose form a right handed coordinate system, so they must not be colinear (or become colinear
due to displacements), and the order of their definition is significant: see the figure below.
The local coordinate system [X’,Y’,Z’] is defined as shown here, and the inverse of this is applied to rotate the model
Page 6.25
Oasys D3PLOT
User manual Version 9.3, Rev. 0, September 2008
back to its undeformed state.
The displacement of node 1 is subtracted from all nodes in the model to bring it back to the undeformed position.
(FIX_NODE applies this translation only, thus it is a subset of SHIFT_DEFORMED, which is why the two operations
cannot be used at the same time.) You should try to choose three nodes whose relative position will not change too
much as the model deforms, so that their motion is representative of the rigid body motion of the structure as a whole.
And node 1, from which the rigid body translation if computed, is the most significant. For example in a frontal impact
car crash analysis you should nodes at the back of the car. If your model has some rigid bodies then nodes on them
would be ideal.
Note
1:
SHIFT_DEFORMED cannot be used at the same time as FIX_NODE, since the translations they apply
would conflict.
Note
2:
SHIFT_DEFORMED can be used in conjunction with "explosion" vectors and magnified displacements. The
order of application is given in Note 3, Section 4.8.14.
Note
3:
SHIFT_DEFORMED uses the same three nodes as those in REFERENCE_GEOMETRY. The difference is
that shifting the model simply changes the graphics displayed, whereas reference geometry changes the data
values contoured and output. They can be used in conjunction or separately.
6.3.5 REFERENCE_NODES Calculating results with respect to
one or three nodes.
FIX_NODE and SHIFT_DEFORMED above affect only
how the current image is displayed, they do not change the
computed values which are contoured or reported.
REFERENCE_NODES, on the other hand, does not affect
the display at all, rather it modified the values that are
computed to make them relative to those at the nodes chosen.
This feature allows intrusion or relative deformation to be
contoured. Two mutually exclusive options are available:
•
Single node: Displacement, Velocity and Acceleration
values are reported relative to that node.
•
Three nodes: Displacement only is reported relative
to node 1, in the coordinate system formed by
N1N2N3.
In the Three nodes case results can be reported in
either the global or the local (N1N2N3) coordinate
system.
The "Single" and "Three" node cases are mutually exclusive,
you cannot have both active at one time.
Page 6.26
User manual Version 9.3, Rev. 0, September 2008
Oasys D3PLOT
6.3.5.1 Defining one or three nodes
Single
Node
You pick a single node <N0>.
Displacements, Velocities and Accelerations are calculated with respect to the value at that node. For
example if V is a velocity vector:
V’N = VN - V0
V’N = modified velocity vector at node <n>
VN = original velocity vector at node <n>
V0 = current velocity vector at reference node <N0>.
Three
Nodes
You pick three nodes <N1,N2,N3>. N1 is the origin,
and the nodes form a right-handed coordinate as
for SHIFT_DEFORMED above.
Displacements (only) are calculated with respect to this system such that for displacement vector D:
D’N = R . [DN - DO]
D’N = modified displacement vector at node <n>
DN = original displacement vector at node <n>
D0 = current displacement vector at reference node <N0>
R = the rotation matrix to transform back to the selected coordinate
system
6.3.5.2 Using REFERENCE_NODE (single node case).
Here is an example showing how a single REFERENCE_NODE might be used.
In this case we have a dummy in a sled test, as above, where a crash is simulated by pulling the sled backwards. However
what we are interested in is the velocity of the dummy relative to the sled, since in a real crash the sled (= car) would be
more or less stationary, while the dummy would still be travelling forwards.
We can achieve this by picking a node on the (rigid) sled as our reference node, and displaying all velocities relative to
that.
Page 6.27
Oasys D3PLOT
Here is the "raw"
image, showing that the
sled is moving rapidly
backwards.
REFERENCE_NODE
now switched on.
Here is the revised
velocity plot now that
the
REFERENCE_NODE
has been switched on.
The velocities of the
sled at node 9018 have
been subtracted from
all velocities, making
those on the dummy
effectively relative to
the sled.
(Should we wish to fix
the sled in model space,
and to draw the
deformed shape of the
dummy relative to that
throughout an
animation, we could
also use
FIXED_NODE.
However the two
operations are
independent and do not
have to be combined.)
Page 6.28
User manual Version 9.3, Rev. 0, September 2008
User manual Version 9.3, Rev. 0, September 2008
Oasys D3PLOT
6.3.5.3 Using REFERENCE_NODES (3 node case)
The following example shows how REFERENCE_NODES (3 nodes) works, and how it is related to
SHIFT_DEFORMED.
Here is the basic model.
It is a crush tube shown in its final state,
with the undeformed geometry overlaid.
The loading platens at each end are
pushed together, but they are free to
rotate. The problem is to determine the
maximum "end to end" deformation.
It is clear from this plot that the blue end
moves and rotates, and this makes it
difficult to determine the deformation
relative to that end. The sequence below
shows how to overcome this problem.
Three nodes (N1, N2, N3) have been
chosen on the loading platen at the blue
end, and they form a local coordinate
system as shown.
SHIFT_DEFORMED turned on.
This is the same model at the same state, but
now SHIFT_DEFORMED has been
switched on, and the model has been rotated
back to the coordinate system formed by
N1N2N3, translated back to origin at N1.
Note that the rotation and translation are
back to the undeformed locations of nodes
N1 to N3.
(This step is not necessary in order to
calculate data relative to reference nodes,
but it makes the example much clearer.)
Page 6.29
Oasys D3PLOT
Contours of X displacement now shown.
This plot shows global X displacement,
which is approximately along the length of
the tube.
However because both ends of the tube have
rotated it is difficult to estimate the
movement of the two ends relative to one
another. We can see that it approximately
177.66 + 36.74 = 214.4, but this may not be
good enough.
In order to obtain a more accurate value it is
necessary to express the displacements in
terms of the coordinate system formed by
N1N2N3.
Remember: SHIFT_DEFORMED only
affects the deformations drawn, it has no
effect on the values that are contoured or
written out.
REFERENCE_NODES turned on, and
contours of local Z’ displacement shown
By switching on REFERENCE_NODES,
and selecting output in the local system, we
can now plot displacements in the local Z’
direction relative to the left hand end.
It is now clear that the actual peak
movement at end two is actually 227.23,
somewhat higher than our estimate from the
approximate global X plot above.
This technique is very useful when
calculating "knock-back" and "intrusion"
displacements at particular locations in a
model.
SHIFT_DEFORMED turned off, but
REFERENCE_NODES left on.
This plot demonstrates that while
SHIFT_DEFORMED and
REFERENCE_NODES are related, and
share the same nodes, they can act
independently.
SHIFT_DEFORMED has been turned off, so
the deformed shape is now the "true" shape,
but the contours are still expressed in the
local Z’ of the axis system defined by
N1N2N3.
This is a harder plot to understand, because
the axis system of the plotted results is not
that easy to discern.
Page 6.30
User manual Version 9.3, Rev. 0, September 2008
User manual Version 9.3, Rev. 0, September 2008
Oasys D3PLOT
6.3.6 REFERENCE STATE/MODEL
Normally results at a given state are drawn and reported
verbatim, subject to the various options above. However it is
possible to subtract from the current data:
•
The results at a different state in this model, showing the
difference between two times.
•
The results at the same, or a different, state in another
model, showing the difference between models.
This operation is applied to all nodal and element data, and its
application can be to any permutation of:
•
The current graphical coordinates (ie the plotted shape)
•
The current data values (ie contoured, written and
time-history values)
•
The current undeformed geometry plot.
By default the reference model is the current model, and the
reference state is zero, and "reference plotting" for a window is
turned off, meaning that no action is taken here.
6.3.6.1 Turning Reference Plotting
on/off
Reference plotting is not active in any window until it is turned on in that window.
Settings for each window are stored separately, and this panel shows those for the first active window selected by the
W1 .. Wn tabs. To define different settings in different windows select a single Wn tab at a time, and configure each
window individually.
Page 6.31
Oasys D3PLOT
User manual Version 9.3, Rev. 0, September 2008
6.3.6.2 Choosing the Reference Model
Two possibilities exist:
Plot relative to
the current
model
This is the default case. You select a reference state in the current model, and results are
plotted relative to this state. If you have multiple models in a window then each model will
be plotted relative to itself.
Data from the reference state are subtracted from those in the current state, and the results
displayed. It is perfectly possible to choose a reference state later than the current one, and
hence to get "negative" results, the computation is simply:
<data>displayed = <data>
Plot relative to
another model
current
- <data>
reference
This is the more complex case of plotting data from this model relative to a state from a
different model. If you have multiple models in a window each model in that window will
be plotted relative to the reference model.
The principle is exactly the same: the reference data is subtracted from the current, but
mapping of reference model onto current is done as follows:
•
Mapping is "by external label".
•
The results from node label <i> in the reference are subtracted from those for node
label <i> in the current model. And likewise for elements.
No checking for geometrical or topological proximity takes place.
•
No check is made that node <i> (or element <j>) in the two models are equivalent, or
even remotely in the same place - either topologically or geometrically.
If no equivalent label is found, zero is reported.
If no matching node or element can be found in the reference model, then zero is
reported as a result - regardless of the actual value in the current model.
This means that models which are topologically nearly identical compare well, but areas
which have been remeshed may give very misleading comparisons.
6.3.6.3 Choosing the Reference State
Whether you are using the current or a reference model you must
define which state in that model is to be used as the "reference"
one.
You can use either a fixed state number, or a changing "current"
one.
Page 6.32
User manual Version 9.3, Rev. 0, September 2008
Oasys D3PLOT
Using a fixed
reference state
This is the default case, invariably used when plotting data relative to the current model.
Using the
"current" state
This meaningless if the reference model is the current model, since results will always be zero.
You simply select a valid state from the model, and this is used as the reference state. It is
perfectly legal to select a fixed state from a different model too.
But if plotting relative to a different reference model it is a powerful tool, especially during
animations:
For each state <i> the data from the equivalent state <i> in
the reference model is subtracted.
This means that you can see how the differences between two models vary over time.
Obviously it is important to make sure that the states in the two models have the same times,
as no check is made for time equivalence.
6.3.6.4 Choosing what Reference data
applies to.
You can control the extent to which "reference" logic applies to
plotted geometry and contoured or written data.
Any permutation of the below can be selected.
Current
Coordinates
Whether or not reference geometry is used for the shape that is plotted on the screen.
Data Values
These are the values contoured, vector plotted, written by the WRITE command and
reported by XY_DATA.
Undeformed
Geometry
This is the display of undeformed geometry on the plot only (when drawn). Normally this
will always display state #0, but if you turn this on the geometry of the reference state will
be used instead.
Note that "coordinates used for plotting" and the component "displacements" are kept
separate, and can be controlled individually.
Page 6.33
Oasys D3PLOT
User manual Version 9.3, Rev. 0, September 2008
6.3.6.5 Examples of using Reference State/Model
The following examples demonstrate how the feature might be used.
Example 1: Reference state in the same model.
Here is the "raw" plot - Von Mises
stress in a crush tube.
And below is the same plot with the
reference state set to #18, which is at t =
0.0085s, in the same model. Remember
that:
<data>displayed = <data> current - <data>
reference
Therefore, as in this example, negative
von Mises stresses can be generated
since, in some locations, the stress at an
earlier state was in fact greater.
(Incidentally this illustrates that the
reference calculation is performed upon
the scalar output of the data component
computation, not upon its individual
tensor components.)
Example 2: Reference state in a different model
In this case the model above has been re-run, but with the section thickness of the crushable elements reduced by 25%.
Here we are comparing the results between original and modified models to see what difference this makes.
Obviously rerunning the same model with different section properties does not upset node or element labelling, so exact
equivalence between the two analyses is preserved.
Page 6.34
User manual Version 9.3, Rev. 0, September 2008
Oasys D3PLOT
Here is the original image, showing
contours of "true" displacement
magnitude.
Here is the same image, with the
displacements in the reference model
subtracted from the "true" ones above.
The "current" state has been used in the
reference model (M1), and this is
reported on the plot.
Page 6.35
Oasys D3PLOT
User manual Version 9.3, Rev. 0, September 2008
It is not that easy to visualise the
differences in shape from the contour
plot above, since they are obscured by
the gross deformations of the structure.
So in this plot reference geometry has
been used for the current (plotting)
coordinates as well, showing the
difference in displacement between the
two models. Effectively this is the
undeformed geometry + the difference in
displacement between the two models.
Displacements have also been magnified
by a factor of 2.5 using MAGNIFY_
DISPLACEMENTS to exaggerate them,
making them clearer.
REFERENCE STATE - Notes
1) If the reference state is set to state 0 then all values reported will be the absolute values.
2) If an analysis contains pre-stressed elements then state 1, not state 0, should be selected if values relative to the
pre-stressed values are required. (State 1 is a genuine set of results at analysis time zero, state #0 is a synthesised
set of zero values.)
3) The reference state option is not available for a model that includes adaptivity, see Section 4.1.11.
4) Using the reference state option will increase the amount of memory used by D3PLOT slightly, as two complete
states have to be stored simultaneously.
REFERENCE MODEL - Notes
1) Any model can be used as a reference model, but it should be reasonably similar to the original if sensible results
are to be obtained.
2) Using a reference model will slow down plotting since the <current> vs <reference> lookup by label imposes an
overhead. It can also slightly increase memory usage.
Next section
Page 6.36
User manual Version 9.3, Rev. 0, September 2008
Oasys D3PLOT
6.4 CUT_SECTIONS
The Cut Section menu is invoked from the Tools menu or
from keyboard shortcut X.
A cut-section, sometimes referred to as a "cutting plane", is
a flat plane that cuts through the model. It may be located
anywhere in space and oriented at any angle.
When the Cutting switch is turned on the intersection of
the plane with the model is calculated and the interpolated
cut plane is drawn.
This is possible in all D3PLOT display modes, (including
animation), and for those that display data this will be
displayed on the cut plane.
Various options, described below, define if and/or how the
model either side of the plane is drawn.
The forces acting on the cut-plane, integrated from element
stresses, may be calculated and output.
Cut Sections are a "per window"
attribute
Cut-section definitions apply to all those windows which
have their W1 .. Wn tabs set. They are stored as an origin
coordinate and a local coordinate system, which cuts
through all models in the relevant windows.
If you use the PICK NODE ... options to derive a
coordinate from a node you will be forced to define which
model to pick from, but thereafter the coordinate is
model-independent.
If you use the option to track node motion across multiple
models then special rules apply: see under Section
follows nodes below.
Page 6.37
Oasys D3PLOT
User manual Version 9.3, Rev. 0, September 2008
6.4.1 Some important rules governing cut sections that must be
clearly understood:
•
Only one cutting plane can be current at any one time, although any number may be stored on disk and
retrieved at will. The plane will only be active if turned on. By default (as with volume clipping) no plane is
defined, and it is switched off.
•
Only Solid, Shell, Beam and Thick shell elements are cut. Other element types, such as joints, springs,
stonewalls, etc, are unaffected. You may want to remove these from the display when using cut planes since
they will span the plane.
•
Forces and moments on cut planes are also only calculated for elements of these four types which are
unblanked, the others are ignored. This is because these are the only element types for which stress &/or
force results are consistently available.
•
Forces and moments are calculated from solid and thick shell stresses, shell force and moment resultants,
and beam forces/moments. Therefore if any of these are rigid no forces will be computed for the relevant
materials, even though the elements may be carrying load.
•
Forces on planes are calculated reasonably accurately. Moments are only approximate and should only be
treated as (usually under-) estimates.
6.4.2 Creating a cutting
plane
The first step in creating a cutting plane is to
choose how you are going to define it.
A plane is defined by its origin and its local X’, Y’
and Z’ vectors.
The top two options permit the section to be
arbitrarily oriented in space, the lower three align
it exactly with the model X, Y and Z axes
respectively.
Regardless of how it is defined initially the
internal definition of the plane is the same, and it
may be translated and rotated at will later.
Page 6.38
User manual Version 9.3, Rev. 0, September 2008
Oasys D3PLOT
LS-DYNA Method
This option allows import of definitions in the format used by the LS-DYNA *DATABASE_CROSS_SECTION
keyword:
•
Normal vector tail coordinate
•
Normal vector head coordinate
•
Edge vector head coordinate
If you have written a .ZTF file from PRIMER than any database cross sections in your original input deck can be
imported by using the Import DATABASE_SECTION option.
Note: LS-DYNA cross sections use lagrangian ("basic" in D3PLOT terminology) space.
When you define a cut section using this method you will be asked if you want to swap to "basic" space for
compatibility with LS-DYNA. This is explained in more detail below in section 6.4.3. (See Appendix II for an
oa_pref option that will allow you to set this as your default definition method.)
Origin and Vectors Method
This definition requires the user to enter (in model coordinate space) the:
•
coordinates of the origin for the plane
•
the local x-axis vector
•
any vector lying in the local XY plane.
N3: Three nodes method
This method requires you to pick three nodes which form the local axis system as follows:
•
Node 1 is the orign
•
Node 2 gives the local X axis from the vector |N1N2|.
•
Node 3 gives the local X axis from the vector |N1N2|.
Normally the coordinates of the nodes at the current state form the basis of the plane definition, but if you choose
"Section follows nodes" you can update the plane at every state as the nodes move.
Constant X,Y,Z Method
The three "constant" values allow you to define the coordinate along the model X, Y or Z axes respectively at which
a plane of that constant axis value will be defined. Locally:
•
The origin will be [0,0] on the other two axes.
•
Local Z is in the +ve direction down the axis chosen.
•
The other two axes are chosen for you, aligned with the two unchosen model axes.
If you use a node here then normally the coordinates of that node at the current state are used, but if you choose
"Section follows nodes" you can update the plane at every state as the nodes move.
6.4.3 Defining a space
system for the plane.
Once you have defined the plane, by one of the
definition methods above, you need to define which
space system it operates in.
This figure shows the Cut space system selection
panel, showing the three possible systems. These are
described below.
Section follows node(s) allows a cut section defined using 3 nodes, or a single node in the constant X/Y/Z cases, to be
updated using the current coordinates of the node(s) at each state.
Page 6.39
Oasys D3PLOT
User manual Version 9.3, Rev. 0, September 2008
BASIC space system
In this system the cut plane is calculated using the model’s undeformed geometry, regardless of the current state in
core.
This means that the parametric coordinates of the cut positions on elements are calculated using the undeformed
geometry, then applied to the current (deformed) in-core state. Therefore the cut plane will almost certainly not
remain flat as the model deforms.
This is a "lagrangian" cut: the cutting plane deforms as the element mesh deforms.
DEFORMED space system
In this system the cut plane is calculated using the model’s current deformed geometry. Therefore the cut position on
elements, and indeed the elements which are cut, can change as the model deforms through the static plane position.
The plane will always remain flat, and will remain fixed in space relative to the model coordinate system.
This is an "eulerian" cut: the cutting plane remains fixed while the element mesh can deform through it.
SCREEN space system
In this system the cut plane is calculated using the current screen coordinates, after the transformation and projection
to screen space.
This has the effect of tying the cutting plane to the screen space system, effectively to your display, therefore both
deformations and viewing transformations (eg dynamic viewing) can move the model through the plane.
This is also an "eulerian" transformation since the model deforms through a static cutting plane.
Note: Force and moment computation varies with section space.
For compatibility with LS-DYNA the forces and moments computed in a BASIC space system are:
•
Always expressed in the global cartesian system
•
Centred on the average coordinate of the cut section at each state.
Whereas those computed in a DEFORMED or SCREEN space system are:
•
Always expressed in the section local coordinate system.
•
Centred on the plane origin as defined by the user.
This is described in more detail in section 6.4.4 below.
Section follows Node(s)
If a cut section has been defined using either the 3 node method or a single node and
a global axis system then this option will force the cut section to follow the node(s)
as they move during the analysis.
Page 6.40
User manual Version 9.3, Rev. 0, September 2008
Oasys D3PLOT
Where there is more than one model in the window(s) affected then the following rules apply:
•
For each model the labels of the nodes are looked up.
•
If all the necessary nodes (3 in "3 nodes" case, 1 in "constant X/Y/Z" case) are found then the normal logic will
apply based on the current coordinates of the nodes in each model, and the section will be updated at every
state.
•
If a node is not found then the "follow" logic is turned off for that model, and the plane will remain static in its
initial position for that model.
Note that using this logic over multiple models may mean that the planes in each model may not be the same, as the
defining nodes may move differently. Exercise care using this option!
6.4.4 FORCES Computing forces
and moments on the cutting plane
This command calculates the forces and moments acting on the
current current plane. The <-? button gives specific on-line help
on this subject.
A summary of the section centre coordinate and the current forces
on it can be shown in the master panel if the check box there is
ticked. These figures will update automatically as the section is
dragged.
Please read the following section on force and moment extraction before using this facility. There are some less
than obvious pitfalls that you need to consider. In particular:
•
Only unblanked elements are included in cut section force calculation.
•
Rigid elements may be transmitting force, but they will always report zero output to the database. Therefore
their contribution to cut forces and moments will always be zero.
•
Forces and moments are only computed from Solids, Beams, Shells and Thick shells. Other element types
either do not report forces (eg springs, seatbelts), or are not sensible in this context (eg SPH elements).
•
There are inconsistencies in the way LS-DYNA writes beam force and moment output prior to LS971,
requiring user intervention if the correct answers are to be calculated.
•
Local bending moments in thick shells are not included, and may also be omitted for thin shells if force &
moment resultant data components are not present in the database.
•
LS-DYNA processes cut-sections in "basic" space, generating forces and moments in the global system. If
you switch to "basic" space in D3PLOT you will get a similar calculation, but "deformed" space results in
D3PLOT are expressed in the plane’s local system.
How cut forces are calculated.
Only forces in the following unblanked element types are computed: solids, (thin) shells, thick shells and beams.
Other element types (eg springs) are ignored since LS-DYNA does not report forces in them in a way that can be
read by D3PLOT. The force and moment values are integrated from the element stress & force results as follows:
Solids:
The cut face through the solid is interpolated, and its area calculated. The element stress tensor is rotated to
the cut plane system and the forces are calculated from:
Where:
Fx is in-plane X force
Fy is in-plane Y force
Fz is normal Z force
No local element moments are calculated within solids: they are constant stress elements.
Page 6.41
Oasys D3PLOT
Thin
shells:
User manual Version 9.3, Rev. 0, September 2008
The shell is expanded into its true 3D shape by adding its (thickness/2) either side of its neutral axis. The cut
area is then calculated in the same way as for a solid element.
The forces are calculated using the shell force resultants [Fx,Fy,Fxy,Qxx,Qyy] which, when divided by
thickness, yield a stress tensor in the shell local coordinate system. This tensor is rotated to the cut plane
system and forces are calculated as for solids above.
Local element moments are also obtained by rotating the moment resultants [Mx,My,Mxy] to the cut plane
axes. But these are only approximate.
If shell force and moment resultants are not present in the database then the element stress tensor is used
instead. However only the mid-surface results are used, treating the element as a quasi-solid, which
means that element local bending moments are ignored. (If the location of the element integration points
and the degree of plasticity are both unknown it is impossible to calculate an accurate local bending
moment.)
Thick
shells:
The cut face through the element is calculated in exactly the same way as for a solid, yielding an area. The
middle surface stress tensor is then applied over this area to give element forces as for solids above.
It is not possible to calculate thick shell moments properly since no moment resultants are available, and
the distribution of bending stress through the element is unknown. So no local moments are calculated for
these elements.
Page 6.42
User manual Version 9.3, Rev. 0, September 2008
Oasys D3PLOT
Beams: The three beam forces [Fx,Fy,Fz] and moments [Mxx,Myy,Mzz] are treated as constant vectors, are rotated
to the cutting plane system and used directly.
Inconsistent beam sign conventions in LS-DYNA releases up to and
including 970
Due to a bug in LS-DYNA versions up to and including LS970 exhibit the following inconsistent sign
convention for beam output:
•
"Resultant" (typically Belytschko-Schwer) elements use one sign convention
•
"Integrated" (typically Hughes-Liu) elements use the opposite sign convention for 4 of the 6 output
components.
The following table shows the sign conventions from releases 970 and earlier:
ComponentMatching?
Fx
Same
Fy
Opposite
Fz
Opposite
Mxx
Opposite
Myy
Opposite
Mzz
Same
Sadly there is no "right" convention for beam output, as different users have
different conventions. The confusion arises because of the different ways in
which the beam types work: integrated beams have integration points at
their centre, whereas resultant beams have (potential) hinges at their ends.
The former reports force in the beam, and the latter reactions at the
supports.
D3PLOT attempts to draw bending moment diagrams on the tensile side,
but depending on which beam type you have used this may or may not be
the case.
Beam sign conventions are consistent from LS-DYNA release 971 onwards
At some stage during the development of LS971 this problem was fixed, and results now use the
"integrated" convention for all beam types. This is consistent with the reporting method for other element
types in LS-DYNA, where results are the forces and moments within the element.
How D3PLOT handles the beam sign convention problem.
The sign convention is crucial when computing cut forces, since the force and moment vectors are
transformed into the plane of the cut, and a reversal of their sign obviously affects the answers.
Unfortunately D3PLOT can’t tell whether an output database is from LS-DYNA 971 or later, since
although the database contains a "version" field LS971 writes "970" in there! Therefore it doesn’t "know"
which sort of beam it is dealing with and it will ask you what beam types you have used when you first
calculate cut forces through a structure. Thereafter it will apply correction factors as required . If you have
mixed the two beam types in your model you will have to be extremely careful when interpreting results
from a pre-970 analysis.
WARNING: Rigid elements report zero stresses, although they may still be transmitting loads. The cut forces
in these elements will be calculated as zero.
Page 6.43
Oasys D3PLOT
User manual Version 9.3, Rev. 0, September 2008
Sign convention of cut forces.
The sign convention adopted is that of the forces acting on the plane from its positive side, expressed in:
•
Deformed space: the plane’s local coordinate system.
•
Basic space: the global model system
Moments are expressed about an axis, using the right hand screw rule. Thus Mxx is moment about the plane X-X axis
in the relevant system. This is illustrated graphically in the figures below.
Coordinate system and centroid of cut forces.
The coordinate system and centroid depend upon the plane’s space system:
In DEFORMED space the following is used, all axes being in the plane local axis system.
Fx is in plane X
force (effectively
shear force)
Fy in is plane Y
force (also shear
force )
Mxx is moment The plane centroid is at the plane’s origin, and its local X, Y and Z axes are
about plane local as defined by the user. These axes may be visualised by turning plane
XX axis
display on. Unless "cut follows nodes" is turned on the centroid and axes
remain fixed as the model deforms.
Myy is moment
about local YY In particular note that moments are calculated about plane local axes
through the plane origin.
Fz is Z force normal Mzz is moment
to the plane.
about local ZZ
In BASIC space the following are used, all axes being in the global model system.
Fx is force in
the global X
axis
Fy is force in
the global Y
axis
Mxx is moment about The plane centroid at any given state is the average coordinate of the cut
the global XX axis
elements, this means that it moves as the model deforms.
In particular note that moments are calculated about plane global axes
Myy is moment about through the current plane centroid as calculated from the average of all
the global YY axis
cut elements.
Fz is force in the Mzz is moment about
global Z axis
the global ZZ
Compatibility with *DATABASE_CROSS_SECTION output from LS-DYNA
LS-DYNA uses the lagrangian approach for cross-sections, and computes their forces using the equivalent of the
BASIC method above. Results from LS-DYNA should match those from D3PLOT when BASIC space is used..
Page 6.44
User manual Version 9.3, Rev. 0, September 2008
Oasys D3PLOT
Consider the following example of a
cantilever cut along its length:
In this example a cantilever made of solids is
loaded downwards at its free end.
There is a cutting plane defined in
DEFORMED space roughly half way along
its length, with the positive side (+ve Z axis)
being the free end.
The force acting on the cut plane from its +ve
side acts downwards.
In the plane local coordinate system this is in
the negative Y sense.
The moment acting on the plane is in the
positive sense about the local XX axis.
Page 6.45
Oasys D3PLOT
User manual Version 9.3, Rev. 0, September 2008
Methods of obtaining written force output
Method 1: Instantaneous force output on Cut-section menu
Method 2: FORCES... Command in the Cut-sections menu
Output here lists the 3 forces and 3 moments broken down for each material that actually contributes force, together
with a summary for the whole model. Remember that elements which are blanked are not included, and materials
which do not contribute any force are also not reported in order to keep the list short. An example is shown below:
Method 3: WRITE Output (as an entity type)
When a cut-section is current the SECTION
entity will be available as an "entity" type in the
WRITE menu:
To use this select SECTION and then a data
component.
You can select a scalar component, (such as
FX_X_CUT_FORCE as shown here), or a
summary of all forces and moments.
The advantage of using WRITE is that the
results can be directed to file for subsequent
use. An example of such output is given below:
++++++++ Data at time .30046E-02 ++++++++
CUT_SECTIONs:listing of CS_CUT_SUMMARY
Cut section: Fx
Fy
Fz
Mxx
----------------------------------------------------------------------------------------------------------------------------------------------------Section
-9.667E+03
1.290E-04
-2.004E+00
-5.770E+01
Page 6.46
User manual Version 9.3, Rev. 0, September 2008
Oasys D3PLOT
Obtaining XY graphs of cut-section forces
wrt. time.
It is possible to use cut-section forces as a
valid entity type for output in the XY_PLOT
command, in a fashion similar to WRITE.
When there is a current cut-section the entity
type SECTION will be available in the
XY_PLOT panel.
Choose the SECTION "entity" type, followed
by a scalar data component, and the results of
that component versus time will be generated.
Results can be written to disk as "curve" files,
using the name sect001.cur etc, and also
drawn as graphs in D3PLOT.
The figure below shows typical output of X cut
force vs. time.
Note that you can also write plotted results to a curve file using the FILE... command on the plotting panel. (See
Section 6.8 for more details.)
Cut area and centroid
It is also possible to extract data components CUT_AREA and CX/Y/Z_CENTROID of the cut section for display in
WRITE and XY_DATA.
Page 6.47
Oasys D3PLOT
User manual Version 9.3, Rev. 0, September 2008
CUT_AREA
Is the sum of all Solid, Shell and Thick shell cut face areas. No attempt is made to
compute the area of cuts through beams.
CX/Y/Z_CENTROID
Is the average coordinates of the cut face, computed from the 1st moment of area of the cut
elements areas. Therefore it suffers from the limitation above in that it does not include
beam elements.
Note that this is the case for both Basic and Deformed space sections, and in the latter
case the reported centroid may be very different to the section origin (although it will be on
the section plane).
Next section
Page 6.48
User manual Version 9.3, Rev. 0, September 2008
Oasys D3PLOT
6.4.5 Positive & Negative Action
Controlling display of structure either
side of the cutting plane.
By default when cutting planes are switched on only the cut
elements are drawn normally, with the remainder in wire-frame..
But it is possible to draw the mesh on both positive and negative
sides of the plane at three levels of complexity. Each side can be
controlled separately.
The options are:
OMIT
The mesh on this side is not drawn at all.
OUTLINE The mesh is drawn in "line" mode. This means no hidden-surface removal, and the cut plane will be
visible through the mesh.
NORMAL The mesh on that side is drawn normally, with contoured data if applicable. Contours will be continuous
over cut and uncut faces.
This image shows a cut
section with the default
settings(with both sides
in outline mode)
Page 6.49
Oasys D3PLOT
This image shows a cut
section set to Omit on the
positive side of the cut
and Normal on the
negative.
Page 6.50
User manual Version 9.3, Rev. 0, September 2008
User manual Version 9.3, Rev. 0, September 2008
Oasys D3PLOT
6.4.6 THICK CUT Creating cut
sections with a finite thickness
Normal cut sections represent an infinitely thin slice through a model. The THICKNESS option can be used to
generate a finite thickness cut through a model.
A 75mm thich cut
6.4.7 Dragging a plane interactively
using the mouse.
The "Drag" button (or the "D" keyboard shortcut) switches D3PLOT into cut-section plane dragging mode.
In this mode the cursor symbol changes to "Sect Drag", and the mouse buttons act as follows:
•
Left mouse translates the plane in the normal (local Z) direction.
•
Middle mouse rotates the plane about the plane local X axis
•
Right mouse rotates the plane about the plane local Y axis.
These operations are chosen because they are the most commonly used "drag" functions.
Page 6.51
Oasys D3PLOT
User manual Version 9.3, Rev. 0, September 2008
The More options button gives a more comprehensive plane
dragging sub-menu.
You choose either Translate or Rotate, and in each case
•
Left mouse translate along / rotates about the X axis
•
Middle mouse ... ditto ... about the Y axis
•
Right mouse ... ditto ... about the Z axis.
You can choose whether these translations / rotations use plane
local or model global axis systems.
Cut section summary forces are shown as in the master panel
and, if selected, will be updated as the plane moves.
6.4.8 Other cut-section commands
There are further commands that help the visualisation of
cut-sections:
CAP 2D
ELEMENTS and
their Width
Page 6.52
Determines whether or not 2D elements (shells and contact segments) have "caps"
drawn where they are cut. A "cap" is a thick line where each 2D element is cut, and it
will show the current visual properties of the element, as in the example below.
Width sets the width of these caps if drawn.
User manual Version 9.3, Rev. 0, September 2008
Oasys D3PLOT
This example shows an eigenvalue analysis of a hollow box of shells. A cut section of constant Z has been applied half
way along, and contours of Y displacement drawn. The "capping" of the shells shows the displacement around the cut
section.
VIEW_PLANE Sets the current view to be normal to the plane.
The current view will be set so that the cutting plane X, Y, Z axes are aligned with screen X, Y, Z; giving a view
exactly normal to the plane. The image is only rotated, not scaled, so it may be necessary to autoscale or apply a
translation to get the view you want.
LOC_PLOT Draws a "location" plot.
This shows three standard views down each of the model X, Y and Z axes; and also the current view. The plane position
is sketched on each image.
A "Graticule" is drawn on each view to provide dimensions. (Note that this image is not stored in laser files.)
Page 6.53
Oasys D3PLOT
User manual Version 9.3, Rev. 0, September 2008
6.4.9 SAVE/RETRIEVE Managing the storage and retrieval of
cut-section definitions on disk.
There is only ever one "current" cutting-plane definition, but up to 100 such definitions can be stored in an external
"section.cut" file, and any number of such files may exist.
Sections are model-independent and may be shared between dissimilar analyses.
Page 6.54
User manual Version 9.3, Rev. 0, September 2008
Oasys D3PLOT
Storing and retrieving cut-sections:
This figure shows the storage and retrieval sub-menu. The four commands in the left hand column manipulate
sections as follows:
STORE
Stores the current section definition in the file.
GET
Reads a stored definition which overwrites the current one.
RENAME Renames a stored definition.
DELETE
Deletes a stored definition.
FILE...
Lets you enter a new "section.cut" filename:
Any filename is permissable, but section.cut is assumed, and the extension ".cut" is
recommended (but not mandatory).
Note that section.cut files are binary, and are not normally transferrable between different
machine types. Nor will you be able to read or edit them.
However transfers between typical workstations (using IEEE format) will usually work OK.
Only GET affects the current definition, the other commands leave it unchanged.
All storage and retrieval operations take place using the current "section.cut" file. If such a file has not been
opened explicitly a file called section.cut is opened automatically (and an empty file of this name is created if it
doesn’t already exist.)
You will note that sections are stored with names as well as numbers. These are optional, but help when identifying
which section does what. A maximum of 40 characters is permitted for each section name.
6.4.10 Using cut sections under OpenGL in 3D mode.
In OpenGL cut-sections are computed in a mixture of software and hardware as follows:
•
OpenGL calculates in hardware the intersection between a cutting plane and the object, thus it will slice through
normal objects correctly.
•
However it does not compute "capping" polygons for the cut faces through 3D elements (solids and thick shells),
or "caps" for 2D elements, these have to be synthesised in software and added to the plot.
While OpenGL will calculate (in hardware) the intersection between a cutting-plane and the object this imposes the
limitation that the plane must be flat. Therefore Eulerian cutting, (in model space and screen space), will work in 3D
mode; but Lagrangrian cutting, (in basic space, which can produce a non-planar surface), will not. The actual cut
elements will be shown correctly in basic space, but if +ve or -ve sides are displayed they will not currently meet the
cut elements correctly.
Therefore if you are running under OpenGL in
3D mode you will need to swap back to 2D
mode (View Box, M2D) if:
•
You need to cut your structure in
Basic space
You are warned about this if you attempt to
invoke either capability while in 3D mode.
Switching to 2D mode will not impose a major
speed penalty in this context, since using
cut-sections drastically reduces the number of
elements to be displayed.
Next Section
Page 6.55
Oasys D3PLOT
6.5 ENTITY Switching the
display of entity categories
on/off.
You can use BLANKING to control the visibility of selected
nodes and elements, but sometimes you may wish to remove a
complete category of entity type from the display list. The
ENTITY menu provides this capability: when an entity
category is switched off it is never displayed in subsequent
plots (of any type) until explicitly turned back on again. The
entity panel also controls label display. By default only the
elements in a model are drawn, with no labels, node symbols
or other information appended to them.
You can add extra information to plots, control the display of
classes of information and label items dynamically on the
screen using the menu. This can be acessed in 3 ways, the
shortcut key E, the top bar menu DISPLAY > ENTITIES or
the button ENT. This panel controls the display of elements
and nodes, (ie basic "structural" items); also their symbols,
labels and local direction triads as well as the display of
"other" items, such as constraints, contacts, rigidwalls, etc;
and also their labels, symbols and other related displayable
data.
It must be stressed that these commands only permit or deny
the display of classes of information, they do not control the
visibility of individual items or models.
For example they might be used to enable the display of
nodes. This would permit nodes in any models to be displayed
provided they were not made invisible by some other
command.
Page 6.56
User manual Version 9.3, Rev. 0, September 2008
User manual Version 9.3, Rev. 0, September 2008
Oasys D3PLOT
The left hand column of the panel dictates the display of the right hand column. At any one time a "master" category
will be selected from the left-hand column (in this example Elements is selected). The "master" categories each
contain further "child" categories below them. The right hand column displays the appropriate "child" categories for
the selcted "master".
The Label columns control whether or not the items will be labelled (with the information selected under Label
with. The Drawn columns control whether or not the items will be drawn. "Child"categories can be controlled
individually (in the example shown the display of beams has been turned off), however they cannot be set so as to be
drawn or labelled if the "master" category is not set to be (setting a "child" to be on will automatically switch the
"master" setting on).
Label with determines what is actually drawn as a "label" when labelling is selected for an element or node class.
Selecting multiple labelling categories will lead to compound labels being generated (eg M1/H1001/P12/) and plots
will become very cluttered if too much information is displayed.
As this example illustrates different models may contain different entity types. Where all currently selected models
contain a type (for example Shells here) the selection box has a white background, whereas if only a subset do then
the box will have a grey background to denote its "mixed" status.
6.5.1 Elements and nodes (Structural Items).
Nodes are a special case.
The display of nodes in D3PLOT is treated differently to that of elements: by default they are not drawn, but they
are still "there" on a plot for the purposes of labelling and screen-picking.
This situation arises because it is convenient to be able to screen-pick and label nodes, but not useful to draw their
symbols: that would just slow down graphics and clutter up the screen. Therefore the treatment of nodes is as
follows:
•
Nodes on visible elements are always "there", even if not drawn explicitly, and may be screen-picked and
labelled (by either method) at will.
•
Turning the Attached nodes switch here on will cause those nodes "attached" to visible elements only to
be displayed using "star" symbols.
•
Turning the All nodes switch here on will cause all nodes, whether attached to an element (visible or
otherwise) or not, to be displayed
Each class of element may be selected for display and/or labelling individually. Here the display of beams has been
turned off.
The ALL ELEMS row selects them all.
Associated data: Local direction TRIADS are drawn for element types with coordinate systems.
6.5.2 How labelling on plots is handled for nodes and elements
Static labels are handled via the Entity panel (as described in this section). "Dynamic" labels may be added using
Quick-Pick (see section 3.5)The default label is a node or element number, but a variable amount of information can be
generated to form a "label" which can run to multiple lines, as this example shows.
Page 6.57
Oasys D3PLOT
User manual Version 9.3, Rev. 0, September 2008
This figure shows an example of shells which have been labelled with:
MODEL Mnnn for Model number <nnn>
LABEL
Snnn for Shell <nnn>.
PART
Pnnn for Part <nnn>.
D3PLOT attempts to group labels logically and to locate them so that they don’t overlap, but if you try to add too much
information you will end up with a total mess on the page.
The "attached" nodes in this figure have also been switched on: these are drawn as asterisks (*) at the relevant element
vertices.
Page 6.58
User manual Version 9.3, Rev. 0, September 2008
Oasys D3PLOT
Res/Constraints Displaying nodal Restraints and Constraints
If a ZTF file is present, then restraint and constraint data will be available for any combination of nodes on:
*BOUNDARY
_SPC
The image below shows how symbols for translational and
rotational restraints and constraints are displayed.
_PRESCRIBED_MOTION
_CYCLIC
_SLIDING
*CONTACT
_CONSTRAINED_xxx
_TIED_xxx
*CONSTRAINED _LINEAR
_WELD_xxx
_NODE_SET
X direction : Red
Y direction : Green
Z direction : Blue
Translational restraints have a cross at their end
Rotational restraints have a box at their end.
Turning on "labels" for the relevant item will give a brief
description of the source of the re/constraint.
"T" designates translational restraint
"R" designates rotational restraint
"All" designates both translational and rotational
_NODAL_RIGID_BODY
*PART
which is rigid
Page 6.59
Oasys D3PLOT
User manual Version 9.3, Rev. 0, September 2008
Here is an example of SPCs and Prescribed motion re/constraints from an actual model.
This image has "labels" turned on, and has been enlarged to show the symbols more clearly. Note that in the X
direction translational constraint is due to a Boundary_Prescribed_Motion, whereas rotational restraint has been
applied via a Boundary_SPC.
Next section
Page 6.60
User manual Version 9.3, Rev. 0, September 2008
Oasys D3PLOT
Page 6.61
Oasys D3PLOT
User manual Version 9.3, Rev. 0, September 2008
6.7 WRITE Listing numerical
data to screen and/or file.
The WRITE command allows you to write to the screen and/or file just about any piece of information in the database
files accessed by D3PLOT. It is designed to list information at a given time, if you want to plot data (in XY graphical
form) you should use the XY_DATA command described in Section 6.8 instead.
The main WRITE control panel is shown right.
The ENTITY, SCAN, GLOBAL SUMMARY,
KEYWORD DATA, COMPRESS, COINC
ELEMENTS and UNATT_NODES commands
generate output, as described in Sections 6.7.1 to 6.7.7
below.
The OUTPUT_TO... options define where the results
are to be written. See Section 6.7.0 below.
File: is the name of the disk output file.
6.7.0 OUTPUT_TO... Choosing output destination(s) for WRITE
output
OUTPUT_TO_SCREEN
Is a screen "listing box". This is the default since any number of lines of output can be
handled by "paging".
OUTPUT_TO_DIALOGUE Is the dialogue box. Listings up to 200 lines long can be handled by scrolling, but
output longer than this will be lost. It has the advantage that is remains visible for
reference during ensuing operations, whereas "listing box" output is lost.
OUTPUT_TO_FILE
Is an ASCII disk file. Output of any length may be written.
Any permutation of these options may be used at the same time, and switched on/off at will.
Page 6.62
User manual Version 9.3, Rev. 0, September 2008
Oasys D3PLOT
6.7.1 [WRITE] ENTITY
The figure (right) shows the ENTITY control panel.
"Entity" output means results for a <list> of standard entity
types, in this example 90 solid elements have been chosen, at
the current time.
It is also possible to write "global" (ie whole model),
"material" and "surface" related information: see Section
6.7.1.7 below.
To use this panel:
•
Select an entity type (eg NODE)
•
Define a <list> of entities
•
Define the data component etc
•
Press APPLY to generate output
6.7.1.0 What does “entity” output produce?
You can write out just about any piece of information about any entity in your database. Two examples, shell and
nodal output, are given below:
D3PLOT "write" output file.
(22-Nov-95 17:45:52)
Database file:
/users/dyna70/test/tall
Title: test1
++++++++ Data at time .35909E-01
++++++++
SHELLs: listing of UNAVERAGED
VON_MISES_STRESS (Top surf)
Page 6.63
Oasys D3PLOT
User manual Version 9.3, Rev. 0, September 2008
Element No: Data value
----------- ------------------------S1
9.656122E+07
S2
1.965423E+08
S3
1.445315E+08
S4
1.689751E+08
S5
1.331927E+08
S6
1.176105E+08
S7
1.465435E+08
S8
1.561687E+08
S9
1.550533E+08
S10
1.043070E+08
S11
1.613382E+08
S12
2.154273E+08
++++++++ Data at time .35909E-01 ++++++++
Nodes: listing of VV_VELOCITY_VECTOR
Node
-------------1000
1001
1002
1003
1004
1005
1006
1007
1008
1009
1010
1011
2000
2001
2002
2003
2004
VX
--------------.0000E+00
-3.6481E-07
-7.4297E-07
-7.5988E-07
.0000E+00
-3.2251E-07
-7.7683E-07
-8.3489E-07
.0000E+00
-3.6481E-07
-7.4297E-07
-7.5988E-07
.0000E+00
3.6482E-07
7.4297E-07
7.5988E-07
.0000E+00
VY
-----------.0000E+00
-1.5074E-07
-1.5094E-06
-2.2915E-06
.0000E+00
-3.7708E-07
-1.5576E-06
-2.3889E-06
.0000E+00
-1.5074E-07
-1.5094E-06
-2.2915E-06
.0000E+00
-2.2947E-07
-1.4183E-06
-2.4126E-06
.0000E+00
6.7.1.1 Selecting an entity type
Firstly choose the type of entity for which you want to extract
data.
In this example the user has chosen Solids. It will then become
possible to select the data component, shell surface and frame of
reference. These will default to what was most recently plotted
in the first window of the current model.
Page 6.64
VZ
---------------.0000E+00
-1.8178E-07
-1.0158E-07
-2.4309E-08
.0000E+00
-1.7842E-17
-2.8229E-13
-2.7706E-13
.0000E+00
1.8178E-07
1.0158E-07
2.4308E-08
.0000E+00
1.8178E-07
1.0158E-07
2.4308E-08
.0000E+00
Mag
-----------.0000E+00
4.3457E-07
1.6854E-06
2.4143E-06
.0000E+00
4.9619E-07
1.7405E-06
2.5306E-06
.0000E+00
4.3457E-07
1.6854E-06
2.4143E-06
.0000E+00
4.6775E-07
1.6043E-06
2.5295E-06
.0000E+00
User manual Version 9.3, Rev. 0, September 2008
Oasys D3PLOT
6.7.1.2 COMPONENT Choosing a data
component.
Every entity type has at least one data component associated
with it, and most have several.
For example the user above has chosen SOLID elements, so
the components shown will be those available for solids, and
also nodal data that can be averaged at nodes for solids.
It is also possible to WRITE "non-data" components such as
element topology and part number.
6.7.1.3 SURFACE Shell surface selection
If Shell elements are selected, the SURFACE button is used to determine for which surface the results will be
written.
You are referred to Section 12.8.2.2 for a more detailed description of shell surfaces.
Note
1:
You have to define surfaces for thick shell output in WRITE. This is not necessary when plotting since it is
possible to draw all three sets of values simultaneously.
Note
2:
Top and bottom shell surfaces are not the element "outer fibres" if the default Gaussian integration scheme
is used. See Section 12.8.2.2 for more details.
Note
3:
It is possible to make LS-DYNA generate output at other than the three surfaces described here, in which
case "layers" will be available for selection as well as surfaces. Typically this will be used for a composites
analyses: see Section 12.8.2.2.
6.7.1.4 FRAME_OF_REF Local, global or cylindrical
When a directional stress or strain component is chosen for solids, shells or thick shells the frame of reference for
output must be defined.
This defaults to global, but you can opt for element local axis system output.
See Section 12 for more information.
Note: It is possible, but unusual, to make LS-DYNA write stresses for some material models in the material axis
system. This would usually only be used for the output of orthotropic material results and laminates. See
Section 12.8.2.3 for more details.
There is no way to tell from the database file that directional stresses for these element types have been
written this way, and D3PLOT assumes that they are in the global system: it is your responsibility to
interpret your results correctly.
6.7.1.5 ENVELOPE
Instead of reporting results at a single time-state, D3PLOT can calculate the maximum or minimum values occurring
over a selection of time-states.
Once a component has been selected the user can press APPLY and the output will be generated. For the example
above it will look like this (taken from file output):
Page 6.65
Oasys D3PLOT
User manual Version 9.3, Rev. 0, September 2008
D3PLOT "write" output file. (22-Nov-95 12:27:49)
Database file: /users/dyna70/test/tall
Title:
test1
++++++++ Data at time .35909E-01 ++++++++
SOLIDs: listing of UNAVERAGED GLOBAL X_DIRECT_STRESS
Element No:
Data value
--------------------------------H1
5.155513E+06
H2
-1.659268E+07
H3
-1.020761E+07
H4
-2.168100E+07
H5
-2.182096E+07
H6
-1.125487E+07
H7
5.599310E+05
and so on to the 80th element
Scalar and compound data components
In the example above the component X_DIRECT_STRESS was used, this is a "scalar" value that generates only one
number per element. In WRITE it is sometimes convenient to be able to be able to write out "compound" data, ie
more than one number per entity. Examples of this are stress and strain tensors for elements, force and moment
summaries for beams, etc.
Therefore you will find such components available in the "specific" component panels, generally at the bottom of
component lists.
For example under stress there are ST_STRESS_TENSOR and PS_PRINC_ STRESS_SUMMARY
components.
Examples of output from these is given below:
++++++++ Data at time .35909E-01 ++++++++
SOLIDs: listing of GLOBAL ST_STRESS_TENSOR
El No:
---------H1
H2
H3
H4
H5
Sx
------------5.1555E+06
-1.6593E+07
-1.0208E+07
-2.1681E+07
-2.1821E+07
Sy
------------1.1453E+07
-1.9981E+07
1.3946E+07
2.9476E+07
3.9145E+07
Sz
----------1.7028E+06
-1.2872E+07
-9.4400E+06
-2.8595E+07
-3.0982E+07
Txy
----------2.8189E+07
3.5470E+07
3.2251E+07
1.9464E+07
-2.4756E+06
Tyz
------------9.2431E+06
-4.0756E+07
-2.9166E+07
-3.1784E+07
-3.4087E+07
Tzx
----------5.0026E+06
1.1448E+07
6.6445E+06
7.4274E+05
-1.5587E+06
++++++++ Data at time .35909E-01 ++++++++
SOLIDs: listing of PS_PRINC_STRESS_SUMMARY
Principal stresses
------------Cosines-------------El No:
cx
cy
cz
----------------------------------------------------------------------H1
Maximum : 2.6341E+07
.79188
.60700
-.06694
Middle : 4.5134E+06
.21564
-.17539
.96059
Minimum : -3.5449E+07 .57134
-.77510
-.26978
H2
Maximum : 3.1369E+07
.40057
. 72321
-.56259
Middle : -3.7253E+06 .76642
.07203
.63829
Minimum : -7.7090E+07 .50214
-.68686
-.52543
"Geometric" and other "miscellaneous" data components
As well as analytical data values it is possible to extract "geometric" data components. For nodes and elements these
appear under the TOPOLOGY and MISC... generic buttons.
Here is an example of component LN_LIST_OF_NODES output for solids:
Page 6.66
User manual Version 9.3, Rev. 0, September 2008
Oasys D3PLOT
++++++++ Data at time .35909E-01 ++++++++
SOLIDs: listing of LN_LIST_OF_NODES
El No:
n1
n2
n3
n4
n5
n6
n7
n8
-----------------------------------------------------H1
1
11
12
2
101
111
112
102
H2
2
12
13
3
102
112
113
103
H3
3
13
14
4
103
113
114
104
For element types for which no analytical data are available (lumped-masses, springs, joints, seat-belt types) only
topologically derived components are available. For example here is a typical SUMMARY output for springs:
++++++++ Data at time .35909E-01 ++++++++
SPRINGs: listing of SUMMARY
Spring No:
Material
Type
N1
N2
--------------------------------------------------SP1
1
Trans spring
243
101
SP2
1
Trans spring
151
233
SP3
1
Trans spring
252
110
SP4
1
Trans spring
160
242
For a full list of data components available in the WRITE command see Sections 12.3 - 12.14.
6.7.1.6 Averaged and Unaveraged element results written at nodes
Element data written at nodes has to be averaged. All elements attached to that node which could legitimately
contribute the required data component are included, and the unweighted average is used. If elements are blanked or
volume-clipped they are only excluded if the MATERIAL_IGNORED or CLIPPING_IGNORED switches
respectively are on.
Problems can arise in the following situations:
On material
boundaries:
For the node there is no "parent" element to give a definitive material number, as there is when
plotting, so averaging will always take place across dissimilar materials.
At element type
junctions:
For the node there is no "parent" element type. So where, for example, a node is common to a
solid and a shell, the results will be averaged across the two types.
Therefore you should take care when using WRITE to extract element data averaged at nodes.
Whenever WRITE tabulates data it prefaces it with its full data component name and, for nodal results, it also states
whether the figures are "averaged" or "unaveraged".
6.7.1.7 Special "entity" types.
As well as the standard node and element categories, familiar in other contexts, you can select the following "global"
and other information for output:
GLOBAL
Refers to the whole model. LS-DYNA computes energies, rigid body velocities and mass; all of which
may be output. See Section 12.3 for more details.
PART
Refers to solid, shell, beam and thick-shell (but not spring) PARTs. LS-DYNA calculates energies,
velocities and mass for these; all of which may be output. See Section 12.4 for more details.
SURFACE Refers to contact surfaces. LS-DYNA writes nodal forces to the .CTF file, and D3PLOT can sum
these to produce overall forces on a surface. (You can also choose to compute MASTER or SLAVE
side forces only.) See Section 12.5 for more details.
AIRBAG
Refers to "airbags" - effectively control volumes - used with the Airbag Particle method. This
capability is still under development in LS-DYNA, and only a limited amount of information is
available for post-processing, see Section 12.13 for more information.
Output for these categories of information under ENTITY is selective: you can choose those materials or surfaces for
which you want to see results.
To list complete summary information you can use the GLOBAL_SUMMARY option in the main WRITE menu
instead: this summarises data for all materials or all contact surfaces, which may be more convenient.
Page 6.67
Oasys D3PLOT
Next section
Page 6.68
User manual Version 9.3, Rev. 0, September 2008
User manual Version 9.3, Rev. 0, September 2008
Oasys D3PLOT
6.7.2 [WRITE] SCAN
This figure (right) shows the SCAN control panel.
"Scan" output means the maximum and minimum results for
a given entity/data component combination.
In this example the user is SCANning for the max/min
Global X stress (middle surface) in shells.
To use this panel:
- Select an entity type (eg NODE)
- Define the data component etc
- Define #rows to calculate
- Press APPLY to generate output
Page 6.69
Oasys D3PLOT
User manual Version 9.3, Rev. 0, September 2008
6.7.2.0 What does a "scan" produce?
A "scan" operation searches the list of entities defined, and outputs the <#rows> maximum and minimum scalar
values that are eligible for plotting (see Section 6.7.2.6 below) in a table. An example of typical output is shown
below:
D3PLOT "write" output file. (22-Jan-96 16:59:01)
Database file: /users/dyna70/test/tall
Title:
test1
++++++++ Data at time .35909E-01 ++++++++
SHELLs: scan of 10 max/min UNAVERAGED
GLOBAL X_DIRECT_STRESS (Mid surf)
Greatest values Smallest values
NumElem
Value
Elem
Value
1
2
3
4
5
6
7
8
9
10
S1
S5
S18
S9
S10
S17
S4
S8
S7
S2
2.29090E+06S15
1.71183E+06S14
-6.71435E+06S13
-8.15491E+06S16
-8.27366E+06S12
-1.30454E+07S3
-1.65524E+07S11
-1.70622E+07S6
-2.12947E+07S2
-2.16315E+07S7
-7.78900E+07
-7.57228E+07
-6.80775E+07
-5.27643E+07
-3.27425E+07
-3.12505E+07
-2.84226E+07
-2.66353E+07
-2.16315E+07
-2.12947E+07
6.7.2.1 Selecting an entity type.
This is done in exactly the same way as for [WRITE] ENTITY output, and exactly the same range of entity types is
available. (See Section 6.7.1.1)
However, in this case, no <list> is selected. Instead all entities of the chosen type which are eligible for plotting (see
Section 6.7.2.6 below) are included in the scan operation.
6.7.2.2 COMPONENT Selecting a data component
This is done in exactly the same way as for [WRITE] ENTITY output, see Section 6.7.1.2, but only scalar data
components are permitted.
6.7.2.3 SURFACE Selecting a shell surface
This is done in exactly the same way as for [WRITE] ENTITY output, see Section 6.7.1.3.
6.7.2.4 FRAME_OF_REF Selecting global/local/cylindrical frame of
reference
This is done in exactly the same way as for [WRITE] ENTITY output, see Section 6.7.1.4.
6.7.2.5 #rows Selecting the number of rows of output
By default 10 rows of output are generated, but any number up to a maximum of 200 is permitted. This controls the
number of #maximum and #minimum values that are stored and output.
Page 6.70
User manual Version 9.3, Rev. 0, September 2008
Oasys D3PLOT
6.7.2.6 What does "eligible for plotting" mean?
Entities are only included in a "scan" operation if they are currently available for plotting. This permits you to restrict
the range of entities scanned using the same tools that are used to restrict what is plotted. The things that exclude them
are:
Blanking:
Blanked nodes/elements are excluded. The contribution of blanked elements to averaging data at nodes
depends on the BLANKING_IGNORED switch.
Vol
clipping:
Volume-clipped nodes/elements are excluded. The contribution of clipped elements to averaging data
at nodes depends on the CLIPPING_IGNORED switch.
Note that an element which is off the current screen because of scale or view-point is still "eligible" for plotting.
6.7.3 [WRITE]
GLOBAL_SUMMARY
This figure shows the Global summary control panel.
This controls the display of the summaries of "global"
(whole model, material and contact surface) data.
This data can also be extracted in a more selective fashion
using the ENTITY command.
6.7.3.1 WHOLE_MODEL Summary data about the whole model only
This is a summary of the energies and rigid-body velocities of the whole model:
GLOBAL data: Summary of whole model data
Energies x 1.0E+12
Velocities x 1.0E+00
Matl: Kinetic
Total Vx
Vy
Vz
Mass
Internal
Sum
2.092
0.130
2.222
2.572
584.463n/a
14.320
6.7.3.2 PART_SUMMARY Summary data for all PARTS + whole model
This is the same as above, but broken down by material.
GLOBAL data: Summary of data by PART
Energies x 1.0E+12
Matl:
Kinetic
Internal Total
Velocities x 1.0E+00
Vx
Vy
Vz
1
2
3
4
5
0.001
0.001
0.055
0.033
0.000
0.018
0.001
0.106
0.006
0.000
0.019
0.002
0.161
0.038
0.000
9.772
16.120
-5.964
-15.872
0.000
104.088 -87.916 1.152E+06
-19.311 -37.918 7.879E+06
100.652 -844.292 2.099E+06
26.443 -384.108 4.536E+06
0.000
0.000 1.024E+06
Sum
Mode
0.090
2.092
0.130
0.130
0.220
2.222
3.220
2.572
17.916 -234.561 1.669E+07
14.320 584.463 n/a
Mass
Note: The "Sum" of all material values is frequently less than the (whole) "Model" values above. This is because the
"Model" values include the contribution from any lumped-masses, contact friction, etc that are not part of
"material" data.
Page 6.71
Oasys D3PLOT
User manual Version 9.3, Rev. 0, September 2008
6.7.3.3 INTERFACE_SUMMARY Summary forces on all contact surfaces
This lists the global [x,y,z,magnitude] force vectors for all contact surfaces. The values are computed from the
individual nodal forces in the .CTF file, and are presented separately for slave and master sides of each surface.
GLOBAL data: Summary of Interface data
Surface
Fx
Fy
Fz
Resultant
1 Slave
8.07831E+09
1.26670E+08
2.61471E+09
7.64240E+09
Master
2 Slave
Master
3 Slave
Master
4 Slave
Master
-1.26670E+08 -2.61471E+09
0.00000E+00
0.00000E+00
0.00000E+00
0.00000E+00
0.00000E+00
0.00000E+00
-4.27069E-02
3.57985E-02
-1.77204E-02
0.00000E+00
0.00000E+00
0.00000E+00
8.07831E+09
-7.64241E+09
0.00000E+00
0.00000E+00
0.00000E+00
0.00000E+00
0.00000E+00
0.00000E+00
8.63139E+00
8.63122E+00
2.35839E+02
2.35839E+02
0.00000E+00
0.00000E+00
Note
1:
Normal contact surfaces with both slave and master sides will have equal and opposite forces on each side.
For example surface #1 here.
Note
2:
The contact force file only contains forces for nodes on segments. Where discrete nodes form one side of a
surface then no forces are written for that side. For example surface #4 above is "Discrete nodes (slave side)
impacting surface (master side)", and forces only appear for the master side.
Note
3:
Single-surface contacts only have a slave side, and the net force on such a contact surface is zero. However
plots will show a distribution of force on the individual segments of the contact.
Note
4:
Contact surface types using a one-way treatment (eg types 10 and 21) write forces for the master side only.
Surface #3 above is such a surface.
Note
5:
Contacts using a constraint rather than a penalty formulation do not generate forces. (However contacts using
"soft constraint" still generate forces.)
6.7.3.4 NODAL_RB_SUMMARY Summary energy and velocity for nodal
rigid bodies
Nodal rigid bodies write energy and rigid body results in the same way as materials:
GLOBAL data: Summary of Nodal rigid body data
Energies x 1.0E+12
Matl:
Kinetic
Internal Total
Velocities x 1.0E+03
Vx
Vy
Vz
Mass
1
2
0.000
0.000
0.000
0.000
0.000
0.000
0.025
0.000
0.000
0.010
0.000
0.000
8.0000E-03
2.0000E-02
Sum
Mode
0.000
2.248
0.000
0.000
0.000
2.248
0.007
27.127
0.007
0.088
0.000
9.480
2.8000E-02
n/a
Next section
Page 6.72
User manual Version 9.3, Rev. 0, September 2008
Oasys D3PLOT
6.7.4 [WRITE] COINC_ELEMS Output of coincident element lists
A "coincident" element is one that shares the same topology as another element of the same type, but not necessarily
in the same order. Coincident elements of different types, for example contact segments on shells, do not qualify.
There are no further arguments or sub-menus for this command, and an example listing is:
COINCIDENT ELEMENT CHECK:
==========================
SOLIDs
Element No:
Coincident element(s):
------------------------------------[None found]
------------------------------------BEAMs
Element No:Coincident element(s):
------------------------------------B13001
B13002
B13003
B13004
B13002
B13003
B13004
B13005
B13003
B13004
B13005
B13006
B13004
B13005
B13006
B13007
B13005
B13006
B13007
B13006
B13007
-------------------------------------[Total of 21 coincident BEAMs]
B13005
B13006
B13007
B13006
B13007
B13007
SHELLs
Element No:
Coincident element(s):
-------------------------------------[None found]
--------------------------------------------------------------------------INTERFACEs
Element No: Coincident element(s):
--------------------------------------I30
I81
I102
I153
--------------------------------------[Total of
2 coincident INTERFACEs]
Every element category in the file is checked through and a summary report as above generated. As in the example
above [None found] is reported when no coincident elements are found in a particular category.
Page 6.73
Oasys D3PLOT
User manual Version 9.3, Rev. 0, September 2008
6.7.5 [WRITE] UNATT_NODES Lists of unattached (non-structural) nodes
D3PLOT considers a node to be "unattached" if it is not part of the topology list of any element. It does not, for example, know about
A typical listing is:
Unattached nodes
-----------------------------------------------------------------------------------------------------------------------------------------------------------------3007 4007 6005 10002
10008100091001010011
10018100191002010021
10502105031050510506
10511105121051410515
10521105221052310524
11004110051100611007
11012110131101411015
11020110211102211023
-----------------------------------------------------------------------------------------Next section
Page 6.74
User manual Version 9.3, Rev. 0, September 2008
Oasys D3PLOT
6.7.6 [WRITE] KEYWORD
DATA
This figure (right) shows the KEYWORD DATA control
panel.
"keyword data" output means results for a <list> of
standard entity types written into a keyword file instead of
output to screen. The output is similar to that of [WRITE]
ENTITY, but it has been arranged into DYNA keyword
format so that it can be read into DYNA as initial data of
a model. In this example 10 shell elements and 10 beam
elements have been chosen for keyword Date output..
To use this panel:
•
Select an entity type (eg Beams) or for a mixture
of entity types select Entities
•
Define a <list> of entities in the selection popup
box
•
Select the data component(s)
•
Select the output .key file
•
Press APPLY to generate output
Page 6.75
Oasys D3PLOT
What does a "keyword data" output
produce?
You can write out five properties in keyword format about
any entity in your database. One example with 10 shells
and 10 beams selected for output is shown below.
Select By
You can select the elements to write out for in Select By.
If you’re selecting elements with a mixture of element
types then you should press "Entities". A list of all entities
will be available to select in the popup menu. If you wish
to write out for a single element type, then you should
press the element type, i.e. Beams/Shells/Thick
shells/Solids/Nodes, where a list of elements with the
chosen type will be listed for selection. In our example, 10
shells and 10 beams are a mixture of element type, so
Entities was pressed selection.
INITIAL STRESS and INITIAL STRAIN
Special attention is given to
*INITIAL_STRESS_SHELL/TSHELL and
*INITIAL_STRESS_BEAM as they both can write
information about more than one integration point of the
element chosen. The ztf output from Primer will include
the information of integration points for any shell and
beam included in the model. From the ztf file D3plot will
look into *SECTION_SHELL/TSHELL,
*INTEGRATION_SHELL and *PART_COMPOSITE for
shells’ integration point information and
*INTEGRATION_BEAM and *SECTION_BEAM for
beams’ integration point information. Combined with the
data at these integration points contained within the ptf
file, we are able to write full initial keywords.
When a ztf file is not present, user defined number of
integration points of shells and their coordinates can be set
as shown in the figure on the right. In this case, the
number of integration points is set as MAXINT from the
CONTROL Card in ptf files at default, which is the
number of integration points the ptf file has data for. By
selecting to "Use user defined coordinates" the editing
panel for the coordinates will appear at the bottom of the
WRITE panel. The values in that are decided using
Gaussian integration rule with the specified number of
integration points. You can edit the values by Apply or
Reset to default values. In the example, Gaussian rule
cooordinates for 3 integration points have been edited
from 0, -.7745967, +.7745967 to 0, -0.5, 0.5.
Page 6.76
User manual Version 9.3, Rev. 0, September 2008
User manual Version 9.3, Rev. 0, September 2008
Oasys D3PLOT
Only Hughes-Liu integration beams can have cross section integration with quadrature integration rules. With a ztf
file D3plot can find this information itself so the option is always greyed out. However, without a ztf file you need to
decide whether they are all Hughes-Liu beams in which case the number of integration points will be decided by the
BEAMIP for beams in the Control Card in the ptf file. If "Resultant beams present" is selected, it’ll assume there’s
only one integration point in all the beams.
There are cases where BEAMIP and MAXINT is set zero in the model which leads to no stress information for
Beams or Shells respectively, D3plot therefore will not write *INITIAL_STRESS_BEAM or
*INITIAL_STRESS_SHELL.
NODAL COORDINATES and INITIAL NODAL VELOCITY
When nodal information of elements is required, such as Nodal coordinates (*NODE) and Initial nodal velocity of
shell (*INITIAL_VELOCITY_NODE), beam and solids, for the elements selected, the nodes on such elements will
be automatically flagged for nodel information output. Please note that by selecting all Entities, it will only include
nodes on all Entities, this does not guarantee all nodes in the whole model to be included for information output.
*KEYWORD
$ Keyword file written by Oasys D3PLOT from plot file
$ Z:\testfiles\cantilever\beam_shell.ptf
$
$
$ ++++++++ Data at time 0.20008E-02 ++++++++
*INITIAL_STRESS_BEAM
12
2
4
1
3.594E+01 0.000E+00 0.000E+00 0.000E+00 0.000E+00 1.994E-01 0.000E+00
3.594E+01 0.000E+00 0.000E+00 0.000E+00 0.000E+00 1.994E-01 0.000E+00
-3.592E+01 0.000E+00 0.000E+00 0.000E+00 0.000E+00 2.761E-01 0.000E+00
-3.592E+01 0.000E+00 0.000E+00 0.000E+00 0.000E+00 2.761E-01 0.000E+00
*INITIAL_STRESS_SHELL
31
1
3
0
0
0.0000000 3.479E+00 -3.919E-04 4.838E-02 3.005E-07 4.622E-06 4.487E-01 0.000E+00
-0.5000000 -1.094E-02 -7.716E-07 2.783E-02 -5.075E-07 4.560E-06 1.809E-01 0.000E+00
0.5000000 -3.501E+00 3.903E-04 7.282E-03 -1.316E-06 4.498E-06 -8.687E-02 0.000E+00
*INITIAL_STRAIN_SHELL
31
-2.756E-07 -7.238E-08 4.445E-07 -9.425E-12 8.468E-11 1.994E-01 3.360E-06
-5.005E-05 1.498E-05
1.511E-05 -2.449E-11 8.357E-11 1.994E-01 -1.613E-06
*ELEMENT_BEAM
12
8
100
101
127
*ELEMENT_SHELL
31
1
80
81
78
206
*NODE
78
8.989016E+01 1.500000E+02
3.950482E+00
0.
0.
80
9.986085E+01 1.600000E+02
4.715574E+00
0.
0.
81
8.989016E+01 1.600000E+02
3.950481E+00
0.
0.
100
9.999877E+00 2.500000E+02
4.969115E-02
0.
0.
101
1.999884E+01 2.500000E+02
1.934823E-01
0.
0.
206
9.986085E+01 1.500000E+02
4.715574E+00
0.
0.
*INITIAL_VELOCITY_NODE
78 -2.744E+02
8.881E-04
5.102E+03
80 -3.398E+02
-7.816E-05 5.955E+03
0.000E+00
0.000E+00
0.000E+00
81 -2.744E+02
-9.552E-04 5.102E+03
0.000E+00
0.000E+00
0.000E+00
100 -2.869E-01
0.000E+00
5.765E+01
0.000E+00
0.000E+00
0.000E+00
101 -2.618E+00
0.000E+00
2.204E+02
0.000E+00
0.000E+00
0.000E+00
206 -3.398E+02
5.687E-05
5.955E+03
0.000E+00
0.000E+00
0.000E+00
Page 6.77
Oasys D3PLOT
User manual Version 9.3, Rev. 0, September 2008
6.7.7 [WRITE]
Cutdown
D3PLOT/PTF file
This figure (right) shows the menu for
writing a compressed set of PTF files.
This option can be used to generate a
new set of PTF/D3PLOT files for a
model that contain only a subset of the
Parts and States in the original model.
As well as reducing the size of the new
PTF/D3PLOT files by reducing the
number of PARTs and STATEs it is
also possible to remove some of the
data components from the files.
This operation can also be performed
in batch using the dialogue commands:
/UTILITES PTF_COMPRESS
See Appendix VII for the full set of
commands.
SELECT_PARTS
This option can be used to select a subset of the model. After selecting the PARTs that are
going to be written to the new set of PTF files the PTF State Size will be recalculated to
show the size of each PTF state in the new files.
SELECT_STATES This option can be used to select a subset of the STATEs in the original model for output to the
new set of PTF files.
As well as selecting a subset of PARTs and STATEs it is also possible to turn off the output of some data components
to the new PTF files. Depending on what data componets and entity types the original model contains the table in the
bottom section of the menu can be used to either select or deselect optional data components for output.
Due to the way the PTF file format works it is not always possibel to turn a data component on/off for a single entity
type. If for example your model contains both Shells and Thick Shells then both the Stress Tensor and Plastic Strain
must be either be truned on or off for both types of elements. Similarly the Strain Tensor must apply to all Solids, Shells
and Thick Shells.
As data componets are turned on/off the PTF State Size will be recalculated to show the size of each PTF state in the
new files.
INCLUDE
NODES FOR
ZTF ITEMS
The PTF/D3PLOT files only contain information for the basic LS-DYNA element types. If you
also have a XTF or XTF file then D3PLOT will use the extra information in these files to draw
Springs. Joints etc.
If you use select a subset of PARTs for output it is possible to select a PART that is attached to
one end of a Spring without selecting the PART connected to the other end of the spring. If this
option is selected then D3PLOT will automatically ensure that the nodes at the end of any springs
(or any other elements) that are no-longer attached to PARTs are also output to the new PTF files
so the items cna be drawn correctly.
Next section
Page 6.78
User manual Version 9.3, Rev. 0, September 2008
Oasys D3PLOT
6.8 XY_DATA Drawing
numerical data as XY plots
and/or writing it to file
The XY_DATA command lets you extract scalar data values in a way similar to WRITE, but in this case over a range
of times, and to plot them and/or write them to file.
XY_DATA is similar in principle to TH_DATA, the T/HIS link, but it operates on low-frequency data extracted from
the plot database files (.ptf etc) rather than high frequency data from the time-history ones (.xtf etc). The TH_DATA
command is described in section 6.12.
Extracted values are buffered in backing store, and remain there available for subsequent replotting until superseded by
further data extraction. This backing store is limited in size, but it should be adequate to cope with extracting data for at
least 500,000 items.
Data can only be extracted for one model at a time. If your run has more than one model currently open you will be
forced to choose the model upon which to operate using the model "tabs".
6.8.0 Using the XY_DATA
commands.
The XY_DATA main menu is shown right.
Select
States
Defines the time states used for output. (By
default all states are preselected)
Three different data extraction and plotting methods are
provided, and are descrived in more detail below:
(1) Data vs
Time
Plots data (Y axis) vs time (X
axis)
(2) Data vs
Data
Plots data (X and Y axes) over a
range of times
(3) Composite
Plots data (X and Y axes) for a
range of items at a time.
Output may be sent to either or both of:
XY Plot
On screen graphical tool that displays curves.
It permits curve selection, zooming, labelling
and symbol display; it also allows you to
select a subset of curves to be written to file.
Files
ASCII format files written in Oasys "curve
file" (.cur) format.
The default filenames will become "live" if
you select this option, and you may use these
or define your own names.
Page 6.79
Oasys D3PLOT
User manual Version 9.3, Rev. 0, September 2008
The data requested are extracted from the complete states as they are read in, and stored on scratch backing store.
When everything has been read in then the file(s) are generated and the XY plot drawn according to what output has
been requested. XY plot management is described in Section 6.8.4, and file management in Section 6.8.5.
The data on backing store is "remembered" until you leave the programme, or overwrite it by reading in some more
results. So once a set of data has been created you can exit and re-enter XY_PLOT at will to review it.
Typical graphical output from XY_PLOT is shown in the figure below
A typical file (the results for Material 1 above) is shown below. This is written in Oasys T/HIS "Curve" file format (see
Section 4.8.5.5 for a description of this format):
$
$
$
$
$
---------------------------------------------------------D3PLOT "T/HIS_INTERFACE" output file. (22-Nov-95 20:22:11)
Database file: /users/dyna70/test/lg09
Title: lg09 : Large Test 9: Belted sled test
----------------------------------------------------------
D3PLOT: Material data
TIME
KE_KINETIC_ENERGY
Material 1
Kinetic energy
.000000E+00
2.490001E-03
4.990020E-03
7.490039E-03
9.999956E-03
1.249986E-02
7.222228E-05
1.272031E+01
3.979501E+01
6.687062E+01
9.656306E+01
1.276856E+02
Page 6.80
User manual Version 9.3, Rev. 0, September 2008
1.499976E-02
1.749984E-02
1.999997E-02
2.249011E-02
2.499991E-02
Oasys D3PLOT
1.723507E+02
2.691978E+02
4.552962E+02
7.637439E+02
1.173867E+03
6.8.1 SELECT_STATES
Choosing the complete states to
be used for output.
The figure (right) shows the SELECT_STATES control
panel.
By default all states in the file are selected for XY_PLOT
output, but you may select any sub-set that you wish.
Once your selection is complete use APPLY to return to the
main XY_PLOT menu.
The commands to select and modify the states selected for
XY_PLOT output are identical to those used for animation.
(Ref Section 4.4.2.) However the internal storage of selected
state numbers is totally separate: states selected for XY
plotting will not affect those stored for animation, and
vice-versa.
States may be selected using BY_TIME (start rime, interval,
end time) or BY_STATE (start state, interval, end state)
It is also possible to select and deselect times from the STATE_LIST menu. Click on
an undepressed state to select it, or on a depressed state to deselect it.
This menu always the shows what has been selected, regardless of the selection
method used. And you can mix selection methods: for example you could select states
by time, then modify the result in this menu.
Page 6.81
Oasys D3PLOT
User manual Version 9.3, Rev. 0, September 2008
Important notes on internal state lists:
Order is
important:
The order in which states are selected is significant. If you pick entries #1, #4, #2 from the menu here,
or when defining a <list>, then that is the order in which they will be processed. Implicit in this is the
fact that states can be repeated, for example the sequence <#1, #2, #3, #2, #1> is quite legal, subject
to the space restrictions below.
Space is
limited:
The amount of space set aside for storing state lists is 2x the number of states available. Thus you
could store the sequence <#1 - #n - #1>, but no more than this.
6.8.2 Data vs Time Generating
data vs time.
This is the simplest form of XY plotting:
•
You select a list of items (here shells have been
chosen)
•
You select a data component (here X Direct Stress)
•
Optionally select shell surface and frame of reference
Apply will then extract and plot the data.
For each item chosen, here shells, a curve will be generated
of
X axis: Time
Y axis: Selected data component
-> Plot
Toggles display to the graphical XY
plotting tool
-> File
Toggles output to a curve file, and you can
define the filename.
Select
states
Allows you to define different states for
output
Done
Returns to the main XY plotting menu
Here is the output generated by the panel above:
Page 6.82
User manual Version 9.3, Rev. 0, September 2008
Oasys D3PLOT
Page 6.83
Oasys D3PLOT
User manual Version 9.3, Rev. 0, September 2008
6.8.3 Data vs Data: Both X and Y
data components against time.
This is very similar to the Data vs Time panel above, except
that you choose data components for both X and Y axes.
Each item (here shells) still forms a curve, but the data
points are <X data> vs <Y data> at each selected state.
For example you might wish to plot the stress vs strain
history for a set of elements, in which case you might
choose:
•
X Axis: Strain
•
Y Axis: Von Mises stress
Here is an example of output from such a plot, showing Von Mises Strain (X axis) against Von Mises Stress (Yaxis).
This shows the classic stress vs strain curve for mild steel.
Page 6.84
User manual Version 9.3, Rev. 0, September 2008
Oasys D3PLOT
Page 6.85
Oasys D3PLOT
User manual Version 9.3, Rev. 0, September 2008
6.8.4 COMPOSITE_DATA Data
vs data for a list of items over a
range of times.
"Composite" data is similar to "Data vs Data" except for the
vital difference that:
•
Each curves contains (x,y) data for the list of items
selected, in order, at a particular time.
•
Therefore the number of curves = the number of
states selected, not the number of items
•
And the number of points in each curve = the number
of items selected.
This plotting mode is useful for displaying the variation of a
quantity across space in a model over a range of times, as the
examples below show.
IMPORTANT: The order in which points are written in
composite curve is the order in which they are defined,
unless subsequently sorted.
•
If you screen-pick items they will appear in the order
picked up to a limit of 1000 items
•
If you select by area, polygon on "all" they will
appear in ascending label order
Sort by: sorting data points.
When points are picked by screen area, or some other
unordered means, their order is usually "wrong". You can
use the Sort by options to correct this, and these are
described below.
6.8.4.1 Example: Displaying profile change during metal-forming.
The figures below show a metal-forming operation, and the way composite plots could be used to interpret the
results. Clearly the order in which the list of nodes (along the edge of the workpiece) is defined is important for the
composite plots below.
Page 6.86
User manual Version 9.3, Rev. 0, September 2008
Oasys D3PLOT
Page 6.87
Oasys D3PLOT
Composite plot of X vs Y coordinates showing formed profile
Page 6.88
User manual Version 9.3, Rev. 0, September 2008
User manual Version 9.3, Rev. 0, September 2008
Oasys D3PLOT
Here is a composite plot of thickness vs X coordinate for the same model
6.8.4.2 Sort By: Sorting data points in Composite plots
In the examples above nodes along the workpiece edge were selected carefully, and in order, by screen picking. This can
be time-consuming so an alternative is to select by area and then to sort by some criterion. The example below shows
what may happen, and how to correct it.
Page 6.89
Oasys D3PLOT
Screen-picking nodes by area
Page 6.90
User manual Version 9.3, Rev. 0, September 2008
User manual Version 9.3, Rev. 0, September 2008
Oasys D3PLOT
Sure enough, some of the nodes are not ordered in ascending X coordinate, giving a muddled plot.
By default no sorting takes place, but you can sort by any of the options in this menu.
In this case sorting by CX_COORD, the current X coordinate, will work for the plot
above, and the plot below shows how this corrects the image.
Note that:
•
The current Sort by option remains current until changed. Any data
subsequently extracted will be sorted in this way.
•
You can resort data currently cached in backing store at any time
Page 6.91
Oasys D3PLOT
User manual Version 9.3, Rev. 0, September 2008
After sorting by Current X coordinate the points are back in a sensible order.
Next section
Page 6.92
User manual Version 9.3, Rev. 0, September 2008
Oasys D3PLOT
6.8.5 Using the XY graphical plotting tool.
When XY plots are requested they are drawn using a standard XY plotting tool. This operates using a menu system
window, so it is not available if the screen menu interface is not being used. The figure below shows a typical XY
data plot.
Page 6.93
Oasys D3PLOT
User manual Version 9.3, Rev. 0, September 2008
6.8.5.0 Selecting the curves to be plotted
By default all curves are plotted, but you can select and deselect individual curves
by clicking on their label buttons (under Key:). If there are too many curves to fit
into the vertical space availble a scroll-bar is added as shown to the right.
Only those curves selected for plotting are drawn when the next PLOT command is
issued. You can use SEL_ALL and UNSEL_ALL to (de)select all of them, and the
FILTER options to select and deselect curves by colour and/or label: see below.
The colours (white, red, green, blue, cyan, magenta, yellow) and letters (A-Z) of
curves are fixed and cannot currently be changed. The letters are used as "symbols"
when symbol display is sturned on, as shown in the plot above.
Obtaining information about
curves.
You can use the popup menus against
any "live" curve in the scrolling key to
obtain the max/min X and Y axis data
for that curve.
Here curve K has been selected.
6.8.5.1 Top commands
Dismiss
Closes the XY plotting window. Data is left unchanged on backing store.
Save...
Writes the currently selected curves only to "curve" files. The syntax and other conventions for these
files are described in Section 6.8.6.
Plot
Redraws the current graph with only those curves selected for plotting.
Zoom
Uses the cursor to zoom in on a rectangular area of the graph, and enlarges this to fill the whole window.
Both X and Y scales become set explicitly, ie taken out of automatic mode, by this command.
X_auto
Resets the X scaling to automatic.
Y_auto
Resets the Y scaling to automatic.
Page 6.94
User manual Version 9.3, Rev. 0, September 2008
Grid
Toggles the grid at tick mark intervals on/off. (Default off)
Key
Toggles the curve "Key" listing on/off. (Default on)
Symbols
Toggles symbol (ie letter) display at points on/off. (Default off)
Lines
Toggles lines between points on/off. (Default on)
Labels
Lets you redefine title and axis labels.
=> T/HIS
Copies selected curves to linked T/HIS (when running) (See below)
Sel_All
Selects all curves for plotting.
Oasys D3PLOT
Unsel_All Deselects all curves for plotting.
Sort...
Sorts the order of appearance of curves in the key
Filter...
Filters visible curves by colour and symbol (See below)
6.8.5.2 Sort... Sorting the order of appearance of curves in the key
Page 6.95
Oasys D3PLOT
User manual Version 9.3, Rev. 0, September 2008
By default the curve "key" will appear in order of item definition, sorted by ascending label number. However when
confronted by a plot with many curves often it is useful to be able to pick out the largest or smallest, and this can be
achieved with Sort....
You can sort by any of the criteria X max/min/mag, Y max/min/mag, and the effect will be to reorder the curve key as
appropriate.
For example: here is a plot of von Mises Stress for 4624 shells over time - confusion - which is the highest value?
Using Sort... by Y max reorders the key with the top Y values at its top, making it possible to turn on just the top few
curves, which are plotted below.
Page 6.96
User manual Version 9.3, Rev. 0, September 2008
Oasys D3PLOT
6.8.5.3 FILTER Commands
When you have many curves the FILTER option is another way of limiting what is displayed.
Clicking on a letter selects only the curves with that symbol, and on a colour only those of that colour. You can use
both at once to restrict selection to just curves of that letter/colour combination. Use APPLY to plot just those
selected, and DONE to return to the main plotting options menu.
6.8.5.4=> T/HIS command: Export curves to linked T/HIS session
If the D3PLOT <=> T/HIS link has been invoked it is possible to export selected curves to the linked T/HIS session.
The number of free curves available in T/HIS is shown, and you can choose which of the local XY_DATA curves to
export. These will become the next free #n curves in T/HIS.
(If linked T/HIS has not been invoked via the THDATA command the => T/HIS button will be greyed out, and this
function will be unavailable.)
Page 6.97
Oasys D3PLOT
User manual Version 9.3, Rev. 0, September 2008
6.8.6 Managing "curve" file output.
By default output from XY_DATA is written to "curve" file
as well as plotted.
This is controlled by the FILES command on the main
control panel: when turned off output to file is suppressed.
(Nb:You can also write files from the XY plotting window
using the FILE... command there.)
6.8.6.1 File naming conventions
All "curve" files must have a name in the form <name>NNN.<extension>, where:
<name>
is any sensible character string, but see conventions below;
NNN
is a 3 or 4 digit number using leading zeros if required;
<extension>
is any sensible character string. ".cur" is recommended.
The reason for this syntax is that more than one file may be generated by an output command, and some sort of
systematic naming convention is required.
By default the following filenames are used:
For global model derived data vs. time:
glob001.cur
For part derived data vs. time:
part001.cur
For contact surface derived data vs. time: surf001.cur
For element derived data vs. time:
elem001.cur
For nodally derived data vs. time:
node001.cur
For any COMPOSITE data:
comp001.cur
You can change them if you wish, but it is recommended that you do not. If you omit the NNN part of the filename
string D3PLOT will insert it for you.
6.8.6.2 Maximum number of files in a sequence.
Implicit in the naming convention above is the sequence
<name>001.cur
to
<name>1000.cur to
Page 6.98
<name>999.cur
<name>9999.cur
followed by
User manual Version 9.3, Rev. 0, September 2008
Oasys D3PLOT
Thus there is a maximum of 9999 files in a sequence.
Each new file output operation starts a new curve file, and D3PLOT will enforce the addition of integers to the base
filename to ensure that each file has a unique name. One consequence of this is that it is not possible to overwrite a
curve file from within D3PLOT: if you want to reuse a particular filename you will need to delete it externally to the
programme.
6.8.6.3 Defining the maximum number of curves in a file.
From V92 onwards the default is for 10,000,000 curves to be written to a "curve" file. When the limit is reached the
current file is closed, and the next one in the sequence is opened for output. In practice this means that all output from
a single curve output command will be written to a single file.
You can change this value to any positive integer with the Max
#curves in file: value.
6.8.6.4 Rules for file output.
The following rules for file output are adopted:
(1) Each output command always starts a new file.
(2) Existing files are never overwritten. Before a new file is opened a test is made to see if one of the same name
already exists and, if it does, the NNN value is incremented until a vacant filename is found.
6.8.6.5 Format of an Oasys T/HIS "curve" file.
This is an ASCII file which is organised as follows:
Line 1:
Line 2:
Graph title
(CHARACTER string)
X axis label
(CHARACTER string)
Y axis label
(CHARACTER string)
Curve label
(CHARACTER string)
Line 3:
Line 4:
Line 5:
<X value> <Y value>(REAL numbers)
Line 6:
<X value> <Y value>(REAL numbers)
:
Line n: <X value> <Y value>(REAL numbers)
And if a second or subsequent curves are to be defined in the file:
Line n+1: CONTINUE
(CHARACTER constant)
Line n+2: Graph title
(CHARACTER string)
Line n+3: X axis label
(CHARACTER string)
Line n+4: Y axis label
(CHARACTER string)
Line n+5: Curve label
(CHARACTER string)
Line n+6: <X value> <Y value>(REAL numbers)
:
And so on for further curves.
Page 6.99
Oasys D3PLOT
User manual Version 9.3, Rev. 0, September 2008
Further notes on Oasys T/HIS curve file format:
•
•
•
•
Character strings should not exceed 48 characters.
Numbers may be entered in free format, separated by spaces or commas. It is recommended that a field
width of 20 be used (use a Fortran format statement something like 2e20.8) since this will then be
compatible with Load Curve input in LS-DYNA.
A curve may contain any number of <data> pairs.
A file may contain any number of curves, separated by CONTINUE statements.
For more information see the Oasys T/HIS User’s Manual.
Next section
Page 6.100
User manual Version 9.3, Rev. 0, September 2008
Oasys D3PLOT
6.9 UTILITIES Miscellaneous
utility functions
The UTILITIES menu is shown in the figure (right).
It provides a home for commands that have no other more
logical place in the D3PLOT programme structure, and
also for functions under development.
As the programme develops the latter commands will
move out to their own menus.
Quick links to sections:
6.9.1 Target Markers
6.9.2 Modify Title
6.9.3 Failure Options
6.9.4 Graphics
6.9.5 Data Components
6.9.6 Metal Forming
6.9.7 Die Closure
6.9.8 Visualisation
6.9.9 Settings File
6.9.10 External Data
6.9.11 Function (F1 - F12) Keys
6.9.12 Compress
6.9.1 TARGET_MARKERS
Adding “target” symbols on nodes.
The figure (right) shows the TARGET_MARKERS control
panel.
Target markers are used to mimic the actual markers that are
attached to objects when being tested. This allows direct
visual comparison between points on high-speed film and
analytical results.
Because markers are attached to nodes they can only be
defined in one model at a time. If multiple models are
present you will be forced to choose the model in which to
define the markers.
Markers are stored as a "per model" attribute, so if you have
multiple windows in a model the markers will appear in all
of its windows.
Page 6.101
Oasys D3PLOT
User manual Version 9.3, Rev. 0, September 2008
The figure (right) shows an example of a dummy
model with target markers applied.
Markers are made up a circle with quadrants of
alternating colours. On the greyscale reproduction
used here they do not stand out very well, but in
colour they are much more marked.
They are attached to nodes and are drawn only if
their parent node is visible.
They are always drawn in the current plane of the
screen regardless of the true orientation of any
underlying mesh.
Marker Radius
If expressed in model space, the default, marker
radius will be about 3% of the model overall
dimension, and size will change as you zoom in and
out.
If expressed in screen space marker radius will be a
fixed size, independent of the model dimensions,
and will not scale as you zoom in or out.
6.9.1.1 Marker switch: Controlling display of target markers.
By default this switch is on, and any markers that are defined will be drawn when the plot is next updated. To
suppress the display of markers without having to delete their definitions turn this switch off.
6.9.1.2 CREATE Creating target markers at nodes
This is very simple. Define a <list> of nodes using the standard range definition panels, and the next time the model is
drawn (with the Marker switch on) target markers with the current attributes will be drawn on those nodes.
6.9.1.3 DELETE Removing target markers from nodes.
This is the exact opposite of CREATE above: define the <list> of nodes from which target markers are to be
removed. It doesn’t matter if a node is selected that does not currently have a marker attached.
6.9.1.4 Radius Defining the symbol radius
A default radius for markers (in model space units) is computed based on the model’s longest dimension: you can alter
this at will. This takes effect the next time you update the plot.
Page 6.102
User manual Version 9.3, Rev. 0, September 2008
Oasys D3PLOT
6.9.1.5 Setting quadrant colours
The default colours for the marker symbol are yellow and
blue, but you can choose new colours for the two quadrants
(Q1 and Q2) from the standard palette given. These take
effect the next time you update the plot.
6.9.1.6 Notes on target markers
Note
1:
Target markers are always drawn in the plane of the screen, regardless of model orientation. On 3-D devices
this results in the symbols being rotated as the image is rotated, and they can disappear when edge-on after a
90 degree rotation. To see them again you will have to issue an explicit redrawing command in the new
orientation.
Note
2:
Hidden surface removal is based on the coordinates of the parent node only: markers are drawn in full if the
node is visible, otherwise not at all.
6.9.2 MODIFY_TITLE... Changing
the title string used for the header
on plots.
The analysis title taken from the .PTF file is normally
used for the header on plots, and also for headers in output
files.
You can change this by simply typing in a new string,
followed by DONE. This will take effect the next time you
update the plot.
Changes here have no effect on the title stored permanently
in the PTF file.
Next section.
Page 6.103
Oasys D3PLOT
User manual Version 9.3, Rev. 0, September 2008
6.9.3 FAILURE_OPTIONS...
Controlling and listing deleted and
“failed” elements.
This figure shows the FAILURE_OPTIONS control panel.
This permits you to control the display of, and to list,
elements flagged as "deleted" by LS-DYNA.
It also controls the processing of "failed" elements as
diagnosed by D3PLOT.
6.9.3.0 What is the difference between a “deleted” and a “failed” element?
A "deleted" element is one that is flagged in the database file by LS-DYNA as having been deleted in the course of
the analysis.
A "failed" element is one that has met some failure criteria within D3PLOT. This capability was added on an
experimental basis for casting simulation, and requires the use of a special version of LS-DYNA with modified
material models.
Ignore the concept of "failed" elements for now! This capability may be resurrected in the future but, at present, it is
dormant.
6.9.3.1 DRAW_DELETED Switching the display of deleted elements on/off.
By default deleted elements are not drawn. Once they have been flagged in a plot state as deleted they are removed
from the display list altogether. If you turn this switch on they will be drawn.
Displaying deleted elements can occasionally crash D3PLOT. Nodes on deleted elements may become
WARNING: unrestrained and, if subject to external force, accelerate off in an arbitrary direction at impossibly high
speeds.
Attempting to display facets attached to such nodes, which may have one corner in your model but
another somewhere in Ursa Minor, can cause problems for the hidden-line algorithms.
HINT: A better way to visualise deleted elements is to leave this switch off, and instead to use the
DT_DELETION_TIME component in a solid contoured plot (ie CT or SI modes). This draws the model
with undeformed coordinates, but with deleted elements at the current time shown in a different colour.
6.9.3.2 LIST_DELETED Listing deleted elements on the display.
For each element type category a list of elements deleted at the current time is given in a listing box on the display.
(The "failure" options below are included for completeness, but they are not recommended for general use:
contact Oasys for more details.)
6.9.3.3 HATCH_FAILED Hatching “failed” elements.
When turned on elements which match the current failure criteria are cross-hatched with the current Hatch colour.
Page 6.104
User manual Version 9.3, Rev. 0, September 2008
Oasys D3PLOT
6.9.3.4 Hatch colour: Setting the “failed” hatching colour.
At present the options are: WHITE, BLACK, OVERLAY, the default being black.
6.9.3.5 CRITERION Setting the “failure” criterion.
This command is not yet implemented in a general form.
6.9.4 GRAPHICS... Setting
special graphics parameters.
This figure shows the GRAPHICS control panel.
This lets you set special attributes of the graphics display.
6.9.4.1 Line width: Setting the line width in pixels.
By default all graphics lines are drawn 1 pixel wide, but on hardware that supports it you can increase this to <N>
pixels.
A common reason for doing this is to improve the appearance of images being transferred to avi or mpeg. Lines taken
from a high resolution computer graphics display often become patchy in movie files, so increasing the line thickness
greatly improves their visibility.
You will notice that drawing takes much longer with thick lines: this is because the graphics device has to render
more pixels.
6.9.4.2 Window size: Setting the graphics window size in pixels
On windows displays it is sometimes convenient to be able to set the graphics window to a specific size in pixels.
This command allows you to do that: in screen menu mode the graphics window only is resized, in raw windows
mode the whole display window is resized.
The window size is not "clamped" by this command: subsequently resizing the window will overwrite this setting.
If you have multiple windows the size will be set for all windows with W1 .. Wn tabs active.
Page 6.105
Oasys D3PLOT
User manual Version 9.3, Rev. 0, September 2008
6.9.5 DATA_COMPONENTS Listing the current database
contents to screen, and current data components to file.
This command is an aid to debugging the software, so you don’t have to know how to use it!
It lists to the screen and to file diag.out the following table:
D3PLOT version 7.0: Data component summary printout
=======================================
# in database
Solids
Thin shells
Thick shells
Beams
( 16)
( 4624)
( 0)
( 0)
Stress tensor
6 * 1
6 * 3
6 * 3
n/a
Plastic strain
1 * 1
1 * 3
1 * 3
n/a
Strain tensor
6 * 1
6 * 2
6 * 2
n/a
Extra variables
0 * 1
0 * 3
0 * 3
n/a
Forces & moments
n/a
8
n/a
6
Thickness & energy
n/a
4
n/a
n/a
Plastic beam data
n/a
n/a
n/a
0
Deletion flagged
T
T
T
T
In addition it writes to file only a listing of the D3PLOT internal data component tables. These are bitwise encoded
listings cross-referencing data components against element type and other internal flags. They have no significance to
users.
Next section
Page 6.106
User manual Version 9.3, Rev. 0, September 2008
Oasys D3PLOT
6.9.6 METAL FORMING
The METAL FORMING panel contains a number of special
options and plotting modes for use with metal forming
analysis. The figure (right) shows the basic METAL
FORMING REFERENCE control panel.
This panel consist of three sections.
1.
The top part of the panel accesses a number of special
plotting modes, see Section 6.9.7.1.
2.
The middle part of the panel allows entities to be
selected for some of the plotting options in the top
part of the panel, see Section 6.9.7.2.
3.
The bottom part of the panel allows a number of
variables to be entered which are used by some of the
plotting options in the top part of the panel, see
Section 6.9.7.3
6.9.6.1 METAL FORMING plotting options
The top part of the Metal Forming Panel contains 5 special plotting options.
Page 6.107
Oasys D3PLOT
User manual Version 9.3, Rev. 0, September 2008
FLD PLOT - Forming Limit Diagram
This option will only be available if some entities have been selected for plotting, see Section 6.9.7.2. When selected,
this option will produce a graph of Major Engineering Strain v Minor Engineering Strain at the current
analysis time for the selected entities, see the figure below.
In addition to the shell elements that are represented by white dots the graph also contains a number of lines relating
to physical and artificial phenomena.
FLC
Forming Limit Curve. This curve represents the point at which the material would fail.
This curve may be generated from an equation or read in from a file, see Section 6.9.7.3
for more details.
Safety
This curve represents a safety margin. It is generated automatically by subtracting a
constant value from the FLC, see Section 6.9.7.3.
Page 6.108
User manual Version 9.3, Rev. 0, September 2008
Oasys D3PLOT
Uniaxial Tension
The uniaxial tension curve is defined by
Pure Shear
The pure shear curve is defined by
Pure Shear
The uniaxial compression curve is defined by
where
E(major), E(minor)
True major/minor strains
R
Normal Anisotropy Parameter
Graph
Options
DISMISS Closes the FLD plotting window.
SAVE
Save the points and the curve data to a curve file for reading into Oasys T/HIS.
ZOOM
Uses the cursor to zoom in on a rectangular area of the graph, and enlarges the area to fill the whole
window.
POINT
Select a point on the graph. The ID of the nearest shell to the point is then written out to the dialogue area
and the shell is labelled in the graphics window if it is visible.
X_AUTO Resets the X scaling to automatic.
Y_AUTO Resets the Y scaling to automatic.
GRID
Toggles a grid at the tick mark intervals on/off (Default off).
KEY
Toggles the curve "Key" on/off (Default off).
TITLE
Toggles the analysis title on/off (Default on).
HELP
Gives on-line help.
Page 6.109
Oasys D3PLOT
User manual Version 9.3, Rev. 0, September 2008
STRAIN PATH
The STRAIN PATH option allows the user to plot the Major Engineering Strain v Minor Engineering Strain
path for the selected entities, see Section 6.9.7.2. This produces a plot of Major Engineering Strain v Minor
Engineering Strain at every plot-state, see the following figure. This option is useful as it shows the strain-route
taken by an element. For example, if the material properties defined by the user do not allow failure then this plot may
help to highlight elements that appear to be okay at the end of the analysis but are likely to have failed during the
analysis if failure criteria had been included in the material model.
If the selected entities are shells then D3PLOT will display the first 20 shells that have been selected. If a material has
been selected then D3PLOT will only display the first 20 shells in that material.
FORMABILITY (CT & SI)
The FORMABILITY options produce either a continuous tone (CT) or shaded image (SI) contour plot indicating the
formability of the product, see the two figures below. These options will only be available if Forming Limit Curve
(FLC) has either been read in or generated within D3PLOT, see Section 6.9.7.3.
The formability of each element is determined by its position on the FLD as follows.
FAILED
Above the FLC.
MARGINAL
Between the FLC and the safety curve.
SAFE STRETCH
+ve minor strain and below the safety curve.
SAFE PLANE STRAIN
Below safety curve, abs[minor strain] < 5%[major strain]
Page 6.110
User manual Version 9.3, Rev. 0, September 2008
SAFE DRAW
Oasys D3PLOT
-ve minor strain, between safety curve and pure shear curve.
MARGINAL WRINKLING Between pure shear curve and uniaxial compression curve.
STRONG WRINKLING
Below uniaxial compression curve.
LOW STRAIN
These options automatically set the following
items before the plot is generated.
•
•
8 Contour levels and colours (see
Section 4.3)
No element averaging (see Section
4.2.4.5)
After the plot is completed these values are reset
to their previous settings.
FORMABILITY (CT) Plot
Page 6.111
Oasys D3PLOT
FORMABILITY (SI) PLOT
Page 6.112
User manual Version 9.3, Rev. 0, September 2008
User manual Version 9.3, Rev. 0, September 2008
Oasys D3PLOT
MAJOR & MINOR
The MAJOR & MINOR option produces a vector plot of the MAJOR and MINOR engineering strains, see the figure
below, where the Major Engineering strains are shown with normal arrow heads and the Minor Engineering strains
are shown with inverted arrow heads. This can only be plotted if the strain tensor has been output to the PTF files for
shell elements.
The following items may be modified
before the plot is generated by changing
the values in the Principal Stress/ Strain
menu, see Section 4.2.7.
•
•
•
•
Number of contour levels
Contour colours
Length of the vector arrows
Shell surface (top, middle and
bottom)
The engineering strains are calculated from the shell element strain tensor using the following equations. These
calculations ignore any through thickness strains.
Page 6.113
Oasys D3PLOT
User manual Version 9.3, Rev. 0, September 2008
where
6.9.6.2 METAL FORMING entity
selection
The metal forming options only apply to 3 and 4 noded shell
elements and therefore only shells or shell materials can be
selected. The panel also shows how many shells have been
selected.
6.9.6.3 METAL FORMING data values
The bottom section of the METAL FORMING panel allows
a Forming Limit Curve (FLC) to be read in from a curve file
(see figure right), or to be generated by D3PLOT from an
equation (see figure below right). The curve file name is
entered in the box. The parameters R, Safety and Low
Strain are added to generate the other curves.
If the FLC is generated from an equation the following
parameters are entered in the boxes: Thickness, N, R,
Safety, and Low Strain.
The FLD curves are then generated according to an empirical formula which is generally applicable for steels as
follows:
If E[minor] < 0
If E[minor] > 0
Where
Page 6.114
E[major] = FLD + E[minor] * ( 0.042 *
E[minor]+0.627 )
E[major] = FLD + E[minor] * (-0.0086 *
E[minor]+0.785)
FLD = ( N/0.2116 ) * ( 23.36 + 14.042*min(T, 3.0))
R
= Normal Anisotropy Parameter
N
= Work Hardening Parameter
User manual Version 9.3, Rev. 0, September 2008
T
Oasys D3PLOT
= Material Thickness (mm)
Other data values
SAFETY
Forming Limit Safety Margin.
LOW STRAIN
Strains are ignored if
The safety curve on the FLD and STRAIN PATH plots is automatically generated by subtracting the SAFETY
value from the FLC.
Next section
Page 6.115
Oasys D3PLOT
6.9.7 UTILITIES,
DIE_CLOSURE
The "Die-Closure" command set, found in the
UTILITIES menu creates and controls the special
CLOSURE data component.
This data component calculates the distance remaining
before a "workpiece" makes contact with its "die".
The terminology implies metal-forming, and the most
common use of this will be to determine how much
further a deformable blank has to be pressed in order to
achieve its desired shape. But any problem requiring the
distance between two pieces of 2D/3D structure to be
calculated can be solved here, and it has application to
many cases in which "distance to contact" needs to be
known.
Page 6.116
User manual Version 9.3, Rev. 0, September 2008
User manual Version 9.3, Rev. 0, September 2008
Oasys D3PLOT
6.9.7.1 Defining the problem
The two figures below show a simple pressing problem, parts exploded, in which the workpiece (blue) is pressed by a
punch into a cup shape. We need to know how far the punch (red) must be pushed down to achieve the required final
shape.
Intial problem layout
Final shape
Page 6.117
Oasys D3PLOT
User manual Version 9.3, Rev. 0, September 2008
6.9.7.2 Defining the "Workpiece" and
"Die" sides.
Closure distance is computed between nodes on the
"workpiece" and element faces (facets) on the "die". Therefore
it is necessary to tell D3PLOT what each side actually is, as in
LS-DYNA contacts.
Once a type has been chosen the standard D3PLOT selection menu is used to define the actual elements or parts.
Each side may be any mixture of 2D and/or 3D elements: solids, shells, and thick shells, although in most cases (as
here) shells will be used. Sides may be defined by element and/or part, and may have elements added and removed at
will, and elements may be deformable or rigid. Definition by part has advantages in adaptively remeshed cases, as in
this example, since the part definition is "remembered" across remeshes and the extra elements are auto-matically
included in the relevant side.
Elements may not exist on both sides at once, and adding an element to one side that already exists in the other will
cause it to be removed from the older definition. This cross-check is automatic. The definition panel is updated
immediately to show how many elements there are on each side, and you can SKETCH each side at any time to
confirm your choice.
6.9.7.3 Plotting closure
Once there is at least one element on each side the CT_PLOT, SI_PLOT and LC_PLOT buttons will be made
"live", and these will immediately compute the closure values, set the programme-wide data component to
CLOSURE, and perform a plot in the relevant mode (continuous-tone, shaded image, line contours).
You can also select the CLOSURE data component explicitly from the DISPLACEMENTS... data category, and
plot it using main menu commands. It is also a scalar (nodal) data component that can be used in WRITE and
XY_PLOT contexts.
6.9.7.4 How the “closure” calculation works, and the output it produces.
It is necessary to calculate the distance from each workpiece node to the nearest facet on the die. This is done by
determining which facet a node will be projected onto when contact is made, and computing to the vector distance
(less element thicknesses) between node and facet. This is very similar to the *CONTACT_NODES_TO_SURFACE
problem in LS-DYNA, except that D3PLOT must consider nodes at some distance from, as well as in contact with,
the die surface.
For nodes close to or in contact with a facet this is a simple calculation, but when a node is quite a long way from the
Page 6.118
User manual Version 9.3, Rev. 0, September 2008
Oasys D3PLOT
die problems of ambiguity ("Which facet will I ultimately make contact with?") and complexity ("I need to be tested
against many distant facets") arise.
To get round these problems, and to achieve a reasonably short computation time, a bucket-sorting process is used:
•
•
•
The volume of space around the workpiece, plus a margin, is calculated and then sub-divided by (x,y,z)
coordinates into a 3D matrix of "buckets". Each bucket is a smaller, rectilinear volume of space.
Each workpiece node is assigned to a bucket, based on its coordinate. Die facets may lie in one or more
buckets, or none at all if very distant.
For each die facet closure is only calculated for workpiece nodes that exist in the same or immediately
adjacent bucket(s) as the facet.
D3PLOT uses a 10x10x10 (x,y,z) array of buckets, and chooses default dimensions such that closure values up to about
20% of the longest workpiece dimension will be calculated. Thus node closures will fall into one of four categories:
Node
location
In Contact
Meaning
Value
The workpiece node lies on or behind the die facet surface. (The penalty algorithm in LS-DYNA 0.0
means that a node may penetrate an element.)
The node is reasonably close to a facet, and a closure distance can be calculated.
> 0.0
Near to
contact
Uncomputed The node is too far from the die for a closure distance to be computed, or has fallen into a
"tunnel" between facets (see below).
Uninvolved For nodes not in the workpiece, so not involved in the closure calculation at all.
-1.0 1
-2.0 1
Closure categories and associated values
Note 1: These values are defaults which can be changed, see OPTIONS... below.
Page 6.119
Oasys D3PLOT
User manual Version 9.3, Rev. 0, September 2008
6.9.7.5 Typical closure output
This figure illustrates the final state of the example shown earlier. Here the "die" side is actually the punch, since that
is the shape against which we wish to measure closure.
Note that the contour levels have been chosen explicitly, with unequal intervals, to illustrate the following:
•
•
•
•
•
The centre of the workpiece is fully in contact: green area, value = 0.0.
There is a zone of progressive opening roughly half way up the walls, where a gap between workpiece and
punch is opening up: yellow (0.01) to red (0.5).
The rest of the workpiece has a gap of 10mm or more (purple).
All punch (ie the "die" side) nodes, for which no closure values are calculated, are blue, having the value of
-2.0.
There is a small patch of "uncomputed" nodes (light blue, = -1.0) at about 4 o’clock on the workpiece. The
reasons for this are explained later.
6.9.7.6 Controlling the die-closure calculation process
Page 6.120
User manual Version 9.3, Rev. 0, September 2008
Oasys D3PLOT
Controlling the thickness used.
By default the true thickness of both workpiece and die is used when calculating closure.
"True" thickness depends on the element type:
(Thin) shells
The current element thickness as reported in the .ptf file. The
centreline +/- half this value is used.
Solids and Tk.
Shells
Zero. (The nodes are assumed to lie on the face surface.)
For workpiece nodes the average thickness of all elements meeting at the node is used, for die facets the actual value is
used.
For each side individually you can apply a factor to the "true" value, or override it with an explicit value. (You may
wish to do this if you have used artificial thicknesses during the calculation, since this will affect contact geometry.)
OPTIONS... Controlling calculation parameters
The default parameters chosen by D3PLOT should be
satisfactory in most cases, but there are situations when you
may wish to alter them.
The OPTIONS... command gives access to the following
adjustable parameters.
"Die facet overlap %age" controls the extent to which die
facets are artificially enlarged (in the in-plane direction) for
the purposes of checking workpiece node projection.
This is important where the die surface is convex with
respect to the workpiece, since it helps to prevent workpiece
nodes falling into the "tunnels" between projected facet
volumes.
This can be illustrated as follows:
Page 6.121
Oasys D3PLOT
User manual Version 9.3, Rev. 0, September 2008
Using the Die facet overlap %age value to prevent nodes being lost on convex surfaces
When workpiece nodes are being projected
onto a convex die surface problems can arise
when nodes lie in the dead zones ("tunnels")
where facets meet.
This is illustrated here: nodes marked * lie in
the areas opposite die facets, and so "know"
which facet they are likely to be projected
onto.
Nodes marked + in the shaded tunnel areas
don’t "know" which facet they will be
projected onto, and so no closure value is
calculated for them.
Clearly this problem becomes more acute as
the distance of a workpiece node from the die
increases, and is the main reason why closure
values for such distant nodes may appear
randomly to be classified as "uncomputed",
and given a value of -1.0.
Page 6.122
User manual Version 9.3, Rev. 0, September 2008
Oasys D3PLOT
The situation can be improved by artificially
increasing the width of die facets so that they
overlap, using the "Die facet overlap %age"
factor.
This is illustrated here: a value of 10% (the
default) has been used, and this shows how
the "tunnel" dead zone has been made
smaller, and also extended further away from
the die surface.
Clearly larger values will lead to fewer nodes
being lost in "tunnels", but this must be
balanced against the fact that it may lead to
invalid closure values being calculated when
nodes are projected onto the wrong facets
because these have become artifically
extended.
This is a case for engineering judgement.
Using the Sort Bucket oversize %age to include distant die facets
The volume of space used for bucket sorting is based on the dimensions of the workpiece, not the die. Therefore if the
die is much larger, or some considerable distance away, then there is a good chance that many facets on it will lie
outside the bucket volume, and this means that they won’t be considered when computing closure.
Increasing the Sort bucket oversize %age value from its default of 20% may include these ...
BUT:
•
•
Closure values calculated from distant facets are likely to be unreliable, since by the time the workpiece and
die meet at that point their respective structures will probably have been deformed so much that contact will
actually occur at some other location.
Increasing the bucket volume will increase the number of nodes and facets in each bucket. The time taken to
compute closure rises as a function of (NWorkpiece * NFacet) in each bucket, and these
values increase as a function of bucket volume, ie linear dimension cubed.
So increasing the bucket size can lead to a rapid rise in the time taken
to compute closure, in the worst case by a fourth power.
Or, put another way, you need good reasons to increase this value!
Controlling the values used for uncomputed, uninvolved and distant nodes.
These values do not affect the calculation at all, only the values assigned to special cases.
Set
uncomputed
to:
Is the value assigned to nodes on the workpiece for which no closure value can be computed. By
default this is -1.0, but you can choose any value - although you should avoid values that might
be confused with valid results (ie zero or small +ve numbers).
Set uninvolved This is the value assigned to all nodes in the model that are not part of the workpiece. The default
to:
is -2.0, but again you can choose any sensible value.
Page 6.123
Oasys D3PLOT
Max distance
val:
User manual Version 9.3, Rev. 0, September 2008
Nodes with computed closure values greater than this value have them reset to the "uncomputed"
value. By default this is +1.0e20, ie no nodes will ever fall into this category, but you can set it to
a sensible upper-bound value.
The advantage of using negative values for uncomputed and uninvolved nodes is that they will never be valid closure
distances, and so can be isolated during contouring by judicious choice of contour bounds, or excluded from plots
altogether with the Limiting Values option in the CONTOUR menu.
6.9.7.7 Closure calculation time
Despite bucket-sorting the closure calculation is still numerically intensive, and can take some time to perform.
Therefore the following strategy is adopted:
•
•
The closure calculation is only carried out when actually required. For example when a plot is requested, or
scalar data extracted
Once calculated the results are stored, so that subsequent plots, changes of contour values, etc, are fast as no
recalculation is required.
The closure calculation has to be repeated when:
•
•
•
•
Either the workpiece or die contents are changed, by adding or removing elements.
Any closure parameter (thickness, bucket size, etc) is changed.
A new complete state is read in.
A velocity arrow or contact force vector plot is carried out. (Since the temporary storage space used is
overwritten by these two plotting modes.)
While closure is being calculated a "progress" bar is written to the dialogue box stating how far, in %age terms, the
calculation has gone. You can use STOP to terminate it prematurely at any time.
6.9.8 VISUALISATION
The figure (right) shows the VISUALISATION control
panel. This option allows input files for ray tracing codes to
be generated.
Output files may be written in a format suitable for either
RADIANCE or POV-RAY.
Notes
1) Only shell elements/materials may be selected for output.
2) ASCII files generated using this option can become very
large due to the input formats required by POV-RAY and
RADIANCE.
Next section
Page 6.124
User manual Version 9.3, Rev. 0, September 2008
Oasys D3PLOT
6.9.9 UTILITIES, SETTINGS_FILE
The "settings" file (extension .set) stores programme and
window status information.
Its purpose is to allow you to define a screen layout that is
model-independent, and to revert to that layout with
minimum effort.
The settings file stores the number of graphics windows, and
for each window:
•
The current view.
•
The background, text and hidden infill colours.
•
The current ENTITY and LABEL settings.
•
The current data component information and plotting
mode.
•
The current contouring settings and colours.
•
Any cut-section data.
•
Any fixed node, shift deformed and reference data.
•
Lighting and shading information.
•
Most DISPLAY_OPTIONS settings.
•
Other miscellaneous data.
Reading in a settings file will optionally open further
windows if the number currently present is less than that in
the file, then apply the stored settings to all the windows in
the display.
The settings file (.set) stores Programme, not Model, information.
Almost all the values in the settings file are model-independent, and can be applied to any analysis. The exceptions are:
The current view.
Both the direction cosines (the view direction) and the current centre, scale and
perspective distance are stored. If applied to a model with significantly different
dimensions it may be necessary to AC (autoscale) after reading the settings file in
order to make the model visible.
Nodes used in Fixed node,
Shift Deformed and
Relative Values.
If any of these nodes are defined they are converted to their external labels when
written to the settings files. When the file is read back in an attempt is made to
match the external label in the current model.
If this is successful (for all nodes in a context where > 1 are required) that mode is
restored, otherwise that mode is switched off.
Nodes used in
Cut_Sections, and "Cut
follows nodes"
Likewise nodes used to define a cut-section are written using external labels.
When reread an attempt is made to match these in the current model.
For cut section definitions it doesn’t matter if the node(s) are not matched, since
they are only used to derive section geometry and can be dispensed with once this
has been computed.
However if "Cut follows nodes" has been selected, but any of the nodes cannot
be matched, this mode will be switched off.
Page 6.125
Oasys D3PLOT
User manual Version 9.3, Rev. 0, September 2008
The Properties (.prp) file stores Model-specific information.
Information about models: item colour, transparency, brightness, overlay, labelling, etc is stored in the "properties" file.
More details about this file are given under PROPS in section 4.2.2.4.
Properties files are written using external labels, so they can be applied to different models. Where an external label is
not matched in the current model, or no counterpart to a current item is found in the properties file, no action is taken.
Therefore properties files can be used to restore model settings to broadly similar analyses.
However the Settings and Properties files are closely related.
Because these files are so closely related in terms of what they do it makes sense to process them together, and the
SETTINGS_FILE panel allows you to read and write both types.
6.9.9.1 The SETTINGS FILE Panel
SAVE_SETTINGS
Stores the settings of all current
windows in the specified ".set"
files.
The default filename
"d3plotnnn.set" is
recommended, although any
filename may be used.
If Save properties file to
disk is selected then the
specified properties file is also
written. Any filename may be
used, but the extension ".prp"
is recommended.
RETRIEVE_SETTINGS
Reads in the specified settings
file. If several are found the most
recent is shown.
If Read properties file from
disk is selected the specified
properties file will be read. In
this example no such file has
been found, so this option is not
available.
If Open new windows if
required is selected then, if the
settings file contains information
for more windows than are
current, additional windows up
to this limit will be opened.
Otherwise settings will only be
applied to existing windows.
If more windows are current than
are defined in the settings file,
then the stored values for
window #1 will be applied to the
excess ones.
6.9.9.2 Reading Settings and Properties files with a new model
Page 6.126
User manual Version 9.3, Rev. 0, September 2008
Oasys D3PLOT
On the New Model panel you can choose to read any Settings or Properties files present after you have read in the
model.
The default filenames used will be:
The most recent Properties file in the model directory of the name:
<filename>_nnn.prp
The most recent Settings file in the current directory of the name:
d3plotnnn.set
These will be applied as if they had been read in explicitly above using RETRIEVE_SETTINGS.
Page 6.127
Oasys D3PLOT
User manual Version 9.3, Rev. 0, September 2008
6.9.10 External Data
"External" data is arbitrary data at three-dimensional points, generated externally, that D3PLOT can superimpose on
the current image in a variety of ways.
The following - artificial - example shows notional head-impact values on a car bonnet, but any data from any source
can be used.
(External data plots are sometimes referred to as "Blob plots", for reasons that are obvious from the plot below!)
6.9.10.1 How External Data plotting works.
An "external data" file is generated (externally) by the user, by any means, that contains some or all of the following
attributes:
•
Arbitrary data values at three-dimensional coordinates in space
•
Contour band values and colours
•
Information about symbol size and labelling
•
Lines used to demarcate regions
D3PLOT reads this file, supplying defaults for information that is not specified, and displays the results on top of the
current image. This display can be turned on or off at will, and modified at any time.
External data is stored on a "per model" basis, so if you have multiple models data has to be read separately for each
model and its visual attributes may also be controlled separately.
Page 6.128
User manual Version 9.3, Rev. 0, September 2008
Oasys D3PLOT
6.9.10.2 The format of an "External Data" file.
External data files are free format ASCII files in which data can appear in any order (unless stated otherwise below).
They may contain any or all of the following information:
Header
Data type
Data format example
$ xxx and blank lines
Lines starting with "$" and blank lines
are treated as comment lines, they can
appear anywhere in the file and are
ignored
$ This is a comment line
name <data name>
A title of up to 30 characters
name This is a demonstration
example
Will read the title "This is a demonstration
example"
automatic
<#bands>.
Denotes automatic contours to be used
with <#bands> levels where
1 <= #bands <= 13
automatic 10
Will use automatic contour levels with 10
bands
Contour bounds are determined by
scanning the data once read.
levels <#levels>
<L1> <rr> <gg>
<bb>
<L2> <rr> <gg>
<bb>
to #levels lines
Denotes manually specified contours
with <#levels> values where:
2 <= #levels <= 14
Each level has a value <Ln> followed
by Red Green Blue colour components,
each component being in the range 0 100.
levels 6
0 0 0 100
5 0 100 100
10 0 100 0
15 100 100 0
20 100 0 0
25 100 0 100
Sets up 6 levels, ie 5 bands, from blue to
magenta
Colour <i> spans the band <i> to <i+1>
Note on contour levels / bands:
•
Commands "automatic" and "levels" are mutually exclusive, you cannot have both.
•
If neither is defined then the default is "automatic" with the same number of levels as currently used for
normal contouring.
•
In the "levels" case you must follow the levels command with the correct number of lines of data.
circle_f <diam>
circle_v <factor>
<min_dia>
<max_dia>
rect_f <width>
<height>
rect_v <fac_w>
<fac_h> <min_dim>
<max_dim>
Only one of these options may be used.
•
circle_f is a fixed diameter
circle
•
circle_v is a variable
diameter circle, with diameter set
to <factor * data>
•
rect_f is a fixed size rectangle
•
rect_v is a variable size
rectangle of width <fac_w *
data> and height <fac_h *
data>
In both "variable" cases there is limiting
minimum and maximum size for the
symbol.
circle_v 0.1 30 250
Would set a variable diameter circle based
on 0.1 * the incoming data value, and subject
to a minimum size of 30 units and a
maximum of 250 units.
rect_v 0.2 0.1 100 300
Would set a variable sized rectangle, width =
0.2 * data, height = 0.1 * data, with a
minimum size of 100 units and a maximum
of 300 units.
Screen units are based on the scaled screen
unit of 4096 units across the window width.
If nothing is defined the default is a
fixed size rectangle of 20 x 20 units.
show_value
<true/false>
Whether or not the data value is drawn
show_value true
as a label on top of each point’s symbol.
The default is false.
Would cause values to be drawn.
Page 6.129
Oasys D3PLOT
data <x,y,z>
<value>
User manual Version 9.3, Rev. 0, September 2008
Data point values. Each point must have data 10.1 20.2 30.3 500.0
an (x,y,z) coordinate followed by a
value. The value may be floating point
Would make a point at position (10.1, 20.2,
or integer.
30.3) with a value of 500.0.
Any number of data values may be
input, by default none is defined.
beam <x1,y1,z1>
<x2,y2,z2>
<colour>
Defines a "beam" (really just a line)
from (x1,y1,z1) to (x2,y2,z2) in colour
number <colour>.
At present colours are hard-wired as
follows:
1.
Red, thin line
2.
Green, medium width line
3.
Blue, thick line
(This feature is a crude solution and will
probably develop in the future.)
Page 6.130
beam 1.0 1.0 1.0 2.0 2.0 2.0 2
Would drawn a medium width green line
from (1,1,1) to (2,2,2)
User manual Version 9.3, Rev. 0, September 2008
Oasys D3PLOT
6.9.10.3 Reading and controlling
External Data files.
Utilities, External Data maps the panel shown here.
Use the File: prompt to define the external data filename,
then Read File... to read it in and store it in memory.
Thereafter the key parameters described above (contour
bands, symbol type and size, data value display) will be
used to initialise this panel, but you can change them
interactively at will.
The turning off/on of display of external data on plots is
controlled by Display active in this model.
Some examples. Note that displaying the underlying model in grey usually works well as it gives good contrast with the
coloured symbols, as does using transparency to show underlying structure.
Page 6.131
Oasys D3PLOT
User manual Version 9.3, Rev. 0, September 2008
Here the symbols in the plot above have been changed to rectangular, varying; and display of data values has been
turned on.
Here symbols have reverted to fixed size squares, and two "beams" have been added to demonstrate their
appearance.
Next section
Page 6.132
User manual Version 9.3, Rev. 0, September 2008
Oasys D3PLOT
6.9.11 UTILITIES, FUNCTION KEYS
It is possible to programme the function keys F1 .. F12 with
command files.
•
You create a command file in the normal way.
•
The file is associated with a function key.
•
It is executed whenever you press that key.
A command file can contain any valid sequence of D3PLOT
commands, for example blanking some items and setting a view,
or defining a cut-section. Generally it is best to avoid very
model-specific commands, or screen picking, if a file is to have a
general usefulness on playback. (Command files are described in
section 8.)
Files can be associated automatically with function key "n" (1 <=
n <= 12) as follows:
•
By the "oa_pref" file line "d3plot*fn_key:
<filename>"
•
By defining file d3plot_fn.tcf in the current
directory ($cwd)
•
By defining file d3plot_fn.tcf in your home
directory ($HOME)
•
By defining file d3plot_fn.tcf in the $OASYS
directory
Files are searched for in the order given above, and the first
definition found "wins". If no definition is found that function
key will be inactive.
Page 6.133
Oasys D3PLOT
User manual Version 9.3, Rev. 0, September 2008
6.9.11.1 Using the function key panel.
The function key panel shows the current status of all function keys.
You can associate a new command file with a function key at any time by
typing in new filename, or use the "?" file filter to find new keys.
SAVE... copies all current definitions to d3plot_f1.tcf ... d3plot_f12.tcf in
the current directory. These local copies make it easier to modify standard
files for your own use.
Clicking on the F1 to F12 buttons will Preview the command file in the
standard playback panel. This simply steps through the file’s contents
without actually executing it:
6.9.11.2 Function key F10 is reserved on Windows platforms.
On Windows platforms the F10 key is reserved by the Windows operating system and cannot be used for D3PLOT
macros.
You can still define a function for key F10 in the oa_pref file, so files set up on Unix or Linux machines will still read
in, but the key will not work and it will be necessary to associate the macro with a different key.
A warning is issued if you attempt to define a macro for the F10 key on these platforms.
Page 6.134
User manual Version 9.3, Rev. 0, September 2008
Oasys D3PLOT
6.9.12 COMPRESS
This option can be used to generate a new set of PTF/D3PLOT files for a model that contain only a subset of the Parts
and States in the original model. See section 6.7.7 for more details.
Page 6.135
Oasys D3PLOT
User manual Version 9.3, Rev. 0, September 2008
6.10 GROUPS:
Groups as of V9.0 of D3PLOT (Nov 2003) have been
extensively rewritten to remove some limitations and to provide
new features. In particular:
•
You may now have an unlimited number of groups. The
previous limit of 30 is removed.
•
Groups are now automatically stored in a ".grp" file
for this model, and are "remembered" across successive
runs of D3PLOT, with no intervention required by the
user. ".grp" files are model dependent.
•
The ascii *GROUP format used by Primer may be read
in as ".asc" files, and converted to internal groups.
These files may be created simply by hand, and are
model independent. ".asc" files may also be written.
They are also read by Oasys T/HIS, and this permits
groups to be used consistently across the Oasys 9.0
software suite.
Groups may be used in most contexts where selection takes place, for example BLANK, WRITE, etc.
They can be set up for a model in any of the following ways:
•
Defined interactively during a D3PLOT run using CREATE.
•
Read in from an external ascii (.asc) groups file
•
Read in from an "old" binary (.bin) groups file
•
Reread from a previous D3PLOT run, made available automatically via the <jobname>.grp file.
For backwards compatibility the "old style" binary groups files ".bin" may still be read (see section 6.10.8 below), but
they are no longer written and their use is deprecated.
Page 6.136
User manual Version 9.3, Rev. 0, September 2008
Oasys D3PLOT
CREATE
Create groups by selecting an entity type (e.g. PART), then
selecting using the normal methods. You must STORE the
group to make it available for blanking and other operations.
STORE saves the group to memory, but not to disk.
SAVE
SAVE stores all selected groups in an ascii (.asc) groups file, making the groups portable across different models.
The format of this file is described in section 6.10.1 below.
READ... Read groups in from an Ascii groups file.
You can read in groups from any ascii groups file, including one not written from this model. The external data is
converted to internal format and saved in the model’s .grp file.
The following rules apply:
Matching of external (file) and internal (model) data
•
•
•
Matching of data between model and group file is via external labels.
If an item exists in the model, but is not defined in the file, it will not be grouped.
If an item exists in the file, but not in the model, it will be ignored - this is not an error.
Groups label and numbering policy:
•
•
•
Groups in an ascii file have unique labels <#i> <#j> ....
They will be transferred to become the same internal group labels in the model’s .grp file.
If group <#n> already exists in the model’s .grp file it is overwritten - unconditionally and with no warning.
Therefore you may read in any number of ascii group files, and the most recent definition of a group in such a file will
Page 6.137
Oasys D3PLOT
User manual Version 9.3, Rev. 0, September 2008
be the current one.
Automatic reading of ascii groups files.
Two types of default ascii groups files may optionally be read in automatically when a new model is opened:
•
"Master" group This may be defined in the "oa_pref" file (see Appendix II) using the
file
d3plot*master_group_file: <filename>
option. This will be read in every time a new model is opened, and the definitions in it will
be mapped onto that model’s groups, creating or replacing groups as required.
•
"Local" group
file in current
directory
If the "Read ASC file (Ascii groups file)" box on the model reading panel
(see section 4.1.1) is selected then the most recent file:
d3plot_<nnn>.asc (eg d3plot_003.asc)
in the directory where the model is found will be read in, replacing or creating groups as
above. Note "most recent" may not necessarily be the file with the highest <nnn> number - it
will depend on the file’s creation date.
These two files are read in the order above, thus a definition in a "local" groups file can supersede one in the "master"
one.
READ_OLD... Reading "old" (pre version 9.0) binary .bin groups
files.
For backwards compatibility the ability to read older .bin binary groups files has been preserved, however D3PLOT
can no longer write these files.
These files contained up to 30 groups which, in pre 9.0 versions, were hard-wired as labels 1 to 30. When read back in
the following rules are applied:
Matching of internal and external data.
•
•
•
The same rules that are used for ascii groups are applied to binary ones.
Items in the .bin file, but not in the model, are ignored.
Items in the model, but not in the .bin file, are not grouped.
Group labelling.
•
•
•
Each group in the .bin file is stored as the first free group id for this model.
Therefore assigned group ids will depend on what has been created &/or read in previously.
You are informed about the label assigned to each group as it is read in.
The use of "old style" binary (.bin) groups files is deprecated.
Binary groups files can be written by earlier versions of D3PLOT, and also by Primer. However their use is
discouraged, and the much more compact and easily edited ascii groups files are recommended instead. This is because:
•
Ascii groups files tend to be much more compact.
•
They are easily created and modified by humans using a normal text editor.
•
They can be read by Oasys PRIMER as part of a keyword deck (the special Oasys *GROUP keyword after
*END)
•
They can be read by Oasys T/HIS.
•
And as ASCII format files there are no issues of binary compatibility across different machines.
Page 6.138
User manual Version 9.3, Rev. 0, September 2008
Oasys D3PLOT
6.10.1 The format of the ASCII groups file (.asc file)
A file contains one or more *GROUP definitions, formatted as follows. All entry is free format.
*GROUP
<title>
<label>
This is a header designating a new group.
<title> may be up to 80 characters wide
<label> is in the range 1 to 99999999 (However large numbers are deprecated )
<item> <range>
<item> <range>
<item> <range>
etc
<item> must be one
of
PART, SURFACE, NODE, SOLID, SHELL, BEAM, TSHELL,
MASS, DISCRETE, SEATBELT, ACCELEROMETER,
SLIPRING, PRETENSIONER, JOINT, RIGIDWALL,
SEGMENT.
If preceded by a minus sign (eg -PART) then these items are removed
from the group.
<range> must be one ALL
all items in that category eg PART ALL
of:
<i> : <j> <start> to <end> range
eg SHELL 10 : 200
<i j k l Up to 5 discrete labels on a eg SOLID 10 20 33 45
m>
line
200
As many lines as required to define the group may be used.
BOX suffix is
Unsupported
The "proper" group definition in Primer also supports the suffix BOX <label> at the end of a
line, meaning that the preceding definitions on that line are limited to what lies within the
*BOX definition.
Because D3PLOT doesn’t "know" about boxes these are ignored, and you should avoid the BOX
suffix if you are planning to use group files outside Primer.
*END
This is optional, and is taken to mean the end of the file. A physical <end of file> is treated as
terminating the last group in the file, and no *END is required.
Any number of group definitions may exist in a file, with the next *GROUP header effectively terminating the previous
group definition.
The easiest way to create a groups file is to write one from D3PLOT, and then look at it in a text editor. The format is
extremely simple and easy to understand.
Warnings:
a)
D3PLOT groups contact surfaces, if they are present, by interface segment.
Since segments are not numbered in a LS-DYNA input deck, or indeed may not even be present for
contacts defined by anything other than segment sets, attempting to read these back into PRIMER will
fail and such definitions should be edited from ascii groups files if they are to be used for this purpose.
b)
Group files written by Oasys PRIMER may contain BOX arguments, limiting the geometric region in
which items are included.
Because D3PLOT doesn’t "know" about boxes it cannot apply these, and they are ignored. Therefore if
you are intending to create groups that are portable across programmes it is recommended that you do
not use the BOX argument.
Next section
Page 6.139
Oasys D3PLOT
User manual Version 9.3, Rev. 0, September 2008
6.11 Coarsen
Mesh coarsening is designed to improve the graphics speed of
large and finely meshed models. It works by grouping adjacent
elements into "patches" and hence sending fewer rendering
requests down the graphics pipeline.
It results in a slight loss of image quality, but this is usually
acceptable and by default D3PLOT reverts to the original
(fine) mesh when you zoom in to look at details.
By default (ie if you don’t use "Custom" settings) coarsening
does the following:
•
Only polygon fill (ie shaded, "fuzzy" shaded image and
hidden infill) is coarsened.
•
Wireframe and hidden overlay are not coarsened.
•
Coarsening is based on the last state in the analysis.
•
Zooming in by a factor of more than 4x the autoscaled
scale reverts to using the original mesh.
Coarsening is fully automatic, with no user intervention
required unless you want to change the default settings.
By default Coarsening is not active, but you can modify this with the d3plot*auto_coarsen "oa_pref" file option
so that large models are automatically coarsened when opened. See Appendix II for more information.
6.11.1 Coarsening Levels, and what they mean.
Off
This is the default state. No coarsening takes place and the original mesh is used.
Mild
Coarsening takes place to a reasonable degree, usually with only mild visual artefacts appearing. Typical
speed-ups of the order of 40% - 50%
Severe
More aggressive coarsening is used, usually with significant visual artefacts, however larger models can
double in speed or better.
Custom Allows user control over all the coarsening parameters.
Mild coarsening is the recommended level for most models, as it tends to give the best trade-off between speed and
image quality.
6.11.2 Examples of Coarsening
The images below show a model with approximately 1,000,000 shell elements in its raw state, and illustrate how
progressively harsher coarsening reduces the image quality but speeds up the graphics.
Page 6.140
User manual Version 9.3, Rev. 0, September 2008
Oasys D3PLOT
This is the original image. Time to animate a frame on representative hardware: approx 95mS / frame
This is the same model using Mild coarsening. Some "speckling" is evident and the overlay is poking through in a few
places. However time to animate this model is now reduced to about 50mS / frame.
Page 6.141
Oasys D3PLOT
User manual Version 9.3, Rev. 0, September 2008
Finally here is the same model using Severe coarsening. More artefacts are visible, and the large patches are clearly
evident on the glass panels. However time to animate now approx 30mS / frame, which is over 3x as fast as the
original model above.
Page 6.142
User manual Version 9.3, Rev. 0, September 2008
Oasys D3PLOT
6.11.3 Custom Coarsening
Use Coarsened Mesh determines the scale at which
the transition between true and coarsened mesh takes
place.
Never
Means that the true mesh is used
at all scales
If max elem size
is < xxx pixels
Not recommended, as it requires
a knowledge of screen
resolution.
If scale factor <
fff
This is the factor on the normal
"autoscaled" scale for this model.
At factors higher than <fff>, ie
when zoomed in, the original
mesh will be used.
Unconditionally
The coarsened mesh is used at all
scale factors.
Use for LI, HI and Overlay determines whether or
not the coarsened mesh lines are used for wireframe
plots, and overlay on shaded and contoured plots.
Normally you should leave this box unchecked, as the
coarse overlay is not representative of the true mesh,
however it can be useful when tuning some of the other
parameters.
Outward normal error, Edge straightness error
and Max edge attributes.
Play with these at your peril! The default values usually
work reasonably well, but they have been arrived at by
trial and error over a wide range of models rather than
by any scientific means. It is beyond the scope of this
manual to explain the theory behind them.
State used for coarsening mesh determines which
state is used when extracting the coarse "Patches". An
example of using this is given below.
Normally this should be the last state, as this will usually
have the greatest deformation and hence limit the
elements that can be merged into patches. However if
the last state is corrupt, or you are only displaying earlier
states, you may get an improvment in both image quality
and speed if you choose an earlier state.
Update Coarse mesh using parameters below. If
you modify any of the detailed parameters the coarse
mesh will not be recalculated, and the changes will not
therefore take effect, until you press this button.
Page 6.143
Oasys D3PLOT
User manual Version 9.3, Rev. 0, September 2008
What happens when you base coarsening on an earlier state.
In this image, using the same model as above, Severe coarsening has been used but has been based on the
undeformed geometry at state #1. The errors that arise from basing patches on elements which subsequently become
deformed are obvious!
Page 6.144
User manual Version 9.3, Rev. 0, September 2008
Oasys D3PLOT
6.12 T/HIS the D3PLOT <=> T/HIS
link
The T/HIS command starts T/HIS in background and establishes a link between the two codes, allowing D3PLOT to
access and display "time-history" data, and to synchronise time-history display in T/HIS with the current state
displayed in D3PLOT.
Linked T/HIS has the following attributes
•
One or more fully functional T/HIS graphics windows running within the D3PLOT user interface.
•
The two codes "talk" to one another and share information about time-history data.
•
Time-history "timeline" plots can be synchronised to show the current state in D3PLOT
•
Accessing a particular time in either code will cause the other to update to show the same time
•
Plotable items in time-history plots are displayed in D3PLOT, and may be screen-picked for selection in
T/HIS.
When the T/HIS link is active the user interface operates either in D3PLOT native mode (as in the rest of this manual),
or T/HIS native mode. You need to be in the correct mode to access commands for the relevant program, and you
swap between modes using the D3PLOT and T/HIS buttons on the top right.
6.12.1 The T/HIS panel
When you first click on T/HIS the following
happens:
•
D3PLOT silently opens a background
T/HIS process
•
This is passed the name of the current
model.
•
It searches for files called <name> that
are readable by T/HIS.
•
If found these are scanned and read into
T/HIS
As shown here the top level T/HIS panel is
identical to the "native" T/HIS top level
commands menu, with the addition of some
options specific to the linked case.
In addition to the top
level panel changing
to display the T/HIS
commands the
D3PLOT viewing
menu is replaced with
the T/HIS Global
Command menu.
If the top level panel
is changed back to
display the D3PLOT
commands the
D3PLOT viewing
panel will be
redisplayed.
Page 6.145
Oasys D3PLOT
User manual Version 9.3, Rev. 0, September 2008
6.12.1.1 Association between models in D3PLOT and T/HIS
When T/HIS is started it will scan for time-history information for all models currently open in D3PLOT, and will
continue to maintain associativity between the two codes. For example model M2 in D3PLOT will also be model M2
in T/HIS.
As models are opened and closed in D3PLOT so T/HIS will also open and close them, maintaining parity of model
numbering. Internal flagging within D3PLOT of items being available for time-history processing will also be
maintained.
WARNING: Opening a model in linked T/HIS only, rather than via D3PLOT, breaks the associativity
between the two codes.
It is not illegal to open a model directly in linked T/HIS, but it has side-effects:
•
Because D3PLOT cannot "know" about such a model’s attributes it cannot be processed in D3PLOT in any
way
•
To make this clear models opened in this way are given model numbers 101, 102, ... in T/HIS
6.12.1.2 Use of T/HIS derived
time-history data in D3PLOT
D3PLOT can display several items (for example springs,
joints, elements and nodes in time-history blocks) that can
have "time-history" information associated with them. When
the T/HIS link is active this is handled as follows:
•
Items in time-history blocks (ie those with
*DATABASE_HISTORY_xxx cards) may be
displayed by using the Entity, Database panel as
shown here.
In this example there are beams, nodes, shells, solids
and thick shells in time-history blocks; but while two
models are current only one of them contains
time-history data, which is why the tick boxes have a
grey background.
•
Time history block symbols are displayed on elements
as crossed lines, and on nodes as small squares. The
image below shows the display of a solid and a few
nodes in time history blocks (with labels turned on).
•
Items not explicitly on *database_history cards, but
which have time-history data available (springs,
seatbelt elements, joints, rigid walls) may also have
their visibility switched in this panel as "pseudo
database history" items.
Page 6.146
User manual Version 9.3, Rev. 0, September 2008
Oasys D3PLOT
The display and
labeling of
items in
"time-history"
blocks can also
be controlled
using the Mark
Items and
Label Items
buttons in the
T/HIS Global
Command
menu.
Screen-picking items in
Time-history blocks for selection in
T/HIS
When items in time-history blocks are displayed
in D3PLOT they can be screen-picked for
selection in T/HIS menus by using Pick
Visible.
Screen picking, menu selection and Key in can
all be combined at will for the purposes of item
selection.
6.12.2
Linked
T/HIS
commands
6.12.2.1 TIMELINE
TIMELINE adds a vertical bar to the T/HIS plot showing the current time displayed in the D3PLOT graphics window.
Each T/HIS graph can have it’s own timeline.
By default the first D3PLOT window will control the position of
the timeline in each T/HIS graph.
The D3PLOT window used to control the timeline position can
be changed using the popup menu in the T/HIS Global
Command menu. This popup can also be used to turn OFF the
timeline. This popup menu will set the timeline for ALL the
T/HIS graphs.
Page 6.147
Oasys D3PLOT
User manual Version 9.3, Rev. 0, September 2008
After turning on the timeline in a T/HIS graph
•
You can drag this bar in the T/HIS window to a new point, and the D3PLOT graphics window will jump to the
new time.
•
Equally if you move the D3PLOT graphics window to a new state the bar in the T/HIS plot will update.
Note that the timeline bar can only be positioned at times in the complete state (.ptf) file, since only these times are
available as plotting states for D3PLOT. (Although D3PLOT can interpolate between states it would be potentially
misleading to associate a "real" time-history value at some intermediate time with an interpolated graphical state.)
Page 6.148
User manual Version 9.3, Rev. 0, September 2008
Oasys D3PLOT
6.12.2.2 Graph Type
The T/HIS graph windows can co-exists with other
D3PLOT graphics windows or they can be located within
D3PLOT windows.
The type of each T/HIS window can be set to either
SIBLING The T/HIS window occupies a "slot" in the
graphics window layout, just like the other
D3PLOT windows W1 .. Wn
CHILD
Makes it a child of a graphics window. If
there is more than one you must choose
which is to be its parent.
It can be resized by dragging its borders,
but may also have a preset Window
Position in one of the four quadrants.
SIBLING T/HIS graphs are positioned on Pages using the same rules as other D3PLOT graphics windows (see
Section 2.6.2.1). CHILD T/HIS graphs do not take up a slot on pages.
The example opposite shows 2 D3PLOT windows (W1 and W2) and 2 T/HIS graphs (G1 and G2). Page 1 contains
W1 and G1 (G1 is a child of W1) and Page 2 contains W2 and G2.
CHILD T/HIS graphs can have their window borders
removed by docking the windows using the Dock option
in the Toolbar of each window.
6.12.2.3 Parent
This option only applies to CHILD windows.
Each T/HIS graph can be positioned within any D3PLOT
window.
Page 6.149
Oasys D3PLOT
User manual Version 9.3, Rev. 0, September 2008
6.12.2.4 Position
This option only applies to CHILD windows.
Each T/HIS graph can be positioned automatically into one
of the four quadrants: bottom/top left/right.
Alternatively each T/HIS window can be moved and
resized by clicking and dragging on it’s borders and
positioned anywhere within the parent D3PLOT window.
This example shows a DOCKED window located in the bottom right hand quadrant of the graphics window. No button
bar is drawn because the mouse is not in that window.
Page 6.150
User manual Version 9.3, Rev. 0, September 2008
Oasys D3PLOT
6.12.2.5 LOCATE Identifying a curve’s item visually in D3PLOT
The LOCATE function lets you right-click on a curve in the T/HIS window to identify the item associated with it.
D3PLOT will then draw cross-hairs through that item in the graphics window. In this example node 1345 has been
identified
.
Only one item can be located at a time: each new pick supersedes the previous one. To turn off the crosshairs deselect
LOCATE in the T/HIS panel.
Page 6.151
Oasys D3PLOT
User manual Version 9.3, Rev. 0, September 2008
6.12.3 Setting Properties for Individual Graphs
The options in the T/HIS Global Command menu always apply to all of the T/HIS graphs that are currently active.
Properties for individual graphs can be set using the Display drop down menu at the top of each T/HIS graph.
Timeline This option can be used to turn on
and off the display of the Timeline
and the D3PLOT window controlling
the timeline for a single T/HIS graph.
Type
This option control the position of the
T/HIS graph in relation to other
windows (see Section 6.12.2.2 for
more details)
Parent
Set the parent for CHILD windows
(see Section 6.12.2.3 for more
details)
Position Set the position for CHILD windows
(see Section 6.12.2.4 for more
details)
6.12.4 Using IMAGES to capture linked images to file.
The IMAGES command in D3PLOT is capable of capturing images containing both D3PLOT and T/HIS windows,
(see Section 7.0 for more details.)
As T/HIS windows can be located within D3PLOT windows the transparency of T/HIS windows can be adjusted so
that the underlying D3PLOT image can be seen through the T/HIS window.
The figure below shows an example of a 50% transparent "docked" T/HIS image overlying the D3PLOT one. In the
undocked or "sibling" cases a composite image will be the size of the rectangular bounding box required to enclose the
selected windows.
Page 6.152
User manual Version 9.3, Rev. 0, September 2008
Oasys D3PLOT
Page 6.153
Oasys D3PLOT
User manual Version 9.3, Rev. 0, September 2008
6.13 Trace Node
Trace node adds lines ("traces") showing the motion history of
selected nodes.
The nodes displayed are user-selected, and the attributes of the
trace lines are also selectable.
Here is an example of a crush tube on which the corner nodes of the plattens have been selected for traces. The outline
undeformed geometry is also displayed to show how the trace paths display the path from original to current geometry.
Page 6.154
User manual Version 9.3, Rev. 0, September 2008
Oasys D3PLOT
6.13.1 The Trace Node control
panel
The steps to be gone through are:
1.
Use Create... to define the nodes for which you
want traces. These can be typed in by label or
screen picked.
2.
Turn the tracer switch ON and traces will be
added to your plots.
3.
You can add more nodes at any time using
Create... , and likewise delete nodes using
Delete...
The meaning of the remaining controls is as follows.
Click on an item to go to its detailed description.
Trace Colour
Sets the colour to be used. May
be fixed or based on data
values at the node.
Trace width
Trace line width. May be fixed
or based on dat avalues
Trace length
How many points prior to the
current node position are
shown.
Solid / Faded
line
The line can be solid along its
length, or can fade out.
Line and
symbol
display
The line itself is always shown,
but you can also choose to
show the current and previous
symbols
Hidden /
wireframe
mode
In hidden mode the lines are
subject to hidden surface
removal, ie they co-exist with
other items.
In wireframe mode they are
effectively drawn on top of any
structure and will always be
visible.
Export to
XY_PLOT
Make a graph of the global
co-ordinates of the nodes at
each time-state.
Page 6.155
Oasys D3PLOT
User manual Version 9.3, Rev. 0, September 2008
6.13.2 Trace Colour
Colours may be constant, chosen from the standard list or mixed using the
Palette, this is straightforward.
However
requires some explanation:
If you have previously performed some sort of data-bearing plot that has
generated values at nodes then DATA colours will draw traces bearing those
colours at the selected nodes. This allows you to show how values have
changed over time.
For example the image below uses DATA mode to display colours showing X
displacement on the example above. Here the traces have been added to a
shaded image contour plot, but they would still be coloured if added to a
non-data-bearing plot.
6.13.3 Trace Width
Sets the width of trace lines.
NOTE: Trace widths are clamped to lie between 1 and 25
screen units to prevent plots getting ridiculous in either of the
last two cases
Fixed screen
space units
Will give a fixed number of pixels width that will not change as the scale of the plot
changes.
Fixed model
space units
Will also give a fixed width, but in the actual units of the model, so this will change as
the image scale changes.
Factor on data
value
Will multiply the data value at the node to produce a quantity that is treated as a
screen space unit, so it will not change with image scale
Page 6.156
User manual Version 9.3, Rev. 0, September 2008
Oasys D3PLOT
6.13.4 Trace Length
Specifies how many points before the current one are shown in
a trace line.
This is best demonstrated by example. In all cases point
symbols have been turned on to make clear what is being
displayed.
Show <n> states
before curr
(Here <n> = 8)
This shows the 8 states
prior to the previous one.
If fewer than <n> states
are available then only
those between the current
and state #0 will be
shown.
Show all states before
curr.
This shows all states from
#0 to the current one.
Page 6.157
Oasys D3PLOT
User manual Version 9.3, Rev. 0, September 2008
Show all states
This shows all states,
including those both
before and after the
current one.
6.13.5 Solid / Faded out line
Determines whether lines are drawn solid, or whether they
Solid lines are obvious (all three plots above use them).
Here is an example of a plot fading out along its length,
showing that it gives a good visual indication of the "age" of
each point compared to the current one.
6.13.6 Symbol Display
Determines whether symbols are shown, and at
which positions.
"Symbols" are a diamond shape on the line at a
data point.
Show trace line only:
No symbols are drawn, and only the line is shown.
Line + current symbol:
The line is drawn, and a symbol is shown at the current point
only.
Page 6.158
User manual Version 9.3, Rev. 0, September 2008
Line + all symbols
Oasys D3PLOT
Symbols are drawn at all points, as shown here.
6.13.7 Hidden vs
Wireframe mode
In "Hidden" mode trace lines occupy the same
3D space as the model, and may become
obscured by structure.
In "Wireframe" mode trace lines are
effectively drawn above the model and will
always be visible.
Page 6.159
Oasys D3PLOT
User manual Version 9.3, Rev. 0, September 2008
6.13.8 XY Plot
Make a graph of the global co-ordinates of the nodes at each time-state. The plots
can be saved as curve files or transferred to T/HIS if the T/HIS link is open.
Page 6.160
User manual Version 9.3, Rev. 0, September 2008
Oasys D3PLOT
6.14 User Data
"User Data" creates and manages user-defined data
components.
These allow completely arbitrary data for nodes and elements to
be processed. The data may be generated externally, or
computed locally from existing data already present in the
database.
Special "binary" user-defined data components may be created
and manipulated via the Javascript interface.
6.14.0 Description of User-defined Data components
Conventional data components in D3PLOT are typically nodal displacements, velocities and accelerations, and element
stresses, but are limited to what is present in the database that has been read.
User-defined components take this a stage further and allow you to define any number of new data components of the
following six types:
Entity type
Class of data
Nodes
Scalar: A single value at nodes
Vector: A [x,y,z] data vector at nodes
Solids, shells, thick shells Scalar: A single value at elements
Tensor: A [xx,yy,zz,xy,yz,zx] data tensor at elements
Beams
Scalar: A single value at beams
Vector: A [x,y,z] data vector at beams
Each user-defined component must fall into one of the six classes in the second column above. It is not possible to mix
classes in a single component.
Once a component has been defined it may be used exactly like "normal" data in any valid context within D3PLOT:
data plotting, written value extraction, XY plotting, etc. Where vector and tensor components are defined standard
operations such as extracting vector direction and magnitude, or deriving sub-components such as principal or von
Mises sub-components, may be performed.
A user-defined component may have its name, content or calculation method changed at any time; however it may not
be swapped between classes. (Although it may be deleted and re-created as a new class.)
User-defined components are treated as "programme-wide" attributes, meaning that the same components apply to all
models read into the database. If you need to apply separate components to different models it will be necessary to
create new user-defined components with different attributes for the various models.
User-defined components must have names that are unique within D3PLOT. This means that not only must their names
not overlap with each other, but they must also not be the same as "standard" components: for example you will not be
permitted to create a user-defined component called "strain".
There are four types of user-defined component in D3PLOT. The first three are created interactively or externally, and
the last is used only when using the Javascript interface. In summary they are:
Page 6.161
Oasys D3PLOT
User manual Version 9.3, Rev. 0, September 2008
(1) Read from file
Data is read from externally supplied ascii
data file(s)
These three methods are easy to use, and in
particular Simple Formulae may be created
interactively.
(2) Simple formula
Data is calculated internally from a
"simple" formula using standard internal
data and arithmetic.
They are suitable for simple processing on a
per node or element basis.
(3) Javascript file
Data is calculated using a small Javascript
file.
(4) User-defined
Binary (UBIN)
Data is created via the Javascript interface (see section 11), not to be confused with method
(3) above
This is a much more powerful method than the three above, in that data can be extracted in
an arbitrary fashion and written likewise, however it is not interactive. It is described
briefly in section 6.4.18 below, and the API functions are described fully in the Javascript
Interface Appendix.
Page 6.162
User manual Version 9.3, Rev. 0, September 2008
Oasys D3PLOT
6.14.1 Creating a new user-defined
component
The steps to be gone through are:
1.
Use New... to start a new component definition
2.
Choose one of the six possible data classes:
Node scalar A single scalar value at nodes
Node
vector
A [x,y,z] vector at nodes (3 values)
So/Sh
scalar
A single scalar value at solids, shells, thick
shells
So/Sh
tensor
A [xx,yy,zz,xy,yz,zx] tensor at ditto (6
values)
Beam
scalar
A single scalar value at beams
Beam
vector
A [x,y,z] vector at beams (3 values)
1.
Define a component name. A default name will be
generated, but any name (up to 30 characters, an unique)
may be used.
2.
Define a data source from one of:
Read from
file
Data is read from externally supplied ascii
data file(s)
Simple
formula
Data is calculated internally from a
"simple" formula using standard internal
data and arithmetic.
Javascript
file
Data is calculated externally using a
Javascript file.
1.
Define a "root" data filename, simple formula or
Javascript filename depending on the data source.
2.
Finally CREATE the new component to save it.
There is also a category of "User Defined Binary Components",
referred to as UBIN, that may only be generated by the
separate Javascript interface to D3PLOT (not to be confused
with the "Javascript file" data source referred to here). See the
Javascript Interface documentation for more information about
these.
Page 6.163
Oasys D3PLOT
User manual Version 9.3, Rev. 0, September 2008
6.14.2 Editing an existing user-defined component
An existing component may be edited at any time.
•
Click on Edit...
•
Choose the component to be edited from the menu
•
Change its attributes.
•
Click on Update to save the changes
The component name and data source may be changed ad lib, but the basic class of the component (Node/SoSh/Beam
and Scalar/Vector/Tensor) can not be altered. To change the component class it is necessary to delete it and then
recreate it using the new class.
Page 6.164
User manual Version 9.3, Rev. 0, September 2008
Oasys D3PLOT
6.14.3 "Read from File"
This method assumes that data in the appropriate format has been generated externally and saved in ascii format data
files.
Filename syntax
A separate file is required for each state, and its name is determined from the "root" filename supplied. This must be of
the form
<name>nnn<.ext>
<name> Is an arbitrary prefix
nnn
Is one or more digits.
<.ext> Is an arbitrary
extension
Where:
For example a valid filename might be"nodal_1.dat" (decomposes to <nodal_>,
<1>, <.dat>)
The actual number used in the "root" filename is not material, it must just be a
digit from 0 - 9.
For each state the digit <nnn> is replaced with the number of the state, so in the example above D3PLOT would look
for the file sequence:
nodal_1.dat for state #1, nodal_2.dat for state#2, and so on.
The number nnn can have up to 10 leading zeros, so both nodal_1.dat and nodal_0001.dat would be
acceptable filenames, and the number of leading zeros does not have to be the same for each state.
If a file for a given state is not found then values of 0.0 will be used for that state.
Page 6.165
Oasys D3PLOT
User manual Version 9.3, Rev. 0, September 2008
File content and structure.
In all files:
•
Blank lines are ignored.
•
Lines starting with #, % or $ are treated as comment lines and are ignored.
•
Input is not case-sensitive: any mixture of upper and lower case can be used.
•
Numeric input is "free": no particular field width or column number is implied.
•
Field separators may be spaces, tabs or commas.
•
Each row of data must be on a single line.
•
Maximum line width is 256 characters.
The formats of the various data types are as follows:
Scalar data
One of
Optionally:
Optionally:
NODE SCALAR
A new header can appear at any time to start a new data category.
SOLID SCALAR
BEAM SCALAR
SHELL SCALAR
TSHELL SCALAR
DEFAULT <value>
A default of 0.0 is assumed if this line is not present
SURFACE TOP or MIDDLE or Ignored for Node, Solid or Beam data.
BOTTOM
or
For shells the current surface is assumed unless a SURFACE or
LAYER <layer no>
LAYER line is defined.
<label> <value>
If <label> is not found in the model the line is ignored.
<label> <value>
Entities which don’t have a value line are given the default value.
Followed by
any
number of
lines
Example of a nodal scalar data file:
Example of a shell scalar data file:
NODE SCALAR
SHELL SCALAR
default 400.0
default 10.0
12
13
14
15
16
17
surface top
1.382457E+02
-4.655358E+01
-2.706973E+02
-2.615501E+02
-1.364710E+02
8.553621E+00
Page 6.166
1 1.23456e+02
2 2.34578e-02
User manual Version 9.3, Rev. 0, September 2008
Oasys D3PLOT
Vector data
One of
NODE VECTOR
BEAM VECTOR
Optionally:
DEFAULT <3 values:
x,y,z>
Followed by
<label> <3 values:
any
x,y,z>
number of lines <label> <3 values:
x,y,z>
Example of a nodal vector data file:
A new header can appear at any time to start a new data category.
Vector data is not valid for solids, shells or thick shells
A default of (0.0, 0.0, 0.0) is assumed if this line is not present
If <label> is not in the model found the line is ignored.
Entities which don’t have a value line are given the default vector
value.
NODE VECTOR
default 1.0 2.0 3.0
1 6.988275E+02 1.032284E+02
-1.468281E+02
2 7.038895E+02 7.875581E+01
-1.475109E+02
3 7.089514E+02 5.428316E+01
-1.481938E+02
4 7.140133E+02 2.981051E+01
-1.488766E+02
5 7.190753E+02 5.337874E+00
-1.495595E+02
6 7.241373E+02 -1.913478E+01
-1.502424E+02
7 7.291992E+02 -4.360743E+01
-1.509252E+02
8 7.342611E+02 -6.808007E+01
-1.516081E+02
9 7.393231E+02 -9.255272E+01
-1.522909E+02
10 7.375262E+02 -9.361953E+01
-1.273784E+02
Page 6.167
Oasys D3PLOT
User manual Version 9.3, Rev. 0, September 2008
Tensor data
One of
SOLID Followed TENSOR
SHELL by one of TENSOR_UPPER
TSHELL
TENSOR_LOWER
TENSOR implies linear data order
TENSOR_UPPER implies upper
triangular order
TENSOR_LOWER implies lower
triangular order
[xx, yy, zz, xy,
yz, zx]
[xx, xy, xz, yx,
yy, zz]
[xx, yx, yy, zx,
zy, zz]
(The tensor is implicitly symmetric)
Optionally:
DEFAULT <6 values>
A default of [0.0, 0.0, 0.0, 0.0, 0.0, 0.0] is assumed if this
line is not present
If a default is supplied it must be in the order implied
above.
Optionally:
Followed by
any
number of
lines
SURFACE TOP or MIDDLE or
BOTTOM
or
LAYER <layer no>
Ignored for Solid data.
<label> <6 values>
<label> <6 values>
If <label> is not found in the model the line is ignored.
For shells the current surface is assumed unless a
SURFACE or LAYER line is defined.
Data must be in the tensor order implied by the header
above
Entities which don’t have a value line are given the default
values.
Example of a nodal scalar data file:
SHELL TENSOR
Default 1.0 2.0 3.0 4.0 5.0 6.0
Layer 1
1 1.1567E+02 -3.9286E+01 -1.2514E-01 -1.2733E+01 3.8389E+00 -4.6773E+00
2 7.0594E+00 3.7640E+00 -1.1621E+00 5.0975E+01 9.0807E+00 -9.8825E-01
3 1.0105E+02 1.4159E+01 9.5627E-01 1.1344E+01 -3.2170E+00 -8.7537E+00
4 1.4473E+00 -5.2854E+01 1.7974E+00 2.5017E+01 -1.0200E+01 -5.3932E+00
5 8.9096E+01 -4.0171E+01 3.4451E-01 -4.2868E+00 3.0106E+00 -6.8030E+00
6 7.1164E+00 9.4949E+00 -1.1046E+00 4.2835E+01 4.2636E+00 1.6420E+00
7 2.4371E+02 2.0140E+01 -1.7336E+01 -7.3324E+01 -3.4727E+00 -1.1746E+01
8 2.1562E+02 3.8205E+01 2.8096E+00 -4.1887E+01 1.1632E+01 -1.0129E+01
9 2.2813E+02 2.3411E+01 1.8917E+01 -6.7636E+01 1.1483E+01 -1.0553E+01
10 1.9249E+02 -2.1300E+01 -1.3462E+00 -4.9531E+01 -5.8716E+00 -8.7624E+00
6.14.4 "Simple Formula"
Calculates results from a "simple" mathematical formula using built-in data components and standard maths operations.
All calculations are performed using floating point arithmetic and produce a single result, thus:
•
Scalar components are evaluated from a single formula
•
Vector components use three (independent) formulae: one for each of [x,y,z]
•
Tensor components use six formulae, one for each of[xx,yy,zz,xy,yz,zx]
Page 6.168
User manual Version 9.3, Rev. 0, September 2008
Oasys D3PLOT
Syntax rules for Simple Formulae
Formulae follow typical "computer programming" syntax, using commonly understood operators.
Operators supported:
*, /, +,
-
Multiply, divide, plus and minus
* and / take precedence over + and -
** and
^
To the power of. Thus "x**2" is "x squared" Note that "^" is Fortran syntax, not the C "exclusive OR"
operator.
%
Modulus operator (x % y is remainder of x /
y)
There is also a "mod" maths function.
( ... )
Brackets may be nested to any (reasonable)
level
(...) take precedence over all other operators
Note: all arithmetic is floating point, thus both "5.0 / 2.0" and "5 / 2" will both deliver the answer 2.5
A formula must be a single line, up to 256 characters long.
Page 6.169
Oasys D3PLOT
User manual Version 9.3, Rev. 0, September 2008
Standard D3PLOT "built in" data components supported
Category
Acronym
Description
Acronym
Description
Nodal data
bx
by
bz
Basic X
coordinate
Basic Y
coordinate
Basic Z
coordinate
vx
vy
vz
vm
X velocity
Y velocity
Z velocity
Velocity
magnitude
cx
cy
cz
dx
dy
dz
dm
Current X
coordinate
Current Y
coordinate
Current Z
coordinate
ax
ay
az
am
temp
X acceleration
Y acceleration
Z acceleration
Acceleration
magnitude
Temperature
X displacement
Y displacement
Z displacement
Displacement
magnitude
Solid and
shell data
Stress and strain tensor-derived data is extracted in the global frame of reference
unless the "l" (for "local") suffix is added to the component acronym, in which
case it is extracted in the element local system. See below for how the Frame of
Reference transformation applies to Simple formula components.
Global tensor components
sxx
syy
szz
sxy or
syx
syz or
szy
szx or
sxz
XX stress
YY stress
ZZ stress
XY stress
(symmetric)
YZ stress (ditto)
ZX stress (ditto)
exx
eyy
ezz
exy or
eyx
eyz or
ezy
ezx or
exz
XX strain
YY strain
ZZ strain
XY strain
(symmetric)
YZ strain (ditto)
ZX strain (ditto)
Element Local tensor
components
sxxl
syyl
szzl
sxyl or
syxl
syzl or
szyl
szxl or
sxzl
XX stress
YY stress
ZZ stress
XY stress
(symmetric)
YZ stress (ditto)
ZX stress (ditto)
exxl
eyyl
ezzl
exyl or
eyxl
eyzl or
ezyl
ezxl or
exzl
XX strain
YY strain
ZZ strain
XY strain
(symmetric)
YZ strain (ditto)
ZX strain (ditto)
Non-directional components
derived from tensor data
svon
smax
smid
smin
sav
sms
von Mises stress
Max principal
stress
Mid principal
stress
Min principal
stress
Average stress
(pressure)
Max shear stress
evon
emax
emid
emin
eav
ems
von Mises strain
Max principal
strain
Mid principal
strain
Min principal
strain
Average strain
(pressure)
Max shear strain
epl
Effective plastic
strain
Page 6.170
User manual Version 9.3, Rev. 0, September 2008
Oasys D3PLOT
Category
Acronym
Description
Acronym Description
Shell only data
rfx
rfy
rfxy
rqx
rqy
rmx
rmy
rmxy
Fx resultant force
Fy resultant force
Fxy resultant force
Qx resultant force
Qy resultant force
Mx resultant moment
My resultant moment
Mxy resultant moment
thk
area
Shell Thickness
Shell Area
eden
hgen
tstp
mass
madd
Internal energy
density
Hourglass energy
Timestep
Mass
Added mass
Solid only data erate
Strain rate
vol
rvol
Element Volume
Element Relative
volume
Beam only
data
bfx
bfy
bfz
bfr
Axial force
YY shear force
ZZ shear force
Resultant force
bmxx
bmyy
bmzz
brm
XX torsional moment
YY bending moment
ZZ bending moment
Resultant moment
bsxx
bsyx or
bsxy
bszx or
bszx
bep
beax
XX axial stress
YX shear stress
(symmetric)
ZX shear stress (ditto)
Plastic strain
Axial strain
bsax
bpe1
bpe2
bry1
bry2
brz1
brz2
bmy1
bmy2
bmz1
bmz2
baen
bie
brxx
Total axial strain
Plastic energy at
end 1
Plastic energy at
end 2
Y rotation end 1
Y rotation end 2
Z rotation end 1
Z rotation end 2
Y moment end 1
Y moment end 2
Z moment end 1
Z moment end 2
Axial energy
Internal energy
Torsional rotation
"Extra" and
ALE data
soxn
shxn
Solid Extra component #n
Shell Extra component #n
bbed
baed
bied
ammgn
amssn
adens
adomf
Contact data
csn
cst
csx
csy
Contact
Contact
stress
Contact
Contact
Normal Stress
Tangential
local X stress
local Y stress
These are contact segment
data averaged at nodes
User-defined
components
unosn
usssn
ubmsn
Nodal scalar component
#n
So/Sh scalar component
#n
Beam scalar component #n
cfgx
cfgy
cfgz
cflx
cfly
cflz
cfm
Bending energy
density
Axial energy density
Internal energy
density
Ale Multi-Matl group
#n
Mass of MM group #n
Ale density
Ale dominant
fraction
Contact global X
force
Contact global Y
force
Contact global Z
force
Contact local X
force
Contact local Y
force
Contact local Z
force
Contact force
magnitude
} Simple formulae may reference other
user} defined components as well as the
standard
} components above.
Page 6.171
Oasys D3PLOT
User manual Version 9.3, Rev. 0, September 2008
Applicability of the "Standard" data components in the table above
The data components above are all implicitly available for nodes.
•
Where the data is nodally-derived (eg current X coordinate cx) then the value is used directly.
•
Where the data is element-derived (for example beam axial force bfx, or contact stress csn) then the nodal
value will be the average of all elements of the relevant type meeting at that node.
Elements may only use components of their "native" type, or nodally-derived data.
•
Where an element data component matches the element type (eg X stress sxx for shells, or YY bending moment
bmyy for beams) then it is used directly.
•
Where an element references a nodally-derived data component (eg X displacement dx) the value used will be
the average of all nodes on that element.
•
Where an element references an element-derived data component of a different type (eg a shell element refers to
beam axial force bfx) then the result will be zero
Applicability of programme settings: Integration point, frame of reference, etc.
•
Data is extracted "per integration point" for user-defined components, and it is not currently possible to specify
data from some explicit integration point within a Simple Formula, meaning that you cannot use this method to
assemble data from multiple integration points in an element.
•
The current global / local / cylindrical "frame of reference" (see section 4.2.4.3) does not apply when a Simple
Formula uses raw tensor components (eg Sxx) for solids and shells. The unqualified acronym (Sxx, Syz, ...)
always extracts global data, and the acronym with an "l" suffix (eg Sxxl, Sxzl) always extracts element local
data.
However if you build a tensor Simple Formula (6 formulae) for solids or shells then the current "Frame of
reference" is applied when it is used. In other words tensor Simple Formulae are treated as "raw data" once
created, exactly like analysis data read from disk, and are subject to the same transformations. (Scalar and vector
user-defined components are not transformed.)
Page 6.172
User manual Version 9.3, Rev. 0, September 2008
Oasys D3PLOT
Maths functions supported:
General functions
sqrt(x)
mod(x,y) (modulo x / y)
log(x) (natural log)
max(x1,x2)
log10(x) (log base 10) min(x1,x2)
exp(x) (e to the x)
Trigonometric functions sin(x)
(use radians, not degrees) cos(x)
tan(x)
Hyperbolic functions
sec(x)
csc(x)
cot(x)
sinh(x)
cosh(x)
tanh(x)
abs(x)
int(x) (truncate to integer)
nint(x) (nearest integer)
ceil(x)
floor(x)
asin(x)
acos(x)
atan(x)
atan2(x, y)
asinh(x)
acosh(x)
atanh(x)
.
Arithmetic types used.
ALL calculations in simple formulae are processed using double precision floating point arithmetic. This includes
constants, and means that the "integer arithmetic" conventions of languages such as Fortran or C, and their associated
truncation, do not apply.
For example the expression 5 / 2 is converted to 5.0 / 2.0, and so returns the result 2.5
Also the "integer" functions above (int, nint, ceil, floor) return integer values, but expressed as floating
results.
For example nint(3.141592) evaluates to 3.0
Examples of simple formulae
(sxx + syy + szz) / -3.0
Standard calculation for average
stress
1 / sqrt(2) * sqrt((sxx-syy)**2 + (syy-szz)**2 +
(szz-sxx)**2 + 6*(sxy**2 + syz**2 + szx**2))
Standard calculation for von
Mises stress
sxx*exx + syy*eyy + szz*szz + sxy*exy + syz*eyz +
szx*ezx
An estimate of strain energy
density in a fully plastic section
Note that the "built in" data components described above can be referred to as simple acronyms, whereas maths
functions require their arguments to be placed inside brackets.
Defining a scalar formula
In the case of a scalar component only a single formula is used.
In the example here the user is calculating pressure at nodes from
stress components.
Page 6.173
Oasys D3PLOT
Defining a vector formula
In the case of a vector component three formulae are used, one for
each of the [x,y,z] components. These are three wholly separate
formulae which are evaluated independently.
In the example here the user is applying factors to displacements at
nodes.
Note that each row must have a formula defined for the component
to be valid.
Defining a tensor formula
In the case of a tensor component six formulae are used, one for each
of the [xx,yy,zz,xy,yz,zx] components. These are six wholly separate
formulae which are evaluated independently.
In the example here the user is extracting only the in-plane (2D)
components of strain for an element.
As with vectors each row must have a formula defined for the
component to be valid even if, as here, some row values set
explicitly to zero.
Page 6.174
User manual Version 9.3, Rev. 0, September 2008
User manual Version 9.3, Rev. 0, September 2008
Oasys D3PLOT
Further notes on Simple Formulae
Handling errors and missing data
If the expression being evaluated is grammatically legal, but not valid in a given context, then zero is returned. Typical
examples are:
•
If a formula references a built-in data component that is not present in the model database.
•
If a mathematically illegal operation is attempted, such as divide by zero or the square root of a negative number.
Evaluation of element quantities at nodes
If an expression refers to an element data component, for example sxx, but is being evaluated for a node, then the
relevant value is averaged from all legal elements at that node subject to the current averaging rules in force.
This can result in elements of more than one type being used: in this example component sxx, X stress, can be present
in solids, shells and thick shells, so if multiple element types use the node then the value will contain contributions from
all of them.
In general you should avoid contouring element quanties evaluated at nodes, since the effect is to smear out results and
hence miss peak values at element centres. The result is identical to "low resolution" contouring of element data for
scalar components.
Evaluation of nodal quantities at elements.
If an expression refers to a nodal quantity, for example cx current X coordinate, but is being evaluated for an element,
then the average value from all the nodes on that element is used.
Limitations of simple formulae
Simple formulae are powerful and very easy to use, but they do have limitations:
•
They only operate on the current node or element, at the current surface or layer if relevant.
•
They do not permit conditional expressions: you cannot use "if(...)" expression syntax
6.14.5 Javascript file
The third way of creating user-defined data components is via an externally defined
Javascript file. Each node or element runs a short Javascript, the result of which becomes
its value.
The Javascript capability in D3PLOT is still under development, but it currently provides the following:
•
Access to the full range of "built in" data components, as supported by "simple formulae" above.
•
Access to other element properties via further data functions.
Using these capabilities expressions can be evaluated in real-time outside D3PLOT, possibly with reference to external
data, and then fed back in for plotting.
The Javascript file method is limited in that it can only work on the current node or element, however it does provide a
bit more functionality than Simple Formulae in that conditional ("if") statements can be used making it possible, for
example, to generate results from an internal lookup table.
For more complex processing it is recommended that you consider generating UBIN components using the main
Javascript interface, see section 6.14.8 below for more information.
Page 6.175
Oasys D3PLOT
User manual Version 9.3, Rev. 0, September 2008
How the Javascript user components work
•
•
•
•
You create a Javascript file (by convention ".js") outside D3PLOT using standard expressions, and also
references to built-in data components.
This is defined as the evaluation method for a user-defined component, currently limited to scalar components.
It is test compiled to check for syntax errors, and if it is OK the compiled script is stored as the evaluation
method for this component
Thereafter nodes or elements run the compiled script on demand to obtain results.
The value used is the return value of the Javascript function. By convention this is the result of the final executable
statement.
The (generally small) Javascript function is run for every element or node that requires data evaluation, so for a large
model there may be some delay while all the values are computed.
Using built-in data components
The full range of data components used for simple formulae is available, with the following differences:
•
Each component is a function in Javascript, not a variable. Therefore it uses the acronym in the simple formula
table above followed by (..). For example:
sxx, X stress, is referred to as sxx() inside Javascript. Note that the function has no arguments.
•
Variable components above, eg "extra" values such as sox, pass the variable as the function argument. For
example:
sox3, Solid Extra component #3, is referred to as sox(3) inside Javascript
Using maths functions
Maths functions in Javascript are supplied by a "Math" class built into the language. For example:
Math.sin(x) evaluates sine (x)
Math.sqrt(y) evaluates the square root of (y)
Extra functions provided for Javascript
At present these are limited to:
label()
Returns the label of the item (eg node or element) currently being evaluated
pid()
Returns the part number of the element currently being evaluated. Zero is returned if called for an
item that does not reference a part.
print(args) Will write <args> to the controlling terminal.
Page 6.176
User manual Version 9.3, Rev. 0, September 2008
Oasys D3PLOT
Examples of Javascript function
This function evaluates von Mises stress.
i = (sxx() - syy());
j = (syy() - szz());
k = (szz() - sxx());
l = Math.sqrt(i*i + j*j + k*k + 6 * (sxy()*sxy() + syz()*syz() +
szx()*szx()));
result = 1 / Math.sqrt(2) * l;
Those used to Fortran or C programming should note that Javascript is a very weakly typed language: numeric variables
are "numbers", not integers, floats or other specific data types. Expressions are evaluated using double precision
floating point arithmetic.
6.14.6 Saving and reloading
user-defined components.
All types of user-defined component described above can be saved
in a "User Component File" called "d3plot.ucf" using the Save
component button, which will save the current component in the
file for future reuse.
Likewise Reload saved will present a menu of components found
in the "d3plot.ucf" file, and choosing one will import its settings for
the component you are currently editing or creating.
Save component Saving the current
component to file.
When you Save the current component you are asked to choose:
•
Which file(s) to save it in.
$OASYS is the system-wide file, usually where the software is installed.
$HOME on Unix/Linux ($USERPROFILE on Windows) is your home directory
$CWD is the current working directory
The formula will be saved in all files selected for which you have write permission.
•
Overwrite existing determines what happens if the name of the component to be stored matches one already
in the file.
If you choose to overwrite then the original component in the file will be overwritten with the new definition.
Otherwise the current component’s name will be added to the file, with its name modified by adding the suffix #1
(or #2, ...) to make it unique.
Name comparison is not case-sensitive, but does consider embedded white space. For example:
"My beam component" is treated as being identical to "MY BEAM COMPONENT"
Page 6.177
Oasys D3PLOT
User manual Version 9.3, Rev. 0, September 2008
Reload saved Reloading a component from
disk to the current definition
When you choose to Reload saved the various "d3plot.ucf"files
are scanned for components that match the current type, and these
are listed in a menu for selection.
In this example the user is using a Simple Formula to define a
solid/shell tensor, and there are three components to choose from.
Note that the component "My true tensor" has previously been stored
twice, and because "overwrite" was not used the second definition
has had "#1" added to it to make its name unique. (This is because
D3PLOT requires components to have unique names, otherwise its
internal parsing of components by name can get confused).
Automatic reloading of user-defined components.
When D3PLOT starts it automatically scans any "d3plot.ucf" files and loads any "unique" components, meaning that
saved user-defined components automatically become available in a new session.
On start-up it scans the following directories:
$OASYS
Typically where the software is installed, and suitable for system-wide components.
You may not have write permission to this directory
$HOME (Unix/Linux)
$USERPROFILE
(Windows)
Your home directory. This would be suitable for components you want to use for a
range of projects.
$CWD (Current working
directory)
The location of this varies:
•
On Unix/Linux it will normally be the directory from which you started
D3PLOT
•
On Windows it will be the "start in" directory defined on an icon, unless
over-ruled by a command-line "start-in" argument
If you double-clicked on a file, or dragged a file onto the D3PLOT icon it will
be the directory of that file.
In addition whenever a new model is opened any "d3plot.ucf" file in that model’s directory is scanned, and any "unique"
components are loaded.
Definition of a "unique" component
A component is deemed to be "unique" if:
•
Its name does not match any currently stored component.
As explained above name matching is not case sensitive, but does consider embedded white space.
and
•
Its data row(s) do not match stored data rows(s)
FILE and JAVAscript filename comparisons are made verbatim.
FORMulae matching ignores both case and embedded white space. (ie the formulae are compressed to remove
any white space before testing for matches)
If a component read from file is found not to be unique, ie it has already been read and stored, then it is ignored. In this
way multiple reads of the same file, or the presence of a formula in more than one file, will not result in multiple
definitions being read and stored.
If a component name matches, but its content (data rows) does not, then it is read in and its name has "#1, #2, etc"
added to make it unique.
Page 6.178
User manual Version 9.3, Rev. 0, September 2008
Oasys D3PLOT
The Format of the "d3plot.ucf" file
Components are saved in the generic format:
<Type> <Source>
<Name>
<Definition row
#1>
:
:
(Up to five further rows)
<Type> is one of
NODE_SCALAR
NODE_VECTOR
<Source> is one of
FILE
FORM(ula)
JAVA(script)
<Name>
Is a user-defined name up to 30 characters long
For FILE a single row
A filename up to 256 characters long
For FORM 1, 3 or 6
formulae. Each
on a new line, and each
up to 256
characters long.
xxxx_SCALAR
xxxx_VECTOR
xxxx_TENSOR
For JAVA a single row
A filename up to 256 characters long
SOSH_SCALAR
SOSH_TENSOR
one formula
three formulae
six formulae
BEAM_SCALAR
BEAM_VECTOR
<scalar>
<x, y, z>
<xx,yy,zz,xy,yz,zx>
The file is free-format ascii (text) and is not case sensitive.
Each row must be on a single line, up to 256 characters long.
Blank lines are ignored.
Lines starting with "%", "$" or "#" in column 1 are treated as comments, and are also ignored.
The only exception is that on Unix/Linux systems filenames are case-sensitive and they will be stored exactly as
they have been defined.
The file may be hand-edited using a normal text editor. It will also be updated by the Save and Reload options
described above.
Here is an example of a typical file
$ Example file, created for user manual 1/11/2007
NODE_VECTOR FILE Example of nodal vector file
i:\demos\example1.dat
NODE_SCALAR FORM Example of scalar node form
sqrt(dx + dy + dz)
BEAM_VECTOR FORM Example of vector beam form
fx * eax
fy * eyz
fz * ezx
SOSH_TENSOR
sxx * exx
Syy * Eyy
sxx * ezz
sxy * exy *
syz * eyz *
szx * ezx *
FORM Example of elem tensor form
0.5
0.5
0.5
BEAM_SCALAR JAVA Example of beam scalar Java
/local/demos/javascript/beam_scalar.js
Page 6.179
Oasys D3PLOT
User manual Version 9.3, Rev. 0, September 2008
6.14.7 Using user-defined data component
Once they have been created user-defined components become available for use in all contexts where "built-in"
components may be used:
•
2D/3D plotting
•
Beam plotting
•
Vector plotting
•
WRITE and XY_PLOT output
In 2D/3D plotting
In this context the User > button(s) will become "live" in the
Nodal results (outlined in red) and/or Solids and
shells (outlined in green) contexts if components of the relevant
types have been defined.
Under each category scalar and vector/tensor components are listed
separately. Scalar components are selected directly, and the
individual sub-components of the vector/tensor cases may be
selected from popup sub-menus.
Selecting Nodal Vector sub-components
Page 6.180
Selecting Element tensor sub-components
User manual Version 9.3, Rev. 0, September 2008
Oasys D3PLOT
In Beam Plotting
As with 2D/3D plotting the User > button will become
"live" if user-defined components for beams are created.
Sub-components for vector types are selectable in exactly
the same way.
In Vector Plotting
In this context any Nodal Vector user-defined components are added
to the standard list of components (Disp, Vel, Accel) eligible for vector
mode (arrow) plotting.
Obviously in this context the vector component as whole is selected, as
all three terms are used to generate the image.
In WRITE and XY_PLOT panels
In these two contexts the User... button will become live in exactly
the same way as described above if the relevant user-defined
components have been defined.
The context shown here is for nodes, but the same applies to
element-derived data.
The sub-menus give access to the top level user-defined
components, and below that popup menus give access to the vector
and tensor sub-components, again exactly as above.
6.14.8 "User Defined Binary" (UBIN) components generated from
the Javascript interface
There is a fourth class of user-defined data component that shares all the attributes of those described above, which is
used with the Javascript interface (described in section 11, and not to be confused with the "Javascript file" method
above).
UBIN components are far more powerful than the methods above since data can be extracted for any node or element,
from any state and at any integration point; and it can be written anywhere in the same way. In addition the Javscript
API allows data to be read from and written to external disk files, so UBIN components can be created from any mix of
internal and external data using algorithms of arbitrary complexity.
UBIN components are used in the same way as the three types above except that:
•
UBIN components can only be created and manipulated via the Javascript interface.
Page 6.181
Oasys D3PLOT
•
•
User manual Version 9.3, Rev. 0, September 2008
They are cached on disk in <jobname>.ubd files alonside the normal database files, meaning that they persist
across D3PLOT sessions.
Their data is stored in compact binary form, meaning that access is quick but <jobname>.ubd files are not
editable.
Once a UBIN component has been created in the Javascript it will appear in the lists and menus of user-defined
components, and can be used in exactly the same was as any of the other user-defined components described above.
The creation and management of UBIN components is described in more detail in the Javascript Interface Appendix.
Page 6.182
User manual Version 9.3, Rev. 0, September 2008
Oasys D3PLOT
7 IMAGES
The IMAGES option allows static screen images and animations to be captured and also to be read in as background.
"Bitmap" static images and animations are handled using the menu below, whilst for Laser plotting see 7.3 LASER
PLOTTING.
7.0 Creating static images
and movies
CAPTURE
Captures a single static frame in one of the following
formats:
Page 7.1
Oasys D3PLOT
User manual Version 9.3, Rev. 0, September 2008
8-bit file formats
BMP
Uncompressed
Uncompressed 8 bit Microsoft windows bitmap. The
approximate size of the file (in bytes) is file size= image
width * image height
BMP
Compressed
8 bit RLE Microsoft windows bitmap.
PNG
8 bit Portable Network Graphics
GIF
Graphics Interchange Format
24-bit file formats
BMP
Uncompressed 24 bit Microsoft windows bitmap. The
approximate size of the file (in bytes) is file size = 3 *
image width *image height
PNG
24 bit Portable Network Graphics
JPG
JPEG (Joint Photographic Experts Group) file
PPM
Uncompressed Portable PixMap. The approximate size of
the file (in bytes) is
file size = 3 * image width *image height
Various .bmp formats are available, and there are Controls for the dithering of
the 8 bit-plane variants and palette optimisation .
RESOLUTION
All images can be output at either the screen resolution or at a resolution of either
2 or 4 times the screen resolution.
The widths of lines will appear to get narrower at 2 or 4 times the screen
resolution. Scaling can be turned on to make the line widths match those on
display.
Page 7.2
User manual Version 9.3, Rev. 0, September 2008
Oasys D3PLOT
CAPTURE
Captures the current animation in one of the
following formats:
AVI
(.avi)
MPEG (.mpg)
GIF
(.gif)
The file format, replay characteristics and frame
repeat parameters can be defined.
Multiple Windows
When multiple windows are present,
any or all of these may be included in
the images and animations by using
the tabs and dropdown menu. If the
T/HIS link is open the menu will
have two columns; one for D3PLOT
windows and one for T/HIS
windows. The captured image will be
the size of the window.
Page 7.3
Oasys D3PLOT
Capturing composite images
of Linked T/HIS and
D3PLOT Windows
When linked T/HIS is running it is possible to
capture a composite image of both D3PLOT and
T/HIS windows, and in addition windows may be
made partially transparent. This is useful if the
T/HIS window is a child of a D3PLOT window so
that the underlying D3PLOT image can be seen.
The figure below shows an example of a 50%
transparent "docked" T/HIS image overlying the
D3PLOT one.
In the undocked or "sibling" cases a composite
image will be the size of the rectangular bounding
box required to enclose the selected windows.
Page 7.4
User manual Version 9.3, Rev. 0, September 2008
User manual Version 9.3, Rev. 0, September 2008
Oasys D3PLOT
7.1 Static file formats supported
JPEG
Joint Photographic Experts Group compressed format. This gives image quality nearly
comparable to 24 bit-plane bitmaps, but with a file of < 5% the equivalent size. JPEG format
is supported by all common visualisation packages and is recommended for all applications
unless image quality is of paramount importance.
8 Bit Compressed
BMP :
8 bit runlength encoded (RLE) Microsoft windows bitmap.
8 Bit
Uncompressed
BMP :
8 bit uncompressed Microsoft windows bitmap. The approximate size of the file is [image
width * image height] bytes.
24 Bit
Uncompressed
BMP:
24 bit uncompressed Microsoft windows bitmap. The approximate filesize is [3 * image width
* image height] bytes.
PNG:
24 bit lossless compressed Portable Network Graphics image. PNG offers the similar degree
of compression as GIF but has better colour quality.
GIF:
8 bit lossless compressed Graphics Interchange Format.
PPM:
24 bit uncompressed Portable PixMap. The approximate size of the file is [3 * image width
*image height] bytes.
7.1.1 Controls on the quality of 8
bit-plane bitmap files.
24 bit BMP files tend to be huge, and the space saved by
using the compressed 8 bit format is attractive. The
trouble is that without further processing the image
quality obtained when 24 bit images are truncated to 8
bits is definitely not!
The problem is the number of colours available in the 8
bit format is 2**8 = 256, and this gives rise to "banding"
when the least significant bits of the original colour
definitions are lost as the original 16 million colours are
truncated.
Dither image
The following sequence of images show how the different levels of dithering affect the quality and file size of a
compressed 8 bit image, comparing it with the JPEG equivalent.
For static images there is no advantage in using BMP files over JPEGs: they are larger and of inferior quality.
However if you are unable to use MPEG animation, and have to revert to AVI format, the various permutations of
image quality and filesize below will be of interest when trying to obtain the best compromise between image quality
and overall file size.
The ideal would be an AVI file composed of JPEGs, or MJPEG format. Sadly all such formats are proprietary and,
perhaps as a consequence, are not supported by the typical players currently available. Hopefully this will change in
the future.
Page 7.5
Oasys D3PLOT
User manual Version 9.3, Rev. 0, September 2008
Here is the original 24 bit-plane image, saved as a
JPEG file. Size 5.1kB
This is the undithered equivalent bitmap image. Size 7.3kB.
Note how the discretising affect of mapping onto a limited
colour palette has caused "banding" which makes the image
almost unusable. However at least the files are small!
"Dithering" is a technique in which an ordered pattern of
noise, xxxxx in the table below, is added to the least
significant bits of a colour value to make it alternate
between two adjacent shades.
Consider the bits for a single colour in this image that
have been truncated from 24 bits (8 bits each of Red,
Green and Blue). Truncated bits are shown in lower case.
Original Red byte
001?????
truncates to
001ooooo
Adding the dither pattern oooxxxxx to the bottom 5
bits of the original byte gives
001????? + oooxxxxx giving
either
or
001ooooo
010ooooo
Here is a dithered version of the image above, size 8kB.
The result may be truncated to 001ooooo, or the
Some banding is still visible, but it has been reduced to an
increased to the next shade up 010ooooo, depending on acceptable level, and the coarsening of spatial resolution is
the trailing bits ????? and the noise value xxxxx at also evident.
that pixel.
Generally dithering gives the best results for animated 8 bit
The effect is to produce a composite shade that is
images
somewhere between the two originals.
Palette Optimization
When 8 bit images are produced the 24 bit palette has to be reduced to only 256 colours. To do this the best way is to
use Palette Optimization to choose the most representative colours used in the image.
Without Palette Optimization 256 colours can be chosen uniformly along the original 24 bit palette, missing out
important colours.
The following figures show the differences in images with Palette Optimization.
Page 7.6
User manual Version 9.3, Rev. 0, September 2008
This is the original image, saved as a GIF, with no
dithering or palette optimization. Size 6.1kB
Oasys D3PLOT
This is the image, saved as a GIF, with palette
optimization. Size 12.6kB
Note that whilst there are still bands, the coarseness of
them has diminished.
The two images above were created from a shaded image plot in D3PLOT and therefore contained a lot of different
colours. The banding is present because the palette has been reduced to the 256 most representative colours in the image.
The following figures are images of a contour plot in D3PLOT.
This is the image, saved as a GIF, with palette
optimization. Size 3.1kB
This is the image, saved as a GIF, with dithering. Size
3.7kB
Note that due to the smaller number of colours in the
image, there is no banding.
Dithering is not well suited to images with distinct colours
since by its nature it produces colours that are somewhere
in between neighbouring colours. This is effective with
shaded images, but not with images where there are sharp
changes of colour.
7.2 Animation file formats supported and their attributes
D3PLOT supports three animation formats:
Page 7.7
Oasys D3PLOT
AVI
(.avi)
User manual Version 9.3, Rev. 0, September 2008
Adapted Video for Internet.
This format acts as a "wrapper" around a sequence of static images, adding information about their content
and the replay rate required.
In principal any still image format can be wrapped in this way, but in practice commonly available players
only support a limited range of formats; and the coder/encoder ("codec") software for higher performance
formats tends to proprietary. For example the Indeo, Cinepak and Sorenson encodings are all copyrighted
and expensive to obtain.
D3plot supports MJPG(Motion JPEG) encoding from version 9.3 which gives great compression, and each
frame gets good image quality which is the same as a JPEG. D3PLOT supports also bitmap encoding
which, while it does not give good compression or image quality (unless the prohibitively voluminous 24
bit option is used), is at least in the public domain and will guarantee to play back in any package. The
dithering options (see Controls) that have been added in version 8.2 give a reasonable compromise
between image quality and file size when 8 bit compressed bitmaps are used.
MPEG
(.mpg)
Motion Picture Experts Group level 1 encoding.
This is a format with variable compression in which quality (in %) can be traded off against file size. In
D3PLOT the default quality is set to 90%, which gives results slightly inferior to the JPEG files.
In normal video streaming an MPEG video is designed to mix "I" frames, containing full information, with
several "P" frames, containing only the difference between this and the preceding "I" frame. This is based
on the assumption that "real life" scenes don’t actually change much between successive frames, and
sending only "difference" information in the "P" frames saves a lot of file space. D3PLOT generates only
"I" frames since the differences between successive frames are large.
The format is designed to play back at video speed of 25 frames/second, and hence it places quite severe
demands on the machine doing the playback. It is also limited to a window size of 768 x 576 pixels
according to the MPEG-1 standard. If either of these limitations pose a problem it may be necessary to
revert to AVI files.
Our experience has shown that a Pentium III processor of at least 500MHz is necessary to obtain
satisfactory replay under Windows. Moreover playback is better under the more recent versions of
software released by Microsoft, running under Windows 2000 or equivalent.
GIF
(.gif)
Graphics Interchange Format.
This format acts as a "wrapper" around a sequence of static GIF images, adding information about their
content and the replay rate required.
GIF animations will tend to be smaller than AVIs and MPEGs and have the advantage that they can be
inserted into Powerpoint as images. This means that unlike AVIs and MPEGs the files do not need to be
carried separately with the presentation.
7.2.1 FRAME_RATE Frame rate when played back
This option can be used to specify the desired playback speed in frames/second.
The playback speed of an AVI movie is encoded into the AVI file along with the length of the movie (seconds). If too
high a playback speed is requested then most AVI movie players will skip some frames to ensure that the movie plays
for the correct length of time.
The playback speed of a GIF animation is also encoded into the GIF file.
At present the frame rate of an MPEG movie cannot be controlled: the MPEG standard fixes this at 24, 25, 30 or 60
frames/second - we use 25 fps.
7.2.2 #REPEAT Number of repeats when played back
This option can be used to make some movie formats repeat themselves. The details vary by format as follows:
Page 7.8
User manual Version 9.3, Rev. 0, September 2008
Oasys D3PLOT
Repeating AVI files
Some AVI movie players contain an option to play a movie more then once, and if your player supports this option
you should use it for repeats since the AVI format is extremely inefficient in this respect: it requires <#frames x
#repeats> to be added to the file, which can make it very large.
However if your AVI movie player does not provide such an option then use #REPEAT to make the movie play
more than once. If 0 repeats are entered for "infinite" replay 32 repeats only will be encoded because of the file size
issue described above. If you must have more repeats then enter an explicit number in the range 1 to 65536, although
you should consider using animated GIFs instead, as these will loop any number of times with no file size penalty.
Repeating animated GIF files
GIF movies can also be made to repeat from 1 to 65535 of times, or if 0 repeats are entered the animation will play
indefinitely. There is no file size penalty for specifying repeats.
Repeating MPEG files
MPEG, being designed for video streams, does not include the concept of repeated looping back from the start so the
"repeat" option is not available. However most players will allow you to cycle repeatedly through MPEG files.
7.2.3 FORMAT AVI file formats supported
AVI movies can be written using a wide range of file formats. D3PLOT supports the following four, since they have
been found to play successfully using ’xanim’ on a range of UNIX machines and Microsoft’s ActiveMovie on PC’s.
MJPG:
Each frame within the movie is stored as an 24 bit JPEG image. This format offers the best
combination of quality and size and is recommended unless your player will not support it.
8 Bit Compressed
:
Each frame within the movie is stored as an 8 bit RLE Microsoft windows bitmap.
8 Bit
Uncompressed :
Each frame within the movie is stored as an 8 bit uncompressed Microsoft windows bitmap.
The approximate size of the movie is: [#frames * image width * image height] bytes
24 Bit
Uncompressed :
Each frame within the movie is stored as an 24 bit uncompressed Microsoft windows bitmap.
The approximate size of the movie is:
[3 * #frames * image width * image height] bytes
The Controls apply equally to the 8 bit formats here in exactly the same way as they do to static images.
7.2.4 QUALITY The playback quality of MPEG files.
MPEG compression is "lossy", and the degree of loss is defined via the quality setting in %: lower quality gives
smaller files, but the image quality degrades noticeably.
In D3PLOT the default quality is set to 90%, which gives an image quality marginally inferior to static JPEG images,
but definitely superior to the best 8 bit AVI formats. File size will be broadly equivalent to the size of the JPEG x the
number of frames in the animation.
(Quality does not apply to AVI or GIF files.)
7.2.5 MAX->MIN or MAX->MIN->MAX
Most AVI players are able to generate a 3600 modeshape animation from 1800 worth of frames, (the MAX->MIN
case). For those which are not use MAX->MIN->MAX which duplicates the frames to produce a full 3600 worth.
Page 7.9
Oasys D3PLOT
Next section
Page 7.10
User manual Version 9.3, Rev. 0, September 2008
User manual Version 9.3, Rev. 0, September 2008
Oasys D3PLOT
7.3 LASER PLOTTING
7.3.0 Introduction to Laser Plotting
By default all graphics images generated by D3PLOT are sent only to the screen, but you can choose to copy them to
laser files (postscript and pdf files for a laser printer).
This is done by pressing the "Plot" button when you are in Postscripts/PDF.
7.3.0.1 Laser language and file format used.
At present D3PLOT writes Postscript laser files, using PS ADOBE level 2.0 commands, and PDF files. These are
ASCII files that can be viewed and edited using any common editor.
"Encapsulated" Postscript files are not written, but later in Section 7.3.4 the very simple edits required to convert a
file to encapsulated form are given.
Laser output is switchable between A4 (297 x 210mm), A3(420 x 297mm) and US "letter" (11" x 8.5") paper sizes.
However the Postscript language makes it easy to edit files to fit other sizes.
The laser driver defaults to "PDF" file format, you can opt for "Postscript" laser file.
7.3.0.2 Number and orientation of plots on a page.
The laser driver defaults to "landscape" orientation, with one plot per page. You can opt for "portrait" orientation and,
in both cases, put multiple plots on a page in a variety of layouts.
7.3.0.3 Resolution setting.
Postscript and pdf files generated can have higher than current screen resolution. Screen resolution, twice and four
times screen resolutions are all available.
Page 7.11
Oasys D3PLOT
User manual Version 9.3, Rev. 0, September 2008
7.3.1 LASER Controlling laser
plotting using the Laser
Plotting panel.
This figure shows the basic laser plotting panel.
This is invoked by the Postscript/pdf command under
Images->Write in the top menu box.
It both controls and shows the status of the current
laser file (if any).
7.3.1.1 Plot button
Press "Plot" button when you want to plot the current view on the screen into a postscript or pdf file.
Any plot directed to laser file is sent by default to the next free sub-image (if the file has multiple plots per page), or
file (if only a single image per file, or the multiple page is full).
When multiple sub-images in a file are in use the next image to be written is shown by depressing the appropriate
icon in the file layout panel. You can override this and choose a different sub-image: see Section 7.3.1.5 below.
Page 7.12
User manual Version 9.3, Rev. 0, September 2008
Oasys D3PLOT
7.3.1.2 Choosing the laser filename
When no file is currently in use the File: entry box will be available. You can give any valid filename for the next
laser file to be written, or let D3PLOT choose one for you. You can also use the
standard file filter box.
button to select a file via the
If the file already exists you will be queried to check that you genuinely want to overwrite it: you cannot append to
existing laser files.
The default naming convention used by D3PLOT for laser files is postNNN.pdf, where:
NNN is a 3 digit number (with leading zeros if required) in the range 001 - 999.
Any existing files are skipped when the next file in the sequence is computed, so in the example above file
post001.ps already exists.
7.3.1.3 Defining a label and figure
number for laser plots.
By default laser files are not labelled and have no figure number, but you may add either or both of these. They are
always put at the bottom of the page, along the short edge, regardless of the orientation used for plots.
This figure shows the standard locations
for title and figure number on laser plots.
The title may be up to 80 characters long,
and is split over two lines if necessary by
D3PLOT.
The figure number may be any string (not
just a number), and is preceded by the
word "figure". It is suggested that it is 6
characters or less long: here "12a" was
used.
This plot is written in "landscape" format,
and reinforces the point that the title and
figure number always go at the bottom of
the paper, regardless of the orientation of
the plot contents.
Page 7.13
Oasys D3PLOT
User manual Version 9.3, Rev. 0, September 2008
7.3.1.4 Orientation Setting Landscape or Portrait plot
orientation.
By default plots are in "Landscape" orientation, with the long side of the plot aligned with the long
side of the paper, but you can choose "Portrait" format instead.
The figure below shows examples of both landscape and portrait format plots, showing how they are aligned on the
paper.
Page 7.14
User manual Version 9.3, Rev. 0, September 2008
Oasys D3PLOT
7.3.1.5 Layout Controlling the number and
layout of sub-images.
In both landscape and portrait formats it is possible to have more than one
plot on a page.
Various pre-programmed permutations of <#x> x <#y> plots are
available as shown here.
Each individual plot on a page will be referred to from now as a
"sub-image".
LANDSCAPE
PORTRAIT
The figures below show examples of 3x3 Landscape and 2x4 Portrait multiple plots.
Page 7.15
Oasys D3PLOT
User manual Version 9.3, Rev. 0, September 2008
Controlling the order in which
multiple plots are drawn.
The right hand menu shows a typical laser panel
for a 3x3 portrait plot in which sub-images 1
and 2 are complete.
Normally sub-images are written in the order
#1 to #n, but if the user wanted the next plot to
be drawn to sub-image #5 instead of #3, he
would click on the [5] icon where the button
gets coloured in blue instead of the [3] icon as it
normally would.
Next sub-image would be the next free one, i.e.
#3 to receive the next plot. The [3] icon will be
coloured in blue.
The status of files, and sub-images within files.
D3PLOT laser files, and sub-images within files, have one of three possible states.
Inactive
Green
No graphics written yet, and not selected for the next plot.
Selected
Blue
No graphics written yet, but selected to receive the next plot.
Closed
Greyed out
File/sub-image complete, and cannot receive any more information.
Page 7.16
User manual Version 9.3, Rev. 0, September 2008
Oasys D3PLOT
The colours referred to above are used for the button icons on multiple sub-image panels, as shown in the figure
above. Only green icons (ie those which are currently inactive) may be selected to receive the next image.
How sub-image status affects the destination of graphics.
(1) If no graphics have been written to a sub-image then the next plotting command will send laser output to the the
sub-image currently "selected".
By default this will be the lowest numbered sub-image that has not yet been written to, but you can choose
another as described above.
(2) Once graphics have been sent to the sub-image its status changes to "closed" This means that it cannot receive
further graphics.
Interaction between sub-images and files
A file with only a single image in it is treated in exactly the same way as an individual sub-image above, except that
it is (implicitly) always "selected" for plotting until something is drawn in it.
A file with sub-images remains current (ie open) until all of the sub-images in it have been "closed", or the user
closes it prematurely with a CLOSE FILE command. Then D3PLOT defaults to the next default filename as defined
in Section 7.3.1.2 above.
The importance of closing files.
While a file is still current it is still connected to the programme, and at least some of its contents will still be held in
system buffers. If you want to send it to a printer you must close it first using a CLOSE FILE command.
This flushes any remaining data to disk and disconnects the file from the programme.
Next section
Page 7.17
Oasys D3PLOT
User manual Version 9.3, Rev. 0, September 2008
7.3.2 MARGINS...
Modifying laser paper size
on the page.
The MARGINS button in the laser control
panel gives a special sub-menu that allows
you to select the margins on all sides:
The margins will only apply to the axis of the
plot that comes closest to the paper borders;
the other axis margins will be overridden to
maintain the correct aspect ratio of plots (ie no
image distortion).
7.3.3 Laser plotting during Animation.
It is possible to store the sequence of images generated for animation in laser files. (This was not possible in earlier
releases.) The figures showing 3x3 Landscape and 2x4 Portrait multiple plots are examples of laser files created in
this way.
To do this proceed as follows:
•
•
•
Turn the laser switch on in the static part of the programme.
Use -> ANIMATE to enter animation. You are warned that laser output is on, and have to confirm that it is
genuinely required.
Generate the animation sequence in the normal way. As each frame is created it is copied to laser the file just
like an ordinary (static) plot.
The header on each frame is altered to show the animation frame number and corresponding time value. (Normally this
would show the analysis title.)
The plot title is unchanged, but the figure number is replaced with the first frame number on each sheet.
Filenames are generated automatically if required using the standard naming sequence described in Section 7.1.2.
7.3.4 Creating Encapsulated Postscript (EPS) files.
EPS format is used by many software packages to import postscript images. The laser files written by D3PLOT are
not in EPS format, but only two very simple edits at the top of the file are required to change this.
The first seven lines of any D3PLOT
laser file look like this:
To convert it to EPS format you must add a "%%BoundingBox:" line,
and delete the "statusdict" line. Thus this file becomes:
%!PS-Adobe-2.0
%!PS-Adobe-2.0
%%EndComments
%%BoundingBox: 0 0 595 842
%%Pages: 1
%%EndComments
%%Page: 1 1
%%Pages: 1
%%Page: 1 1
Page 7.18
User manual Version 9.3, Rev. 0, September 2008
Oasys D3PLOT
statusdict begin
/a1test save def
/a1test save def
The arguments of the "BoundingBox" line are the Postscript coordinates:
<lower left> <lower right> <upper left> <upper right>
These must be expressed in raw Postscript space of 72 points per inch, and they assume that the paper is in portrait
format with its origin at its lower left corner.
The the values in the example above refer to A4 format: 210 x 297 mm = 595 x 842 points; US "letter" paper would
give 8.5" x 11" = 612 x 792 points. Clearly a smaller bounding box would select only a subset of the image.
For more information on encapsulated postscript see the "PostScript Language Reference Manual, 2nd edition" by
Adobe Systems Incorporated. (Published by Addison Wesley, ISBN 0-201-18127-4)
7.3.5 Notes on laser plotting
•
Users on 3D devices should note that turning the laser on will temporarily force the graphics mode back to
2D. This is because a laser plot is intrinsically a 2D image and is computed in software.
•
Transient graphics added "dynamically" to the screen are never copied to laser files. Examples are
cursor-pick symbols, and also the information added interactively with the DYNAMIC_LABEL function.
•
If an attempt to open a laser file fails because the file/directory refuses "write" permission, or the disk is full,
you are warned and laser output is switched off.
•
You can switch laser output off and on at will in the course of assembling a file with multiple images.
Sub-images will only be written when the laser is on.
•
Some of the defaults here may be preset outside D3PLOT via preferences in the .oa_pref file: see
Appendix II
Next section
Page 7.19
Oasys D3PLOT
7.4 Reading static images and
movies
Static image
Read an image file to display as a background image behind a
model instead of a solid background colour.
The formats we support are the same as we are able to write,
see Capture.
Scaling Options
If the image dimensions do not match the graph window
dimensions then the image can be scaled to fit or it can be
tiled.
Below is an example background with the model overlayed
on top.
Page 7.20
User manual Version 9.3, Rev. 0, September 2008
User manual Version 9.3, Rev. 0, September 2008
Oasys D3PLOT
Page 7.21
Oasys D3PLOT
MOVIE (AVI file)
Read movies in one of the following formats:
AVI
(.avi)
MPEG (.mpg)
We support all movie formats that we are able to create,
namely bitmap AVI, MJPG AVI and MPEG. Some AVIs
need extra codec to be read in successfully, an error message
will tell you that the codec is not supported and you will need
to install the appropriate codec in order to read the movie.
Movie Options
Movie Options allow you to choose the start frame and state
as well as the interval for both the movie and the simulation
analysis. This can be particularly useful when you try to
synchronize the movie with the simulation analysis. See
Matching for how this can be done.
Scaling Options
If the movie dimensions do not match the graph window
dimensions then the image can be scaled to fit or it can be
tiled.
Page 7.22
User manual Version 9.3, Rev. 0, September 2008
User manual Version 9.3, Rev. 0, September 2008
Oasys D3PLOT
Movie (Static files)
Read a series of files with the same name and extension in a
format of <name>nnn.<ext>
E.g.
d3plot001.jpg, d3plot002.jpg,
d3plot003.jpg.....d3plot010.jpg
D3plot will search for all qualified images and read them
together. D3plot will then display them in the order as
they’re numbered as you play the simulation.
Movie Options
You can control the start frame and interval the same way
as you do with movie frames, and aligh them with analysis
data, too. See Matching for how this can be done.
Scaling Options
If the image dimensions do not match the graph window
dimensions then the image can be scaled to fit or it can be
tiled. This will be applied to all images once you’ve set it.
Page 7.23
Oasys D3PLOT
7.5 Watermarks
It is possible to add a "watermark" to a plot.
Simply load in an image file in the watermark
panel and set its transparent colour and overall
transparency.
It will be drawn in front of the normal image,
using the transparency settings you have defined.
The position and size can also be set.
Below is an example with black as the transparent
colour (the image was created on a black
background) with 20% opaqueness.
Page 7.24
User manual Version 9.3, Rev. 0, September 2008
User manual Version 9.3, Rev. 0, September 2008
Oasys D3PLOT
7.6 Print ... option (Windows platforms only)
On Windows platforms only there are standard Page setup and Print...
options under the File menu.
These will capture all currently visible graphics windows, size them to the
current paper size rectangle and print them on the selected printer.
Print resolution:
On the standard Print ... panel there is an extra resolution option.
Page 7.25
Oasys D3PLOT
User manual Version 9.3, Rev. 0, September 2008
Choosing 2x or 4x resolution will capture the image at that factor times the current screen resolution, and will give a
higher quality image. This may be useful if your screen is small, or you are planning to print on larger paper.
Page 7.26
User manual Version 9.3, Rev. 0, September 2008
Oasys D3PLOT
8 COMMAND AND SESSION
FILES
8.0 Introduction to Command and Session Files.
It is possible to record commands issued during a D3PLOT session (in "session" files), and replay these during the
current or a subsequent session (as "command" files).
This is exactly equivalent to having two tape-recorders available: one to record commands and one to play them
back. It is also possible to have both turned on at the same time so that commands being played back from an earlier
session get recorded (and possibly edited) during the current session.
Note that Settings Files may offer a more convenient alternative to command files, if the aim is to generate a
particular plot.
8.0.1 How session files record screen-menu events
In command-line mode session files are simple: they simply record and play back verbatim typed in commands.
When screen-menu mode is in use it becomes necessary to record commands expressed as button clicks, slider
motions, etc; so a different strategy is required.
D3PLOT stores these screen menu "events" in special codes in the session file, and replays them as if they had been
applied by the user.
8.0.2 Compatibility with session files from earlier releases of
D3PLOT
Since command-line syntax has been preserved in this version, and command input into the dialogue window is still
permitted, command-line command fiels are backwards c-compatible. Button-click command files are NOT
backward-compatible.
The file format used for version 7.0 command files is itself backwards compatible: you should not need to modify
existing files at all for them to work with this version.
Page 8.1
Oasys D3PLOT
User manual Version 9.3, Rev. 0, September 2008
8.1 CFILE Invoking the
command-file launcher box.
Command and session files have separate control
windows that are "launched" from the launcher box
shown in the figure (right).
This can also be used during the operation of these files,
see Section 8.4.
8.2 Recording “session” files.
This figure (right) shows the RECORD control panel for
session files.
The [RECORD] CONTROLS... button in the launcher
box maps this panel, which manages the recording of
commands.
It works exactly like a tape-recorder: you can use the
RECORD button to switch on recording, and all
subsequent commands are recorded until it is turned off
again by STOP.
It has two modes:
Record Actually records commands. This is the default.
Review Allows you to go back and forth to review
recorded commands.
8.2.1 How “session” files are recorded.
When in Record mode, with the RECORD button depressed, every command, screen-pick, button press, etc
(except those in the session & command file control panels) is recorded in an internal file. You could think of this as
being the tape of a video recorder, with each video "frame" representing a command.
Page 8.2
User manual Version 9.3, Rev. 0, September 2008
Oasys D3PLOT
As each command is stored it is also reported in the
Current command status area at the base of the box.
Each command ha a unique line number, and in this
example line #1 (out of 1 line recorded so far) is the
command /ac in the dialogue box.
8.2.2 Reviewing stored commands.
If you switch from Record mode to Review mode then you will find that all the
tape recorder buttons become live, and that (implicitly) command recording stops.
You will also note that the RECORD button becomes a REVIEW button:
In review mode you can list stored commands using
the commands shown here.
REVIEW
>
Plays the recorded commands forwards from the current position, listing them in the Current
command status box as described above. A time delay of 1 second between commands is left by
default, but you can alter this using the SPEED... options. STOP halts this process.
STEP <
&>
Respectively step backwards and backwards a single command.
SEARCH
<< & >>
Respectively search backwards and
forwards for a specified command.
You can search for any
permutation of box name, function
or dialogue string.
The options shown here are
presented to you when you use
either SEARCH button. It is
recommended that you use the [?]
buttons to identify boxes or
functions from menus, as these will
get the syntax right. Command
string searches are not case
sensitive.
TOP &
END
Will take you to line #1 and the last line respectively.
Goto
line:
Will take you to the line number you specify.
Page 8.3
Oasys D3PLOT
User manual Version 9.3, Rev. 0, September 2008
8.2.3 Editing and overwriting commands.
When you switch back into Record mode and start recording commands again, they start being recorded at the
current position in the file. So if you have moved backwards during a Review, then start recording, you will
overwrite commands stored at that point - just as would happen in an ordinary tape-recorder.
Commands are overwritten on a line-by-line
basis. Consider this example:
•
•
You record 20 commands.
You go back to line #13 in review
mode.
•
You record 4 commands starting at
line #13.
In this situation the original four commands (#13 to #16) will be overwritten, but commands #17 to #20 will be
unchanged.
To delete commands from the current position to end of file use the DELETE TO EOF button.
It is possible to edit command files using a text editor. WE recommend using command-line commands where these
are available. These can be inserted in the file amongst button-click commands. To find out about the command-line
menu system, type H or M in the dialogue box.
8.2.4 Inserting index
marks.
You can put markers, "index marks", on any line
in your file. These have no command
significance, but are useful as targets for search
operations. The INDEX... command options are
shown here. Index marks can be SET and
CLEARed, and you can search for them in
either direction with the FIND NEXT << & >>
buttons.
8.2.5 Writing out session files.
Session files are stored as internal scratch files, and must be written out to disk in ASCII form before they can be read
back in as "command" files. This is done by the SAVE TO DISK command.
WARNING: If you record a session file, and then exit D3PLOT without issuing the SAVE_TO_DISK
command, your recorded commands will be lost.
The format of the ASCII file, and advice on editing it, is given in Section 8.5.
Next section
Page 8.4
User manual Version 9.3, Rev. 0, September 2008
Oasys D3PLOT
8.3 Playing back
“command” files.
This figure shows the command file playback
control panel.
To use it you must first enter a command filename
in the File: box. This is read in and converted into
internal form, and the command buttons will then
become live.
To execute commands continuously you use the
PLAY > button. This can be halted with the
STOP button. STEP executes commands one at a
time.
It has two modes:
Playback Executes commands. This is the
default.
Preview Previews commands without
executing them.
8.3.1 How “command” files are processed.
Commands are stored in an internal scratch file that, as with "record" mode, is like a tape in a tape recorder. Each
command forms a separate line, and you can move the "tape" back and forth to locate it at any line.
When in Playback mode you can PLAY your commands. Each command from the current position to <end of file> is
executed as if you had typed it in, screen-picked it, etc. To stop a playback prematurely use the STOP button.
By default a PLAY operation operates at full speed, but you can introduce a delay between commands using the
SPEED... options. This can be useful if you want to interrupt a sequence at a particular point, and if full speed
playback is too fast to follow.
The current command is always shown in the
Current command status box. In the example
here we are currently at command #10 (out of 12 in
the file), which is a DISMISS button press.
Page 8.5
Oasys D3PLOT
User manual Version 9.3, Rev. 0, September 2008
8.3.2 Previewing commands.
The playback control panel can be operated in Preview (instead of
Playback) mode. This allows you to view commands without actually
executing them, and thus to position yourself where you want in the file.
The PLAY > button is replaced by a PREVIEW > one to remind you which mode you are in. Commands are listed in
the Current command status box as above, and you can STEP backwards and forwards as before. These and the
other positioning and searching commands operate in exactly the same way as for recording session files: see Section
8.2.2 for more detailed instructions.
8.3.3 Handling errors during playback.
When you are playing commands it is possible to generate errors. Examples might be playing back commands
recorded in a model with 10 materials in a different one with only five materials. If the screen button corresponding to
the (non-existent) 10th material is picked in some context (eg from a menu) an error will occur.
The ERRORS... command lets you set the action to
be taken when errors occur.
The Action on errors options are shown here, with
the default Warn and continue option set.
The other options are self-explanatory.
Section 8.5 gives more information about how errors
may occur, and how to avoid them.
8.3.4 Opening new command files.
You can read in a new command file at any time, or reread the current one (assuming it has been updated on disk).
In either case all existing commands in the internal scratch file are deleted and superseded by those read in. You
cannot concatenate the contents of the new file with the existing one.
8.3.5 Recording session files during command file playback.
This is quite legal. The two operations are quite separate, and commands executed from a command file will be
recorded exactly as if they had been typed in. This is the recommended method of editing and appending to session
files.
8.4 Using the “launcher” box
during recording and
playback
This figure shows the command/session file "launcher"
box part of the way through a simultaneous record and
playback session.
This box need not be mapped, but it can be useful to use it
rather than the full control panels since it uses less space.
The "launcher" box always echos the
PLAYBACK/STOP status of the playback box if a
command file is resident in memory.
Page 8.6
User manual Version 9.3, Rev. 0, September 2008
Oasys D3PLOT
It also echos the RECORD/STOP status of the record box if that is in use.
Since the main panels for these two operations take up a lot of space on the screen you can use the simple on/off
functionality provided by the "launcher" box instead.
Think of it as a primitive remote control that can only has a "pause" function. It operates as follows:
During
Playback:
When you are in PLAY mode the PAUSE button will be available, and you can press it to pause
playback.
Once pressed, as in the example above, it will be greyed out and the RESUME button made
available instead. This, obviously, continues the playback.
During
Recording:
When RECORD is on, as in the example here, the PAUSE button is live. If pushed it suspends
recording, and subsequent commands will not be recorded until RESUME is pressed.
In either case you can of course invoke the main control panels and override these buttons.
When recording or playback are not active then the buttons on this panel will be greyed out: they only become "live"
when they might be needed.
8.5 More information about command and session files
8.5.1 The format of the ASCII disk files used for these.
The ASCII files are up to 132 columns wide, with column numbers reserved as follows:
1 to 80
Dialogue strings from the dialogue box, button text, etc
81
Continuation character for long strings (C below)
82 to 132
Encoded screen-menu functions
Diagrammatically this gives:
<Dialogue string (80 characters)> |C| <Encoded screen-menu function values>
If the continuation column (#81) is occupied then it assumed to be a "long" line, and the character string can extend to
column 132. Any screen-menu function values will then appear on the next line.
If columns 82 to 132 are empty the command is assumed to be a simple "dialogue" command, typed in by the user.
An example of a command file is:
$
$ Oasys D3PLOT version 7.0 session file
$ Date/time: 25-Nov-95 17:42:00
$
/re 2
1
/bl sta
1
/hi
1
DISMISS
26
CFILE
23
1
1
1
3
3
1
1
1
2
2
0
0
0
1
14
0
0
0
0
0
0
0
0
0
0
0
0
0
0
0
0
0
0
0
0
Page 8.7
Oasys D3PLOT
User manual Version 9.3, Rev. 0, September 2008
8.5.2 Backwards compatibility with command files from earlier
versions of D3PLOT
This file format is fully backwards compatible with text-only command files from earlier versions of D3PLOT. They
will have nothing in columns 82 to 132, and so will be treated as command-line input, which is what they are.
The command-line syntax in Version 7.0 of D3PLOT is virtually unchanged from earlier releases, so the vast
majority of existing command-files should run with no modification.
8.5.3 Editing command files by hand.
You can type in commands (in columns 1 to 80) that are genuine "command-line" commands, and you should leave
columns 82 to 132 blank.
It is also possible to concatenate screen-menu command files using the editor, BUT beware the following:
Context
errors:
The instructions "drive along motorway", and "remove wheel nuts and take wheel off car" are both
perfectly sensible. But only if the intervening commands "in case of puncture pull over to hard shoulder,
stop, and jack up car" are inserted.
If you concatenate two sets of command files you can generate context errors if you miss out intervening
steps. For example if file one sets up contour levels, and file two operates animation controls, you will
have problems because you have omitted to switch from "static" to "animation" modes in between.
This is a context error. Normally you would not be able to operate animation controls while in "static"
mode, since the buttons would not be available. But this protection is absent when replaying command
files.
Range
errors:
Menus of items, for example lists of materials, may have fewer rows in this file than in the one where the
command file was generated.
Since the screen-menu function recorded is the menu row, not its contents, this produces errors if you
try to reference rows for non-existent entries.
To concatenate files it is better to PLAY each of them in turn through D3PLOT, while simultaneously RECORDing
them. This will allow you to spot and fix context errors more quickly, and also to insert missing commands if needed.
8.5.4 Certain commands are not recorded in session files.
Commands in "pop-up" windows, for example warning, confirmation and listing boxes are not recorded in session
files.
Also commands in the file filter box are not. You can make this work for you: if you want to define a different
filename at playback time use [?] for the file filter box, if you want to use a fixed filename without intervention at
playback time type it explicitly into the File: text box as this will be recorded.
8.6 Associating command files with Function keys
From version 8.3 onwards the keyboard function keys F1 to F12 can be programmed to play back command files. This
is described under UTILITIES, FUNCTION KEYS in section 6.9.11.
8.7 Running command files from the command line.
When running D3PLOT in batch it can be convenient to invoke a command file to run a specified set of commands. The
following command-line arguments may be used to do this:
Page 8.8
User manual Version 9.3, Rev. 0, September 2008
Oasys D3PLOT
-cf=<command
filename>
Runs "command filename" until its end, and then reverts to normal command line
input.
-exit
This optional. If used then D3PLOT exits when the end of the command file is
reached.
More information about command-line syntax is given in Appendix IV.
Page 8.9
Oasys D3PLOT
Page 8.10
User manual Version 9.3, Rev. 0, September 2008
User manual Version 9.3, Rev. 0, September 2008
Oasys D3PLOT
9 DISPLAY_OPTIONS:
Controlling the appearance of the display and many of the items drawn on it.
The main Display Options control panel is shown right.
This contains switches (left column), and options with
sub-menus (right column), which control many aspects of
display appearance.
See the following sections for details:
9.1 Back faces
9.2 Internal faces
9.3 Local Triads
9.4 Model box
9.5 Undeformed
9.6 Spring symbols
9.7 Beam symbols
9.8 Belt symbols
9.9 SPH symbols
9.10 Airbag Particle symbols
9.11 Other symbols
9.12 Hidden options
9.13 Free edges
9.14 Window dressing
Overlay display, colour and edge angle are described in
section 4.2.2.2
9.15 Graphics test factor
9.1 BACK_FACES switch: Display of “back” faces of solid
and thick shell elements
To save graphics rendering effort the "back" faces of 3D elements (solids and thick shells) can be turned off. This is the
default on 2D devices, but on 3D devices they are left on (in case the model is rotated to expose its back). The effect of
this is shown in the figures below.
Page 9.1
Oasys D3PLOT
BACK_FACES off
User manual Version 9.3, Rev. 0, September 2008
BACK_FACES on
9.2 INTERNAL_FACES switch: Display of inside faces of
solid & thick shell elements
By default the internal faces of 3D elements are never displayed: as well as requiring extra rendering effort leads to
cluttered plots. The figure below left shows a wall of solids with internal (but not back) faces turned on, and below
right, the same wall with both internal and back faces on.
You may need to turn internal faces on if you are trying to screen pick solids several layers deep by screen-area.
Otherwise each screen area selection will only pick the (visible) solids at the front of the image, like peeling an onion,
and several such picks will be required to select all the solids through the depth.
9.3 LOCAL_TRIADS switch: Display of element local axes
Solid, shell, thick-shell, beam and interface elements all have local coordinate systems, and you can display "local"
triads of their axes using this switch. The figure below left shows examples of local triads on solids, and the figure
below right, on beams and shells.
Page 9.2
User manual Version 9.3, Rev. 0, September 2008
Oasys D3PLOT
The method used to compute element local axes is given in the following section:
Solids
Section 12.7.4
In all cases D3PLOT generates local axes from the element topology alone.
Thin shells
Section
12.8.2.1
Note that it does NOT currently "know" about any local material axes, beta angles
or ply directions.
Thick
shells
Section 12.9.6
Beams
Section
12.10.1
Segments
Contact segments use the same method as thin shells.
An easier way of spotting reversed outward normals of shells and interface segments
The local Z axes (outward normals) of shells and interface segments are important in some contexts. For shells
averaging across adjacent elements with top and bottom surfaces flipped gives misleading contours, and for interface
segments some types of contact surface cause problems if their outward normals face the wrong way.
Therefore, as well as being able to display local triads, you can plot their OUTWARD_NORMAL components in CT
continuous-tone plots. This plots normals that face you in magenta, and those that face away from you on blue. It
makes it easy to spot elements that face the wrong way: certainly it is easier than hunting for reversed local Z axes
using triads!
9.4 MODEL_BOX switch: Displaying the model external
dimensions
It can be useful to know what the external dimensions of your model are. One way to do this is to use a GRATICULE
(see Section 9.14), but this uses screen space and can’t be transformed with the model. The MODEL_BOX option is
an alternative: it draws a box that represents exactly the largest [x,y,z] external dimensions of your model, and adds
tick marks. The figure below shows an example of this. This box rotates with the model, and can be viewed from any
angle.
Page 9.3
Oasys D3PLOT
User manual Version 9.3, Rev. 0, September 2008
9.5 UNDEFORMED... menu Displaying the undeformed
geometry
Normally just the current geometry is drawn, but you can overlay this with a hidden-line plot, using in various styles, of
the undeformed geometry. An example is shown below.
Page 9.4
User manual Version 9.3, Rev. 0, September 2008
Oasys D3PLOT
The following attributes of the undeformed geometry may be set:
(NOT_)DRAWN Whether it is displayed.
COLOUR
Its line colour
Line Style
May be Broken or Solid
Edge Style
May be All edges or Free edges only.
Page 9.5
Oasys D3PLOT
User manual Version 9.3, Rev. 0, September 2008
9.6 SPRING_SYMBOLS...
menu: Setting the drawing
style for springs and dampers
By default springs use
"zig-zags"
and damper elements use
"dashpots"
You can change these to Plain line style, in which they are drawn as simple lines. This saves vectors, reduces clutter,
and can be useful during animation to improve speed and economise on memory usage. See Section 9.9 for details of
how grounded and zero length elements are drawn
9.7 BEAM_SYMBOLS... menu: Setting the drawing style
for beams.
By default beams are drawn as lines
You can choose to use "thick" lines
"Thick" and spotweld beam symbol
sizes may be set individually.
The "thick" symbols can make it easier to see beams in plots
that contain a lot of lines, although they are slower to draw.
The nominal dimensions in the boxes below are calculated as
a %age of the overall model diagonal length, and they may
require adjustment to give sensibly sized symbols for very
asymmetrical models.
Similarly the size of the "blobs" on the end of spotweld
beams may need adjusting to give visually acceptable results.
Note that "spotweld" (type 9 referencing *MAT_SPOTWELD) beams will only be drawn as such if a ZTF file for this
analysis is found, as this contains the extra section data required to determine their attributes.
Page 9.6
User manual Version 9.3, Rev. 0, September 2008
Oasys D3PLOT
9.7.1 True Section: displaying the actual beam cross-section.
If a .ZTF file from release 9.2 or later of Oasys PRIMER has been read then section information will be available for
beams which, if this option is selected, allows them to be drawn using their "true" section shapes.
For beams with explicit section dimensions this is simple, and the actual dimensions are used.
For beams where only Area, Ixx and Iyy properties are available then a thin-walled rectangular section that matches
these properties is synthesised. This should be approximately correct, but obviously it cannot represent I beams or
rectangular sections with varying wall thicknesses, but it should give a reasonable representation of beam dimensions.
If you use inconsistent or impossible properties you may get some strange looking sections!
9.8 BELT_SYMBOLS... menu: Setting the sizes of
seat-belt and related symbols.
You cannot change the symbols used for drawing seat-belts
and related elements, but you can change their visual size in
this menu.
All dimensions are expressed in model space units and can
be changed at will, the default values are only an estimate of
what should look sensible.
Summary of default and modifiable symbols of Springs, Beams and
Seatbelts
The figure below left shows default symbols for all springs, beams and belt types; and the figure below right shows
what they can be modified to become.
Page 9.7
Oasys D3PLOT
User manual Version 9.3, Rev. 0, September 2008
9.9 SPH Symbols. Managing SPH element display.
Smooth Particle Hydrodynamic (SPH) elements are spheres
with a given "radius of influence" that can change over time.
By default D3PLOT renders them as spheres of the current
diameter, treated as opaque for shading and hidden surface
removal, but this can be changed using the options here.
Symbol type: controlling the method used to draw SPH elements:
Point
Uses "points" to display elements. These are 2 dimensional squares drawn in the plane of the screen at the
appropriate location, and with width and height "radius" x 2.
OpenGL renders "points" extremely fast, meaning that this is an efficient display method if you have many
SPH elements; however the symbol has no depth, is not "lit", and there will be a hardware-specific maximum
size for a point symbol so it may not show the true size of elements.
Cube
Uses a cube of width, height and depth "radius" x 2 to display elements.
This only ever shows 3 faces, so it is reasonably fast to draw, but it looks a bit odd showing a spherical
element as a cube. However cubes have depth and orientation, and can be lit, so the result is better-looking
that a "point".
Sphere
Draws a sphere of the relevant radius, giving a "true" element appearance. However spheres require many
facets for rendering, making these slower to draw.
Sphere quality is a value between 1 and 5 which determines the number of facets used to render the sphere
symbols. Each increment halves the equatorial and meridional angular increment size, quadrupling the number
of facets on the symbol.
The default value of 2 gives a good compromise between symbol quality and rendering speed, but you may
wish to increase this figure when generating presentation quality images.
This image shows a "chicken" made of SPH elements striking a flat plate, and demonstrates the default spherical symbols
at quality level 2 and their true radius. The SPH elements have been contoured with their radius.
Page 9.8
User manual Version 9.3, Rev. 0, September 2008
Oasys D3PLOT
Symbol size: controlling SPH symbol display.
True radius x <factor> uses the radius of influence reported for the current state multipled by <factor>. This is the
default and is recommended for most cases.
Fixed radius <value> uses the stipulated fixed radius size. This can sometimes be useful if analyses have gone wrong
somehow and delivered very large (or small) radii, making it impossible to see what is happening unless the symbol size
is set explicitly.
9.10 AB Pcle Symbols: Managing Airbag Particle display
Airbag particles can be thought of as small spheres of gas
emitted from an inflator to apply pressure inside an airbag.
D3PLOT treats them as "elements" for display and contouring
purposes.
They are rendered using symbols that are the same as those used
for SPH elements. However the two element types are highly
unlikely to appear in the same analysis, and their relative sizes
are also likely to be very different, so despite the potential for
confusion this similarity is not a problem.
Symbol type: controlling the method used to draw ABP elements:
Point
Uses "points" to display particles. These are 2 dimensional squares drawn in the plane of the screen at the
appropriate location, and with width and height "radius" x 2.
"Points" are drawn extremely fast in OpenGL, and since a typical airbag may have tens of thousands of
particles this is the default display method.
Cube
Uses a cube of width, height and depth "radius" x 2 to display particles.
This only ever shows 3 faces, so it is reasonably fast to draw, but it looks a bit odd showing a spherical
element as a cube. However cubes have depth and orientation, and can be lit, so the result is
better-looking that a "point".
Sphere
Draws a sphere of the relevant radius, giving a "true" particle appearance. However spheres require many
facets for rendering, making these slower to draw.
Sphere quality is a value between 1 and 5 which determines the number of facets used to render the
sphere symbols. Each increment halves the equatorial and meridional angular increment size, quadrupling
the number of facets on the symbol.
The default value of 1 gives a rather "pointy" looking particle symbol, but it is usually acceptable given
their small size. Higher quality values may be necessary when generating images for presentation.
Page 9.9
Oasys D3PLOT
User manual Version 9.3, Rev. 0, September 2008
Default "point" method.
Spheres, quality = 1
This image shows a typical "pancake" airbag being inflated by particles. Part
of the fabric has been cut away to show the particle elements inside which are
drawn by the default "point" method.
Spheres, quality = 2
The three images on the right show a detail of the right hand side to
demonstrate how the different display methods appear when enlarged. For this
particular analysis the "point" display method the speed of animation was
limited by the refresh rate of the monitor at 85 frames per second, whereas the
"sphere" methods displayed at about 30 fps.
Symbol size: controlling ABP symbol display.
True radius x <factor> uses the radius reported for the current state multipled by <factor>. This is the default and is
recommended for most cases. In all the analyses encountered so far particle radius has remained constant throughout
the run, however it is written as a value at every state so this may change in the future.
Fixed radius <value> uses the stipulated fixed radius size.
9.11 Other Symbols: controlling further symbols
Restraint length is the size given to restraint and constraint
symbols applied to nodes in model space units.
Page 9.10
User manual Version 9.3, Rev. 0, September 2008
Oasys D3PLOT
Node symbols controls how nodes are shown. Normally they use a star, but these can be quite slow to draw on
some hardware, and points will render many (up to 100x) faster.
This image shows "stars"
This image shows "points"
This image shows a panel of shells with the default "star" symbol seen head on. The
images on the right enlarge a corner detail to show both "star" and the "point"
alternative.
9.12 HIDDEN_OPTIONS... menu: Setting hidden-line
display options.
This menu controls the algorithm and resolution used for
creating hidden-line plots when in 2D mode. (It has no
influence on 3D mode plots.)
It also controls the element fill colour used for hidden-line
plots.
See:
PAINTER and
RIGOROUS
To set 2D hidden-line
calculation method
X x Y Resolution
To control the resolution used for
calculating 2D hidden-line plots.
FILL_COLOUR...
To control hidden-line fill
colour (all modes)
PAINTER and
RIGOROUS:
Setting 2-D hidden-line removal
algorithm
D3PLOT offers these two alternative hidden-line algorithms that are biased towards speed and accuracy respectively.
These commands are irrelevant in 3-D mode.
PAINTER
Where the image is broken into facets and these are drawn in order of increasing distance from the eye
of the observer. This is the default method because it is quick and simple, but it can make mistakes:
especially at interfaces, and it assumes that facets don’t cross or intersect.
Page 9.11
Oasys D3PLOT
User manual Version 9.3, Rev. 0, September 2008
RIGOROUS Where the image is drawn internally, each pixel is checked to ensure that the correct parts are drawn,
and only then is it mapped to the screen. This takes longer but will never make mistakes, hence it is
offered as an alternative for problem plots.
The two problems that can occur in "painter" mode, and the way that "rigorous" mode solves them, are shown in the
following four figures.
"Painter" mode makes mistakes where large and small facets are adjacent
The figures above show how "painter" mode gets confused when rendering adjacent facets of different sizes: it draws
them in the wrong order. "Rigorous" mode fixes this.
"Painter" mode cannot resolve the intersection of crossed facets
These two figures show how "painter" mode cannot compute the intersection when facets are crossed, whereas
"rigorous" mode handles this correctly.
Which algorithm should I use?
Both algorithms are fully operative for all display modes that require hidden-line removal or its equivalent (eg CT
Continuous-Tone, etc), but the "painter" mode will always be faster, which is why it is the default. You will only need
"rigorous" mode when the errors in rendering shown in the figures above become unacceptable.
Users on 3D devices are not faced with this dilemma: the hardware Z-buffering used in hardware is, in effect, the
"rigorous" algorithm. So you get the better method anyway.
Page 9.12
User manual Version 9.3, Rev. 0, September 2008
Oasys D3PLOT
X x Y resolution: Setting the 2D hidden-line calculation
resolution
Both types of hidden-line calculation method use an internal resolution which, by default is set to the resolution (in
pixels) of the graphics window. You can override this value by typing in new <x> and/or <y> values, and subsequent
plots will use those values until you resize the window.
You might wish to reduce the resolution in order to speed up hidden-line plots, especially in "rigorous" mode, where
the time taken is proportional to the product of <x> * <y>. There will be a corresponding reduction in image quality.
Hint: There is an easier way of doing this. Before you issue the plotting command resize the graphics window to
make it small, draw the image, then resize it again to its original dimensions. The image will be computed at
the smaller resolution but displayed at the full size.
Notes on hidden-line methods and resolution:
•
•
•
•
Laser plots are computed at the current screen resolution so you could set a high resolution to improve laser
image quality on a low resolution device.
On windows devices the resolution is reset every time the window is resized: this operation will supersede any
setting made explicitly with the X x Y resolution command.
When dithered contouring or shading is used, or a solid filled plot (ie CT, SH, SI) drawn in "rigorous" mode,
the display has to be calculated at the window pixel resolution, regardless of any of the settings made here.
These internal settings are made for you automatically, and are transient for the duration of that plotting
operation only, they do not change anything set here.
All of the above is applicable to 2D mode plotting only. Z-buffered hidden-line plotting under OpenGL in 3D
mode is implemented completely differently, it is implicitly "rigorous"
FILL COLOUR .... Setting the hidden-line
fill colour for 2d and 3d elements.
By default 2D and 3D elements are filled with the current background colour, whatever that may be.
However by clicking on the FILL COLOUR... button you may choose any other colour. The feedback button shows
the current colour (here "B’Ground").
The following three images demonstrate how the fill colour can be modified:
(1) This image shows the default
behaviour:
Black background with element infill in the
background colour.
Page 9.13
Oasys D3PLOT
(2) In this image the background colour has
been converted to grey.
The default infill is still background colour,
so elements are also filled in with grey.
(3) In this image the background is still
grey.
The hidden-line infill colour has been set
explicitly to black.
Page 9.14
User manual Version 9.3, Rev. 0, September 2008
User manual Version 9.3, Rev. 0, September 2008
Oasys D3PLOT
9.13
FREE_EDGES...
menu: Controlling
free edge display
of element
borders
LI line and HI hidden-line plots,
and the hidden-line overlay of
element borders normally draw all
element edges. In "free-edge"
mode you can choose to draw only
those borders which are "free"
edges.
Two separate options are provided
for controlling the display of free
edged in Line/Hidden plotting and
in all other plotting modes. The
defaults for these 2 options are:
Line/Hidden
Defaults to off
Other overlays
Defaults to on
"Free" edges can be displayed
either as topological free edges or
as "feature" lines: this is explained
in more detail below.
Overlays apply to all plotting modes that are not wireframe of hidden, and overlay display itself is controlled in the
OVERLAY panel. (See Section 4.2.4)
Individual element overlay styles can also be set in the PROPS panel (Section 4.2.2.4).
What is a "free" edge?
A purely topological "free" edge is defined as an element (or face) border that is attached to only one element. This is
illustrated in the two figures below.
Page 9.15
Oasys D3PLOT
User manual Version 9.3, Rev. 0, September 2008
What is a "feature line"?
The purely topological definition of a free edge can sometimes give unsatisfactory images since it is dictated purely by
element connectivity, and not by the actual shape of the mesh.
A "feature line" occurs when adjacent elements, or faces of adjacent 3D elements, have outward normal vectors that are
more than the "edge angle" apart. This has the effect of inserting extra lines where the mesh changes shape, giving a
better idea of the underlying surface.
The "edge angle" is the same as that used to denote sharp edges during smooth shading: see the Edge Angle notes in the
section on lighting.
Free edge overlay
Feature line overlay
In this image purely topological free edges have been used.
The image is understandable but a lot of detail is absent
from areas of mesh of the same part id.
In this image feature lines with an "edge angle" of 20
degrees have been used. This has resulted in lines
appearing in previously empty areas: in particular the
mouth and eyes have acquired some detail, and the arms
are better defined.
Feature lines are logically ORed with free edges when selected, and they can be used both as overlay on
shaded/contoured plots, and as the edging mode for wire/hidden plots. They normally involve more vectors than pure
free edges, so they take longer to draw and may have an adverse effect on animation speed.
Modifying the topological definition of a "free" edge
The definition above is open to modification: blanking elements can create free edges, as can volume-clipping and
the borders between element materials (or contact surfaces). You can control whether or not each of these categories
apply by setting the following switches:
Page 9.16
User manual Version 9.3, Rev. 0, September 2008
Oasys D3PLOT
BLANKING -> EDGES Influence of Blanking on free edge display.
Normally blanking elements does not create "free" edges, but if you turn the BLANKING -> EDGES switch on then
the edges created by blanking are shown. This effect is shown in the figure below
Page 9.17
Oasys D3PLOT
User manual Version 9.3, Rev. 0, September 2008
CLIPPING -> EDGES Influence of Volume-Clipping on free edge display
In the same way that element borders created by blanking do not, by default, create free edges; those exposed by
volume clipping do not either. This is illustrated in the figure below where a clipping volume is used to remove solid
elements from the same wall as in the previous example.
Page 9.18
User manual Version 9.3, Rev. 0, September 2008
Oasys D3PLOT
MATERIALS -> EDGES Influence of material boundaries on free edge display
The border between materials of the same element type does not, by default, qualify as a free edge. (Borders between
different element types always qualify as edges.) If MATERIALS -> EDGES is turned on then such borders are
treated as free edges. This is illustrated in the figure below.
SURFACES -> EDGES Influence of contact surface boundaries on free edge display
You can think of contact surface boundaries in the same way as material boundaries: the different surface ids equate
to the different material ids, and the same edge definition logic applies.
However: The default setting of the SURFACES -> EDGES switch is on. The reason for this is that it would be
very unusual to have two adjacent contact surfaces forming a single (geometric) surface, but it is quite
common to have two or more coincident surfaces. In the coincident case it is useful to see the edges.
Notes on FREE_FACE options:
•
•
•
•
•
Free edges are only computed for 2 and 3-D entities, that is: solids, thin shells, thick shells and contact
surface facets.
Free edge computation is worked out separately for each element type. For example an edge common to a
shell and a solid will still be treated as a free edge.
Where elements are deleted, due to material failure, free edges may be created at that and subsequent
complete states.
A "line" mode plot with free edges only is the fastest way of drawing something in D3PLOT since it
combines minimal computation with only a small amount of screen vectors. It is a good way of assembling a
quick animation
Precomputed free-edge dynamic viewing is available: see Section 5.1.0.
Page 9.19
Oasys D3PLOT
9.14 WINDOW_DRESSING...
menu: Controlling screen
appearance.
The "dressing" that can be added to plots: date, header, triad,
etc is controlled from this window.
It also controls the "soft" window size.
Page 9.20
User manual Version 9.3, Rev. 0, September 2008
User manual Version 9.3, Rev. 0, September 2008
Oasys D3PLOT
Controlling "Window Dressing": HEADER, DATE, BORDER, CLOCK, TRIAD, CONTOUR_BAR
This figure shows the main "Window Dressing" attributes. Each of these can be switched on or off at will, the default
being everything except the GRATICULE and BORDER are on. The Window Size shown in this example is Part
Screen so that the borders are visible, but the default is Full Screen.
These options are all straightforward, with the exception of the GRATICULE. This gives the current model
dimensions, but the space system used depends upon the current view:
Model
space
Is used if the view is orthogonal down one of the screen X, Y or Z axes. The appropriate XY, YZ or XZ
coordinates are shown, and these move as the model moves (try dynamic translation and you’ll see).
Screen
space
Is used if the view is not orthogonal. This just shows the current window dimensions (X = 0 - 4095, Y =
0 - 3129). It is only useful for setting up volume clipping using screen space orientation.
If a GRID is added it draws a grid on the screen at the current tick mark interval.
Controlling the "soft" window size: Window Size
By default the graphics can extend over the complete window area, and no "soft" window clipping is in force. You
can restrict the graphics to a sub-set of the screen, ie to a "soft" window, by settings a Window Size.
Page 9.21
Oasys D3PLOT
User manual Version 9.3, Rev. 0, September 2008
This is controlled by the radio buttons in the middle of the Window Dressing control panel,
as shown here.
There are three pre-programmed options:
Full screen
(Default) use the whole screen
Part screen
Leave contour bar and header clear
Report format Set dimensions for local hard-copier
User defined
Set screen rectangle using the mouse
The meaning of each of these is shown in the figure below:
9.15 Graphics text factor
This is a simple factor in the range 1 to 10 applied to graphics text on plots, which will be scaled by the relevant
amount.
Because not all hardware supports scalable fonts, and some larger fixed size fonts may not be installed, it is possible
that some maximum text size on the display will be reached and a further increase in factor has no effect.
Page 9.22
User manual Version 9.3, Rev. 0, September 2008
Oasys D3PLOT
10 PART TREE
This enables quick navigation around a Model and helps with blanking etc. The Part Tree is available from the tab:
The part tree defaults to a view of the parts within the mode. If a ztf file is present, the model hierarchy by INCLUDE
file will be displayed.
10.1 Part Tree Behaviour
Items can be selected by left-clicking anywhere on their row. Where selecting more than 1 item would be valid you can
hold <ctrl> whilst clicking to select multiple items. Alternatively the <click> (start of range) .. <shift><click> (end of
range) method (cf Windows) may be used.
Clicking on the [-] button next to models / include files / assemblies will collapse branches. Collapsed branches will
have a [+] button which when clicked will expand the branch.
Right-clicking on an item or a selection of items produces a pop-up menu with the options shown on the right (not all
of these options will be available for some selections).
Page 10.1
Oasys D3PLOT
User manual Version 9.3, Rev. 0, September 2008
Blank
Blanks the item
Unblank
Unblanks the item
Only
Blanks all other items and unblanks the item
Colour
Colours the items (or elements associated with the item)as selected
Transparency
Sets the transparency the items (or elements associated with the item)as selected
Display Mode Marks the item to be drawn with a particular method (wireframe, hidden, shaded or current)
Overlay
Colour
Sets the item to be draen with a particular colour overlay
Overlay Mode Sets the style of Overlay the item is to be drawn with (see section 4.2.2.2)
Page 10.2
User manual Version 9.3, Rev. 0, September 2008
Oasys D3PLOT
Brightness
Controls how light or dark the colour of the item is when illuminated, but the effect is to add matt
colour (not whiteness, which would make it look shiny).
Shininess
Adds white highlights, but no colour, to make the object look shiny.
10.2 Part tree top menu bar
The top menu bar allows quick access top common functions, as well as controlling how the part tree behaves and is
displayed.
Opts
There is a range of options for controlling the part tree available via the Opts pop-up menu. These include how items
are labelled and ordered as well as whether assemblies, tree lines and icons are drawn.
Page 10.3
Oasys D3PLOT
User manual Version 9.3, Rev. 0, September 2008
Type
From the Type pop-up menu it possible to select a variety of different item types to be displayed in the tree in addition
to parts. These appear below the parts in the tree, and most of the options (edit, blank etc) are available through the
"right-click" menu.
Blank / Unblank / Only
One use of the part tree is as easy way access to blanking commands. Blank, Unblank and Only (blank all other
items) and commands can be applied to the currently selected items.
Sel all / Clear
The Sel all and Clear buttons can be used to select all items and empty the selection respectively.
Select
The Select button invokes an object menu for selecting parts. Selection can also be made via the Quick Pick option
"Locate in Tree". Operations such as blank,colour, etc may then be carried out on the selected entities.
Include/Assembly
The Include and Assembly buttons determine what type of hierarchy is displayed.
These have effect only when the requisite information is available to D3PLOT via the ztf file, and in the case of
assemblies, via an assembly file written out by Primer.
Assemblies are user-defined hierarchical groupings of parts, created in Primer.
Find
The Find button gives a search option. Text or an ID number is entered in the text field. D3PLOT finds a part whose
title contains the text, or a part with an ID matching the number. The arrows determine whether the search direction is
up or down from the current selection. Next will find the next matching item. The search will only find matches for
currently enabled options (i.e. if id is disabled and items are labelled by name only a search for part 15 will return no
matches regardless of its presence in the tree).
Page 10.4
User manual Version 9.3, Rev. 0, September 2008
Oasys D3PLOT
Page 10.5
Oasys D3PLOT
Page 10.6
User manual Version 9.3, Rev. 0, September 2008
User manual Version 9.3, Rev. 0, September 2008
Oasys D3PLOT
11 The Javascript
Interface
Programming D3PLOT externally for both batch and interactive
use.
11.0 Introduction
Javascript is a freely available scripting language that is normally found performing the "work" behind interactive web
pages, however its syntax and structure also make it an excellent tool for providing an externally programmable
interface to programmes in general.
Within D3PLOT it is implemented as follows:
•
There is a D3PLOT Application Programming Interface (API) which provides a range of functions that allow
you to interrogate the database, open windows, generate plots, and so on. This is written in a very simple and
non-intimidating way, with relatively few functions, that should be easy for non-programmers to use.
•
There is also a function which issues "command line" instructions to D3PLOT, making it possible to use the
code’s full repertoire of command-line commands, meaning that virtually every function in D3PLOT is callable
from within a Javascript.
•
There is a special class of "user defined binary (UBIN) data components" that can be created from within a
Javascript, making it possible to generate an unlimited number of new data components which then become
available for processing in exactly the same way as the standard ones found in an LS-DYNA database.
•
Finally the D3PLOT API shares the same user-interface methods and commands as the PRIMER one, making it
possible to generate user-defined panels as part of the graphical user interface, and to read and write files.
Anyone familiar with C or shell script programming will find existing Javascripts are instantly readable, and can be
given minor edits without further ado. For those who are more ambitious a good guide to the language is "Javascript, A
definitive Guide" by David Flanagan, published by O’Reilly, ISBN 0596101996.
The sections below describe how to run Javascripts in D3PLOT, and summarise its Javascript API. For details of the
API and its functions, and also some examples, see the Javascript Appendix
11.1 Using Javascript in
D3PLOT.
Human-readable Javscripts need to be compiled, meaning turned
from something human-readable into a set of instructions that a
computer can understand; and then run in their compiled form.
They can be changed and rerun in their modified form at any time
without having to exit and re-enter D3PLOT, making the "write,
test, modify, re-test" development cycle very quick and easy.
11.1.1 Compiling and Running a script
Run Script will both compile and run the script unless it contains syntax errors, in which case it stops with an
error message when compilation fails.
Check
Script
only compiles the script, reporting any errors found, and does not run it.
Memory
size
is the threshold size of the Javascript memory "arena" at which Garbage Collection will take place.
Page 11.1
Oasys D3PLOT
User manual Version 9.3, Rev. 0, September 2008
11.1.2 Dealing with errors in scripts
Script errors come in two forms:
Syntax
errors
Are mistakes of Javascript grammar or spelling, resulting in error messages during compilation.
These are easy to detect and correct since the line number and offending syntax are both described
by the compiler. The script needs to be edited to correct the problem and then recompiled.
Sometimes several iterations of the compile/edit cycle are required to eliminate all errors from a
script.
Run-time
errors
Are errors of context or logic in scripts that are syntactically correct, and thus have compiled, but
which fail at some stage when being run.
A typical example of a run-time error is an attempt to divide a value by zero, yielding the illegal
result infinity. More subtle errors involve passing an invalid value to a function, accessing an array
subscript that is out of range, and so on.
The D3PLOT Javascript API has been written in such a way that it handles "harmless" run-time
errors by issuing a warning and continuing execution, but that more serious errors which could result
in the wrong answers being generated issue an error message and terminate.
Here is an example script which demonstrates both types of error. This script lists all the shell elements attached to the
first node in the model, and calls to the Javascript API are hyperlinked to their relevant function definitions.
if(i = GetElemsAtNode(1, SHELL))
{
Print("Number of shell elements on node " + GetLabel(NODE, 1) + " = " +
i.nn + "\n");
for(j=0; j<i.nn; j++)
{
k = j + 1;
Print("Shell #" + k + " = " + GetLabel(SHELL, i.list[j]) + "\n");
}
}
else
{
Print("No shells at node " + GetLabel(NODE, 1) + "\n");
}
This initial script is syntactically correct, and on an example model writes the following to the controlling terminal:
Number of shell elements on node 1 = 4
Shell #1 = 31318414
Shell #2 = 31318415
Shell #3 = 31319004
Shell #4 = 31319006
If a syntax error is deliberately introduced by omitting the second bracket at the end of line 1, leaving the "if" statement
incomplete, ie:
if(i = GetElemsAtNode(1, SHELL)
Then this produces the compilation error:
Error when compiling J:\javascript\demo.js: at line 2:
SyntaxError: missing ) after condition
Which is computer-speak for "you left out the closing bracket on that ’if’ statement".
Page 11.2
User manual Version 9.3, Rev. 0, September 2008
Oasys D3PLOT
If a run-time error is deliberately introduced by omitting the second argument (SHELL) to GetElementsAtNode(),
making the first line:
if(i = GetElemsAtNode(1))
Then this is not picked up during compilation because the syntax is correct, but shows up when the script is run with the
message:
%%% ERROR %%%
Fewer than 2 arguments supplied to Javascript function <get_elements_at_node>
And the script run terminates prematurely.
Because this example script has only one call to GetElementsAtNode() it is easy to identify and correct the problem, but
in more complex scripts with many such calls it may be necessary to insert diagnostic Print() statements in order to
track down a particular error.
11.1.3 Setting the Garbage Collection
Threshold Size
(This is an advanced topic, and you don’t need to understand it.)
Javascripts execute inside a memory "arena", allocated dynamically from the operating system, which grows in size as
storage is requested within the script. This growth occurs due to requests for "new" variables within the script and also
when API functions allocate and return values and objects, and it is limited only by what the operating system can
deliver.
The nature of Javascript means that objects frequently become redundant, and it is wasteful not to reuse the storage that
they occupy, therefore there is a "Garbage Collection" process running behind the scenes which periodically checks
storage and releases that which is no longer needed. This process is automatic and hidden from the user, it just
"happens".
However Garbage Collection is quite a CPU-hungry process, so it is only carried out periodically when the threshold
set here is reached. This can sometimes be observed during script execution as a periodic "pause for thought", and if
you are monitoring memory usage with a system tool you may see it drop during these pauses.
Clearly this threshold value must be large enough not to trigger excessively frequent (and costly) garbage collections,
while at the same time not being so large that scripts build up large amounts of excess memory to the detriment of the
rest of the programme. Experience has shown that the default of 8MBytes is a reasonable compromise between these
two criteria for the majority of scripts, but you may find that scripts which allocate a lot of storage benefit from fewer
"pauses", and hence run faster, if this value is increased.
To recap:
•
This threshold does not limit the memory the script can use, that is limited only by the operating system.
•
It only sets the threshold at which Garbage Collection runs.
•
Scripts which allocate a lot of memory, and which exhibit frequent pauses, may run faster with a larger value.
•
... and finally:
... if you don’t understand this topic don’t worry. Most scripts will run quite happily with the default value, and
you can ignore this setting unless they appear to be struggling.
11.1.4 Assigning Javascripts to
Function Keys
If a script is to be run repeatedly it can be convenient to set up a
short-cut to it by assigning it to a function key, giving a "one click"
method of running it.
Function keys can also be used to run D3PLOT command (.tcf) files, see Utilities, Function Keys, and key assignment
may mix the two types at will. Javascripts so assigned should use the extension ".js" since this is how the two file types
are distinguished from one another when the function key is used: files with any extension which is not ".js" are
assumed to be command files.
Assignment of Javascripts to function keys can also be saved in the oa_pref file in exactly the same way as command
Page 11.3
Oasys D3PLOT
User manual Version 9.3, Rev. 0, September 2008
files see Utilities, Function Keys for details of how this is done.
11.1.5 Maintaining a library of
Javascripts
It is also convenient to have a library of scripts in a defined
location.
By default D3PLOT looks in
$OASYS/d3plot_library/scripts, but you can define a
different directory by setting the preference:
d3plot*script_directory:
some_different_directory_name
In the your oa_pref file.
All scripts found in the relevant directory will be listed in the
Javascript panel, as shown in this example.
Using the "description:" comment at the top of a script to identify its purpose.
To help to identify scripts special comments are searched for in the top 10 lines of each script, and if description:
is found, for example the comment line:
// description: Some description of the script’s purpose
Then the description line is shown as hover text when the mouse is placed over that filename. In the example above the
"princ2d" script has the line
// description: Calculation of 2D principal stresses in a shell
Using the "name:" comment at the top of a script to change its name
Normally the name shown for a script will be its filename, stripped of any leading pathname and trailing ".js" extension.
However if the string name: is found in the first ten lines of the script, then the following name will be used instead.
For example the line:
// name: temporary
Will result in the script appearing with the name "temporary" in tha Javascript panel. This does not affect the actual
name of the script, only the name on its library button.
11.1.6 Running a Javascript in "batch" mode.
All the above assumes that Javascripts will be run interactively from the user interface, however it is also possible to run
a script in "batch" mode using the command line interface. The relevant command-line commands are:
/JAVASCRIPT - +- COMPILE
+- EXECUTE
Compiles and checks the script, but does not run it.
(Re)compiles and runs the script
+- MEMORY <nnn> Resets the Garbage Collection threshold to <nnn> MBytes
Page 11.4
User manual Version 9.3, Rev. 0, September 2008
Oasys D3PLOT
To run a Javascript from batch these commands need to be placed in a command file and run using the command line
"-cf=command filename" option. For example the command file might be:
... some other commands
/JAVA EXEC my_script.js
...some further commands
And the command line required to run D3PLOT might be something like:
$OASYS/d3plot93.exe -d=default -cf=command_file -exit analysis_name
Obviously multiple script invocations may be placed in a command file. For more information see:
Command and Session files
Describes command files, and explains how to create and use them
Valid D3PLOT command line
arguments
Describes the various command line arguments, and how to use
them
11.2 The D3PLOT Javascript API
11.2.1 Summary table of API functions
The table below lists all the functions in the API, grouped by category. The hyperlinks will take you to their detailed
descriptions in the Javascript Appendix.
...Window...
Window and frame management
CreateWindow()
DeleteWindow()
SetWindowActive()
GetWindowMaxFrame()
SetWindowFrame()
GetWindowFrame()
GetWindowModels()
Create a new window containing 1 or more models in <model list>
Delete (a) window(s), optionally "disposing" of orphan models
Sets the "active" flag on the specified window(s)
Returns the highest frame in <window_id>
Displays frame <frame_number> in the specified window(s)
Returns the current frame of <window_id>
Returns an object containing information about the model(s) in <window_id>
Get...
"Getting" general information about the model
GetNumberOf()
GetTime()
GetLabel()
GetPid()
GetMid()
GetTopology()
GetElemsAtNode()
GetData()
QueryDataPresent()
General routine to return the quantity of many different things
Return the analysis time of the current state, or of <state> if defined.
Return the external label of internal <type/item>
Return the internal part id of internal <type/item>
Return the external material id of internal <type/item>
Return an object containing topology, #nodes and part id for internal <type/item>
Return a list of elements of <type> at <node>
Return scalar, vector or tensor data for data <component> of <type/item>
Returns JS_TRUE if data <component> is present.
Set...
"Setting" general information about the model
SetCurrentModel()
SetCurrentState()
Sets <model_id> to be current for data "get" and "put" operations
Sets <state_id> to be current for data "get" and "put" operations
...Ubin...
Manipulating User Defined Binary (UBIN) data components
CreateUbinComponent()
LocateUbinComponent()
DeleteUbinComponent()
GetUbinData()
PutUbinData()
Create a user-defined internal binary (UBIN) data component and return its "handle"
Returns an object with the <handle> and other attributes of UBIN component <name>
Deletes UBIN component <handle>
Get data from UBIN component <handle> for <type/item>
Insert data for UBIN component <handle> for <type/item>
Page 11.5
Oasys D3PLOT
User manual Version 9.3, Rev. 0, September 2008
...Cut...
Manipulating cut sections
SetCutSection()
GetCutSection()
GetCutForces()
Defines cut-section attributes in <window_id>
Retrieves cut-section attributes from <window_id>
Returns the forces, moments, centroid and area from the cut-section in <window_id>
Dialogue...
Command line dialogue insertion
Executes 1 or more lines of command-line dialogue commands
DialogueInput()
DialogueInputNoEcho() As for DialogueInput(), but with no echo to dialogue box
Miscellaneous Diagnostic and other general functions.
Print()
Prints <arg 1> and any following arguments on the terminal (stdout).
Common
User interface and i/o functions common with the Oasys PRIMER Javascript API
File
Window
Widget
Handles file opening, closing and general i/o
Handles creation and management of menu system windows
Handles primitives and processing in Window classes
11.2.2 More information about using the Javascript API
The main documentation of the API is in the Javascript Appendix under the headings below. It is strongly
recommended that you read this Appendix before embarking on writing Javascripts, as it explains the concepts and
pitfalls in more detail.
Notes on programming
•
•
•
•
•
Independence of scripts, and runs of scripts
Argument types (integer, double, etc) used in the interface
Compulsory and optional arguments in the functions above
Return values from functions
Execution errors and warnings
Notes on data abstraction and processing.
•
•
•
•
•
•
•
•
•
Adapting programming style to improve memory efficiency
Using User-defined Binary (UBIN) data components
The "current" model and state during data manipulation
Ordering processing for efficiencient data extraction
Using Direct Disk Access (DDA) for "hopping around" a large dataset
Internal item indices versus external item labels
Ordering of data in Vector and Tensor arrays
Testing for the presence or absence of a given data component
Special considerations when processing adaptively remeshed analyses
Notes on handling windows and models in windows.
•
•
The "current frame" in windows
Multiple models in windows
Recommended window setup when using this API
Detailed Description of Javascript Interface Functions.
•
•
•
•
•
•
•
Window manipulation
Setting "current" status items
Functions to "Get" and "Put" data and other information
Functions for processing User-defined Binary (UBIN) data components
Functions for processing cut-sections
Functions for inserting command-line dialogue input
Functions for diagnostic ouput
Page 11.6
User manual Version 9.3, Rev. 0, September 2008
Oasys D3PLOT
List of valid constants to be used in the functions above:
11.2.3 Examples
By far the easiest way to learn Javascript is by example and, more specifically by modified existing scripts to do what
you want.
Oasys software comes supplied with examples in the $OASYS/programme_library/examples directory (for
D3PLOT $OASYS/d3plot_library/examples) and you are free to use and modify these files for your own
purposes.
There are also some simple documented examples in the Javascript Appendix Examples section.
Page 11.7
Oasys D3PLOT
Page 11.8
User manual Version 9.3, Rev. 0, September 2008
User manual Version 9.3, Rev. 0, September 2008
Oasys D3PLOT
12 MORE ABOUT DATA AND DATA
COMPONENTS
12.0 Introduction to this section on data and data
components.
It is important that you understand what data LS-DYNA writes, and how D3PLOT processes it for presentation.
Therefore this section is organised to provide the following information:
12.0.1 Format and contents of the LS-DYNA databases.
In Section 12.1 the format and in Section 12.2 the contents of each of the LS-DYNA databases processed by D3PLOT
are described in more detail. The various output switches available in LS-DYNA to control their contents are also
described.
12.0.2 “Global” and “summary” data descriptions.
D3PLOT makes a distinction between global and summary data components, (those for the whole model, materials and
contact surfaces), and components for individual element types. Sections 12.3 to 12.5 describe the "summary" data
components available for the whole model, materials and contact surfaces respectively.
12.0.3 Data components for nodes and element types that write
results.
Not all entity types write results to the files processed by D3PLOT. Only nodes, solids, shells, thick shells, beams and
contact surface segments have data components available for them. These are described in Sections 12.6 to 12.11
respectively.
12.0.4 Data components for entities that do not write results.
Those entities which do not write results to databases processed by D3PLOT are lumped-masses, springs, seat-belt
types, joints and stonewalls. Nevertheless geometric and other data components are available for these and are
described in Section 12.12.
12.0.5 Theory behind data manipulations.
The theory and formulae behind the computation of derived data components is given in Section 12.13. For example
von Mises stress, principal stresses, etc.
Page 12.1
Oasys D3PLOT
User manual Version 9.3, Rev. 0, September 2008
12.1 Format of the LS-DYNA databases processed by
D3PLOT
D3PLOT processes three of the binary database file types from LS-DYNA:
Complete
.ptf Contains basic geometry and topology of, and transient results for, nodes, solids, shells, beams
state
}
and thick shells.
Dynamic
.rlf Eigenvalue files contain modeshape (not transient) results.
relaxation
}
Eigenvalue
(ex Nike)
---Contact force .ctf Contains geometry and topology of, and transient results for, contact surface segments.
Extra time
.xtf Contains geometry and topology of lumped-masses, springs, seat-belt types, stonewalls and
history
joints. (But the results for these are not processed by D3PLOT.)
Note that the .xtf file is not supported by MPP dyna, and that it is increasingly likely to be
supplanted by the "binout" (or LSDA) database file. From V9.0 onwards the .ztf file contains
all the plottable data previously extracted from the .xtf file, so there is no loss of functionality in
D3PLOT.
Pseudo time .ztf Contains extra information culled from the input deck: nodal contacts, restraints and constrained,
history
part and contact names. From V9.0 onwards also contains all static data previously saved in the
.xtf file, making plotting of these extra items possible if an .xtf file is not present.
The .ztf file is generated by Oasys PRIMER directly from the input deck, usually by running a
batch translation phase immediately after the ls-dyna analysis.
12.1.1 The “familied” nature of database files.
All of the database files above use a family structure. There is always a "root" member, which may have between 1 and
999 "children". This is done to keep file sizes down: there are many advantages to having a few moderately big files
instead of one huge one.
The "root" members:
Have the names <job>.ptf, <job>.ctf, etc.
The "child" members: Have names <job>.ptf01 to <job>.ptf99;
then <job>.ptf100 to <job>.ptf999
The maximum size of a family member is set when LS-DYNA is run, and a new "child" member is opened if writing
the current block of information would cause the current member to spill over this limit.
By default 7Mbytes is used (in single precision), corresponding to 1835008 words of data, but it is possible to change
this when the LS-DYNA job is submitted via the X= parameter on the DYNA submission line, or via the Oasys shell.
However very large analyses often use a larger family size in order to stop results states spilling over into multiple
family members.
By default D3PLOT determines the file family size automatically (by taking the greater size of the first two members of
a family, and rounding up to the nearest Mbyte). You can over-ride this by setting an explicit size (see Section 4.1.7)
but this should rarely, if ever, be necessary.
Note: Previous versions of D3PLOT used signed 32 bit integers to represent disk addresses, which limited total
database size to 231 words, or 2GWords.
Version 8.0 onwards of D3PLOT uses 64 bit integers to represent disk addresses, even on 32 bit machines, which
means that it can access disk addresses up to 263 words, or 9e18 words.
LS-DYNA from approximately 2002 (~LS960) onwards no longer adheres to the maximum database size logic for .ptf
files for larger models. If the state is too big to fit into a single family member it is allowed to increase in size in order
to contain the state. D3PLOT handles this automatically.
12.1.2 Setting the family member size of database files
The following strategy is adopted when the software is supplied to you by Oasys:
Page 12.2
User manual Version 9.3, Rev. 0, September 2008
•
•
•
•
Oasys D3PLOT
The whole software suite defaults to 7MByte family members if no external environment variables are set.
The environment variable FAM_SIZE may be set to a family size in MBytes. This should be an integer
between 1 and 100, and it is the preferred method of changing this value since it will be picked up by all the
software in the suite.
In the oasys shell you can set a different size when submitting a LS-DYNA job with the Binary file
size slider in the ADDITIONAL FILES panel.
In D3PLOT the value defaults to FAM_SIZE if this has been set, otherwise it is computed automatically.
You can also modify the value both at file input and during a session using the commands described in
Sections 4.1.1 and 4.1.8.
Please contact Oasys if you need more advice on changing this value.
12.1.3 Handling missing family members
It is not possible to use any of the database files above if their "root" family member is missing. This contains control,
geometry and topology data that is required if the rest of the file family is to be read. However it is possible to process
families in which some children have been deleted.
The data written to a file family is: <Control and topology> <state #1> <state #2> ...
and certain rules are used to make selective removal of child family members easier.
(1) If adding a <state> would overflow the maximum size permitted in the current member, it is closed and a new
one is opened.
(2) A new family member is always started following the writing of a restart dump file.
(3) If a <state> is too big to fit into a single member then the maximum size rule is still obeyed: the first member is
filled to capacity, then the next one is opened to take the remainder of the data. Thus <states> will be written in
pairs (or, if large enough, triplets, quadruplets and so on) of family members.
This is best explained by example. Two are given here: one for a moderate size analysis, and one for a huge one. In both
cases a maximum family size of 7MB is assumed.
Example 1: Basic control and topology requires 2MB, each state uses 3MB.
Root member
Control + Geometry
<State #1>
Child #1
<State #2>
<State #3>
Child #2
<State #4>
2MB
3MB
3MB
3MB
Child #3
<State #5>
<State #6>
Child #4
<State #7>
Restart dump => new member
3MB
3MB
3MB (Last state in file)
3MB
Example 2: Basic control and topology require 8MB, each state 12MB.
Root member
Control + Geometry
(part 1)
7MB
Child #2
<State #1: part 1>
7MB
Child #4
<State #2: part 1> 7MB
Child #3
Child #5
Child #1
<State #1: part 2> 5MB
<State #2: part 2> 5MB
Control + Geometry 1MB
And so on in pairs
(part 2)
Note that the basic geometry spills into the first child, and that subsequent <states> always come in pairs of files. In this
example child family members containing states could be removed, but only in matched pairs.
Hint: Use the UNIX command ls -lt to look at your files. This will give a "long" listing showing file size, and
also sort them into chronological order of creation.
Then look for matched pairs of files that will, in this example, have 7MB and 5MB sizes with the smaller file
being marginally more recent.
D3PLOT will skip gaps in a file family sequence if the FILE_SKIP environment variable is set. This is an integer that
defines how many missing files will be skipped before the search is abandoned. The default value set in the oasys_81
shell is 5, but values much larger than this (up to 999) could be used. Larger values will increase the time delay when
SCANning files as children are searched for on disk. See Section 4.1.1 and 4.1.7 for ways to alter this value at run time.
Page 12.3
Oasys D3PLOT
User manual Version 9.3, Rev. 0, September 2008
12.1.4 Disk format of binary database files.
All the files above are "random access binary files". This means that they are stored in the binary format of the
machine, and cannot be read or edited with tools such as a text editor.
There are several machine formats available, the most common one being:
IEEE
(Stands for the Institute of Electrical and Electronic Engineers). This is the most common, and a de-facto
standard on Unix workstations.
CRAY
Used on Cray XMP, YMP, C90, J90, etc.
Convex This is now no longer current, but older C1xx, C2xx and C3xx machines used this format.
There are two word-lengths in common use:
32
bit
Single precision, using 4 bytes. This gives 7 or 8 decimal figures of precision, and a decimal exponent in the
range +/-38.
64
bit
Double precision, using 8 bytes. This gives 14 or 15 decimal figures of precision, and a decimal exponent of
+/-308 in IEEE format, or +/-2465 in Cray format.
There are two possible way to arrange the bytes in the words:
Big endian
Byte order [4] [3] [2] [1] (single precision example)
(or Most Significant Byte : MSB)
Little endian
Byte order [1] [2] [3] [4] (single precision example)
(or Least Significant Byte : LSB)
Oasys LS-DYNA is normally supplied such that it writes 32 bit IEEE (Big endian) files, regardless of the machine
architecture and precision it is running on. This is achieved by converting results if necessary in the output routines.
D3PLOT is capable of reading any of the formats above. It detects the format by scanning the contents and converts it
automatically on input to the native format of the machine on which it is running. Therefore you will sometimes see a
message like:
[This machine is Cray 64 bit Normal endian ]
[File format is IEEE 32 bit Normal endian ]
when it reads files. This is just a notification message and you need not take any further action: in the example above
they will be converted automatically to 64 bit Cray format.
Does using 32 bit format on a 64 bit machine reduce the precision of my answers?
It does not affect the precision of the calculation at all: this is always performed at the full precision of the machine,
and dump files also use the full precision (so restarts do not compromise accuracy). It is only the databases written for
post-processing that are truncated to 32 bits.
So yes, it does affect the precision in post-processing: you will be forsaking 14 or 15 significant figures for 7 or 8. But
consider for a moment what this means: a typical car model might be 5 metres long, so single precision output will
resolve displacements to somewhere between 0.05 and 0.5 microns. And anyway, is your calculation really accurate to
0.00001%?
It is hard to envisage the situation where this matters and, in the opinion of Oasys, the benefits of halving disk space
usage and having files which may be post-processed without conversion on workstations far outweigh any
disadvantages. However Oasys will supply the code with 64 bit output on request.
Are there any other limitations in using 32 bit file formats?
Only one: if you are post-processing on a 64 bit machine you will have problems if your 32 bit file contains integers
(eg node, element or material numbers) outside the range +/-224 (16,777,216). This is because the bit patterns of integer
and floating point numbers become hard to tell apart at this point, and this distinction is required for automatic
conversion.
Page 12.4
User manual Version 9.3, Rev. 0, September 2008
Oasys D3PLOT
So, if you run on (say) a Cray and post-process on that machine then try to keep your node, element, material and other
labels below this limit. If you take your files to a 32 bit machine for post-processing the problem will not arise and you
can use the full valid integer range.
Alternatively, please request a version that writes 64 bit output from Oasys.
Why does D3PLOT sometimes mix up IEEE and Cray 64 bit formats in older files?
Prior to LS-DYNA 940 it was not possible to tell if a 64 bit file came from a Cray or an IEEE machine. (Subsequent
database files contain values which make distinction possible.)
Therefore if the file type is indeterminate D3PLOT defaults to one or the other format, which may be wrong. You can
control the default 32 and 64 bit file types using the following environment variables:
Variable name
Word size
Possible values
Default in V8.0
FILE_TYPE_32
32 bit
IEEE, CONVEX
IEEE
FILE_TYPE_64
64 bit
CRAY, IEEE, CONVEXIEEE (was CRAY in V7.x)
eg setenv FILE_TYPE_64 CRAY Would be required to read an older 64 bit Cray file in V8.0
Next Section
Page 12.5
Oasys D3PLOT
User manual Version 9.3, Rev. 0, September 2008
12.2 Contents of the LS-DYNA database files processed
by D3PLOT
(See Section 12.2.4 for a summary table of all contents in all files.)
12.2.1 The "complete state" (.ptf) file. (Also .rlf and d3eigv
files.)
12.2.1.1 Defining output parameters in LS-DYNA
The following LS-DYNA control cards control output of this file:
*DATABASE_BINARY_D3PLOT Is mandatory. Controls output frequency.
*DATABASE_EXTENT_BINARY Is optional. This card allows switching of certain parts of the file’s contents
on/off. These are discussed in section 9.2.1.3 below.
12.2.1.2 The generic contents of the complete state file
Control information:
Number of nodes
Number of each type of element
Number of materials
Amount of data written for each element type
Basic geometry & topology:
Undeformed nodal coordinates
Element topology
Arbitrary numbering tables
Complete state:
(Repeated for all times
dumped)
Time
Global data: energies, velocities, masses, stonewall forces
Nodal coordinates
Temperatures at nodes
Nodal velocities
Nodal accelerations
Solid element stresses and plastic strain
Thick shell stresses and plastic strains
Beam forces
Thin shell stresses, strains & related data
Deleted element tables
Page 12.6
User manual Version 9.3, Rev. 0, September 2008
Oasys D3PLOT
12.2.1.3 Controllable contents of the complete state file.
The options on the *DATABASE_EXTENT_BINARY card in the LS-DYNA input deck allow you to control the
following contents of the complete state file.
NEIPH "Extra" data components for solid elements. Default None.
Some material models generate more information for solids than can be written in the standard formats. For
these "extra" variables may be written. They are <neiph> scalar values that follow the normal data. They:
•
•
Are written for every solid element, regardless of material model.
Have no explicitly defined component names associated with them: this will depend on the material
model.
NEIPS "Extra" data components for shells and thick shells. Default None.
As with solids some material models write extra information for shells. They are <neips> scalar values
that:
•
•
Are written at every "surface" output for every shell, regardless of material model used.
Have no explicitly defined components associated with them: this will depend on the material model.
MAXINT Number of "surfaces" written for shell and thick shell elements. Default 3.
The default value of 3 writes data at neutral axis, innermost and outermost integration points for shells and
thick shells. Values other than 3 write results for the first <maxint> integration points: read Section
12.8.2.2 before using them.
STRFLG
Write directional strain tensors for solids, shells & thick shells. Default Off.
By default no strain tensors are written for any elements, (although effective plastic strain is). Turning this
flag on causes the strain tensors for solids, shells and thick shells to be written. Note that:
•
•
A single tensor at the element centre is written for solids.
Tensors at innermost and outermost integration points only are written for shells and thick shells,
regardless of the <maxint> value.
The following flags can be used to reduce database size by controlling the output for shells and thick shells. By default
they are all On.
NOTE:
None of the following four flags influences the output for solid elements.
SIGFLG Controls the output of the stress tensors for shells and thick shells.
The symmetric stress tensor (6 values) is written at <maxint> "surfaces" for every shell and thick shell,
so turning this off usually saves 18 values per shell. You will, of course, then not be able to post-process
any stresses.
EPSFLG Controls the output of effective plastic strain for shells and thick shells.
The effective plastic strain (1 value) is written at <maxint> surfaces for every shell and thick shell. Turning
this off will usually save 3 values per shell.
RLTFLG Controls the output of force and moment resultants for shells.
Force and moment resultants (8 values) are written for every shell (but not for thick shells). Turning this
off will save 8 values per shell.
ENGFLG Controls the output of thickness and strain energy density for shells.
Thickness, strain energy density and two other (unused) values are written for shells (but not for thick
shells). Turning this off will save 4 values per shell.
CMPFLG Composite material stress output in local axes. Default Off.
By default all stress tensors are written in the global coordinate system. Turning this flag on causes those
from composite materials to be written in the material local axis system(s).
Page 12.7
Oasys D3PLOT
User manual Version 9.3, Rev. 0, September 2008
WARNING: There is no way for D3PLOT to tell from the database that these stress tensors are in the
local system. It assumes that ALL STRESS TENSORS ARE IN THE GLOBAL SYSTEM.
If you use this facility IT IS YOUR RESPONSIBILITY to interpret your results correctly:
they will be reported in D3PLOT as global stresses.
BEAMIP Number of "extra" data values written for beam elements. Default None.
All beam elements write 6 basic forces and moments, but certain element and material formulations can
generate extra data:
Resultant formulation (Belytschko-Schwer) beams can generate a further 15 "plastic" values, depending
upon the material model used.
Integrated (Hughes-Liu) beams can generate 5 "extra" stress and strain values at each integration point.
There is no way of telling from the database whether "extra" beam results contain "Integrated"
stress/strain data, or "Resultant" plastic data.
LS-970 and earlier: inconsistent beam sign conventions.
There is an inconsistency of sign convention in beam output from versions of LS-DYNA prior to release
971.
•
"Resultant" (typically Belytschko-Schwer) elements use one sign convention
•
"Integrated" (typically Hughes-Liu) elements use the opposite sign convention for 4 of the 6 output
components.
The following table shows the status quo up to and including LS-DYNA release 970:
ComponentMatching?
Fx
Same
Fy
Opposite
Fz
Opposite
Mxx
Opposite
Myy
Opposite
Mzz
Same
Which is right?
Sadly there is no "right" for beam output, as different users have different
conventions. The confusion arises because of the different ways in which
the beam types work: integrated beams have integration points at their
centre, whereas resultant beams have (potential) hinges at their ends. The
former reports force in the beam, and the latter reactions at the supports.
This has serious implications when plotting beam data (see section 4.2.5)
and when extracting cut section forces and moments through beam
structures (see section 6.4.6)
LS-971 onwards: beam sign conventions corrected.
At some stage during the development of LS-DYNA 971this bug was corrected, and the output from
resultant and integrated beams now match. The sign convention that has been adopted is the "integrated"
one.
D3PLOT handling of Beam sign convention problems.
Unfortunately it is not possible to determine the analysis code version accurately from a database file (at
the time of writing, September 2008, output databases from LS-DYNA 971 still report their version
number as 970). Therefore D3PLOT adopts the following approach:
•
Contour plots of beam data are always shown "as is". This tends not to matter since it is usually
easy enough to see what plots mean.
•
However when computing cut-section forces through beams the sign convention is vital, therefore
D3PLOT will prompt you for the sign convention to be used.
IT IS YOUR RESPONSIBILITY to interpret your beam results correctly.
Page 12.8
User manual Version 9.3, Rev. 0, September 2008
Oasys D3PLOT
DCOMP Data compression flag. Default 1.
The default value of "1" means that database compression is turned off and a full set of data values is written
to the database for each rigid element in the model. If this option is set to "2" data values will not be output
for rigid elements. This option can significantly reduce the size of the binary files written by LS-DYNA if
the model contains a large proportion of rigid elements.
The following output options are currently not supported by D3PLOT, and should not be changed from their default
(off) states:
SHGE
Output of shell hourglass energy.
STSSZ Output of shell element time steps.
12.2.2 The Extra Time History (.XTF) file
12.2.2.1 Defining output parameters in LS-DYNA
The following LS-DYNA control cards control output of this file:
*DATABASE_BINARY_XTFILE Is mandatory. It controls output frequency and if you don’t have this card you
won’t have an .XTF file.
The contents of this file are determined by LS-DYNA, and you have no control over them.
It is intended primarily for time-history processing, but D3PLOT uses it to obtain the geometry and topology of
springs, seat-belt types, joints, stonewalls and lumped masses. D3PLOT ignores the state information in it (use Oasys
T/HIS to process that).
12.2.2.2 Generic contents of the .XTF file.
Control data:
Title
Number of nodes
Number of elements
Amount of data written for
elements
Initial data block:
Nodes for reactions
Spring topologies
Seat-belt etc topologies
Lumped mass data
Joint geometry
Stonewall geometry
Arbitrary numbering tables
Beam element time history blocks
Complete states (repeated n times)
(Not processed by D3PLOT)
Next section
Page 12.9
Oasys D3PLOT
User manual Version 9.3, Rev. 0, September 2008
12.2.3 The Contact Force (.CTF) file
12.2.3.1 Defining output parameters in LS-DYNA
The following LS-DYNA control cards control output of this file:
*DATABASE_BINARY_INTFOR Allows you to set an output frequency for this file different to that used for the
.PTF file, which is the default. (Note that you must request this file when
submitting the job in order for it to be written.)
It is strongly recommended that you DO NOT use an output frequency for this file that is different to that used for
the .PTF file. If you do D3PLOT can have problems trying to synchronise contact surface data with other results.
This file contains the topology and results for all segmented contact surfaces in the model. You have no control over its
internal structure.
12.2.3.2 Generic contents of the .CTF file
Control information:
Number of nodes
Number of interface surface and segments
Geometry and topology:
Undeformed nodal coordinates
Interface segment topology
Arbitrary numbering tables
Complete state data: (repeated n times)
Time
Global data: Energies and velocities
Current nodal coordinates
Nodal velocities
Interface segment stresses
Nodal contact forces
12.2.4 Key to finding information in OASYS LS-DYNA database
files
.PTF file
.CTF file .THF file
.XTF file
Global energies
KE, IE, TE
KE, IE, TE
KE, IE, TE
KE, IE, TE
Global velocities
VX, VY, VZ
VX, VY, VZ
VX, VY, VZ
VX, VY, VZ
Whole model data:
External work
Time-step
Page 12.10
EW
DT
User manual Version 9.3, Rev. 0, September 2008
Oasys D3PLOT
Data by material:
Material energies
KE, IE
KE, IE
Material velocities
VX, VY, VZ
VX, VY, VZ
Masses
Mass
Mass
Nodal data:
Geometry
[X,Y,Z] coords
[X,Y,Z]
coords
[X,Y,Z] coords
[X,Y,Z] coords
Displacements
[dX,dY,dZ]
[dX,dY,dZ]
[dX,dY,dZ]
[dX,dY,dZ]
Temperatures
[temps]
Velocities
[vX,vY,vZ]
Accelerations
[aX,aY,aZ]
[temps]
[vX,vY,vZ]
[vX,vY,vZ]
[aX,aY,aZ]
Nodes for reactions
Geom + reacts
Solid & thick shell
element data:
Topology
Connectivity & mat’l
Connectivity & mat’l
Stresses &c
Stress tensor
Stress tensor
Plastic Strain
Plastic strain
Strain tensor
Strain tensor
Extra variables
Extra variables
(Els in TH blocks)
Thin shell element
data:
Topology
Connectivity & mat’l
Connectivity & mat’l
Stresses &c
Stress tensor
Stress tensor
Plastic Strain
Plastic strain
Strain tensor
Strain tensor
Extra variables
Extra variables
Force/moment
resultants
Force/moment
resultants
Thickness & strain
energy density
Thickness & strain
energy density
(Els in TH blocks)
Page 12.11
Oasys D3PLOT
User manual Version 9.3, Rev. 0, September 2008
Beam element data:
Topology
Connectivity & mat’l
Conn’ty & mat’l
Conn’ty & mat’l
Results
Forces & moments
Forces & moments
Extra data Mat’l
29
Extra data Mat’l 29
(Els in TH blocks)
(Els in TH
blocks)
Spring element data:
Topology
Conn’ty & mat’l
Results
Force/elongation
Moment/rotation
Seat-belt etc elem
data:
Topology
Conn’ty & mat’l
Results
Force/elongation
/pullout etc
Lumped-mass
element data:
Topology
Node no & mass
Stonewall data:
Geometry
Normal forces
All geom
Fwalls
Fwalls
Fwalls
Interface data:
Geometry
All geom
Summary forces
Detailed results
Fx,Fy,Fz
summaries
Segment
stresses
All nodal
forces
Page 12.12
User manual Version 9.3, Rev. 0, September 2008
Oasys D3PLOT
Joint data:
Topology
Nodes, type
stiffness
Airbag (control
volume) data:
Results
Pressures etc
Notes on file types:
.PTF
file :
"Complete
state" file
is written at low frequency and has a complete description of the whole model.
.CTF
file :
"Contact
force" file
is written at the same frequency as the .PTF file, & is a complete description of the
interface forces & stresses.
.THF
file :
"Time
history" file
is written at a high frequency and contains a (user-specified) subset of the model for
detailed examination. It is used for XY graph type display (eg T/HIS).
.XTF
file :
"Extra
time-hist" file
is written at the same frequency as the .THF file, and contains extra information that
cannot be accomodated in the .THF file structure. Used for XY plots, and also for
providing the geometry for the graphics display of walls, joints, springs, etc
.ZTF
file :
"Extra static
data" file
is not generated by LS-DYNA, but rather by running Oasys Primer either in batch
(immediately after the analysis) or manually. Extra "static" data are extracted from the
keyword input deck and become available for post-processing.
12.3 Global (whole model) data components
This section describes the data components available for the "whole" model. These can only be processed as
numerical values in WRITE and XY_DATA.
Global data components are all extracted from the complete state (.PTF) file.
Raw components written by LS-DYNA are shown THUS, those calculated or derived by D3PLOT are shown
oblique THUS.
Energies
KE_KINETIC_ENERGY
The total kinetic energy.
IE_INTERNAL_ENERGY
The total strain and other non-kinetic energy.
TE_TOTAL_ENERGY
The sum of the two terms above.
Velocities
VX_X_VELOCITY
Average X velocity of the whole model
VY_Y_VELOCITY
Average Y velocity of the whole model
VZ_Z_VELOCITY
Average Z velocity of the whole model
VR_VELOCITY_RESULTANT Vector sum of above (computed by D3PLOT)
Page 12.13
Oasys D3PLOT
User manual Version 9.3, Rev. 0, September 2008
Mass values
MASS The sum of all material masses.
Note:
This only contains mass from solid, shell, beam and thick shell materials. Lumped masses, stonewalls, and
any other entity types which might contribute mass to the model are not included. Thus, for most models,
this is an underestimate.
Momentum values (From mass * velocity)
MX_X_MOMENTUM
Mass * average X velocity
MY_Y_MOMENTUM
Mass * average Y velocity
MZ_Z_MOMENTUM
Mass * average Z velocity
MR_MOMENTUM_RESULTANT Vector sum of the above
Note: The mass used here is the computed mass above, so the computed momenta may be an underestimate.
Next section
Page 12.14
User manual Version 9.3, Rev. 0, September 2008
Oasys D3PLOT
12.4 Part ("material") data components
This section describes the data components available for materials. These can be processed as numerical values in
WRITE and XY_DATA, and from release 9.3 onwards part-based data may also be plotted as well. (In this case all
elements of the part are "contoured" in the same colour representing their part value.)
Material data components are all extracted from the complete state (.PTF) file.
12.4.1 The "material" data available depends upon the files
present.
Complete
state files
(.ptf)
These files are always present, and contain part data for:
1.
All parts (materials) of solid, shell, thick shell, beam and SPH elements.
2.
All nodal rigid bodies
3.
All discrete and seatbelt elements.
Category (1) may be extracted and processed numerically (in WRITE and XY_PLOT), and visually
(in 2D3D plotting) because the part numbers of these element classes are known.
Category (2), nodal rigid bodies, may be listed as a category under WRITE, GLOBAL; however they
cannot be plotting because their underlying nodes are not known.
Category (3), discrete and seatbelt element part data, cannot be processed from .ptf files alone because
these files do not contain information about these elements.
ZTF files
If a .ztf file has been written from Oasys PRIMER then it becomes possible both to visualise discrete
and seatbelt elements, and also to determine their part numbers. Therefore it is possible to associate
part data with elements for these types, and process them in the same way as solids, shells, etc.
This also means that discrete and seatbelt elements can be selected and processed "by part" for
operations such as blanking, picking, and so on.
XTF files
If an .xtf file is present, which will increasingly not be the case, as it is not supported by MPP versions
of LS-DYNA, then discrete and seatbelt elements can be visualised; but the file does not contain the
information required to associate these element types with their part ids as defined in the LS-DYNA
keyword input deck, so their part-based data cannot be accessed.
D3PLOT automatically "culls" from part listings, menus, etc those parts which either do not contain any elements or for
which the element type cannot be determined. The only time that they become visible is when a WRITE,
MATERIAL_SUMMARY listing is produced.
12.4.2 The data components available for Materials
Raw components written by LS-DYNA are shown THUS, those calculated or derived by D3PLOT are shown
oblique THUS.
(Note that these are the same component names as are used for global (whole model) results.)
Energies
KE_KINETIC_ENERGY
The material kinetic energy.
IE_INTERNAL_ENERGY
The material strain energy.
TE_TOTAL_ENERGY
The sum of the two terms above.
Page 12.15
Oasys D3PLOT
User manual Version 9.3, Rev. 0, September 2008
Velocities
VX_X_VELOCITY
Average X velocity of the material
VY_Y_VELOCITY
Average Y velocity of the material
VZ_Z_VELOCITY
Average Z velocity of the material
VR_VELOCITY_RESULTANT Vector sum of above (computed by D3PLOT)
Mass values
MASS
The reported material mass.
Momentum values (From mass * velocity)
MX_X_MOMENTUM
Mass * average X velocity
MY_Y_MOMENTUM
Mass * average Y velocity
MZ_Z_MOMENTUM
Mass * average Z velocity
MR_MOMENTUM_RESULTANT Vector sum of the above
12.5 Contact Surface summary components
This section describes the summary (whole surface) data components available for contact surfaces, as opposed to
those available for contact segments (which are described in Section 9.11).
These cannot be plotted, they can only be processed as scalar values in WRITE and XY_DATA.
Contact surface summary data components are all extracted from the contact force (.CTF) file. They are all forces,
computed in D3PLOT by summing the nodal forces on each surface.
12.5.1 The data components available.
Forces
FX_CONTACT_X_FORCE
Total X force on the surface.
FY_CONTACT_Y_FORCE
Total Y force on the surface.
FZ_CONTACT_Z_FORCE
Total Z force on the surface.
FR_CONTACT_FORCE_RES Vector sum of above.
12.5.2 Why results from the .CTF file may differ from those in the
.XTF file.
The .CTF file is an instantaneous "snapshot" of the status of all contact surface segments at the time-step when the
dump took place.
Page 12.16
User manual Version 9.3, Rev. 0, September 2008
Oasys D3PLOT
The .XTF file output is generated within LS-DYNA by averaging contact forces on each surface over the time period
since the previous time-history dump. Therefore the results are not instantaneous.
There are pros and cons to both approaches: the averaging used for .XTF output means that very fast spikes are not
missed, but their magnitude is attenuated by the averaging process; whereas the instantanous data in the .CTF file
reports the correct magnitude but, in doing so, may miss a spike altogether. The .XTF approach is better for
time-history plotting, and the .CTF approach for graphical output.
12.5.3 When the Master and Slave side forces differ.
Where the forces on master and slave sides are with 5% of one another the average value is reported. Where the
difference is greater the side with the higher force magnitude is used.
Differences can occur - normally one side is zero, for example in the surface of single-surface contacts, or discrete
nodes impacting a surface. (In the latter case the nodes are not on segments, so are not written to the .CTF file.)
12.6 Nodal data components
LS-DYNA writes nodal results to the .PTF and .CTF files. All directional results are in the global cartesian
system except accelerations at nodes classified as accelerometers.
D3PLOT is able to plot nodal data on 2D and 3D elements by averaging across their faces.
It will process scalar nodal data, element data averaged at nodes and other geometrical data in the WRITE and
XY_PLOT menus.
12.6.1 The nodal data components available from the .PTF file.
Undeformed coordinates
BX_BASIC_X_COORD
BY_BASIC_Y_COORD
BZ_BASIC_Z_COORD
Current coordinates
CX_CURRENT_X_COORD
CY_CURRENT_Y_COORD
CZ_CURRENT_Z_COORD
Displacements (Derived from <current> - <undeformed>)
DX_X_DISPLACEMENT
DY_Y_DISPLACEMENT
DZ_Z_DISPLACEMENT
VY_Y_VELOCITY
VZ_Z_VELOCITY
AY_Y_ACCELERATION
AZ_Z_ACCELERATION
DR_DISP_RESULTANT
Velocities
VX_X_VELOCITY
VR_VEL_RESULTANT
Accelerations
AX_X_ACCELERATION
AR_ACCEL_RESULTANT
Page 12.17
Oasys D3PLOT
User manual Version 9.3, Rev. 0, September 2008
Temperatures
Note: Temperatures are only written in a thermal-only, combined structural and thermal, or
structural analyses using thermal materials.
TEMPERATURE
Coordinates, velocities and accelerations are not written in a thermal-only analysis.
12.6.2 The nodal components available from the
.CTF file.
Contact Forces
XG_GLOBAL_X_FORCE
ZG_GLOBAL_Z_FORCE
YG_GLOBAL_Y_FORCE
FM_FORCE_MAGNITUDE
Local contact forces use the average local axis system of the parent segments meeting at the node. This is
only an approximation.
XL_LOCAL_X_FORCE
YL_LOCAL_Y_FORCE
ZL_LOCAL_Z_FORCE
Note: Contact force results are only available if a .CTF file is available, and forces are only available at nodes
which form part of the topology of contact segments. For example forces at the "discrete nodes" which impact
a surface, or nodes "spot-welded" to a surface, are not available.
12.6.3 Element data components averaged at nodes by D3PLOT
Where nodes are attached to underlying elements for which averaging at nodes is meaningful, (solids, shells, thick
shells and contact segments), D3PLOT will report averaged values for scalar output.
The averaging logic is the same as that required to produce contour plots with one important exception: contouring a
facet provides a "parent" element for the node, so that discontinuities between elements meeting at the node can be
resolved by reference to the parent. However averaged data at nodes for scalar output cannot have such a "parent", and
some logical errors can occur: for example averaging data where a node is common to elements of two different types.
Averaged STRESS data available at nodes:
(Solids, shells, thick shells)
The basic tensor components:
X_DIRECT_STRESS
XY_SHEAR_STRESS
Y_DIRECT_STRESS
YZ_SHEAR_STRESS
Z_DIRECT_STRESS
ZX_SHEAR_STRESS
And the stresses derived from these by D3PLOT:
MAX_PRINC_STRESS MAX_DEV_PRINC_STRESS VON_MISES_STRESS
MID_PRINC_STRESS
MID_DEV_PRINC_STRESS
MAX_SHEAR_STRESS
MIN_PRINC_STRESS
MIN_DEV_PRINC_STRESS
PRESSURE
Page 12.18
User manual Version 9.3, Rev. 0, September 2008
Oasys D3PLOT
Averaged STRAIN data available at nodes:
(Solids, shells, thick
shells)
The effective plastic strain:
STRAIN
The basic strain tensor:
SX_DIRECT_STRAIN SXY_SHEAR_STRAIN
SY_DIRECT_STRAIN SYZ_SHEAR_STRAINS
SZ_DIRECT_STRAIN ZX_SHEAR_STRAIN
And the strains derived from these by D3PLOT
SMAX_PRINC_STRAIN SVON_MISES_STRAIN
SMID_PRINC_STRAIN
SMAX_SHEAR_STRAIN
SMIN_PRINC_STRAIN
The 1st 99 “extra” data components (if present)
SO1_SOLID_EXTRA_1
SO9_SOLID_EXTRA_99
(Solids only)
SH9_SHELL_EXTRA_99
(Shell and thick shells only)
to
SH1_SHELL_EXTRA_1
to
Further derived values
SR_STRAIN_RATE
(Solids only)
RV_RELATIVE_VOLUME VOLUME
(Solids and thick shells only)
Averaged FORCE and MOMENT resultants in shells available at nodes
Thin shell force and moment resultants (see section 12.8.7 for an explanation of these)
FX_NORMAL_FORCE MX_BENDING_MOMENT
QXZ_SHEAR_FORCE
FY_NORMAL_FORCE MY_BENDING_MOMENT
QYZ_SHEAR_FORCE
FXY_SHEAR_FORCE
MXY_BENDING_MOMENT
And the stresses derived by D3PLOT from these
XA_AXIAL_ONLY
XB_BENDING_ONLY XO_OUTER_FIBRE
YA_AXIAL_ONLY
YB_BENDING_ONLY YO_OUTER_FIBRE
XYS_SHEAR_ONLY
XYO_OUTER_FIBRE
Averaged thin shell miscellaneous components available at nodes:
INTERNAL_ENERGY_DENSITY
AS_AREA_OF_SHELL THICKNESS
Page 12.19
Oasys D3PLOT
User manual Version 9.3, Rev. 0, September 2008
Averaged contact segment STRESS components available at nodes:
Contact "stresses" in segments
CN_CONTACT_NORMAL CT_CONTACT_TANGENTIAL
COX_CONTACT_X
COY_CONTACT_Y
12.6.4 Geometric data components available for output at nodes
These may be listed using WRITE, but not plotted in any way.
Topological data:
EN_ELEMENTS_AT_NODE (Lists elements attached to node)
Next section
Page 12.20
User manual Version 9.3, Rev. 0, September 2008
Oasys D3PLOT
12.7 Solid element data components.
12.7.1 The effect of Solid shape, element formulation and
#integration points on output.
Solid elements in LS-DYNA may be 8 noded bricks, 6 noded wedges, or 4 or 10 noded tetrahedra. Their formulation
may be single-point integration, 8 point integration, or reduced 20 noded.
Regardless of their shape, number of nodes or element formulation solid elements write out one of the following,
depending on the variable <NINTSLD> on the *DATABASE_EXTENT_BINARY card.
NINTSLD = 1
(or 0)
(The default case)
One set of results at the element centre. For those with more than one integration point this set
of values is an average.
NINTSLD = 8
8 sets of results arranged at the 2 x 2 x 2 integration point locations.
The effect of writing 8 integration points worth of data for elements with only a single
integration point is undefined, and this option should only be used with fully integrated solids.
Versions of LS-DYNA prior to ls970 do not have this option, and only single integration point ouput is available
from them.
D3PLOT supports output at multiple integration points to a limited degree, although in most contexts only the value
at the first integration point is used.
12.7.2 The results available for solid elements
Solid elements write the results to the .PTF file. The following tables show the raw data components, and those
derived by D3PLOT.
Symmetric stress tensor:
X_DIRECT_STRESS
XY_SHEAR_STRESS
YZ_SHEAR_STRESS
Y_DIRECT_STRESS
ZX_SHEAR_STRESS
Z_DIRECT_STRESS
This is written in the global cartesian coordinate system. It is always output, regardless of any of the switchable settings
on the *DATABASE_EXTENT_BINARY control card. (See Section 9.2.1.3)
The stress components that can be derived this by D3PLOT are:
MAX_PRINC_STRESS
MAX_DEV_PRINC_STRESS
VON_MISES_STRESS
MID_PRINC_STRESS
MID_DEV_PRINC_STRESS
MAX_SHEAR_STRESS
MIN_PRINC_STRESS
MIN_DEV_PRINC_STRESS
PRESSURE
Effective plastic strain.
PLASTIC_STRAIN
The effective plastic strain is always output, as above. It has no intrinsic direction.
Page 12.21
Oasys D3PLOT
User manual Version 9.3, Rev. 0, September 2008
“Extra” variables for solids
If NEIPH has been defined on the *DATABASE_EXTENT_BINARY control card then <neiph> "extra" variables will
be written. D3PLOT will accept any number of these, but will only process the first 99. These have the names:
SO1_SOLID_EXTRA_1
SO9_SOLID_EXTRA_99
to
They are treated as separate scalar values of unknown type which may be contoured and written out, but not processed
in any way.
Directional strain tensor for solids
If STRFLG has been set on the *DATABASE_EXTENT_BINARY control
card the symmetric strain tensor for solids will be written out. This is
always oriented in the global cartesian coordinate system.
SX_DIRECT_STRAIN
SXY_SHEAR_STRAIN
SY_DIRECT_STRAIN
SYZ_SHEAR_STRAIN
SZ_DIRECT_STRAIN
SZX_SHEAR_STRAIN
And the strains derived from these by D3PLOT
SMAX_PRINC_STRAIN SVON_MISES_STRAIN
SMID_PRINC_STRAIN
SMAX_SHEAR_STRAIN
SMIN_PRINC_STRAIN
Components derived geometrically by D3PLOT
Strain rate is calculated from the nodal displacements and velocities:
SR_STRAIN_RATE
Volume and relative volume (VolCURRENT / VolOriginal) are calculated from nodal coordinates:
RV_RELATIVE_VOLUME VOLUME
Geometric components
These components are extracted from the topology, and can be output in WRITE:
MN_MATERIAL_NUMBER LN_LIST_OF_NODES
FE_FACING_ELEMENTS
12.7.3 Averaged nodal components for solids.
All the nodal results from the .PTF file listed in Section 9.6.1 are available for contouring on solid elements (in
2D/3D plotting mode). They can also be extracted as averaged element data for use in WRITE and XY_PLOT.
Nodal contact force components from the .CTF file cannot be processed on solid elements.
Page 12.22
User manual Version 9.3, Rev. 0, September 2008
Oasys D3PLOT
12.7.4 Transforming directional solid results to the element local
system
It is possible to transform stress and strain tensor results from the global to the local element coordinate system using
the FRAME_OF_REFERENCE options.
The local element axes, [X’, Y’, Z’] for this purpose, are calculated as follows. If we adopt the notation that the vector
from node 1 to node 2 is N1N2:
X’
= N1N2 approximately: the true X’ vector is recomputed below
Z’
= N1N3 x N2N4 (Where x is a vector cross-product)
Y’
= Z’ x X’
X’
= Y’ x Z’ This final transformation is required to correct for any warping
The formulae above are simplified for clarity. In 8 noded hexahedra the average of the bottom (N1N2N3N4) and top
(N5N6N7N8) faces is used to determine a "middle" face; and for 6 noded wedges a similar averaging process is used.
For tetrahedra Z’ is obtained from N1N2 x N1N3.
12.7.5 Solid element results from thermal-only (TOPAZ3D)
analyses
When a thermal-only analysis is run solid elements only are used.
However these do not write any results: the only output from such analyses is temperatures and flux vectors (in place of
velocities) at nodes.
Thermal loading for structural models: the *LOAD_THERMAL_TOPAZ
keyword.
It is possible to apply thermal loading to a structural model in the form of temperatures at nodes, varying over time, by
using a "topaz" input file combined with the *LOAD_THERMAL_TOPAZ keyword. However this has to be a "pure"
thermal file, formatted exactly as if it came from an old (1980s or 1990s) version of Topaz3d, and this is not the same as
the output file that contemporary LS-DYNA generates from a thermal only analysis.
D3PLOT has an undocumented capability to generate "pure" Topaz files from contemporary "thermal only" output please contact Oasys if you need to use this feature.
12.7.6 Solid element results from combined thermal and structural
analyses
When a combined thermal/structural analysis is run the results for solids are exactly the same as those in a purely
structural analysis.
12.7.7 Solid element results from an implicit NIKE3D analysis.
D3PLOT provides limited support for standalone NIKE3D (N3PLOT) files. Solid elements in these files report results
at 8 integration points, and D3PLOT will process this, but this capability is still under development. Users wishing to
use NIKE3D, either standalone or as embedded in LS-DYNA, should contact Oasys first for advice.
12.7.8 User-defined Solid data components.
D3PLOT 9.3 permits you to create an unlimited number of user-defined data components for solids. These may be
either scalar or tensor:
•
Scalar components are just treated as numerical values with no known properties or orientation.
•
Tensor components are assumed to be in the global system when created, and are subject to Frame of Reference
transformation as described in 12.7.4 above in exactly the same way as stresses and strains read from the
database. The same derived components (principal, max shear, von Mises, etc) are also available.
Page 12.23
Oasys D3PLOT
Next section
Page 12.24
User manual Version 9.3, Rev. 0, September 2008
User manual Version 9.3, Rev. 0, September 2008
Oasys D3PLOT
12.8 Thin Shell element results.
12.8.1 Effect of shell shape and formulation on output
Thin shells in LS-DYNA may be quadrilateral or triangular; they may have a single integration point on plan, or be
fully integrated; they may have from 1 to <n> integration points through their thickness; they may be linear (3 or 4
noded) or parabolic (6 or 8 noded).
Regardless of any of these permutations:
-
On plan:
shells only report results at their centre;
-
In elevation:
shells only report results at <maxint> points through their thickness.
(<maxint> is on the *DATABASE_EXTENT_BINARY card, and is explained in Section 12.2.1.3)
Sounds simple? Well it isn’t! There is lots of scope for misunderstanding thin shell results, and if you have doubts
please read this section. If you are still confused after that please contact Oasys for help and advice.
12.8.2 Description of shell output
Thin shells write out a large number of data values, and it is important that you understand exactly what they are. The
greatest sources of confusion are the coordinate systems used and the relationship between integration points and data.
12.8.2.1 Thin shell coordinate systems
Global cartesian and element local.
Results are written in both of these systems depending on their nature. The local element axes, [X’,Y’,Z’], are
calculated as follows. If we adopt the notation that the vector from node 1 to node 2 is N1N2:
X’ = N1N2 approximately: the final X’ vector recomputed below.
Z’ = N1N3 x N2N4 (Where x is a vector cross-product)
Y’ = Z’ x X’
X’ = Y’ x Z’ This final transformation is required to correct for any warping
Some components are written in the global cartesian system, and D3PLOT can transform these results to the local
element system if required with the FRAME_OF_REFERENCE options. Examples are the stress and strain tensor
values.
Other components are written in the element local system. Examples are the force and moment resultants.
We will revisit this topic later.
12.8.2.2 Thin shell integration points
From 1 to n through the thickness.
The majority of shell element formulations in LS-DYNA have a single integration point on plan, with from 1 to <n>
integration points through their thickness. The "fully integrated" formulations have 2 x 2 integration points on plan, and
again from 1 to <n> points through the thickness. For more information about shell formulations refer to the LS-DYNA
theory manual.
For the purposes of this discussion we can ignore the number of integration points on plan, since they do not affect the
output: thin shells only ever write results at the element centre as viewed on plan. What we are concerned with here is
the number through the thickness, (as viewed in elevation) and we must consider two cases:
Case 1: MAXINT on the *DATABASE_EXTENT_BINARY card is set to the default of three.
In this situation, regardless of the number of integration points through the thickness used in the shell element
formulation(s), stress tensor and plastic strain output for all shell elements is written at three "surfaces":
Page 12.25
Oasys D3PLOT
"Top"
User manual Version 9.3, Rev. 0, September 2008
: The outermost integration point
"Middle" : The neutral axis
"Bottom" : The innermost integration point
The outer integration point is located on the +ve local Z’ of the neutral axis, the inner on the -ve Z’ side. (Membrane
elements with a single integration point write the same value to all three surfaces.)
The important thing to note here is that, unlike linear-elastic codes, LS-DYNA reports "top and bottom surface"
stresses at the outer and inner integration points, and not at the element outer fibres.
Assuming the default Gaussian integration scheme is used the location of the outermost integration points is given in
the following table as a function of shell thickness/2 (t/2) for the range of 1 to 6 integration points through the
thickness.
No of Points
1
2
3
Distance from neutral axis as a proportion of t/2 (Gaussian integration)
0.0 (membrane)
0.577
0.775
0.861
0.906
0.932
4
5
6
Note:
Prior to LS-960
If the element formulation uses >5 integration points through its thickness then trapezoidal
integration is used - even if Gaussian is specified..
From LS-960
onwards
The user manual claims that Gaussian integration is used for any number of points if specified.
It is possible to specify "user-defined" integration rules, which may locate integration points at different points through
the thickness. For example Gauss-Lobatto quadrature will locate the outer and inner integration points on their
respective outer fibres, but there is a speed penalty to pay for this.
In addition, in many analyses the section will be largely plastic, and the exact values of stress will be somewhat
academic. Generally highly nonlinear problems are more concerned with plasticity and consequent energy absorbtion.
However if you are in, or close to, the linear elastic region, and/or exact stress levels are important, you should consider
using more integration points in order to extract results more precisely.
Case 2: "Layer" output with MAXINT set to some value other than the default of 3
In this situation LS-DYNA writes out the stress tensor and plastic strain values for the first <maxint> integration
points in the shell, starting at the innermost (bottom) one. You would generally only use this for composites analysis
where results in all layers are significant.
(1) LS-DYNA no longer calculates the "middle" neutral axis values for you.
If you have an odd number of integration points D3PLOT assumes that the middle one is the neutral axis value,
if you have an even number of integration points D3PLOT averages the central pair to produce an approximate
"middle" value.
(2) There is no check that MAXINT is equal to #integration points in a shell.
If MAXINT is less than the number of integration points in a shell you will be missing results; if greater the extra
results will probably be junk. The true number of integration points in a shell is not written to the .PTF file, so
D3PLOT cannot check this for you.
(3) There is a special case when MAXINT = 5.
If, and only if, MAXINT = 5 then results are written out in the integration point order: #3, #1, #2, #4, #5. There
is no obvious reason for LS-DYNA doing this, and it is not documented anywhere, but a simple shell bending
test model will reveal it to be true.
In this situation D3PLOT will still permit you to select "top", "middle" and "bottom" surfaces as before (with the
"middle" surface being defined as in (1) or (3) above). But it will also permit you to define a Layer number instead in
the range 1 to <maxint>. An example of this is shown in Section 4.2.4.2.
Page 12.26
User manual Version 9.3, Rev. 0, September 2008
Oasys D3PLOT
If you choose it this output option it is your responsibility to ensure that you interpret your results correctly.
If a ZTF file is not present D3PLOT has no means of knowing how many integration points a given element has
actually specified on its section definition; nor whether it uses Gaussian, Lobatto or user-defined rules.
It is up to you to interpret your results correctly.
12.8.2.3 Cases where stress and strain tensor output are in the local
coordinate system
Flag CMPFLG on the *DATABASE_EXTENT_BINARY card can be set to cause composite material stress and strain
tensor output to be in the element (or material) local coordinate system. There is no way to detect this from the the
.PTF file so, if you use this option, D3PLOT will assume that your results are still in the global system. Therefore it
will be your responsibility to ensure that you interpret your results correctly.
12.8.3 The results available for thin shell elements
Thin shell elements write the results to the .PTF file. The following tables show the raw data components, and those
derived by D3PLOT.
Symmetric stress tensor:
X_DIRECT_STRESS
XY_SHEAR_STRESS
Y_DIRECT_STRESS
Z_DIRECT_STRESS YZ_SHEAR_STRESS
ZX_SHEAR_STRESS
This is assumed to be written in the global cartesian coordinate system at <maxint> surfaces. Its output is on by
default, but may be switched off using the SIGFLG parameter on the *DATABASE_EXTENT_BINARY control card.
(See Section 9.2.1.3)
The stress components that can be derived this by D3PLOT are:
MAX_PRINC_STRESS MAX_DEV_PRINC_STRESS VON_MISES_STRESS
MID_PRINC_STRESS
MID_DEV_PRINC_STRESS
MAX_SHEAR_STRESS
MIN_PRINC_STRESS
MIN_DEV_PRINC_STRESS
PRESSURE
Effective plastic strain.
STRAIN
The effective plastic strain is written at the same <maxint> surfaces as the stress tensor. It has no intrinsic direction.
By default it is switched on, but may be turned off using the EPSFLG parameter on the
*DATABASE_EXTENT_BINARY control card.
“Extra” variables for thin shells
If NEIPS has been defined on the *DATABASE_EXTENT_BINARY control card then <neips> "extra" variables
will be written at each of <maxint> surfaces (as for the stress tensor above). D3PLOT will accept any number of
these, but will only process the first 99. These have the names:
SH1_SHELL_EXTRA_1 to
SH9_SHELL_EXTRA_99
They are treated as separate scalar values of unknown type which may be contoured and written out, but not processed
in any way.
Page 12.27
Oasys D3PLOT
User manual Version 9.3, Rev. 0, September 2008
Directional strain tensor for thin
shells
If STRFLG has been set on the
*DATABASE_EXTENT_BINARY control card the
symmetric strain tensor for thin shells will be written
out at the innermost and outermost integration points
only, regardless of the value of <maxint>. This is
assumed to be oriented in the global cartesian
coordinate system.
SX_DIRECT_STRAIN
SXY_SHEAR_STRAIN
SY_DIRECT_STRAIN
SYZ_SHEAR_STRAIN
SZ_DIRECT_STRAIN
SZX_SHEAR_STRAIN
And the strains derived from these by D3PLOT
SMAX_PRINC_STRAIN SVON_MISES_STRAIN
SMID_PRINC_STRAIN
SMAX_SHEAR_STRAIN
SMIN_PRINC_STRAIN
Shell force and moment resultants
Shell force and moment resultants are written as <Force/unit width> and <moment/unit width> in the
element local cordinate system. By default these are on, but they can be switched off with the RLTFLG flag on the
*DATABASE_EXTENT_ BINARY control card. (These components are explained in section 12.8.7)
FX_NORMAL_FORCE MX_BENDING_MOMENT
QXZ_SHEAR_FORCE
FY_NORMAL_FORCE MY_BENDING_MOMENT
QYZ_SHEAR_FORCE
FXY_SHEAR_FORCE
MXY_BENDING_MOMENT
Stresses derived by D3PLOT from the force & moment resultants
XA_AXIAL_ONLY
XB_BENDING_ONLY XO_OUTER_FIBRE
YA_AXIAL_ONLY
YB_BENDING_ONLY YO_OUTER_FIBRE
XYS_SHEAR_ONLY
XYO_OUTER_FIBRE
Thickness and Internal energy density components
By default these components are written. They can be turned off with the ENGFLG flag on the
*DATABASE_EXTENT_BINARY control card.
INTERNAL_ENERGY_DENSITY
THICKNESS
Components derived geometrically by D3PLOT
Shell area is calculated from the nodal coordinates:
AS_AREA_OF_SHELL ON_OUTWARD_NORMAL
Page 12.28
User manual Version 9.3, Rev. 0, September 2008
Oasys D3PLOT
Geometric components
These components are extracted from the topology, and can be output in WRITE:
MN_MATERIAL_NUMBER LN_LIST_OF_NODES
12.8.4 Averaged nodal data components for thin shells.
All the nodal results from the .PTF file listed in Section 12.6.1 are available for contouring on the shell elements (in
2D/3D plotting mode). They can also be extracted as averaged element data for use in WRITE and XY_PLOT.
Nodal contact force components from the .CTF file cannot be processed on thin shell elements.
Next section
Page 12.29
Oasys D3PLOT
User manual Version 9.3, Rev. 0, September 2008
12.8.5 Out of plane (Z’) stress tensor components
Thin shells in LS-DYNA do not calculate the element through-thickness (Z’) direct stress which will always be zero,
although the through thickness shear terms (YZ’ and XZ’) are calculated. Thus five of the six terms of the local stress
tensor are used, giving:
This means that principal stresses will not necessarily lie in the plane of the shell.
12.8.6 Out of plane (Z’) strain tensor components
Thin shells do not integrate the through thickness strain ( Z’), but this value may nevertheless be reported as non-zero.
This is because the shell thickness may change, leading to a strain: its stiffness in this direction is based on volume
preservation, but there is no stress associated with this.
Therefore principal strains also may not be confined to the plane of the element.
12.8.7 FX_ etc Explanation of shell force and moment resultants.
These are integrals, computed by LS-DYNA, of the stresses in the shell local system to create force and moment values
per unit width in the element local system.
The sign convention is taken from "Theory of Elastic Stability" Timoshenko and Gere, and the equations to derive the
resultants from the local stress values are given below. (t is the shell thickness.)
These are the forces and moments per unit width integrated over the element thickness. They are written in the element
local axis system.
Page 12.30
User manual Version 9.3, Rev. 0, September 2008
Oasys D3PLOT
12.8.8 XA_ etc Stresses in thin shells derived from force and
moment resultants
The force/moment resultants are converted to local axial and bending stresses as follows:
Axial stress
=
F/t
Bending stress
=
6M/t2
Outer fibre stress =
F/t +/- 6M/t2
Where: F = force / unit width
M = moment / unit width
t = section thickness
Note that the bending component here assumes a linear elastic stress distribution (ie stress = My/I) so "bending" and
"outer fibre" stresses will be incorrect in a plastic section.
12.8.9 Summary of coordinate systems and default locations of thin
shell results
This table shows the coordinate system and location of each category of data written by LS-DYNA, and also the same
information for results derived from these by D3PLOT. It assumes the default of MAXINT = 3.
TYPE OF DATA
COORDINATE SYSTEM
ELEMENT
LOCATION
Basic global stress tensor
Global cartesian axes (Can transform to
local)
Inner integration point
Neutral axis
Outer integration point
Stresses derived from global tensor
n/a
Inner integration point
Neutral axis
Outer integration point
Plastic strain
n/a
Inner integration point
Neutral axis
Outer integration point
Force/moment resultants
Element local axes
Whole element
Stresses derived from force/moment
resultants
Element local axes
Outer fibre
Neutral axis
Directional strain tensor
Global cartesian axes (Can transform to
local)
Inner integration point
Outer integration point
Extra data at integration points
Undefined
Inner integration point
Neutral axis
Outer integration point
Additional components
n/a
Whole element
Coordinate system and default locations for thin shell element data
Notes on this table:
• The entry "n/a" in the coordinate system column means that the data does not have a fixed direction. For example
VON_MISES or PRINCIPAL stresses. The words "can transform to local" means that D3PLOT global to local
transformation is available.
• The entry "whole element" in the element location column means that the data is for the element as a whole. For
example FXX_AXIAL_FORCE or THICKNESS components.
Page 12.31
Oasys D3PLOT
User manual Version 9.3, Rev. 0, September 2008
• The "outer fibre" stresses calculated from force/moment resultants assume a linear elastic stress distribution the
element. This may not always be the case.
12.8.10 User-defined shell components.
D3PLOT 9.3 permits you to create an unlimited number of user-defined data components for shells. These may be
either scalar or tensor:
•
Scalar components are just treated as numerical values with no known properties or orientation.
•
Tensor components are assumed to be in the global system when created, and are subject to Frame of Reference
transformation in exactly the same way as stresses and strains read from the database. The calculation of the
element local system is explained in section 12.8.2.1 above. The same derived components (principal, max shear,
von Mises, etc) are also available.
12.9 Thick shell element results
Thick shells in LS-DYNA look like bricks, but their internal formulation is more that of a shell. For example they use
very similar integration schemes and, like thin shells, do not integrate through thickness (Z’) stress. (However through
thickness strain is computed from volume conservation.)
12.9.1 Effect of shell shape and formulation on output
Thick shells in LS-DYNA may be hexahedra or extruded triangles. They may have a single integration point on plan,
or be fully integrated. They may have from 1 to 5 integration points through their thickness.
However, like thin shells:
On plan:
thick shells only report results at their centre;
In elevation:
thick shells only report results at <maxint> points through their thickness.
(<maxint>is on the *DATABASE_EXTENT_BINARY card, and is explained in Section 9.2.1.3)
In most respects thick shells are like thin shells, and you are encouraged to read Section 9.8.2 which describes some of
the pitfalls of using them. This will not be repeated here.
12.9.2 The results available for thick shell elements
Thick shell elements write the results to the .PTF file. The following tables show the raw data components, and those
derived by D3PLOT.
Symmetric stress tensor:
X_DIRECT_STRESS XY_SHEAR_STRESS
Y_DIRECT_STRESS YZ_SHEAR_STRESS
Z_DIRECT_STRESS ZX_SHEAR_STRESS
This is assumed to be written in the global cartesian coordinate system at <maxint> surfaces. Its output is on by
default, but may be switched off using the SIGFLG parameter on the *DATABASE_EXTENT_BINARY control card.
(See Section 12.2.1.3)
The stress components that can be derived this by D3PLOT are:
Page 12.32
User manual Version 9.3, Rev. 0, September 2008
Oasys D3PLOT
MAX_PRINC_STRESS MAX_DEV_PRINC_STRESS VON_MISES_STRESS
MID_PRINC_STRESS
MID_DEV_PRINC_STRESS
MAX_SHEAR_STRESS
MIN_PRINC_STRESS
MIN_DEV_PRINC_STRESS
PRESSURE
Effective plastic strain.
STRAIN
The effective plastic strain is written at the same <maxint> surfaces as the stress tensor. It has no intrinsic direction.
By default it is switched on, but may be turned off using the EPSFLG parameter on the
*DATABASE_EXTENT_BINARY control card.
“Extra” variables for thick shells
If NEIPS has been defined on the *DATABASE_EXTENT_BINARY control card then <neips> "extra" variables will
be written at each of <maxint> surfaces (as for the stress tensor above). D3PLOT will accept any number of these,
but will only process the first 99. These have the names:
SH1_SHELL_EXTRA_1
SH9_SHELL_EXTRA_99
to
They are treated as separate scalar values of unknown type which may be contoured and written out, but not processed
in any way.
Directional strain tensor for thick
shells
If STRFLG has been set on the
*DATABASE_EXTENT_BINARY control card the
symmetric strain tensor for thick shells will be written
out at the innermost and outermost integration points
only, regardless of the value of <maxint>. This is
assumed to be oriented in the global cartesian
coordinate system.
SX_DIRECT_STRAIN
SXY_SHEAR_STRAIN
SY_DIRECT_STRAIN
SYZ_SHEAR_STRAIN
SZ_DIRECT_STRAIN
SZX_SHEAR_STRAIN
And the strains derived from these by D3PLOT
SMAX_PRINC_STRAIN SVON_MISES_STRAIN
SMID_PRINC_STRAIN
SMAX_SHEAR_STRAIN
SMIN_PRINC_STRAIN
Components derived geometrically by D3PLOT
Thick shell volume and relative are calculated from the nodal coordinates:
VOLUME
RV_RELATIVE_VOLUME
Geometric components
These components are extracted from the topology, and can be output in WRITE:
MN_MATERIAL_NUMBER LN_LIST_OF_NODES FE_FACING_ELEMENTS
Page 12.33
Oasys D3PLOT
User manual Version 9.3, Rev. 0, September 2008
12.9.3 Averaged nodal data components for thick shells.
All the nodal results from the .PTF file listed in Section 12.6.1 are available for contouring on thick shell elements (in
2D/3D plotting mode). They can also be extracted as averaged element data for use in WRITE and XY_PLOT.
Nodal contact force components from the .CTF file cannot be processed on thick shell elements.
12.9.4 Out of plane (Z’) stress tensor components
Thick shells in LS-DYNA do not calculate the element through-thickness ( Z’) direct stress which will always be
zero, although the through thickness shear terms ( YZ’ and XZ’) are calculated. This means that these elements
should not be used where a full three-dimensional stress state is expected to develop.
Thus five of the six terms of the local stress tensor are used, giving:
This means that principal stresses will not necessarily lie in the plane of the shell.
12.9.5 Out of plane (Z’) strain tensor components
Thick shells do not integrate the through thickness strain ( Z’), but this value may nevertheless be reported as
non-zero. This is because the shell thickness may change, leading to a strain: its stiffness in this direction is based on
volume preservation, but there is no stress associated with this.
Therefore principal strains also may not be confined to the plane of the element.
12.9.6 Frame of reference: computing the local coordinate system
The local coordinate system used for thick shells is computed in much the same way as for shells, except that the
average of the bottom (N1N2N3N4) and top (N5N6N7N8) faces is used to produce a "middle" face. The formulae
are, as with shells:
X’
= N1N2 approximately: the true X’ vector is recomputed below
Z’
= N1N3 x N2N4 (Where x is a vector cross-product)
Y’
= Z’ x X’
X’
= Y’ x Z’ This final transformation is required to correct for any warping
In the case of a 6 noded thick tria Z’ is obtained from N1N2 x N1N3
12.9.7 User-defined Thick shell data components.
D3PLOT 9.3 permits you to create an unlimited number of user-defined data components for solids. These may be
either scalar or tensor:
•
Scalar components are just treated as numerical values with no known properties or orientation.
•
Tensor components are assumed to be in the global system when created, and are subject to Frame of Reference
Page 12.34
User manual Version 9.3, Rev. 0, September 2008
Oasys D3PLOT
transformation as described in section 12.9.6 above in exactly the same way as stresses and strains read from the
database. The same derived components (principal, max shear, von Mises, etc) are also available.
Next section
Page 12.35
Oasys D3PLOT
User manual Version 9.3, Rev. 0, September 2008
12.10 Beam element results
Beams in LS-DYNA are always linear, 2-noded elements. There are several different formulations but the two
principal types are:
Resultant:
Used for standard sections, and special "plastic" resultant formulations.
Integrated:
Also used for standard sections, but also for user-defined arbitrary sections.
Note that due to a bug in LS-DYNA the output sign convention used for the two types above is inconsistent up to and
including LS-DYNA release 970, this problem has been fixed from LS-DYNA 971 onwards. This issue is described in
section 12.2.1.3 where controlling beam output is discussed. This has implications for beam plotting (section section
4.2.5) and when extracting cut section forces and moments through beam structures (see section 6.4.4).
12.10.1 “Basic” components for all beams.
All beams types generate a "basic" force and moment vector (even if some of them populate it entirely with zeros!).
This is [Fx, Fy, Fz, Mxx, Myy, Mzz], where all results are written in the local axis system for beams. The
D3PLOT components have the names:
FX_AXIAL_FORCE
MXX_TORSIONAL_MOMENT
FY_Y_SHEAR_FORCE MYY_BENDING_MOMENT
FZ_Z_SHEAR FORCE
MZZ_BENDING MOMENT
The local axis system for beams is derived as follows:
If N1N2 is the vector from node 1 to node 2:
X’
= N1N2
Z’
= N1N2 x N1N3 (Where x is the vector cross-product)
Y’ = Z’ x X’
The "third" node (N3) is the orientation node for the beam, serving only to define its local Y’ axis. It has no structural
significance. If the representation of beam local axes during post-processing is important throughout an analysis you
should consider defining separate "third" nodes for each beam element, and setting the <nrefup> field on the
*CONTROL_OUTPUT card to update these nodes’ coordinates.
12.10.2 “Extra” components for Hughes-Liu beams
If the BEAMIP flag on the *DATABASE_EXTENT_BINARY card is used "extra" data for <beamip> integration
points in Hughes-Liu beams will be output. The 5 components for each point are:
XX_AXIAL_STRESS
SP_PLASTIC_STRAIN
YY_SHEAR_STRESS SAX_AXIAL_STRAIN
ZZ_SHEAR_STRESS
These values are calculated by LS-DYNA, and output in the relevant beam local axes.
12.10.3 “Extra” components for Belytschko-Schwer beams
If BEAMIP on the *DATABASE_EXTENT_BINARY card is set to 3 or more the following extra data components will
be written for all Belytschko-Schwer beams:
Page 12.36
User manual Version 9.3, Rev. 0, September 2008
MY1_Y_BENDING_MOM_END_1
MZ1_Z_BENDING_MOM_END_1
MY2_Y_BENDING_MOM_END_2
MZ2_Z_BENDING_MOM_END_2
MYD_Y_MOM_DISTRIBUTION
MZD_Z_MOM_DISTRIBUTION
Oasys D3PLOT
MMD_MOM_MAG_DISTRIBUTION
And if the Belytschko-Schwer beams use a resultant material formulation:
RXX_PLASTIC_TORS_ROTN
RZ1_Z_PLASTIC_ROT_END_1
RY1_Y_PLASTIC_ROT_END_1
RZ2_Z_PLASTIC_ROT_END_2
RY2_Y_PLASTIC_ROT_END_2
RZD_Z_MOM_DISTRIBUTION
RYD_Y_ROT_DISTRIBUTION
RMD_ROT_MAG_DISTRIBUTION
PE1_PLASTIC_ENERGY_END_1
PED_PLASTIC_ENERGY_DIST
PE2_PLASTIC_ENERGY_END_2
EAX_AXIAL_ENERGY
SAX_TOTAL_AXIAL_STRAIN
IE_INTERNAL_ENERGY
BED_BENDING_ENERGY_DENS = (PE1 + PE2) / Length
AED_AXIAL_ENERGY_DENS
= EAX / Length
IED_INTERNAL_ENERGY_DEN
= IE / Length
12.10.4 Notes on beam data.
(1) Hughes-Liu beams locate their integration point(s) at mid-span, and have a constant shear force and moment
along their length.
Belytschko-Schwer beams calculate the moment variation along the beam, so may have different Myy and Mzz
terms at ends one and two. This presents a problem when only the basic force and moment vector is written since
only one Myy and one Mzz term are output. These are in fact the values at node 1. So if you have a cantilever
fixed at end 2, with a point load at end 1, you will not see any moment in it (although it will behave correctly).
The best solution to this problem is to write the "extra" data since, as is shown above, separate end 1 and end 2
moments are then written to file.
(2) At present there is no way to tell from the database whether the "extra" data is for Belyschko-Schwer or
Hughes-Liu beams. So both sets of options may be extracted from the same dataset: it is your responsibility to
interpret your data correctly.
12.11 Contact segment results
This section describes the results available for individual contact segments, as distinct from those for surfaces as a
whole as described in Section 4.2.6.
Contact segment results are written to the .CTF file, so if this file is missing it will not be possible to visualise or
process contact surface results.
12.11.1 What are contact segments?
They are not really elements, although it is convenient to treat them as such within D3PLOT. They are 3 or 4 noded
areas over which contact is calculated, and which must lie on "real" structural elements underneath.
Contact forces are calculated at nodes, and then averaged over the area of their connected segments to give contact
Page 12.37
Oasys D3PLOT
User manual Version 9.3, Rev. 0, September 2008
"stress": really these value are "pressure" not "stress" (although the units are the same).
Users should be aware that contact forces in LS-DYNA are calculated from the repulsion forces required to stop nodes
penetrating surfaces, and that this is an inherently noisy process since penetrations - and hence forces - tend to
oscillate. Therefore contact forces on individual segments at a given state should be treated as a snapshot of a dynamic
process, and not necessarily a good indication of the mean contact force averaged over a longer time period.
12.11.2 Components written by LS-DYNA for contact segments.
Contact segment "stress" values written by LS-DYNA at segments:
CN_CONTACT_NORMAL
Stress normal to surface;
CT_CONTACT_TANGENTIAL Resultant stress in plane of surface;
CX_CONTACT_X
In-plane local X stress;
CY_CONTACT_Y
In-plane local Y stress;
Contact forces written by LS-DYNA at nodes, averaged by D3PLOT over segments:
XG_GLOBAL_X_FORCE
FM_FORCE_MAGNITUDE
XL_LOCAL_X_FORCE
YG_GLOBAL_Y_FORCE
ZG_GLOBAL_Z_FORCE YL_LOCAL_Y_FORCE
ZL_LOCAL_Z_FORCE
Local forces are transformed to reflect the orientation of a segment. But since the nodal forces on which they are based
also have contributions from adjacent segments they should be regarded as approximate.
Versions of LS-DYNA from approximately ls960 (~2002) onwards may also write:
Contact
Contact
Contact
Contact
gap
gap
gap
gap
at
at
at
at
node
node
node
node
N1
N2
N3
N4
D3PLOT wil process files containing these data, but they are ignored and are
not plottable.
Surface energy density of
segment
12.11.3 Geometric components calculated by D3PLOT
ON_OUTWARD_NORMAL Special geometric component to show segment orientation.
12.11.4 Results for whole surfaces
D3PLOT can also sum up results for contact surfaces, and the results can be viewed numerically in WRITE and
XY_DATA. These values are the numerical sum of the relevant component for all segments in the surface.
When LS-DYNA writes contact surface results to the .CTF file it distinguishes between Master and Slave sides of each
contact, therefore D3PLOT allows you to report results for contact surfaces as follows:
Master side
Results are computed from segments on
the master side
Slave side
Results are computed from segments on
the slave side
Page 12.38
User manual Version 9.3, Rev. 0, September 2008
Oasys D3PLOT
Surface as a whole where the summary results from master and slave
sides are within 5% by magnitude.
Directional (eg X
force)
(Master - slave)
* 0.5
(Master and slave sides should be equal in magnitude, and directional
components opposite in sign.)
Magnitude values
(Master + slave)
* 0.5
Therefore the sign of the output of
directional values is that of the master
side.
Surface as a whole where summary results from master and slave sides
differ by more than 5% by magnitude. (Typically the single-surface
case, or "nodes to" types with no slave segments.)
Whichever side has the greater value by
magnitude, with no sign change applied.
12.11.5 How LS-DYNA calculates and D3PLOT processes contact
“stresses”
IMPORTANT: The "stresses" on interfaces will always be lower than the true values in the elements, and they will
also be spread over a wider area.
This is because of the way the penalty force and contouring algorithms work. Consider the following example (see the
three figures below)
a) A single node (say on the master side) touches part of the (slave) surface. (Master and slave are inter-changeable
in this example.)
b) The reaction forces on the slave side are distributed among the four nodes on the slave segment.
c) Contact stress is then computed over the sphere of influence of each node on the slave surface, and stress is assigned
to each contact segment.
Page 12.39
Oasys D3PLOT
User manual Version 9.3, Rev. 0, September 2008
d) Contouring which, in D3PLOT averages over elements, spreads the stress over a further region of contact segments.
Thus the contact at a single point has generated an apparent stress spread over twenty five elements - clearly this is not
correct. To get round this you can:
•
•
Plot "force" components (eg FM_FORCE_MAGNITUDE) which omit step (c) above, so force is spread only
over nine segments in this example.
Plot force vectors (VECTOR command) which will only show force arrows at the four nodes on the slave
segment.
However in real examples the problem is less severe: the genuine contact is usually spread over several segments and it
is only around the borders of the contact region that stresses spread out too far.
Nevertheless contact "stresses" should not be treated as more than approximate contact pressures, and in particular they
must not be expected to be the same as (true) stress in the underlying elements.
Next section
Page 12.40
User manual Version 9.3, Rev. 0, September 2008
Oasys D3PLOT
12.12 Smooth Particle Hydrodynamic (SPH) Data
components
From release 9.3 D3PLOT will process SPH elements if present in the database.
12.12.1 SPH membership of PARTs
SPH elements belong to PARTs in exactly teh same way as solids, shells and beams; so D3PLOT processes them "by
part", and makes their part-based data components available in exactly the same way.
In addition it will be clear from the tables below that the stress and strain SPH database components are the same as
solid and shell ones, so they are contoured alongside them in 2D3D plotting mode, fitting in neatly with PART
membership.
12.12.2 SPH Data organisation
SPH elements can be thought of as having a single integration point at their centre, and all directional tensor
components are written out in the global model system. The global/local frame of reference transformation has no effect
on these results, and the current surface/integration point setting also does not affect them.
SPH elements can be deleted, as with other elements. D3PLOT detects this and removes deleted elements from the plot.
12.12.3 The results available for SPH elements
SPH elements write out the following block of 18 values per element to the .PTF file:
•
Radius of influence (1 value, used to determine its size when drawn)
•
Pressure (1 value)
•
Stress tensor (6 values)
•
Plastic strain (1 value)
•
Density (1 value)
•
Internal energy (1 value)
•
Number of neighbours (1 value)
•
Strain tensor (6 values)
Experience suggests that the above data components are written regardless of any flags on
*DATABASE_EXTENT_BINARY or other control cards.
The following tables show the raw data component names, and also those derived by D3PLOT.
Symmetric stress tensor:
X_DIRECT_STRESS
XY_SHEAR_STRESS
YZ_SHEAR_STRESS
Y_DIRECT_STRESS
ZX_SHEAR_STRESS
Z_DIRECT_STRESS
This is written in the global cartesian coordinate system.
The stress components that can be derived this by D3PLOT are:
MAX_PRINC_STRESS
MAX_DEV_PRINC_STRESS
VON_MISES_STRESS
MID_PRINC_STRESS
MID_DEV_PRINC_STRESS
MAX_SHEAR_STRESS
MIN_PRINC_STRESS
MIN_DEV_PRINC_STRESS
PRESSURE
Page 12.41
Oasys D3PLOT
User manual Version 9.3, Rev. 0, September 2008
Effective plastic strain.
PLASTIC_STRAIN
The effective plastic strain is always output, as above. It has no intrinsic direction.
Directional strain tensor
Unlike other element types this strain tensor is written unconditionally,
regardless of the value of STRFLG on the
*DATABASE_EXTENT_BINARY card.
SX_DIRECT_STRAIN
SXY_SHEAR_STRAIN
SY_DIRECT_STRAIN
SYZ_SHEAR_STRAIN
SZ_DIRECT_STRAIN
SZX_SHEAR_STRAIN
And the strains derived from these by D3PLOT
SMAX_PRINC_STRAIN SVON_MISES_STRAIN
SMID_PRINC_STRAIN
SMAX_SHEAR_STRAIN
SMIN_PRINC_STRAIN
Further SPH-only components
RADIUS
NUM_NEIGHBOURS
VOLUME
ENERGY
DENSITY
PRESSURE
It is not clear why PRESSURE is written separately, rather than being
deduced from the stress tensor. D3PLOT uses this value rather than (Sx
+ Sy + Sz) / -3.0
The following are derived from the above:
VOLUME
(from radius)
MASS (from VOLUME x DENSITY)
12.13 Airbag Particle (ABP) data components
From release 9.3 D3PLOT processes Airbag Particle elements.
These can be thought of as small spherical particles which are emitted from an inflator to apply pressure to an airbag, as
an alternative to using a control volume. Each inflator contains one or more gas generators, which emit particles as the
analysis progresses. This means that - in effect - particles are "born" when they first appear in the analysis, and while
they don’t "die" as such they may pass through the fabric of the bag (or through a vent hole) and cease to take an active
part in the analysis. Therefore the number of particles is initially zero, and their quantity increases as they pop into
existence as the analysis progresses.
The way particles act upon the fabric of the bag is effectively to make contact with it and hence apply force, mimicing
the true behaviour of actual gas particles - albeit on a much larger scale.
Airbag particles are treated as elements within D3PLOT, and such data values are as contourable are displayed in the
2D3D plotting mode. However as will be clear from the tables below these particles act more like small rigid balls and
don’t have element data as such, so the main purpose in plotting them is to see how they are inflating the airbag and
"contouring" their data is nearly meaningless.
At the time of writing (September 2008) the information available about this feature is limited, and the information
below has been largely reverse-engineered from what is present in databases written from example analyses run in
Page 12.42
User manual Version 9.3, Rev. 0, September 2008
Oasys D3PLOT
LS-DYNA 971R4. It is likely that this feature will be developed further, and generate more information in the future.
12.13.1 ABP membership of "Airbags"
Within D3PLOT airbag particles belong to "Airbags" in exactly the same sense that solids, shells and beams belong to
"Parts". (The "airbag" is the Control Volume definition in the input deck.) It is not possible to tell from the .ptf file what
the fabric elements making up a bag are, so it cannot be drawn explicitly, however being able to select and process "by
airbag" fits neatly into the logic of the programme, and makes it easy to select and control these elements.
"Per airbag" data can be plotted (all particles in a bag getting the same contour value), and can also be displayed
numerically in WRITE and XY_DATA. At present the data components available at "Airbag" level are:
ANP_ABAG_NUM_PARTICLES the number of "live" particles in this bag
AVOL_AIRBAG_VOLUME the current bag volume
12.13.2 ABP data components
The following data components are written from LS-DYNA 971R4 and may be "contoured" in 2D3D plotting mode as
data components. "Contouring" is a misnomer in this context, since each particle is independent and has a single value,
however the display of this value can still be useful.
Current coordinates
CX_CURRENT_X_COORD
CY_CURRENT_Y_COORD
CZ_CURRENT_Z_COORD
Displacements (Derived from <current> - <undeformed>)
DX_X_DISPLACEMENT
DY_Y_DISPLACEMENT
DZ_Z_DISPLACEMENT
VY_Y_VELOCITY
VZ_Z_VELOCITY
DR_DISP_RESULTANT
Velocities
VX_X_VELOCITY
VR_VEL_RESULTANT
Other
MASS
GAS_ID (The gas number)
SPIN_ENERGY
RADIUS
LEAKAGE (0 inside bag, 1 escaped, 2 & 3
??)
TRANS_ENERGY
NS_DIST (Distance to nearest bag
segment)
VOLUME (from RADIUS)
DENSITY (from MASS / VOLUME)
12.13.3 Nodes on ABP elements: VISFLG on *AIRBAG_PARTICLE
card
Page 12.43
Oasys D3PLOT
User manual Version 9.3, Rev. 0, September 2008
The documentation on the *AIRBAG_PARTICLE card suggests that VISFLG must be turned on in order to see airbag
particles. This is misleading: airbag particle data is written to the .ptf file regardless if present in the analysis, and this
flag simply turns on the output of nodes coincident with these elements.
Since D3PLOT 9.3 onwards will visualise ABP elements without needing these nodes it is recommended that you turn
the VISFLG off in order to reduce the output database size.
12.14 Data components for other entity types
LUMPED_MASSES, SPRINGS, SEAT_BELTS etc, JOINTS, STONEWALLS:
D3PLOT cannot currently extract time-dependent data for these element types, (except normal force on stonewalls), so
only geometric data components are available for them. These data are extracted from the .xtf file if present, or from
the .ztf file if not. If neither file is present then these items will not be processed.
12.14.1 LUMPED-MASS components
LN_LIST_OF_NODES CE_CONNECTED_ELEMENTS MASS
SUMMARY
12.14.2 SPRING/DAMPER components
MN_MATERIAL_NUMBER LN_LIST_OF_NODES
TYPE_OF_SPRING
SUMMARY
In addition if the BEAM flag on the *DATABASE_BINARY_D3PLOT card may be used to write spring results into
beam "slots" in the .ptf file as follows:
BEAM = 0
(default)
Extra beam elements are added to the .ptf file using the spring/damper topology, and Global [Fx, Fy,
Fz, Fr] forces are written in the Fx, Fy, Fz, Myy data "slots" for beams
BEAM = 1
No extra beams are written
BEAM = 2
Extra beam elements are written as for the "0" case above, but only the resultant force is written to
the Fx "slot".
If these extra beams are present in the database D3PLOT has no way of knowing whether they are genuine beams, or
springs masquerading as beams. Therefore if you use this option treat your results with care.
12.14.3 SEAT_BELT, RETRACTOR and SLIP_RING components
MN_MATERIAL_NUMBER LN_LIST_OF_NODES
SUMMARY
Since seatbelt elements are really discrete elements inside LS-DYNA the BEAM flag on
*DATABASE_BINARY_D3PLOT will also result in beams being written out for seatbelt elements as described in
12.14.2 above.
12.14.4 JOINT components
LN_LIST_OF_NODES
TYPE_OF_JOINT
SUMMARY
12.14.5 STONEWALL components
Page 12.44
STIFFNESS
User manual Version 9.3, Rev. 0, September 2008
NORMAL_FORCE
Oasys D3PLOT
SUMMARY
Notes:
•
•
•
The SUMMARY components above are the most useful since they list all relevant data for each element type.
Spring, seat-belt and stonewall transient data may be extracted from the .XTF file via the Oasys T/HIS
time-history plotting programme.
Velocity of moving stonewalls can be deduced from the velocities of the optional extra nodes that can be
placed on such stonewalls.
12.15 Theory and Formulae
This section describes some of the theory and equations use to process data components in D3PLOT.
12.15.1 Manipulations of stress and strain tensor components
We have adopted the tensor notation for global stresses :
[S] =
(Symmetric: Upper triangle = lower triangle)
Where X,
Y,
Z are the "direct" stresses, and
XY,
Similarly we have adopted the notation for global strains:
[E] =
Where
YZ,
XZ
the shear stresses.
(Symmetric: Upper triangle = lower triangle.
X,
Y,
Z
are the "direct" strains, and
XY,
YZ
,
XZ
the shear strains.
12.15.1.1 Rotating a tensor to give element local stresses
If we have a set of direction cosines in the 3x3 matrix [R] then we can rotate a tensor thus:
[S’] = [R][S][R]T where [S’] =
This is how the global to local transformation of stresses and strains is carried out when the
FRAME_OF_REFERENCE is set to LOCAL: the [R] matrix is formed from the local axes of the element. The
prime " ’ " notation is used to signify that the component is in the local (as opposed to global) coordinate system.
12.15.1.2 Computing von Mises Stress The deviatoric stress.
Page 12.45
Oasys D3PLOT
User manual Version 9.3, Rev. 0, September 2008
This is
given
by:
12.15.1.3 Computing PRESSURE The hydrostatic pressure.
This is given by:
-(X +
/ 3.0
Y
+
Z)
(Note: compression +ve)
12.15.1.4 Computing PRINCIPAL stresses
The principal stresses (maximum, middle, minimum) are the three roots (P) of the cubic:
PMAX’
PMID’
PMIN’=
Where PMAX > PMID > PMIN
Deviatoric principal stresses values are given by subtracting the hydrostatic pressure, thus:
[PN - PRESSURE]
12.15.1.5 Computing MAX_SHEAR_STRESS.
This is given by: (PMAX - PMIN) / 2.0
12.15.1.6 Computing equivalent strain values.
These are all computed in exactly the same way as the stress terms above, substituting [E] for [S], except that the
von Mises strain has a factor of 2/3 applied:
This is given by:
Page 12.46
User manual Version 9.3, Rev. 0, September 2008
Oasys D3PLOT
13 D3PLOT USE OF GRAPHICS
HARDWARE
D3PLOT supports 2 categories of graphics devices:
X_Windows
X(option)
2-D windows on any Unix hardware, and on PCs via emulation.
OpenGL
OPENGL
3-D windows on all common hardware. Only available method under Windows.
This section gives more details about these device categories, and describes what capabilities are available on each one.
You should not normally need to read this section, and it is included for interest only. If you have problems with
graphics hardware please contact Oasys for advice.
13.1 The "X" (X_Windows) 2-D protocol.
X_Windows is the most widely supported graphics protocol on modern engineering work-stations. It has the following
attributes:
• It uses a client/server mode of working that makes it network transparent. That is you can display results on one
machine (the server), while actually running on another, (the client). Client and server may be totally different
machines connected by a network, or indeed the same machine working autonomously.
• It supports a wide range of screen types. Almost any graphics screen of any resolution and type will work under this
protocol.
• It integrates well with window managers. All current workstation window managers will support multiple "X"
windows.
• It is two dimensional only. (The PEX 3D extension has proved unsuccessful in the face of competition from
OpenGL.)
The D3PLOT screen menu is an X-Window, a child of the window manager, and it has its own children that it manages
locally.
The menu system always uses the default visual of the screen so that, in itself, it will not clash with other applications.
The graphics sub-window within this menu may also be invoked with the default visual, or with a different one.
X "visuals" are discussed in the next section.
13.1.1 X_Windows colour visuals and their attributes
Since the X_Windows protocol is designed to run on a wide range of hardware it offers a range of four colour "visuals"
to employ the various graphics screens to best effect.
VISUAL TYPE
Typical #Bit-planes
#Colours available
Colourmap type
PseudoColor
4 - 12
16 - 4096
Read/write
StaticColor
4 - 12
16 - 4096
Read-only
DirectColor
4 - 24
16 - 16777216
Read/write
TrueColor
4 - 24
16 - 16777216
Read-only
You don’t have to understand X visuals fully to use D3PLOT, but you should be aware that the visual type and number
of bit-planes you use have an influence on image quality, interaction between the various windows on the screen and
animation speed.
#Bit-planes:
The number of colours available is 2#BIT-PLANES. Most display modes in D3PLOT will function with
16 colours, ie 4 bit-planes; but the two lighting modes SH (GREYSCALE) and SI SHADED_IMAGE
need at least 100 colours to give decent results, and work best with 256 or more colours. So using more
bit-planes will give better quality images: on a 24 bit-plane visual D3PLOT will give "true" colour
rendering.
However animation requires images in memory (pixmaps) to be transferred to the screen, and the
greater the number of bit-planes in an image the longer this takes. So using more bit-planes gives
slower animation.
Page 13.1
Oasys D3PLOT
Map
type:
User manual Version 9.3, Rev. 0, September 2008
Read/write colourmap visuals (Pseudocolor and Directcolor) permit colours to be changed dynamically on the
screen without re-drawing, whereas read-only ones require the image to be re-drawn if colours are to be
changed. In addition read/write colourmaps permit entries to be created that match as exactly as possible the
shades required, whereas read-only maps have to select shades from those available: this is not a problem on
24 bit-plane screens where all possible shades exist, but it can give inferior lighting plots on devices with
fewer bit-planes.
More significantly read/write visuals generally require multiple screen windows to share colourmaps, and this
can lead to colours in some windows changing as entries which are correct for one window conflict with those
for another. Read-only maps never suffer from this problem.
13.1.2 Choosing an X_Windows visual
From the above discussion it should be clear that there is no "best" X_Windows visual for D3PLOT, and indeed a high
performance 24 bit-plane visual may be a liability if fast animation is required. Therefore D3PLOT release 8.0 allows
you to choose any visual supported by your server. When it asks you to give a device type:
You may select one of the following X options:
X8
Using an 8 bit-plane visual for fast animation.
D3PLOT will use a TrueColor visual if it exists, failing that then PseudoColor and finally StaticColor.
Shading and lighting should be acceptable, but dithering will be required to reproduce all shades.
X24
Using a 24 bit-plane visual for best quality lighting and shading.
D3PLOT will choose a TrueColor or DirectColor visual. Shaded and SI plots will be of good quality, but
animation will be slower as three times as much information has to be moved around.
XMENU Interactive selection of visuals from menu.
This option presents you with a menu of the visuals available on the server and lets you select one.
Considerable on-line help is available.
X8 will be adequate for most users, X24 is only justified if you are going to be grabbing screen images and need the
higher image quality.
Note that "dithered" laser plots are sent to the screen at the depth of the visual, but are always generated in "true"
(effectively 24 bit-plane) colour in the laser file.
13.2 3D protocol: OpenGL.
The OpenGL graphics library has become the de-facto industry standard, and is available on virtually all hardware.
OpenGL itself has no native window support, it runs under the windowing system of its host machine. Therefore on
Unix machines OpenGL rendering takes place within an X window, and on PCs within a "windows" window. In
environments that support it OpenGL can operate in separate client/server mode, and using "objects" in the server can
be efficient in this mode.
OpenGL is similar in most respects to X_Windows except that it is fully three-dimensional and utilises hardware
acceleration for most graphics functions. In particular:
• The image can be rotated, translated and scaled dynamically using the mouse as under X. But this is now carried
out by the hardware so, depending on hardware power and size of model, this can be done far faster.
• All calculations involving hidden-surface removal are done by the hardware using Z-buffering, generally far faster
than they can be achieved in software.
• Likewise all shading and lighting calculations are done in hardware, again far faster than in software. Smooth
(gouraud) shading and transparency are implemented in hardware.
• "Clipping", the ability to calculate the intersection between the image and arbitrary planes, is provided. This
provides facilities such as "Z-clipping" which are not available in software.
OpenGL will give better performance than 2D X under nearly all circumstances. The exceptions to this are:
Page 13.2
User manual Version 9.3, Rev. 0, September 2008
Oasys D3PLOT
Large
animations:
3D animations require up to4 times the amount of memory as the equivalent under X. If you attempt
to create large animations you may run your machine out of memory, or at least cause it to "page"
unacceptably. Very large (ie product of #vectors x #frames) animations are best carried out under X
for this reason.
Hidden-line
plots:
Hidden-line (and line contour) plots produced by Z-buffering are not as good as those generated in
software. You can get round this by switching temporarily back to 2-D mode.
The complications of different visuals and numbers of bit-planes do not usually apply to OpenGL. They operate in
"RGB" mode (roughly equivalent to Truecolor), and generate intermediate shades by hardware dithering if not enough
bit-planes are available to produce the required colour directly.
If your device supports 3D you should use it.
13.3 Summary of capabilities of each graphics protocol
The following table summarises the capabilities of the various graphics devices listed in this section.
FUNCTION
Display mode:
LI (LINE)
HI (HIDDEN_LINE)
LC (LINE_CONTOUR)
CT (CONTINUOUS_TONE)
VE (VECTOR)
ARROW
SH (GREYSCALE)
SI (SHADED_IMAGE)
X-Windows
OpenGL
x
x
x
x
x
x
x (2)
x (2)
x
x (1)
x (1)
x
x
x
x
x
Function:
Animations
Plots may be stopped
Dynamic viewing
x
x
x
x (3)
x
x
Notes:
(1) Hidden-line and line contour quality under 3D is adequate. Better results may be obtained by switching
temporarily to 2D mode.
(2) Quality on visuals with fewer than 8 bit-planes not good.
(3) Very large animations under 3D may run the computer out of memory. Switching to 2D mode may be better for
these.
Some minor differences between output format on different devices may be found, for example character sizes, but
generally plots should look the same on all devices.
Page 13.3
Oasys D3PLOT
Page 13.4
User manual Version 9.3, Rev. 0, September 2008
User manual Version 9.3, Rev. 0, September 2008
Oasys D3PLOT
14 PROBLEM SOLVING
This section describes some common problems, and gives suggestions about solving them. It doesn’t attempt to cover
all possible causes: please call Oasys if you cannot solve your problems.
14.1 Problems reading files:
The files are read but seem to be corrupt on initialisation.
If the node and element numbering is reported as being scrambled it is likely that the analysis job crashed on
initialisation or, if the job is still running, it may not yet have initialised. Check to see if it crashed (see the .LOG file).
If it is still running try reading it again later when it has got a bit further (this is because the node and element arbitrary
numbering tables are the last items to be written at job initialisation).
Alternatively the automatic file format detection may have mis-diagnosed the file’s data format. Check that the
FILE_TYPE_32 or _64 environment variables are set correctly (Section 12.1.4). This is particularly the case when
reading older 64 bit files.
D3PLOT crashes when reading in a file.
This generally means that the .PTF file is corrupt. For a job that is still running wait for it to be initialised, for a job
that has finished this means that it crashed during initialisation leaving an incomplete file. The D3PLOT crash is due to
trying to work out coordinate limits from nonsensical values.
The crash can also be caused by trying to read 64 bit files in IEEE rather than Cray format, or vice-versa. See
Section 12.1.4.
The last state(s) in the file seem to have nonsensical times and/or
corrupt results.
This usually means that a complete state has been only partially written. If the analysis job is still running it usually
means that the computer system buffers are still holding data waiting to be written to disk. Wait to see what happens
when the next state is written as this will probably sort out its predecessor. You can force a dump of a plot state by
using the STATUS command in the OASYS_81 command shell.
If the job has finished then it probably crashed or ran out of disk space. Check the messag or .otf files for error
messages, check the .log file for evidence of crashes or disk space exhaustion.
D3PLOT reports that the .XTF or .CTF files are incompatible with
the .PTF file.
This means that the control parameters in the various files suggest that they have come from different analyses. The
most common cause of this is that files from an old analysis of the same name have not been deleted when the new one
is run: check the creation dates on the files.
D3PLOT will ignore the incompatible .ctf / .xtf file(s) and continue running.
D3PLOT issues warning that >1000 element meet at a node
This invariably means that the file is either corrupt (ie completed analysis job crashed on initialisation), or is still
waiting to initialise (job still running). Take action as described for when D3PLOT crashes reading a file.
Page 14.1
Oasys D3PLOT
User manual Version 9.3, Rev. 0, September 2008
D3PLOT issues warning that solid or thick shell elements have
crossed faces.
This may not be an error: it is possible (but unusual) for this situation to arise legitimately. If this is the only message
issued and D3PLOT initialises normally have a look at the offending elements and check their topology. If this is
blatantly wrong it means that the file is corrupt.
D3PLOT warns that 6-noded thick shells have mis-numbered
faces.
It is a common error to create triangular thick shells using the solid "wedge" numbering sequence (1,2,3,4,5,5,6,6)
instead of the "extruded triangle" sequence (1,2,3,3,4,5,6,6). LS-DYNA will still run, but the results for these elements
will be dodgy. D3PLOT will also run, but the face numbering for these elements will be wrong leading to
mis-diagnosis of external faces, free edges and data averaging at nodes.
D3PLOT issues warning that duplicate solids or thick shells exist
Again this may indeed be the case. Check as described above, and take heed that coincident solids may not be displayed
unless the DISPLAY_OPTIONS, INTERNAL_FACES switch is turned on. (Since all their faces will be marked
internal.)
Problems with missing .PTF file family members: last <n> states
not read
If the final <n> states from your analysis are not read, and these appear to be in the last family member(s), check for
gaps in family member numbering. If one or more family members appear to be missing check the reason. However you
can skip gaps in the family member sequence using the FILE >, FILE_SKIP command: see Section 4.1.7.
D3PLOT fails to read some states from a file, with a regular pattern
This can occur if the family member size has been set to a value smaller than that used when writing the files, as states
in the tail end of family members are not read.
In D3PLOT 8.0 onwards family member size detection should be automatic, but you can over-ride it using the FILE >,
FAM_SIZE command, or by setting the FAM_SIZE environment variable as described in Section 4.1.7.
File protection problems.
D3PLOT does not require "write" access to database files, so you can process results to which you only have
"read-only" access.
However operations that create files: laser plotting, view storage and session file generation, all require "write" access
to the relevant directories. If a file open fails due to protection errors you will be warned and the operation will be
aborted.
Page 14.2
User manual Version 9.3, Rev. 0, September 2008
Oasys D3PLOT
14.2 General graphics problems:
The terminal won’t draw anything
There are several possible causes. Have you:
•
•
•
•
•
•
BLANKED everything out of sight? Try turning the BLANKING switch off.
CLIPPED everything out of sight? Try turning the VOLUME_CLIPPING switch off.
Turned all entities off? Check the status of the ENTITY settings.
Scaled, rotated, zoomed everything out of sight? Try a ZERO command.
Are your deformations so large that the image at this complete state time is off the screen? Try an AC
command.
Got a corrupt .PTF file? (Job crashed)
Facets of solids and thick-shells disappear when the model is very
distorted.
This is because the "back face" detection algorithm can get confused when elements become very misshapen, and
removes faces that it shouldn’t. Try turning the DISPLAY_OPTIONS, BACK_FACE switch on, which should cure
the problem. Alternatively you can reduce distortions artificially by setting the displacement magnification factors to
values less than 1.0: see DEFORM, MAGNIFY_DISPLACEMENTS.
2-D hidden-line removal seems to make mistakes.
The default "painter" algorithm is cheap and cheerful, and it can make mistakes. You can prevent this by using the more
expensive "rigorous" algorithm: see DISPLAY_OPTIONS, HIDDEN_LINE_OPTIONS.
Problems displaying stonewalls
Stonewalls, especially infinite ones, present a problem since their characteristic size is so much greater than typical
facets in a model. This can show up very clearly in hidden-line plots where they often appear to be in front of or behind
where they should be.
This is usually due to their interaction with the perspective calculation, and turning this off (PERSPECTIVE, OFF),
and switching to "rigorous" hidden-line removal will improve matters considerably.
Page 14.3
Oasys D3PLOT
User manual Version 9.3, Rev. 0, September 2008
14.3 Memory consumption problems.
The message “unable to obtain more memory” is given
This means that an attempt to allocate more memory has failed because the system has refused to give it. This can
happen in many different contexts, but is most common when building animations under OpenGL, as this is a
memory-intensive process.
The problem may be soluble at the system level:
(1) All systems
•
•
Check that other unnecessary processes competing for system resources have been shut down. Use the ps
command (Unix) or the Task Manager (Windows NT) to examine system usage.
Check that you have enough swap space configured. (System administrator privileges are required to alter
this.)
(2) Unix systems: Make sure that the operating system is not imposing arbitrary limits.
•
•
•
Artificial limits may be imposed in your command shell. The unlimit command can be used to lift all
restrictions that you, as a user, have privileges to change.
The maximum "data segment size" in the kernel may be set to a low value. Many Unix systems come
configured with this set to their physical memory size, which stops a given process spilling far into swap
space. You will need system administrator privileges to change this as it requires the kernel to be modified
and rebuilt.
Check that the window manager process has not been running for a long time, and has accumulated a lot of
memory. If it has it may be necessary to kill it (ie revert to console mode) then restart it using startx.
If these do not work then you will have to reduce the amount of memory you are using within the D3PLOT process
itself:
•
•
•
•
Use the FILE >MEMORY then VIEW database command to empty (partially or fully) the database.
Change the animation mode from VECTOR to DIRECT (ANIM >, DISPLAY_MODE: see Section 4.4.2.2)
to save memory.
If you have two computers try using client / remote server mode. See Section 4.4.2.2.
See Section 11.7 on "memory management"
14.4 Graphics problems peculiar to X_Windows devices.
The programme seems to “hang” when first started
Possibly there is a communications problem, or you have given the wrong display address for the DISPLAY
environment variable (in which case your window may be appearing on another machine!) Failing that try restarting the
programme as window managers can occasionally "hang".
The message “Installed private map” appears when the
window is created.
This is not an error, but it may be the prelude to problems. What it indicates is that D3PLOT is unable to find enough
free colour cells in the current, shared colour map and has decided to create its own. This may cause colours to change
in other windows. If this is the case you could try requesting fewer colours or running under a different visual: see
Section 10.1.
Colours in other windows change as I run D3PLOT.
This is a symptom of the private colourmap described above: it occurs when a Pseudo- or DirectColor visual is run
with a private (non-shared) colourmap. This ’colourmap flashing’ can occur on older displays which do not have
Page 14.4
User manual Version 9.3, Rev. 0, September 2008
Oasys D3PLOT
adequate hardware support for multiple windows using different colourmaps. The problem can sometimes be solved by:
• Setting the environment variable SM_USE_VISUAL to default (C shell syntax)
setenv SM_USE_VISUAL default
(Bourne/Korn shell syntax)
SM_USE_VISUAL=default; export SM_USE_VISUAL
• Selecting device XMENU..., then choosing the visual that is marked as "default".
If these remedies do not work please contact Oasys for further advice.
Colours in D3PLOT graphics window correct only when I “zoom” or
screen-pick
This happens when a private colourmap is installed as described above on low-end devices that cannot support mulitple
maps. The best solution is to avoid the creation of a private colourmap using the strategies referred to above, but if this
unavoidable then it may help to change the default settings of the window manager.
In your home directory there needs to be a file ".Xdefaults". (Use ls -a to see "hidden" files starting with a ".")
Edit this file to contain the line:
*colormapFocusPolicy: pointer
Note that the case of letters in both filename and edited entry is important and must be exactly as shown here. When
you have completed this log out completely from the screen and then log back in again to make it active. (It is not
sufficient just to restart the window manager.)
When an animation is reloaded the colours are all wrong
In versions of D3PLOT prior to version 6.0 the colourmap was not saved in animation files. Release 6.0 onwards
remedies this problem.
The message “Found unknown code nnn in stack” appears
while animating.
Animations are stored in a memory "stack" as a series of codes that represent the graphics operations required to build
the image. Occasionally a corrupt code finds its way into this stack and causes this message.
The most common cause is when the X server has become overloaded and lost synchronisation with its client process.
You may need to slow down animation to prevent this..
The image doesn’t change scale when the window is resized.
Occasionally the resize "event" is missed by the D3PLOT command handler. If this happens just resize the window
again by a tiny amount, to create a new "event", which should then be processed.
Problems with X_Windows addresses over a network
The X_Windows protocol makes a distinction between the process running the computer programme, the "client", and
that displaying the graphics, the "server". This is to enable a software package to operate in the same way whether it is
running on the local machine, or on a remote machine over a network.
Where client and server are the same machine then no confusion arises since there is no ambiguity about where graphics
should be displayed. However when you are displaying results over a network from a remote client you may get the
message:
Unable to open display :0
This means that the host machine must be told where to display graphics. On UNIX machines you do this by setting the
DISPLAY environment variable as follows:
Page 14.5
Oasys D3PLOT
C shell:
User manual Version 9.3, Rev. 0, September 2008
setenv DISPLAY <server>:0
Bourne shell: DISPLAY=<server>:0 export DISPLAY
Where <server> is the network address of the machine on which you are displaying the graphics. A raw address (eg
69.60.10.1) may always be used or, if the host machine knows about your server, you can use the machine’s name.
Multiple screens: The ":0" is the screen id on that machine, and this will almost always be screen zero as here. The
exception is when you have multiple screens attached to a device, in which case the syntax will become ":0.0" for the
first screen, ":0.1" for the second screen, and so on.
Therefore typical destination commands might be:
setenv DISPLAY snoopy:0
(Machine "snoopy", screen 0)
setenv DISPLAY 69.177.15.2:0 (Address 69.177.15.2, screen 0)
setenv DISPLAY :0.1
(This machine, screen 1)
(nb: On UNIX machines see the file /etc/hosts for host names and internet addresses. You will only be able to
refer by name to machines in this file. However you can display on any machine by referring directly to its numeric
address: the names in this file are just convenient aliases for this.)
Problems when the server refuses a connection
A further complication may arise due to permission not being granted for that host to connect to your server. This will
generate the message:
Host is not permitted to connect to server
In this case you must also tell your server to accept graphics from the host with the command:
xhost + <hostname>
If you omit <hostname> then access will be permitted to all hosts. Your system manager can configure your system
such that access is permanently permitted to a selected list of hosts, or indeed all hosts. The latter (all hosts) is potential
security hole since the inter-client communication permitted by X window managers is a possible back door for
hackers. Network users: you have been warned!
Next section
Page 14.6
User manual Version 9.3, Rev. 0, September 2008
Oasys D3PLOT
14.5 Graphics problems peculiar to OpenGL
Screen-picking selects invisible entities
Because hidden surface removal is performed in the hardware Z-buffer it is difficult for the client D3PLOT process to
know what is and is not visible in a hidden or shaded plot. The picking algorithms attempt to work this out, but
occasionally they make mistakes.
There is no absolute cure for this, but suggestions are: reject the pick, rotate the image a touch, and try again as this may
make the selection of the visible element less ambiguous. Or maybe just try again taking more care to pick the centre of
the item you want. Failing that swap back to 2-D mode (M2D), and generate the image in software.
The image disappears altogether
This can happen for a variety of reasons:
Z-clipping
It is possible to rotate, translate or scale an image such that it passes totally outside the screen Z clipping
region. Try resetting these planes: (3D_OPTS, Reset Z). Turn the projection box (3D_OPTS,
SHOW_PROJ switch) on to see the view frustrum and clipping plane locations.
Bad
matrix
The hardware rotation matrix can sometimes get corrupted if a very large number of screen rotations
give rise to progressive ill-conditioning: (ie direction cosines no longer have unit length). In this case
reset the matrix with the command ZERO (reset to default viewing state).
There can also be less obscure reasons: see "The terminal won’t draw anything" in Section 13.2.
Hidden-line quality is poor in 3-D mode
This is a limitation of Z-buffered graphics. The problem arises because hidden-line plots are generated by drawing
visible borders around black polygons, and sometimes the Z coordinates of the polygon win, and sometimes those of the
line win, resulting in a broken line. The breaks will move as the image is rotated. D3PLOT attempts to get round this by
raising the lines slightly above the polygon surface, but this doesn’t work very well when polygons are near edge-on to
the viewer.
You can adjust the amount by which the polygon borders are lifted above the surface by holding down the <left
control> button and the <left mouse button>. Moving the mouse up the screen will lift lines off the surface
towards you, moving it down will move them back down.
The best solution is to switch back to 2-D mode temporarily as the software algorithms can avoid this problem.
Animations in 3D mode become horrendously slow.
Storing animations in 3D mode can take up to 4 times as much memory as in 2D (or X) mode: see Sections 4.4.2.2 and
4.4.3. This means that you run your machine out of memory much faster and the slowdown is due to it "paging"
memory to and from disk.
Unless you are prepared to buy more memory the only thing you can do is to reduce the memory being used by one or
more of:
•
•
•
•
Reducing #frames and/or #vectors by simplifying the plot.
Using a "cheaper" display mode.
Switching to DIRECT animation mode - slower, but uses no memory.
Emptying some of your database memory (FILE >, DATABASE,
EMPTY_xxx)
Alternatively you could use 2D mode (View Box, M2D command). Animations in 2D use a lot less memory although
dynamic viewing and changes to the image become much slower to implement.
Page 14.7
Oasys D3PLOT
User manual Version 9.3, Rev. 0, September 2008
14.6 Miscellaneous problems.
Problems with coincident solid or thick-shell elements.
You are warned if coincident solid or thick-shell elements are found when the files are read in. This is because all faces
of such elements will be flagged as "internal" and the elements won’t be displayed unless you turn the
DISPLAY_OPTIONS, INTERNAL_FACES switch ON.
There may also be problems with averaging data at nodes for such elements unless you set the AVERAGING:
MATERIAL_IGNORED and BLANKING_IGNORED switches carefully. See Section 4.2.4.5 for more details.
You can list coincident elements of all types with the WRITE, COINCIDENT command.
Problems displaying “extra nodes on rigid bodies”
D3PLOT considers nodes that are not attached to elements to be non-structural and does not normally display them.
"Extra nodes on rigid bodies" can fall into this category as, unless they are attached to an element, they do not appear to
be part of anything. To see these you need to turn the ENTITY, ALL_NODES switch ON.
You can list nodes that D3PLOT considers to be non-structural with the WRITE, UNATTACHED_NODES
command.
Problems seeing contact surfaces.
You can only see your contact surfaces if you have written the (optional) contact force (.CTF) file during your analysis.
No .CTF file: no contact surfaces visible.
If your analysis would take a long time to re-run you can at least visualise the contact surface geometry by reinitialising
it under a different name with a contact force file, and then renaming this .CTF to look as if it came from the original
analysis. D3PLOT will extract the geometry from this but obviously will be unable to read transient contact force data
which isn’t there. It can cope with this, although you will get the warning message at initialisation that there are no
contact force states to match structural states.
Problems seeing springs, joints and stonewalls.
The topology of these elements is extracted from the .XTF file so, if it isn’t there, you won’t see these.
Reinitialising and renaming the .XTF file as above will solve this problem.
14.7 MEMORY Viewing and
controlling the memory usage
for this process, and the whole
machine.
On all operating systems D3PLOT has to co-exist with other processes, and when its consumption of system resources
is small this is not an issue. However as you process larger models you will approach the capacity of you machine, and
control of memory use will become important. There are two key issues:
Page 14.8
User manual Version 9.3, Rev. 0, September 2008
Oasys D3PLOT
Process size, the size of the D3PLOT process, affects
performance.
•
•
As this approaches 80 - 90% of the physical memory size of the machine it will become necessary for the
operating system to use "virtual" memory. This is because other processes need to maintain a presence in
memory and, to make space, some of the D3PLOT process will need to be paged ("swapped out") onto virtual
memory on disk.
Paging, when some of the process pages(1) are swapped onto disk, has a major impact on speed because of the
delay in reading them back into memory again when needed. The symptoms are a much slower response,
accompanied by the disk chattering away. However the process will continue to run, albeit more slowly.
Virtual memory usage - running out will halt processes, or even
crash the machine.
•
•
•
•
Operating systems maintain "swap space", which is an area of disk set aside for pages of memory that have
been "paged" out of physical memory. This is known as "virtual" memory, and is usually up to 3 times the size
of physical memory, but can be any value set by the system administrator.
Virtual memory allows computers to handle the situation where the sum total of memory space requested by
all processes is greater than the physical memory available. They do this by swapping unneeded pages of
memory onto disk, then swapping them back into memory (evicting other pages to make space) when they are
required again. A "page fault" occurs when an executing process requires a page that is not resident in memory
and has to be read in from disk.
Parking dormant processes on disk has no impact on the performance of running ones. But it will be obvious
that if a running process makes excessive use of virtual memory it will generate a lot of page faults, which will
slow down its performance.
If virtual memory space is all used up then the operating system will start to kill processes, and the machine
may crash if essential services cannot obtain the memory they need!
The MEMORY panel itself is shown here.
This section shows Physical memory statistics.
The machine has 253MB of memory. D3PLOT is using
11.5%. The alarm has been set at 80%.
This section shows Virtual memory statistic s.
The machine has 2047MB of swap space, of which 7.4% is in
use, alarm set at 90%.
This section shows the results database memory usage
summary.
Finally this section allows you to alter the graphics display
mode. (Some modes use more memory than others.)
Page 14.9
Oasys D3PLOT
User manual Version 9.3, Rev. 0, September 2008
Memory usage bars:
The two usage bars (%age physical memory used by D3PLOT , and total %age virtual memory usage over the whole
machine) are replicated in miniature on the MEM button on the front panel for easy reference. So long as they both stay
in the green you don’t have a problem, and even light orange (60%) is probably OK. More than that and you may need
to take action - see below.
Alarm limits:
Both physical and virtual limits have alarm values set at 80 and 90% respectively. If an alarm limit is reached D3PLOT
stops what it is doing and maps an alarm panel explaining the problem. You can change alarm values at any time, and
set them to large values (eg 1000%) if you want to ignore them altogether.
Database Usage:
This summarises the settings of the results database, and the VIEW... button takes you to the main database manager.
Allows you to select an animation mode as described in Section 4.4.2.2. (The same as ANIM > DISPLAY_MODE).
Some modes use more memory than others.
What to do if memory runs short.
•
•
•
•
•
•
•
•
•
•
If virtual memory is short see if there is anything else running on the machine that you can shut down
(remember the virtual memory bar is for the whole machine, not just D3PLOT).
This usually happens when building animations. See if you can cut down what is displayed to save memory:
Display alternate states instead of every state;
Use a simpler display mode (eg flat shading, not smooth; SI not CT)
Turn off unneeded display items (node symbols, labels)
If the results database is very full use its OPTIONS > EMPTY_xxx commands to release some space, and
reduce the soft and hard %ages. (This may not release space back to the operating system, but the space freed
can be re-used internally.)
Use a less expensive display mode:
DIRECT uses no display memory, but is slow.
VECTOR is a reasonable compromise (the default)
PIXMAP/OBJECT use a lot of display memory in the server process
In extreme cases you may find that none of the above free enough memory and you have to exit and start again with
"cheaper" (in terms of memory) settings. If this happens:
•
•
Before reading in a model use the MEMORY button on the filename panel to select the display mode and
database soft/hard %ages.
Then define a filename and read in the model. The new settings will be used ab initio and will result in lower
memory usage.
Another problem that can occur following PIXMAP or OBJECT mode animations is that the graphics server process
(owned by the operating system) may grow to a very large size and cause problems. This is because some operating
systems don’t allow memory to be released once it has been allocated.
It will be necessary to shut down and restart this process in the following way:
•
•
•
Logout from the display.
At the "login" prompt choose the "no windows" or "console" mode (usually under an "options" menu). This
will shut down the X server completely.
Most "Common Desktop Environment" (CDE) window managers will automatically restart the X server after a
short delay.
Page 14.10
User manual Version 9.3, Rev. 0, September 2008
Oasys D3PLOT
Dealing with huge models by using two computers in client / remote
server mode.
If, despite everything you do, your model is too big to fit into your machine you may still be able to deal with it by
splitting the job over two machines. The "client" machine runs the D3PLOT process, and the remote "server" displays
the graphics.
•
•
•
•
On the client set the DISPLAY environment variable to point to the display on the server machine. (Eg
setenv DISPLAY remote_name:0 )
Under X-windows use PIXMAP mode, and under OpenGL use OBJECT mode. Both of these result in the
graphics data being displayed in the server, not the client.
The initial transfer of graphics data from client to server will be slow, since it has to go down a network. But
subsequent animation, performed locally on the server, will be fast.
Keep and eye on the memory usage on the server: D3PLOT does not monitor this for you. (It only "knows"
about the client machine.)
Section 4.4.2.2 explains how animation works in client/server mode. Sections 2.3 and 2.4 give more information on
specifying network addresses.
1. A "page" of memory is a conveniently sized quantum, typically 4kB: this varies between systems.
Page 14.11
Oasys D3PLOT
Page 14.12
User manual Version 9.3, Rev. 0, September 2008
User manual Version 9.3, Rev. 0, September 2008
Oasys D3PLOT
Appendices
APPENDIX I PROGRAMME LIMITATIONS
D3PLOT has certain inherent limitations because of its internal structure. These are:
Maximum number of nodes, elements and materials:
Maximum number of nodes is
2**31 - 1 = 2.1e9
Maximum number of elements is 2**31 - 1 = 2.1e9
(Under 2D X11 graphics 2**24 - 1 = 16.7e6)
Maximum number of materials is 2**31 - 1 = 2.1e9
(Under 2D X11 graphics 2**16 - 1 = 65,535)
These are the maximum quantities that may be processed. The maximum external label ids are
limited only by output field width, so that the permitted external label range is 1 - 2**31 (approx
2e9, the same as LS-DYNA).
Maximum problem size:
Memory management in D3PLOT is "dynamic". This means that space is requested from the operating system as it
is required and, theoretically, problems up to size limits above can be processed. The only realistic limit will be the
ability of your computer to provide memory and processing power.
In practice a typical small workstation will easily process models of 500,000 elements, and addition of more memory
and page file (swap) space will raise this limit to several million elements. For example processing a model with
170,000 shells on the author’s machine required a total of about 55MBytes of memory. However large animations
consume memory, and this may impose a limit upon effective problem size.
Most 32 bit operating systems impose a limit of 2GBytes on any process size, and this will tend to impose the
upperbound on these systems. This is due to the maximum memory addresses can be stored in a 32 bit integer (4GB),
and the needs of the operating system itself. An exception is x86 hardware under Windows and Linux which, with
suitable configuration, will allow 3GB of memory to be used.
On 64 bit systems maximum memory usage is effectively unlimited, since a 64 bit integers permit up to 1.8e19 bytes
(16,000,000 Terabytes) to be addressed. The maximum process size will be dictated by the amount of physical and
virtual memory available.
Maximum animation sequence.
Up to 2**31 (roughly 2e9) frames may be generated, saved and displayed - subject to memory limitations.
The amount of information, the product of <amount of graphics information> x <number of frames>, is limited only
by the amount of memory available.
Page A.1
Oasys D3PLOT
User manual Version 9.3, Rev. 0, September 2008
APPENDIX II OA_PREF FILE: SETTING USER
PREFERENCES
It is possible to set "user preferences" in the oa_pref file outside the programme. This file allows customisation of
many aspects of the programme: for example colours, function key operations, display attributes, laser file settings, and
so on. This can be done in three ways:
1.
From Options > Edit Prefs in D3PLOT
2.
From the Preferences editor called from the Oasys shell
3.
By hand-editing the preference file.
Where the oa_pref file is located, and search order.
The "oa_pref" file is read once when D3PLOT starts, and is searched for in the following locations in the order given:
(1) The $OASYS directory. Qualitatively a "site wide" set of options.
(2) Your home directory ($HOME on Unix/Linux, $USERPROFILE on Windows.). Qualitatively an individual user’s
set of options.
(3) The current working directory. Qualitatively a job-specific set of options.
Each file is read if found, but if a definition occurs in more than one file then the most recently encountered definition is
used. Therefore you can have a local definition in your $HOME or $cwd directories that supersedes the "global" one in
$OASYS, but still read the latter file.
oa_pref file naming conventions.
"oa_pref" file naming convention.
In the $OASYS directory
"oa_pref" in all cases
In $HOME directory (Unix/Linux)
In $USERPROFILE (Windows - typically C:\Documents
and Settings\<user id> )
(The use of ".oa_pref" with a leading "." on
Unix/Linux is deprecated.)
In current directory ($cwd)
How to determine the value of $USERPROFILE on Windows.
Normally this will be located in c:\Documents and Settings\<user id>\ however to find out this value on
a Windows machine do the following:
•
Bring up an MS-DOS window (Start menu, Accessories, Command Prompt)
•
Type SET in this window to receive a listing of all environment variables.
(For reasons best known to Microsoft not all environment variables appear in the "Environment variables" window
accessed from My Computer, Properties, Advanced.... The method above is better.)
How to determine the value of $HOME on Unix / Linux
The simplest method is to give the following commands, which will jump to the $HOME directory and print its
pathname:
•
cd $HOME
•
pwd
Page A.2
User manual Version 9.3, Rev. 0, September 2008
Oasys D3PLOT
The interactive Preferences Editor
You are free to edit oa_pref files by hand, but there is an interactive "Preferences Editor" that may be called from
within D3PLOT that makes the job much easier.
It is started by Options, Edit Prefs:
The preferences editor reads an XML file that contains all possible preferences and their valid options, and allows
you to change them at will. In this example the user is changing the background colour in D3PLOT.
Note that changes made in the Preferences editor will not affect the current session of D3PLOT, they will only take
effect the next time it is run.
If you have write permission on the oa_pref file in the $OASYS directory you will be asked if you want to update
that file, otherwise you will only be given the option of updating your own file in your $HOME / $USERPROFILE
directory.
Page A.3
Oasys D3PLOT
User manual Version 9.3, Rev. 0, September 2008
In this example the user is changing the ambient light intensity.
The option is "active" (ie present in the oa_pref file) and currently is set to 40.
Usage is:
•
Select an option in the Tree on the left hand side
•
Make it active / inactive
•
If active select a value from the popup, or type in a value if necessary
The colour of the highlighting in the left hand side tree is significant:
Green Means that the option has been read from your $HOME file.
Red
Means that the option has been read from the $OASYS file.
In either event, regardless of the data source, the updated option will be written to the file chosen when you started
the preferences editor.
Because of the order of file reading (see above), and option read from the master $OASYS file, amended, and
written to your local $HOME file will take precedence when you next run D3PLOT.
Format of the oa_pref file
Entries are formatted in the following way: <programme>*<option>: <setting>
For example:
d3plot*laser_paper_size: A4
The rules for formatting are:
•
The <programme>*<option>: string must start at column 1;
•
This string must be in lower case, and must not have any spaces in it.
•
The <setting> must be separated from the string by at least one space.
•
Lines starting with a "#" are treated as comments and are ignored.
(Users accustomed to setting the attributes of their window manager with the .Xdefaults file will recognise this
format and syntax.)
Page A.4
User manual Version 9.3, Rev. 0, September 2008
Oasys D3PLOT
Permissible "oa_pref" options for D3PLOT
The list of D3PLOT options available in this file is as follows:
Preference
Type
Description
Valid arguments
contour_levels
<integer>Number of contour levels 2 - 13
default_component<string> Valid data component
name
graphics_refresh <string> Refresh graphics window OFF, ON
when exposed
graphics_type
<string> Graphics format to start
X8, X24, X, Opengl, Default
D3PLOT with
initial_plot_mode <string> Initial drawing mode
LINE, HIDDEN, SHADED
max_frame_rate <string> Maximum animation rate UNLIMITED, 1, 5, 10, 20, 25, 50, 75, 100
in frames/second
maximise
<logical>Maximise window when TRUE, FALSE
D3PLOT started
menu_resize
<string> Which panel borders are NONE, L, R, T, B, LR, LT, LB, LRT, LRTB,
free to resize
RT, RB, RTB, TB, ALL
overlay_mode
<string> Overlay drawn
OFF, FREE, ALL
placement
<string> Location for initial windowLEFT, RIGHT, BOTTOM, TOP,
on multi-screen display
LEFT_BOTTOM, LEFT_TOP,
RIGHT_BOTTOM, RIGHT_TOP
plot_border
<string> Border drawn on plot
OFF, ON
show_maxmin
<string> Max and Min data values OFF, DATA, ALL
drawn on plot
start_in
<string> Directory to start D3PLOT
in
surface_output
<string> Surface to output results TOP, MIDDLE, BOTTOM, MAX, MIN, ALL
Default
6
<none>
ON
<none>
SHADED
UNLIMITED
FALSE
ALL
FREE
<none>
OFF
DATA
<none>
MIDDLE
The following options control automatic mesh coarsening, and set a model size threshold at which this is
implemented. This can be useful if you habitually process very large models and are happy to accept slightly poorer
image quality in return for faster graphics. See COARSEN for more information.
Preference
auto_coarsen
coarsen_threshold
Type
Description
<string> Automatic mesh coarsening on initial read
<integer> Min number of shells for auto-coarsening
Valid arguments
Default
OFF, MILD, SEVEREOFF
0 - 1000000000
250000
The following options define the colours used in plots, thereby affecting plot appearance.
Preference
Type Description
background_colour<string>Background
colour
overlay_colour
<string>Overlay colour
text_colour
<string>Text colour
Valid arguments
WHITE, BLACK, RED, GREEN, BLUE, CYAN, MAGENTA,
YELLOW, GREY
WHITE, GREY, BLACK, RED, GREEN, BLUE, CYAN,
MAGENTA, YELLOW, ELEMENT
WHITE, BLACK, RED, GREEN, BLUE, CYAN, MAGENTA,
YELLOW, GREY
Default
BLACK
GREY
WHITE
The following options permit the default cut-section method and space system to be configured. Users who wish to
default to compatibility with the LS-DYNA section definition method may wish to use these options. See
CUT_SECTIONS for more information.
Preference
Type Description
Valid arguments
cut_section_type <string>Default cut section OV_ORIGIN_AND_VECTORS,
definition method N3_THREE_NODES, X_CONSTANT,
Y_CONSTANT, Z_CONSTANT,
LS_DYNA_METHOD
cut_section_space<string>Default cut section BASIC, DEFORMED, SCREEN
space system
cut_section_fsys <string>Cut section force AUTOMATIC, GLOBAL, LOCAL
and moment
computation system
Default
X_CONSTANT
DEFORMED
AUTOMATIC
Page A.5
Oasys D3PLOT
User manual Version 9.3, Rev. 0, September 2008
The following set of options defines how various files are handled by D3Plot. Option "master_group_file" defines a
"master" group file to be read every time a new model is opened: (see GROUPS). For information regarding the
various file formats corresponding to the "read_<xxx>" options, see section 4.1.
Preference
Type
Description
master_group_file<string> Valid master (ascii) groups filename
file_names
<string> Controls input filename syntax. LSTC = d3*,
OASYS/ARUP = job.ptf*
read_ctf_file
<logical>Read CTF file
read_xtf_file
<logical>Read XTF file
read_ztf_file
<logical>Read ZTF file
read_prp_file
<logical>Read PRP (properties) file
read_set_file
<logical>Read SET (settings) file
read_asc_file
<logical>Read ASC (ascii groups) file
autocreate_ztf
<logical>Create ZTF file automatically if required
primer_version <string> Name of PRIMER executable for ZTF file
auto-creation
input_warnings <string> Switching and location of warnings on input
Valid arguments
Default
<none>
OASYS, ARUP, LSTC OASYS
TRUE, FALSE
TRUE, FALSE
TRUE, FALSE
TRUE, FALSE
TRUE, FALSE
TRUE, FALSE
TRUE, FALSE
TRUE
TRUE
TRUE
TRUE
TRUE
TRUE
TRUE
primer93.exe
NONE, DIALOGUE,
MENU
DIALOGUE
The function keys F1 to F12 can have pre-defined command files assigned to them: (see UTILITIES,
SETTINGS_FILE.)
Preference
f1_key
f2_key
f3_key
f4_key
f5_key
f6_key
f7_key
f8_key
f9_key
f10_key
f11_key
f12_key
Type
<string>
<string>
<string>
<string>
<string>
<string>
<string>
<string>
<string>
<string>
<string>
<string>
Description
File for key F1
File for key F2
File for key F3
File for key F4
File for key F5
File for key F6
File for key F7
File for key F8
File for key F9
File for key F10
File for key F11
File for key F12
Valid argumentsDefault
<none>
<none>
<none>
<none>
<none>
<none>
<none>
<none>
<none>
<none>
<none>
<none>
The following options define the background and watermark images that can be embedded into plots. See section 7.4.
Preference
background_image
watermark_image
Type
<string>
<string>
Description
Valid background image filename
Valid watermark image filename
Valid argumentsDefault
<none>
<none>
The following strings and values control laser plotting setup (see section 7.3 for more on laser plotting).
Preference
laser_paper_size
laser_orientation
laser_mode
laser_insert_file
laser_top_margin
laser_bottom_margin
laser_left_margin
laser_right_margin
Page A.6
Type
<string>
<string>
<string>
<string>
<real>
<real>
<real>
<real>
Description
Default paper size
Default page orientation
Default laser mode
Valid filename
Top margin size in mm
Bottom margin size in mm
Left margin size in mm
Right margin size in mm
Valid arguments Default
US, A4
A4
Portrait, LandscapeLandscape
Colour, Greyscale Greyscale
<none>
10
30
20
10
User manual Version 9.3, Rev. 0, September 2008
Oasys D3PLOT
Window layout commands control how multiple graphics windows are positioned and sized, and give some further
options. (See section 2.6.2)
Preference
window_layout
Type
Description
Valid arguments
<string> Multiple window layout type TILE_WIDE, TILE_TALL, CASCADE,
1x1, 2x2, 3x3
auto_hide
<logical>Hide graphics window
TRUE, FALSE
function bar
show_tabs
<logical>Show window tabs on panels TRUE, FALSE
windows_same_size<logical>Windows initially the same TRUE, FALSE
size
Default
TILE_WIDE
FALSE
TRUE
FALSE
The following shaded_<xxx> options affect lighting (SHaded and SI) plots only.
Preference
shaded_ambient
shaded_diffuse
shaded_shininess
shaded_saturation
Type
<real>
<real>
<real>
<real>
Description
Percentage ambient light (0-100)
Percentage diffuse brightness (0-100)
Percentage specular brightness (0-100)
Percentage colour saturation (0-100)
Valid argumentsDefault
0.0 - 100.0
40
0.0 - 100.0
90
0.0 - 100.0
70
0.0 - 100.0
50
The following options affect the operation and appearance of linked T/HIS: (see section 6.12)
Preference
Type
Description
Valid arguments
Default
this_window_location <string> Linked T/HIS window location on
SIBLING, CHILD, DOCKEDSIBLING
screen
this_link_version
<string> Name of 32 bit executable for T/HIS link
this93.exe
this_link_version_64 <string> Name of 64 bit executable for T/HIS link
this93_64.exe
this_link_timeout
Timeout period (seconds) for T/HIS link 1 - 1000
5
<integer>
The following options affect the appearance and behaviour of the graphical user interface (see section 3.7.1), left
handed support, and the mouse
Preference
display_factor
Type Description
<real> Factor on display size
(0.5-2.0)
display_brightness<real> Menu brightness (0.0-1.0)
display_saturation <real> Menu colour saturation
(0.0-1.0)
font_size
<string>Menu font size
font_type
<string>Menu font typeface and
strength
left_handed
<string>Left handed switching of
mouse and/or keyboard
zoom_factor
<real> Zoom Factor for mouse
wheel(0.01-0.2)
Valid arguments
0.5 - 2.0
Default
1.0
0.0 - 1.0
0.0 - 1.0
1.0
1.0
SMALL, DEFAULT, LARGE
DEFAULT
HELVETICA, HELVETICA-BOLD, TIMES, HELVETICA
TIMES-BOLD, COURIER, COURIER-BOLD
NONE, MOUSE, KEYBOARD, ALL
NONE
0.01 - 0.2
0.05
If a selection menu is not wide enough to display all the contents, it can be expanded automatically by the following
(see section 3.7.3)
Preference
menu_expand
menu_expand_delay
menu_expand_speed
Type
<string>
<real>
<real>
Description
Automatic menu expansion on/off switch
Factor on delay time before expansion
Factor on menu expansion speed
Valid argumentsDefault
OFF, ON
ON
0.1 - 5.0
1.0
0.1 - 5.0
1.0
The following options define how Javascripts are processed by D3Plot. See section 11 for further details.
Preference
Type
Description
script_directory<string>Directory in which D3PLOT looks for
scripts
Valid
arguments
Default
$OASYS/d3plot_library/scripts
Page A.7
Oasys D3PLOT
User manual Version 9.3, Rev. 0, September 2008
The following options allow the user to change the symbols (and their quality) representing various entities which are
drawn in plots. See DISPLAY_OPTIONS for further details.
Preference
abp_symbol
abp_quality
sph_symbol
sph_quality
Type
Description
<string> Symbol for Airbag Particles
Quality of Airbag Particle sphere symbol
<integer>
<string> Symbol for SPH elements
Quality of SPH sphere symbol
<integer>
Valid arguments
Default
POINT, CUBE, SPHEREPOINT
1-5
1
POINT, CUBE, SPHERESPHERE
1-5
2
The following <xxx>_visibility flags set the relevant ENTITY switches, and may subsequently be turned
on/off manually in the normal way. The setting given here becomes the default for <reset> operations.
Preference
mass_visibility
spring_visibility
sbelt_visibility
joint_visibility
stonewall_visibility
segment_visibility
segment_hatching
Page A.8
Type
<string>
<string>
<string>
<string>
<string>
<string>
<string>
Description
Lumped mass visibility
Spring/damper visibility
Seatbelts etc. visibility
Joint visibility
Rigidwall visibility
Contact segment visibility
Contact segment hatching
Valid argumentsDefault
OFF, ON
OFF
OFF, ON
ON
OFF, ON
ON
OFF, ON
ON
OFF, ON
ON
OFF, ON
OFF
OFF, ON
ON
User manual Version 9.3, Rev. 0, September 2008
Oasys D3PLOT
Thus a typical range of settings might be:
d3plot*plot_border:
ON
d3plot*menu_resize:
TBR
d3plot*initial_plot_mode: LINE
d3plot*laser_paper_size:
A4
d3plot*laser_orientation: Portrait
d3plot*laser_mode:
Greyscale
The only one which requires explanation is
laser_insert_file
This is a file, in valid PS-ADOBE 2.0 Postscript format, that will be inserted at the top of every laser file. It could
contain a company logo, standard header for a project, etc. It is inserted verbatim. For example you might have the
.oa_pref line:
d3plot*laser_insert_file: /usr/local/logos/company_logo.psc
No check is made for its validity or syntactical correctness - that is up to you to get right.
Global preferences.
From version 9.3 onwards global preferences that apply to all programs can be specified using "oasys" as the
program name.
oasys*<keyword>: <argument
At present the following global preferences can be defined
PreferenceType
Description
Valid arguments
file_names <string> Controls input filename syntax. OASYS, LSTC
LSTC = d3*, OASYS = job.ptf*
maximise <logical>Maximise window when Program TRUE, FALSE
is started
placement <string> Location for initial window on
LEFT, RIGHT, BOTTOM, TOP, LEFT_BOTTOM,
multi-screen display
LEFT_TOP, RIGHT_BOTTOM, RIGHT_TOP
start_in
<string> Directory to start Program in
Default
OASYS
FALSE
<none>
<none>
The following options affect the appearance and behaviour of the graphical user interface, left handed support, and
the mouse
Preference
display_factor
Type Description
<real> Factor on display size
(0.5-2.0)
display_brightness<real> Menu brightness (0.0-1.0)
display_saturation <real> Menu colour saturation
(0.0-1.0)
font_size
<string>Menu font size
font_type
<string>Menu font typeface and
strength
left_handed
zoom_factor
<string>Left handed switching of
mouse and/or keyboard
<real> Zoom Factor for mouse
wheel(0.01-0.2)
Valid arguments
0.5 - 2.0
Default
1.0
0.0 - 1.0
0.0 - 1.0
1.0
1.0
SMALL, DEFAULT, LARGE
DEFAULT
HELVETICA, HELVETICA-BOLD, TIMES, HELVETICA
TIMES-BOLD, COURIER,
COURIER-BOLD
NONE, MOUSE, KEYBOARD, ALL
NONE
0.01 - 0.2
0.05
Page A.9
Oasys D3PLOT
User manual Version 9.3, Rev. 0, September 2008
The following strings and values control laser plotting setup
Preference
Type
Description
Valid arguments Default
laser_paper_size
<string> Default paper size
US, A4
A4
laser_orientation
<string> Default page orientation
Portrait, LandscapeLandscape
laser_top_margin
<real>
Top margin size in mm
10
laser_bottom_margin
<real>
Bottom margin size in mm
30
laser_left_margin
<real>
Left margin size in mm
20
laser_right_margin
<real>
Right margin size in mm
10
If a preference is defined twice using both "oasys*" and "d3plot*" then the "d3plot*" setting will override
the global setting.
Page A.10
User manual Version 9.3, Rev. 0, September 2008
Oasys D3PLOT
APPENDIX III CHANGED DEFAULTS THAT AFFECT
APPEARANCE
Changes between V9.3 and V9.2
•
Spotweld beam "blobs" are now oriented into the local axis system of the beam, making it easier to see how
spotwelds have rotated. (There is no method of reverting to the previous behaviour.)
Changes between V9.2 and V9.0
Apart from the changes to the user interface the only significant change to graphics is to SI Shaded Image data
plotting mode.
•
Previously this only produced gouraud shaded (fuzzy banded) plots.
•
In V92 the default is now to produce plots with solid contour bands (in effect CT mode plots with lighting).
•
The original "fuzzy" plots are still available from the popup menu on the SI button itself.
Changes between V8.x and V9.0
In order to improve appearance at initial startup the following changes to settings have been made:
Initial plot mode
Was
LINE
now
SHADED
Overlay mode
Was
FULL
now
FREE
Overlay colour
Was
WHITE
now
GREY
All of these may be configured using the relevant "oa_pref" file settings, see above, vis:
d3plot*initial_plot_mode:
d3plot*overlay_mode:
d3plot*overlay_colour:
LINE / HIDDEN / SHADED
OFF / FREE / ALL
WHITE, ... etc
Changes between V7.x and V8.0
In order to improve the initial appearance of plots some defaults which affect the appearance of shaded plots have
been changed:
BRIGHTNESS
Was
100%
now
90%
SHININESS
Was
70%
now
70%
AMBIENT
Was
25%
now
40%
SHADED_SAT
Was
100%
now
50%
Light position
Was
at observer
now
above right shoulder
Page A.11
Oasys D3PLOT
User manual Version 9.3, Rev. 0, September 2008
The effect on lighting plots will be to make them darker, less brightly coloured, and obviously lit from a different
position. To restore the previous defaults it will be necessary either to edit the ".oa_pref" file (see below), or to
reset these values explicitly in the PROPS menu.
The changes required in the .oa_pref file to restore the original lighting attributes are:
d3plot*shaded_ambient:
25
d3plot*shaded_diffuse:
90
d3plot*shaded_shininess:
70
d3plot*shaded_saturation:
100
Next section
Page A.12
User manual Version 9.3, Rev. 0, September 2008
Oasys D3PLOT
APPENDIX IV COMMAND LINE OPTIONS AND
WINDOWS FILE ASSOCIATIONS
UNIX
Instead of starting Oasys D3PLOT using the Oasys command shell it is also possible to start D3PLOT from the
command line. Starting D3PLOT from the command line offers a number of advantages.
•
Faster start-up is possible by pre-selecting the device type.
•
The input filename can be specified and opened automatically.
•
Faster start-up is possible by pre-selecting the device type
Argument format:
<application name> (<arg 1>) … (<arg n>) (<input filename>)
Valid D3PLOT command-line arguments
Graphics device type
-d=<device type>
Valid device types are:
OpenGL (3D graphics)
eg -d=default
opengl
X-windows, 8 bit-planes
x8
X-windows,24 bit-planes
x24
X8 if present, else X24
x
OpenGL if present, then X8 if
default present, then X24
Flag to start with window maximised (full screen) -maximise
(No argument)
Command file name
-cf=<filename>
A valid command file name (usually
Flag to exit when command file run complete if
-exit
*.tcf)
desired
(No argument)
Checkpoint file to replay
-replay=<filename> A valid D3PLOT ckeckpoint file
Number of lines to execute in checkpoint file
-rlines=<nnnn>
(usually cp_d3plotnnnn)
Where <nnnn> is a positive integer
Alternate "start in" directory (redefines current
-start_in=<pathname>A valid directory (eg c:\my_files,
working directory)
/data/my_files)
Input database filename.
<filename>
A valid input file type:
(The extra time history (.xtf) and contact force
(.ctf) databasees are also opened if present.)
eg run_1.ptf
name.ptf (Complete state file)
d3plot
( ditto )
Some examples for D3PLOT might be:
pathname/d3plot83.exe -d=opengl -maximise
run_2.ptf
(Use device OpenGL, full -screen, open file
run_2.ptf)
Note that no spaces should be left in the syntax <arg>=<value>.
For example:
"-d = x8" is illegal.
Correct syntax is:
"-d=x8"
Page A.13
Oasys D3PLOT
User manual Version 9.3, Rev. 0, September 2008
WINDOWS (PCs)
Command-line arguments on Windows
It is possible to define command-line arguments under Windows: either directly when running an application from a
MS-DOS prompt, or by defining "action" arguments when configuring a shortcut as described below. However this is
unusual, and it is suggested that you seek advice from Oasys if you are not sure how to do this.
To make .ptf files open in D3PLOT by double-clicking on them
Under Windows on PC platforms it is possible to set up file associations so that double clicking on files with the .ptf,
extension opens them automatically in D3PLOT. It is also possible to set up shortcuts so that double-clicking on the
D3PLOT icon automatically starts the desired graphics mode.
All of these settings are optional: you should be aware that under the Windows operating system associating a filetype
(via its extension) with an application is convenient, but can also be restricting and complicated to undo.
(1) If .ptf files do NOT currently have an application associated with them.
You can tell if no action is associated because a "double-click" doesn’t work, and they have some non-specific, usually
"windows", icon.
(If they do have an associated action already defined, go to here instead).
• Right click on any .ptf file, and select Open with…
from the popup menu
• You will get the "Open with" panel.
• Type in a suitable description of the .ptf files. For
example: "LS-DYNA complete state file"
• Make sure that the Always use… box here is ticked,
• Use the directory browsing window to find the correct
D3PLOT executable. You are looking for file
d3plot83.exe. (If you can’t remember where it is
installed use Start-> Find->Files or Folders to
locate it.)
• Click on OK to close the "Open With" window. This
should start D3PLOT, but at present it won’t "know"
about device type or filename: so select STOP to exit
it.
If D3PLOT doesn’t start check through what you’ve done, and ask Oasys for help if you can’t resolve the problem.
Page A.14
User manual Version 9.3, Rev. 0, September 2008
Oasys D3PLOT
• In any folder window click on View, then select Folder
Options… from the menu.
•
•
Select the File Types tab at the top.
Scroll down the list of Registered file types until you
get to the name you entered for .ptf files e.g.
"LS-DYNA complete state file". Highlight this and
select Edit…
Page A.15
Oasys D3PLOT
•
•
•
User manual Version 9.3, Rev. 0, September 2008
In the Edit File Type panel click on Change
Icon…
And use BROWSE… in the Change Icon panel
to find file d3plot81_og.exe.
Then, in the Edit File Type panel, click
on Edit… to obtain the Editing action
panel:
The Action: entry should be set to "open" (greyed out).
You now need to edit the contents of the Application used... box:
At this stage you must decide what graphics driver you wish D3PLOT to open under. The options are:
openglOpenGL 3D graphics. If your hardware supports it then use this, as it will give the fastest animation and best
shading.
x24 X-Windows 2D graphics using 24 bit-planes. This will give good shading and lighting, but 24 bit-plane
animation is slower than 8 bit-plane
x8
X-Windows 2D graphics using 8 bit-planes. This gives poorer quality shading and lighting, but faster animation
than the x24 option.
defaultChooses the best available option from the above.
•
Edit the existing string to remove the "%1" at its end and replace it with -d=<option> where <option> is
one of the above. For example:
-d=opengl
Selects OpenGL
-d=default
Lets D3PLOT choose the best option
It is recommended that you use:
d=default Which will select X, and provide for any future options.
(Note that there must be no spaces in this definition: -d = x24 would cause an error. Also you must use lower case
throughout. -d=X24 would also cause an error.)
•
Click on OK in the Editing action window to close and save it.
•
Click on Close in the edit File Type window to close and save it.
•
Click on Close in the Folder Options window to close and save it.
Page A.16
User manual Version 9.3, Rev. 0, September 2008
Oasys D3PLOT
You should now find that:
• All .ptf files on your system show the D3PLOT icon.
• Double-clicking on any such file starts D3PLOT with the appropriate graphics driver, and opens that file.
It is not possible to set up the filename "d3plot" for double-clicking in this way since Windows requires filename
extensions when assigning applications to files.)
(2) If .ptf files DO currently have an application associated with them
•
In any folder window click on View, then select Folder Options… from the menu.
•
Select the File Types tab at the top.
•
Scroll down until you find the file type currently associated with .ptf files.
•
Highlight it and click on Edit…
The procedure is then the same as the above, except that you are replacing…
•
Icon (click on Change Icon)
•
Application (click on Edit…)
...instead of defining new values.
If you are unsure it may be easier to Remove the current registered file type, then start afresh from (1) above.
APPENDIX V ENVIRONMENT VARIABLES USED BY
D3PLOT
Environment variables can be used to set certain key parameters and to alter the default behaviour of the code.
Generally these settings will be inserted into the "oasys_xx" command shell, but individual users are free to define
their own parameters.
The setting of environment variables is done as follows:
Unix/Linux systems running "C" shell (/bin/csh) or its derivatives
such as /bin/tcsh:
The format of the command is:
setenv <parameter> <argument list>
For example:
setenv DISPLAY my_machine:0
setenv SM_USE_VISUAL default
setenv DISPLAY_FACTOR 1.2
(Note that the "oasys_xx" shell is written using C shell syntax, so if it is amended the format above should be
used.)
Page A.17
Oasys D3PLOT
User manual Version 9.3, Rev. 0, September 2008
Unix/Linux systems running "Bourne" (/bin/sh) or "Korn" (/bin/ksh)
shells
The format of the command is:
<parameter>=<argument list>; export <parameter>
For example:
DISPLAY=my_machine:0; export DISPLAY
SM_USE_VISUAL=default; export SM_USE_VISUAL
DISPLAY_FACTOR=1.2; export DISPLAY_FACTOR
Page A.18
User manual Version 9.3, Rev. 0, September 2008
Oasys D3PLOT
Windows systems
Choose the
"System" panel
==>
==>
==> NT4: Click on
"Environment" tab
Win2K: Click on
the "Advanced" tab,
then "Environment
Variables..."
Alternatively
right-click on on
"My computer"
==>
NT4: Click on "Environment" tab
Win2K: Click on the "Advanced" tab, then
"Environment Variables..."
Right Click, select
"Properties"
This panel is from a
Windows NT4
machine, but the
panel on Win2K or
XP is very similar.
Then insert the relevant Variable and Value strings into the User or System settings as desired.
In this example it can be seen that iser Administrator has set the DISPLAY environment variable to
170.177.1.92:0.
Page A.19
Oasys D3PLOT
User manual Version 9.3, Rev. 0, September 2008
The following environment variables may be used to control the
behaviour of D3PLOT.
Variable name
Description
Possible Values
Default
The following variables control the graphics and attributes of the display window and menu system.
DISPLAY
The X11 display id on which graphics will be
drawn. (This is ignored on "native" Windows
systems.)
(<machine
name>):<server
id>(<.screen id>)
:0
overlay
default
<visual id> in hex
overlay
If this is not defined (most systems initialise
this to ":0") then no connection can be made
to an X server, and no graphics will be drawn.
SM_USE_VISUAL
Sets the X11 "visual" id to be used for screen
menus. Where a graphics display provides
"overlay" planes these should normally be
used, otherwise this should be left undefined or
set to "default". Using an explicit visual id is
possible, and this should be defined in
hexadecimal (eg 0xf16).
Experience has shown the on some Silicon
Graphics systems using the "overlay" planes
can result in very strange colours in other
windows, in which case "default" should be
used.
Also on some W2000 and graphics board
combinations problems may also arise with
overlay planes and, again, "default" should be
used.
The following options may be used to configure the menu interface, and are intended for use by those who are having
difficulties with the standard settings, or who have displays with unusual attributes.
If you need advice about configuring your machine, and particularly if you suffer from physical impairment that may
be eased by changing default settings, please contact Oasys and we will do our best to help.
DISPLAY_SATURATION
DISPLAY_BRIGHTNESS
DISPLAY_FACTOR
Page A.20
Saturation controls the colour saturation
(intensity) of menus
Brightness controls the colour brightness of
menus
"Factor" sets the relative display scale, and can
range from 0.5 (making menus larger) to 2.0
(making them smaller). It may also be set to
"automatic" which derives a factor from the
physical screen dimensions.
0.0 to 1.0
0.0 to 1.0
0.5 to 2.0, or
automatic
1.0
1.0
1.0
User manual Version 9.3, Rev. 0, September 2008
SM_FONT_SIZE
SM_FONT_TYPE
Oasys D3PLOT
Sets the size of fonts used in the menu
interface. Possible values are:
SMALL
Will reduce the size of text in
windows and buttons, and may
be suitable on very large
displays.
MEDIUM
"Normal" text size suitable for
most purposes.
LARGE
"Large" text, which may be
more easily read by those with
visual impairment.
DEFAULT
The default size (usually
medium) on this hardware.
Sets the font (type-face) to be used for menu
fonts
HELVETICA
HELVETICA-BOLD
Uses the
proportionally
spaced
"Helvetica" (on
X11) or "Arial"
(on Windows)
fonts.
TIMES
TIMES-BOLD
Uses the
proportionally
spaced "Times"
font.
COURIER
COURIER-BOLD
Uses the fixed
spaced "Courier"
font.
SMALL
MEDIUM
LARGE
DEFAULT
<none>
HELVETICA
HELVETICA-BOLD
HELVETICA
(implicitly
DEFAULT)
TIMES
TIMES-BOLD
COURIER
COURIER-BOLD
The "Bold" options for the font give a bolder
and thicker font.
The actual type-face used on a given platform
will depend upon what fonts have been
installed on that machine, and it is possible that
the font and size combination selected may not
be available. For advice on installing fonts
please contact Oasys.
Page A.21
Oasys D3PLOT
LEFT_HANDED
User manual Version 9.3, Rev. 0, September 2008
Configures the keyboard and/or mouse for
left-handed users.
KEYBOARD
KEYBOARD
MOUSE
ALL
<none>
Swaps the left and right
"meta" keys (<shift>and
<ctrl>) for the purposes of
dynamic viewing.
Note: At present (V9.0) this
does not work on Windows
platforms for technical
reasons. We hope to fix this
in the future.
MOUSE
Swaps the left and right
mouse buttons for the
purposes of all mouse actions
(pick, drag, dynamic
viewing)
ALL
Both of the above
The following two variables apply on Windows platforms only, and should only be used if the menu system is
clearly obtaining the wrong display size from the system, as evidenced by fonts and menus being very much the
wrong size.
DISPLAY_HEIGHT
Set an explicit display height in millimetres
<height in mm>
<none>
DISPLAY_WIDTH
Set an explicit display width in millimetres
<width in mm>
<none>
The following options can be used to solve fairly obscure memory and display problems on X11 platforms.
USE_PIXMAPS
Controls whether or not the menus use
true or false
"pixmaps" (off-screen memory) to produce
smooth scrolling. Turning this off (false) will
save memory, and may help memory problems
on a display that has only limited memory
available for the X server, but will give slightly
jerky window scrolling.
true
SAVE_UNDER
This flag was introduced to fix a specific bug
on Compaq Alpha OSF4.x operating systems.
Normally the window manager requests a
redraw of windows that have been updated,
even when they are currently obscured by
something else. However the OSF4 window
manager series failed to do this, leading to
"bare" patches underneath popup menus when
these were unmapped.
true
Setting this flag to false results in more
redraws on these systems since it suppresses
the default "save under" property of X11
windows, but it does at least prevent windows
getting bare areas.
Compaq have fixed the bug in OSF5, and
possibly in later releases of OSF4.
Page A.22
true or false
User manual Version 9.3, Rev. 0, September 2008
ALPHA_PERMIT_BROKEN Another Compaq problem with older graphics
cards under OSF4.x was a crash the first time
broken lines for undeformed geometry were
drawn. To prevent this Compaq machines have
this capability switched off.
Oasys D3PLOT
true or false
false
To enable undeformed geometry to use broken
lines on these machines set this variable to
true.
The following are normally used when running command files, or performing automatic post-processing in batch
mode.
MENU_AUTO_CONFIRM
This variable is often used when replaying
command files which, when recorded, paused
and asked the user to confirm things. (For
example HELP and Warning messages.) If the
variable is set (true) then these will not pause
and will behave as if the user had pressed
"OK" - meaning that command files can play
back without user intervention.
true or false
false
FILE_EXIST_ACTION
Action to be taken when opening a file for
output, and the file already exists.
<none>
overwrite
append
<none>
true or false
false
Normally you will be prompted for the action
to be taken when a file selected for output
already exists. However if this variable is set to
overwrite or append then the relevant
action will be taken automatically.
This is generally used when playing automatic
post-processing batch scripts.
SUPPRESS_CHECKPOINT Suppresses the reading and writing of
checkpoint files. This is desireable in batch
mode since it prevents spurious checkpoint
files being read in and processed.
The following controls the display of on-line manual pages on Unix systems only. (Windows systems use the default
web browser.)
NETSTART
Command string to start Netscape on
Unix/Linux hosts. This is used to fire up the
Netscape browser in order to read manual
pages from within D3PLOT.
Any valid Unix
command string.
<none>
The following variables control the default behaviour of the database management system.
Page A.23
Oasys D3PLOT
D3PLOT_CACHE_DATA
User manual Version 9.3, Rev. 0, September 2008
Default setting of the "CACHE_DATA"
database switch. This controls whether or not
D3PLOT attempts to store all data read from
disk in its own core image. This setting can be
changed manually during execution.
full
(was
true
prior to
V8.3)
Stores all data read from disk in
memory until the database
caching memory limits are
reached. This can use a lot of
memory and is not recommended
unless disk access is very slow.
scalar
Stores basic nodal coordinates
and the current component’s
"scalar" data only. A reasonable
trade-off between speed and
memory size.
full
scalar
off
scalar
(Also, for backwards
compatibility:
true
false
off
Only basic nodal coordinate data
(was
are stored. Saves memory but
false
may make data-bearing plots
prior to
slow to modify.
v8.3)
Generally Unix systems are better at cacheing
disk data in spare system memory than
Windows systems, making "disk" rereads
faster since they are actually copied from
memory. This makes the "off" option viable
under Unix - however you may need to
experiment.
D3PLOT_SOFT_LIMIT
Controls the amout of memory (in MB) set
aside for the "soft" database limit
1 to 2048 MB
60% of
system
memory
D3PLOT_HARD_LIMIT
Controls the amout of memory (in MB) set
aside for the "hard" database limit
1 to 2048 MB
80% of
system
memory
The following variables set special parameters for data file reading and management, and are not normally used.
D3PLOT_SOLID_SE
Controls whether or not D3PLOT calculates
strain energy density for solid elements. Doing
this makes the assumption that the elements
have not entered the plastic strain regime, so it
is not normally set.
true or false
false
D3PLOT_SOLID_8
Analyses containing 8 integration points worth
of data for solid elements are processed
(NINTSLD = 8 on *DATABASE EXTENT
BINARY), but only the first integration point is
normally considered. If this flag is set then
limited support for all 8 integration points is
provided.
true or false
false
true or false
false
This facility is only partially implemented and
should not be relied on.
PTF_CONTIGUOUS
CTF_CONTIGUOUS
Page A.24
Some versions of LS-DYNA sometimes
contravene the rules for starting a new family
member, and write data contiguously across
file boundaries when they should not. Setting
these variables may enable such files to be
read.
User manual Version 9.3, Rev. 0, September 2008
D3PLOT_LIST_CROSSED Normally coincident solid elements and those
with crossed faces are dealt with by issuing a
summary warning that they exist. Set this
variable to see a detailed listing of all such
elements.
Oasys D3PLOT
true or false
false
The following variables are provided for debugging purposes only, and should not normally be used.
XSYNC
Runs the X server in "synchronised"
(unbuffered) mode. This will give woefully
slow graphics, and is used for debugging
purposes only.
true or false
false
WARN_REDEFINE
Makes the menu system issue a warning if a
button is redefined. Again this is normally only
used for debugging purposes.
true or false
false
CP_FILE_FILTER
When replaying checkpoint files this maps the
file filter box and waits for user input, instead
of using the path/filename encoded in the
checkpoint file.
true or false
false
0 (off)
1
2
0
true or false
false
true or <none>
<none>
This is used when replaying checkpoint files
on a machine different to that on which they
were written, or when the encoded file
pathnames are no longer valid.
CP_DEBUG
When replaying checkpoint files this writes
details of each command to <stdout>, and
waits for <enter> before proceeding.
0
Off, the default. Checkpoint files play
through without halts.
1
On. Checkpoint files echo all
commands to <stdout>, and wait for a
<return> on <stdin> before proceeding.
However graphics commands (dynamic
viewing, zoom, etc) play through
without pause.
2
On. As for 1 above, but every
command (including dynamic viewing)
pauses and waits for confirmation
before proceeding.
Used for debugging problem files.
CP_REFORMAT
When replaying checkpoint files written on a
machine with a difference display resolution
some picking and other screen-dependent
operations may not work correctly.
Setting this variable causes the playback
machine to map the D3PLOT menu system
onto a "virtual" display resolution equal to that
of the original machine which *may* solve
these problems if the two displays are not
wildly different. It is more likely to work if the
playback machine has a higher resolution than
that on which the file was written.
D3PLOT_TIMING
Writes the time taken for each frame to be
drawn to <stdout>. Used for timing
comparison purposes.
Page A.25
Oasys D3PLOT
User manual Version 9.3, Rev. 0, September 2008
APPENDIX VII DIALOGUE COMMAND SYNTAX
D3Plot has a dialogue command set that can be used in any of three ways:
1.
In graphical (screen menu) mode commands can be typed into the "DialogueBox" at any time.
2.
In non-graphical (text only) mode commands are typed in at the terminal prompt
3.
In command files, run either interactively or in batch, commands areexecuted as if typed in.
In all cases the command input syntax is identical, although there are minor differences in output between "screen
menu" and "text-only" modes: in the latter case all output has to go to the controlling terminal ("stdout"), whereas in
the former separate windows are used for "help", "listing" and other output.
The Dialogue Command Structure
The command structure forms a hierarchical "tree", with the top-level D3PLOT_MANAGER at its "root".
The following rules apply:
•
Command words may be abbreviated to any degree so long as:
•
they are unique in the context of their current menu
•
they must have at least their first two characters given
•
For example BP_BEAM_PLOTTING CT_CONTINUOUS may be abbreviated to BP CT.
Navigation up and down menu levels is performed as follows:
•
<command> takes you to the command’s (sub-)menu level
•
Forward slash "/" takes you back to the top D3PLOT_MANAGER level before executing the following
command(s)
For example BP_BEAM_PLOTTING above takes you into the BEAM_PLOTTING sub-menu
•
•
•
The command /DEFORM EXPLODE would work at the BEAM_PLOTTING prompt because it would return to
the top level before parsing the DEFORM command.
There is also a "global menu" of commands which is available at any (sub-)menu prompt.
•
These are primarily graphics commands that do not require a context
•
The commands can be listed with the GM (for Global Menu) command
Any command can be aborted by typing Q(uit). This will return control to the next highest command prompt in
the "tree"
At any prompt you can type H(elp) to receive advice about what to do next.
Main Menu Commands:
CT_CONTINUOUS_
TONE
Continuous tone (solid)
contour plot
LC_LINE_CONTOURS Line contour plot
CL_CLOUD_PLOT
"Cloud" (points) plot
ISO_SURFACE_PLOT Iso-surface contour plot
VELOCITY_PLOT
Velocity arrows plot
CRITERION_PLOT
Criterion mode plot
The syntax is:
COMPONENT <data>
Page A.26
Defines the data component <data> to plot
User manual Version 9.3, Rev. 0, September 2008
ATTRIBUTE <attr>
Oasys D3PLOT
Defines the attributes of the criterion analysis. Valid <attr>s are:
LENGTH
<length>
Symbol length
COLOUR
<colour>
Symbol colour. Valid <colour>s are:
DATA_VALUE
Scales colours with
data values
FIXED_COLOURS Sets fixed colours
SYMBOL
<symbol>
Symbol type. Valid <symbol>s are:
HIERARCHY MAX stress has normal
arrow head
MID stress has flat T
arrowhead
MIN stress has inverted
arrow head
ALL_LINES All components drawn using
plain lines
SI_SHADED_IMAGE
GO
Perform the criterion plot
EXPLAIN
Further help
STATUS
Show the current settings
Shaded image plotting
options
The syntax is:
SHININESS <%age>
Set the object shininess
SATURATION <%age>
Set the object colour saturation
OVERLAY_COLOUR
<colour>
Set the overlay colour
LM_LIGHTING_MODEL
<switch>
Turn lighting model ON or OFF
BRIGHTNESS <%age>
Set directional lighting intensity
AMBIENT_LIGHT_LEVEL
<%age>
Set ambient light level
SHADING_TYPE
<option>
Set smooth or flat shading. Valid <option>s are:
Flat shading
FLAT
SMOOTH <angle> Smooth shading with an edge angle <angle>
DS_DITHER_SHADING
<switch>
Turn dithered shades ON or OFF
GOURAD_SHADING
<option>
Set solid or fuzzy contour bands. Valid <option>s are:
ON
Fuzzy bands
OFF Solid bands
Page A.27
Oasys D3PLOT
INTERFACE_
PLOTTING
User manual Version 9.3, Rev. 0, September 2008
DC_DITHER_CONTOURS
<switch>
Turn contour dithering ON or OFF
COLOUR_MAP
Draw the current colour map
GO
Execute the plot
STATUS
Show the current settings
EXPLAIN
Further help
Plot sliding interface results
The syntax is:
COMPONENT <data>
Define the <data> component to plot
LC_LINE_CONTOURS
Line plot
CT_CONTINUOUS_TONE
Continuous tone contour plot
SI_SHADED_IMAGE
Shaded contour plot
VECTOR_PLOT
Vector force plot
HATCHING_SWITCH
<switch>
<switch> hatching ON or OFF
OPACITY_SWITCH
<switch>
<switch> opacity ON or OFF
EXPLAIN
Further help
BP_BEAM_PLOTTING Plots beam data
The syntax is:
CT_CONTINUOUS
Continuous tone contour plot
DP_DIAGRAM_PLOT
Bending moment diagram plot
COMPONENT <data>
Defines the data component <data> to plot
INTG_POINT
Set H-L beam extra dat integration point
R2_REVERSE_END_2
Set the reverse end 2 switch on or off
THICKNESS
Set the CT plot beam thickness
ATTRIBUTES <attr>
Defines the attributes of the DP plot. Valid <attr>s are:
SIZE <size>
Size of the maximum diagram vector in
screen units
HATCHING
<hatch>
Intervals between the intermediate lines in
screen units
PROJECTION
<proj>
How the diagram is projected. Valid
<proj>s are:
SCREEN Always in the screen XY
plane
LOCAL
LABEL_VALUES
OPACITY_SWITCH
Page A.28
In the local YY or ZZ plane
Set the label switch on or off
Set the opacity switch on or off
User manual Version 9.3, Rev. 0, September 2008
GREYSCALE
Oasys D3PLOT
EXPLAIN
Further help
WARNINGS
Some notes and caveats
STATUS
Show the current settings
Draw a solid shaded plot
The syntax is:
COLOUR_OF_OBJECT
<colour>
Set monochrome object colour
SHININESS <%age>
Set object shininess level
SATURATION <%age>
Set object colour saturation
OVERLAY_COLOUR
<colour>
Set overlay colour
LM_LIGHTING_MODEL
<switch>
Turn lighting model ON or OFF
BRIGHTNESS <%age>
Set directional light intensity
AMBIENT_LIGHT_LEVEL
<%age>
Set ambient light level
SHADING_TYPE
<option>
Set smooth or flat shading. Valid <option>s are:
FLAT
Flat shading
SMOOTH <angle> Smooth shading with an edge angle <angle>
DS_DITHER_SHADING
<switch>
Turn dithered shades ON or OFF
GO
Execute the plot
STATUS
Show the current settings
EXPLAIN
Further help
COMPONENT <data> Defines the data component
<data> to plot
STRESS_CONTROL
Control stress plotting
The syntax is:
PART_IGNORED_SW
Do / do not average across parts
BLANKING_IGNORED_SW
Do / do not include blanked elements
CLIPPING_IGNORED_SW
Do / do not include clipped elements
AVERAGE_SWITCH
Do / do not average stress at nodes
GLOBAL_COORDINATES
Use global coordinates
LOCAL_COORDINATES
Rotate to local element coordinates
SURFACE <surface>
Select a shell surface or layer. Valid <surface>s are:
TOP, MIDDLE, BOTTOM, MAX_ALL, MIN_ALL, MAG_ALL or
a layer number if present
EXPLAIN
Further help
Page A.29
Oasys D3PLOT
User manual Version 9.3, Rev. 0, September 2008
STATUS
CONTOUR
Show the current settings
Control contour settings
The syntax is:
NUMBER_OF_LEVELS
<levels>
Defines the number of contour levels
AUTOMATIC
Autoscales the levels
MANUAL_MAX_MIN <min> Manually sets the minimum <min> and maximum <max>
<max>
USER_DEFINED
Define each contour line
RESOLUTION <res>
Define the contour resolution. Valid <res>s are:
LOW, MEDIUM or HIGH
FORCE_LABELS
Force line labelling on LC plots
LABEL_FREQUENCY
<freq>
Set the labelling frequency on LC plots to <freq>
LIMITING_VALUES
<switch> <low>
<high> <action>
Define what is contoured by upper and lower bound limits.
Where:
<switch> Is either ON or OFF
<low> Is the lower limit
<high> Is the upper limit
<action> Is the exclusion behaviour and can be:
OMIT, OUTLINE or BLACK
DISPLAY_OPTIONS
OVERLAY_COLOUR
<colour>
Set the overlay colour
ARROW_LENGTH
<length>
Set the length of arrows
STATUS
Show the current settings
Set display parameters
The syntax is:
Page A.30
UNDEFORMED_SWITCH
Do / do not draw undeformed geometry
BF_SWITCH
Do / do not draw back faces
IF_SWITCH
Do / do not draw internal faces
LOCAL_TRIAD_SWITCH
Do / do not draw triad
CLOCK_SWITCH
Do / do not draw clock
HEADER_SWITCH
Do / do not draw title header
CONTOUR_BAR_SWITCH
Do / do not draw contour bar
NASTRAN_CASES_SW
Do / do not draw nastran cases/freqs
DATE_SWITCH
Do / do not draw date on plots
BORDER_SWITCH
Do / do not draw border
GRATICULE_SWITCH
Do / do not draw graticule
User manual Version 9.3, Rev. 0, September 2008
Oasys D3PLOT
GRID_SWITCH
Do / do not draw graticule grid
MODEL_BOX_SWITCH
Do / do not draw box round model
ALL_NODES_SWITCH
Do / do not draw all nodes
LABEL_SWITCH
Control node / element labelling
ENTITY_SWITCH
Control entity visibility
HO_HIDDEN_LINE_OPT
<option>
Set hidden line options. Valid <option>s are:
FREE_FACE_OPTIONS
<option>
PAINTER
Use "painter" algorithm
RIGOROUS
Use "rigorous" algorithm
RESOLUTION <x> <y>
Set the resolution to <x> x <y>
Set how free edges are displayed. Valid <option>s are:
OFF
Turn free edges off
ON
Turn free edges on
BE_BLANK_EDGES
Blanking does create free edges
BN_BLANK_NO_EDGES Blanking does not create free edges
SEAT_BELT_OPTIONS
<option>
SPRING_SYMBOL
<option>
CE_CLIP_EDGES
Clipping does create free edges
CN_CLIP_NO_EDGES
Clipping does not create free edges
PE_PART_EDGES
Part boundaries create edges
PN_PART_NO_EDGES
Part boundaries do not create edges
SE_SURF_EDGES
Surface boundaries create edges
SN_SURF_NO_EDGES
Surface boundaries do not create edges
Set how seat belt elements are displayed. Valid <option>s are:
BELT_WIDTH <width>
Set the visual width
RETRACTOR_SIZE <size>
Set the visual retractor size
SLIP_RING_SIZE <size>
Set the visual slip ring size
Set how spring elements are displayed. Valid <option>s are:
ZIG_ZAG Display springs as a zig-zag
LINE
Display springs as a line
BEAM_SYMBOL <option> Set how beam elements are displayed. Valid <option>s are:
LINE
Display beams as a thin line
THICK_LINE
Display beams as a thick line
Page A.31
Oasys D3PLOT
User manual Version 9.3, Rev. 0, September 2008
WINDOW <option>
Define the image window setting. Valid <option>s are:
FULL_SCREEN
The plot occupies the full screen
PART_SCREEN
The plot will not overwrite titleor contour key
REPORT_FORMAT The colour hard-copied the image will be the
same size as a Laser A4 plot
USER_DEFINED
STATUS
VIEW_OPTIONS
Define the plot window with cursor
Show the current settings
Store and get views from a
file
The syntax is:
STORE <view id>
<name>
Store the current view in <view id> with the name <name>
GET <view id>
Get the view <view id>
DIRECTORY
List the stored views
RENAME <view id>
<name>
Rename a stored view <view id> to <name>
DELETE <view id>
Delete view <view id>
FILE_NAME
<file_name>
Change the name of the file the views are stored in to <file_name>
PERSPECTIVE <option> Set perspective options. Valid <option>s are:
WE_WRITE_EXPLICIT
ON
Turn perspective on
OFF
Turn perspective off
DISTANCE
<distance>
Set the eye to centre distance to
<distance>
Display the explicit centre and scale
RE_READ_EXPLICIT <x, Set the explicit centre to the coordinates <x y z> and the scale to
y, z> <scale>
<scale>
BLANK
STATUS
Show the current settings
EXPLAIN
Further help
Blank / unblank entities
The syntax is:
Page A.32
<entity> <list>
Blank the <list> of entities of type <entity>
ON
Switch blanking on
OFF
Switch blanking off
ALL
Blank all entities except nodes
UNBLANK <enitity>
<list>
Unblank the list of entities of type <entity>
REVERSE
Reverse the blanking
STATUS
Show the current settings
User manual Version 9.3, Rev. 0, September 2008
UNBLANK
Oasys D3PLOT
Unblank entities
The syntax is:
VOLUME_CLIPPING
<entity> <list>
Unblank the <list> of entities of type <entity>
ALL
Unblank all entities
Clip display by volume
The syntax is:
CREATE <option>
Create a clipping volume. Valid <option>s are:
CARTESIAN
<x_max,
y_max, z_max>
<x_min,
y_min, z_min>
<orient>
Define a box.
Where:
<x_max,
y_max,
z_max> and
<x_min,
y_min,
z_min>
Define the corners of a box
<orient>
Defines the orientation of
the volume and can be:
BASIC_MODEL,
DEFORMED_MODEL or
SCREEN_SPACE
CYLINDRICAL
<x_c, y_c,
z_c> <rad>
<min_height>
<max_height>
<H_axis>
<orient>
Define a cylinder
Where:
<x_c, y_c,
z_c>
Defines the centre of the
cylinder
<rad>
Defines the radius of the
cylinder
<min_height>
<max_height>
Define the height of the
cylinder
<H_axis>
Is the global axis to align
the cylinder with and can
be X, Y or Z
<orient>
Defines the orientation of
the volume and can be:
BASIC_MODEL,
DEFORMED_MODEL
or SCREEN_SPACE
Page A.33
Oasys D3PLOT
User manual Version 9.3, Rev. 0, September 2008
SPHERICAL
<x_c, y_c,
z_c> <rad>
<orient>
Define a sphere
Where:
<x_c,
Defines the centre of the
y_c, z_c> sphere
<rad>
Defines the radius of the
sphere
<orient>
Defines the orientation of the
volume and can be:
BASIC_MODEL,
DEFORMED_MODEL or
SCREEN_SPACE
CUT_SECTIONS
CANCEL
Cancels the clipping volume
ORIENT
Defines the orientation of the volume and can be:
BASIC_MODEL, DEFORMED_MODEL or SCREEN_SPACE
DO_DISCARD_OUTSIDE
Remove elements outside the volume
DI_DISCARD_INSIDE
Remove elements inside the volume
OFF
Turn the clipping off
ON
Turn the clipping on
LOCATION_PLOT
Draw 4 views of the model to visualise the volume
SKETCH
Sketch the volume on the current image
STATUS
Show the current settings
EXPLAIN
Further help
Define a section that cuts
through the model
The syntax is:
Page A.34
OFF
Turn the cut section off
ON
Turn the cut section on
User manual Version 9.3, Rev. 0, September 2008
CREATE <option>
Oasys D3PLOT
Create a cut section. Valid <option>s are:
LS_DYNA_METHOD
<x_nt, y_nt, z_nt>
<x_nh, y_nh, z_nh>
<x_eh, y_eh, z_eh>
<orient>
Define normal and edge coordinates
Where:
<x_nt,
y_nt,
z_nt>
Defines the Normal Tail
coordinate
<x_nh,
y_nh,
z_nh>
Defines the Normal
Head coordinate
<x_eh,
y_eh,
z_eh>
Defines the Edge Head
coordinate
<orient> Orientation of cutting
plane and
can be:
BASIC_MODEL,
DEFORMED_MODEL,
SCREEN_SPACE
OV_ORIGIN_&_VECTORS Define an origin, local x axis and
<x_o, y_o, z_o>
local xy plane
<x_x, y_x, z_x>
<x_xy, y_xy, z_xy> Where:
<orient>
<x_o,
Defines the origin
y_o,
z_o>
<x_x,
y_x,
z_x>
Defines the local x axis
<x_xy,
y_xy,
z_xy>
Defines the local xy
plane
<orient> Orientation of cutting
plane and
can be:
BASIC_MODEL,
DEFORMED_MODEL,
SCREEN_SPACE
N3_THREE_NODES <N1, Define a plane with three nodes
N2, N3> <orient>
Where:
<N1,
N2,
N3>
Defines the three nodes
<orient> Orientation of cutting
plane and
can be:
BASIC_MODEL,
DEFORMED_MODEL,
SCREEN_SPACE
Page A.35
Oasys D3PLOT
User manual Version 9.3, Rev. 0, September 2008
X_CONSTANT
<x> <orient>
Define a plane of constant X
Where:
<x>
Defines the x coordinate
<orient> Orientation of cutting plane and
can be:
BASIC_MODEL,
DEFORMED_MODEL,
SCREEN_SPACE
Y_CONSTANT
<y> <orient>
Define a plane of constant Y
Where:
<y>
Defines the ycoordinate
<orient> Orientation of cutting plane and
can be:
BASIC_MODEL,
DEFORMED_MODEL,
SCREEN_SPACE
Z_CONSTANT
<z> <orient>
Define a plane of constant Z
Where:
<z>
Defines the zcoordinate
<orient> Orientation of cutting plane and
can be:
BASIC_MODEL,
DEFORMED_MODEL,
SCREEN_SPACE
CANCEL
Cancels the cut section
SYSTEM <orient>
Define the orientation of the cutting plane. Valid <orient>s are:
BASIC_MODEL
Tied to model space, undeformed geometry
DEFORMED_MODEL Tied to model space, deformed geometry
SCREEN_SPACE
FSYS <system>
Page A.36
Tied to the screen
Define the system for force and moment calculations. Valid
<system>s are:
AUTOMATIC
Basic space will use global coordinates, deformed
and screen space will use local coordinates
LOCAL
Local coordinates
GLOBAL
Global coordinates
User manual Version 9.3, Rev. 0, September 2008
POSITIVE_ACTION
<action>
DEFORM
Oasys D3PLOT
Action for elements on positive side of the section. Valid <action>s
are:
OMIT
Do not draw the elements
OUTLINE
Draw the elements in outline
NORMAL
Draw the elements in the display mode
NEGATIVE_ACTION
<action>
Action for elements on negative side of the section. Valid <action>s
are the same as above
LOCATION_PLOT
Draw 4 views of the model to visualise the section
VIEW_PLANE
Change view to normal to plane
SKETCH
Sketch the section
FORCE
Calculate forces on current section
STORE <section id>
<name>
Store the current section in <section id> with the name <name>
GET <section id>
Retrieve the stored section <section id>
RENAME <section id>
<name>
Rename a stored section <section id> to <name>
DELETE <section id>
Delete section <section id>
DIRECTORY
List stored sections on file
FILE_NAME
<file_name>
Change the name the sections are stored in to <file_name>
STATUS
Show the current settings
EXPLAIN
Further help
Modify or deform the
geometry
The syntax is:
EXPLODE <action>
Separate parts. Valid <action>s are:
DEFINE <parts>
<x, y, z>
Define the list of <parts> to explode
along the vector <x, y, z>
CANCEL
Remove the vector
MAGNIFY_DISP <x, y,
z>
Magnify the displacements by <x, y, z>
FIX_NODE <action>
Apply a negative translation, equal to the displacement of a node, to
the whole model. Valid <action>s are:
DEFINE <node id> Define the node <node id>
CANCEL
SHIFT_DEFORMED
<action>
Remove the translation
Apply a negative translation and rotation equal that defined by three
nodes, to the whole model. Valid <action>s are:
DEFINE <N1, N2, N3> Define the three nodes
CANCEL
Remove the translation and rotation
Page A.37
Oasys D3PLOT
User manual Version 9.3, Rev. 0, September 2008
REF_NODE <action>
Contour relative to a node or three nodes. Valid <action>s are:
SINGLE_NODE
<node id>
Define the node <node id>
THREE_NODES <N1, Define the three nodes
N2, N3>
REF_STATE <action>
GLOBAL
Contour results in global system
LOCAL
Contour results in local system defined
by nodes<N1, N2, N3>
REF_VALUES
Toggle on and off whether reference
values should be used for WRITE and
XY_DATA
Contour relative to a state. Valid <action>s are:
ON
Turn reference state on
OFF
Turn reference state off
REF_MODEL
<action>
Select a reference model. Valid
<action>s are:
SET_REF_STATE
<action>
NUMBER
<model id>
Set the reference
model to <model id>
CURRENT
Set the reference
model to the current
model
Select a reference state. Valid <action>s
are:
NUMBER
Set the reference state
<state id> to <state id>
Set the reference state
to the state at time
<time>
CURRENT
Use the current state
COORDS
Toggle on or off whether to apply
reference to current coordinates
DATA_VALUES
Toggle on or off whether to apply
reference to data values
UNDEFORMED
Toggle on or off whether to apply
reference to undeformed geometry
STATUS
Show the current settings
EXPLAIN
Further help
EXPLODE <action>
Separate parts. Valid <action>s are:
MAGNIFY_DISP <x, y,
z>
Page A.38
TIME_RS
<time>
DEFINE <parts>
<x, y, z>
Define the list of <parts> to explode
along the vector <x, y, z>
CANCEL
Remove the vector
Magnify the displacements by <x, y, z>
User manual Version 9.3, Rev. 0, September 2008
FIX_NODE <action>
Oasys D3PLOT
Apply a negative translation, equal to the displacement of a node, to
the whole model. Valid <action>s are:
DEFINE <node id> Define the node <node id>
CANCEL
SHIFT_DEFORMED
<action>
Remove the translation
Apply a negative translation and rotation equal that defined by three
nodes, to the whole model. Valid <action>s are:
DEFINE <N1, N2, N3> Define the three nodes
CANCEL
REF_NODE <action>
Remove the translation and rotation
Contour relative to a node or three nodes. Valid <action>s are:
SINGLE_NODE
<node id>
Define the node <node id>
THREE_NODES <N1, Define the three nodes
N2, N3>
REF_STATE <action>
GLOBAL
Contour results in global system
LOCAL
Contour results in local system defined
by nodes<N1, N2, N3>
REF_VALUES
Toggle on and off whether reference
values should be used for WRITE and
XY_DATA
Contour relative to a state. Valid <action>s are:
ON
Turn reference state on
OFF
Turn reference state off
REF_MODEL
<action>
Select a reference model. Valid
<action>s are:
SET_REF_STATE
<action>
NUMBER
<model id>
Set the reference
model to <model id>
CURRENT
Set the reference
model to the current
model
Select a reference state. Valid <action>s
are:
NUMBER
Set the reference state
<state id> to <state id>
TIME_RS
<time>
Set the reference state
to the state at time
<time>
CURRENT
Use the current state
COORDS
Toggle on or off whether to apply
reference to current coordinates
DATA_VALUES
Toggle on or off whether to apply
reference to data values
UNDEFORMED
Toggle on or off whether to apply
reference to undeformed geometry
Page A.39
Oasys D3PLOT
WRITE
User manual Version 9.3, Rev. 0, September 2008
STATUS
Show the current settings
EXPLAIN
Further help
Write data to the terminal
The syntax is:
<entity> <list>
<component>
Write <component> data for a <list> entities of type <entity>
SCAN <entity> <nn>
<component>
Display the maximum and minimum <nn> values of <component>
for element type <entity>
GS_GLOBAL_SUMMARY
<summary>
Display a model summary. Valid <summary>s are:
GS_GLOBAL_SUMMARY
Whole model summary
PS_PART_SUMMARY
Whole model summary by part
NRB_NODAL_RB_SUMMARY Nodal rigid body summary
IS_INTERFACE_SUMMARY Contact surfaces summary
XY_DATA
COINCIDENT
Display coincident elements
STATUS
Show the current settings
EXPLAIN
Further help
Plot XY Data
The syntax is:
NODES <list>
<component>
Plot <component> data versus time for nodes in <list>
SOLIDS <list>
<component>
Plot <component> data versus time for solids in <list>
BEAMS <list>
<component>
Plot <component> data versus time for beams in <list>
SHELLS <list>
<component>
Plot <component> data versus time for shells in <list>
THICK_SHELLS <list>
<component>
Plot <component> data versus time for thick shells in <list>
STONEWALLS <list>
<component>
Plot <component> data versus time for stonewalls in <list>
INTERFACES <list>
<component>
Plot <component> data versus time for interfaces in <list>
PARTS <list>
<component>
Plot <component> data versus time for parts in <list>
AIRBAGS <list>
<component>
Plot <component> data versus time for airbags in <list>
SURFACES <component> Plot <component> data versus time for surfaces
Page A.40
GLOBAL <component>
Plot global <component> data versus time
COMP_XY <entity>
<list> <component1>
<component2>
Plot <component1> data versus <component2> over time for the
<list> of <entity>s
User manual Version 9.3, Rev. 0, September 2008
Oasys D3PLOT
COMP_LINE <entity>
<list> <component1>
<component2>
Plot <component1> data versus <component2> at a given time for
the <list> of <entity>s
SORT <action>
Sort the COMP_LINE data points. Valid <action>s are:
SET_INTERVALS
<start> <interval>
<finish>
NO_SORT
No sorting
LABEL
Sort by label ids
X_VALUE
Sort by data x value
Y_VALUE
Sort by data y value
BX_COORD
Sort by item basic x coordinate
BY_COORD
Sort by item basic y coordinate
BZ_COORD
Sort by item basic z coordinate
CX_COORD
Sort by item current x coordinate
CY_COORD
Sort by item current y coordinate
CZ_COORD
Sort by item current z coordinate
Set the start time for the first state to be extracted, the time interval
between states and the time of the last state to be extracted
SELECT_STATES <list> Give a <list> of state numbers to be used
IMAGES
SHOW_TIMES
Show state times in .ptf file
WRITE_CURVES
Turn curve file writing on or off
CURVE_NAMES <type>
Change the default curve file names. Valid <type>s are:
GLOBAL
Global data curves
PART
Part data curves
AIRBAG
Airbag data curves
CONTACT
Contact data curves
ELEMENT
Element data curves
NODE
Node data curves
COMPOSITE
Composite curves
SECTION
Cut section curves
NUMBER_OF_CURVES
<curves>
Set the maximum number of curves in a .cur file to <curves>
STATUS
Show the current settings
EXPLAIN
Further help
Output images and
animations
The syntax is:
JPEG <filename>
Write the current image as a jpeg to <filename>
Page A.41
Oasys D3PLOT
User manual Version 9.3, Rev. 0, September 2008
BMP_U8 <filename>
Write the current image as an uncompressed 8-bit bitmap to
<filename>
BMP_C8 <filename>
Write the current image as a compressed 8-bit bitmap to <filename>
BMP_U24 <filename>
Write the current image as an uncompressed 24-bit bitmap to
<filename>
PPM <filename>
Write the current image as a portable pixmap to <filename>
PNG_8BIT <filename>
Write the current image as an 8-bit png to <filename>
PNG_24BIT <filename> Write the current image as a 24-bit png to <filename>
LABEL
GIF <filename>
Write the current image as a gif to <filename>
MPEG <filename>
Write the current animation as an mpeg to <filename>
AVI_MJPG <filename>
Write the current animation as a motion-jpeg to <filename>
AVI_U8 <filename>
Write the current animation as an uncompressed 8-bit motion-jpeg
to <filename>
AVI_C8 <filename>
Write the current animation as a compressed 8-bit motion-jpeg to
<filename>
AVI_U24 <filename>
Write the current animation as an uncompressed 24-bit motion-jpeg
to <filename>
DITHER <level>
Set the dithering level
FRAME_RATE <n>
Set to <n> number of frames per second for animations
REPEAT <n>
Set to <n> number of repeats for animations
QUALITY <%age>
Image quality of J/MPEG files
STATUS
Show the current settings
Display labels
The syntax is:
<entity> <list>
A <list> of <entity>s to label
LABEL
Toggle on or off if entities are labelled with their node/element
number
PN_PART_NUMBER
Toggle on or off if entities are labelled with their part/surface number
NE_NODES_ON_ELEMENT
Toggle on or off if nodes attached to an element are labelled
EN_ELEMENTS_ON_NODE
Toggle on or off if elements attached to a node are labelled
NC_NODAL_COORDINATES Toggle on or off if nodes are labelled with their coordinates
UTILITIES
DATA_VALUE
Toggle on or off if nodes/elements are labelled with their current data
value
STATUS
Show the current settings
EXPLAIN
Further help
General utility commands
The syntax is:
COLOUR_OF_ENTITIES
<entity> <list>
<colour>
Page A.42
Set the colour of a <list> of <entity> type to <colour>
User manual Version 9.3, Rev. 0, September 2008
Oasys D3PLOT
TRANSPARENCY
<entity> <list>
<%age>
Set the percentage transparency of a <list> of <entity> type to
<%age>
MEASURE_DISTANCE
<action>
Measure distances on screen. Valid <action>s are:
PP_POINT_TO_POINT
Distance between two screen points
(cursor picked)
NN_NODE_TO_NODE
Distance between two nodes (cursor
picked)
NO_NODE_TO_ORIGIN
Current node location (cursor picked)
NA_NODE_ANGLE
Angle between vectors n1n2 and n1n3
(cursor picked)
PA_POINT_ANGLE
Angle between vectors p1p2 and p1p3
(cursor picked)
TITLE_MODIFY <title> Change the model title to <title>
UNATTACHED_NODES
List any unattached nodes
TARGET_MARKERS
<action>
Add nodal target markers. Valid <action>s are:
FAILURE_LOGIC
<action>
DATA_COMPONENTS
RADIUS <rad>
Define the radius of the marker
COLOUR <col1>
<col2>
Define the two colours <col1> <col2>
of the marker
CREATE <node id>
Create a marker on node <node id>
DELETE <node id>
Delete the marker from node <node id>
OFF
Turn target markers off
ON
Turn target markers on
How to handle failed elements. Valid <action>s are:
DS_DELETED_SWITCH
Toggle displaying deleted
elements
DL_DELETED_LIST
List deleted elements
FH_HATCHING_SWITCH
Toggle hatching deleted
elements
FC_FAILED_CONTOUR
<colour>
Hatching colour
FL_FAILED_LIST
List failed elements
CRITERION
Define failure criterion
List data components
Page A.43
Oasys D3PLOT
User manual Version 9.3, Rev. 0, September 2008
CUSTOMISE_GRAPHICS
<action>
Graphic options. Valid <action>s are:
LW_LINE_WIDTH
<pixels>
Define line width in pixels
M3D_3D_GRAPHICS
Switch to 3D mode
M2D_2D_GRAPHICS
Switch to 2D mode
UPDATE_LEVEL
<level>
Define the update level
SOFT_CLIP_SWITCH
Turn the software clipping on or off
SP_SHOW_PROJECTION
Turn the box showing a
representation of the projection and
clipping planes on or off
WINDOW_SIZE <x> <y>
Set the window size
FILE_SKIP <n>
Skips <n> missing .ptf files
FAMILY_SIZE <size>
Set the file member size to <size> in MBytes
SETTINGS_FILE
<action>
Write or read a settings file. Valid <action>s are:
WRITE <filename>
Write to <filename>
READ <filename>
Read from <filename>
TOPAZ_FILE <To> <Tf> Write a topaz file
<Ti> <size> <header>
<family> <filename> Where:
<To> is the time offset
<Tf> is the time factor
<Ti> is the time interval
<size> is the family member size in MBytes
<header> sets whether to write a header of initial data to file and can
be YES or NO
<family> is the family member to start at
<filename> is the name of the file to write to
STL_FILE <filename>
<type>
Write an .stl file to <filename> as a file in the format <type>
Where:
<type> is either ASCII or BINARY
EXTERNAL <action>
Page A.44
Plot externally defined data. Valid <action>s are:
READ_FILE <filename>
Read from <filename>
OFF
Switch data off
ON
Switch data on
GLOBAL_FACTORS
<filename>
Read <filename> for global factors
MENU_ATTRIBUTES
Display the menu attributes panel
User manual Version 9.3, Rev. 0, September 2008
PTF_COMPRESS
<action>
JAVASCRIPT
Oasys D3PLOT
Generate a new set of ptf files with a subset of the data. Valid
<action>s are:
MODEL <model id>
Set the current model
FILENAME <filename>
Set the filename
PART <list>
Set a <list> of parts to output
STATES <list>
Set a <list> of states to output
APPLY
Write the ptf files
(NO_)VELOCITIES
Turn on/off output of nodal
velocities
(NO_)ACCELERATIONS
Turn on/off output of nodal
accelerations
(NO_)TEMPERATURES
Turn on/off output of nodal
temperatures
(NO_)SHELL_STRESS
Turn on/off output of shell and
thick shell stress tensor
(NO_)PLASTIC
Turn on/off output of plastic strain
(NO_)SHELL_FORCES
Turn on/off output of shell forces
and moments
(NO_)SHELL_THICKNESS
Turn on/off output of shell
thicknesses
(NO_)SHELL_EXTRA
Turn on/off output of shell extra
variables
(NO_)SOLID_EXTRA
Turn on/off output of solid extra
variables
(NO_)BEAM_EXTRA
Turn on/off output of beam extra
variables
(NO_)STRAIN
Turn on/off output of strain tensor
(NO_)SPH_STRESS
Turn on/off output of strain tensor
for SPH elements
(NO_)SPH_PLASTIC
Turn on/off output of plastic strain
for SPH elements
(NO_)SPH_STRAIN
Turn on/off output of stress tensor
for SPH elements
Javascript interface
The syntax is:
COMPILE <filename>
Compiles the javascript <filename> to check it for errors
EXECUTE <filename>
Executes the most recently compiled javascript file or compiles and
executes <filename> if given and different
MEMORY <size>
Sets javascript memory arena to <size> in MBytes
STATUS
Display programme status
NEW_MODEL
<filename>
Open model <filename>
EXIT
Exit D3Plot
Page A.45
Oasys D3PLOT
User manual Version 9.3, Rev. 0, September 2008
Global Menu Commands:
DRAW
Draws the undeformed geometry in line mode
LINE
Draws the current state in line mode
HIDDEN_LINE
Draws the current state in hidden-line mode
SHADED
Draws the current state in shaded mode
REDRAW
Redraws all windows
CW_CURRENT_WINDOW <window id> Sets the current window to <window id>
CM_CURRENT_MODEL <model id>
Sets the current model to <model id>
SXY, SYZ, SZX
Preset views on XY, YZ and XZ axes
+XY, +YZ, +ZX
Alternative syntax for the above
-XY, -YZ, -ZX
Reversed views of the above
ISOMETRIC
Preset isometric view
+ISO, -ISO
Same as above and reverse
RS <x y z>
Rotate about screen coordinates <x y z>
RM <x y z>
Rotate about model coordinates <x y z>
ZM
Zoom in using cursor
CENTRE
Centre image on cursor position
MG <scale>
Magnify by factor <scale>
AU_AUTOSCALE_UNDEF
Autoscale on undeformed geometry
AC_AUTOSCALE_CURR
Autoscale on current geometry
ZERO_VIEW
Reset view to plan on XY plane
TIME <time>
Set to a state at time <time>
Where:
<time> is a time value, PREVIOUS, NEXT or LAST
STATE <number>
Set to a state by <number>
Where:
<number> is a state number, PREVIOUS, NEXT or LAST
FILE_SCAN
Re-scan file family for new states
SS_SHOW_STATES
Show all state times in the file
GM_GLOBAL_MENU
Display global menu command summary
GH_GLOBAL_HELP
Help on global commands
GE_GLOBAL_EXPLAIN
Details of global commands
Page A.46
User manual Version 9.3, Rev. 0, September 2008
Oasys D3PLOT
APPENDIX VI JAVASCRIPT API
Description of D3PLOT API functions and methods.
The following pages describe the functions ("methods") available in the D3PLOT Javascript interface. For information
about how to run Javascript files see section 11.
Return
value
boolean
Function name
Purpose
CreateWindow(model_list);
Create a new window containing 1 or more models in
<model list>
boolean DeleteWindow(window_list, (dispose flag))
Delete (a) window(s), optionally "disposing" of orphan
models
boolean SetWindowActive(window_id, active_flag)
Sets the "active" flag on the specified window(s)
integer GetWindowMaxFrame(window_id)
Returns the highest frame in <window_id>
boolean SetWindowFrame(window_id, frame_number)
Displays frame <frame_number> in the specified
window(s)
integer GetWindowFrame(window_id)
Returns the current frame of <window_id>
object
GetWindowModels(window_id)
Returns an object containing information about the
model(s) in <window_id>
boolean SetCurrentModel(model_id)
Sets <model_id> to be current for data "get" and "put"
operations
boolean SetCurrentState(state_id)
Sets <state_id> to be current for data "get" and "put"
operations
integer GetNumberOf(type, (further args))
General routine to return the quantity of many different
things
boolean QueryDataPresent(component, (type))
Returns JS_TRUE if data <component> is present.
double GetTime((state))
Return the analysis time of the current state, or of <state>
if defined.
integer GetLabel(type, item, (state))
Return the external label of internal <type/item>
integer GetPid(type, item, (state))
Return the internal part id of internal <type/item>
integer GetMid(type, item, (layer), (state))
Return the external material id of internal <type/item>
Return an object containing topology, #nodes and part id
object
GetTopology(type, item, (state))
for internal <type/item>
object
GetElemsAtNode(node, type, (state))
Return a list of elements of <type> at <node>
double or GetData(component, type, item, (int_pnt), (extra), Return scalar, vector or tensor data for data <component>
array
(fr_ref), (state), (dda))
of <type/item>
integer CreateUbinComponent(name, item type, data type, Create a user-defined internal binary (UBIN) data
if_existing)
component and return its "handle"
object
LocateUbinComponent(name)
Returns an object with the <handle> and other attributes
of UBIN component <name>
integer DeleteUbinComponent(handle)
Deletes UBIN component <handle>
double or GetUbinData(ubin handle, type, item, int_pnt,
Get data from UBIN component <handle> for <type/item>
array
(state))
Insert data for UBIN component <handle> for
boolean PutUbinData(ubin handle, type, item, int_pnt,
data, (state))
<type/item>
Defines cut-section attributes in <window_id>
boolean SetCutSection(window_id, attribute, value)
object
GetCutSection(window_id, (state_id), (model_id)) Retrieves cut-section attributes from <window_id>
object
GetCutForces(window_id, (include blanked),
Returns the forces, moments, centroid and area from the
(part_id), (state_id), (model_id))
cut-section in <window_id>
boolean DialogueInput(line_1, (line_2), ... (line_n))
Executes 1 or more lines of command-line dialogue
commands
boolean DialogueInputNoEcho(line_1, (line_2), ...
As for DialogueInput(), but with no echo to dialogue box
(line_n))
Utility functions common with the PRIMER Javascript API Global Class
boolean
Print(arg)
boolean
Println(arg);
Prints <arg> on the terminal (stdout), but does not add
<carriage return> or <line feed>. Successive Print() calls
will append to the line.
Prints <arg> on the terminal followed by a line feed
Page A.47
Oasys D3PLOT
boolean
boolean
Message(arg);
Warning(arg);
boolean
Error(arg);
string
NumberToString(<number>, <width>);
boolean
integer
boolean
Sleep(nsecs);
System(arg);
Exit();
User manual Version 9.3, Rev. 0, September 2008
Prints <arg> in the dialogue box followed by a line feed
Prints warning message <arg> in the dialogue box
followed by a line feed
Prints error message <arg> in the dialogue box followed
by a line feed
Formats <number> (integer or float) to a string using the
specificed <width>
Sleeps (pauses execution) for <nsecs> seconds.
Issues command <arg> to the operating system
Exits from D3PLOT
In addition the following classes are common with the PRIMER API:
File
Handles file opening, closing and general i/o
Window
Handles creation and management of menu system windows
Widget
Handles primitives and processing in Window classes
Full documentation of the Oasys PRIMER Javascript API may be found under primer_js_api.html
Notes on programming:
All scripts and script runs are independent
Javascript variables and "current" settings are not "remembered" in any way across successive executions of
scripts. Each script, including a second and subsequent execution of the same compiled script, is wholly
independent; and default current model, window and other values are reset every time a script is executed.
Argument types:
Javascript is a very weakly typed language in which data can be thought of as "numbers", "strings", "arrays",
"objects" and so on. However when describing a function it is useful to be more precise about the sort of
argument expected or returned, and the following descriptions are used below.
A "whole number" which would qualify as an integer in languages such as Fortran or C.
A "floating point number". Javascript does all floating point arithmetic in double precision, so there
is no concept of a single precision "float".
Boolean Either JS_TRUE or JS_FALSE. Typically this is the success/failure status outcome of function
calls that do not return a data value. It does not translate to a "number", and should only be used for
logical tests.
String
A string of one or more characters in "..". For example "this is a string".
<type>
An array of values of <type>. Javascript does not assign types to arrays, and their subscripts may be
Array
of mixed type, however in the context of this API arrays will be of a single type, eg integer,
which will be specified.
Object
Javascript objects may be of any type, and members may be added at will. In the context of this
API they will be classes, and the class members will be specified.
Constant Will be a capitalised constant value from a defined list (eg DX, SOLID, etc), effectively an
integer. All valid constants for this API are listed in the Table of Valid Constants below.
A common error is to pass an argument that is a String to a function below that expects a "number" of some
sort, typically when data has been read from an external file and processed using string manipulation functions.
This will generate a "wrong type of argument" error when the function executes.
Integer
Double
The solution is to use one of the Javascript conversion functions Number(xxx), ParseInt(xxx) or
ParseFloat(xxx) to convert the string to a number.
Compulsory and optional arguments:
Many functions have optional arguments. These will always be the trailing arguments and they will be written
Page A.48
User manual Version 9.3, Rev. 0, September 2008
Oasys D3PLOT
italicised and placed in brackets in the function description. For example:
integer DemoFunction(arg_1, arg_2, (arg_3), (arg_4))
<arg_1> and <arg_2> are compulsory.
<arg_3> and <arg_4> are optional and may be omitted.
However if an optional argument is to be specified then any other optional arguments that precede must also be
supplied. For example in the example above if <arg_4> is to be specified then <arg_3> must also be supplied
even if it has the default value of zero.
Unless specified otherwise below a value of zero can be used for any optional argument that has to be supplied
but is to be ignored.
Return values:
All functions in this API return a value, although you are free to ignore this. As a general rule those that
"GetXxxx" something return an integer, double, array or object as a result, and others return the boolean value
JS_TRUE or JS_FALSE to denote success or failure. Each function’s return type is documented below, and will
be one of:
Boolean JS_TRUE or JS_FALSE
Integer An integer value
Double
A floating point value
Array
An array of values, usually all of type Integer or Double
Object
A Javascript "object" that is a structure with members defined by name.
Execution errors and warnings
Errors and warnings from the Javascript "engine" itself are sent to <stdout>. If a script fails to compile, or
generates errors during execution, you should examine the controlling terminal window, or the log file if output
has been piped to that.
Errors and warnings during execution of the functions described below will result in messages being sent both to
the D3PLOT dialogue window and to <stdout>. Most such errors will result in termination of the script
execution with error status, although there are a few cases where "harmless" errors, meaning unlikely to corrupt
anything, will generate warnings and execution will continue.
Notes on data abstraction and processing.
Adapting programming style to improve memory efficiency
It is perfectly possible to import all the data from one or more states into the Javascript arena and to process it
there, however you should be aware that data storage in Javascript is quite "bloated" (for example all scalar
values are stored as 8 byte words) and that you may hit memory problems if you try to import too much data. It
is possible to increase the size of the Javascript arena, but this still has to be allocated from the machine’s storage
heap and you may ultimately hit the memory limits of your machine.
Javascript also allows you to create and extend arrays and objects at will, making it very tempting to write scripts
that exploit this flexibility. This is fine so long as you don’t attempt to store too much in this way, since it is a
very wasteful of memory, but if you start using "create and extend" for large quantities of data you will find that
you run out of memory quite quickly.
With this problem in mind this API has been written in a way that will - hopefully - encourage you to keep your
bulk data storage inside D3PLOT proper, and only to import data as and when it is required for processing. This
will result in faster execution and fewer memory-related problems.
Page A.49
Oasys D3PLOT
User manual Version 9.3, Rev. 0, September 2008
User Defined Binary Components
As an incentive to use memory efficiently an unlimited number of "User Defined Binary Components" (referred
to as UBIN) may be created. These are very similar to the existing D3PLOT user-defined components, and are
processed in much the same way. They have the following attributes:
•
UBIN components are created from the Javascript by CreateUbinComponent().
•
Each component must be assigned to one of the categories: SOSH (Solid and Shell), BEAM or NODE.
•
Each component must be one of the types SCALAR, VECTOR or TENSOR.
•
Each UBIN component has its values supplied via Javascript "PutUbinData()" functions.
•
Similarly the data may be re-imported into the Javascript via "GetUbinData()" calls.
D3PLOT manages UBIN data in such a way that memory consumption is minimised, writing it out to (binary
".ubd") disk files if necessary and re-importing it from these files if required. This process is transparent to both
the interactive user and the Javascript programmer, and means that the amount of data that is created and stored
in this way is limited only by the disk space available on the machine.
UBIN data is also saved to file when no longer needed, or when D3PLOT exits, meaning that it is saved as an
additional dataset and thus is automatically available during subsequent processing of a model.
The "current" model and state for data manipulation routines.
It is usually the case that you will be processing data for a single model and state at a time, and to save the need
to specify these arguments to every data processing routine the data "put" and "get" routines in this interface
operate by default on a "current state" in a "current model". The data "put" and "get" routines have an optional
argument to specify a state different to the current one if required. Each model has its own, independent current
state, and setting this will only affect the current model.
(Functions that process windows, or "by window" (eg cut-sections) use the window’s model and state rather than
this "current" one. Be careful of this distinction.)
Ordering data processing for efficiency: changing state number is expensive...
When you wish to process data over a range of states, for example to find a data envelope over time, you should
bear in mind that because of the way storage is managed changing states is an expensive operation. Therefore it
is better to perform all the processing in state A, then repeat for state B, and so on; rather that looping over all
states separately for each item. For example:
GOOD: state loop is the outer one
BAD: state loop is the inner one.
for(istate=1; istate<=max_states;
istate++)
{
for(i=1; i<=n_items; i++)
{
for(i=1;
i<=n_items; i++)
{
for(istate=1;
istate<=max_states;
istate++)
{
<get
data>
<process
it>
<get
data>
<process
it>
Clearly there is also a trade-off to be made between local storage in the Javascript in the "good" example on the
left versus slower speed in the "bad" one on the right.
... but the Direct Disk Access (dda) flag can be used if necessary.
Routine GetData() normally works on the assumption that you will want to read data for many items from the
current state, therefore if the requested data is not currently in core it will read the complete data vector for all
items of that type from disk into memory for that state, most likely re-using the memory used for the same data
Page A.50
User manual Version 9.3, Rev. 0, September 2008
Oasys D3PLOT
vector in a previous state. This is efficient since all subsequent data reads for items in that state can be processed
directly from memory without any further disk access, and it explains why changing states is a potentially
expensive operation.
However the situation may arise where you want to read data for only a few items over a wide range of states,
possibly in a random order, and the overhead of reading the complete data block for all items is prohibitively
costly. In addition hopping back and forth between states might result in "churning" as data is read, discarded
and reread repeatedly, making a bad situation worse.
The <dda> argument to GetData() will, if set to ON, change this behaviour so that complete data vectors are not
read into memory, and instead data for the requested item only is read directly from disk, and then forgotten.
This is an efficient solution when only a few items are being read from a large model over a range of states, but
it will become progressively slower as more and more items are read, since each will require an explicit read
from disk.
Clearly if data for enough items is read directly there will come a point where it is better to revert to the default
behaviour. It is not possible to give guidance about where this point will lie since it will be a function of model
size, number of states, computer memory capacity and speed of disk access; if you are writing a script that "hops
about" states in a model you will have to experiment in order to find the best solution for your application. It is
recommended that you try the default behaviour first (<dda> undefined or OFF), and only try setting it if the
speed of your script is unacceptably slow.
Internal "item" numbers and external labels
Inside D3PLOT all nodes, elements, parts, etc are dealt with by their internal "item number" which is a sequence
starting from 1 with no gaps, and external labels are used only when displaying data for the user; likewise
element topology lists and lists of elements at nodes all refer to internal item numbers. The reason for this is
obvious: finding data for an item number is a direct lookup, whereas an external label may be non-sequential
and require a search to find its internal equivalent.
All the functions below which process data for explicit items take a pair of arguments (written as <type/item> for
convenience):
Type code
One of the item type constants NODE, SOLID, etc
Item number If +ve this is treated as an internal item number starting at 1
If -ve this is treated as an external label id.
Clearly it is far more efficient to use internal indices rather than labels, since the latter require a search to resolve
them, however the option is available if required. When presenting data to the user, or writing it to file, the
"GetLabel()" function can be used to return the external label of an internal <type/item> pair.
Ordering of data in vector and tensor arrays.
Where data is transferred in arrays the following data order is used.
Data type
Array length Data order
Data vector (eg force vector, direction vector)
Coordinate (eg origin, centroid)
array[3]
[X, Y, Z]
Data tensor (eg element stresses)
array[6]
[XX, YY, ZZ, XY, YZ, ZX]
To make this easier, and especially to avoid any ordering errors for tensor data, this API has the following
constants defined:
•
X, Y, Z for vectors
•
XX, YY, ZZ, XY, YZ, ZX for tensors.
(Tensors are symmetric, so constants YX (== XY), ZY (== YZ), XZ (== ZX) are also defined, it
doesn’t matter which are used.)
These are intended to be used for array subscripts to make coding clearer. For example in the following table
both columns mean the same thing and are equally valid, but it is recommended that you use the left hand
column’s syntax as it is both clearer and less error-prone.
Page A.51
Oasys D3PLOT
Using constants
User manual Version 9.3, Rev. 0, September 2008
... is much
clearer than ...
Using numbers
fx = a[X];
fy = a[Y];
fz = a[Z];
fx = a[0];
fy = a[1];
fz = a[2];
sxx = b[XX];
sxy = b[XY];
szx = b[ZX];
sxx = b[0];
sxy = b[3];
szx = b[5];
Testing for the presence of a given data component.
One problem when post-processing data is that you cannot assume that a given data component will be present
in a model database, as most output is switchable. The GetData() function will return values of zero for
components that are not present, but will not issue any warning messages in the process. So in order to write
robust scripts that will work with databases of unknown origin it is wise to use QueryDataPresent() to interrogate
the database before attempting to extract data from components known to be optional.
Special considerations when working with adaptively remeshed analyses
When working with adaptively remeshed analyses you should bear in mind that each file family will almost
certainly have a different number of nodes and elements, and that it is therefore extremely important to ensure
that the item indices you are extracting are valid for the current state. To be on the safe side it is best to obtain
the "number of" items every time you change state numbers.
In addition there is no guarantee that node or element <i> in family #1 will be the same in family #2. Exercise
great care when extracting data from multiple families!
Notes on handling windows and models in windows.
The "current frame" in windows.
Windows in D3PLOT display results at a particular time in an analysis, each such time being a "frame", and
animation displays the sequence of "frames". By default the times shown are those of each results state, meaning
that "frame id" is equal to "state id". However this is not always the case, consider the following:
•
The user has chosen to interpolate results by time, with the result that "frames" lie at fixed time intervals
which no longer equate to states.
•
The user is post-processing an eigenvalue analysis in which each "state" is in fact a given modeshape. In
this case animation cycles a modeshape through the phase angles from -180 to +180 degrees in steps,
with each phase angle step being a "frame".
Admittedly the two cases above are only rarely used, but the distinction between "frames" and "states" is
important in these situations.
This API provides the following routines to deal with frames in window:
GetWindowMaxFrame(window_id)
Returns the highest frame in <window_id>
SetWindowFrame(window_id,
frame_number)
Displays frame <frame_number> in the specified
window(s)
GetWindowFrame(window_id)
Returns the current frame of <window_id>
Note that the "current frame" of a given window is purely an attribute of that window, and has no connection
with the current model and state of this API as described above.
Page A.52
User manual Version 9.3, Rev. 0, September 2008
Oasys D3PLOT
Models in Windows
D3PLOT requires an active window to contain at least one model, although it is possible to display any number
of further models in the window. The following routines process and provide information about models in
windows.
GetWindowModels(window_id) Returns an object containing information about the model(s) in
<window_id>
Processing windows containing multiple models can become difficult since each model’s data at a given "frame"
may contain results at a different time, and the attributes of each model may be different - for example not all
models may contain a given data component.
Functions in this API which manipulate model data in windows may have an optional <model_id> argument to
specify which model in a window is being processed. If this is omitted then the first model, as returned by
function GetWindowModels(), will be used.
They may also have an optional <state_id> argument to specify the state number to be used. If this is omitted the
model’s state at the current "frame" in that window will be used.
It will be clear that processing data in windows containing multiple models is best avoided - please see
"Recommended window setup when using this API" for suggestions about how to avoid these problems.
Recommended window setup when using this API
It will be clear from the above that departing from defaults of "one model per window" and "one frame per state" makes
Javascript programming more difficult since the programmer has to add extra arguments to function calls to make sure
that the correct data is being processed. Therefore it is strongly recommended that when scripts manipulate windows, or
process data on a "per-window" basis (eg cut-sections), the following limitations should be adhered to:
•
Each window processed should only contain a single model.
•
The default of "show all states" should be used so that window "frames" are identical to model "states"
Detailed Description of Javascript Interface Functions.
Window manipulation
boolean CreateWindow(model_list)
Creates a new window containing one or more models contained in <model_list>.
The new window will always be the next free window, it is not possible to create windows "out of order" or to have
gaps in the window numbering sequence.
<model_list> must be one of:
An array of model numbers.
At least one valid model number must be
The length of this array is taken from its object property, or a model id of zero provided.
terminates the list.
Asingle (scalar) model number
The constant ALL to specify all models.
At least one valid model number must be provided.
Arguments: <model_list>integer
An array of model
Specifies the model(s) to be placed in the
array
numbers
new window.
or
or
integer
A scalar model
At least one model number must be
or
number
supplied.
constant
or
ALL
Return
<status>
Boolean
JS_TRUE on success, JS_FALSE on failure.
value:
Page A.53
Oasys D3PLOT
User manual Version 9.3, Rev. 0, September 2008
Example:
a = new array(2, 3); Create a new window containing models #2 and #3
CreateWindow(a);
CreateWindow(6);
Create a new window containing model #6
CreateWindow(ALL);
Create a new window containing all currently active models.
boolean DeleteWindow(window_list, (dispose_flag))
Deletes one or more windows in <window_list>, dealing with "orphaned" models according to <dispose_flag>
<window_list> must be one of:
An array of window numbers.
At least one valid window number must
The length of this array is taken from its object property, or a window id of be provided.
zero terminates the list.
Asingle (scalar) window number
The constant ALL to specify all windows.
If a deleted window contains a model that is not in any other windows then that model becomes an "orphan".
By default orphan models are left in the database, but <dispose_flag>, if provided, controls this treatment.
WARNING:
•
•
D3PLOT does not permit gaps in window numbering, therefore when a window is deleted any windows higher
than this are renumbered downwards to fill the gap.
However D3PLOT does not renumber models following the deletion of preceding ones. Deleted model ids
simply become "inactive".
This means that following a window deletion operation:
•
The total number of windows will change.
•
Any window ids above those deleted will have been renumbered downwards.
•
If any orphan models were deleted these models will now be inactive.
•
If the current Javascript model has been deleted then the "current" model pointer will be reset to the first active
model, or <undefined> if there are no such models.
Therefore if a script is to continue execution after a window deletion operation it is prudent to ensure that any "current"
user-defined variables in the Javascript are reset to sensible values.
Arguments: <window_list> integer
An array of model Specifies the model(s) to be placed in the
array
numbers
new window.
or
or
integer
A scalar model
At least one model number must be
or
number
supplied.
constant
or
ALL
<dispose_flag>constant
LEAVE or DELETE LEAVE (default) leaves orphaned models
in the database.
DELETE deletes orphaned models.
Return
<status>
Boolean
JS_TRUE on success, JS_FALSE on failure.
value:
Example:
a = new array(2, 3);
DeleteWindow(a);
Delete windows #2 and #3 leaving any orphaned models in the database.
DeleteWindow(6, DELETE);
Delete window #6, also deleting any orphaned models.
DeleteWindow(ALL, LEAVE); Delete all windows, leaving any orphaned models in the database.
Page A.54
User manual Version 9.3, Rev. 0, September 2008
Oasys D3PLOT
boolean SetWindowActive(window_id, active_flag)
Sets the "active" flag on a window.
When more than one window is in use it is convenient to be able to operate on a group of "active" windows with a
single command in the Javascript, rather than having to loop over selected windows each time, and this function
provides that capability. This activity status is used solely within the Javascript interface and does not have any
bearing upon or connection with the Wn "tabs" used in the graphical user interface.
By default all windows are active (ON), but you can change this by setting the activity of specific windows ON or
OFF.
integer Window numberSpecifies the window(s) to have their status set
or
or
constantALL
<active_flag>constantOFF or ON
OFF makes the selected window(s) inactive
ON makes window(s) active
Return value:<status>
Boolean JS_TRUE on success, JS_FALSE on failure.
Example:
Arguments:
<window_id>
SetWindowActive(1, OFF);
Turns off the activity flag for window #1
SetWindowActive(ALL, ON); Makes all current windows active.
integer GetWindowMaxFrame(window_id)
Returns the highest frame number in the specified window.
"Frame" number is usually the same as state number, but there are a few situations when this
is not the case:
•
Eigenvalue analyses. Each state is animated though <#frames> between +/-180
degrees phase angle
•
Nastran-derived static analyses. Each loadcase is likewise animated through
<#frames>
•
Transient analyses that are being interpolated by time, giving (end time / time interval)
frames.
In all cases animating a window results in it cycling through frames 1 to <max #frames>.
Arguments
<window_id>IntegerWindow number Specifies the window number
Return value:<max #frame> IntegerHighest frame number in window
Example:
a =
GetWindowMaxFrame(2);
Get the highest frame number in Window #2
boolean SetWindowFrame(window_id, frame_number)
Sets the current "frame" in the window(s) specified to <frame_number>. The effect is immediate and the window(s)
will be redrawn if necessary to show the requested frame.
See the notes in GetWindowMaxFrame() above on how frame number relates to state number.
Arguments: <window_id>
integer Window number Specifies the window(s) to have the frame number
or
or
set
constantALL
<frame_number>integer The frame number Should be a +ve integer value in the range 1 to
to set
max #frames in window.
Values greater than max #frames are truncated to
this
Return
<status>
Boolean JS_TRUE on success, JS_FALSE on failure.
value:
Page A.55
Oasys D3PLOT
User manual Version 9.3, Rev. 0, September 2008
Example:
SetWindowFrame(1, 10);
Set window #1 to display frame #10
SetWindowActive(ALL, 3); Set all windows to display frame #3
integer GetWindowFrame(window_id)
Returns the current "frame" in window <window_id>
See the notes in GetWindowMaxFrame() above on how frame number relates to state number.
Arguments: <window_id>
integer Window number
Specifies the window(s) to have the frame
or
(integer)
number set
constantor
ALL (constant)
Return
<frame_number>integer The current frame number in the specified window (integer)
value:
Example:
a = GetWindowFrame(1); Get current frame of window #1
object GetWindowModels(window_id)
Returns information about the model(s) in window <window_id>, which must be a valid window number.
Every active window in D3PLOT must have at least one model, but may have any number.
Arguments:
<window_id>
integerWindow number (integer)Specifies the window id
Return value:<model information>object An object with the following fields:
.nm
The number of models in the
window
.list[
An array of model numbers, of
]
length <nm>
If this function is called on an inactive window
then <nm> will return zero, and <list> will not
be defined.
Example:
a = GetWindowModels(1);
Get list of models in window #1
for(i=0; i<a.nm; i++)
{
<do something with a.list[i]>
Setting "Current" status items
boolean SetCurrentModel(model_id)
Sets the current model for the Javascript interface to <model_id>.
At the start of script execution the current model is automatically set to the first active model in the
database.
Arguments:
<model_id>IntegerModel numberSpecifies the model id to be made current
Return value:<status> BooleanJS_TRUE on success, JS_FALSE on failure.
Example:
SetCurrentModel(2); Make model #2 current
Page A.56
User manual Version 9.3, Rev. 0, September 2008
Oasys D3PLOT
boolean SetCurrentState(state_id)
Sets the "current" state for the Javascript interface to <state_id>
This is the state used for all "get" and "put" functions which handle model-related data. If the
optional <state_id> argument in a get/put function call is used then that state is used instead for
the duration of that call, but this current state is not changed.
The current state is a property of the current model, in other words each model has its own,
separate, current state. For all models this defaults to state #1 (if present).
Setting the current state in model <i> has no effect on the current state in any other model.
Arguments:
<state_id>IntegerState numberSpecifies the state id to be made current
Return value:<status> BooleanJS_TRUE on success, JS_FALSE on failure.
Example:
SetCurrentState(27); Make state #27 current
Functions to "get" and "put" data and other information.
integer GetNumberOf(type_code, (state_id))
Returns the quantity ("number of") items of type <type_code> in the current model.
Note that in adaptively remeshed models the current family may affect the number of nodes and elements returned. The
family of the current state will be used unless you supply the optional <state_id> argument, in which case the family of
that state will be used.
Page A.57
Oasys D3PLOT
User manual Version 9.3, Rev. 0, September 2008
Arguments: <type_code>ConstantA valid type code or other constant from the list
Type code
constant
Returns
Type code
constant
Returns
WINDOW
Number of windows
USER
Total number of
user-defined
components
MODEL
Number of models
UNOS
FAMILY
Number of families in UNOV
current model (CM)
Number of
user-defined node
scalar "
.. node vector ..
STATE
Number of states in
CM
.. Parts in CM ..
.. Contact surfaces in
CM..
PART
SURF
Return
value:
Examples:
USSS
.. solid/shell scalar ..
USST
UBMS
.. solid/shell tensor ..
.. beam scalar ..
UBMV
.. beam vector ..
NODE
.. Nodes in Current
Family (CF) ..
SOLID
.. Solids in CF..
NIP_H
Number of Solid
integration points
BEAM
.. Beams ..
NIP_B
Number of Beam int
pts (integrated beams)
SHELL
.. Shells..
NIP_S
Number of Shell int
pnts
TSHELL
.. Thick shells..
NIP_T
Number of Thick
Shell int pnts
MASS
.. Lumped masses ..
SPRING
.. Springs and dampers NEIPH
..
Number of "extra"
solid data values
SBELT
.. Seat-belts ..
NEIPS
RETR
.. Retractors..
NEIPT
Number of "extra"
shell data values
Number of "extra"
thick shell data values
SLIP
.. Sliprings ..
PRET
JOINT
WALL
.. Pretensioners ..
.. Joints ..
.. Rigid walls ..
SEGM
.. Contact segments ..
<state_id> Integer Optional: a state id (integer) which will be used instead of the current
state.
Only necessary in adaptively remeshed analyses.
<quantity> Integer The number of items of this type.
a = GetNumberOf(MODEL);
Return the number of models
a = GetNumberOf(NIP_S);
Return number of shell integration points
a = GetNumberOf(SOLID, state_id); Return number of solid elements in family of state <state_id>
Page A.58
User manual Version 9.3, Rev. 0, September 2008
Oasys D3PLOT
integer QueryDataPresent(component, (type_code))
Returns JS_TRUE if data <component> is present in the current model’s database, otherwise JS_FALSE.
For some data components that are switchable the <type_code> must also be supplied, these are listed below.
Arguments: <Component> ConstantA valid component constant from the list below.
<type_code> ConstantRequired for the following components:
Return
value:
Examples:
Component type
Typical component constants
Stress tensor derived eg SXX, ... SVON
Strain tensor derived eg EXX, ... EVON
Effective plastic strainEPL
Strain rate
ERATE
In the cases above one of the type codes SOLID, SHELL or TSHELL
must also be supplied.
<True/False>Boolean JS_TRUE if component is present
JS_FALSE if not present
if(QueryDataPresent(EPL, SOLID)) ... Returns JS_TRUE if Effective Plastic Strain exists for solids
if(QueryDataPresent(TEMP)) ...
Returns JS_TRUE if nodal temperatures exist
integer GetTime((state_id))
Returns the analysis time of the current state, or that of <state_id> if defined.
Arguments:
<state_id>IntegerOptional: State numberThe state to be used instead of the current state.
Return value:<time>
Double The time of the state, or the frequency for eigenvalue analyses
Example:
time = GetTime();
Returns the time of the current state.
time = GetTime(istate); Returns the time of state <istate>.
integer GetLabel(type_code, item, (state_id))
Returns the external label of internal <item> of type <type_code>.
Arguments: <type_code>ConstantA valid type code (NODE,
The type of the item
SOLID, etc)
<item>
Integer The internal item number starting Its internal item number
from 1
<state_id> Integer Optional: State number
The state to be used instead of the
current state.
Only necessary in adaptively remeshed
analyses.
Return
<label>
Integer The external label of the item
value:
Example:
a = GetLabel(NODE, 27); Returns the external label of the 27th internal node.
Page A.59
Oasys D3PLOT
User manual Version 9.3, Rev. 0, September 2008
integer GetPid(type_code, item, (state_id))
Returns the internal part id of internal <item> of type <type_code>.
Arguments: <type_code>ConstantA valid part-based element type
code ( SOLID, etc)
<item>
Integer If +ve: The internal item number
starting from 1
If -ve: The external label of the
item
<state_id> Integer Optional: State number (integer)
Return
value:
Example:
<pid>
The type of the item
Internal item numbers will be many
times faster to process
The state to be used instead of the
current state.
Only necessary in adaptively
remeshed analyses.
Integer The internal part id (internal, sequential numbering starting from 1)
a = GetPid(SHELL, 27); Returns the internal part id of the 27th internal shell.
integer GetMid(type_code, item, (layer_id), (state_id))
Returns the external material id of internal <item> of type <type_code>.
Use of this function requires that material data be present, which means that a .ztf file must have been read.
If the optional <layer_id> argument is used the element must be in a part using a *PART_COMPOSITE definition.
If the material number is requested for a (composite) layer that does not exist in this item a value of zero is returned. No
warning message is issued in this situation since experience has shown that this is a common occurrence and excessive
warning messages are a nuisance.
Arguments: <type_code>ConstantPART
The type of the item. If an element
or a valid part-based element type type then the part id is
code ( SOLID, etc)
obtained from the element’s topology
list.
<item>
Integer If +ve: The internal item number Internal item numbers will be many
starting from 1
times faster to process
If -ve: The external label of the
item
<layer_id> Integer Optional: For composites the layer Ignored if omitted or zero
number 1 - n
<state_id> Integer Optional: State number (integer) The state to be used instead of the
current state.
Only necessary in adaptively
remeshed analyses.
Return
<mid>
Integer The external material id
value:
Examples:
a = GetMid(PART, 2);
Returns the external material id of *PART 2
b = GetMid(PART, 12, 3);
Returns the external material id of the 3rd layer of *PART_COMPOSITE 12
c = GetMid(SHELL, 27);
Returns the external material id of the 27th internal shell.
d = GetMid(SHELL, 100, 2); Returns the external material id of the second layer of internal shell 100.
Assumes that the part of the shell is of type *PART_COMPOSITE
Page A.60
User manual Version 9.3, Rev. 0, September 2008
Oasys D3PLOT
object GetTopology(type_code, item, (state_id))
Returns the topology list for internal <item> of type <type_code>. This should only be used for element types which
have nodal topologies.
Arguments: <type_code>ConstantA valid element type code (
The type of the item
SOLID, etc)
<item>
Integer If +ve: The internal item number Internal item numbers will be many
starting from 1
times faster to process
If -ve: The external label of the
item
<state_id> Integer Optional: State number
The state to be used instead of the
current state.
Only necessary in adaptively remeshed
analyses.
Return
<Topology> Object An object with the following members:
value:
.nn
Integer
Number of nodes in
topology list
.top[ Integer
Array of internal
(Node and part ids are in
]
array
node ids.
internal, sequential
numbering starting from
.pid
Integer
Internal part id if for 1.)
part-based
elements, otherwise
zero.
Example:
a = GetTopology(SHELL, 27); Returns an object with the members described above..
nnodes = a.nn;
n1 = a.top[0];
n2 = a.top[1];
pid = a.pid;
object GetElemsAtNode(node, type_code, (state_id))
Returns an object containing the number of elements of <type> at <node>, and also an array <list[ ]> of their internal
indices.
If there are no elements of <type> at the node then JS_FALSE is returned.
Arguments: <node>
Integer If +ve an internal node index The node at which to return the list of
If -ve an external node label
elements
<type_code> ConstantA valid element type code (
The type of the item
SOLID, etc)
<state_id>
Integer Optional: State number
The state to be used instead of the
current state.
Only necessary in adaptively
remeshed analyses.
Return
<Element
Object If there are any elements of <type> at the node an object with the
value:
list>
following members:
.nn
Integer
.list[ ] Integer
array
Number of elements in <list[
]>
Array of internal element indices
If there are no elements then the integer value JS_FALSE
Page A.61
Oasys D3PLOT
User manual Version 9.3, Rev. 0, September 2008
Example:
if(a = GetElemsAtNode(inode,
SHELL))
{
nelems = a.nn;
e1 = a.list[0];
e2 = a.list[1];
}
Returns an object with the list of shell elements at node
<inode>.
If there are no elements the function returns JS_FALSE.
double or double array GetData(component, type_code, item, (int_pnt), (extra), (fr_of_ref),
(state_id), (dda))
Returns the data for <component> of <item> of type <type_code>.
The return value is scalar, array[3] or array[6] for scalar, vector and tensor components respectively.
WARNING: If the function arguments are grammatically correct but the requested data component is not present in the
database, then 1, 3 or 6 zeros are returned as required, and no warning message is output. Therefore it is good practice
to use function QueryDataPresent() to check that an optional data component is actually present in a database before
attempting to extract its values.
Page A.62
User manual Version 9.3, Rev. 0, September 2008
Oasys D3PLOT
Arguments: <component>Constant A valid component code (eg DX, Only valid codes in the list below are
SXY)
permitted.
<type_code>Constant A valid element type code (
The type of the item
SOLID, etc)
<item>
Integer If +ve: The internal item number Internal item numbers will be many
starting from 1
times faster to process
If -ve: The external label of the
item
<int_pnt> Integer Optional:
Integration points are only meaningful
•
If +ve is an integration point for some components, such as shell
id (1 = lowest),
stress tensors and integrated beam
•
Alternatively one of the
stresses. This argument may be
codes TOP, MIDDLE,
omitted if not needed.
BOTTOM
<extra>
Integer
<fr_of_ref>Integer
<state_id> Integer
<dda>
Integer
Use zero to define a null "padding"
argument
Optional:
This argument is only necessary for a
•
The "extra" solid or shell
few components, and may be omitted
component id for
if not needed.
components SOX or SHX
•
The ALE multi-material
group id for components
AMMG and AMMS
•
The sub-number for
user-defined components
UNOS, UNOV, USSS,
USST, UBMS, UBMV
Use zero to define a null "padding"
argument
Optional: If supplied should be one This argument is only necessary for
of the constants:
directional components (eg X stress),
•
GLOBAL
and then only when something other
•
LOCAL
than the default GLOBAL coordinate
•
CYLINDRICAL
system is to be used.
Use zero to define a null "padding" If omitted, or set to zero, it defaults to
argument
GLOBAL for directional components,
and is ignored for all others.
Optional: State number
The state to be used instead of the
current state.
Optional: "Direct Disk Access"
Either OFF (default) for normal data
flag.
cacheing
or ON to enable direct disk reading of
data.
If turned on this reads data not
currently in core memory directly
from disk without loading the
complete data vector for the state into
core.
Return
value:
<Data>
Double
or
Double
array
This should be used if you want to
extract results for a few items over a
range of states, since it will potentially
be faster.
The return value will be one of three types:
double
(scalar)
For data components that return a
single scalar value (eg SXX)
double
array[3]
For data components that return a
vector value (eg UNOV)
double
array[6]
For data components that return a
tensor value (eg ETEN)
See table
below for
data
component
codes and
return
types.
Page A.63
Oasys D3PLOT
User manual Version 9.3, Rev. 0, September 2008
Examples:
a = GetData(SXX, SHELL, 27, 2,
0, LOCAL);
Returns the (scalar) X stress of internal shell #27 at integration point 2,
in the element local coordinate system.
b = GetData(ETEN, SOLID, 93);
sxx = b[0];
sxy = b[3];
Returns an array[6] of the strain tensor in solid element #93, implicitly
in the global coordinate system.
c = GetData(UNOV, NODE, inode,
0, 2, 0, 3);
vx = c[0];
vy = c[1];
vz = c[2];
Returns an array[3] of the 2nd user-defined Nodal Vector component
at internal node #inode at state #3.
Functions for processing user-defined binary (UBIN) data components.
integer CreateUbinComponent(component_name, component_type, data_type,
if_existing)
Creates a new user-defined binary (UBIN) component.
Note that user-defined components are "programme wide", so once created the data "slots" exist in all models. Data
values that are not populated will return a value of zero.
Arguments: <component_name>String A name for this
The name must be unique, and it will be
component, character
modified to make it so by appended
string up to 30 characters numbers if an existing component of this
long.
name already exists.
<component_type>ConstantMust be one of the
User-defined components must fall into
constants:
one of these three categories.
•
U_NODE for nodal
data
It is not possible to have a component of a
•
U_SOSH for solid,given name that contains data for more
shell & thick shell than one of these types.
data
•
U_BEAM for beam
data
<data_type>
ConstantMust be one of the
Choose the data type that matches the
constants:
information you want to store.
•
U_SCALAR for
scalar data (any
type)
•
U_VECTOR for
vector data
(U_NODE and
U_BEAM only)
•
U_TENSOR for
tensor data
(U_SOSH only)
<if_existing>
ConstantAction to take if ubin
REPLACE deletes the existing ubin
component
component, replacing it with this
<component_name>
definition. This means that any existing
already exists.
data for the existing user-defined
component of this name is deleted, and the
component is re-initialised.
RENAME changes the
<component_name> argument of this
function call by adding a suffix to make it
unique, so that the existing component of
this name (and its data) will be left
unchanged, and the new one will not clash
with it.
Page A.64
User manual Version 9.3, Rev. 0, September 2008
Return
value:
<Handle>
Oasys D3PLOT
Integer A "handle" for the newly created component that should be used in
subsequent "ubin" processing function calls.
This "handle" should be regarded as private data, and not modified
in any way. In addition if a UBIN component is created and then
recreated and over-written in a script (if_existing =
REPLACE) the "handle" from each call may be different - don’t
assume that it has not changed.
Example:
handle_1 = CreateUbinComponent("My nodal data",
U_NODE, U_SCALAR);
Creates a component for nodal scalar
data
handle_2 = CreateUbinComponent("My shell tensor
data", U_SOSH, U_TENSOR);
Creates a tensor component for solid,
shell and thick shell data
object LocateUbinComponent(component_name)
Locates an existing UBIN component <name> and returns its <handle>.
This is useful when a previous run has created a UBIN component and this script wishes to work with it.
<name> is not case-sensitive, but an exact character match is required, so embedded white space is significant.
If the lookup succeeds this function returns the handle of the component (which will be a +ve integer), if it fails it
returns the value JS_FALSE.
Arguments: <component_name>String A name to search for, a
Component names are not
character string up to 30 case-sensitive, but searching only
characters long.
succeeds if an exact match is found.
Return
<Component info>Object If successful this routine returns an object with members:
value:
or
.handle Integer The "handle" of the UBIN component
JS_FALSE .ctype
Constant One of U_NODE, U_SOSH, U_BEAM
Constant One of U_SCALAR, U_VECTOR,
U_TENSOR
If unsuccessful it returns JS_FALSE.
.dtype
Example:
if(udata = LocateUbinComponent("My
nodal data"))
{
handle = udata.handle;
...
}
else
{
... deal with failure
Looks for component "My nodal data" and puts the result of
a successful lookup in object <udata>.
integer DeleteUbinComponent(handle)
Deletes an existing UBIN component <handle>. The component is deleted from
memory, and any ".ubd" files cached on disk are also deleted.
If this succeeds it returns JS_TRUE, otherwise JS_FALSE.
Arguments:
<handle>IntegerThe handle of an existing UBIN component
Return value:<status>IntegerJS_TRUE on success, JS_FALSE on failure.
Example:
if(!DeleteUbinComponent(handle_1)) Deletes UBIN component
{
<handle_1>
...deal with failure...
Page A.65
Oasys D3PLOT
User manual Version 9.3, Rev. 0, September 2008
boolean PutUbinData(handle, item_type, item, int_pnt, data, (state_id))
Stores data for <type/item> in the UBIN component <handle>.
This will overwrite any existing data in that "slot", which will be lost.
Arguments: <handle>
Integer A UBIN component handle as
returned by CreateUbinComponent()
<item_type>ConstantA constant of the standard type codes
NODE, SOLID, SHELL, etc.
<item>
<int_pnt>
<data>
This must be a handle of an existing
UBIN component.
It is illegal to attempt to store data
for a type that does not match the
underlying UBIN component type
This must match the underlying type thus, for example, you cannot store
of the UBIN component, thus NODE NODE data for a U_SOSH
for components of type U_NODE, and component.
so on.
Integer If +ve: The internal item number
Internal item numbers will be many
starting from 1
times faster to process
If -ve: The external label of the item
Integer Integration point: must be a +ve layer "Top", "Middle" and "Bottom" are
number (lowest = 1)
not allowed in this context since
"middle" is not writable in cases
Or zero for item types NODE and
with an even number of points.
BEAM that do not consider integration
points in this context.
A value of 1 should normally be
used for solid elements
Double
The data to be stored. Its format
The alignment of array members
depends on the "data type" of the
should be as follows:
or
component:
Vector: [X, Y, Z]
Double
"Data
valid <data> type(s)
array
Tensor: [XX, YY, ZZ, XY, YZ, ZX]
type"
U_SCALAR Scalar double, or
double array[ ] of
length >= 1.
U_VECTOR Double array[ ]of
length >= 3
U_TENSOR Double array[ ]of
length >= 6
<state_id> Integer Optional: State number
Return
value:
Example:
<status>
The state to be used instead of the
current state.
Boolean JS_TRUE on success, JS_FALSE on failure.
dvec = new array(6);
dvec[XX] = sxx;
dvec[YZ] = syz;
PutUbinData(handle_1, SOLID,
27, 1, dvec);
Write an array of tensor data for solid #27, which implies that the
UBIN data component <handle_1> is of type U_SOSH, and that its
data type is U_SCALAR.
PutUbinData(handle_2, NODE, 17,
0, 19.5, istate);
Write the scalar value 19.5 for node #17, in state <istate>.
This implies that the UBIN component <handle_2> is of type
U_NODE and its data is U_SCALAR.
Page A.66
User manual Version 9.3, Rev. 0, September 2008
Oasys D3PLOT
double or double array GetUbinData(handle, item_type, item, int_pnt, (state_id))
Retrieves data for <type/item> in the UBIN component <handle>.
If the data has not previously been written (a) value(s) of 0.0 will be returned.
Arguments: <handle>
Integer A UBIN component handle as
returned by CreateUbinComponent()
<item_type>Constant A constant of the standard type codes
NODE, SOLID, SHELL, etc.
Return
value:
This must be a handle of an existing
UBIN component.
It is illegal to attempt to store data
for a type that does not match the
underlying UBIN component type
This must match the underlying type thus, for example, you cannot store
of the UBIN component, thus NODE NODE data for a U_SOSH
for components of type U_NODE, and component.
so on.
<item>
Integer If +ve: The internal item number
Internal item numbers will be many
starting from 1
times faster to process
If -ve: The external label of the item
<int_pnt> Integer Integration point: must be a +ve layer "Top", "Middle" and "Bottom" are
number (lowest = 1)
not allowed in this context since
"middle" is not directly readable in
Or zero for item types NODE and
cases with an even number of
BEAM that do not consider integration points.
points in this context.
A value of 1 should normally be
used for solid elements
<state_id> Integer Optional: State number
The state to be used instead of the
current state.
<data>
double
Results are returned as:
or
"Data type" Data type returned
double
array
U_SCALAR
Scalar double
U_VECTOR
Double array[3]
U_TENSOR
Double array[6]
Examples:
dvec = GetUbinData(handle_1,
SOLID, 27, 1);
sxx = dvec[0];
szx = dvec[5];
Retrieve an array of tensor data for solid #27, which implies that the
UBIN data component <handle_1> is of type U_SOSH, and that its
data type is U_SCALAR.
nval = GetUbinData(handle_2,
NODE, 17, 0, istate);
Retrieve the scalar value of node #17, in state <istate>.
This implies that the UBIN component <handle_2> is of type
U_NODE and its data is U_SCALAR.
Page A.67
Oasys D3PLOT
User manual Version 9.3, Rev. 0, September 2008
Functions for processing cut-sections
boolean SetCutSection(window_id, attribute, value)
Sets an <attribute> of the cut_section in <window_id> to <value>.
Each D3PLOT window has a single cut-section which, by default, is not active. Its location, orientation and type can be
defined here, and it can be turned on or off. Forces and moments from the cut-section can be obtained from function
GetCutForces().
Cut section definitions are a "per window" attribute that apply to all models in the window. Thefore if the window has
multiple models, and nodes are used to define the section (N1 or N3), the origin and/or vectors of the section may vary
for each model in the window. In addition if the coordinates of these nodes are "followed" (FOLLOW_N), then the
section locations may change from state to state.
STATUS determines whether or not the cut section is active in the current window. The section does not have to be
active in order to compute cut forces and moments.
SPACE determines whether the section is Lagrangian (BASIC) or Eulerian (DEFORMED). In the BASIC case the
section is tied to the undeformed geometry and will move and distort as the model deforms, in the DEFORMED case the
section is fixed in model space and the structure passes through it. For compatibility with LS_DYNA the way forces are
calculated also varies with section space - see the documentation on GetCutForces() below.
The section can be defined by any of the following methods:
CONST_X
CONST_Y
CONST_Z
This is simplest. The plane will be aligned at a constant X, Y or Z axis depending on the
CONST_X/_Y/_Z suffix, with its origin either at the explicit coordinate (array) <coord[3]>, or at the
coordinate of node (integer) <node_id>.
OR_AND_V An array of 9 numbers in three triplets: <origin coordinate>, <X axis vector>, <XY plane vector>. Local
Z is obtained from X cross XY.
N3
An array of three integer node ids. Node #1 is the origin, N1N2 is the local X vector and N1N3 defines
the local XY plane. Local Z is obtained from N1N2 cross N1N3
LS_DYNA
An array of 9 numbers in three triplets: <Normal tail coord (origin)>, <Normal head coord>, <X axis
head coord>. Local Z and local X are obtained directly, and local Y from Z cross X.
FOLLOW_N(odes) determines whether or not a DEFORMED space section will track the motion of the node(s) used to
define it. This is only meaningful for sections defined by:
•
N3. The motion of all three nodes will update the origin and axes at each state
•
CONST_X/Y/Z where a node has been used to define the origin. The node motion will update the section origin
at each state, but its axes will remain constant.
Page A.68
User manual Version 9.3, Rev. 0, September 2008
Oasys D3PLOT
Arguments: <window_id>Integer A valid window id, or ALL for all active windows.
<attribute>Constant<attribute> / <value> pairs must be selected from the table below.
<value>
Varies
Attribute Type
Permissable values
STATUS
Constant
OFF or ON (default is OFF)
SPACE
Constant
BASIC, DEFORMED (default) (or
SCREEN, not recommended)
OR_AND_V Double
array[9]
<Origin> coordinate, <x axis vector>,
<xy plane vector>
CONST_X
CONST_Y
CONST_Z
Constant X plane centred at <origin> or at
<node_id>
Double
array[3]
or
Integer
node_id
Constant Y plane centred at <origin> or at
<node_id>
Constant Z plane centred at <origin> or at
<node_id>
N3
Integer
array[3]
3 Node indices (+ve) or labels (-ve) to
define the section
LS_DYNA
Double
array[9]
<Normal tail coord (origin)>, <Normal
head coord>, <X axis head coord>
FOLLOW_N Constant
OFF or ON (default is OFF)
All coordinates and vectors must be defined in model space, and will
always form an orthogonal right handed coordinate system in which local Z
is normal to the cut plane.
Vector length is irrelevant (but should be well-conditioned), and the Y axis
is obtained automatically from the vector cross product Z_AXIS x
X_AXIS. If the Z and X axes as supplied are not at right angles the X will
be updated to make it orthogonal to Y and Z.
The most recent of N1, N3 or ORIGIN will define the cut section origin
coordinate.
The most recent of N3, or ORIGIN / X_AXIS / Z_AXIS will define
the section orientation.
Care must be taken when defining nodes for windows that contain multiple
models. Since a node index (+ve) may resolve to a different node in each
model it is usually best to use external labels (-ve) in this context to avoid
ambiguity. (The speed of the external => internal lookup will not matter as
this function is unlikely to be called many times.)
Return
value:
<Boolean>
FOLLOW_N(odes) will only have an effect if N1 or N3 were the most
recently defined sources of origin and orientation.
JS_TRUE The return value will be JS_TRUE for success, or JS_FALSE for failure.
or
JS_FALSE
Examples:
SetCutSection(SPACE, DEFORMED);
Set the cut section to "deformed" (lagrangian) space.
var coord = new Array(1.0, 2.0, 3.0);
Make the section constant in Z, with its origin at (1,2,3).
Implicitly this means a plane of constant Z = 3.
if(!SetCutSection(CONST_Z, coord))
{ <deal with error>
var data = new Array(0.0, 0.0, 0.0,
10.0, 0.0, 0.0, 0.0, 10.0, 0.0);
if(!SetCutSection(LS_DYNA, data))
{ <deal with error>
Make a cut-section using the LS_DYNA method with the
origin at (0,0,0), Z axis pointing down the global X vector
(head at (10,0,0)), and X axis down the global Y vector
(0,10,0)
Page A.69
Oasys D3PLOT
User manual Version 9.3, Rev. 0, September 2008
Object GetCutSection(window_id, (state_id), (model_id))
Retrieves all attributes of the cut_section in <window_id>.
This routine returns a single object which is a structure containing all the attributes settable by SetCutSection() above.
Arguments: <Window_id> IntegerA valid window id.
<state_id> IntegerOptional: A valid state id. If omitted the state of the window’s current
frame will be used.
This only matters if:
•
The section uses N1 or N3 definition methods
and
•
It has been set to "follow_nodes
<model_id>
In which case the section origin and/or vectors may change as the node(s)
move.
IntegerOptional: A valid model id that exists in <window_id>. If omitted the first
model in the window will be used.
This only matters if:
•
The section uses N1 or N3 definition methods
and
•
The window contains more than one model.
In which case the section origin and/or vectors in each model in the
window may be different.
Page A.70
User manual Version 9.3, Rev. 0, September 2008
Return
value:
Oasys D3PLOT
<Attributes>Object The return value is a single object with the members:
Member name Type
Values returned
.status
Integer
Either OFF or ON
.space
Integer
Either BASIC, DEFORMED or
SCREEN
.origin[3]
Double
array[3]
Origin coordinates
.x_axis[3]
Double
array[3]
Local X axis vector (normalised)
.y_axis[3]
Double
array[3]
Local Y axis vector (normalised)
.z_axis[3]
Double
array[3]
Local Z axis vector (normalised)
.definition Integer
One of OR_AND_V, CONST_X,
CONST_Y, CONST_Z, N3,
LS_DYNA
or zero if no section has been defined
yet.
.nodes[3]
For definition ==
CONST_X/Y/Z: nodes[0] = index of
node if supplied.
For definition == N3: nodes[0 to
2] = indices of three N3 nodes.
Integer
array[3]
This array will always be present and
have three entries, with unused entries
being set to zero.
.follow_n
Integer
ON if the section follows N1 or N3 as
appropriate
OFF if it does not.
This value is only meaningful for
definition == CONST_X/Y/Z
where a <node_id> was supplied, and
N3
If the call fails the boolean value JS_FALSE is returned instead.
Examples:
a = GetCutSection(1);
Retrieve the attributes of the cut section in window 1 at the current state and
model.
a = GetCutSection(2, 10,
3);
Retrieve the attributes of the cut-section in window 2, at state #10 in model
#3.
Page A.71
Oasys D3PLOT
User manual Version 9.3, Rev. 0, September 2008
Object GetCutForces(window_id, (include blanked), (part_id), (state_id), (model_id))
Returns the forces, moments, centroid and area of the cut section in <window_id>.
The optional arguments allow further refinement of what is computed.
This routine returns an object with separate members for force, moment, centrod and area: see "return value" below for
data format and coodinate system.
WARNING #1: Cut-sections in D3PLOT are a "per window" attribute, cutting all models in a window at the
current "frame".
If the optional <state_id> argument is not supplied the forces and moments returned will be at the state of the current
"frame" of the window, and while this will normally be the same as the current "state" this is not necessarily the case,
since the user may have interpolated results by time.
Likewise if the optional <model_id> argument is not supplied then the model used will be the first in the window (as
reported by function GetWindowModels()), which may not be the same as the "current model" of the Javascript
interface.
Therefore to avoid ambiguity when extracting cut-section forces and moments it is recommended that:
•
The window being used should only contain a single model
•
The window should be set up to display all states without interpolation, thus <state id> == <frame id>. (This is
the default for windows.)
This "single model in a window" approach is strongly recommended in this context since visual feedback will then
match computed values.
WARNING #2: By default computed forces do NOT include blanked elements.
Since cut section display is primarily intended to be used interactively the default behaviour is to omit blanked
elements from the force and moment calculation, since in this way the reported values match what is visible on the
screen.
This behaviour is not ideal for batch processing since the user can, by manipulating blanking, change the results
which are computed. Therefore the optional argument <include_blanked> may be used to override this behaviour and
to force blanked elements to be considered. If omitted, or set to zero, then the default behaviour of omitting blanked
elements will continue.
WARNING #3: Cutting a model exactly at mesh lines can result in ill-conditioned force and moment
calculation.
It is tempting to define cut planes at nodes since this is easy to do, however this can give rise to ill-conditioning in a
rectilinear mesh since the cut may lie exactly on the border between two adjacent elements and therefore won’t
"know" which one’s results to use. Since LS-DYNA elements are constant stress there can be a step change in data
values at element borders, and moving the cut plane by a tiny amount can result in a correspondingly large change in
cut force and moment values.
It is strongly recommended that cut section definitions used for force and moment extraction should be located away
from mesh lines so that they cut elements near their centres, thus avoiding any ambiguity about which elements to
use.
Arguments:
<Window_id>
<Include
Blanked>
<Part id>
<State_id>
<Model_id>
Page A.72
IntegerA valid window id.
IntegerOptional: 0
To omit blanked elements (default)
1
To include blanked elements
IntegerOptional: 0
All part ids considered (default)
<part_id>Only forces in <part_id> will be
computed.
If +ve this is the internal part index
If -ve this is the external part label
IntegerOptional: A valid state id. If omitted the state of the window’s
current frame will be used.
IntegerOptional: A valid model id that exists in <window_id>. If
omitted the first model in the window will be used.
User manual Version 9.3, Rev. 0, September 2008
Return
value:
<Results>
Oasys D3PLOT
Object The return value is an object with the following members
Member name
Data format
Content
Data
alignment
.force[3]
Double
array[3]
3 forces
[Fx, Fy, Fz]
.moment[3]
Double
array[3]
3 moments
[Mxx, Myy,
Mzz]
.centroid[3] Double
array[3]
Cut section
centroid
[Cx, Cy, Cz]
Cut section [Area]
area
The coordinate system of these results depends upon the cut
section’s space system as follows:
.area
Double
BASIC
space
Forces are moments are always returned in the
global axis system, about the geometrical centre
of the cut elements at the given state. Therefore
the effective origin is likely to change as the
model deforms. (This is the method used by
LS-DYNA)
DEFORMED
space
Forces and moments are returned in the plane
local axis system, about the current section
origin. The origin and axes will remain fixed as
the model deforms unless one of the "section
follows node(s)" options has been used.
SCREEN
space
Forces and moments are also returned in the
plane local axis system. This space system is not
suitable for computing results since these will
change as the user updates the view, and
therefore its use in this context is strongly
deprecated.
If the call fails the boolean value JS_FALSE is returned instead.
Examples:
if(a = GetCutSection(1))
{
fx = a.force[X];
myy = a.moment[Y];
area = a.area;
Retrieve the results of the cut section in window 1 using all default
attributes.
b =
GetCutSection(2,0,3,12,1);
Retrieve the results from unblanked elements in part 3 using the section in
window 2 for state 12 in model 1.
Page A.73
Oasys D3PLOT
User manual Version 9.3, Rev. 0, September 2008
Functions for inserting command-line dialogue input
Boolean DialogueInput(line_1, (line_2), ... (line_n))
Boolean DialogueInputNoEcho(line_1, (line_2), ... (line_n))
Executes one or more command-line syntax commands <line_1>, (<line_2> ... <line_n>). There is no limit
to the number of lines that may be specified in a single call. See Dialogue Command Syntax for a full list of
command-line commands
The NoEcho variant is identical, except that it suppresses the echo of the commands to the dialogue box.
D3PLOT provides a full command-line syntax as an alternative to graphical user interface commands, and a
sequence of such commands may be provided here.
Note that:
•
Each call to DialogueInput starts at the top of the D3PLOT command-line "tree", at the
D3PLOT_MANAGER >>> prompt
•
Each call is autonomous, there is no "memory" of where in the command-line tree previous
commands finished.
•
However within a single call the current command-line tree is remembered from one line to the next.
•
Commands are not case-sensitive, although filenames and titles in command strings are.
Therefore commands which require more than one line of input to complete must be specified in a single
call; and it makes sense to group a sequence of related commands together in a single call, although this is
not mandatory.
If this succeeds it returns JS_TRUE, otherwise JS_FALSE.
Arguments:
<line_1> ...String A complete or partial command, as it would be typed in
(<line_2>) String The next line, or the logical continuation of the previous line
and so on to
(<line_n>)
Return value:<status>
IntegerJS_TRUE on success, JS_FALSE on failure.
Examples:
DialogueInput("BLANK SOLID ALL", Blanks all solids.
"UNBLANK SOLID 1 to 10",
Unblanks solids 1 to 10.
"HIDDEN");
Performs a hidden line plot.
All commands are echoed to the dialogue box
DialogueInputNoEcho("STATE 10",
"/GREY GO",
"/IMAGE jpeg image.jpg");
Read state 10
Performed a shaded ("greyscale" in command-line
syntax) plot
Create a JPEG format file "image.jpg"
Command is not echoed to the dialogue box.
Page A.74
User manual Version 9.3, Rev. 0, September 2008
Oasys D3PLOT
Functions for diagnostic ouput
Boolean Print(arg_1, (arg_2), (arg_3), ...)
Prints argument(s) <arg_1> to <arg_n> to the controlling terminal (<stdout> in C). This is a crude function intended for
diagnostic output only, and you have very little control over data formatting.
Note that:
•
Arguments may be strings, or anything that can be converted to a string (eg a number).
•
At least one argument must be supplied, but any number may be used. They can can mix strings and numbers at
will.
•
This function does not append a line feed to the end of output, to do this output the C language line feed
character "\n" (see the example below).
•
If you don’t add a line feed then successive calls to <Print> will append output on the same line. However output
is buffered, so you will only see a result on <stdout> when you eventually supply the <line feed> character to
terminate the line. Building up a line of output from a succession of calls is a perfectly valid process.
If this succeeds it returns JS_TRUE, otherwise JS_FALSE.
Arguments: <arg_1>
String or
1 or more arguments that may be strings or numbers, the latter will
...
number
be converted to strings.
Return
<status> Integer
JS_TRUE on success, JS_FALSE on failure.
value:
Examples:
a.area = 3.14159;
Prints the message
Print("The answer is "The answer is 3.141592"
" + a.area + "\n");
to <stdout>, terminating the line with a <line feed> (because the line ends "\n".).
Note the use of the "+" operator which when used with strings in Javascript causes
them to be concatenated into a single result. Note also that the number <a.area> is
automatically converted into a string by Javascript in this context.
Print(a.x, ", ",
a.y, ", ", a.z,
"\n");
Prints the [x, y, z] components of object <a> in a comma-separated format, followed
by a line feed.
List of valid constants to be used in the functions above:
General constants:
Item type codes
OFF
ON
Switch off
Switch on
ALL
All of a category
LEAVE
DELETE
REPLACE
RENAME
Leave behind (eg don’t delete)
Delete
Replace
Rename
STATUS
Return status of something
WINDOW
D3PLOT window id
MODEL
FAMILY
STATE
D3PLOT model id
Model family id
Analysis state id
ELEM
NODE
SOLID
BEAM
SHELL
TSHELL
MASS
SPRING
SBENT
SBELT
RETR
SLIP
PRET
JOINT
WALL
Generic elements
Nodes
Solids
Beams
Shells
Thick shells
Lumped masses
Springs (discrete elements)
Seat belt types generally
Seat-belt elements
Retractors
Slip-rings
Pretensioners
Joints
Rigidwalls
USER
User-defined component
PART
SURF
SECT
Parts
Contact surfaces
(Element) section definitions
Cut-section constants
Data extraction
Page A.75
Oasys D3PLOT
User manual Version 9.3, Rev. 0, September 2008
SPACE
Space system call argument
BASIC
DEFORMED
SCREEN
Basic (eulerian) space
Deformed (lagrangian) space
Screen space
TOP
MIDDLE
BOTTOM
Top shell surface
Middle shell surface
Bottom shell surface
OR_AND_V
CONST_X
CONST_Y
CONST_Z
N3
LS_DYNA
GLOBAL
Global coord system
LOCAL
Element local system
Origin & vectors definition method CYLINDRICAL Cylindrical system
Constant X defn method
Constant Y defn method
NIP_H
#Solid intg points
Constant Z defn method
NIP_B
#Beam intg points
3 nodes defn method
NIP_S
#Shell intg points
ls-dyna defn method
NIP_T
#Tk shell intg points
FOLLOW_N
"Section follows nodes" flag
NEIPH
NEIPS
NEIPT
#"Extra" solid variables
#"Extra" Shell variables
#"Extra" Tk shell variables
Array subscript acronyms (for example a[X] is the same as a[0])
X
Y
Z
0 } directional
1 } equivalents
2 } for vectors
XX
YY
ZZ
XY or YX
YZ or ZY
ZX or XZ
0}
1 } directional
2 } equivalents
3 } for tensors
4}
5}
Data component acronyms and return value types:
All data components (as used by GetData()) return a single scalar value unless noted otherwise
in the table below as vector or tensor, in which case the array data order is also given.
Nodal data component acronyms
Solid and Shell specific data acronyms
BX
BY
BZ
BV
Basic (undeformed) X coord
Basic Y coord
Basic Z coord
Basic vector [Bx,By,Bz]
VOL
RVOL
Volume } solids
Relative volume } only
THK
AREA
Thickness
Area
CX
CY
CZ
CV
Current X coord
Current Y coord
Current Z coord
Current vector [Cx,Cy,Cz]
DX
DY
DZ
DM
DV
X displacement
Y displacement
Z displacement
Displacement magnitude
Displacement vector [Dx,Dy,Dz]
RFX
RFY
RFXY
RQX
RQY
RMX
RMY
RMXY
FX force resultant
FY ditto
FXY ditto
XZ shear force ditto
YZ shear force ditto
MX moment resultant
MY moment ditto
MXY moment ditto
VX
VY
VZ
VM
VV
X velocity
Y velocity
Z velocity
Velocity magnitude
Velocity vector [Vx,Vy,Vz]
EDEN
HGEN
TSTP
MASS
MADD
Internal energy density
Hourglass energy
Timestep
Mass
Added mass
AX
AY
AZ
AM
AV
X acceleration
Y acceleration
Z acceleration
Acceleration magnitude
Acceleration vector [Ax,Ay,Az]
TEMP
Nodal temperature
Element stress components
Page A.76
Element strain components
User manual Version 9.3, Rev. 0, September 2008
Oasys D3PLOT
SXX
SYY
SZZ
SXY or SYX
SYZ or SZY
SZX or SXZ
X stress
Y stress
Z stress
XY shear stress
YZ shear stress
ZX shear stress
EXX
EYY
EZZ
EXY or EYX
EYZ or EZY
EZX or EXZ
X strain
Y strain
Z strain
XY shear strain
YZ shear strain
ZX shear strain
SVON
SMAX
SMID
SMIN
SAV
SMS
von Mises stress
Max principal stress
Middle princ stress
Min princ stress
Average stress (pressure)
Max shear stress
EVON
EMAX
EMID
EMIN
EAV
EMS
von Mises strain
Max principal strain
Middle princ strain
Min princ strain
Average strain
Max shear strain
STEN
Stress tensor
[Sxx,Syy,Szz,Sxy,Syz,Szx]
ETEN
Strain tensor
[Exx,Eyy,Ezz,Exy,Eyz,Ezx]
EPL
ERATE
Effective plastic strain
Strain rate
Basic and integrated beam components
BFX
BFY
BFZ
BFR
Belytschko-schwer resultant data
FX axial force
FY shear force
FZ shear force
Force magnitude
BSAX
BPE1
BPE2
BRY1
BRY2
BMXX
MXX torsional moment
BRZ1
BMYY
MYY bending moment
BRZ2
BMZZ
MZZ bending moment
BMY1
BRM
Moment magnitude
BMY2
BMZ1
BFMV
Force and moment vectors
BMZ2
6 values: [Fx,Fy,Fz,Mxx,Myy,Mzz] BAEN
BIE
BSXX
Axial stress
BRXX
BSYX or BSXY YZ shear stress
BSZX or BSXZ XZ shear stress
BBED
BEP
Effective plastic strain
BAED
BEAX
Axial strain
BIED
"Extra" solid and shell data
SOX
SHX
Extra solid data
Extra shell & tk shell data
Total axial strain
Plastic energy at end 1
Plastic energy at end 2
Y rotation end 1
Y rotation end 2
Z rotation end 1
Z rotation end 2
Y moment end 1
Y moment end 2
Z moment end 1
Z moment end 2
Axial energy
Internal energy
Torsional rotation
Bending energy density
Axial energy density
Internal energy density
ALE data
ADENS
ADMOF
Ale density
Ale dominant fraction
AMMG
AMMS
Ale multi-material group id
Ale multi-mat group mass
Contact surface derived data (only if a .ctf file has been read)
CSN
CST
CSX
CSY
Contact normal stress
Contact tangential stress
Contact local X stress
Contact local Y stress
CFGX
CFGY
CFGZ
CFLX
CFLY
CFLZ
CFM
Contact global X force
Contact global Y force
Contact global Z force
Contact local X force
Contact local Y force
Contact local Z force
Contact force magnitude
U_NODE
U_SOSH
U_BEAM
User-defined nodal component
ditto solid, shell, tk shell comp
ditto beam components
U_SCALAR
U_VECTOR
U_TENSOR
Scalar data (1 value)
Vector data (3 values)
Tensor data (6 values)
User-defined data component type codes
UNOS
UNOV
Node scalar
Node vector
USSS
USST
Solid & shell scalar
Solid & shell tensor
UBMS
UBMV
Beam scalar
Beam vector
Page A.77
Oasys D3PLOT
User manual Version 9.3, Rev. 0, September 2008
Examples
The following simple examples show how the functions above might be used. Further example scripts may be found in
directory $OASYS/d3plot_library/examples
Capturing a sequence of static images to JPEG files
The following example loops over all frames in window #1 issuing the dialogue command "/IMAGE JPG
example_file_nnn.jpg" which will capture each frame in a separate JPEG file.
n = GetWindowMaxFrame(1); // Here window #1 is assumed to be current
for (i=1; i<=n; i++)
{
SetWindowFrame(1, i);
DialogueInput("/IMAGE JPG example_file_" + i +".jpg");
}
Looping through states extracting cut-section results
The following example works through each state in the current model in turn, setting up a cut-section at the constant X
coordinate of node #100, then rotates this section through 360 degrees in 5 degree increments, printing out the resulting
forces and moments at each increment.
/* We need an array with 9 subscripts to hold data */
var data = new Array(9);
/* Turn on cut section display in window #1 */
SetCutSection(1, STATUS, ON);
/* Loop over all states in the model in turn */
n = GetNumberOf(STATE);
for(i=1; i<=n; i++)
{
time = GetTime(i);
Print("Time = " + time + "\n");
SetCurrentState(i);
/* Set sections at const X at current position of node 100, and "get" the result
*/
SetCutSection(1, CONST_X, 100);
info = GetCutSection(1);
/* The following uses origin and vectors mode to sweep the section through 360
degrees in
** 5 degree increments, extracting the forces and moments at each position */
data[0] = info.origin[X]; /* Origin stays where it currently is */
data[1] = info.origin[Y];
data[2] = info.origin[Z];
for(i=0; i<=360; i+=5)
{
st = Math.sin(i*0.017453);
ct = Math.cos(i*0.017453);
data[3] = ct; /* X axis vector */
data[4] = 0.0;
data[5] = st;
data[6] = 0.0; /* XY plane vector */
data[7] = st;
data[8] = ct;
Page A.78
User manual Version 9.3, Rev. 0, September 2008
Oasys D3PLOT
SetCutSection(1, OR_AND_V, data);
c = GetCutForces(1);
Print("Forces = " + c.force[X] + ", " + c.force[Y] + ", " + c.force[Z] +
"\n");
Print("Moments = " + c.moment[X] + ", " + c.moment[Y] + ", " +
c.moment[Z] + "\n");
Print("Centroid = " + c.centroid[X] + ", " + c.centroid[Y] + ", " +
c.centroid[Z] + "\n");
Print("Area = " + c.area + "\n\n");
}
}
Calculating the max value and storing it as a UBIN component.
This example loops over all states in model #1 finding the maximum Sxx value of each solid and shell in the model,
and storing it as a new scalar UBIN component in state #1.
/* If you have > 1 model then set the one you want. Model #1 is assumed in
** this example. */
SetCurrentModel(1);
/* It is assumed that only a single scalar value is required, and it is for
** solids & shells. So find out the number of states, solids and shells */
nstate = GetNumberOf(STATE);
nshell = GetNumberOf(SHELL);
nsolid = GetNumberOf(SOLID);
shell_env = new Array();
solid_env = new Array();
/* Create arrays to hold the max/min data. Here they are initialised to
** zero, which might not be a good choice if you are looking for max values
** and incoming results could be negative. Fill in your own initial value. */
for(j=1; j<=nshell; j++) shell_env[j] = 0.0;
for(j=1; j<=nsolid; j++) solid_env[j] = 0.0;
/* Loop over states collecting max data.
**
** Note that making the outer loop the state is more efficient than making it
the
** element, since changing state is a more costly operation. */
for(i=1; i<=nstate; i++)
{
SetCurrentState(i);
Print("Doing state " + i + "\n");
for(j=1; j<=nshell; j++)
{
c = GetData(SXX, SHELL, j, 1);
if(c > shell_env[j]) shell_env[j] = c;
}
for(j=1; j<=nsolid; j++)
{
c = GetData(SXX, SOLID, j, 1);
if(c > solid_env[j]) solid_env[j] = c;
}
}
/* Now create a scalar user-defined binary component to hold the result */
Page A.79
Oasys D3PLOT
User manual Version 9.3, Rev. 0, September 2008
icomp = CreateUbinComponent("Maximum of SXX", U_SOSH, U_SCALAR);
/* Data has to be stored at a state, so choose state 1 */
SetCurrentState(1);
/* Then populate this user-defined component, intg point #1. */
for(j=1; j<=nshell; j++) PutUbinData(icomp, SHELL, j, 1, shell_env[j]);
for(j=1; j<=nsolid; j++) PutUbinData(icomp, SOLID, j, 1, solid_env[j]);
Extracting data by ply from a composite analysis.
Post-processing composite analyses can be difficult because the elements have many integration points, and a physical
ply may not use the same integration point in two adjacent elements, meaning that post-processing by "layer" (ie by
integration point) is not helpful.
This script assumes that ply information has been created using a *PART_COMPOSITE card, with each ply assigned to
a separate material id of the relevant ply number, and it sorts results into a separate UBIN component by ply. In this
way a given UBIN component will show results for a single ply across the whole model.
// JavaScript to plot composite data for selected elements
// Date: 26 June 2008
// Version 1.0
n = get_window_max_frame(1);
set_current_model(1);
var a = GetWindowFrame(1);
SetCurrentState(a);
nsh = GetNumberOf(SHELL);
nip = GetNumberOf(NIP_S);
npa = GetNumberOf(PART);
var
var
var
var
var
part = new Array();
part_id = new Array();
part_flag = 0;
co1 = 0; // part counter
co2 = 0; // ply counter
var ply = new Array();
var ply_id = new Array();
var ply_flag = 0;
var tmp1 = 0;
var offset = {}; // part, ip
var order1= {}; // part, ip
var order2= {}; // part, ip
var max1 = {};
var max2 = {};
var iter= 0; // iteration counter
var i_flag = 0;
var t_flag = 0;
// setup part array
for (i=1; i<=npa; i++) //shell
{
part_flag = 0;
a = GetLabel(PART, i);
b = GetMid(PART, i, 1);
if (b == 0) // check to see if the part is not a Part Composite
{
Page A.80
User manual Version 9.3, Rev. 0, September 2008
Oasys D3PLOT
part_flag = 1;
}
for(j=1; j<=co1; j++) //part
{
if (a == part_id[j]) // check to see if the part is already defined
{
part_flag = 1;
}
}
if (part_flag == 0)
{
co1 = co1 + 1;
part[co1] = i;
part_id[co1] = a;
}
}
// setup ply order array
for (i=1; i<=co1; i++) // part
{
order1[i] = new Object;
for(j=1; j<=nip; j++) // ip
{
b = GetMid(PART, part[i], j);
order1[i][j] = b;
}
}
// setup ply id array
for (i=1; i<=co1; i++) //part
{
for(j=1; j<=nip; j++) //ip
{
b = order1[i][j];
if (b == 0) // ply doesn’t exist
{
ply_flag = 1;
}
for (k=1; k<=co2; k++) //ply already created
{
if (b == ply_id[k])
{
ply_flag = 1;
}
}
if (ply_flag ==
{
co2 = co2 +
ply_id[co2]
Message(co2
}
0)
1;
= b;
+" "+ b);
ply_flag = 0;
}
}
//////////////////////////// proccessing loop
while (i_flag == 0)
{
iter = iter + 1;
Message("Iteration "+ iter);
Page A.81
Oasys D3PLOT
User manual Version 9.3, Rev. 0, September 2008
if(iter > 1)
{
for (i=1; i<=co1; i++) // part
{
for(j=1; j<=co2; j++) // ip
{
order1[i][j] = order2[i][j];
}
}
}
//// ply order array
for (i=1; i<=co2; i++) //ply
{
ply[i] = new Object;
for(j=1; j<=co1; j++) //part
{
ply[i][j] = new Object;
for(k=1; k<=co2; k++) //ply
{
b = order1[j][k];
if (b == ply_id[i])
{
ply[i][j] = k
}
}
}
}
//// find max position for each ply
for (i=1; i<=co2; i++)
{
max1[i] = 0;
for(j=1; j<=co1; j++)
{
if (typeof(ply[i][j]) == "object")
{
ply[i][j] = 0;
}
max1[i] = Math.max(max1[i], ply[i][j] );
}
}
for (i=1; i<=co2; i++)
{
Message(i +" "+ ply_id[i] + " "+ max1[i]);
}
// offset ply
for (i=1; i<=co1; i++) // part
{
order2[i] = new Object;
max = 0;
pos2 = 0;
for(j=1; j<=co2; j++) // ip
{
pos1 = j;
b = order1[i][j]; // ply id
for(k=1; k<=co2; k++) // ply
{
if(ply_id[k] == b)
{
max = max1[k]
}
Page A.82
User manual Version 9.3, Rev. 0, September 2008
Oasys D3PLOT
}
if(b != null && b != 0)
{
p_off = Math.max((pos2 - pos1 + 1),0);
pos2 = Math.max(max, (p_off + pos1));
order2[i][pos2] = b;
}
}
}
i_flag = 1;
for (i=1; i<=co1; i++) // part
{
for(j=1; j<=co2; j++) // ip
{
if(order1[i][j] != order2[i][j]) i_flag = 0;
}
}
}
////////////////// create table
var
var
var
var
var
we
x1
x2
y1
y2
=
=
=
=
=
new Window("Ply Layout", 0.2, 0.3, 0.5, 0.6 );
0;
0;
0
0;
var part = new Widget(we, Widget.LABEL, 0, Math.max((co1*10)+30, 70), 10, 20,
"PART");
part.justify=Widget.CENTRE;
for (i=1; i<=co2; i++) // ply
{
t_flag = 1;
y1 = (i*10) + 20;
y2 = y1 + 10;
for(j=1; j<=co1; j++) // part
{
x1 = (j*10) + 10;
x2 = x1 + 10;
if(i == 1)
{
var partl = new Widget(we, Widget.LABEL, x1, x2, 20, 30,
""+part_id[j]);
}
var mark = new Widget(we, Widget.BUTTON, x1, x2, y1, y2, " ");
if (order2[j][i] != 0 && order2[j][i] != null)
{
mark.text= ""+order2[j][i];
mark.background=Widget.BLUE;
mark.foreground=Widget.WHITE;
t_flag = 0;
}
}
if(t_flag == 1)
{
var yn = i;
i = co2+1;
}
}
var ply = new Widget(we, Widget.LABEL, 10, 20, (yn*5)+25, (yn*5)+35, "PLY");
var exit = new Widget(we, Widget.BUTTON, 20, 60, (y1+20), (y2+20), "Exit");
exit.background = Widget.DARKRED;
Page A.83
Oasys D3PLOT
User manual Version 9.3, Rev. 0, September 2008
exit.foreground = Widget.WHITE;
exit.onClick = ex_clicked;
we.Show(false)
////////////////////////////////////////////////////////////////////////////////
function ex_clicked()
{
Exit();
}
///////////////////////////////////////////////////////////////////////////////
Using the Window and Widget classes to present ply data
graphically
This example demonstrates the use of Menu Window and Widget classes of the common API
shared with PRIMER to present information to the user graphically, and to interact with him.
It goes through a laminate model using *PART_COMPOSITE and sorts the plies into usage
by part. This information is then presented to the user as shown in the figure here and the
script pauses until the user clicks on "Exit" in order to continue.
SetCurrentModel(1);
SetCurrentState(1);
nsh = GetNumberOf(SHELL);
nip = GetNumberOf(NIP_S);
npa = GetNumberOf(PART);
var
var
var
var
var
part = new Array();
part_id = new Array();
part_flag = 0;
co1 = 0; // part counter
co2 = 0; // ply counter
var ply = new Array();
var ply_id = new Array();
var ply_flag = 0;
var tmp1 = 0;
var offset = {}; // part, ip
var order1= {}; // part, ip
var order2= {}; // part, ip
var max1 = {};
var max2 = {};
var iter= 0; // iteration counter
var i_flag = 0;
var t_flag = 0;
// setup part array
for (i=1; i<=nsh; i++) //shell
{
part_flag = 0;
Page A.84
User manual Version 9.3, Rev. 0, September 2008
Oasys D3PLOT
a = GetPid(SHELL, i);
a = GetLabel(PART, a);
b = GetMid(SHELL, i, 1);
for(j=1; j<=co1; j++) //part
{
if (a == part_id[j] || b == 0) // check to see if the part is already
defined or not a Part Composite
{
part_flag = 1;
}
}
if (part_flag == 0)
{
co1 = co1 + 1;
part[co1] = i;
part_id[co1] = a;
}
}
// setup ply order array
for (i=1; i<=co1; i++) // part
{
order1[i] = new Object;
for(j=1; j<=nip; j++) // ip
{
b = GetMid(SHELL, part[i], j);
order1[i][j] = b;
}
}
// setup ply id array
for (i=1; i<=co1; i++) //part
{
for(j=1; j<=nip; j++) //ip
{
b = order1[i][j];
for (k=1; k<=co2; k++) //ply
{
if (b == ply_id[k] || b == 0)
{
ply_flag = 1
}
}
if (ply_flag == 0)
{
co2 = co2 + 1;
ply_id[co2] = b;
}
ply_flag = 0;
}
}
//////////////////////////// processing loop
while (i_flag == 0)
{
iter = iter + 1;
Message("Iteration "+ iter);
if(iter > 1)
{
for (i=1; i<=co1; i++) // part
{
for(j=1; j<=co2; j++) // ip
{
order1[i][j] = order2[i][j];
Page A.85
Oasys D3PLOT
User manual Version 9.3, Rev. 0, September 2008
}
}
}
//// ply order array
for (i=1; i<=co2; i++) //ply
{
ply[i] = new Object;
for(j=1; j<=co1; j++) //part
{
ply[i][j] = new Object;
for(k=1; k<=co2; k++) //ply
{
b = order1[j][k];
if (b == ply_id[i])
{
ply[i][j] = k
}
}
}
}
//// find max position for each ply
for (i=1; i<=co2; i++)
{
max1[i] = 0;
for(j=1; j<=co1; j++)
{
if (typeof(ply[i][j]) == "object")
{
ply[i][j] = 0;
}
max1[i] = Math.max(max1[i], ply[i][j] );
}
}
// offset ply
for (i=1; i<=co1; i++) // part
{
tmp1 = 0;
offset[i] = new Object;
for(j=1; j<=co2; j++) // ip
{
b = order1[i][j];
for(k=1; k<=co2; k++) // ply
{
if(ply_id[k] == b)
{
if(max1[k] > j)
{
tmp1 = max1[k] - j;
}
}
}
offset[i][j] =tmp1
}
}
for (i=1; i<=co1; i++) // part
{
order2[i] = new Object;
for(j=1; j<=co2; j++) // ip
{
a = offset[i][j];
b = order1[i][j];
order2[i][j+a] = b;
}
Page A.86
User manual Version 9.3, Rev. 0, September 2008
Oasys D3PLOT
}
i_flag = 1;
for (i=1; i<=co1; i++) // part
{
for(j=1; j<=co2; j++) // ip
{
if(offset[i][j] != 0) i_flag = 0;
}
}
}
////////////////// create table
var
var
var
var
var
we
x1
x2
y1
y2
=
=
=
=
=
new Window("Ply Layout", 0.2, 0.3, 0.5, 0.6 );
0;
0;
0
0;
var part = new Widget(we, Widget.LABEL, (co1*5)+15, (co1*5)+25, 10, 20, "PART");
part.justify=Widget.CENTRE;
for (i=1; i<=co2; i++) // ply
{
t_flag = 1;
y1 = (i*10) + 20;
y2 = y1 + 10;
for(j=1; j<=co1; j++) // part
{
x1 = (j*10) + 10;
x2 = x1 + 10;
if(i == 1)
{
Message("a"+ part_id[j]);
var partl = new Widget(we, Widget.LABEL, x1, x2, 20, 30,
""+part_id[j]);
}
var mark = new Widget(we, Widget.BUTTON, x1, x2, y1, y2, " ");
if (order2[j][i] != 0 && order2[j][i] != null)
{
mark.text= ""+order2[j][i];
mark.background=Widget.BLUE;
mark.foreground=Widget.WHITE;
t_flag = 0;
}
}
if(t_flag == 1)
{
var yn = i;
i = co2+1;
}
}
var ply = new Widget(we, Widget.LABEL, 10, 20, (yn*5)+25, (yn*5)+35, "PLY");
var exit = new Widget(we, Widget.BUTTON, 20, 60, (y1+20), (y2+20), "Exit");
exit.background = Widget.DARKRED;
exit.foreground = Widget.WHITE;
exit.onClick = ex_clicked;
we.Show(false)
////////////////////////////////////////////////////////////////////////////////
function ex_clicked()
{
Page A.87
Oasys D3PLOT
User manual Version 9.3, Rev. 0, September 2008
Exit();
}
Using the File class to write data to file.
This example extracts maximum and minimum Z displacement values of nodes and writes them to a file
"reporter_variables" that can be used to set up variables in Oasys Reporter. It demonstrates the use of the File
class to open a file, write to it, and close it.
var fence_part_min = 4;
var fence_part_max = 7;
var
var
var
var
var
var
var
var
max_states;
istate;
ipart;
nnode;
inode;
objElem;
internal_pid;
external_pid;
var
var
var
var
var
var
z_max = 0;
z_min = 0;
max_node = 0;
min_node = 0;
max_state = 0;
min_state = 0;
var f;
/* Get the number of states in the current model */
max_states = GetNumberOf(STATE);
/* Get the number of nodes in the current model */
nnode = GetNumberOf(NODE);
print("Start of loop\n");
/* Loop over each state */
for(istate=1; istate<=max_states; istate++)
{
SetCurrentState(istate);
print("State " + istate + "\n");
/* Loop over each node */
for(inode=1; inode<=nnode; inode++)
{
/* Get shell elements at node */
if(objElem = GetElemsAtNode(inode, SHELL))
{
if(objElem.nn > 0)
{
/* Get the external PID */
internal_pid = GetPid(SHELL, objElem.list[0]);
external_pid = GetLabel(PART, internal_pid);
/* Check it against parts to test */
if(external_pid>=fence_part_min && external_pid<=fence_part_max)
{
temp = GetData(DZ, NODE, inode);
Page A.88
User manual Version 9.3, Rev. 0, September 2008
Oasys D3PLOT
if(temp > z_max)
{
max_state = istate; /* Store the state the maximum
occurs */
max_node = inode; /* Store the node the maximum occurs
at */
z_max = temp; /* Store the maximum */
}
if(temp < z_min)
{
min_state = istate; /* Store the state the minimum
occurs */
min_node = inode; /* Store the node the minimum occurs
at */
z_min = temp; /* Store the minimum */
}
}
}
}
}
}
/* Open a file to write the variables to */
f = new File("./reporter_variables", File.WRITE);
/* Write to the file */
f.Writeln("VAR Z_MAX DESCRIPTION=’Maximum z displacement’ VALUE=’" + z_max +
"’");
f.Writeln("VAR Z_MIN DESCRIPTION=’Minimum z displacement’ VALUE=’" + z_min +
"’");
f.Writeln("VAR Z_MAX_NODE DESCRIPTION=’Node with maximum z displacement’
VALUE=’" + max_node + "’");
f.Writeln("VAR Z_MIN_NODE DESCRIPTION=’Node with minimum z displacement’
VALUE=’" + min_node + "’");
f.Writeln("VAR Z_MAX_STATE DESCRIPTION=’State with maximum z displacement’
VALUE=’" + max_state + "’");
f.Writeln("VAR Z_MIN_STATE DESCRIPTION=’State with minimum z displacement’
VALUE=’" + min_state + "’");
/* Close the file */
f.Close();
Next section
Page A.89