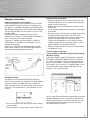
1
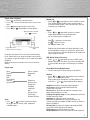
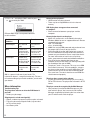
g Operating instruction
Safety information
Some of the following information may not apply to your
particular product; however, as with any electronic
product, precautions should be observed during handling
and use.
•
•
•
•
•
•
•
•
•
•
•
•
•
•
2
Read these instructions.
Keep these instructions.
Heed all warnings.
Follow all instructions.
Do not use this apparatus near water.
Clean only with dry cloth.
Do not block any ventilation openings.
Install in accordance with the manufacturer’s
instructions.
Do not install near any heat sources such as radiators,
heat registers, stoves, or other apparatus (including
amplifiers) that produce heat.
Do not defeat the safety purpose of the polarized or
grounding-type plug. A polarized plug has two blades
with one wider than the other. A grounding type plug
has two blades and a third grounding prong. The wide
blade or the third prong is provided for your safety. If
the provided plug does not fit intoyour outlet, consult
an electrician for replacement of the obsolete outlet.
Protect the power cord from being walked on or
pinched particularly at plugs,convenience receptacles,
and the point where they exit from the apparatus.
Only use attachments/accessories specified by the
manufacturer.
Use only with the cart, stand, tripod, bracket, or table
specified by the manufacturer, or sold with the apparatus.
When a cart is used, use caution when moving the
cart/apparatus combination to avoid injury from tip-over.
Unplug this apparatus during lightning storms or when
unused for long periods of time.
Refer all servicing to qualified service personnel.
ADDITIONAL SAFETY INFORMATION
• Do not place lighted candles, cigarettes, cigars, etc. on
the product.
• Connect power cord only to AC power source as
marked on the product.
• Care should be taken so that objects do not fall into the
product.
Computer connection
Connecting the player to the computer
Connect the player to your computer with the mini USB
cable provided. The player will turn on automatically. It
will appear as a Windows portable device (Windows XP,
with Windows Media Player 10 installed) using the Media
Transfer Protocol (MTP) or a drive letter if you are using
Windows 2000.
It might take several seconds for the player to be
detected. Click “Refresh” in My Computer or Explorer to
make sure the player has been detected.
The player is capable of transferring files at USB 2.0.
If USB 2.0 port is available on your computer, use it to
connect to your player.
The player is still backward compatible with the older
USB 1.1 ports. However, you will not be able to take full
advantage of the potential speed increase.
The player
USB port
of your
To open the
cover: lift it
up and
rotate
Important battery information
• Charge the player for at least 3 hours before first use.
• Charge the player for at least 2 hours after putting the
player away for a long time.
• Battery replacement should only be made by trained
technicians.
• Do not attempt to open the player. No user serviceable
parts inside.
• Do not separately recharge, disassemble, or incinerate
or expose to high temperatures over 45ºC (113ºF).
Examples of high temperatures that may damage your
product include leaving it in a locked car in the
summer, the dashboard of a car or putting it on top
of other heat generating electronics devices (such as
power amplifiers and computer monitors).
• Keep away from children. Do not disassemble and do
not dispose of in fire.
Transferring files to the player
Transferring files via Windows Explorer (Drag-and-drop)
(Windows XP only)
In Windows Explorer, when the RCA player is opened in
MTP mode, and Windows Media Player 10 is installed,
the “Data” and “Media” views will be displayed for the
player. The Data folder is used to manage data content
on the player, such as text files. The Media folder is used
to manage media content supported by the player for
playback, such as mp3 and wma.
Charging the battery
Your player will charge through the USB connection
when it is connected to your computer. The display below
shows where the animated battery icon is displayed
when charging. To fully charge the player, make sure your
computer is on and the device is connected for at least
3 hours.
• You can still transfer files to the player while in battery
charging mode.
• When the battery is full, the display shows “Battery full”.
You can copy files to / delete files from the player through
Windows Explorer, but you cannot open or edit the files
directly from the player. If you want to edit the files, you
will need to copy the files from the player to another
location (drive) in the system.
3
Transferring files via Windows Explorer (Drag-and-drop)
(Windows 2000)
From Windows Explorer, highlight all the files/folders you
want to transfer to your player and drag them to the drive
letter that is associated with it.
Before disconnecting the USB connection from the
computer or the player, be sure the “Safe to Remove
Hardware” message is displayed.
General controls
If your computer has installed Windows Media Player 11,
“Internal Storage” shows instead of the folders
mentioned above. Copy files inside “Internal Storage”.
Secure music download files must be transferred to your
player through one of the provided Jukebox software
packages or any applications recommended by the
online music download service. Please visit the online
music download service’s website where you purchased
your content from for more details on transferring
secure music to your player.
Disconnecting your player from the computer
For Windows XP users, your player is connected in MTP
(Media Transfer Protocal) mode to your computer by default, you may disconnect the USB cable directly when file
download is completed. Do not disconnect the USB connection during file download.
Doing so may corrupt system files or the files being
downloaded.
If you are using Windows 2000, you can disconnect the
player by left clicking on the icon
from the system tray
and selecting the drive corresponding to your player.
4
1. m
• To access the file or player menu.
• Press and hold to lock or unlock the player’s
keys.
• To stop the radio recording.
2.
USB jack - Attach the small end (Type mini-B)
of the mini-USB cable here. Attach the large end
(Type A) to your computer’s USB port. The player will
enter USB mode automatically, and you can transfer
files to and from the computer.
The player’s battery will also be charging when
connected to the computer.
3.
Earphone jack
Follow the diagram to open the USB jack or earphone
jack cover.
To unlock the keys after the player has turned off
automatically, press and then press
and hold m while
the message “Press and hold m to unlock” is displayed.
File menu
How files are organized?
Files transferred to the player are sorted automatically
according to their file types. Music files are further sorted
according to several parameters for quickly searching
your favorite music. Once your player is switched on, you
will see the file menu as below:
4.
Press once to turn on the player. Press and hold to turn
off the player.
• To start and pause playback.
• To start and stop the stopwatch.
• To make selections in menus.
File menu
• To skip to a previous file or scan a file
backwards.
• To go back a level in the menus.
• To skip to the next file or scan a file
forwards.
• To advance or make selections in menus.
+
• To increase the volume during playback.
• To scroll up in the menus.
–
• To decrease the volume during playback.
• To scroll down in the menus.
5. Reset button
6. Armband/Wristband rings
Turning on or off the player
to turn on the player.
• Press
• Press and hold
to turn off the player.
Locking the keys
Press and hold m to lock (or unlock) keys to prevent
accidental key activation.
Now Playing
Music
Audiobooks
Radio Recs
My Selections
Artists
Albums
Titles
Genres
Years
• Now Playing (only available when the playback is
in progress or paused. Select it to show the currently
playing file)
• Music (contains music files which are further sorted)
• Audiobooks (contains audible files)
• Radio Recs (contains radio recording)
• My Selections (contains a playlist of your preferred
music files)
The file menu is displayed when m is pressed during
playback.
File menu navigation
• Press
to go to the next menu level.
• Press + or – to move along menu items at the same
level.
to go to the previous menu level.
• Press
• If the selected item is a music, audible or recorded file,
press
or
to start playback.
5
The following example illustrates the steps to select and
play a music file in the “Artists” category.
1. Highlight “Music” by pressing + or –, then
to advance.
press
Player menu
The player menu lets you access more features
of the player.
Depending on the mode you are in (e.g. music playback,
radio recording etc.), the items available in the player
menu may vary.
2. Highlight “Artists” by pressing + or –, then
to advance.
press
3. The artist menu appears with the artists listed in
alphabetical order. Highlight a desired artist by
to advance.
pressing + or –, then press
4. The albums of the selected artist appear.
Highlight a desired album by pressing + or –, then
press
to advance.
5. The songs of the selected album appear.
Highlight a desired song by pressing + or –, then
press
or
to start playback.
• The song’s information will show on the display during
playback. The information available depends upon the
ID3 tags that have been set up for the song.
6
Follow the steps below to access the player menu:
• If you are at the file menu navigation screen, press m
once to access the player menu.
• If you are at the playback screen, press m
twice to access the player menu.
• If you are in the radio mode, press m once
to access the player menu.
Player menu navigation
to go to the next menu level.
• Press
• Press + or – to move along menu items at the same
level.
• Press
to go to the previous menu level.
• Press
or
repeatedly to select options.
More menu items available,
press
to advance
Shuffle
• Press
or
repeatedly to select shuffle on or off.
Files will be played randomly when shuffle mode is
activated. Shuffle mode is not available when you are
listening to an audible file.
Repeat
• Press
or
repeatedly to select a repeat
mode. Repeat mode is not available when
you are listening to an audible file.
– repeat the current item,
One
All
– repeat all items,
Off – repeat mode is off.
Player menu’s items
Currently selected
option
In general, the player menu consists of the following
items. Some items may not be available or extra items
may appear in specific modes such as radio and audible
playback.
Refer to the relevant sections in the user manual for
details.
Player menu
Go to
Shuffle
Repeat
DSP
Clear MySel
Settings
System Info
Library / Radio
Stopwatch
BMI
Brightness
Screensaver
Powersave
FreqStep
Language
Unit
Personal Info
Flip Display
Restore Defaults
Go to
or
to switch among the library
• Press
(to access the file menu), radio, stopwatch
and BMI modes.
Repeat and shuffle modes will work differently if you
have highlighted a song or a set (albums, genres etc.).
You can select your desired combination of shuffle and
repeat mode to suit you.
DSP (Digital Signal Processor)
or
repeatedly to select a DSP mode.
• Press
Options available: Flat, Rock, Jazz, Bass and Pop. DSP
is not available when you are listening to an audible
file.
Clear MySel (Clear My Selections)
• To clear the playlists. Refer to page 21 for details.
Settings
or
to enter the settings menu and then
• Press
press + or – to highlight an item.
Refer to the player for options available within each
item. Press
or
repeatedly to select options.
Brightness: to adjust the display light brightness.
Screensaver: to adjust the duration before the
screensaver activates.
Powersave: to adjust the duration for automatic shut
down when the player is in idle.
FreqStep (Frequency Step): to select between the US and
Europe frequency mode.
Language: to select the menu’s language.
Unit: to select between the English and metric unit
system in weight and height for BMI calculation. Refer to
page 27 for details.
Personal Info: to input sex, weight and height for BMI
calculation. Refer to page 27 for details.
Flip Display: to rotate the display by 180o
Restore Defaults: to restore all menus to factory defaults.
7
System Info
or
to show the amount of free
• Press
space available and the firmware version.
To listen to My Selections:
1. Press + or – to highlight “My Selections” folder from
the file menu.
Music playback
Press once to skip
to the previous file*,
or press and hold to
fast reverse.
Press once to start the
playback. Press during
playback to pause and
again to resume.
Press to go to the file or
player menu (refer to page
16-19).
Press and hold to lock or
unlock the keys.
To increase the volume
Press once to skip to the
next file, or press and
hold to fast forward.
To decrease the
2. Press
to begin playback.
To clear My Selections:
1. Press m once or twice to access to player menu (refer
to “Player menu” on page 18 for details).
2. Press + or – to highlight “Clear MySel” and then
or
to confirm clearing.
press
* Press
within the beginning 4 seconds of the current file to skip to the
previous file. Otherwise, you will return to the beginning of the current file.
Music playback display
Repeat mode
Shuffle mode
Playback mode
Title of current file
Artist name of current file
Current file number / total
number of files
Key lock is activated
Battery level indicator
Elapsed time of current file
The information provided in the playback screen depends
upon the metadata fields that have been set up for the
song.
Music playback
My Selections
My Selections is a playlist of your preferred music files
(audible and radio recorded files are not selectable).
To select a music file as My Selections:
1. While listening to a favorite music file, press m twice.
The player menu is shown.
2. Highlight “Add to MySel” by pressing + or – and then
press
or
to confirm.
“Added to MySel” shows on the display briefly.
8
Other playback features
You may play your music files randomly and / or
repeatedly as well as select the DSP effect to best suit
your music. To do so, you need to access the player menu
during music playback. Refer to page 18-19 for details.
Audible playback controls
Press once to skip
to the previous file*,
or press and hold to
fast reverse.
Press once to start the
playback. Press during
playback to pause and
again to resume.
Press to go the file or player
menu (refer to page 16-19).
Press and hold to lock or
unlock the keys.
To increase the volume
Press once to skip to the
next file*, or press and
hold to fast forward.
To decrease the
* For sectioned audible files only: during playback or pause of a sectioned
audible file, press m twice to access the player menu. Highlight “Skipping”
by pressing + or –. Press
or
to select between “File” or “Section”.
If “Section” is selected, skipping will be by section only when
or
is
pressed. Press
within the beginning 4 seconds of the current section to
skip to the previous section.
Otherwise, it will return to the beginning of the current section.
The section mode will automatically switch back to the file mode every
time a new audible file is skipped to or played or when the player is turned
off.
Radio display
Audible playback display
Key lock is activated
Playback mode
Title of current file
Author name of current file
Current file number / total
number of files (skippingbyfile mode is selected)
Key lock is activated
Battery level indicator
Elapsed time of current file
Current section number / total
number of sections (skipping-bysection mode is selected)
Radio
Radio (switching on)
1. Press m in any mode to access the player menu
(during music playback, m has to be pressed twice).
or
.
2. While “Go to” is highlighted, press
Preset mode with preset
station number (in manual
mode, this icon is off)
Current frequency
Battery level indicator
Stereo signal is
received
Frequency scale
Manual and preset modes
• Press
to select between the two modes while
listening to the radio.
• In manual mode, press
or
to select frequency
manually.
• In preset mode (refer to the display above), press
or
to select stations saved in preset memory.
Selecting radio frequency
or
to select frequency.
In manual mode, press
Press and hold the button to start automatically search
for the next available channel.
3. While “Radio” is highlighted, press
switch on the radio.
or
to
Saving preset stations
You can save up to 20 channels as preset stations.
1. Select a radio frequency. Refer to “Selecting radio
frequency” on the previous page.
2. Press m to access the player menu and then
press + or – to highlight “Save to Preset”.
Radio (switching off)
1. Press m in the radio mode to access the player menu.
or
.
2. While “Go to” is highlighted, press
3. Select one of the modes to switch to and then
press
or
.
or
to advance.
3. Press
4. The next available preset station number shows,
press
or
to select another number if so
desired.
5. Press
to save the selected frequency as
the assigned preset station number.
Selecting preset stations
or
In preset mode, press
station.
to select a preset
• Alternatively, press and hold until the
player powers off to switch off the radio.
9
Clearing preset stations
or
to select an
1. In preset mode, press
unwanted preset station.
2. Press m to access the player menu and then
press + or – to highlight “Clear Preset”.
3. Press
or
to delete the unwanted preset station.
Suppressing stereo signal
If FM stereo signal is weak, selecting mono sound may
reduce the noise.
1. While listening to the radio, press m to access the
player menu and then press + or – to highlight “Mode”.
or
to select between “Mono” or
2. Press
“Stereo” sound.
3. Press m to exit the player menu.
Start recording
Radio program can be recorded as .wav format.
1. While listening to the radio, press m to access the
player menu and then press + or – to highlight “Start
Recording”.
Listening to radio recording
1. In the file menu, press + or – to highlight “Radio Recs”
and then press
to show the archive of radio
recordings.
2. Press + or – to highlight one of the recorded files and
then press
or
to listen to the selected file.
Deleting radio recording
1. In the file menu, press + or – to highlight “Radio Recs”
and then press
to show the archive of radio
recordings.
2. Press + or – to highlight an unwanted recorded file.
3. Press m to access the player menu. Press + or – to
highlight “Delete File”.
4. Press
or
to delete the unwanted file.
Using stopwatch
to start recording.
2. Press
3. Press
to pause recording, press again to resume.
4. Press m to stop recording.
Record duration
You may select the maximum record duration.
1. While listening to the radio, press m to access the
player menu and then press + or – to highlight “RecDur”.
or
to select among 5m, 30m, 1h
2. Press
and max (5 min, 30 min, 1 hour and maximum).
3. Press m to exit the player menu.
10
1. To access the stopwatch, press m once or twice to
access the player menu.
2. While “Go to” is highlighted in the menu,
press
or
to advance.
3. Press + or – to highlight “Stopwatch” and then
press
or
.
BMI (Body Mass Index)
BMI is a measure which takes into account a person’s
weight and height to estimate total body fat in adults. It
may vary depending on your body type and composition.
BMI is calculated by the following formula:
4. Press
to start the stopwatch. Press again to stop
the stopwatch.
You should have entered your personal information
before checking this index (refer to Personal Information).
5. While the stopwatch is stopped, press – to reset the
stopwatch.
Multiple lap timing
to start timing of the
1. In stopwatch mode, press
first lap.
2. Press + at the start of the second, third lap and so on
(maximum 30 laps).
• The unit will display the lap difference briefly after
the second lap is finished and then the average time
on the display.
Total elapsed time
Lastest lap time
Lap difference
Average time
to stop the stopwatch when all laps are
3. Press
finished.
or
to review all the lap times.
4. Press
5. Press – to clear all lap times and reset the stopwatch.
Personal information
For accurate use of BMI, you should have entered your
personal information first.
1. Press m once or twice to access the player menu
(refer to page 18 for details).
2. Press + or – to highlight „Settings“ and press
or
to enter its sub-menu.
3. Press + or – to highlight „Personal Info“ and
press
or
to enter its sub-menu.
4. Press + or – to highlight among Sex, Weight and
Height. Press
or
to select one of them and
then press + or – to adjust values.
5. Press
to confirm when finished.
Changing unit
You may change between the English and
metric unit system when inputting your
personal information.
1. Press m once or twice to access the player menu.
2. Press + or – to highlight „Settings“ and press
or
to enter its sub-menu.
3. Press + or – to highlight „Unit“.
4. Press
or
to select between the English and
metric unit system.
Checking BMI
1. Press m once or twice to access the player menu.
2. While “Go to” is highlighted in the menu, press
or
to advance.
11
3. Press + or – to highlight “BMI” and then press
or
to check your BMI.
Different BMI ranges correspond to different
health condition.
Health
Condition
Males
Females
Underweight
Less than 20
(<20)
Less than 18
(<18)
Ideal
greater than
or equal to 20
but less than 25
(>=20 but <25)
greater than or
equal to 18 but
less than 23
(>=18 but <23)
Overweight
greater than
or equal to 25
but less than 30
(>=25 but <30)
greater than or
equal to 23 but
less than 30
(>=23 but <30)
Obese
greater than
or equal to 30
(>=30)
greater than or
equal to 30
(>=30)
BMI is a general indicator of your health. The
information above is a rough estimation only. To have a
full understanding of your health condition, consult with
your doctor.
More information
Troubleshooting Tips
The player does not turn on when the PLAY button is
pressed?
• Battery may be empty.
Skipping tracks or bad sound quality?
• Repeat, random or program function may be activated.
• There may be strong magnetic fields (e.g. too close
to TV) near the player.
• Low Battery level.
12
Cannot perform playback?
• LOCK function may be activated.
• There may be no mp3/WMA tracks in the internal
memory.
USB display does not appear when connected
to computer?
• Check connection between your player and the
computer.
Cannot playback tracks on the player.
• Make sure audio tracks are encoded in the mp3 or
Windows Media formats at supported bitrates. Bitrates
supported by the player:
mp3 – 32 to 320 kbps
wma – 48 to 192 kbps
• WMA files may be DRM protected and you do not have
the proper rights (license) to play the files.
• Check the website and/or application help system of
the music download service provider from where the
content was purchased for license acquisition details.
For more information on how license acquisition
works, go to www.microsoft.com/windowsmedia/drm.
• Play the original or downloaded song on your
computer to ensure that there was nothing wrong with
the encoding of the mp3 or WMA.
• The player’s clock is inaccurate. This may cause DRM
files to work incorrectly. To fix the problems, connect
the player to the computer using the USB cable. Then
connect to the secure service where DRM encoded
files came from. The clock should reset and DRM files
should now work properly.
The player does not work after reformat.
• In case you need to reformat the player, it must be in
FAT or FAT32 format. The player does not work in NTFS
format.
The player cannot be recognized by Audible Manager
• Your previously installed Audible Manager may not
work with this player. You have to reinstall Audible
Manager completely by following the instruction from
your CD which comes with the player.
Why can’t my portable player playback songs
downloaded from my paid Music Service Provider
subscription service?
• The internal clock in your portable player may not be
up to date. Downloading a new subscription song from
your Music Service Provider should update your
player’s clock and allow it to playback all your songs
again.
• The license for your subscription songs may have
expired. Synchronize your device with your PC again to
obtain an update to your license. If the problem
persists, please contact your Music Service Provider
for additional support.
Cannot access the player via Windows 2000.
• Install the Service Pack 3 for Windows 2000. Visit
www.windowsupdate. microsoft.com for details.
13