1
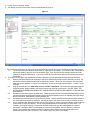
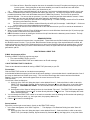
Hudson County MLS On Line Forms Document Preparation System – User Reference Manual Introduction - Hudson County MLS Document Preparation System ....................................................................................................1 First Time Log In and registration...........................................................................................................................................................1 How to use the system ...............................................................................................................................................................................1 SEQUENCE OF OPERATION: ..............................................................................................................................................................1 REQUIRED FIELDS:..............................................................................................................................................................................4 HOW TO EMAIL A PRINT FILE:..........................................................................................................................................................4 E-MAIL the document off-line ...........................................................................................................................................................4 I. SAVE THE PRINT FILE TO YOUR PC:......................................................................................................................................4 IIa. SEND A PRINT FILE THROUGH E-MAIL..............................................................................................................................5 IIb. ALTERNATE METHOD OF SENDING THE PRINT FILE THROUGH E-MAIL ................................................................. 5 Forms Capabilities ....................................................................................................................................................................................5 CALCULATIONS .....................................................................................................................................................................................5 Acrobat™ Reader – Notes ........................................................................................................................................................................5 System Usage Hints – Frequently Asked Question..................................................................................................................................6 Saving Data Files ......................................................................................................................................................................................6 System Requirements ................................................................................................................................................................................6 Parameter Settings - Introduction ............................................................................................................................................................6 Settings:.....................................................................................................................................................................................................6 Support ......................................................................................................................................................................................................7 Introduction - Hudson County MLS Document Preparation System The purpose of this user manual is to explain how to use the web based system. This system requires the Microsoft Internet Explorer web browser which is usually included with PC purchases. If your PC does not have this package you can download it from www.microsoft.com. First Time Log In and registration Before starting this sequence, the first time you use the system, please read and follow the instructions in the Settings section of this document. The Settings section explains the necessary steps to enable you to save data files either on your PC or on the mbaiforms.net web server. If you do not follow those instructions you may only be able to save data files on the mbaiforms.net web server. How to use the system SEQUENCE OF OPERATION: The flow of events in this system is the following; 1. Use Internet Explorer to go to www.mlsguide.com 2. login 3. Select “FORMS”. 4. On the WELCOME (Document Categories) Screen click the radio button to the left of the transaction type you are dealing with, e.g. Listing Agreement – Condo or Cooperative, Listing Agreement Commercial/Industrial/Business, etc.. as shown here in Figure 1. FIGURE 1 5. Hit the “Click to Continue” button. 6. This brings you to the “Edit Control” screen, shown below as Figure 2. Figure 2 1. The checkboxes and buttons on the left of the screen select documents, and control the display of data entry screens. 1.1. The check boxes select the documents used for a this type of transaction. You can select any combination of documents shown in the form set for a transaction type. If you check a box the selected document will be included in the printed documents. If you omit a check box, that document will not be included in the printed documents. 2. The buttons to the right of the checkboxes control the data entry screen associated with the selected document. 2.1. Buttons with white background (changing to red when selected) and borders control data entry screens. All documents in each transaction package are selected by default. When you click the button, the associated data entry screen appears. In Figure 2, the data entry screen for the “Property Description – Condo or Coop” is shown. 2.2. Keep in mind that this is a “data entry screen” and NOT a document. Documents are generated using the “Build Document” button located in the action button group at the top of the screen. DO NOT PRINT THE DATA ENTRY SCREENS ASSUMING THEY CAN BE SUBSTITUTED FOR DOCUMENTS. THEY ARE NOT DOCUMENTS. 2.3. Some documents don't require any data entry. These documents do not have associated data entry screens. These documents use information entered on the Property Description screen. for example, the Buyer Name, Broker information, Seller Name, Property address, etc. 2.4. Some data entry screens are too long to fit on the screen. Use the scroll bar at the right side of the screen to move the data entry screen up and down. Use the tab keys or the cursor to move from one field to the next. 2.5. As you complete each data entry screen use the “Save to Server” button in the Action Button Group at the top of the screen to save your data file. This is recommended based on the experience of many users. For example, you may be called by a customer to another activity while you are entering data for a specific transaction. Saving the Data File will enable you to return to the system, open the data file (“Load from Server”) and complete the transaction without re-entering data. Data files can be saved either to the mbaiforms.net server (“Save to Server”) or to a folder on you PC (“Save Local Data”). 3. 4. 5. 6. 2.5.1.Save to Server –Data files saved on the server is accessible from any PC anywhere as long as you can log in to the system. Saving data files on the server enables you to start a contract at home and finish it elsewhere, such as at your office, your clients house, etc. 2.6. When you have completed data entry for all screens, if you have not already saved the data file, save it now. Click the "Build Document" button to generate the Adobe (.pdf) Print File. The Print File consists of the completed, printable documents, filled in with all the data entered in the Data Entry Screens. The Print File is opened in a separate Window. You can use this as a preview, if you wish, to be sure that all the data needed is entered. If there is a problem, you can close this Window it and make changes in the Data Entry Screens. 3.1. The Print File is a locked file and cannot be changed directly. To make a change, close the Print File window and return to the Data Entry Screens. 3.2. The Print File name is a random number followed by the suffix .pdf, for example, “ 94921566.pdf “. Click once on this number to see the completed document package. At this point you can choose to Print the documents or save the documents on your PC to send as an attachment to an Email message. When you are finished, click the "Close All Windows" button or use the Windows close button (the 'X') at the top right of your screen to close each of the open windows. HELP information is shown by clicking the “click here for help” label above the data entry screen buttons. The help screen opens in a separate window. REQUIRED FIELDS: Many of the documents in this system have “required fields”. These fields must be filled in before the system will accept the “Build Document” function. If you click the “Build Document” button and any of the required fields are not filled, the system will provide you with the list of fields and tell you to return to the Data Entry Screens to complete them. Once all “required field” are filled, when you click the “Build Document” button, the system will build the document package and generate the .pdf file. HOW TO EMAIL A PRINT FILE: E-MAIL the document off-line E-mailing a PRINT FILE off line requires two steps. 1. First, save the PRINT FILE to your PC. 2. Second, send the PRINT FILE as an attachment to an E-mail message. I. SAVE THE PRINT FILE TO YOUR PC: There are two alternative methods for saving a PRINT FILE (document) to your PC. First method: Click the PRINT FILE number to view the document package. In the Adobe® window that opens you will see the document package. In that window there is a small button bar. One of the icons on that button bar is titled “save a copy”. This icon looks like a floppy disk in some versions of the Adobe Reader™, but in any case, the title will appear when the cursor hovers over the icon. Click this button. You will see a Save As dialog box. 1.1. At the top of the “Save As” dialog box there is a box labeled “Save in”. Select the folder in which to save this PRINT FILE. (for example, Desktop, My Documents, My Contracts, Temp, the floppy drive, or any other folder you choose). Remember the folder. You will need the folder and file name to attach the file to an email message. 1.2. At the bottom of the “Save As” dialog box there is a box labeled “File name”. The PRINT FILE number appears here. The box labeled “Save as type” is shown directly below the “File name” box. This box displays the words Adobe Acrobat Document. 2. You can change the PRINT FILE number to an easier to remember name by deleting the file number and replacing it with whatever name you wish, e.g., the buyer name, the property address, etc. 3. Click the Save button in the dialog box. Second method: Right Click (use the right mouse button), directly on the PRINT FILE number. 1. In the menu that appears, click “Save Target As…” . This displays a “File Download” dialog box and a “Save As” dialog box. 1.1. At the top of the “Save As” dialog box there is a box labeled “Save in”. Select the folder in which to save this PRINT FILE. (for example, Desktop, My Documents, My Contracts, Temp, the floppy drive, or any other folder you choose). Remember the folder. You will need the folder and file name to attach the file to an email message. 1.2. At the bottom of the “Save As” dialog box there is a box labeled “File name”. The PRINT FILE number appears here. The box labeled “Save as type” is shown directly below the “File name” box. This box displays the words Adobe Acrobat Document. 2. You can change the PRINT FILE number to an easier to remember name by deleting the file number and replacing it with whatever name you wish, e.g., the buyer name, the property address, etc. 3. Click the Save button in the dialog box. IIa. SEND A PRINT FILE THROUGH E-MAIL : After writing a message to an email recipient, ATTACH the PRINT FILE to the message. That will send the PRINT FILE to the recipient. As long as the recipient has an Adobe or Acrobat Reader, he/she will be able to read and print the documents. The method of attaching a file to an e-mail message depends on the e-mail you use. Please read the instructions on attaching a file for your e-mail system in the documentation from your e-mail vendor. Popular e-mail systems are Microsoft Outlook, Outlook Express, AOL, Eudora, etc. IIb. ALTERNATE METHOD OF SENDING THE PRINT FILE THROUGH E-MAIL: Either 1) Double Click on the PRINT FILE number. – this will launch Adobe Reader and display the PRINT FILE OR; 2) Launch Adobe Reader and click FILE > OPEN and open the PRINT FILE. In the menu line click FILE > E-MAIL. 1.1.1.This will launch your e-mail software and display a mail form. 1.1.2.Fill in the mail form and click Send. That will put the email message in the outbox of your email package. Launch your email package and when you send all messages, this message will actually be sent. 1) NOTE: Whether you choose to download the file or display it in an Internet Window, Internet Explorer actually downloads it to your system. The difference is that a File Download Dialog box is only displayed when the “Save Target As…” choice is made. This dialog box is not displayed for any other option. a) Download times can be several minutes depending on the number of documents used in a transaction and the speed of your communications link to the Internet. A contract package that includes 30 or more pages may require more than a minute to download using a modem connection. On the other hand, if you are just downloading a single document, say just a contract with no addenda, the download time will be a few seconds. b) If you choose to display the Document in an Internet Window, the download prior to displaying the document will present a blank screen. Since there is no information about how the download is going, you may conclude that nothing is happening and that can lead to unnecessary false starts and frustration. c) Selecting “Save Target As…” causes a File Download dialog box to be presented by Internet Explorer rather than a blank screen. This download dialog box displays the estimated download time, and shows the progress of the download and the time remaining. This information lets you know what is happening, and eliminates unnecessary false starts and frustration. Forms Capabilities CALCULATIONS When filling in the fields related to “Totals” and “Monthly Rent” on the Property Description – 2 to 4 Family the system automatically calculates two values; 1. the Monthly Rent in the right column 2. the Totals at the bottom of each column. The purpose of the calculation is to provide an accurate set of numbers for the document. Acrobat™ Reader – Notes There are several features of the Acrobat™ Reader that are particularly useful. These are; d) Find all instances of a word in the contract package. For example, say you want to locate the word “water” in any document in the package. Click on the Edit command in the menu line of Acrobat™ Reader and select Find in the pull down menu (or use the [Ctrl, F] shortcut). Type in the word “water” and the Acrobat™ Reader will find the first instance and display the document at that point. To find the next instance of this word click on Edit and Find Again (or use the [Ctrl, G] shortcut), and Acrobat™ Reader will display the next instance of the selected word. e) Go to a specific screen of the completed set of documents. Click on Document, and select Go to Screen (or use the [Ctrl, N] shortcut) and select the screen you wish to go to . f) Use the scroll bar to the right of the document to scroll through all the screens of the document to get to the one you want. g) To print a single document Click on File and select Print in the pull down menu. If the screen you want to print is the screen you are looking at, select Print Current screen. Alternatively, enter the page numbers or range of page numbers that you want to print and print them. System Usage Hints – Frequently Asked Question The “Frequently Asked Questions” manual is available for download from the Welcome Screen. It is shown at the bottom of the list of document packages. Click the document name and it will open in Adobe Reader. Saving Data Files 1. Data files saved on the server are only accessible to you. There is no need to select a folder in which to save the data file. This makes opening a file for re-use simpler, since you do not need to remember in which folder you had saved it. 2. Data files saved on the server are accessible from any PC. You can start a contract at home, save the data file, go to the office and then open the same data file and complete the contract at the office. 3. Data files saved on the server are retained until deleted by you. We recommend you delete data files every few months. 4. Data files saved on the server omit all data related to Social Security numbers. System Requirements You must have the following packages installed on your PC to use this system. 1. Internet Explorer 5 or later. At the time of this writing the current version is IE 6.0. 2. Adobe Acrobat™ Reader version 4.0 or later – current version at time of this writing is 7.0. To see the version of Internet Explorer (IE) that you have do the following; While you are using Internet Explorer click on the HELP command in the menu line at the top of the IE window. In the “pull down” menu, click on “About…”. The screen that appears includes the version number. If it is not version 5.0 or later, please download and install the current version. Download time will vary based on the speed of your internet connection, so make sure that you have the necessary time set aside to do this. Upgrades from older versions of IE are available at no cost directly from Microsoft. http://windowsupdate.microsoft.com If you do not already have a copy of the Acrobat™ Reader, it is available at no cost from www.adobe.com. Please click on the Adobe button to download and install this package. The download time varies depending on the speed of your connection, so make sure that you have the necessary time set aside to do this. (Probably less than 15 minutes). If you need to set parameters for this system, see the section titled Parameter Settings at the end of this document. Parameter Settings - Introduction This section describes the parameter settings needed to run the forms package, and how to set them. 1. 2. 3. 4. On the Windows Desktop, Click the START button. Click on Settings Click on Control Panel Click on Internet Options (in the control panel display) Settings: This section describes the parameter settings needed to run our package, and how to set them. 1. 2. 3. 4. On the Windows Desktop, Click the START button. Click on Settings Click on Control Panel Click on Internet Options (in the control panel display) This will display the Internet Options dialog box. 1. Click on the Security tab 2. Click once on the Internet Globe to insure that it is highlighted, (i.e., selected). 3. Click the Custom Level button at the bottom of the Security tab. This will display the Security Settings Dialog box. 4. In the Security Settings dialog box scroll down to the bottom. 4.1. find the line that reads “Allow websites to prompt for information using scripted Windows” 4.2. Set this option to “Enable” 4.3. Click “OK” to close the Security Settings dialog box. 4.3.1.The system will ask if you “really want to make the change” 4.3.2.answer “YES” 4.4. Click “OK” to close the Internet Properties (or Internet Options) dialog box. 5. The following change is recommended as it will to direct Internet Explorer to save the data that you enter in each field on each form and present pull down lists as you start typing. This is just a convenience to you. It is not a requirement for using the system. 5.1. Click the Content Tab at the top of the Internet Options dialog box 5.2. Click the “AutoComplete” button in the “Personal Settings” area of the Content Tab 6. There are four checkboxes shown in the dialog box. The checkbox that must be checked is labeled “Forms”. The others have no bearing on this system. Click OK to exit the Content Tab, and OK again to exit the Internet Properties box. Once you have completed all this, the package should run without a problem. If it does not, or if you need help with this configuration, please call technical support at 703-349-6405. Support If you have questions about anything in this manual or questions on the use of the product, please call 703-349-6405. Before you call for support: Did you check this manual for help? Gather the following information and call the Technical Support phone number listed above. Your name, company name, NRDS number, User Name and phone number. Version number of Internet Explorer, (version 5.0 or later) Version number of Adobe® Reader™, Adobe® Acrobat™ Reader or Adobe® Acrobat™ Information about your computer including operating system, e.g., Windows 98, NT, ME, 2000, XP, Vista, etc. What you were doing when the problem happened Sometimes it will be necessary to get a copy of your data file in order to fix a problem. If so, please attach a copy of the data file to your email message, or, if the file is available on the server, send the name of the data file to tech support so that we can access it directly. Visit our web site at www.mbaiforms.com for helpful tips on this product, to order products, or to find out about more products and services available from MB Associates, Inc.