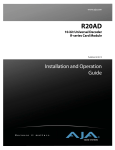
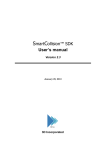
1
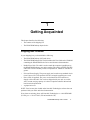
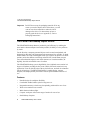
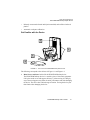
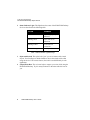
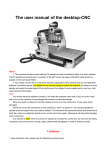
PHANTOM® DESKTOP™
USER ’S GUIDE
Copyright Notice
©1999-2005. SensAble Technologies, Inc. All rights reserved.
Printed in the USA.
Except as permitted by license, no part of this publication may be reproduced, stored in a
retrieval system, or transmitted, in any form or by any means electronic, mechanical, recording
or otherwise, without prior written consent of SensAble Technologies.
Trademarks
FreeForm, FreeForm Concept, FreeForm Modeling, FreeForm Modeling Plus, FreeForm
Mold, PHANTOM, PHANTOM Desktop, PHANTOM Omni, GHOST, 3D Touch, SensAble
and SensAble Technologies are trademarks or registered trademarks of SensAble
Technologies, Inc. Other brand and product names are trademarks of their respective holders.
Warranties and Disclaimers
SensAble Technologies does not warrant that this publication is error free. This publication
could include technical or typographical errors or other inaccuracies. SensAble may make
changes to the product described in this publication or to this publication at any time, without
notice.
Questions or Comments
If you have any questions for our Customer Support staff, please contact us at
[email protected]. You can also phone 1-888-SENSABL (U.S.A. only) or 1-781-937-8315
(International).
If you have any questions or comments about the documentation, please contact us at
[email protected].
Corporate Headquarters
SensAble Technologies, Inc.
15 Constitution Way
Woburn, MA 01801
Phone: 1-888-SENSABL (U.S.A. only)
E-mail: [email protected]
Internet: http://www.sensable.com
Last updated - Thursday, 10 February, 2005
P/N - 01670 R11
Contents
Preface ...............................................................
Chapter 1
i
Getting Acquainted .............................................1
Shipping Box Contents ........................................................... 1
The PHANTOM Desktop Haptic Device ............................... 2
Chapter 2
Installing the PHANTOM Device Drivers ...........7
System Requirements .............................................................. 7
Installing the PHANTOM Device Driver ............................... 8
Chapter 3
Connecting the PHANTOM Desktop Device ...11
Connecting the Device .......................................................... 11
Limits to the Range of Motion of the Device ....................... 13
Chapter 4
Device Calibration .............................................17
Chapter 5
Computer Setup ................................................19
Appendix A Customer Support ...........................................21
Appendix B Troubleshooting ..............................................23
Appendix C Configuring Multiple Devices .........................27
Appendix D Regulatory Notices
.........................................29
Appendix E Device Specifications
.....................................33
Appendix F Device Packaging Instructions ......................35
PHANTOM Desktop User’s Guide
PHANTOM Desktop User’s Guide
Preface
About This Guide
The PHANTOM Desktop User's Guide describes the process of connecting the
hardware and installing the required device drivers, and demonstration software for
your new PHANTOM Desktop system.
We've worked extensively to ensure that the PHANTOM Desktop and Device
Drivers install and work smoothly on your computer. If you experience any
problems in the installation or use of your system or hardware, please contact
Customer Support as indicated in Appendix A, “Customer Support”, of this
document. Your feedback and input are essential! Please don't hesitate to contact us
with technical questions and suggestions for improvement.
How This Guide Is Organized
The PHANTOM Desktop User's Guide is divided as follows:
Chapter 1, Getting Acquainted, describes the PHANTOM Desktop and many of
the items that came with the system.
Chapter 2, Installing the PHANTOM Device Drivers, describes how to install
the software necessary to run this product.
Chapter 3, Connecting the PHANTOM Desktop Device, describes how to
connect the hardware.
Chapter 4, Device Calibration, describes how to calibrate the device.
Chapter 5, Computer Setup, describes changes that may need to be made to your
computer for using the PHANTOM Desktop device via the parallel port.
PHANTOM Desktop User’s Guide
i
PREFACE
Additionally, there are several appendices that include information on Customer
Support, troubleshooting, configuring multiple devices, regulatory notices, device
specifications and repackaging instructions.
Typographical Conventions
This guide uses the following typographical conventions:
ii
Convention
Description
Italics
First use of a new term;
See the User Manual.
shows emphasis; references
another document or file.
<Italics>
A variable
Bold
Keywords, actual user input, Click Ok.
directory paths, program
group names or examples.
Greater Than (>)
Indicates a menu pick.
Courier
Identifies code samples.
Note, Warning,
Important
Calls out important
information.
PHANTOM Desktop User’s Guide
Example
<Installed Directory>/
files.
Tools > Options
1
Getting Acquainted
1e
rC
h
t
p
a
This chapter describes the following:
•
The contents of the shipping box
•
The PHANTOM Desktop haptic device
Shipping Box Contents
In your shipping box you should find the following:
•
The PHANTOM Desktop 3D Touch device.
•
The PHANTOM Desktop Kit: The kit includes this User Guide and a CD-ROM
containing the PHANTOM Device Driver and electronic documentation.
•
Parallel Port Cable: The cable is used to attach the computer's parallel port to
the PHANTOM Desktop or one unit to another. The cable is an IEEE 1284 EPP
cable with a ferrite bead that provides an impedance at 100mhz of 199 ohms or
greater.
•
Universal Power Supply: The power supply can be used on any standard circuit
(an AC input of 47-63 Hz and 100-250 VAC) using the supplied power cord.
•
Power Cord (if supplied): The power cord connects the Universal Power
Supply to the wall outlet. If no cord was shipped with your unit, use a cable
with a current carrying capacity of at least 5 Amps that satisfies national and
local electrical requirements.
•
A gelpad wrist rest.
NOTE: Your box may also include other SensAble Technologies software that was
purchased with your order and other documentation.
If any items are missing, please call SensAble Technologies at +1-888-SENSABL
(US only) or +1-781-937-8315 (US and outside the US).
PHANTOM Desktop User’s Guide
1
1 GETTING ACQUAINTED
The PHANTOM Desktop Haptic Device
Important Do NOT throw away the packaging materials. If for any
reason you need to ship the device in the future, you will
want to reuse these materials to reduce the risk of
damage to the device. For instructions on how to
properly pack the device see Appendix F, “Device
Packaging Instructions”.
The PHANTOM Desktop Haptic Device
The PHANTOM Desktop enhances productivity and efficiency by enabling the
most intuitive human/computer interaction possible, the ability to solve problems
by touch.
For the first time, computer-generated objects can be created, manipulated, and
deformed just like their real counterparts in the most natural way possible...by hand.
Model makers can sculpt virtual digital mock-ups, surgeons can practice on virtual
patients, molecular chemists can fit drug molecules into virtual human receptor
sites, and mechanical engineers can check tolerances of virtual assemblies, all
digitally, but with an incredible sense of realism.
The PHANTOM Desktop system's high fidelity force feedback senses motion in 6
degrees of freedom providing the best, most realistic 3D Touch sensation for any
application. Users can feel the point of the stylus in all axes, and track its orientation
(pitch, roll and yaw). The PHANTOM Desktop's portable design, compact
footprint, and simple parallel port interface ensure quick installation and ease of
use.
Features
•
Portable design for workplace flexibility.
•
Comfortable molded rubber stylus for long term use.
•
Integrated momentary switch on stylus optimally positioned for ease of use.
•
Wrist rest to maximize user comfort.
•
Multi-function indicator light.
•
Compact workspace offers better range of motion for ease of use.
•
Small desktop footprint.
2
PHANTOM Desktop User’s Guide
1 GETTING ACQUAINTED
The PHANTOM Desktop Haptic Device
•
Robustly constructed of metal and injection molded, carbon fiber reinforced
plastics.
•
Automatic workspace calibration.
Get Familiar with the Device
2
1
3
4
FIGURE 1-1. Front view of the PHANTOM Desktop with wrist rest
The following correspond to the call-outs in Figure 1-1 and Figure 1-2.
1
Metal Covers and base: hold to lift the PHANTOM Desktop device.
The PHANTOM Desktop device is a sensitive piece of electronic equipment.
Lift by the metal covers and support the base [1] when moving it. Lifting by
any of the moving parts may affect the unit's performance and risks damaging
the device. The device has a limited range of motion. Forcing the device past
these limits risks damaging the device.
PHANTOM Desktop User’s Guide
3
1 GETTING ACQUAINTED
The PHANTOM Desktop Haptic Device
2
Status Indicator Light: This light shows the status of the PHANTOM Desktop
device as described in the following table:
COLOR
MEANING
Constant Green
Active and properly
calibrated
Blinking Green
Active, but out of
calibration
Blinking Yellow
Just attached or
powered on
Constant Orange
Stand-by mode
Table 1: Status Indicator Light Meanings
3
Stylus with Switch: The stylus is the "pen" you use to interact with virtual
objects. Your forefinger or thumb should rest above the raised switch when
using the device. Like a mouse button, the switch is used differently in each
application.
4
Gelpad Wrist Rest: The wrist rest helps to support your wrist while using the
PHANTOM Desktop. Try it in many locations to determine which is best for
you.
4
PHANTOM Desktop User’s Guide
1 GETTING ACQUAINTED
The PHANTOM Desktop Haptic Device
6
7
5
FIGURE 1-2. Connectors on the Rear of the PHANTOM Desktop
5
Parallel Port To Computer: The male bottom connector is connected to the
computer's parallel port using the supplied IEEE-1284 rated cable.
6
Parallel Port to Second PHANTOM Desktop: The female upper connector is
daisy-chained to a second PHANTOM Desktop when two units are used
simultaneously. When daisy-chained, this connector has to be attached to the
male bottom connector on the second unit.
7
Power Plug Connector: The power plug from the Universal Power Supply
connects to this socket. Use only the Skynet Power supply provided by
SensAble Technologies for the operation of this equipment.
PHANTOM Desktop User’s Guide
5
1 GETTING ACQUAINTED
The PHANTOM Desktop Haptic Device
6
PHANTOM Desktop User’s Guide
2
Installing the PHANTOM
Device Drivers
2e
rC
h
t
p
a
This chapter will show you step by step how to install the PHANTOM Device
Driver.
System Requirements
The following system requirements apply to the use of the PHANTOM Desktop
and driver software:
•
The PHANTOM Desktop and Device Drivers run on Intel processor PCs (and
select AMD processor PCs - please see our website), Windows 2000, or
Windows XP. The Desktop will also run on Red Hat Linux; for information
contact Customer Support.
•
When PCs are used, it is recommended that you use a 166 MHz Pentium II
processor at a minimum.
•
The PHANTOM Device Drivers distribution requires approximately 30 MB of
disk space. The PHANTOM Device Drivers do not specify memory
requirements; however, a minimum of 32 MB for PC platforms and 64 MB for
SGI platforms is recommended for overall system performance.
•
The PHANTOM Device Drivers are distributed on CD-ROM. The device
driver may be found on the CD of any software you have purchased.
PHANTOM Desktop User’s Guide
7
2 INSTALLING THE PHANTOM DEVICE DRIVERS
Installing the PHANTOM Device Driver
Installing the PHANTOM Device Driver
Installing on Non-Windows Operating Systems For instructions on installing on
other operating systems, such as Linux, see the Installation Guide that came with
your product.
To install the PHANTOM Device Drivers on a Windows platform:
1
Log in to your computer as administrator (or as a user with administrative
privileges).
2
Insert the CD into the CD-ROM drive. Then run SETUP.EXE from the
PHANTOM Device Drivers folder. Follow the instructions on the screen during
the installation to specify the installation directory and custom installation
instructions.
If you have previously installed an older version of the
PHANTOM Device Drivers on the computer, you will be
prompted to remove it before proceeding with the installation. If
you get this message:
1
Exit the setup program.
2
From the Start menu, select Settings > Control Panel > Add/
Remove Programs.
3
Find the PHANTOM Device Driver in the list and select it.
4
Press Add/Remove.
Note If you are prompted during the uninstall to delete
shared files that appear to no longer be needed, DO NOT
DELETE these files unless you are absolutely sure of
their use.
When you have finished uninstalling, resume the installation of
the new PHANTOM Device Driver.
8
PHANTOM Desktop User’s Guide
2 INSTALLING THE PHANTOM DEVICE DRIVERS
Installing the PHANTOM Device Driver
The default directory for installing the PHANTOM Device Drivers is C:\Program
Files\SensAble\PHANTOM Device Drivers. You will also find the Dice demo
program executable in the C:\Program Files\SensAble\3D Touch Demos directory.
You will be using this demo application to calibrate your device in a coming
chapter.
At the end of the Setup process you will be presented with the PHANToM
Configuration dialog box (shown below) that allows you to configure the software
for your PHANTOM device.]
FIGURE 2-1. Selecting the Configuration
PHANTOM Desktop User’s Guide
9
2 INSTALLING THE PHANTOM DEVICE DRIVERS
Installing the PHANTOM Device Driver
Note You can also access the PHANTOM Configuration application any
time after installation through the Settings/Control Panel/PHANTOM
Configuration icon from the Start Menu.
3
Select the Default PHANToM item from the PHANToM drop-down list.
4
Select the Desktop in the PHANToM model drop-down list.
5
The Port Number field specifies the port that will be used by the PHANTOM
Desktop. In most cases, this field should be set to 1. If you have installed an
additional parallel port card for use with your PHANTOM Desktop, you will
need to check your system settings to determine the correct value. For an addon card, this value will most likely need to be set to 2.
6
After the installation completes you will be prompted to restart the computer.
Rather than restarting your computer, you should shut it down and turn it off to
connect the PHANTOM Desktop. To do this, choose restart later, then shut
down your computer normally and turn off the power to your computer. Leave
the power off and proceed to Chapter 3, "Connecting the PHANTOM Desktop
Device".
10
PHANTOM Desktop User’s Guide
3
Connecting the PHANTOM
Desktop Device
3e
rC
t
p
a
h
This chapter will show you:
•
How to connect a PHANTOM Desktop device to your computer
•
The limits to the range of motion of the PHANTOM Desktop device.
Connecting the Device
Warning Lift by the metal covers and support the base when moving the
PHANTOM Desktop. Lifting by any of the moving parts may affect the
unit's performance and risks damaging the device. The PHANTOM
Desktop device has a limited range of motion. Forcing the device past these
limits risks damaging the device.
1
With the computer still turned off, attach the male end of the supplied IEEE1284 rated cable to your computer's parallel port.
The high demands of the PHANTOM Desktop device on the parallel port
require the device to have a dedicated parallel port for its use. If you are
currently using your parallel port for a printer, dongle or other peripheral, you
will need to install an additional parallel port card in your system. You can
choose whether to connect the PHANTOM Desktop device or the other
peripherals to the additional card.
PHANTOM Desktop User’s Guide
11
3 CONNECTING THE PHANTOM DESKTOP DEVICE
Connecting the Device
B
A
FIGURE 3-1. Detail of Connectors
2
Plug the female end of the cable to the male bottom connector (A) of
PHANTOM Desktop.
3
Hook up the Skynet Power Supply (use only the supplied power supply with
the PHANTOM Desktop device):
Plug the power cord into the power supply. Plug the power cord into an
available outlet (for 110V the outlet must be rated for at least 2 Amps, for
220V: 1 Amp). The green status light on the power supply indicates that it is
working correctly. Finally plug the power connector into the connector (B) on
the back of PHANTOM Desktop device.
4
Ensure that the PHANTOM Desktop Status Indicator Light is lit (it will either
be blinking yellow or solid orange if working properly). If it is not, check all of
the connections. If the problem persists, contact SensAble Technologies.
5
Position the PHANTOM Desktop device.
12
PHANTOM Desktop User’s Guide
3 CONNECTING THE PHANTOM DESKTOP DEVICE
Limits to the Range of Motion of the Device
FIGURE 3-2. Suggested Position of the PHANTOM Desktop
Place the PHANTOM Desktop device to the inside of your mouse; place the gelpad
wrist wrest directly in front of the PHANTOM Desktop. (This should place the
device in a comfortable position). In certain applications, the PHANTOM Desktop
device can be used in place of the mouse.
Limits to the Range of Motion of the Device
It is important to understand the physical limitations of the PHANTOM Desktop
device so that you do not inadvertently damage the device by forcing it past its
designed limits.
The device has six degrees of motion. All the degrees of motion have their limits, so
when you reach one of these limits you'll feel a sudden stop. That is the mechanical
stop designed into the device. Forcing the device past any of these stops risks
damaging the device.
To become more familiar with the physical limits of the PHANTOM Desktop
device, follow these steps before using the device:
PHANTOM Desktop User’s Guide
13
3 CONNECTING THE PHANTOM DESKTOP DEVICE
Limits to the Range of Motion of the Device
1
Grasp the black rubber grip of the stylus as you would a pen, with the free end
of the stylus (what would be the non-writing end of a pen) pointing toward you
and the point of the stylus (the end connected to the arm) pointing toward the
unit. Using the following illustrations as a guide, gently move the stylus in all
directions to locate the mechanical stops.
UP/DOWN
LEFT/
RIGHT
IN/OUT
FIGURE 3-3. Moving with the arm
2
14
Using the above figure as a guide, start with large-but gentle-movements. Move
the stylus left/right, up/down, and in/out. The segments of the PHANTOM
Desktop device will move. When you reach a limit, you'll feel one of the
device's mechanical stops. Don't force the device past any of these stops.
PHANTOM Desktop User’s Guide
3 CONNECTING THE PHANTOM DESKTOP DEVICE
Limits to the Range of Motion of the Device
BACK/FORTH
LEFT/RIGHT
UP/DOWN
FIGURE 3-4. Moving from the wrist
3
Hold the arm attached to the stylus with one hand and gently rotate the stylus
back/forth, up/down, and left/right with your other hand. Again, when you
encounter a limit, the motion will be stopped.
Now you have a feel for the range of motion of the PHANTOM Desktop device and
where its limits are.
Important When you're using the device, never force it past its
limits. Be especially careful never to turn the stylus so
that the connected end faces you.
Now that the PHANTOM Desktop device is properly positioned and you have a
feel for its range of motion, you may continue with the final steps of installation and
calibrate your device.
PHANTOM Desktop User’s Guide
15
3 CONNECTING THE PHANTOM DESKTOP DEVICE
Limits to the Range of Motion of the Device
16
PHANTOM Desktop User’s Guide
4
Device Calibration
4e
rC
p
a
h
t
The PHANTOM Desktop device automatically maintains proper calibration when
plugged in. Since you have just supplied power to the device for the first time,
however, you will need to calibrate it as described below. Once this procedure is
complete, you should not need to execute it again unless you unplug or otherwise
lose power to the PHANTOM Desktop device.
If your computer is unable to communicate with the PHANTOM
Desktop device you may have to configure your System's BIOS for
communicating to the parallel port via the ECP or EPP communication
protocols. For instructions, see Chapter 5, "Computer Setup".
The Dice Demo The Dice demo consists of a single cube bounded by a box-shaped
haptic workspace. This program makes use of more advanced dynamics and
collision detection. When used with a 6 DOF PHANTOM device this demo
demonstrates GHOST SDK's ability to generate both forces and torques. There are
options for enabling/disabling gravity, adjusting dynamic properties of the cube,
and if you click the stylus while touching the die, you can pick it up.
1
Start the Dice demonstration available in SensAble Install directory/3D Touch
Demos. [On a Linux workstation, the demos are located in the /usr/bin
directory.]
The Dice demo will start and you will be presented with a room with a single
die in it. At this point, the light on your PHANTOM device should be blinking
green, indicating that it awaits calibration. If you receive an error or the
application does not start for any reason, please see Appendix B,
"Troubleshooting".
2
To calibrate the PHANTOM Desktop device, pick up the stylus as you would a
pen, but with the free end towards you. Now, move the yellow probe around in
the virtual room. Because your device is uncalibrated, you will be able to pass
PHANTOM Desktop User’s Guide
17
4 DEVICE CALIBRATION
through the walls of the room. Move the yellow probe about in the room,
passing fully through the side walls, ceiling and front and back of the room. If
you feel resistance, don't force the device. Excessive force will break the stops
and damage the device.
At some point during this exploration, the light on the PHANTOM Desktop
light should stop flashing and stay a constant green. The walls will now become
fully touchable. This indicates that it has acquired the appropriate information
and automatically calibrated the device.
3
Feel free to fully explore the room using your sense of touch. Touch the die and
push it around. Feel the edges and corners of the room.
When the PHANTOM Desktop arm is fully extended such as when touching
the nearest corners of the room, it may buzz a bit. This is normal.
If the light never stops flashing or you never feel the walls of the room, see
Appendix B: Troubleshooting.
4
Exit the Dice demo by clicking your mouse on the X in the upper right corner
of the window.
The device is now fully calibrated and should not need re-calibration unless it is
unplugged. If you do need to re-calibrate the device, repeat the above procedure.
18
PHANTOM Desktop User’s Guide
5
Computer Setup
5e
rC
h
t
p
a
Some computers require that you configure your System's BIOS for communicating
to the parallel port via the ECP or EPP communication protocols. If your computer
is unable to communicate with the haptic device and you have checked that all
cables are properly connected, you may need to reconfigure your computer’s BIOS
as explained below.
Warning Please refer to your computer’s user manual for specific
instructions. The following instructions are generic and may not pertain
exactly to your situation.
To change the BIOS settings:
1
Turn on your computer and get ready to enter BIOS setup. On most systems, a
message such as "Hit F2 for Setup" will appear shortly after power-up. The
most common key to hit for your system is listed in the table above in
parentheses in the List B column. However, you should double-check your
computer manual to be sure what key to hit and when.
2
Enter the peripheral setup options.
Once you have entered the BIOS setup, you need to access the BIOS page for
configuring peripherals. On most systems, these options are presented in the
advanced page or a peripheral page of the BIOS setup.
3
Set the parallel port to the correct mode (ECP or EPP).
If your system does not have an ECP or EPP setting, please contact Customer
Support as indicated in Appendix A, "Customer Support", of this document.
4
Save your changes and exit the BIOS setup. This will reboot your system
automatically and it should now be set up for working with the PHANTOM
Desktop device.
PHANTOM Desktop User’s Guide
19
5 COMPUTER SETUP
20
PHANTOM Desktop User’s Guide
Appendix A Customer Support
Warning DO NOT OPEN THE UNIT. There are no serviceable
components in the PHANTOM Desktop device or power supply. Return to
SensAble for servicing. See Appendix F, "Device Packaging Instructions".
If you encounter any difficulties, you can obtain Customer Support through the
following three channels:
•
If you purchased your PHANTOM Desktop from a distributor, please contact
them first.
•
SensAble Technologies Customer Support can be reached via e-mail at
[email protected].
•
SensAble Technologies Customer Support can also be reached via telephone:
-
Inside the United States: 1-888-SENSABL (1-888-736-7225).
-
Outside the United States: +781-939-7444.
PHANTOM Desktop User’s Guide
21
A CUSTOMER SUPPORT
22
PHANTOM Desktop User’s Guide
Appendix B Troubleshooting
This section provides tips for correcting some common PHANTOM Desktop
device problems. If after following these steps, you cannot resolve the problem,
please contact Customer Support (see Appendix A).
The PHANTOM Desktop light does not come on at all. The light on the
PHANTOM Desktop device should be on if it is receiving power. Check that the
power supply is plugged into a working outlet (the light on the power supply should
be green if it is). Then check that the connection between the power supply and the
PHANTOM device is made correctly.
The light on the PHANTOM Desktop device is orange. This is not a
problem. When the device is plugged in, but not currently being used by an
application, it will be orange to let you know that it is receiving power.
The light on the PHANTOM Desktop device is flashing
yellow. This is not a problem. This indicates that the power to the device and the
parallel port have just been initially connected. Once you successfully run an
application with the device, such as one of the provided demonstrations, the light
should no longer be this color.
When running a demonstration or application, the light on the
PHANTOM Desktop device flashes green. This indicates that your
PHANTOM Desktop may not be properly calibrated. This can happen if you unplug
it. To re-calibrate the device, follow the steps outlined Chapter 4, "Device
Calibration". If you are unable to calibrate the device using these steps, please
contact Customer Support as explained in Appendix A.
PHANTOM Desktop User’s Guide
23
B TROUBLESHOOTING
When I start a demo I get an error. This can happen if the device is not
plugged in properly or is not configured properly. Execute the following steps,
checking at each point for proper operation:
1
Verify power supply - Check to make sure the PHANTOM Desktop device is
plugged in properly. The light on the device will be lit (and possibly flashing) if
power is being supplied.
2
Verify parallel port connection - Make sure that you have the parallel port
cable plugged into the LOWER port on the PHANTOM Desktop device. Make
sure you have the other end plugged into the parallel port on your computer.
3
Verify matched settings between the PHANTOM Desktop device and
computer:
4
a
From the Start menu, select Settings > Control Panel. Within the control
panel window, select PHANTOM Configuration. You will be presented
with a dialog box for configuring your device. Ensure that PHANTOM
Desktop is chosen as the model. Check and write down the parallel port
mode and base address (for example, "ECP" and "x378").
b
Restart your computer and prepare to enter the BIOS setup. (If you are
unfamiliar with configuring a BIOS, get assistance from a system
administrator or other computer professional.)
c
Enter BIOS setup (how this is done varies by machine, but the key to hit
will usually be listed immediately upon the start of the re-boot sequence usually F1, F2 or DEL. On some machines, you may have to turn the
computer fully off and on again to reach the BIOS configuration utility).
d
While you are in the peripherals configuration page, check to see what
alternate settings are available for the parallel port (for example, check to
see if both ECP and EPP are available). If the device does not run with one
setting you can try another using the steps below.
If the device still does not run and you have more than one setting available in
your BIOS setup (see "d" above), then re-enter the PHANTOM Configuration
utility and set the port mode to one of the other modes available in your BIOS.
Then, restart and re-enter the BIOS setup and set it to the same settings.
If, after following the above steps, you are still unable to start a demonstration
application, please contact SensAble Customer Support.
24
PHANTOM Desktop User’s Guide
B TROUBLESHOOTING
I am able to start a demonstration application; but even though the
light is solid green, the device behaves strangely when I move it
around in a scene. It is possible that there is a defect or a loose connection
inside the PHANTOM Desktop device. DO NOT ATTEMPT TO OPEN THE
DEVICE. Contact SensAble Customer Support. When contacting Support, you may
be asked to run the "PHANTOM Test" application to help with diagnosis. This
application can be found in the directory where you installed the PHANTOM
Device Drivers.
The following describes the basic features of this test application which you should
be prepared to run.
Select - Select the PHANTOM device which you want to test. Usually this will be
"Default PHANTOM".
Read Encoders - The values being sensed for the positions and rotations of the
device are dynamically displayed in the window. It additionally will display
whether the stylus switch is pressed or not and whether you are holding the device
(presence switch=on). The picture of the PHANTOM Desktop device should
change dynamically as you move the stylus around.
Cycle Amps - This will simply turn the amplifiers off then on again repeatedly to
test their functioning. You should hear the device clicking on and off.
PHANTOM Desktop User’s Guide
25
B TROUBLESHOOTING
Test Forces - Move the Move the sliders with your mouse to generate forces which
push against your hand. X controls force parallel to the table. Y controls force up
and down. And Z controls force in and out.
.
IMPORTANT
Perform this test deliberately and slowly to avoid sudden movements. Hold
onto the stylus when executing this test.
Box Test -- Provides a box which you can feel with your PHANTOM Desktop. The
sides of the box should feel flat and the corners sharp.
Quit - Quits the test application.
26
PHANTOM Desktop User’s Guide
Appendix C Configuring
Multiple Devices
Multiple Devices
If you want to use more than one PHANTOM device with your computer, you can
create as many as 20 uniquely named PHANTOM configurations. Each named
PHANTOM configuration can refer to a particular system configuration that you
use frequently. Which device to use is defined by the software application which
uses it. All demonstrations installed with the PHANTOM Device Drivers use
"Default PHANToM" as the configuration.
To create a new PHANTOM configuration, simply select the Add button and key in
a name to call that device. Then, follow the instructions previously given for
defining the configuration for that device.
Dual Configurations
The Dual Configuration settings only apply if you want to set up a pair of
PHANTOM devices to work in tandem with each other. You must have created at
least two PHANTOM devices as described above before the Dual Configuration tab
becomes useful. Once you have created at least two devices, go to the Dual
Configuration area and select the PHANTOM devices you would like to use in a
paired configuration. Then, enable the check box to turn the dual configuration on.
PHANTOM Desktop User’s Guide
27
C CONFIGURING MULTIPLE DEVICES
28
PHANTOM Desktop User’s Guide
Appendix D Regulatory
Notices
FCC Notice (U.S. Only)
The PHANTOM® Desktop™ haptic device is classified by the Federal
Communications Commission (FCC) as a Class B digital device.
Note: This equipment has been tested and found to comply with the limits for a
Class B digital device, pursuant to part 15 of the FCC Rules. These limits are
designed to provide reasonable protection against harmful interference in a
residential installation. This equipment generates, uses and can radiate radio
frequency energy and, if not installed and used in accordance with the instructions,
may cause harmful interference to radio communications. However, there is no
guarantee that interference will not occur in a particular installation. If this
equipment does cause harmful interference to radio or television reception, which
can be determined by turning the equipment off and on, the user is encouraged to try
to correct the interference by one or more of the following measures:
•
Reorient or relocate the receiving antenna.
•
Increase the separation between the equipment and receiver.
•
Connect the equipment into an outlet on a circuit different from that to which
the receiver is connected.
•
Consult the dealer or an experienced radio/TV technician for help.
Modifications not expressly approved by the manufacturer could void the user's
authority to operate the equipment under FCC rules.
The following information is provided on the device covered in this document in
compliance with FCC regulations:
Product Name: PHANTOM Desktop
Model Number: 01352
Company Name: SensAble Technologies
PHANTOM Desktop User’s Guide
29
D REGULATORY NOTICES
NOTES:
Any changes or modifications to the hardware not expressly approved by SensAble
Technologies could void the user's authority to operate this equipment.
Use of an IEEE-1284 parallel port cable with a ferrite bead is required to comply
with the Class B limits of Part 15 of FCC rules. This cable is provided with the
hardware; additional cables are available directly from SensAble Technologies.
Canadian Requirements:
Canadian Department of Communications Radio Interference Regulations
This digital apparatus, the PHANTOM Desktop haptic device, does not exceed the
Class B limits for radio-noise emissions from digital apparatus as set out in the
Radio Interference Regulations of the Canadian Department of Communications.
Règlement sur le brouillage radioélectrique du ministère des Communications
Cet appareil numérique, the PHANTOM Desktop haptic device, respecte les limites
de bruits radioélectriques visant les appareils numériques de classe B prescrites
dans le Règlement sur le brouillage radioélectrique du ministère des
Communications du Canada.
30
PHANTOM Desktop User’s Guide
D REGULATORY NOTICES
European Requirements:
EN 55022 Statement
This is to certify that the SensAble Technologies PHANTOM Desktop haptic
device is shielded against the generation of radio interference in accordance with
the application of Council Directive 89/336/EEC, Article 4a. Conformity is
declared by the application of EN 55022 Class B (CISPR 22).
Warning: This is a Class B product. In a domestic environment, this product may
cause radio interference, in which case, the user may be required to take appropriate
measures.
Achtung: Dieses ist ein Gerät der Funkstörgrenzwertklasse B. In Wohnbereichen
können bei Betrieb dieses Gerätes Rundfunkstörungen auftreten, in welchen Fällen
der Benutzer für entsprechende Gegenmaßnahmen verantwortlich ist.
Attention: Ceci est un produit de Classe B. Dans un environnement domestique, ce
produit risque de créer des interférences radioélectriques, il appartiendra alors à
l'utilisateur de prendre les mesures spécifiques appropriées.
PHANTOM Desktop User’s Guide
31
D REGULATORY NOTICES
32
PHANTOM Desktop User’s Guide
Appendix E Device
Specifications
Nominal Position Resolution >1100 dpi (~0.023 mm)
Workspace 6.4 w x 4.8 h x 4.8 d in (160 w x 120 h x 120 d mm)
Backdrive Friction <0.23 oz. (0.06 N)
Maximum Exertable Force 1.8 lbf. (7.9 N)
Continuous Exertable Force (24 hrs) 0.4 lbf. (1.75 N)
Stiffness
X axis > 10.8 lb/in (1.86 N/mm)
Y axis > 13.6 lb/in (2.35N/mm)
Z axis > 8.6 lb/in (1.48 N/mm)
Inertia (apparent mass at tip) ~0.101 lbm. (45 g)
Footprint 5 5/8 w x 7 1/4 in d (~143 w x 184 d mm)
Weight* 6 lb 5 oz.
Operating Temperature 50° to 95°F10° to 35°C
Storage Temperature -40° to 149°F-40° to 65° C
Relative Humidity 20% to 80% (noncondensing)
Force Feedback 3 degrees of freedom (x, y, z)
Position Sensing x,y,z (digital encoders); [stylus gimbal - pitch, roll, yaw (+/- 3% linearity potentiometers)]
Input Voltage 100-250 VAC
Input Frequency 47-63 Hz
Input Current 2A @ 115 VAC1A @ 230 VAC
Warranty Three months
*Does not include power supply or cables.
Product specifications are subject to change without notice
PHANTOM Desktop User’s Guide
33
E DEVICE SPECIFICATIONS
34
PHANTOM Desktop User’s Guide
Appendix F Device Packaging
Instructions
If you need to transport or ship the device, please follow these packaging guidelines
to reduce the risk of damage.
Important
Remember, the PHANTOM Desktop device is a sensitive piece of electronic
equipment. Lift by the metal covers and support the base when moving it. Lifting by
any of the moving parts may affect the unit's performance and risks damaging the
device. The PHANTOM Desktop device has a limited range of motion. Forcing the
device past these limits risks damaging the device.
Shipping Checklist / Packing Materials:
•
1 Small cardboard box (internal box)
•
1 Large shipping box (external box)
•
1 Set of white foam inserts (for internal box)
•
1 Set of gray foam inserts (for external box)
•
Thin, clear, plastic wrapping material
•
1 Accessory Tray
•
1 Roll of packing tape
PHANTOM Desktop User’s Guide
35
F DEVICE PACKAGING INSTRUCTIONS
Packing the Device and Accessories
First package up the PHANTOM Desktop device:
1
If necessary, assemble small shipping box and place bottom half of the white
foam insert into the box.
2
Lay plastic wrapping into the foam insert.
3
Hold the PHANTOM device by base and support the stylus as shown in image
below.
4
Orient the PHANTOM device with the foam cutout as shown below
5
Gently lower the PHANTOM device into the foam insert while maintaining
alignment of the PHANTOM arm to the cutout.
FIGURE A-5. Place the device into the bottom insert over the plastic.
36
PHANTOM Desktop User’s Guide
F DEVICE PACKAGING INSTRUCTIONS
6
Ensure that the PHANTOM device is fully seated by pressing firmly at point 1,
shown in the following image.
7
Check to see that the PHANTOM arm is fully seated by carefully pressing at
point 2, shown in the following image.
FIGURE A-6. Press carefully to ensure the device is secure.
8
Fold plastic over the PHANTOM device.
9
Place top half of foam insert over the PHANTOM device.
10 Close the box and tape it closed.
11 Place gray foam bottom into large shipping box and place small box (with
PHANTOM device inside) into foam.
12 Place gray foam top over small (internal) box and place accessory tray on top of
the foam.
13 Place the power supply, power cord, EPP cable (if any are needed) into
accessory tray.
14 Fill extra space in accessory tray with bubble wrap or other packing material so
that flaps on the outer box slightly compress the packing material. Close large
box, and tape closed.
Note The accessory tray may be left empty, but must be included to ensure
package integrity.
PHANTOM Desktop User’s Guide
37
F DEVICE PACKAGING INSTRUCTIONS
38
PHANTOM Desktop User’s Guide