1
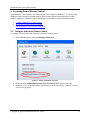
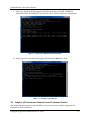
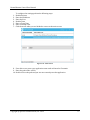
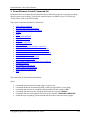
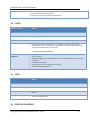
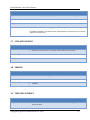
Spirent Nomad Remote Control User Manual 5280 Corporate Drive, Frederick, MD. 21703 Document Version: XX November 2014 Nomad Remote Control User’s Manual Notice: The Bluetooth word mark and logos are owned by the Bluetooth® SIG, Inc. and any use of such marks by Spirent Communications, Inc. is under license. Other trademarks and trade names are those of their respective owners. Notice: NOTE: This equipment was tested and found to comply with the limits for a Class A digital device, pursuant to Part 15 of the FCC Rules. These limits are designed to provide reasonable protection against harmful interference in a residential installation. This equipment generates, uses and can radiate radio frequency energy and, if not installed in accordance with the instructions, may cause harmful interference to radio communications. However, there is no guarantee that interference will not occur in a particular installation. If this equipment does cause interference to radio or television reception, which can be determined by turning the equipment off and on, the user is encouraged to try to correct the interference by one or more of the following measures: Reorient or relocate the receiving antenna Increase the separation between the equipment and the receiver Connect the equipment into an outlet on a circuit different from that to which the receiver is connected Consult the dealer or an experienced radio/TV technician for help Changes or modifications to the Nomad hardware not expressly approved by Spirent Communications, Inc. may void the user’s authority to operate the equipment. Notice: Spirent’s Nomad ME hardware contains FCC certified transmitter modules FCC ID R47F2M03MLA. Spirent’s Nomad HD ME hardware is FCC certified under the FCC ID WR2-NOMADHD-01. Notice: This Class A digital apparatus complies with Canadian ICES-003. Cet appareil numérique de la Classe A est conforme à la norme NMB-003 du Canada. Copyright © Spirent Communications, Inc. 2014 2 Nomad Remote Control User’s Manual Contents 1 Introduction ..................................................................................................................................................................... 5 2 Accessing Nomad Remote Control.......................................................................................................................... 6 3 2.1 Configure Nomad for Remote Control ......................................................................................................... 6 2.2 Install and Configure the PuTTY Utility ...................................................................................................... 7 2.3 Sample Voice Quality Remote Control Command Session .................................................................. 9 2.4 Sample Call Performance Remote Control Command Session ........................................................ 11 2.5 APP Daemon ......................................................................................................................................................... 16 Nomad Remote Control Command Set ............................................................................................................... 18 3.1 NEW SESSION PROFILE................................................................................................................................... 19 3.2 SET LOG FILE PATH .......................................................................................................................................... 19 3.3 LOAD SESSION PROFILE ................................................................................................................................. 19 3.4 START...................................................................................................................................................................... 20 3.5 STOP ........................................................................................................................................................................ 20 3.6 START AUTO REPORT ...................................................................................................................................... 20 3.7 STOP AUTO REPORT ......................................................................................................................................... 21 3.8 VERSION................................................................................................................................................................. 21 3.9 TIME SYNC INTERNET ..................................................................................................................................... 21 3.10 TIME SYNC GPS ................................................................................................................................................... 22 3.11 SET INPUT LEVEL .............................................................................................................................................. 22 3.12 SET BT INPUT LEVEL ....................................................................................................................................... 22 3.13 SET OUTPUT LEVEL .......................................................................................................................................... 23 3.14 SET BT OUTPUT LEVEL ................................................................................................................................... 23 3.15 CREATE TASK ...................................................................................................................................................... 25 3.16 COMPLETE CP DATA ........................................................................................................................................ 26 3.17 GET RESULTS ....................................................................................................................................................... 27 3.18 COMPLETE DATA ............................................................................................................................................... 27 3.19 SET SCORING MODEL ....................................................................................................................................... 28 3.20 GENERATE EXCEL.............................................................................................................................................. 28 3.21 SET PROMPT ........................................................................................................................................................ 29 3.22 RECONNECT BT .................................................................................................................................................. 29 3.23 START PAIRING .................................................................................................................................................. 29 3.24 STOP PAIRING ..................................................................................................................................................... 30 3.25 QUIT ......................................................................................................................................................................... 30 Copyright © Spirent Communications, Inc. 2014 3 Nomad Remote Control User Manual Figure 2-1- Enable Nomad Remote Control .................................................................................................................... 6 Figure 2-2 - putty.exe Download Link ............................................................................................................................... 7 Figure 2-3 - PuTTY Configuration Screen......................................................................................................................... 8 Figure 2-4 - PuTTY Connection Status ............................................................................................................................... 8 Figure 2-5 - CREATE TASK Command and Reply.......................................................................................................... 9 Figure 2-6 - SET LOG FILE PATH Command and Reply ........................................................................................... 10 Figure 2-7 - START Command and Reply ...................................................................................................................... 10 Figure 2-8 - START AUTO REPORT Command and Reply ...................................................................................... 11 Figure 2-9 - STOP Reply and Command ......................................................................................................................... 11 Figure 2-10 - CREATE TASK Command and Reply .................................................................................................... 12 Figure 2-11 - SET LOG FILE PATH Command and Reply ........................................................................................ 13 Figure 2-12 - START Command and Reply ................................................................................................................... 13 Figure 2-13 - START Command and Reply ................................................................................................................... 14 Figure 2-14 - COMPLETE CP DATA Command and Reply ...................................................................................... 15 Figure 2-15 - GET RESULTS Command and Reply ..................................................................................................... 15 Figure 2-16 - GET RESULTS Command and Reply ..................................................................................................... 16 Figure 2-17 –Daemon Settings ........................................................................................................................................... 16 Figure 2-18 – Main Screen ................................................................................................................................................... 17 Copyright © Spirent Communications, Inc. 2014 4 Nomad Remote Control User Manual 1 Introduction Nomad Remote Control is an optional command set for controlling Nomad remotely via any Socket Client. Remote functionality includes: Time synchronization Specification of output file name and location Starting / stopping a recording session Displaying Call Performance call results on a remote client Displaying MOS results on a remote client Copyright © Spirent Communications, Inc. 2014 5 Nomad Remote Control User Manual 2 Accessing Nomad Remote Control Nomad Remote Control may be accessed using the PuTTY utility for Windows 7. If you are using Windows Vista or another operating system, please contact Spirent Communications Product Support. Otherwise, follow the steps in this chapter to learn how to control Nomad remotely. Configure Nomad for Remote Control Install and Configure the PuTTY Utility Sample Remote Control Command Session 2.1 Configure Nomad for Remote Control To configure Nomad for Remote Control perform the following steps.: 1. In the Nomad software, select the Settings>General tab. Figure 2-1- Enable Nomad Remote Control 2. Ensure that the Enable Remote Control via TCP Socket 7072 option is selected. 3. Windows or your security software may attempt to block this request. “Unblock” or allow access to the program. Copyright © Spirent Communications, Inc. 2014 6 Nomad Remote Control User Manual 2.2 Install and Configure the PuTTY Utility Nomad must be running on the remote computer before attempting to connect using PuTTY. To install PuTTY perform the following steps. 1. Browse to: http://www.chiark.greenend.org.uk/~sgtatham/putty/download.html 2. On the PuTTY Download webpage scroll down to the putty.exe download link. Figure 2-2 - putty.exe Download Link 3. Click on putty.exe and save it locally. Saving the putty.exe utility will allow you to run it without returning to the web page. 4. Once saved you can run PuTTY when you are going to use Nomad Remote Control. To configure PuTTY perform the following steps: 1. With Nomad running, open PuTTY. Copyright © Spirent Communications, Inc. 2014 7 Nomad Remote Control User Manual Figure 2-3 - PuTTY Configuration Screen 2. Enter the following configuration settings: Host Name – Enter the IP address of the host computer (or localhost for a locally installed Nomad) Port – 7072 Connection Type – Raw 3. If desired, Save the session settings. 4. Click Open to display the command prompt. Figure 2-4 - PuTTY Connection Status Copyright © Spirent Communications, Inc. 2014 8 Nomad Remote Control User Manual 2.3 Sample Voice Quality Remote Control Command Session The sample command sequence presented here creates and executes a voice quality test for a mobile connected via analog audio cable to Channel 1. Before commencing with these steps, connect a test handset to Channel 1 via audio cable and dial the test phone number. 1. At the HyperTerminal prompt, create a new task using this command: CREATE TASK: VQ_MOBILE, 1, NumberToDial, NumberDialingFrom, 10, 195, 145 2. Hit Enter after entering the command. The command and the reply will be visible on the screen. Note: This command creates a new Voice Quality task with the following properties: Channel Index = 1 Number To Dial = NumberToDial Number Dialing From = NumberDialingFrom Number Of Test Cycles = 10 (enter 0 here to perform infinite cycles) Input Level = 195 Output Level = 145 Figure 2-5 - CREATE TASK Command and Reply Copyright © Spirent Communications, Inc. 2014 9 Nomad Remote Control User Manual 3. Type the command to create the session output file and hit Enter: SET LOG FILE PATH: C:\VQ01 Figure 2-6 - SET LOG FILE PATH Command and Reply 4. Type the command to start logging and hit Enter: START Figure 2-7 - START Command and Reply 5. Type the command to display results locally and hit Enter: START AUTO REPORT 6. After several recording cycles multiple MOS reports will be visible in the PuTTY area. Copyright © Spirent Communications, Inc. 2014 10 Nomad Remote Control User Manual 7. Events are displayed during logging in the following format: VQ SCORE: CHANNEL X, TransferDirection, TimeStampUTC, CycleNumber, Score, InsGain, AudioLevel, Classification Figure 2-8 - START AUTO REPORT Command and Reply 8. Finally, type the command to stop logging followed by the Enter key: STOP Figure 2-9 - STOP Reply and Command 2.4 Sample Call Performance Remote Control Command Session The sample command sequence presented here creates and executes a Mobile Originated Call Performance task on Channel 1. Copyright © Spirent Communications, Inc. 2014 11 Nomad Remote Control User Manual At the PuTTY prompt, create a new task using this command: CREATE TASK: CP_MO, 1, NumberToDial, NumberDialingFrom, 45, 60, 15, 20, Fixed Hit Enter after entering the command. The command and the reply will be visible on the screen. Note: This command creates a new Call Performance Mobile Originated task with the following properties Channel Index = 1 Number To Dial = NumberToDial Number Dialing From = NumberDialingFrom Access Timeout = 45 seconds Duration = 60 seconds Wait Time = 15 seconds Number of Test Cycles = 20 Init Mode = Fixed Figure 2-10 - CREATE TASK Command and Reply Type the command to create the session output file and hit Enter: SET LOG FILE PATH:C:\CP01 Copyright © Spirent Communications, Inc. 2014 12 Nomad Remote Control User Manual Figure 2-11 - SET LOG FILE PATH Command and Reply Type the command to start logging and hit Enter: START Figure 2-12 - START Command and Reply The logging session can be allowed to run for the specified number of cycles or manually stopped by typing the command to stop logging and hit Enter: STOP Copyright © Spirent Communications, Inc. 2014 13 Nomad Remote Control User Manual Figure 2-13 - START Command and Reply Note: If the logging session is allowed to run to completion without using the STOP command then the following message will be returned when the session is done LOGGING SESSION COMPLETED Type the command to complete the Call Performance data and hit Enter: COMPLETE CP DATA:C:\CP01 Note: As soon as a session is stopped the data is automatically starting to complete by Nomad. This command allows the user to know when it is done. One of the following will happen when this is called: The file has already completed and the completion message is returned FILE DATA ALREADY COMPLETE The file has not yet completed and a status message will be displayed every 10 seconds until a final confirmation message COMPLETING DATA, PLEASE WAIT… FINISHED COMPLETING DATA Copyright © Spirent Communications, Inc. 2014 14 Nomad Remote Control User Manual Figure 2-14 - COMPLETE CP DATA Command and Reply Type the command to retrieve the Call Results for the session and hit Enter: GET RESULTS:C:\CP01 Results are displayed in the following format: CP RESULT: CHANNEL X, MessageType, TimeStampUTC, CallID, AccessTimeout, AccessTime, ExpectedDuration, ActualDuration, ResultType Once all results have been sent the following message will be displayed indicating the total number of results sent: CP RESULTS SENT: numberOfResultsSent Figure 2-15 - GET RESULTS Command and Reply Additional commands are available for remotely implementing many common Nomad functions. See the following section for the full Remote Control command set. Copyright © Spirent Communications, Inc. 2014 15 Nomad Remote Control User Manual 2.5 APP Daemon As a separate option, you can obtain from Spirent, an APP Domain application, which you can use to enable remote starting of your Nomad device. After downloading the APP Daemon application, extract the zip file and click APPDAemon.exe and a screen like the following appears. Figure 2-16 - GET RESULTS Command and Reply Prior to starting, click Settings and a screen like the following appears. Figure 2-17 –Daemon Settings Copyright © Spirent Communications, Inc. 2014 16 Nomad Remote Control User Manual 1. 2. 3. 4. 5. 6. 7. To configure the settings perform the following steps. Disable the host. Enter the IP Address Enter the Port Disable Toast Enter a Toast Time Enter a Startup Time. Click the arrow when you are finished to return to the main screen. Figure 2-18 – Main Screen 8. From this screen, enter your application name such as Nomad or Chromatic. 9. Enter the path of the .exe file. 10. Double click on the path and you can now remotely start the application. Copyright © Spirent Communications, Inc. 2014 17 Nomad Remote Control User Manual 3 Nomad Remote Control Command Set Nomad installs a server host that will automatically run when the program is executed, providing limited remote control ability. Socket level communication is available on port 7072 from any “Socket Client” such as the PuTTY utility. The remote commands available for Nomad are: NEW SESSION PROFILE SET LOG FILE PATH: LogFilePath LOAD SESSION PROFILE: ProfileName START STOP START AUTO REPORT STOP AUTO REPORT VERSION TIME SYNC INTERNET TIME SYNC GPS SET INPUT LEVEL: ChannelIndex, InputLevel SET BT INPUT LEVEL: ChannelIndex, InputLevel SET OUTPUT LEVEL: ChannelIndex, OutputLevel SET BT OUTPUT LEVEL: ChannelIndex, OutputLevel CREATE TASK: TaskString COMPLETE CP DATA: LogFilePath GET RESULTS: LogFilePath SET SCORING MODEL:ChannelIndex,ScoringModel GENERATE EXCEL SET PROMPT:PromptString START PAIRING:ChannelIndex STOP PAIRING:ChannelIndex QUIT The commands are described in detail below. Notes: Commands may be entered in either upper or lower case. Commands should be terminated by with a CRLF (Carriage-Return / Line-Feed). Commands that execute successfully will be prefixed with the response “OK: ”. Commands that fail to execute will be prefixed with the response “ERROR: ”. Commands that are unrecognized will result in the response “UNKNOWN COMMAND: “. If Nomad stops responding, restart Nomad and the socket connection and try again. Copyright © Spirent Communications, Inc. 2014 18 Nomad Remote Control User Manual 3.1 NEW SESSION PROFILE Command Format NEW SESSION PROFILE Purpose Removes the tasks from all channels to build a new Session Profile from scratch Parameter(s) None Example NEW SESSION PROFILE Possible Error Responses Test is running 3.2 SET LOG FILE PATH Command Format SET LOG FILE PATH: LogFilePath Purpose Sets the file name for the current logging session log file to the path specified by LogFilePath. Parameter(s) LogFilePath Example This command sets the log file path as “C:\VQ01.txt”: Possible Error Responses SET LOG FILE PATH: C:\VQ01 Test is running Log file path cannot be empty Directory does not exist 3.3 LOAD SESSION PROFILE Command Format LOAD SESSION PROFILE: ProfileName Purpose Loads the session profile with the name of ProfileName Parameter(s) ProfileName Example This command loads a profile called “VoiceQualityTestProfile”: LOAD SESSION PROFILE: VoiceQualityTestProfile Copyright © Spirent Communications, Inc. 2014 19 Nomad Remote Control User Manual Possible Error Responses Test is running Session profile name cannot be empty Cannot find session profile named [suppliedName] 3.4 START Command Format START Purpose Starts a logging session Parameter(s) None Example START Nomad Response If the logging session is allowed to run to completion, without being stopped remotely using the stop command, or through the UI, then the following message will be returned when the session is done: LOGGING SESSION COMPLETED Possible Error Responses Log file path is not set Test is running The following Bluetooth channels must be in a ‘CONNECTED’ state before starting: [channels] No Internet Connection System Clock not sync’d with Call Server clock Problem starting MT Campaign Command Format STOP Purpose Stops a logging session Parameter(s) None Example STOP Possible Error Responses No active logging session 3.5 STOP 3.6 START AUTO REPORT Copyright © Spirent Communications, Inc. 2014 20 Nomad Remote Control User Manual Command Format START AUTO REPORT Purpose Enables local reporting of voice quality results while a test is running Parameter(s) None Example START AUTO REPORT Nomad Response Events are displayed during logging in the following format: VQ SCORE: CHANNEL X, TransferDirection, TimeStampUTC, CycleNumber, Score, InsGain, AudioLevel, Classification 3.7 STOP AUTO REPORT Command Format STOP AUTO REPORT Purpose Disables local reporting of voice quality results while a test is running Parameter(s) None Example STOP AUTO REPORT Command Format VERSION Purpose Returns the current running version of Nomad Parameter(s) None Example VERSION 3.8 VERSION 3.9 TIME SYNC INTERNET Command Format TIME SYNC INTERNET Purpose Attempts to synchronize the test PC clock to the Audio Server using internet time synchronization Copyright © Spirent Communications, Inc. 2014 21 Nomad Remote Control User Manual Parameter(s) None Example TIME SYNC INTERNET Possible Error Responses Could not start internet time sync Command Format TIME SYNC GPS Purpose Attempts to synchronize the test PC clock to the Audio Server using GPS time synchronization Parameter(s) None Example TIME SYNC GPS Possible Error Responses Could not start gps time sync 3.10 TIME SYNC GPS 3.11 SET INPUT LEVEL Command Format SET INPUT LEVEL: ChannelIndex, InputLevel Purpose Sets the analog input level (downlink volume) of the selected channel Parameter(s) ChannelIndex InputLevel Example This command sets the Channel 1 input level to 200: Possible Error Responses SET INPUT LEVEL: 1, 200 Invalid channel Input level must be greater than or equal to x Input level must be less than or equal to x 3.12 SET BT INPUT LEVEL Command Format SET BT INPUT LEVEL: ChannelIndex, InputLevel Copyright © Spirent Communications, Inc. 2014 22 Nomad Remote Control User Manual Purpose Sets the Bluetooth input level (downlink volume) of the selected channel Parameter(s) ChannelIndex InputLevel Example This command sets the Channel 3 Bluetooth input level to 2: Possible Error Responses SET BT INPUT LEVEL: 3, 2 Invalid channel Input level must be greater than or equal to x Input level must be less than or equal to x 3.13 SET OUTPUT LEVEL Command Format SET OUTPUT LEVEL: ChannelIndex, OutputLevel Purpose Sets the analog output level (uplink volume) of the selected channel Parameter(s) ChannelIndex OutputLevel Example This command sets the Channel 1 output level to 145: Possible Error Responses SET OUTPUT LEVEL: 1,145 Invalid channel Output level must be greater than or equal to x Output level must be less than or equal to x 3.14 SET BT OUTPUT LEVEL Command Format SET BT OUTPUT LEVEL: ChannelIndex, OutputLevel Purpose Sets the Bluetooth output level (uplink volume) of the selected channel Parameter(s) ChannelIndex OutputLevel Example This command sets the Channel 3 output level to 10: SET BT OUTPUT LEVEL: 3, 10 Copyright © Spirent Communications, Inc. 2014 23 Nomad Remote Control User Manual Possible Error Responses Invalid channel Output level must be greater than or equal to x Output level must be less than or equal to x Copyright © Spirent Communications, Inc. 2014 24 Nomad Remote Control User Manual 3.15 CREATE TASK Command Format CREATE TASK: TaskString Purpose Creates a task using a specific task string to enter the descriptive parameters Voice Quality Task Strings VQ_MOBILE, ChannelIndex, NumberToDial, NumberDialingFrom, CycleCount, InputLevel, OutputLevel, AudioInterface,SampleRate,<optional:HfpVersion> VQ_BASE, ChannelIndex, NumberToDial, NumberDialingFrom, CycleCount, InputLevel, OutputLevel, AudioInterface,SampleRate,<optional:HfpVersion> VQ_RECORD_ONLY, ChannelIndex, NumberToDial, NumberDialingFrom, CycleCount, InputLevel, OutputLevel, AudioInterface,SampleRate,<optional:HfpVersion> VQ_SOURCE_ONLY, ChannelIndex, NumberToDial, NumberDialingFrom, CycleCount, InputLevel, OutputLevel, AudioInterface,SampleRate,<optional:HfpVersion> Note: CycleCount may be set to 0 for infinite cycles Call Performance Task Strings CP_MO, ChannelIndex, NumberToDial, NumberDialingFrom, AccessTimeoutSeconds, DurationSeconds, WaitTimeSeconds, Attempts , InitMode, HFPVersion CP_MT, ChannelIndex, NumberToDial, NumberDialingFrom, AccessTimeoutSeconds, DurationSeconds, WaitTimeSeconds, Attempts, InitMode, HFPVersion CP_M2MO, ChannelIndex, NumberToDial, NumberDialingFrom, AccessTimeoutSeconds, DurationSeconds, WaitTimeSeconds, Attempts , InitMode, HFPVersion, ExternalDevice, ExternalDeviceChannelIndex CP_M2MT, ChannelIndex, NumberToDial, NumberDialingFrom, AccessTimeoutSeconds, DurationSeconds, WaitTimeSeconds, Attempts, InitMode, HFPVersion, ExternalDevice, ExternalDeviceChannelIndex InitMode options: Fixed – Creates a synchronous call campaign Variable – Creates an asynchronous call campaign HFPVersion options: V1_5 – HFP Version1.5 V1_6 – HFP Version1.6 ExternalDevice Options: LocalReceiver: For use on M2MO tasks when the receiver is on a local channel LocalCaller: For use on M2MT tasks when the caller is on a local channel RemoteReceiver: For use on M2MO tasks when the receiver is on a remote unit RemoteCaller: For use on M2MT tasks when the caller is on a remote unit Copyright © Spirent Communications, Inc. 2014 25 Nomad Remote Control User Manual Example Possible Error Responses This command creates a new Voice Quality task with the following parameters: Channel Index = 1 Number To Dial = 617-277-2111 Number Dialing From = 443-888-6259 Number of Test Cycles = 10 Input Level = 195 Output Level = 145 CREATE TASK: VQ_MOBILE, 1, 6172772111, 4438886259, 10, 195, 145 Tests is running Task configuration string cannot be empty Task configuration string not formatted properly Task configuration string does not contain enough arguments Invalid task type Invalid channel VQ_MOBILE task not licensed VQ_BASE task not licensed VQ_RECORD_ONLY task not licensed VQ_SOURCE_ONLY task not licensed CP_MO task not licensed CP_MT task not licensed Failed to create task 3.16 COMPLETE CP DATA Command Format COMPLETE CP DATA: LogFilePath Purpose Completes all CP data associated with the given log file Parameter(s) LogFilePath Example This command sets the log file pat as “C:\CP01.txt” Nomad Response COMPLETE CP DATA: C:\CP01 The following result will be displayed if the data associated with the given log file is already complete: FILE DATA ALREADY COMPLETE If the data associated with the given log file is not yet complete, then a status message will be displayed indicating ongoing completion action every 10 seconds until a final confirmation message is returned. An example follows: Possible Error Responses COMPLETING DATA, PLEASE WAIT… COMPLETING DATA, PLEASE WAIT… FINISHED COMPLETING DATA File does not exist Not a valid log file Copyright © Spirent Communications, Inc. 2014 26 Nomad Remote Control User Manual 3.17 GET RESULTS Command Format GET RESULTS: LogFilePath Purpose Gets the results from the CP tests associated with the given log file. Parameter(s) LogFilePath Example This command retrieves the CP results associated with “C:\CP01.txt” Nomad Response GET RESULTS: C:\CP01 Results are displayed in the following format: CP RESULT: CHANNEL X, MessageType, TimeStampUTC, CallID, AccessTimeout, AccessTime, ExpectedDuration, ActualDuration, ResultType Once all results have been sent, a message will be sent in the following format indicating the total number of results that were sent: CP RESULTS SENT: numberOfResultsSent Possible Error Responses File does not exist Not a valid log file File data not complete No CP Results available 3.18 COMPLETE DATA Command Format Purpose Parameter(s) Example COMPLETE DATA: LogFilePath Completes all data (Call Performance and/or Voice Quality) associated with the given log file LogFilePath This command will complete the Voice Quality data in the logfile “C:/VQ1.txt” COMPLETE DATA: C:/VQ1.txt This command will compete the Call Performance data in the logfile “C:/CP1.txt” Nomad Response COMPLETE DATA: C:/CP1.txt The following result will be displayed if the data associated with the given log file is already complete: FILE DATA ALREADY COMPLETE If the data associated with the given log file is not yet complete, then a status message will be displayed indicating ongoing completion action every 10 seconds until a final confirmation message is returned. An example follows: COMPLETING DATA, PLEASE WAIT… COMPLETING DATA, PLEASE WAIT… Copyright © Spirent Communications, Inc. 2014 27 Nomad Remote Control User Manual FINISHED COMPLETING DATA Possible Error Responses File does not exist Not a valid log file 3.19 SET SCORING MODEL Command Format Purpose Parameter(s) Example SET SCORING MODEL: ChannelIndex, ScoringModel Sets the scoring model for the given ChannelIndex and ScoringModel parameters ChannelIndex ScoringModel This command sets the scoring model of channel 1 to PESQ SET SCORING MODEL: 1, PESQ This command sets the scoring model of channel 2 to POLQA Nomad Response Possible Error Responses SET SCORING MODEL: 2, POLQA Scoring model set to PESQ Scoring model set to POLQA Invalid Channel Invalid task descriptor (Channel does not have a valid task descriptor) Invalid scoring model 3.20 GENERATE EXCEL Command Format Purpose Parameter(s) Example Nomad Response GENERATE EXCEL: LogFilePath, ExcelPath Generates an Excel report from the give LogFilePath and saves it to the give ExcelPath LogFilePath ExcelPath This command will generate the excel report for the given LogFilePath and ExcelPath parameters GENERATE EXCEL: C:/CP1.txt, C:/CP1.xlsx If ExcelPath were set to “C:/CP1.xlsx” C:/CP1.xlsx created Copyright © Spirent Communications, Inc. 2014 28 Nomad Remote Control User Manual Possible Error Responses Invalid number of arguments The log file ‘LogFilePath’ does not exist on disk! The excel file ‘ExcelPath’ already exists on disk! Please choose another file. Unable to create report 3.21 SET PROMPT Command Format Purpose Parameter(s) Example SET PROMPT: PromptString Sets the prompt string for the terminal PromptString This command will set the command prompt to the > symbol Nomad Response Possible Error Responses SET PROMPT: > If the prompt was set correctly Prompt set to > N/A 3.22 RECONNECT BT Command Format Purpose Example RECONNECT BT Reconnects all Bluetooth channels This command will set the command prompt to the > symbol RECONNECT BT Nomad Response Possible Error Responses Reconnect BT Initiated OK: Reconnect BT Initiated EVENT: Channel 1 - Service:True EVENT: Channel 1 - Signal:2 EVENT: Channel 1 - Roaming:False EVENT: Channel 1 - Battery:2 EVENT: Channel 1 - RSSI:8 EVENT: Channel 1 - RXQUAL:255 EVENT: Channel 1 - Name:DEVICE-NAME EVENT: Channel 1 - SubscriberNumber:1111111111 EVENT: Channel 1 - Bluetooth Address:12:23:34:45:56:67 N/A START PAIRING: ChannelIndex Starts the pairing process 3.23 START PAIRING Command Format Purpose Copyright © Spirent Communications, Inc. 2014 29 Nomad Remote Control User Manual Parameter(s) Example ChannelIndex START PAIRING:1 Nomad Response EVENT: Channel 1 pairing enabled. Possible Error Responses ERROR: Channel is not in the READY state. Cannot start pairing. Command Format Purpose Parameter(s) Example STOP PAIRING: ChannelIndex Stops the pairing process. ChannelIndex STOP PAIRING:1 Nomad Response OK: Channel 1 pairing disabled. Possible Error Responses ERROR: Channel is not in the Connecting state. Cannot stop pairing. QUIT Quits the application quit OK: Exiting... Test is in progress. Cannot quit. 3.24 STOP PAIRING 3.25 QUIT Command Format Purpose Example Nomad Response Possible Error Responses Copyright © Spirent Communications, Inc. 2014 30