1
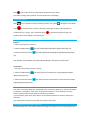
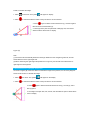
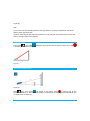
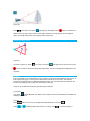
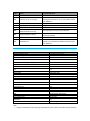
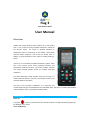
Flag 3 Laser Distance Meter User Manual Overview AdirPro Flag 3 laser distance meter measures up to 328’ (100m) with +/- 1/16” (1.5mm) accuracy, integrates a tilt sensor, and has an HD full-color screen. The screen is specially designed for professional users. It’s powered on a li-ion battery, which greatly enhances battery usage life, and can last for several years. In addition, its green background color makes it visually pleasing to look at mOS V1.5, is an innovated and patented measuring system, which has a vivid colorful screen, strong interactive interface, and professional measuring functions. The various auxiliary functions and unique personal settings provide an excellent measuring experience. The built-in Bluetooth module transfers data from the Flag 3 to Android and iOS devices in real-time, and enables remote control and photo-distance association. The Flag 3 has the perfect combination of an ergonomic and modern design that gives it a beautiful look and comfortable grasp. The Flag 3 is a leading laser distance meter heralding a new era of professional measurement. Power on and off Power on Long press to power on the instrument and activate the laser. The single measuring interface will be displayed on the screen. Power off Manually Long press to power off the instrument. Power off Automatically The instrument will be power off automatically after three minutes of inactivity. Keypad List 1. OK / Confirm 2. Return / Cancel 3. Area/Volume/Pythagorean 4. Tilt / Auto Level / Auto Height / Triangle area 5. Go Left 6. Go Right 7. Go up/ Addition(+) 8. Go down/Subtraction(-) 9. Bluetooth 10. Reference Point 11. Menu 12. Clear off / Power off 13. Power on / Measurement Reference Setup The default reference setting: the bottom of the instrument. Press to switch the reference point between the top, bottom, tripod, and end-piece of the instrument. There is a beep warning tone when a reference point is changed. The reference point will return to default every time when the unit is powered off. I.E. the measuring reference point is from the bottom of the instrument every time when it’s powered on. Single Measurement Press to activate the laser. Aim the laser at the object which is to be measured and press again to take measurement. Results will be seen on the screen’s display immediately. Continuous Measurement (max/min distance) Long press to activate continuous measurement. Under this mode minimum or maximum distance can be measured from a fixed measuring position by sweeping ideal points. Note: Continuous measurement will stop after 5 minutes. Area Measurement Press once to activate area measuring function. The symbol Press to take the first side distance measurement (e.g. length). will appear on the display. Press again to take the second side distance measurement (e.g. width). The results of length, width, perimeter, and area will be seen on the display. Volume Measurement Press twice to activate the volume measuring function. The symbol Press to activate the laser, and aim at the target. Press again to take the first side distance measurement (e.g. Length). Then, respectively press will appear on the display. to measure the width and height. The resulting volume will be display in the summary line. Addition/Subtraction Distance 1. Take a measurement of a distance. 2. Press the addition button 3. Press the subtraction button . The next measurement’s data will be added to the former one. . The next measurement’s data will be subtracted from the former one. This operation can be repeated. The results will be displayed in the main area of the screen. Area/Volume 1. First take a measurement of area or volume. 2. Press the addition button , and measure the second area/volume. This measurement will be added to the former one. 3. Press the subtraction button , and measure the second area/volume. This measurement will be subtracted from the former one. Indirect Measurement This device can measure distance to inaccessible points, such as the distance to a wall which is blocked by obstacles or the height of a tree, using a trigonometric function. To ensure measuring accuracy, indirect measurements should be based on the following conditions: (1) The measuring points of the object which is to be measured should be on the same horizontal or vertical line. (2) Put the device at a fixed but horizontally and vertically rotary tripod. Indirect Measurement: Pythagoras Two Points As shown (Figure A), if a user wants to measure the height of the pink line, he can use Pythagoras Two Points to calculate the height. 1. Press three times. The symbol will appear on display. 2. Press to activate the laser and aim at the point which is to be measured. 3. Press again to take the first measurement (1), and then again to take the second measurement (2). 4. The height of the pink line (third side of triangle), first, and second distance values will be seen on display. Figure (A) Note: (1) The device will automatically determine the longer distance as the triangle’s hypotenuse, and the shorter distance as the right-angle side. (2) When measuring the right-angle side (Distance 2 in Figure A), user should ensure laser beam is right-angled to the target line. Indirect Measurement: Pythagoras Three Points As shown in Figure (B), if the user wants to measure the height of the pink line, he can use Pythagoras Three Points function to calculate the height. 1. Press four times. The symbol 2. Press to activate the laser and aim at the point which is to be measured. 3. Press will appear on the display. again to take the measurements from first (1), second (2), and to third (3) points. 4. The height of the pink line, first, second, and third distance points’ values will be seen on display. Figure (B) Note: (1) The device will automatically determine the longer distance as triangle’s hypotenuse, and shorter distance as the right-angle side. (2) When measuring the right-angle side (Distance 2 in Figure B), the user should ensure that the laser beam is at a right-angle to the target line. Angle Measurement Press button . The symbol will appear in the function field. As shown in Figure (C). Press to measure the tilt and the distance. Figure(C) Auto Horizontal Measurement Figure (D) Press twice. The symbol will appear on the display. Press to measure the tilt and hypotenuse distance (1). The results of tilt, distance of hypotenuse, and two right-angle sides will be seen on display. Refer to Figure (K). Auto Height Measurement Figure (E) Press three times. The symbol will appear on the display. Press button to measure the distance to the top of the object, bottom of the object, distance of two hypotenuse, and the height of object. The results will be seen on the display. Refer to Figure (E). Triangle Area Measurement Figure (F) As shown in Figure (F), press four times. The symbol will appear in the function area. Press button to measure the three sloping sides respectively. The area of triangle will be displayed in the result bar. Bluetooth Flag 3 laser distance meter’s Bluetooth function is used for interactions with Android and iOS devices on their corresponding App. It can be used for data transfer, remote control, and more. The following information is a guide to how to enable the Bluetooth function. For more information and details on the function and operating steps, please refer the Android or iOS App. Users can go to Bluetooth functions by the following two methods: (1) Shortcut Long press until the Bluetooth icon flickers on the status bar. This means Bluetooth is enabled and waiting for connection. (2) Menu Press Press . Use the arrow keys to navigate and select Bluetooth. Then press or to switch the Bluetooth function on and off. Press . to save the setting, or press to quit the setting without saving. Bluetooth APP downloading address: www.AdirPro.net Menu Press to go to the function menu, which lists all of Flag 3’s functions by 3x3 icons per page. Use the arrow keys to select the desired function. Staking out Measurement Press . Use the arrow keys to navigate and select “Loft”, and then press Press or Press or Press and start Staking Out measurement. . to move the cursor and select the corresponding number. to increase/decrease the value until the desired distance is reached. Move the instrument along the staking out line. The screen will show the distance in real-time. When approaching the preset distance within 0.1m, the instrument will start buzzing. The status bar will show or icon to indicate which is the right direction to reach the appointed distance. Timer Press . Use the arrow keys to navigate and select “Timer”, and then press Press or Press or Press and start timing the measurement. . to move cursor and select the corresponding number. to increase/decrease the exact time value. The countdown (e.g. 10, 9, 8...) is displayed and the last 5 seconds are counted down with a beep. After the last beep the measurement is taken and the value is displayed. Historical Data 1. View historical record: Press and use the arrow keys to navigate. Select “Record” to call the function up. Press to select the measurment type, and press to enter the record of this type. Press or or to select one record and press to read the details. The information displayed will include data type (locked/unlocked), date, time, measurement function, measurement types, corresponding result, and, additional information. 2. Delete historical record: 1) Delete by batch When viewing historical data, when a measurement type is selected, the user can press press to delete all the historical records belonging to this measurement type. and then 2) Delete one by one Press record. or to browse the records. Next press , and then to delete the selected 3. Historical data lock / unlock Usually, the instrument saves a limited number of measurement data. It will automatically delete the oldest data when new data comes in. The “data locking” function enables the user to save data permanently unless the user deletes it manually from the memory. Press or to browse the records. Then, press to lock and unlock the record. Thermometer Press . Use the arrow keys to navigate and select “thermometer”. Press . The current temperature of instrument in the environment will be displayed on the screen. Press to return to the menu. Level Press . Use the arrow keys to navigate and select “level”. Press . Three mercury columns represents the X, Y and 45° axes. The degree value is also displayed. Press to return to the menu. Bubble Press . Use the arrow keys to navigate and select “Bubble”. Press . to select “Yes” or “No”. This will switch the leveling bubble on and off. Press or Press to save the setting or press to exit without saving. Measuring Unit Press Press . Use the arrow keys to navigate and select “Unit”. Press or setting, or press . to change the distance unit between m, ft., in, and ft. + in. Press to exit without saving. Note: System default measuring unit is m. Angle Unit Press . Use the arrow keys to navigate and select “Angle-unit”. Press Press or Press to save the setting, or press . to select the desired unit: +/- 0.0° or 0.00%. to exit without saving. Note: System default angle unit is: +/- 0.0° Language Press Press Press Constant . Use the arrow keys to navigate and select “Language”. Press or to select a language, either “Chinese” or “English”. to save the setting, or press to exit without saving. . to save the Press Press Press Press . Use the arrow keys to navigate and select “Const”. Press . or to move the cursor and select corresponding number. or to increase/decrease the exact value. to save the setting, or press to exit without saving. Note: All measuring results will be added or subtracted from the constant; tolerance will be calculated into the result. Beep Press Press Press . Use the arrow keys to navigate and select “Beep”. Press or . to select “Yes” or “No” to switch the beep function on or off. to save the setting, or press to exit without saving. G-Sensor Press . Use the arrow keys to navigate and select “G-sensor”. Press . The built-in tilt sensor can be automatically calibrated. Calibration requires two measurements on a level surface. 1. Put the instrument on a flat surface, then press 2. Rotate 180°, then press button. . The sensor will then be calibrated. Date Settings Press . Use the arrow keys to navigate and select “Date Setting”. Press Press or to select the corresponding place. Press or to increase/decrease the exact value. Press to save the setting, or press . to exit without saving. Brightness Press . Use the arrow keys to navigate and select “Brightness”. Press Press or Press . to adjust the brightness. to save the setting, or press to exit without saving. Reset Press . Use the arrow keys to navigate and select “Reset”. Press Press or Press to reset, or press . to select “Yes” or “No” to confirm whether you’d like to reset the instrument. to exit without saving. After resetting, all personal settings will be deleted and will revert back to the default settings. About Us Press . Use the arrow keys to navigate and select “About us”. Press . There is some relevant information about software, such as software version number, ownership, and so on. Go back to the menu system by clicking Troubleshooting . Code Cause Corrective Measure 204 Calculation error Refers to user menu, repeat the procedures 208 Currency for LD out of range 220 Battery low Replace with new batteries 252 High temperature Keep instrument within 32 °F ~ 104 °F 253 Low temperature Warm up the device to meet work conditions If cannot be solved after several times of reboot, meaning the instrument is out of order, please contact your distributor. Received signal too weak, 255 measurement time too long 256 Received signal too strong 261 Measure value over range 500 Hardware error Use target plate or change a good reflection Target too reflective, use target plate or do not aim at strong light objective Please take measurements within its range Switch on/off the device several times. If the symbol still appears, your instrument is defective. Please contact your distributor. Function List and Specifications Specification Typical measuring range Typical measuring accuracy Flag 3 0.17’-328’ (0.05m-100 m) ± 1/16” (1.5 mm) Measuring units m/in/ft/ft+in Area/Volume/Pythagoras/Add/Subtract Tilt/Auto level/Auto Height/Staking out Beep Bluetooth mOS V1.5 Historical Data Button Class Button Life Button Type Battery Type Battery Life 1,000 sets Metal dome array 500,000times Laser class Class 2M II Laser type 635 nm, < 1mW Ingress protection Operating temperature Storage temperature LCD Resolution USB Auto laser off Auto instrument off IP65 0°C~40°C -10°C~60°C Dimensions Weight Membrane keyboards Lithium Battery 15,000 measurements QVGA (320*240) Online upgrade, Data export 30seconds 180 seconds 4.92” x 2.09” x 1.30” (125 mm x 53 mm x 33 mm) 5.64 oz (160g) Note: 1. Range: The maximum measuring range is determined by the version of the meter. Exact measuring range for the laser distance meter is shown on the gift box. In poor daylight or reflection conditions, please you the target plate or a better reflective surface. 2. Accuracy: In optimal conditions (good target surface properties and room temperature) the measuring range is up to 328’ (100m). In unfavorable conditions (intense sunshine, poor reflectivity in target surface – i.e. a black surface, or high temperature variations) the deviation over the entire 328’ may increase. Warranty 1. Maintenance Do not use aggressive cleaning agents or solutions. Remove the battery before a long period of non-use. 2. Warranty The AdirPro Flag 3 comes with a one year warranty from AdirPro. More detailed information is available at www.adirpro.com 3. Contact AdirPro 27 Selvage Street Irvington, NJ 07111 Phone: 845.738.1467 Fax: 973.854.8650 Website: www.adirpro.com