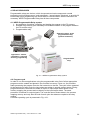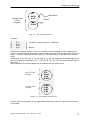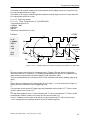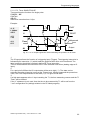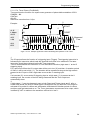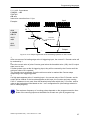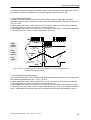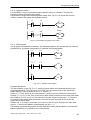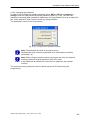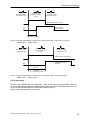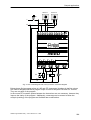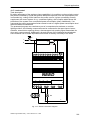
1
Contents
CONTENTS
1. INTRODUCTION............................................................................................................... 6
2. GENERAL ......................................................................................................................... 7
2.1. Specifications ................................................................................................................. 7
2.2. Description of NEED programmable relay front panel..................................................... 7
2.3. System structure and order numbers.............................................................................. 9
3. INSTALLATION................................................................................................................13
3.1. Installation order ............................................................................................................14
3.2. Mechanical fixing ...........................................................................................................14
3.2.1. Attaching to the mounting rail (DIN 35mm).........................................................14
3.2.2. Bolt fixing ............................................................................................................15
3.3. Terminals, cables ..........................................................................................................16
3.4. Connection of 230V AC discrete inputs .........................................................................17
3.5. Connection of 220V DC discrete inputs .........................................................................20
3.6. Connection of 24V (12V) DC discrete inputs..................................................................21
3.7. Analogue AC input connections....................................................................................22
3.8. Analogue 220 DC input connections..............................................................................24
3.9. Analogue 24V (12V) DC input connection.....................................................................25
3.10. Output connection ......................................................................................................28
3.11. AC power supply connection ......................................................................................29
3.12. 220 DC power supply connection ...............................................................................29
3.13. 24V (12V) DC power supply connection .....................................................................31
4. RELAY RESOURCES ......................................................................................................32
4.1. NEED Programmable Relay system ..............................................................................32
4.2. Program cycle ...............................................................................................................32
4.3. NEED Programmable Relay resources..........................................................................34
4.4. Digital inputs..................................................................................................................36
4.4.1. Normally open digital inputs. ...............................................................................36
4.4.2. Normally closed digital inputs..............................................................................36
4.5. Digital outputs................................................................................................................36
4.5.1. Normal digital outputs. ........................................................................................37
4.5.2. Digital pulse outputs............................................................................................37
4.5.3. Digital resetting outputs.......................................................................................38
4.5.4. Digital setting outputs..........................................................................................38
4.5.5. Normal digital outputs used for further control.....................................................38
4.5.6. Inverted digital outputs used for further control. ..................................................39
4.6. Markers .........................................................................................................................39
4.6.1. MDIR marker ......................................................................................................40
4.7. Timers ...........................................................................................................................43
4.7.1. Timer „Delayed activation” (ON-DELAYED). .......................................................44
4.7.2. Timer “Delayed deactivation” (OFF-DELAYED) ..................................................45
4.7.3. Timer “Single pulse”...........................................................................................45
4.7.4. Timer “Pulses” (FLASHING) ...............................................................................46
4.8. Counters........................................................................................................................47
4.9. Clocks ...........................................................................................................................49
4.9.1. Clock operation...................................................................................................50
4.9.2. Remarks concerning Clock configuration ............................................................60
4.10. Real time clock, ...........................................................................................................63
4.11. Comparator – analogue inputs.....................................................................................64
4.12. Potentiometer ..............................................................................................................69
4.13. Remanent values of the programmable relay ..............................................................70
NEED Programmable Relay – User’s Manual ver. 1.5EN
Contents
4.12.1. Remarks on remanent values ...........................................................................71
5. PROGRAMMING LANGUAGES.......................................................................................74
5.1. Text language (STL) programming ................................................................................74
5.1.1. STL program structure ....................................................................................74
5.1.1.1. Symbolic names...........................................................................................77
5.1.2. Description of STL instructions........................................................................78
5.1.2.1. AND instruction ........................................................................................78
5.1.2.2. AND parenthesis instruction .....................................................................78
5.1.2.3. AND NOT instruction................................................................................81
5.1.2.4. AND NOT parenthesis instruction.............................................................81
5.1.2.5. OR instruction .........................................................................................82
5.1.2.6. OR parenthesis instruction ......................................................................83
5.1.2.7. OR NOT instruction ..................................................................................84
5.1.2.8. OR NOT parenthesis instruction..............................................................85
5.1.2.9. XOR instruction .......................................................................................86
5.1.2.10. XOR parenthesis instruction..................................................................86
5.1.2.11. XOR NOT instruction.............................................................................87
5.1.2.12. XOR NOT parenthesis instruction .........................................................88
5.1.2.13. S setting instruction ................................................................................89
5.1.2.14. R resetting instruction.............................................................................89
5.1.2.15. = assigning instruction............................................................................89
5.1.2.16. FP pulse relay instruction .......................................................................90
5.1.2.17. Timer instructions ...................................................................................91
5.1.2.18. Counter instructions ...............................................................................96
5.1.2.19. Clock instructions .................................................................................101
5.1.2.20. Analogue inputs ...................................................................................102
5.1.2.21. Load statement (LOAD)........................................................................103
5.1.2.21.1. ‘L’ statement for Timers. ...................................................................103
5.1.2.21.1.1. Constant time values for Timers. ....................................................103
5.1.2.21.1.2. Time values for Timers based on the Potentiometer setting ...........103
5.1.2.21.1.3. Time values for Timers based on the voltage values on analog
voltage inputs......................................................................................................104
5.1.2.21.1.4. Time values for Timers based on the current values on current analog
inputs ..................................................................................................................105
5.1.2.21.2. ‘L’ statement for Counters. ...............................................................106
5.1.2.21.2.1. Constant threshold values for counters...........................................106
5.1.2.21.2.2. Threshold values for counters, defined according to the Potentiometer
setting .................................................................................................................107
5.1.2.21.2.3. Threshold values for Counters based on the voltage values on analog
voltage ................................................................................................................107
inputs ..................................................................................................................107
5.1.2.21.2.4. Threshold values for Counters based on the voltage values on......108
current analog inputs...........................................................................................108
5.1.2.22. “Always setting” instruction SET ...........................................................111
5.1.2.23. “Always clearing” instruction CLR.........................................................112
5.2. Programming in LAD graphic language .......................................................................113
5.2.1. Symbols in LAD. ...........................................................................................113
5.2.2. Inputs............................................................................................................114
5.2.3. Outputs .........................................................................................................114
5.2.4. LAD program structure..................................................................................115
5.2.5. LAD network structure...................................................................................115
5.2.6. Description of elements used. .......................................................................116
5.2.7. Configuration.................................................................................................118
5.2.7.1. Configuration of inputs ...........................................................................118
5.2.7.2. Configuration of outputs .........................................................................119
NEED Programmable Relay – User’s Manual ver. 1.5EN
Contents
5.2.7.3. Configuration of Markers ........................................................................119
5.2.7.4. Configuration of Timers ..........................................................................120
5.2.7.5. Configuration of Counters.......................................................................121
5.2.7.6. Sample configurations............................................................................122
5.2.8. Element location rules ..................................................................................123
5.2.9. Connection types. .........................................................................................124
5.2.9.1. Mapping the input to the output. .............................................................124
5.2.9.2. Mapping the negated input to the output. ...............................................124
5.2.9.3. Series connection...................................................................................124
5.2.9.4. Parallel connections ...............................................................................125
5.2.9.5. Series-parallel connection. .....................................................................126
5.2.10. Symbolic names..........................................................................................127
5.2.11. LAD program...............................................................................................127
6. INSTALLATION AND SOFTWARE DESCRIPTION .......................................................128
6.1. Hardware requirements ...............................................................................................128
6.2. Software installation ....................................................................................................128
6.3. Uninstalling..................................................................................................................128
6.4. Connecting the PC to the programmable relay ............................................................128
6.5. Quick start – creating the application ...........................................................................129
6.6. Working with PC Need ................................................................................................136
6.6.1. Main program window description.....................................................................136
6.6.2. Menu bar ..........................................................................................................137
6.6.3. Toolbar .............................................................................................................139
6.6.4. Keyboard shortcuts ...........................................................................................140
6.7. STL program editor......................................................................................................142
6.7.1. STL editor .........................................................................................................142
6.7.2. STL Compilation ...............................................................................................143
6.7.3. Configuration of STL editor ...............................................................................144
6.8. LAD program editor .....................................................................................................145
6.8.1. New program ....................................................................................................145
6.8.2. Saving a program..............................................................................................146
6.8.3. Opening an existing program ............................................................................147
6.8.4. Program edition ................................................................................................147
6.8.5. Edition of an object ...........................................................................................151
6.8.6. Configuration of LAD editor...............................................................................154
6.9. Settings .......................................................................................................................155
6.9.1. Types of settings...............................................................................................155
6.9.2. Timer settings ...................................................................................................157
6.9.3. Clock settings ...................................................................................................158
6.9.4. Counter settings................................................................................................158
6.9.5. Comparator settings..........................................................................................159
6.9.6. Remanence ......................................................................................................159
6.9.7. Input delays ......................................................................................................160
6.10. Preview of variables ..................................................................................................161
6.11. LAD ladder view ........................................................................................................163
6.12. Password...................................................................................................................164
6.12.1. Password entering ..........................................................................................164
6.12.2. Changing the password ..................................................................................165
6.13. Real-time clock (RTC) ...............................................................................................166
6.14. Source code ..............................................................................................................167
7. START-UP .....................................................................................................................168
7.1. Switching on ................................................................................................................168
7.1.1. Preliminary operations for the AC version. ........................................................168
7.1.2. Preliminary operations for the DC version.........................................................168
7.1.3. Turning the power on. .......................................................................................168
NEED Programmable Relay – User’s Manual ver. 1.5EN
Contents
8. INFORMATION ON HARDWARE ..................................................................................169
8.1. Relay power supply. ....................................................................................................169
8.1.1. Relay 115/230 V AC power supply....................................................................169
8.1.2. Relay 220 V DC power supply ..........................................................................169
8.1.3. Relay 24 (12) V DC power supply .....................................................................169
8.2. Inputs ..........................................................................................................................170
8.2.1. 230 V AC inputs................................................................................................170
8.2.2. 220 V DC inputs................................................................................................172
8.2.3. 24 (12) V DC inputs ..........................................................................................173
8.3. Outputs........................................................................................................................173
8.4. Input delay...................................................................................................................174
8.4.1. Input delays for NEED-230AC-... relay..............................................................174
8.4.2. Input delays for NEED-24DC-... , NEED-12DC relays.......................................176
8.5. Output delay. ...............................................................................................................178
9. EXTERNAL MEMORY ...................................................................................................179
9.1. Memory card ...............................................................................................................179
9.2. Storage organization ...................................................................................................180
9.3. Memory programming .................................................................................................180
9.3.1. Writing a program .............................................................................................180
9.3.2. Writing settings .................................................................................................181
9.3.3. EEPROM memory status ..................................................................................181
9.3.4. Reading the settings .........................................................................................181
9.4. Operation of memory card with NEED relay ................................................................182
10. SAMPLE APPLICATIONS ............................................................................................183
10.1. Part height assessment .............................................................................................183
10.2. Automatic door ..........................................................................................................188
10.3. School bells ...............................................................................................................196
10.4. Fault detection...........................................................................................................203
10.5. Control of the travel of cars in the bend of the belt conveyor .....................................207
10.6. Lighting and ventilation controller ..............................................................................211
10.7. Load control...............................................................................................................218
10.8. Three-phase motor control and protection .................................................................221
11. TECHNICAL SPECIFICATIONS...................................................................................227
12. GLOSSARY..................................................................................................................238
12. INDEX ..........................................................................................................................240
NEED Programmable Relay – User’s Manual ver. 1.5EN
Introduction
1. INTRODUCTION
NEED is a programmable relay which may replace even complex relay or contactor
connections. The device is freely programmable i.e. the program present in the controller’s
memory can be modified at any time without having to change the peripheral systems of the
entire environment, which was actually impossible using conventional relay control.
Extensive capabilities and excellent parameters combined with functionality of the
programmable relay enable the shortening of design time and the reduction of costs of
applications implemented
.
NEED Programmable Relay – User’s Manual ver. 1.5EN
6
General
2. GENERAL
2.1. Specifications
- 6 or 13 digital inputs,
- 2 or 3 digital-analog inputs:
NEED-230AC-x1-.. : 0–255V AC,
NEED-220DC-x1-.. : 0–255V DC,
NEED-24DC-x1-.., NEED-12DC-x1-.. :
voltage range: 0–25,5V DC (in 0.10V steps) or 0 – 12.75V (in 0.05V steps),
current range: 0–51mA (0.2mA steps) or 0 – 25.5mA (in 0.1mA steps),
- 4 or 8 relay outputs (230V AC/10A),
- Potentiometer for setting the analog values,
- Real time clock,
- Automatic change of summer/winter time in different time zones,
- Operation mode indicator
- RUN/STOP operation mode switch
- I/O status indications
- Programmability of LAD and STL,
- PC software,
- External memory module,
- Fast counter/frequency measuring device (up to 20kHz)
- Detection of correct direction of connection of the L1, L2, L3 phases
- Measurement of asymmetry of the L1, L2, L3 phases.
2.2. Description of NEED programmable relay front panel.
1
2
3
4
11
5
6
7
8
10
4
9
Fig. 2.2.1. Description of NEED..-x1-08-4 programmable relay front panel.
NEED Programmable Relay – User’s Manual ver. 1.5EN
7
General
1
2
3
4
11
5
6
7
8
10
4
9
Fig. 2.2.2. Description of NEED..-x1-16-8 programmable relay front panel.
Designation
1
2
3
4
5
6
7
8
9
10
11
Description
Screw terminal for power supply
Screw terminals for digital inputs
Screw terminals for digital and analogue inputs
Mounting holes
Operating mode switch (RUN-STOP)
Potentiometer for setting analogue values
Relay status LED indicator
Terminal for programming and additional program memory module
Screw terminals for outputs Q1 – Q4
LED indicators of output states
LED indicators of input states
NEED Programmable Relay – User’s Manual ver. 1.5EN
8
General
2.3. System structure and order numbers
NEED Programmable Relay
Cable for
programming and
diagnostic
Memory card
Software
Type designation
NEED
Additional accessories, interoperability with
extensions, galvanic separation of inputs.
D - Display
E - Interoperability with extension modules
G - Galvanic separation of inputs
Number and type of outputs: 4R - 4 relay outputs, 8R - 8 relay outputs
R - Relay outputs
Number of inputs: 08 - 8 inputs; 16 - 16 inputs
Relay version:
01 programming and diagnostics connector type A
11 programming and diagnostics connector type B
Supply voltage type:
AC - alternating
DC - direct
Rated supply voltage
NEED Programmable Relay – User’s Manual ver. 1.5EN
9
General
Example1:
NEED – 230AC – 01 – 08 – 4R
The NEED programmable relay– rated supply voltage 230V AC – version 01, programming
port type A – 8 inputs – 4 relay outputs – without the possibility to add any extensions, an
LCD display, inputs without galvanic separation.
Example2:
NEED – 24DC – 11 – 08 – 4R
The NEED programmable relay– rated supply voltage 24V DC – version 11, programming
port type B – 8 inputs – 4 relay outputs – without the possibility to add any extensions, an
LCD display, inputs without galvanic separation.
Example3:
NEED – 24DC – 11 – 16 – 8R
The NEED programmable relay– rated supply voltage 24V DC – version 11, programming
port type B – 16 inputs – 8 relay outputs – without the possibility to add any extensions, an
LCD display, inputs without galvanic separation.
The programmable relay without display requires the use of a cable for programming
and software diagnostic.
Name
NEED Programmable Relay
Programming and diagnostics cable
RS232 with A type connector
Programming and diagnostics cable
RS232 with B type connector
Programming and diagnostics cable USB
with B type connector
Memory card with A type connector
Memory card with B type connector
Software
User’s guide
Designation
See the type designation
NEED – PC – 15A
NEED – PC – 15B
NEED – PC – 15C
NEED – M – 1K
NEED – M – 1KB
NEED – PC Need
The NEED Programmable Relay – User’s
Guide
NEED with a type A programming and diagnostics connector can be programmed
only by means of the type A programming cable. The memory card must also be
equipped with a type A connector. The same applies to the NEED relay with B type
connector.
Example4:
When ordering relay type: NEED – 230AC – 01 – 08 – 4R you can also order:
NEED – PC – 15A – programming and diagnostics cable with type A connector.
NEED – M – 1K - memory card with type A connector.
Example5:
When ordering relay type: NEED – 230AC – 11 – 08 – 4R you can also order:
NEED – PC – 15B – programming and diagnostics cable with type B connector.
NEED – M – 1KB - memory card with type B connector.
NEED Programmable Relay – User’s Manual ver. 1.5EN
10
General
Fig. 2.3.2. Programming and diagnostics cable RS232 and memory with A type connector.
Fig. 2.3.3. Programming and diagnostics cable RS232 and memory with B type connector.
NEED Programmable Relay – User’s Manual ver. 1.5EN
11
General
Fig. 2.3.4. Programming and diagnostics cable USB with B type connector.
NEED Programmable Relay – User’s Manual ver. 1.5EN
12
Installation
3. INSTALLATION
Symbols used
Electric shock hazard!
Do not perform any work on a powered unit!
!
Warning!
Information and hints.
Please read the following before installing the programmable relays!!!
Dangerous voltages capable of causing death are present in the
programmable relay and at its connections.
•
•
•
•
•
•
•
•
•
•
•
•
•
•
Turn off the device/system where the programmable relay is to be installed.
Protect the device/system from inadvertent activation.
Make sure that no voltage is present in the device/system.
Set the switch of the programmable relay to STOP.
Make all necessary measurements and checks in order to prevent unintended
activation of the programmable relay.
Remember to eliminate electrostatic charge before touching the apparatus.
Connect short-circuit and preventive protections.
Observe the rules and recommendations indicated in the User’s Manual.
Installation of the programmable relay should be carried out by a person acquainted
with the principles of electric installation.
Remember that, once installed, the devices must be protected against inadvertent
activation.
All connections of the programmable relay must be compliant with relevant safety
standards.
The parameters of the power supply network should not exceed the tolerance limits
indicated in the relay’s technical specifications.
Should the relay be used in systems where emergency stop is required, behaviour of
the system during activation and release of the emergency stop must be defined in
order to avoid unforeseen occurrences e.g. uncontrolled activation of the automation
system.
Define proper reaction of the system to switching the power off and then back on.
NEED Programmable Relay – User’s Manual ver. 1.5EN
13
Installation
Safety conditions
• In order to ensure safe operation and reliable functioning of the unit, installation of the
programmable relay should be performed by a person familiar with electric installation
rules.
• Safety standards pertaining to work with electrical equipment as well as health and
occupational safety rules must be duly observed during installation.
• Follow the programmable relay installation conditions.
3.1. Installation order
1. Preparation and protection of the installation place.
2. Mechanical fixing.
3. Connection of cables
- connection of inputs.
- connection of outputs.
- connection of power supply.
3.1.1. Preparation and safeguarding of the installation place
!
•
•
•
•
•
Turn off the unit/system where the programmable relay is to be installed.
Be aware of the electric shock hazard.
Protect the unit/installation from inadvertent activation.
Make sure that no voltage is present in the unit/system.
Where it is not possible to fully cut off the current from the installation area,
points that pose a contact hazard must be additionally protected; exercise
utmost care!
•
Check the condition of cables.
3.2. Mechanical fixing
3.2.1. Attaching to the mounting rail (DIN 35mm)
Assembly
Dismantling
1
3
3
2
2
1
Fig. 3.2.1. Attachment to the mounting rail.
NEED Programmable Relay – User’s Manual ver. 1.5EN
14
Installation
Assembly (fig. 3.2.1.)
1. Attach the module to the top part of the mounting bar.
2. Pull the bottom catch down.
3. With the bottom catch retracted push the module forward and release the retracted
catch.
4. Ensure that the relay module is mounted securely.
Dismantling (fig. 3.2.1.)
1. Pull the bottom catch down.
2. With the bottom catch retracted draw the module aside from the bar.
3. Lift the module and remove it from the bottom catches.
M4
3.2.2. Bolt fixing
1
NEED
Przekaźnik
programmable
NEED
programowalny
relay
Programmable
NEED
Relay
M4
2
Fig. 3.2.2. Bolt fixing.
Two bolt (or tapping screw) fixing.
Diameters of bolt fixing holes: 5.5 mm.
Note: No additional adapters are necessary to perform the fixing, use the fixing holes
provided.
Clearances:
It is recommended to keep a distance of 3 cm between the edges of the input and those of
the output connectors of the programmable relay and other installation parts (mounting
channels, other apparatuses, mounting cabinet wall etc.). This will enable easy cable laying
and ensure efficient cooling of the module. Clearances to be observed when fixing the
module are shown in Fig. 3.2.3.
Side walls may contact other apparatuses, housing parts etc.
The above notes refer to both horizontal and vertical fixing; the distance from the connector
edge must be observed.
One must also remember to leave a minimum of 25 mm clearance in front of the unit, when
installing it in a closed cabinet.
NEED Programmable Relay – User’s Manual ver. 1.5EN
15
30mm
30mm
30mm
NEED
Relay
NEED
Programmable
Przekaźnik
programowalny
Relay
Przekaźnik
NEED
programowalny
Programmable
NEED
30mm
Installation
Fig. 3.2.3. Clearances – horizontal and vertical fixing.
3.3. Terminals, cables
The terminals provided allow the use of leads of the following cross-section areas:
- solid cable
from 0.25mm2 to 4 mm2
from 0.25mm2 to 2.5mm2 - stranded cable with sleeve end
Terminal screw tightening torque: 0.5 Nm (max 0.6Nm)
• Leads should be as short as practicable but not taut.
• Where long conductors are used they must be screened or twisted in pairs – phase or
signal cable (L) with neutral cable (N) or 0V cable with +12(24)V input signal cable for
DC version.
• It is recommended to insulate alternating current and direct current circuits, and those
generating electrical pulses by laying the cables in an appropriate manner. This can
be achieved by avoiding parallel arrangement of power and signal leads, twisting the
pairs of wires or screening with screen end being earthed.
• Cross section area of the cable must be selected with regard being paid to the current
flowing through the load.
Note: In all cases not explicitly specified in this manual laws, standards , and
governmental regulations on electrical systems in force must be applied.
NEED Programmable Relay – User’s Manual ver. 1.5EN
16
Installation
3.4. Connection of 230V AC discrete inputs
!
Inputs must be connected to the same relay from which power is supplied to
the programmable relay.
Reverse connection of the supply power i.e. interchanging the phase
conductor (L) and the neutral conductor (N) being connected to the
programmable relay inputs may result in dangerous voltages being present on
the input terminals and in the non-detection of logic states.
!
Inputs are not electrically isolated from the electrical system powering the
relay.
Electric shock hazard. In case the connection of the neutral conductor
(N) is interchanged with that of the phase conductor (L) or if the neutral
conductor (N) is not connected, current of the voltage equal to that of the
supply current may be present at the terminals.
The following contact parts can be connected to the inputs: push-buttons (normally open,
normally closed), connectors, switches, relay contacts, photocells and 2- or 3-wire proximity
detectors 230V AC.
Input signal voltage ranges according to PN-EN 61131 standard:
Input off: 0 to 40 V AC (logical ‘0’)
Input on: 85 to 260 V AC (logical ‘1’)
Input current for the NEED-230AC-x1-08-4:
I1 to I4: 0.6 mA
at 230 V AC
I5, I6 : 8 mA
at 230 V AC improved resistance to interference,
possibility of connecting long cables – see technical
specification.
I7, I8 : 0,9 mA
at 230 V AC
Input current for the NEED-230AC-x1-16-8:
I1 - I11 : 0,6 mA at 230 V AC
I12, I13
: 8 mA
at 230 V AC improved resistance to interference,
possibility of connecting long cables – see technical
specification.
I4, I15, I16 : 1,5 mA at 230 V AC
Inputs are of resistance type except for I5 and I6 inputs for the NEED-230AC-x1-8-.. version
and I12, I13 for the NEED-230AC-x1-16-.. (inputs which are of resistance-capacity type)
where longer leads can be connected.
Do not use excessively long leads due to their capacitance and susceptibility to
electromagnetic interference which can lead to uncontrolled states of logic inputs e.g.
signaling of an „ON” state of the input.
Lengths of cables which can be connected depend on the internal input system:
a. lead of up to 10 meters can be connected to inputs with normal noise immunity –
measurement was made for the worst case of running the phase lead and input lead
parallel to each other (for example with a two wire cable).
b. cables of lengths up to 100 m can be connected to inputs as they incorporate integral
100 nF capacitors which increase the input current
c. similar to the normal noise immunity inputs a cable of the length of up to 10 m can be
connected to analogue inputs.
NEED Programmable Relay – User’s Manual ver. 1.5EN
17
Installation
Inputs no. I7 and I8 for the NEED-230AC-x1-8-.. version and I14, I15, I16 for the
NEED-230AC-x1-16-.. can be used as discrete or analog inputs – depending on
how they are used in the program.
For inputs with higher noise immunity, in order to limit the starting current it is recommended
that an approx. 1kOhm 1W resistor (fig. 3.4.2) be connected in series with the contact
component (fig. 3.4.2. shows a connection for the NEED-230AC-x1-8-.. version).
Inputs I5, I6 for the NEED-230AC-x1-8-.. version and I12, I13 for the NEED-230AC-x1-16-..
with internal capacitors can be shunted with external resistors (100k Ohm) put between the
input and the N lead so that their capacity can be discharged in a shorter time.
N
L
B1
L
N N
NC
contact
NO
contact
NO
NC
I1
2 x NO switch
2xNO
I2 I3 I4 I5 I6 I7 I8
Fig 3.4.1. Input connections – contact elements.
N
L
NC
B1
contact
NO
contact
1k
L N N
Starting
current
reduction
1k
2 x NO switch
I1 I2 I3 I4 I5 I6 I7 I8
Fig 3.4.2. Input connections – contact elements + resistors reducing the input current surge.
NEED Programmable Relay – User’s Manual ver. 1.5EN
18
Installation
N
L
sensor
L
Out
N
B1
L
N N
Thermal
switch
I2 I3 I4
I1
I5 I6 I7 I8
Fig 3.4.3. Input connections – proximity sensor + thermal switch contact.
In order to reduce interference at discrete inputs Nos. I1...I4, I7, I8 and increase the
lengths of cables which may be used to connect control units to those inputs,
external elements must be used which increase the current in the circuit, and input
filters.
1. Increasing the current in the input circuit
In order to reduce interference at inputs Nos. I1...I4, I7, I8 an external capacitor can be
used e.g. 100nF/275V class X1 or X2 (increase of current) to be connected between the
input terminal and the N terminal (Fig. 3.4.4)
N
I3
L
B1
100nF
275V
L
N N
I1
I3 input current
increase
I2 I3 I4
I5
I6 I7 I8
Fig 3.4.4. Input current increase.
2. RC filter
In order to reduce interference at inputs Nos. I1...I4, I7, I8 an RC filter can be used
(capacitor 100nF/275V class X1 or X2 connected in series and 1k resistor) to be
connected between the input terminal and the N terminal (Fig. 3.4.5).
NEED Programmable Relay – User’s Manual ver. 1.5EN
19
Installation
N
I4
L
B1
RC filter to
reduce
interference
1k
100nF
275V
L
N N
I1
I2 I3 I4
I5
I6 I7 I8
Fig 3.4.5. Input RC filter.
!
Note: Feeding a voltage higher than the maximum permissible between the I1..In
and N input terminals can result in damaging the input circuits of the programmable
relay.
3.5. Connection of 220V DC discrete inputs
Electric shock hazard.
!
!
Note: Feeding a voltage higher than the maximum permissible between the I1..In
and 0V input terminals can result in damaging the input circuits of the
programmable relay.
Inputs are not electrically isolated from the electrical system powering the relay.
The following contact parts can be connected to the inputs: push-buttons (normally open,
normally closed), connectors, switches, relay contacts, photocells and others detectors 220V
DC.
Input signal voltage ranges according to EN 61131 standard:
Input off: 0 to 40 V DC (logical ‘0’)
Input on: 85 to 260 V DC (logical ‘1’)
Input current for the NEED-220DC-x1-08-4:
I1 to I6: 0.6 mA
at 220 V DC
I7, I8 : 1,1 mA
at 220 V DC
Input current for the NEED-220DC-x1-16-8:
I1 - I13 : 0,6 mA at 220 V DC
I4, I15, I16 : 1,1 mA at 220 V DC
Do not use excessively long leads due to their capacitance and susceptibility to
electromagnetic interference which can lead to uncontrolled states of logic inputs e.g.
signaling of an „ON” state of the input.
Lengths of cables which can be connected depend on the internal input system:
- lead of up to 10 meters can be connected to inputs with normal noise immunity –
measurement was made for the worst case of running the parallel to each other (for
example with a two wire cable).
- a shielded cable of the length of up to 10 m can be connected to analogue inputs.
NEED Programmable Relay – User’s Manual ver. 1.5EN
20
Installation
Inputs are of resistance type.
Inputs no. I7 and I8 for the NEED-220DC-x1-8-.. version and I14, I15, I16 for the
NEED-220DC-x1-16-.. can be used as discrete or analog inputs – depending on
how they are used in the program.
+220V 0V
220V
B1
NO
L
+220V 0V 0V
I1
2xNO
NC
I2
I14 I15 I16
Fig 3.5.1. Input connection – contact components.
3.6. Connection of 24V (12V) DC discrete inputs
The following contact parts can be connected to the input terminals: push-buttons (normally
open, normally closed), connectors, switches, relay & contactor contacts, photocells and 2or 3-wire proximity detectors 24V (12V) DC.
Input signal voltage ranges are according to EN 61131 standard.
Table 3.6.1. & 3.6.2. includes digital input parameters depending on the voltage version of
the relay.
Table 3.6.1. NEED-..DC-x1-8-.. Programmable relay input parameters.
Supply
voltage
V
24 DC
12 DC
Input
nr
I1..I6
I7..I8
I1..I6
I7..I8
Input signal range
Input OFF
Input ON
V
-3..5
-3..5
-1..4
-1..4
V
15..30
15..30
8..26
8..26
Input
resistance
Rated voltage
mA
kΩ
3.3
7.44
2
12.36
3.3
3.65
3.3
10.92
Input current
Table. 3.6.2. NEED-..DC-x1-16-.. Programmable relay input parameters
Supply
voltage
V
24 DC
12 DC
Input
no.
I1..I13
I14..I16
I1..I13
I14..I16
Range of input signals
Cut-off input
Start input
V
-3..5
-3..5
-1..4
-1..4
V
15..30
15..30
8..26
8..26
Input
resistance
Rated voltage
mA
kΩ
3.3
7.44
2
12.36
3.3
3.65
3.3
10.92
Input current
If inputs I14..I16 are configured as current inputs then their impedance is 49 Ω.
NEED Programmable Relay – User’s Manual ver. 1.5EN
21
Installation
Note: Feeding a voltage higher than the maximum permissible between the I1..In
and 0V input terminals can result in damaging the input circuits of the
programmable relay.
Inputs are of the resistance type.
Inputs no. I7 and I8 for the NEED..-x1-8-.. version and I14, I15, I16 for the NEED..DC-x1-16-.. can be used as discrete or analog inputs – depending on how they are
used in the program.
0V
+24V DC
B1
NO
contact
+24V 0V 0V I1
NC
contact
I2 I3 I4
I5
2xNO switch
I6 I7 I8
Fig 3.6.1. Input connection – contact components.
0V
+24V DC
sensor
Czujnik
B1
+24V 0V 0V I1
+
Out
-
I2 I3 I4
Thermal
switch
I5
I6 I7 I8
Fig 3.6.2. Input connection – proximity sensor, thermal switch contact.
3.7. Analogue AC input connections
Electric shock hazard. In case the connection of the neutral conductor
(N) is interchanged with that of the phase conductor (L) or if the neutral
conductor (N) is not connected, current of the voltage equal to that of the
supply current may be present at the terminals.
!
Analogue inputs are not electrically isolated from the mains powering the
relay.
Input signal voltage ranges for analogue inputs are 0 to 255 V AC; with the
accuracy of +/- 3% of the measurement range value.
Phase and frequency of the current measured need not to be equal to those of
the supply current in order for the analogue measurement to be correct.
NEED Programmable Relay – User’s Manual ver. 1.5EN
22
Installation
However, if the analogue inputs are to be used as digital ones both the inputs
and current supplying the programmable relay must be connected to the same
phase.
Analogue inputs can be used as discrete ones. In such a case discrete input
connection principles must be followed – see above.
Analogue measurement is performed using an averaging circuit. The result is
shown in the root-mean-square current.
Due to averaging the measurement on analogue inputs is delayed.
Input voltage (measured) must be stable for a while in order for the measurement to be
accurate.
Analog inputs for the NEED-230AC-x1-8-4 version
In relays of this type these are the last two inputs no. I7 and I8.
N
L
L
B1
Potentiometer
L N N
Connecting to a
three-phase network
is not allowed
I1 I2 I3 I4 I5 I6 I7 I8
Fig. 3.7.1. Analogue inputs – potentiometer, network voltage control - NEED-230AC-01-8-...
Analog inputs for the NEED-230AC-x1-16-8 version
In relays of this type these are the last three inputs no. I14, I15 and I16.
L3
L2
L1
N
!
B1
Connecting to a
three-phase network
is allowed
L
N
N
I1
I2
I14 I15 I16
Fig. 3.7.2. Analogue inputs –network voltage control - NEED-230AC-01-16-...
NEED Programmable Relay – User’s Manual ver. 1.5EN
23
Installation
L
N
L
B1
Potentiometer
N
L
N
N
I1
I2
I14 I15 I16
Fig. 3.7.3. Analogue inputs – potentiometer - NEED-230AC-01-16-...
In the NEED-230AC-.. loading times for Timers and thresholds for Counters is not available.
Note: Remember that the parts connected must be of appropriate power and rated
operating voltage.
Note: Remember that the analogue input is power consuming which may cause
the measurement results to be inaccurate if the self-impedance of the source of the
voltage measured is too high.
!
Caution: Components such as potentiometers, switches etc. must be carefully
insulated due to the electric shock hazard.
3.8. Analogue 220 DC input connections
Electric shock hazard
!
Analogue inputs are not electrically isolated from the mains powering the relay.
Input signal voltage ranges for analogue inputs are 0 to 255 V DC (step 1V); with
the accuracy of +/- 2% of the measurement range value.
Analogue inputs can be used as discrete ones. In such a case discrete input
connection principles must be followed – see above.
Analogue measurement is performed using an averaging circuit. The result is shown in the
root-mean-square current.
Due to averaging the measurement on analogue inputs is delayed.
Input voltage (measured) must be stable for a while in order for the measurement to be
accurate.
Analog inputs for the NEED-220DC-x1-8-4 version
In relays of this type these are the last two inputs no. I7 and I8.
Analog inputs for the NEED-220DC-x1-16-8 version
In relays of this type these are the last three inputs no. I14, I15 and I16.
NEED Programmable Relay – User’s Manual ver. 1.5EN
24
Installation
+220V 0V
+220V
B1
Potentiometer
0V
+220V 0V 0V
I1
I2
I14 I15 I16
Fig. 3.8.1. Analogue inputs - NEED-220DC-x1-16-8.
Note: Remember that the parts connected must be of appropriate power and rated
operating voltage.
!
Note: Remember that the analogue input is power consuming which may cause
the measurement results to be inaccurate if the self-impedance of the source of the
voltage measured is too high.
Caution: Components such as potentiometers, switches etc. must be carefully
insulated due to the electric shock hazard.
3.9. Analogue 24V (12V) DC input connection
The range of input signals for analog inputs configured as voltage inputs is 0–25.5V DC (in
0.1V steps) or 0 – 12.75V (in 0.05V steps).
The range of input signals for analog inputs configured as current inputs is 0–51 mA (in 0.2
mA steps) or 0 – 25.5 mA (in 0.1 mA steps).
Accuracy of +/- 2 % of the measurement range value
Resolution of analog inputs: 8 bit.
Analogue inputs can be used as discrete ones. In such a case discrete input
connection principles must be followed – see above.
Analog inputs are I7 and I8 for the DC NEED..-x1-8-.. version and I14, I15, I16 for the
NEED..-x1-16-... version.
The diagram below presents a circuit for setting the voltage at I7 input and controlling the
power supply voltage via I8 input connected to “+” of the relay power supply. Such
connection allows using the potentiometer to adjust not only the comparator thresholds but
also to set times for the Timers and adjust thresholds of the Counters.
0V
+24V
+24V DC
B1
Potentiometer
+24V 0V 0V I1
I2
I3
I4
I5
I6
I7
I8
Fig. 3.9.1. Analogue inputs - potentiometer
NEED Programmable Relay – User’s Manual ver. 1.5EN
25
Installation
Analog inputs in the NEED relay make it possible to read external voltage in the range of 0V
÷ 25.5V (or 0V..12.5V for the NEED-24DC-x1-16-.. version ). The connection arrangement
for the external voltage source for the NEED-24DC-x1-8-.. version is presented in fig. 3.7.2.
Power pack
0V
DC
+24V DC
B1
0V
+24V 0V 0V I1
I2
0..+25.5V
I3
I4
I5
I6
I7
I8
Fig. 3.9.2. Analogue inputs – range.
Note: Remember that the parts connected must be of appropriate power and rated
operating voltage.
Note: Remember that the analogue input is power consuming which may cause
the measurement results to be inaccurate if the self-impedance of the source of the
voltage measured is too high.
Transducer 0..10V DC
Various types of electric transducers (voltage, current, frequency transducers) or non-electric
transducers (temperature, pressure, force transducer) equipped with standard analogue
voltage or current outputs, can be connected to the analogue inputs. For voltage
transducers generating voltage of 0 to 10V for the minimum and maximum value of the
parameter converted, a 100-point conversion characteristics is obtained.
0V
Transducer
+24V DC
Frequency,
temperature
pressure,
level position,
distance etc.
B1
0..10 V DC
+24V 0V 0V I1 I2 I3 I4 I5 I6 I7 I8
3.9.3 Analogue inputs – transducer 0..10.
Transducer 0..20 mA
The NEED-24DC-x1-8-4 and NEED-12DC-x1-8-4 do not have a built in current/voltage
converter.
In order to use a transducer with current output of the range of 0..20 mA or 4..20 mA a
simple current converting circuit must be used. This can be obtained by measuring the
voltage drop at the 510Ω resistor constituting the transducer load. The voltage drop is
proportional to the value of the current according to the ratio: 1 mA = ~ 0.5V. The
calculations account for the self-resistance of the analogue input of the transducer.
NEED Programmable Relay – User’s Manual ver. 1.5EN
26
Installation
Characteristic conversion points for 24V DC version are:
- 1mA → ~0,5V
- 4mA → ~1,9V
- 10mA → ~4,9V
- 20mA → ~9,8V
0V
Transducer
+24V DC
510 Ω
B1
0.5W
0..20 mA
4..20 mA
Frequency,
temperature
pressure,
level position,
distance etc.
+24V 0V 0V I1 I2 I3 I4 I5 I6 I7 I8
3.9.4. Analogue inputs – transducer 0..20 mA for the NEED-24DC-x1-08-4 version.
The NEED-24DC-x1-16-8 and NEED-12DC-x1-16-8 have a built in current/voltage converter.
Converters with current output can be connected directly to the AI14, AI15, AI16 inputs of the
relay after they are configured in the PC Need program as current inputs (I) or downloading
the settings into the relay.
0V
Transducer
+24V DC
B1
0..20 mA
Frequency,
temperature
pressure,
level position,
distance etc.
4..20 mA
+24V 0V
0V
I1
I2
I14
I15
I16
Fig. 3.9.5. Analog inputs – 20mA converter for the NEED-24DC-x1-16-8 version.
!
Note: Feeding a voltage higher than the maximum permissible between the
analog input terminals and 0V can result in damaging the input circuits of the
programmable relay.
!
Note: Voltage should not be supplied to inputs AI14, AI15, AI16 set as current
inputs.
!
Note: Connecting a voltage source to inputs no. AI14, AI15, AI16 set as current
inputs can damage them. The maximum input voltage for I=51mA is 2.5V.
Note: Feeding voltage from a source higher than 51mA to inputs AI14, AI15,
AI16 set as current inputs will trip the internal safety device. The relay has an
input sampling cycle.
NEED Programmable Relay – User’s Manual ver. 1.5EN
27
Installation
3.10. Output connection
Output terminals are connected to the contacts of the Q1..Qn inner electromagnetic relays.
The NEED..-x1-8-4R version includes 4 relay outputs. The extended NEED..-x1-16-8R
version includes 8 relay outputs.
Outputs are potential-free and electrically isolated from the rest of the system and from one
another – independent control systems can be constructed.
Load capacity of one output – see technical specification - 230V 10A for resistant loads.
Relay-controlled output circuits must be appropriately protected (fuse) depending on the
power and nature of the load, in order not to exceed the values indicated in the technical
specification.
Q1
Q2
Q3
Q4
Motor
switch
Lamp
M
N
L
Fig. 3.10.1. Relay outputs – 230V AC mains supply.
Q1
Q2
Q3
Q4
Solenoid
valve coil
Lamp
-
+
N
DC
24V
L
Fig. 3.10.2. Relay outputs – various external circuits.
NEED Programmable Relay – User’s Manual ver. 1.5EN
28
Installation
3.11. AC power supply connection
Supply voltage is dangerous to life!
User’s safety depends on the quality of the connections!
Observe correct connection of supply voltage conductors – phase conductor
(L) and neutral conductor (L).
!
Interchanging the connections of conductors to the power supply inputs i.e.
connecting the phase conductor (L) to the N-terminal and connecting the
neutral conductor (N) to the L-input terminal of the programmable relay may
result in dangerous voltages being present on the I1...I8 input terminals and
the communication ports, and in non-detection of logic states.
Rated supply voltage: 115/230V AC ; 50/60Hz
!
Supplying 400 V AC phase-to-phase voltage between L and N terminals
will destroy the programmable controller.
Protect the programmable relay with a fuse of rated current of 1A. Certainly
the protection level cannot be excessively high as it will not perform the
intended function – the recommended maximum value is 6A.
Should the protection be common for inputs and outputs, the protection
current of the programmable relay power supply of min. 1A must be taken into
account.
N
L
Fuse min. 1A
(max. 16A)
B1
characteristics B, C
L
N
N
I1
I2
In
Fig. 3.11.1. Programmable relay power supply (115/230 V AC).
3.12. 220 DC power supply connection
Supply voltage is dangerous to life!
User’s safety depends on the quality of the connections!
NEED Programmable Relay – User’s Manual ver. 1.5EN
29
Installation
!
Interchanging the connections of conductors to the power supply inputs of the
programmable relay may result in dangerous voltages being present on the
I1...In input terminals and the communication ports, and in non-detection of
logic states.
Rated supply voltage: 220V DC.
!
Note: Feeding a voltage higher than the maximum permissible between the
+220V and 0V terminals can result in damaging the programmable relay.
Protect the programmable relay with a fuse of rated current of 1A. Certainly the protection
level cannot be excessively high as it will not perform the intended function – the
recommended maximum value is 16A.
Should the protection be common for inputs and outputs, the protection current of the
programmable relay power supply of min. 1A must be taken into account.
0V
+220V
B1
Fuse min. 1A
(max. 16A)
+220V 0V 0V
I1
I2
In
Fig. 3.12.1. Programmable relay power supply (220 V DC).
NEED Programmable Relay – User’s Manual ver. 1.5EN
30
Installation
3.13. 24V (12V) DC power supply connection
The rating of the fuse to protect the cables should be greater than 1A as a current surge
occurs when switching on the unit, due to the charging of the internal capacitor located in the
relay power pack.
0V
+24V
B1
Fuse, min. 1A
+24V 0V 0V
I1
I2
In
Fig. 3.13.1. Programmable relay power supply (NEED-24DC-x1-..).
0V
+12V
B1
Fuse, min. 1A
+12V 0V 0V
I1
I2
In
Fig. 3.13.2. Programmable relay power supply (NEED-12DC-x1-..).
!
Note: Feeding a voltage higher than the maximum permissible between the
+24V (+12V) and 0V terminals can result in damaging the programmable relay.
NEED Programmable Relay – User’s Manual ver. 1.5EN
31
NEED relay resources
4. RELAY RESOURCES
Programmable relays are devices, which incorporate two basic components: central
processing unit including memory, and peripherals – inputs/outputs. Obviously, to provide full
functionality some programming unit and a cable for communication with the controller are
necessary. NEED Programmable Relay has all those components.
4.1. NEED Programmable Relay system
1. An application for editing, compiling and loading the program to the PC memory.
2. External relay memory (not necessary but facilitates transfer of the program between
the PC and the relay).
3. Programmable relay.
External memory of the
programmable relay
(optional extension)
Application - edition,
compilation, relay and
memory programming
Programmable
relay
Fig. 4.1.1 NEED Programmable Relay system.
4.2. Program cycle
In order to run various applications using the programmable relay first of all an appropriate
program must be created and placed in the controller’s memory. Once run, the controller
starts processing the program from the first instruction to the last. The cycle is then repeated.
At the beginning of each cycle the input states are written in special memory areas. During
program execution references are made to copies of input/output states written in the
memory mapping the process and not directly to the input/output states. The same
procedure is followed for output signals. The controller stores those states in the process
mapping memory and only after the end of each cycle the states are copied to the relay
outputs.
Controller operating cycle is presented in Fig. 4.2.1.
NEED Programmable Relay – User’s Manual ver. 1.5EN
32
NEED relay resources
Writing to the
system memory
Reading input
states
Memory
the
om
r
f
ry
ead
o/R memo
t
e
t
Wri ystem
s
Q1: 0
Q2: 1
Q3: 1
Q4: 0
R
e
sy ad
st ing
em f
r
m om
em t
or he
y
Controller
programme
I1: 0
I2: 1
I3: 1
.
.
.
I8: 0
Writing
output
states
Fig.4.2.1. Controller operating cycle.
Good knowledge of the NEED Programmable Relay resources is required to properly
understand and program that relay.
NEED Programmable Relay – User’s Manual ver. 1.5EN
33
NEED relay resources
4.3. NEED Programmable Relay resources
POTENTIOMETER
Resources physically
available in the
programmable relay
Inputs
INPUTS/OUTPUTS
I1 - I16, Q1 - Q8
CPU
Program
memory
MARKERS
M1 - M16, MDIR
TIMERS, COUNTERS
T1 – T16, C1 - C8, HC
Outputs
COMPARATORS
Resources
available in the
program only
A1- A12
WEEKLY CLOCKS
REAL TIME CLOCK
H1 - H4, RTC
Fig..4.3.1. NEED programmable relay resources.
Communication between the NEED relay and the external devices is carried out via outputs
and inputs. These are practically the only resources, noticeable to users, which may be a
basis for creating even very complex applications. But the actual power of each relay is
determined by its internal resources – “invisible” from the outside, accessible only to the
program. The Fig. 4.3.1. illustrates, in a symbolic manner, the resources of the
programmable relay while Table 4.3 shows quantities of individual components comprised by
the relay system structure.
Proper use and utilization of the resources of the NEED programmable relay depend on the
user. Below please find a description of individual components and writing methods for
different programming languages.
NEED Programmable Relay – User’s Manual ver. 1.5EN
34
NEED relay resources
Table 4.3. NEED programmable relay resources.
Name
“I” digital Inputs
“Q” NO type relay
digital outputs
Comparators
“A”
Markers
“M”
Quantity
NEED-..-x1- 08- 4
I1 – I8
the I7,I8 inputs can also be
used as analog inputs
Quantity
NEED-..-x1-16- 8
I1 – I16
the I14, I15, I16 inputs can
also be used as analog inputs
Q1 – Q4
Q1 – Q8
A1 – A8
A1 – A12
M1 – M16
M1 – M16
MDIR marker
Defining the direction of
connection of the L1,
L2, L3 phases
MDIR
Timers
“T“
T1 – T8
T1 – T16
Counters
“C”
C1 – C8
C1 – C8
Fast counter
HC up to 20kHz
HC1
Real time
clock
Weekly clocks
“H”
1
H1 – H4
NEED Programmable Relay – User’s Manual ver. 1.5EN
1
Automatic change of
summer/winter time in
different time zones
H1 – H4
35
NEED relay resources
4.4. Digital inputs
Each of the 8 inputs may be configured as normally open or normally closed.
Those resources represent physical inputs of the programmable relay.
4.4.1. Normally open digital inputs.
Symbols of normally open digital inputs.
STL
LAD
A I1
or
O I1
or
X I1
I1
SYMBOL: In, „n” being the input number n=1..8 ; NEED..-x1-08-..
n=1..16 ; NEED..-x1-16-..
LOGICAL STATES:
‘1’ – supply voltage present at the input.
‘0’ – no supply voltage present at the input.
4.4.2. Normally closed digital inputs.
Symbols of normally closed digital inputs.
STL
AN I1
or
ON I1
or
XN I1
LAD
I1
SYMBOL: In, „n” being the input number n=1...8 ; NEED..-01-08-..
n=1...16 ; NEED..-01-16-..
LOGICAL STATES:
‘0’ – supply voltage present at the input.
‘1’ – no supply voltage present at the input.
4.5. Digital outputs
Digital outputs can be of different types. However, it must be remembered that there are
max. 8 physical outputs available!
NEED Programmable Relay – User’s Manual ver. 1.5EN
36
NEED relay resources
4.5.1. Normal digital outputs.
Symbols of normal digital outputs.
STL
LAD
= Q2
SYMBOL: Qn, „n” being the output number, n=1..4 ; NEED..-x1-08-..
n=1..8 ; NEED..-x1-16-..
LOGIC STATES:
‘1’ – contacts closed.
‘0’ –contacts open.
This type of output works like an ordinary relay i.e. the coil, when energised, triggers the
relay actuation.
4.5.2. Digital pulse outputs.
Symbols of digital pulse outputs.
STL
LAD
FP Q2
SYMBOL: Qn, „n” being the output number, n=1..4 ; NEED..-x1-08-..
n=1..8 ; NEED..-x1-16-..
LOGIC STATES:
‘1’ – if the previous state was ‘0’ and a logical positive control edge occurred.
‘0’ – if the previous state was ‘1’ and a logical positive control edge occurred.
This output acts like a flip-flop which, when actuated by a rising edge, changes the state of
its output to the opposite one.
NEED Programmable Relay – User’s Manual ver. 1.5EN
37
NEED relay resources
4.5.3. Digital resetting outputs.
Symbols of digital resetting outputs.
STL
LAD
R Q2
SYMBOL: Qn, „n” being the output number, n=1..4 ; NEED..-x1-08-..
n=1..8 ; NEED..-x1-16-..
LOGICAL STATES:
‘0’ – if the control state ‘1’ occurred.
4.5.4. Digital setting outputs.
Symbols of digital setting outputs.
STL
LAD
Q2
S
S Q2
SYMBOL: Qn, „n” being the output number, n=1..4 ; NEED...-x1-08-..
n=1..8 ; NEED..-x1-16-..
LOGICAL STATES:
‘1’ – if the control state ‘1’ occurred.
4.5.5. Normal digital outputs used for further control.
Symbols of normal digital outputs used for further control.
STL
A Q2
or
O Q2
or
X Q2
LAD
Q2
SYMBOL: Qn, „n” being the output number, n=1..4 - NEED..-x1-08-..
n=1..8 - NEED..-x1-16-..
LOGIC STATES:
‘1’ – if the physical output state is ‘1’.
‘0’ – if the physical output state is ‘0’.
NEED Programmable Relay – User’s Manual ver. 1.5EN
38
NEED relay resources
4.5.6. Inverted digital outputs used for further control.
Symbols of digital outputs used for further control.
STL
LAD
AN Q2
or
ON Q2
or
XN Q2
Q2
SYMBOL: Qn, „n” being the output number, n=1..4 - NEED..-x1-08-..
n=1..8 - NEED..-x1-16-..
LOGICAL STATES:
‘1’ – if the physical output state is ‘0’.
‘0’ – if the physical output state is ‘1’.
4.6. Markers
A Marker is a logical element which is treated as a variable used in the program. It has its
internal state ‘0’ or ‘1’.
No specific input or output can be physically connected with a marker but it can be used for
connecting logical program structures. Thus markers can be treated as 16 reserved bits
which can be referred to as inputs or outputs, i.e. they are subject to the same „operations”
(instructions) as the inputs and outputs are but they have no physical representation in the
form of contacts.
The marker symbol M appears in the syntax of the instruction or the graphic to replace the
letter I or Q.
SYMBOL: Mn, „n” being the number within the range of 1 to 16
LOGICAL STATES:
‘0’ or ‘1’ – depending on the function in the program
Symbols of Markers
STL
LAD
M2
= M2
M1
FP M1
M8
R M8
NEED Programmable Relay – User’s Manual ver. 1.5EN
R
39
NEED relay resources
Symbols of markers – ctd.
STL
LAD
M4
S M4
S
A M2
or
O M2
or
X M2
M2
AN M9
or
ON M9
or
XN M9
M9
4.6.1. MDIR marker
For the NEED-230VAC-x1-16-8 version, in addition to the aforementioned 16
Markers the MDIR Marker also exists.
The MDIR Marker defines the direction of phases no. L1, L2, L3 connected to the I14, I15,
I16 inputs. If phase L1 is connected to I1), L2 to I15, L3 to I16 then MDIR assumes the value
of ‘1’, otherwise the MDIR value is ‘0’.
The MDIR Marker is read only.
Figures 4.6.1 and 4.6.2 show examples of connections, where MDIR takes the successive
values of ‘1’ and ‘0’.
If the supply cable is not connected to one of the analog inputs (I14, I15, I16), then the MDIR
marker takes a random value– figure 4.6.3.
NEED Programmable Relay – User’s Manual ver. 1.5EN
40
NEED relay resources
N
L1
L2
L3
B1
MDIR=1
L1
N
N
L
I2
I1
L2 L3
I14 I15 I16
Fig.4.6.1. Connection of a three phase network, where the MDIR marker takes the logical value of ‘1’.
N
L1
L2
L3
B1
MDIR=0
L3
L
N
N
I1
I2
L2 L1
I14 I15 I16
Fig. 4.6.2. Connection of a three phase network, where the MDIR marker takes the logical value of ‘0’.
NEED Programmable Relay – User’s Manual ver. 1.5EN
41
NEED relay resources
N
L1
L2
L3
B1
MDIR=?
L2 L3
L
N
N
I1
I2
I14 I15 I16
Fig.4.6.3. Connection of a three phase network, where the MDIR marker takes random values of ‘0’ or
‘1’.
NEED Programmable Relay – User’s Manual ver. 1.5EN
42
NEED relay resources
4.7. Timers
SYMBOL: Tn, „n” being the Timer number: n=1..8 ;NEED..-x1-08-4
n=1..16 ; NEED..-x1-16-8
LOGICAL STATES OF TRIGGER and RESET INPUTS
‘0’ or ‘1’ – depending on the function in the program
OUTPUT LOGICAL STATES:
‘0’ or ‘1’ – depending on the function in the program
TIME RANGES:
Values of times measured are presented in table 4.7.
A Timer is a time element enabling the use of time control in a programmable relay.
Each of 8 Timers can be used in one of the following configurations:
- ON-DELAYED,
- OFF-DELAYED,
- SINGLE PULSE,
- FLASHING.
The Logical structure of a Timer comprises inputs, outputs, operating mode and a time value
to be measured.
Timer inputs and outputs can be logically combined also via bit signals (I,Q,M).
Inputs
Inputs are composed of:
- TRIGGER input (this input actuates the operation of the Timer e.g. starts the time
measurement)
- RESET input (causes the timer’s output to be set to low state (‘0’) and stops the time
measurement.)
INPUTS
OUTPUT
TIMER
TRIGGER
Time value to
be measured
Time
RESET
Mode
Fig. 4.7.1. Logical structure of the Timer.
Time to be measured
The time to be measured by the Timers is set by using appropriate loading instructions (STL,
LAD).
Time range of Timers is shown in table 4.7.
Mode
Type of Timer operation e.g. delayed actuation, single pulse etc.
NEED Programmable Relay – User’s Manual ver. 1.5EN
43
NEED relay resources
Table 4.7. Time ranges of timers .
Time format
Range
Increment
s.ms (seconds.milliseconds)
min.s (minutes.seconds)
h.min (hours.minutes)
0s.10ms - 99s.990ms
0min.1s - 99min.59s
0h.1min - 99h.59min
10ms
1s
1min
Outputs
Timer output is set or reset depending on the time function selected (Timer type).
Timer outputs can be used in the program as markers, by replacing the letter M in the
designation with the letter T.
4.7.1. Timer „Delayed activation” (ON-DELAYED).
Symbols of SD Timer .
STL
LAD
T1
L 10s
SD T1
SD
10s.000ms
T1
R T1
R
Time function performed:
If leading edge is present at the Trigger input while the Reset input is inactive then, after a
time period preset on the timer, the Timer output is activated to the state ‘1’ – the Trigger
input must remain in the high state. Should the Trigger input change its state to ‘0’ the time
counter is automatically reset and the output is cleared.
If the Reset input is set to ‘1’, the Timer is reset at any point of its operation to stop time
measurement. Output state returns to the original state (‘0’). Time measurement is resumed
only after the Reset signal is set to low and the positive edge is present at the Trigger input.
NEED Programmable Relay – User’s Manual ver. 1.5EN
44
NEED relay resources
4.7.2. Timer “Delayed deactivation” (OFF-DELAYED)
Symbols of the SF Timer.
STL
LAD
T1
L 10s
SF T1
SF
10s.000ms
T1
R T1
R
Time function performed:
If the Trigger input state is ‘1’ with ‘0’ state being present at he Reset input, then the output is
active. If now the Trigger input goes to low state (‘0’ – trailing edge) then, after a time set on
the Timer, the Timer output is deactivated – set to ‘0’.
Should the Trigger input change its state to ‘1’ the time counter is automatically reset and the
output is set back to high state (‘1’).
If the Reset input is set to ‘1’, the Timer is reset to stop time measurement, the Timer output
state changing to ‘0’. Time measurement is resumed only after the Reset signal is set to low
(‘0’) and a negative triggering edge is present at the Trigger input.
4.7.3. Timer “Single pulse”
Symbols of the SE Timer.
STL
LAD
T1
L 10s
SE T1
SE
10s.000ms
T1
R T1
R
Time function performed:
If the triggering signal (leading edge) appears at the Trigger input, the Reset input being
inactive, then the system activates the output for the time set and returns to ‘0’ state
afterwards – state of the Trigger at that time is of no importance (it can have the value of ‘0’).
Each positive edge at the Trigger input extends the pulse by another time set. Setting of the
Reset input at any time point resets the Timer output state to ‘0’. Next triggering can occur
after the Reset input is set to ‘0’ and another leading edge appears at the Trigger input.
NEED Programmable Relay – User’s Manual ver. 1.5EN
45
NEED relay resources
4.7.4. Timer “Pulses” (FLASHING)
Symbols of the SL Timer.
STL
LAD
T1
L 10s
SL T1
SL
10s.000ms
T1
R T1
R
Time function performed:
The Timer acts as a square wave generator of pulse-width modulation of 50%. The system
starts to generate pulses of the preset duration time when the Trigger input state is ‘1’.
Durations of ‘1’ and ‘0’ states are equal and the operating frequency for that Timer type is:
f=1/(2T), “T” being the preset time to be measured by the Timer.
Setting the Reset input state to high results in immediate setting of the output state to low.
When the Trigger signal goes to low, the Timer output also goes to ‘0’.
The interdependence between the Trigger and Reset inputs and the Timer output are as
follows:
• Once the state ‘1’ is sent to the Trigger, the Reset input being at ‘0’, the output first
remains in the ‘0’ state for the time period preset previously and then goes to ‘1’, the
cycle being repeated afterwards.
• If both Trigger and Reset are set to ‘high’ at the same time, then the output is ‘0’.
Once the Reset goes to low state, the Trigger remaining at ‘1’, the system activates
the output to the time set and deactivates it afterwards, the cycle being repeated.
NEED Programmable Relay – User’s Manual ver. 1.5EN
46
NEED relay resources
4.8. Counters
SYMBOL: Cn , n being the Counter number within the range of 1 to 8
LOGICAL STATES OF INPUTS: CU, CD, RESET:
‘0’ or ‘1’ depending on the function in the program.
LOGICAL STATES OF OUTPUT:
‘0’ or ‘1’ depending on the function in the program.
RANGE OF VALUES COUNTED:
0- 65535.
The counter counts the pulses that occur during the presence of the leading edge at that
input which triggers the counting.
The logical structure of the Counter comprises inputs, output and the numerical value of
pulses to be counted.
Counter inputs and outputs can be logically combined also via bit signals (I,Q,M).
Inputs
The inputs comprise:
- resetting input (RESET) –
- inputs triggering the count –
sets the Counter output to low state (‘0’) and stops pulse
count, and sets the Counter to zero
CU,CD – signals sent to those inputs, leading edges, trigger
the count-up or count-down, respectively. Thus, the same
Counter can perform simultaneous count-up and countdown functions.
INPUTS
OUTPUT
COUNTER
CU
C
CD
RESET
N
Number of
pulses to be
counted
Fig. 4.8.1. Logical structure of the counter.
Number of pulses to be counted
Number of pulses to be counted, from the range of 0 to 65535, can be defined using loading
instruction (STL) or settings file (“*.set”) of the relay for the LAD diagram.
Output
Counter output is set to high or reset (set to low) depending on the pulse Counter state.
Counter output state goes to ‘1’ if the below condition is true
- the current number of pulses counted ≥ preset number to be counted.
Counter output state goes to ‘0’ if the below condition is true
- the current number of pulses counted < preset number to be counted.
Occurrence of a positive edge at the CU input results in increasing the number counted by 1
while the positive edge at the CD input reduces that value by 1.
NEED Programmable Relay – User’s Manual ver. 1.5EN
47
NEED relay resources
The Counter outputs can be used in the program as Markers, the letter M being replaced in
the designation by the letter “C”.
Symbols of Counter
STL
LAD
C3
L C#3
CU C1
CU
C#1
C1
L C#9
CD C1
D
C#9
C1
R C1
R
Pulse count up:
- The Counter counts the pulses that occur at the CU input.
- Counting is performed in ascending order. If the number of pulses counted is
higher than or equal to the preset number of pulses then the Counter output state
goes to ‘1’. This state remains unchanged until high state occurs at the Reset
input, which causes both the output and the current counter value to be reset.
- The Counter can never overflow; if the number of the pulses counted reaches
65535, the Counter stops counting up.
Pulse count-down:
- The Counter counts the pulses that occur at the CD input.
- Counting is performed in descending order. If the number of pulses counted is
higher than or equal to the preset number of pulses then the Counter output state
goes to ‘1’. This state remains unchanged until high state occurs at the Reset
input, which causes both the output and the current counter value to be reset.
- The Counter can never overflow; if the number of the pulses counted reaches 0,
the Counter stops counting down.
For the NEED-24DC-x1-16-8 version, in addition to the aforementioned 8 Counters
there is one more, a Fast Counter - HC counting pulses of a maximum frequency of
20kHz. HC is a hardware based Counter which counts pulses appearing at the I11
input. The CU, CD inputs, in addition to the direction counting function, also
provide the function for activating the Fast Counter.
The Fast Counter can run in the frequency mode – it counts pulses appearing at the
I11 input during 1second.
NEED Programmable Relay – User’s Manual ver. 1.5EN
48
NEED relay resources
The Fast Counter, after reaching the maximum value - 65535, starts counting from
zero after performing the reset function.
For the NEED-230VAC-01-16-8 version the Fast Counter HC measures the power
supply network frequency (50Hz or 60Hz) – for the frequency mode. Whereas in the
counter mode it counts pulses of the power supply network every 20ms (for the 50Hz
frequency of the power supply network) or 16,6ms (for the 60Hz power supply
network)
4.9. Clocks
SYMBOL: H<n> , n being the Clock number from 1 to 4.
LOGICAL STATES OF THE OUTPUT:
‘0’ or ‘1’ depending on the function in the program.
CLOCK
CLOCK 1
Channel A Channel BChannel C Channel D
Day1
OUTPUTS
Time ON
Day2
Time OFF
Day1
Time ON
Day2
Time OFF
Day1
Time ON
Day2
H1
Time OFF
Day1
Time ON
Day2
Time OFF
CLOCK 2
H2
H3
CLOCK 3
CLOCK 4
H4
Fig. 4.9.1. Logical structure of the Clock.
When programming the relay, one-week H1, H2, H3 and H4 control clocks can be used.
Each Clock has four channels A,B,C and D. The Clock output is common for the four
channels. Figure 4.9.1 illustrates the logical structure of the Clocks.
NEED Programmable Relay – User’s Manual ver. 1.5EN
49
NEED relay resources
4.9.1. Clock operation
Clock operation in the programmable relay can be compared to the operation of a device, the
schematic diagram of which is presented in Fig. 4.9.2. The clock is turned on using „ON”
switches and turned off using „OFF” switches. Clock setting is performed using “PC Need”
program.
OFF
ON
Power
supplay
Channel A
Channel B
Channel C
Channel D
Auxilary contact
Clock output
contact
Fig. 4.9.2. Schematic diagram of a single clock.
NEED Programmable Relay – User’s Manual ver. 1.5EN
50
NEED relay resources
Example 1
Fig. 4.9.3. shows a sample configuration window for the Clock 1.
Clock number
Channel symbol
First day
Last day
ON time
OFF time
Fig. 4.9.3. Sample Clock 1 configuration window.
First day
– first day in a one-week schedule when the clock is turned
on /off (Monday in the above example).
Last day
– last day in a one-week schedule when the clock is turned
on/off (Friday in the above example).
ON time
– time of turning on the clock output (range: from 0.00 to 23.59)
(5.00 in the above example).
OFF time
– time of turning off the clock output (range: from 0.00 to 23.59)
(6.00 in the above example).
In the configuration presented above Clock 1 will set its output state to high each day,
Monday through Friday, between 5 a.m. (ON time) and 6 a.m. (OFF time). This situation is
presented in Fig. 4.9.4.
NEED Programmable Relay – User’s Manual ver. 1.5EN
51
NEED relay resources
Monday
'1'
H1
'0'
4.00
5.00
6.00 7.00 8.00 9.00 10.00
Tuesday
H1
'1'
'0'
4.00
5.00
6.00 7.00 8.00 9.00 10.00
...
Friday
H1
'1'
'0'
4.00
5.00
6.00 7.00 8.00 9.00 10.00
Fig.4.9.4. Clock 1 operation in the configuration presented in Fig. 4.9.3.
Example 2
Fig. 4.9.5. shows a sample configuration window for the Clock 1.
Fig. 4.9.5. Clock 1 sample configuration window.
In the configuration presented above Clock 1 will set its output state to high on each day,
Monday through Wednesday, between 7 a.m. (ON time) and 10 a.m. (OFF time) and
between 11 a.m. (ON time) and 2 p.m. (OFF time) and between 3 p.m. (ON time) and 4 p.m.
(OFF time). Additionally the Clock 1 output will be set Monday through Friday between 5 a.m.
and 6 a.m. This situation is presented in Fig. 4.9.6.
NEED Programmable Relay – User’s Manual ver. 1.5EN
52
NEED relay resources
Monday
'1'
H1
5.00
6.00
7.00
10.00 11.00
14.00 15.00 16.00
Tuesday
'1'
H1
5.00
6.00
7.00
10.00 11.00
14.00 15.00 16.00
Wednesday
6.00
14.00 15.00 16.00
'0'
'1'
'0'
6.00
Friday
H1
5.00
10.00 11.00
Thursday
H1
5.00
7.00
'0'
'1'
H1
5.00
'0'
6.00
'1'
'0'
Fig. 4.9.6. Clock 1 operation in the configuration presented in Fig.4.9.5.
NEED Programmable Relay – User’s Manual ver. 1.5EN
53
NEED relay resources
Example 3
Fig. 4.9.7. shows a sample configuration window for Clock 2.
Fig.4.9.7. Clock 2 sample configuration window.
In the configuration presented above, Clock 2 will set its output state to high each Monday at
10 a.m. (turn-on time) and will turn off each Tuesday at 11 a.m. If this control is to be applied
to a greater number of days, the fields „ON time” or „ OFF time must be left blank for
appropriate channels. Clock 2 operation diagram is shown in Fig. 4.9.8.
'1'
H2
Monday
10.00
Tuesday
0.00
11.00
'0'
Fig. 4.9.8. Clock 2 operation in the configuration presented in Fig. 4.9.7.
Identical Clock 2 operation can be achieved if the configuration is made as shown in Fig.
4.9.9.
NEED Programmable Relay – User’s Manual ver. 1.5EN
54
NEED relay resources
Fig. 4.9.9. Clock 2 sample configuration window.
Example 4
If the ON time is later than the OFF time the clock output is turned off on the following day configuration according to Fig. 4.9.10.
Fig. 4.9.10. Clock 1 sample configuration window.
'1'
H1
Thursday
Wednesday
10.00
0.00
6.00
'0'
Fig. 4.9.11. Clock 1 operation in the configuration presented in Fig. 4.9.10.
NEED Programmable Relay – User’s Manual ver. 1.5EN
55
NEED relay resources
If the OFF time is earlier than the ON time NEED programmable relay turns off the
output of the Clock being used, on the following day.
Example 5
Turning the clock output on for 24 hours.
In order to achieve a 24-hour operation the Clock 3 must be configured as shown in Fig.
4.9.12.
Fig. 4.9.12. 24-hour operation sample configuration window.
NEED Programmable Relay – User’s Manual ver. 1.5EN
56
NEED relay resources
Example 6
It must be remembered that the clock output state depends on the states of all four channels.
Let’s analyse the configuration of Clock 4 shown in Fig.4.9.13.
Fig.4.9.13. Clock 4 sample configuration window.
Please note that the times preset in channels A and C are the same – Fig.4.9.14.
'1'
Sunday
10.00
16.00
Monday
10.00
H4
Tutaj Zegar jest
wyłączony
Tutaj zegar
był juŜ
włączony
10.00
H4
Tuesday
15.00
10.00
'0'
'1'
H4
16.00
17.00 18.00
Thursday
10.00
H4
16.00
Friday
10.00
17.00 18.00
H4
16.00
'0'
'1'
H4
16.30
Wednesday
'0'
'1'
'0'
'1'
'0'
'1'
'0'
Fig. 4.9.14. Operation of Clock 4 in the configuration shown in Fig. 4.9.13.
As the clock time settings may overlap it must be always taken into account that the clock
output turns on that channel the turn-on time of which is earlier and it turns off the channel
the turn-off time of which is earlier.
NEED Programmable Relay – User’s Manual ver. 1.5EN
57
NEED relay resources
Example 7
Let’s analyse the configuration of Clock 4 shown in Fig.4.9.15.
Fig. 4.9.15. Clock 4 sample configuration window.
The clock will turn on its output on Monday and Tuesday at 8 a.m. and will turn it off at
12 noon (and not 3 p.m. ! – “first on - first off” rule is used). Clock 4 operation diagram is
presented in Fig. 4.9.16..
At this point Clock turns
its output on and off
(Channel B setting)
Monday
'1'
H4
'0'
8.00
Tuesday
12.00
15.00
'1'
H4
'0'
8.00
9.00
At this point Clock is
already on!
12.00
15.00
At this point Clock is
already off!
Fig. 4.9.16. Operation of Clock 4 in the configuration shown in Fig.4.9.15.
NEED Programmable Relay – User’s Manual ver. 1.5EN
58
NEED relay resources
Example 8
Figure 4.9.17. shows the configuration of Clock 1. If the power is turned on between 10 a.m.
and 12 noon, the relay output contacts will be open but the time will be still monitored. On
return of the supply voltage at 12 noon the Clock H1 output state will be high – according to
H1 configuration. This situation is illustrated in Fig. 4.9.18.
Fig. 4.9.17. Clock 1 sample configuration window .
Power
turn-off
10.00
12.00
A H1
= Q1 8.00
Power
turn-on
Q1
Relay contacts at
output Q1are open
during power failure
Power supply
Thursday
0.00
After power restoration
the time is correct so
according to H1 settings
Q1=1
7.00
'1'
'0'
'1'
'0'
Friday
Fig. 4.9.18. Operation of Clock 1 in the configuration shown in Fig.4.9.17.
In case of power failure, time is still measured by the relay however the contacts of
the output relays do not close. Clock back up during power supply is 64 hours (at
25oC).
NEED Programmable Relay – User’s Manual ver. 1.5EN
59
NEED relay resources
4.9.2. Remarks concerning Clock configuration
4.9.2.1 One blank field – 3 filled fields (for 1 channel)
1. All fields filled, “ON “ field blank
Example:
Fig. 4.9.2.1.1. Sample Clock configuration – “ON” field blank.
The Clock will turn its output on from Sunday to Tuesday at 10 a.m.
2. All fields filled, “OFF” field blank
Example:
Fig. 4.9.2.1.2. Sample Clock configuration – 3 fields filled.
NEED Programmable Relay – User’s Manual ver. 1.5EN
60
NEED relay resources
From Sunday to Tuesday the Clock will turn its output on at 5.00 a.m. If only the “ON”
time is set, the Clock will remain on all the time.
3. All fields filled, “Day 1” field blank
Example:
Fig. 4.9.2.1.3. Sample Clock configuration – “Day 1” field blank.
The Clock will enable its output only on Tuesdays at 5.00 a.m. and will disable it only on
Tuesdays at 2 p.m.
4. All fields filled, “Day 2” field blank.
Example:
Fig. 4.9.2.1.4. Sample Clock configuration – “Day 2” field blank.
The Clock will enable its output only on Sunday at 5.00 a.m. and will disable it only on
NEED Programmable Relay – User’s Manual ver. 1.5EN
61
NEED relay resources
Sunday at 2 p.m.
4.9.2.2. Two fields blank – 2 fields filled (for one channel)/
1. “ON” and “OFF” fields blank
Example:
Fig. 4.9.2.2.1. Sample Clock configuration – “ON” and “OFF” fields blank.
The Clock is not operating – invalid setting which may not be sent to the relay.
2. “Day 1” and “Day 2” fields blank
Example:
Fig. 4.9.2.2.2. Sample Clock configuration – “Day 1” and “Day 2” fields blank.
The Clock is not operating – invalid setting which may not be sent to the relay.
NEED Programmable Relay – User’s Manual ver. 1.5EN
62
NEED relay resources
4.9.2.3. Three fields blank (for one channel)
The Clock is not operating – invalid setting which may not be sent to the relay.
4.10. Real time clock,
The real time clock makes it possible to set the time, date and time zone according to which
the summer/winter time change takes place in the NEED-..-x1-16-8 relay. The settings for
the Real Time Clock are made through the PCNeed program. Fig. 4.10.1. shows the settings
dialog box.
Fig. 4.10.1. The Real Time Clock Settings Dialog Box.
The real time clock supports the following time zones:
EU 1:00 – The zone where the change to summer time takes place on the last Sunday of
March from 1:00 to 2:00 a.m., and the change to winter time - on the last Sunday
of October from 2:00 to 1:00 a.m.
EU 2:00 – The zone where the change to summer time takes place on the last Sunday of
March from 2:00 to 3:00 a.m., and the change to winter time - on the last Sunday
of October from 3:00 to 2:00 a.m.
EU 3:00 – The zone where the change to summer time takes place on the last Sunday of
March from 3:00 to 4:00 a.m., and the change to winter time - on the last Sunday
of October from 4:00 to 3:00 a.m.
RU – The zone where the change to summer time takes place on the last Sunday of March
from 2:00 to 3:00 a.m., and the change to winter time - on the last Sunday
of October from 3:00 to 2:00 a.m.
US – The zone where the change to summer time takes place on the 2nd Sunday of March
from 2:00 to 3:00 a.m., and the change to winter time - on the first Sunday
of November from 3:00 to 2:00 a.m.
NEED Programmable Relay – User’s Manual ver. 1.5EN
63
NEED relay resources
4.11. Comparator – analogue inputs
SYMBOL: An, where n – is the comparator number: n=1..8 for NEED-..-x1-08-..
n=1...12 for NEED-..-x1-16-..
LOGICAL STATES OF INPUT:
‘0’ or ‘1’ depending on analogue voltage values and the programmable relay configuration
settings.
Symbols of Comparator.
STL
LAD
A A1
or
O A1
or
X A1
A1
AN A1
or
ON A1
or
XN A1
A1
The programmable relay system is equipped with two (NEED-..-01-08-4) or three (NEED-..01-16-8) analog inputs. Fig. 4.11.1. shows the logical structure of the Comparators in the
NEED-..-01-08-4 relay.
Analog signals can be compared in the Comparator with each other, with a predefined
standard value and with the set-point of an external potentiometer. The result of the
comparison defines the state of the Comparator’s outputs. The outputs are always set to the
high state (‘1’), if the condition of the comparison is satisfied. Available comparisons are
shown in table 4.11.1 and 4.11.12.
Table 4.11.1. Possible configurations of comparator comparisons for NEED... – 08-4.
No.
1.
2.
3.
4.
5.
6.
7.
8.
9.
10.
Comparison type
I7 ≥ Standard value
I7 ≤ Standard value
I8 ≥ Standard value
I8 ≤ Standard value
I7 ≥ Potentiometer
I7 ≤ Potentiometer
I8 ≥ Potentiometer
I8 ≤ Potentiometer
I7 ≥ I8
I7 ≤ I8
NEED Programmable Relay – User’s Manual ver. 1.5EN
64
NEED relay resources
Table 4.11.2. Possible configurations of comparator comparisons for NEED... – 16-8.
No.
1.
2.
3.
4.
5.
6.
7.
8.
9.
10.
11.
12.
13.
14.
15.
16.
17.
18.
19.*
20.*
21.*
22.*
Comparison type
I14 ≥ Standard value
I4 ≤ Standard value
I15 ≥ Standard value
I15 ≤ Standard value
I16 ≥ Standard value
I16 ≤ Standard value
I14 ≥ Potentiometer
I14 ≤ Potentiometer
I15 ≥ Potentiometer
I15 ≤ Potentiometer
I16 ≥ Potentiometer
I16 ≤ Potentiometer
I14 ≥ I15
I14 ≤ I15
I14 ≥ I16
I14 ≤ I16
I15 ≥ I16
I15 ≤ I16
ASYM ≥ Standard value
ASYM ≤ Standard value
ASYM ≥ Potentiometer
ASYM ≤ Potentiometer
* - possible only for NEED-230AC-01-16-8
ASYM is the phase asymmetry index (only for NEED-230AC-x1-16-8).
Shows the rms values of the total of L1, L2, L3 phases.
ASYM takes the value of 0V for correct levels of L1, L2, L3 phases. When
asymmetry is present (the voltage level of any phase is different from the
rated. Value ASYM takes the value greater than 0V.
ASYM with the MDIR Marker and the Comparators make it possible to use the
NEED-230AC-x1-16-8 device as a supervisory relay, controlling asymmetry, order
and voltage levels of the L1, L2, L3 phases.
NEED Programmable Relay – User’s Manual ver. 1.5EN
65
NEED relay resources
INPUTS
OUTPUTS
Comaparator 1
Reference
value
Potentiometer
I8
I7
Input 8
analogue value
>=
A1
Input 7
analogue value
A2
I7
Comaparator 2
I8
I7
Comaparator 3
I8
A3
A4
I7
Comaparator 4
I8
I7
A5
Comaparator 5
I8
I7
A6
Comaparator 6
I8
I7
A7
Comaparator 7
I8
I7
A8
Comaparator 8
I8
Fig. 4.10.1. Logical structure of Comparator
The following are used for comparison:
1. Model value (defined when configuring the PC Need program) of the following range:
0 – 255V for NEED-230AC-x1-..
0 – 25.5V and 0 – 12.75V for NEED-24DC-x1-16-8.., NEED-12DC-x1-16-8.
2. Potentiometer (control range 1 – 255) – available at the front relay board.
3. Voltage values of analog inputs.
Table 4.11.3 shows the ranges taken by the standard value.
Table 4.11.3. Possible standard value ranges for the comparator comparisons.
Type
NEED-230AC-x1-..
NEED-12DC-x1-..
NEED-24DC-x1-..
NEED-12DC-x1-16-8
NEED-24DC-x1-16-8
Standard value range
0 – 255V
0 – 25.5V
0 – 25.5V
0 – 12.75V
0 – 12.75V
An example of the A6 comparator configuration for comparison with the standard value is
shown in fig. 4.11.3.
NEED Programmable Relay – User’s Manual ver. 1.5EN
66
NEED relay resources
Fig. 4.11.3. An example of the A6 comparator configuration for comparison with the standard value.
The A6 Comparator output is set to ‘1’, when the voltage value at the I7 input is equal to, or
greater than 200V.
Table 4.11.4 shows the Potentiometer range for comparator comparisons.
Table 4.11.4. Possible standard value ranges for the comparator comparisons.
Type
NEED-230AC-x1-..
NEED-12DC-x1-..
NEED-24DC-x1-..
Standard value range
1 - 255
An example of the A7 comparator configuration for comparison with the Potentiometer is
shown in fig. 4.11.4.
Fig. 4.14.4. An example of the A7 comparator configuration for comparison with the Potentiometer.
NEED Programmable Relay – User’s Manual ver. 1.5EN
67
NEED relay resources
The A7 Comparator output is set to ‘1’, when the voltage value at the I8 input is equal to, or
greater than the value set with the Potentiometer.
For NEED-24DC-x1.., NEED-12DC-x1.. the potentiometer takes values from 0.1 to
25.5. It must be pointed out that in the Variable view window POT takes values from
1 – 255, but for the comparator comparisons values from 1/10 (i.e. 0.1) to 255/10
(i.e. 25.5) are used!
For example for the “AI7<=POT” relationship at the voltage of AI7=5V, the comparator output
will be set to the high state, e.g. to the variable setting of POT=50 (i.e. 50/10) in Variable
view.
Therefore for the potentiometer to be set correctly for NEED-24DC-x1-.., NEED-12DC-x1..
relays, the POT variable value shown in the Variable view must always be divided by 10.
Table 4.11.5. shows the ranges of analog inputs in the NEED relay.
Table 4.11.5. Ranges of analog inputs in the NEED relay
Type
NEED-230AC-x1-..
NEED-12DC-x1-..
NEED-24DC-x1-..
NEED-12DC-x1-16-8
NEED-24DC-x1-16-8
NEED-12DC-x1-16-8
NEED-24DC-x1-16-8
NEED-12DC-x1-16-8
NEED-24DC-x1-16-8
Analog input type
Voltage
Voltage
Voltage
Voltage
Voltage
Current
Current
Current
Current
Scope
0 – 255V
0 – 25.5V
0 – 25.5V
0 – 12.75V
0 – 12.75V
0 – 51mA
0 – 51mA
0 – 25.5mA
0 – 25.5mA
Resolution
1V
0.1V
0.1V
0.05V
0.05V
0.2mA
0.2mA
0.1mA
0.1mA
An example of the A10 Comparator configuration for comparing the values of signals at the
I14, I15 analog inputs is shown fig. 4.11.5.
Fig. 4.11.5. An example of the A10 comparator configuration for comparison of two analog values.
The A10 Comparator output is set to ‘1’, when the voltage value at the I14 analog
input is equal to, or greater than the value at the I15 analog input.
NEED Programmable Relay – User’s Manual ver. 1.5EN
68
NEED relay resources
If any analog input of the NEED relay is configured as a current input, then only the voltage
value is taken for comparison, according to the following formula:
The comparator voltage value [V] = 0,5*value of the current measured at the input [mA]
This is linear scaling, where 20mA is equal to 10V.
Example:
A current output sensor is connected to the I16 analog input. We want the measured analog
value (for example pressure), “converted” to current, not to exceed 10mA.
The A1 comparator must be configured as shown in fig. 4.11.6. – according to the formula
presented above.
0,5 * 10mA = 5V
Enter 5 in the field on the left.
Fig. 4.11.6. An example of the A1 comparator configuration in the PC Need program for the AI16
analog input configured as a current input.
In the NEED-230AC-x1-.. relay the analog inputs are read every 4ms. This delay
does not depend on the delay settings for the I7, I8 or I14, I15, I16 with configuration
through the PC Need software – please refer to section “8.4. Input delays”.
For relays: NEED-12DC-x1-.. and NEED-24DC-x1-.. delay settings for the I7, I8 or
I14, I15, I16 analog inputs will cause averaging of the measured values read,
according to the following formula:
Current value = (previous value + value read from the analog input) / 2
Analog inputs in NEED-12DC-x1-.. and NEED-24DC-x1-.. relays are read every 4ms.
4.12. Potentiometer
Potentiometer is a typical hardware resource and can be used to:
- adjust times for Timers,
- adjust values to be counted by Counters,
- adjust switching threshold of the Comparator, .
NEED Programmable Relay – User’s Manual ver. 1.5EN
69
NEED relay resources
Full turn of the Potentiometer corresponds to values 1 - 255. Appropriate Potentiometer
values can be set using „L” instruction (STL – see Item 5.1.2.21., LAD - see Item 5.2), in
which the Potentiometer ranges can be modified by means of a program, in order to better
adapt them to the expected measured value. An example of the use of Potentiometer is
presented in Fig. 4.11.1.
Fig. 4.11.1. Example of the use of the Potentiometer.
In the above example T1 Timer will measure time the length of which is equal to:
Potentiometer setting x 10ms (e.g. 12*10=120ms)
At the same time the Comparator A8 output will be at high state when the value of voltage
present at the I8 analogue input is higher than the value set with the Potentiometer (1 – 255).
4.13. Remanent values of the programmable relay
It is frequently required in the control processes that data must be retained after power off.
The programmable relay allows definition of some „areas” of the relay resources, to be the
so-called remanent resources, which can be backed up during power off or after switching
the relay to STOP mode. Resources which can be defined as remanent are presented in
Table 4.11.1.
Table 4.11.1. Remanent resources in NEED programmable relay.
Remanent resources
Markers
Timers
Counters
Range
M1– M16
T5 – T8
C5 – C8
In order to define the programmable relay resources as remanent, respective fields must be
marked in the PC Need configuration application. Sample configuration of relay remanent
values is presented in Fig. 4.11.2.
NEED Programmable Relay – User’s Manual ver. 1.5EN
70
NEED relay resources
Fig. 4.11.2. Sample configuration of remanent resources.
Markers M13, M14, Timer 7 and Counter 7 were configured as remanent in the above
example.
Such configuration should be made in the relay STOP mode.
Remanent resources are not factory-set, neither are they set after a RESET operation.
Remanence setting may cause unexpected program execution due to undefined
initial conditions.
4.12.1. Remarks on remanent values
1. Markers
If the Marker is set as remanent then, after switching the power off and on again or after the
relay has gone through the cycle of RUN → STOP→ RUN, it will “remember” the logical state
it had before the power off.
Example:
Let’s set Marker M7 as remanent.
Power off
Power on again
Supply
A I1
S M7
I1
M7
Fig. 4.12.1.1. Remanence of Marker M7.
NEED Programmable Relay – User’s Manual ver. 1.5EN
71
NEED relay resources
Once the power is switched off and on again the state of M7 is high, despite I1=’0’.
2. Timers
If the Timer is set as remanent then, after switching the power off and on again or after the relay has gone through the cycle of
RUN → STOP→ RUN, it will “remember” the logical state it had before the power off.
Example:
Let’s set Timer T5 as remanent
Power on again
Power off
Supply
I1
Remaninig time to be
measured
6s
Time
measured
by T5
Time measured = 14s
A I1
L 20s
SE T5
T5
A T5
=Q1
Q1
start
4s
8s
12s
16s
20s
24s end
Fig. 4.12.1.2. Remanence of Timer T5.
Once triggered, T5 Timer starts the time measurement. After power off at 14s the time
measured is remembered, and once the power is on again the Timer resumes the
measurement of the 20 s period and sets its output to high for the remaining 6 seconds.
3. Counters
If the Counter is set as remanent it will remember its logical state and the number of pulses
counted after the power is switched off and then on again.
NEED Programmable Relay – User’s Manual ver. 1.5EN
72
NEED relay resources
Example:
Let’s set Counter C5 as remanent
Supply
A I6
L C#6
CU C5
A C5
=Q1
I6
Counter
C5
Q1
Fig. 4.12.1.3. Remanence of Counter C5.
Pulses that occur at I6 increase the value of Counter C5. Once the power is switched off and
on again the Counter remembers its value and the original state it had before the power off.
Further triggering pulses cause the Counter to count not from zero but starting from the value
remembered before the power off.
A remanent Counter will count the pulse if the input state was ‘0’ before the power
off and ‘1’ after the power on. Such a pulse will not be counted by a non-remanent
Counter.
If the Counter input state was ‘1’ before the power off and it remained high after the
power on, a remanent Counter will not count such a pulse.
NEED Programmable Relay – User’s Manual ver. 1.5EN
73
Programming languages
5. PROGRAMMING LANGUAGES
NEED relay can be programmed using two programming languages. They were defined in
such a way as to make the relay programming as effective as possible and to provide user
with a possibility to select the most convenient programming language. Hence, the following
languages can be used to describe control tasks:
- text language – Statement List (STL),
- graphic language – Ladder Diagram (LAD),
5.1. Text language (STL) programming
STL text language (Statement List) is a set of instructions comprising logical operations,
relations as well as functions of flip-flops, timers, counters etc. which allow proper
programming of the relay. The use of a text language for programming of the NEED relay is
very efficient and produces an object code which is closest to the internal structure of the
program.
5.1.1. STL program structure
An STL program is a sequence of successively executed instructions.
Each instruction is composed of two elements:
1) Instruction symbol - identifier (code), which is a keyword in STL language,
2) Argument i.e. variable.
<code>
A, A(, AN, AN(, O,O(, ON, ON(,
X, X(, XN, XN(
S, R, =, FP
SD, SF, SE, SL
CU, CD
L, SET, CLR
<argument>
I,Q,M, MDIR, H, A,
T, C, HC1, H
L-Counter 1)
L- Timer2)
1- L-Counter – is a set number of counts to be performed by the Counter.
2- L-Timer – is a set time to be measured by the Timer.
Logical notation of some sequences, of which the program is composed, consists of a
condition (so-called preceding part) and a result (so-called successive part). In other words if
the conditions, noted using specific instructions and variables, are met that situation will yield
a result which is also noted using specific instructions and variables. Such composition of a
condition and a statement is called a circuit.
Thus, the following record type is allowed:
A I1
A I2
S Q5
However, it is not allowed to use an entry like this:
I1
A I2
S Q5
NEED Programmable Relay – User’s Manual ver. 1.5EN
74
Programming languages
Logical circuit
of the
program
A I2
AN H1
A A8
Condition
Result
S M16
Fig 5.1.1.1. STL program structure
Example:
1)
2)
3)
4)
A I1
A A2
S Q4
R Q1
Condition (checks relations: I1 AND A2)
Result
Instructions recorded in lines 1 and 2 are conditions in this example. If both conditions are
met, the I1 output and A2 comparator output states being high, then the Q4 output will be set
(state ‘1’) and Q1 output will be reset (state ‘0’). Thus instructions ‘S Q4’ and ‘R Q1’ are the
result.
Instructions: A, A(, AN, AN(, O, O(, ON, ON(, X, X(, XN, XN (compose the conditional part of
the circuit while the instructions: S, R, =,FP, SD, SF, SL, SE, CD, CU are the resultant part of
the circuit.
Each separate circuit should begin with a condition and end with a result.
Circuit Obwód
1 of the 1
program
programu
A I2
AN H1
A A8
S M16
Circuit 2Obwód
of the
program
A M16
S M1
R M2
S Q2
2
programu
Fig.5.1.1.2. Two sample circuits in STL.
There is only one program in the programmable relay which cannot be split into subroutines
to be called.
NEED Programmable Relay – User’s Manual ver. 1.5EN
75
Programming languages
The controller processor executes individual instructions successively, beginning with the
first and ending with the last one. Once the last instruction is executed the program cycle is
repeated. Controller program processing is presented in Fig. 5.1.1.3.
Instruction 1
Instruction 2
Instruction 3
...
Instruction N-1
Instruction N
Fig. 5.1.1.3. STL program processing.
Table 5.1.1. contains all available STL instructions.
Table 5.1.1. STL instructions.
STL
Instruction
A
A(
AN
AN(
O
O(
ON
ON(
X
X(
XN
XN(
S
R
=
FP
L
Description
AND instruction
AND parenthesis instruction
AND NOT instruction
AND NOT parenthesis instruction
OR instruction
OR parenthesis instruction
OR NOT instruction
OR NOT parenthesis instruction
XOR instruction
XOR parenthesis instruction
XOR NOT instruction
XOR NOT parenthesis instruction
Setting instruction
Resetting instruction
Assigning instruction
Pulse relay
Loading instruction
NEED Programmable Relay – User’s Manual ver. 1.5EN
Operands
I,Q,M,MDIR,A,H,C,HC1,T
I,Q,M,MDIR,A,H,C,HC1,T
I,Q,M,MDIR,A,H,C,HC1,T
I,Q,M,MDIR,A,H,C, HC1,T
I,Q,M,MDIR,A,H,C,HC1,T
I,Q,M,MDIR,A,H,C, HC1,T
Q,M
Q,M,T,C,HC1
Q,M
Q,M
Constant operand value
76
Programming languages
Table 5.1.1. STL instructions – ctd.
STL
Instruction
SD
SE
SF
SL
CU
CD
SET
CLR
Description
Timer – Delayed turn-on
Timer – Delayed turn-off
Timer – Single pulse
Timer – Pulses
Counter – Up-count
Counter – Down-count
„Always setting” instruction
„Always clearing” instruction
Operands
T
T
T
T
C, HC1
C, HC1
5.1.1.1. Symbolic names
For the NEED relays it is possible assign symbolic names to variables in a project. This way
the program is easier to analyze and clearer.
To associate a variable with a symbolic name, use an expression with the following syntax:
. DEFINE < symbolic name > = <variable >
After that a symbolic name preceded with the % character can be used instead of the
variable address, such as Q1, I11, for example:
.DEFINE Pump = Q1
.DEFINE Failure = I11
A %Failure
R %Pump
Symbolic names are case insensitive.
Names of relay resources and statements cannot be symbolic names.
Symbolic names may not begin with a digit, and can contain up to 30 characters.
NEED Programmable Relay – User’s Manual ver. 1.5EN
77
Programming languages
5.1.2. Description of STL instructions
5.1.2.1. AND instruction
SYMBOL - A
‘A’ instruction is a logical instruction of AND type.
SYNTAX:
A < I,Q,M,MDIR,A,H,C,HC1,T >
Instruction execution time: 6 µs
Example:
STL
Relay diagram
Q1
I5
A I5
A I1
= Q1
I1
I5
'1'
'0'
I1
Q1
'1'
'0'
'1'
'0'
Fig. 5.1.2.1. Sample time series at I5 and I1 inputs and Q1 output.
The example above employs a series connection.
Q1 output will be set (state ‘1’) when states of both inputs are high, according to the principle
of AND function.
5.1.2.2. AND parenthesis instruction
SYMBOL – A(
‘A(’ is a logical instruction of AND, type the operand of which is the result of logical
operations given in the parentheses.
SYNTAX:
A(
Conditional instructions
)
Instruction execution time: 6µs
Figure 5.1.2.2.1. illustrates the principle of execution of the ‘A(‘ instruction. All other
„parenthesis” instructions are based on the same principle.
NEED Programmable Relay – User’s Manual ver. 1.5EN
78
Programming languages
Conditional
instructions
A(
Conditional
instructions
)
Conditional
instructions
Executive
instructions
Conditional
instructions
A <a result of
operation in
parentheses >
Conditional
instructions
Executive
instructions
Fig. 5.1.2.2.1. Principle of ‘A(‘ “parenthesis” instruction.
Parenthetical operations are performed. The logical operations produce a result (‘0’ or ‘1’),
which is used in subsequent logical operations for example in the program:
A I1
A(
O M1
O M2
)
=Q1 // it is equivalent to I1 AND (M1 OR M2) = Q1 logical operation
and logical states: M1=’0’, M2=’0’, I1=’1’.
Thus, it can be noted that:
A I1
A(
O M1
O M2
)
=Q1
A ‘1’
A ‘0’ //because ‘0’ O ‘0’ = ‘0’
= ‘0’
Which means that, for the states analysed, the Q1 output state will be ‘0’ while in case of
states M1=’1’, M2=’0’, I1=’1’ the following results are produced:
A I1
A(
O M1
O M2
)
=Q1
A ‘1’
A ‘1’ //because ‘1’ O ‘0’ = ‘1’
= ‘1’
NEED Programmable Relay – User’s Manual ver. 1.5EN
79
Programming languages
Example:
STL
Relay diagram
M1
A I6
A I7
A(
O M1
O M2
)
= Q1
I6
Q1
I7
M2
I6
'1'
'0'
'1'
I7
'0'
'1'
M1
'0'
'1'
M2
'0'
Result of operation A(
O M1
O M2
)
Q1
'1'
'0'
'1'
'0'
Fig. 5.1.2.2.2. . Sample time series at I6, I7 , M1 and M2 inputs and Q1 output.
Q1 output will be set (state ‘1’) when states of I6 and I7 inputs are high and one of the
Markers (M1 or M2) is at state ‘1’.
NEED Programmable Relay – User’s Manual ver. 1.5EN
80
Programming languages
5.1.2.3. AND NOT instruction
SYMBOL - AN
‘AN’ instruction is a logical instruction of AND NOT type (AND instruction with negated
operand state).
SYNTAX:
AN < I,Q,M,MDIR,A,H,C,HC1,T >
Instruction execution time: 6µs
Example:
STL
Relay diagram
Q1
I5
AN I5
AN I1
= Q1
I1
I5
'1
'
'0
'1'
I1
'
'0
'1'
'
'0
'
Q1
Fig. 5.1.2.3. Sample time series at I5 and i1 inputs and Q1 output.
Comments:
Q1 output will be set (state ‘1’), when states of both inputs are low (‘0’).
5.1.2.4. AND NOT parenthesis instruction
SYMBOL – AN(
‘AN(’ is a logical instruction of AND NOT type the operand of which is the result of logical
operations given in the parentheses.
SYNTAX:
AN(
Conditional instructions
)
Instruction execution time: 6µs
NEED Programmable Relay – User’s Manual ver. 1.5EN
81
Programming languages
Example:
STL
I6
A I6
A I7
AN(
O M1
O M2
)
= Q1
'1'
'0'
'1'
I7
'0'
'1'
M1
'0'
'1'
M2
'0'
Result of operation AN(
O M1
O M2
)
'1'
'0'
'1'
Q1
'0'
Fig. 5.1.2.4. Sample time series at I6, I7, M1 and M2 inputs and Q1 output.
Comment:
Q1 output will be set (state ‘1’) when states of I6 and I7 inputs are high and both Markers
(M1 and M2) are at state ‘0’.
5.1.2.5. OR instruction
SYMBOL - O
‘O’ instruction is a logical instruction of OR type
SYNTAX:
O < I,Q,M,MDIR,A,H,C,HC1,T >
Instruction execution time: 6µs
Example:
STL
Relay diagram
I5
O I5
O I1
= Q1
Q1
I1
NEED Programmable Relay – User’s Manual ver. 1.5EN
82
Programming languages
'1'
I5
'0'
'1'
I1
'0'
'1'
Q1
'0'
Fig. 5.1.2.5. Sample time series at I5 and i1 inputs and Q1 output.
Comment:
Q1 output will be set (state ‘1’), when state of one the inputs is high (‘1’).
Parallel connection is employed.
5.1.2.6. OR parenthesis instruction
SYMBOL – O(
‘O(’ is a logical instruction of OR type the operand of which is the result of logical operations
given in the parentheses.
SYNTAX:
O(
Conditional instructions
)
Instruction execution time: 6µs
Example:
STL
A I6
A I7
O(
A M1
A M2
)
= Q1
Relay diagram
I6
I7
M1
M2
NEED Programmable Relay – User’s Manual ver. 1.5EN
Q1
83
Programming languages
I6
'1'
'0'
'1'
I7
'0'
'1'
M1
'0'
'1'
M2
'0'
Result of operation O(
A M1
A M2
)
'1'
'0'
'1'
Q1
'0'
Fig. 5.1.2.6. Sample time series at I6, I7 , M1 and M2 inputs and Q1 output.
Q1 output will be set (state ‘1’) when states of I6 and I7 inputs are high or both Markers (M1
or M2) are at state ‘1’.
5.1.2.7. OR NOT instruction
SYMBOL - ON
‘O’ instruction is a logical instruction of OR NOT type (OR instruction with negated operand
state).
SYNTAX:
ON < I,Q,M,MDIR,A,H,HC1,C,T >
Instruction execution time: 6µs
Example:
STL
Relay diagram
I5
ON I5
ON I1
= Q1
NEED Programmable Relay – User’s Manual ver. 1.5EN
Q1
I1
84
Programming languages
'1'
I5
'0'
'1'
I1
'0'
'1'
Q1
'0'
Fig. 5.1.2.7. Sample time series at I5 and I1 inputs and Q1 output.
Comment:
Q1 output will be set (state ‘1’), when state of at least one the inputs is low (‘0’).
5.1.2.8. OR NOT parenthesis instruction
SYMBOL – ON(
‘ON(’ is a logical instruction of OR NOT type of the result of logical operations given in the
parentheses.
SYNTAX:
ON(
Conditional instructions
)
Instruction execution time: 6µs
Example:
STL
I6
A I6
A I7
ON(
A M1
A M2
)
= Q1
'1'
'0'
'1'
I7
'0'
'1'
M1
'0'
'1'
M2
'0'
Result of operation ON(
A M1
A M2
)
Q1
'1'
'0'
'1'
'0'
Fig. 5.1.2.8. Sample time series at I6, I7, M1 and M2 inputs and Q1 output.
Q1 output will be set (state ‘1’) when states of I6 and I7 inputs are high or one of the Markers
(M1 or M2) is at state ‘0’.
NEED Programmable Relay – User’s Manual ver. 1.5EN
85
Programming languages
5.1.2.9. XOR instruction
SYMBOL - X
‘X’ instruction is a logical instruction of XOR type
SYNTAX:
X < I,Q,M,MDIR,A,H,C,HC1,T >
Instruction execution time: 6µs
Example:
STL
Relay diagram
Q1
I5
X I5
X I1
= Q1
I1
'1'
I5
'0'
'1'
I1
'0'
'1'
Q1
'0'
Fig. 5.1.2.9. Sample time series at I5 and I1 inputs and Q1 output.
Q1 output will be set (state ‘1’) when states of I5 and I1 inputs are opposite (I5=’1’ and I1=’0’
or I5=’0’ and I1=’1’ ).
5.1.2.10. XOR parenthesis instruction
SYMBOL – X(
‘X(’ is a logical instruction of XOR type the operand of which is the result of logical operations
given in the parentheses.
SYNTAX:
X(
Conditional instructions
)
Instruction execution time: 6µs
NEED Programmable Relay – User’s Manual ver. 1.5EN
86
Programming languages
Example:
STL
A I7
X(
A M1
A M2
)
= Q1
'1'
I7
'0'
'1'
M1
'0'
'1'
M2
'0'
Result of operation X(
A M1
A M2
)
'1'
'0'
'1'
Q1
'0'
Fig. 5.1.2.10. Sample time series at I7, M1 and M2 inputs and Q1 output.
Q1 output will be set (state ‘1’) according to the principle of XOR function, i.e.:
Q1=1 for I7=1 and one of the Markers is set to ‘0’ state.
Q1=1 for I7=0 and both Markers are set to high state (‘1’).
5.1.2.11. XOR NOT instruction
SYMBOL - XN
‘XN’ instruction is a logical instruction of XOR NOT type
SYNTAX:
X < I,Q,M,MDIR,A,H,HC1,C,T >
Instruction execution time: 6µs
Example:
STL
Relay diagram
Q1
I5
I1
X I5
XN I1
= Q1
NEED Programmable Relay – User’s Manual ver. 1.5EN
87
Programming languages
'1'
I5
'0'
'1'
I1
'0'
'1'
Q1
'0'
Fig. 5.1.2.11. Sample time series at I5 and I1 inputs and Q1 output.
Q1 output will be set (state ‘1’) when logical states of I5 and I1 inputs are the same (I5=’0’
and I1=’0’ or I5=’1’ and I1=’1’ ).
5.1.2.12. XOR NOT parenthesis instruction
SYMBOL – XN(
‘XN(’ is a logical instruction of XOR NOT type of the result of logical operations given in the
parentheses.
SYNTAX:
XN(
Conditional instructions
)
Instruction execution time: 6µs
Example:
STL
Relay diagram
A I7
XN(
A M1
A M2
)
= Q1
'1'
I7
'0'
'1'
M1
'0'
'1'
M2
'0'
Result of operation XN(
A M1
A M2
)
Q1
'1'
'0'
'1'
'0'
Fig. 5.1.2.12. Sample time series at I7, M1 and M2 inputs and Q1 output.
Q1 output will be set (state ‘1’) according to the principle of XOR NOT function, i.e.:
Q1=1 for I7=1 and states of both Markers (M1 and M2) are high (‘1’).
Q1=1 for I7=0 and state of one of the Markers is low (‘0’).
NEED Programmable Relay – User’s Manual ver. 1.5EN
88
Programming languages
5.1.2.13. S setting instruction
SYMBOL - S
‘S’ instruction is a logical instruction that sets the operand to high state (‘1’)
SYNTAX:
S < Q,M >
Instruction execution time: 6µs
Example:
STL
Relay diagram
Q1
A I5
S Q1
I5
Q1
A I1
R Q1
I1
'1'
I5
'0'
'1'
I1
'0'
'1'
Q1
'0'
Fig. 5.1.2.13. Sample time series at I5 and I1 inputs and Q1 output.
Q1 output will be set (state ‘1’) when the state of I5 input is high (‘1’). It will remain in that
state until low state (‘0’) is set using ‘R’ instruction – I1 input.
5.1.2.14. R resetting instruction
SYMBOL - R
‘R’ instruction is a logical instruction that sets the operand to low state (‘0’)
SYNTAX:
R < Q,M,T,C,HC1 >
Instruction execution time: 6,5µs
Example: See ‘S’ instruction
5.1.2.15. = assigning instruction
SYMBOL - =
The instruction of ‘=’ is a logical instruction in which the operand takes on a value (‘0’ or ‘1’
state) which depends on the result of previous logical operations
SYNTAX:
= < Q,M >
Instruction execution time: 6,7µs
NEED Programmable Relay – User’s Manual ver. 1.5EN
89
Programming languages
Example:
STL
Relay diagram
Q1
A I5
A I1
= Q1
I5
I1
I5
'1'
'0'
'1'
I1
'0'
'1'
Q1
'0'
Fig. 5.1.2.15. Sample time series at I5 and I1 inputs and Q1 output.
Q1 output state depends on previous logical operations i.e. it takes on ‘0’ state when the
state of one of the inputs is ‘0’, or it takes on the state ‘1’ when the states of both inputs are
‘1’.
5.1.2.16. FP pulse relay instruction
Pulse relay performs the function of a flip-flop triggered by the leading edge. Each leading
pulse changes the output state to opposite.
SYMBOL - FP
SYNTAX:
FP < Q,M >
Instruction execution time: 5,9µs
Example:
STL
Relay diagram
Q1
A I1
FP Q1
I1
'1'
I1
'0'
'1'
Q1
'0'
Fig.5.1.2.16. Sample time series at I1 input and Q1 output.
NEED Programmable Relay – User’s Manual ver. 1.5EN
90
Programming languages
If the state of Q1 output remains low and a positive control edge occurs at I1 input then the
Q1 output state will be set to high.
If the state of Q1 output remains high and a positive control edge occurs at I1 input then the
Q1 output state will be set to low.
5.1.2.17. Timer instructions
5.1.2.17.1. Timer „Delayed turn-on” (ON-DELAYED
Timer delays the turn-on.
SYMBOL - SD
SYNTAX:
SD <T>
Instruction execution time: 8.3µs
Example:
START
2
A I8
L 400ms
SD T1
1
4
RESET
I1
A T1
= Q1
A I1
R T1
5
3
I8
Measured
time
Timer
2
t
Q1
Output
Fig. 5.1.2.17.1. Sample signal time series illustrating the operation of SD Timer.
1.
I8 input performs the function of a triggering input (Trigger). Directly after the triggering
instruction there is an instruction (‘L’) loading the specified time value to be measured. The
latter instruction should be put directly before Timer instruction (SD).
Time is measured after the execution of SD Timer activation instruction (leading edge at I8
input).
2.
After a time of t=400ms the Q1 output state is set to high (‘1’). At the same time a high (‘1’)
signal should be retained at the I8 triggering input.
3.
If a low state occurs at the I8 Trigger input the measured time counter of T1 Timer is reset
and Q1 output is set to low (‘0’).
4.
If a high state appears at the I1 input resetting the T1, the measured time T1 Timer will be
automatically cleared, and the Q1 output is set to the low state (‘0’).
If the “L” statement is not used, then the time to be measured by T1 will be set from the
“*.set” configuration file (settings window in the PC Need program).
NEED Programmable Relay – User’s Manual ver. 1.5EN
91
Programming languages
5.1.2.17.2. Timer – Delayed turn-off (OFF-DELAYED)
Timer delays the turn-off.
SYMBOL - SF
SYNTAX:
SF <T>
Instruction execution time: 8.3µs
Example:
1
4
1
2
2
1
2
2
START
I5
A I5
L 200ms
SF T1
5
RESET
I1
A T1
= Q1
Timer
A I1
R T1
3
3
Measured
time
t
Output
Q1
Fig. 5.1.2.17.2. Sample signal time series illustrating the operation of SF Timer.
1.
The I5 input performs the function of a triggering input (Trigger). Directly after the triggering
instruction there is an instruction (‘L’) which loads the specified time value to be measured.
The latter instruction should be put directly before the Timer instruction (SF).
Setting of I5 input results in automatic setting of T1 Timer output.
2.
Time is measured after the execution of SF Timer activation instruction (trailing edge at I5
input).
3.
After a time of t=200ms the Q1 output state is set to low (‘0’) –Q1 is turned off.
4.
If, during the Timer’s time measurement, a high state (‘1’) occurs at its trigger input, the
measured time counter is reset. The Timer is actuated again once a trailing edge occurs at I5
input.
5.
If a high state appears at the I1 input resetting the T1, the time measuring counter and the T1
Timer will be cleared.
If the “L” statement is not used, then the time to be measured by T1 will be set from the
“*.set” configuration file (settings window in the PC Need program).
NEED Programmable Relay – User’s Manual ver. 1.5EN
92
Programming languages
5.1.2.17.3. Timer SINGLE PULSE
Timer performs the function of a single pulse.
SYMBOL - SE
SYNTAX:
SE <T>
Instruction execution time: 8.3µs
Example:
I5
A I5
L 200ms
SE T1
1
1
1
START
3
I1
RESET
A T1
= Q1
A I1
R T1
Timer
2
2
t
Q1
Measured
time
Output
Fig. 5.1.2.17.3. Sample signal time series illustrating the operation of SE Timer.
1.
The I5 input performs the function of a triggering input (Trigger). The triggering instruction is
followed by an instruction (‘L’) which loads the specified time value to be measured. The
latter instruction should be put directly before SE Timer instruction.
Time is measured after the execution of the Timer activation instruction (leading edge at I5
input).
2.
For a period of t=200ms the Q1 output state will be set to high (‘1’). The state can be
extended if another triggering occurs at the Trigger input. Having measured the preset time
value, the Timer output returns to low state (‘0’) – Q1 goes to low state.
3.
If a high state appears at the I1 input resetting the T1, the time measuring counter and the T1
Timer will be cleared.
If the “L” statement is not used, then the time to be measured by T1 will be set from the
“*.set” configuration file (settings window in the PC Need program).
NEED Programmable Relay – User’s Manual ver. 1.5EN
93
Programming languages
5.1.2.17.4. Timer Pulses (FLASHING)
Timer performs the function of a square wave generator of pulse-width modulation of 50%.
SYMBOL - SL
SYNTAX:
SL <T>
Instruction execution time: 8.3µs
Example:
3
1
I5
START
2
2
A I5
L 20ms
SL T1
A T1
= Q1
A I1
R T1
I1
RESET
Measured
Time
Timer
t
Q1
Output
Fig.5.1.2.17.4. Sample signal time series illustrating the operation of SL Timer.
1.
The I5 input performs the function of a triggering input (Trigger). The triggering instruction is
followed by an instruction which loads the specified time value to be measured. The latter
instruction should be put directly before SL Timer instruction.
Time is measured after the execution of Timer activation instruction (high state ‘1’ at the I5
triggering input).
For a period of t=20ms the Q1 output state will be set to low (‘0’) and then, for another period
of 20ms, it will be set to high (‘1’). The situation will be repeated as long as the high state is
present at the I5 input or until a high state occurs at the I1 resetting input.
2.
If a low state (‘0’) occurs at the I5 triggering input or a high state (‘1’) is present at the I1
resetting input, the counter of the time being measured and the Timer output are
automatically reset.
3.
If high states (‘1’) are simultaneously sent to both Reset and Trigger inputs and if, after a
certain time period, the level of Reset signal is changed to low (‘0’) then the Timer output is
activated for a period of t=20ms and, afterwards, deactivated for another period of t=20ms
and then again activated and so on. The Timer generates a square wave at its output, which
is shifted by 180o in relation to the waveform referred to in item 1.
NEED Programmable Relay – User’s Manual ver. 1.5EN
94
Programming languages
5.1.2.17.5. Remarks concerning use of Timers
1. The same Timer can be used many times, in different modes.
1
A I1
L 20ms
SD T1
A I2
L 50ms
SF T1
A I3
L 50ms
SE T1
I1
'0'
'1'
2
SF Mode
I2
'0'
'1'
3
SE Mode
I3
'0'
'1'
4
I4
A I4
L 20ms
SL T1
A T1
= Q8
'1'
SD Mode
SL Mode
'0'
Timer T1
'1'
Q8
'0'
SD mode
operation
SF mode
operation
SE mode
operation
SL mode
operation
Fig. 5.1.2.17.5. Sample signal time series illustrating multiple use of T1 Timer.
If, according to the above example, the leading edge occurs at the I1 input , then T1 Timer
will be triggered in SD mode, with the time of 20 ms (1).
If the trailing edge occurs at the I2 input, then the T1 Timer will be triggered in SF mode, with
the time of 50 ms (2).
If leading edge occurs at the I3 input , then the T1 Timer will be triggered in SE mode, with
the time of 50 ms (3).
If high state occurs at I4 input then the T1 Timer will be triggered in SL mode, with the time of
20 ms (4). Figure 5.1.2.17.5. illustrates sample time series at I1, I2, I3, I4 and Q8.
NEED Programmable Relay – User’s Manual ver. 1.5EN
95
Programming languages
5.1.2.18. Counter instructions
5.1.2.18.1. Count-up
SYMBOL – CU
SYNTAX:
CU <C>
Instruction execution time: 6.1µs
Example:
A I5
L C#100
CU C1
Input
1
I0
...
3
I1
Reset
...
A C1
=Q1
Counter
A I1
R C1
2
4
5
6
...
3
Maximum
Counter value
Counter
Threshold
Counter value
2
1
...
Q1
Output
Fig. 5.1.2.18.1. Sample signal time series illustrating operation of CU Counter.
1.
Occurrence of leading edge at the I5 triggering input results in the current C1 Counter value
being increased by 1.
2.
Once the current Counter value reaches the threshold value (6) the Q1 output state is set to
high.
If further pulses occur at the triggering input, they will be counted by the Counter until the
maximum value of 65535 is reached, its output remaining at high state.
The Counter never overflows. Once the maximum value is reached the Counter stops
responding to the triggering pulses.
3.
If a high state appears at the I1 resetting input – the current value of the C1Counter and its
output will be cleared. If the low state appears at this input, the Counter can keep running.
If the “L” statement is not used, then the threshold value after which the C1 Counter sets its
value to the high state will be based on the “*.set” configuration file (the Settings window in
the PC Need program).
NEED Programmable Relay – User’s Manual ver. 1.5EN
96
Programming languages
5.1.2.18.2. Count-down
SYMBOL – CD
SYNTAX:
CD <C>
Instruction execution time: 6.1µs
Example:
Input
1
I0
...
3
A I4
L C#100
CD C1
I1
...
Reset
102
101
100
A C1
=Q1
2
Counter
...
Threshold
Counter value
A I1
R C1
Q1
...
Output
Fig.5.1.2.18.2. Sample signal time series illustrating operation of CD Counter.
1.
After occurrence of a leading edge at the I4 triggering input, the current C1 Counter value will
be reduced by 1.
2.
Once the current value of pulse Counter goes below the threshold value (100), the Q1 output
state is set to low.
If further pulses occur at the I4 triggering input, they will be counted by the Counter until the
minimum value of 0 is reached.
The Counter never overflows. Once the minimum value is reached the Counter stops
responding to the triggering pulses.
3.
If a high state appears at the I1 resetting input – the current value of the C1Counter and its
output will be cleared. If the low state appears at this input, the Counter can keep running.
If the “L” statement is not used, then the threshold value after which the C1 Counter sets its
value to the high state will be based on the “*.set” configuration file (the Settings window in
the PC Need program).
.
The maximum frequency of counting pulses depends on the program execution time.
State of the counting input must be stable for at least one cycle of program loop.
NEED Programmable Relay – User’s Manual ver. 1.5EN
97
Programming languages
5.1.2.18.3. Remarks on the use of Counters
1. Using the HC Fast Counter
To use the Fast Counter:
connect the Counter triggering signal to the I11 input.
activate the Fast Counter using the CU or CD statement, for example:
A I11
L # 25000
CU HC1
In the aforementioned example the Fast Counter will set its output to the high state, if the
current value of the Counter is greater than or equal to 25000.
A I11
L # 100
CD HC1
In the aforementioned example the Fast Counter will set its output to the high state, if the
current value of the Counter is greater than or equal to 100.
If the “L” statement is not used, then the threshold value after which the Fast Counter sets
its output to the high state will be based on the “*.set” configuration file (the Settings window
in the PC Need program).
The Fast Counter counts up and down. After reaching the maximum value - 65535, starts
counting from zero after performing the reset function.
The Fast Counter can also measure the frequency – the corresponding mode of operation
will be set by means of the PC Need program configuration window.
The maximum guaranteed frequency of operation of the Fast Counter is 20kHz.
Fig. 5.1.2.18.3.1. shows an example of the HC1 Fast Counter settings window.
Fig. 5.1.2.18.3.1. HC1 Quick Counter - configuration window example.
NEED Programmable Relay – User’s Manual ver. 1.5EN
98
Programming languages
In the aforementioned example the Quick counter will set its output to the high state, if the if
the number of pulses counted during 1 second is greater than or equal to 100.
2. One switching threshold
In order to set one threshold that switches the Counter output to high state, the same
arguments (values to be counted) must be used in the Load instruction for both CU and CD Fig. 5.1.2.18.3.
Leading edges that occur at M1 cause the C1 Counter to count up. If the value counted by
C1 is higher than or equal to 6 then the C1 output will be set.
Leading edges that occur at A1 cause the C1 Counter to count down. If the value counted by
C1 is lower than 6 then the C1 output state will be set to low.
M1
A M1
L C#6
CU C1
A A1
L C#6
CD C1
A C1
= M16
6 pulses
A1
Value 6,
threshold Conter
value
Counter
C1
1
2
3
4
4 pulses
5
6
5
4
3
2
3
4
5
6
7
8
Values counted
by the Counter
M16
Fig. 5.1.2.18.3. Sample signal time series illustrating the Counter operation for two
identical switching thresholds.
3. Two switching thresholds (range)
If the Load instructions of the Counters have different arguments (values to be counted) then
two switching thresholds are set – Fig. 5.1.2.18.4.
Leading edges that occur at M1 cause the C1 Counter to count up. If the value counted by
C1 is higher than or equal to 6 then the C1 output will be set.
Leading edges that occur at A1 cause the C1 Counter to count down. Only when the value
counted by C1 is lower than 3 the C1 output state will be set to low. Thus, during count-down
the C1 output state is high when the values counted by the Counter are between 6 and 3.
NEED Programmable Relay – User’s Manual ver. 1.5EN
99
Programming languages
M1
A M1
L C#6
CU C1
6 pulses
A1
Value 6, threshold
Counter value
A A1
L C#3
CD C1
Counter
C1
A C1
= M16
2
1
6
5
4
3
Value 3, threshold
Counter value
4 pulses
5
4
3
2
5
4
3
7
6
8
Values counted
by the Counter
M16
Fig. 5.1.2.18.4. Sample signal time series illustrating the Counter operation for two
different switching thresholds .
4. Several switching thresholds
It is also possible to define several switching thresholds. The “always enabled” input „takes
control” over the Counter and, depending on the value currently counted and the threshold
set for that input, the Counter output is either set or reset – Fig. 5.1.2.18.5.
A M1
L C#6
CU C1
M1
6 pulses
A1
A A1
L C#5
CD C1
4 pulses
Q2
A Q2
L C#3
CU C1
H3
A H3
L C#100
CU C1
A C1
= M16
Value 6, threshold
Counter value
Counter
C1
1
2
3
4
5
6
5
4
3
2
3
4
5
6
7
8
Values counted
by the Counter
M16
Fig.5.1.2.18.5. Sample signal time series illustrating the Counter operation for multiple
different switching thresholds.
NEED Programmable Relay – User’s Manual ver. 1.5EN
100
Programming languages
5.1.2.19. Clock instructions
The Clock is a real-time clock and its configuration should be carried out using “PC Need”
application, see Chapter 6.
Detailed Clock description see Item 4.9 „Clocks”.
SYMBOL – H
SYNTAX:
<Conditional instructions> H <Clock number>
Example:
STL
Relay diagram
Q1
H1
A H1
= Q1
'1'
H1
'0'
'1'
Q1
'0'
Fig. 5.1.2.19.1 Sample time series at H1 contact and Q1 output.
The H1 Clock is configured appropriately using PC Need program – see Chapter 6. Figure
5.1.2.19.2 presents a sample configuration of H1 Clock.
Fig. 5.1.2.19.2 Sample configuration of H1 Clock.
Q1 output will be set according to H1 Clock output state changes Sunday through
Wednesday between 8 a.m. and 3 p.m.
NEED Programmable Relay – User’s Manual ver. 1.5EN
101
Programming languages
5.1.2.20. Analogue inputs
A detailed description of analogue input function see Item 4.10 „Comparator – analogue
inputs”.
SYMBOL – A
SYNTAX:
<conditional instructions> A <Comparator number>
Example:
STL
Relay diagram
Q1
A1
A A1
= Q1
'1'
A1
'0'
'1'
Q1
'0'
Fig. 5.1.2.20. Sample time series at A1 contact and Q1 output.
Analogue inputs are properly configured using PC Need application – see Chapter 6. Figure
5.1.2.20.2 presents a sample configuration of A1 Comparator.
Fig. 5.1.2.20.2 Sample configuration of A1 Comparator.
The Comparator compares the preset value (100) with the analogue value at I7 input. If the
voltage value at I7 input is higher than or equal to 100V the Comparator takes on the state
‘1’, otherwise the output of the Comparator will be at the state ‘0’.
The Q1 output follows the changes that occur at the A1 comparator output.
NEED Programmable Relay – User’s Manual ver. 1.5EN
102
Programming languages
5.1.2.21. Load statement (LOAD)
The ‘L’ statement is used for defining the Timer times and (counting) threshold values for
Counters.
SYMBOL – L
SYNTAX:
L <value>
5.1.2.21.1. ‘L’ statement for Timers.
5.1.2.21.1.1. Constant time values for Timers.
Time of statement execution: 8.3µs.
The <value> parameter for the ‘L’ statement assumes the respective constant time values
from the ranges given in Tab. 5.1.2.21.1. e.g.:
Table 5.1.2.21.1. shows the available time values, which can be used with the ‘L’ statement.
Table .5.1.2.21.1. ‘L’ statement arguments for Timers.
Time format
Range
Step
Examples of values
s.ms (seconds.milliseconds)
min.s (minutes.seconds)
h.min (hours.minutes)
0s.10ms – 99s.990ms
0min.1s – 99min.59s
0h.1min – 99h.59min
10ms
1s
1min
0.50ms, 24s, 50s.120ms
2min, 32min, 98min.24s
1h, 5h.18min
L 100ms
SL T1
//The value of 100ms will be loaded into the T1 Timer running in the SL mode
L 10min
SD T2
//The value of 10 min will be loaded into the T2 Timer running in the SD mode
L 1h.34min
SF T8
//Timer T8 running in the SF mode will be loaded with
//1h.34min
5.1.2.21.1.2. Time values for Timers based on the Potentiometer setting
Time of statement execution: 10.3µs.
You can also use the value read from the Potentiometer as the time to be measured by
Timers, then the <value> argument of the ‘L’ statement can take the following values (please
refer to Table 5.1.2.21.2.):
1. x10ms
L Pot x10ms //Time to be measured = current Potentiometer value (1 – 255)x10ms,
//e.g. when the Potentiometer set value = 25, then the time to be measured =
//25x10ms = 250ms.
2. x100ms
L Pot x100ms //Time to be measured = current Potentiometer value (1 – 255)x100ms,
//e.g. when the Potentiometer set value = 15, then the time to be measured =
//15x100ms = 1500ms = 1.5s
NEED Programmable Relay – User’s Manual ver. 1.5EN
103
Programming languages
3. x1s
L Pot x1s
//Time to be measured = current Potentiometer value (1 – 255)x1s,
//e.g. when the Potentiometer set value = 10, then the time to be measured =
//10x1s = 10s
4. x10s
L Pot x10s
//Time to be measured = current Potentiometer value (1 – 255)x10s,
//e.g. when the Potentiometer set value = 8, then the time to be measured =
//8x10s = 80s
5. x1min
L Pot x1min
//Time to be measured = current Potentiometer value (1 – 255)x1min,
//e.g. when the Potentiometer set value = 255, then the time to be measured
//255x1min = 255min
Tab.5.1.2.21.1.2. ‘L’ statement arguments for Timers obtained through Potentiometer settings.
Potentiometer range
1 – 255
Multiplier
Time range
x 10ms
x 100ms
x 1s
x 10s
x 1min
10ms – 2.55s
100ms – 25.50s
1s – 4min15s
10s – 42min30s
1min – 255min0s
5.1.2.21.1.3. Time values for Timers based on the voltage values on analog voltage inputs
Time of statement execution: 10,3µs.
For measuring time for Timers, it is possible to use the values of voltages read from
the I7, I8 analog inputs in the NEED-12DC-x1-08-4, NEED-24DC-x1-08-4 version or
I14, I15, I16 in the NEED-12DC-x1-16-8, NEED-24DC-x1-16-8 version.
For the analog voltage inputs the <value> argument of the ‘L’ statement can take the time
values presented in the 5.1.2.21.1.3. Table
NEED Programmable Relay – User’s Manual ver. 1.5EN
104
Programming languages
Tab.5.1.2.21.1.3. The ‘L’ statement arguments for Timers obtained by reading the analog inputs in
voltage mode.
The voltage range
measured on the
analog input [V]
0.10 – 25.50
(in 0.10 steps)
0.05 – 12.75
(in 0.05 steps)
Range multiplier
x 10ms
x 100ms
x 1s
x 10s
x 1min
x 10ms
x 100ms
x 1s
x 10s
x 1min
General multiplier
x 10
x 20
Time range
10ms – 2s550ms
100ms – 25s500ms
1s – 4min15s
10s – 42min30s
1min – 255min0s
10ms – 2s550ms
100ms – 25s500s
1s – 4min15s
10s – 42min30s
1min – 255min0s
The time measured for the NEED-24DC-x1-.., NEED-12DC-x1.. relays is calculated as
follows:
Voltage values on the analog input [V] x range multiplier x general multiplier = measured
time
In the STL language syntax the AI7 or AI8 symbols are used for NEED-12DC-x1-08-4,
NEED-24DC-x1-08-4 or AI14, AI15, AI16 for NEED-12DC-x1-16-8, NEED-24DC-x1-16-8, for
example:
L AI7 x1min
L AI14 x100ms
//Time to be measured = current voltage value at the analog input
//AI7[V] x 1min x 10,
//e.g. voltage value on the AI7 analog input = 20V,
//time to be measured = 20 x 1min x 10 = 20min x 10 = 200min
//Time to be measured = current voltage value at the analog input
//input AI14[V] (range 0.05V - 12.75V) x 100ms x 20,
//e.g. AI14 analog voltage value = 10V,
//time to be measured = 10V x 100ms x 20 = 1000ms x 20 = 20s
Increased resolution of analog inputs (operating range 0.05V – 12.75V) can be used
only for the NEED-12DC-x1-16-8 or NEED-24DC-x1-16-8 relays.
5.1.2.21.1.4. Time values for Timers based on the current values on current analog inputs
Time of statement execution: 10,3µs.
For current analog inputs (only for NEED-12DC-x1-16-8, NEED-24DC-x1-16-8) the <value>
argument of the ‘L’ statement can take the time values presented in the 5.1.2.21.1.4 Table.
NEED Programmable Relay – User’s Manual ver. 1.5EN
105
Programming languages
Table 5.1.2.21.1.4. The ‘L’ statement arguments for Timers obtained by reading the analog inputs
in the current mode.
The current range
measured on the
analog input [mA]
0.2 – 51.0
(in 0.2 steps)
0.1 – 25.50
(in 0.1 steps)
Range multiplier
x 10ms
x 100ms
x 1s
x 10s
x 1min
x 10ms
x 100ms
x 1s
x 10s
x 1min
General multiplier
Time range
x5
x 10
10ms – 2s550ms
100ms – 25s500ms
1s – 4min15s
10s – 42min30s
1min – 255min0s
10ms – 2s550ms
100ms – 25s500s
1s – 4min15s
10s – 42min30s
1min – 255min0s
The time measured for the NEED-24DC-x1-16-8, NEED-12DC-x1-16-8 relays is calculated
as follows:
The current values on the analog input [mA] x range multiplier x general multiplier =
measured time
L AI16 x1min
L AI14 x1s
//time to be measured = present current value in [mA] (range 0.2 – 51) x
//1min x 5
//e.g. AI16 current value = 10mA
// the time to be measured = 10mA x 1min x 5 = 10minx5=50min
//time to be measured = present current value in [mA] (range 0.1 – 25.5) x 10
//e.g. AI16 current value = 5mA
//time to be measured = 5mA x 1s x 10 = 5s x 10 = 50s
Increased resolution of analog inputs (operating range 0.10mA – 25.50mA) can be
used only for the NEED-12DC-x1-16-8 or NEED-24DC-x1-16-8 relays.
5.1.2.21.2. ‘L’ statement for Counters.
5.1.2.21.2.1. Constant threshold values for counters
Time of statement execution: 8.3µs
The <value> parameter of the ‘L’ statement takes the corresponding constant values for
Counters from the range of 0–65535 e.g.:
L C#10
CU C1
//Setting of value 10 to be counted by the C1 up counter
L C#1000
CD C8
//Setting of value 1000 to be counted by the C8 down counter
NEED Programmable Relay – User’s Manual ver. 1.5EN
106
Programming languages
5.1.2.21.2.2. Threshold values for counters, defined according to the Potentiometer setting
Time of statement execution: 10.3µs.
You can also use the value read from the Potentiometer as the set value to be counted by
the Counters, then the ‘L’ statement format can take the following value:
1.
L Pot x1
CU C1
//value to be counted from the (1 – 255)x1 range (e.g. the Potentiometer’s
//value is set to 23 – then the value to be counted by C1 is
//equal to 23x1=23)
2.
L Pot x10
CD C2
// value to be counted from the (10 – 255)x1 range (e.g. the Potentiometer’s
//value is set to 23 – then the value to be counted by C2 is
//equal to 23x10=230)
3.
L Pot x100
// value to be counted from the (1 – 255)x100 range (e.g. the Potentiometer’s
//value is set to 23 – then the value to be counted by C3 is
//equal to 23x100=2300)
Table 5.1.2.21.2.1. ‘L’ statement arguments for Counters obtained through Potentiometer settings.
Potentiometer range
Range multiplier
1 – 255
X1
X 10
x 100
Number range
1 – 255
10 – 2550
100 – 25500
5.1.2.21.2.3. Threshold values for Counters based on the voltage values on analog voltage
inputs
Time of statement execution: 10.3µs.
For setting thresholds for the Counter it is possible to use the values of voltages read
from the I7, I8 analog inputs in the NEED-12DC-x1-08-4, NEED-24DC-x1-08-4
version or I14, I15, I16 in the NEED-12DC-x1-16-8, NEED-24DC-x1-16-8 version. In
this case the <value> argument of the ‘L’ statement can take the threshold values
shown in the Table no. 5.1.2.21.2.3.
NEED Programmable Relay – User’s Manual ver. 1.5EN
107
Programming languages
Table 5.1.2.21.2.3. The ‘L’ statement arguments for Counters obtained by reading the analog inputs.
The voltage range on
the analog input [V]
0.1 – 25.5
(in 0.1 steps)
0.05 – 12.75
(in 0.1 steps)
Range multiplier
x1
x 10
x 100
x1
x 10
x 100
General multiplier
Number range
x 10
x 20
1– 255
10 – 2550
100 – 25500
1– 255
10 – 2550
100 – 25500
The threshold set for the NEED-24DC-x1-.., NEED-12DC-x1-.. relays is calculated as
follows:
Voltage values on the analog input [V] x range multiplier x general multiplier =
Counter threshold
In the STL language syntax the AI7 or AI8 symbols are used for NEED-12DC-01-08-4,
NEED-24DC-01-08-4 or AI14, AI15, AI16 for NEED-12DC-01-16-8, NEED-24DC-01-16-8,
for example:
L AI7 x100
//Value to be counted = current voltage value at the analog input
//(range: 0.1V – 25.5V) AI7[V] x 100 x 10,
//e.g.. voltage value at AI7=10V
//value to be counted = 10V x 100 x 10 = 10V x 1000 = 10 000
L AI15 x10
//Value to be counted = current voltage value at the analog input
//(range: 0.05V – 12.75V) AI15[V] x 10 x 20,
//e.g. AI15 analog voltage value = 1V,
//value to be counted = 1V x 10 x 20 = 1V x 200 = 200
Increased resolution of analog inputs (operating range 0.05V – 12.75V) can be used
only for the NEED-12DC-x1-16-8 or NEED-24DC-x1-16-8 relays.
5.1.2.21.2.4. Threshold values for Counters based on the voltage values on
current analog inputs
Time of statement execution: 10.3µs.
For setting thresholds for the Counter it is possible to use the values of currents read
from the I14, I15, I16 analog inputs in the NEED-12DC-x1-16-8, or NEED-24DC-x116-8. In this case the <value> argument of the ‘L’ statement can take the threshold
values shown in the Table no. 5.1.2.21.2.4.
NEED Programmable Relay – User’s Manual ver. 1.5EN
108
Programming languages
Table 5.1.2.21.2.4. The ‘L’ statement arguments for Counters obtained by reading the analog inputs.
The current range on
the analog input [mA]
0.2 – 51.0
(in 0.2 steps)
0.1 – 25.5
(in 0.1 steps)
Range multiplier
x1
x 10
x 100
x1
x 10
x 100
General multiplier
x5
x 10
Number range
10 – 255
100 – 2550
1000 – 25500
10– 255
100 – 2550
1000 – 25500
The threshold set for the NEED-24DC-x1-.., NEED-12DC-x1-.. relays is calculated as
follows:
The current values on the analog input [mA] x range multiplier x general multiplier =
Counter threshold
L AI16 x100
L AI15 x10
//Value to be counted = present current value at the analog input
//(range 0.2mA – 51mA) AI16 [mA] x 100 x 5,
//e.g. AI16 current value = 1mA
//value to be counted = 1mA x 100 x 5 = 1mA x 500 = 500
//Value to be counted = current voltage value at the analog input
// (range: 0.1mA – 25.5mA) AI15[mA] x 10 x 10,
//e.g. AI15 current value = 10mA
//value to be counted = 10mA x 10 x 10 = 10mA x 100 = 1000
Increased resolution of analog inputs (operating range 0.10mA – 25.50mA) can be
used only for the NEED-12DC-x1-16-8 or NEED-24DC-x1-16-8 relays.
Examples of use of the ‘L’ statement.
A I5
L 20s
SF T1
A I5
L C#10
CU C8
A I8
L Pot x1s
SE T2
A I5
L AI16 x10
CU C1
A 20s value will be loaded into the T1 Timer .
NEED Programmable Relay – User’s Manual ver. 1.5EN
109
Programming languages
A fixed threshold value of 10 is set for the C8 Counter C8, toggling its output state from low
(‘0’) to high (‘1’).
The T2 Timer will be loaded with the Potentiometer value multiplied by 1s
For the C1 Counter a threshold value is set by means of the analog value present on AI16,
multiplied by 10 (range multiplier 0.1 – 25.5V) x 10 (general multiplier), toggling its output
state from (‘0’) to high (‘1’).
5.1.2.21.3. Remarks concerning the use of ‘L’ instruction
1. If no Load statement was performed in the program, then the time values measured by
Timers and the threshold values for Counters are defined in the PC Need program, in the
“*.set” configuration file, e.g.:
A I3
SE T2
A I5
CD C2
In the example above the T2 Timer will measure the time of 1s, set in the PC Need program,
whereas the Counter will set/clear its output at the threshold of 21. The following
configurations are set in fig. 5.1.2.21.3.1. and fig. 5.1.2.21.3.2.
Fig. 5.1.2.21.3.1. Time setting for T2 Timer.
NEED Programmable Relay – User’s Manual ver. 1.5EN
110
Programming languages
Fig. 5.1.2.21.3.2. Time setting for C2 Counter.
2. If a Load statement was performed in the program, then all time values to be
measured by Timers and values to be counted by Counters are defined by this statement.
A I3
SE T2
A I8
L 1min
SE T3
A I8
SE T4
In the example above triggering of the T2 Timer with the ramp-up on the I3 input will cause
T2 to measure the time set in the PC Need program, in the configuration file.
If a rising edge appears at the I8 input, then the T3 Timer will measure the time defined in
the Load statement – 1min, and the T4 Timer will measure the time set in the “*.set” settings
file.
5.1.2.22. “Always setting” instruction SET
‘SET’ instruction permanently sets the state to high ‘1’.
SYMBOL – SET
SYNTAX:
SET
Instruction execution time: 8.9µs
‘SET’ instruction is unconditional (always executed), and it permanently sets the logical state
of ‘1’ in the conditional part of the circuit.
Example:
SET
= Q4
SL T1
S M16
NEED Programmable Relay – User’s Manual ver. 1.5EN
111
Programming languages
Upon execution of that instruction Q4 output and M16 Marker will be permanently set to high
state ‘1’ while the T1 Timer will be permanently released to operate in the pulse generator
mode.
5.1.2.23. “Always clearing” instruction CLR
‘CLR’ instruction permanently sets the state to low ‘0’.
SYMBOL – CLR
SYNTAX:
CLR
Instruction execution time: 8.9µs
‘CLR’ instruction is unconditional (always executed), and it permanently sets the logical state
of ‘0’ in the conditional part of the circuit.
Example:
CLR
=Q4
= M1
SL T1
Upon execution of the ‘CLR’ instruction M1 Marker and Q1 output will be permanently set to
low state ‘0’ while T1 Timer will never be started.
NEED Programmable Relay – User’s Manual ver. 1.5EN
112
Programming languages
5.2. Programming in LAD graphic language
LAD (Ladder Diagram) is a simple programming method used to edit PLC programs. As the
basic language standard principles are maintained, the application of that language should
cause no problems to users who are familiar with a similar programming method. First time
users of NEED relays will be able to learn and use a programming method based on drawing
electrical connection diagrams.
5.2.1. Symbols in LAD.
Ladder diagram language (LAD) is based on symbols of contact and relay logics. It enables
representation of contacts (input elements), two-state outputs (reflecting the relay coils) and
function outputs.
Basic LAD language symbols to represent the inputs are presented in Fig. 5.2.1.1.
I1
I1
Normallyopen input
(NO)
Normallyclosed input
(NC)
Fig. 5.2.1.1. Basic LAD language elements- inputs.
Functional outputs are Timers - Fig. 5.2.1.2. and Counters – Fig. 5.2.1.3.
T1
T2
T3
T4
T5
SD
SD
SD
SF
SD
SE
SD
SL
SD
R
100ms
2h
2s
500ms
0s
Single pulse
Timer
Operation in
cycles Timer
Resetting Timer
(SINGLE PULSE)
(FLASHING)
Delayed turn-on
Timer
(ON-DELAYED)
Delayed turn-off
Timer
(OFF-DELAYED)
(RESET)
Fig.5.2.1.2. LAD language elements – Timers.
C1
C1
C1
SD
CU
SD
CD
SD
R
3468
4000
9999
COUNTER UP
COUNTER DOWN
RESET
COUNTER
Fig. 5.2.1.3. LAD language elements - Counters.
LAD language symbols to represent outputs are presented in Fig. 5.2.1.4.
NEED Programmable Relay – User’s Manual ver. 1.5EN
113
Programming languages
Q1
Two-state
output
(=)
Q2
Q3
S
R
Two-state
setting output
(S)
Two-state
resetting output
(R)
Q4
Pulse
relay
(FP)
Fig.5.2.1.4. LAD language elements – outputs.
LAD language symbols to represent Markers are presented in Fig. 5.2.1.5.
M1
Two-state
marker
(=)
M2
M3
S
R
Two-state
setting marker
(R)
Two-state resetting
marker
(R)
M4
Pulse
marker
(FP)
Fig.5.2.1.5. LAD language elements – Markers.
5.2.2. Inputs
From the point of view of the LAD program, not only a physical contact of an electric device
(discrete input) can be an input but also a state (logical level) of Timer, Counter, Clock,
Marker or even output. Since those elements, during their operation, are assigned two-state
values (‘0’ or ‘1’) it is possible to check them and make the operation of other circuit
components dependent on them.
Note: Output check consists only in acquiring program information on the state of the
register which controls that physical output. That means that the efficiency of the
relay and of execution system of the output are not taken into account.
5.2.3. Outputs
The simplest arrangement involves a two-state element such as a relay with powered or
unpowered coil. In such a case the relay is active if the relay coil is powered, i.e. a specific
logical state is assumed for it. Our case employs a “positive” logics which means that the
state ‘1’ represents an active output while the inactive output is that of the logical state ‘0’.
Depending on the function assigned (see Table 5.2.6.) an output may be set to be
continuously dependent on the outputs (‘=’ instruction) which is analogous to an active relay,
if the coil is powered. Functioning of both SET and RESET outputs is different as, once the
conditions are met, the logical state ‘1’ is set permanently (‘S’ instruction). Such a state is
maintained until a resetting operation (R) is executed which is corresponding to the
functioning of a backed-up relay.
LAD outputs also do not need to have corresponding physical outputs in the relay structure,
they are so-called functional outputs which enable the use of such elements as Timer,
Counter, Clock, Marker. The elements are set similarly to physical outputs (they take on state
‘0’ or ‘1’) depending on functions assigned to them (see Table 5.2.6.).
NEED Programmable Relay – User’s Manual ver. 1.5EN
114
Programming languages
5.2.4. LAD program structure
Symbols are placed in networks. Networks are placed in a ladder in a rung-like manner.
Successive networks (ladder rungs) are read one by one from the top to the bottom. After the
last rung has been reached the program tracking process is started from the beginning.
The network is limited on the left and right by current rails . The right rail may be either visible
in the drawing or invisible. Due to analogy to relay diagram, LAD programs can be read as
the passage of current from the left vertical line to the right (e.g. left side being the power
supply, right side being the ground potential) through individual networks.
I1
I2
Q1
Network
I3
Input
element
Output
element
I4
T1
SD
SD
0s.200ms
T1
I5
Q2
S
Power supply lines
Fig. 5.2.3. Sample application in LAD language
5.2.5. LAD network structure.
Network must have appropriate format and syntax. Below please find several main
principles:
- each network may have up to 16 parallel lines, each line may have up to 4 logical
elements connected in series,
- the last element of the series connection in the network must be one of the executive
elements (two-state output or function output),
- network can have maximum 16 output elements,
- network must have at least one contact (input) upstream the execution element
(output) or vertical connection,
- there must be no branch having its beginning or end within another branch, which is
connected with the “supply line” or outputs
NEED Programmable Relay – User’s Manual ver. 1.5EN
115
Programming languages
Sample prohibited connections are presented below:
•
I3 connection upstream the network
I3
I1
•
Q1
No output element
I1
•
I2
I2
I4
Branch within another network the end (or beginning) of which is connected with
„supply line” or outputs (in the example below the Q4 output must not be connected
to the I3 and I5 branches).
I1
I2
I4
I3
I5
Q3
Q4
5.2.6. Description of elements used.
The logical element (symbol – see Table 5.2.6), which performs the function of a signal input
or output in the LAD language can be assigned different variables i.e. the signal input can be
not only the voltage supplied to hardware inputs (designated as I1..I8) but also the state of
Timer, Counter, Clock or output. The assignment is made according to the description on the
element symbol. The designation digit is the number of input to be checked. Similarly, not
only the physical inputs but also Markers (outputs without physical leads) and states of
Timers, Counters etc. can be set. Symbols of the LAD language including description and
permissible signal XY variables for the specific element (X – input, Y – output) are presented
in Table 5.2.6.
Active input – an input the state of which allows signal flow (logical ‘1’ for the NO input,
logical ‘0’ for the NC input)
Active output – an output the logical signal of which is ‘1’.
NEED Programmable Relay – User’s Manual ver. 1.5EN
116
Programming languages
Table 5.2.6. Basic symbols of LAD language.
LAD
Xn
Xn
Ym
Ym
Ym
S
Ym
R
Tn
SD
SD
N
Tn
SD
SF
N
Tn
SD
SE
N
Tn
SD
SL
N
Cn
SD
CU
N
Cn
SD
CD
N
Description
Normally open input.
Active input (contact closed), when the logical value of the
variable assigned is ‘1’.
Normally closed input.
Active input (contact open), when the logical value of the
variable assigned is ‘0’.
Pulse relay – performs the function of a flip-flop triggered by
the leading edge. Each leading pulse changes the output
state to opposite. (FP)
Assigning output
Sets the value of the assigned variable to ‘1’ when the signal
is applied to the output. Equivalent of an open-contact relay
(copying of the input state to the output)
Set output
Sets the value of the assigned variable to ‘1’ when the signal
is applied to the output and maintains the state until “Reset”
instruction is executed or the programmable relay is powered
off (backed-up relay).
Reset output
Sets the value of the assigned variable to ‘0’ when the signal
is applied to the output and maintains the state until “Set” (SSTL) instruction is executed or the programmable relay power
supply is cut off (output resetting).
Delayed turn-on Timer
Sets the value of Tn = ‘1’ after the preset time „N” has
elapsed counted from the time of activation.
Variable
X: I,A,H Q,M, T,
C,
n: number of
possible inputs of
a specific type
Y: Q, M
m: number of the
outputs of the
specific type
Y: Q, M
m: number of the
output of the
specific type
Y: Q, M
m: number of the
output of the
specific type
Delayed turn-off Timer
Maintains the value of Tn = ‘1’ for the preset time „N” after
the activation signal has ceased.
Single pulse Timer
After activation a single pulse is generated of the duration of
„N”.
Pulse Timer
If active, a square wave is generated (pulses) with pulsewidth modulation of 50% (pulse high state duration time „N”
and low state duration time „N”).
Counter up
Pulses are counted on activation – Counter state is increased
at the input assigned to the specific Counter. After the current
Counter has reached the threshold of „N” the Counter state
goes to ‘1’.
Counter down
Pulses are counted on activation – Counter state is
decreased at the input assigned to the specific Counter. After
the current Counter value has gone below the threshold of
„N” the Counter state goes to ‘1’.
NEED Programmable Relay – User’s Manual ver. 1.5EN
117
Programming languages
5.2.7. Configuration
5.2.7.1. Configuration of inputs
Each input in the program (network) must be assigned a type and a variable. The type is
assigned in a graphic manner – by selecting the normally open or normally closed contact,
the variable is placed above the graphic symbol. The variable which defines the input type is
composed of a letter designation and a number.
I,H,A,Q,M,C,HC,T,MDIR
I1..In
H1..H4
A1..An
Q1..Qn
M1..M16
C1..C8
T1..Tn
I1
Q1
Sample operations:
In - reading of the physical state of
input In
Hn - reading of the state of clock n
An - reading of the comparison
result n
n – number of Inputs –
depending on relay
version
Fig. 5.2.7.1. Configuration of inputs.
The following variables are available:
I - inputs,
H - Clocks,
A – analogue comparisons,
Q – states of outputs,
M – states of Markers,
C – states of Counters,
T – states of Timers.
HC – fast meter/gauge of frequencies 0-20 kHz.
MDIR – system phase direction marker
NEED Programmable Relay – User’s Manual ver. 1.5EN
118
Programming languages
5.2.7.2. Configuration of outputs
Physical outputs are presented using graphic symbols illustrated in Fig. 5.2.7.2. Expected
output behavior determines the graphic symbol to be used. Above the graphic symbol the
letter Q is put which designates the output and its number.
I,H,A,Q,M,C,HC,T,MDIR
Q1..Qn
S
R
Q1
I1
Possible actions:
S - output setting (Set)
R - output resetting (Reset)
- pulse relay - each leading pulse changes
the state to opposite
No symbol - assignment (=)
No symbol – the state
prevailing at the input
is assigned to the
output
n – number of Outputs –
depending on relay
version
Fig. 5.2.7.2. Configuration of outputs
5.2.7.3. Configuration of Markers
Markers, just like the outputs, are presented using the same graphic symbol by replacing Q
with M (as illustrated in Fig. 5.2.7.3).
Expected Marker behavior determines the graphic symbol to be used inside the graphic
designation of the Marker. Above the graphic symbol the letter M is put which designates the
Marker, and its number
I,H,A,Q,M,C,HC,T,MDIR
M1..M16
M1
I1
Possible actions:
S - Marker setting (Set)
R - Marker resetting (Reset)
- pulse relay - each leading pulse changes
the state to opposite
No symbol - assignment (=)
S
R
No symbol – the state
prevailing at the input
is assigned to the
Marker
Fig. 5.2.7.3. Configuration of Markers.
NEED Programmable Relay – User’s Manual ver. 1.5EN
119
Programming languages
5.2.7.4. Configuration of Timers
Timers are presented using the same graphic symbols which are used for outputs – see Fig.
5.2.7.4.
Expected Timer operation determines the symbol to be used inside the graphic designation
of the Timer. A letter T and a Timer number are put above the graphic symbol.
T1..Tn
I,H,A,Q,M,C,HC,T,MDIR
T1
I1
SE
3s.200ms
Available settings:
0..99s 0..990ms increment 10ms
1..99min 0..59s increment 1s
0..99h 0..59 increment 1min
Pot x multiplier - value read from the potentiometer x
10ms, 100ms, 1s, 10s, 1min.
Potentiometer is adjustable in the range of 1..255
Adjustment ranges:
Pot x10ms - adjustment range 10ms..2.55s
Pot x100ms - 100ms..25.5s
Pot x1s
- 1s..4min,15s
Pot x10s
- 10s..42min, 30s
Pot x1min - 1min..4h, 15min
- Value read from analog input – only DC versions:
AI7 or AI8 x1, x10, x100 (8-input versions)*
AI14, AI15, AI16 x1, x10, x100 (16-input versions)**
SE
SD
SF
SL
R
200ms
2s
3min
4h
2s.190ms
3min.4s
4h.11min
Pot x1s
Pot x1min
Pot x10s
n – number of Timers –
depending on relay version
* - NEED ..DC-x1-08-4
** - NEED ..DC-x1-16-8
Fig. 5.2.7.4. Configuration of Timers.
For measuring time for Timers, it is possible to use the values of voltages read from
the I7, I8 analog inputs in the NEED-12DC-x1-08-4, NEED-24DC-x1-08-4 version or
I14, I15, I16 in the NEED-12DC-x1-16-8, NEED-24DC-x1-16-8 version.
It is described in more details in Section 5.1.2.21.1. ‘L’ statement for Timers.
NEED Programmable Relay – User’s Manual ver. 1.5EN
120
Programming languages
5.2.7.5. Configuration of Counters
Counters are presented using the same graphic symbol which are used for outputs – see
Fig. 5.2.7.5. Expected Counter operation determines the symbol to be used inside the
graphic designation of the Counter. The letter C, which stands for Counter, and Counter
number are placed above the graphic symbol.
C1..C8, HC1
I,H,A,Q,M,C,HC,T,MDIR
CU
CD
R
C1
I1
CU
C#234
Count threshold
C#15
Pot x1
Available settings:
Numerical value: C#0..65535
Value read from the potentiometer
Pot x1, x10, x100
Fast meter HC1
Potentiometer is adjustable in the range of
counting impulses
1..255
at input I11
- Value read from analog input – only DC
versions:
AI7 or AI8 x1, x10, x100 (8-input versions)*
* - NEED ..DC-x1-08-4
AI14, AI15, AI16 x1, x10, x100 (16-input
** - NEED ..DC-x1-16-8
versions)**
Fig. 5.2.7.5. Configuration of Counters.
The voltage values read from analog inputs I7, I8 for NEED-12DC-x1-08-4, NEED24DC-x1-08-4 or I14, I15, I16 for NEED-12DC-x1-16-8, NEED-24DC-x1-16-8, may
be used for setting the Meter threshold.
A more detailed description is provided in chapter 5.1.2.21.2 The ‘L’ instruction for
Meters.
The DC NEED..-x1-16-8 versions are equipped with a HC1 Counter HC1 counting
pulses with a frequency of up to 20kHz. HC1 is a hardware-based Counter, counting
pulses appearing on the I11 input. The CU, CD inputs, in addition to the counting
function, also provide the function for activating the Quick counter.
The Quick Counter can run in the frequency mode – it counts pulses appearing at the I11
input during 1second.
The Quick counter never overflows. The counting threshold can be set in the range of
0..65535. Performing a Reset operation of a Quick counter rests the status and number of
counted pulses.
For the NEED-230AC-x1-16-8 version the HC1 Quick Counter measures the
network frequency (50Hz or 60Hz), if the I11 input is active.
Fast meter may be used as an additional timer because the network frequency is
known and constant. If threshold = 1000, then in the case of 50Hz the meter will
switch after 100 x 20ms = 20s.
NEED Programmable Relay – User’s Manual ver. 1.5EN
121
Programming languages
5.2.7.6. Sample configurations
Example 1:
SL Timer – Pulses (Pulse generator)
Q1 output
state
Timer 4
SL
T4
Q1
Pulse generator
SL
100ms
Period
duration
Function:
If the state of Q1 input element (output 1), being
the condition for the generator functioning, is '1'
then the T4 output can be used as a generator of
square wave of the pulse width modulation of
50%.
T4 pulses are generated only if Q1='1'.
Fig. 5.2.7.6.1. Sample configuration of SL Timer.
Example 2:
Timer reset
Input I1
Timer 1
I1
T1
R
R
Reset
1s
Function:
If I1 input state goes to '1' than the state of '0'
will be forced at the T1 output and the Timer will
be deactivated.
To start functioning again the T1 Timer must be
reactivated.
Fig. 5.2.7.6.2. Sample Timer reset.
NEED Programmable Relay – User’s Manual ver. 1.5EN
122
Programming languages
5.2.8. Element location rules .
Fig. 5.2.8.1. illustrates a very simple program network including the arrangement of
elements according to the structure described above. To make the illustration clearer the
examples indicate discrete inputs and outputs.
Inputs
Outputs
I2
I1
Q1
I3
Output
element
Input
elements
Fig. 5.2.8.1 LAD network
Generally the network is composed of the input part (conditional, preceding part) and the
output part (executive, succeeding part). The first part determines the conditions that must be
satisfied in order for the output to be activated (executive element).
Input elements can be interconnected in various ways, the number of such connections
being dependent only on the legibility of the program and editing possibilities.
Note: The maximum number of NEED relay input elements placed in one line is 3 (n=3) i.e.
there can be only 3 elements (contacts) in one series, with the maximum number of parallel
elements being m=150. That means that 150 rows can be assigned to one network. There
can be a maximum of 150 output elements (1 per horizontal line). Program limitation is the
number of 150 horizontal lines (maximum of 862 bytes after compilation).
X11
Xn
X 1m
Xnm
Y1
Ym
Fig. 5.2.8.2. Maximum number of elements in one network.
NEED Programmable Relay – User’s Manual ver. 1.5EN
123
Programming languages
5.2.9. Connection types.
Control system design requires a program which combines the relations between input and
output signals in a suitable manner.
Basic connection types are presented below.
5.2.9.1. Mapping the input to the output.
I1
Q1
I1
Q1
I1 input state will be „copied” to the Q1
output. The Q1 output will be active
(Q1=’1’) if the logical state of the I1 input
is ‘1’.
5.2.9.2. Mapping the negated input to the output.
Negated I1 input state will be copied to
the Q1 output. The Q1 output will be
active (Q1=’1’) if the logical state of the I1
input is ‘0’.
5.2.9.3. Series connection.
The above circuit performs the function of
a logical product (AND operation). The Q2
output will be active (Q2=’1’) if both inputs
(I1 and I2) are in the logical state ‘1’.
I1
I2
Q2
Q2
Other types of series connections are presented below
The Q2 output will be active (Q2=’1’) if the
I1 input state is ‘1’ and the I2 input state is
‘0’.
I1
I2
Series connection of 3 elements.
The Q2 output will be active (Q2=’1’) if
logical states of all inputs (I1..I3) are ‘1’.
I1
I2
I3
Q2
Series connection of 3 elements.
The Q2 output will be active (Q2=’1’) if the
I1 input state is ‘1’ and the states of I2 and
I3 inputs are ‘0’.
I1
I2
I3
Q2
NEED Programmable Relay – User’s Manual ver. 1.5EN
124
Programming languages
5.2.9.4. Parallel connections
The circuit presented beside performs the
function of a logical sum. The Q3 output
will be active (Q3=’1’) if one of the inputs
(I1 and I2) or both of them are in the
logical state ‘1’.
I1
Q3
I2
Other types of parallel connections are presented below
I1
Q3
The Q3 output will be active (Q3=’1’) if
one of the inputs (I1 or I2) or both of them
are in the logical state ‘0’
I2
The circuit presented beside performs the
function of a logical sum of 3 elements.
The Q3 output will be active (Q3=’1’) if at
least one of the inputs (I1, I2 or I3) is in the
logical state ‘1’
I1
Q3
I2
I3
Logical sum of 3 elements.
The Q3 output will be active (Q3=’1’) if the
I1 input is active (state ‘1’) or one of the
inputs (I2 or I3) or both of them are in the
logical state ‘0’
I1
Q3
I2
I3
NEED Programmable Relay – User’s Manual ver. 1.5EN
125
Programming languages
5.2.9.5. Series-parallel connection.
In order to present the control circuit, the basic connections described above can be
combined as long as the permissible numbers of horizontal input elements (3) and vertical
input elements (150) are not exceeded, according to connection rules.
If, in order to control the output, the algorithm requires a greater number of input elements to
be used, then the connection ladder must be modified respectively, using Markers i.e. the
tasks must be divided into smaller tasks.
Sample circuits employing combinations of series-parallel connections, including function
interpretation, are presented below.
Circuit incorporating serial connection of I1
I1
I2
Q1
element with parallel-connected I2 and I3
elements.
The Q1 output functioning is as follows:
Q1=’1’ if I1 is active (state ‘1’) and the
logical state of one of the I2 and I3 inputs
I3
(or both) is ‘1’.
Circuit incorporating serial connection of I1
element with parallel-connected I2 and I3
elements and further series-connected I4.
The Q3 output functions as follows:
Q3=’1’ if I1 and I4 are active (state ‘1’) and
one of the I2 and I3 inputs (or both) is
inactive (state ‘0’).
A circuit equivalent to that above can be
presented in a different form: serial
connection of I1, I4 comes first and is
followed by a series connection of I2 and
I3.
NEED Programmable Relay – User’s Manual ver. 1.5EN
I1
I2
I4
Q3
I3
I1
I4
I2
Q3
I3
126
Programming languages
5.2.10. Symbolic names
For the NEED relays it is possible assign symbolic names to variables. This way the
program is easier to analyze and clearer.
It is possible to toggle the variable/symbolic name view. Fig. 5.2.10. shows the circuit in
ordinary notation and below with symbolic names.
I1
I2
T1
SD
SD
500ms
In1
Delay
In2
SD
500ms
Fig. 5.2.10. Example of symbol use in LAD.
5.2.11. LAD program.
The program is composed of networks. The simplest program can include only one network
(program line). A program composed of 3 networks is presented below.
I1
I2
T1
SD
SD
500ms
T1
I3
Q1
Q1
M1
SD
S
Fig. 5.2.11. Sample LAD program.
Program description:
The first network, as per Fig. 5.2.11., employs inputs which are connected directly to the
programmable relay. The first input (I1) is of NC type, the second (I2) of NO type which
means that the Timer is turned on if I1 = ‘0’ and I2 = ‘1’.
States of T1 Timer (which is set in the network 1) and I3 input are checked in the second
network (T1, I3, Q1). If the Timer is turned on (after 500ms counted from the time point when
the condition of I1=’0’ and I2 =’1’has been met) and the I3 input is active (I3 = ‘1’) then the
Q1 output will be at high state (powered). Once the I3 input is turned off (I3=’0’) the Q1
output will be deactivated.
Network No. 3 is used to „remember” the turn-on of the Q1 input. Once the Q1 input state
goes to ‘1’ then the M1 Marker is permanently set (M1 = ‘1’).
It should be noted that the program actually ends with setting the M1 Marker, as further M1
Marker operations (e.g. resetting) are not performed.
NEED Programmable Relay – User’s Manual ver. 1.5EN
127
Installation and software description
6. INSTALLATION AND SOFTWARE DESCRIPTION
PC Need is a computer program which can be used to edit, compile and load programs to
the memory of the programmable relay. It additionally makes it possible to monitor the relay
resources during operation which keeps the user informed on the states of inputs and
outputs, Timers, Counters etc. This ensures full control over the program being currently
executed.
Simplicity and diversity of the program edition (text or graphics) features make PC Need a
very convenient tool enabling very fast creation of even most complicated applications with
shorter implementation times.
6.1. Hardware requirements
Any PC with RS232 or USB interface. Operating system: Windows NT®, Windows 98®,
Windows 2000®, Windows XP®, Vista®.
6.2. Software installation
1.
Place the installation CD in the CD-ROM of your computer.
2.
If the installation is not started automatically find the “setup.exe” file on the CD and
double-click it to start the installation.
3.
During setup select an appropriate folder to install PC Need application to. If an
option to put the icon on the desktop was selected then, after successful installation PC
Need, an icon should be placed on your desktop. PC Need can also be launched using
an icon on the taskbar.
6.3. Uninstalling
In order to remove the program from your computer it should be uninstalled automatically
using Start > Programs > Relpol > Uninstall PC Need.
Selection of that option will result in the program being uninstalled.
6.4. Connecting the PC to the programmable relay
The programmable should be connected to the PC using a dedicated cable.
RS232 or USB
Transmission cable
Fig. 6.4. Connecting NEED programmable relay with the PC
!
Should the power supply conductors i.e. the phase (L) and neutral (N) conductors, be
interchanged when connecting to the power supply terminals of the programmable
relay, dangerous voltages can be present at the communication terminal of the relay.
NEED Programmable Relay – User’s Manual ver. 1.5EN
128
Installation and software description
6.5. Quick start – creating the application
In order to create a specific control application based on the programmable relay an
appropriate program must be written first. There are two editors available in PC Need:
- text editor to edit STL programs,
- graphics editor to edit LAD programs
Depending on the editor used the programs are written as files with “*.stn” extension (STL
text editor) or “*.ldn” extension (LAD graphics editor).
Setup file “*.set” is used to edit the NEED relay resources (adjustment of Clock ON times,
adjustment of comparison relations for the Comparators, values to be counted and operating
modes for the Counters, time to be measured and operating modes for the Timers, remanent
values).
STL editor
LAD editor
Window
settings
Fig. 6.5.1. PC Need program windows.
Any project for the NEED relay should contain at least one file with “*.stn” or “*.ldn”
extension (user’s program). If the programmer uses such programmable relay resources as
Clocks or Comparators then the relay settings editable in the setting window (Fig. 6.5.1) must
be loaded to the NEED relay memory, in addition to the source code (STL or LAD program).
In case of LAD editor an option “Save settings with LAD data” (active by default – see Fig.
6.5.2) can be set within the option of Configuration > LAD project. Once the option is
checked a program file “*.ldn” and a setting window are loaded to the relay memory.
NEED Programmable Relay – User’s Manual ver. 1.5EN
129
Installation and software description
Fig. 6.5.2. LAD project configuration windows.
Fig. 6.5.3 illustrates schematically the project contents for the NEED programmable relay.
Programme edition
STL
file "*.stn"
Relay resoucers
LAD
OR
file "*.ldn"
Settings
file "*.set"
Settings
file "*.set"
Fig. 6.5.3 Files included in the project for the NEED programmable relay
If the programmer uses Clocks, Comparators, remanence then the settings must be loaded
to the relay memory.
Example:
Project: STL program without use of relay resources such as Clocks, remanences,
Comparators etc. – Fig. 6.5.4.
NEED Programmable Relay – User’s Manual ver. 1.5EN
130
Installation and software description
Fig. 6.5.4. STL program
Only “*.stn” file to be loaded.
Example:
Project: LAD program. Option checked: “Save settings with LAD data”.
Fig. 6.5.5. LAD program
Upon selection of “Relay > Transmission > Write to the relay” from the Menu, a LAD
program (“*.ldn” file) is saved in the programmable relay memory together with settings.
NEED Programmable Relay – User’s Manual ver. 1.5EN
131
Installation and software description
Example:
Project: STL program using Clock and Comparator
Fig. 6.5.6. STL program using Clock and Comparator
„Example2.stn” file and „Example2.set” settings to be loaded to the relay.
6.5.1 Sample project – STL program
1. Start PC Need.
2. Create new project e.g. File > New select the appropriate relay type in the selection
window (see figure below) and select STL in the “Project type” field.
NEED Programmable Relay – User’s Manual ver. 1.5EN
132
Installation and software description
3. Write a program e.g. such as the one below
4. Connect the computer to the relay and carry out configuration of the RS232 serial port.
Config > Options > Port – select the proper (free) port. The operation must be repeated
only for the first start of the program or if the communication port is to be changed.
5. Set the relay to STOP mode (using switch or Device > Stop).
NEED Programmable Relay – User’s Manual ver. 1.5EN
133
Installation and software description
Program
RUN/STOP
6. Load the program to the memory of the relay: Relay > Transmission > Write to the
relay.
Loading the program to
the relay
7. Switch the relay over to the RUN mode (using the switch or Relay > Run) and feed the
signal (high state) to the I1 input. The Q1 output should flash (1-second on and 1-second
off).
NEED Programmable Relay – User’s Manual ver. 1.5EN
134
Installation and software description
NEED Programmable Relay – User’s Manual ver. 1.5EN
135
Installation and software description
6.6. Working with PC Need
6.6.1. Main program window description
User interface window opens upon PC Need start.
Name
1. Menu bar
Settings
window
2. Tool bar
STL editor
window
LAD editor
window
3.
Workspace
4. Status bar
Fig. 6.6.1. PC Need user interface
User interface is composed of the following items:
1. Menu bar.
2. Tool bar.
3. Workspace – including windows i.a.: LAD, STL Editor, Settings, Configuration,
Element settings.
4. Status bar.
NEED Programmable Relay – User’s Manual ver. 1.5EN
136
Installation and software description
6.6.2. Menu bar
File – management of file operations
> New – opening of the project selection window: STL, LAD, Settings
>> STL – creation of a new file in STL language editor
>> LAD – creation of a new project in LAD language editor
>> Settings – creation of a new file of SET settings
> Open – opening of an existing file for edition or change of settings;
files opened:
*.stn – files written in STL text language
*.ldn – files written in LAD ladder language
*.set – setting files (SET)
(„*” – file name; .stn extension – file type
> Save – saving the file to disc
> Save as – saving the file to disc by creating a new file
> Document – information on the software being created (to print table)
> Page setup
> Print preview
> Print – printing the document
> Recent projects – shortcuts to the most recent projects
> Exit – Alt+F4 ending the work with NEED
Edit – program edition commands
> Undo - undoes the last operation
> Redo - redoes the undone operation
> Cut - cutting the selected content
> Copy - copying the selected content
> Paste - inserting the content in the selected place
> Delete - deleting the selected content
> Search - search window (STL, LAD)
> Find next - searching for the next same element (STL, LAD)
> Replace - possibility to replace the element with a different one
View – setting the NEED program window parameters – active if edited (open) in the
LAD ladder language
> Zoom - matching the area in the LAD editor window
>> Zoom in – increasing the size
>> Zoom out– decreasing the size
>> Normal – default size
> STL window – displays STL window with resultant compilation
code of LAD language.
Device – set of relay operation features
> Transmission – support of the relay communication
>> Write to the relay – program compilation and sending the
program executive code to the relay or saving of the new settings
(depending on the window currently active)
>> Read from the relay – reading the settings from the relay or
reading the values for previewing of the variables (depending on the
window currently active)
>> Read the source code – reading source code from the relay (only
the NEED ..-..-16-8 version relays)
>> Compare – comparing the code of the program currently saved
on the disc with the program saved in the relay (comparison to the
active open code in the editor)
> External memory – memory module support
NEED Programmable Relay – User’s Manual ver. 1.5EN
137
Installation and software description
>> Write – writing the current program or settings to the memory
module. Currently open program or setting file is saved. If you want to
load both the program and the settings the saving must be performed
twice, once for the active program window and once for the active
settings file window
>> Read – reading the settings from the memory module
>> Status – information on the memory partition status and disabling
of the partition
> Stop – command to switch the relay into STOP mode
> Run – command to switch the relay into RUN mode
> Reset – resetting the program memory, settings in the relay and the
password
> Settings – opening the setting edition window
> RTC – opening the window of relay time management
> Device ID– information on type and the relay software version
> Password – protection against reading and saving the program in the
programmable relay
>> Input – inputting password to be verified against the password in
the relay
>> Change – change of the existing password including verification
Tools – set of functions to start the application
> Compilation – program compilation
> Element settings – opening the window with contact parameters (LED
editor)
> Preview of variables – opening the window to preview current values of
variables in the relay. Enabling the preview Device > Run. It must be entered
in the table which variables are subject to reading.
> Symbolic IDs – changing variable display method – registers/symbol
names
Configuration – PC Need options
> Options
Access to programme options (including selection of communication port, options of
editors)
General – selection of communication port, decision to open files from the
previous session; cancelling the password protection
STL editor – default or own editor settings
LAD editor – default or own editor settings
> LAD project – window opening – options of saving the program code and
settings and the decision to open STL window after compilation of LAD
program
> Language - changing
Windows – managing the open windows in the workspace of the NEED program
> Cascade – stacking the windows
> Tile – arranging the windows side by side
> Windows info
Help – help file and information on the program
> Index
> PC Need – information
NEED Programmable Relay – User’s Manual ver. 1.5EN
138
Installation and software description
6.6.3. Toolbar
The most frequently used menu options are toolbar buttons which, once clicked, enable
quicker opening of individual program functions. Below please find a brief description of
toolbar buttons.
New
Create a new document (file)
Open
Opens an existing document (file)
Save
Saves active document
Print
Prints active document.
Cut
Cuts the selection
Copy
Copies the selection
Paste
Pastes the selection
Undo
Undoes the last operation
Redo
Redoes the undone operation
Compilation
Active document compilation
Zoom out
Reduces the window contents size (LAD, Variable view)
Normal view
Sets the default view (LAD only)
Zoom in
Enlarges the window contents size (LAD, Variable view)
Save
Saving (transmission) to the relay (LAD,STL,SET)
Read
Reading (transmission) from the relay (LAD,L, SET,
ladder view, variable view)
Read source
Reading the source program from the relay
Variable view
Reading the status of selected variable from the relay
Symbolic names
Toggling the address/symbol view
Clock
Opens real-time clock window (RTC)
Settings
Opens settings window
Options
Access to programme options (including selection of
communication port, options of editors)
Stop
Sets STOP mode in the relay (Program stop)
Run
Sets RUN mode in the relay (Program start)
NEED Programmable Relay – User’s Manual ver. 1.5EN
139
Installation and software description
6.6.4. Keyboard shortcuts
PC Need provides access to most commands through keyboard shortcuts.
The following are functions assigned to keys or key combinations.
PC Need
F1
Display the online help.
F3
Find the next occurrence of a word (in STL) or an item in
LAD. The Find window must be displayed first.
F5
Save data to the relay (STL or LAD and or SET)
F6
Read data from the relay (SET)
F7
Compile
F11
Display the settings window (for the active LAD window)
F12
Display the variable view window
CTRL + "N"
New Project window
CTRL + "O”
Open File window
CTRL + "S”
Save the file in the active window
CTRL + "P"
Print the document
ALT + F4
Exit the NEED program
CTRL + "Z"
Undo
CTRL + "Y"
Redo
CTRL + "X"
Cut
CTRL + "X"
Cut
CTRL + "C"
Copy
CTRL + INSERT
Copy
CTRL + "V"
Paste
SHIFT + INSERT
Paste
CTRL + NUM+
Enlarge the window contents (normal zoom)
CTRL + NUM-
Reduce the window contents (reduce the zoom)
CTRL + NUM*
Default size of window contents (enlarge zoom)
CTRL + T
Set the STOP mode in the relay
CTRL + R
Set the RUN mode in the relay
CTRL + ALT + "R"
SHIFT + CTRL + "Z"
Relay reset
Open the relay time management window
NEED Programmable Relay – User’s Manual ver. 1.5EN
140
Installation and software description
CTRL + SHIFT + "I"
Information about relay software type and version
SHIFT + CTRL + "A" Display the "item setting" window (for the active LAD window)
ALT + "/"
Display the About PCNeed window
LAD Editor
A
Insert a comparator
C
Insert a counter
D
Insert MDIR
H
Insert a clock
I
Insert an input
M
Insert a marker
Q
Insert an output
T
Insert a timer
SHIFT + “C”
Insert a quick counter (HC)
CTRL + ”A”
Select the whole LAD diagram
SPACE BAR
ENTER
Left ALT + ←
Left ALT + →
Left ALT + ↑
Left ALT + ↓
HOME
END
Draw a horizontal line
Show the Item settings window
If an item is selected then the LEFT and RIGHT arrows
change the NO/NC FP,SE, SD, SF,... functions
If an item is selected, then the UP and DOWN arrows change
the register number function.
If no item is selected, you can draw links with the arrow keys.
Work the same as in text editors.
Additionally, use them together with SHIFT for selecting.
Page Up
Page Down
Explanation:
F2 – pressing the F2 function key
CTRL+S – Press the Ctrl key and the S key at the same time
CTRL+NUM+ – press the Ctrl key and the + key on the numeric keypad at the same time
CTRL+ALT+ ”R” – pressing the Ctrl and (left) Alt and the R key at the same time
CTRL+SHIFT+ ”Z” – pressing the Ctrl and SHIFT and the Z key at the same time.
NEED Programmable Relay – User’s Manual ver. 1.5EN
141
Installation and software description
6.7. STL program editor
Program edition in STL language is carried out in STL editor – see window below.
Program name
Entering and
program
edition
window
Size
change
Compilation
window
Fig. 6.7.1. STL editor.
6.7.1. STL editor
®
Editor window is opened in the workspace of PC Need and follows the Windows standards
as regards the change of size and location, and closing.
Editor operation is similar to the use of a simple notebook. Text is entered from the keyboard
using syntax principles given in Item 5.1. Programming is made in STL text language. It is
possible to delete, shift or copy a selection or the entire text.
• Marking – made using a mouse or a keyboard Mark –SHIFT+arrow keys
(simultaneously press SHIFT and selected arrow keys, according to the shifting
direction) – mark the selected text.
• Cut – mark the text to be cut and Cut it by simultaneously pressing Ctrl and X keys.
The text cut will be stored in the clipboard.
• Delete – mark the text to be deleted and perform Delete operation – “Del” key.
• Paste – put the cursor where the beginning of the text to be pasted is to be located,
perform “Paste” command – combination of “Ctrl” and “V” (simultaneous pressing of
Ctrl and V keys). Upon completion of the operation the content of the system
clipboard is inserted.
• Transfer – consists in marking (Mark) of the selected text and cutting it (Cut Ctrl+X)
followed by pasting at the required location (Paste Ctrl+V).
• Copy – mark the text to be copied (see: Mark) and Copy it using the combination of
Ctrl and C keys (simultaneous pressing of Ctrl and C keys).
Comments
In order to improve the legibility of the program being edited comments can be added to it.
The text included in a comment is not parsed when creating the executable code.
A comment which starts with „// or” is valid to the end of the line. Such a comment can be
started from the beginning of the line or from the point behind a written instruction.
NEED Programmable Relay – User’s Manual ver. 1.5EN
142
Installation and software description
Examples:
// This is a comment starting from the beginning of the line.
; This is also a comment starting from the beginning of the line.
A I1 ;This is a comment inserted behind an instruction.
In order to omit a greater number of lines during compilation the following comment can be
used: /* text */ Such a type of comment must define the beginning and the end of the text
which will not be included in the program code.
Example:
/* A I1
A I2
= Q1
*/
A I3
=Q2
The first three instructions will be omitted when compiling the program. The source code will
be created starting from A I3 instruction.
6.7.2. STL Compilation
Initially the bottom window is empty, and after running he compile command (F7) the
compilation report is displayed. If the program is correct a message is displayed (see Fig.
6.7.1.) to provide information on completion of the program compilation, code size and
percentage of relay memory occupied.
Should the program contain errors, the message will indicate the error type and location [row
number, column number] – Fig. 6.7.2., including comment.
Error – “s” operand
cannot be used
Compilator
information
Fig. 6.7.2. Compilation error.
NEED Programmable Relay – User’s Manual ver. 1.5EN
143
Installation and software description
6.7.3. Configuration of STL editor
It is possible to adapt the appearance of the edition window to own preferences in
Configuration > Options STL editor tab. The following can be set:
- background colour
- colour of comment font
- colour of input element font
- colour of logical operator font
- colour of output element font
- colour of function font on outputs
- colour of argument font
- colour of directive font (.DEVICE, .DEFINE)
- colour of unrecognized text font
- font (type, style, size, script)
Default settings can be restored any time.
Fig. 6.7.3 Configuration of STL editor.
NEED Programmable Relay – User’s Manual ver. 1.5EN
144
Installation and software description
6.8. LAD program editor
6.8.1. New program
In order to create a program in LAD language, select File > New > LAD from the Menu after
starting PC Need program.
Fig. 6.8.1.1. New LAD project.
Select relay type, LAO project type and define number of LAD ladder columns.
Selection is confirmed by pressing Enter or clicking the left mouse button.
LAD editor window will be opened in the workspace.
Program
name
Window
controls
Change
width
Change
height
Change
size
Fig. 6.8.1.2. LAD Editor – new program.
Window size can be adjusted according to the requirements and preferences using mouse.
By using the standard window control buttons
the LAD editor window can be
maximized, minimized or closed (x).
NEED Programmable Relay – User’s Manual ver. 1.5EN
145
Installation and software description
6.8.2. Saving a program
Since a newly opened program has no name (No name (LAD)) it must be saved under an
appropriate name. To do so go to File menu and select Save As option.
Fig. 6.8.2.1. „Save As” window.
Clicking the left mouse button opens the Save file window.
Fig. 6.8.2.2. LAD „Save file” window.
Select file location (access path), here:
Save in: NEED;
File name: enter e.g. Program1;
Save as type: LAD (default file name extension – .ldn)
and confirm the operating by clicking Save button.
NEED Programmable Relay – User’s Manual ver. 1.5EN
146
Installation and software description
6.8.3. Opening an existing program
In order to open an existing document go to File menu and select Open. A standard file
manager window is opened (see above). Select the file with “*.ldn” extension. A similar result
can be achieved by clicking
in the toolbar or using a keyboard shortcut Ctrl+O.
6.8.4. Program edition
Create a new LAD program from File menu (see 6.8.1.) and name it e.g.. Program1.ldn (see
6.8.2). Adjust the window size to obtain a LAD editor window.
Insertion
point
Column
Scroll bar
WORKSPACE
Row
Fig. 6.8.4.1. LAD Editor window.
The work area is a grid based on squares, the location of which is defined by columns
marked A, C, E... and rows numbered 001..150.
The A, C, E... columns are used for inserting input components of the program (physical
inputs, condition of outputs, Markers, Timers, Counters, Clocks, Comparators) or
connections.
The B, D, F... columns are used for inserting connections between elements.
The last column is used for inserting output items (physical outputs, Markers Timers,
Counters).
Drawing a connection diagram
Use the mouse to move the cursor over square grid cells inside the LAD editor window; the
cell currently selected is marked with a grey border. Additionally, cell coordinates (row,
column) are indicated in the left-hand bottom corner of the status bar. A cell is selected by
placing the cursor over it and clicking the left mouse button. Once the cell is selected
(marked) use the left mouse button to select object or connection (depending on the current
column) from the drop-down menu. Symbols used are in accordance with LAD language
description (item 5.2).
NEED Programmable Relay – User’s Manual ver. 1.5EN
147
Installation and software description
Inserting an input object:
Right-clicking inside the column A, C or E (cell 001 A in the example below) causes a dropdown menu to open – see Fig. 6.8.4.2.
I input
element
NO contact
Insertion
point:
Row 001
Column A
Fig. 6.8.4.2. Inserting an input object.
Left-click or press Enter to confirm the selection.
Inserting an output object
Right-clicking inside the column G (cell 001 G in the example below) causes a drop-down
menu to open – see Fig. 6.8.4.3.
Insertion
point:
Row 001
Column G
Input
element
inserted
Q output
element
Fig. 6.8.4.3. Inserting an output object.
Deleting an object
An object can also be deleted. To this end select (mark) a cell where the object is located,
select (highlight) Delete from the drop-down menu (right-click menu). Once the command is
left-clicked the object will be deleted.
NEED Programmable Relay – User’s Manual ver. 1.5EN
148
Installation and software description
Inserting a connection
Insertion
point:
Row 001
Column B
Connection selection
(Connect input to
output )
Fig. 6.8.4.4. Inserting a connection.
Once the connection cell is selected and the right mouse button is clicked the currently
available connections are displayed in the drop-down menu. in addition to the graphic symbol
an abbreviated direction symbol is provided which is a combination of letters S,W, N, E.
S – South (down)
W – West (left)
N – North (up)
E – East (right)
It is also possible to delete a connection. To this end select (mark) a cell where the
connection is located, select (highlight) Delete from the drop-down menu (right-click menu).
Once the command is left-clicked the object will be deleted.
Area editing
The PC Need program enables editing of the LAD project by deleting, moving and copying
the selected area. The copy area is a rectangular made of the connection grid squares.
The selection is made using left mouse button, while the right button opens the drop-down
menu with a list of options.
Fig. 6.8.4.5. Row selection and the choice of options.
•
•
•
•
•
Cut – the selected (dark background) row or area may be moved elsewhere using the
Cut option, and then by pointing to the starting left grid square of the target location
and performing the Paste operation.
Copy – the selected area may be copied elsewhere using the Copy option, and then
by pointing to the starting left grid square of the target location and performing the
Paste operation.
Delete – the selected area may be deleted – the grid will be empty.
Delete row – the selected row will be deleted.
Insert row – an empty row will be placed in the selected location.
NEED Programmable Relay – User’s Manual ver. 1.5EN
149
Installation and software description
Changing the input type
Left-click the object cell to be changed (I1). Rightclick to open the drop-down menu and select the
object type (H) and contact type (NO or NC).
Confirm the selection by clicking the left mouse
button.
Fig. 6.8.4.6. Input type change.
Changing the output type
Left-click the object cell to be changed. Right-click to open the
drop-down menu and select the new type (M).
Confirm the selection by clicking the left mouse button.
Fig. 6.8.4.7. Output type change.
Following the above rules a program can be created as shown in Fig. 6.8.4.8 (below).
Fig. 6.8.4.8. Program in LAD.
The Program2 file is linked to the “Settings” window (Program2.ldn) which is necessary to
configure elements such as Timer, Clock, Counter, Comparator, Remanence and Input
delay.
Values for Timers and Counters entered in the Settings are visible in the LAD diagram.
NEED Programmable Relay – User’s Manual ver. 1.5EN
150
Installation and software description
6.8.5. Edition of an object
Each object located in the diagram (connection grid) is editable. It is possible to change
parameters, type and number of input, output, contact type.
Object configuration
Double-clicking of the left mouse button on the element located in the diagram calls the
Object configuration window.
Fields available for change depend on the object type.
Input element:
Change contact
number
Input type I
Entering a
symbolic name
Change argument
for „Load” operation
Change
contact type
(NO)
Function
Fig. 6.8.5.1. Object configuration window.
Fig. 6.8.5.1 presents Object configuration for input I (physical input). Windows of other input
types (A, H, Q, M, T, C) look similar. The number selection for a specific input type depends
on the relay resources. Contact type (NO or NC) can be selected for each input.
The Function field is disabled for the inputs, as the field is used only for output objects.
Object configuration for Q output and M Marker.
Number of output (1..n or 1..16 if M was selected) and the function available depending on
the output type, can be selected. For Q output and M Marker they are the following
operands: =, S, R, FP.
Object –
Output (Q)
Output
number
Symbolic
name
Function
Assignment
Fig. 6.8.5.2. „Object configuration – output” window.
The contact selection field is disabled for outputs in the Object configuration window while
the Function field is enabled.
NEED Programmable Relay – User’s Manual ver. 1.5EN
151
Installation and software description
Object configuration for Timer output
The following parameters: number 1..n and operands: SD, SF, SE, SL, R can be selected for
the Timer (T) output.
Pulse time
Object
Timer (T)
Symbolic
name
Timer
number
Time setting
without the
use of Load
Function:
„ON delayed”
Fig. 6.8.5.3. „Object configuration – Timer” window.
If the option Use “L” – Pot is selected the clock multiplier and the value set by the
Potentiometer are used for counting by the Timer. According to the example below, for the
multiplier x1 the value to be counted can be set within the range 1s...255s ((1-255)x1s).
If the option Use “L” – AI7 or AI8 is selected the clock multiplier and the value read from the
I7 (or I8 for AI8) analogue input are used for counting by the Timer. Values read from the
analogue inputs are within the same range as those read from the Potentiometer i.e.
between 1 and 255.
Pulse time
Object
Timer (T)
Value from the
potentiometer
Function:
„ON delayed”
Multiplier
Fig. 6.8.5.4. „Object configuration – Timer POT” window.
Note: Time value can be changed in Setting window
NEED Programmable Relay – User’s Manual ver. 1.5EN
152
Installation and software description
Object configuration for Counter output
The following parameters: number 1..8 and operands: CU, CD, R can be selected for
Counter (C) output.
Value to be
counted
Object Counter (C)
Symbolic
name
Counter
number
Function Count up
Fig. 6.8.5.5 „Object configuration – Counter” window.
If the option Use “L” – Pot is selected the clock multiplier and the value set by the
Potentiometer are used for counting by the Counter. According to the example below, for the
multiplier x1 the value to be counted can be set within the range 1s...255s ((1-255)x1s).
Count thresholdValue from the
potentiometer x1
Function –
Count up
Value from the
potentiometer
Multiplier
Fig. 6.8.5 6. „Object configuration – POT Counter” window.
If the option Use “L” – AI7 or AI8 is selected the clock multiplier and the value read from the
I7 (or I8 for AI8) analogue input are used for counting by the Counter. Values read from the
analogue inputs are within the same range as those read from the Potentiometer i.e.
between 1 and 255
Note: Value to be counted can be changed in Setting window
NEED Programmable Relay – User’s Manual ver. 1.5EN
153
Installation and software description
6.8.6. Configuration of LAD editor
Appearance of editor window can be adapted to own preferences in Configuration >
Options window, LAD editor tab.
The following can be set independently for each of EDITION, STOP and RUN modes:
- colour of background, window and connections columns
- grid colour
- colour of contact column background
- colour of cursor frame
- colour of background of highlighted area
- colour of connections
- colour of elements
- colour and font of resource type
- colour and font of symbolic names
- colour and font of function description
- colour and font of parameter description
- colour and font of column and row description
- colour of wrong connections and elements
(font - type, style, size, script).
Default settings can be restored any time.
Preview
Colour
Font
Fig. 6.8.6 Configuration of LAD editor
NEED Programmable Relay – User’s Manual ver. 1.5EN
154
Installation and software description
6.9. Settings
6.9.1. Types of settings
There are two types of settings:
1. Settings window linked to LAD program.
2. Settings file, independent
In the first case settings are made for the active LAD program window to store the program
data.
In the other case file (or files) of different names can be created manually and they can be
loaded to the relay memory to replace the former settings.
This is advisable if you want to change the Timers’ times without changing the program. The
new settings can be entered by editing the file without the need to perform a search in the
program.
Program name
T1 Timer
edition
LAD-related
settings
Range switch
Entering the
time
Fig. 6.9.1.2. LAD-related settings.
If the LAD program-related “Settings” file is not loaded, the program in the relay will be
executed using recent settings present in the relay.
After the reset they will be: the maximum values of Timers and Counters, reset Clocks, no
remanence and enabled input delays.
In order to access Settings in the LAD program edition click the icon in the toolbar or
alternatively select Device > Settings (or press F10 key). Fig. 6.9.1.2. illustrates the result of
executing that command and editing the Timer 1 (SE mode, time: 1s).
In order to create a new SET file select New in the File menu and check Settings in the
Create new project window and select the relay type.
Settings pertaining to the LAD program are stored automatically when the program is saved,
if the option is enabled in the LAD project configuration
Settings created manually must be saved, as in the case of LAD or STL, and named.
NEED Programmable Relay – User’s Manual ver. 1.5EN
155
Installation and software description
Fig. 6.9.1.3. Newly created settings file (SET).
The default extension of the Settings file saved to the disc is “*.set”.
The basic differences between the LAD program-related settings and the manual file of
Program1.set are presented below.
Note: Settings file is loaded independently from the program. By default, a program
and, subsequently, settings related to it are loaded it in the PC NEED program for the
LAD editor.
Automatic loading of settings can be disabled by using the following menu options:
Configuration > LAD project.
Fig. 6.9.1.1. LAD project configuration.
Type of variables to be set can be selected by using the tabs:
The Settings window associated with the LAD program can only be closed using
while the
SET file has also the icons
.
Except for the name and association the edition of settings is identical as it consists in filling
the described fields or selecting values from drop-down menus.
NEED Programmable Relay – User’s Manual ver. 1.5EN
156
Installation and software description
The same
name
LAD-related
settings
Name of the
independent
settings file
Settings for
program LAD
Independent
settings
Fig. 6.9.1.4. Differences in settings.
6.9.2. Timer settings
Select the Timer number, assign a range to it (hours: minutes, minutes: seconds, seconds:
milliseconds x 10) and enter the set time value in the editable fields.
Timer selection
Time edition
Fig. 6.9.2.1. Settings of Timers.
NEED Programmable Relay – User’s Manual ver. 1.5EN
157
Installation and software description
6.9.3. Clock settings
Select the Clock number (H1..H4) and edit the selected channels A..D by setting week days,
hours and minutes.
Setting for
Channel B
Start day
selection
Selection
of Clock
End day
selection
Selection of
minutes
Selection of
hours
Fig. 6.9.3.1. Clock settings.
6.9.4. Counter settings
Select the Counter number and enter the value to be counted.
Selection of Counter
Selection of
HC Counter
Edition of
value
Edition of
value
C/f switch
Fig. 6.9.4.1. Counter settings.
NEED Programmable Relay – User’s Manual ver. 1.5EN
158
Installation and software description
6.9.5. Comparator settings
Select the Comparator number and assign a comparison type to it, and enter the voltage
value in volts for the comparisons with the permanent value.
Selection of Comparator
Voltage value
edition [V]
Comparison
type
Fig. 6.9.5.1. Comparator settings.
6.9.6. Remanence
The variable to be remanent is selected by selecting the variable check box (Fig. 6.9.6.1 M1, T5, T6 and C8 were selected as remanent).
Fig. 6.9.6.1.Remanence settings.
NEED Programmable Relay – User’s Manual ver. 1.5EN
159
Installation and software description
6.9.7. Input delays
If the input is to be scanned without a delay its checkbox must be deselected (I7..I13 input in
Fig. 6.9.7.1. will not be delayed).
By default inputs have their checkboxes selected – input delay is on.
Fig. 6.9.7.1. Input delay settings
NEED Programmable Relay – User’s Manual ver. 1.5EN
160
Installation and software description
6.10. Preview of variables
PC Need is equipped with a tool for monitoring all variables in the relay.
To open the Preview window go to: Tools >Preview of variables or use this button .
Keyboard shortcut: F12.
If a connection was established with the relay, a continuous preview of variables entered can
be started by using the button
(Reading) or going to: Device > Transmission > Reading
from the relay (keyboard shortcut: F6).
Selection of variables to be previewed is made by entering those variables in the Res.
Number column. Fig. 6.10.1. illustrates the entering of I3 variable. In order to enter a new
variable double click the left mouse button or press Enter on the first free cell in the Res.
Number column. Mnemonic utilized for writing of programs and the following symbols are
used:
POT – Potentiometer
AI7, AI8 – voltage values at the input terminals (I7 and (\I8 respectively).
AI14, AI15, AI16 – voltage values at the input terminals (I14 and (\I15 \I16 respectively).
RTC – Real-time clock.
HC – fast meter/gauge of frequencies 0-20 kHz.
MDIR – system phase direction marker
The green highlight color in the Variable column and the Online label on the status bar,
highlighted with green color, means the relay operates in the RUN mode.
Red highlight color signals the relay’s STOP mode.
The binary variables with the value “1” in the Status column are highlighted with green color.
The connection with the relay is signaled on the status bar:
• For active view of variables and RUN mode:
•
For active view of variables and STOP mode:
Fig. 6.10.1. Preview of variables.
The variable entered can be changed or replaced with another one.
The State column shows the read value of 0 or 1 for binary variables.
NEED Programmable Relay – User’s Manual ver. 1.5EN
161
Installation and software description
The Current column indicates current values of Timers and Counters or a numerical value for
POT, AIn. In case of RTC date and time are given in the format of day/month/year hour:
minute: second.
The Preset column lists the preset values of Timers and Counters.
The Other column shows additional information such as Timer mode, comparison type of the
Comparator etc.
The T1 row of the Preview table shown in Fig. 6.10.1 includes information saying that the
Timer state is 0, there is 4.01s left to be counted, the preset time is 10s and the Timer is set
to the pulse generation mode (SL).
NEED Programmable Relay – User’s Manual ver. 1.5EN
162
Installation and software description
6.11. LAD ladder view
PC Need makes it possible to view the running of the LAD program in the relay.
If connection with the relay is active, then by clicking the right mouse button, in the active
window of the LAD program you can display a menu from which you can choose the Ladder
view.
Connection with the relay is indicated with a flashing word Online on the status bar:
•
For active LAD view and RUN mode:
•
For active LAD view and STOP mode:
To stop the ladder view click the right mouse button on the right mouse button and select
. You can also press F6.
Fig. 6.11.1. Ladder view window
In the ladder view the active items or circuits are red, the inactive ones are black. In fig.
6.11.1 the active circuits are 002, 003. Circuit 001 is inactive because I1 input condition is
“0”. In t he 002 circuit the I1 input is of NC type, its status is “0”. From the LAD point of view it
is active. Additionally information is displayed about the current ad set time value of the
Timer. For Counters the counted value and the set threshold is indicated.
In the STOP mode the ladder is inactive, it cannot be viewed.
NEED Programmable Relay – User’s Manual ver. 1.5EN
163
Installation and software description
6.12. Password
In order to prevent access by unauthorized persons the NEED programmable relay can be
protected with a 4-digit password (0 to 9999).
If a password is to be used when programming the NEED relay, select “Do not ask for
password” in Menu > Configuration > Program (Fig. 6.12.1).
Default password is 0 (zero).
The password is stored in the EEPROM memory of the relay.
Relay reset restores the default password.
Fig. 6.12.1. Enabling the asking for password.
6.12.1. Password entering
If the option „Do not ask for password” is not selected, when starting PC Need programme
the password to establish communication with NEED relay must be entered. Password can
be entered using Menu > Device > Password > Enter or when prompted once the
command on the communication with the relay is used. If the password is not set (password:
0) it is sufficient to accept the command; the command will be executed.
Fig. 6.12.2. Password entering window.
NEED Programmable Relay – User’s Manual ver. 1.5EN
164
Installation and software description
6.12.2. Changing the password
In order to set or change the existing password select: Menu > Device > Password >
Change. Enter the valid password (current password) (see Fig. 6.12.2.) and the new
password to be used (New password). Additionally, the new password is to be re-entered in
the „Verify password” field in order to avoid any typing mistakes.
The password is saved in the relay memory.
Fig. 6.12.3. „Change device password” window.
Note: The password is stored in the relay memory.
Resetting the relay causes the password to be reset and set to default
(password = 0).
Note: When using an external memory to program the relay, the external
memory password must be identical to that of the relay.
If the passwords are different the relay will not respond to the external
memory.
The external memory password is the one which was set in PC Need during the
programming.
NEED Programmable Relay – User’s Manual ver. 1.5EN
165
Installation and software description
6.13. Real-time clock (RTC)
To open the RTC window go to Menu > Device > RTC (Ctrl+Shift+Z on the keyboard) or use
the icon
in the toolbar.
It is also possible to preview the current time in the relay– Read button, to set any date and
time and use the Save button and to set the current time of the programming device (PC) by
means of the Synchronize option.
Fig. 6.13.1. Real time clock window.
The Time zone check box makes it possible to set automatic change of winter to summer
time and the other way round depending on the geographic location. The None option means
that the relay will not take any time changes into account.
NEED Programmable Relay – User’s Manual ver. 1.5EN
166
Installation and software description
6.14. Source code
In the NEED ..-..-16-8 version relays it is possible to save the source code directly in the
relay. It is not possible to load the code into an external memory.
The source program is loaded during transmission to the relay immediately after the
executable code and settings are loaded.
Loading of the source code is set by default. You can disable storing source code in the
relay, by unchecking the option “Save the source data” in the Configuration > Program
menu.
Fig. 6.14.1. The Program Configuration window.
Source code can be read from the relay through the Relay > Transmission > Read
program code or using a button.
After retrieving the project contents PC Need automatically opens a new window n the editor
(LAD, STL) w in which the program loaded to the relay was authored.
NEED Programmable Relay – User’s Manual ver. 1.5EN
167
Start-up
7. START-UP
7.1. Switching on
7.1.1. Preliminary operations for the AC version.
1. Check if the power is connected properly:
terminal L: phase conductor 230V AC
terminal N: neutral conductor
2. Check if the relay inputs and outputs are connected properly;
Caution: I1.. In inputs are controlled by the phase conductor L
!
3. Set the RUN/STOP switch to STOP.
4. Protect the circuits controlled by the programmable relay against unauthorized
access – when started up for the first time there is a risk of uncontrolled
operation of machinery (drives, pumps, fans) and devices or of dangerous
voltages being present at the inputs. This may be caused by e.g. a program
error or wrong cable connections.
7.1.2. Preliminary operations for the DC version.
1. Check if the power is connected properly:
terminal +24V DC: positive supply conductor 24V DC
terminal +12V DC: positive supply conductor 12V DC
terminal 0V: power supply ground
2. Check if the relay inputs and outputs are connected properly;
Caution: I1.. In inputs are controlled by the voltage positive in relation to 0V
!
terminal
3. Set the RUN/STOP switch to STOP.
4. Protect the circuits controlled by the programmable relay against unauthorized
access – when started up for the first time there is a risk of uncontrolled
operation of machinery (drives, pumps, fans) and devices or of dangerous
voltages being present at the inputs. This may be caused by e.g. a program
error or wrong cable connections.
7.1.3. Turning the power on.
1.Connect external power supply to the programmable relay terminals.
2.Check the functioning of independent safety instruments (if any) – e.g. emergency
power off switch.
3. Check if the signaling of the programmable relay inputs by LEDs is proper.
4. Switch the RUN/STOP switch to RUN.
Monitor the functioning of the system – in case of malfunctioning check the
connection system and the control program.
NOTE: Once RUN mode is selected, the program is activated that takes control over
the outputs.
NEED Programmable Relay – User’s Manual ver. 1.5EN
168
Information on hardware
8. INFORMATION ON HARDWARE
8.1. Relay power supply.
8.1.1. Relay 115/230 V AC power supply
Schematic diagram of the NEED relay power supply circuit is presented in Fig.8.1.1
Fuse
R
L
V
Varistor
N
Fig.8.1.1. Schematic diagram of the NEED AC relay power supply circuit.
!
The NEED relay power pack circuit is not electrically isolated from the mains power
supply. This means that, should the conductors connected to L and N terminals be
interchanged, voltages dangerous to life can be present at the communication
terminal.
8.1.2. Relay 220 V DC power supply
Schematic diagram of the NEED relay power supply circuit is presented in Fig.8.1.2.
Fuse
R
+220
V
Varistor
0V
Fig.8.1.2. Schematic diagram of the NEED AC relay power supply circuit.
!
The NEED relay power pack circuit is not electrically isolated from the mains power
supply. This means that, should the conductors connected to 220V and 0V terminals
be interchanged, voltages dangerous to life can be present at the communication
terminal.
8.1.3. Relay 24 (12) V DC power supply
Schematic diagram of the NEED relay power supply circuit for the 24V DC version is
presented in Fig.8.1.3. The 12V DC version differs in components selected.
NEED Programmable Relay – User’s Manual ver. 1.5EN
169
Information on hardware
L1
Fuse
D1
+24V
V
Varistor
0V
GND
Fig.8.1.3. Schematic diagram of the NEED DC relay power supply circuit
!
The relay power supply systems in the DC version are protected against reverse
connection of supply voltage.
8.2. Inputs
8.2.1. 230 V AC inputs
Concept diagram of the NEED relay input systems is shown in Fig. 8.2.1 and Fig. 8.2.2
Analog inputs are I7 and I8 for the DC NEED..-x1-8-.. version and I14, I15, I16 for the
NEED..-x1-16-.. version.
Inputs with increased resistance to interference are I5 and I6 for the AC NEED..-x1-8-..
version and I12, I13 for the AC NEED..-x1-16-.. version.
R1
Inputs I1..I4
R2
C1
R1
Inputs I5, I6
R2
C1
C2
R1
R2
For analogue
measurements
Inputs I7, I8
R3
C1
R4
For digital
measurements
C2
R5
Fig.8.2.1. Schematic diagram of the NEED-230AC-x1-8-4 input circuits.
NEED Programmable Relay – User’s Manual ver. 1.5EN
170
Information on hardware
Inputs with increased resistance to interference include a condenser (antiinterference filter) which allows them to be connected with long cables.
Inputs I7, I8 function as digital and analog inputs – see chapter “4.11. Comparator
– Analog input.”
The NEED relay inputs are not galvanically separated from the power grid
supply.
!
R1
R2
Inputs I1..I11
R3
C1
R1
R2
Inputs I12, I13
C1
R3
C2
N
R2
R1
For digital
measurements
Inputs I14..I16
R3
R4
R5
For analogue
measurements
R6
R7
R8
ASYM
takes the frame
potential for full
symmetry
Fig.8.2.2. Schematic diagram of the NEED-230AC-x1-16-8 input circuits.
Inputs with higher noise immunity (I12, I13) are equipped with a capacitor (noise
filter), therefore long leads can be connected to them.
The I14, I15, I16 have the function of digital inputs and analog inputs – see
section 4.11. Comparator - analog input.
!
The NEED relay inputs are not electrically isolated from the mains power
supply.
NEED Programmable Relay – User’s Manual ver. 1.5EN
171
Information on hardware
8.2.2. 220 V DC inputs
Concept diagram of the NEED relay input systems is shown in Fig. 8.2.3 and Fig. 8.2.4
Analog inputs are I7 and I8 for the DC NEED..-x1-8-.. version and I14, I15, I16 for the
NEED..-x1-16-.. version.
R1
Inputs I1..I6
R2
C1
R2
R1
For analogue
measurements
Inputs I7, I8
R3
C1
R4
For digital
measurements
C2
R5
Fig.8.2.3. Schematic diagram of the NEED-220DC-x1-8-4 input circuits.
Inputs I1..I11
R1
R2
R3
C1
Inputs I14..I16
R2
R1
R3
R4
For analogue
measurements
C1
R5
For digital
measurements
R6
C1
Fig.8.2.4. Schematic diagram of the NEED-220DC-x1-16-8 input circuits.
!
The NEED relay inputs are not galvanically separated from the power grid supply.
NEED Programmable Relay – User’s Manual ver. 1.5EN
172
Information on hardware
8.2.3. 24 (12) V DC inputs
The schematic diagram of the NEED DC relay input circuits was presented in fig. 8.2.5. All
digital and digital-analog inputs for NEED-..DC-x1-8-4 have a similar arrangement of
connections. The analog-digital inputs have a different connection layout for the NEED-..DCx1-16-8 version, as shown in fig. 8.2.6.
R1
R3
Inputs I1..In
R2
C1
Fig.8.2.5. Schematic diagram of the NEED-24DC-x1-8-4 relay input circuits.
R1
R3
For digital
measurements
Inputs I14..I16
R2
R4
C1
R5
For analogue
measurements
C2
Fig. 8.2.6. Schematic diagram of the NEED-24DC-x1-16-8 digital-analog inputs.
8.3. Outputs
Schematic diagram of the NEED relay output circuits is presented in Fig.8.3.1
.
Q1
.
.
1
2
1
Qn
2
Fig.8.3.1. Schematic diagram of the NEED relay output circuits.
NEED relay outputs are potential-free relay contacts.
NEED relay outputs are electrically separated from the inputs and the mains power
supply.
NEED Programmable Relay – User’s Manual ver. 1.5EN
173
Information on hardware
8.4. Input delay
A frequent problem in control issues is contact bounce e.g. relay contact bounce. The
NEED programmable relay enables appropriate setting of input delays so that those
problems can be eliminated. Input signal processing in the NEED relay is illustrated in
Fig.8.4.1.
Fig.8.4.1. Processing of input signals in the NEED relay
Input delays in the NEED relay can be adjusted using program configuration (see chapter 6: „
INSTALLATION AND SOFTWARE DESCRIPTION). A sample configuration window of PC
Need program including a delay for the I2 input is presented in Fig. 8.4.2.
Fig. 8.4.2. Sample input delay configuration.
8.4.1. Input delays for NEED-230AC-... relay
If no delay is set for the inputs then the NEED relay checks input signals every 20ms (one
positive half of the sinusoidal waveform for the power supply frequency of 50 Hz). Directly
after the check it will perform interpretation of whether the voltage present at the input is at
high or a low state. It means that the maximum input signal interpretation time (without
delay) is 20ms + program cycle time.
After that time, at the maximum, the signal present at the NEED non-delayed input can be
„noticed” and properly interpreted by the relay.
If a delay is preset for the inputs then the NEED relay performs interpretation of input
signals every 20ms (at the supply voltage frequency of 50Hz). If the input state remains
unchanged after the third check the relay will perform interpretation to recognize the
voltage level as low or high. It means that the maximum input signal interpretation time is
60ms + program cycle time.
NEED Programmable Relay – User’s Manual ver. 1.5EN
174
Information on hardware
After the maximum time of 60ms (but not before 40ms), the signal present at the NEED
input can be „noticed” and properly interpreted by the relay.
Table 8.1. presents delay times for the programmable relay inputs.
Table 8.1. Delay times of the NEED relay inputs.
Supply voltage
frequency
f=50Hz
f=60Hz
Input signal maximum delay time
Delay ON
Delay OFF
60ms+cycle time
20ms+ cycle time
49.8 ms+ cycle time
16,6ms+ cycle time
Interpretations of logical states of the NEED relay inputs are presented in Fig. 8.4.3. and
Fig. 8.4.4.
The switch is OFF no signal at I1 input
I1 input is checked
at these "points"
The switch is ON signal is present at
I1 input
The switch is OFF no signal at I1 input
Signal
waveform at the
I1 input
Calibration
signal in the
relay
20ms
'1'
I1
Current delay
'0'
Logical state of I1 input in
the relay.
Max. delay =
20ms +program cycle time
Fig. 8.4.3. Interpretation of the relay I1 input logical; state – delay time not preset – NEED-230 AC.
NEED Programmable Relay – User’s Manual ver. 1.5EN
175
Information on hardware
The switch is ON the signal is present
at I1 input
The switch is OFF no signal at I1 input
The switch is OFF no signal at I1 input
I1 input is checkedat
these points
Signal waveform
at the I1 input
Calibration
signal in the
relay
20ms
'1'
I1
Logical state of I1 input
in the relay
Current delay
'0'
Max. delay =
60ms + program cycle time
Fig. 8.4.4. Interpretation of the relay I1 input logical state – delay time preset – NEED-230AC-...
Signal wave format I1
input of the relay
Calibration sygnal
in the relay
'1'
I1
1
2
3
4
'0'
Fig.8.4.5. Sample interpretation of the relay I1 input logical state – delay time not preset –
NEED-230AC-...
The following stages can be distinguished in the input signal waveform illustrated in Fig.
8.4.5.:
Input signal is at high state (1) so the relay interprets it as a logical one. However, if within
the following 20ms the relay does not detect the right sinusoid level then it changes the state
of its input to logical zero (2). After further 20ms the input signal is interpreted as a high state
(3). Short pulses can be detected correctly if they occur at right moments in the input signal
interpretation by the relay (4).
8.4.2. Input delays for NEED-24DC-... , NEED-12DC relays
If no delay is set for the inputs then the NEED relay checks input signals once in a loop
cycle. Directly after the check it will perform interpretation of whether the voltage present at
the input is at a high or a low state. It means that the maximum input signal interpretation
time (without delay) is equal to the maximum program cycle time
After that time, at the maximum, the signal present at the non-delayed input can be
„noticed” and properly interpreted by the relay.
NEED Programmable Relay – User’s Manual ver. 1.5EN
176
Information on hardware
If a delay is preset for the inputs then the NEED relay performs interpretation of input
signals every 21ms. It means that the maximum delayed input signal interpretation time is
21ms + program cycle time.
After the maximum time of 21ms, the signal present at the NEED input can be „noticed”
and properly interpreted by the relay.
If during the delay time measurement in NEED-24DC-..., NEED-12DC-... relays, the
input signal is changed the time count is restarted.
NEED Programmable Relay – User’s Manual ver. 1.5EN
177
Information on hardware
The switch is OFF no signal at I1 input
The switch is ON signal is present at
I1 input
The switch is OFF no signal at I1 input
Signal waveform at the I1 input
Logical state of I1
input in the relay
I1
Max. delay =
max. program cycle time
Fig.8.4.6. Sample interpretation of the relay I1 input logical state – delay time not preset –
NEED-24DC-..., NEED-12DC-...
The switch is OFF no signal at I1 input
The switch is ON signal is present at
I1 input
The switch is OFF no signal at I1 input
Signal waveform at the I1 input
Logical state of I1 input
in the relay
I1
max 21ms
Max. delay =
21ms + program cycle time
Fig.8.4.7. Sample interpretation of the relay I1 input logical state – preset delay time–
NEED-24DC-..., NEED-12DC-...
8.5. Output delay.
Outputs of the NEED relay are not delayed – they are set as quickly as possible. However,
one must take into account the delays resulting from the output control elements used e.g.
for the version NEED-230AC-01-08-4R the operating time is:
Output relay operating time + cycle time.
NEED Programmable Relay – User’s Manual ver. 1.5EN
178
External memory
9. EXTERNAL MEMORY
9.1. Memory card
In order to enhance the functionality of the NEED relay an external memory card NEED_M1K is available. The card is an EEPROM module of the capacity of 1 KB. The memory can
be used for copying the program to the NEED relay without the need to use a computer.
Type B
Type A
Fig. 9.1.1. External memory module – top and bottom views.
The module is programmable using a cable for programming the NEED relay. To this end
place the module in the appropriate terminal, in the programming cable plug (Fig. 9.1.2).
It is also possible to read the settings saved in the memory partition.
Upon removing the programming cable from the plug place the programmed memory card in
the relay in place of the programming cable plug – the programming cable and the memory
use the same terminal of the NEED relay.
Memory module
Programming
terminal
Fig. 9.1.2. External memory module installation place in the relay and the cable terminal.
Note: The lead with inserted memory module should not be connected to the
programming port and used for programming the relay.
Note: Using the lead with inserted memory module for programming can result in
uncontrolled data transmission to the relay or memory module.
NEED Programmable Relay – User’s Manual ver. 1.5EN
179
External memory
9.2. Storage organization
The card memory is split into 2 partitions – one for code storage and the other for storage of
settings. When programming the memory card you can select which partitions are to be
active. If a partition is active the data written in it are copied to the NEED relay memory.
Therefore it is possible to load a program code only, or to load new settings only or to load
both the program code and the settings. If none of the partitions is active the relay will load
no data to its internal memory.
9.3. Memory programming
9.3.1. Writing a program
If a memory card is connected to the programming cable terminal, enable that program
window the code of which is to be written to the memory (active window is the one in the
foreground, with blue title bar). Then go to Device > External memory > Write.
Writing program
„Program3.ldn”
Fig. 9.3.1.1. Writing a program.
Upon opening the “Writing a program” window set the password according to that set in the
relay and press Start button. The password prompt appears only if the option “Don't ask for
the password” was not set in program configuration.
Note: If the password entered during memory programming is different than the
password in the NEED relay the program is not copied to the internal memory of the
programmable relay.
Once the operation is performed a message is displayed to inform that the program writing is
completed. Press OK – the program code is placed in the card memory.
Fig. 9.3.1.2. „Writing program” window.
NEED Programmable Relay – User’s Manual ver. 1.5EN
180
External memory
9.3.2. Writing settings
If a memory card is connected to the programming cable terminal, enable (in the foreground,
with blue title bar) the Settings window. Then go to Device >
External memory > Write
Fig. 9.3.2.1. “Writing settings” window.
Upon opening the Writing relay settings window decide whether the settings are to be
protected with a password and press Start button. The password must be according to that
written in the relay. Otherwise the memory will not be copied. Once the writing is finished a
message is displayed to inform that the writing of settings is completed.
9.3.3. EEPROM memory status
To retrieve the memory status control option: Relay > External memory > Status.
You can disable – with the Disable button the Program or Settings partition or both.
Once e.g. the Program partition has been disabled (Fig. 9.3.3.2) only the data from the
Settings partition will be copied to the NEED relay.
Fig. 9.3.3.1. „Active partitions” window.
Fig. 9.3.3.2. „Inactive partitions” window.
Note: Partition is enabled (activated) by loading a new content.
9.3.4. Reading the settings
It is possible to read the Settings partition from the memory card.
To this end, in the workspace of PC Need enable the Settings window where the read data
are to be sent. In the example below a Read_EEPROM.set file was created for that purpose.
After execution of the command of Device > External memory > Read (see window below)
– the data will be copied from the partition to the file with .set extension.
NEED Programmable Relay – User’s Manual ver. 1.5EN
181
External memory
Fig. 9.3.4.1. “Reading settings” window.
9.4. Operation of memory card with NEED relay
!
Memory card can be inserted only while the power supply of the NEED relay is
off.
Voltages hazardous to health and life can be present at the communication
port (applies to 115/230V AC version).
!
Inserting a card while the relay power supply is on may result in a damage to
the memory circuit and the relay.
1. While the power is off insert the memory card module in the programming terminal of the
NEED relay.
2. Once the module power is switched on the memory contents (active partitions) is copied to
the NEED relay memory. A red MODE LED is blinking during the copying operation.
3. Once the contents is copied the relay sets the operating mode according to the position of
the operating mode switch. If RUN mode is selected program execution is started
automatically.
Note: Memory contents is copied once on switching the power on. Once the copying
is completed the memory module can be removed from the relay terminal.
Note: Rewriting data from memory to the controller is possible when:
- the password is correct,
- the memory stores data which are correct for the relay type,
- partitions are active,
- data in the relay are different from those in memory.
Note: External memory does not permit transmitting of the LAD/STL source code to
the relay.
NEED Programmable Relay – User’s Manual ver. 1.5EN
182
Sample applications
10. SAMPLE APPLICATIONS
10.1. Part height assessment
Quite frequently a need arises during the manufacturing process to sort the parts according
to their dimensions. The task can be performed manually by measuring the certain
dimension or automatically, using the NEED programmable relay together with several
external sensors. If e.g. only two height categories are involved, it takes the NEED
programmable relay and two sensors detecting the geometric dimension in a proper manner
to compose the full control set.
Details
Height 1
"I_high1"
Height 2
"I_high2"
Co
"Q_high1"
b
yor
e
v
n
s
elt'
ion
ect
r
i
d
"Q
_s
"
ch
n
y
"Q_high2"
Separator
r
rs fo
e
n
i
ta
Con tails
de
"I_lim1"
"I_lim2"
Fig. 10.1.1.Part height detection.
Task description:
Parts transported on the impulse feeder must be sorted according to their heights.
Equipment selection:
1) In order for the task to be performed properly two sensors must be selected of the
proper range. If the parts are made of metal, induction sensors can be used to detect
height. Let’s the name of the sensor for height 1 detection (high details) be “I_high1”
while the sensor detecting the height 2 (low details) be “I_high2”. Assumption is made
that the belt movement is synchronized so a signal to enable the restarted belt
movement (let’s call it “Q_synch”) is also necessary.
2) Separator can be a pulse solenoid valve-controlled cylinder (on sending a control signal
to one electromagnet coil the valve remains in that position also after the signal has
faded, until a signal is sent to the other coil) on which two containers are fixed. “Height
1 of the parts” and “Height 2 of the parts” will stand for extreme positions of the
NEED Programmable Relay – User’s Manual ver. 1.5EN
183
Sample applications
cylinder. Let’s name the outputs controlling the electromagnets “Q_high1” and
“Q_high2” with corresponding extreme position sensors “I_lim1” and “I_lim2”.
3) Programmable relay: 4 inputs and 3 outputs are necessary.
Fig. 10.1.1. illustrates the concept of the task analysed while the electrical connection
diagram is presented in Fig. 10.1.2.
Algorithm:
First the height of the parts will be checked. If sensor “I_high1” is actuated it means the part
is a higher one. If sensor “I_high2” is actuated with “I_high1” not being actuated the part is a
lower one. Depending on the height the container is moved (the output connected to the
solenoid valve is switched on) towards higher or lower parts respectively. After the operation
completion (once the container is set to the proper part type) synchronization signal for belt
movement is sent. The detailed operation algorithm is presented below.
Was "I_high1"
actuated ?
YES
Back
NO
NO
NO
Was “I_high2”
sensor
actuated
YES
Set "Q_high1" output
Reset "Q_high2" output
Set "Q_high1" output
Set "Q_high2" output
Was "I_lim1"
sensor actuated ?
Was "I_lim2"
sensor actuated ?
YES
Low part
High part
START
NO
YES
Set “Q_synch"
output
It must be noted that the program execution does not “stop” at any point. The controller does
not wait for any starting signal, the program is simply processed from the first to the last line.
NEED Programmable Relay – User’s Manual ver. 1.5EN
184
Sample applications
Program
Let’s arrange our equipment configuration
Address
I1
I2
I3
I4
Inputs
„I_high1”
„I_high2”
„I_lim1”
„I_lim2”
Address
Outputs
Q1
„Q_high1”
Q2
„Q_high2”
Q3
„Q_synch”
Now let’s try to translate the algorithm to the programming language.
STL
//High detail detection
A I1
//If I1=1, then set Q1. If I1=0 do not do anything
AN T1
// T1 Timer must be at low state
S Q1
//Set the container to „high”
R Q2
//Q2=0, Q1=1
//Low part detection
AN I1
//High part detection sensor is not operating I1=0 and
A I2
// low part detection sensor I2=1
AN T1
// T1 Timer must be at low state
S Q2
// Set the container to „low”
R Q1
//Q2=1, Q1=0
//High part
//I3 limit sensor detection at the cylinder
A I3
//If a leading edge occurs at I3
A Q1
//and Q1 is set
=M1
//then set M1 Marker
//Low part
//I4 sensor detection at the cylinder
A I4
// If a leading edge occurs at I4
A Q2
// and Q2 is set
=M2
// then set M2 Marker
//Detection of gap between the parts
AN I1
//No ”high” part
AN I2
//No low part
R M1
//Resetting auxiliary M1, M2 Markers
R M2
//Releasing T1 Timer for synchronization
O M1
//If M1 Marker or
O M2
// M2 Marker is at state ‘1’
L 1s
//then release T1 Timer1 in the Single Pulse mode
SE T1
//with the duration time of 1s
A T1
//Set Q3 according to T1
=Q3
T1 Timer was used to generate the pulse in the Single Pulse mode. It means that the
occurrence of a leading edge at I3 or I4 input will cause a single synchronization pulse to be
generated at Q3.
NEED Programmable Relay – User’s Manual ver. 1.5EN
185
Sample applications
The LAD language version of the program is presented below.
LAD
I1
T1
Q1
S
Checking the
highpart sensor
Q2
R
I2
I1
T1
Checking the high part
sensor I1 and low part
sensor I2
I3
Q1
R
Q2
S
Q1
I4
Q2
I1
I2
Setting the
proper position
for high part
container
Setting the
proper position
for low part
container
M1
M2
M1
R
Detection of
appropriate limit
sensors located
on the cylinder
Detection of
gaps between
the parts
M2
R
M1
M2
T1
T1
SE
1s.000ms
Release of T1 Timer by leading
edges of M1 and M2 Markers cylinder movement and setting
the container for the proper
detail type
NEED Programmable Relay – User’s Manual ver. 1.5EN
Q3
T1 Timer initiation
in the single pulse
mode
Q3 follows the
changes of T1 i.e.
state of Q3 =
state of T1
186
Sample applications
N
Out
I_high1
L
N
Out
I_high2
L
N
L N
Out
I_lim1
Out
I_lim2
L
B2
N
L
L
N
I1
I2
N
I1 I2
I3
I4
I5
I3 I4
I6
I7
I5 I6
I8
MODE
I7 I8
RUN/STOP
115-230V AC INPUT 8xAC
M
NEED
Q1
Q2
Q3
L1
Q4
OUTPUT 4xRELAY/10A
Q1
L2
Q2
Q3
Q4
L3
Q_synch
Q_high1
Q_high2
N
L
Fig. 10.1.2. Sample electric connection diagram of the circuit for part height detection.
NEED Programmable Relay – User’s Manual ver. 1.5EN
187
Sample applications
10.2. Automatic door
Everyone knows the automatic door control. Automatic doors are very often used at stores,
offices, banks etc. but the NEED programmable relay can „enrich” the conventional control
with new functions to improve not only the customer traffic but also the functionality of the
entire building.
Signal
lamp
Motion
sensor
Opening
sensor
Entrance
Closing
sensor
Door
drive
Control panel
Manual
Directions of
movement
Auto
End
Open
Close
Fig. 10.2.1. Automatic door control.
Task description:
Control the opening and closing of automatic door in a building.
1. A proper motion sensor must be selected. The sensor range must be such that the traffic
is not hampered due to the door response time i.e. the door must open well before the
customer enters the doorway. May the outer sensor be named “I_out” and the inner one
“I_in”. In order for the door position to be detected also extreme position sensors must be
installed. The position sensors’ names will be “I_open” for open door sensor and “I_close” for
closed door sensor. In order to improve the functionality a switch may be added to enable
setting of 3 operating modes: Auto – the entire system operates as during regular working
hours, End – door opens only for the people leaving the building. It is a good rule to equip the
control system with manual mode so our system will also have “Open” and “Close” buttons to
manually open and close the door in the Manual mode (neither Close nor Auto are on). All
the buttons will be put in one place – a control panel.
2. Door should be driven by a motor with an anti-clasp coupling. The signal to control the
motor operation will be “Q_close” (forward movement – closing – contactor on, backward
movement – opening – contactor off) and “Q_motor” – output switching the motor on. The
system will be additionally equipped with a signal lamp “Q_alarm” which will be blinking
during “Closing” of the store.
3. NEED programmable relay – 8 inputs and 3 outputs will be necessary.
NEED Programmable Relay – User’s Manual ver. 1.5EN
188
Sample applications
Algorithm
First, the operating mode must be defined which is signaled by the lamp (in this case the
lamp blinks for the Closing mode). The door is to open when the signal at the motion detector
output is high. In order to avoid actuation caused by incidental releases the system responds
only after 200ms i.e. if after 200ms from the release the motion is still detected by the motion
sensor, the door starts opening. The delay time must be obviously adjusted so that the
person leaving or entering does not wait for the door to open (appropriate adjustment and
sensitivity of motion detectors are involved).
After opening the door remains open for about 5 seconds and it closes afterwards. Each
motion detected during the closing operation causes the door to open again. Limit sensors
are used to stop the door movement.
If Manual mode is selected the door opening is performed by pushing the Open button.
NEED Programmable Relay – User’s Manual ver. 1.5EN
189
Sample applications
Algorithm
NO
NO
Is END
mode on?
START
Is AUTO
mode on?
Is
"I_open"=
1?
YES
YES
NO
YES
Enable lamp blinking
"Q_alarm"
Disable lamp blinking
"Q_alarm"=0
Is
"I_close"
=1?
NO
"Disable
motor
Q_motor=0"
YES
Open the door
"Q_motor"=1
"Q_close"=0
Close the door
"Q_motor"=1
"Q_close"=1
Was "I_in" or "I_out"
sensor actuated in
AUTO mode or was
"I_in" sensor
actuated in END
mode?
NO
Wait 200ms
NO
YES
Are "I_out" sensoror
"I_in" sensor still
enabled in AUTO
mode, or is "I_in"
sensor still enabled
in END mode
YES
Open the door
"Q_motor"=1
"Q_close"=0
Close the door
"Q_close"=1
"Q_motor"=1
NO
Is the "I_lim"
limit sensor
enabled?
Is "I_in" or
"I_out" sensor
enabled?
YES
Stop the door
movement
"Q_motor"=0
YES
Change the direction
of movement
"Q_close"=0
NO
Is the "I_close"
limit sensor
enabled?
NO
YES
Turn the motor off
"Q_close"=0
"Q_motor"=0
Wait = 5s
Is "I_in" or
"I_out" sensor
enabled?
NO
YES
NEED Programmable Relay – User’s Manual ver. 1.5EN
190
Sample applications
Program
Equipment configuration:
Address
I1
I2
I3
I4
I5
I6
I7
I8
Inputs
„I_in”
„I_out”
„I_open”
„I_close”
„Auto”
„End”
„Close”
„Open”
Address
Q1
Q2
Q3
Outputs
„Q_close”
„Q_motor”
„Q_alarm”
STL
O I1
O I2
=M1
//Enter M1 Marker to inform
// about actuation of any of the motion sensors („I_in” or „I_out”).
A M1 // M2 Marker is set if „Auto” mode was selected and
A I5 // motion was detected outside and inside the building
=M2
A I1
A I6
=M3
// M3 Marker is set if „Close” mode was selected and
// motion was detected inside the building
AN I5 //Setting the operating mode to „Manual”
AN I6
=M13 //Marker of the „Manual” operating mode
A I6 // I6 as a signal triggering T3
L 1s // Timer 3 setting to blinking mode (pulse length: 1s)
SL T3
A T3
=Q3
//Switching the signal lamp on for the „Closing” operating mode
O M2 // M4 Marker is set if motion was detected
O M3 // at any of the sides in any of the modes
= M4
A M4
L 200ms
SD T1
//Delay of 200ms generated by T1 Timer in
//Single Pulse mode
A T1 //Setting the M6 auxiliary Marker after 200ms from
S M6 //triggering – actuation of any of the motion sensors
A T1 //Checking after 200ms if a sensor at any of the sides detects motion
A M4
R M5 //Determination of door movement direction – opening
NEED Programmable Relay – User’s Manual ver. 1.5EN
191
Sample applications
A M6 //Entrance door motor operation
AN I3 //until the actuation of I3 sensor
= M16
A M6 // Entrance door motor operation
AN I4 // until the actuation of I3 sensor = M15
O M15 //Turning the door motor on or off
O M16
=Q2
A I3 //Triggering the T2 Timer operating in the Delayed On mode
L 5s //i.e. setting a „fixed” door opening time
SD T2
R M6 //Resetting M6 Marker
A T2 //Setting M5 auxiliary Marker
AN M4
S M5
A M5 //Turning Q1 off once
AN I4 //the limit position signaled by I4 is reached
=Q1
A I7 //Manual door closing – movement – button pressed
A M13
S Q1
S Q2
AN I7 //Manual mode –stop.
A M13
R Q1
R Q2
A M13 //Manual opening of the door – movement – button pressed
A I8
S Q2
NEED Programmable Relay – User’s Manual ver. 1.5EN
192
Sample applications
LAD
I1
M1
Detection of
actuation of any of
the motion sensors
I2
M1
I5
M2
Setting Auto
mode
I1
I6
M3
Setting
Closing mode
I5
I6
I6
M13
Setting Manual
mode
T3
SL
Triggering of T3
Timerin Pulse mode
1s
T3
1s.000ms
Q3
M2
M4
Blinking of the
lampconnected to
Q3
Motion detection
inClosing and
Auto modes
M3
M4
T1
SD
0s.200ms
T1
T1
M6
S
M4
M5
R
NEED Programmable Relay – User’s Manual ver. 1.5EN
Timer start in Delayed On
mode triggering and unstable
operationof the opening
mechanism
after the motion has been
detected)
Setting the M6 auxiliary
Marker after T1 Timer is
turned on
Checking, after 200ms if a
sensor at any of the sides
detects motion.
193
Sample applications
M6
I3
M16
M5
I4
M15
M15
Turning the door motor
limit position on or off
depending on the
Q2
M16
I3
M6
R
Starting T2 Timer in Single Pulse
mode – setting “fixed” door opening
time
T2
SD
5s.000ms
T2
M4
M5
Setting the M5 auxiliary Marker
M5
I4
Q1
Turning Q1 off once the limit position
signalized by I4 is reached
I7
M13
Q1
S
Manual door opening - movement
button pressed
Q2
S
M13
I7
Q1
R
Manual mode of the door -stop
Q2
R
I8
M13
Q2
S
NEED Programmable Relay – User’s Manual ver. 1.5EN
Manual opening of the door - movement
button pressed
194
Sample applications
N
Out
I_in
L
N
Out
I_out
L
N
L N
Out
I_open
L
B2
N
Out
I_close
L
L
N
I1
I2
N
I1 I2
I3
I4
I5
I3 I4
I6
I7
I5 I6
I8
Open
Close
END
AUTO
Manual
L N
I7 I8
MODE
RUN/STOP
115-230V AC INPUT 8xAC
M
NEED
Q1
Q2
Q3
Q_close
Q4
OUTPUT 4xRELAY/10A
Q1
Q2
Q3
Q4
Q_alarm
N
L
Q_motor
L1
L2
L3
Fig. 10.2.2. Sample electric connection diagram to control the automatic door operation.
NEED Programmable Relay – User’s Manual ver. 1.5EN
195
Sample applications
10.3. School bells
Quite frequently timers/clocks are installed at schools, plants to actuate specific devices
(bells, alarms, heaters etc.) at pre-selected times. By using the NEED programmable relay
you can create your own simple time control system which is better adapted to the local
requirements and needs.
Task description:
Create a “bell-ringing” system based on the below class schedule
Class
Class 1
Class 2
Class 3
Class 4
Class 5
Class 6
Class 7
Class 8
Duration
8.00 a.m. – 8.45 a.m.
8.50 a.m.– 9.35 a.m.
9.40 a.m.– 10.25 a.m.
10.35 a.m.– 11.20 a.m.
11.50 a.m.– 12.35 p.m.
12.45 p.m.– 1.30 p.m.
1.40 p.m.– 2.25 p.m.
2.35 p.m. – 3.20 p.m.
Break bell
On- start
Off-start
8.45 a.m. 8.46 a.m.
9.35 a.m. 9.36 a.m.
10.25 a.m. 10.26 a.m.
11.20 a.m. 11.21 a.m.
12.35 p.m. 12.36 p.m.
1330 p.m. 1.31 p.m.
2.25 p.m. 2.26 p.m.
3.20 p.m. 3.21 p.m.
Class bell
On-start
Off-start
8.49 a.m. 8.50 a.m.
9.39 a.m. 9.40 a.m.
10.34 a.m. 10.35 a.m.
11.49 a.m. 11.50 a.m.
12.44 p.m. 12.45 p.m.
1.39 p.m. 1.40 p.m.
2.34 p.m. 2.35 p.m.
3.29 p.m. 3.30 p.m.
Equipment selection:
1) Select an appropriate panel with buttons to allow manual bell control and turning the
bells off at preset periods e.g. during winter/summer holidays, Christmas holidays, on
Saturdays etc.
Let’s assign the name as follows:
• Manual mode switch – “I_manual” (only “manual bell ringing” available in that
mode).
• Automatic switch mode – “I_auto”.
• Button to turn the bell on in the manual mode – “I_on”.
2) NEED programmable relay: 3 inputs, 1 output.
Program
Equipment configuration:
Address
I1
I2
I3
Inputs
„I_manual”
„I_auto”
„I_on”
Address Outputs
Q1
„Q_bell”
Algorithm
To turn the bell on and off Clocks will be used in the below configuration:
NEED Programmable Relay – User’s Manual ver. 1.5EN
196
Sample applications
Clock 1
Clock 2
NEED Programmable Relay – User’s Manual ver. 1.5EN
197
Sample applications
Clock 3
Clock 4
There is one inconvenience that must be pointed out. The Clocks can be adjusted with 1
minute accuracy. So how to handle bells of durations of e.g. 7 seconds only? (one minute
ringing time is too long). The Timer in Single Pulse mode can be used to allow the
adjustment of the ringing times. Methods to enable and disable the bell are presented in Fig.
10.3.2.
NEED Programmable Relay – User’s Manual ver. 1.5EN
198
Sample applications
T1
H1,H2,H3,H4
Q1
Time value (up to 25.5s)
settable using the potentiometer
Fig. 10.3.1 Bell control method.
Of course, the Potentiometer allow only a rough setting of time values but it gives fairly
satisfying results in determination of bell-on times. This means that outputs of H1, H2, H3
and H4 clocks are on for a period of 1 minute (the shortest duration which can be set for the
Clocks). The Clocks trigger Timer 1 (time value to be measured, adjustable using the
Potentiometer) which in turn sets the Q1 output. Fig. 10.3.2 illustrates the method of
“shaping” the bell-on times.
H1or H2 or H3 or H4
60 s
T1
Time setting
using the potentiometer
t1
t2
t3
Q1
Fig. 10.3.2. Time „shaping” method.
NEED Programmable Relay – User’s Manual ver. 1.5EN
199
Sample applications
STL
O H1
O H2
O H3
O H4
L Pot x100ms
SE T1
// Enabling H1 or,
// enabling H2 or,
// enabling H3 or,
// enabling H4
//results in triggering T1 Timer in Single Pulse mode
//with duration time adjusted with the Potentiometer
//AUTO mode
A I2
//If the AUTO mode is selected the bell operates normally
A T1
=Q1
//Manual mode
A I1
//If the Manual mode is selected the bell responds to
A I3
//I3 button being pressed – turning the bell on
S Q1
A I1
AN I3
R Q1
// If the Manual mode is selected the bell responds to
// I3 button being depressed – turning the bell off
NEED Programmable Relay – User’s Manual ver. 1.5EN
200
Sample applications
LAD
H1
T1
SE
Pot x100ms
H2
Triggering of T1
Timer in Single
Pulse mode
H3
H4
I2
T1
I1
I3
I1
I3
Q1
If AUTO mode is
selected the bell
operates normally
Q1
S
If Manual mode is selected
the bell responds to I3 button
being pressed - turning the bell on
Q1
R
If Manual mode is selected
the bell responds to I3 button
being depressed - turning the off
NEED Programmable Relay – User’s Manual ver. 1.5EN
201
Sample applications
L N
B2
L
N
I1
I2
N
I1 I2
I3
I4
I_ręczny
I_auto
I_włącz
P3
I5
I3 I4
I6
I7
I5 I6
I8
MODE
I7 I8
STOP/RUN
115-230V AC INPUT 8xAC
NEED
Q1
Q2
Q3
Q4
OUTPUT 4xRELAY/10A
Q1
Q2
Q3
Q4
N
L
Fig. 10.3.3. Sample electric connection diagram for school bell control.
NEED Programmable Relay – User’s Manual ver. 1.5EN
202
Sample applications
10.4. Fault detection
The manufacturing process very often requires detection of faulty parts. NEED
programmable relay can be used to compose a simple and cheap system to control the
quality of the parts manufactured.
Hole detection
sensor
Parts
Part detection
sensor
Sensor for
counting the
terminals
UL
A
F
TY
OK
Fig. 10.4.1. Faulty part detection.
Task description
Create a system to enable checking small parts (openings in the transistor housings and the
numbers of terminals). Once a faulty part is detected it must be separated from the remaining
ones.
Equipment selection:
1) To detect the hole a pair of optical sensors (transmitter and receiver) are necessary.
The number of transistor terminals can be counted by a laser sensor of small light
spot diameter. Also a sensor to detect the transported part can be added as this will
greatly simplify our program.
2) Separator can be a pulse solenoid valve-controlled cylinder (on sending a control
signal to one electromagnet coil the valve remains in its position also after the signal
has faded, until a signal is sent to the other coil) on which e.g. mechanical partitions
will be installed to deflect the flow of faulty parts
3) NEED programmable relay: 3 inputs and 2 outputs.
NEED Programmable Relay – User’s Manual ver. 1.5EN
203
Sample applications
Algorithm
Occurrence of a part (sensor is enabled) on the transporting line should trigger the sensor for
counting the terminals. The hole in the transistor housing should be checked at the same
time.
Program:
Equipment configuration:
Address
I1
I2
Inputs
Sensor to detect the hole in the
transformer housing
Sensor to count the terminals
I3
Sensor to detect the part
Address
Q1
Q2
Outputs
Separator position:
OK
Separator position:
FAULTY
STL
A I3
= M1
R M3
//Part presence detection, saving the state of
//I3 sensor to M1
//Resetting the „Part OK” Marker – this allows the partition
//to remain in place and not to be shifted
//each time a part occurs
A M1
A I1
S M2
//Checking the opening (if a part is present)
A I2
L C#3
CU C1
//Setting C1 Counter to count 3 terminals
//of the transistor
AN M1
A M2
A C1
S M3
/Checking the presence of the opening and if the three terminals
//of the transistor have been counted when the part
//was no longer „seen” by I3 sensor
//Setting „Part OK” Marker
A M3
S Q1
R Q2
//If the transistor is OK the partition is shifted to release
//the flow in direction of good parts
AN M1
AN M3
R Q1
S Q2
/If the transistor is faulty the partition is shifted to release
/ the flow in direction of faulty parts
AN M1
R M2
R C1
/Resetting auxiliary Markers and C1 Counter
NEED Programmable Relay – User’s Manual ver. 1.5EN
204
Sample applications
LAD
I3
M1
M3
Part presence
detection
R
M1
I1
I2
M2
S
C1
CU
C#3
M1
M2
C1
M3
S
M3
Checking the
opening in the
part
Triggering of
C1Counter
to count the number
of transistor's
terminals
Setting M3
Marker for a
good part
Q1
S
Q2
R
M1
M3
Q2
S
Q1
R
M1
Directing the
flow towards
good parts
Directing the
flow towards
faulty parts
M2
R
Resetting auxiliary
Markers and C1
Counter
C1
R
NEED Programmable Relay – User’s Manual ver. 1.5EN
205
Sample applications
N
Czujnik
Sensordotodetekcji
detect
otworu w obudowie
the hole in the
tranzystora
Out
transistor housing
L
N
Sensor to count
the number of
Out
Czujnik liczący
terminals
wyprowadzenia
L
N
L N
Sensor to detect
the part
Out
Czujnik detekujący detal
L
B2
L
N
I1
I2
N
I1 I2
I3
I4
I5
I3 I4
I6
I7
I5 I6
I8
I7 I8
MODE
RUN/STOP
115-230V AC INPUT 8xAC
NEED
Q1
Q2
Q3
Q4
OUTPUT 4xRELAY/10A
Q1
Q2
Valve coil to control
the cylinder - position:
OK
Q3
Q4
Valve coil to control
the cylinder - position:
FAULTY
N
L
Fig. 10.4.2. Sample electrical connections for fault detection in parts
NEED Programmable Relay – User’s Manual ver. 1.5EN
206
Sample applications
10.5. Control of the travel of cars in the bend of the belt conveyor
Task description.
Transferring the cars from one side of the belt conveyor to the other one. The operation is
performed by a turntable driven by M1 motor.
Only one car can be on the turntable at a time.
Next car cannot be placed on the turntable raceway if the previous one has not left it or the
belt conveyor flight is full (cars queuing around the bend).
Additionally, the cars can be removed when in the bend but they have to be returned.
To perform the task several control components will be necessary which are demonstratively
presented in Fig. 10.5: sensors (inputs) - I1 and I2, outputs (Q1, Q2 and Q3).
Connect the sensors’ outputs to the programmable relay inputs as follows:
I1 input – inductive sensor to detect a car (230V AC PNP)
I2 input - inductive sensor to detect a queue and the transfer of a car to the other side of the
belt conveyor (230 V AC PNP).
Q1 output – coil of the solenoid valve which controls the S1 pneumatic cylinder (230V AC).
Q2 output – starting up M1 motor
Q3 output – lamp to signal if the number of cars put on the conveyor is equal to the number
of those coming off the conveyor
Belt conveyor
CAR
1
Sensor 2
(inductive)
Queue
I2
M
I1
Sensor 1
(inductive)
Car
2
Metal part
detectable
by the sensor
Driving motor
M1
Q1
Interlocking
Fig. 10.5.1. Controlling the belt conveyor bend.
NEED Programmable Relay – User’s Manual ver. 1.5EN
207
Sample applications
Sensor 1
Sensor 2
L
N
L
Out
L
Out
B1
N
N
L
N
I1
I2
N
I1 I2
I3
I4
I5
I3 I4
I6
I7
I5 I6
I8
I7 I8
RUN/STOP
MODE
115-230V AC INPUT 8xAC
NEED
Q1
Q2
Q3
Q4
OUTPUT 4xRELAY/10A
Q1
S1
Q2
M1
Q3
Q4
X1
L
N
Fig. 10.5.2. Controlling the belt conveyor bend – electrical diagram
Below please find programs written in LAD and STL languages. Numbers in the first column
are used to designate individual program loops in order to compare LAD and STL records.
They are not parts of the program.
In the normal STL notation spaces between the instructions are not necessary, however they
improve the clarity of the program. Additionally, comments can be entered to allow the
analysis (tracking) of the program and facilitate later modifications.
NEED Programmable Relay – User’s Manual ver. 1.5EN
208
Sample applications
LAD program
I1
I2
M1
1
S
M1
M2
T1
I1
2
SD
SF
200mS
3
T1
Q1
Q1
I1
M1
4
M2
S
M2
6
M2
Car release operation is marked – car is in
the turning area.
M1
The car has exited the turning area –
actuation of I2 input („Queue” sensor)
results in resetting of the Markers of the
previous operations. The car control
program is ended at this point; the 4
remaining lines provide information on the
number of the cars coming on and off the
turntable raceway. Once the car has exited
the queue sensor the conditions of the first
line of the program are met.
M2
R
C1
SD
CU
7
Car interlock is released (power is supplied
to Q1 solenoid valve coil ) for a period equal
to the duration of I1 sensor „on” state +
200ms.
Power is supplied to the turntable raceway
motor only when there is a car to be
transferred
R
M8
Time necessary to release the car (open the
interlock) is set. The time is the state of I1
input (car sensor) plus 200 ms.
Q2
5
I2
If a car is present (the “Car” sensor is on I1 input) and there is no queue around the
bend (I2 input is off) then the M1 Marker is
set – car to be transferred.
C#1
M8
Setting C1 Counter to value 1.
The instruction is executed only once after
power is turned on – when the value of M8
is 0. The Counter is loaded with value 1 (as
a counter-up). The Counter is ready for use.
R
M2
C1
8
SD
CU
9
C#1
C1
SD
CD
I2
C#1
C1
10
NEED Programmable Relay – User’s Manual ver. 1.5EN
Q3
After setting the M2 Marker (car is allowed
on the turntable raceway) – the state of car
Counter is increased by 1.
Once I2 input is enabled the car Counter
state is decreased by 1.
If the car C1 Counter state is equal to or
higher than 1 the Q3 output is enabled
because the value preset for C1 is 1. X1
lamp is on is the car is being turned.
209
Sample applications
STL program
1
2
3
4
5
6
7
A I1
AN I2
S M1
A M1
AN M2
A I1
L 200mS
SF T1
A T1
= Q1
AN Q1
AN I1
A M1
S M2
A M2
= Q2
A I2
A M2
R M1
R M2
AN M8
L C#1
CU C2
S M8
8
A M2
L C#1
CU C2
9
A I2
L C#1
CD C2
10
A C2
= Q3
If a car is present (the “Car” sensor is on - I1 input) and there is no
queue around the bend (I2 input is off) then the M1 Marker is set – car
to be transferred.
Time necessary to release the car (open the interlock) is set. The time
is the state of I1 input (car sensor) extended by 200 ms
M1 and M2 Markers prevent the Timer to be triggered again if another
car appears at I1 sensor (M1) and before the car has left the turning
area (M2).
Car interlock is released (power is supplied to Q1 solenoid valve coil )
for a period equal to the duration of I1 sensor „on” state + 200ms.
Car release operation is marked – car is in the turning area.
Power is supplied to the turntable raceway motor only when there is a
car to be transferred.
The car has exited the turning area – actuation of I2 input („Queue”
sensor) results in resetting of the Markers of the previous operations.
The car control program is ended at this point; the 4 remaining lines
provide information on the number of the cars coming on and off the
turntable raceway. Once the car has exited the queue sensor the
conditions of the first line of the program are met..
Setting C2 Counter to value 1.
The instruction is executed only once after power is turned on – when
the value of M8 is 0. The Counter is loaded with value 1 (as a counterup). The Counter is ready for use. M8 is set to 1 which ensures that,
until the power is off the circuit (6) will have no impact on the program
operation.
After setting the M2 Marker (car is allowed on the turntable raceway)
– the state of car Counter is increased by 1.
Once I2 input is enabled the car Counter state is decreased by 1.
If the car C2 Counter state is equal to or higher than 1 the Q3 output
is enabled because the value preset for C1 is 1. X1 lamp is on is the
car is being turned.
Remarks to the program
The initial situation (before the program in the programmable relay is started) is as follows.
The S1 INTERLOCK cylinder (controlled by Q1 solenoid valve) is permanently extended.
Once the programmable relay is turned on (START) the states of circuit inputs and outputs
are checked. Further, the program instructions are executed line by line, description: see
remarks in the table above.
NEED Programmable Relay – User’s Manual ver. 1.5EN
210
Sample applications
10.6. Lighting and ventilation controller
Task description
The aim of the presented system is to control the lighting of e.g. an office, manufacturing
plant, shop etc. It is often the case that, when leaving the house, we forget to switch off the
unnecessary lighting or to switch on the so-called night lighting system, necessary for
security purposes to protect the facility. Additionally, the signaling LEDs located in the
programmable relay provide information on the circuits being on and the operation of the
buttons.
The system allows to centrally turn the power on/off (manually or automatically) at preset
time or e.g. after turning on/off of an external alarm system.
L N
B1
P
1
L
N
I1
I2
P
2
P
3
N
I1 I2
I3
I4
I5
P
4
P
5
I3 I4
I6
I7
I8
P
6
P
7
I5 I6
I7 I8
MODE
RUN/STOP
115-230V AC INPUT 8xAC
NEED
Q1
Q2
Q3
Q4
OUTPUT 4xRELAY/10A
Q1
Q2
Q3
Q4
L N
B2
OL1
Motor
switch
OL2
B3
M
Fan
motor
N
L
Fig. 10.6.1. Connection diagram
NEED Programmable Relay – User’s Manual ver. 1.5EN
211
Sample applications
Execution
To switch the system on momentary-on switches will be used i.e. switches which conduct
current only when pressed. As they are programmable they can be used in such a way that
when pressed for the first time they will turn the circuit on, and the circuit will be turned off
once the switches are pressed again. Additional switch (with two stable conditions) allows to
change the operating mode from manual to automatic or the other way round. When in
manual mode the system does not respond to central switching off.
The use of the programmable relay makes the operation convenient, allows energy savings
and provides possibilities to modify the system without changes in the system. The solution
presented shows how flexibly any room lighting can be “shaped”.
The system shown in Fig. 10.6. includes the following components:
P1 – emergency switch contact
P2 – operating mode switch
P3, P4 – L1 lamp circuit switches
P5 – L2 lamp circuit switch
P6 – alarm system contact (independent alarm system)
P7 – fan switch (momentary-on type)
I7 input – supply voltage control
Q1 – OL1 circuit control
Q2 – OL2 circuit control
Q4 – fan motor on-switch
Operation:
Opening of the P1 contact disables all output circuits
P2 open – manual mode, P2 closed – automatic mode
P3 or P4 – first pressing turns the Lamp Circuit 1 on, another pressing turns it off
P5 – the same as P3 and P4 (but for Lamp Circuit 2)
P6 – contact providing the external alarm system arming status
P7 – switching the fan on/off
In manual mode the lighting is switched on/off by the alarm system contact or according to
the Clock settings or using P3, P4, P5 buttons.
In manual mode only P3, P4, P5 buttons are operational.
The exhaust fan operates in the preset times.
The figure below illustrates a sample configuration of the Clock set to operate daily from
Monday to Friday between 7 a.m. and 3:15 p.m.
Fig. 10.6.2. Clock configuration
NEED Programmable Relay – User’s Manual ver. 1.5EN
212
Sample applications
Program in LAD
I3
M1
Response to buttons connected to I3
input.
Change in button state causes a change
in the state of the M1 Marker.
I5
M2
Response to buttons connected to I5
input.
Change in button state causes a change
in the state of the M2 Marker.
Power on at preset time – for lamp circuit
1 in auto mode.
Actuating pulse of the length of 200ms –
pulse contact simulation – ON state only
during the triggering.
1
2
I2
H1
3
T1
SE
200ms
H1
I2
4
SE
I6
5
T3
H2
200ms
T2
SE
200ms
6
H2
200ms
T1
M1
S
8
T3
9
NEED Programmable Relay – User’s Manual ver. 1.5EN
Power off for lamp circuit 2 – disabling
pulse of the duration of 200ms.
End of the lamp circuit 2 operation.
Response to the pulse set in Pos. 3 Single
forced turn-on of M1 and, consequently,
Q1 output controlling the lamps 1. Such a
solution does not prevent switching of Q1
by I3.
Response to the pulse set in Pos. 4.
Single resetting of M1 and, consequently,
Q1 output which controls the lamps 1.
M1
R
M1
Preset time-power on for lamp circuit 2.
Actuating pulse of the duration of 200ms pulse contact simulation - ON state only
during the triggering (leading edge at H2).
Start of the L2 circuit operation.
T4
SE
7
Power off at preset time or using the
contact – alarm system armed – for lamp
circuit 1 in auto mode – disabling pulse of
the duration of 200ms.
If I2 input is on (auto) T3 disabling pulse is
generated
Controlling the output directly via M1 – the
Marker depends on the I3 input and is
reset by the time circuit (H1) and the
alarm contact.
Q1
213
Sample applications
T2
M2
10
S
T4
M2
R
11
M2
Q2
I8
M8
12
13
I2
Q1
T5
SD
14
Response to the pulse set in Pos. 5.
Single forced turn-on of M2 and,
consequently, enabling the Q2 output
controlling the lamps 2. Such a solution
does not prevent switching of Q2 by I5.
Response to the pulse set in Pos. 6.
Single resetting of M2 and, consequently,
resetting the Q2 output which controls the
lamps 2.
Controlling the output directly via M2 – the
Marker depends on the I5 input and is set
and reset by the time H2 Clock.
Response to the button connected to I8
input.
Change in button state causes a change
in the state of the M8 Marker
Setting the delay, if the automatic
operation and the lamp 1 circuit are on,
then the fan is actuated with delay.
10s
T5
T6
SE
15
Pulse actuating the fan – the delay set in
Pos. 14 is over.
200ms
T6
16
S
T3
17
18
M8
M8
R
M8
Q4
I1
Q1
R
19
A1
Q2
R
Q4
Single setting of M8 in reaction to the
enabling pulse of T6 set in the previous
circuit (Pos. 15).
Resetting the M8 Marker if the time of T3
has elapsed or the alarm is switched on
(Pos. 4) in auto mode.
Direct fan control via M8 Marker (i.e. via I8
button) but also enabling the automatic
operation by H1 Clock and switching off
after the operation is over (H1=OFF) or if
the alarm was armed before I6=ON.
Protection of circuits. If the contact
connected I1 is open then the Q1, Q2 and
Q4 outputs are interlocked – off (contacts
open). Additionally, through the use of A1
Comparator the outputs will be
disconnected if the mains voltage is higher
than the preset one (according to the
equipment configuration – the calibration
value for I7).
R
NEED Programmable Relay – User’s Manual ver. 1.5EN
214
Sample applications
1
// Turn on/off circuit 1 - buttons
A I3
FP M1
Response to buttons connected to I3 input.
Change in button state causes a change in the state
of the M1 Marker .
2
// Turn on/off circuit 2 - button
A I5
FP M2
Response to buttons connected to I5 input.
Change in button state causes a change in the state
of the M2 Marker.
// Auto power on at preset time
// Circuit L1 – actuating pulse
A I2
A H1
L 200ms
SE T1
Power on at preset time – for lamp circuit 1 in auto
mode.
Actuating pulse of the length of 200ms – pulse
contact simulation – ON state only during the
triggering.
3
4
// Power off at preset time or using the
//alarm system
// L1 circuit in auto mode
AN H1
O I6
= M10
A I2
A M10
L 200ms
SE T3
5
6
7
8
9
// Power on at preset time
// L2 circuit - actuating pulse
A H2
L 200ms
SE T2
// Power off at preset time
// L2 circuit
AN H2
L 200ms
SE T4
// Circuit 1 power on
A T1
S M1
// Circuit 1 power off
A T3
R M1
// Q1 output
O M1
= Q1
NEED Programmable Relay – User’s Manual ver. 1.5EN
Power off at preset time or using the contact – alarm
system armed – for lamp circuit 1 in auto mode –
disabling pulse of the duration of 200ms.
M10 –logical sum of the off time (H1) and I6 –
someone armed the alarm system before.
If I2 input is on (auto) T3 disabling pulse is
generated.
Power on at preset time for lamp circuit 2. Actuating
pulse of the duration of 200ms - pulse contact
simulation - ON state only during the triggering -> H2
= 1.
Start of the L2 circuit operation.
Power off for lamp circuit 2 – disabling pulse of the
duration of 200ms.
End of the lamp circuit 2 operation
Response to the pulse set in Pos. 3 Single forced
turn-on of M1 and, consequently, Q1 output
controlling the lamps 1. Such a solution does not
prevent switching of Q1 by I3
Response to the pulse set in Pos. 4. Single resetting
of M1 and, consequently, Q1 output which controls
the lamps 1.
Controlling the output directly via M1 – the Marker
depends on the I3 input and is reset by the H1 Clock
and the alarm contact.
215
Sample applications
10
// Circuit 2 power on
A T2
S M2
Response to the pulse set in Pos. 5. Single forced
turn-on of M2 and, consequently, enabling the Q2
output which controls the lamps 2. Such a solution
does not prevent switching of Q2 by I5
Response to the pulse set in Pos. 6. Single resetting
of M2 and, consequently, resetting the Q2 output
which controls the lamps 2.
11
// Circuit 2 power off
A T4
R M2
12
// Q2 output
A M2
= Q2
13
// P8 button on
// - Fan
A I8
FP M8
Response to the button connected to I8 input.
Change in button state causes a change in the state
of the M8 Marker
Setting the delay, if the automatic operation and the
lamp 1 circuit are on, then the fan is actuated with
delay.
14
// Power on - Fan
// Setting the delay
A I2
A Q1
L 10s
SD T5
15
16
17
// Actuating pulse
A T5
l 200ms
SE T6
// Fan auto power on
A T6
S M8
// Fan power off
// automatically at preset time or using
the alarm
A T3
R M8
Controlling the output directly via M2 – the Marker
depends on the I5 input and is set and reset by the
H2 Clock.
Pulse actuating the fan – the delay set is over.
Single setting of M8 in reaction to the enabling pulse
of T6 set above (Pos. 15).
Single resetting of the M8 Marker if the time of H1
has elapsed or the alarm is switched on (Pos. 4) in
auto mode
18
// Q4 output
A M8
= Q4
Direct fan control via M8 Marker (i.e. via I8 button)
but also automatic enabling the operation by H1
Clock and switching off after the operation is over
(H1=OFF) or if the alarm was armed before I6=ON
19
// Protection/disabling
AN I1
O A1
R Q1
R Q2
R Q4
Protection of circuits. If the contact connected to I1
input is open then the Q1, Q2 and Q4 outputs are
interlocked – off (contacts open). Additionally,
through the use of A1 Comparator the outputs will be
disconnected if the mains voltage is higher than the
preset one (according to the equipment configuration
– the calibration value for I7).
NEED Programmable Relay – User’s Manual ver. 1.5EN
216
Sample applications
Remarks to the program
The example above is only one of the possible uses of the NEED programmable relay which
is to show the application of various instructions e.g. the FP function allows the natural use of
momentary-on switches as light switches.
The use of the internal clock provides a number of possibilities to control the circuits in a
time-based manner. The use of the analogue input allows to protect the controlled circuits
against the effects of wrong supply voltages (provided that the executive circuits are supplied
from the same phase as the power supply of the programmable relay).
NEED Programmable Relay – User’s Manual ver. 1.5EN
217
Sample applications
10.7. Load control
Task description
By taking advantage of the analogue input capabilities it is possible to quite precisely control
the power consumed by a load and provide adequate response once the consumption level
is exceeded e.g. cutting off the load from the power source. It gives a possibility to easily
supplement the control system of e.g. a staircase lighting, with a feature which allows the
protection of the system from uncontrolled power consumption (theft). Additionally, if so
composed the power consumption limiter cannot be set to a higher power consumption level
without software modifications.
The presented program can constitute a part of a comprehensive staircase or corridor
lighting solution; the following components can be connected to the spare inputs: button
switches, external door opening sensor, electromagnet lock opening signal transmitted via
door entry system network. Additionally, through the use of the integrated clock/calendar
some features can be made dependent on the time of the day or the day of the week.
B1
n2=10
L
Tr1
N
n1=1
L
N
I1
I2
N
I1 I2
I3
I4
I5
I3 I4
I6
I7
I5 I6
I8
MODE
I7 I8
RUN/STOP
115-230V AC INPUT 8xAC
NEED
Q1
Q2
Q3
Q4
OUTPUT 4xRELAY/10A
Q1
Q2
Q3
Q4
X2
X1
L
N
Fig. 10.7. Electric connection diagram.
NEED Programmable Relay – User’s Manual ver. 1.5EN
218
Sample applications
For simplification purposes let’s assume that an additional current transformer component
will be used to convert the main circuit current to a proportional voltage. The higher the
power consumption the higher the voltage on the secondary side. Bearing in mind the
equipment limitations we know that the power of up to 2300W can be controlled (I=10A,
Uz=230V AC).
If assumed that the current of 10A corresponds to the voltage of 100V in the secondary
winding, the current of e.g. 5A can be set by entering the value of 50 as standard value. The
built-in Potentiometer can be used instead to be set manually to the desired value. Q1 output
can be controlled according to the current consumed through the use of the A2 analogue
Comparator feature (I7 >= standard value). Once the set level is exceeded (I7>=50V) the
output disconnects the load which is signaled by Q2 output. Re-actuation can be done after
10 seconds from the cut-off (the time is adjustable).
STL program
1
AN M5
L 2S
SE T1
S M5
2
3
4
5
6
7
AN T1
A M5
A A2
= M2
A A2
L 10s
SF T2
AN T1
A M2
AN T2
= Q1
AN Q1
R M5
Relay power on. Input function of the time necessary for load stabilization
(T1 Timer – 2 seconds), M5 Marker means a program start.
M2 Marker is set if the time necessary for the first enabling of the load has
elapsed and the load current is not exceeded (A2 = ‘1’).
Locking time for the output if the allowed current level has been exceeded.
Controlling the output which enables the load. The output is on after 2
seconds from the power-on (T1) or depending on the M2 Marker (current
control). The output is locked by the time delay enabling (T2) once the A2
comparison condition is exceeded (current value exceeded).
Output is off – the control program starts from the beginning.
Signal output – on, if the load is disconnected.
A T2
AN Q1
=Q2
Additional ”automatic step system” – setting the on-time at 30 seconds.
A I1
L 30s
SE T5
Additional ”automatic step system” – lamp control by Q4.
8
A T5
= Q4
Remark to the program:
Please note that the M5 Marker cannot be set as remanent in the configuration –its state
should not be “remembered” after power-on.
NEED Programmable Relay – User’s Manual ver. 1.5EN
219
Sample applications
LAD program
T1
M5
1
SD
SE
2s
Relay power on. Input function of the
time necessary for load stabilization
(T1 Timer – 2 seconds), M5 Marker
means a program start.
M5
S
2
3
T1
M5
A2
A2
M2
T2
M2 Marker is set if the time necessary
for the first enabling of the load has
elapsed and the load current is not
exceeded (A2 = ‘1’).
Locking time for the output if the
allowed current level has been
exceeded.
SF
10 s
4
5
T1
M2
T2
Q
1
Q1
M5
R
6
7
T2
Q1
I1
Controlling the output which enables
the load. The output is on after 2
seconds (T1) or depending on the M2
Marker (current control). The output is
locked by the T2 Timer.
Output is off – the control program
starts from the beginning.
Q2
Signal output – on, if the load is
disconnected.
T5
Additional ”automatic step system” –
setting the on-time at 30 seconds.
SD
SE
30s
8
T5
Q4
Additional ”automatic step system” –
lamp control by Q4.
Remarks to the program
Circuits 1..6 refer to the diagram presented in Fig. 10.7. Circuits 7 and 8 show further
application possibilities for spare inputs/outputs in arrangement of a simple system to timecontrol a staircase lighting.
NEED Programmable Relay – User’s Manual ver. 1.5EN
220
Sample applications
10.8. Three-phase motor control and protection
Task description
The purpose of the presented system is to control a motor and monitor the parameters of the
power supply network for a low power 3-phase motor. By using the NEED 230AC-x1-16-8
relay we can handle starting/cutting-off the 3-phase motor, control the power supply
parameters and if required switch over to backup power supply without any additional
components.
Start
Stop
Back. Sup.
P2
P1
L
I1
N
N
I1 I2
I2
I3
I4
I5
P3
I3 I4
I6
I7
I5 I6
I8
I9
I7 I8
I10
I11 I12
I9 I10 I11 I12 I13
I13
I14 I15
I14
I16
I17
I15
I18
MODE
I16
RUN/STOP
230V AC INPUT 16xAC
NEED-230AC-01-16-8R
Q1
Q2
Q3
Q4
Q5
Q6
Q7
Q8
OUTPUT 8xRELAY/10A
Q1
Q2
Q3
Q4
Q5
Supply
Q6
Q7
Q8
L1
N
L2
L1
L3
L2
PE
L3
Back-up
supply
PE
M1
X1
R
3~
Fig. 10.8.1. Electrical connections diagram.
The motor is started/cut-off with the START / STOP buttons. The “Backup power” switch
makes it possible to choose the mode of operation:
- switched off – in the event of a power supply network problem the motor will be cut off.
- switched on - in the event of a power supply network problem the motor will continue to
run on backup power supply and will automatically revert to the main power, if the power
supply parameters are within the required limits.
the relay’s built in functionality makes it possible to implement a power supply network
monitoring relay, satisfying the following functionalities:
a) Monitoring of voltage levels of individual phases (minimum - Umin and maximum
power supply voltage - Umax)
b) Phase sequence monitoring
c) Phase loss monitoring
d) Asymmetry monitoring – Uasym
NEED Programmable Relay – User’s Manual ver. 1.5EN
221
Sample applications
The aforementioned parameters can be freely configured in the program settings.
You can set the minimum and maximum voltage separately for each phase, as well as the
minimum and maximum asymmetry level. Modifying the program we can give up the
monitoring of selected parameters, it is not essential for the controlled system.
The STL program
The program is comprised of three parts:
1. Definition of relay type
2. Definition of symbolic names
3. Control program (Source code)
// Relay type
1 .DEVICE="230AC-X1-16-8"
2 // Symbolic variables
.DEFINE A1_L1min=A1
.DEFINE A2_L2min=A2
.DEFINE A3_L3min=A3
.DEFINE A4_L1max=A4
.DEFINE A5_L2max=A5
.DEFINE A6_L3max=A6
.DEFINE A7_Asym=A7
.DEFINE A8_Asym=A8
.DEFINE I1_Zal_rez=I1
.DEFINE I2_START=I2
.DEFINE I3_STOP=I3
.DEFINE M1_Umin=M1
.DEFINE M2_Umax=M2
.DEFINE M3_Uzas=M3
.DEFINE M4_Asym=M4
.DEFINE M5_Zas_OK=M5
.DEFINE M6_ZALACZ=M6
.DEFINE Q1_R=Q1
.DEFINE Q2_Sygn=Q2
.DEFINE Q3_L1=Q3
.DEFINE Q4_L2=Q4
.DEFINE Q5_L3=Q5
.DEFINE Q6_L1rez=Q6
.DEFINE Q7_L2rez=Q7
.DEFINE Q8_L3rez=Q8
.DEFINE T1_Opozn=T1
.DEFINE T2_sygn=T2
// Program
3 A %A1_L1min
A %A2_L2min
A %A3_L3min
= %M1_Umin
A
A
A
=
%A4_L1max
%A5_L2max
%A6_L3max
%M2_Umax
A %M1_Umin
A %M2_Umax
= %M3_Uzas
NEED Programmable Relay – User’s Manual ver. 1.5EN
The M1 marker is set, when the voltage of
each phase is higher than Umin.
The M2 marker is set, when the voltage of
each phase is lower than Umax.
The M3 marker is set, if the phase voltages
are within set limits.
222
Sample applications
3 A %A7_Asym
A %A8_Asym
= %M4_Asym
The M4 marker is set if the asymmetry voltage
does not exceed Uasym.
A %M3_Uzas
A %M4_Asym
A MDIR
SD %T1_Opozn // 1.00s
The T1 timer is started if phase voltages,
asymmetry and sequence are correct
The M5 marker is set, if the controlled
parameters are stable during a predefined
delay time.
A %T1_Opozn
= %M5_Zas_OK
A %I2_START
A %M5_Zas_OK
S %M6_ZALACZ
The M6 marker is set after the START button,
if the power supply parameters are correct. It
is cleared by the STOP button or if the power
supply parameters are incorrect and backup
power supply is not enabled.
A(
ON %I3_STOP
O(
AN %I1_Zal_rez
AN %M5_Zas_OK
)
)
R %M6_ZALACZ
Q1 output – on, if power supply parameters
are correct
A %M5_Zas_OK
= %Q1_R
A
A
A
=
=
=
Motor start on.
Q3, Q4, Q5 outputs – switching on phases L1,
L2, L3 respectively to the motor
%M6_ZALACZ
%M5_Zas_OK
%I3_STOP
%Q3_L1
%Q4_L2
%Q5_L3
A(
O %I1_Zal_rez
ON %M5_Zas_OK
)
AN %M5_Zas_OK
A %M6_ZALACZ
= %Q6_L1rez
= %Q7_L2rez
= %Q8_L3rez
SL %T2_sygn // 0.50s
Failover to backup power supply. Q6, Q7, Q8
outputs – enabling backup power supply
(phases L1rez, L2rez, L3rez respectively) to
the motor.
The T2 timer in SL mode generates pulses for
the Q2 output
A %T2_sygn
= %Q2_Sygn
Q2 output - backup power on signal - toggles
on/off 0.5s/0.5s.
The LAD program
1
A1
A2
A3
M1
A4
A5
A6
M2
NEED Programmable Relay – User’s Manual ver. 1.5EN
The M1 marker is set, when the
voltage of each phase is higher
than Umin.
223
Technical specifications
2
3
The M2 marker is set, when the
voltage of each phase is lower
than Umax.
The M3 marker is set, if the phase
voltages are within set limits.
4
The M4 marker is set if the
asymmetry voltage does not
exceed Uasym.
5
The T1 timer is started if phase
voltages, asymmetry and
sequence are correct
6
The M5 marker is set, if the
controlled parameters are stable
during a predefined delay time.
7
The M6 marker is set after the
START button, if the power supply
parameters are correct. It is
cleared by the STOP button or if
the power supply parameters are
incorrect and backup power supply
is not enabled.
8
9
NEED Programmable Relay – User’s Manual ver. 1.5EN
Q1 output – on, if power supply
parameters are correct
Motor start on.
224
Technical specifications
10
M6
M5
I3
Q3
Q3, Q4, Q5 outputs – switching on
phases L1, L2, L3 respectively to
the motor
Q4
Q5
I1
M5
M6
Q6
11
Q7
M5
Failover to backup power supply.
Q6, Q7, Q8 outputs – enabling
backup power supply (phases
L1rez, L2rez, L3rez respectively) to
the motor.
The T2 timer in SL mode generates
pulses for the Q2 output
Q8
T2
SD
SL
0.5s
T2
Q2
12
Q2 output - backup power on signal
- toggles on/off 0.5s/0.5s.
The LAD program may also use symbol names (similar to STL).
If the symbols are assigned to the registers and the view is switched to the symbol names,
then the symbol name will be visible instead of the register name. Below is an example for
the first line.
A1_L1min
A2_L2min
A3_L3min
1
NEED Programmable Relay – User’s Manual ver. 1.5EN
M1_Umin
The M1 marker is set, when the
voltage of each phase is higher than
Umin.
225
Technical specifications
Settings
The parameters of the power supply network are controlled through the I14, I15, I16 analog
inputs.
The minimum Umin and maximum Umax voltages for each phase are set in A1..A6
comparators, respectively:
A1: AI14 >= 200V
A2:
A3:
A4:
A5:
AI15 >= 200V
AI16 >= 200V
AI14 <= 240V
AI14 <= 240V
A6: AI14 <= 240V
Fig. 10.8.1. The comparator settings.
For all phases the minimum voltage is set as 200 V and the maximum voltage as 240V. They
are, of course, freely configurable.
The A7 and A8 comparators are used for setting the minimum and maximum asymmetry
voltage, 0..10V.
A7: ASYM >= 0V
A8: ASYM <= 10V
Additionally you can set the delay time of the T1 timer, i.e. the minimum time of stability of
correct network parameters and the T2 signaling pulses time.
NEED Programmable Relay – User’s Manual ver. 1.5EN
226
Technical specifications
11. TECHNICAL SPECIFICATIONS
General data
Relay description
NEED..-x1-08-4R
NEED..-x1-16-8R
Use
Supply voltage
NEED-230AC-x1-..
NEED-220DC-x1-..
NEED-24DC-x1-..
NEED-12DC-x1-..
Installation:
Location
Mounting
Operating location
Installation
6 AC digital inputs
2 analog- digital inputs
4 NO digital relay outputs
Real time clock,
13 AC digital inputs
3 analog- digital inputs
8 NO digital relay outputs
Real time clock,
Fast counter
Three phase network control
In LV systems
95V ÷ 260V AC, 50Hz/60Hz
154V – 242V DC
19.6V ÷ 28.8V DC
10.2V ÷ 14.4V DC
Any
On a 35mm wide mounting bar
or 2 screws Ø 4mm
In a control cabinet, system switchgear
conforming with EN 61131-2
The device can be mounted only by a person
qualified in fitting electrical systems
1×2.5mm2
2×1mm2
Maximum tightening torque of the connection 0.6Nm
terminals
Standards conformity
PN-EN 61131-2
Connecting wires
Certificates
Size:
NEED..-x1-08-4R:
Width
Length
Height
Weight
NEED-..-x1-16-8R:
Width
Length
Height
Weight
NEED Programmable Relay – User’s Manual ver. 1.5EN
CE, B UL, VDE, GOST
72mm
90mm
55mm
210g
132mm
90mm
55mm
370g
227
Technical specifications
Environment and mechanical conditions and requirements
Operating temperature
From -20°C to +55°C
Relative humidity
10-95% non condensing
Atmospheric pressure
795hPa up to 1080hPa
Contamination level
2
Vibrations allowed in operating conditions
(PN-EN 60068-2-6)
Shocks (PN-EN 60068-2-27)
5Hz to 9Hz (fixed amplitude of 3.5mm)
9Hz to 150Hz (fixed acceleration of 1g)
6 shocks (half-sinusoid 15g/11ms)
Flat and supported drop
(PN-EN 60068-2-31)
100mm, 2 tests
30°, 2 tests
Storage transportation temperature
-40°C to +70°C
Free fall (PN-EN 60068-2-32):
product in transportation packaging
product in sale packaging
1000mm
300mm
Safety requirements
Rated insulation resistance
300V AC
Rated surge voltage
2 500V
Overvoltage category
Class II
Enclosure protection class (PN-EN 60529)
IP 20
Fire rating (UL94)
V0
NEED Programmable Relay – User’s Manual ver. 1.5EN
228
Technical specifications
EMC Requirements
Radiated interference emission (EN 55011)
NEED..-x1-08-4R
NEED..-x1-16-8R
Conducted interference emission (EN 55011)
NEED..-x1-08-4R
Boundary value class A, group 1
Boundary value class B, group 1
Boundary value class A, group 1
NEED..-x1-16-8R
Boundary value class B, group 1
Resistance to electrostatic discharge (EN 61000-4-2) 8kV – airborne discharge,
4kV – surface discharge,
Susceptibility to radio frequency electromagnetic
fields (EN 61000-4-3)
10V/m,
80MHz – 1 000MHz
800MHz – 960MHz
1.4GHz – 2.0GHz
A series of fast electrical transient states (EN 610004-4):
NEED-230AC-x1-..
2kV – power leads
2kV – signal wires
NEED-220DC-x1.., NEED-24DC-x1.., NEED-12DCx1-..
High energy surge (EN 61000-4-5):
NEED-230AC-x1-..
power supply port
2kV – power leads
1kV – signal wires
input circuit ports
2kV – asymmetric signal
1kV – symmetric signal
2kV – asymmetric signal
1kV – symmetric signal
NEED-220DC-x1.., NEED-24DC-x1-.., NEED-12DCx1-..
power supply port
1kV – asymmetric signal
0.5kV – symmetric signal
input circuit ports (unshielded lines)
Resistance to radio frequency interference
NEED Programmable Relay – User’s Manual ver. 1.5EN
0.5kV – asymmetric signal
0.5kV – symmetric signal
3V
26 – 80MHz
229
Technical specifications
Power supply circuit
Power supply voltage:
NEED-230AC-x1-..
rated value
operating range
115V / 230V AC, 60Hz/50Hz
95V – 260V
NEED-220DC-x1-..
rated value
operating range
220V DC
154V – 242V DC
NEED-24DC-x1-..
rated value
operating range
24V DC
19.6V – 28.8V DC
NEED-12DC-x1-..
rated value
operating range
Rated current (for high states on all inputs and
outputs)
NEED-230AC-x1-08-4R
NEED-220DC-x1-08-4R
NEED-24DC-x1-08-4R
NEED-12DC-x1-08-4R,
12V DC
10.2V – 14.4V DC
19mA
15mA
70mA
120mA
NEED-230AC-x1-16-8R
NEED-220DC-x1-16-8R
NEED-24DC-x1-16-8R
NEED-12DC-x1-16-8R,
Max. power consumption:
NEED-230AC-x1-08-4R
NEED-220DC-x1-08-4R
NEED-24DC-x1-08-4R
NEED-12DC-x1-08-4R
40mA
26mA
160mA
260mA
NEED-230AC-x1-16-8R
NEED-220DC-x1-16-8R
NEED-24DC-x1-16-8R
NEED-12DC-x1-16-8R
Higher harmonics in the power supply signal
NEED-230AC-x1-..
< 10VA
< 6W
< 5W
< 5W
Current protection in the power supply circuit
NEED-24DC-x1-.., NEED-12DC-x1-..
Current protection in the power supply circuit
NEED-230AC-x1-.., NEED-220DC-x1-..
Resistance to slow and fast power supply voltage
change
Power stoppages (EN 61131-2)
Real time clock maintenance
NEED Programmable Relay – User’s Manual ver. 1.5EN
< 5VA
< 3W
< 3W
< 3W
< 10% of the voltage value of the
fundamental component
500mA
Protection against change of polarity
600mA
PN-EN 61131-2
20ms
64h in T=+25°C
24h in T=+55°C
230
Technical specifications
Specification of input circuits
Digital inputs type (EN 61131-2)
Type 1 (current receiving inputs)
Quantity
NEED..-x1-08-4R
8 (I1-I8)
NEED..-x1-16-8R
16 (I1-I16)
Visualization of logical status
LED diodes
Rated voltage:
NEED-230AC-x1-08-4
for the logical state of ‘1’
for the logical state of ‘0’
85V – 260V
0V – 40V
NEED-230AC-x1-16-8
for the logical state of ‘1’
for the logical state of ‘0’
85V – 260V
0V – 32V
NEED-220DC-x1-..
for the logical state of ‘1’
for the logical state of ‘0’
80V – 260V
0V – 40V
NEED-24DC-x1-..
for the logical state of ‘1’
for the logical state of ‘0’
15 – 40V
-3V – 5V
NEED-12DC-x1-..
for the logical state of ‘1’
for the logical state of ‘0’
Input current for the logical state of ‘1’:
8V – 26V
-1.5V – 4V
NEED-230AC-x1-08-4 (for 230V AC)
0.6mA (I1 – I4)
8.0mA (I5 – I6)
0.9mA (I7 – I8)
NEED-220DC-x1-08-4 (for 220V DC)
0,6mA (I1 – I6)
1,1mA (I7 – I8)
NEED-24DC-x1-08-4 (for 24V DC)
3.3mA (I1 – I6)
2.0mA (I7 – I8)
NEED-12DC-x1-08-4 (for 12V DC)
3.3mA (I1 – I6)
1.1mA (I7 – I8)
NEED-230AC-x1-16-8 (for 230V AC)
0.6mA (I1 – I11)
8.0mA (I12 – I13)
1.5mA (I14 – I16)
NEED-220DC-x1-16-8 (for 220V DC)
0,6mA (I1 – I13)
1,1mA (I14 – I16)
NEED-24DC-x1-16-8 (for 24V DC)
3.3mA (I1 – I13)
2.0mA (I14 – I16)
NEED Programmable Relay – User’s Manual ver. 1.5EN
231
Technical specifications
NEED-12DC-x1-16-8 (for 12V DC)
3.3mA (I1 – I13)
1.1mA (I14 – I16)
Input impedance:
NEED-230AC-x1-08-4
I1 – I4
I5 – I6
I7 – I8
NEED-230AC-x1-16-8
I1 – I11
I12 – I13
I14 – I16
NEED-220DC-x1-08-4
I1 – I6
I7 – I8
400kΩ
28.75kΩ
200kΩ for the positive half-wave
400kΩ for the negative half-wave
400kΩ
28.75kΩ
200kΩ for the negative half-wave
400kΩ for the negative half-wave
400kΩ
200kΩ
NEED-220DC-x1-16-8
I1 – I13
I14 – I16
400kΩ
200kΩ
NEED-24DC-x1-08-4
I1 – I6
I7, I8
7,44kΩ
12,36kΩ
NEED-24DC-x1-16-8
I1 – I13
I14 – I16
7,44kΩ
12,36kΩ
NEED-12DC-x1-08-4
I1 – I6
I7, I8
3,65kΩ
10,92kΩ
NEED-12DC-x1-16-8
I1 – I13
I14 – I16
3,65kΩ
10,92kΩ
NEED-24DC-x1-16-8, NEED-12DC-x1-16-8
I14 – I16 in the current range
49Ω
Maximum delay time for transition from the
logical state of ‘0’ to ‘1’:
NEED-230AC-x1-..
Contact rebound elimination ON
Contact rebound elimination OFF
60ms
20ms
NEED-220DC-x1-..,NEED-24DC-x1-..,
NEED-12DC-x1-..
Contact rebound elimination ON
Contact rebound elimination OFF
21ms
0.20ms + program cycle time
Maximum delay time for transition from the
NEED Programmable Relay – User’s Manual ver. 1.5EN
232
Technical specifications
logical state of ‘1’ to ‘0’:
NEED-230AC-x1-..
Contact rebound elimination ON
Contact rebound elimination OFF
60ms
20ms
NEED-220DC-x1-.., NEED-24DC-x1-..,
NEED-12DC-x1-..
Contact rebound elimination ON
Contact rebound elimination OFF
21ms
0.25ms + program cycle time
Rated insulation resistance
300V AC
Galvanic separation:
from power supply voltage
mutual
from outputs
no
no
yes
Maximum allowed lead length (the L and
signal leads run together):
NEED-230AC-x1-08-4:
for digital inputs I1 – I4
for digital inputs I5 – I6
for digital inputs I7 – I8
10m
100m
10m
NEED-230AC-x1-16-8:
for digital inputs I1 – I11
for digital inputs I12 – I13
for digital inputs I14 – I16
10m
100m
10m
NEED-220DC-x1-..
10m
NEED-24DC-x1-.., NEED-12DC-x1-..
100m
Output circuits specification
Digital outputs type (EN 61131-2)
Relay type – NO contacts, w/o protection
(AC digital outputs supplying a current)
Quantity
NEED-..-x1-08-4R
4
NEED-..-x1-16-8R
Visualization of logical status
8
LED diodes
Parallel connection of outputs for improving
load capacity
External protection of the output circuit
not allowed
16A (installation switch B16)
Rated load current in AC1 category
10A AC
Rated load voltage in AC1 category
250V AC
NEED Programmable Relay – User’s Manual ver. 1.5EN
233
Technical specifications
Minimum contact current
10mA
Minimum contact voltage
10V
Contact resistance
<100mΩ
Total output current (EN 61131-2)
NEED-..-x1-08-4R
NEED-..-x1-16-8R
Rated insulation resistance
reinforced
basic
Contact gap test voltage
40A (4x10A)
80A (8x10A)
300V
between inputs and outputs
between outputs
1 000V AC
Operating time
7ms
Recovery time
3ms
Max. connection frequency
at rated load (AC1 category)
600 cycles/h
w/o load
72,000 cycles/h
Contact life
in AC1 category
depending on the T time constant
(L/R=40ms)
>0.7×10⁵ (10A 250V AC)
>105 (0.15A 220V DC)
Mechanical life
Galvanic separation:
from supply voltage
from digital inputs
PC connector and the memory card
3×10⁷ connection cycles
yes
yes
yes
Specification of analog input circuits
Input type
Analog inputs
Quantity:
NEED-..-x1-08-4
2 (I7 – I8)
NEED-..-x1-16-8
Input type
NEED-230AC-x1..
NEED-220DC-x1.., NEED-24DC-x1..,
NEED-12DC-x1..
NEED-24DC-x1-16-8, NEED-12DC-x1-16-8
Input impedance:
NEED-230AC-x1-08-4
I7 – I8
NEED-230AC-x1-16-8
I14 – I16
NEED-220DC-x1-08-4
I7 – I8
NEED Programmable Relay – User’s Manual ver. 1.5EN
3 (I14 – I16)
voltage, alternating signal
voltage, fixed signal
current, fixed signal
200kΩ for the positive half-wave
400kΩ for the negative half-wave
200kΩ for the negative half-wave
400kΩ for the negative half-wave
200kΩ
234
Technical specifications
NEED-220DC-x1-16-8
I14 – I16
200kΩ
NEED-24DC-x1-08-4
I7 – I8
12,36kΩ
NEED-24DC-x1-16-8
I14 – I16
12,36kΩ
NEED-12DC-x1-08-4
I7 – I8
10,92kΩ
NEED-12DC-x1-16-8
I14 – I16
10,92kΩ
NEED-24DC-x1-16-8, NEED-12DC-x1-16-8
I14 – I16 in the current range
Range of input signals:
NEED-230AC-x1-..
NEED-220DC-x1-..
NEED-24DC-x1-..
NEED-12DC-x1-..
NEED-24DC-x1-16-8
NEED-12DC-x1-16-8
Input current:
NEED-230AC-x1-08-4 (for 230V AC)
NEED-220DC-x1-08-4 (for 220V DC)
NEED-24DC-x1-08-4 (for 24V DC)
NEED-12DC-x1-08-4 (for 12V DC)
NEED-230AC-x1-16-8 (for 230V AC)
NEED-220DC-x1-16-8 (for 220V DC)
NEED-24DC-x1-16-8 (for 24V DC)
NEED-12DC-x1-16-8 (for 12V DC)
Conversion time
Digital resolution:
NEED-230AC-x1-..
NEED-220DC-x1-..
NEED-12DC-x1-08-4 (voltage range)
NEED-12DC-x1-16-8 (voltage range)
NEED-24DC-x1-08-4 (voltage range)
NEED-24DC-x1-16-8 (voltage range)
NEED-12DC-x1-16-8 (current range)
NEED-24DC-x1-16-8 (current range)
Maximum allowed sustained overload:
NEED-230AC-x1-..
NEED-220DC-x1-..
NEED-24DC-x1-..
NEED-12DC-x1..
NEED Programmable Relay – User’s Manual ver. 1.5EN
49Ω
0V - 255V AC
0V - 255V DC
0V - 25.5V DC
0V - 14.4V DC
0 – 51mA (in the current range)
0 – 51mA (in the current range)
0.9mA
1,1mA
2.0mA
1.1mA
1.5mA
1,1mA
2.0mA
1.1mA
1ms
1V AC
1V DC
0,1V
0,1V or 0,05V
0,1V
0,1V or 0,05V
0,2mA or 0,1mA
0,2mA or 0,1mA
300V AC
300V DC
40V DC
26V DC
235
Technical specifications
Analog input error:
Maximum error in 25°C
NEED-230AC-x1-..
NEED-220DC-x1-..
NEED-24DC-x1-.., NEED-12DC-x1-..
±3% of the measuring range
±2% of the measuring range
±2% of the measuring range
Crosstalk between channels
36dB
Nonlinearity
±3%
Lead length (shielded)
40m
Galvanic separation:
from power supply voltage
from digital inputs
from digital inputs
from the programming connector
no
no
yes
no
Central unit and memory
User program memory capacity
NEED..-x1-08-4
862 bytes
NEED..-x1-16-8
835 bytes
Type of memory available
EEPROM
Programming languages (EN 61131-3)
Text (STL)
Graphical (LAD)
Program resources
NEED..-x1-08-4:
Markers
Timers
Timer Accuracy
Counters (counting up/down)
Counted values
Comparators
Number of possible comparison operations
Weekly clock
Real time clock,
Real time clock accuracy
NEED..-x1-16-8:
Markers
Timers
Timer Accuracy
Counters (counting up/down)
Counted values
Comparators
Number of possible comparison operations
Weekly clock
Real time clock,
Real time clock accuracy
NEED Programmable Relay – User’s Manual ver. 1.5EN
16
8
±1% of the set value + (0 - 1)ms
8
0-65535
8
10
4×4 channels
1
±3 s/day
16
16
±1% of the set value + (0 - 1)ms
8
0-65535
12
22
4×4 channels
1
±3 s/day
236
Technical specifications
Remanence:
Clock upkeep time
Markers
Counters
Timers
64h (in 25°C)
24h (in 40C°)
M1 – M16
C5 – C8
T5 – T8
External memory card
Connector description
NEED-M-1K (type A connector)
Two-row connector
NEED-M-1KB (B type connector)
One-row connector
Dimensions (length × height × depth)
30mm x 11mm x 5mm
Weight
2g
Memory type
EEPROM
Memory capacity
1KB
Connector interface type
I2C
Dedicated cable
Connector description
NEED-PC-15A (type A connector)
Two-row connector
NEED-PC-15B (type B connector)
One-row connector
NEED-PC-15C (type B connector)
Cable length
One-row connector
2m
Weight
100g
Connection method:
with the PC:
NEED-PC-15A/15B
NEED-PC-15C
with the relay
Cable type:
NEED-PC-15A/15B
NEED-PC-15C
Digital data transmission speed
NEED-PC-15A/15B
NEED-PC-15C
Data validation
NEED Programmable Relay – User’s Manual ver. 1.5EN
9 pin D-Sub
USB
dedicated port
RS 232
USB
19200bit/s
1,5Mbit/s
checksums
237
Glossary
12. GLOSSARY
Cycle time
– processing time of all program instructions
Password
– protection against copying of the program present in the controller
memory
Memory card
– external memory of the programmable relay from which the program
can be transferred to the internal memory of the relay
Compilation
– checking of the program correctness and generation of a code
comprehensible to the programmable relay processor
Configuration
– setting of appropriate parameter values for the programmable relay
LAD
– graphic language for relay programming
Counter
– logical element of internal relay resources, used in the control counting
functions of the program
Program loading
– writing the compiled program from the PC to the programmable relay
memory
Program memory – storage area of the relay dedicated for writing the control program by
the user
Program
– record of a specified control process using a suitable programming
language
Programmable relay – relay equipped with inputs (contacts), outputs (coils) and
programmable logical resources incl. memory
RUN
– one of the relay operating modes in which the program is normally
processed
STL
– text relay programming language
STOP
– one of the relay operating modes in which the program is not executed
by the relay – relay outputs are cut off
Timer
– logical element of the relay internal resources used in program for
performance of time control functions
Trigger
– input actuating the time measurement by the Timers
Input
– physical relay input for connecting external signals coming from
sensors, contacts etc.
Analogue input
– physical relay input for connecting analogue signals
Output
– physical relay output for connecting controlled devices: lamps,
contactors, solenoid valves etc.
Remanent resources
– logical elements of the relay which „remember” their state after
power off
NEED Programmable Relay – User’s Manual ver. 1.5EN
238
Glossary
Clock
– logical element of the relay internal resources used in program
for performance of control functions utilizing real time
Marker
– logical element of the relay internal resources used in program
for performance of control function
NEED Programmable Relay – User’s Manual ver. 1.5EN
239
Index
12. INDEX
=, statement, 89
AND -A, 78
AND NOT -AN, 81
AND NOT( -AN(, 81
AND( -A(, 78
ASYM, 65
Bolt fixing, 15
CD, Counter instruction, 97
Clock instructions, 101
Clocks, 49
CLR, instruction, 112
Comparator, comparisons, 64
Configuration, Clock, 51
Connection, analogue inputs, 22, 24
Connection, digital inputs, 17, 20, 21
Connection, inputs, 25
Connection, outputs, 28
Connection, power supply, 29, 31
Counters, 47
Counters, inputs, 47
Counters, number of pulses to be counted,
47
Counters, output, 47
CU, Counter instruction, 96
Editor, LAD, 145
Examples, applications, 183
External memory, 179
files, types, 155
Fixing to the DIN mounting rail, 14
FP, statement, 90
Input delay, 174
Installation, 128
Instructions for analogue inputs, 102
LAD, 113
LAD, Counters, 121
LAD, inputs, 114, 118
LAD, network, 115
LAD, outputs, 114, 119
LAD, program, 115
LAD, rules, 123
LAD, Timers, 120
LOAD – L,, 103
Markers, 39
MDIR marker, 40
Memory Programming, 180
Memory, copying, 182
Memory, partitions, 180
Menu, 136
Menu, description, 137
operation, CD Counter, 48
Operation, Clock, 50
Operation, CU Counter, 48
Operation, SD Timer, 91
NEED Programmable Relay – User’s Manual ver. 1.5EN
Operation, SD Timer, 44
Operation, SE Timer, 45
Operation, SF Timer, 92
Operation, SF Timer, 45
Operation, SL Timer, 46
Operation, Timer SE, 93
Operation, Timer SL, 94
OR NOT( -ON(, 85
OR -O, 82
OR( -O(, 83
Output delay, 178
PC connection, 128
Potentiometer, 69
Power supply, 169
Preview of variables, 161
Program cycle, 32
Project, 129
Quick counter, 48
Real time clock,, 63
Relay resources, 34
Remanences, 70
Reset -R, 89
S, statement, 89
SE, Timer instruction, 93
SET, instruction, 111
Settings, 155
Settings, Clocks, 158
Settings, Comparators, 159
Settings, Counters, 158
Settings, input delays, 160
Settings, Remanences, 159
Settings, Timers, 157
SF, Timer instruction, 92
SL, Timer instruction, 94, 95
Start-up, 168
STL, 74
Symbols, Comparator, 64
Symbols, digital control outputs, 38
Symbols, digital inputs, 36
Symbols, digital pulse outputs, 37
Symbols, digital resetting outputs, 38
Symbols, digital setting outputs, 38
Symbols, inverted digital control outputs,
39
Symbols, LAD, 113, 116
Symbols, Markers, 39
Symbols, normal digital outputs, 37
Symbols, SD Timer – delayed activation,
44
Symbols, SE Timer – Single pulse, 45
Symbols, SF Timer – Delayed activation,
45
Symbols, SL Timer - Pulses, 46
240
Index
Terminals, cables - types, 16
Timer, inputs, 43
Timer, outputs, 44
Timer, time ranges, 43
Timer, time to be measured, 43
Timers, 43
Tools, 136
NEED Programmable Relay – User’s Manual ver. 1.5EN
Type, designation, 9
Uninstalling, 128
XOR NOT -XN, 87
XOR NOT( -XN(, 88
XOR -X, 86
XOR( -X(, 86
241