1
Digitronics Software User's
Guide
Formerly the “Terminal User's Guide”
March, 1994
This manual is an introduction to the use of Digitronics Software
applications on OpenVMS systems. It gives the beginning user
enough information to access the computer system and begin using
application programs.
Digitronics Software
420 West Lambert Road, Suite G
Brea, CA 92821
(714) 255-1312 (Voice)
(714) 255-9685 (FAX)
This material is proprietary to Digitronics Software and is not to be reproduced or disclosed except in
accordance with the product license or upon written authorization of Digitronics Software.
The information in this document is subject to change without notice and must not be construed as a
commitment by Digitronics Software. Digitronics Software reserves the right to change the
specifications of the product described herein at any time and without notification.
Digitronics Software has taken reasonable precautions to ensure the accuracy of the material contained in
this manual. However, Digitronics Software assumes no responsibility for any errors or omissions that
may appear in this manual.
Copyright © 1987-94 by Digitronics Software. All Rights Reserved
Contents
1 Preparing to Access the System ............................................................................................1–1
1.1 Getting to know your Workstation .................................................................................................1–1
1.2 Getting ready to access the system .................................................................................................1–2
2 Logging in, Logging out, and Maintaining Security.............................................................2–1
2.1 Logging in ......................................................................................................................................2–1
2.2 Logging Out ...................................................................................................................................2–3
3 Using the System.....................................................................................................................3–1
3.1 Running Programs ..........................................................................................................................3–1
3.1.1 Working at the system prompt..............................................................................................3–2
3.1.2 Working with menus ............................................................................................................3–2
3.2 Working with Screen Applications.................................................................................................3–4
3.2.1 Operating sequence ..............................................................................................................3–4
3.2.2 Using keyboard editing functions in screen applications......................................................3–5
3.3 Running Report Programs ..............................................................................................................3–6
3.4 Getting help or more information ...................................................................................................3–9
3.4.1 Using DOCCRT .................................................................................................................3–10
3.4.2 Getting Information about Menu Items ..............................................................................3–10
3.4.3 Getting help while in a screen application..........................................................................3–11
3.4.4 Tutorial Help ......................................................................................................................3–11
3.5 Changing your Password ..............................................................................................................3–12
3.6 Selecting Fiscal Year and School .................................................................................................3–14
4 Communicating with other users...........................................................................................4–1
4.1 Using MAIL ...................................................................................................................................4–1
4.1.1 Sending a message................................................................................................................4–1
4.1.2 Receiving a message.............................................................................................................4–2
4.1.3 Getting help with MAIL .......................................................................................................4–3
4.2 Using PHONE ................................................................................................................................4–3
4.2.1 Calling Someone ..................................................................................................................4–3
4.2.2 Answering a call...................................................................................................................4–4
4.2.3 Rejecting a call.....................................................................................................................4–4
5 Working with Files ...................................................................................................................5–1
5.1 What is a file?.................................................................................................................................5–1
5.2 Your Directory ...............................................................................................................................5–2
iii
Contents
5.3 Creating files ..................................................................................................................................5–2
5.3.1 Print files ..............................................................................................................................5–2
5.3.2 Creating your own files ........................................................................................................5–2
5.3.3 Gifts......................................................................................................................................5–3
5.4 What can you do with them? ..........................................................................................................5–3
5.4.1 Typing a file .........................................................................................................................5–3
5.4.2 Deleting a file .......................................................................................................................5–3
5.4.3 Copying Files .......................................................................................................................5–4
5.4.4 Renaming Files.....................................................................................................................5–4
5.5 Purging Accumulated Versions of Files .........................................................................................5–5
6 Using Color ..............................................................................................................................6–1
iv
Preface
Objectives
This manual is an introductory guide to using Digitronics Software application products on VAX and AXP
computer systems. It gives the new user enough information to access the OpenVMS system and begin
using application programs.
Intended Audience
The Digitronics Software User's Guide is suitable for any user who is new to Digitronics products, or
OpenVMS, or both. It addresses the needs of both end users and data processing professionals whose
duties require them to work with our products.
Prerequisite Reading
This manual presumes no prior knowledge of OpenVMS or Digitronics software products.
Structure of this Document
Associated Documents
For more information about the OpenVMS system, consult various volumes of the OpenVMS
Documentation Set. For the most part, the VMS documentation is geared toward programmers, operators,
system managers and other trained data processing staff.
The following Digitronics Software manuals contain information which might be of interest to you:
v
Contents
•
Secondary School Site Administrator's Guide
•
Elementary School Site Administrator's Guide
•
Student Services Educational Application (SSEA) Reports Reference Manual
Summary of Technical changes
None; this is a new manual.
Acknowledgments
The following are trademarks of Digitronics Software: SSEA, DFMS, VFMS, DS/DIALER, DS/BPS
The following are trademarks of Digital Equipment Corporation: AXP, Alpha AXP, DEC, OpenVMS, and
VAX.
The use of trademarks or registered trademarks in this manual, even when not specifically identified as
such, must not to be construed to mean that those trademarks or registered trademarks may be used freely
by anybody.
vi
1
Preparing to Access the System
The computer system you will be using is one of the VAX series, manufactured by Digital Equipment
Corporation (DEC). The VAX is a multi-user system, meaning that a single VAX computer can
simultaneously serve the needs of many people (unlike most PCs, which are single-user systems).
1.1 Getting to know your Workstation
Depending on how your system is configured, you will be using some or all of the following equipment to
access the VAX:
Video terminal: this device has a screen to display information coming from the VAX, and a
keyboard for you to type on.
Personal computer (PC): With a communications software package, the keyboard and screen of your
PC can substitute for those of a video terminal.
Modem: lets you access the VAX over ordinary telephone lines, instead of having a permanent
connection.
Printer: You may have a local printer directly attached to and under the control of your terminal or
PC.
Whenever your terminal is turned on, or your PC communications software is loaded and running, a visible
marker called a cursor appears on the screen to indicate where the next character you type will go. The
cursor is usually in the form of either a block or an underline, and may be steady or blinking (on a PC, do
not confuse this cursor with the arrow-shaped mouse cursor, which might also be visible on the display).
On many terminals and PC communications packages, you can select the cursor appearance you prefer; we
suggest the blinking block format because it is easiest to spot on a crowded display.
All video terminal and PC keyboards—or at least those made specifically for use in the USA—have the
familiar standard “QWERTY” layout of letter and number keys. Keys for symbols are scattered around the
edges of this main cluster in arrangements that differ slightly from manufacturer to manufacturer.
If you haven't worked with a computer or terminal keyboard before, some of the keys may be unfamiliar to
you, and others may work slightly differently from the corresponding typewriter keys. Here's a list of keys
you should pay particular attention to:
LOCK This key is like the shift-lock key on a typewriter, but usually affects only the letters on PC and
terminal keyboards. It is sometimes labeled “ALPHA LOCK” or “CAPS LOCK” to emphasize
this fact.
1–1
Preparing to Access the System
Getting ready to access the system
If you're on a PC, watch out for this twist: while LOCK is in effect, holding SHIFT down while
typing letters produces lowercase letters.
CONTROL Usually located somewhere on the left side of the alphanumeric cluster, this key may also
be labeled “Ctrl” or “Cntl”. The CONTROL does nothing by itself: in use, it is always held down
while another key is pressed. CONTROL combinations are used to send commands to the VAX.
The notation CONTROL + X means to hold down the CONTROL key while pressing X.
ALT This key is found on PC keyboards. Like SHIFT and CONTROL, it only works when held down
while pressing another key. ALT key combinations are used to control features of some
communications packages.
HELP, F2, PF2 When working with a screen, you can press HELP to get some information about the
field in which your cursor is located.
Many video terminal keyboards, as well as most PC keyboards, do not have a HELP key. On
these, the F2 (or PF2) key serves as the HELP key.
SELECT, ESC The SELECT is located in the editing cluster, which is the middle grouping of keys.
It is used to perform special functions in some screens.
On keyboards without a SELECT key, you can use the ESC key in place of SELECT.
←, →, ↑, ↓ These keys are usually located off to the right of the main keyboard cluster, typically
grouped in the shape of a diamond or an upside-down “T”). They are used to move the cursor
around a screen.
1.2 Getting ready to access the system
When you are ready to access the VAX system for the first time, your system manager will give you several
pieces of information that you will need. At the very least, you will receive a username and a secret
password. Basically, the username tells the system who you are, and the password proves that you are who
you say you are.
Keep your password secret: it is your protection against unauthorized people accessing the VAX under the
guise of your username! Here are a few tips to help make sure that your secret password stays secret:
•
NEVER write your password down.
•
NEVER reveal your password to anybody else except in the most extreme of circumstances.
•
Avoid choosing passwords that could be easily guessed by someone casually acquainted with you,
such as names of family members.
•
If you think that someone may have learned your password, change it immediately using the
procedure described in Section 3.5.
As an additional security measure, you will normally be required to select a new password the first time you
access the system, and also periodically thereafter.
Depending on your particular system setup, you might also need one or more of the following additional
pieces of information in order to access the system and log in:
1–2
Preparing to Access the System
Getting ready to access the system
Dial-up phone number: if you must manually connect dial-up calls, you will need the appropriate
telephone number. Treat dial-up numbers as confidential information.
Server password: a secret word that must be given before you can gain access to any of the services
offered by your computer network. It is usually required only for dial-up access. Treat server
passwords as confidential information.
Service name: You might need to select from among several services offered by your network.
Secondary password: a second password needed to log in to your computer account, and usually
known only to someone else (your supervisor, for example). Your system administrator will tell
you if a secondary password is in effect for your account.
1–3
2 Logging in, Logging out, and
Maintaining Security
This chapter gives you information about starting and ending a session with the computer.
2.1 Logging in
The process of establishing a session on the VAX is called logging in. Here is the step-by-step procedure :
1.
Get your equipment ready. If you are using a video terminal, turn on the power and give it a few
seconds to warm up. If using a PC, boot up as usual and start your communications software
running; your System Manager will give you specific instructions for your particular hardware and
software set-up.
2.
If you are accessing the system by dial-up, make the connection now. Your System Manager will
describe how to do this with the your particular equipment set-up.
If you are not using dial-up access, simply press ↵ several times to get the system's attention.
1.
If you see a pound-sign (#) prompt on your screen, enter the server password that your System
Manager gave you:
# SERVERPWD↵
↵
The password will not echo back to your screen as you type. Remember to press ↵ after entering the server
password.
If you entered the password incorrectly, another # will appear and you will be able to try again. After a
number of incorrect attempts (usually three), the server will disconnect you and hang up your phone
connection (if using dial-up).
1.
Next, you you may see an announcement message and an Enter username> prompt similar to
this example:
DECserver 200 Terminal Server V2.0 (BL29) - LAT 5.1
Please type HELP if you need assistance
2–1
Logging in, Logging out, and Maintaining Security
Logging in
Enter username>
If so, enter your username and press ↵.
1.
If you now see the prompt Local>, enter CONNECT (or CONN), a space, the service name that
your System Manager gave you, and press ↵:
Local> CONNECT STUDENT↵
↵
Local -010- Session 1 to STUDENT on node LARRY:: established
1.
You should now see a greeting message followed by a Username: prompt:
Welcome to OpenVMS V5.4
Username:
If not, press ↵ several times to get the computer's attention. If you still get no response after several tries,
contact your Data Processing department for help.
1.
Enter your username and press ↵ in response to the Username: prompt. A Password: prompt
will then appear. Enter your password and press ↵. No characters will appear on your screen
while you type your password—this prevents other people from seeing your password.
If a second Password: prompt appears, your account requires a secondary password. Have the person who
knows the secondary password (usually your supervisor) enter it, and press ↵.
When you have entered your username and password (and secondary password, if required) correctly, the
system will respond with several lines of messages, as in this example:
Welcome to OpenVMS V5.4-2
Username: MYNAME
Password: MYPASSWORD
ATTENTION ALL USERS:
System will be down Monday, 13-JUL-1992, from 6:00 PM to 8:00 PM
for scheduled maintenance.
Last interactive login on Tuesday, 19-MAY-1992 21:59
You have 1 new Mail message.
Some of these are messages (such as the one that starts out “ATTENTION ALL USERS… from your Data
Processing staff or system manager.
Pay particular attention to the “last interactive login” message: it tells you the date and time
that someone last logged in under your username. Check that the date and time shown are
reasonable for your computer usage patterns (remember that the time is in 24-hour format, so
3:00 PM is shown as 15:00). logins taking place at times that are not normal for you (for
example, late at night, on weekends, etc.), contact your System Manager immediately.
2–2
Logging in, Logging out, and Maintaining Security
Logging Out
1.
At this point, the system may display the following message:
Your password has expired; you must set a new password to log in
New password:
This means it's time for you to choose a new password. Select a new password and enter it in response to
the New password: prompt (remember, as always, to press ↵ your entry):
New password: MYNEWPASSWORD↵
↵
Nothing will echo back to your screen as you type your new password.
Next, the system will then prompt you to enter the new password again by displaying:
Verification:
Re-enter your new password, exactly as you typed it before, and press ↵:
Verification: MYNEWPASSWORD↵
↵
1.
If your account was set up to place you into a menu, the menu will appear, and the cursor will wait
near the bottom of the screen. Otherwise, a system prompt—usually a dollar sign ($)—will appear
at the left side of the screen, and the cursor will wait next to it. Either way, the system is now
ready to accept your commands.
2.2 Logging Out
At the end of your session, you must inform the computer that you are finished working. This process is
called logging out and has these purposes:
1.
It helps secure your terminal against unauthorized use. Anyone wishing to access the computer
through your terminal after you have logged out will have to log in with a valid username and
password.
2.
It releases system resources you held during your session, thus making those resources available to
other users.
3.
If you are being billed for your computer usage, logging out stops further accumulation of charges
against your account.
Complete your first VAX session by logging out as described below:
1.
If you are currently in a menu, return to the system prompt by entering the command EXIT↵.
2.
At the system prompt, enter LOGOUT↵:
$ LOGOUT↵
↵
MYNAME
logged out at 29-APR-1992 17:13:58.49
2–3
Logging in, Logging out, and Maintaining Security
Logging Out
1.
If you see Local> prompt, enter another LOGOUT↵ command to complete the logout process:
Local> LOGOUT↵
↵
If you are using dial-up access, your phone connection should terminate within a few seconds after you
complete your logout; your System Manager can tell you how to verify this with your particular equipment
set-up.
Always log out when you leave your terminal unattended, to prevent possible unauthorized
access by passers-by.
2–4
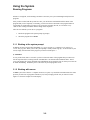
3
Using the System
Now that you know how to start and end a computer session by logging in and logging out, you are ready to
begin using the system to get real work done. This chapter introduces some of the basic procedures you
will be using in your daily routine:
•
How to run programs
•
How to use menus
•
How to work with screen forms
•
How to get help and information
•
Selecting different fiscal years and schools
And finally, although you should have already learned how to change your password by experience during
your first login, this important security feature is covered in detail.
3.1 Running Programs
A program is essentially a set of instructions directing the computer to perform a particular task. Programs
are the tools that get work done for you on the computer.
You will have access to a variety of programs that perform tasks related to your job responsibilities. Every
program has a short code name by which you refer to it. For example, the main student information screen
is STUCRT, a Brief Student Directory report is produced by STU01, ATT05 prepares the Monthly
Attendance report, and so on.
If these names seem a bit cryptic to you, rest assured that there is a method to the apparent madness. With
the exception of a few special cases, programs are named according to a systematic scheme in which each
name consists of two pieces:
•
The first half is a short (usually three letters) abbreviation that hints at the general application area
to which the program belongs. For example, programs that deal mainly with general student
information have names that start with STU…. Other examples include GRD… for grade
reporting, ATT… for attendance, and so on.
•
The second half is usually either “…CRT or a two-digit number. “…CRT” identifies a screen; a
number means a report or update program.
3–1
Using the System
Running Programs
Obscure as it might be, such a naming convention is necessary in a system containing literally hundreds
programs.
After you have worked with the system for a time, you will become comfortable with the names of the
programs that you use frequently. Eventually, you will even find it convenient to use program names in
conversation or writing when you want to refer to specific programs; after all, it's a lot easier to say
“SSS19” than “Listing of students without enough course requests”.
There are two methods you can use to a programs:
1.
Invoke the program at the system prompt ($ prompt)
2.
Select the program from a menu.
3.1.1 Working at the system prompt
In addition to being a useful verbal shorthand, every program name is a command to the computer to
execute that program. When you see the system prompt—usually a dollar sign ($)—at the left side of your
screen, simply enter the name of the program you want to run and press ↵:
$ STUCRT↵
↵
As easy as this looks, there is one catch: you have to know the name of the program that you want to run.
For the experienced user, working from the command line is an efficient and worthwhile choice. But if
you're just learning the system, that dollar sign and blinking cursor staring back at you from your screen can
be rather intimidating. Fortunately, there is an easier way to run programs: menus.
3.1.2 Working with menus
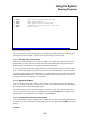
A menu is just a list of choices. Computer menus are, in spirit, very much like restaurant menus: the menu
presents you with a list of programs available to you, and you simply pick the one you want to execute.
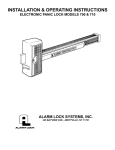
Figure 3-1 shows an example of a menu display.
3–2
Using the System
Running Programs
1.
2.
3.
4.
5.
6.
STU_LISTINGS
Student listings Menu
STU01
STU02
STU11
STU33
STU41
STU75
PRINT CONDENSED STUDENT ALPHA DIRECTORY
PRINT STUDENT DIRECTORY
PRINT STUDENT DATA BASE ERROR LISTING
PRINT STUDENT LISTING BY STREET NAME
UNDUPLICATED VOCATIONAL EDUCATION COUNT (CBEDS)
ADVISOR LISTING
Type the number or name of your selection.
Press HELP, PF2, or F2 for more Info
Figure 3-1: Example of a menu
Because your choices are laid out right before you, working from a menu is much more convenient than
working from the system prompt—especially if you are just starting to learn the system.
3.1.2.1 Selecting items from the menu
Each line on a menu describes a menu item that is available to you. Many of the menu items you see are
programs that you can run, but some are other menus that contain additional selections (the items titles
generally make it clear which items are programs and which are sub-menus).
To select an item from the currently displayed menu, enter the item number shown to the left of the item,
press ↵. Instead of the number, you may also enter the item code which immediately follows the number.
For example, suppose you have the menu in Figure 3-1 displayed and you want to execute the item called
“PRINT STUDENT DIRECTORY”. This item is line #2 on the menu, and its item code is “STU02”, so
you could execute it by entering either 2↵ (or STU02↵).
3.1.2.2 Bypassing the Menu
You can execute any menu item available to you—whether or not it appears on the currently displayed
menu—by entering its code name. You don't need to wend your way down through layers of sub-menus to
get to the exact menu on which that program appears.
For example, suppose you have the menu of Figure 3-1 displayed on your screen, but you want to run a
“Reverse Verification of Course Requests” (SSS04) report. Even though SSS04 is not an option on the
displayed menu, you can still run the report simply by entering SSS04↵.
3.1.2.3 Invoking menus from the system prompt
Your system manager may have configured your account so that you enter a menu automatically each time
you log in. If not, you can manually invoke the menu system by entering the command MENU at the system
prompt:
$ MENU↵
↵
3–3
Using the System
Working with Screen Applications
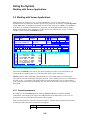
3.2 Working with Screen Applications
Many programs use formatted screens to present information to you in an easily readable form. A
formatted screen is essentially the electronic equivalent of a paper form. It consists of a fixed background,
corresponding to the pre-printed lines and words on a paper form, and a series of fields, corresponding to
areas where you would fill in information on a paper form. The background and the fields are usually
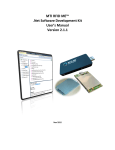
displayed with different visual characteristics so that you can easily tell them apart. Figure 3-2 show an
example of a screen used by the STUCRT program.
FY90 STUCRT
DIGITRONICS SECONDARY SCHL #25
06/26/92
17:17
NUMBER LAST-NAME.... FIRST-NAME MIDDLE-NM. SEX GR BIRTHDATE OTH-NAME E/C SP
[ 65911][ABRO
NAHRAIN
F
6 04/12/80
7
STREET-ADDRESS.......... CITY.............. ZIPCD GRID# AREA PHONE
ROOM
[1442 VISTA GRANDE RD
][EL CAJON
][92019][
][619 447-4804]109
[1442 VISTA GRANDE RD
][EL CAJON
][92019]
PRIMARY-GUARDIAN-NAME... PRIMARY-WORK SECONDARY-GUARDIAN-NAME. SECONDARY-WK
[M/M SABAH ABRO
][
][
][
]
L/S 874 COUN GA LE PRI BIRTHPLACE..... UC1 UC2 UC3 UC4 INEL PROB DIST-DATE
95 [ ][
][ ][ ][ 0][DETROIT,MI
][
][
][
][07/01/87]
ADV ADVISOR NAME... R/I IMM-DATE TRK DATE-ENRL DATE-LEFT ST
[
][
][ ][
][4] [06/24/91][
]
SEC PER S COURSE-TITLE.TEACHER-NM.ROOM SEC PER S COURSE-TITLE.TEACHER-NM.ROOM
[ 300] 2 S P US HIST C BUSCH
HIS4[ 401] 7 S SR ENG GEN COE
ENG5
[ 301] 2 S STUDNT ASST* BUSCH
[
]
[ 513] 3 S P SOPH ENG
FOWLER
LA05[
]
[ 726] 3 S BUSINESS MAT KAWKA
FS14[
]
[ 222] 4 S PE SEM 2*
BEAL
WGYM[
]
[ 127] 5 S P JR ENG
C ALLED
ENG3[
]
[ 128] 5 S SP PROJ-SC S ALLED
FS23[
]
[ 400] 6 S STUDNT ASST* COE
[
]
ENTER FUNCTION [ ] REF-DATA [
]
A=ADD B=BCK C=CHG D=DRP E=END F=FWD G=GET H=HLP I=INACT P=PER R=REG S=SEC T=TR
Figure 3-2: Typical formatted screen display
(Beware that the STUCRT screen used at your site has probably been more or less customized for your
specific needs, so it might not look exactly like the “plain-vanilla” version shown here.)
STUCRT, which is used to maintain the Student Master files for secondary schools, is a fairly typical
representative of screen-based display and update programs. Notice that most of the screen—all but the last
two lines, in fact—is occupied by data fields and their associated background. You can alter the data in
some of the fields, while others are for display only. The last two lines of the screen are where you control
the program.
3.2.1 Operating sequence
Everything you do with STUCRT begins by entering a function code in the box labeled "ENTER
FUNCTION" (some functions also require some additional data in the “REF-DATA” area). The very
bottom line of the screen summarizes the function codes available.
Most screen programs have a few basic functions in common. The table below summarizes the functions
and function codes TYPICALLY used with screen programs:
Code
A
Meaning
Add a new record
3–4
Using the System
Working with Screen Applications
B
C
D
E
F
G
H
Back up by one record in sequence
Change currently displayed record
Delete currently displayed record
Exit from program
Go forward one record in sequence
Get a specific record
Display help text for the program
Remember that all programs may not use function codes in the way described above; the table simply
describes the most common usage. Some programs attach different meanings to specific function codes,
and others include codes in addition to the basic ones. Notice that STUCRT, for example, includes not only
the codes shown above, but several others to control additional functions specific to STUCRT.
Basically, then, a session with STUCRT consists of following two steps, repeated as many times as
necessary:
Get the student record you want to work with on the screen. Using the various function codes, you
can scan through the file alphabetically until you find the student you want, get a specific student
by giving a name or ID number, or even add an entirely new student record.
Do something to the record. You can request to alter some of the data in the record, or drop the
entire record.
When you are done working with STUCRT, issue an E (end) command to return to your menu or system
prompt.
3.2.2 Using keyboard editing functions in screen applications
When you are entering data into a formatted screen application, you can use a number of special keystrokes
in order to move around the screen and edit data. Briefly, these are:
←, →, ↑, ↓ Each moves the cursor one step in the direction indicated by the arrow.
INSERT or CONTROL + A Toggles between insert mode and overstrike mode.
CONTROL + B Moves the cursor backwards by words.
REMOVE or CONTROL + D Deletes the character at the cursor.
CONTROL + E Moves the cursor to the end of the current field.
CONTROL + F Moves the forward by words.
CONTROL + H Moves the cursor backward by fields.
TAB Moves the cursor to the next field.
DO or CONTROL + N Displays a pop-up window from which you can select various utilities and
desk accessories.
CONTROL + P Saves a snapshot of the current video form in the file SCREEN.LST.
CONTROL + R Redraws the entire display (useful if the screen contents become garbled for some
reason).
$<$\FBOX{X} Backspaces and erases characters.
3–5
Using the System
Running Report Programs
CONTROL + U Progressively “undoes” input, restoring first the current field, then the entire screen.
Three CONTROL + U commands return the screen data to its original state.
CONTROL + W Deletes the word to the left of the cursor.
HELP Displays a help message for the field in which the cursor is located.
3.3 Running Report Programs
Report programs present a different operating style as compared to screens. Screen programs are highly
interactive. A session with a screen program is much like a dialog: you give a command, the program
responds to that command, you give another command, the program gives another response, and so on.
Reports, in contrast, are much less conversational. After the program prompts you for any necessary
operating parameters (such as sorting options, selection criteria, and the like), it needs no further attention.
You start the program, supply whatever information the program requests, and leave it to chug away. After
a time, the program finishes and you have a completed report ready for printing.
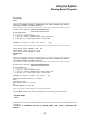
To illustrate the use of a typical report program, let us run a “Brief Student Directory” by grade level. The
program STU01 produces this report. Figure 3-3 shows the entire dialog that would appear on your
terminal while running STU01.
3–6
Using the System
Running Report Programs
DS1> STU01↵
↵
PROGRAM NAME:
STU01
********************************************************************************
*THIS IS A CONDENSED LISTING OF STUDENT NAME, SEX, GRADE, BIRTHDATE AND STATUS *
*WITH THREE COLUMNS OF STUDENTS PER PAGE.
*
********************************************************************************
Current Switch Settings: ABCDEFGHIJKLMNOPQRSTUVWXYZ
00000000000000010010000000
SW VAL DESCRIPTION
– —————————————————————————G 0 Print all students alphabetically
G 1 Print all students alphabetically within grade level
G 2 Ask user for a single grade level to be printed
<RETURN> to continue or
A)bort
S)et switch ?
-> S↵
↵
********************************************************************************
>Enter Switch Letter (RETURN to end): G↵
↵
>Enter Numeric Value for Switch: G 1↵
↵
>Enter Switch Letter (RETURN to end):↵
↵
PROGRAM NAME:
STU01
********************************************************************************
*THIS IS A CONDENSED LISTING OF STUDENT NAME, SEX, GRADE, BIRTHDATE AND STATUS *
*WITH THREE COLUMNS OF STUDENTS PER PAGE.
*
********************************************************************************
Current Switch Settings: ABCDEFGHIJKLMNOPQRSTUVWXYZ
00000010000000010010000000
SW VAL DESCRIPTION
– —————————————————————————G 0 Print all students alphabetically
G 1 Print all students alphabetically within grade level
G 2 Ask user for a single grade level to be printed
<RETURN> to continue or
A)bort
S)et switch ?
->↵
↵
STU01–Brief Student Directory (3 columns)
SWG=1
Printing by grade
Enter Desired Track or 0 for All
0↵
↵
<OUTPUT DIRECTED TO P1929.LST>
Figure 3-3: Example of terminal dialog for a report program (STU01)
To start STU01, enter STU01↵ at the system prompt, or select the program from the menu.
PROGRAM NAME:
STU01
************************************************************************
********
*THIS IS A CONDENSED LISTING OF STUDENT NAME, SEX, GRADE, BIRTHDATE AND
STATUS *
3–7
Using the System
Running Report Programs
*WITH THREE COLUMNS OF STUDENTS PER PAGE.
*
************************************************************************
********
Current Switch Settings: ABCDEFGHIJKLMNOPQRSTUVWXYZ
00000000000000010010000000
The standard startup dialog begins with an announcement which identifies the program (STU01) and gives
a brief outline of the program's function. The announcement is followed by your current switch settings.
There are twenty-six of switches, named A–Z, each having a one-character value (listed under the
corresponding letter). Many programs use the settings of these switches to select options or otherwise
determine their behavior. You have your own private set of switches, separate from those of other users.
SW VAL DESCRIPTION
– —————————————————————————G 0 Print all students alphabetically
G 1 Print all students alphabetically within grade level
G 2 Ask user for a single grade level to be printed
The standard dialog then lists the switch settings which affect the particular program you are running. In
this example, STU01 is sensitive to the “G” switch: setting it to “0” lists all students alphabetically, “1” lists
students by grade level (alphabetic within each grade), and “2” lets you list just the students in particular
grade.
<RETURN> to continue or
A)bort
S)et switch ?
-> S↵
↵
The startup dialog now gives you the opportunity to alter one or more switch settings to specify the report
you wish to produce. Checking the current switch settings displayed earlier, you find that your “G” switch
is set to “0”, which would produce an alphabetic listing of the entire school. You need to change switch
“G” to a “1”, to get a listing by grade. So you respond to this prompt with “S↵”.
************************************************************************
********
>Enter Switch Letter (RETURN to end): G↵
↵
>Enter Numeric Value for Switch: G 1↵
↵
>Enter Switch Letter (RETURN to end):↵
↵
The switch-changing dialog asks you to enter the switch you want to change, to which you respond G↵.
The program then asks you for the value for switch “G”; you respond with 1↵. When the program asks for
another switch to set, you simply press ↵ to indicate that you have no more settings to make.
PROGRAM NAME:
STU01
************************************************************************
3–8
Using the System
Getting help or more information
********
*THIS IS A CONDENSED LISTING OF STUDENT NAME, SEX, GRADE, BIRTHDATE AND
STATUS *
*WITH THREE COLUMNS OF STUDENTS PER PAGE.
*
************************************************************************
********
Current Switch Settings: ABCDEFGHIJKLMNOPQRSTUVWXYZ
00000010000000010010000000
SW VAL DESCRIPTION
– —————————————————————————G 0 Print all students alphabetically
G 1 Print all students alphabetically within grade level
G 2 Ask user for a single grade level to be printed
<RETURN> to continue or
A)bort
S)et switch ?
->↵
↵
The initial announcement appears again so that you can confirm your switch settings. Note that your “G”
switch is now set to “1”, to produce a listing by grade. At this point, you could elect to make more switch
settings (by entering S↵), or exit the program entirely (by entering A↵). If your switch settings are all
correct and you want to go ahead with the program, just press ↵ without entering anything else.
STU01–Brief Student Directory (3 columns)
SWG=1
Printing by grade
Enter Desired Track or 0 for All
0↵
↵
Here is the STU01-specific part of the startup dialog. (Up to this point, the set-up routine has been a
standard dialog shared by many programs.) STU01 displays another announcement, then asks you to enter
an attendance track number. If your school uses multi-track attendance and you want to list only the
students on a certain track, enter that track number (followed, as usual, by ↵); if you want students in all
tracks, or if you don't use multiple tracks, enter 0↵ as in the example.
<OUTPUT DIRECTED TO P1929.LST>
No more input is required. STU01 has collected all the information it needs to produce the desired report.
After a time, the program will display an “<OUTPUT DIRECTED TO …>”, indicating a file to which the
report is being written. When the program has finished, you can send this file to a printer, or examine it on
your screen.
3.4 Getting help or more information
There are a number of means of getting more information about and application programs:
3–9
Using the System
Getting help or more information
From the system prompt: Run the program DOCCRT, which lets you browse through a file of
documentation about applications that are available to you.
From a menu: Issue the menu HELP command to get information about a menu item.
Within a screen application: Use the HELP key to get information about the field where your cursor
is currently located. Or, use the “H” (help) function for a more detailed explanation of program
functions.
These techniques are described below.
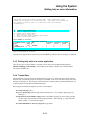
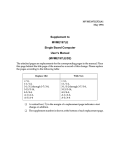
3.4.1 Using DOCCRT
The DOCCRT screen program accesses a database of information about other programs that are available to
you.
PROGRAM-ID
TITLE
[STU01
] [PRINT CONDENSED STUDENT ALPHA DIRECTORY
]
MENU
SOFTWARE-SYSTEM CLASS RWAD HLP DOCUMENTATION
FILE,RWAD
[STU_LISTINGS
] [STU
] [BAT] [R
] [ ][ADM
] [STU,R
]
FORM
LPI
VFU
MAGTAPE
[LOC,R
]
[STANDARD_WIDE ] [ 6] [
] [
]
[USR,R
]
.........K E Y....W O R D S.....................................................
[REPORT
]
.........D E S C R I P T I O N..................................................
[THIS IS A CONDENSED LISTING OF STUDENT NAME, SEX, GRADE, BIRTHDATE AND STATUS ]
[WITH THREE COLUMNS OF STUDENTS PER PAGE.
]
[
]
[
]
[
]
[
]
[
]
SV
SWITCH VALUE DESCRIPTION
[G2][Ask user for a single grade level to be printed
]
[G0][Print all students alphabetically
]
[G1][Print all students alphabetically within grade level
]
[ ][
]
[ ][
]
ENTER FUNCTION [ ][
]
END OF SWITCH-VALUE LIST
B=BACK E=END F=FORWARD G=GET H=HELP L=LAST N=NEXT P=Program-help
Figure 3-4: Sample DOCCRT display
Figure 3-4 shows an example of the DOCCRT display.
To run DOCCRT, simply enter DOCCRT↵; you may do this either at the system prompt or from a menu.
Enter DOCCRT STU01↵ (at the $ prompt) and you will see a screen like the one in Figure 3-4.
3.4.2 Getting Information about Menu Items
While working with the menu system, you can get information about menu items with the HELP command.
Enter HELP, a space, and the item number or item code of the menu entry you want help with. For
example, typing HELP 2↵ or HELP STU02↵ on the sample menu of Figure 3-1 would produce a help
display similar to the one in Figure 3-5.
3–10
Using the System
Getting help or more information
STU02
PRINT STUDENT DIRECTORY
THIS REPORT PRINTS THE STUDENT'S NUMBER, NAME, GRADE, PARENT NAME, PHONE
NUMBER AND GRID NUMBER IN A STUDENT DIRECTORY. THE REPORT CAN BE PRINTED FOR
ALL STUDENTS BY NAME OR GRADE, OR A PARTICULAR GRADE CAN BE PRINTED
ALPHABETICALLY.
SV
G0
D0
G1
2
D1
SWITCH VALUE DESCRIPTIONS
PRINT IN ALPHABETICAL ORDER
CREATE DOUBLE SPACED REPORT
PRINT ALPHA BY GRADE LEVEL
PRINT ONE GRADE LEVEL (OPERATOR INPUTS GRADE)
CREATE SINGLE SPACED REPORT
[Press RETURN to Continue]
OPERATIONS INFORMATION
SOFTWARE-SYSTEM CLASS RWAD
FILE,RWAD FILE,RWAD FILE,RWAD
[STU
] [BAT] [R
]
[STU,R
] [LOC,R
] [USR,R
]
FORM
LPI
MAGTAPE
[
,
] [
,
] [
,
]
[STANDARD_WIDE ] [ 6] [
]
[
,
]
Figure 3-5: Help display for a menu item
For help on the using the menu system itself, press the HELP key when the menu is waiting for a command.
3.4.3 Getting help while in a screen application
There are two types of help available to you while you are using a screen application program like
STUCRT: field help and tutorial help. Tutorial help is activated by a function code, and field help is
activated by the HELP key.
3.4.4 Tutorial Help
Tutorial help lets you peruse a brief user manual about a program. To activate this form of help, enter the
function code “H” when the program is waiting for a command. Your screen will clear and you will see the
first page of the help text. The first page of the tutorial text is usually a table of contents which directs you
to specific pages for information about particular topics.
When a page of text has been displayed, you have several options:
To see the next page: Press ↵.
To go to a specific page: Enter the page number (followed by ↵). For example, display page 2 by
entering 2↵.
To skip ahead or back a number of pages: Enter a the number of pages you want to skip, preceded
by either a plus sign (forward) or a minus sign (backward). Thus, entering +2↵ skips ahead two
pages; entering –3↵ goes back three pages.
To return immediately to the screen program: Type QUIT↵.
3–11
Using the System
Changing your Password
If there is no help tutorial for a program, you will receive the message “%Sorry - No help
available” in response to the “H” function.
3.4.4.1 Field Help
At any time in a screen program, you can press the HELP key on your terminal to get information about the
field in which the cursor is located. If your model of terminal does not have a key labeled “HELP”, some
other key will be designated as a replacement HELP key. On VT100-series terminals, for instance, PF2
substitutes for HELP. On Televideo terminals, the F2 key serves as a HELP key.
Short help messages will appear in the STATUS field, which is usually occupies the right-hand half of the
second-to-last line of the screen. Messages that are too long for the STATUS field will temporarily overlay
parts of the formatted screen. The last line of a long message will tell you to “[Press RETURN to
continue]”, and the message remain on the screen until you press the ↵ key.
3.5 Changing your Password
As a security-enhancing measure, the VAX limits the length of time during which you may use a given
password. In VAX terminology, your password has a limited lifetime (typically 90 days), after which it is
said to expire. After your password has expired, you cannot access the system until you choose a new
password. In addition, you may voluntarily change your password any time you want.
As expiration time of your current password nears, you will begin seeing messages similar to this one each
time you log in:
WARNING - Your password expires on Tuesday, 23-JUN-1992 20:18
These messages let you know that will have to choose a new password after the indicated date and time.
1.
Enter the command SET PASSWORD↵, either at the system prompt or in a menu. You will be
asked to supply your current password; enter it and press ↵:
$ SET PASSWORD
Old password: MYOLDPASSWORD↵
↵
New password:
Your old password will not appear on the screen as you type it.
If you try to log in after your password has expired, the following message will appear:
Your password has expired; you must set a new password to log in
and you will be automatically placed into the password-changing dialog.
1.
If you are required to use a generated password, the system will now display a list of randomly
generated nonsense words, followed by a New password: prompt:
anroackyax
aifmartpag
cuozanosaw
an-roack-yax
aif-mart-pag
cu-o-za-no-saw
3–12
Using the System
Changing your Password
warvwoxo
syusuril
warv-wox-o
syu-su-ril
Choose a password from this list, or press RETURN to get a new list
New password:
You must choose your password from the left-hand column of this list (the column on the right shows the
“words” broken into syllables). If you don't like any of the generated words shown, you can press ↵ to get
another list.
If you are not required to use a generated password, just the New password: prompt will appear. In this
case, you can choose any password composed of letters, digits, dollar signs ($), and underscores (_).
1.
New password: In response to the New password: prompt, enter the word or phrase that you
have chosen as your new password and ↵.
New password: MYNEWPASSWORD↵
↵
Nothing will appear on your screen as you enter your new password.
1.
The system will prompt with Verification:. Enter your new password again, spelling it exactly as
you did the first time, and press ↵:
Verification: MYNEWPASSWORD↵
↵
Again, the password does not appear on your screen as you enter it.
If you entered everything correctly, the system prompt ($) or your menu will reappear and your your new
password will be in effect for all future logins. If you made a mistake, the system will display an error
message explaining what was wrong, and your current password will remain unchanged.
The password changing procedure can fail for any of several reasons:
•
You didn't give the correct old password: If you are using the SET PASSWORD command, you
must supply your current password in order to initiate the password-changing routine. This
prevents someone from just walking up to your logged-in terminal and issuing a SET PASSWORD
command to change your password.
•
You didn't type two identical copies of the new password: Requiring you to type the new
password twice reduces the chances of accidentally setting your password to an unknown value as
the result of an unnoticed typing error.
•
The new password you specified wasn't long enough: Your password must be longer than a
certain number of characters. The typical minimum password length is 6 characters, but even
longer passwords may be required on your system. Your system may impose a minimum password
length. Longer passwords enhance security because they are harder to guess.
•
You're trying to reuse a password too soon: The system prevents you from re-using any
password that you have used in the recent past—typically within that last year.
•
You're trying to use an “undesirable” password: The system screens out common words and
phrases which might be easy to guess and prevents you from using such words as passwords.
3–13
Using the System
Selecting Fiscal Year and School
3.6 Selecting Fiscal Year and School
Data in the VAX system is separated according to fiscal (or academic) year and school. You can access
data from only one school and one year at a time. But, if necesssary, you can switch to different schools or
years with the commands DFSCHL and DFYEAR. If you won't be using this capability, you may skip the
rest of this section.
To check your current school and fiscal year settings, use the DFMSET utility:
$ DFMSET ↵
*PRT↵
↵
SWITCH
SETTINGS
F/Y=92
DST=075
SCH=025
ABCDEFGHIJKLMNOPQRSTUVWXYZ
00000010000000010000000000
DIGITRONICS TEST DISTRICT
DIGITRONICS TEST SENIOR HIGH #1
* ↵
SWITCH
SETTINGS
F/Y=98
DST=099
SCH=999
ABCDEFGHIJKLMNOPQRSTUVWXYZ
00000020000000010000000000
DIGITRONICS TEST DISTRICT
DIGITRONICS TEST SENIOR HIGH #1
$
This example shows that you are currently set to fiscal year (F/Y) 1992, and school #25 (Digitronics Test
Senior High #1).
To change to a different year, enter the command DFYEAR, a space, and the year:
$ DFYEAR 1992↵
↵
YEAR SET TO 1992
You can enter the entire four-digit year, as in the example, or just the last two digits (e.g., DFYEAR 92).
Normally, the fiscal year is designated by the calender year in which it ends; thus, the fiscal year running
from 7/1/91–6/30/92 is Fiscal 1992.
To select a new school, enter the command DFSCHL, a space, and the code number of the school:
$ DFSCHL 25↵
↵
SCHOOL CODE SET TO 0025 DIGITRONICS TEST SENIOR HIGH #1
Every school is designated by a 3-digit code number; you should have a list of schools and their numbers
handy for your reference.
3–14
4
Communicating with other users
There are two methods that you can use to communicate with other users on your VAX system: MAIL and
PHONE. MAIL is a computerized version of conventional mail in which users exchange messages. PHONE
lets you carry on two-way conversation with another user.
4.1 Using MAIL
The MAIL facility is basically an electronic post office. You compose a message and specify who is to
receive it. The MAIL system then delivers a the message to the recipient, to be read at his or her
convenience. Likewise, other users can send messages to you.
To send a mail message or read any messages waiting for you, you must get into the MAIL utility. There
are three ways to do this:
•
From the system prompt ($), enter the command MAIL↵.
•
From a menu, enter the command MAIL↵; or if MAIL is offered as an item on the menu, you
select it in the usual manner.
•
From within a screen program, press the DO key or CONTROL + N, and select the M option from
the pop-up window that appears.
When MAIL is running, it displays the prompt MAIL> to that it is ready to accept commands.
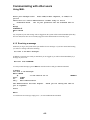
4.1.1 Sending a message
To send a message, enter the command SEND↵. MAIL will then prompt you for the particulars of the
message: a list of primary recipients, a list of carbon-copy recipients, the subject, and the text of the
message. Press CONTROL + Z at the end of the message text, and MAIL will deliver the message. Here is
a short example of how to send a message:
$ MAIL↵
↵
MAIL> SEND↵
↵
To:
BOB,DIANE,KEN↵
↵
Cc:
JOHN,MARY↵
↵
Subj:
Demonstration of MAIL↵
↵
4–1
Communicating with other users
Using MAIL
Enter your message below. Press CTRL/Z when complete, or CTRL/C to
quit:↵
↵
There will be a short demonstration of MAIL today in the ↵
Conference Room.
All of your questions will be answered then.↵
↵
↵
Mike↵
↵
CONTROL+Z
MAIL> EXIT↵
↵
$
Any recipients of your mail message who are logged into the system will be notified immediately that they
have new mail; those who are not currently logged in will be informed the next time they log in.
4.1.2 Receiving a message
Each time you log in, the system checks your mailbox for new messages. If you have unread mail waiting,
you will see a message such as the following:
You have 3 new Mail messages.
In addition, if someone else sends you mail while you are logged in, you will be alerted immediately by a
message on your screen:
New mail from USERNAME
To read your mail messages, get into MAIL as described in above and give a READ command:
$ MAIL↵
↵
You have 3 new messages.
MAIL> READ↵
↵
#1
11-JUL-1986 14:32:19
From:
DIANE
To:
MIKE
Subj:
Mail Demonstration
The demonstration was most helpful.
put it together.
NEWMAIL
Thank you for taking the time to
Diane
MAIL>
To read the next new message, simply press ↵, or enter another READ command.
4–2
Communicating with other users
Using PHONE
4.1.3 Getting help with MAIL
MAIL provides a HELP command which you can use to obtain information about MAIL features. For
instance, you can get information about the SEND command by entering HELP SEND↵ at the MAIL>
prompt, as in this example:
$ MAIL↵
↵
MAIL> HELP SEND↵
↵
SEND
Sends a message to another user(s).
You can use the SEND command
etc
Subtopic? ↵
Topic? ↵
MAIL>
After displaying information for the SEND command, HELP shows a list of sub-topics related to the SEND
command and prompts you with Subtopic?. If you wish to see information about one of the sub-topics,
enter the subtopic name and HELP will show it to you and reissue the Subtopic? prompt.
When you are finished viewing sub-topics, press ↵ in response to the Subtopic? prompt. HELP now
displays the Topic? prompt, indicating that you may select another main topic. Pressing ↵ again leaves the
HELP mode and returns you to the MAIL> prompt.
To get a list of the main topics for which help is available enter HELP↵ at the MAIL> prompt. You can
also enter HELP HELP to get information about using HELP, or HELP GETTING_STARTED for a basic
introduction to the features of mail.
4.2 Using PHONE
The PHONE facility lets you conduct a two-way conversation with another user. PHONE splits your screen
into two halves. The top half shows the text that you type, and the bottom one displays the responses of the
other user. You see everything that the other user types, and the other user sees everything that you type.
4.2.1 Calling Someone
To call someone using PHONE, enter (at system command level) PHONE, followed by that person's
username. For example:
$ PHONE SALLY↵
↵
PHONE splits your screen into two windows and displays the message “Ringing SALLY...”.
When the called user answers, PHONE displays the message “That person has answered your call”. You can
now begin conversing.
4–3
Communicating with other users
Using PHONE
When you are finished with your conversation, press CONTROL + Z twice: once to hang up the
connection, a second time to exit from PHONE. If the person you called hangs up first, you only to press
CONTROL + Z once.
If the called party does not answer within a reasonable amount of time, press CONTROL + Z to abandon
the call and exit from PHONE.
4.2.2 Answering a call
If someone phones you, the system will alert you by beeping your terminal bell and displaying a message
similar to the following:
USERNAME is phoning you
(12:34:56)
This message will repeat every 10 seconds or so until either you answer or the caller gives up.
To answer the phone, you must be at system command level ($ prompt). Enter the command PHONE
ANSWER. When the conversation is over, press CONTROL + Z twice to hang up and exit from PHONE. If
the caller hung up first, you only need to type CONTROL + Z once.
4.2.3 Rejecting a call
If you receive a call and don't want to talk to the caller at this time, enter (at system command level) the
command PHONE REJECT. The caller will receive a message that you have rejected the call.
4–4
5
Working with Files
This chapter gives you information about files. It describes what they are and gives you information about
how to manage them.
5.1 What is a file?
A file is simply a collection of data grouped under a single name. The files you will be concerned with are
text files, which contain lines of text.
A file has a name, called a file specification (or filespec, for short). A filespec contains three parts:
•
File name
•
File type
•
Version number
Punctuation characters separate the components: a period between name and type, a semicolon between
type and version.
Here is an example of a filespec:
LETTER.TXT;3
In this filespec, LETTER is the file name, TXT is the file type, and 3 is the version number.
Each component of the filespec has a particular meaning:
File name: The file name is the “main” identifying name associated with a file. It should hint at the
nature of the file's contents. For example, a file called LETTER.TXT probably contains a letter of
some sort.
File type: The reason for having a file type component in filespecs is to allow you to create families of
similar files having the same name but different types. For example, in addition to LETTER.TXT,
you might have LETTER.OLD which keeps a copy of an old version of the letter.
Version number: The version number keeps track of how many times a file has been changed. You
can have several versions of a file outstanding at any one moment. You do not have to worry
much about version numbers. Except in one instance (the DELETE command, discussed below),
5–1
Working with Files
Your Directory
you never even need to mention them specifically because the system assumes you want to work
with the most recent version of a file (that is, the one with the highest version number).
5.2 Your Directory
The system assigns you a private storage area called a directory for your files. Normally, only you yourself
can access the files in your directory area; the system protects your files from other users.
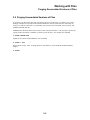
You can easily find out what files you have in your directory with the DIRECTORY command. Here is an
example of this command:
$ DIR↵
↵
LETTER.TXT;1
MAIL.MAI;1
LETTER.OLD;1
TELCO.LTR;2
LETTER.4MAY86
TELCO.LTR;1
LOGIN.COM;1
TELCO.BAK;1
Total of 8 files
$
Notice that there are two versions of the file TELCO.LTR.
5.3 Creating files
Files don't just magically appear in your directory: they have to come from somewhere. Basically, any file
you see in your directory came to be there by one of three means. Either:
1.
You ran a program which wrote its output report into a print file
2.
You created the file yourself
3.
Someone else put the file there for you
5.3.1 Print files
Most report programs write their output into a file in your directory. In most cases, the system creates a
unique filename of the form “Pnnnn.LST” (where “nnnn” is usually the time of day) and displays the name
of the file in a message:
<OUTPUT DIRECTED TO Pnnnn.LST>
5.3.2 Creating your own files
You can use a program called a text editor to create a file and fill it with text. Text editors have commands
which let you enter your text and correct errors easily. Typical text editing functions let you move around
5–2
Working with Files
What can you do with them?
within the text, add new material, move text from place to place, and search for specific words and phrases
within the text.
The VAX offers two standard text editors: EVE and EDT. Discussion of the operation of these editors is
outside the scope of this introductory manual; ask your system manager for more information about text
editors available at your installation.
5.3.3 Gifts
Sometimes, other users may put files in your directory for you. For example, the system operator can run a
complex or lengthy job for you, then deliver the output report file into your directory for you to do with as
you please. Also, your system manager may have arranged security clearances so that you can swap files
with some group of users (perhaps the people in your office).
5.4 What can you do with them?
Just having files isn't too useful: it's what you do with them after you've got them that counts. Here are
some of the things you can do with a file in your directory:
•
Type its contents out to your screen
•
Make a copy of it
•
Give it a new name
•
Delete it
5.4.1 Typing a file
The TYPE command lists out the contents of a file on your screen. Here is an example of its use:
$ TYPE TEST.TXT
Line 1
Line 2
Line 3
5.4.2 Deleting a file
When you no longer need a file, you can delete it so that it doesn't clutter up your directory. For example, if
you wanted to delete LETTER.TXT, you would give the command:
$ DELETE LETTER.TXT;*
If you wish, you can use the abbreviation DEL in place of DELETE.
5–3
Working with Files
What can you do with them?
Remember we said that you almost never need to worry about version numbers? Well, the DELETE
command is the one special case where you have to worry about them. With the DELETE command, you
must always specify a version number. The ";*" at the end of the file specification is a wildcard version
number which simply means “all versions”.
Although in this case we chose to use a wildcard version number to delete all outstanding versions of the
file, you could actually give an exact version number. For instance, if you had versions 1, 2, and 3 of the
file TELCO.LTR, you could delete just version #2 with this command:
$ DELETE TELCO.LTR;2
In general though, it's easier not to worry too much about version numbers, and just remember to stick “;*”
on the end of the filespec when using a DELETE command.
5.4.3 Copying Files
Copying a file creates an identical duplicate of the file under a new name. Afterward, you have both your
original file and the new one, both with identical contents. Here is an example of the COPY command:
$ COPY LETTER.TXT LETTER.16JUN86
The COPY command consists of the word COPY, followed by the filespec of your original file, followed by
the file specification you want to assign to the new copy. Notice that you don't need version numbers here
because the system assumes you want to copy the most recent version of LETTER.TXT.
Wildcards are not just for DELETE commands, and also not just for version numbers. By using wildcards
in places other than the version number, you can copy whole families of files at once. For example:
$ COPY LETTER.* LETTER_AS_OF_16_JUN_86.*
copies all files with the filename LETTER, regardless of file type. Each new file has the name
LETTER_AS_OF_16_JUN_86 and the same file type as the corresponding old file. So LETTER.TXT
would get copied to LETTER_AS_OF_16_JUN_86.TXT, LETTER.BAK to
LETTER_AS_OF_16_JUN_86.BAK, etc.
5.4.4 Renaming Files
Renaming a file simply changes its filespec without changing any of the data in it. For example, suppose
you have decided that LETTER.TXT would be better described by the name ATTEND.LTR. You could
give the following RENAME command:
$ RENAME LETTER.TXT ATTEND.LTR
to change the name of the file.
5–4
Working with Files
Purging Accumulated Versions of Files
5.5 Purging Accumulated Versions of Files
If you revise your files often, many old versions may pile up in your directory. Frequently, your system
manager will imposes some limit on the maximum number of versions of the same file, so that your are
won't get too cluttered. But still, it's a good idea to get rid of any old versions that you're not using. The
PURGE command does this.
PURGE deletes all but the most recent version of each of the specified files. You can purge a specific file,
a group of files specified by a wildcard, or all files in your directory. For example, the command
$ PURGE LETTER.TXT
deletes all old versions of LETTER.TXT. The command
$ PURGE *.TXT
purges all files of type .TXT. To purge all files in your directory, enter a PURGE command without a
filespec:
$ PURGE
5–5
6
Using Color
You can display Digitronics Software applications in color if your video terminal or PC communications
software supports the American National Standards Institute (ANSI) method of color specification. Here is
a partial list of products which support ANSI color:
•
DECterm
•
ZSTEM 320
If your terminal or emulator is not one of those listed above, you should be able to find out from your
owner's manual whether or not it supports ANSI color.
If your have a terminal or emulator which supports ANSI color, your System Administrator can follow steps
described in his or her VFMS Programmer's Reference Manual to enable you to view Digitronics Software
applications in color.
6–1
Index
A
ALT key, 1–2
arrow keys, 1–2
ATT05, 3–1
C
CONTROL key, 1–2
cursor, 1–1
READ command, 4–2
SEND command, 4–1
menu, 3–3
bypassing, 3–3
defintion of, 3–2
getting help on, 3–10
HELP command, 3–10
invoking manually, 3–3
selecting from, 3–3
D
P
DECterm, 6–1
DELETE command, 5–3
DFMSET, 3–14
DFSCHL, 3–14
DFYEAR, 3–14
DIRECTORY command, 5–2
DOCCRT, 3–10
password
changing, 3–12
generated, 3–12
PF2 key, 1–2
PHONE, 4–1, 4–3, 4–4
answering, 4–4
calling, 4–3
rejecting a call, 4–4
print file, 5–2
E
ESC key, 1–2
ESCAPE key&see ESC key, 1–2
R
F
READ command (MAIL), 4–2
F2 key, 1–2
field, 3–4
field help, 3–12
file, 5–1
print, 5–2
fiscal year, 3–14
function code, 3–4
S
H
T
help, 1–2
for a field, 3–12
on a menu, 3–10
tutorial, 3–11
HELP command (MENU), 3–10
HELP key, 3–12
L
school, 3–14
SELECT key, 1–2
SEND command (MAIL), 4–1
SSS04, 3–3
STU01, 3–1, 3–6, 3–7, 3–8, 3–9
STUCRT, 3–1, 3–4, 3–5, 3–11
text editor, 5–3
tutorial help, 3–11
W
wildcard, 5–4
Z
ZSTEM 320, 6–1
LOCK key, 1–1
logging in, 2–1
M
MAIL, 4–1, 4–2
Index-1