1
CODESSA PRO User’s Manual
Comprehensive Descriptors
For Structural and
Statistical Analysis
CODESSA
PRO
User’s manual
by
Alan R. Katritzky, Ruslan Petrukhin and Hongfang Yang
(University of Florida)
Mati Karelson
(University of Tartu, Estonia)
-1-
CODESSA PRO User’s Manual
Copyright ©2002 University of Florida
All rights reserved
The contents of this manual and the associated software are the property of University of
Florida and are copyrighted. This publication, or parts thereof, may not be reproduced in
any form, by any method, for any purpose.
UNIVERSITY OF FLORIDA PROVIDES MATERIALS “AS IS” WITHOUT WARRANTY OF
ANY KIND, EITHER EXPRESSED OR IMPLIED, INCLUDING BUT NOT LIMITED TO ANY
IMPLIED WARRANTIES OR CONDITIONS OF MERCHANTABILITY OR FITNESS FOR A
PARTICULAR PURPOSE. IN NO EVENT SHALL UNIVERSITY OF FLORIDA BE LIABLE TO
ANYONE FOR SPECIAL, COLLATERAL, INCIDENTAL, OR CONSEQUENTIAL DAMAGES
IN CONNECTION WITH OR ARISING OUT OF PURCHASE OR USE OF THESE MATERIALS,
EVEN IF UNIVERSITY OF FLORIDA HAS BEEN ADVISED OF THE POSSIBILITY OF SUCH
DAMAGE ARISING FROM ANY DEFECT OR ERROR IN THESE MATERIALS. THE SOLE
AND EXCLUSIVE LIABILITY TO UNIVERSITY OF FLORIDA, REGARDLESS OF THE FORM
OF ACTION, SHALL NOT EXCEED THE PURCHASE PRICE OF THE MATERIALS
DESCRIBED HEREIN.
University of Florida reserves the right to revise and improve its products as it sees fit.
Third Party Trademarks
Microsoft is a registered trademark, and Windows XP, Windows 2000, Windows NT,
and Windows 9xs are trademarks of Microsoft Corporation.
All other brand and product names are trademarks or registered trademarks of their
respective holders.
-2-
CODESSA PRO User’s Manual
Table of contents
INTRODUCTION............................................................................................................. 5
CODESSA PRO RELEASE CANDIDATE (RC2) LICENSE AGREEMENT FOR
END USERS ...................................................................................................................... 6
CHAPTER 1 INSTALLING CODESSA PRO ............................................................ 11
1.1 SYSTEM REQUIREMENTS:................................................................................. 11
1.2 INSTALLATION INSTRUCTIONS. ..................................................................... 12
CHAPTER 2 DESCRIPTION OF CODESSA PRO ................................................... 13
2.1 CONCEPTS AND DEFINITIONS.......................................................................... 13
Artifacts: ................................................................................................................... 13
Storage: ..................................................................................................................... 13
Snapshot (Cache File):.............................................................................................. 13
Workspace: ............................................................................................................... 13
Folder: ....................................................................................................................... 13
Structure:................................................................................................................... 14
Descriptors: ............................................................................................................... 14
Property:.................................................................................................................... 14
Descriptor/Property Matrix:...................................................................................... 14
Current Analysis Dimensions: .................................................................................. 15
Correlation: ............................................................................................................... 15
List: ........................................................................................................................... 15
2.2 CODESSA PRO VISUAL INTERFACE................................................................ 16
2.2.1 WORKSPACE ....................................................................................................... 17
2.2.2 WORK AREA ........................................................................................................ 19
2.2.2.1 Structure View Window ................................................................................... 19
2.2.2.2 Correlation View Window................................................................................ 20
2.2.3 PROPERTY WINDOW ........................................................................................ 21
2.2.4 LOG WINDOW ..................................................................................................... 22
CHAPTER 3 USING CODESSA PRO TO START A NEW PROJECT.................. 23
3.1 CREATING A NEW FOLDER FOR THE NEW PROJECT.............................. 23
3.2 CREATING A STORAGE LIST ............................................................................ 23
3.3 PREPARING STORAGE ........................................................................................ 24
-3-
CODESSA PRO User’s Manual
3.4 CALCULATING CORRELATION. ...................................................................... 27
3.5 VIEWING CORRELATIONS ................................................................................ 27
3.6 PRINTING YOUR RESULTS................................................................................. 27
3.7 MANIPULATING LISTS ........................................................................................ 28
-4-
CODESSA PRO User’s Manual
INTRODUCTION
CODESSA PRO is an entirely new software package, which performs tasks
similar to CODESSA, but with many distinct advantages over the previous
software package. In particular, its add-in mechanism makes CODESSA
PRO expandable, its calculation engine has been optimized at the assembly
language level for Pentium, Pentium Pro, Pentium II, Pentium III and Pentium IV
processors, and finally, it has been designed to run in 32-bit Windows environments.
CODESSA (Comprehensive Descriptors for Structural and Statistical Analysis) PRO is a
comprehensive program for developing quantitative structure/property relationships
(QSPR), integrating all necessary mathematical and computational tools to (i)calculate a
large variety of molecular descriptors on the basis of the 3D geometrical and/or quantumchemical structural input of chemical compounds; (ii) develop (multi)linear and nonlinear QSPR models of the chemical, physical or biological properties of individual
compounds (non-linear QSPR models are still in preparation); (iii) perform cluster
analyses of the experimental data and molecular descriptors; (iv) interpret the developed
models, and (v) predict properties for compounds previously unknown or unavailable.
This manual presents the guidelines for the successful development of a
QSAR/QSPR models using the CODESSA PRO program. The execution of each step of
the program normally requires knowledge of the proceeding steps, and the steps are
therefore discussed in the sequence in which they would be accomplished. This manual
also provides further information concerning the features and methods available in the
CODESSA PRO program, their purpose, and the interpretation of the results. For a more
detailed description of the program and the techniques employed, please refer to the
CODESSA PRO Reference Manual.
The CODESSA PRO program is designed to operate in the following
Microsoft Windows environments: Windows 2000, Windows XP, Windows
NT and Windows 9x. To start CODESSA PRO, double click on its icon
shown above. When the program starts, the CODESSA PRO Visual Interface
(CVI) window will open. Click Calculate on the menu-bar to open a pull-down menu,
next click on the Load storage option to refresh the current snapshot, which is then
displayed on the screen. Alternatively, the single keystroke F5 will refresh the snapshot.
Before attempting to use CODESSA PRO, it is necessary to understand some of the
concepts and terminology used within the program.
-5-
CODESSA PRO User’s Manual
CODESSA PRO Release Candidate (RC2) License Agreement
for End Users
The University of Florida Research Foundation, Inc. (hereafter referred to as
"UFRF"), a nonstock, nonprofit, Florida corporation, having a place of business at 223
Grinter Hall, Gainesville, Florida 32611-5500, grants to the licensee ("Licensee") a nonexclusive license ("License") to utilize the CODESSA PRO Release Candidate (RC2)
("Software") and related materials described in the Software section (XII.) subject to the
following terms.
The CODESSA PRO Release Candidate (RC2) Order Form will become part of
this Agreement and must be completed for this product ordered by the Licensee and
signed by an authorized representative of the Licensee.
I. Site Definition
The Site is defined as university or firm/company owned machines including
networks, labs and stand-alone machines. A company is defined as multinational if it has
offices in more than one country.
II. Usage
A. Licensee may:
i)
provide unlimited use of the Software by staff for licensee institute
business and research
ii)
make copies of the Software reasonably required for Licensee's working
and archival purposes - these copies of the Software will then become subject to the
Terms
iii)
make composite programs which include portions of the Software in
inseparably bound, executable form only for use on the computer(s) at the Site(s)
specified
B. Licensee may not:
i)
alter the Software; if the Licensee elects to alter the Software despite this
prohibition, the altered Software is not eligible for technical support and shall then
become subject to these Terms and the title to such altered Software shall vest in UFRF
ii)
publish or otherwise publicize information regarding the Software, the
performance or accuracy of the Software, or other experiences with the Software without
the express prior written consent of UFRF
iii)
allow home use
III. Fees, taxes and payment
After signing this license agreement and sending credit card information, or an
appropriate check or money order made out to the University of Florida Research
-6-
CODESSA PRO User’s Manual
Foundation, Inc., a compact disk (CD) containing the CODESSA PRO Release
Candidate (RC2) executables will be sent to The Licensee.
i)
The cost of the CODESSA PRO Release Candidate (RC2) program
executables for non-profit and academic organizations for the first year is $800.00
(Eight Hundred Dollars); those having already licensed CODESSA PRO Release
Candidate (RC2) will pay $400.00 (Four Hundred Dollars) for each subsequent
year.
ii)
The cost of the Site license of CODESSA PRO Release Candidate (RC2)
program executables for for-profit and commercial organizations for the first year
is $20,000.00 (Twenty Thousand Dollars); those having already licensed
CODESSA PRO Release Candidate (RC2) will pay $10,000.00 (Ten Thousand
Dollars) for each subsequent year. The single user license for for-profit and
commercial organizations for the first year is $10,000.00 (Ten Thousand Dollars);
those having already licensed CODESSA PRO Release Candidate (RC2) will pay
$5,000.00 (Five Thousand Dollars) for each subsequent year.
iii)
US federal or US state governments can license CODESSA PRO Release
Candidate (RC2) and make executable code available to their users from nonprofit organizations under the same conditions as for other non-profit and
academic organizations. For foreign governments, the license fee should be paid
under the same conditions as for for-profit and commercial organizations (III.iii)
unless a viewer is obtained.
iv)
For multi-Site, multinational, for-profit companies, there should be a
license fee paid per Site, although subsequent Sites will need to pay only 75 %
(seventy-five percent) of the fee.
v)
The academic fee may be reduced or waived in special circumstances.
Please explain your request and need for a waiver or reduction to: [email protected].
For the License, Licensee will pay to UFRF any shipping and handling charge,
associated sales, use, excise, or similar taxes imposed upon UFRF.
IV. Period of license
The period of the License will:
i)
begin on the date UFRF signs the CODESSA PRO Release Candidate
(RC2) License Agreement
ii)
end on the date of the first occurrence of any of the following events;
a)
the expiration of 365 days from the date UFRF signs the
CODESSA PRO Release Candidate (RC2) License Agreement;
b)
the expiration of ninety (90) days written notice of termination
from Licensee to UFRF;
c)
Licensee breaches any of the Terms or any terms of any other
agreement between Licensee and UFRF, or, if the breach can be
corrected, if Licensee fails to correct that breach within thirty (30)
days after notification from UFRF;
d)
Licensee performs any act of insolvency or bankruptcy;
-7-
CODESSA PRO User’s Manual
Following termination, Licensee may not use either the Software or the composite
programs made in accordance with II.A.iii, and must promptly return the Software and all
related materials to UFRF, or certify in writing that the Software and materials have been
destroyed.
V. Disclaimer of warranty and limitation of liability
THE SOFTWARE IS PROVIDED “AS IS,” EXCEPT AS EXPRESSLY SET
FORTH IN THIS AGREEMENT, UFRF MAKES NO REPRESENTATIONS AND
EXTENDS NO WARRANTIES OF ANY KIND, EITHER EXPRESS OR IMPLIED,
INCLUDING BUT NOT LIMITED TO WARRANTIES OF MERCHANTABILITY,
FITNESS FOR A PARTICULAR PURPOSE OR ANY OBLIGATION OF RESULTS
WITH RESPECT TO SOFTWARE OR ANY OF THE DOCUMENTATION
SUPPLIED TO LICENSEE UNDER THIS AGREEMENT WHETHER
TRANSMITTED IN WRITING OR ORALLY.
UFRF ASSUMES NO
RESPONSIBILITIES WHATSOEVER WITH RESPECT TO USE.
LICENSEE
AGREES THAT UFRF WILL NOT BE LIABLE FOR ANY SPECIAL, INDIRECT OR
CONSEQUENTIAL DAMAGES HEREUNDER, INCLUDING BUT NOT LIMITED
TO LOSS OF USE OR THE LOSS OF DATA OR INFORMATION OF ANY KIND,
HOWEVER CAUSED.
VI. Proprietary information
Licensee acknowledges that the Software is proprietary and that UFRF retains
title to the Software and reserves the copyright and all intellectual property rights in the
Software and all related materials supplied to Licensee. Licensee must not remove any
copyright notices from the Software or related materials and must ensure that proper
acknowledgement of the rights reserved to UFRF appears in any copies, composite
programs, references, or alterations of the Software made by Licensee under the Terms.
Except as authorized in the Terms or by prior written approval from UFRF, Licensee may
not transfer or otherwise disclose any portion of the Software to any third party. Licensee
must take appropriate action by instruction, agreement, or otherwise with Licensee’s
employees and Licensee’s authorized users of the Software to restrict the usage and
disclosure of the Software and all related materials in accordance with the Terms.
With License managed Software, Licensee will distribute License keys in a responsible
manner with suitable controls. License keys will not be made available in a publicly
accessible manner (for example: via Internet, newsletter, etc.). Procedures will be
established to record license key distribution. Section VII will survive the termination of
the License.
VII. Transfer of licenses
Except as authorized in the Terms or by prior written approval from UFRF,
Licensee may not sub-license, assign or otherwise transfer the License to any third party.
-8-
CODESSA PRO User’s Manual
VIII. Export control regulation
This software may not be used in or transferred to other countries or used for any
purposes except in accordance with the applicable export control regulations of the
United States of America.
IX. General
The Terms are governed by the law of the State of Florida. The invalidity or
unenforceability of any provision of this Agreement (including the Terms) under
applicable law shall not affect the validity or enforceability of any other provisions of this
Agreement. This Agreement, and any other UFRF Documents incorporated by reference
for the Software constitutes the entire agreement between Licensee and UFRF. They may
be amended only by a written agreement signed by authorized representatives of both
Licensee and UFRF.
X. CODESSA PRO Release Candidate (RC2) services
1. Online documentation is provided on www.codessa-pro.com.
2. One set of Software will be supplied on CD ROM or can be downloaded from
the prescribed internet site.
3. Technical support
- support service to Licensee by telephone, fax, or email for inquiries
XI. Payment
ANNUAL LICENSE – CODESSA PRO Software licensed on an annual basis
must be renewed each year by Licensee to retain right for use of the Software. The term
of the annual license begins on the first day of the month following shipment of the
Software. The annual license fee is due within 30 days of invoice.
If Licensee fails to make payment within that period, UFRF (without prejudice to
its other rights and remedies) considers the license cancelled and Licensee forfeits all
rights to use the Software covered under the terms of this agreement.
-9-
CODESSA PRO User’s Manual
___________________________________________________________________________________
Name of Authorized CODESSA PRO Release Candidate (RC2) Software User – PRINT
OR TYPE
_____________________________________________________________________
SIGNATURE of Authorized CODESSA PRO Release Candidate (RC2) Software User
_____________________________________________________________________
Full Name of Organization – PRINT OR TYPE
_____________________________________________________________________
Professor or Lab Group Name and/or Department – PRINT OR TYPE
[ ] Non-Profit
[ ] Profit
[ ] State or federal government
[ ] Benchmarking/demonstration
[ ] Other, explain_______________________________________________________
E-mail of Authorized CODESSA PRO Release Candidate (RC2) Software User:
_____________________________________________________________________
Telephone and fax number:
_____________________________________________________________________
Payment Method: All licensing fees must be PREPAID by check, money order, or credit
card. NO purchase orders are accepted.
If an invoice is required for check payment, please send a request
to: [email protected]
1. [ ] Check Enclosed *Please make the check payable to: University of Florida Research Foundation,
Inc. Mailing Address: (223 Grinter Hall, Gainesville, Florida 32611-5500)
2. 2. [ ] Credit Card: [ ] MasterCard [ ] Visa
Number: _______________________________ Expiration Date: ________________
PRINT or TYPE the name, as it appears on the card:
_____________________________________________________________________
**All orders take two weeks to process and are mailed by Postal Services. The shipping
is paid for by supplier. Delivery is within 15 business days.
PRINT or TYPE the shipping address/attention to:
* Please include room, floor, or any special receiving instructions.
_____________________________________________________________________
_____________________________________________________________________
_____________________________________________________________________
_____________________________________________________________________
_____________________________________________________________________
Send license and appropriate fee payment to:
_____________________________________________________________________
_____________________________________________________________________
_____________________________________________________________________
_____________________________________________________________________
_____________________________________________________________________
- 10 -
CODESSA PRO User’s Manual
Chapter 1 Installing CODESSA PRO
1.1 System requirements:
Hardware:
--------Processor: Pentium class systems - minimum. All processors developed hereafter
by Intel Corp. are supported on the assembly level optimization.
All AMD current processors work as old Pentium with higher clock
freqency (no special optimization).
Memory: 128MB minimum, 256MB default tuning.
CD-ROM: A CD-ROM or a compatible DVD device is required to install
CODESSA PRO software.
Other:
A 3D graphics accelerator is highly recommended because of extensive
use of OpenGL for presentation of molecules.
2-button mouse is required.
Software:
--------Operation system: Windows XP Professional, Windows XP Home, Windows 2000,
Windows NT (with limitation on using network drives)
Workstation and Server.
On Windows ME, Windows 98 and Windows 95, the program works
with many limitations and is tested not very well.
Operation system extensions: Internet Explorer 4.0 SP2 or newer version.
- 11 -
CODESSA PRO User’s Manual
1.2 Installation instructions.
1. Place the CODESSA PRO CD in your CD-ROM drive.
2. If the windows Autorun feature is turned on, the installation options will be
displayed automatically. If the installation options do not appear, open the
Windows Start Menu and choose Run. The RUN dialog box opens.
3. Enter the following command in the open text box (assuming D is your CDROM:
D:\setup.exe
4. Choose OK. The CODESSA PRO setup program initializes and the CODESSA
PRO setup dialog box opens.
5. Follow the on screen instructions for product choice and installation.
The CODESSA PRO setup program will detect an existing CODESSA PRO
installation and offer you the choice of uninstalling or keeping the older version of the
program.
- 12 -
CODESSA PRO User’s Manual
Chapter 2 Description of CODESSA PRO
2.1 Concepts and definitions
The use of CODESSA PRO requires an understanding of the following concepts:
Artifacts:
These are the individual files or items used by CODESSA PRO. There are four
types of artifacts: structures, descriptors, properties, and models. Using the CODESSA
PRO program will frequently require manipulation of single artifacts or lists of artifacts.
CODESSA PRO names explicitly most artifacts (e.g. descriptors and models).
Storage:
All items that are connected with a project are stored in a single location within
the file system - in the storage. To change a storage location, click Option on the main
menu-bar and select Storage. The box that opens allows the user to control the storage
location of structure files, correlations, descriptors, lists etc.
Snapshot (Cache File):
The snapshot (CODESSA PRO cache file) is a binary (compressed)
representation of all items in storage. This file is located in the memory whenever work is
being performed on the CVI module. The cache file reloads each time the CVI detects a
change in the storage contents. The snapshot can be reloaded manually at anytime by
opening the pull-down menu Calculate on the menu-bar, then selecting Load storage, or
by using F5 keyboard shortcut.
Workspace:
The workspace is a window within the CVI that represents the snapshot, it is
located in the workspace area on the top left side of the CVI frame.
Folder:
A folder is used to store lists and is similar to a directory. CODESSA PRO uses
four types of folders: structure, descriptor, property, and model (correlation). Each of the
first three folders has a system-generated list named All. This list will contain “ALL” of
the structures, descriptors or properties for the corresponding folder. The Descriptors
folder also includes system-defined descriptor lists according to group and type. A
particular descriptor item may be contained in several lists. The Correlations folder
contains lists for each property item in the property folder. The list is generated
automatically by the system when a property item is created. When correlations are
- 13 -
CODESSA PRO User’s Manual
calculated, 50 correlation items (by default) will be stored in the list that corresponds to
the property.
Structure:
A structure is a representation of an individual chemical object with a precise
chemical constitution. Examples of structures include a single molecule, a monomeric
unit of a polymer, or a molecular complex with a definite composition. The minimum
information that a structure must include is the types of atoms involved and their
connectivity. Each structure must be linked with three files containing: 3-D structure,
SCF, and Force information. Before a 3-dimensional structure can be input into
CODESSA PRO, it must be converted to MDL molfile format and be optimized. The
molfile structures are stored in the 3D MOL(MOPAC) Subfolder, SCF output files are
stored in the SCF Subfolder, and Force output files are stored in the THERMO
Subfolder. SCF and Force structures will be created and properly stored automatically by
the CMol3D module. See Starting a New Project for instructions to create each file
type. It is vital that the name for a particular structure be exactly the same in each
directory. Structure names must be in the form Sddddddd.xxx and should be added in
sequential order (e.g. S0000001.xxx, S0000002.xxx…), which will be produced
automatically by CODESSA PRO.
Descriptors:
Descriptors are defined as numerical characteristics associated with chemical
structures. They are derived from the structures’ chemical constitution, topology,
geometry, inherent wavefunction, potential energy surface or some combination of these
items. The values of a particular descriptor can be provided by the user or calculated by
the CODESSA PRO program. Each descriptor value must be associated with a
previously defined structure. Descriptors calculated by the CODESSA PRO program are
named automatically; renaming descriptors is not recommended.
Property:
Property is a physical or chemical characteristic, biological activity, or other
characteristic of interest. Each property value must be associated with a structure located
in the Structure folder.
Descriptor/Property Matrix:
The descriptor/property matrix consists of descriptor (all columns except the last)
and property (the last column) values. The horizontal dimension of the matrix is the
descriptor/property ID sequence and the vertical dimension is the structure ID sequence.
The matrix has two presentations: binary and text. The binary presentation is used for
internal use, while the text presentation is optimized for import into the STATISTICA
and other software package at present in the CSV format.
- 14 -
CODESSA PRO User’s Manual
Current Analysis Dimensions:
The dimensions used for an analysis by CODESSA PRO are the property, the list
of descriptors, and the list of the structures. All the dimensions are selected by right
clicking the dimension desired; this will open a context pop-up menu, from which should
be chosen make current; the one chosen will be in boldface font to indicate that it is the
currently selected dimension. The default dimensions for a new snapshot file are:
Dimension
Property
List of descriptors
List of structures
Default value
First selected
All group
All group
The selected dimensions are used in the formation of the descriptor/property matrix.
Correlation:
A correlation represents the results of a (multi)linear regression between a property
of interest ( y ) and one or more selected descriptors ( xi ).
y = a0 + ∑ ai xi
Correlations are composed of regression coefficients (ai ), a correlation coefficient
(R ), a squared standard deviation (s2) and a Fisher criterion F value for the set of
structures used in the derivation of the correlation. By default, each correlation is named
by its number of structures (N), correlation coefficient (R2), crossvalidated correlation
(R2CV) and Fisher criterion value (F), and squared standard deviation (s2).
2
List:
A list is collection of the chemical structures, descriptors, physical and chemical
or other property of interest, or models (correlations). Lists can be either system type or
user type. System lists cannot be deleted by the user. To select the items that it is desired
to include in a new list, right click to show a context pop-up menu, and then choose
create list to make a new list. To delete a list, click the list that you want to delete, right
click to show a context pop-up menu, and then choose delete list.
- 15 -
CODESSA PRO User’s Manual
2.2 CODESSA PRO Visual Interface
Workspace: An on-screen presentation of the current cache file.
Work Area: The screen space for various view windows.
Property Window: The property window depicts information about properties of the
selected object and is available for almost all objects.
Log Window: The window’s purpose is protocol all operation on the storage.
Tool Bar: Shortcuts to commonly performed tasks. The task will be displayed when the
pointer is positioned over the icon.
- 16 -
CODESSA PRO User’s Manual
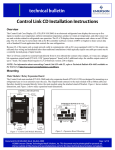
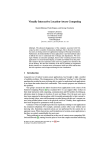
2.2.1 Workspace
The workspace area contains an on-screen
presentation of the current cache file which is
essentially a directory tree. Clicking on the minus
will collapse a folder (branch of the tree) and
clicking on a plus will expand a folder. When a
folder is expanded (note the structures folder) it
will show the lists (note All list) contained in the
folder. The same icon is used to represent lists as
folders because they are also used to contain files. If
a list is empty then there will be no plus or minus
beside it.
The Structures folder is expanded to show
the list All. The list All is also expanded to show the
structure artifacts.
Notice the icon beside the
structure artifact. Each type of artifact will have a
different icon. The name that is listed will be the same
as the name given on the first line of the molfile. The
last structure artifact gives the filename of the molfile
because the name was not entered on the first line of
the molfile. Double clicking on an artifact launches a
structure view window in the work area.
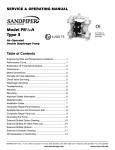
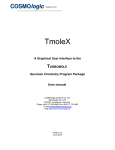
The descriptors folder is expanded to show
the All, External, and Constitutional lists as well
as several other descriptor artifacts. The All list is in
boldface font because it is the currently selected
analysis dimension for descriptors. Notice the
descriptor icon is different from the structure icons
pictured above. If an artifact is selected, its color
will change from black to blue.
- 17 -
CODESSA PRO User’s Manual
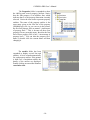
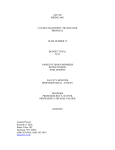
The Properties folder is expanded to show
the All list and several property artifacts. Notice
that the fifth property is in boldface font, which
indicates that it is the property dimension currently
selected. Notice the icon used to represent property
artifacts. The name of the property artifact is the
same name given on the first line of the property
(P0000005.prp) file. As you can see in the picture,
the first four property files are named “<insert name
of property here>”. This is because all these four
property files are presently empty, therefore the first
line of these property files is now “<insert name of
property here>”. You can alter the property files’
name by double click the current name and then
changing it.
The models folder has been
expanded to display several lists and
artifacts. A list is created automatically
for each property artifact. If the pointer
is held over a correlation artifact, the
details of the artifact are displayed.
Double clicking on an artifact launches
correlation view.
- 18 -
CODESSA PRO User’s Manual
2.2.2 Work Area
2.2.2.1 Structure View Window
Double clicking on a structure artifact in the structures folder opens a structure
view window in the work area. Structures are 3-dimensional and can be viewed as wireframe, ball and stick, CPK surface, solvent accessible surface (SASA), Zefirov’s charges
on SASA (solvent accessible surface area) and MOPAC charges on SASA(solvent
accessible surface). Right clicking inside the window opens the view and label context
pop-up menu. Selecting view provides the six options mentioned above, and the label
identifies the number or the type of each atom. When the pointer is positioned over the
view window, it changes to a 4-sided arrow that can be dragged to rotate the structure.
- 19 -
CODESSA PRO User’s Manual
2.2.2.2 Correlation View Window
Double clicking on a correlation artifact opens the correlation view window. The
graph shows the observed (experimental) values versus the predicted values of the
property in question. When the window is first opened, all the points for outliers will be
blue rather than yellow. The color of the points will change to blue to indicate they have
been selected. Clicking once on a point will display its properties and their associated
values in the properties window. Double clicking on a point will open in the work area a
structure view window, for the structure that corresponds to that point. Right clicking
the window will open a context pop-up menu that will give the opportunity to show
structures, show descriptors, create Sublists, mark outliers and mark non-outliers as
desired.
Double clicking on a descriptor artifact will also open a correlation view
window. The window will show the relationship between the descriptor and the property
dimension selected. The value predicted according to any model chosen maybe viewed
by selecting that model, clicking the view pull-down menu, and then choosing predicted
properties. This will display the observed property values, predicted property value and
errors.
- 20 -
CODESSA PRO User’s Manual
2.2.3 Property Window
The item selected determines the contents of the property window. If a folder or
list is selected in the workspace, the number of artifacts contained is displayed. If an
artifact is selected, the property window will provide varying information, depending on
the type of artifact.
The picture on the left shows the
information given in the property
window when a structure artifact is
selected. It will also show the
experimental value and calculated value of
the property of the current structure, which
are not shown in the picture now.
The picture shows the information provided
when a descriptor artifact is selected in the
workspace.
When a property artifact is
selected, information from the prp file is
displayed.
This
includes
name,
comments and the number of structures.
The property window for correlation
artifacts lists the details of the correlation.
Details displayed include the properties used in
the correlation.
- 21 -
CODESSA PRO User’s Manual
2.2.4 Log Window
The log window describes each operation that has been performed on the storage.
Double clicking on a correlation in the workspace will give a full description of the
correlation (as pictured below). The text is in RTF format and can be cut and pasted
directly into a word processing program.
The edit pull-down menu has options to select all log, copy from log, paste to
log and clear all log. Transferring the information for several correlations to a word
processing program can be accomplished by clearing all log, double clicking on each of
the correlations, then clicking select all log, finally copy from log.
- 22 -
CODESSA PRO User’s Manual
Chapter 3 Using CODESSA PRO to start a new project
3.1 Creating a new folder for the new project
You can select the drive on which it is desired to save the data, and then make a
new folder which can be named either by project number or any other way of your
choosing.
3.2 Creating a storage list
You have two choices for creating a storage list, either one for many projects or
just for one individual project. If you decide to use a single storage list for many projects,
you must keep an index of the structure and molecule names. Although a general storage
for many projects allows a research group to avoid repeating the calculations of structures
and descriptors as well as to minimize the amount of storage space used, we strongly
recommended the use of separate storage list for each project.
To create storage for a new project, click the option pull-down menu, click
storage, and browse to find the folder that has just been created for your storage. Then,
click OK to close the window. Now, in the project folder you will find a subfolder list, an
example of which appears in the following picture. You can name each folder in many
desired manner or use the default names which shown in the shaded area.
- 23 -
CODESSA PRO User’s Manual
All the storage subfolders should be empty before starting any optimization or
calculation. First, you need to prepare .mol files of your structures and save them either in
the MOL subfolder or in a location of your choosing. Keep in mind, no matter how you
name your .mol files, whenever you run CODESSA PRO, the program will automatically
name the files as Sddddddd.mol.
3.3 Preparing storage
Compared with old CODESSA, a major enhancement achieved by CODESSA
PRO is that CODESSA PRO is highly automatic, and this obviates manual storage
preparation.
Since you already have all the .mol files of all the structures, if you save your
.mol files in the MOL Subfolder, pressing F5 keyboard shortcut automatically prepares
all the data which are necessary for doing correlation. If the location of your .mol files is
different, then select the edit pull-down menu, choose add structure, browse for the
folder where your .mol files are located and click ok.
The process through which CODESSA PRO prepares all the data, except property
files, is divided into 11 stages. Each of these 11 stages is performed automatically in
sequence by CODESSA PRO.
Stage 1
This is the first model building stage. The program applies simple molecular
mechanics preoptimization and transfers the 2-dimensional structures from the MOL
subfolder to the 3-dimensional structures that will be stored in the 3D MOL (Molecular
Mechanic) subfolder. Missing hydrogen atoms are added according to the formal
valence rules. The model building is done deterministically for the first iteration and
stochastically for subsequent iterations.
- 24 -
CODESSA PRO User’s Manual
Stage 2
This stage is concerned with the conversion of the file from MDL MOL format in
the 3D MOL (Molecular Mechanic) subfolder into the MOPAC input file format for
preliminary geometry optimization in the MOPAC Optimization (step1) subfolder.
Stage 3
This stage performs the preliminary geometry optimization using CMOPAC
(MOPAC Version 7 clone). If the gradient is less than 5.0, the program automatically
proceeds to Stage 4. If the gradient is more than 5.0, then the program automatically go
back to Stage 1 and starts model building again, stochastically. This process is continued
up to 10 times until the optimization stage is passes on the criteria of the gradient value
being less than 5.0. If success is not achieved after 10 iterations, then program stops.
Stage 4
During this stage, the program converts the MOPAC output files in the MOPAC
Optimization (step1) subfolder into a MOPAC input file for precise geometry
optimization, and stores them in the MOPAC Optimization (step2) subfolder.
Stage 5
CODESSA PRO is performing precise geometry optimization at this stage. If the
gradient value can be reduced to less than 0.5, then the program proceeds automatically
to Stage 6. If the gradient is more than 0.5, then CODESSA PRO goes back to Stage 1
and does model building again, stochastically. This process is continued up to 10
iterations until the gradient value test for the precise optimization is satisfied. If 10
iterations are unsuccessful, the calculations are stopped.
Stage 6
At this stage, the CODESSA PRO program converts the MOPAC output files in
the MOPAC Optimization (step2) Subfolder into MOPAC input files for calculation of
molecular properties. It is possible to do this without calculation of the Hessian matrix.
The resulting MOPAC input file is stored in SCF Subfolder.
Stage 7
Next, at stage 7, the CODESSA PRO program produces a set of molecular
properties calculated using CMOPAC. MOPAC input files. The resulting output files are
stored in the SCF Subfolder.
Stage 8
Next, CODESSA PRO program takes the molecular geometries in the MOPAC
Optimization (step2) Subfolder, prepares MOPAC input files for force calculations, and
stores them in the THERMO Subfolder. At this stage keyword ROT=1 is added, which
is valid for C1, CI, and CS groups of symmetry (This applies to almost all organic
molecules). However, If molecular symmetry is different from point groups C1, CI, and
CS mentioned above, the keywords need to be edited manually. To achieve manual
- 25 -
CODESSA PRO User’s Manual
editing, open the .mni files in MOPAC Optimization (step1) Subfolder or MOPAC
Optimization (step2) Subfolder with Notepad or Wordpad, and then add the desired
keywords.
Stage 9
At this stage, CODESSA PRO program calculates the molecular properties using
the Hessian matrix (“force” calculation). The state of the molecule is determined using
the signs of eigenvalues of the Hessian matrix. If the molecule are in a transition state,
than the program goes back to Stage 1 and restarts by using stochastic addition again. If
the molecule is in its ground state, then go to Stage 10. If 10 iterations are unsuccessful,
stop calculation.
Stage 10
This stage will be reached only in situations when all mentioned the geometry
tests above are satisfied. At this stage, the MDL MOL file in the 3D MOL (MOPAC)
Subfolder is formed, based on formal connectivity information from the MDL MOL file
in the MOL Subfolder, and atomic coordinates from the MOPAC output file in the
MOPAC Optimization (step2) Subfolder.
Stage 11
CODESSA PRO takes all MDL MOL files in the 3D MOL (MOPAC)
Subfolder, the MOPAC output file in the SCF Subfolder and the MOPAC output file in
the THERMO Subfolder to do descriptor value calculations. The resulting text file with
descriptor values is stored in the Descriptor’s Subfolder. All intermediate files are
deleted from storage at this stage. Only MDL MOL files in the MOL Subfolder and the
3D MOL (MOPAC) Subfolder, and MOPAC input and output files in the SCF
Subfolder and THERMO Subfolder remains.
If the calculation cycle is not finished at Stage 1, changes can be made to the files
at the last successful stage manually (usually it is editing of MOPAC keywords) and the
calculations restatred. If four files (MDL MOL files in the MOL Subfolder and the 3D
MOL (MOPAC) Subfolder, and the MOPAC output files in the SCF Subfolder and the
THERMO Subfolder) are present and up-to-date, no further calculation will be done.
The up-to-date state is defined using the modification time of the files. In case it is not,
the calculations will be processed starting from the most recently corrected file. To
invoke the recalculation, select from the menu Calculate/Load Storage (F5) or
Calculate/Descriptors (F6). In the last case, only problematic structures which show in
MOPAC Optimization (step1) Subfolder and MOPAC Optimization (step2)
Subfolder will be recalculated. If the problems arise as a result of a structure’s improper
format, you must redraw the structure in the MOL Subfolder.
Note:
Before a correlation is run, you should check if everything in the storage is ready. All
subfolders in the storage should be empty except the following:
1. MOL Subfolder- this subfolder should contain all .mol files of all structures.
- 26 -
CODESSA PRO User’s Manual
2. SCF Subfolder- this subfolder should contain only .mni and .mno files of all
structures.
3. THERMO Subfolder- this subfolder should contain only .mni and .mno files of
all structures.
4. 3D MOL (MOPAC) Subfolder- this subfolder should contain only .mol files of
all structures which are different .mol files from the mol files present in the MOL
Subfolder.
Preparing property files
If the above is accomplished satisfactorily, the final requirement prior to
correlation is to prepare the property files. On the CODESSA PRO window, click the
edit pull-down menu and choose add property. Then you input the name, comment,
and property value according to the format which is indicated in the notepad, and
finally, use the F5 keyboard shortcut for CODESSA PRO to load the data.
3.4 Calculating the correlation.
Ensure that structures, descriptors, and properties of interest are selected (they
should all appear in boldface font). If not, right click the name of structures, descriptors
or property to show a context pop-up menu, then select make current to highlight them
.Click on the calculate pull-down menu and choose HMPRO, or just press the F9
keyboard shortcut instead. The correlation will be finished automatically by CODESSA
PRO. If you just want to calculate descriptors, then click on the calculate pull-down
menu and choose descriptors, or press the F7 keyboard shortcut instead. You can also
choose form matrix which in addition to descriptor calculation will also form a matrix.
You can limit the maximum number of descriptors for your model by clicking on the
option pull-down menu, choosing HMPRO, clicking expanding, then inputting the
maximum number of descriptors you permit in your model.
3.5 Viewing correlations
When the correlations are finished, you just double click model and all the
models respond to each property file will show up. Then you double click the model that
you want to take a look to open the correlation view window (see page 17)
3.6 Printing your results.
- 27 -
CODESSA PRO User’s Manual
Use print from the file menu bar to print the correlation plot from the work area.
To print information from the log area, follow the instructions given on page 19 and then
print from the corresponding word processing program.
3.7 Manipulating lists
CODESSA PRO automatically produce one or more lists in each folder, but when
analyzing a property or correlation, it is sometimes helpful to create a user-defined list,
e.g. a list of structures containing phenyl rings. The simplest method for creating a list in
CODESSA PRO is to select several artifacts from one or more existing lists (i.e. all),
right click to open the context pop-up menu and left click on create list. A list can also
be formed from a group of artifacts that are linked to a common artifact. If a descriptor is
chosen to be the common artifact, then all the structures that are defined for that
descriptor could be selected for a list. To create the list from a common artifact, select the
common artifact, open the context pop-up menu, click on Select Linked, and then select
the type of artifacts that you want to add to the list. To create a list from multiple common
artifacts, select the list that is created corresponding to each common artifact, then
perform the AND operation (see below).
- 28 -
CODESSA PRO User’s Manual
The List Logic module in CODESSA PRO compares the artifacts contained in
two lists and can be opened by clicking any artifact, right clicking to show the context
pop-up menu, and choosing lists logic, or just using the F4 keyboard shortcut instead.
Choose the type of artifact that will be contained by the list by clicking on the appropriate
button in the Sub-List Type box (descriptors is selected in the example above). Choose
the desired lists for comparison and the appropriate Operation. The artifacts from the
two lists that meet the criteria of the operation will be displayed in the Results box. The
results can then be copied to a new list (Create) or be selected (Select) for further
comparison. When comparing three or more lists, first compare two of the lists, click on
Select, restart List Logic, select Current Selection in The First List box, then select the
remaining list in The Second List box.
- 29 -