1
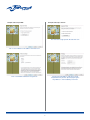
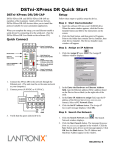
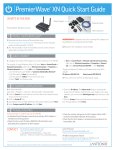
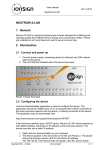
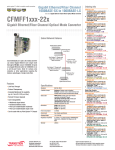
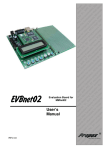
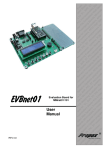
Technical note #25R0
M Series
IP management and recovery
Through Armonía Pro Audio Suite you can easily set the
IP configuration of your M Series amplifiers as long as they
are in DHCP or are configured with a static IP on the same
Armonía subnet.
It may happen that a static IP in a different subnet
with respect to Armonía configuration has been assigned
to your M Series HDSP+ETH amplifier (i.e. 10.0.x.y versus
169.254.x.y): if this is the case, Armonía does not recognize
the amplifier and you can not import it into the workspace.
You have to reset the IP configuration of your M Series
HDSP+ETH amplifier.
In order to reset the IP configuration of your M Series
HDSP+ETH amplifier outside the Armonía environment, follow next instruction.
Setting an IP policy on Adau based devices with an
external Lantronix tool
FIG. 2: Select the device on the right
panel and click Assign IP.
M Series HDSP+ETH amplifiers come with one rear
RJ45 port for remote device communication, using the IP
layer and the UDP protocol. Factory default settings are
DHCP/AutoIP, but a fixed IP policy can also be adopted.
NOTE: Due to the fact that the Lantronix configurator
uses the Etherner layer, no IP set up is necessary.
All the available Lantronix-based devices should appear.
Please note that devices that are not compatible with the
IP network mask of your network interface should appear
too due to the fact that the Lantronix Confgiurator uses the
Ethernet stack.
Reset IP configuration
Adau based devices can be set up with a static IP (or
any other IP policy) with an external software programmer
provided by Lantronix™. In order to set up the IP address
please proceed as follow:
Download and install the DeviceInstaller™ software
from the Lantronix Web Site on your PC. Please refer to
Lantronix documentation for installation.
2. Shutdown any M Series client (Armonía or third-party
client).
WARNING! Make sure that the only connected Lantronixbased devices are M Series units. Any third-party device
(e.g. printers) that are equipped with a Lantronix unit
are visbile with this software.
Powersoft will be not responsible for any damage suffered by third-party products equipped with Lantronix
hardware.
3. Launch the program: it should automatically scan your
network. If not, manually initiate the scan by clicking
the Search button.
4. Select the device whose IP address policy you want to
set and press the button Assign IP.
1. Connect the device to your PC.
5. Follow the Device Installer wizard. Any kind of IP policy
can be set.
6. When done, the device network will restart automatically.
FIG. 1: Lantronix DeviceInstaller – Press the search button
to start a (new) search.
1
Setting IP addressing to DHCP
Setting IP addressing to Static IP
FIG. 5: Select assign specific IP and click next.
FIG. 3: Select Obtain an IP address and click next.
FIG. 4: Set DHCP and Auto IP assignment.
FIG. 6: Select IP address and subnet mask
compatible with your PC. Specifying the gateway address is not mandatory. Click next.
2