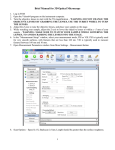
1
DEKTAKXT
STYLUS PROFILER
USER MANUAL
P/N 980-365
©2011, Bruker Corporation
All rights reserved
Printed in the United States of America
May 31, 2011
COPYRIGHT NOTICE
The reproduction, transmission, or use of this document or its contents is not permitted without express
written authority. Offenders will be liable for damages. All rights reserved.
All configurations and specifications are subject to change without notice.
TRADEMARK NOTICE
Vision64 is a registered trademark of Bruker Corporation. All other brand or product names are trademarks
or registered trademarks of their respective holders.
Bruker Nano Surfaces Business
2650 East Elvira Road
Tucson, Arizona 85756
Phone: (520) 741-1044
Fax: (520) 294-1799
WARRANTY
Bruker Corporation Statement of Limited Warranty
This product is covered by the terms of the Bruker Corporation standard warranty as in effect on the
date of shipment and as reflected on the Bruker Order Acknowledgement and Quote. While a
summary of the warranty statement is provided below, please refer to the Order Acknowledgement
and/or Quote for a complete statement of the applicable warranty provisions. In addition, a copy of
these warranty terms may be obtained by contacting Bruker.
WARRANTY. Seller warrants to the original Buyer that new equipment will be free of defects in material and
workmanship for a period of one year commencing (a) on final acceptance or (b) 90 days from shipping,
whichever occurs first. This warranty covers the cost of parts and labor (including, where applicable, field
service labor and travel required to restore the equipment to normal operation).
Seller warrants to the original Buyer that replacement parts will be new or of equal functional quality and
warranted for the remaining portion of the original warranty or 90 days, whichever is longer.
Seller warrants to the original Buyer that software will perform in substantial compliance with the written
materials accompanying the software. Seller does not warrant uninterrupted or error-free operation.
Seller's obligation under these warranties is limited to repairing or replacing at Seller's option defective nonexpendable parts or software. These services will be performed, at Seller's option, at either Seller's facility or
Buyer's business location. For repairs performed at Seller's facility, Buyer must contact Seller in advance for
authorization to return equipment and must follow Seller's shipping instructions. Freight charges and shipments
to Seller are Buyer's responsibility. Seller will return the equipment to Buyer at Seller's expense. All parts used
in making warranty repairs will be new or of equal functional quality.
The warranty obligation of Seller shall not extend to defects that do not impair service or to provide warranty
service beyond normal business hours, Monday through Friday (excluding Seller holidays). No claim will be
allowed for any defect unless Seller shall have received notice of the defect within thirty days following its
discovery by Buyer. Also, no claim will be allowed for equipment damaged in shipment sold under standard
terms of F.O.B. factory. Within thirty days of Buyer's receipt of equipment, Seller must receive notice of any
defect that Buyer could have discovered by prompt inspection. Products shall be considered accepted 30 days
following (a) installation, if Seller performs installation, or (b) shipment; unless written notice of rejection is
provided to Seller within such 30-day period.
Expendable items, including, but not limited to, lamps, pilot lights, filaments, fuses, mechanical pump belts, Vbelts, wafer transport belts, pump fluids, O-rings and seals ARE SPECIFICALLY EXCLUDED FROM THE
FOREGOING WARRANTY AND ARE NOT WARRANTIED. All used equipment is sold 'AS IS, WHERE
IS,' WITHOUT ANY WARRANTY, EXPRESS OR IMPLIED.
Warranty
i
Seller assumes no liability under the above warranties for equipment or system failures resulting from (1) abuse,
misuse, modification or mishandling; (2) damage due to forces external to the machine including, but not limited
to, acts of God, flooding, power surges, power failures, defective electrical work, transportation, foreign
equipment/attachments or Buyer-supplied replacement parts or utilities or services such as gas; (3) improper
operation or maintenance or (4) failure to perform preventive maintenance in accordance with Seller's
recommendations (including keeping an accurate log of preventive maintenance). In addition, this warranty does
not apply if any equipment or part has been modified without the written permission of Seller or if any Seller
serial number has been removed or defaced.
No one is authorized to extend or alter these warranties on Seller's behalf without the written authorization of
Seller.
THE ABOVE WARRANTIES ARE EXPRESSLY IN LIEU OF ANY OTHER EXPRESS OR IMPLIED
WARRATIES (INCLUDING THE WARRANTY OF MERCHANTABILITY), AND OF ANY OTHER
OBLIGATION ON THE PART OF SELLER. SELLER DOES NOT WARRANT THAT ANY EQUIPMENT
OR SYSTEM CAN BE USED FOR ANY PARTICULAR PURPOSE OR WITH ANY PARTICULAR
PROCESS OTHER THAN THAT COVERED BY THE APPLICABLE PUBLISHED SPECIFICATIONS.
NO CONSEQUENTIAL DAMAGES. LIMITATION OF LIABILITY. Seller shall not be liable for
consequential damages, for anticipated or lost profits, incidental, indirect, special or punitive damages, loss of
time, loss of use, or other losses, even if advised of the possibility of such damages, incurred by Buyer or any
third party in connection with the equipment or services provided by Seller. In no event will Seller's liability in
connection with the equipment or services provided by Seller exceed the amounts paid to Seller by Buyer
hereunder.
Buyer is advised that, if the equipment is used in a manner not specified by the manufacturer, the protection
provided by the equipment may be impaired.
Notices: The information in this document is subject to change without notice. No Liability is assumed for errors
contained herein or of incidental or consequential damages in connection with the furnishing, performance, or
use of the material.
Warranty
ii
TABLE OF CONTENTS
Chapter 1. Safety . . . . . . . . . . . . . . . . . . . . . . . . . . . . . . . . . . . . . . . . . . . . . . . . . . . . . . 1-1
Safety Features . . . . . . . . . . . . . . . . . . . . . . . . . . . . . . . . . . . . . . . . . . . . . . . . . . . . . . . . . . . . . . . . . . . .1-1
Red Emergency Off Button . . . . . . . . . . . . . . . . . . . . . . . . . . . . . . . . . . . . . . . . . . . . . . . . . . . . . . . .1-1
White Power On Button and Black Power Off Button . . . . . . . . . . . . . . . . . . . . . . . . . . . . . . . . . . . .1-2
Safety Precautions . . . . . . . . . . . . . . . . . . . . . . . . . . . . . . . . . . . . . . . . . . . . . . . . . . . . . . . . . . . . . . . . .1-2
Safety and Health Hazards . . . . . . . . . . . . . . . . . . . . . . . . . . . . . . . . . . . . . . . . . . . . . . . . . . . . . . . . . . .1-4
Mechanical Hazards . . . . . . . . . . . . . . . . . . . . . . . . . . . . . . . . . . . . . . . . . . . . . . . . . . . . . . . . . . . . .1-4
Pressure Hazards . . . . . . . . . . . . . . . . . . . . . . . . . . . . . . . . . . . . . . . . . . . . . . . . . . . . . . . . . . . . . . .1-4
Installation and Maintenance Safety Issues . . . . . . . . . . . . . . . . . . . . . . . . . . . . . . . . . . . . . . . . . . . . . .1-4
General Lockout/Tagout Procedures . . . . . . . . . . . . . . . . . . . . . . . . . . . . . . . . . . . . . . . . . . . . . . . .1-5
Lockout Procedure . . . . . . . . . . . . . . . . . . . . . . . . . . . . . . . . . . . . . . . . . . . . . . . . . . . . . . . . . . .1-5
Returning the System to Operation. . . . . . . . . . . . . . . . . . . . . . . . . . . . . . . . . . . . . . . . . . . . . . . . . .1-5
Electrical Task Classification . . . . . . . . . . . . . . . . . . . . . . . . . . . . . . . . . . . . . . . . . . . . . . . . . . . . . .1-5
Chapter 2. System Overview . . . . . . . . . . . . . . . . . . . . . . . . . . . . . . . . . . . . . . . . . . . . 2-1
How the System Works . . . . . . . . . . . . . . . . . . . . . . . . . . . . . . . . . . . . . . . . . . . . . . . . . . . . . . . . . . . . . .2-2
Stage Configurations. . . . . . . . . . . . . . . . . . . . . . . . . . . . . . . . . . . . . . . . . . . . . . . . . . . . . . . . . . . . . . . .2-2
Profiler Components . . . . . . . . . . . . . . . . . . . . . . . . . . . . . . . . . . . . . . . . . . . . . . . . . . . . . . . . . . . . . . . .2-3
Measurement Head . . . . . . . . . . . . . . . . . . . . . . . . . . . . . . . . . . . . . . . . . . . . . . . . . . . . . . . . . . . . .2-3
Sensor Head and Stylus Assembly. . . . . . . . . . . . . . . . . . . . . . . . . . . . . . . . . . . . . . . . . . . . . . . . . .2-4
Sample-Positioning Stage. . . . . . . . . . . . . . . . . . . . . . . . . . . . . . . . . . . . . . . . . . . . . . . . . . . . . . . . .2-4
Scan Stage . . . . . . . . . . . . . . . . . . . . . . . . . . . . . . . . . . . . . . . . . . . . . . . . . . . . . . . . . . . . . . . . . . . .2-4
Electronics . . . . . . . . . . . . . . . . . . . . . . . . . . . . . . . . . . . . . . . . . . . . . . . . . . . . . . . . . . . . . . . . . . . .2-4
Base Feet . . . . . . . . . . . . . . . . . . . . . . . . . . . . . . . . . . . . . . . . . . . . . . . . . . . . . . . . . . . . . . . . . . . . .2-5
Environmental Enclosure . . . . . . . . . . . . . . . . . . . . . . . . . . . . . . . . . . . . . . . . . . . . . . . . . . . . . . . . .2-6
EMO Box. . . . . . . . . . . . . . . . . . . . . . . . . . . . . . . . . . . . . . . . . . . . . . . . . . . . . . . . . . . . . . . . . . . . . .2-6
Computer and Software . . . . . . . . . . . . . . . . . . . . . . . . . . . . . . . . . . . . . . . . . . . . . . . . . . . . . . . . . . . . .2-7
Options and Accessories. . . . . . . . . . . . . . . . . . . . . . . . . . . . . . . . . . . . . . . . . . . . . . . . . . . . . . . . . . . . .2-8
Chapter 3. Basic Operations and Maintenance . . . . . . . . . . . . . . . . . . . . . . . . . . . . . 3-1
Powering Up the System . . . . . . . . . . . . . . . . . . . . . . . . . . . . . . . . . . . . . . . . . . . . . . . . . . . . . . . . . . . . .3-1
Powering Down the System . . . . . . . . . . . . . . . . . . . . . . . . . . . . . . . . . . . . . . . . . . . . . . . . . . . . . . . . . .3-3
Loading and Unloading the Sample . . . . . . . . . . . . . . . . . . . . . . . . . . . . . . . . . . . . . . . . . . . . . . . . . . . .3-4
Table of Contents
iii
Loading the Sample . . . . . . . . . . . . . . . . . . . . . . . . . . . . . . . . . . . . . . . . . . . . . . . . . . . . . . . . . . . . 3-4
Unloading the Sample. . . . . . . . . . . . . . . . . . . . . . . . . . . . . . . . . . . . . . . . . . . . . . . . . . . . . . . . . . . 3-5
Towering Up and Down . . . . . . . . . . . . . . . . . . . . . . . . . . . . . . . . . . . . . . . . . . . . . . . . . . . . . . . . . . . . . 3-5
Adjusting the Illumination. . . . . . . . . . . . . . . . . . . . . . . . . . . . . . . . . . . . . . . . . . . . . . . . . . . . . . . . . . . . 3-5
Using the Manual Stage-Positioning Controls . . . . . . . . . . . . . . . . . . . . . . . . . . . . . . . . . . . . . . . . . . . . 3-6
Adjusting the X-Y Position. . . . . . . . . . . . . . . . . . . . . . . . . . . . . . . . . . . . . . . . . . . . . . . . . . . . . . . . 3-6
Leveling the Stage . . . . . . . . . . . . . . . . . . . . . . . . . . . . . . . . . . . . . . . . . . . . . . . . . . . . . . . . . . . . . 3-6
Using the Auto Stage-Positioning Controls . . . . . . . . . . . . . . . . . . . . . . . . . . . . . . . . . . . . . . . . . . . . . . 3-7
X-Y Control Panel . . . . . . . . . . . . . . . . . . . . . . . . . . . . . . . . . . . . . . . . . . . . . . . . . . . . . . . . . . . . . . 3-7
Theta Control Panel . . . . . . . . . . . . . . . . . . . . . . . . . . . . . . . . . . . . . . . . . . . . . . . . . . . . . . . . . . . . 3-9
Removing an Installed Stylus . . . . . . . . . . . . . . . . . . . . . . . . . . . . . . . . . . . . . . . . . . . . . . . . . . . . . . . 3-10
Installing a Different Stylus . . . . . . . . . . . . . . . . . . . . . . . . . . . . . . . . . . . . . . . . . . . . . . . . . . . . . . . . . 3-13
Cleaning the Stylus Tip . . . . . . . . . . . . . . . . . . . . . . . . . . . . . . . . . . . . . . . . . . . . . . . . . . . . . . . . . . . . 3-16
Electronically Configuring and Calibrating the Profiler . . . . . . . . . . . . . . . . . . . . . . . . . . . . . . . . . . . . 3-17
General Care and Maintenance . . . . . . . . . . . . . . . . . . . . . . . . . . . . . . . . . . . . . . . . . . . . . . . . . . . . . 3-17
Chapter 4. Taking Measurements and Analyzing Data . . . . . . . . . . . . . . . . . . . . . . . 4-1
Setting the Measurement Options . . . . . . . . . . . . . . . . . . . . . . . . . . . . . . . . . . . . . . . . . . . . . . . . . . . . . 4-2
Settings on the Measurement Options Tab. . . . . . . . . . . . . . . . . . . . . . . . . . . . . . . . . . . . . . . . . . . 4-2
Taking a Standard Manual 2D Measurement . . . . . . . . . . . . . . . . . . . . . . . . . . . . . . . . . . . . . . . . . . . . 4-4
What Happens During a Scan Measurement . . . . . . . . . . . . . . . . . . . . . . . . . . . . . . . . . . . . . . . . . 4-7
Creating an Automation Recipe that Includes Deskew Points . . . . . . . . . . . . . . . . . . . . . . . . . . . . . . 4-10
Appending Analytical Functions . . . . . . . . . . . . . . . . . . . . . . . . . . . . . . . . . . . . . . . . . . . . . . . . . . . . . 4-13
Setting the Cursor Locations and Bandwidths. . . . . . . . . . . . . . . . . . . . . . . . . . . . . . . . . . . . . . . . . . . 4-14
Applying Software Leveling . . . . . . . . . . . . . . . . . . . . . . . . . . . . . . . . . . . . . . . . . . . . . . . . . . . . . . . . . 4-16
Creating a Database . . . . . . . . . . . . . . . . . . . . . . . . . . . . . . . . . . . . . . . . . . . . . . . . . . . . . . . . . . . . . . 4-18
Creating an Analyzer Recipe. . . . . . . . . . . . . . . . . . . . . . . . . . . . . . . . . . . . . . . . . . . . . . . . . . . . . . . . 4-20
Using the Data Analyzer and Analysis Toolbox . . . . . . . . . . . . . . . . . . . . . . . . . . . . . . . . . . . . . . 4-20
Setting the Parameters for an Analysis or Filter . . . . . . . . . . . . . . . . . . . . . . . . . . . . . . . . . . . . . . 4-22
Selecting the Meta Data . . . . . . . . . . . . . . . . . . . . . . . . . . . . . . . . . . . . . . . . . . . . . . . . . . . . . . . . 4-22
Creating a Vision Recipe . . . . . . . . . . . . . . . . . . . . . . . . . . . . . . . . . . . . . . . . . . . . . . . . . . . . . . . . . . . 4-22
Viewing and Analyzing Stored Data . . . . . . . . . . . . . . . . . . . . . . . . . . . . . . . . . . . . . . . . . . . . . . . . . . 4-23
Chapter 5. Using Vision64 . . . . . . . . . . . . . . . . . . . . . . . . . . . . . . . . . . . . . . . . . . . . . . 5-1
Opening Vision64 . . . . . . . . . . . . . . . . . . . . . . . . . . . . . . . . . . . . . . . . . . . . . . . . . . . . . . . . . . . . . . . . . 5-1
Closing Vision64 . . . . . . . . . . . . . . . . . . . . . . . . . . . . . . . . . . . . . . . . . . . . . . . . . . . . . . . . . . . . . . . . . . 5-1
Important Vision64 Directories . . . . . . . . . . . . . . . . . . . . . . . . . . . . . . . . . . . . . . . . . . . . . . . . . . . . . . . 5-2
Using the Vision64 Online Help. . . . . . . . . . . . . . . . . . . . . . . . . . . . . . . . . . . . . . . . . . . . . . . . . . . . . . . 5-2
Finding a Help Topic . . . . . . . . . . . . . . . . . . . . . . . . . . . . . . . . . . . . . . . . . . . . . . . . . . . . . . . . . . . . 5-2
Selecting WinDows for Display . . . . . . . . . . . . . . . . . . . . . . . . . . . . . . . . . . . . . . . . . . . . . . . . . . . . . . . 5-3
Working With Vision Views . . . . . . . . . . . . . . . . . . . . . . . . . . . . . . . . . . . . . . . . . . . . . . . . . . . . . . . . . . 5-3
Displaying Other Vision64 Windows . . . . . . . . . . . . . . . . . . . . . . . . . . . . . . . . . . . . . . . . . . . . . . . . . . . 5-6
More Features of the Interface . . . . . . . . . . . . . . . . . . . . . . . . . . . . . . . . . . . . . . . . . . . . . . . . . . . . . . . 5-9
Changing the Units and Other User Preferences . . . . . . . . . . . . . . . . . . . . . . . . . . . . . . . . . . . . . . . . 5-10
iv
Table of Contents
Applying Filters . . . . . . . . . . . . . . . . . . . . . . . . . . . . . . . . . . . . . . . . . . . . . . . . . . . . . . . . . . . . . . . . . . .5-11
Performing Analyses . . . . . . . . . . . . . . . . . . . . . . . . . . . . . . . . . . . . . . . . . . . . . . . . . . . . . . . . . . . . . . .5-12
3D Mapping Optiion . . . . . . . . . . . . . . . . . . . . . . . . . . . . . . . . . . . . . . . . . . . . . . . . . . . . . . . . . . . . . ....5-13
Table of Contents
v
1
SAFETY
The DektakXT™ system may be set up and operated only in accordance with the instructions
outlined in this manual. In the chapters that follow, the messages below indicate that special vigilance
is required.
CAUTION
Whenever you see a Caution note, there is a possibility that data will be lost, or there
is some specific action that you must perform for the system to work properly.
WARNING
Whenever you see a Warning note, there is the possibility of personal injury
or equipment damage.
SAFETY FEATURES
Several features of the DektakXT system ensure operator safety.
Red Emergency Off Button
The DektakXT system is equipped with a red EMERGENCY OFF button, located on the EMO box
(see Figure 1-1). This unit may be placed in any convenient and readily accessible location.
Pressing the EMERGENCY OFF button shuts off DC power to the system devices, excluding the
computer, monitor, and power supply adapter. The 24 VDC control circuit in the EMO Box also
remains energized.
Safety
1-1
Emergency Machine
Off (EMO) button
Power On button
Power Off button
Figure 1-1: EMO Box
CAUTION
Use the EMERGENCY OFF button only in case of an emergency.
White Power On Button and Black Power Off Button
The DektakXT system is equipped with a white POWER ON button and a black POWER OFF button.
These buttons are located next to the red EMERGENCY OFF button on the EMO Box (see
Figure 1-1).
Pressing the POWER ON button provides DC power to all system devices but the computer, monitor,
and power supply adapter.
Pressing the POWER OFF button shuts off DC power to all system devices but the computer, monitor,
and power supply adapter. The 24 VDC control circuit in the EMO Box also remains energized.
SAFETY PRECAUTIONS
The DektakXT system is designed to minimize potential health and safety hazards during normal
operation and routine maintenance activities. As with any mechanical system that uses electrical
energy and compressed air, it contains some physical and electrical hazards. You should be aware of
these potential hazards and the controls used to minimize them. Review this section and contact
Bruker if you have any questions on environmental, health, or safety-related issues associated with
the system.
Potential safety hazards associated with the system are clearly identified in this manual. In addition,
warning and safety labels have been placed on the system where there exists a potential for personal
1-2
Safety
injury or damage to the system. The following table illustrates each label, describes its meaning, and
indicates where it appears on the system.
Table 1-1: Warning, Safety, and Compliancy Labels
Safety
1-3
SAFETY AND HEALTH HAZARDS
Although the DektakXT system has been designed with safety in mind, it does contain some inherent
potential hazards. Physical hazards associated with operating the equipment are discussed in this
section.
Mechanical Hazards
Mechanical hazards exist in the systems wherever moving parts are located, such as slides. Protection
against most of the mechanical hazards in the DektakXT system is provided in the form of a hood and
system base. Wherever possible, physical guards have been placed around moving parts to prevent
personnel from contacting them. The exceptions are the areas around and above the X-Y stage. These
areas, however, do not contain pinch-point hazards.
Some maintenance tasks may require removal of the hood and system base. In these cases, safe work
practices, including use of lockout procedures for electricity, pressure (pneumatic system) or other
applicable hazards, should be followed. Only trained service personnel should perform maintenance
activities that require mechanical motion while the hood and base are removed.
Pressure Hazards
Pressure hazards exist due to the difference in kinetic energy of a gas within a container or piping
system and the surrounding environment. If a sudden breach of a gas line or a pressurized container
were to occur (for example, a gas delivery line bursts), the pressure differential between the gas in the
line and the surrounding atmosphere will cause the gas to be forcefully expelled into the surrounding
atmosphere. This can cause physical injuries due to particles flying outward with extremely high
speed.
The DektakXT system uses compressed clean dry air (CDA) to operate the optional vibration
isolation table. It is designed to use CDA at the typical house-supplied pressures of 50 psi. The CDA
fittings or components of the pneumatic system should be adjusted only after appropriate release of
air-line pressure. As with electrical and mechanical tasks, maintenance activities involving the air
lines should occur only after appropriate pressure lockout procedures have been implemented (see
General Lockout/Tagout Procedures in the section that follows).
INSTALLATION AND MAINTENANCE SAFETY ISSUES
Certain installation activities require attention to special safety hazards in addition to the overall
system hazards discussed in the Safety and Health Hazards section above. The installation of the
systems requires connection and adjustment of electricity and pressurized air lines. These types of
activities require knowledge and use of lockout/tagout procedures.
Maintenance procedures often present greater hazards to personnel than normal production activities
due to the need to defeat safety features in order to access the equipment. The following sections
present general information on some of the key safety-related procedures or actions that maintenance
personnel should follow when servicing the DektakXT system.
1-4
Safety
General Lockout/Tagout Procedures
This section describes general lockout/tagout procedures for electrical systems and pressurized air
lines. Contact your internal safety and health representative for more detailed procedures for your
facility, as well as for training and authorization/certification requirements.
Lockout Procedure
1
Notify all affected and other persons of intended lockout.
2
Turn off the computer following the normal shutdown procedure.
3
Unplug the first cord on the power supply adapter from its receptacle on the signal processor on the back of
the DektakXT stylus profiler.
4
Unplug the second cord on the power supply adapter from its wall outlet.
5
Place the power supply adapter with its two disconnected cords in a secure location. This is the equivalent
of a lockout/tagout procedure on a more complex system.
6
Close the air regulator toggle switch below the vibration isolation table.
7
Dissipate any residual pressure following the appropriate dissipation procedure (for example, opening a
bleed valve).
8
Verify that all personnel are clear of the hazard zone.
9
Attempt to restart the equipment. If properly locked out the equipment should not be able to be started.
10
Use a voltmeter and make voltage measurements to verify that all electrical sources have been locked out.
If properly locked out, no voltage should be present. Check the reading on supply line pressure gauges to
verify that no pressure exists within the system. If properly locked out, no pressure should exist.
11
Perform maintenance work.
Returning the System to Operation
1
Verify that all personnel, materials, tools, and test equipment are clear of the hazard zone.
2
Plug the first cord on the power supply adapter into its receptacle on the signal processor on the back of
the DektakXT stylus profiler.
3
Plug the second cord on the power supply adapter into a wall outlet.
4
Open the air regulator toggle switch to repressurize the vibration isolation table.
5
Turn on the computer following the normal startup procedure.
6
Notify all affected and other persons that the lockout has been cleared and the equipment is back in
operation.
Electrical Task Classification
Each task involving electrical operations is evaluated for severity and classified according to the
criteria outlined in Table 1-2. These criteria categorize electrical hazards into four types, ranging
from Type 1 (de-energized) to Type 4 (fully energized and exposure required). Lockout/tagout
requirements, including training requirements, are based on the type of hazard present.
• All operator tasks are classified as Type 1 or 2.
• Only qualified service personnel should perform Type 3 or 4 tasks, following established
Bruker service policies.
Safety
1-5
Table 1-2: Classification of Operator Tasks
Task Type
Description
Type 1
Equipment is fully de-energized
Type 2
Equipment is energized. Energized circuits are covered or
insulated.
Type 3
Equipment is energized. Energized circuits are exposed and
inadvertent contact with uninsulated energized parts is
possible. Potential exposures are no greater than 30 volts rms,
42.4 volts peak, 60 volts DC or 240 volt-amps in dry locations.
Type 4
Equipment is energized. Energized circuits are exposed and
inadvertent contact with uninsulated energized parts is possible.
Potential exposures are greater than 30 volts rms, 24 volts peak,
60 volts DC, or 240 volt-amps in dry locations. Potential
exposures to radio-frequency currents, whether induced or via
contact, exceed certain limits.
NOTE – No routine tasks for the DektakXT system are classified as Type 4.
During any troubleshooting or maintenance activities that are performed while the DektakXT system
is operating, the technician should always be able to easily reach the EMERGENCY OFF button on the
EMO Box (see Figure 1-1). In case of an emergency, the technician can press the EMERGENCY OFF
button to immediately stop the system.
In some circumstances, it is advisable to have two service personnel working on a system at the same
time. This ensures that one person will always have access to the EMERGENCY OFF button.
1-6
Safety
2
SYSTEM OVERVIEW
The DektakXT® stylus surface profiler is an advanced thin and thick film step height measurement
tool. In addition to profiling surface topography and waviness, the DektakXT system measures
roughness in the nanometer range. Available with a standard manual sample-positioning stage (see
Figure 2-1) or an optional automatic X-Y or theta stage (see Figure 2-3), it provides a step-height
repeatability of 5Å (<0.6 nm).
In addition to taking two-dimensional surface profile measurements, the DektakXT system can
produce three-dimensional measurements and analyses when equipped with the 3D Mapping Option.
Hood-covered
measurement
head that
includes the
tower, camera,
illuminator, and
sensor
Bridge
Sensor head and
stylus
Block sample
fixture (chuck)
Manual samplepositioning stage
Scan stage
System base
Base foot
Figure 2-1: DektakXT Stylus Profiler with the Standard Manual X-Y Sample-Positioning Stage
System Overview
2-1
HOW THE SYSTEM WORKS
The DektakXT system takes measurements electromechanically by moving a diamond-tipped stylus
over the sample surface according to a user-programmed scan length, speed, and stylus force. The
stylus is linked to a Linear Variable Differential Transformer (LDVT), which produces and processes
electrical signals that correspond to surface variations of the sample. After being converted to digital
format, these surface variations are stored for display and analysis.
The Vision64 application calculates and displays the results of user-selected analytical functions for
measuring surface texture and other parameters to characterize the profile data. For example, the Ra
(average roughness) analytical function—the most commonly used international parameter of
roughness—calculates the arithmetic average deviation from the mean line within the assessment
length. If there is an active database, selected analytical functions are logged to it during each
measurement.
STAGE CONFIGURATIONS
The DektakXT stylus surface profiler comes in the following stage configurations:
• The standard 2-D DektakXT system, which includes a two-axis, manual sample-positioning
stage with 101.6 x 101.6 mm (4 x 4 inches) of X-Y translation, manual leveling, two-point
programmable or cursor software leveling, and manual theta rotation (see Figure 2-2). This
standard stage accommodates samples up to 50 mm (1.9 inches) thick and performs long scans
of 55 mm (2.16 inches). It provides ± 50.8 mm (2 inches) of X-Y translation as well as manual
theta positioning (see Figure 2-3). The standard system is available with 50 mm (1.97 inch), 100
mm (3.94 inch), and 150 mm (5.90 inch) wafer alignment pins, along with one of the following
sample fixtures (chucks):
• 101 mm (4-inch) square base platform with no vacuum capability
• Ceramic vacuum
• Dedicated photo voltaic vacuum
Figure 2-2: Standard Manual Sample-Positioning Stage with Square Base Platform Fixture
2-2
System Overview
• The 3D Mapping and Automation Options, which include an X-Y auto sample-positioning
stage (see Figure 2-3). In addition to 3D mapping (see Figure 2-15), these options provide
automation and programmability of up to 200 sites on samples of up to 150 mm (5.90 inches)
in diameter. The X-Y auto sample-positioning stage includes one of the following sample
fixtures (chucks):
• 50 mm to 76 mm (2 to 3 inch) wafer vacuum
• 101 mm to 152 mm (4 to 6 inch) wafer vacuum
• Dedicated 203 mm (8-inch) wafer vacuum
• Ceramic vacuum
• Dedicated photo voltaic vacuum
Figure 2-3: X-Y Auto Stage with Wafer Vacuum Sample Fixture (Chuck)
PROFILER COMPONENTS
As shown in Figure 2-1, the DektakXT stylus surface profiler system contains all of the mechanical,
electrical, and optical components for sample positioning, sample viewing, and
scanning/measurement. As described in Stage Configurations on page 2-2, the system can be
configured with a manual or X-Y auto stage. Its sturdy single-arch bridge design reduces sensitivity
to adverse environmental conditions.
Measurement Head
The hood-covered measurement head shown in Figure 2-1 houses a USB video camera and an LED
illuminator to assist the operator in feature location and stylus centering. The live video output of the
camera provides feedback to the operator during a scan measurement.
The measurement head also includes a sensor head that magnetically holds the stylus assembly and
contains the feedback mechanisms required to track stylus movement as it rides over the sample
surface.
System Overview
2-3
WARNING
Do not remove the hood and attempt to service the components of the
yourself. Instead call Bruker Customer Service. Failure to heed this warning
can result in damage to delicate equipment.
Sensor Head and Stylus Assembly
A diamond-tipped stylus (see Figure 2-3) attached to the sensor head permits accurate twodimensional surface profiler measurements in a wide range of applications. In standard configuration,
user-programmable stylus force from 1 mg to 15 mg allows profiling on soft or hard surfaces.
A variety of available stylus tip sizes are available to fill a broad range of measurement applications.
Each tip comes in its own protective case.
NOTE – The DektakXT system comes with a stylus exchange tool that allows you to safely
exchange one stylus for another without damaging the delicate tip.
.
Figure 2-4: Sensor Head and Stylus Assembly
Sample-Positioning Stage
Available sample-positioning stages and sample fixtures (chucks) are discussed in Stage
Configurations on page 2-2.
Scan Stage
The direct-drive scan stage accelerates measurements by reducing the time between scans. This
allows for the generation of large 3D maps or long scans for measuring stress.
Electronics
The DektakXT system includes a power supply adapter with an input voltage 100 - 240 VAC
(see Figure 2-5). This unit sends power to the various system components.
2-4
System Overview
A signal processor provides monitoring and control of the LVDT signal, stylus force coil,
stage motor, and LED illumination (see Figure 2-6). An integrated cable connector panel
handles system input, output, and power signals.
Power demand is 110 VA maximum with a standard outlet power connection.
Figure 2-5: Power Supply Adapter
Figure 2-6: Signal Processor
Base Feet
The standard urethane polymer base feet (see Figure 2-7) help isolate the system from the
surrounding vibrational environment.
Figure 2-7: Standard Base Foot
System Overview
2-5
The optional passive pneumatic isolation feet (see Figure 2-8) accept compressed air or nitrogen.
These feet can be used in place of a large vibration isolation system.
Figure 2-8: Isolation Base Foot
Environmental Enclosure
The acrylic environmental enclosure (see Figure 2-9) protects the sample and scan area from adverse
outside influences such as noise, vibrations, dust, and air currents. The front door lifts to provide
sample access. The system should always be operated with the enclosure door closed.
Figure 2-9: Environmental Enclosure with the Door Closed
EMO Box
An Emergency Machine Off box (EMO Box) includes POWER OFF and POWER ON buttons, along
with an EMERGENCY OFF button (see Figure 2-10). The EMERGENCY OFF button cuts off power to the
DektakXT system but leaves power on to the computer and monitor. After the EMERGENCY OFF
button has been depressed, the power cannot be returned to the system until it has been released. This
is accomplished by turning it clockwise by one-eighth turn.
2-6
System Overview
Emergency Machine
Off (EMO) button
Power On button
Power Off button
Figure 2-10: EMO Box
COMPUTER AND SOFTWARE
The DektakXT system can include the optional Dell™ computer, keyboard, mouse, and DVD drive.
If you prefer to used your own preferred computer it must fill the following requirements:
• The computer must be capable of running the Windows7 operating system
• The monitor must have a 6 x 9 aspect ratio and minimum display resolution 1920 x 1080.
The pre-loaded Vision64 measurement and analysis software (see Figure 2-11) has 64-bit parallelprocessing architecture. It allows you adjust the system illumination, position a sample under the
stylus, take single-scan or automated measurements (see Figure 2-12), calculate analytical functions,
apply analyses and filters, and perform special operations, such as comparing the analytical results
from multiple scans. For an introduction to Vision64, see Chapter 5 of this manual. For full
instructions on using the Vision64 software, see the DektakXT online Help.
Figure 2-11: The Vision64 Welcome Screen
System Overview
2-7
Figure 2-12: Output Display for a Single-Scan Measurement
OPTIONS AND ACCESSORIES
A number of options and accessories are available for the DektakXT system, including:
• A video monitor that provides a 23-inch, high-resolution, flat-panel color display (see Figure 213). It shows programs and graphics in full color, along with a color video image of the sample
surface from the USB camera in the tower assembly.
Figure 2-13: Video Monitor
• The X-Y auto stage described in Stage Configurations on page 2-2.
• A broad line of calibration standards (see Figure 2-14).
2-8
System Overview
Figure 2-14: Step Height Standard
• A variety of styli for measuring fine surface features and softer samples.
• Stress Measurement for calculating tensile or comprehensive stress on processed wafers.
• The 3D Mapping Option that enables true 3D-mapping (see Figure 2-15), calculates the bearing
ratio, and performs many other analyses.
• 200-mm (7.8 inch) data-stitching software for increasing the scan length to 150 mm or longer
with multiple stitching operations (available only on systems that include the X-Y auto stage).
Figure 2-15: 2D Contour Plot Generated with the 3D Mapping Option
System Overview
2-9
3
BASIC OPERATIONS AND MAINTENANCE
This chapter describes the basic use of your DektakXT stylus surface profiler, including the software
procedures that involve profiler control. For instructions regarding other software procedures, see
Chapter 5 of this manual and the Vision64 online Help.
POWERING UP THE SYSTEM
The following steps include all possible startup contingencies. Normally you can simply press the
white ON button on the EMO Box, turn on the computer and monitor, and then start the Vision64
software.
To power up the DektakXT system:
1
Verify that the cable from power supply adapter is connected to a wall outlet.
2
Verify that all USB cables are connected.
3
Verify that the software key is installed in a USB port of the computer (see Figure 3-1). (The software key is
shipped inside the Vision64 CD case.)
Figure 3-1: Software Key in a USB Port
4
Verify that the red Emergency Off button on the EMO Box is in the On (popped-up) position. If it is not,
release it by rotating it clockwise until it pops up (see Figure 3-2).
Basic Operations and Maintenance
3-1
Figure 3-2: ReleasIng the Red Emergency Off Button on the EMO box
5
Press the white ON button on the EMO Box. After you do this, the following events occur:
•
The white ON button on the EMO box illuminates (see Figure 3-3).
Figure 3-3: EMO Box with Illuminated On Button
•
•
•
The light bar at the back of the profiler Illuminates.
The red LED lights on the scan stage limit switches illuminate.
6
Press and release the power button on the front of the computer.
7
Turn on the monitor and power up the computer.
8
Select Start > Vision64 or click the Vision64 application button
software launches, the following events occur:
•
•
•
9
3-2
All system devices are powered up with the exception of the computer and monitor.
on the desktop or task bar. As the
The tower assembly moves to its upper limit. The system stops with the stylus in the Tower Up position.
The scan stage initializes. You can now safely position the sample beneath the stylus.
The Vision64 Welcome screen appears, followed by the Vision64 Instrument tab, which includes the
DektakXT Live Video Display (see Figure 3-4).
Allow the system to warm up for approximately 15 minutes before taking a scan measurement.
Basic Operations and Maintenance
Figure 3-4: Vision64 Instrument Tab, Including the Live Video Display
POWERING DOWN THE SYSTEM
IMPORTANT SAFETY INFORMATION! The DektakXT system is equipped with a
red EMERGENCY OFF button located on the EMO Box connected to the back of the profiler (see
Figure 3-4). You may place this box in any convenient and readily accessible location.
Pressing the EMERGENCY OFF button immediately shuts off power to all system components,
excluding the computer, monitor, and power supply adapter. The 24 VDC control circuit in the
EMO Box also remains energized. After you power down the system via the EMO box, you
must exit Vision64, shut down the computer, and turn off the monitor as described below.
Emergency Machine
Off (EMO) button
Black Off Button
Figure 3-5: Red EMO and Black Off buttons on the EMO box
Basic Operations and Maintenance
3-3
To power down the DektakXT system:
1
Close the Vison64 software as described in Closing Vision64 on page 5-1.
2
Press the black OFF button on the EMO Box (see Figure 3-5). This shuts off power to all system devices
but the computer, monitor, power supply adapter, and 24 VDC control circuit in the EMO Box.
3
Select Start > Shut Down from the Windows 7 Start menu, and then click Shut Down in the dialog box
that appears.
4
Turn off the monitor.
LOADING AND UNLOADING THE SAMPLE
WARNING
If the sample does not freely clear the stylus, click the Tower Up
to
raise the stylus so that it is safely above the sample. Failure to do so can
damage both the stylus and the sample.
Loading the Sample
Click the Unload Sample button
on the toolbar above the Live Video Display to move the scan
stage forward 55mm (two inches). You can now conveniently place a sample on the sample fixture
(see Figure 3-6) remove it without risk of damage to the stylus or the sample.
Click the Load Sample button
to move the scan stage backward its home position. Use the
manual or auto stage controls to fine-position the area of interest on the sample beneath the stylus.
For instructions, see Using the Manual Stage-Positioning Controls on page 3-6 and Using the Auto
Stage-Positioning Controls on page 3-7.
Figure 3-6: Sample Loaded on the Theta Sample Fixture (Chuck)
3-4
Basic Operations and Maintenance
Unloading the Sample
When a scan routine is complete, the stylus automatically lifts off the surface. To remove the sample,
from the fixture, click the Unload Sample button
to make the system move the samplepositioning stage forward. You can now lift your sample off the fixture.
TOWERING UP AND DOWN
You must slowly lower the tower assembly to bring the feature that you want to measure into focus in
the Live Video Display. To do this, click the Tower Down
button on the toolbar above the Live
Video Display.
To raise the tower assembly, click the Tower Up
button.
To bring the tower all the way up to its home position, click the Tower Home button
.
NOTE – The DektakXT profiler automatically towers down to bring the stylus into contact
with the sample whenever you start a single-scan measurement, 3D map scan, or automation
program.
WARNING
The tower assembly has a total travel range of 50mm, so sample heights
must not exceed 50mm.
ADJUSTING THE ILLUMINATION
After lowering the tower to focus the camera on your sample, you must adjust the illumination level
of the video image displayed on the monitor. To do this, move the slider on the Intensity Bar at the
bottom of the right pane of the Live Video Display (see Figure 3-7). Move it to the right to increase
the illumination and to the left to decrease it. The feature that you want to scan should be clearly
illuminated.
NOTE – When you save a Vision recipe, the illumination level is automatically included
along with the other measurement settings.
Figure 3-7: Intensity Bar
Basic Operations and Maintenance
3-5
USING THE MANUAL STAGE-POSITIONING CONTROLS
If your DektakXT system includes the manual sample-positioning stage (see Figure 3-8), you must
use the procedures described in this section to adjust both the X and Y positions.
Adjusting the X-Y Position
To position a sample using the manual sample-positioning stage controls:
1
Ensure the stylus is not touching the sample surface. If it is, click the Tower Up button
toolbar.
2
Position the scan start site by using the X-Y positioning levers.
•
•
•
on the
Pull the lever below the front of the platform for coarse X movement.
Pull the lever below the left side of the platform for coarse Y movement.
Use the respective knobs to finely position the sample.
X fine-positioning
knob
X coarsepositioning Lever
Y coarsepositioning
lever
Figure 3-8: X-Y Positioning Levers on the Manual Sample-Positioning Stage
NOTE – After fine-tuning the scan site using the X and Y positioning levers, you may have
to re-null the tower to adjust for skew. (To re-null the tower, tower up and then tower down.)
Leveling the Stage
All stage configurations of the DektakXT system allow you to manually level the sample-positioning
stage by turning the leveling knob below it (see Figure 3-9). The closest possible manual leveling
ensures the best profiler performance. Guidelines for leveling the stage appear after the picture.
3-6
Basic Operations and Maintenance
Stage-leveling knob
Figure 3-9: Stage-Leveling Knob
As you perform manual stage leveling, follow these guidelines:
• To view the effect of leveling on the profile trace in real time, perform stage leveling while a
scan measurement is in progress.
• To verify that the maximum possible level has been obtained, position the cursors so that they
intersect the same horizontal plane.
• If the profile trace is extremely off-level, change the measurement range to 5240kÅ. Level the
trace, change to the intermediate range, and then repeat the procedure until the stage is leveled.
The best level is achieved by using the 6.5kÅ range.
USING THE AUTO STAGE-POSITIONING CONTROLS
When you open Vision64, the Live Video Display appears by default. On its right-hand side, it
contains two instrument control panels—the X/Y Control Panel and the Theta Control Panel.
X-Y Control Panel
Prior to a taking measurement, you must position the area of interest on the sample under the stylus
by adjusting the X-Y position of the motorized sample-positioning stage. Instructions for doing this
appear after the figure.
Basic Operations and Maintenance
3-7
Figure 3-10: X-Y Stage Control Panel
To set the X-Y position of the motorized sample-positioning stage:
1
In the X-Y Control Panel in the Live Video Display (see Figure 3-10), click the blue Gear icon in the upper
right corner to enter the select the units as well as the speeds for Fast, Medium, and Slow (see
Figure 3-11). If you select the Grab Circle to Move check box, you must grab the red circle in the middle of
the X-Y Control Panel before you can adjust the X/Y position of the motorized stage. When your settings
are complete, click OK.
Figure 3-11: X/Y Options Dialog Box
2
In the lower right corner, click the speed at which you want the stage to travel.
3
Do one of the following:
•
3-8
Holding down the left mouse button, drag the red dot in the center of the cross hairs. The dot becomes an
arrow that you can drag with the cursor. The real time X and Y positions of the stage appear in the boxes
Basic Operations and Maintenance
at the lower left. Click and drag to move the stage to another area of interest and display it in the Live Video
Pane. When you have obtained the correct stage position, release the mouse button.
•
. Either type your locations in the X and Y fields or click the
Move button to move the stage to those locations.
Click the Edit Mode button
Theta Control Panel
Prior to a taking measurement, you must place the area of interest on the sample under the stylus by
adjusting the position of the motorized theta sample-positioning stage. Instructions for doing this
appear after the figure.
Figure 3-12: Theta Stage Control
To set the position of the motorized theta sample-positioning stage:
1
In the Theta Control Panel in the Live Video Display (see Figure 3-12), click the blue Gear icon in the upper
right corner to enter the units as well as the speeds for Fast, Medium, and Slow on both the R Axis and the
Theta Axis (see Figure 3-13). If you select the Grab Rectangle to Move check box, you must grab the red
rectangle in the middle of the Theta Control Panel before you can adjust the theta position of the motorized
stage.When your settings are complete, click OK.
Basic Operations and Maintenance
3-9
Figure 3-13: RTheta Stage Options Dialog Box
2
Holding down the left mouse button, drag the red bar in the center of the ring. The bar becomes an arrow
that you can drag with the cursor. The real time theta position of the stage appears in the box below the
ring. This position is graphically depicted by the moving red indicator on the yellow ring.
3
When you have obtained the correct stage position, release the mouse button.
REMOVING AN INSTALLED STYLUS
When a stylus becomes worn or you want to measure another type of sample, you must remove the
currently installed stylus from the sensor head (see Figure 3-18) before replacing it with a different
one.
.
Figure 3-14: Sensor Head and Stylus on the DektakXT Profiler
3-10
Basic Operations and Maintenance
To remove a stylus from the sensor head on the DektakXT profiler:
1
Locate the protective case in which the stylus was shipped and place it near the DektakXT stylus profiler
(see Figure 3-15).
Figure 3-15: Protective Stylus Case
2
Locate the black plastic stylus exchange tool (see Figure 3-18) and place it near the stylus case.
3
Tower up to the Home position
4
On the profiler, turn the brass thumbscrew on the left side of the sensor head counter-clockwise to loosen
the sensor head magnetic shield (see Figure 3-16).
to allow room for maneuvering.
Brass thumb screw
on sensor head
Magnetic shield
Figure 3-16: Sensor Head with Magnetic Shield Attached
5
Slip the shield off the pin on the right side of the sensor head.
6
Carefully move the shield toward the front of the profiler and pull it off the sensor head, making sure to
avoid contact with the stylus.
Front of
profiler
Figure 3-17: Magnetic Shield Removed from Sensor Head
Basic Operations and Maintenance
3-11
7
Rotate the thumbscrew on the stylus exchange tool so that a gray circle (NOT a green one) is visible and
the magnet is NOT engaged (see Figure 3-18).
Magnetic disk pad
Alignment pin
(one of five)
Gray circle indicating
that the magnet is
disengaged
Channel for
holding the
stylus
Thumbscrew
Figure 3-18: Stylus Exchange Tool with Its Magnet Disengaged
8
Position the stylus exchange tool beneath the sensor head (see Figure 3-19).
9
Holding the stylus exchange tool by its sides, align the alignment pins on its top with the outside of the front
of the sensor head (see Figure 3-19). Gently push up until the tool is flush with the bottom of the sensor
head. The ridge at the back of the stylus exchange tool must roughly line up with the back of the sensor
head. The stylus tip should extend out through the front of the channel on the exchange tool.
Sensor head
Alignment pin
Stylus tip
Figure 3-19: Stylus Exchange Tool Flush with the Bottom of the Sensor Head
WARNING
Avoid any personal contact with the stylus arm or tip. This can result in
damage to the stylus.
10
Rotate the thumbscrew on the left side of the stylus exchange tool so that a green circle becomes visible
and the magnet is engaged. The magnet now pulls the stylus into the channel on the exchange tool (see
Figure 3-18). Lower the exchange tool containing the stylus from the bottom of the sensor head and take it
to the protective case in which the stylus was shipped (see Figure 3-15).
11
To remove the stylus from the stylus exchange tool:
a. Disengage the magnet on the exchange tool by rotating the thumb wheel in either direction so that a gray
circle replaces the green one.
3-12
Basic Operations and Maintenance
b. Using tweezers, gently grip the silver magnetic disk pad at the back of the stylus and then lift the stylus
out of the channel on the stylus exchange tool.
c. Place the stylus in its protective case with the tip pointing downward through the hole in the film in the
lower part of the protective case (see Figure 3-20).
Figure 3-20: Inserting the Stylus Tip into the Hole in the Film in the Stylus Case
WARNING.
Always store the stylus in its protective case. Failure to do so can result in
damage to the stylus.
INSTALLING A DIFFERENT STYLUS
NOTE – The following instructions assume that you have already removed the magnetic
shield from the sensor head on the DektakXT profiler. If this is not the case, follow steps 4 - 6
in the previous section.
to allow room for maneuvering.
1
Tower up to the Home position
2
Locate the stylus exchange tool. If its green circle is visible, rotate the thumbscrew in either direction to
disengage the magnet and replace the green circle with a gray one. (This means that the magnet is NOT
engaged as shown in Figure 3-21.)
Basic Operations and Maintenance
3-13
Magnetic disk pad
Alignment pin
(one of five)
Gray circle that
indicates that the
magnet is disengaged
Channel for
holding the
stylus
Thumbscrew
Figure 3-21: Stylus Exchange Tool with Its Magnet Disengaged
3
Locate the case that holds the stylus that you want to install. After opening the case, use tweezers to gently
lift the stylus holding ONLY THE SILVER MAGNETIC DISK PAD AT ITS BACK END (see Figure 3-22).
Figure 3-22: Lifting the Stylus from Its Case
3-14
4
Align the magnetic disk pad of the stylus with the magnetic disk pad on the stylus exchange tool (see
Figure 3-21).
5
Seat the stylus in the channel on the exchange tool. The stylus arm should extend out through the front
channel on the exchange tool (see Figure 3-23)l.
Basic Operations and Maintenance
6
Rotate the thumb wheel on the left side of the stylus exchange tool counterclockwise to display the green
circle and engage the magnet (see Figure 3-23).
Magnetic disk pad on
the stylus exchange
tool
Magnetic disk pad
on the stylus
Stylus arm
extended out
through front of
channel
Green circle indicating
that the magnet is
engaged
Figure 3-23: Stylus Exchange Tool with a Stylus Seated in the Channel and the Magnet Engaged
7
Place the stylus exchange tool underneath the sensor head on the DektakXT profiler. Holding the stylus
exchange tool by the sides, align the alignment pins on its top with the outside of the front of the sensor
head (see Figure 3-19). Gently push up until the tool is flush with the bottom of the sensor head. The ridge
at the back of the stylus exchange tool must roughly line up with the back of the sensor head.
Sensor head
Alignment pin
Stylus tip
Stylus exchange tool
Figure 3-24: Stylus Exchange Tool Flush with the Bottom of the Sensor Head
WARNING
Avoid any personal contact with the stylus arm or tip. This can result in
damage to the stylus.
8
Disengage the magnet by rotating the thumbwheel in either direction so that a gray circle replaces the
green one.
9
Lower the stylus exchange tool.
10
Position the magnetic shield on the thumbscrew shaft on the left side of the sensor head.
Basic Operations and Maintenance
3-15
11
Turn the brass thumb screw clockwise to attach the magnetic shield as shown in Figure 3-25. Do not
tighten the screw—just “snug” it.
Brass thumb screw
on sensor head
Magnetic shield
Figure 3-25: Sensor Head with Magnetic Shield Attached
CLEANING THE STYLUS TIP
1
Tower up to the Home position
t.
2
If there is a sample on the chuck or stage, remove it.
3
Clean the stylus tip using a lint-free synthetic cotton swab, which will not leave any fibers on the stylus.
Moisten the swab with deionized water or laboratory-grade isopropyl alcohol. Lightly touch the stylus tip
with the synthetic cotton swab to remove any dust. You may also use a small soft-bristle paintbrush. Do
NOT use an air gun.
CAUTION
Dispose of wipes in an appropriately labeled solvent-contaminated waste
container.
3-16
Basic Operations and Maintenance
ELECTRONICALLY CONFIGURING AND CALIBRATING
THE PROFILER
WARNING
Most of the settings available from the icons in the Configuration section of the
Instrument toolbar should NOT be changed by the user without help from Bruker
Customer Service. To reach Bruker Customer Service, call 800-873-9750.
To change the DektakXT hardware configuration settings:
1
On the Instrument tab of the Ribbon in Vision64, click one of the following icons to open its associated
dialog box:
Figure 3-26: Configuration and Calibration Buttons on the Instrument Tab
•
Click Advanced Setup to open a dialog box that allows you to make the settings for Soft Touchdown
(which controls the gradual increase of the stylus force to a specified value) and Tower LVDT Phase and
Force (which controls the production and processing of the electrical signals that correspond to surface
variations of the sample). Call Bruker Customer Service for help in making your settings. When you are
done, click OK.
•
The Stylus Force Calibration wizard guides you through the process of calibrating the force with which
the stylus tip contacts the sample.
•
The Vertical Calibration wizard guides you through the procedure of taking a height or depth
measurement and comparing the results with a calibration standard’s certified value. An average
measured value that is within ± 0.5% of the certified value ensures that your DektakXT system is taking
accurate measurements.
•
The Reset Dektak function initializes the scan stage.
NOTE – For a full explanation of all DektakXT configuration settings, see the Vision64 online
Help.
GENERAL CARE AND MAINTENANCE
Follow these guidelines:
• Do not use lubricants on the stage leadscrews.
• Always position the sample so that the stylus is the only part of the stylus assembly that touches
the sample.
Basic Operations and Maintenance
3-17
• Keep the environmental enclosure door closed both when the DektakXT system is in use and
when it is not.
• Never connect or disconnect any cables when the power is on.
• Do not lower the tower without the stage assembly in place.
• Do not move a sample during a scan measurement.
• Avoid vibration and shock during measurements. For example, ensure that an operator does not
bump a surface close to the profiler or the profiler itself during a measurement.
• Always raise the tower to the maximum vertical position when the system is not in use.
3-18
Basic Operations and Maintenance
4
TAKING MEASUREMENTS AND
ANALYZING DATA
This chapter tells you how to take manual and automated scan measurements. It also explains the
manipulation and analysis of scan data.
Figure 4-1: DektakXT System with an Open Enclosure Door
Taking Measurements and Analyzing Data
4-1
SETTING THE MEASUREMENT OPTIONS
Before taking a manual measurement or an automated series of measurements, you must make
selections in the Measurement Setup window (see Figure 4-2). If you save these selections as a
Vision recipe that you designate as the default, the system will automatically apply them to every
future measurement. For instructions, see Creating a Vision Recipe on page 4-18.
NOTE – If the Measurement Options window does not appear, click the Measurement
Setup button
on the Ribbon.
Figure 4-2: Measurement Options Tab of the Measurement Setup window
Settings on the Measurement Options Tab
Scan Type: Select from the following:
• Standard Scan: A normal scan type in which the scan is performed across the surface of a
sample. Because the tower is nulled before each scan, each successive scan has its own
reference point.
• Static Tower Scan: A special scan type in which the scan is performed across the surface of a
sample, but the tower is nulled before only the first scan. Each successive scan therefore uses
the same initial reference point.
• Static Scan: A special scan type in which the scan is performed at the same point. (The scan
stage does not move.) The tower is nulled before the scan. This scan type is primarily used for
determining the noise and drift of the system.
• Map Scan: If your system includes the 3D Mapping Option, select this scan type to measure,
analyze, and view surface contour data in three dimensions (X, Y, and Z).
4-2
Taking Measurements and Analyzing Data
Range: Enter a value that indicates vertical resolution of the scan. When measuring extremely fine
geometries, the 6.5 um range provides a vertical bit resolution of 0.1 nm. For general applications, the
1.0 nm vertical resolution of the 65.5 um range is usually adequate. When measuring thick films or
very rough or curved samples, select the 524 um range with 8.0 nm resolution.
NOTE – The selected scan range is scaled across the LVDT output of the stylus head
sensor and digitized. The greater the selected scan range, the lower the vertical resolution of
the measurement. The 6.5um range will provide a vertical bit resolution of approximately
0.1nm. The 65.5um range has a resolution of 1nm, the 524um range has a resolution of 8nm,
and the 1mm range has a vertical resolution of 15nm. So while the 65.5um, 524um, and 1mm
scan ranges would all work for a 10um step, the 65.5um is the best.
Profile: Select from the following:
• Valleys: Provides 90% of the measurement range below the zero horizontal grid line. This
option is used primarily for measuring etch depths.
• Hills and Valleys: Provides 50% of the measurement range above the zero horizontal grid line
and 50% below. This option is used in most applications, especially if the surface characteristics
of the sample are not well known, or if the sample is out of level.
• Hills: Provides 90% of the measurement range above the horizontal grid line. This option is
used primarily for measuring step heights.
NOTE – When setting up ranges and scan profile types, always think about keeping the
stylus trace from “topping out” or “bottoming out” in the Data Acquistion window.
Stylus Type: Select the currently installed stylus type from the drop-down list.
Stylus Force: Enter a value between 1 mg and 15 mg.
Length: Enter a scan length between 50 um and 55,000 um (55 mm) for a non-stitched measurement.
Duration: Enter amount of time it will take to complete a given scan. Scan duration, in conjunction
with scan length, determines the horizontal resolution of a scan. For most applications, a 10 - 20
second scan provides adequate resolution and throughput.
Resolution: Enter the horizontal resolution for the scan length and scan duration. The scan resolution
is expressed in um/sample, indicating the horizontal distance between data points.
Sample: Indicates the number of data points that the system should take on the sample during a
measurement.
Speed: Indicates the scan speed in units of um/s.
Tower Up After Scan: Select this check box to make the DektakXT stylus profiler automatically
raise the tower ti a safe position after each scan.
Use Soft Touchdown: If your system includes the 3D Mapping Option, select this check box to
make the DektakXT stylus profiler increment the stylus force up to the specified value. This causes
the stylus to descend more slowly, thus minimizing the possibility of scratching the sample.
Taking Measurements and Analyzing Data
4-3
NOTE – For instructions on making the settings on the Advanced Tab, see Creating an
Automation Recipe that Includes Deskew Points on page 4-10. For instructions on making the
settings on the Data Stitching and 3D Map tabs, see your Vision64 online Help.
TAKING A STANDARD MANUAL 2D MEASUREMENT
The most common measurement performed on the DektakXT system is a Standard manual 2D
measurement, which consists of a single trace along the sample in the Y direction (that is, along the
front-to-back axis). When the scan is complete, Vision64 provides an output of the two-dimensional
trace, describing the height of surface features with an interactive Z versus Y plot.
The length of the trace that you can define depends upon the DektakXT stage that is installed. For a
DektakXT system with the manual 150mm X-Y stage, the standard scan length can range from 50um
minimum to 55mm maximum. For a DektakXT system equipped with an automated 150mm XY
stage, the standard scan length can range from 50um minimum to 200mm maximum. Scan lengths
from 55mm to 200mm use the DektakXT's data stitching capability, which is described in the online
Help.
IMPORTANT! Always operate the DektakXT inside its acrylic environmental enclosure
(see Figure 4-1). This enclosure protects the sample and scan area from adverse outside
influences such as noise, vibrations, dust, and air currents. Always operate the system with
the enclosure door closed.
WARNING
Always raise the tower prior to loading a sample. Failure to do so can
damage the stylus and sample.
1
4-4
In the Vision64 Measurement Setup window, do one of the following:
•
If your system includes the X-Y or theta auto stage, click Unload Sample
in the Live Video Display.
The tower moves to its full upward position, and the stage moves to its full front (unload) position.
•
If your system includes the manual X-Y stage, click Tower Up
in the Live Video Display and then
use the manual stage controls to bring the stage to its full front position. For instructions, see Chapter 3.
2
Place the sample on the sample fixture (chuck). If you are measuring a wafer, this will be the vacuum wafer
chuck. If your are measuring a solar sample, this will be the solar chuck. Otherwise, place the sample on
the square base platform of the scan stage itself.
3
If your system includes a vacuum chuck, turn on the vacuum switch.
4
In the Live Video Display, click the Load Sample button
position, ready for a measurement.
. The scan stage moves back to its home
Taking Measurements and Analyzing Data
5
Click Tower Down
in the Live Video Display. The tower lowers to the measurement position with the
stylus down, and the stylus makes brief contact with the sample. The stylus then moves to its Up position.
6
If necessary, adjust the Intensity slider in the Live Video Display so that the sample is clearly illuminated.
Figure 4-3: Illumination Bar
7
Adjust the position of the X-Y or theta stage until you find the location of interest on your sample.
8
Fine-position the location of interest in the center of the Live Video Display.
NOTE – Since the stylus scans across the sample in the Y direction, it is important to
position the features of your location of interest so that they are perpendicular to the scan
direction. For example, if you are measuring a step height standard, the step must run
horizontally across the Live Video Display. Samples such as metals should be positioned so
that the lay (the predominant direction of the surface texture) runs horizontally across the Live
Video Display.
NOTE – Because the scan will move “Up” in the Live Video Display, the trace must be
positioned above the stylus, thus ensuring that it will be fully measured.
9
On the Measurement Options tab of the Measurement Setup window, select Standard Scan (see Figure
4-4).
10
If you do not want to use the default Measurement Options settings that are stored in your Vision recipe,
change any other settings on the Measurement Options tab of the Measurement Setup window. For
definitions of the parameters in the Measurement Options window, see Setting the Measurement Options
on page 4-2.
NOTE – If your system includes the X-Y auto stage, click the Teach button
to the left
of the Length field open a window that lets you drive the stage to the start-point of the scan.
Taking Measurements and Analyzing Data
4-5
Figure 4-4: Measurement Options Window
11
Click the Advanced Options tab and make sure that the Number of Measurements is set to 1.
12
Click the Measurement button on the Ribbon (see Figure 4-5) and then select Measurement. The events
that now occur are described in What Happens During a Scan Measurement on page 4-6.
Figure 4-5: Measurement Buttons
13
4-6
Observe the measurement in real-time in the Data Acquisition window. If the scan hits or exceeds the top
or bottom border of the Data Acquisition window, adjust the tilt on the scan stage (see Figure 4-6) and/or
increase the Scan Range value in the Measurement Options window.
Taking Measurements and Analyzing Data
Stage-leveling knob
Figure 4-6: Stage-Leveling Knob
14
At the end of the measurement, the Data Analysis window appears (see Figure 4-6). If desired, click Save
> Dataset.
Figure 4-7: Data Analysis Window
What Happens During a Scan Measurement
When a measurement begins, the tower assembly lowers and the stylus descends. You can see the
stylus and its shadow in the Live Video Display (see Figure 4-7).
Taking Measurements and Analyzing Data
4-7
Figure 4-8: Live Video Display Showing the Descending Stylus and Its Shadow
After the stylus tip contacts the sample surface, it begins to scan over the surface features. The Live
Video Display shows a real-time image of the stylus along with a measurement trace of the surface in
the Data Aquisition window to the right (see Figure 4-8). It also provides the vertical and horizontal
distances between the cursor/trace intercepts and the distances from the vertical and horizontal “zero”
grid lines.
NOTE – If your system includes the 3-D Mapping package, or if the scan is set for Hill or
Valley, the process described above is somewhat different. For example, during a
measurement with the 3D Mapping package, a real-time picture of the sample appears during
data collection (see Figure 4-9).
After the scan measurement is complete, the Data Analysis Display appears (see Figure 4-10). The
surface features encountered by the stylus are represented as a two-dimensional profile. To the right,
the output display shows a list of the scan parameters along with any user-requested analytical
results. If you have created and activated a database, that database appears beside the Data Analysis
display (see Figure 4-25).
At the end of the scan measurement, the tower and stylus automatically move back to their starting
positions, and the system is immediately ready for the next measurement.
4-8
Taking Measurements and Analyzing Data
Figure 4-9: Live Video of the Stylus with the Real-Time Measurement Trace on the Right
Figure 4-10: Real-Time Picture of the Sample During a Measurement Taken with the 3D Mapping Package
Taking Measurements and Analyzing Data
4-9
Figure 4-11: Data Analysis Display
CREATING AN AUTOMATION RECIPE THAT INCLUDES
DESKEW POINTS
When you are developing an Automation recipe for a production reference sample, all programmed
X and Y coordinates relate to the position of that particular sample as it rests on the stage. It is
unlikely that you can load subsequent samples at the exact physical location of the reference point
that was used to define the Automation recipe.
To compensate for such skewing, you can establish Deskew reference and measurement points on a
reference sample at the time that the Automation recipe is defined. You may select any easily
identifiable landmarks on the reference sample as Deskew points (for example, the test pads on a
silicon wafer or substrate corners). When the system runs the Automation recipe, it refers to these
Deskew points to correct for variations in the positions of your samples.
To create and run an Automation recipe that includes Deskew points:
1
Position your reference sample on the stage so that the area that you want to use as your Deskew
reference point is visible in the Live Video Display. The Deskew reference point anchors the sample
location to a fixed stage position.
2
Click the Automation Setup button
3
Tower down
4
To set the Deskew reference point:
on the Ribbon. The Automation Editor appears.
.
a. In the Live Video Display, drive the stage to the area that you want to use as the Deskew reference point.
b. In the Automation Editor, click Set Reference Point. A red circle enclosing an R now appears in that
location (see Figure 4-12).
4-10
Taking Measurements and Analyzing Data
Figure 4-12: Setting the Deskew Reference Point
5
To set the Deskew alignment point:
a. Drive the stage to the area on the image that you want to use as the Deskew alignment point.
b. Tower down
.
c. In the Automation Editor, click the Add Alignment Site button. A solid red circle now appears at that
location (see Figure 4-13).
Figure 4-13: Setting the Deskew Alignment Point
Taking Measurements and Analyzing Data
4-11
6
To program the measurement points:
a. Drive the stage to the area on the image that you want to use as the first measurement point.
b. Tower down
.
c. In the Automation Editor, click the Measurement Site button. A number outlined by a green circle now
appears at that location (see Figure 4-14).
d. Repeat the above steps to define all further required measurement points.
Figure 4-14: Setting a Deskew Measurement Point
7
In the Automation Editor, select the Align at Start of Automated Run check box to activate the Deskew
feature. The system will now automatically run the Deskew recipe prior running this Automation recipe.
8
If desired, change the Automation Options at the bottom of the Automation Editor (see Figure 4-15).
Figure 4-15: Options at the Bottom of the Automation Editor
9
4-12
Select Save > Automation Recipe. Name this recipe and then click Open.
10
Select Measurement > Automated Measurement. The system automatically runs the Deskew recipe
followed by the Automation recipe.
11
As the measurement sequence initiates, an Automation Status message appears. Watch the live progress
bar as the stage moves to the first location specified in the Automation recipe.
12
After the stylus arrives at each programmed point, you must use the Live Video Display and the Instrument
Control Panel above it to tower down
and align that point. The stylus then runs over the sample, and
the stage moves to the next location specified in the Automation recipe.
Taking Measurements and Analyzing Data
13
At any time, you can click to cancel the automated sequence.
14
At the end of an automation run, a message informs you that the system has “Completed script named
[Script Name].” Click OK.
APPENDING ANALYTICAL FUNCTIONS
After you take a scan measurement, Vision64 can calculate a number of analytical functions for
analysis of roughness, waviness, step height, and geometrical measurements. Frequently calculated
functions include ASH (delta average step height), horizontal distance, and vertical distance. You can
save your selection of analytical functions to a Vision recipe so that they are automatically calculated
whenever you take a manual measurement or an automated series of measurements.
To select analytical functions:
.
1
On the Ribbon, click the Data Analysis icon
2
With the live measurement results open, right-click on the Analytical Results pane in the Data Analysis
window. The following pop-up menu appears.
Figure 4-16: Analytical Results Pop-Up Menu
3
Select Append. The following window appears.
Taking Measurements and Analyzing Data
4-13
Figure 4-17: Analytical Functions window
4
Select your analytical functions and then enter the positions and bandwidths of the cursors that define the
area in which the analytical functions should be calculated.
5
Click Calculate.
SETTING THE CURSOR LOCATIONS AND
BANDWIDTHS
The red reference (R) cursor and green measurement (M) cursor in the Data Analysis Display define
the portion of the profile trace on which to calculate analytical functions on the measurement results
(see Figure 4-18). You can adjust the bandwidth at each cursor to average the data points within that
cursor’s bandwidth. This is especially useful for average step height measurements.
4-14
Taking Measurements and Analyzing Data
Figure 4-18: 2D Profile of the Data Analysis Display Showing the R and M Cursors
To change the position of each cursor on the measurement data, click on it and then drag it with the
mouse.
To change the bandwidth of a cursor, click it to display small boxes that you can then drag. To
reposition the cursors while maintaining the same distance between them, click on one of the cursors,
and then hold down the Alt key while dragging that cursor. The second cursor moves along with it.
The locations of the R Cursor and M Cursor and their bandwidths appear in a box at the bottom of
the Data Analysis window (see Figure 4-7). To change these settings, type in new values and press
Enter.
NOTE – The numbers in the Cursor Status box indicate the points at which the cursors
intercept the profile trace in relation to the horizontal scale.
Figure 4-19: Cursor Status Box
Taking Measurements and Analyzing Data
4-15
APPLYING SOFTWARE LEVELING
Software leveling allows the system to quickly and automatically level the profile trace. You must
software level the stage in order to obtain accurate step height measurements and accurate readings
from analytical functions. Software leveling sets the reference and measurement cursors at zero to
establish a reference for measurements.
To software level a trace from a live measurement in the Data Analysis window:
1
Click Terms Removal (F-Operator) in the Analysis Toolbox (see Figure 4-20) to add it to the Data
Analyzer tree (see Figure 4-21).
Figure 4-20: Terms Removal (F-Operator) in the Analysis Toolbox
4-16
Taking Measurements and Analyzing Data
Figure 4-21: Terms Removal (F-Operator) in the Data Analyzer Tree
2
Position the R and M cursors as far apart as possible along the baseline of the step.
3
Right-click and select Two-Point Linear Fit rom the Data Leveling Settings pop-up menu (see
Figure 4-22).
4
The profile trace re-plots and levels with the R and M cursor intercepts at zero.
Figure 4-22: Data Leveling Pop-up Menu
Taking Measurements and Analyzing Data
4-17
CREATING A DATABASE
NOTE – Every time you change the selection of analytical functions that you want to log,
you must create a new database.
To create a database:
1
Select the analytical functions, cursor positions, and analyses and filters that you want to include in this
database.
2
Click the Database Setup button
and then click Create New File
appears. Enter a name for your database and then click Save.
3
As shown in Figure 4-23, the Database Setup View window appears. The currently selected analysis flow
is available from nested expandable lists in the upper right corner. A table to the left shows the parameters
in the currently active database, whose path appears above the table.
. A Save window
Figure 4-23: Database Setup View window
4-18
Taking Measurements and Analyzing Data
4
The following buttons appear at the bottom of the Database Setup View window:
Figure 4-24: Buttons at the Bottom of the Database Setup View window
5
Click the desired button and make the appropriate entries.
NOTE – Click Select All Analytical Results to populate the database with the current
selections or analysis parameters in the Analytical Results table.
6
Click OK in the Database Setup window.
7
Do one of the following:
•
•
Toggle to Database button on the Analyze Tab to Logging Enabled
.
Click the General Preferences button
on the Preferences, set Enable Data Logging to True, and
then click OK. A database file is now generated for each scan measurement (see Figure 4-25).
Figure 4-25: Data Analysis Display with an Open Database Window
Taking Measurements and Analyzing Data
4-19
CREATING AN ANALYZER RECIPE
An Analyzer recipe contains your selected analytical functions, 2D analyses, and filters. If your
system includes the 3D mapping package, it also contains the default plot and 3D analysis/filter flow.
IMPORTANT! The Analyzer recipe that is open when you save a Vision recipe becomes
part of that Vision recipe. This means that the analyses and filters that it contains will
automatically be applied to every future dataset. For more information, see Creating a Vision
Recipe on page 4-22.
To create an Analyzer recipe:
1
Take a new scan measurement.
2
Select your analytical functions and cursor bandwidth settings as explained in Appending Analytical
Functions on page 4-13and Setting the Cursor Locations and Bandwidths on page 4-14.
3
Select your analyses and filters in the Analysis Toolbox as explained in the next section.
4
Click the Open Database button
at the button of the Database window and then open the database
that you want to associate with this Analyzer Recipe.
5
On any Ribbon tab, select Save > Analyzer Recipe.
6
To make this Analyzer recipe a part of the currently open Vision recipe, select the Default Analyzer check
box on the toolbar on top of the Data Analyzer.
Using the Data Analyzer and Analysis Toolbox
An Analyzer recipe is associated with each dataset and appears in the Data Analyzer (see
Figure 4-26) whenever that dataset is active. An Analyzer recipe consists of the name of the active
dataset, the dataset type (for example, Surface Height), the Raw Data analysis, and any other analyses
and filters that have been selected in the Analysis Toolbox (see Figure 4-27).
Figure 4-26: Data Analyzer
4-20
Taking Measurements and Analyzing Data
Below the Data Analyzer, the Analysis Toolbox contains all of the analyses and filters that can be
applied to a dataset (see Figure 4-27).
Figure 4-27: Analysis Toolbox
To apply an analysis or filter, click it in the Analysis Toolbox. The selected operation is immediately
performed on the active scan dataset. In the Data Analyzer above the Analysis Toolbox, the operation
now appears as part of the workflow tree (Analyzer recipe), as shown in Figure 4-28.
Figure 4-28: Workflow Tree that Includes Terms Removal (F-Operator) and Step Detection
Taking Measurements and Analyzing Data
4-21
IMPORTANT! After you click a second analysis (not a filter), the Analysis toolbox goes
blank because you can perform only one analysis per branch. If you want to perform more
than one analysis, click the Profile Filter branch and then add another analysis, which then
becomes an additional branch of the Data Analyzer.
Setting the Parameters for an Analysis or Filter
To set the default parameters for an analysis or filter, right-click its icon, click Default Settings,
make your settings in the window that appears, and then click OK. The settings will now be applied
during every future operation of this type.
Selecting the Meta Data
To select the types of meta data to be stored with each dataset, click the Meta Data button
the Data Analyzer.
in
To view the meta data that is already associated with an active dataset, click the Meta Data button on
the toolbar above the Data Analyzer.
CREATING A VISION RECIPE
A Vision recipe contains all of the information that the system needs to make a single scan
measurement. It also includes the Analyzer recipe that is active when you create and save the Vision
recipe, so you can scan a sample and then visualize and analyze the resulting dataset with a single
click.
To create and save a Vision recipe:
4-22
1
Select a scan type and make measurement selections in the Measurement Setup window.
2
Do one of the following:
•
To save this Vision recipe independently of the currently active Analyzer recipe, click Save > Vision
Recipe on any Ribbon Tab.
•
To save the currently active Analyzer recipe as part of this Vision recipe, select the Default Analyzer
check box on the Data Analyzer Toolbar and then click Save > Vision Recipe on any Ribbon Tab.
3
In the Save As window, enter a recipe name. The system supplies the file extension.
4
To save your settings as the default Vision recipe that the system will apply to every new scan
measurement, select the Set as the Startup Recipe check box on top of the Data Analyzer.
5
Click Save.
Taking Measurements and Analyzing Data
VIEWING AND ANALYZING STORED DATA
DektakXT measurement results are stored in files with an .opdx extension. To open one, select Open
> Dataset.
Multiple stored datasets can be simultaneously opened and displayed in the Active Data Gallery (see
Figure 4-28). Click a thumbnail image of a dataset to make it the active one in the Data Analysis
window (standard DektakXT) or the Main Display Area (3D Mapping Option).
To apply filters and analyses to the active dataset, make selections in the Analysis Toolbox. For
instructions, see Using the Data Analyzer and Analysis Toolbox on page 4-18.
To save any changes to the active dataset, select Save > Dataset.
Figure 4-29: Active Data Gallery Containing Multiple Stored Datasets
Taking Measurements and Analyzing Data
4-23
5
USING VISION64
This chapter explains basic Vision64 operations and describes the user interface. For full instructions
on using Vision64, see its online Help.
NOTE – For instructions on Vision64 software features that control the DektakXT profiler,
see Chapter 3.
OPENING VISION64
Select Start»Vision64 or double-click the Vision64 application button
on the desktop or task
bar. The Vision64 Welcome screen appears, followed by the Vision64 Instrument tab, which includes
the DektakXT Live Video Display.
Vision64 requires a software key to run (see Figure 5-1). If the key is not installed in a USB port, an
error message appears. If this occurs, install the key and restart Vision64.
Figure 5-1: Software Key in a USB Port
CLOSING VISION64
Click the Exit button
in the upper right-hand corner. When you are prompted to confirm
that you want to exit the program, click Yes.
Alternatively, you can close Vision64 by clicking the Vision64 application button
taskbar followed by Close Window.
Using Vision64
on the
5-1
IMPORTANT VISION64 DIRECTORIES
The Vision64 application directory, C:\Program Files\Veeco\Vision64, holds the
Vision64 executable code. The directory C:\ProgramData\Veeco\Vision64 holds data and
configuration information for the Vision64 application.
USING THE VISION64 ONLINE HELP
IMPORTANT! Online assistance in using Vision64 is immediately available through the
Vision Help menu. This extensive Help system should always be your main source of
information about using the Vision64.
Finding a Help Topic
To display Help in the Vision64 software, select Help > Help Contents (see Figure 5-2) or press the
F1 key to open the Help Tab.
Figure 5-2: Help Button on the Vision64 Ribbon Tab
You can click into another Display Tab to change the contents of the Main Display Area and then
return to the same Help topic by re-selecting the Help Tab.
The Help opens to a Table of Contents (on the left) and an introduction to Vision64. Help topics can
be selected by clicking one of the following buttons in the left panel of the Help Tab:
• Contents lets you browse the Table of Contents. Double-click on a “book” (major heading) to
view its “pages” (individual topics). Double-click on a page to view the topic.
• Index lets you view search terms that can help you locate topics. Type in the first few letters of
the word or phrase that you are looking for. The scrolling list displays that portion of the
alphabetical display. Double-click on a topic in the list to display it.
• Search lets you search for any word in the Help system. Type the word you want to find in the
field provided. Then double-click on a found topic to view its information.
• Favorites displays the topics that you have previously added to a list.
At the top of the Help Tab, Print, Back, Forward, Home, Refresh, Stop, and Add to Favorites
buttons allow you to navigate the system.
5-2
Using Vision64
SELECTING WINDOWS FOR DISPLAY
Click the Windows button on the toolbar. From the list, select the windows that you want to display
(see Figure 5-3).
Figure 5-3: Vision64 Window Selection Buttons and Menu
WORKING WITH VISION VIEWS
The Vision64 workspace can simultaneously display one or more of the following Vision View
windows, which appear in Figure 5-3 through Figure 5-7:
• Measurement Setup
• Automation Setup
• Data Acquisition
• Data Analysis (which includes the Data Analyzer and Analysis Toolbox
if Raw Data is selected)
You can change the size and layout of each Vision View by clicking and dragging with the
mouse. You can save each configuration by clicking Save > Vision Views. If you save your preferred
set of Vision Views as the startup, it will appear each time that you start Vision64.
Click the Reset button to return to the factory-set configuration of the currently displayed Vision
View. Click Reset All to return to all of the factory-set configurations of all four of the Vision
Views
.
Using Vision64
5-3
Figure 5-4: Measurement Setup Vision View
Figure 5-5: Automation Setup Vision View
5-4
Using Vision64
Figure 5-6: Data Acquisiton Vision View
Figure 5-7: Data Analysis Vision View
Using Vision64
5-5
Figure 5-8: Data Analyzer
Figure 5-9: Analysis Toolbox
DISPLAYING OTHER VISION64 WINDOWS
In addition to the four Vision Views, you can display the following items:
• The Live Video Display that gives you a live view of your sample and the stylus (see
Figure 5-10).
• The Instrument Control Panel that allows you to control the DektakXT profiler (see
Figure 5-11).
• The Active Gallery Display that simultaneously displays thumbnail views of all active datasets.
It appears below the Data Analysis Vision View (see Figure 5-12).
• The Database Display that shows statistical analysis results in a comma-separated variable file
(see Figure 5-13).
5-6
Using Vision64
NOTE – To use the Analysis toolbox: Click an icon to immediately apply it to the active
dataset. Right-click an icon to open an analysis setup dialog box. The Analysis Toolbox is
available only when Raw Data is selected in the Data Analyzer.
Figure 5-10: Live Video Display
Using Vision64
5-7
Figure 5-11: Instrument Control Panel for the X-Y Stage
Active Gallery showing four open
datasets
Data Analysis Vision View
showing the selected dataset
Figure 5-12: Active Gallery with Multiple Datasets
5-8
Using Vision64
Figure 5-13: A DektakXT Database
MORE FEATURES OF THE INTERFACE
Application Menu Button Use this button
to open the Application Menu, from which you
can access the most common Vision64 application functions (see Figure 5-14).
Using Vision64
5-9
Figure 5-14: Application Menu
Ribbon This taskbar (see Figure 5-15) provides access to all of the functions available in Vision64.
Note that the most commonly used buttons are permanently displayed to the left and right of each tab
on the Ribbon.
Ribbon Tabs Click these tabs to make the Ribbon display the Analyze Tab (see Figure 5-15), the
Instrument Tab, or the Preferences Tab. You can perform the functions on these tabs by clicking a
button or by using keyboard shortcuts. Some tabs include split-buttons that provide multiple related
commands.
Figure 5-15: Ribbon with the Analyze Ribbon Tab Selected
CHANGING THE UNITS AND OTHER USER
PREFERENCES
You can specify different units before or after a scan measurement. After you have done this, the data
plot, scan parameters, measurement parameters, ranges, and analytical function calculations all
appear in the new units that you have specified.
5-10
Using Vision64
To change units before or after a scan measurement:
1
On the Preferences tab of the Ribbon, click the Units and Numbers button
2
Make your settings in the Units dialog box (see Figure 3-15), and then click OK.
.
Figure 5-16: Units Dialog Box
APPLYING FILTERS
To apply a filter to the active dataset, click Profile Filter in the Data Analyzer (see Figure 5-8) or
Analysis Toolbox (see Figure 5-9). Then click Edit Settings (in the Data Analyzer) or Edit Default
Settings (in the Analysis Toolbox). The following dialog box appears.
Using Vision64
5-11
Figure 5-17: Surface Profile Filter Settings Dialog Box
Select the filter that you want to apply. If this is a Gaussian filter, select Apply Short Cutoff or
Apply Long Cutoff to determine the frequency cutoff wavelength. In the Output section, select the
type of profile in which you want to view the output. Click OK. The system applies the selected filter
to the active dataset.
To apply a Terms Removal (F-Operator) or Micro Form filter, click it in the Analysis Toolbox
(seeFigure 5-9). To change the settings, right-click it prior to its application.
PERFORMING ANALYSES
To perform an analysis on the active dataset, click the analysis (for example, Bearing Ratio) that you
want to apply in the Analysis Toolbox (see Figure 5-9). To change the analysis settings, right-click
the analysis and select Edit Default Settings prior to performing it. Make your selections and click
OK. The dialog box for the Bearing Ratio analysis appears in Figure 5-18.
5-12
Using Vision64
Figure 5-18: Bearing Ratio Analysis Dialog Box
3D MAPPING Option
If your Vision64 software includes the 3D Mapping Option, the user interface and workflow operate
somewhat differently than described in this chapter. For example, the Data Visualization Taskbar
allows you to quickly change the displayed plot while the Combo Plot drop-down list lets you select
combination plots for display (see Figure 5-19). For more information about the 3D Mapping Option,
see your Vision64 online Help.
Figure 5-19: Data Visualization Taskbar and Combo Plot Drop-down List
Using Vision64
5-13
Numerics
3D Mapping Option 2-9
A
Analysis Toolbox 4-21, 5-6
Analytical functions, appending 4-13
Analyzer recipes 4-20
Application Menu button 5-9
Auto Stages 2-3
Automated measurements 4-10
Automation Editor 4-10
Automation recipes 4-10
B
Base feet 2-5
Bridge 2-3
C
Calibrating the system 3-17
Camera 2-3
Chucks for 3D mapping and automation 2-3
Computer 2-6, 2-7
Configuring the system 3-17
Cursor locations and bandwidths, setting 4-14
D
Data Analyzer 4-20, 5-6
Database
Creating 4-18
Example 5-9
Data-stitching software 2-9
DektakXT Stylus Profiler
Components described 2-3
Configuring and calibrating 3-17
Electronics 2-4
Environmental enclosure 2-6, 4-4
Illustrated 2-2
DektakXT Stylus Profiler - cont.
Options and accessories 2-8
Principle of operation 2-2
Scanning operation 4-8
E
Electrical task classification 1-5
Electronics 2-4
Emergency Off button 1-1
EMO box 2-6, 3-2
Environmental enclosure 2-6, 4-4
H
Hazards
Mechanical 1-4
Pressure 1-4
Help, using Vision64 5-2
I
Illumination, adjusting 3-5
Installation of the system, safety issues 1-4
Intensity bar 3-5
L
Leveling the stage 3-6
Linear Variable Differential Transformer 2-2
Loading and unloading sample 3-4
Lockout procedures 1-5
M
Maintenance of the system 1-4, 3-17
Manually leveling the stage 3-6
Measurement, sequence of events 4-7
Measurement head, described 2-3
Measurement Options, setting 4-2
IX-1
Measurements, scan
Automated 4-10
Manual 4-4
Mechanical hazards 1-4
Meta data, selecting and viewing 4-22
Monitor 2-7, 2-8
T
O
Units, changing 5-10
User preferences, changing 5-10
Online help 5-2
Optics, adjusting illumination 3-5
P
Power On and Off switches 1-2
Power supply adapter 2-4, 2-5
Powering down 3-3
Powering up 3-1
Pressure hazards 1-4
R
Ribbon in Vision64 5-10
Ribbon tabs 5-10
S
Safety features
Emergency Off button 1-1
Power On and Off switches 1-2
Safety precautions 1-2
Sample fixtures for stages 2-3
Scanning process 4-8
Signal processor 2-5
Software key 3-1
Software leveling 4-16
Stage
Configurations 2-2
Controlling the X-Y auto 2-3
Controlling the theta auto 3-9
Manually leveling 3-6
Sample fixtures (chucks) 2-3
Using the manual positioning controls 3-6
Step height standard 2-9
Stored data, viewing and analyzing 4-23
Stylus
Cleaning the tip 3-16
Removing 3-13
Installing a new 3-10
IX-2
Theta stage control 3-9
Tower assembly 2-3
Towering up and down 3-5
Turning on the system 3-1
U
V
Vision recipes 4-22
Vision Views 5-3
Vision64
Closing 5-1
Described 2-2, 2-7
Directories 5-2
Elements of the workspace 5-3
Interface explained 5-1
Online help 5-2
Opening 5-1
Selecting windows for display 5-3
Starting 3-2
Vision Views 5-3
W
Wafer vacuum sample fixture 2-3
X
X-Y auto stage, manually leveling 3-6