1
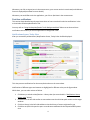
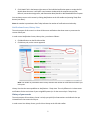
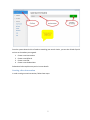
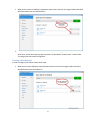
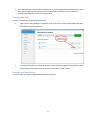
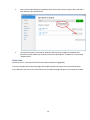
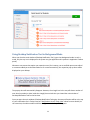
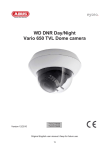
ABE 4 Training Module: Desktop Notification Tool Overview In this session, you will learn how to work with ABE Desktop Notification Tool as well as practical application of the tool. Understanding ABE Desktop Notification Tool ABE Desktop Notification Tool is a Windows and Mac based client application that displays notifications to a user about new events generated by the Web-based ABE School system. It is also an easy place to: See recent history of events he/she assigned and/or created Search students and start an action from there Quickly log in and drill down to the event details on Web-based school site without extensive navigation and discovery efforts ABE Desktop Notification Tool is capable of: Connecting to a remote Web-based ABE School System via Web Service-based API Authenticating users with the Web-based ABE School System Searching for students by their names Receiving event notifications related to tasks assigned to the users Initiating activities on a selected student in a default browser, automatically navigating to the right page of the Web-based educational system Launching the most popular actions (in a default browser window) on the Web-based educational system through clicking on Quick Links Providing options of starting itself automatically at the computer start-up time Providing the option of automatic user login upon the application start Displaying pop-up alerts the arrival of a new event Displaying the application icon in the system tray Performing auto-update to the most recent version upon the start of the application (once the respective update is uploaded to ABE Web server) User Manual for ABE Desktop Notification Tool is a good source of additional information on the application. The user manual explains: System requirements to run the application on your desktop computer or laptop Step-by-step Installation and Configuration process to enable you to deploy it without assistance of a professional IT system administrator UI concepts Notifications framework 1 Working with ABE Desktop Notification Tool This chapter provides you with the comprehensive step-by-step instructions on how to accomplish various tasks with ABE Desktop Notification Tools. The sections below cover topics as follows Starting ABE Desktop Notification Tool Real-time notifications History of your events Quick actions on students Quick links Starting ABE Desktop Notification Tool 1. Start the application through Start menu or by clicking the desktop icon 2. Welcome screen appears when you start ABE Desktop Notification Tool. Its main purpose is to facilitate user login process 3. To log into the system, use following steps: a. Specify your user name and password (the same as you use on School Site) b. Press Sign In button Notes: You can also use the respective check boxes to enable the following options Sign you in automatically, using the login and password you have just provided Auto-start ABE Desktop Notification Tool when your machine starts If you do not remember your password, you can click on ‘Forgot it?’ link. It will open a new browser window with the password reminding form. Once you provide the email used to register your School Site account, the system will automatically email you the 2 new password Once you log into the application, you will see the main elements of the user interface as follows 1. Main window 2. The marine-colored triangle icon in the tray: 3. The context menu (displayed when you right click on the tray icon) with actions as follows Whenever you minimize the main window of the application, it disappears. Only the tray icon indicates the application is still running at this moment. Whenever you would like to see the main window again, you click on Open ABE Desktop Tool item in the context menu. Sign in automatically and Auto-start when computer starts items are actually flags. They work exactly as the respective checkboxes in Welcome screen (see above for more details). 3 Whenever you click on Logout item in the context menu, your current session is terminated, and Welcome Screen is displayed (see above for more details). Whenever you would like to exit the application, you click on Quit item in the context menu. Real-time notifications This section shows detailed step-by-step instructions on how to work with real-time notifications in the main window of Desktop Notification Tool. You may refer to “Using Desktop Notification Tool in Background Mode” below to see how real-time notifications arrive when you use the application in background mode. Notifications Screen, Today View After you successfully authenticated, Notifications Screen, Today’s View shall be displayed: This view presents notifications for the events/actions due on the current date. Notifications of different types and statuses are highlighted in different colors per the figure above. While there, you can select actions as follows 1. Click History to switch to Notifications – History view (see more details in “Notifications Screen, History View” below) 2. Click Search in the left-side toolbar to start student search and initiate quick actions on the target students 3. Click Your History in the left-side toolbar to view the history of events originated by you 4. Click links on Quick Links panel to open a new browser window with the respective ABE Systems view 4 5. Click ‘details’ link in the bottom right corner of the individual notification panes to review the full details about the event. It will open a new browser window with the respective event (FBA, Referral, Intervention Assignment, and Observation Note) details in Web-based ABE School system. You can always return to this screen by clicking Notifications on the left toolbar and pressing Today filter button (see above). Note: the number in parentheses after Today indicates the number of notifications arrived today. Notifications Screen, History View The main purpose of this screen is to show all the event notifications that have come to you across the current school year. In order to use Notifications Screen, History View, you select as follows: 1. Click Notifications on the left-side toolbar 2. Click History tab, on the screen appeared Note: the number in parentheses after History indicates the number of notifications arrived to you in the past. History View has the same capabilities as Notifications – Today view. The only difference is it shows event notifications for the entire time of your using ABE Systems (vs. for the current day in Today View). History of your events The main purpose of Your History Screen is to help you quickly find interventions and referrals that you initiated across the current school year. In order to use Your History Screen, you click Your History on the left-side toolbar 5 As mentioned above, this screen only displays events of Referral and Intervention types that you created in Web-based school system. Quick actions on students This chapter is intended to walk you through the process of searching for students and taking quick action s on them (creating new interventions, referrals, FBAs, and student notes) via your instance of Desktop Notifications Tool application. First of all, you shall find the target student you want to take an action on. To accomplish this, click Search in the application toolbar and type the name (first or last) of a student you would like to take an action on. 6 Once the system shows the list of students matching your search criteria, you can take 4 kinds of quick actions on the student you targeted. 1. 2. 3. 4. Create a new Intervention Create a new Referral Create a new FBA Create a new Student Note Subsections below explain every action in more details. Creating a New Intervention In order to assign a new intervention, follow these steps: 7 1. When search results are displayed, expand the quick actions menu for the target student and select New Intervention from the drop-down list 2. The system will open a new browser window or tab to present a page with New Intervention form. Once there, please follow step-by-step instructions as described in “Interventions” section titled “Creating a New Intervention Assignment” Creating a New Referral In order to assign a new referral, follow these steps: 1. When search results displayed, expand the quick actions menu for the target student and select New Referral from the drop-down list 8 2. The system will open a new browser window or tab to present a page with New Referral form. Once there, please follow step-by-step instructions as described in “Referrals” section “Scenario 1: Creating a New Referral from the List of All Students” Creating a new FBA In order to schedule a new FBA, follow these steps: 1. When search results displayed, expand the quick actions menu for the target student and select New FBA from the drop-down list 2. The system will open a new browser window or tab to present a page with New FBA form. Once there, please follow step-by-step instructions as described in “FBA” section. Creating a new Student Note In order to add a new note to targeted student, follow these steps: 9 1. When search results displayed, expand the quick actions menu for the target student and select New Note from the drop-down list 2. The system will open a new browser window or tab to present a page with New Note form. Once there, please follow step-by-step instructions as described in “Introduction” section titled “Student Notes”. Quick Links Quick links area is in the bottom of the left-side toolbar (see below highlighted). It contains clickable links to the useful pages of the Web-based School system that you would utilize the most. Whenever you click on any of the links there, the respective page will open in a new browser window. 10 Using Desktop Notification Tool in Background Mode When you close the main window of Desktop Notification Tool, it goes into background mode. In such a mode, only the tray icon is displayed in the system tray (no application tab is present in Application Taskbar panel). Whenever new events that require your attention occur (for instance, you are notified upon a new referral or someone added you to the observation list for a new Intervention), the respective pop-up alerts will be displayed on your desktop The pop-up alert will automatically disappear. However, the triangle icon in the tray will show a number of new alerts (a number in white inside the triangle) that arrived since you viewed the main window of Desktop Notification Tool for the last time. Once you open the main window of Desktop Notification Tool again, the new notifications will be at the top of your notifications list in Today View (see “Notifications Screen, Today View” above for more details). At the same time, the white number inside the triangle icon in the tray will disappear. 11 Best Practices The best practice with ABE Desktop Notification Tool is to actually use it whenever you are at your desk or with your laptop. Summary In this session, you learned and practiced the usage of ABE Desktop Notification Tool If you have more questions about the topic presented, you are welcome to contact our Support. 12