1
CLEANING & MAINTENANCE
Cleaning Exterior:
To clean the exterior use a mild, non-abrasive household type cleaner mixed with warm water. Apply by using a damp
cloth that you soaked in the cleaning solution and wrung out. Do not expose LCD Display to liquids as this may cause
damage.
Sanitizing and Decontamination of Interior:
When sanitizing the interior, a mixture of 30% chlorine bleach with 70% water solution is considered the best method
for decontamination. However, any household detergent or mild soap solution is suitable and can be used. This includes
bleach, detergents, and mild soaps. Other cleaners and disinfectants that can be safely used include hydrogen peroxide,
and denatured alcohol. NOTE: DO NOT USE ANY PETROLEUM BASED CLEANING SOLUTIONS.
To perform this sanitizing procedure, cover all inner surfaces with the solution, let stand for 30 minutes and remove.
Spraying the solution into the inner vessel is preferred, although agitation of the solution inside the inner will suffice. Rinse
the decontaminated surfaces with clean water and make sure all cleaner residues have been removed. Allow the tank to
dry completely before putting back into service.
If you have any questions concerning decontamination process please contact Custom BioGenic Systems Technical
Support 1-800-523-0072.
System Check
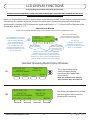
1. Test all alarm functions for proper operation.
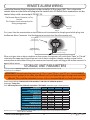
2. Check any connected Remote Alarms or Automatic Dialing Systems to ensure proper operation. See page 26 for
detailed instructions on how to manually cause a HIGH ALARM or LOW ALARM to test the remote alarm contacts.
3. Check for leaks at all connection points of the liquid nitrogen lines.
4. Be sure that all electrical wires are free of damage and plugs are firmly in place.
IMPORTANT: This should be done only as required, and is not a necessary part of maintenance.
Solenoid valve(s) may be opened to inspect for cleanliness and to check seals for wear.
Wipe seals with a clean, lint-free cloth. Distilled ammonia may be used to wipe seals if needed.
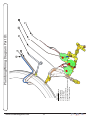
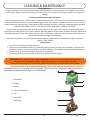
The solenoid valves may be opened and cleaned if they are not working smoothly. If this is done, use
the diagram below to re-assemble the valves properly. (NOTE: If the valve is found to be defective, the entire
valve must be replaced, individual parts are not available).
7
1. Valve Body
5
2. Plunger
4
3. Flange
4. Valve Coil Locknut
3
5. Coil
6. Spec. Plate
2
7. Valve Cap
1
www.custombiogenics.com
6
41