1
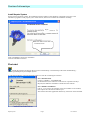
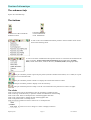
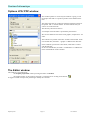
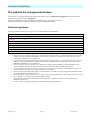
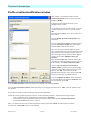
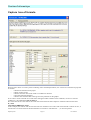
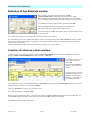
HEPATO SYSTEM
Help to liver fibrosis assessment software
User manual
Gentiane Informatique S. A. R. L.
17, Chemin Prébois
38660 St Hilaire Du Touvet
Tél/Fax : 00 33 476 08 31 32
www.gentiane.fr
Version : 3.13
22/07/2009
Gentiane Informatique
Generalities
HEPATO SYSTEM is an original software permitting the graphic edition of scoring systems based upon serum markers of
liver fibrosis. It constitutes a help to the diagnosis and the prognosis.
The user has a large selection of formatting tools of lines and texts. Thus, it can underscore the elements which further the
interpretation of gross results.
This program can work under two different modes :
- the manual mode : where the results are captured and printed patient by patient..
- the automatic mode : where the results are read in a file produced by a data processing.
It keeps the patients who have been inserted , and permits :
- the search of patients by name, date and file number.
- the creation of the deletion of patients.
- the sample management.
In addition to the scoring systems we deliver, it integrates the possibility of a complete setting of profiles and formulas.
By profile, we must understand : a list of markers (also named analytes or parameters) made up by the user. This list can
contain only one marker.
- creations, deletions, association of markers
- capture and modification of reference values.
- capture and modification of age brackets.
- capture and modification of formulas and score definitions, correlation to the METAVIR scores.
Hepato System
Page 2
User manual
Gentiane Informatique
Installation
Implement
Insert the CD in the CD player : Click on install
Gentiane Informatique Products
Hepato System
Click on
install
Wait for the apparition of the window below
Hepato System and Interbase installation
Click
Click successively
successively
on
on each
each button
button
Install Hepato System
Install Interbase
In multiuser version, the software asks : « Will the PC be the server ? ».
Answer : « yes » if you want the PC to host the data base. It will have to be visible and accessible in reading-writing on the
network.
Hepato System
Page 3
User manual
Gentiane Informatique
Install Hepato System
On the ancient operating systems; the installation software updates some Windows components necessary to the
installation programs. It will propose you to restart the PC; then it will continue the installation normally.
Hepato System – InstallShield Wizard
Hepato
Click on button Next then
on button Finish
Click on FINISH to achieve the installation
Close the installation software.
First start
Launch the software clicking on the icon seen on the desktop or with the help of the menu START doing :
Start/Programs/Hepato System/Hepato System.
A code will be asked to you in the opposite window on each PC containing the software.
For a demonstration :
Capture « DEMO » ; then PRESS OK
On demonstration, this software can be used on a period of 30 days.
Beyond, the definitive installation is made from the software.
For a definitive installation :
Call us : 33 4 76 08 37 06, transmit us the given number in the window,
then capture the code that we indicate you
The software becomes applicable without any restriction on the hard disk.
Hepato System
Page 4
User manual
Gentiane Informatique
The main window
When the user launches this program thanks to the menu START of Windows or to the icon on the desktop, he accedes to
the following window.
The submenu File
Presented in the window above, it contains the following elements.
Certificate : permits the user to print the licence certificate of the software use. This element is active only if the
installation of the software has been done.
Definitive installation : see the chapter Installation/First start.
Save the registers : permits the user to save his parameters of the graphic presentations (colours, font, sizes) and
optionally the unbridle code specific to the computer.
Enter the slot where you want to save. Then, point Yes or No if you want to insert in it the key to unbridle.
Retrieve the registers : restore the saved data thanks to Save the registers. Point to the software, the slot where the file
has been saved.
Save all : this option gathers all the backup operations :
- the patients backup: (See: Patients backup)
- the profiles backup (markers) (See : Export the profile file)
- the graphic presentations backup: (See: Save registers)
Depending on whether you would have chosen: With the view to restore on this PC or not, the software will save or not
the key to unbridle.
Point to the directory software in which the save will have to be laid down.
Retrieve all : restores the saved elements with Save all. Point to the software where the save has been laid down.
Quit : closes the application
Hepato System
Page 5
User manual
Gentiane Informatique
The submenu patients
Work : has access to the list of patients. From this one, the user can create , modify or
remove some patients.
List management: has access to the window patients list management . From this one, the
user can realise archival storage operations, removal or patients restoration, either
punctually (backup from one transmission to another user) , or by programming
(regular backup of security).
The submenu profiles
Creation/modification of profiles : opens the window
Profiles management. The user can define on it his markers
and associate them (in profiles).
Creation/modification of sentences : opens the window
Comments management. The user can create some sentences,
then he will be able to use them to comment his profiles.
Creation/modification of contexts access to a system of
comment definition.
Import the profile file : restores the parameter of the saved profiles with the option : Export the profile file.
Export the profile file : permits to save your data concerning the markers. Point to the software, the slot to which the
backup will be done.
The submenu options
Heading : opens the window : Laboratory heading
where the user defines the coordinates of the
laboratory. These data are taken back in the heading of
the graphic document transmitted.
Launch the automaton : opens the Patient entering
automaton. This annex application asserts the
acquisition of patient data from the files produced by a
tierce processing data.
Working directory : When a multiuser configuration
is used, one PC is the server. Point the others by this
option, the directory where the software works on the server.
Registration for automated updating : Use this option to get entitled for automated updating.
The submenu help
About Hepato System : opens an information window on Kinetics
system.
Index : activates the software online help.
Assistance : Launch the TeamViewer software in order to give us
access to your computer.
The button
Hepato System
does the same.
Page 6
User manual
Gentiane Informatique
The buttons
opens the window : Patient list.
Profile management
opens the window : Context management.
opens the window :
Patients list window
You have access to this window from the main window doing on the menu: Patients/ Work or clicking on the
button opposite.
Move in the
patient list
Sorting,
filtration tools
Selected
patient
Patient
counter
This one presents the last sample of the patient . This list varies according to the filtration criteria selected by the user.
Filtration by dates and/or by profile.
The information represented are:
- the unique identity number of the patient
- his surname, first name, date of birth, maiden name
- the date of the last sample
- the realised profile
The buttons
The buttons representing arrows serve to move in the patient list.
They permit to have access to (from the left to the right respectively)
- the first record
- the next record
- the previous record
- the last record
The button Create presents a window of a blank patient data form. The user will enter the necessary data for the creation
of a new patient.
The button Modify presents a window of patient data window containing the selected patient data.
Hepato System
Page 7
User manual
Gentiane Informatique
The button View presents the document which will be produced by the program.
The button Print launches the printing of the selected patient.
The button Delete proposes to remove the selected patient.
The button Patient list display a document which contains the data of selected patients in text.
The button Empty proposes to empty the list of the patients.
The button Management opens the window : Patients list management.
The tabs
Patient research : permits to find a patient. According to the search criterion chosen, enter : the identity , the surname, the
sample number (number of the file day). Press the button Launch. If a patient corresponds to the search criterion , the
window of Graphic preparation opens and contains the data of the patient found .
Date filter/Defined dates : filters the patients according to the date of the last sample. Enter the chronological markers of
your choice then press the button: Filter
Date filter/Programmed dates : filters the patients according to the date of the last sample. Enter the number of days
which precede today , then press the button : Filter
Programmed dates and Defined dates: are mutually exclusive.
Profile filter/Selected profiles : filters the patients according to the given profile. Click on Select , check the profiles of
the patients that you want to see, click OK
Profile filter/Chosen profile(s) : filters the patients according to the given profile. Select on the profiles of the list to
activate this filter or select All to desactivate.
Selected profiles/Chosen profile(s) are mutually exclusive
Sort out by : : organizes the list of the patients according to the chosen criterion. Select a criterion, eventually check
Dicreasing order then click on Sort out.
The clicks
You also can click the title row of the grid in the column you want to sort.
Hepato System
Page 8
User manual
Gentiane Informatique
Fenêtre de saisie des données patient
Cette fenêtre est accessible à partir de la fenêtre : Liste des patients en pressant le bouton Créer pour créer un nouveau
patient ou Modifier pour traiter le patient sélectionné.
Elle est destinée à la saisie ou à l’édition de toutes les données du patient.
Required fields
Filter
visible
result
Comment view
The fields : Identity, Sample n°, Name, First name, Sex, Birth date are required in order to be allowed to select a
profile.
Once the Profile selected, enter the result of each parameter.
The button opposite, opens the window : Insight of the profile which presents the definitive document.
This last mentioned will be able to be published and transmitted.
The button opposite, permits to display and print as text the patient result.
The button opposite permits to retrieve the precedences of the patient from the data base of the backup.
(See Patient list management)
The button opposite give access to a text editor in which pemits to edit this comment.
The buttons opposite permits on samples, respectively the creation, the deletion and the cancelling of a new
item.
Hepato System
Page 9
User manual
Gentiane Informatique
Profile insight window
This window permits to view and to make a last change of the graphic before transmitting it. It is accessible from the
windows Patient data capture or Patient list pressing the button View.
Laboratory heading
Make visible or hide
the comment
Fonts, colours
Transmission : Printing,
graphic file, e-mail
Comment on the same
sheet or on another sheet
Patient information rectangle
Sizable rectangle for the comment
The choices of presentation done by the user, will be, whenever it’s possible, applied to all the patients having the same
profile.
Hepato System
Page 10
User manual
Gentiane Informatique
The submenu file
Print :
Profile : prints the graphic with , eventually, the comment if it is visible, as
presented above.
Comment: prints the comment alone on a sheet aside.
All : prints the graphic and the comment on a sheet aside (in this case , it will be
better to mask the comment at the bottom of the graphic)
In the JPG/PDF file : produces a graphic file JPG or PDF format (see below :
Window JPG/PDF Options).
The submenu view
Show rectangle comment : makes the comment visible at the bottom of the
graphic.
Cut : You can modify the aspect of graphics, specifying if the Y axis must or
mustn't adapt to the patient result exceeding the expected highest value. If not, the
line of the result will be dotted.
Default viewing : retrieve initial colours an font.
Heading : opens the window. Laboratory heading with a view to modifying it.
JPG/PDF Options : opens the window JPG/ PDF where the user defines the
features of the JPG file to produce. ( See below: Window JPG/PDF)
Line width : Specify a width for the result lines.
Column width : Specify a width for the score columns.
Calculation trace : Presents the details of the calculation for each score.
Comment trace : Presents de details of the comment research.
Green orange red : When marked the right part of the columns are colored from
green (down side) to red (up side) instead of a unique colour.
Apply to other profiles : Sends back the modifications of the presentation to the
other profiles when it’s possible.
The submenu comment
See : opens the window : Editor :that constitutes an editing texts.
Sentence insertion: opens the window: pre recorded sentences where the user can
select a sentence to insert in the comment ( under the graphic) at the position of the
scrolling text.
On a sheet aside: memorizes that the prints will be done in two parts: the graphic
and the comment. If we use this option, it’s better to mask the comment part which
appears at the bottom of the graphic.
Empty: erases the content of the comment
Rectangle around the comment: outlines the comment of a rectangle
The submenu help
Opens the contextual help.
Hepato System
Page 11
User manual
Gentiane Informatique
Le sous-menu Fichier
Imprimer :
Profil : Imprime le graphique avec éventuellement le commentaire s’il est visible,
comme présenté ci-dessus.
Commentaire : Imprime le commentaire seul sur une feuille à part.
Tout : Imprime le graphique et le commentaire sur une feuille à part (dans ce cas il
vaudra mieux masquer le commentaire au bas du graphique).
Dans un fichier JPG/PDF : Produit un fichier graphique au format JPG ou PDF.
(Voir plus bas : Fenêtre Options JPG/PDF).
Le sous menu Vue
Montrer rectangle commentaire : rend visible le
commentaire au bas du graphique.
Tronquer : Lorsque cette coche est mise, et qu’un
résultat de score est supérieur au maximum, son trait sera
figuré au maximum et affiché en pointillés.
Affichage par défaut : Réattribution au profil des
couleurs et polices initiales.
En tête : ouvre la fenêtre En-tête du laboratoire en vue
de la modifier.
Options JPG/PDF : ouvre la fenêtre Options JPG/PDF
où l’utilisateur définit les caractéristiques du fichier JPG
à produire (Voir plus bas : Fenêtre Options JPG/PDF).
Largeur paramètre : permet à l’utilisateur de régler la
largeur de la colonne réservée à chaque paramètre.
Traçabilité du calcul et du commentaire: Affiche des
information sur l’origine des ces éléments.
Vert orange rouge : Caractère de coloration des colonnes.
Appliquer aux autres profils : répercute les modifications de présentation aux autres profils lorsque c’est possible.
The sub-menu anteriorities
It permits to
-
Show or hide an antrriority,
Choose the anteriority to display (the last one by default).
Import the presedeneces of a patient which could have been deleted and saved in a backup.
The submenu comment
See : opens the window : Editor :that constitutes an editing texts.
Sentence insertion: opens the window: pre recorded sentences where the user can
select a sentence to insert in the comment ( under the graphic) at the position of the
scrolling text.
On a sheet aside: memorizes that the prints will be done in two parts: the graphic
and the comment. If we use this option, it’s better to mask the comment part which
appears at the bottom of the graphic.
Empty: erases the content of the comment
Rectangle around the comment: outlines the comment of a rectangle
Hepato System
Page 12
User manual
Gentiane Informatique
The submenu help
Opens the contextual help.
The buttons
Print
Production of a JPG or PDF file
Production a mail
Comment publishing
Colour modification
Fonts modification
A click on the colour modification button permits to choose another colour for the
items in the following menu.
A click on the fonts modification button permits the user to choose the text element that he
wants to modify : Name of the profile, Patient data (demographic data), Graphic
data (content of the labels, values on the axes), Comment, Titles (demographic data).
This pair of buttons permits to print only the profile (with the comment at the bottom, if it’s visible) or to print
the comment on a second sheet aside.
This pair of buttons permits to mask or to display the clouds of the reference values.
This pair of buttons permits to display or not the anteriority.
This pair of buttons permits to adapt or not the score maximum to the patients score when it is higher.
The clicks
Click on each of the lines of the heading to have the possibility to modify the font
Click on the logo of the laboratory to open the window of modification of the heading
Click on the word : Name to modify the font of the demographic data titles.
Click on the patient name to modify the font of demographic data
Click on the profile name to modify its font.
Click right on the comment to insert a sentence or to modify the font.
Click on a score to change its colour or display its kinetics.
Hepato System
Page 13
User manual
Gentiane Informatique
Options JPG/ PDF window
This window permits to set the way the software is going to call
the graphic files that it is opened to produce at the demand of the
user.
The name of the file can contain the surname and the first name of
the patient and / or the file number. Tick the elements that you
want to see in the name file
The directory file must be chosen
An example of the full name is presented by the software
We can also define the size of the saved graphic, compared to a A4
sheet.
The software can produce some files of PDF or JPG format. In the
case of PDF files, the suffix : “-graphe” is added to the name file.
If the comment is printed on a sheet aside, a RTF file is created
with the JPG file.
In the case of PDF files, the suffix “-Commentaire” is added to the
name of the PDF file of the comment
The Editor window
This window is accessible from :
- the Graphic preparation window pressing the button : Comment
- the insight window of the profile by the menu : Comment/ See or clicking on the button :
It suggest an editor of simple text permitting to modify the comment.
Hepato System
Page 14
User manual
Gentiane Informatique
The patients list management window
This window is accessible from the menu of the main window doing : Patients/List management or from the window
patient list pressing the button : Management
It offers the possibility to make some backups, some deletions or some patient retrievals.
The button: backup use permits to consult the content of this backup data base.
Ponctual operations
For each possible operation, here the procedure to respect and the expected effects
Operation
By date
1 Backup
X
2 Backup
X
All patients With deletion of saved patients
X
3 Backup
X
4 Backup
X
5
6
7
8
Restauration
Restauration
Deletion
Deletion
1.
2.
3.
4.
5.
6.
7.
8.
X
X
X
X
X
Select the dates in the fields which appear. Click on launch and select the way of the destination in the proposed
window. The selected patients disappear of the list and are copied in the recipient file. If this one exists, it isn’t
deleted but completed to the saved patients.
Select the dates in the fields which appear. Click on launch and select the way of the destination in the proposed
window . The selected patients are copied in the recipient file and remain in the list. If this one exists, it isn’t
deleted but completed to the saved patients.
Click on Launch . You must select a way of destination in the proposed window. Confirm the deletion. The
patients disappear from the list and are copied in the recipient file. It this one exists, it is replaced.
Click on Launch . You must select a way of destination in the proposed window. The patients are copied in the
recipient file and remain in the list. It this one exists, it is replaced.
Select the dates in the fields which appear. Click on Launch . select the way of the origin in the proposed window.
The selected patients are added to the list.
Click on Launch. You must select the way of the origin in the proposed window. The patients who existed in the
list are deleted. Those who are retrieved are added to the list.
Select the dates in the fields which appear. Click on Launch. Confirm the deletion. The selected patients
disappear from the list.
Click on Launch. Confirm the deletion. All the patients disappear from the list.
Hepato System
Page 15
User manual
Gentiane Informatique
Programmed operations
The programming backup serves to create a second data base of the patients with the view to increasing the security of the
data and to lighten the current data base of the patients or the samples which would not be relevant anymore.
.
These ones will be done at each date change.
Operation
Deletion
1
X
2
X
3
Backup
X
Number of days
n
n
X
n
When you press the button : Record, the software memorizes the placing of the ticks above and makes the first treatment.
Indicate after how long, since the creation , the patients must be treated . if the number of days is zero, the treatment
isn’t done.
1. Indicate the way of the recipient file (once and for all) . It will be left in the field. Way of saving. If the recipient
file exists , the software suggests you to delete it. During the following treatments , the patients are added in it.
The patients having n age days disappear from the list .
2. the patients having n age days disappear from the list .
3. Indicate the way of the recipient file (once and for all). If the recipient file exists , the software suggests you to
delete it. During the following treatments , the patients are added in it.
Window backups use
This window is accessible from the window Patients list management clicking on the button : Saving use. It permits the
exploitation of the backups.
If, in the window of the Management of the patient list, any backup has been programmed , the software opens a dialog
box when you have to select the way of backup to explore.
On the contrary, the programmed backup is opened by default. You can choose another backup doing : File/Open and
choose another slot. The whole of the saved patients is presented. You can select some patients by “ filtration” giving all
information or part of fields: Identity, name, surname, first name then pressing Activate/ Filter.
The button Import is going to restore the selected patient(s) in the main data base.
The button Delete takes definitely the selected patient(s) off of this base.
A right click on the grid permits to select all or to unselect All of the list.
Hepato System
Page 16
User manual
Gentiane Informatique
Fenêtre de gestion des contextes
Access to the context window from the main window choosing : Profiles/Creation/Modification of contexts.
You also can click the opposite button.
You have to select the profile for which you wish to edit contexts.
The window shown is used to define the contexts, that is to say the a section of results of scores between values choosen
by the user. This is done by entering new values in the fields : High, Low.
The red rectangles upside realize these sectionss.
You can associate each context to a comment. This comment will be proposed by the sofware each time it will encounter a
patient whose results of score match those defined in the context.
The fields : High, Low
Enter in these fields the limits of the section of each score. Theses values will define the context.
Hepato System
Page 17
User manual
Gentiane Informatique
The menu, the buttons
New : to create a new context.
Open and the button :
to edit an existing context.
Save as… and the buttons :
name.
and
to save the context giving it a
Launch CtxView and the button :
run an appended application which presents
the context as a spreadsheet. This can make easier the edition of the contexts if
those become numerous.
Context list : access to the management of this list.
Option/Print context+comment : if marked the couple context and its comment are printed if the button :
is clicked.
open a text editor to create or edit the comment associated to the context
Comment/Current context or the button :
being edited.
Comment/Systematic : Permits to create a comment which will be proposed for each patient, whatever his score results
are.
Hepato System
Page 18
User manual
Gentiane Informatique
Profiles management window
This window is accessible from the main window
doing : Profiles/Profiles creation-modification.
This winodw is used to manage the profiles
By profile we must say : a list of analytes composed by
the user. Their association aims at a profit to the
diagnosis. This list can only contain one analyte.
To valid the seizures on this window or on the windows
on which we have access, press the button OK
Press the button Cancel. If you give up recording the
seizures.
The button Ref. Val opens the window : Creation of
reference values where you can seize the
physiological values, of the analytes of the selected
profile.
Profile creation
Enter in the field Profile the profile name to be created. If this name doesn’t still exist in the list, the button Create
becomes active . click below to open the window. Creation/ profile modification
Profile modification
Select in the list, the profile to modify then press the button : Modify . the window Creation/ Modification od profile opens
to let you make some modifications.
Profile deletion
Select in the list to delete then press the button Delete
Remarks:
We advise you to create a profile called MATRIX containing the whole analytes .The software makes a particular
treatment of this profile. When you modify an analyte, this modification is sent back in all the profiles containing this
analyte.
Hepato System
Page 19
User manual
Gentiane Informatique
Profile creation/modification window
This window is accessible from the window :
Profile management, when we press the button
Create or Modify.
It suggests all the elements necessary to the
parameter of the profiles.
To validate the seizures on this window or on the
windows which give access to, press the button
OK.
Press the button Cancel if you don’t want to save
the seizures.
You can modify the name of the profile in the
field above.
You can create a new analyte seizing his name in
the field: Parameter/Analyte then pressing the
button Create which becomes active
Press it to see the new analyte added to the list.
So, a created analyte must have the definition of the
age bracket to receive the physiological values of
each of the age brackets. Press the button Ages to
create in the window: Definition of the age
brackets.
Press the button Ref. Val. to edit the chart of the
physiological values according to the age , the sex
in the window : Creation of reference values.
You can copy an analyte if it is already in
another profile. For that, press the button Copy,
select the profile which contains the analyte to be
copied , click OK, select in the list of the
parameters the analyte(s) to be copied, click OK.
The chosen analyte(s) are added to the list.
You can reappoint an analyte. Select the analyte
to be reappointed, press the button Rename, enter
the new spelling, press OK.
You can delete an analyte. Select the analyte to be deleted, press the button Delete.
You can move an analyte in the list. Select the analyte to be dragged, press the button : Move, enter the number of the
new position.
It is possible to create a profile containing some calculated parameters.
So that the entered parameters appear in the list of the calculated parameters , follow the following procedure:
- Enter a parameter name calculated in the field entitled : Parameter.
- Select the box of the calculated parameters pressing the button-radio entitled: Calculated parameters
- The button Create becomes active, press it.
Then, you must select this new calculated parameter and press the button Calcul. to make it affect a formula.
You can enter a Password to protect your formulas.
Hepato System
Page 20
User manual
Gentiane Informatique
Capture box of formula
When we have chosen to create a profile containing some calculated parameters, the seizure box of formula is proposed.
It contains:
- A field of the formula seizure proper
- A field of unity seizure
- A field to force the value of the result if a condition is checked.
- A list of the entered parameters
- A field to enter the name that will be given to the parameter on the graphic
If we want to create a formula for a result which will appear under condition in the comments, we have to seize the
condition in : the entitled field: Do not show if.
We will be able to force the value of the result if the result of the formula complies a condition entered in the field :
If ; Then.
AFormula<0;0|RESULT>10;10
In this example, the software will increase the result of a formula to zero if the result of the formula is inferior to zero; it
will also force to ten the result of the main formula if it exceed ten. The character : ‘|’ is used as separator.
Hepato System
Page 21
User manual
Gentiane Informatique
Condition not to display a result in the comments
The condition is checked by the comparison of two formulas
The formulas must be divided by one of the following signs:
• = equal
• < inferior
• <= inferior or equal
• > superior
• >= superior or equal
• <> different
So that the field of seizure contains for example :
Résult_Formulal<>result_ formula2 or
Result_Formule1<1 or
Result_Formule1>=250
Remarks
If the condition is checked , the result isn’t displayed.
Formula capture
When we have chosen to create a profile containing some calculated parameters , we have to indicate with the help of a
mathematical formula , the relation between the calculated parameter and the result(s) of the known parameters (entries)
Click on a parameter of the list so that it can appear in the field of seizure of the formula.
Example:
To enter the following formula: “(PARAM1*PARAM2)/PARAM”
1.
2.
3.
4.
5.
6.
7.
open a (
click on PARAM1
press *
click on PARAM2
close the )
press /
click on PARAM3
Remark :
Each elementary operation of the formula must appear into brackets
This formula will be used to deduce the normals of the calculated parameter making the calculation on the normals of the
entered parameter(s).
The check box : Protect the formula when it is on, avoid the tracability of the calculation which is normally accessible
from Insight of the profile window. It also avoid this window to be open again if a password have been defined in the
Profile creation/modification window.
The notation : PARAM1% indicates we use the percentage of the median for normal values instead of the concentration
(see : Reference values definition).
Error in the formula
The software has checked the formula applying the calculation on the reference values.
If an error has appeared, here is one of the following reasons:
• parity default between the open and close brackets
• division by zero
• name of the parameter incorrectly spelled.
Correct the error, then validate again the window of profile creation.
Hepato System
Page 22
User manual
Gentiane Informatique
Definition of Age Brackets window
This window is accessible from the window : Profile
creation/modification of the profile pressing the button : Ages.
When a definition of age brackets has already been done, the software
gives a warning indicating that the normals already saved will be lost.
To validate the seizures on this window, press the button OK.
Compteur
The button Erase deletes all the age brackets already seized.
The software permits to define until 40 age brackets.
If you click directly on OK, the software creates a unique bracket from 0
to 115 years old.
You must create brackets in increasing order. The first bracket starts at day zero.
For each bracket to be created, indicate the superior marker in the field: at and check : Days, Months or Year according
the case. Then click on the computer to increment it. The superior marker of the previous bracket becomes the inferior
marker of the actual bracket.
The last created bracket will be arbitrarily extrapolated at the age 115 by the software.
Creation of reference values window
You have access to this window from the window : Profiles management pressing the button : Ref. Val. or from the
window: Profile creation/modification pressing the button : Ref. Val..
To validate the seizures on
this window , press the
button Ok.
Press the button Cancel if
you don’t want to save the
seizures.
It presents a chart of seizure
of the normal values. For a
given age bracket and for
each sex, a slot is made for
the median and for the
differences considered as normal in relation to this median.
These differences can be presented and published in percentage of the median or in concentration according to what you
will have chosen in the option of the menu : Display
In the list : Parameter, select the one you want to treat.
Give some information to the field : Unity.
When you want to change the unity, you can ask the software to apply a factor automatically to the presented data. So,
the field factor appears, enter the value of the factor then press OK to launch the calculation.
Press Print to have the output of the chart.
Hepato System
Page 23
User manual
Gentiane Informatique
Laboratory heading window
You have four lines of
free text to seize the
laboratory heading. These
data will appear above
the graphic on the
definitive document .
Enter the list of the
Biologists, separated by
semicolons. The software
will propose you to
choose the one who is
responsible of the patient
in the window: Graphic
Preparation.
Enter in the field Logo,
the slot of the graphic file
which will be used as a
logo of the laboratory in
the heading.
The button Logo opens a
search window of the
graphic file.
Tick Stretch out the
image to adapt the logo
at the height of the
heading.
Then , choose its slot
ticking one of the three
options proposed.
A miniature representation of the heading is displayed at the bottom of the window.
Hepato System
Page 24
User manual
Gentiane Informatique
Use in connected mode
The connected mode is confered by the use of an additional application in charge of realising automatically the insertion
of the patients data in the data base, and eventually printing the graphics without the intervention of the user. This
application is composed of a delivered program in the connected version.
Its putting into service also requires, an unbridle code. See at the top the installation procedure.
This program can :
- examine permanently the presence of an interchange file whose name, slot and format have been defined with the
provider of a tierce data processing. The patients data are read in it, integrated to the patient data base of the
software, then the file is deleted.
- put a query directly to laboratory system information (LIS).
The Application Launch
From the menu of the main window of the sofware, make : Option/Launch the automaton or click the button :
A window entitled Patients entering automaton then appears.
.
Definition of the connection parameters
1 Interchange file reading
Interlocutor
The interlocutor is the name of the tierce data processing which puts the patients data at the automaton.
It has established a protocol of communication with several computer science societies, whose list appears in the menu
under the choice : Options/Interlocutor.
The user has to tick in this list, the name of the interlocutor who supplies the patients data.
Interchange file
By the menu, doing Options/ interchange File, the user defines in agreement with the society which provides the data, the
name and the path of the file which contains them.
Deadlock File
By the menu doing, Options/ deadlock file , the user defines in agreement with the society which provides the data , the
name and the path of the deadlock file.
The deadlock file serves as evidence of the use of the interchange file, to avoid the conflicts with this one.the existence of
a deadlock file indicates that the interchange file is in the process of use .
When an application wants to intervene on the interchange file, it must wait for the deadlock file being absent. As soon as
it is possible, it creates it to prevent the second application from using it. It deletes it when it has finished.
Interchange file and deadlock file mustn’t be homonyms.
Hepato System
Page 25
User manual
Gentiane Informatique
Requirements of setting for a right connection
To have the possibility to interpret correctly the interchange file, the automation must know the spelling of the name of the
analytes. It supposes that the spelling of the analytes is the same on the sofware and on the interlocutor. See above the
column creation of profiles or the online-help.
Using Option/Matching table from the
main window, it is possible to establish a
correspondence between the code used in
the software (Published code) and the code
received from the file or the query. Enter
the real spelling of the name of the analytes
in the column entitled : Received code.
You can also enter a factor if necessary to
convert the results obtained.
2 Query direct to the LIS (Laboratory Information System)
Interlocutor
Choose the interlocutor like in the previous case.
Query
As the query is specific to the interlocutor, each interlocutor have a specific query definition window.
Press Alt V to access to the connexion parameters. Use Save and test the connexion to verify it. Once the connexion to
the database is established, follow the instructions in the Help tab.
If the spelling of the name of the analytes used by software doesn’t match the one used in the database, click the button :
Matching table (See above).
Hepato System
Page 26
User manual
Gentiane Informatique
Check the thick Launch query every n minutes to get the query execution automatic. If this thick isn’t checked the
software presents to the user un button entitled Execute the query.
Hepato System
Page 27
User manual
Gentiane Informatique
Classical Mode
The automaton will only take into account the patients for which it will have recognized enough data to constitute a
profile
In the list of the created profiles, it will search to use the most important (the one containing the most analytes) with the
data which are transmitted to it.
Free-choice profile mode
This functioning supposes that you have created un profile named
«MATRIX» containing all the analytes of which you hope to retrieve the
results.
In this mode, the software will retrieve all the results of the patient if the
analytes belong to the MATRIX profile, and this even if some analytes of the
MATRIX profile are absent
To activate the free-choice profile, click on : Options/Free-choice profile :
the following window appears.
When Always is ticked, the software will keep a MATRIX profile to the
patient, even if the collated results permit to propose another profile.
When, If incomplete patient data is ticked, the software tries, each time it retrieves a result, to allocate to the patient a
profile as in a classical mode.
Keep the patient’s profile
When a patient already exists in the database, the results of a new sample are added to the database. If these results don’t
match the profile (analytes are not the same) a new profile is allocated to the patient. This functioning can be changed to
always keep the same profile to the patient checking this thick.
Move data file after reading
When there are one or more other Gentiane applications installed on the PC, they can have the same patient data source.
As each application has to delete the received file, it can first make a copy of it dedicated to the next application. Click this
option and enter the path of the copy to make.
Save the options
Make Options/Save the options to store this parameter.
Hepato System
Page 28
User manual
Gentiane Informatique
Table of Contents
GENERALITIES................................................................................................................................................................... 2
INSTALLATION................................................................................................................................................................... 3
IMPLEMENT .......................................................................................................................................................................... 3
Install Interbase ............................................................................................................................................................... 3
Install Hepato System ...................................................................................................................................................... 4
FIRST START ......................................................................................................................................................................... 4
THE MAIN WINDOW ......................................................................................................................................................... 5
THE SUBMENU FILE .............................................................................................................................................................. 5
THE SUBMENU PATIENTS ...................................................................................................................................................... 6
THE SUBMENU PROFILES ....................................................................................................................................................... 6
THE SUBMENU OPTIONS ........................................................................................................................................................ 6
THE SUBMENU HELP ............................................................................................................................................................. 6
THE BUTTONS ....................................................................................................................................................................... 7
PATIENTS LIST WINDOW ................................................................................................................................................ 7
THE BUTTONS ....................................................................................................................................................................... 7
THE TABS.............................................................................................................................................................................. 8
THE CLICKS .......................................................................................................................................................................... 8
FENETRE DE SAISIE DES DONNEES PATIENT .......................................................................................................... 9
PROFILE INSIGHT WINDOW ........................................................................................................................................ 10
THE SUBMENU FILE ............................................................................................................................................................. 11
THE SUBMENU VIEW ........................................................................................................................................................... 11
THE SUBMENU COMMENT ................................................................................................................................................... 11
THE SUBMENU HELP ........................................................................................................................................................... 11
LE SOUS-MENU FICHIER...................................................................................................................................................... 12
LE SOUS MENU VUE ............................................................................................................................................................ 12
THE SUB-MENU ANTERIORITIES .......................................................................................................................................... 12
THE SUBMENU COMMENT ................................................................................................................................................... 12
THE SUBMENU HELP ........................................................................................................................................................... 13
THE BUTTONS ..................................................................................................................................................................... 13
THE CLICKS ........................................................................................................................................................................ 13
OPTIONS JPG/ PDF WINDOW........................................................................................................................................ 14
THE EDITOR WINDOW................................................................................................................................................... 14
THE PATIENTS LIST MANAGEMENT WINDOW...................................................................................................... 15
PONCTUAL OPERATIONS ..................................................................................................................................................... 15
PROGRAMMED OPERATIONS ............................................................................................................................................... 15
WINDOW BACKUPS USE ................................................................................................................................................ 15
FENETRE DE GESTION DES CONTEXTES................................................................................................................. 15
THE FIELDS : HIGH, LOW .................................................................................................................................................... 15
THE MENU, THE BUTTONS ................................................................................................................................................... 15
PROFILES MANAGEMENT WINDOW ......................................................................................................................... 15
PROFILE CREATION ............................................................................................................................................................. 15
PROFILE MODIFICATION ...................................................................................................................................................... 15
PROFILE DELETION ............................................................................................................................................................. 15
PROFILE CREATION/MODIFICATION WINDOW.................................................................................................... 15
CAPTURE BOX OF FORMULA ..................................................................................................................................... 15
DEFINITION OF AGE BRACKETS WINDOW............................................................................................................. 15
CREATION OF REFERENCE VALUES WINDOW ..................................................................................................... 15
Hepato System
Page 29
User manual
Gentiane Informatique
USE IN CONNECTED MODE .......................................................................................................................................... 15
THE APPLICATION LAUNCH ................................................................................................................................................ 15
DEFINITION OF THE CONNECTION PARAMETERS.................................................................................................................. 15
1 Interchange file reading.............................................................................................................................................. 15
2 Query direct to the LIS................................................................................................................................................ 15
Classical Mode .............................................................................................................................................................. 15
Keep the patient’s profile............................................................................................................................................... 15
Move data file after reading .......................................................................................................................................... 15
Save the options ............................................................................................................................................................. 15
Hepato System
Page 30
User manual