1
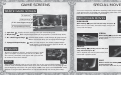
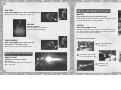
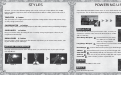
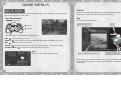
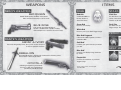
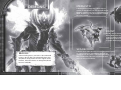
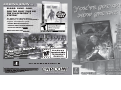
WARNING: PHOTOSENSITIVITY/EPILEPSY/SEIZURES A very small percentage of individuals may experience epileptic seizures or blackouts when exposed to certain light patterns or flashing lights. Exposure to certain patterns or backgrounds on a television screen or when playing video games may trigger epileptic seizures or blackouts in these individuals. These conditions may trigger previously undetected epileptic symptoms or seizures in persons who have no history of prior seizures or epilepsy. If you, or anyone in your family, has an epileptic condition or has had seizures of any kind, consult your physician before playing. IMMEDIATELY DISCONTINUE use and consult your physician before resuming gameplay if you or your child experience any of the following health problems or symptoms: • dizziness • eye or muscle twitches • disorientation • any involuntary movement • altered vision • loss of awareness • seizures, or or convulsion. TABLE OF CONTENTS Getting Started 2 Welcome to Fortuna 4 Game Controls 6 Basic Actions 8 RESUME GAMEPLAY ONLY ON APPROVAL OF YOUR PHYSICIAN. _____________________________________________________________________________ Getting Into the Game 10 Use and handling of video games to reduce the likelihood of a seizure • Use in a well-lit area and keep as far away as possible from the television screen. • Avoid large screen televisions. Use the smallest television screen available. • Avoid prolonged use of the PLAYSTATION®3 system. Take a 15-minute break during each hour of play. • Avoid playing when you are tired or need sleep. Game Screens 11 Special Moves 13 Styles 16 Powering Up 17 Game Menus 18 Network 22 _____________________________________________________________________________ Stop using the system immediately if you experience any of the following symptoms: lightheadedness, nausea, or a sensation similar to motion sickness; discomfort or pain in the eyes, ears, hands, arms, or any other part of the body. If the condition persists, consult a doctor. NOTICE: Use caution when using the SIXAXIS™ wireless controller motion sensor function. When using the SIXAXIS™ wireless controller motion sensor function, be cautious of the following points. If the controller hits a person or object, this may cause accidental, injury or damage. Before using, check that there is plenty of space around you. When using the controller, grip it firmly to make sure it cannot slip out of your hand. If using a controller that is connected to the PS3™ system with a USB cable, make sure there is enough space for the cable so that the cable will not hit a person or object. Also, take care to avoid pulling the cable out of the PS3™ system while using the controller. Weapons 24 Items 25 Characters 26 Demons 28 WARNING TO OWNERS OF PROJECTION TELEVISIONS: Do not connect your PLAYSTATION®3 system to a projection TV without first consulting the user manual for your projection TV, unless it is of the LCD type. Otherwise, it may permanently damage your TV screen. HANDLING YOUR PLAYSTATION®3 FORMAT DISC: • Do not bend it, crush it or submerge it in liquids. • Do not leave it in direct sunlight or near a radiator or other source of heat. • Be sure to take an occasional rest break during extended play. • Keep this disc clean. Always hold the disc by the edges and keep it in its protective case when not in use. Clean the disc with a lint-free, soft, dry cloth, wiping in straight lines from center to outer edge. Never use solvents or abrasive cleaners. b 1 GETTING STARTED PLAYSTATION®3 system front GETTING STARTED Using the SIXAXIS™ wireless controller (for PLAYSTATION®3) Slot cover Port indicators CF*1 slot Eject button 2 SD* Memory Card slot Memory Stick™ slot CF L2 button L1 button R2 button R1 button Directional buttons button button button button Left stick/ L3 button* Right stick/ R3 button* SD/miniSD *1 CompactFlash® *2 Secure Digital Insert the disc with the label side facing up. Disc slot USB connector SELECT button Power button START button PS button Vent Eject button WLAN access indicator HDD access indicator USB connectors Note: Some models of the PLAYSTATION®3 system do not include media slots. For specific features included, refer to the instructions for use of your model of the PLAYSTATION®3 system. Starting a game: Before use, carefully read the instructions supplied with the PLAYSTATION®3 computer entertainment system. The documentation contains information on setting up and using your system as well as important safety information. * The L3 and R3 buttons function when the sticks are pressed. Note: To use the controller, you must first register or “pair” the controller with the PLAYSTATION®3 system and assign a number to the controller. For details, refer to the instructions supplied with the system. Saved data for PLAYSTATION®3 format software Saved data for PLAYSTATION®3 format software is saved on the system’s hard disk. The data is displayed under “Saved Game Utility” in the Game menu. Check that the MAIN POWER switch (located on the system rear) is turned on. Insert the Devil May Cry 4 disc with the label facing up into the disc slot. Select the icon for the software title under [Game] in the PLAYSTATION®3 system’s home menu, and then press the x button. Refer to this manual for information on using the software. Quitting a game: During gameplay, press and hold down the PS button on the wireless controller for at least 2 seconds. Then select “Quit Game” from the screen that is displayed. 2 Hint To remove a disc, touch the eject button after quitting the game. 3 WELCOME TO FORTUNA On the coast of a distant land lies the castle town of Fortuna. THANK YOU It is here that the group known as the Order of the Sword practices a religion so mysterious, no outsider knows what happens behind closed doors. From the Devil May Cry® 4 Development Team in Japan, we at In times past, the Order of the Sword fought to protect mankind. They revere the demon warrior Sparda as their god, and their hatred of all other demons runs deep. Their sole purpose is the extermination of these demons. Capcom wish to thank you for your purchase of this game and your support! We had quite a lot of fun working with new next-gen consoles and really taking advantage of the graphics capabilities, as well as finding new ways to make this action game unique and newly On the day of the annual Festival of the Sword, a powerful man appeared seemingly from nowhere. Before anyone could act, this man assassinated the head of the Order! A young knight of the Order, whose only purpose previously was the extermination of all demons, was immediately ordered to pursue the mysterious assassin... challenging while staying true to the contemporary Devil May Cry style. Capcom’s fans truly have a passion for excellence in videogames. We are proud to present this next installment of the Devil May Cry saga to you and wish you many happy hours of discovering brand new chain-combos and your own style of gameplay. From one group of videogame fans to another, thank you. A number of demons appeared suddenly from deep within the Mitis Forest and attacked the city, destroying a number of houses and inflicting slight injuries to citizens. As luck would have it, Nero, a knight of the Order of the Sword, was present at the scene. All demons were exterminated. During this incident, a private female citizen who was a traveling companion of Nero’s, was injured. Nero himself received a minor injury to his right shoulder. The ministry of technology has determined that Nero’s sword, the Red Queen, took some damage and is currently being repaired. A detailed investigation of the area was performed, but no conclusions have been made concerning the reason behind the demon attack. There will be another investigation at a later date. 4 5 GAME CONTROLS This default configuration can be changed at the OPTIONS screen. Control Pad Port indicators USB connector L2 button L1 button R2 button R1 button Directional buttons button button button button Left stick/ L3 button* Right stick/ R3 button* START button PS button SELECT button NERO 6 t button Close-range attack DANTE t button Close-range attack s button Long-range attack c button s button Dante becomes a playable character only c button after certain goals are x button accomplished. Long-range attack Examine / Devil Bringer / Cancel x button Jump / Examine / Confirm l button Not Used , button Examine / Style Action / Cancel Jump / Examine / Confirm l button Devil Trigger Exceed , button Switch long-range weapon r button Lock-On target r button Lock-On target d button Not Used d button Switch close-range weapon Left Stick Move / Change lock-on target (press .) Left Stick Move / Change lock-on target (press .) Right Stick Move camera / Reset camera (press f) Right Stick Move camera / Reset camera (press f) Directional buttons Not Used Directional buttons Change style w button Pause Menu w button Pause Menu q button Taunt q button Taunt 7 BASIC ACTIONS Walk / Run : left stick Close-range attack: t button Press the left stick partially forward to walk, and press it fully forward to run. You cannot run while pressing the r button. Press the t button to attack with your sword or other closerange weapons. Repeatedly press the t button for a variety of attacks or combine it with the r button and/or the left stick. (With two or more close-range weapons equipped, press the d button to select and switch weapons instantly.) Examine: c button, x button Devil Bringer, Style Action: c button To examine an item or move through a door into the next room, stand in front of it and press the c or x button. Press these buttons to use Nero and Dante’s special moves, the Devil Bringer and Style Actions. Jump / Evade: x button Press the x button to jump. The longer you press and hold the button, the higher you’ll jump. While in midair close to a wall or object, press the x button again to kick off and go even higher. To evade, hold the r button, move left or right and press the x button. Lock-On target: r button Press the left stick in the direction of the enemy or object you want to target, and then the r button to lock-on. As long as you stay locked-on, your attacks aim for that target. If the left stick is not pressed, you lock onto the nearest opponent. (You can change your lock-on type at the Options screen.) 8 Long-range attack: s button Press the s button to fire your gun or other long-range weapon. Repeatedly press or hold the the s button for a variety of attacks. (With two or more long-range weapons equipped, press the , button select and switch weapons instantly.) Exceed: , button (Nero only) As Nero, briefly press and hold , to charge the Exceed Gauge, which has a max of level three. The Red Queen sword hits harder and faster when fueled by the power of the Exceed propellant system. Devil Trigger: l button (Dante only) As Dante, when the Devil Trigger Gauge reaches level three, press the l button to become a demon. Dante’s demon form is stronger and faster, and his health recovers slowly. This effect lasts only as long as the gauge has energy; when the gauge is empty, Dante returns to human form. To return to human form sooner, press l. Camera: right stick Use the right stick to get a good look at your surroundings during battle and while searching rooms. (There are some areas where the camera cannot move.) 9 GETTING INTO THE GAME Install When the game starts for the first time, Devil May Cry 4 game data will be installed on the PLAYSTATION®3 hard disk drive. You must install the Devil May Cry 4 game data to play the game. Only one copy of the Devil May Cry 4 game data can be installed to the hard disk drive. 4.9GB of free space is required to install the game data. GAME SCREENS MAIN GAME SCREEN ⑥ Exceed Gauge (Nero only) ① Vitality Gauge ② Red Orb ③ Combo Meter GAME START Press START at the Title Screen to go to the Start Menu. NEW GAME Start the game from the beginning. Tutorial When this option is turned ON, game play advice will be displayed during play. Human/Devil Hunter Automatic Select game difficulty. (Human = beginner / Devil Hunter = advanced) Player and enemy strength, etc. will vary depending on difficulty. When Automatic is turned on, various combos and attacks are easier to perform. ⑤ Lock-On Cursor LOAD GAME Resume a previous game from a save point. OPTIONS Confirm or adjust game settings. (You can also access the Options menu from the Pause Menu.) ① Vitality Gauge ② Red Orb As you take damage, your vitality decreases. When it reaches zero, the game is over. Displays number of Red Orbs acquired. ③ Combo Meter GAME OVER When your character’s Vitality Gauge reaches zero, the game is over, and the Continue Screen appears. Select CONTINUE to restart your mission from a set point. If you have a Gold Orb, use it to revive where you died. ④ Mini Map 10 The Combo Meter critiques your fighting skills as you combine attack moves together. The more impressive the attack combo, the better the score. A map of the current room is displayed. The map shows the player’s position and location of doors. ⑤ Lock-On Cursor ⑥ Exceed Gauge ④ Mini Map When locked-on a target, this cursor appears and displays the target’s vitality. Nero’s Exceed Gauge indicates the level of energy stored in the Red Queen sword. 11 GAME SCREENS DANTE GAME SCREEN ① Style Icon ② Royal Gauge ③ D.T. (Devil Trigger) Gauge ④ Equipped Weapon Display ① Style Icon ② Royal Gauge You can use many moves and abilities depending on the weapons equipped and the Styles used. Some special moves are available from the beginning, while others can be acquired at the Skill Up menu. This is a list of a few of Nero’s special skills. RED QUEEN MOVES HIGH ROLLER While holding r, press the left stick away and press t. Move in close to your enemy, then with a mighty swing of your sword, send them flying! Displays the name and logo of the style currently being used. STREAK When using the Royal Guard style, this gauge fills as you block enemy attacks. ③ D.T. (Devil Trigger) Gauge As Dante attacks enemies or takes damage, this gauge increases. When 3 or more units fill up, you can engage the Devil Trigger ④ Equipped Weapon Display When you equip weapons, the currently equipped weapon briefly appears. Long-range weapons appear on the left, and close-range weapons on the right. MISSION The game is divided into missions, and each mission has specific goals to accomplish to proceed to the next mission. When you clear a mission, the Results screen appears with your score and the number of Proud Souls collected. SAVE Select SAVE at the Results screen to save your game. You can also save from the Pause Menu, the Continue screen and the Mission Select screen. If you save in the middle of a mission, reloading will start from the beginning of the mission. This game requires 3.4MB of free space on the PLAYSTATION®3 hard disk drive to save game data. (Network data can only be loaded through auto load at game startup.) 12 SPECIAL MOVES While holding r, press the left stick toward and press t. Charge toward your foes and mow them down with powerful blazing speed! SHUFFLE While holding r, quickly press the left stick away, toward and press t. Take a step back and, with one quick motion, blast forward with a powerful stroke! SPLIT While in midair and holding r, press the left stick toward and press t. Drop down from above with all your might to slice your foes! 13 SIDE ROLL While holding r, move to either side and press x. Quickly roll to the left or right out of harm’s way! DEVIL BRINGER MOVES BUSTER Press c with an enemy at point-blank range. Grab an enemy with your right arm, and hurl them with magical strength! (Not all enemies can be grabbed.) AIR HIKE Press x in midair. Create a magic platform beneath your feet to jump even higher! SNATCH While holding r, Press c. Extend your right arm, grab an enemy, and yank them toward you. (Not all enemies can be grabbed, you cannot use snatch if you don’t meet the correct conditions.) You can also use Snatch to: TABLE HOPPER While holding r, move to either side and press x just as the enemy attacks. Slide to avoid an attack with blinding speed! BLUE ROSE MOVES CHARGE SHOT Hold s for at least one second, then release. Fire a shot imbued with powerful magic from Nero’s right arm! 14 Reach breakable objects in the distance. Grab objects and use them to move through the stage. Grab items such as Red Orbs, etc. 15 STYLES POWERING UP As Dante, you can select different fighting styles and try each style’s unique abilities. Use the c button to perform a style move. Press the directional buttons while in combat, even in mid-move, to change styles. TRICKSTER 1 Select Power Up at the Mission Start screen, or access the Power Up screen via a Divinity Statue during a mission. You can Power Up using Proud Souls or by buying new items with Red Orbs. button This style makes use of high speed acrobatic maneuvers. Dodge attacks and toy with enemies using an array of high speed moves! SWORDMASTER 3 button Excel in using a variety of close-range weapons to their fullest potential. Perfect your dazzling swordplay! SKILL UP \ GUNSLINGER 4 button Keep your enemies at bay by making full use of a variety of long-range weapons. Show off your magnificent marksmanship! Use Proud Souls to increase your character’s skills, or revert your character to a previous state and use the Proud Souls for another skill at a later time. ROYALGUARD Close-Range Weapons Increase/Decrease your character’s ability to use swords and other close-range weapons. Long-Range Weapons Increase/Decrease your character’s ability to use guns and other long-range weapons. 2 button Use your enemy’s attack against him! This defensive style allows you to counter enemy attacks, turning the situation to your advantage! STYLE PROGRESS \ Devil Bringer By using collected Proud Souls at the Skill up screen, you can level up each of your styles and gain new Style Moves. Abilities Auto Skill Up Skill List Cancel All Increase/Decrease the power of your Devil Bringer and other special abilities. Increase/Decrease the power of your Devil Trigger and other special abilities. Automatically Skill Up your character in one of three ways based on your playstyle. View a list of all your currently usable skills and acquired weapons. Clears all skills you have acquired thus far. ITEM Level 1 Level 2 Level 3 Buy items with Red Orbs at this screen. EXIT 16 Leave the Power Up screen. 17 GAME MENUS PAUSE MENU Skill List Press the START button during play to display the Pause menu. Save, check items, check map, review skills and change options on this screen. Pause Menu Controls l/r View a list of skills that are usable with your currently selected weapons and abilities. You can view an explanation of each usable skill and its actions by selecting it. Map Cycle Pages View a map of your current area. Name of current area c Cancel x Confirm Door Divinity Statue Directional buttons (Left Stick) Move selection cursor Item Skill List Map Systems Check which items you have. View skills that are currently usable with the weapons and abilities you possess. View a map of the current stage. Abort or restart the current mission, save your progress, or adjust game settings. Exit Pause Menu Leave the Pause menu and return to the game. Item Check or use your purchased and key items. Name of currently selected room Currently selected room Player’s current location Rooms that you have already entered as well as the doors leading to and from those rooms are displayed on the map. Rooms you have not yet entered are not displayed. The currently selected room shines yellow. 18 19 GAME MENUS Systems Motion Sensor You can save game data, abort or restart the current mission, and change game settings at the Systems menu. With the Motion Sensor ON, turn the controller left and right to move the camera. Save Data Save your game progress. Quit Mission Select Yes to end the current mission. Game data will not be saved. Retry Mission View and change each of the game’s settings. Options Exit Restart the current mission from the beginning. Items and orbs that you have gathered during the mission will be carried over when you restart. Return to the Pause Menu. To quickly set the camera behind your character, shake the controller vigorously. Motion Sensor Tips: Make sure you have plenty of room around you. Hold on tight to the controller to avoid accidentally throwing it. With the USB cable connected, make sure the cable doesn’t catch on anything, hit anyone, or accidentally disconnect from the PLAYSTATION®3. OPTIONS Game Options Sound This screen offers more detailed settings than the Pause menu. Adjust the music and sound effect settings. Lock-On Display Brightness Lock-On Type Mini-Map Turn the Lock-On target on or off. Select the type of Lock-On target. Display settings for the in-game mini map. Adjust the game’s brightness. Control Camera Change camera control settings. Customize the game’s controls. Tutorial Turn the tutorial text display on or off. Subtitles Turn movie subtitles on or off. Vibration Turn the controller’s vibration function on or off. Default Reset game options to default settings. Exit 20 Exit the Options menu and return to the previous screen. 21 NETWORK By connecting to the PLAYSTATION®Network at the Network menu, view player rankings divided according to difficulty, as well as various accomplishments. By using the PLAYSTATION®Network service, you can view the world rankings and play information of players around the world. MY HISTORY Check only your own various accomplishments and game statistics. Ranking View rankings divided according to difficulty. My History View your own online play information. Friend’s History View the online play information of players on your friends list. FRIEND’S HISTORY Check your friends’ various accomplishments and game statistics. Select the name of the friend to view their specific statistics. Exit Exit the Network Menu and return to the previous screen. RANKING View various world player ranking statistics according to difficulty and mission. In World Rankings, display players’ ranks from 1 to 10,000. View Friend Rankings to see your rankings alongside your friends’. 22 23 WEAPONS NERO’S WEAPONS RED QUEEN A blade developed by the Order of the Sword. Nero customized it heavily to suit his needs. BLUE ROSE A six-shooter customized by Nero to fire with a double barrel. Capable of taking down multiple foes or enemies encased in armor. ITEMS ORBS STARS Red Orb Vital Star Sacrifice Red Orbs at Divinity Statues to obtain new items. Use Vital Stars to restore vitality. There are three varieties: S, M and L. Green Orb Devil Star Restores some vitality. Use Devil Stars to restore some of your Devil Trigger Gauge. There are two varieties: S and L. White Orb Restores part of your Devil Trigger Gauge. PROUD SOUL Blue Orb Fragment DANTE’S WEAPONS EBONY & IVORY Personally designed by Dante, these pistols are the weapon of choice for rapid-fire situations. Collect 4 Blue Orb Fragments to make a whole Blue Orb. Gold Orb* Continue your game from the spot where you died. Blue Orb* REBELLION A powerful blade that is the physical manifestation of Dante’s power. Passed down to Dante by his father. COYOTE-A A hunting shotgun that spreads buckshot over a large area. Tremendously powerful at point-blank range. 24 Sacrifice Proud Souls to Divinity Statues to acquire new abilities. Increases your Vitality Gauge maximum by a little. HOLY WATER Use the water’s holy power to inflict heavy damage on all enemies in the area. Purple Orb* Increases the maximum of your Devil Trigger Gauge. *Some of these items can be bought with Red Orbs 25 CHARACTERS CREDO Charged with protecting Fortuna from demons via his role as Supreme General of the Holy Knights, Credo earned his title through skill with the blade, gaining the respect of the Order’s members and the hundreds under his command. As Kyrie’s brother, he too has accepted Nero as a member of his family, despite the youth’s constant insubordination. KYRIE The songstress at the Order’s Festival of the Blade, the beloved Kyrie is also the younger sister of the Holy Knights’ Supreme General, Credo. Having accepted the orphaned Nero into her family as a child, their ambiguous relationship contains aspects of family, friend and lover. DANTE NERO Although respected by his fellow Holy Knights for his talents, Nero’s sardonic attitude proves that he doesn’t play well with others. Preferring to work solo, Nero is often given the Order of the Sword’s dirty work. 26 The son of the dark knight Sparda, Dante is the hero who defeated the demon emperor and sealed off the demon world, saving all of humanity. Now making his living tracking down demons as a Devil Hunter, his illustrious career of fighting the demons that dare to threaten humanity has made him a truly superior warrior. Some say that his skill and power have surpassed even that of the legendary Sparda himself. 27 DEMONS MEPHISTO A floating demon wrapped in a black cape of special gas that allows it to pass through objects. Mephisto appears to its foes as a black demon of death; however, its true physical form is nothing but a tiny coward. FROST An elite demon sired by the emperor of demon-kind, Frosts are all-purpose soldiers used in a variety of situations. Frosts encase themselves in ice to recover their strength, so quickly destroying their icy cocoon is key. SCARECROW BERIAL A demon hailing from a cruel circle of the underworld known as the Fire Hell. The otherworldly flames that wrap Berial’s body prevent him from magical attacks. However, when these flames are extinguished, Berial becomes vulnerable. 28 A demon which takes the form of sacks filled with Trypoxylus. These insects are unintelligent. However, by moving as one, they form a Scarecrow-like being. With a bladed arm, this type of Scarecrow often takes the role of executioner. 29 LOG ON... A shadow knight rose up, holding an enchanted sword named after me. That blade will challenge the devil’s reign. CAPCOM-UNITY.COM TALK TO US! In addition to fan-to-fan Destroying the minions of darkness that stand in his path, the knight finally faced the strongest demon. But his strength was no match for the devil’s dark wrath. He was defeated and fell into oblivion. discussions, Capcom staffers and even executives read and respond directly to your questions! Find other fans, competitors, or even PLAY against Capcom staff! EARN REWARDS for community The people offered up their prayers, believing in the day when the darkness would pass, and sang songs of remembrance to the fallen knight. These prayers became our strength, our miracle, and by this miracle the shadow knight was reborn, and once again fought the devil’s power. As the shadow knight said, the darkness has cleared. participation and gaming achievements! Check out BEHIND-THE-SCENES blogs, articles, and media! Enter Capcom Unity member-only CONTESTS AND SWEEPSTAKES! Get BREAKING NEWS announcements and SPECIAL OFFERS from the Capcom Store! COMING SOON... BLOOD. RUNS. COLD. FOR THE FIRST TIME ON THE PLAYSTATION ®3 SYSTEM! The million unit selling blockbuster, Lost Planet™, is coming to the PLAYSTATION ®3 computer entertainment system. UÊ / -Ê1/*9,Ê//UÊ,** Ê- Ê*9,Ê * UÊ8 1-6Ê " -"Ê " / / 777°"-/* //° " on! o S g omin C ando Comm om Bionicday e ndo.c h t a m Join unity to m o comm ionicc b at www. Character Wayne by ©Lee Byung Hun/BH Entertainment CO., LTD, ©CAPCOM CO., LTD. 2006, 2008 ALL RIGHTS RESERVED. BIONIC COMMANDO ©CAPCOM CO., LTD. 2008 ALL RIGHTS RESERVED. BIONIC COMMANDO, CAPCOM and the CAPCOM LOGO are registered trademarks of CAPCOM CO., LTD. LOST PLANET is a trademark of CAPCOM CO., LTD. “PlayStation”, “PLAYSTATION” and “PS” Family logo are registered trademarks of Sony Computer Entertainment Inc. The ratings icon is a registered trademark of the Entertainment Software Association. All other trademarks are owned by their respective owners. $39.99 SPRING 2008 DEVIL MAY CRY : THE ANIMATED SERIES ® Get a COOL DVD case for Volume 1 COMING SUMMER 2008! PLAY IT AGAIN FOR THE FIRST TIME! $5 OFF Volume 2 with Collectors Box! AND If you purchased the Devil May Cry® 4 Collectors Edition, which includes Volume 1 of the Devil May Cry®: The Animated Series, go to www.advfilms.com and sign up for several free bonuses: ALL ART COMPLETELY REDRAWN BY HAND! 24/7 ON PLAYSTATION®NETWORK! A totally evil DVD Case for Volume 1! VISIT REGULARLY FOR UPDATES @ A $5 Off Coupon toward your purchase of Devil May Cry®: The Animated Series Volume 2 with Limited Edition Collectors Box! STREETFIGHTERWORLD.COM Shipping and handling charges of $3.99 apply. ® 2007 CAPCOM ENTERTAINMENT, INC. ALL RIGHTS RESERVED. “PlayStation”, “PLAYSTATION” and “PS” Family logo are registered trademarks of Sony Computer Entertainment Inc. The ratings icon is a registered trademark of the Entertainment Software Association. All other trademarks are owned by their respective owners. Devil May Cry: The Animated Series © 2007 CAPCOM CO., LTD / DMC Committee NOTES CREDITS REPAIRS AFTER EXPIRATION OF WARRANTY Marketing Nique Fajors, Laili Bosma, Frank Filice, Philip Ser, Tony Leung If the Blu-ray Disc™ develops a problem after the 90-day warranty period, you may contact the CAPCOM Consumer Service Department at the phone number noted previously. If the CAPCOM service technician is unable to solve the problem by phone, he/she may instruct you to return the defective Blu-ray Disc™ to CAPCOM freight prepaid at your own risk of damage or delivery, enclosing a check or money order for $20.00 (U.S. funds) payable to CAPCOM. We recommend sending your Blu-ray Disc™ certified mail. CAPCOM will replace the Blu-ray Disc™ subject to the conditions above. If replacement Blu-ray Disc™s are not available, the defective product will be returned to you and the $20.00 payment refunded. Creative Services Francis Mao, Jacqueline Truong, Christine Converse, Kevin Converse, Stacie Yamaki, Lindsay Young Localization - Jon Airhart, Andrew Alfonso, Brandon Gay, JP Kellams Public Relations Chris Kramer Community Seth Killian, Christopher Tou Customer Service Darin Johnston, Randy Reyes U.S. Publishing Scot Bayless, Adam Boyes, Rey Jimenez, Gary Lake, Kraig Kujawa, Dave Witcher Legal Estela Lemus 90-DAY LIMITED WARRANTY CAPCOM ENTERTAINMENT, INC. (“CAPCOM”) warrants to the original consumer that this Blu-ray Disc™ from CAPCOM shall be free from defects in material and workmanship for a period of 90 days from date of purchase. If a defect covered by this warranty occurs during this 90-day warranty period, CAPCOM will replace the Blu-ray Disc™ free of charge. To receive this warranty service: 1. Notify the CAPCOM Consumer Service Department of the problem requiring warranty service by calling (650) 350-6700. Our Consumer Service Department is in operation from 8:30 a.m. to 5:00 p.m. Pacific Time, Monday through Friday. 2. If the CAPCOM service technician is unable to solve the problem by phone, he/she will instruct you to return the Bluray Disc™ to CAPCOM freight prepaid at your own risk of damage or delivery. We recommend sending your Blu-ray Disc™ certified mail. Please include your sales slip or similar proof of purchase within the 90-day warranty period to: CAPCOM ENTERTAINMENT, INC. Consumer Service Department 800 Concar Drive, Suite 300 San Mateo, CA 94402-2649 This warranty shall not apply if the Blu-ray Disc™ has been damaged by negligence, accident, unreasonable use, modification, tampering or by other causes unrelated to defective materials or workmanship. 36 WARRANTY LIMITATIONS ANY EXPRESS OR IMPLIED WARRANTIES, INCLUDING WARRANTIES OF MERCHANTABILITY AND FITNESS FOR A PARTICULAR PURPOSE, ARE HEREBY DISCLAIMED. IN NO EVENT SHALL CAPCOM BE LIABLE FOR SPECIAL, INDIRECT, CONSEQUENTIAL OR INCIDENTAL DAMAGES RESULTING FROM THE BREACH OF ANY EXPRESS OR IMPLIED WARRANTIES. The provisions of this warranty are valid in the United States and Canada only. Some states and provinces do not allow limitations on how long an implied warranty lasts or exclusions of consequential or incidental damages, so the above limitations and exclusions may not apply to you. This warranty gives you specific legal rights, and you may have other rights, which vary from state to state or province to province. ESRB RATING This product has been rated by the Entertainment Software Rating Board. For information about the ESRB rating, or to comment about the appropriateness of the rating, please contact the ESRB at www.esrb.org. CAPCOM ENTERTAINMENT, INC., 800 Concar Drive, Suite 300, San Mateo CA 94402-2649. ©CAPCOM CO., LTD. 2008 ALL RIGHTS RESERVED. Devil May Cry, CAPCOM and the CAPCOM LOGO are registered trademarks of CAPCOM CO., LTD. Dolby and the double-D symbol are trademarks of Dolby Laboratories. All other trademarks are owned by their respective owners. “PLAYSTATION” is a registered trademark and “PS3” is a trademark of Sony Computer Entertainment Inc. The ratings icon is a trademark of the Entertainment Software Association. SIXAXIS is a trademark of Sony Computer Entertainment Inc. © 2007 Sony Computer Entertainment Inc. 37


![Zoria RPG System [v0.3.5.65 Amber Release] (4.2MB PDF)](http://vs1.manualzilla.com/store/data/005863942_1-9b91ecb9cab405b7a5ed4ce5145d0e9c-150x150.png)

![[v0.3.5.63 Blue Release] (4.17MB PDF)](http://vs1.manualzilla.com/store/data/005758602_1-69f3b29a9a050ef0b6d8d37fccf12e09-150x150.png)