1
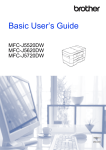
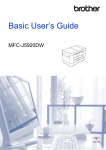
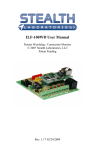
PiSector GSM Cellular Wireless Alarm System User Manual ( GS08 ) Read manual fully before use. PiSector Inc., USA, www.pisector.com Welcome to PiSECTOR Thank you for choosing PiSECTOR. Everyone at PiSECTOR is committed to giving you the best home security available today, and we want you to know that we take the safety of your home and family very seriously! PiSECTOR was the first to develop a personal alarm system with state-of-the art home protection at an affordable cost. Our innovation has made us one of the fastest-growing security companies in the industry. PiSECTOR offers you the Ademco Protocol Security System. We've put complete control of your security system in your hands…anytime, from anywhere in the world. PiSECTOR allows you to instantly arm and disarm your system, change your system settings, check your home security system’s status and so much more. We encourage you to change the default password as soon as you get your system set up. Congratulations! You won't find anything like PiSECTOR anywhere else in the market place. Our user-friendly systems are designed with more functions and at an affordable price. This guide will walk you through the easy set up of your PiSECTOR system. Your system has already been customized and tuned, so everything is ready to go when you open the box. Please be sure to register with PiSECTOR.com for any needed tech support and to receive future product updates. Again, thank you for being a PiSECTOR customer. We're doing everything we can to make sure your home and family stay safe. Sincerely, PiSector Inc. System Components Console Panel Program: press this key then input password, you will enter program status (default password 888888 ) Arm: press this key and input password, you can activate your system as Away from home Disarm: press this key and input password, you can deactivate your system Chime: press this key, you will see icon on LCD screen, that means you have enabled your Chime function, (to make it work go to Sensor-Edit and set your door sensor for Chime zone as Yes, a musical bell tone will sound when you open the door) Home: press this key and input password, you can activate your system as Stay Home (if you go to SensorEdit and set part of sensors for Home zone as No, when you press Home, those sensors will disable, all other sensors will still be active) Emergency: press this key anytime, and it will instantly trigger your alarm system 24/7, regardless whether your system is armed or disarmed TALK/END: enter a phone number, then press this key to make a call and to hang-up when finished (only works with SIM card installed) Scroll Key: press this key to page up and down, to move and select menu list for functions, you can also use this key to find last 30 alarm events during System Disarm Status Function keys: Search: when you see an icon display on LCD screen, you can press “Search” to find existing events Back: use to exit the last step during programing Enter: to confirm your information Mute: quiets all keyboard sounds Vol+/Vol-: for adjusting the console’s sound volume Connect Console Panel: Place the console near your phone cord Remove the table stand and cover on back side of console Remove the SIM card cover SIM Card Slot: Please pay attention to the direction arrow marked on the slot: “LOCK” / “OPEN.” DO NOT insert or take out the SIM card when the main unit console panel is powered on. (Option) Connect the phone cord to LINE Port on back of console Connect your home telephone to TEL port on back of console. Route the phone cord through the channel toward the side of the console (if you have no landline, you can use OBi110 / MagicJack / Vonage / Ooma VoIP service to connect your Internet router / modem, then connect console to the VoIP device) Note: If you use only a landline, you cannot dial out via the console, you will need to use your home phone to dial out or to receive calls, system will auto dial out if alarming, but if you use a GSM SIM card, the main console can function as a telephone, you are able to dial out and receive calls Connect the power adapter to POWER port on back of console Route the power adapter (12V 1A) cord through the channel toward the side of the console Plug the power adapter into a nearby electrical wall outlet that is not controlled by a switch Set the Battery Switch to ON position for internal battery backup charging Wired Port - Function interface of the main unit 1 GND Ground 2 Z3 Wired sensor 1: support both NO and NC (Auto create Zone 49) 3 GND Ground 4 Z4 Wired sensor 2: support both NO and NC (Auto create Zone 50) 5 GND Ground 6 +12V DC 12V Positive Wired in Keychain Remote Press to Arm / Activates your system as Away from home Press to Disarm / Deactivates your system when you return home Press to Home arm / Activates your system as Stay Home (if you go to Sensor-Edit and set part of sensors for Home zone as No, when you press Home, that sensor will disable, and all other sensors will remain enabled) Press this key, you will see icon on LCD screen, that means you have enabled your Chime function, (to make it work, go to Sensor-Edit and set your door sensor for Chime zone as Yes, you will hear musical bell sounds when you open your door), press once to enable, press once again to disable Press once for "silent emergency alarm mode.” This allows you to call for help silently when someone threatens your life without triggering the siren and alerting the intruder. If you press and hold for 3 seconds, the siren will start sounding loudly in emergency alarm mode. Program Remote Keychain: If you received a pre-programed system kit, please ignore this step and do not program it again. Press PROGRAM button on console, enter the default password 888888. Select Remote Controllers then press Enter on console. You will see the following menu: Add Select Add, press Enter, then you will see Trigger Controller Code, press any button on your remote Keychain. Nine digits will appear on console screen for 1-2 seconds. This is the unique address for this keychain. The console will request you add an owner’s name for this remote. Input a name for this remote and then press SAVE. You will see Record Owner Name, then press Enter and record a voice for this remote keychain. Note: Each time you press Add, follow steps above. You can add one remote and a maximum of 8 Keychain Remotes. Edit Select Edit, press Enter to find the name of the remote, then press Enter again, you can edit the remote keychain name or record a voice for the remote keychain. Delete Select Delete and press Enter, you can find all your remotes’ names to delete one or all remote keychains, if you want to remove them from your console panel. Delayed Arm If you select Delayed Arm and press Enter, then set Yes, you will have 60 seconds to leave the house. Default sets Delay as Yes. It gives you 60 seconds to leave the house when you arm system by remote keychains. (You can change this time using System Settings menu, under Arm Delay time.) Program and Mount Bracket Door/Window Sensors If you received a pre-programed system kit, please ignore this step and do not program it again. All new Door / Window sensors you need should be programed to your console. Open the cover and remove the insulated paper, then close the cover. Place small magnet next to sensor. Press PROGRAM button on console, enter the default password 888888. Use Scroll key to choose Sensor then press Enter on console. Add Press Enter again, then you will see Trigger Sensor / Code. Trigger your sensor by moving the small magnet away from the large transmitter. Then console will request you to add a Zone Name for this sensor. Input a name for the sensor, then press SAVE. You will see Record Sensor Name, press Enter, record your own voice for this sensor. This is what you will hear when you receive an alarm call. Note: Each time you press Add, follow above steps. You can add from 1 to 50 sensors. Edit Select it then press Enter, you can use Auto search or Manual search to find your target sensor and highlight it, then press Enter to Edit Sensor Functions as listed below: Note: if you don’t know sensor name then choose Auto Search, when you trigger an individual sensor, its name will be displayed on the console panel. Select the sensor name and press Enter, then you will see the menu display as below: (MAKE SURE ONLY ONE SENSOR IS TRIGGERED EACH TIME TO AVOID ANY ACCIDENTAL TRIGGERING OF A DIFFERENT SENSOR. PLEASE KEEP ALL YOUR MOTION SENSORS IN DIFFERENT ROOMS AND MAKE SURE ALL WINDOW/DOOR SENSORS ARE ATTACHED TO THEIR MAGNET PARTS IN CLOSED STATUS.) Edit Zone Name: Highlight Edit Zone name, press Enter and you will be able to rename the sensor Record Zone Name: Highlight it, press Enter, select “Record”, you are able to record 5 seconds of your own voice. If recording a sensor’s name in your own voice, this is what you will hear to identify that sensor when you receive an alarm call. Emergency Zone Highlight it, press Enter, Default is NO, (If you set YES, the zone will be on 24 hours, regardless of your system’s Arm or Disarm status. This is recommended to be used for smoke detector, panic button, water leak sensor and temperature sensors only. DO NOT set any door sensor or motion sensor as Emergency Zone.) Home Zone Highlight it, press Enter, Default is YES, ( if you select NO, the zone will disable during home alarm status, recommended setting for motion sensor NO, all Window/door sensors YES) Chime Zone Highlight it, press Enter, Default is NO,( if you set as YES, the zone will alert you with a bell sound during disarm and home alarm status, use for doors only) Delayed Zone Highlight it, press Enter, Default is NO, (if set YES, allows you to come back home and open the door without immediately triggering the system. System default delay alarm time is 45 seconds. You can change this time by going to "System Settings" to set the Alarm Delay time.) Siren Enable Highlight it, press Enter, Default is YES, (if set NO, siren will disable when this zone triggered, no siren alarm will sound) Note: All zones are instant zones by Default. (“Instant” refers to the system being immediately armed if any zone is triggered when the system is in armed status.) Delete select it then press Enter, you can find the target sensor and delete it, you can delete any sensor from the console panel NOTE: After programing all sensors to your console, please test each sensor before you mount the sensor to the appropriate location. DO NOT close the door faster than one second during testing, open door and wait 1-2 seconds, when you see sensor light off then close the door, otherwise the console may only receive door open signal and not detect the door close signal, and will not reset properly for the next open cycle… Place each sensor in the appropriate location. Note: If possible, place the bracket on the stationary frame of door or window, and place the magnet on the door or window itself. For better adhesion, you can clean window/door surfaces with rubbing alcohol before mounting hardware. You may also apply super glue on the surface of window/door before you apply 3M mounting tape. Various orientations between the Bracket and Magnet may be used as long as 3/4" distance is not exceeded. See Example in Figures 1-4 NOTE: SPACERS IN BOTTOM TRAY MAY BE USED ON THE BRACKET OR MAGNET TO ADJUST ALIGNMENT Once you have determined the appropriate location and orientation for the Bracket and Magnet, attach them with double-sided tape (the Magnet Space and Bracket Space are optional; only apply when your door/window gap is too big or too low.) Program and Mount Motion Sensors: Prepare Motion Sensor A. B. C. Separate the front and back covers of the Motion Sensor by pressing the tab with your finger or the tip of a pen (Figure A and B). Remove insulating paper from the battery and CLOSE the cover. The sensor needs 1-3 minutes to initialize itself. You will see a red indicator blink once every 3 seconds during initialization. If you don't see the indicator blink as described during initialization, please open the cover, remove the battery and reinstall the battery again until you see the indicator flash as described. The sensor will be ready for use when the indicator stops blinking. (Note: DO NOT keep the cover open since it may effect the sensor during initialization and cause the sensor to not work properly.) 1 switch for battery notification, Default is set to ON. OFF position disables the low battery notification. 2 switch for LED signal light. The default is set to on, but if you do not want a flashing light when the sensor detects an intruder, you can turn it off. When the battery is low, the LED light becomes yellow. Motion sensor sensitivity adjustment A = Switch 2 B = Switch 1 Low sensitivity: Switch 2 at ON position and Switch 1 at OFF position Medium Sensitivity: Switch 2 at OFF position and Switch 1 at ON position High Sensitivity (Default): Switch 2 at ON position and Switch 1 at ON position Program the Motion Sensor (only for DIY kit or add new sensors) If you received a pre-programed system kit, please ignore this step and do not program it again. Before programing any sensor, you need to switch off all your existing sensors and disarm your system. Press PROGRAM button on console and enter the default password 888888. Use Scroll key to choose Sensor then press Enter on Console. Add press Enter you will see Trigger Sensor /Code, then walk 2-3 steps in front of The Motion Sensor which you have prepared and you will see nine digits displayed on console screen for 1-2 seconds. This is the unique address for this sensor. The Console will request you add a Zone Name for this sensor, then press SAVE. You will see Record Sensor Name, then press Enter and record a voice for this sensor. (MAKE SURE ONLY ONE SENSOR IS TRIGGERED EACH TIME TO AVOID ANY ACCIDENTAL TRIGGERING OF A DIFFERENT SENSOR. PLEASE KEEP ALL YOUR MOTION SENSORS IN DIFFERENT ROOMS AND MAKE SURE ALL WINDOW/DOOR SENSORS ARE ATTACHED TO THEIR MAGNET PARTS IN CLOSED STATUS.) Edit select it then press Enter, you can use Auto search or Manual search to find your target sensor and high light it then press Enter to Edit Sensor Functions as below menu list Note: if you don’t know sensor name then choose Auto Search, when you trigger an individual sensor and its name will be displayed on the console panel. Select the sensor name and press Enter, then you will see the menu displays as below: (MAKE SURE ONLY ONE SENSOR IS TRIGGERED EACHTIME TO AVOID ANY ACCIDENTAL TRIGGERING OF A DIFFERENT SENSOR. PLEASE KEEP ALL YOUR MOTION SENSORS IN DIFFERENT ROOMS AND MAKE SURE ALL WINDOW/DOOR SENSORS ARE ATTACHED TO THEIR MAGNET PARTS IN CLOSED STATUS.) Edit Zone Name: Highlight Edit Zone name, press Enter and you will be able to rename the sensor. Record Zone Name: Highlight it, press Enter, select “Record”, you are able to record 5 seconds of your own voice. If recording a sensor’s name in your own voice, this is what you will hear to identify that sensor when you receive an alarm call. Emergency Zone Highlight it, press Enter, Default is NO, (If you set YES, the zone will be on 24 hours, regardless of your system’s Arm or Disarm status. This is recommended to be used for smoke detector, panic button, water leak sensor and temperature sensors only. DO NOT set any door sensor or motion sensor as Emergency zone.) Home Zone Highlight it, press Enter, Default is YES, (if you select NO, the zone will disable during home alarm status, No recommended for motion sensor, select Yes for all Window/door sensors.) Chime Zone Highlight it press Enter, Default is NO, (This function does not work with motion sensors.) Delayed Zone Highlight it press Enter, Default is NO, (if set YES, allows you to come back home and open the door without triggering the system. System default delay alarm time is 45 seconds. You can change this time by going to "System Settings" to set the Alarm Delay time.) Siren Enable Highlight it, press Enter, Default is YES, (if set NO, siren will disable when this zone triggered, no siren alarm will sound.) Note: All zones are instant zones by Default. (“Instant “refers to the system being immediately armed if any zone is triggered when the system is in armed status.) Delete select it then press Enter, you can find the target sensor and delete it. Test the Motion Sensor The Motion Sensor will initialize itself during the first 1-3 minutes after the front cover is re-attached (DO NOT KEEP Cover open.) Do not test it during initialization. You can walk 3-5 steps in front of motion sensors after initialization. The LED will remain on for 3 seconds when motion is detected. The Motion Sensor will then short blink once as it recycles itself for the next motion event. 1. Move away from the area that is in direct line of sight of the Motion Sensor (move to an adjacent room). Wait 2-3 minutes until the LED stops blinking. 2. Move back into the line of sight of the Motion Sensor, walk around 3-5 steps. (This will trigger the main console.) If the Motion Sensor test is successful, the LCD screen will display "xxx Sensor Alarm" if system is armed. If these words do not appear, either (A) the 20-second waiting period since the last trigger has not expired, or (B) the Motion Sensor is not in communication with the PiSECTOR system main console. If you want to re-start the initialization again, open the Front Cover and remove battery. Wait 5 seconds before re-installing the battery. Re-attach the Front Cover. Note1: To save battery power, motion sensor may be insensitive if you activate it more than three times in a few minutes. Please leave the detectable area for several minutes and come back. It will detect you again. Note2: Motion sensors may be insensitive or give false alarms if the temperature is more than 98F (37C). Mount Motion Sensor D. Place the motion sensors in the following location recommendations (check marked locations) shown in Figure C. Avoid the example location marked with the "X" which are household areas that typically cause false alarms, such as heat, air conditioning, fans, or direct sunlight. The recommended mounting height is 6.5-7.0 feet for both coverage and pet immunity purposes. E. Apply the 3M adhesive tape in the locations shown in Figure D for corner mounting or wall mounting (apply super glue on the surface of window or wall before applying 3M adhesive tape to prevent sensors from falling.) If you prefer to use screws to mount the motion sensor, follow the screw position shown in Figure E (optional) Detection Patterns Motion sensor Specifications Replacement Battery: CR123A Mounting Height: 6.5-7.0 feet Range: Approximately 40 feet with 90-degree vertical field of view and a 110-degree field of view in the horizontal plane Wireless Sirens Plug the siren into wall outlet, then press PROGRAM key on console. Enter the default password 888888. Use scroll key to select Wireless Sirens, press ENTER, you will see the following menu: Add If you received a pre-programed system kit, please ignore this step and do not program it again. Add an Indoor Wireless Siren, highlight Add and press Enter, you will see a default siren name such as Siren 1, then press Enter, you will see "Put siren in Setting Mode". Go to the wireless siren and press the code button one time on the wireless siren, you will see all 4 lights are on. This means the siren is in setting status waiting for the console to send a signal. Then go back to the console, press Enter and you will hear two beeps from the console and will see “Add successful”. Then you need to press Set button 5 times until all lights are off to test the set mode on siren. (DO NOT test it when all 4 LED lights are on.) Caution: If you press and hold code button more than 3 seconds, the siren will be deleted from console panel. Add an outdoor wireless sensor, highlight Add, press Enter, you will see a default siren name such as Siren1 / Siren2 / Siren3, then press Enter, you will see "Put Siren in Setting Mode". Plug siren into the power adapter (9V 500mah), and you will hear ONE beep. Unplug and plug the siren a second time within seconds after the first time, you will hear ONE beep again. Unplug and plug the siren for a third time within seconds after the second time, you will hear a FEW short beeps from the siren. The FEW short beeps mean the siren is ready and in setting mode for program. Go back to the main console and press Enter immediately (no more than 5 seconds after the few short beeps), you will hear 3 beeps, 2 short beeps, and 3 beeps consecutively for confirmation. That means your siren has been added to your main console. You may press “back” key until the console displays “System Disarmed” and the date/time page. Unplug siren from the power adapter and wait for 10 seconds to exit the setting mode. Test: Connect siren to the power adapter. Press Emergency key on the main console. You should hear the alarm sounding. (Caution: If you plug and unplug the siren to the adapter consecutively and rapidly 5 times, the siren will be deleted from the main console. You will need to follow the steps above to reprogram.) Edit Select Edit and press Enter, you will see all 3-siren names, select a siren’s name and press Enter. You will then be able to change the siren’s name. Delete If you find system shows “Space Full” while you add extra siren or reprogram siren, select "Delete.” Delete all siren names: “Siren 1”, “Siren 2”, and “Siren 3”. Then you can reprogram the sirens using above instructions. Siren Enable Select "Siren Enable". If you set No, the sirens will not give any alert for the entire system. If you only want to quiet an individual zone's siren, you have to go to Sensors menu and Edit it. For details, read Edit under Sensors. Duration You can set wireless sirens to sound a continuous alert. You can set it from 1 second to a maximum of 180 seconds. Arm/Disarm Tone Select Arm/Disarm Tone and press Enter. If you set Yes, when you use the remote control to arm and disarm system, you will hear a loud beep warning from the siren. You can set No to turn off this warning tone. Default is No. Encrypt select Encrypt then press Enter, you will see default 1234 and a blink, you can then directly input another 4 digits to encrypt your siren. BEWARE: If you change encryption code to a new code, you will need to reprogram all of your wireless sirens to the console again. You may change it before you program your sirens. Once you change the code, DO NOT change it again while adding additional sirens; otherwise, you will lose the first siren’s program. Video: https://www.youtube.com/watch?v=JcPcwCBLQyc https://www.youtube.com/watch?v=BQEkK__q3Ug Add Contact Phone Numbers Press PROGRAM key on console. Enter the default password 888888. Use scroll key to select Phone Numbers, press Enter, you will see the following menu: Add Select Add, press Enter. You will see Input Phone Number. Directly input your area code and phone number, press Save. You can add a maximum of 6 numbers for emergency contact if the system is triggered. It is recommended to add your cell phone and your family or friends’ numbers. DO NOT add 911 or the local police number unless you get a permit. Edit select Edit, press Enter. You will see Phone#1, Phone#2… select the target number which you want to edit, then press Enter, you will see Auto login, press Enter, If you set Auto login as Yes, then you can remotely call the system telephone number from anywhere in the world. You do not need to enter the password again to save you time when entering system remotely. It is recommended to set only your own number as auto login. For all other numbers, keep default as No. Delete Select Delete then press Enter, you will see all numbers which you saved, choose the target number which you want to delete then press Enter and delete it. SMS Numbers This system can store 3 text message receiving cell phone numbers. When alarming, e.g., power outage or triggered sensors, the console will send a text message to all listed numbers. Press PROGRAM key on console. Enter the default password 888888. Use scroll key to select SMS Numbers, press Enter, you will see the following menu: Add Select Add, press Enter. You will see Input Phone Number, directly input your area code and cell phone number, press Save. You can add a maximum of 3 numbers to receive alarm text messages. Delete Select Delete then press Enter, you will see all saved numbers, choose the target number which you want to delete then press Enter and delete it. Arm/Disarm Notification Select Arm/Disarm Notification then press Enter, if you check Yes, you will get a text message notification each time you ARM or DISARM the system, default is NO. Outgoing Message Press PROGRAM key on console and enter the default password 888888. Use scroll key to select Outgoing Messages, press Enter, you will see the following menu: Edit Text Message press Enter, you can directly input an outgoing text message. Record Voice Message Select it and press Enter, select Record, and press Enter. You will see “Recording” and a counter from 10 to 00. When you see 10, you need to immediately begin recording your voice and stop when you see 00. It is recommended that you record your home address for the outgoing message. Play You can select Play to play your voice. If you do not like it, you can Delete it and Record it again until you are satisfied. Note: The closer you are to the console during recording, the better the quality of the recording. Your mouth should be no more than 2 inches away from the console. Connect Monitoring Center Press PROGRAM key on console. Enter the default password 888888. Use scroll key to select Monitoring Center. You can call your Monitoring Company to set up all requests. Please make sure your monitoring company supports ADEMCO protocol if you want a third party Monitoring Company to monitor your system (it will cost you monthly monitoring fees depending on which company you choose.) Monitoring Center Number Select and press Enter. Then select Add to add your monitoring center telephone number. ADEMCO Contact ID Select and press Enter then select Add to add your monitoring company account number. Select Delete to delete your account number. Select ADEMCO Contact ID then press Enter to select the protocol ID according to your monitoring center protocol ID request. Upload Alarm Data Select and press Enter, if set YES, all your data will be uploaded to the monitoring center station, default is NO. Upload Arm/Disarm Data Select and press Enter, if you set YES, every time you arm or disarm your system, the information will be uploaded to monitoring center station, default is NO. Daily Schedule Press PROGRAM key on console. Enter the default password 888888. Use scroll key to select Daily Schedule. Enable If you want to enable this function, first select Disable then press Enter, set NO, then go back and select Enable, you can set the Arm time for your departure, and Disarm Time for when you arrive Home, then the system will Arm/Disarm automatically on schedule, so that you will never forget to arm or disarm system. Disable If you want to disable this function, select Disable then press Enter and check Yes. Default is YES (disable). System Settings Press PROGRAM key on console. Enter the default password 888 888. Use scroll key to select System Settings, you will see the following menu: Password Select Password then press Enter. You will see old Password 888888. Then press Enter and input 6 digits (not letters or icons), press Enter again and input same password to confirm your new password, then press Save. Arm Delay Time Select it and press Enter, you will see 60, directly input 2 digits for your delay time. You can change the setting to allow you enough time to leave the house. Default is set for 60 seconds, which is the maximum delay time for the system. Alarm Delay Time Select it and press Enter, you will see 60, directly input 2 digits for your delay setting. You can change the setting to allow you enough time when you return home to disarm the system before it alarms. Default is set to 40 seconds. (This Alarm Delay time only works when you set individual sensors as Delay Zones. Otherwise, it does not work. I.e., disarm system, press PROGRAM key then input password, highlight Sensor and press Enter, highlight Edit, press Enter, then highlight Manual Search and press Enter. Choose the sensor name then press enter, use scroll key to find Delay Zone then press Enter and check Yes, save it.) Maximum is 60 seconds. Landline Cut Warning Select it and press Enter. If you set Yes (during System Arm or Home Status), the system will immediately go off and sirens will start alarming if an intruder cuts the landline or unplugs the landline jack. Default is set as No. Ring Time Before Answer Select it and press Enter, you will see 1 flash, directly input a digit for your ring count (maximum is 9). This allows you to change the ring times for answering your regular home phone, e.g., if you set it at 5 rings, during 5 rings you can answer your regular home phone, after 5 rings the alarm system will answer it. The system will answer with the prompt "Enter your password." Then you can enter your password to control the system. Press 1 to Arm system, Press 2 to Disarm system, Press 3 to listen in. Press 4 to use console as an intercom, press # to end. Door/Window Open Reminder Select it and press Enter. If you set it to Yes, you are not able to arm your system when doors or windows are left open. It will remind you which zone door or window is open. You must close it, unless you arm the system by pressing button and holding for 3 seconds to force system to be armed. The default is set to NO. (This function will not work with GSM06 console.) Note: this function will only work when you use a remote keychain to arm your system. You can still press the console’s Arm key and input your password without this reminder warning. Date/Time Allows you to manually set your local date and time Priority Dial Telephone When you connect your console with dual networks (Landline and GSM), you may need to highlight “Priority Dial Telephone.” Press Enter and highlight “Yes” then save it. This function allows you to set your system to use your landline priority to call out and save your SIM card credit. Note: If someone cuts your landline, the system will automatically call out from your SIM card. If you only use SIM card, please set this function as NO. Language English Factory Reset<Restore Defaults> Allows you to set all functions as default without deleting your sensors and sirens so you do not need to reprogram again. If you choose <Format System>, it will go back to factory default and format all your settings including your sensors and sirens. Then you will need to reprogram all sensors, sirens and remotes to the console again. Beware of this function… About System Version press Enter you will find your software version Production Date: press Enter you will see the producing time of your system Manufacture By Pisector Inc. IMEI: press Enter you can find IMEI number for your system, maybe request to active your SIM card Remotely Control Your Home Security Alarm System Dial the number of the main unit console panel by your cell phone, and after 1 ring, you will hear a voice prompt “Please enter password”. If the password is correct, you will then hear a voice prompt “Please enter instruction" then you can press 1 to arm, Press 2 to disarm, Press 3 to monitor, or Press 4 to intercom. If the password is incorrect, you will hear a prompt voice “Wrong password, please re-enter”. The system default operate password is 888888. Make sure to enter the password firmly by pressing and holding one digit at a time so you can hear a beep for each key press. You may need to hold keys for half a second at a time. Press [1]: arm, if finished successfully, you will hear a voice prompt “System armed”. Press [2]: disarm, if finished successfully, you will hear a voice prompt “System disarmed”. Press [3]: monitoring for 30 seconds, to continue monitoring, press [3] again for another 30 seconds. You can cancel monitoring at anytime by pressing [1] to arm and [2] to disarm. Press [4]: two-way intercom for 30 seconds. You cannot operate the main unit console panel during this time. You can cancel intercom at anytime by pressing [1] to arm and [2] to disarm. Or just simple text message from you cell phone to Arm/Disarm/Home Arm/History checking it Password follow by 1 for Arm. i.g 888881 Password follow by 2 for Disarm. i.g 8888882, Password follow by 3 for Home Arm, I.g 8888883 Password follow by 4 for History checking. i.g 8888884. Answer Alarm Call: to prevent alarm call answered by voice mail, you need manually answer the incoming alarm pre-saved cell phone then press # # twice to stop call the second number. Wireless Panic Button (Option) Program Panic Button If you received a pre-Programed system kit, please ignore this step and do not program it again. Panic Button you need should be programmed to your console. on your Press PROGRAM button on console, enter the default password 888 888 Use Scroll key to choose Sensor then press Enter on Console. Then choose Add, press Enter again, then you will see Trigger Sensor, trigger your Panic Button by pressing the Red circle button. Then the console will request you to add a Zone Name for this sensor. Input a name for this sensor, then press SAVE. You will see Record Sensor Name, press Enter, record a voice for this panic button. Set the Panic button as Emergency zone, use it in 24/7 regardless of console being Armed or Disarmed (Press PROGRAM button on console, enter the default password 888 888, use Scroll key to choose Sensor then press Enter on Console. Choose Edit press Enter, then choose Manual Search press Enter, use Scroll key to find Panic button name and highlight it then press Enter, use Scroll key to choose Emergency zone then press Enter, highlight Yes then press Save, use function key “Back” to exist the program) In the SAME way you can add a Smoke Detector, Water Leak Sensor, Carbon Monoxide, and Temperature Sensors. You also can add a Glass Break Sensor to your system. Wireless Signal Transmitter (option) Wireless Signal Transmitter expands your wireless range up to 500 feet and makes the communication between all sensors and the main console better. Please install the antenna and plug a 12V 1A power adapter to the Power plug. Place the Wireless Signal Transmitter away from the main console for about 10 feet. Keep code 4 and 5 at ON position, all other codes at OFF position. The Transmitter will then start to auto transfer all the signals between the sensors and the main console. (Note: if you notice any issue such as an “open icon” displaying on the screen when the door or window is open because the main console has detected that the door or window is open, and the same icon is still showing after physically closing the door or window, a communication problem must have caused this issue. For a solution, you may need purchase this repeater to add to your system.) Extra Wireless Keypad Instruction ( option) Model: WKP-03 This keypad does not work alone. You need to program it with PiSector Alarm Systems. It supports System model GS07, GS08, PS03 series systems. Anti-Remove Spring Package includes PiSector Keypad x 1 Power adapter 12V 1A, input 100-240V output 9- 12V, Current 1A RFID Door Access Keychain Tag X 2 Add the keypad to console Step 1 Connect power to the keypad, and you will see Arm indicator light flash once every second. This is Stand by(Disarm) status, meaning system is at power on. To keep internal back up battery in charge, please turn on the battery switch to ON position. Put the keypad on a hard surfaced table, and make sure to not trigger the keypad by releasing the anti-move spring, or by pressing the anti-move spring with hand. Make sure the keypad does not get triggered during programming. Step 2 At your main console, press Program followed by password. Then choose Remote Controllers ---press Enter --- select Add --- press Enter again. When you see "Trigger Controller, Code: " display, go to your extra keypad, press default password 1 2 3 4 5 6 followed by Arm key (the lock icon), and you will see 9 digits display on the console. This is unique address for the extra keypad on the console. It will be auto saved after 3 seconds, and you will see "Add Owner Name". You can give a name to this keypad on the console, and then follow the steps to record a voice for the keypad name as your choice (optional). After that press Enter to continue until you see Add successful. Step 3 Press Chime key to exit setting status. Add RFID Key chains to Keypad During system disarm status, you can press default password 1 2 3 4 5 6 followed by Enter key. You will see Set indicator light on and Enter key flashing. Then press 2 0 1 followed by an Enter key --- Send indicator light on --- move your target key chain (the one that you want to add) close to the keypad read area, and you will hear a few short beeps, meaning add successful. You may add maximum 8 pieces RFID keys. At the end press Chime key to exit setting status. Delete RFID key chains from your PiSector Keypad During system disarm status, you can press default password 1 2 3 4 5 6 followed by Enter key. You will see Set indicator light on and Enter key flashing. Then press 2 1 1 follow by an Enter key. It will auto delete all key chains. You CANNOT delete one key chain each time. If you lost any key chain please choose to delete all key chains, then add other key chains again. At end, press Chime key to exit setting status. Operating instruction Password followed by Arm key to arm system--- Arm indicator light on in solid Password followed by Disarm key to disarm System. Open light on for 3 seconds (depending on how long you set for door open time --default 3 seconds) --- Arm indicator light flashes once every second Password followed by Home key to arm system when you are at home--- Arm indicator light flashes once every 3 seconds Password followed by SOS for emergency Password followed by Chime key to change system to Chime status Use key chain to disarm system directly without entering any password Other features Set Door Open Time During system disarm status, you can press default password 1 2 3 4 5 6 followed by Enter key. You will see Set indicator light on and Enter key flashing and press 5 0 + T T (“T T” for time, from 01 to 99 seconds) and Enter. This time is for how long you need an access to door without triggering the alarm. For example, when you use a key chain or password to open the door, how long you would want the door to be closed and system still be in arm status. Wireless Encryption If you had a neighbor having the same system or other devices that interfere your system and always results in false alarm, then during system disarm status, press default password 1 2 3 4 5 6 followed by Enter key. When you see Set indicator light on and Enter key flashing, press 4 0 + dddd (any 4 digits pass code --- you do not need to remember this pass code it is only for encrypting the system with other device) Change Password After setting up your keypad, you may change the default password to your own password for safety. During system disarm status, you can press default password 1 2 3 4 5 6 followed by Enter key. You will see Set indicator light on and Enter key flashing. Then press 3 0 + new password + Enter, repeat the new password follow by Enter one more time (you may set new password up to 6 digits). Then press Chime key to exit setting status. (Please keep your new password to a safe place and do not forget it) Reset Password If you forget your password, remove the keypad from the wall. At backside of the keypad, you will see Reset button, press the reset button and hold for 3 seconds, it will reset the keypad password to default password 1 2 3 4 5 6. Wired Port Connection for Magnetic force lock or Electronics lock(Option) Magnetic force lock and Electronic lock. Please make sure which type of lock you have, and select the correct connection Fig 1 for Normal Close Fig 2 for Normal Open