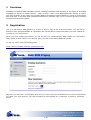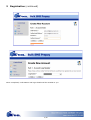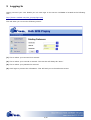
1
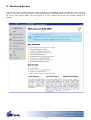
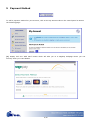
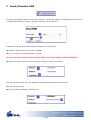
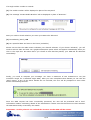
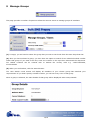
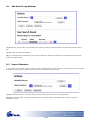
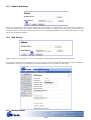
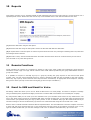
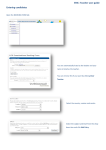
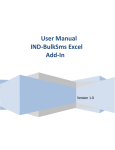
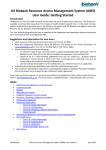
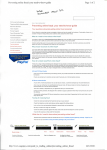
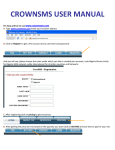
 BULK SMS USER GUIDE
Version 2.0
1/18
Contents
1
Overview
page 3
2
Registration
page 3
3
Logging In
page 6
4
Welcome
page 7
5
Payment Method
page 8
6
Credit Topup
page 9
7
Send/Schedule SMS
page 10
8
Group Setup
page 12
9
Managing Groups
page 14
9.1
Add New Group Member
page 15
9.2
Import Numbers
page 15
9.3
Export Numbers
page 16
9.4
Edit Group
page 16
9.5
Delete Group
page 17
10
Reports
page 18
11
Remote Functions
page 18
12
Email to SMS and Email to Voice
page 18
2/18
1
Overview
BulkSMS is a bespoke SMS Campaign service enabling businesses and members of the public to send SMS
messages to groups of mobile phones - large or small - from a web application after signing up online.
The main purpose of the utility is to send an SMS to all mobile numbers added to a group at a scheduled
date and time. It will also allow individual members to manually sign up to or leave a group by texting a
keyword to a specified number.
2
Registration
This is a self-service SMS product so anyone is free to sign up for an account online. You will not be
asked to enter payment details at registration but will be able to enter these after you have created an
account at your convenience.
When you have created an account, you will be given 10 complementary SMS credits. You will need to
add a credit or debit card to your account when you wish to purchase additional credits.
To sign up online, visit the following URL:
https://www.x-ondata.com/sms_prepay/login.php
(1) Here you will find a ‘Create New Account’ link. Click on the link and follow the on screen instructions
to create your new account. You will be asked to enter details on a sequence of screens, as shown
below.
3/18
2
Registration (continued)
4/18
2
Registration (continued)
When completed, confirmation and login details will be emailed to you.
5/18
3
Logging In
Having received your user details you can now login to the service. BulkSMS is located at the following
URL:
http://www.x-ondata.com/sms_prepay/login.php
This will allow you to view the following screen:
(1) This is where your Service ID is entered.
(2) This is where your User ID is entered. The User ID will always be ‘9000.’
(3) This is where your password is entered.
(4) Click login to process the information. This will lead you to the Welcome Screen.
6/18
4
Welcome Screen
This screen shows a welcome screen and introduction, and displays a menu of options in the left hand
column. This main menu is present on almost every page of the application and you can use it to access
all of the main pages. When you are logged in to your account there will be a greater selection of
options.
7/18
5
Payment Method
To add a payment method to your account, click on the My Account tab on the control panel to access
the following page:
(1) Simply click the ‘Add Card’ button which will take you to a SagePay webpage where you can
securely enter your card details.
8/18
6. Credit Top-up
(1) You can top-up your SMS credits at the same URL by clicking the Top-up button once your card is
accepted.
(2) If you want to remove card details, you can do this by clicking the ‘Remove Card’ button. If required
you can now replace your payment details with a new card.
9/18
7
Send/Schedule SMS
This page provides the main function of the system - sending an SMS to a predefined group of users or
a single mobile with the option to specify a date and time for delivery.
Initially the user will be presented with two options. You can either:
(1) Select a group from the drop down list OR
(2) You can input an individual mobile number.
Do not enter information in both of these fields or an error message will be displayed.
(3) When you have done this, click the ‘Select’ button to enter your choice.
If a group was selected, the main details will be displayed below which will include:
(1) The group keyword
(2) The number of members in that group.
10/18
If a single mobile number is entered:
(1) The mobile number will be displayed in place of the Keyword.
(2) The message ‘Private Mobile Number’ will be displayed in place of ‘Business.’
Next you need to decide whether you want your SMS to be delivered:
(1) Immediately (Send), OR
(2) At a specified date and time in the future (Schedule).
Please ensure that the radio button indicates your desired selection. If you choose ‘Schedule’, you will
need to select a date and time via a graphical date/time picker which will appear automatically when you
click in the input box. Be aware that if you choose a time that has passed, your SMS will be delivered
immediately.
Finally, you need to compose your message. You have a maximum of 160 characters to use (the
maximum length for a standard single SMS.) After you have completed these details you can click the
‘Send’ button. If any of the above details are not included, the user will be prompted to enter them
before resubmitting the form.
Once the SMS request has been successfully processed, the user will be presented with a brief
information readout confirming details of the transmission. Please note that this does not check whether
the SMS was actually received by the mobile.
Important - At this point do not refresh the browser as the SMS will be resent.
11/18
8
Group Setup
On this page you can create a new group. You will need to complete the following mandatory fields
before you click the ‘Submit’ button. There are also some optional fields that you can complete. Below is
a brief description of each field:
Mandatory Fields:
(1) Desired keyword: This is the name of the new group and the name that users will know that group
by. If they reply to a message or attempt to sign up to a group, they will specify this word somewhere
in their SMS.
(2) Business Name: this is the official company name for the group. It is stored in X-on’s records but will
not usually be displayed.
12/18
8
Group Setup (continued)
(3) Auto Response Message Signup: If a member signs up to a group by texting the Keyword to the
main number, they will receive this as an automated SMS message.
(4) Auto Response Message Return: If a member returns to the group after leaving, they will receive
this as an automated SMS message.
Optional Fields:
(5) Lead capture email address: This is the email address of a group’s administrator. When a new group
member adds themselves to a group, or when a group member sends a reply to a group keyword, an
email will be delivered to the address specified here. More than one email address can be entered here
with each address separated by a semi-colon.
(6) Lead capture SMS 1-3: As with capture email address, when a new group member adds themselves
to a group or when they send a reply to a group keyword, an SMS will be delivered to each of the mobile
numbers entered here.
13/18
9
Manage Groups
This page provides a number of options to allow the account owner to manage groups of members.
(1) To begin, you will need to select the group that you wish to work with from the main drop down list.
(2) Once you have selected a group, you then have the option to search for an individual mobile number
within that group. If you want to do this, enter the number in the input box underneath the drop down
list. Mobile numbers can be entered with or without the country code e.g. +447123123456,
07123123456.
(3) When you are finished, click the Search button.
The User Search result section will display all members of your chosen group that matched your
requirements. If you didn’t specify a mobile number, you will see every user in that group.
When a group is selected, the main details of that group will be displayed under Group Details.
14/18
9.1
Add New Group Member
(1) At this time you can add a new member to the group by entering a mobile number in the ‘Manually Add User’ input
box.
(2) Click ‘Add’ to confirm this addition
(3) You can also delete a member from the group by clicking the ‘Delete’ link against the corresponding group member
under User Search Result.
9.2
Import Numbers
If you would like to upload a list of members to an existing group, you can do this by simply entering a list of mobile
numbers into a text file (one number per line) and saving it with the extension CSV.
(1) After making sure there is an active group selected, locate your CSV file on any storage device.
(2) Click the Import button. All mobile numbers in your chosen file that do not already exist in that group will be
uploaded in one go.
15/18
9.3
Export Numbers
(1) If you would like to export a list of members to your computer or a storage device, you can do this by selecting a
group and clicking ‘Export.’ You will then be presented with a dialog box asking you where you wish to save the file. The
file will be saved as a CSV file, meaning you can view it in a spreadsheet application such as Microsoft Excel or in a text
editor such as Windows Notepad.
9.4
Edit Group
(1) If you wish to edit a group, you can do so by loading the desired group and then clicking the Edit button.
The group’s main details will be displayed in a form and these can be changed and updated as needed by clicking the
Submit button. Once you are finished you can close the browser or move to one of the other pages.
9.5
Delete Group
16/18
(1) If you want to remove an entire group you can do this by clicking the Delete button under actions when a group is
selected. The group, together with all its users, will be deleted.
Make sure you are certain before you do this as there is no undo.
17/18
10
Reports
This feature will allow you to download details of SMS messages sent from all groups under the current account over a
specified period of time. Please note that records may not be available until 1 hour after the SMS has been sent.
(1) Select the Start date using the date picker.
(2) Select the End date using the date picker. Ensure the End date falls after the Start date.
(3) If required there is also the option to enter a keyword which will return only messages containing this word, otherwise
all messages will be returned.
(4) Once this is done, click the Download button. All results returned will be saved as a CSV file which you can save to
your hard disk or any other storage device.
11
Remote Functions
Group members can respond to a message by sending a reply to the main number and including the group keyword
somewhere in their reply. The reply will be received at the email address specified by the group administrator when the
group was created.
It is possible for anyone to manually sign up to a group by sending the group keyword to the main account phone
number. They can also remove themselves from a group by sending an SMS with the word STOP to the main number.
When they sign up they will be informed when they have been successful by an appropriate “Auto Response” message
being sent to them (will only receive this when signing up and not upon cancellation.)
12
Email to SMS and Email to Voice
Purchasing credits also allows you to use our Email to SMS service. For most people, it’s easier to compose a message
using a standard qwerty keyboard and highly convenient to conduct SMS conversations from a desktop PC or laptop.
By using Email to SMS you can send up to 160 characters from your favourite email account to any mobile device. The
text in the email will be received as a standard SMS within seconds of being sent. To use simply send an email from the
email account you specified during the sign up alert process. In the ‘To Address’ field, type the mobile number that you
want the message to be sent to followed by ‘@x-onsms.com’. Each Email sent using this service will cost 1 credit.
Email to Voice is almost identical to Email to SMS as explained above. The main difference is that the recipient will receive
a phone call and when answered the text in your email will be read out to them in an imitation of a human voice. To use,
type the mobile number that you want the message to call in the ‘To Address’ field followed by ‘@x-onvoice.com.’
18/18