1
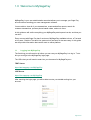
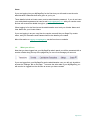
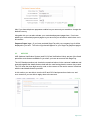
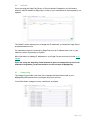
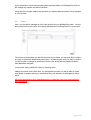
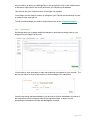
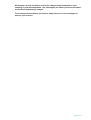
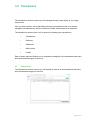
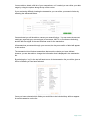
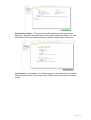
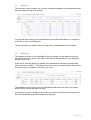
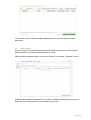
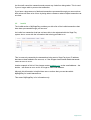
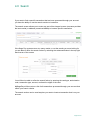
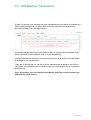
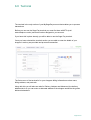
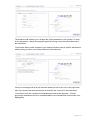
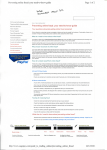
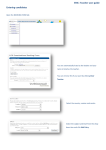
MySagePay User Guide
Table of Contents
1.0
1.1
1.2
Welcome to MySagePay
Logging into MySagePay
What you will see
3
3
4
2.0
2.1
2.2
2.3
2.4
2.5
2.6
2.7
2.8
2.9
2.10
Settings
My Account
Settings
AVS/CV2
3D Secure
Restrictions
Valid IPs
Change Log
Users
Pay Methods
Surcharges
5
5
6
7
8
9
11
11
12
13
14
3.0
3.1
3.2
3.3
3.4
3.5
Transactions
Transactions
Summary
Settlement
Bulk Actions
Invalid
16
16
21
21
22
23
4.0
Search
24
5.0
Card Machine Transactions
25
6.0
Terminal
26
Page 2 of 27
1.0 Welcome to MySagePay
MySagePay is your own administration area that allows you to manage your Sage Pay
account without needing your own management software.
You are able to view all of your transactions, create and define reports, search for
customer transactions, process phone based orders, and much more.
In this guide we will outline everything your MySagePay admin panel can do, and how you
can do it.
Every account with Sage Pay has 2 versions of MySagePay available to them, a Test and
a Live area. Both the Test and Live systems look and work in the same way. In this guide
we will provide information that can be used on either platform.
1.1
Logging into MySagePay
The first thing you will need to do before you can use your MySagePay is to log in. To do
this you must go to the MySagePay login page.
The URLs that you will need to enter into your browsers for MySagePay are –
TEST Server
https://test.sagepay.com/MySagePay
LIVE Server
https://live.sagepay.com/MySagePay
After reaching the login page you will be able to enter your details and log into your
account.
Page 3 of 27
Users
If you are logging into your MySagePay for the first time you will need to use the main
administrative credentials that were given to you by us.
These details include a Vendor name, and an administrative password. If you do not have
your administrative password to hand e-mail [email protected] with your vendor name
and we will re-send the details through to you.
When logging in for the first time as the administrative user both your Vendor Name and
User Name are your Vendor Name.
If you are logging in as your own User the vendor name will be your Sage Pay vendor
name, and your Username and Password will be the details you created.
More information on logging into MySagePay can be found on our website.
1.2
What you will see
Now that you have logged into your MySagePay admin panel you will be presented with a
number of tabs along the top of the page that you can use to manage your account.
If you are logged into your MySagePay as the administrative user you will only be able to
access the “Settings” tab on the page. To access the other tabs in your MySagePay you
will need to be logged into the account as a user you have created.
Page 4 of 27
2.0 Settings
The settings area of MySagePay is where you will manage the users, restrictions, and
fraud prevention tools available on your account.
Once on the settings tab all of the available sections of your account you are able to
manage will be listed on the left hand side of the screen.
In this section we will cover each section and run through the options that are available to
you.
2.1
My Account
The My Account section allows you to change the details of the user that you are currently
logged into the account as.
You are able to create a new password for our user, and add an e-mail address to the
user so you can receive updates and communications from us.
If you are logged in as the administrative user you are not able to change the password.
You can only change passwords for users that you have created, not the main user set-up
by Sage Pay.
Page 5 of 27
2.2
Settings
The settings enable you to change the details of your account and apply certain
restrictions. You have four options in this section –
Restricted Domains – This is where you are able to add specific e-mail domains to your
account that once applied force users to have e-mail addresses that use the domains
listed. For example – if you add Sage Pay.com to the list users can only change their
email addresses to [email protected]
Language Settings – This is where you are able to choose the language of your payment
pages. Once selected your payment pages will then display to the customer in the
language you have selected.
Account Settings – The account settings allow you to change the details for your
company that are displayed to your customers. You are able to change your company
display name, your homepage URL, and your support e-mail address.
Page 6 of 27
Also if you have telephone payments enabled on your account you are able to change the
default currency.
Alongside this you can also activate your customised payment pages here. If we have
added your customised payment pages to your account you are able to switch them on in
this section.
Payment Pages logo – If you have provided Sage Pay with your company logo it will be
displayed to you here. This is the logo that will appear on your Sage Pay payment pages.
2.3
AVS/CV2
AVS (Address Verification System) and CV2 (Card Verification Value) are two of the fraud
prevention tools that are available to you when you have an account with Sage Pay.
The AVS fraud prevention tool checks the numerical values in the customer’s address and
postcode against the details that are held with the card issuing bank to ensure they match.
The CV2 uses the three digit security code on the reverse of the card to ensure it matches
with the card details that are provided.
In this section you are able to turn the AVS and CV2 fraud prevention checks on, and
once turned on you are able to apply rules to the account.
Page 7 of 27
Adding a rule – A rule is a setting that you can use to define how the results of your AVS
and CV2 checks will be used by the Sage Pay systems.
From only performing the checks to rejecting transactions based on the results you can
decide what you want to do with the results on the account.
When setting your rules you can have as many or as few as you would like. To set a rule
all you need to do is pick a start price and end price range – anything from 0.00 –
100,000.00 and select what you would like to accept.
For full details on how to set your AVS/CV2 rule base you can visit the Sage Pay website.
2.4
3D Secure
3D Secure is another fraud prevention tool that is available to you when using Sage Pay.
The 3D Secure scheme is managed by Verified by VISA and MasterCard Secure Code
and is password protection for your shoppers.
If you have 3D Secure enabled on your account your shoppers will be required to enter
the password they have assigned to their card in order to process a transaction.
3D Secure is available to e-commerce transactions ONLY and does not apply to
telephone orders.
Page 8 of 27
Adding a rule – Similar to the AVS/CV2 fraud prevention tools you are able to set your
own rules that will define how Sage Pay use the results of the 3D Secure checks with your
transactions.
You can decide when 3D Secure is applied to transactions, and if you would like the
transactions to be accepted or rejected based on the 3D Secure results.
When adding a rule you will need to select a start price and end price and what you would
like to see accepted or rejected for each.
If you would like to add a 3D Secure rule, full details on how to do so can be found on the
Sage Pay website.
2.5
Restrictions
The restrictions section is where you can manage IP addresses, countries, and cards you
would like to prevent from processing transactions through your account.
There are four options to choose from when deciding what you would like to block.
Blocked IP Addresses – Here you can block specific or ranges of IP addresses from
being able to process transactions through your account.
More about Blocking IP Addresses can be found on our website.
Page 9 of 27
Blocked Card Ranges – By entering the first 9 digits of a specific card you will prevent
any card beginning with those numbers from processing a transaction through your
account.
If you would like to know about blocking card ranges, please go to our website.
Blocked Countries – Blocking a country will stop any transactions from being accepted
when the IP address used is from a country you have blocked.
To block a country you will need to select it from a list provided by Sage Pay. To find out
more, please look at our website.
Blocked Issuing Countries – By selecting a country to block you will prevent any cards
that are issued in that country from being able to make a purchase through your account.
To block an issuing country you will need to select it from a list provided by Sage Pay. For
more information you can go to the Sage Pay website.
Page 10 of 27
2.6
Valid IPs
If you are using the Sage Pay Server or Direct method of integration you will need to
submit a valid IP address to Sage Pay in order for your transactions to be accepted by our
systems.
The Valid IP section allows you to manage the IP addresses you would like Sage Pay to
accept transactions from.
If a transaction request is received by Sage Pay from an IP address that is not on your
valid list it will be rejected by our system.
More information on adding IP addresses to your Sage Pay account can be found on our
website.
If you are using the Sage Pay virtual terminal to process transactions or the Form
method of integration you will not need to use this section of MySagePay.
2.7
Change Log
The change log provides a list of all of the changes that have been made to your
MySagePay admin panel since you began using your account.
You will be shown changes to rules, restrictions, and users.
Page 11 of 27
If you would like to check when anything was amended within your MySagePay account
the change log is where this will be checked.
Along with the changes made it also provides you with the date and times of any changes
to your account.
2.8
Users
Here, you are able to manage all of the User profiles for your MySagePay panel. You are
able to add and remove users, and change permissions of existing users in your account.
The main screen provides you with an overview of your users, you are then able to select
any user to amend the details and permissions. By selecting the user you want to amend
you will be able to change all permissions for the user along with the passwords and email addresses assigned.
You are also able to delete the users by selecting them.
Adding new users is also done here, by clicking add new user you will be able to create
new details for people within your business so they can access your MySagePay admin
panel.
All users should have their own MySagePay credentials, user accounts SHOULD
NOT be shared.
Page 12 of 27
When adding users, or amending users any changes that you will make will appear in the
change log so you can monitor the changes you have made.
2.9
Pay Methods
The Pay Methods screen shows you all of the card types and currencies that can be
accepted on your Sage Pay account.
If you would like to know what your account can accept you need to select this page and
all of the information will be displayed for you.
Along with the card types and currencies you are also able to set-up your PayPal account
to be used on your Sage Pay account here.
Page 13 of 27
All you need to do within your MySagePay to set-up PayPal is click on the PayPal option
in the bottom right hand of the screen and enter your PayPal e-mail address.
This will then link your PayPal account to the Sage Pay systems.
You will also need to make a number of changes to your PayPal account directly in order
to enable it to be used with us.
To find out what settings you need to amend have a look at our PayPal set-up article.
2.10
Surcharges
Surcharges allow you to apply additional charges to cards that are being used by your
shoppers on your Sage Pay account.
You are able to set a surcharge for each card type that is accepted on your account. The
amount can either be fixed (a set amount) or a percentage of the transaction.
Once the surcharge has been added to your account it will then be added to the value of
the transaction once the shopper reaches the payment pages, or when you are
processing the transaction through the MySagePay terminal.
Page 14 of 27
Surcharges can only be used to recover the charges that are imposed on your
company by your merchant bank. Any surcharges you add to your account cannot
exceed those transactional charges.
For e-commerce transactions you must be using Protocol 3.0 for surcharges to
work on your account.
Page 15 of 27
3.0 Transactions
The transactions section is where you will manage the day to day activity of your Sage
Pay account.
Here you will be able to see all transactions that are processed through your account,
manage those transactions, perform voids and refunds, and manage your settlement.
The transactions section gives you five options to manage your transactions –
•
Transactions
•
Summary
•
Settlement
•
Bulk Actions
•
Invalid
Each of these options will allow you to completely manage all of the transactions that have
been processed through your account.
3.1
Transactions
The transactions section is where you will be able to view all of the transactions that have
been processed through your account.
Page 16 of 27
You are able to obtain a full list of your transactions, or if needed you can refine your date
range by using the options along the top of the screen.
If you are having difficulty locating the transaction you can refine your search further by
selecting the advanced button.
Once selected you will be able to narrow your search further. You can enter the amount,
card type, payment type, account type (e-commerce, MOTO, or Continuous Authority),
and the last four digits of the card that was used for the transaction.
All transactions processed through your account, be they successful or failed will appear
in this section.
The transaction list will show transactions that meet the criteria you have defined,
however you are also able to change the information that is displayed in the transaction
list.
By selecting the “cog” in the top left hand corner of the transaction list you will be given a
full list of details you can have selected.
Once you have selected which fields you would like to be included they will then appear
for each transaction on the list.
Page 17 of 27
Exporting
If you would like a copy of your transaction list you can do so by clicking on either the
“Print Friendly” or “Export to CSV” buttons. This will provide you with a copy of the
transaction list that can be exported to Excel in CSV format, or a printable version.
Transaction Details
Along with viewing your transactions you are also able to manage them here. Once you
have located the transaction you are able to perform certain actions depending on the
transaction type, and the date it was made.
To perform any actions on transactions processed through your account you must first
click on the transaction to bring up the transaction details screen.
All options available to perform on the transaction will then be displayed in the bottom
right of the pop-up.
Once the transaction detail has loaded you will also see a number of options down the left
hand side of the screen.
These options are –
Summary – a breakdown of the transaction details including the shopper details (name
and address).
Additional Details – here you will be shown details of the IP address used, if the
transaction has been refunded, and the basket contents.
Page 18 of 27
Authorisation Details – This screen shows the merchant number used for the
transaction, along with the authorisation code, and the settlement details. The card
information such as the address, card type, and last 4 digits can be found here.
Fraud results – A breakdown of the fraud prevention checks and result for Address,
Postcode, and Security Code as well as the 3rd Man fraud score and the 3D Secure
results.
Page 19 of 27
Related transactions – Here you will see any other transactions that have been
processed that relate to the original transaction. Refunds and repeat transactions will be
displayed here.
Page 20 of 27
3.2
Summary
The Summary section enables you to view a complete breakdown of the transactions that
were processed through your account.
You can drill down through your transactions from successful and failed, to e-commerce
or MOTO, to users, and card types.
This also provides you with the volumes, and values of the transactions for analysis.
3.3
Settlement
The settlement section of your MySagePay account shows you the details of all of the
transactions that were sent to your bank, and the funds transferred from your shopper’s
account to your own.
At the end of each day Sage Pay take all of the transactions that were processed and
collect them into a “Batch”. This batch is then sent to your merchant bank for the funds to
be moved from your shopper’s account to your own.
The settlement screen gives you a list of all batches that have been sent to your bank
along with the volume and values of each.
If you want to view the contents of each batch you can do by clicking on the batch and a
list of the transactions included will appear as a pop up.
Page 21 of 27
You can then use the settlement totals displayed here to reconcile with your bank
statements.
3.4
Bulk Actions
If you are using the Deferred payment method the bulk actions screen can be used to
perform actions on more than one transaction at a time.
With the deferred payment type you have two actions you can take – Release or Abort.
A Release will enable the transaction to be sent for settlement and allow the funds to be
taken from the shoppers account and credited to your own.
Page 22 of 27
An Abort will cancel the transaction and prevent any funds from being taken. This is used
if you no longer wish to process the transaction.
If you have a large amount of deferred transactions processed through your account then
bulk actions will save a lot of time by being able to release or abort multiple transactions at
one time.
3.5
Invalid
The Invalid section of MySagePay provides you with a list of the invalid transactions that
have been processed through your account.
An invalid is a transaction that has not been able to be registered with the Sage Pay
system due to errors with the information that is being provided to us.
This is commonly caused by the transactions being sent to Sage Pay by an IP address
that has not been added to the account, or if the shopper has entered details that would
cause an error to occur.
Another example of this is if the shopper enters [email protected] as the email address – the
double .. will cause an error as it is no longer a valid email address.
Although this information is helpful there are no actions that you can take within
MySagePay for invalid transactions.
This area of MySagePay is for information only.
Page 23 of 27
4.0 Search
If you want to find a specific transaction that has been processed through your account
you have the ability to use the search section to locate this.
The search screen allows you to enter any part of the shopper’s name (surname provides
the best results) or address (numerical details) to locate a specific transaction.
If the Sage Pay systems return too many results, or not the results you were looking for
you are able to refine the search further by selecting the advanced button in the top right
hand corner of the screen.
You will then be able to refine the search further by entering the card type, authorisation
code, transaction type, amount, and last four digits of the card.
MySagePay will then return a list of all transactions processed through your account that
match your search criteria.
The search section can be used anytime you want to locate a transaction that is on your
account.
Page 24 of 27
5.0 Card Machine Transactions
If Sage Pay provide your business with your Card Machines along with your Website and
Phone based transactions you will be able to view the transactions that have been
processed through your card machine here.
All transactions that have been processed through your card machine will appear in this
section and NOT in the transaction section of your MySagePay.
Once the transactions have been processed through your card machine they will appear
in MySagePay the following day.
There are no actions that you can take with the transactions that appear in this section.
The details of the transactions processed through your card machine are for information
purposes only.
If you do not have your card machine provided by Sage Pay you will not have any
transactions in this section.
Page 25 of 27
6.0 Terminal
The terminal is the only section of your MySagePay account that enables you to process
transactions.
Before you can use the Sage Pay terminal you must first have a MOTO (mail
order/telephone order) merchant number assigned to your account.
If you have this in place already you will be able to use the Sage Pay terminal.
Once you have selected the terminal section you are able to enter the details of your
shopper in as they are provided and process a transaction.
The first screen of the terminal is for your shoppers billing information such as name,
billing address, and postcode.
Along with this you will also see tabs for Delivery Address and Advanced, the delivery
address tab is so you can enter an alternate address if the shopper would like the goods
delivered elsewhere.
Page 26 of 27
The advanced tab enables you to change the unique transaction code (Vendor Tx code)
for the transaction, change the payment type that is being used, and add a reference to
the transaction.
You are also able to make changes to your fraud prevention tools for specific transactions
without having to add or remove any features for all customers.
Once you are happy with all of the customer details you will move over to the right hand
side of the screen and enter the amount and confirm the currency for the transaction.
You will then enter the customer’s card details and select make payment. This will
process the transaction and once completed add it to the transactions section within your
MySagePay.
Page 27 of 27