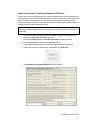
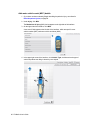
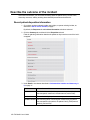
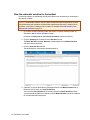
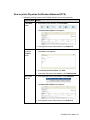
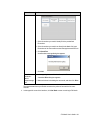
1
FH Medic User's Guide
© 1993 - 2014
Xerox Government Systems, LLC. All rights reserved.
2900 100th St., Suite 309
Urbandale, IA 50322
WSpell ActiveX Spelling Checker © 1997 - 2002
Wintertree Software, Inc.
PDF Rasterizer.NET © 2001 - 2005
TallComponents BV
FIREHOUSE Software® is a registered trademark of Xerox Government Systems, LLC. All rights reserved. Microsoft, MS, MS-DOS,
Microsoft Visual FoxPro, and Microsoft Access are registered trademarks. Windows is a trademark of Microsoft Corporation. CAMEO is a
registered trademark. iPad is a registered trademark of Apple, Inc. All other products or services mentioned in this manual are identified
by the trademarks or service marks of their respective companies or organizations. Xerox disclaims any responsibilities for specifying
which marks are owned by which companies or organizations.
FIREHOUSE Software is protected by the copyright laws that pertain to computer software. It is illegal to make copies of the Software
except for backups. It is illegal to rent, lease, sublicense, or otherwise transfer any of the materials. It is illegal to remove or obscure proprietary notices. It is illegal to duplicate and distribute the Software by any other means, including electronic transmission. To protect trade
secrets contained in the Software, you may not decompile, reverse engineer, dissemble, or otherwise reduce the Software to human perceivable form. You may not modify, adapt, translate, rent, lease, or create derivative works based upon the Software or any part thereof.
Xerox warrants the original media are free from defects in material and workmanship, assuming normal use, for ninety (90) days from the
date of purchase. Except for express warranty of the original media set forth above, Xerox grants no other warranties, express or implied,
by statute or otherwise, regarding the media related materials, their fitness for any purpose, their quality, their merchantability, or otherwise. The liability of Xerox, under the warranty set forth above, shall be limited to the amount paid by the customer for the product. In no
event shall Xerox be liable for any special, consequential, or other damages for breach of warranty.
© 2014 Xerox Government Systems, LLC.- Printed in the United States. All rights reserved. No part of this work covered by copyright
hereon may be reproduced in any form by any means -- graphic, electronic, or mechanical -- including photocopying, recording, taping, or
storage in any information retrieval system, without the written permission of the copyright owner.
ii
FH Medic User's Guide
FIREHOUSE Software License Agreement
Carefully read the following terms and conditions before installing software from FIREHOUSE Software. Only an
Authorized Representative of the purchaser should install the software. Installing the software indicates acceptance
of these terms and conditions specified in the License Agreement.
Xerox Government Systems, LLC and the party who installs this software (“you”) hereby agree as follows:
1. Licensed Software: “Licensed Software” means the software component and modules ordered and paid for by
you, as listed in Xerox’s client database of licensed products, and as evidenced by your customer receipt.
Licensed Software includes all documentation relating to our software. It also includes any upgrades, modifications, and customizations (collectively, “Improvements”) to our software, should such Improvements be
delivered to you at a later time.
2. End Users: “End User(s)” means (i) your employees with a need to access the Licensed Software; and (ii) third
party consultants engaged by you who have a need to access the Licensed Software, and who are fulfilling
legitimate business functions for you on your behalf.
3. Materials: This document contains links to downloaded files and applicable manual(s) relating to the
Licensed Software.
4. License Grant: Xerox hereby grants a revocable, non-exclusive, non-transferable license to use the Licensed
Software on a single microcomputer, in the United States of America. The number of End Users authorized to
access the Licensed Software concurrently is reflected on your invoice and in this License Agreement. You may
increase the maximum number of concurrent End Users by procuring additional licenses from Xerox based
upon the then-current license fee schedule. You may not make use of any object code for any component(s) or
modules(s) for which you have not expressly obtained a license for use under this Agreement. Any rights not
expressly granted in this Agreement are expressly reserved. You agree not to (a) rent, lease, sublicense,
assign or otherwise transfer the Licensed Software, including any of the materials or your rights hereunder, (b)
remove or obscure our proprietary notices, (c) translate, alter, decompile or disassemble any of the materials,
(d) copy any of the materials without our prior written consent, (e) use the software for other agencies. You shall
have no right to access, copy or otherwise use the source code for software licensed under this license. You
are prohibited from causing or permitting the reverse engineering, disassembly or decompilation of the software licensed under this license. You are prohibited from modifying, improving or otherwise enhancing the software licensed under this license.
5. Terms: This license is effective until terminated. You may terminate it at any time by destroying the materials
and all copies of any material made from the original materials and notify Xerox immediately. This license terminates automatically upon breach of any of the conditions of this license. Upon termination, you agree to destroy all copies of the materials. Use of the materials without a valid license of the materials is unauthorized and
may subject you to monetary penalties.
6. Confidentiality: You receive the right to use the Licensed Software and materials as specified herein, but you
do not become the owner of the Licensed Software and materials. The Licensed Software and materials are
exclusive property of Xerox and are protected by trade secret, copyright, and trademark law. You acknowledge
that the materials are Xerox property and contain valuable, confidential, unpublished information developed by
Xerox at a great expense. You agree to protect the materials from unauthorized reproduction, distribution, disclosure, or use of publication. You may not transfer any materials or software to anyone or entity without the written consent of Xerox authorized personnel.
7. U.S. Government Restricted Rights: The Licensed Software and documentation related thereto were
developed at private expense and are provided with "RESTRICTED RIGHTS". Use, duplication, or disclosure
by the Government is subject to restrictions as set forth in FAR 52.227-14 and DFAR 252.227-7013 et seq. or its
successor.
FH Medic User's Guide
iii
8. Export Laws: You may not export the Licensed Software and agree to comply with all laws, regulations, orders
or other restrictions of the U.S. Export Administration Regulations.
9. Warranty: We warrant the downloadable files to be free from material defect in normal use for 90 days from the
date of receipt of materials. We do not warrant the error-free operation of the Licensed Software contained in the
downloadable files, or that such Licensed Software will meet your requirements. The Licensed Software is
licensed "as is". We will, however, attempt to correct or bypass any actual reproducible and significant error in
the software, provided you notify us and describe it in writing within 90 days from the date of receipt of the materials, and we will, within a reasonable time, at our option, provide either a corrected copy or work around instructions. This does not cover altered software or require us to customize our software to meet your hardware or
operating system requirements. Section 11 specifies your exclusive remedy for any breach by us of this section.
No dealer, company, or person is authorized to expand, alter this section or any other provision of this agreement. Any such agreement will not bind Xerox. XEROX MAKES NO OTHER WARRANTIES WHATSOEVER,
EXPRESS OR IMPLIED, WITH REGARD TO THE SOFTWARE LICENSED UNDER THIS LICENSE, IN WHOLE
OR IN PART. XEROX EXPLICITLY DISCLAIMS ALL WARRANTIES OF MERCHANTABILITY AND OF FITNESS
FOR A PARTICULAR PURPOSE. XEROX EXPRESSLY DOES NOT WARRANT THAT THE LICENSED
SOFTWARE, IN WHOLE OR IN PART, WILL BE ERROR FREE, WILL OPERATE WITHOUT INTERRUPTION OR
WILL BE COMPATIBLE WITH ANY HARDWARE OR SOFTWARE OTHER THAN THE EQUIPMENT. LICENSEE
WAIVES ANY CLAIM THAT THE LIMITED WARRANTY SET FORTH IN THIS SECTION OR THE REMEDY FOR
BREACH OF SUCH LIMITED WARRANTY FAILS OF ITS ESSENTIAL PURPOSE.
10. Limitation of Liability: XEROX’S LIABILITY IN CONNECTION WITH THE LICENSED SOFTWARE UNDER THIS
LICENSE, OR ANY OTHER MATTER RELATING TO THIS LICENSE WILL NOT EXCEED THE FEE THAT YOU
ACTUALLY PAID TO XEROX FOR THE SOFTWARE GIVING RISE TO THE LIABILITY. REGARDLESS
WHETHER ANY REMEDY SET FORTH HEREIN FAILS OF ITS ESSENTIAL PURPOSE OR OTHERWISE, IN NO
EVENT WILL XEROX BE LIABLE TO YOU FOR ANY SPECIAL, INCIDENTAL, OR CONSEQUENTIAL
DAMAGES, WHETHER BASED ON BREACH OF CONTRACT, TORT (INCLUDING NEGLIGENCE), PRODUCT
LIABILITY, INDEMNIFICATION, OR OTHERWISE, AND WHETHER OR NOT XEROX HAS BEEN ADVISED OF
THE POSSIBILITY OF SUCH DAMAGE. YOU ACKNOWLEDGE THAT XEROX HAS SET ITS FEES AND
ENTERED INTO THIS LICENSE IN RELIANCE UPON THE LIMITATIONS OF LIABILITY AND THE
DISCLAIMERS OF WARRANTIES AND DAMAGES SET FORTH IN THIS LICENSE, AND THAT THE SAME
FORM AN ESSENTIAL BASIS OF THE BARGAIN BETWEEN THE PARTIES.
11. Remedy: In the event that Xerox breaches this agreement, your sole remedy is to notify us of such breach within
the applicable warranty period and we will at our sole option, either cure the breach or refund the license fee
paid to us for the materials. In no event will Xerox be responsible for any damage beyond the amount of the
license fee or for any indirect, special, incidental, consequential or similar damages or profits to you or any other
person, or entity, regardless of the legal basis, even if Xerox has been advised of the possibility of such damages, except to the extent applicable state law specifically prohibits such exclusion.
12. General (System Only): This license shall be governed by laws of the State of Iowa. All prior correspondence
oral or written including without limitation, all understandings with respect to the Licensed Software or materials
relative thereto are hereby superseded. This license constitutes your and our entire agreement and understanding regarding the Licensed Software and materials relative thereto.
General (Evaluation Only): This evaluation program is provided free of charge to the registered requestor of the
evaluation software and is to be used solely as an evaluation copy.
13. Software Maintenance Agreement: 90 days free phone support is provided with purchase of FIREHOUSE Software. A separate software maintenance contract is available for an additional charge. This software maintenance contract is not mandatory but highly recommended. The annual maintenance contract includes phone
support and program updates. The cost of the software maintenance contract is based on the type and number
of modules installed. In the event that the 90 day free support period has expired and no software maintenance
contract has been established, a “per call” fee will be billed to you for telephone or other technical support.
iv
FH Medic User's Guide
Technical support
FH® Technical Support:
Phone: 800-921-5300, option 2
[email protected]
Sales contacts
Jim Brandariz
Phone: 800-796-1614, 530-621-0981
Fax: 530-626-8582
[email protected]
Peter Eleftherakis
Phone: 888-362-4446, 508-362-4446
Fax: 508-362-5932
[email protected]
AZ, CA, NV, OR, WA
CT, MA, ME, NH, NY, RI, VT, Ontario
Mike Rogers
Phone: 888-941-3473, 214-504-0242
Fax: 214-504-0244
[email protected]
Forest Nace
Phone: 800-285-8685
Fax: 724-283-9086
[email protected]
AR, KS, LA, MO, MS, OK, TX
DE, IN, KY, MD, NJ, OH, PA, VA, WV
Roger DeDoncker
Rebecca Sanger
Phone: 800-921-5300, ext. 1
Fax: 515-288-4825
[email protected]
AK, AL, CO, GA, FL, HI, ID, IA, IL, MI, MN,
MT, NC, ND, NE, NM, SC, SD, TN, UT, WI,
WY, International
FH Medic User's Guide
v
Table of Contents
Introduction
1
Log into FH Medic
1
Specify crew members for the unit
4
Add or edit an incident
7
Transfer an incident to another unit
10
Understand the interface and data entry in it
11
Return to the list of incidents
14
Change the crew member list
15
Specify response information
16
Add location and incident data
16
Record call response times
19
Add NFIRS data
22
Enter an incident narrative
23
Record patient information
Specify the patient's personal information
25
Search for a patient
27
Read information from a driver's license
29
Specify the patient's home address
30
Specify the patient's financial guarantor
31
Collect the patient's medical history
32
List the patient's medications
34
List any allergies the patient has
38
Specify insurance information
39
Attach an Advanced Beneficiary Notice (ABN)
45
Attach a Physician's Certification Statement (PCS) form
47
Assess the patient's situation
50
Identify the chief and secondary complaints
50
Assess OPQRST symptoms
52
Perform initial patient assessment
54
List patient symptoms
57
Describe patient injuries
58
Add motor vehicle crash (MVC) details
vi
25
FH Medic User's Guide
60
Add fall or burn injury details
63
Add stabbing or gunshot injury details
65
Work with the injury summary
Document treatments and vitals data
Record treatments to the patient
67
69
69
Ventilate the patient
71
Clear the patient's airway
72
Administer oxygen to the patient
73
Intubate the patient
74
Administer transcutaneous pacing (TCP) to the patient
76
Monitor the EtCO2 level of the patient
77
Decompress the patient's chest
78
Provide IV (intravenous) fluids to the patient
79
Administer medication to the patient
81
Perform cardioversion or defibrillation on the patient
82
Perform IO (intraosseous infusion) on the patient
83
Perform CPR (cardiopulmonary resuscitation) on the patient
84
Immobilize the patient's spine
85
Apply a splint to the patient
86
Restrain the patient
87
Apply bandages to the patient
88
Apply a traction splint to the patient
89
Perform an obstetrical delivery for the patient
90
Perform a 12-lead EKG (electrocardiography) on a patient
92
Employ a CPAP (continuous positive airway pressure) treatment
93
Document alleged or suspected abuse or neglect
94
Apply thermal treatments to the patient
95
Use an air adjunct device on a patient
96
Apply an AED (automated external defibrillator) to a patient
97
Document field termination for a patient
98
Contact medical control for a patient
99
Perform a 4-lead ECG (electrocardiography) on a patient
100
Use a medical alert for a patient
101
Record vitals data
103
FH Medic User's Guide vii
Import vitals data from an EKG device
106
Describe the outcome of the incident
108
Record patient disposition information
108
Acquire and delete signatures
110
Provide a signature for a patient
114
Provide a medic's narrative for the incident
116
View the automatic narrative for the incident
118
Add CPR (cardiopulmonary resuscitation) information
119
Validate data
121
Complete an incident
122
Review and respond to QA/QI notes
123
Amend a patient care report (PCR)
125
Add, view, fax, and print forms
128
Add forms to the incident
128
View the patient summary
129
View, fax, or print the patient care report (PCR)
131
View, fax, or print supplemental forms
134
View or print a Physician Certification Statement (PCS)
137
View, fax, or print the Controlled Substance Usage / Waste form
139
Attach files to or delete files attached to an incident
142
View the procedure for treating a symptom
143
View installation and synchronization information
144
Minimize or exit FH Medic
145
viii FH Medic User's Guide
Introduction
FH® Medic, a powerful cloud-based, electronic patient care reporting (ePCR) system, is engineered to meet the needs of emergency medical service (EMS) organizations nationwide from
large-scale agencies to the smallest, most basic services. FH Medic is gold-compliance certified
by the National EMS Information System (NEMSIS). The FH® Medic User's Guide is designed to
help you record crew member, response, and patient data on the incident scene, to generate
reports and forms from the data entered, and to send the necessary information to the appropriate
individuals and facilities.
Caution: The FH® Medic User's Guide documents FH Medic with its default display settings
and field labels. If an FH Medic administrator uses the FH Medic administration web site to hide
fields or change field labels, not all the fields referenced in this User's Guide may be available to
you. Contact your FH Medic administrator about possible changes if you are not able to find
fields referenced in the User's Guide.
FH® technical support staff is available to answer your questions by telephone or email. Technical
support hours are from 7:00 A.M. to 7:00 P.M. Central time, Monday through Friday, and from 8:00
A.M. to 12:00 P.M. on Saturday. Call 800-921-5300, option 2. You can also send an email to
[email protected].
Log into FH Medic
1. Depending on whether you installed a demonstration copy of FH Medic or a purchased
copy, do one of the following.
To launch this
Do this
Demonstration copy
l
Choose Start → Xerox → FH Medic → FH Medic.
Purchased copy
l
Choose Start → ACS Inc → FH Medic → FH Medic.
The FH Medic login screen appears.
2. Click in Unit, or click Choose to the right of Unit.
FH Medic User's Guide
1
The Select Unit list appears.
3. Click the name of the unit you want to work with.
The login screen reappears, with your selection listed for Unit.
4. Click in User Name, or click Choose to the right of User Name.
The Choose User dialog box appears.
5. Specify the name of the user you want to log in as in one of the following ways.
Tip: Several logins are available for evaluating a demonstration copy of FH Medic.
a. Click Last Name or First Name to list the users alphabetically by their last or first
name.
b. (Optional) In the blank field above the keyboard, type part or all of the user's last or
first name, depending on your selection in the previous step.
The list of user names automatically filters as you type, to display only the user
names matching the characters you have entered.
2
FH Medic User's Guide
Tip: You can click Back to delete the last character in the string in this field, or you
can click Clear to erase all the characters at once.
Note: The Add This button is reserved for other functionality in the application,
and does not affect the characters you have typed or the list of user names.
c. From the list of user names, select the one you want to log into FH Medic with.
d. In the upper right corner of the dialog box, click Submit.
The login screen reappears, with your selection listed for User Name.
6. Click in Password.
A keyboard appears on the screen.
7. Use the keypad to enter the password, and then click Submit.
For the demonstration copy of FH Medic, passwords for the sample logins are listed
below.
User name
Password
Guest, FH
demo
One, Medic
MedicOne
Two, Medic
MedicTwo
Three, Medic
MedicThree
Four, Medic
MedicFour
The Incidents screen appears in FH Medic, with the Update Crew dialog box displayed.
8. Continue with Specify crew members for the unit, on page 4.
FH Medic User's Guide
3
Specify crew members for the unit
After you log in, the Update Crew dialog box appears automatically, listing the crew member
whose user name and password you logged in with as the primary medic. The primary medic is
responsible for documenting the incident the unit and its crew responded to.
You can add or delete crew members from the list, specify who the office in charge (OC) is, and
change the primary medic. You can also define non-system individuals on a crew, who participate
in a medical dispatch, but who are not regularly scheduled crew members.
1. From Shift, select the shift for the incident the data entry is occurring on.
2. (If necessary) Edit the existing crew member list.
To do this
Do this
Add personnel
to the crew
a. At the top of the dialog box, click Add Personnel.
The Choose User dialog box appears.
b. Using the dialog box as you did when logging in, select an individual's name, and then click Submit.
The name of the personnel member appears in the crew member
list.
4
FH Medic User's Guide
To do this
Do this
Define the
officer in
charge (OC)
a. From the list of crew members, select the name of the individual
you want to be the officer in charge.
b. Click Select as OC.
To the right of the crew member's name, the abbreviation OC
appears to indicate that the selected crew member is the officer in
charge.
Change the
primary medic
a. From the list of crew members, select the name of the individual
you want to be the primary medic.
b. Click Make Primary.
A keyboard appears on the screen.
d. Use the keypad to enter the password, and then click Submit.
User name
Password
Guest, FH
demo
One, Medic
MedicOne
Two, Medic
MedicTwo
Three, Medic
MedicThree
Four, Medic
MedicFour
The list updates to indicate that the crew member you selected is
now the primary medic.
Add non-system users to
the crew
a. In Name, type the name of the non-system user.
b. (Optional) In ID, type an identification code appropriate for the nonsystem user.
This identification code can be anything defined by the fire department, the state, or another agency.
c. From Type, select an option corresponding to the type of non-system personnel the individual is.
FH Medic User's Guide
5
To do this
Do this
Example: Non-system individuals include trainees, interns, doctors, police officers, explorers, or additional fire personnel not normally assigned to the unit.
Note: The options for this menu are defined by the FH Medic
administrator, on the FH Medic Cloud. Information on defining
these options is available in the FH® Medic Administrator's
Guide, available at http://www.firehousesoftware.com/webhelp/FHMedic/Default.htm.
d. Click Add Non-System User.
The name of the non-system user appears in the crew member list
in the dialog box.
Remove personnel from
the crew
a. From the list of crew members, select the name of the individual
you want to delete from the crew.
b. Click Remove Selected.
The name of the crew member disappears from the list.
3. In the upper right corner of the Update Crew dialog box, click Submit.
The Incidents screen of FH Medic appears, and a summary of the crew members
appears in the upper right corner of the user interface.
Note: To access the Update Crew dialog box again from the Incidents screen, in the
upper right corner, click Change Crew. From any other screen in FH Medic, choose
FH → Crew.
6
FH Medic User's Guide
Add or edit an incident
After you specify which crew members are associated with a unit, the Incident screen of
FH Medic appears. If incidents have already been added, a summarized list of them appear in the
Incidents screen.
If information has been entered for an incident, the Incidents screen lists the incident's number,
description (the provider impression and the patient's last name, age, and gender), incident date
of service (DOS), incident age, and incident status.
An incident can have one of the following statuses:
Status
Indicates
Incomplete You created a new incident and begun entering data for it, but have not finished
entering data, validating the data, and marking the incident as complete. The incident remains in the list until it is completed, and can not be released to another
group for quality assurance and quality improvement (QA/QI) review or billing.
Complete
You have entered all the required incident data, validated the data, and marked the
incident as complete. The incident remains in the list for a specified amount of
time, can be accessed by an administrator for QA/QI review, and can be exported
for billing. You may view, but not edit, a completed incident.
Review
The incident has been through a QA/QI review and then sent back to you for modification. After you make the changes, you can complete the incident again.
Transfer
The incident was created by another unit, and then transferred to you (the current
unit). A transferred incident lists crew members from both units, and can be completed as a normal, incomplete incident.
FH Medic User's Guide
7
1. Depending on whether you want to add a new incident or edit the data in an existing incident, do one of the following.
To do this
Add a new incident
Do this
l
At the bottom of the screen, click Add New.
A new, blank incident is created,
Add a practice
incident
Copy an existing
incident and mark it
as a new incident
Edit the data in an
existing incident
l
At the bottom of the screen, click Add Practice.
A new "practice" incident is created, which follows all of the
same rules as a regular incident, except that it is not exported
and does not appear in reports or incident counts. This feature
lets you practice using FH Medic without impacting your real
data.
l
At the bottom of the screen, click Copy Incident to New.
FH Medic copies an existing incident's information and call
times, up to the at-scene time. This feature is useful if you
have an incident with multiple patients requiring treatment—
you can start a new incident without having to re-enter the incident information for every patient, and only edit the differences
for the next patient.
1. Select the incident you want to edit the data for.
2. At the bottom of the screen, click Edit.
Tip: Click Refresh Incidents to download transferred calls and update status changes
from the FH Medic Cloud.
The Response screen appears.
8
FH Medic User's Guide
2. (Optional) Continue with Understand the interface and data entry in it, on page 11.
3. Enter or edit the data you need for the incident.
l
Specify response information, on page 16
l
Record patient information, on page 25
l
Assess the patient's situation, on page 50
l
Document treatments and vitals data, on page 69
l
Describe the outcome of the incident, on page 108
FH Medic User's Guide
9
Transfer an incident to another unit
If multiple units responded to an incident, you can transfer an incident to another unit, so that other
crews can contribute information to the incident. All participating crew members are documented
on the patient care report.
1. (If you are not at the Incidents screen) In the upper left corner of the interface, click the
FH logo, and then choose Incidents.
2. From the list, select the incident you want to transfer to another unit.
3. At the bottom of the interface, click Transfer.
The Transfer Ticket to Unit dialog box appears.
4. From the menu, select the unit you want the incident to be transferred to, and then click
Transfer.
A confirmation dialog box appears.
The incident disappears from your incident list. The Get Transfer Tickets button appears
in the upper right of the Incidents screen for the receiving unit. When the recieving unit
clicks this button, the incident appears in their incident list.
10 FH Medic User's Guide
Understand the interface and data entry in it
Once you have logged into FH Medic and added a new incident, the interface is organized into
several discrete components:
l
A menu under the FH logo
l
Tabs organizing data into large groups
l
Sub-tabs to further organize fields
l
A list of fields on each of the sub-tabs
l
A data selection/entry area for entering your data
l
Buttons for performing actions with your data
Tab
Lets you record
Response
Information about the incident itself, call times, National Fire Incident Reporting
System (NFIRS) data, and a narrative.
Patient
The demographics of the person, their past medical history, medications they are
taking, allergies they may have, and insurance information.
Situation
Information about the medical or traumatic complaint, the assessments, symptoms, and injuries.
Events
The treatments and supplies used, and record the patient's vital signs.
Summary
Disposition information record signatures, and add additional narrative information.
FH Medic User's Guide 11
Tabs and fields with red text indicate required information when entering data for an incident. As
you enter data for the required fields, the field names turn black. When all of the required fields on a
required sub-tab have data, the name of the sub-tab also turns black. When all of the required
fields on all of the required sub-tabs have data, the name and icon of the primary tab turns blue.
Note: As soon as you enter data, it is relayed to the server using a wireless connection, eliminating the need to "save" data as you work.
FH Medic is set up to help you enter data as quickly and efficiently as possible by grouping the
data on tabs, sub-tabs, and fields. Tabs and fields with red text indicate required information when
entering data for an incident.
By default, the incident data screen that appears is the Response tab, with the Incident Information sub-tab selected, and fields for entering location and incident data will appear on the left side
of the interface.
When you click a field on the left side of the interface, depending on the type of data needed for the
field and whether pre-defined values already exist in FH Medic, one of the following things appear
for data entry.
If this is the
case
No pre-defined
values exist in
FH Medic
12 FH Medic User's Guide
This happens
A keyboard appears on the screen, and you can use it to enter the value
needed, and then click Submit.
If this is the
case
This happens
Example: If you click Address, a keyboard appears, and you can type in
the street address where the incident occurred.
If you do not want to enter a value for the field, you can leave the field blank
and click Submit.
After you click Submit, if the system requires only a single value for the field,
FH Medic automatically moves on to the next field and displays either a list of
pre-defined choices for the field in the data selection/entry area, or a keyboard
for the field.
Pre-defined val- A list of pre-defined choices for the field in the data selection/entry area.
ues exist in
Example: If you click Zip, a list of the available zip codes appears in the
FH Medic
data selection/entry area.
If only one of the pre-defined values is permitted for the field, after you click a
value from the list of pre-defined values, FH Medic automatically moves on to
the next field, and displays either a list of pre-defined choices for the field in
the data selection/entry area, or a keyboard for the field.
Note: If a blank field appears at the top of the list of pre-defined values, you
have the additional option to click it and use the keyboard that appears to
enter a value not included in the list of pre-defined values. When you enter a
custom value, FH Medic does not move automatically to the next field. To
enter the value for the next field, you need to click the field on the right side
of the interface.
If more than one pre-defined value is permitted for the field, you can make multiple selections in the data selection/entry area. The first time you select a button in the right side of the interface, a green circle with a checkmark appears,
and the item is listed in the field at the top of the right side of the interface.
FH Medic User's Guide 13
If this is the
case
This happens
If you click a selected button a second time, a red circle with an X appears,
and the listing at the top changes to indicate the selection does not apply for
the field (example: NO Anemia).
If you click the button a third time, the selection status clears entirely.
Pre-defined values in FH Medic are set up by the FH Medic administrator. Information on defining
these values is available in the FH® Medic Administrator's Guide, at http://www.firehousesoftware.com/webhelp/FHMedic/Default.htm.
After you provide data for all of the fields on a sub-tab, FH Medic automatically moves on to the
next sub-tab of fields. After you provide data for all of the sub-tabs on a tab, FH Medic automatically moves on to the next tab of data needed. In this manner, you enter the data for an incident with a minimum of clicks and keystrokes.
Return to the list of incidents
While you are entering or editing data for an incident, or looking at any other screen in the interface,
you may want to return to the Incidents screen to access a different incident.
l
Choose FH → Incidents.
The Incidents screen appears, listing all the available incidents.
14 FH Medic User's Guide
Change the crew member list
1. Depending on where you are in the FH Medic interface, do one of the following.
If you are here
At Incidents
screen
On any data entry
tab
Do this
l
In the upper right corner of the interface, click Change Crew.
l
Choose FH → Crew.
The Update Crew dialog box appears.
2. Follow the directions in Specify crew members for the unit, on page 4, to use the
options and fields in the dialog box to change the list of crew members.
FH Medic User's Guide 15
Specify response information
Response information for an incident includes its location, basic incident information, call times,
National Fire Incident Reporting System (NFIRS) information, and a narrative.
Add location and incident data
1. (If you have not done so already) Add a new incident, or open an existing incident, as
described in Add or edit an incident, on page 7.
By default, the Response tab and Incident Information sub-tab are selected, and fields
for entering location and incident data appear on the left side of the interface. Fields with
red text indicate required information.
2. Under Location, enter data as described in Understand the interface and data entry in
it, on page 11.
Field
Information needed
Address
The street address where the incident occurred.
Zip
The name of the state where the incident occurred, and the numerical code assigned by the U.S. Postal Service to all U.S. jurisdictions.
City
The name of the city where the incident occurred.
Note: If the incident occurred in an unincorporated area, use the
city found in the mailing address for the incident location.
State
The name of the state where the incident occurred.
Location Type
A description of the location where the incident occurred.
Map Page
The page number the location can be found on in the fire department's map book.
Comments
Additional comments about the location of the incident.
16 FH Medic User's Guide
3. Under Incident, enter data as described in Understand the interface and data entry in
it, on page 11.
Field
Information needed
Incident A unique incident number assigned by the fire department or dispatch center
Number for every incident to which the department is called.
Note: You may need to obtain this number from an alarm or dispatch center.
Date of
Service
The date the dispatcher was notified about the incident.
Transport
Type
The type of transportation used to take a patient to a facility for treatment.
This is typically an Advanced Life Support (ALS) or Basic Life Support
(BLS) apparatus.
Dispatch
Complaint
The reason emergency personnel were initially dispatched to the scene.
Scene
Information
A list of other units and crew members at the incident scene.
1. Click Show.
The Scene Information screen appears.
2. Do any of the following.
To do this Do this
Add a unit
to the
scene
a. On the right side of the screen, click Add New.
The Unit on Scene Information dialog box
appears.
FH Medic User's Guide 17
Field
Information needed
To do this Do this
b. Click Select Unit.
The Select Unit dialog box appears, listing the units
you can add to the scene.
c. Click the unit you want to add to the scene.
d. Under Crew, click either List Unit Users or List All
Users.
Depending on your selection, all the crew members
in FH Medic, or only the crew members assigned to
the unit you selected, will be listed in the next step.
e. From the menu below List Unit Users or List All
Users, select the name of the crew member you
want to add to the incident.
f. Click Add.
The name of the selected crew member appears in
the Crew list above List Unit Users or List All
Users.
g. Repeat step f as many times as needed to list the
additional crew members at the scene.
h. (If you added a crew member who was not at the
scene) From the Crew list, select the name of the
crew member you want to delete, and then click
Remove.
i. Click Time On Scene, and then enter the time the
crew member arrived on the scene.
j. Click Submit.
The name of the unit, crew member, and time the
crew member arrived on the scene appear on the
Scene Information screen.
Remove a
unit or
18 FH Medic User's Guide
a. Select the unit or crew member you want to remove
from the list.
Field
Information needed
To do this Do this
crew mem- b. Click Remove Selected.
ber from
the scene
3. In the lower right corner of the screen, click Go Back.
Prior
Aid
Notes about what aid was given to the patient before the medics arrived.
Record call response times
1. (If you have not done so already) Add a new incident, or open an existing incident, as
described in Add or edit an incident, on page 7.
By default, the Response tab and Incident Information sub-tab are selected.
2. Click the Call Times sub-tab.
Fields for specifying a variety of times appear on the left side of the interface.
FH Medic User's Guide 19
3. For each of the fields, do one of the following.
To do this
Do this
Enter the current 1. Click the button for the field.
system time on
The current time appears in the field to the right of the button, and
your computer
a number pad with additional buttons and a time display appears
in the data selection/entry area.
2. (If necessary) Adjust the time displayed with the Now, 5 min
ago, 10 min ago, +1 min, or -1 min buttons.
3. (Optional) Click Clear, and then click the number buttons to reenter a time.
Manually enter a
time
1. Click the button with the greater-than symbol
the time field you want to fill.
to the right of
A number pad with additional buttons and a blank time display
appears in the data selection/entry area.
2. Do any of the following.
l
l
20 FH Medic User's Guide
Click Now to enter the current system time on your computer.
Click 5 min ago or 10 min ago to enter the current system
time on your computer, minus five or ten minutes, respectively.
To do this
Do this
l
Click the number buttons to enter a time.
3. (Optional) Adjust the time displayed with the +1 min or -1 min
buttons.
Note: Some of the fields have an additional mileage field below the number pad, so
that you can record the odometer reading on the apparatus at various points of travel
during the incident.
Field
Information needed
Call Received
The time the phone rings (911 call to public safety answering point
or other designated entity) requesting emergency medical service
(EMS) support.
Dispatched
The time dispatch was notified by the 911 call taker (if a separate
entity).
En Route
The time the unit responded (the time the vehicle started moving).
At Scene
The time the responding unit arrived on the scene (the time the
vehicle stopped moving).
At Patient
The time the responding unit arrived at the patient's side.
Arrive
Destination
The time the responding unit arrived with the patient at the destination or transfer point.
Transfer Care
The time the patient was transferred from this EMS agency to
another EMS agency for care.
Unit Clear
The time the responding unit left the scene (started moving).
At Home
The time the responding unit was back in their service area. In
agencies who utilize Agency Status Management, home location is
the service area as assigned through the agency status management protocol.
4. In the lower left corner of the screen, enter data as described in Understand the interface and data entry in it, on page 11.
Field
Information needed
Responding
Mileage
The odometer reading on the unit before leaving to respond to the
incident.
At Scene
Mileage
The odometer reading on the responding unit when it arrived on the
scene.
At Destination
Mileage
The odometer reading on the responding unit when it arrived with
the patient at the destination or transfer point.
Clear Mileage
The odometer reading on the responding unit when it left the scene.
FH Medic User's Guide 21
Add NFIRS data
You can also record data for National Fire Incident Reporting System (NFIRS) in FH Medic.
1. (If you have not done so already) Add a new incident, or open an existing incident, as
described in Add or edit an incident, on page 7.
By default, the Response tab and Incident Information sub-tab are selected.
2. Click the NFIRS sub-tab.
Fields for specifying NFIRS data appear on the left side of the interface.
3. Under NFIRS, enter data as described in Understand the interface and data entry in
it, on page 11.
Field
Information needed
Incident Type
A description of the actual situation emergency personnel found on
the scene when personnel arrived.
Alarm Type
The definition of an alarm, determined at the local level.
Aid Given /
Received
An indication of whether assistance was given or received from
another fire department to help resolve an incident. That assistance
can be in the form of personnel or equipment from one or more
departments.
Property Use
A description of the type of location where the incident occurred.
Action Taken
The duties performed at the incident scene by the responding personnel.
22 FH Medic User's Guide
Enter an incident narrative
The incident report is an official record of an incident, and must accurately describe the incident
and the actions taken to mitigate it. While many facts can be recorded in code fields, some information can be presented only in a detailed narrative. Critical information may be left out unless the
narrative report is completed. Information that should be included in the narrative includes observations and actions taken. They should be reported in a logical order—usually chronological.
You should use the narrative report to describe scene conditions, including property damage. Also
describe the condition of the premises when you left, report any remaining hazards, and summarize the incident.
1. (If you have not done so already) Add a new incident, or open an existing incident, as
described in Add or edit an incident, on page 7.
By default, the Response tab and Incident Information sub-tab are selected.
2. Click the Incident Narrative sub-tab.
A large text area for entering text about the incident appears.
3. Click in the large text area, or click Keyboard at the bottom of the tab.
A keyboard appears over the screen.
4. Use the keyboard to type a narrative describing the incident, and then click Submit.
5. In the lower right corner of the tab, click Check Spelling.
If spelling errors are found in your text, the Check Spelling dialog box appears.
FH Medic User's Guide 23
6. (If the Check Spelling dialog box appears) Use the dialog box to correct any spelling
errors in your text.
7. (Optional) Add hand-written notes or sketches to the incident narrative.
a. In the lower left corner of the tab, click Scratch Pad.
A blank drawing dialog box appears.
b. Using your finger, stylus, or a mouse pointer, draw or write in the scratch pad window.
A black, two-pixel line follows your movements.
Tip: If you are unsatisfied with your results, click Clear to remove all lines from the
scratch pad window.
c. Click Close.
The notes or drawings on the scratch pad remain available until the incident is closed,
and you can add to them as needed by repeating steps a–c.
24 FH Medic User's Guide
Record patient information
Patient information includes demographic (personal, address, and financial) information, past
medical history, medication, allergies, and insurance data.
Specify the patient's personal information
1. (If you have not done so already) Add a new incident, or open an existing incident, as
described in Add or edit an incident, on page 7.
By default, the Response tab and Incident Information sub-tab are selected.
2. Click the Patient tab, and then click the Demographics sub-tab.
Fields for specifying the patient's personal information appear on the left side of the interface.
3. Under Personal Info, enter data as described in Understand the interface and data
entry in it, on page 11.
Tip: If the patient already exists in FH Medic from a previous incident, you can pull up the
patient's existing data, as described in Search for a patient, on page 27. If you have a
driver's license scanner available, you can read the patient's information from their
driver's license, as described in Read information from a driver's license, on page 29.
Field
Information needed
Last Name,
First Name,
Middle Initial
The patient's last (family) name, first (given) name, and middle initial (if any).
FH Medic User's Guide 25
Field
Information needed
DOB
The patient's date of birth.
Note: If you are not able to obtain the patient's date of birth, in
the number pad on the right side of the interface, click UTO
(unable to obtain).
FH Medic automatically calculates the patient's age and displays it
in Age.
Age Units
The division of time (years, months, days, hours, minutes) to associate with the value in Age.
Race
The identification of the race of the casualty, based on U.S. Office
of Management and Budget (OMB) designations.
Sex
The patient's gender.
Phone
The patient's home or primary telephone number.
Tip: If the phone number is not available, click UTO (unable to
obtain).
Height
(feet-inches)
The patient's height, in feet and inches.
Weight
The patient's weight, in pounds or kilograms.
Tip: To indicate the units you are using for the patients weight,
click the button to the right of the field in the data selection/entry
area. The label on this button changes between lbs and kg, to indicate the current unit for the weight.
Tip: If you cannot establish the patient's weight, click UTO (unable
to obtain).
DL Number
The patient's driver's license number.
SSN
The patient's Social Security Number (SSN).
Tip: If the SSN is not available, click UTO (unable to obtain).
26 FH Medic User's Guide
Search for a patient
If the patient already exists in FH Medic from a previous incident, you can call up his existing
information instead of re-entering it again for the current incident.
1. At the bottom of the tab, click Lookup Patient.
The Search Existing Patients dialog box appears.
2. Do one of the following.
To do this
Do this
Find a patient
by their Social
Security Number (SSN)
1. Click Search by SSN.
The dialog box updates to display the SSN field.
2. Click SSN.
The Patient Social Security Number dialog box appears.
3. Use the keypad to type the patient's SSN, then click Submit.
The value you specified appears in SSN.
4. Click Search.
If an SSN matching your entry is found, the patient's record
appears in the list in the dialog box.
FH Medic User's Guide 27
To do this
Do this
Find a patient
by their name
1. Click Search by Name and DOB.
The fields in the dialog box update to display the First Name,
Last Name, and DOB fields.
2. Click First Name.
A keyboard appears on the screen.
3. Use the keypad to type the patient's first name, and then click
Submit.
4. Repeat the previous two steps for Last Name.
5. Click DOB (date of birth).
The Patient Date of Birth dialog box appears.
6. Use the dialog box to enter the patient's date of birth, and then
click Submit.
7. Click Search.
If patient name or date of birth matching your specifications is
found, the patient's record appears in the list in the dialog box.
3. Depending on whether the patient is found, do one of the following.
Was the
Do this
patient found?
No
l
In the lower left corner of the dialog box, click Go back to return to
the Demographics sub-tab.
The Demographics sub-tab reappears with blank fields.
Yes
1. In the results list, select the patient.
2. In the lower right corner of the dialog box, click Select This
Patient.
The Demographics sub-tab reappears, and the patient's data
populates the fields.
28 FH Medic User's Guide
Read information from a driver's license
If the patient or a responsible party for the patient has a driver's license, and if you have a driver's
license scanner available, you can swipe the driver's license through the scanner and transfer the
information on the license into FH Medic instead of entering it manually.
Note: Not all states issue driver's licenses that can be read by driver's license scanner.
1. At the bottom of the tab, click Scan Drivers License.
The Swipe Driver's License dialog box appears.
2. Depending on whose driver's license you will scan, click either Patient's ID or Responsible Party's ID.
3. Swipe the driver's license through the scanner and follow any directions provided with the
scanner for its operation.
If the scanner can read the information on the driver's license, data appears in the Swipe
Driver's License dialog box.
4. Click Close.
The Demographics sub-tab reappears. If the driver's license was successfully read, the
patient's data populates the fields.
FH Medic User's Guide 29
Specify the patient's home address
1. (If you have not done so already) Add a new incident, or open an existing incident, as
described in Add or edit an incident, on page 7.
By default, the Response tab and Incident Information sub-tab are selected.
2. Click the Patient tab, and then click the Demographics sub-tab.
Fields for specifying the information about the patient appear on the left side of the interface. Fields with red text indicate required information.
Tip: If the patient already exists in FH Medic from a previous incident, you can pull up the
patient's existing data, as described in Search for a patient, on page 27. If you have a
driver's license scanner available, you can read the patient's information from their
driver's license, as described in Read information from a driver's license, on page 29.
3. Scroll down through the fields until the Home Address section appears.
4. Under Home Address, enter data as described in Understand the interface and data
entry in it, on page 11.
Field
Information needed
Address 1,
Address 2
The patient's home mailing or street address.
ZIP
The patient's home ZIP code of residence. This is the numerical
code assigned by the U.S. Postal Service to all U.S. jurisdictions.
City
The patient's home city, township, or residence.
Tip: When you click this field, the Copy Address from Incident
and UTO buttons appear in the data selection/entry area. You can
click the first button to copy the information from the Response tab,
Location sub-tab. If you click UTO (unable to obtain), the address
fields are no longer required.
Note: If the patient lives in an unincorporated area, use the city
found in the mailing address for the patient.
30 FH Medic User's Guide
Field
Information needed
State
The home state, territory, or province, or District of Columbia where
the patient resides.
County
The patient's home county, parish, or residence.
Resident or
Non-resident
An indication of whether or not the patient is a resident in the area
(district, county, zone, city, and so forth) where the incident
occurred. You can use this information to analyze statistics, calculate applicable billing, and so forth.
Specify the patient's financial guarantor
A financial guarantor is a third party who promises to provide payment on a bond, loan, or other
liability in the event of default. While many guarantees apply to debt instruments, they may also
be used for day-to-day expenses, such as those incurred during an incident.
1. (If you have not done so already) Add a new incident, or open an existing incident, as
described in Add or edit an incident, on page 7.
By default, the Response tab and Incident Information sub-tab are selected.
2. Click the Patient tab, and then click the Demographics sub-tab.
Fields for specifying the information about the patient appear on the left side of the interface.
Tip: If the patient already exists in FH Medic from a previous incident, you can pull up the
patient's existing data, as described in Search for a patient, on page 27. If you have a
driver's license scanner available, you can read the patient's information from their
driver's license, as described in Read information from a driver's license, on page 29.
3. Scroll down through the fields until the Financial Guarantor section appears.
FH Medic User's Guide 31
4. Under Financial Guarantor, enter data as described in Understand the interface and
data entry in it, on page 11.
Field
Information needed
Last Name,
First Name
The full name of the financial guarantor of the patient.
Relationship
The relationship of the financial guarantor to the patient.
Address
The home mailing or street address, city, state, and zip code for the
financial guarantor of the patient.
Phone
The phone number of the financial guarantor. If this number is not
available, click UTO (unable to obtain) in the data selection/entry
area.
Collect the patient's medical history
1. (If you have not done so already) Add a new incident, or open an existing incident, as
described in Add or edit an incident, on page 7.
By default, the Response tab and Incident Information sub-tab are selected.
2. Click the Patient tab, and then click the Past History sub-tab.
Fields for specifying the patient's medical history information appear on the left side of the
interface.
32 FH Medic User's Guide
3. Under Patient Past Medical History, for each of the fields, enter data as described in
Understand the interface and data entry in it, on page 11.
Field
Information needed
Cardiovascular
Conditions the patient may have relating to the heart, blood vessels, or the circulation.
Cancer
Types of cancer the patient may have.
Neurological
Any disorders of the body's nervous system the patient may have.
Gastrointestinal
Conditions the patient may have relating to the stomach and intestine, and sometimes to all the structures from the mouth to the
anus.
Genitourinary
Conditions the patient may have caused by infections affecting the
genital area and urinary system.
Infectious
Any illness the patient may have that can be transmitted to people
and organisms through the environment.
Metabolic / Endo- Conditions the patient may have which affect the body's procrine
duction of certain hormones, or the body's ability to process certain
nutrients and vitamins.
Respiratory
Conditions the patient may have relating to the organs in the body
that let the patient breathe.
Psychological
Conditions the patient may have related to the mental and emotional state of a person.
Women's Health Conditions the patient may have related to issues specific to
human female anatomy. These often relate to structures such as
female genitalia and breasts or to conditions caused by hormones
specific to females.
Surgical
Types of surgery performed on the patient in the past.
Immunizations
An indication of whether or not (if known) the patient has been
immunized, and if those immunizations are up-to-date.
FH Medic User's Guide 33
List the patient's medications
1. (If you have not done so already) Add a new incident, or open an existing incident, as
described in Add or edit an incident, on page 7.
By default, the Response tab and Incident Information sub-tab are selected.
2. Click the Patient tab, and then click the Meds sub-tab.
Fields for specifying any medication the patient is taking appear on the left side of the interface, and a list of medications for you to quickly choose from is listed in alphabetical order
at the bottom of the interface.
Tip: You can scroll backward and forward through the list of medications by clicking the
right and left arrow buttons below the list.
34 FH Medic User's Guide
3. Do any of the following.
To do this
Indicate the patient
is not taking medication.
Do this
l
Below the list in the upper left corner of the interface, click
None.
The word NONE appears in the medication list.
Add medications the a. Scroll through the list of medications as needed and click a
patient is taking to
medication the patient is taking.
the list.
A dialog box for specifying the amount of the dose and frequency appears.
b. Specify the amount and frequency the patient takes the medication.
i. For Amount, click the field, and then use the keyboard
that appears to type the amount of the medication the
patient takes each time.
ii. From the list below Amount, select the units for the
amount taken.
iii. In Frequency, click the field, and then use the keyboard
FH Medic User's Guide 35
To do this
Do this
that appears to type the number of times the patient
takes the medication.
iv. From the list below Frequency, select the time interval
the patient takes the medication in.
v. Click Continue.
The medication is added to the list in the upper left
corner of the interface.
c. Repeat steps a–b as needed to list all the medications the
patient is taking.
Add a medication
which is not listed.
a. Click in the field for the keyboard to the right of the medication list, and type the name of the medication the patient
is taking.
b. Click Add This.
A dialog box for specifying the amount of the dose and frequency appears.
36 FH Medic User's Guide
To do this
Do this
c. Specify the amount and frequency the patient takes the medication, as described above in the instructions for adding
medications the patient is taking to the list.
Delete a medication
from the list the
patient is taking.
a. In the list in the upper left corner of the interface, select the
medication you want to delete.
b. Click Delete Selected Drug.
The medication disappears from the list.
FH Medic User's Guide 37
List any allergies the patient has
1. (If you have not done so already) Add a new incident, or open an existing incident, as
described in Add or edit an incident, on page 7.
By default, the Response tab and Incident Information sub-tab are selected.
2. Click the Patient tab, and then click the Allergies sub-tab.
Fields for specifying the information about allergies the patient has appear on the left side
of the interface.
3. Under Allergies, enter data as described in Understand the interface and data entry in
it, on page 11.
Field
Information needed
Medications
A list of medications (penicillin, aspirin, morphine and so forth)
which trigger an allergic reaction in the patient.
Environment
A list of environmental factors (dust, latex, pollen, and so forth)
which trigger an allergic reaction in the patient.
Food
A list of foods (shellfish, gluten, dairy, and so forth) which trigger an
allergic reaction in the patient.
Insects
A list of insect bites or stings (from ants, bees, spiders, and so
forth) which trigger an allergic reaction in the patient.
38 FH Medic User's Guide
Specify insurance information
1. (If you have not done so already) Add a new incident, or open an existing incident, as
described in Add or edit an incident, on page 7.
By default, the Response tab and Incident Information sub-tab are selected.
2. Click the Patient tab, and then click the Insurance sub-tab.
Fields appear for specifying the information about any insurance the patient has.
3. Under Add Insurance Type, add insurance information in one of the following ways.
To do this
Do this
Add other
payer or
self-pay
information
1. Click Not Obtained.
A field for indicating why you could not obtain the information
appears.
2. Click Not Obtained.
A list of reasons appears in the data selection/entry area for why
insurance information could not be obtained.
3. In the data selection/entry area, click the reason that applies to the
patient.
FH Medic User's Guide 39
To do this
Do this
Add Medicare insurance
1. Click Medicare.
Fields appear for specifying Medicare information.
2. Under Medicare, enter data as described in Understand the interface and data entry in it, on page 11.
Add Medicaid insurance
Field
Information needed
Medicare Payer
The health care program that is submitting the
medical bills for the patient to Medicare.
Medicare ID #
The number that uniquely identifies a health
care provider and is used on billing forms submitted to Medicare.
1. Click Medicaid.
Fields appear for specifying Medicaid information.
2. Under Medicaid, enter data as described in Understand the interface and data entry in it, on page 11.
40 FH Medic User's Guide
Field
Information needed
Medicaid Payer
The list of insurance companies working with
Medicaid to submit the medical bills for the
patient to Medicaid.
Medicaid ID #
The number that uniquely identifies a health
care provider and is used on billing forms submitted to Medicaid.
To do this
Do this
Add private
insurance
1. Click Private Insurance.
Fields appear for specifying private insurance information.
2. Under Private Insurance, enter data as described in Understand
the interface and data entry in it, on page 11.
Field
Information needed
Company Name The name of the patient's insurance company.
Subscriber ID
The patient's identification number to the insurance company.
Group Number
The identification number or name of the
patient's insurance group.
Insurance
Phone
The phone number of the insurance company.
Plan Type
The type of insurance plan the patient is
covered under.
Insured Name
The last (family) name, first (given) name, and
middle name (if any) of of the person insured by
the insurance company.
Insured SSN
The Social Security Number (SSN) of the person insured by the insurance company.
Note: If you are not able to obtain the phone
number, in the number pad on the right side
of the interface, click UTO (unable to obtain).
Note: If you are not able to obtain the SSN,
in the number pad on the right side of the
interface, click UTO (unable to obtain).
FH Medic User's Guide 41
To do this
Add other
payer or
self-pay
information
Do this
Field
Information needed
Insured DOB
The date of birth (DOB) of the person insured
by the insurance company.
1. Click Other Payer or Self Pay.
Fields appear for specifying who is paying the medical bills for the
patient.
2. Under Other Payer or Self Pay, enter data as described in Understand the interface and data entry in it, on page 11.
Field
Information needed
First Name
The first (given) name of the person paying the
medical bills for the patient.
Last Name
The last (family) name of the person paying the
medical bills for the patient.
Address
The home mailing or street address of the person paying the medical bills for the patient.
City
The patient's home city, township, or residence.
Note: If the patient lives in an unincorporated
area, use the city found in the mailing
address for the patient.
42 FH Medic User's Guide
To do this
Do this
Field
Information needed
State
The home state, territory, or province, or District of Columbia where the person paying the
medical bills for the patient resides.
Zip
The ZIP code of residence for the person paying the medical bills for the patient. This is the
numerical code assigned by the U.S. Postal
Service to all U.S. jurisdictions.
Relationship
The relationship of the patient to the primary
insured person.
Phone
The home or other phone number of the person
paying the medical bills for the patient.
Note: If you are not able to obtain the phone
number, in the number pad on the right side
of the interface, click UTO (unable to obtain).
Next of Kin
The last (family) name, first (given) name, and
middle initial (if any) of the patient's closest relative or guardian.
Phone
The home or other phone number of the
patient's closest relative or guardian.
Note: If you are not able to obtain the phone
number, in the number pad on the right side
of the interface, click UTO (unable to obtain).
Employer
The name of the patient's employer.
Employer
Phone
The phone number of the patient's employer.
Date of Birth
The patient's date of birth.
Note: If you are not able to obtain the phone
number, in the number pad on the right side
of the interface, click UTO (unable to obtain).
FH Medic User's Guide 43
4. In the lower left corner of the interface, click Submit.
The original interface for the Insurance tab reappears, and the insurance information you
entered appears in the list in the lower half of the tab.
Tip: To change the information for any of the insurance types listed, select the entry, and
then click Edit Selected. The fields for that type of insurance reappear, and you can edit
the data as needed.
5. (Optional) Delete an insurance type from the list.
a. Select the entry you want to delete, and then click Delete Selected.
The Delete Insurance Type dialog box appears.
b. Click Yes.
The insurance type you selected disappears from the list.
6. (Optional) Attach an Advanced Beneficiary Notice (ABN) form to the patient's insurance
information, as described in Attach an Advanced Beneficiary Notice (ABN), on page
45.
7. (Optional) Attach a Physician's Certification Statement (PCS) form to the patient's insurance information. as described in Attach a Physician's Certification Statement (PCS)
form, on page 47.
8. In the lower left corner of the screen, for Hospital Face Sheet, select Yes or No to indicate whether or not to include a cover sheet for the health insurance documentation.
44 FH Medic User's Guide
Attach an Advanced Beneficiary Notice (ABN)
An Advance Beneficiary Notice (ABN), also known as a "waiver of liability," is a notice that suppliers and other medical providers are required to give a patient when they offer services or items
that they know or have reason to believe Medicare will determine to be medically unnecessary for
the patient, and therefore, will not pay for.
Providers are not required to give a patient an ABN for services or items explicitly excluded from
Medicare coverage (items that are never covered by Medicare even if medically necessary, such
as hearing aids). In addition, ABNs only apply if the patient is in Original Medicare, not if the
patient is in a Medicare private health plan (HMO, PPO or PFFS).
1. (If you have not done so already) Add a new incident, or open an existing incident, as
described in Add or edit an incident, on page 7.
By default, the Response tab and Incident Information sub-tab are selected.
2. Click the Patient tab, and then click the Insurance sub-tab.
Fields appear for specifying the information about any insurance the patient has.
3. In the lower right corner of the interface, under Forms, click ABN Form.
The Advanced Beneficiary Notice of Noncoverage dialog box appears.
FH Medic User's Guide 45
4. Fill out the fields in the form as appropriate.
5. Under Signature of patient or person acting on patient's behalf, have the patient or
acting on the patient's behalf use the stylus, their finger, or the mouse pointer to "write"
their signature in the box.
Tip: If the signature is not satisfactory, click Clear Signature and have the individual
sign the ABN form again.
6. Click View Form.
The form, as it would appear if you print or fax it, appears in FH Medic.
Tip: You can fax an ABN to a destination or print the ABN by clicking Fax or Print at the
top center and top right of the interface, respectively, and then following the prompts that
appear.
7. In the upper left corner of the interface, click Go Back.
46 FH Medic User's Guide
Attach a Physician's Certification Statement (PCS) form
A Physician's Certification Statement (PCS) is required for patients who are under the direct care
of a physician and are required for scheduled and non-scheduled non-emergency ambulance transports. The physician is responsible for supervising the medical care of the patient, including
reviewing the patient’s program of care, ordering medications, monitoring changes in the patient’s
medical status, and signing and dating all orders.
Note: A PCS is not required for emergency transports or for non-scheduled, non-emergency
transports of patients residing at home or in facilities where they are not under the direct care of
a physician.
1. (If you have not done so already) Add a new incident, or open an existing incident, as
described in Add or edit an incident, on page 7.
By default, the Response tab and Incident Information sub-tab are selected.
2. Click the Patient tab, and then click the Insurance sub-tab.
Fields appear for specifying the information about any insurance the patient has.
3. In the lower right corner of the interface, under Forms, click PCS Form.
The Physician's Certification Statement dialog box appears.
FH Medic User's Guide 47
4. Make selections in the form as appropriate.
5. From Facility or Hospital Faculty Position, select the type of faculty authorizing the
ambulance transportation.
6. Click Get Faculty Signation.
The PCS - Faculty Signature dialog box appears.
7. Click the Type Name field, and then use the keyboard that appears to type the name of
the facility or hospital faculty who will sign the PCS.
Tip: To remove the name from Type Name, click Clear to the right of the field.
8. Under Please Sign Here, have the individual use the stylus, their finger, or the mouse
pointer to "write" their signature in the box.
Tip: If the signature is not satisfactory, click Clear Signature and have the individual
sign the form again.
9. Click Save Signature.
The PCS - Faculty Signature dialog box closes.
10. In the Physician's Certification Statement dialog box, click Get Patient Signature.
48 FH Medic User's Guide
The PCS - Patient Signature dialog box appears.
11. Repeat steps 8–10 to get the patient's signature.
12. Click View Form.
The form, as it would appear if you print it, appears in FH Medic.
Tip: You can print the PCS by clicking Print at the top right of the interface, and then following the prompts that appear.
13. In the upper left corner of the interface, click Go Back.
FH Medic User's Guide 49
Assess the patient's situation
When you assess the patient's situation, you can record critical patient information such as the
chief complaint, the onset, provocation/palliation, quality, region/radiation, severity, and time
(OPQRST) of the complaint, the assessment of the patient, symptoms, and injury descriptions/locations.
Identify the chief and secondary complaints
The chief complaint is a concise statement describing the symptom, problem, or condition that is
the reason for a medical encounter. A secondary complaint is a second, less severe problem with
the patient, which may or may not be directly related to the chief complaint.
1. (If you have not done so already) Add a new incident, or open an existing incident, as
described in Add or edit an incident, on page 7.
By default, the Response tab and Incident Information sub-tab are selected.
2. Click the Situation tab.
By default, the Chief Complaint sub-tab is selected, the Primary Impression selection
button below the sub-tab is selected, and the Medical sub-tab under below Primary
Impression is selected.
3. Determine whether the complaint is a medical issue or a trauma (physical injury) to the
patient, and then click either the Medical or Trauma sub-tab.
Selections for specifying the problem the emergency medical services team was called
for in one or two words appear.
50 FH Medic User's Guide
4. Click one of the selections to describe the primary problem.
Your selection appears on the Primary Impression button.
5. (Optional) In the upper right corner of the interface, click Quick Actions.
The Quick Buttons dialog box appears, listing action plan information such as treatment
processes and medications that you may administer based on the selected primary
impression.
a. Select the treatment and/or medication that was administered to the patient.
The time is automatically recorded for that treatment or medication, and automatically added to the events log, where the patient's vitals, procedures, and medications are recorded.
b. Click Hide to close the dialog box.
6. Click the Secondary Impression sub-tab.
7. Repeat steps 3-5 to identify the secondary impression.
8. Depending on whether or not the primary impression is the actual chief complaint, in the
upper right corner of the interface, do one of the following.
FH Medic User's Guide 51
Is the chief complaint
the same as the
Do this
primary impression?
Yes
l
Click Same as Impression.
The selection listed on the Primary Impression button
appears under Chief COmplaint.
No
l
In Chief Complaint, type a description of the actual complaint the patient suffers.
Assess OPQRST symptoms
OPQRST is an mnemonic initialism used by medical providers to facilitate taking a patient's symptoms and history in the event of an acute illness. Each letter stands for an important line of questioning for the patient assessment. The parts of the mnemonic are: Onset , Provocation/palliation,
Quality, Region/Radiation, Severity, and Time.
1. (If you have not done so already) Add a new incident, or open an existing incident, as
described in Add or edit an incident, on page 7.
By default, the Response tab and Incident Information sub-tab are selected.
2. Click the Situation tab, and then click the OPQRST sub-tab.
Fields for gathering information related to the OPQRST symptoms appear on the left side
of the interface.
52 FH Medic User's Guide
3. Under Time, enter data as described in Understand the interface and data entry in it,
on page 11.
Field
Information needed
Days, Hours,
Minutes
The number of days, hours, and minutes that have elapsed since
the patient began experiencing the complaint for this call.
Onset Date /
Time
The date and time when the patient initially experienced the complaint for this call.
Provocation
A description of any movement, pressure (such as palpation) or
other external factor makes the problem better or worse. This can
also include whether the symptoms relieve with rest.
Quality
The patient's description of the pain (sharp, dull, crushing, burning,
tearing, or some other feeling, along with the pattern, such as intermittent, constant, or throbbing).
Radiation
Where the pain is on the body and whether it radiates (extends) or
moves to any other area. This can give indications for conditions
such as a myocardial infarction, which can radiate through the jaw
and arms. Other referred pains can provide clues to underlying medical causes.
Severity
The pain score (usually on a scale of 0 to 10). Zero is no pain and
ten is the worst-possible pain.
FH Medic User's Guide 53
Perform initial patient assessment
The initial patient assessment, also referred to as the primary survey, is a critical component of
pre-hospital care. This assessment is the basis from which all medical and trauma care decisions
are made.
1. (If you have not done so already) Add a new incident, or open an existing incident, as
described in Add or edit an incident, on page 7.
By default, the Response tab and Incident Information sub-tab are selected.
2. Click the Situation tab, and then click the Assessment sub-tab.
An interface for adding a new patient assessment appears on the left side of the interface,
and a summary of any assessment information you enter appears at the bottom of the
interface. Because you may assess the patient's condition multiple times during treatment, you can record your findings for each of these assessments.
3. Click Add New Assessment.
54 FH Medic User's Guide
The interface updates, and fields for entering assessment information appear on the left
side of the interface. The Date/Time of Assessment field is selected by default, and a
number pad for entering the time the patient was assessed appears on the right side of
the interface.
4. For Date/Time of Assessment, do one of the following.
l
l
Click Now to enter the current system time on your computer.
Click 5 min ago to enter the current system time on your computer, minus five
minutes.
l
Click the number buttons to enter a time.
l
Adjust the time displayed with the +1 min or -1 min buttons.
5. (Optional, if all or most of the assessments you perform fall within normal limits for the
patient) In the upper left corner of the interface, click Within Normal Limits.
All the assessment fields fill in with a value of Normal. You can override this value for
any individual field with the step below.
FH Medic User's Guide 55
6. For the remaining fields, enter data as described in Understand the interface and data
entry in it, on page 11.
Field
Information needed
Skin
A description of the patient's skin appearance, temperature, and
moisture level, such as pale, cold, and clammy, or mottled and
warm.
Head/Face
Any visible injury to the patient's head, such as a mass, lesion, or
swelling, and a description of their initial facial features, such as
asymmetric smile or droop.
Neck
A description of the patient's neck, such as jugular vein distention (JVD),tracheal deviation, the presence of stoma, and so
forth.
Chest/Lungs
A description of the patient's chest and lung function, such as
symmetrical rising/falling with each breath, the presence of subcutaneous emphysema (SCE, SE, or Sub Q air), stridor, or crepitus upon palpation.
Heart
Pulse rate, character, rhythm, and other information gathered
through auscultation with a stethoscope or other cardiac monitoring systems.
LU Abdomen,
LL Abdomen,
RU Abdomen,
RL Abdomen
An assessment of all four quadrants of the abdomen for distension, tenderness, a mass, guarding, entrance and exit
wounds, evisceration, painful areas, distention, and discoloration.
GU
A description of the condition and any injuries to the patient's genital and urinary systems (kidneys, ureters, urinary bladder, and
urethra).
Back Cervical,
Back Thoracic,
Back Lumbar/Sacral
Pain to range of motion (ROM) in the patient's back, existence of
a mass, tenderness in the paraspinal muscles, muscle tightness,
and tenderness in the spinous process.
RU Extremities,
RL Extremities,
LU Extremities,
L Extremities
A description of any tenderness, swelling, weakness, deformity,
contusions, abrasions, buns, bruises, wounds, blood, angulations, abnormal pulses or sensations for the patient.
Left Eye,
Right Eye
An indication of whether the patient's pupils are equal and reactive to light and accommodation (PERLA), discolored, dialated
(and how far), or irregular.
Mental Status
An assessment of whether the patient is alert and oriented to
time, person, place, and date (A+O x 4), or whether they are confused, hallucinatory, combative, or unresponsive.
Neurological
Evaluation of the patient's nervous system, including gait, cranial
muscle tone, posture, speech, tremors,or weakness on one side
of the body.
56 FH Medic User's Guide
List patient symptoms
1. (If you have not done so already) Add a new incident, or open an existing incident, as
described in Add or edit an incident, on page 7.
By default, the Response tab and Incident Information sub-tab are selected.
2. Click the Situation tab, and then click the Symptoms sub-tab.
Fields for gathering information related to patient symptoms appear on the left side of the
interface.
3. Under Patient Symptoms, enter data as described in Understand the interface and
data entry in it, on page 11.
Field
Information needed
General
A list of general symptoms from the patient, such as chills dizziness, weakness, excessive sweating, thirst, and so forth.
Respiratory
A list of symptoms from the patient's respiratory system, such as
a Cheyne-Sokes breathing pattern, stridor, coughing , sputum production, and so forth.
Cardiovascular
A list of symptoms from the patient's cardiovascular system, such
as edema, numbness or tingling, cardiac arrhythmia, nausea,
vomiting, chest pain, and so forth.
Neurological
A list of symptoms from the patient's neurological system, such as
headache or migraine, unsteady gait, vertigo, impaired speech or
vision, unlateral weakness, aphasia, and so forth.
Head / Neck
A list of symptoms from the patient's head and neck, such as ear
pain, difficulty swallowing, hearing trouble, stiffness, swollen
tongue, and so forth.
FH Medic User's Guide 57
Field
Information needed
GI
A list of symptoms from the patient's gastrointestinal (GI) tract,
such as abdominal cramping or distension, bloody stool or constipation, flatulence, heartburn, incontinence, and so forth.
GU / GYN
A list of symptoms from the patient's genitourinary and/or gynecology systems, such as contractions, pelvic pain, incontinence, and
so forth.
Musculoskeletal
A list of symptoms from the patient's muscular and skeletal symptoms, such as joint pain and swelling, back pain, muscular cramping, and so forth.
Metabolic
A list of symptoms from the patient's metabolic system, such as
dehydration, hyperglycemia, jaundice, rashes, hives, and so forth.
Describe patient injuries
1. (If you have not done so already) Add a new incident, or open an existing incident, as
described in Add or edit an incident, on page 7.
By default, the Response tab and Incident Information sub-tab are selected.
2. Click the Situation tab, and then click the Injury sub-tab.
Fields for gathering information related to a patient's injury appear on the left side of the
interface.
58 FH Medic User's Guide
3. Under Injury, enter data as described in Understand the interface and data entry in it,
on page 11.
Field
Information needed
MOI
The circumstance in which an injury occurs.
If you click MVC (motor vehicle crash), a new set of fields appear
on the right side of the interface, which are specific to this type of
incident. Information on specifying data for these fields is available in Add motor vehicle crash (MVC) details, on page 60.
If you click Fall, Burns, Stabbing, or Gunshot, a dialog box
appears showing a human body, and you need to specify more
details about the injury. Depending on the MOI you clicked, information on specifying these details is available in Add fall or burn
injury details, on page 63, and in Add stabbing or gunshot
injury details, on page 65.
Type of Activity
A description of the activity the patient was involved in when the
injury occurred.
Incident
Location
A description of where the patient was when the injury was sustained.
Incident Type
An indication of whether or not the injury was work-related.
Intent of Injury
A description of the intent behind the injury (unintentional, assault,
legal intervention, and so forth).
Patient Exposure A list of items the patient was exposed to as causing the injury, or
as a result of the injury, such as blood, chemicals, disease, body
fluids, and so forth.
FH Medic User's Guide 59
Add motor vehicle crash (MVC) details
1. (If you have not done so already) Begin describing the patient's injury, as outlined in
Describe patient injuries, on page 58.
2. Under Injury, click MOI.
The Mechanism of Injury (MOI) choices appear on the right side of the interface.
3. On the right side of the interface, click MVC.
A new set of fields appear on the left side of the interface, which are specific motor
vehicle crashes (MVC) and motor vehicle accidents (MVA).
4. In the upper right corner of the interface, click Vehicle Type, and then select the type of
vehicle the patient was riding in when they were injured.
60 FH Medic User's Guide
5. (Optional) In the upper right corner of the interface, click Free Draw, and then drag the
mouse pointer to "draw" on the vehicle image, to indicate information related to the crash.
Note: You can remove any markings you draw on the vehicle image by clicking Clear
Draw.
6. Under Vehicle Image, click MVC Patient Position.
A white X in a red circle appears by default in the driver's seat of the vehicle image, and
the value for MVC Patient Position is automatically set to the driver's seat.
7. (If the patient was not in the driver's seat during the crash) Click the vehicle image, on the
seat the patient occupied during the crash.
FH Medic User's Guide 61
The position marker on the vehicle image updates accordingly, as does the value for
MVC Patient Position.
8. Under Details, enter data as described in Understand the interface and data entry in
it, on page 11.
Field
Information needed
Safety Equipment
A list of any passenger protection restraints, breathing apparatus,
flotation devices, or protective equipment employed during the
crash.
Extrication
An indication of whether or not the patient had to be removed from
the vehicle by bystanders or emergency personnel.
Ejected from
Vehicle
An indication of whether or not the patient was ejected from the
vehicle during the crash.
Collision
A list of locations where the vehicle was impacted during the
crash.
9. Click Continue to return to entering information about the patient injuries.
62 FH Medic User's Guide
Add fall or burn injury details
1. (If you have not done so already) Begin describing the patient's injury, as outlined in
Describe patient injuries, on page 58.
2. Under Injury, click MOI.
The Mechanism of Injury (MOI) choices appear on the right side of the interface.
3. On the right side of the interface, click Fall or Burns.
The Add Fall or Add Burns dialog box appears, showing a human body.
Tip: To access the back of the body in the dialog box, click Show Back.
4. Click a point of injury on the body in the dialog box.
A dialog box of injury descriptions appears. The list of descriptions will vary, depending
on whether you are adding details about a fall or a burn.
5. Click a description of the injury at the point you clicked on the human body diagram.
Tip: If you are adding burn details, you also need to click Continue.
FH Medic User's Guide 63
A white X in a red circle appears on the human body diagram at the point you clicked.
6. Repeat steps 4–5 for each injury you need to indicate and describe for the patient.
7. Click Continue to close the human body diagram dialog box, and return to entering information about the patient injuries.
64 FH Medic User's Guide
Add stabbing or gunshot injury details
1. (If you have not done so already) Begin describing the patient's injury, as outlined in
Describe patient injuries, on page 58.
2. Under Injury, click MOI.
The Mechanism of Injury (MOI) choices appear on the right side of the interface.
3. On the right side of the interface, click Stabbing or Gunshot.
The Add Stabbing or Add Gunshot dialog box appears, showing a human body.
Tip: To access the back of the body in the dialog box, click Show Back.
4. Click a point of injury on the body in the dialog box.
FH Medic User's Guide 65
A white X in a red circle appears on the human body diagram at the point you clicked.
5. Repeat steps 3–4 for each injury you need to indicate on the patient.
6. Click Continue to close the human body diagram dialog box, and return to entering information about the patient injuries.
66 FH Medic User's Guide
Work with the injury summary
1. (If you have not done so already) Add a new incident, or open an existing incident, as
described in Add or edit an incident, on page 7.
By default, the Response tab and Incident Information sub-tab are selected.
2. Click the Situation tab, and then click the Diagram sub-tab.
A summary of injury information entered when you described the patient's information
appears. A numbered list of the injuries you entered on the Injury tab appears on the left
side of the interface, and a human body diagram appears on the right side of the interface,
with numbered markers corresponding to the list on the left.
Information on entering injury data is available in Describe patient injuries, on page 58.
3. Do any of the following.
To do this
View injury
markers on the
other side of the
body
Indicate suspected internal
injuries
Remove an
injury
Do this
l
At the bottom of the interface, click Show Back.
The human body diagram changes to show the back of the body,
and the label on the button updates to Show Front. To return to
the front view of the body, click Show Front.
l
In the lower left corner of the interface, click Suspected Internal
Injuries.
A new entry for internal injuries appears at the bottom of the list.
1. In the injury list on the left, select the injury you want to remove.
2. In the lower left corner of the interface, click Remove Selected
Injury.
The injury disappears from the list.
Draw on the
body diagram
l
In the lower right corner of the interface, click Free Draw, and
then drag the mouse pointer to "draw" on the human body dia-
FH Medic User's Guide 67
To do this
Do this
gram, to indicate information related to the injuries.
Note: You can remove any markings you draw on the body diagram by clicking Clear Drawing.
Add an injury
1. Click the human body diagram at the location you want to add an
injury.
A dialog box of injury descriptions appears. The list of descriptions will vary, depending on whether you are adding details
about a fall or a burn.
2. Click the button corresponding to the injury you want to add to
the human body diagram.
A new injury marker appears on the body diagram, and a corresponding new entry appears in the injury list on the left.
68 FH Medic User's Guide
Document treatments and vitals data
You can document the treatments administered to the patient during the course of those treatments.
Record treatments to the patient
1. (If you have not done so already) Add a new incident, or open an existing incident, as
described in Add or edit an incident, on page 7.
By default, the Response tab and Incident Information sub-tab are selected.
2. Click the Events tab, and then click the Treatments sub-tab.
A list of possible treatments appears.
3. Click the button for the treatment administered to the patient.
Fields for gathering information related to the treatment appear on the left side of the interface.
4. Supply the necessary information for the treatment you selected.
l
Ventilate the patient, on page 71
l
Clear the patient's airway, on page 72
l
Administer oxygen to the patient, on page 73
l
Intubate the patient, on page 74
l
Administer transcutaneous pacing (TCP) to the patient, on page 76
l
Monitor the EtCO2 level of the patient, on page 77
l
Decompress the patient's chest, on page 78
l
Provide IV (intravenous) fluids to the patient, on page 79
l
Administer medication to the patient, on page 81
l
Perform cardioversion or defibrillation on the patient, on page 82
FH Medic User's Guide 69
l
Perform IO (intraosseous infusion) on the patient, on page 83
l
Perform CPR (cardiopulmonary resuscitation) on the patient, on page 84
l
Immobilize the patient's spine, on page 85
l
Apply a splint to the patient, on page 86
l
Restrain the patient, on page 87
l
Apply bandages to the patient, on page 88
l
Apply a traction splint to the patient, on page 89
l
Perform an obstetrical delivery for the patient, on page 90
l
Perform a 12-lead EKG (electrocardiography) on a patient, on page 92
l
Employ a CPAP (continuous positive airway pressure) treatment, on page 93
l
Document alleged or suspected abuse or neglect, on page 94
l
Apply thermal treatments to the patient, on page 95
l
Use an air adjunct device on a patient, on page 96
l
Apply an AED (automated external defibrillator) to a patient, on page 97
l
Document field termination for a patient, on page 98
l
Contact medical control for a patient, on page 99
l
Perform a 4-lead ECG (electrocardiography) on a patient, on page 100
l
Use a medical alert for a patient, on page 101
70 FH Medic User's Guide
Ventilate the patient
1. (If you have not done so already) Do the following.
a. Add a new incident, or open an existing incident, as described in Add or edit an
incident, on page 7.
By default, the Response tab and Incident Information sub-tab are selected.
b. Click the Events tab, and then click the Treatments sub-tab.
The Treatments and Supplies sub-tabs appear. The Treatments sub-tab is selected by default, displaying a list of possible treatments.
2. Click Ventilation.
Fields for gathering information related to the treatment appear on the left side of the interface.
3. Under Ventilation, enter data as described in Understand the interface and data entry
in it, on page 11.
Field
Information needed
Time
The time the treatment was administered to the patient. By default,
this value is populated with the computer's system time when you
selected this treatment option.
Type
The type of bag valve mask used in the treatment (adult, pediatric,
or infant).
Rate (Breaths)
The number of breaths administered per minute to the patient.
O2 Flow
The rate at which oxygen flows into the patient through the ventilator.
Performed By
The person who performed the treatment.
Notes
Any additional information related to the treatment.
Prior To Arrival
Indicate whether or not actions were performed on the patient
before you arrived on the scene.
4. Click Submit to save the treatment information you entered.
The Treatments tab reappears.
FH Medic User's Guide 71
Clear the patient's airway
1. (If you have not done so already) Do the following.
a. Add a new incident, or open an existing incident, as described in Add or edit an
incident, on page 7.
By default, the Response tab and Incident Information sub-tab are selected.
b. Click the Events tab, and then click the Treatments sub-tab.
The Treatments and Supplies sub-tabs appear. The Treatments sub-tab is selected
by default, displaying a list of possible treatments.
2. Click Clear Airway.
Fields for gathering information related to the treatment appear on the left side of the interface.
3. Under Clear Airway, enter data as described in Understand the interface and data
entry in it, on page 11.
Field
Information needed
Time
The time the treatment was administered to the patient. By default,
this value is populated with the computer's system time when you
selected this treatment option.
Method
The manner in which the airway was cleared of obstruction.
Performed By
The person who performed the treatment.
Notes
Any additional information related to the treatment.
Prior To Arrival
Indicate whether or not actions were performed on the patient before
you arrived on the scene.
4. Click Submit to save the treatment information you entered.
The Treatments tab reappears.
72 FH Medic User's Guide
Administer oxygen to the patient
1. (If you have not done so already) Do the following.
a. Add a new incident, or open an existing incident, as described in Add or edit an
incident, on page 7.
By default, the Response tab and Incident Information sub-tab are selected.
b. Click the Events tab, and then click the Treatmentssub-tab.
The Treatments and Supplies sub-tabs appear. The Treatments sub-tab is selected by default, displaying a list of possible treatments.
2. Click Oxygen Adminis.
Fields for gathering information related to the treatment appear on the left side of the interface.
3. Under Oxygen Adminis, enter data as described in Understand the interface and
data entry in it, on page 11.
Field
Information needed
Time
The time the treatment was administered to the patient. By default,
this value is populated with the computer's system time when you
selected this treatment option.
Type
An indication of how the oxygen was administered (with a mask, a
nebulizer, a nasal cannula, and so forth).
Rate (LPM)
The number of liters per minute (LPM) through the oxygen device's
flowmeter.
Performed By
The person who performed the treatment.
Notes
Any additional information related to the treatment.
Prior To Arrival
Indicate whether or not actions were performed on the patient
before you arrived on the scene.
4. Click Submit to save the treatment information you entered.
The Treatments tab reappears.
FH Medic User's Guide 73
Intubate the patient
1. (If you have not done so already) Do the following.
a. Add a new incident, or open an existing incident, as described in Add or edit an
incident, on page 7.
By default, the Response tab and Incident Information sub-tab are selected.
b. Click the Events tab, and then click the Treatments sub-tab.
The Treatments and Supplies sub-tabs appear. The Treatments sub-tab is selected
by default, displaying a list of possible treatments.
2. Click Intubation.
Fields for gathering information related to the treatment appear on the left side of the interface.
3. Under Intubation, enter data as described in Understand the interface and data entry
in it, on page 11.
Field
Information needed
Time
The time the treatment was administered to the patient. By default,
this value is populated with the computer's system time when you
selected this treatment option.
Type
The type of intubation performed (endotracheal, nasotracheal, and
so forth).
Technique
The intubation technique used (standard, blind, digital, and so forth).
74 FH Medic User's Guide
Field
Information needed
Successful
An indication of whether or not the intubation was successful.
Attempts
The number of attempts made at intubating the patient.
Size
The size of the tube inserted during the intubation.
Tube Depth
The depth to which the tube was inserted.
Location
Where the intubation tube was inserted.
ETCO2
The end-tidalcarbon dioxide (EtCO2) level in the patient's respiration.
Checks
A list of the checks performed on the patient, to verify that the intubation is working as expected.
Tube Secured
An indication of how the tube is secured in position.
Performed By
The person who performed the treatment.
Prior To Arrival
Indicate whether or not actions were performed on the patient before
you arrived on the scene.
4. Click Submit to save the treatment information you entered.
The Treatments tab reappears.
FH Medic User's Guide 75
Administer transcutaneous pacing (TCP) to the patient
Transcutaneous pacing (TCP) is for temporary management of symptomatic bradycardia, including heart blocks (adults/adolescents and children with a heart rate less than 60 beats per minute).
1. (If you have not done so already) Do the following.
a. Add a new incident, or open an existing incident, as described in Add or edit an
incident, on page 7.
By default, the Response tab and Incident Information sub-tab are selected.
b. Click the Events tab, and then click the Treatments sub-tab.
The Treatments and Supplies sub-tabs appear. The Treatments sub-tab is selected
by default, displaying a list of possible treatments.
2. Click TCP.
Fields for gathering information related to the treatment appear on the left side of the interface.
3. Under TCP, enter data as described in Understand the interface and data entry in it,
on page 11.
Field
Information needed
Time
The time the treatment was administered to the patient. By default,
this value is populated with the computer's system time when you
selected this treatment option.
Rate
The pacing rate used for the TCP device.
mA
The amount of current delivered until electrical and mechanical capture is achieved.
Capture
An indication of whether electrical and mechanical capture is
achieved, as demonstrated by palpable pulses that correspond to
electrical pacing spikes (maximum 120 mA).
Performed By
The person who performed the treatment.
Notes
Any additional information related to the treatment.
76 FH Medic User's Guide
Field
Information needed
Prior To Arrival
Indicate whether or not actions were performed on the patient before
you arrived on the scene.
4. Click Submit to save the treatment information you entered.
The Treatments tab reappears.
Monitor the EtCO2 level of the patient
EtCO2 is the end-tidalcarbon dioxide level in the patient's respiration.
1. (If you have not done so already) Do the following.
a. Add a new incident, or open an existing incident, as described in Add or edit an
incident, on page 7.
By default, the Response tab and Incident Information sub-tab are selected.
b. Click the Events tab, and then click the Treatments sub-tab.
The Treatments and Supplies sub-tabs appear. The Treatments sub-tab is selected by default, displaying a list of possible treatments.
2. Click EtCO2 monitoring.
Fields for gathering information related to the treatment appear on the left side of the interface.
3. Under EtCO2 monitoring, enter data as described in Understand the interface and
data entry in it, on page 11.
Field
Information needed
Time
The time the treatment was administered to the patient. By default,
this value is populated with the computer's system time when you
selected this treatment option.
ETCO2
The end-tidalcarbon dioxide (EtCO2) level in the patient's respiration.
Type
The type of tube used while monitoring the EtCO2 level, such as a
nasal tube or endotrachial tube.
FH Medic User's Guide 77
Field
Information needed
Performed By
The person who performed the treatment.
Notes
Any additional information related to the treatment.
Prior To Arrival
Indicate whether or not actions were performed on the patient
before you arrived on the scene.
4. Click Submit to save the treatment information you entered.
The Treatments tab reappears.
Decompress the patient's chest
1. (If you have not done so already) Do the following.
a. Add a new incident, or open an existing incident, as described in Add or edit an
incident, on page 7.
By default, the Response tab and Incident Information sub-tab are selected.
b. Click the Events tab, and then click the Treatments sub-tab.
The Treatments and Supplies sub-tabs appear. The Treatments sub-tab is selected
by default, displaying a list of possible treatments.
2. Click Chest Decompression.
Fields for gathering information related to the treatment appear on the left side of the interface.
3. Under Chest Decompression, enter data as described in Understand the interface
and data entry in it, on page 11.
Field
Information needed
Time
The time the treatment was administered to the patient. By default,
this value is populated with the computer's system time when you
selected this treatment option.
Site
Which side of the chest the decompression was performed on.
Size (gauge)
The gauge size of the needle (if used) during a chest decompression.
78 FH Medic User's Guide
Field
Information needed
Performed By
The person who performed the treatment.
Notes
Any additional information related to the treatment.
Prior To Arrival
Indicate whether or not actions were performed on the patient before
you arrived on the scene.
4. Click Submit to save the treatment information you entered.
The Treatments tab reappears.
Provide IV (intravenous) fluids to the patient
1. (If you have not done so already) Do the following.
a. Add a new incident, or open an existing incident, as described in Add or edit an
incident, on page 7.
By default, the Response tab and Incident Information sub-tab are selected.
b. Click the Events tab, and then click the Treatments sub-tab.
The Treatments and Supplies sub-tabs appear. The Treatments sub-tab is selected by default, displaying a list of possible treatments.
2. Click IV.
Fields for gathering information related to the treatment appear on the left side of the interface.
FH Medic User's Guide 79
3. Under IV, enter data as described in Understand the interface and data entry in it, on
page 11.
Field
Information needed
Time
The time the treatment was administered to the patient. By default,
this value is populated with the computer's system time when you
selected this treatment option.
Side
An indication of the side of the body the IV needle was inserted into.
Site
A description of the location where the IV needle was inserted
(hand, forearm, jugular, and so forth).
Successful
An indication of whether or not the insertion of the IV needle was
successful.
Attempts
The number of attempts made in inserting the IV needle.
Size (gauge)
The gauge size of the needle used for the IV treatment.
Type
The type of fluid administered to the patient through the IV.
Rate
The drop rate of the IV, such as TKO (to keep open) or bolus (a
single dose of medication).
Performed By
The person who performed the treatment.
gtts/min
The number of drops per minute of the fluid administered to the
patient.
Total Volume
Infused (ml)
The total volume of fluid absorbed by the patient.
Drip Set
The number of drops per minute that the patient recieves through a
drip set (the hypodermic needle, tubing, air chamber, and other
parts needed to administer IV fluids).
Prior To Arrival
Indicate whether or not actions were performed on the patient
before you arrived on the scene.
4. Click Submit to save the treatment information you entered.
The Treatments tab reappears.
80 FH Medic User's Guide
Administer medication to the patient
1. (If you have not done so already) Do the following.
a. Add a new incident, or open an existing incident, as described in Add or edit an
incident, on page 7.
By default, the Response tab and Incident Information sub-tab are selected.
b. Click the Events tab, and then click the Treatments sub-tab.
The Treatments and Supplies sub-tabs appear. The Treatments sub-tab is selected by default, displaying a list of possible treatments.
2. Click Medication Administration.
Fields for gathering information related to the treatment appear on the interface.
3. Under Medication Administration, enter data as described in Understand the interface and data entry in it, on page 11.
Field
Information needed
Time
The time the medication was administered to the patient. By
default, this value is populated with the computer's system time
when you selected this treatment option.
Drug Name
The name of the medication administered to the patient.
Dose
The size of the dosage administered to the patient.
Units
The units the dose was measured in.
Route
How the medication was administered to the patient.
Performed By
The person who performed the treatment.
Pain Prior to
Treatment
A rating on a scale of 1–10, of the pain the patient experienced
before the medication was administered.
Pain after
A rating on a scale of 1–10, of the pain the patient experienced after
FH Medic User's Guide 81
Field
Information needed
Treatment
the medication was administered.
Prior To Arrival
Indicate whether or not actions were performed on the patient
before you arrived on the scene.
4. Click Submit to save the treatment information you entered.
The Treatments tab reappears.
Perform cardioversion or defibrillation on the patient
Cardioversion is a procedure that can restore a fast or irregular heartbeat to a normal rhythm. Defibrillation is a therapeutic dose of electrical energy to an affected heart with a defibrillator.
1. (If you have not done so already) Do the following.
a. Add a new incident, or open an existing incident, as described in Add or edit an
incident, on page 7.
By default, the Response tab and Incident Information sub-tab are selected.
b. Click the Events tab, and then click the Treatments sub-tab.
The Treatments and Supplies sub-tabs appear. The Treatments sub-tab is selected
by default, displaying a list of possible treatments.
2. Click Cardioversion / Defibrillation.
Fields for gathering information related to the treatment appear on the left side of the interface.
3. Under Cardioversion / Defibrillation, enter data as described in Understand the interface and data entry in it, on page 11.
Field
Information needed
Time
The time the treatment was administered to the patient. By default,
this value is populated with the computer's system time when you
selected this treatment option.
Type
An indication of whether a cardioversion or defibrillation treatment
was performed on the patient.
82 FH Medic User's Guide
Field
Information needed
Energy
The number of Joules delivered by the medical device during the
treatment.
Performed By
The person who performed the treatment.
Prior To Arrival
Indicate whether or not actions were performed on the patient before
you arrived on the scene.
4. Click Submit to save the treatment information you entered.
The Treatments tab reappears.
Perform IO (intraosseous infusion) on the patient
Intraosseous infusion (IO) is the process of injecting directly into the marrow of a bone to provide
a non-collapsible entry point into the systemic venous system. This technique is used to provide
fluids and medication when intravenous (IV) access is not available or not feasible.
1. (If you have not done so already) Do the following.
a. Add a new incident, or open an existing incident, as described in Add or edit an
incident, on page 7.
By default, the Response tab and Incident Information sub-tab are selected.
b. Click the Events tab, and then click the Treatments sub-tab.
The Treatments and Supplies sub-tabs appear. The Treatments sub-tab is selected by default, displaying a list of possible treatments.
2. Click IO.
Fields for gathering information related to the treatment appear on the interface.
3. Under IO, enter data as described in Understand the interface and data entry in it, on
page 11.
Field
Information needed
Time
The time the treatment was administered to the patient. By default,
this value is populated with the computer's system time when you
selected this treatment option.
FH Medic User's Guide 83
Field
Information needed
Needle
The size of the needle used to inject fluid or medication into the
bone marrow during the treatment.
Location
The name of the bone the fluid or medication was injected into.
Side
An indication of the side of the body the bone was in, into which
fluid or medication was injected.
Performed By
The person who performed the treatment.
Notes
Any additional information related to the treatment.
Prior To Arrival
Indicate whether or not actions were performed on the patient
before you arrived on the scene.
4. Click Submit to save the treatment information you entered.
The Treatments tab reappears.
Perform CPR (cardiopulmonary resuscitation) on the patient
Cardiopulmonary resuscitation (CPR) is an emergency procedure attempting to restore spontaneous circulation and breathing by performing chest compressions with or without ventilation, in
an effort to manually preserve intact brain function until further measures can be taken.
1. (If you have not done so already) Do the following.
a. Add a new incident, or open an existing incident, as described in Add or edit an
incident, on page 7.
By default, the Response tab and Incident Information sub-tab are selected.
b. Click the Events tab, and then click the Treatments sub-tab.
The Treatments and Supplies sub-tabs appear. The Treatments sub-tab is selected
by default, displaying a list of possible treatments.
2. Click CPR.
Fields for gathering information related to the treatment appear on the left side of the interface.
84 FH Medic User's Guide
3. Under CPR, enter data as described in Understand the interface and data entry in it,
on page 11.
Field
Information needed
Time
The time the treatment was administered to the patient. By default,
this value is populated with the computer's system time when you
selected this treatment option.
Performed By
The person who performed the treatment (a bystander, family member, medical personnel, and so forth).
Performed By
(Name)
The name of the person who performed the treatment.
Prior To Arrival
Indicate whether or not actions were performed on the patient
before you arrived on the scene.
4. Click Submit to save the treatment information you entered.
The Treatments tab reappears.
Immobilize the patient's spine
1. (If you have not done so already) Do the following.
a. Add a new incident, or open an existing incident, as described in Add or edit an
incident, on page 7.
By default, the Response tab and Incident Information sub-tab are selected.
b. Click the Events tab, and then click the Treatments sub-tab.
The Treatments and Supplies sub-tabs appear. The Treatments sub-tab is selected by default, displaying a list of possible treatments.
2. Click Spinal Immobilization.
Fields for gathering information related to the treatment appear on the left side of the interface.
FH Medic User's Guide 85
3. Under Spinal Immobilization, enter data as described in Understand the interface
and data entry in it, on page 11.
Field
Information needed
Time
The time the treatment was administered to the patient. By default,
this value is populated with the computer's system time when you
selected this treatment option.
Type
The type of device used to immobilize the patient's spine, such as a
cervical collar, a backboard, a CID, and so forth.
Performed By
The person who performed the treatment.
Notes
Any additional information related to the treatment.
Prior To Arrival
Indicate whether or not actions were performed on the patient before
you arrived on the scene.
4. Click Submit to save the treatment information you entered.
The Treatments tab reappears.
Apply a splint to the patient
1. (If you have not done so already) Do the following.
a. Add a new incident, or open an existing incident, as described in Add or edit an
incident, on page 7.
By default, the Response tab and Incident Information sub-tab are selected.
b. Click the Events tab, and then click the Treatments sub-tab.
The Treatments and Supplies sub-tabs appear. The Treatments sub-tab is selected
by default, displaying a list of possible treatments.
2. Click Splint.
Fields for gathering information related to the treatment appear on the left side of the interface.
86 FH Medic User's Guide
3. Under Splint, enter data as described in Understand the interface and data entry in
it, on page 11.
Field
Information needed
Time
The time the treatment was administered to the patient. By default,
this value is populated with the computer's system time when you
selected this treatment option.
Type
The type of device used to immobilize a portion of the patient's anatomy, such as a backboard, a leg board, a CID, and so forth.
Locations
A list of the portions of the patient's anatomy that was immobilized.
Thermal
Treatments
A list of hot, warm, cold, or cool devices used to treat the patient.
Performed By
The person who performed the treatment.
Notes
Any additional information related to the treatment.
Prior To Arrival
Indicate whether or not actions were performed on the patient
before you arrived on the scene.
4. Click Submit to save the treatment information you entered.
The Treatments tab reappears.
Restrain the patient
1. (If you have not done so already) Do the following.
a. Add a new incident, or open an existing incident, as described in Add or edit an
incident, on page 7.
By default, the Response tab and Incident Information sub-tab are selected.
b. Click the Events tab, and then click the Treatments sub-tab.
The Treatments and Supplies sub-tabs appear. The Treatments sub-tab is selected by default, displaying a list of possible treatments.
2. Click Restraint.
Fields for gathering information related to the treatment appear on the left side of the interface.
FH Medic User's Guide 87
3. Under Restraint, enter data as described in Understand the interface and data entry in
it, on page 11.
Field
Information needed
Time
The time the treatment was administered to the patient. By default,
this value is populated with the computer's system time when you
selected this treatment option.
Type
An indication of the type of restraint used on the patient (soft
restraints, plastic straps, handcuffs, and so forth)
Locations
A list of the portions of the patient's anatomy that were restrained.
Applied By
The person who applied the restraints.
Prior To Arrival
Indicate whether or not actions were performed on the patient before
you arrived on the scene.
4. Click Submit to save the treatment information you entered.
The Treatments tab reappears.
Apply bandages to the patient
1. (If you have not done so already) Do the following.
a. Add a new incident, or open an existing incident, as described in Add or edit an
incident, on page 7.
By default, the Response tab and Incident Information sub-tab are selected.
b. Click the Events tab, and then click the Treatments sub-tab.
The Treatments and Supplies sub-tabs appear. The Treatments sub-tab is selected
by default, displaying a list of possible treatments.
2. Click Bandage.
Fields for gathering information related to the treatment appear on the left side of the interface.
88 FH Medic User's Guide
3. Under Bandage, enter data as described in Understand the interface and data entry
in it, on page 11.
Field
Information needed
Time
The time the treatment was administered to the patient. By default,
this value is populated with the computer's system time when you
selected this treatment option.
Types
A list of the types of bandages applied to the patient's injuries.
Location
The location on the patient's anatomy where the bandage was
applied.
Performed By
The person who performed the treatment.
Notes
Any additional information related to the treatment.
Prior To Arrival
Indicate whether or not actions were performed on the patient
before you arrived on the scene.
4. Click Submit to save the treatment information you entered.
The Treatments tab reappears.
Apply a traction splint to the patient
1. (If you have not done so already) Do the following.
a. Add a new incident, or open an existing incident, as described in Add or edit an
incident, on page 7.
By default, the Response tab and Incident Information sub-tab are selected.
b. Click the Events tab, and then click the Treatments sub-tab.
The Treatments and Supplies sub-tabs appear. The Treatments sub-tab is selected by default, displaying a list of possible treatments.
2. Click Traction Splint.
Fields for gathering information related to the treatment appear on the left side of the interface.
FH Medic User's Guide 89
3. Under Traction Splint, enter data as described in Understand the interface and data
entry in it, on page 11.
Field
Information needed
Time
The time the treatment was administered to the patient. By default,
this value is populated with the computer's system time when you
selected this treatment option.
Side
An indication of which side of the body was immobilized in a traction
splint.
Performed By
The person who performed the treatment.
Notes
Any additional information related to the treatment.
Prior To Arrival
Indicate whether or not actions were performed on the patient before
you arrived on the scene.
4. Click Submit to save the treatment information you entered.
The Treatments tab reappears.
Perform an obstetrical delivery for the patient
1. (If you have not done so already) Do the following.
a. Add a new incident, or open an existing incident, as described in Add or edit an
incident, on page 7.
By default, the Response tab and Incident Information sub-tab are selected.
b. Click the Events tab, and then click the Treatments sub-tab.
The Treatments and Supplies sub-tabs appear. The Treatments sub-tab is selected
by default, displaying a list of possible treatments.
2. Click Obstetrical Delivery.
Fields for gathering information related to the treatment appear on the left side of the interface.
90 FH Medic User's Guide
3. Under Obstetrical Delivery, enter data as described in Understand the interface and
data entry in it, on page 11.
Field
Information needed
Time
The time the treatment was administered to the patient. By default,
this value is populated with the computer's system time when you
selected this treatment option.
Delivery
A list of the procedures that occurred during the birth of the infant.
Complications
A list of the delivery complications occurred during the birth.
APGAR
1 Minute
The APGAR rating (Appearance, Pulse, Grimace, Activity, Respiration) of the infant one minute after delivery.
APGAR
5 minutes
The APGAR rating of the infant five minutes after delivery.
Performed By
The person who performed the treatment.
Notes
Any additional information related to the treatment.
Prior To Arrival
Indicate whether or not actions were performed on the patient
before you arrived on the scene.
4. Click Submit to save the treatment information you entered.
The Treatments tab reappears.
FH Medic User's Guide 91
Perform a 12-lead EKG (electrocardiography) on a patient
1. (If you have not done so already) Do the following.
a. Add a new incident, or open an existing incident, as described in Add or edit an
incident, on page 7.
By default, the Response tab and Incident Information sub-tab are selected.
b. Click the Events tab, and then click the Treatments sub-tab.
The Treatments and Supplies sub-tabs appear. The Treatments sub-tab is selected
by default, displaying a list of possible treatments.
2. Click 12 Lead EKG.
Fields for gathering information related to the treatment appear on the left side of the interface.
3. Under 12 Lead EKG, enter data as described in Understand the interface and data
entry in it, on page 11.
Field
Information needed
Time
The time the treatment was administered to the patient. By default,
this value is populated with the computer's system time when you
selected this treatment option.
Interpretation
A list of the interpreted results of the electrocardiography.
Performed By
The person who performed the treatment.
Notes
Any additional information related to the treatment.
Prior To Arrival
Indicate whether or not actions were performed on the patient
before you arrived on the scene.
4. Click Submit to save the treatment information you entered.
The Treatments tab reappears.
92 FH Medic User's Guide
Employ a CPAP (continuous positive airway pressure) treatment
1. (If you have not done so already) Do the following.
a. Add a new incident, or open an existing incident, as described in Add or edit an
incident, on page 7.
By default, the Response tab and Incident Information sub-tab are selected.
b. Click the Events tab, and then click the Treatments sub-tab.
The Treatments and Supplies sub-tabs appear. The Treatments sub-tab is selected by default, displaying a list of possible treatments.
2. Click CPAP.
Fields for gathering information related to the treatment appear on the left side of the interface.
3. Under CPAP, enter data as described in Understand the interface and data entry in
it, on page 11.
Field
Information needed
Time
The time the treatment was administered to the patient. By default,
this value is populated with the computer's system time when you
selected this treatment option.
O2 Flow Rate
The rate of oxygen being used to create the mild positive air pressure needed to keep airways open in the patient.
Performed By
The person who performed the treatment.
Notes
Any additional information related to the treatment.
Prior To Arrival
Indicate whether or not actions were performed on the patient
before you arrived on the scene.
4. Click Submit to save the treatment information you entered.
The Treatments tab reappears.
FH Medic User's Guide 93
Document alleged or suspected abuse or neglect
1. (If you have not done so already) Do the following.
a. Add a new incident, or open an existing incident, as described in Add or edit an
incident, on page 7.
By default, the Response tab and Incident Information sub-tab are selected.
b. Click the Events tab, and then click the Treatments sub-tab.
The Treatments and Supplies sub-tabs appear. The Treatments sub-tab is selected
by default, displaying a list of possible treatments.
2. Click Alleged or Suspected Abuse or.
Fields for gathering information related to the treatment appear on the left side of the interface.
3. Under Alleged or Suspected Abuse or Neglect, enter data as described in Understand the interface and data entry in it, on page 11.
Field
Information needed
Time
The time the alleged or suspected abuse or neglect was noted. By
default, this value is populated with the computer's system time
when you selected this treatment option.
Prior To Arrival
Indicate whether or not actions were performed on the patient before
you arrived on the scene.
4. Click Submit to save the treatment information you entered.
The Treatments tab reappears.
94 FH Medic User's Guide
Apply thermal treatments to the patient
1. (If you have not done so already) Do the following.
a. Add a new incident, or open an existing incident, as described in Add or edit an
incident, on page 7.
By default, the Response tab and Incident Information sub-tab are selected.
b. Click the Events tab, and then click the Treatments sub-tab.
The Treatments and Supplies sub-tabs appear. The Treatments sub-tab is selected by default, displaying a list of possible treatments.
2. Click Thermal Treatments.
Fields for gathering information related to the treatment appear on the left side of the interface.
3. Under Thermal Treatments, enter data as described in Understand the interface and
data entry in it, on page 11.
Field
Information needed
Time
The time the treatment was administered to the patient. By default,
this value is populated with the computer's system time when you
selected this treatment option.
Type
A list of the hot, warming, cold, or cooling devices used on the
patient.
Location
A description of where on the patient's anatomy the thermal treatments were applied.
Performed By
The person who performed the treatment.
Notes
Any additional information related to the treatment.
Prior To Arrival
Indicate whether or not actions were performed on the patient
before you arrived on the scene.
4. Click Submit to save the treatment information you entered.
The Treatments tab reappears.
FH Medic User's Guide 95
Use an air adjunct device on a patient
Once an open airway has been established, an oropharyngeal or nasopharyngeal airway device
may be used to facilitate an open airway. Both of these devices prevent the tongue from occluding
the airway, providing an open conduit for air to pass.
1. (If you have not done so already) Do the following.
a. Add a new incident, or open an existing incident, as described in Add or edit an
incident, on page 7.
By default, the Response tab and Incident Information sub-tab are selected.
b. Click the Events tab, and then click the Treatments sub-tab.
The Treatments and Supplies sub-tabs appear. The Treatments sub-tab is selected
by default, displaying a list of possible treatments.
2. Click Air Adjunct.
Fields for gathering information related to the treatment appear on interface.
3. Under Air Adjunct, enter data as described in Understand the interface and data entry
in it, on page 11.
Field
Information needed
Time
The time the treatment was administered to the patient. By default,
this value is populated with the computer's system time when you
selected this treatment option.
Type
An indication of whether an oropharyngeal or nasopharyngeal airway device was used.
Successful
An indication of whether the device was successfully applied to the
patient.
Size
The size of the airway device.
Performed By
The person who performed the treatment.
Notes
Any additional information related to the treatment.
Prior To Arrival
Indicate whether or not actions were performed on the patient before
96 FH Medic User's Guide
Field
Information needed
you arrived on the scene.
4. Click Submit to save the treatment information you entered.
The Treatments tab reappears.
Apply an AED (automated external defibrillator) to a patient
1. (If you have not done so already) Do the following.
a. Add a new incident, or open an existing incident, as described in Add or edit an
incident, on page 7.
By default, the Response tab and Incident Information sub-tab are selected.
b. Click the Events tab, and then click the Treatments sub-tab.
The Treatments and Supplies sub-tabs appear. The Treatments sub-tab is selected by default, displaying a list of possible treatments.
2. Click AED.
Fields for gathering information related to the treatment appear on the left side of the interface.
3. Under AED, enter data as described in Understand the interface and data entry in it,
on page 11.
Field
Information needed
Time
The time the treatment was administered to the patient. By default,
this value is populated with the computer's system time when you
selected this treatment option.
Performed By
The person who performed the treatment (bystander, family member, medical personnel, and so forth).
Performed By
(Name)
The name of the person who performed the person.
Number of
Shocks
The number of times the AED was used to shock the patient.
FH Medic User's Guide 97
Field
Information needed
Notes
Any additional information related to the treatment.
Prior To Arrival
Indicate whether or not actions were performed on the patient
before you arrived on the scene.
4. Click Submit to save the treatment information you entered.
The Treatments tab reappears.
Document field termination for a patient
Field termination is the cessation of treatments to the patient, when such as signs of obvious
death, obvious mortal wounds and vital organ destruction, and resuscitation efforts would
endanger responders are apparent.
1. (If you have not done so already) Do the following.
a. Add a new incident, or open an existing incident, as described in Add or edit an
incident, on page 7.
By default, the Response tab and Incident Information sub-tab are selected.
b. Click the Events tab, and then click the Treatments sub-tab.
The Treatments and Supplies sub-tabs appear. The Treatments sub-tab is selected
by default, displaying a list of possible treatments.
2. Click Field Termination.
Fields for gathering information related to the treatment appear on the left side of the interface.
3. Under Field Termination, enter data as described in Understand the interface and
data entry in it, on page 11.
Field
Information needed
Time
The time the treatment was administered to the patient. By default,
this value is populated with the computer's system time when you
selected this treatment option.
Reason for Ter-
A list of the reasons the treatments in the field were ended, such as
98 FH Medic User's Guide
Field
Information needed
mination
signs of obvious death, obvious mortal wounds and vital organ
destruction, and resuscitation efforts would endanger responders.
Performed By
The name of the person who determined that treatments in the field
should end.
Notes
Any additional information related to the treatment.
Prior To Arrival
Indicate whether or not actions were performed on the patient
before you arrived on the scene.
4. Click Submit to save the treatment information you entered.
The Treatments tab reappears.
Contact medical control for a patient
1. (If you have not done so already) Do the following.
a. Add a new incident, or open an existing incident, as described in Add or edit an
incident, on page 7.
By default, the Response tab and Incident Information sub-tab are selected.
b. Click the Events tab, and then click the Treatments sub-tab.
The Treatments and Supplies sub-tabs appear. The Treatments sub-tab is selected by default, displaying a list of possible treatments.
2. Click Contacted Medical Control.
Fields for gathering information related to the treatment appear on the left side of the interface.
3. Under Contacted Medical Control, enter data as described in Understand the interface and data entry in it, on page 11.
Field
Information needed
Time
The time the treatment was administered to the patient. By default,
this value is populated with the computer's system time when you
selected this treatment option.
FH Medic User's Guide 99
Field
Information needed
Performed By
The name of the person who obtained medical control (also known
as medical direction) to gain approval for certain treatments or guidance in performing a treatment.
Physician Name The name of the physician who granted approval or provided guidance to the medic in the field.
Notes
Any additional information related to the treatment.
Prior To Arrival
Indicate whether or not actions were performed on the patient
before you arrived on the scene.
4. Click Submit to save the treatment information you entered.
The Treatments tab reappears.
Perform a 4-lead ECG (electrocardiography) on a patient
1. (If you have not done so already) Do the following.
a. Add a new incident, or open an existing incident, as described in Add or edit an
incident, on page 7.
By default, the Response tab and Incident Information sub-tab are selected.
b. Click the Events tab, and then click the Treatments sub-tab.
The Treatments and Supplies sub-tabs appear. The Treatments sub-tab is selected
by default, displaying a list of possible treatments.
2. Click ECG (4 Lead).
Fields for gathering information related to the treatment appear on the left side of the interface.
3. Under ECG (4 Lead), enter data as described in Understand the interface and data
entry in it, on page 11.
Field
Information needed
Time
The time the treatment was administered to the patient. By default,
this value is populated with the computer's system time when you
100 FH Medic User's Guide
Field
Information needed
selected this treatment option.
Performed By
The name of the person who obtained medical control (also known
as medical direction) to gain approval for certain treatments or guidance in performing a treatment.
Prior To Arrival
Indicate whether or not actions were performed on the patient before
you arrived on the scene.
4. Click Submit to save the treatment information you entered.
The Treatments tab reappears.
Use a medical alert for a patient
1. (If you have not done so already) Do the following.
a. Add a new incident, or open an existing incident, as described in Add or edit an
incident, on page 7.
By default, the Response tab and Incident Information sub-tab are selected.
b. Click the Events tab, and then click the Treatments sub-tab.
The Treatments and Supplies sub-tabs appear. The Treatments sub-tab is selected by default, displaying a list of possible treatments.
2. Click Alerts.
Fields for gathering information related to the treatment appear on the left side of the interface.
3. Under ECG (4 Lead), enter data as described in Understand the interface and data
entry in it, on page 11.
Field
Information needed
Time
The time the treatment was administered to the patient. By default,
this value is populated with the computer's system time when you
selected this treatment option.
Type
The type of alert that was activated to obtain medical assistance.
FH Medic User's Guide 101
Field
Information needed
Performed By
The name of the person who activated the alert.
Prior To Arrival
Indicate whether or not actions were performed on the patient
before you arrived on the scene.
4. Click Submit to save the treatment information you entered.
The Treatments tab reappears.
102 FH Medic User's Guide
Record vitals data
Note: If vitals data was recorded on an EKG device, you can import the data into FH Medic
instead of entering the data manually. Information on importing the data is available in Import
vitals data from an EKG device, on page 106.
1. (If you have not done so already) Add a new incident, or open an existing incident, as
described in Add or edit an incident, on page 7.
By default, the Response tab and Incident Information sub-tab are selected.
2. Click the Events tab, and then click the Vitals sub-tab.
Fields for gathering information related to the treatment appear on the left side of the interface, and a summary of the vitals information you enter appears at the bottom of the interface. Because you may assess the patient's vitals multiple times during treatment, you
can record the vitals data for each of these assessments.
Note: The first time you access this screen, a new, blank vitals entry is automatically
added to the vitals summary listing.
3. (If this is not the first time you accessed the Vitals tab) At the bottom of the interface,
click New.
A new listing for the vitals information you will record appears at the bottom of the interface, and a blank set of fields appear on the left side of the interface.
FH Medic User's Guide 103
4. Under Vitals, enter data as described in Understand the interface and data entry in it,
on page 11.
Note: (Optional) You can also add detailed information to specific patient vitals information. In the right pane, if a numerical key pad appears, the Details button appears in the
upper right corner of the keypad.
a. Click Details.
The Details dialog box appears.
b. Select the detail button for the information you want to add, and then click
Continue.
Field
Information needed
Time Taken
The time the treatment was administered to the patient. By default,
this value is populated with the computer's system time when you
selected this treatment option.
BP Sys
The patient's systolic blood pressure (BP).
BP Dia
The patient's diastolic blood pressure.
HR (BPM)
The patient's heart rate (HR), in beats per minute (BPM).
RR (BPM)
The patient's respiratory rate (RR), in breaths per minute (BPM).
SP02 %
The patient's blood oxygen saturation (SPO2).
ETCO2
The patient's end-tidalcarbon dioxide (EtCO2) the level in the
patients
104 FH Medic User's Guide
Field
Information needed
CBG mg/dl
The patient's capillary blood glucose (CBG) level.
Temperature
The patient's body temperature.
Position
The patient's position, such as standing, sitting, supine, in a
Fowler's position, and forth.
EKG
An indication of cardiac performance from an EKG (electrocardiography) device.
Performed By
The person who performed the treatment.
Pain Scale
The patient's description of how much pain they were experiencing,
on a scale of 0 to 10.
SPCO
The patient's carboxyhemoglobin (SpCO) levels.
SPMET
The patient's methemoglobin (SpMet) levels.
Prior To Arrival
Indicate whether or not actions were performed on the patient
before you arrived on the scene.
5. Under Revised Trauma Score, or RTS, enter the numerical score (from 0–12) calculated from the Glasgow coma scale, systolic blood pressure, and respiratory rate.
Note: When you fill in the necessary fields under Vitals and Glascow Coma Score,
FH Medic calculates the RTS for you.
6. Under Glascow Coma Score, enter data as described in Understand the interface
and data entry in it, on page 11.
Field
Information needed
Motor Response A numerical rating of the patient's ability to obey commands and
responses to pain.
Verbal
Response
A numerical rating of the patient's ability to comprehend and
respond to questions clearly and coherently.
Eye Response
A numerical rating of the patient's ability to open their eyes spontaneously, in response to speech, or in response to pain.
FH Medic User's Guide 105
Import vitals data from an EKG device
If vitals data was recorded on an EKG device, and if you connect the EKG device to the mobile
computer running FH Medic, you can import the data into FH Medic.
1. (If you have not done so already) Add a new incident, or open an existing incident, as
described in Add or edit an incident, on page 7.
By default, the Response tab and Incident Information sub-tab are selected.
2. Click the Events tab, and then click the Vitals sub-tab.
Fields for gathering information related to the treatment appear on the left side of the interface, and a summary of the vitals information you enter appears at the bottom of the interface. Because you may assess the patient's vitals multiple times during treatment, you
can record the vitals data for each of these assessments.
Note: The first time you access this screen, a new, blank vitals entry is automatically
added to the vitals summary listing.
3. At the bottom of the interface, click Import Vitals EKG.
106 FH Medic User's Guide
The Choose Patient Record dialog box appears, listing imported EKG and vitals files.
4. Under Choose Patient Record, select the name of the patient you want to import, and
then click Import Record.
The vitals information imports as patient data, and all other records for the patient import
as attachments to the patient's care record.
5. Click Close.
FH Medic User's Guide 107
Describe the outcome of the incident
At the end of the incident, you can record information about the patient as they exit the scene,
where they were sent, and any resulting alerts that EMS personnel need to deal with.
Record patient disposition information
1. (If you have not done so already) Add a new incident, or open an existing incident, as
described in Add or edit an incident, on page 7.
By default, the Response tab and Incident Information sub-tab are selected.
2. Click the Summary tab, and then click the Disposition sub-tab.
Fields for gathering information related to the patient as they leave the scene of the incident appear.
3. Under Details, enter data as described in Understand the interface and data entry in
it, on page 11.
Field
Information needed
Outcome
How the incident ended, with respect to the the patient (the patient
was transported, transferred, refused treatment, and so forth).
Destination
The medical facility the patient was transported to.
Location Choice The influencing factor in choosing the medical facility the patient
was transported to (the patient, the patient's family, EMS protocol,
proximity, and so forth).
108 FH Medic User's Guide
Field
Information needed
Priority to
Destination
An indication of how important it is to transport the patient to the destination medical facility.
Code to
Destination
An indication of whether lights and/or sirens were used when transporting the patient. A code of 380 Initial Lights and Sirens/Dwngrd
indicates that no lights or sirens were used. A code of 2 indicates
that lights, but no sirens were used, and a code of 3 indicates that
both lights and sirens were used.
4. Under Patient Information, enter data as described in Understand the interface and
data entry in it, on page 11.
Field
Information needed
Personal Items
List any personal items (cell phone, cash, ring, backpack, and so
forth) that belonged to the patient, and that have been collected during the incident by EMS personnel.
Items Given To
The individual the patient's personal items have been given to for
safe keeping.
Escorted By
The individual who escorted the patient from the incident scene.
Condition on
Arrival
The condition of the patient when they arrived at a medical facility.
5. Under Diverted, enter data as described in Understand the interface and data entry in
it, on page 11.
Field
Information needed
Fac Diverted From
The medical facility the patient was originally en route to for additional care.
Fac Divert Time
The time the patient was diverted from the original destination
medical facility.
Reason Diverted
The reason the patient was diverted from the original destination
medical facility.
6. Under Air EMS, enter data as described in Understand the interface and data entry in
it, on page 11.
Field
Information needed
Air EMS Contacted The time the air emergency service (EMS) was contacted.
Air EMS Arrival
The time the air EMS transport arrived on the scene.
Air EMS Depart
The time the air EMS transport left the scene.
Air EMS Company
The name of the air EMS company used.
7. Under Alerts, in EMS Exposure, select all infectious diseases that EMS personnel may
have been exposed to during the incident.
FH Medic User's Guide 109
Acquire and delete signatures
Depending on the outcome you select for a patient, the label on any button representing a required
signature is red, to indicate that the signature is required.
1. (If you have not done so already) Add a new incident, or open an existing incident, as
described in Add or edit an incident, on page 7.
By default, the Response tab and Incident Information sub-tab are selected.
2. Click the Summary tab, and then click the Signatures sub-tab.
Buttons for different types of signatures that you may need appear, and the labels on buttons representing required signatures are red.
3. For each of the signatures that you need to acquire, do the following.
a. Click the signature type button you need.
A dialog box containing fields needed for the signature appears. This dialog box
always contains Cancel, Clear Signature, Save Signature, Type Name, and
Please Sign Here. Additional fields and read-only information may also appear,
depending on the type of signature you clicked.
Example: If you click Parent / Guardian, the Parent / Guardian Signature
appears, containing the additional legal information and the Relationship to Patient
field. If you click Patient, the Patient Signature dialog box appears, containing additional legal information. If you click Primary Medic, the Primary Medic Signature
dialog box appears, containing the additional Crew Names button.
110 FH Medic User's Guide
b. In Type Name, enter the name of the person who will signed the signature form.
Tip: If a different person than the one whose name is specified signs the form, click
Clear to the right of the Type Name field, and then enter the correct name.
c. In Please Sign Here, use your finger, a stylus, or a mouse to "write" your signature
in the box.
Tip: If the person signing the form is dissatisfied with the appearance of their signature, at the top of the dialog box, click Clear Signature, and then ask them to sign
the form again.
d. (If additional fields appear in the dialog box) Do the following.
Signature type
Parent / Guardian Signature
Additional fields
i. Read the legal information provided.
Tip: To more easily read the legal information, to the right of
the text, click Expand. The View Text dialog box appears,
and displays the text in a larger font, on a white background.
ii. Click the field for Relationship to Patient.
The Relationship to Patient dialog box appears.
iii. Click the button corresponding to the signer's relationship
to the patient, or in the blank field, type a relationship.
iv. Click Continue.
Patient
Note: If the patient is unable or unwilling to provide the necessary signature, see Provide a signature for a patient, on
page 114 instead.
l
Read the legal information provided.
Tip: To more easily read the legal information, to the right of
the text, click Expand. The View Text dialog box appears,
and displays the text in a larger font, on a white background.
Primary Medic
i. (If the name supplied in Type Name is not the name of the
primary medic at the incident) Click Crew Names.
A list of the crew members responding to the incident
appears.
FH Medic User's Guide 111
Signature type
Additional fields
ii. Click the name of the crew member who will sign as the
primary medic.
Person/Entity
Receiving
Patient,
i. Click the Signature Type field.
The Person/Entity dialog box appears.
Other
ii. Do one of the following.
l
l
Click the Doctor, Nurse, Coroner, PD Department,
or Other buttons to quickly select the title of the person
or organization (such as the police department) that
received the patient.
Click the blank field to the left of Clear, and use the
keyboard that appears to type the title of the person or
organization that received the patient.
The blank field to the left of Clear updates to reflect your
selections.
iii. (Optional) Click Clear to remove the selection displayed in
the field to the left of Clear.
iv. In the upper right corner of the dialog box, click Continue.
The Person/Entity dialog box closes, and the signature
type you specified appears under Signature Type in the
Person/Entity Receiving Patient Signature dialog box.
v. (Optional) In the Person/Entity Receiving Patient Signature dialog box, click Clear to remove the selection displayed under Signature Type.
Patient Refused
Transport,
l
Patient Refused
Treatment,
Parent/ Guardian Refusal for
Minor
e. Click Save Signature.
112 FH Medic User's Guide
Read the legal information provided.
Tip: To more easily read the legal information, to the right of
the text, click Expand. The View Text dialog box appears,
and displays the text in a larger font, on a white background.
The dialog box closes, and a small image of the signature appears in the list at the
bottom of the interface.
4. (Optional) Delete one of the signatures.
a. (If you have not done so already) Add a new incident, or open an existing incident, as
described in Add or edit an incident, on page 7.
By default, the Response tab and Incident Information sub-tab is selected.
b. Click the Summary tab, and then click the Signatures tab.
A list of the signatures you have acquired already appears at the bottom of the interface.
c. Select the signature in the list that you want to delete, and then click Delete Selected.
The signature disappears from the list.
FH Medic User's Guide 113
Provide a signature for a patient
If a patient is unable or unwilling to sign forms, a medic from the incident needs to sign the Patient
Unable / Unwilling to Sign Reason form.
1. (If you have not done so already) Add a new incident, or open an existing incident, as
described in Add or edit an incident, on page 7.
By default, the Response tab and Incident Information sub-tab are selected.
2. Click the Summary tab, and then click the Signatures sub-tab.
Buttons for different types of signatures that you may need appear.
3. On the right side of the interface, click Patient Unable or Unwilling to Sign.
The Patient Unable / Unwilling to Sign Reason dialog box appears.
4. Click Choose Reason.
114 FH Medic User's Guide
The Select Reason dialog box appears.
5. Click one of the reason buttons to indicate why the patient cannot or will not sign the normal form.
6. In Medic Signature, use your finger, a stylus, or a mouse to "write" your signature in the
box.
Tip: If the person signing the form is dissatisfied with the appearance of their signature,
at the top of the dialog box, click Clear Signature, and then ask them to sign the form
again.
7. Click Save Signature.
The dialog box closes, and a small image of the signature appears in the list at the bottom
of the interface.
FH Medic User's Guide 115
Provide a medic's narrative for the incident
An automatic narrative is generated by the software, based on the information you entered in the
other tabs in FH Medic. However, this automatic narrative may not capture critical information
observed at the scene or through interacting with the patient, and should be supplemented with
medic's narrative when necessary.
Tip: You can copy the automatic narrative to the medic's narrative, and then add to it and edit it as
needed for a more detailed medic's narrative. Information on the automatic narrative is available in
View the automatic narrative for the incident, on page 118.
1. (If you have not done so already) Add a new incident, or open an existing incident, as
described in Add or edit an incident, on page 7.
By default, the Response tab and Incident Information sub-tab are selected.
2. Click the Summary tab, and then click the Narrative sub-tab.
The Medic Narrative and Auto Narrative sub-tabs appear, and the Medic Narrative tab
is selected by default.
3. On the Medic Narrative tab, click in the large text area, or click Keyboard at the bottom
of the tab.
A keyboard appears over the screen.
Tip: If you copied the automatic narrative to the medic narrative, you can edit the text in
the medic narrative as needed.
4. Use the keyboard to type a narrative describing the incident, and then click Submit.
5. In the lower right corner of the tab, click Check Spelling.
116 FH Medic User's Guide
If spelling errors are found in your text, the Check Spelling dialog box appears.
6. (If the Check Spelling dialog box appears) Use the dialog box to correct any spelling
errors in your text.
7. (Optional) Add hand-written notes or sketches to the incident narrative.
a. In the lower left corner of the tab, click Scratch Pad.
A blank drawing dialog box appears.
b. Using your finger, stylus, or a mouse pointer, draw or write in the scratch pad window.
A black, two-pixel line follows your movements.
Tip: If you are unsatisfied with your results, click Clear to remove all lines from the
scratch pad window.
c. Click Close.
The notes or drawings on the scratch pad remain available until the incident is
closed, and you can add to them as needed by repeating steps a–c.
FH Medic User's Guide 117
View the automatic narrative for the incident
An automatic narrative is generated by the software, based on the information you entered in the
other tabs in FH Medic.
Caution: The automatic narrative may not capture critical information observed at the scene or
through interacting with the patient, and should be supplemented with medic's narrative when
necessary. Information on adding a medic's narrative is available in Provide a medic's narrative for the incident, on page 116.
1. (If you have not done so already) Add a new incident, or open an existing incident, as
described in Add or edit an incident, on page 7.
By default, the Response tab and Incident Information sub-tab are selected.
2. Click the Summary tab, and then click the Narrative sub-tab.
The Medic Narrative and Auto Narrative sub-tabs appear, and the Medic Narrative
sub-tab is selected by default.
3. Click the Auto Narrative sub-tab.
The tab displays the automatically generated narrative.
4. (Optional) To copy the automatically generated narrative to the Medic Narrative tab, at
the bottom of the screen, click Copy to Narrative.
The text on the Auto Narrative tab is instantly copied to the Medic Narrative sub-tab.
You can then edit and add to the information on the Medic Narrative sub-tab as needed to
fill out information about the patient.
118 FH Medic User's Guide
Add CPR (cardiopulmonary resuscitation) information
Cardiopulmonary resuscitation (CPR) is an emergency procedure attempting to restore spontaneous circulation and breathing by performing chest compressions, with or without ventilation,
in an effort to manually preserve intact brain function until further measures can be taken.
1. (If you have not done so already) Add a new incident, or open an existing incident, as
described in Add or edit an incident, on page 7.
By default, the Response tab and Incident Information sub-tab are selected.
2. Click the Summary tab, and then click the CPR sub-tab.
The CPR page appears.
3. Under CPR, enter data as described in Understand the interface and data entry in it,
on page 11.
Field
Information needed
Cardiac Arrest
An indication of whether or not cardiac arrest occurred, and if one
did occur, whether or not it was before EMS personnel arrived.
Cardiac arrest, also known as cardiopulmonary arrest or circulatory arrest, is the cessation of normal circulation of the blood
due to failure of the heart to contract effectively. A cardiac arrest
is different from (but may be caused by) a heart attack, where
blood flow to the muscle of the heart is impaired.
Cardiac Arrest
Etiology
The apparent cause or origin of the cardiac arrest, such as an
unexpected arrest, trauma, drowning electrocution, and so forth.
Resuscitation
Attempted
The types of resuscitation attempted on the victim, such as ventilation, chest compressions, defibrillation, and so forth. A resuscitation attempt the act of attempting to maintain or restore life by
establishing or maintaining airway (or both), breathing, and circulation.
FH Medic User's Guide 119
Field
Information needed
Arrest Witnessed An indication of whether or not the arrest was seen or heard by
another person, and by whom.
First Monitored
Rhythm
The first type of cardiac rhythm present when a monitor or defibrillator is attached to a patient after a cardiac arrest.
Spontaneous Cir- An indication of whether or not the patient began breathing (more
culation
than an occasional gasp), coughing, or movement. and if spontaneous circulation did occur, whether or not it was before medical personnel arrived.
Neurological Out- A simple validated neurological score such as the Cerebral Percome
formance Category (CPC) should be recorded, if available.
Time of Arrest
An indication of how long it has been since the arrest happened to
the time EMS personnel arrived.
Time of Resuscitation Discontinued
The date and time the person performing CPR stopped resuscitation.
Reason CPR Dis- An indication of why the person performing CPR stopped.
continue
Cardiac Rhythm
120 FH Medic User's Guide
An indication of what kind of rhythm the patient's heart had after
CPR had stopped.
Validate data
At any point in time with your data entry, you can validate your data to see if there are any incomplete or invalid entries that need to be addressed.
1. In the upper right corner of the interface, click Validate.
The Incident Validation screen appears, listing any items that are incomplete, or which
have invalid data entered.
2. In the list, click an item you want to complete or correct.
The tab containing the incomplete or invalid information appears.
3. Complete or correct the incomplete or invalid entry.
4. Repeat steps 1–3 until a message that all the required fields are satisfied appears.
FH Medic User's Guide 121
5. Depending on what you want to do, do one of the following.
To do this
Do this
Enter more data
for the incident
Close the report
l
Click Continue Documentation.
The normal interface for entering data into fields reappears.
l
Click Complete Report.
On the Incidents screen, which lists all of the incidents and
their current status, the status changes to Complete in the incident list, and the report is ready for review by administration on
the FH Medic Cloud. The report can no longer be edited in
FH Medic once it is marked as complete.
Complete an incident
When you have successfully validated your data, you can choose to complete the incident. Information on validating your data is available in Validate data, on page 121.
1. In the upper right corner of the interface, click Validate.
If all your data is valid, a message that all the required fields are satisfied appears.
2. Click Complete Report.
On the Incidents screen, which lists all of the incidents and their current status, the
status changes to Complete in the incident list, and the report is ready for review by administration on the FH Medic Cloud. The report can no longer be edited in FH Medic once it is
marked as complete.
122 FH Medic User's Guide
Review and respond to QA/QI notes
Quality assurance (QA) measures compliance against certain necessary standards. Quality
improvement (QI) is a continuous improvement process. QA is required and normally focuses on
individuals, while QI is a proactive approach to improve processes and systems. Standards and
measures developed for quality assurance, can inform the quality improvement process.
When you complete an incident in FH Medic, it is reviewed by administrators on the FH Medic
Cloud. Sometimes questions may arise concerning the incident, and administrators can respond
with questions and review notes, which can be reviewed in FH Medic. You can also respond to
those questions and notes, and view a history of the notes.
1. Choose FH → Incident → Review Notes.
The Review Notes page appears, displaying any messages from the QA/QI reviewer on
the FH Medic administration site.
2. Click an incident that has a status of Review.
The Review Notes page appears, displaying any messages from the QA/QI reviewer on
the FH Medic administration site.
FH Medic User's Guide 123
3. Read the notes about the changes that are needed.
4. (Optional) Under Respond to Admin, respond to the person who sent the message.
a. From Send To, select the person you want to send a reply to.
b. In Message, type a message, and then click Send.
A confirmation dialog box appears.
c. Click OK.
5. In the upper right corner of the interface, click Close.
124 FH Medic User's Guide
Amend a patient care report (PCR)
If you complete an incident, and if it is returned from the FH Medic administrators with a status of
Review, you can amend the patient care report (PCR). FH Medic does not change the original
PCR, but lists the changes at the bottom of the PCR, under the Amendments heading.
1. (If you are not already on the Incidents screen) Choose FH → Incidents.
The Incidents screen appears, listing all the available incidents.
2. Click an incident that has a status of Review.
The Review Notes page appears, displaying any messages from the QA/QI reviewer on
the FH Medic administration site.
3. Read the notes about the changes that are needed.
4. (Optional) Under Respond to Admin, respond to the person who sent the message.
a. From Send To, select the person you want to send a reply to.
b. In Message, type a message, and then click Send.
A confirmation dialog box appears.
c. Click OK.
5. In the upper right corner of the interface, click Close.
6. Make the changes requested in FH Medic.
7. Depending on where you are in the FH Medic interface, do one of the following.
FH Medic User's Guide 125
If you are
here
At Incidents
screen
On any data
entry tab
At any screen
except the
Incidents
screen
Do this
l
At the bottom of the interface, click View PCR.
l
In the upper right corner of the interface, click View PCR.
a. Choose FH → Incident → Forms.
The Forms screen appears.
b. Under Forms for this Incident, click PCR.
c. In the lower right corner of the interface, click View Selected.
The Patient Care Report screen appears.
126 FH Medic User's Guide
8. Scroll to the bottom of the screen and locate the Amendments section of the PCR.
The changes you made to the incident appear in the Amendments section.
FH Medic User's Guide 127
Add, view, fax, and print forms
At any point in time with your data entry, you can validate your data to see if there are any incomplete or invalid entries that need to be addressed.
Add forms to the incident
1. Choose FH → Incident → Forms.
The Forms screen appears.
2. Under Available Forms, select the form you want to edit.
In the lower right corner of the interface, the View Selected button grays out, and the Edit
Selected button is renamed Add Form.
3. Click Add Form.
The dialog box related to the form you selected appears.
Example: If you added the Controlled Substance, the Controlled Substance Usage
/ Waste Form dialog box appears.
4. Fill out the form with data as needed for the incident.
5. Click Submit.
The form disappears under Available Forms and appears under Forms for this
Incident.
128 FH Medic User's Guide
View the patient summary
1. (If you have not done so already) Add a new incident, or open an existing incident, as
described in Add or edit an incident, on page 7.
By default, the Response tab and Incident Information sub-tab are selected.
2. In the upper right corner of the interface, click PT Summary.
The PCR Summary screen appears, and provides an informal synopsis of all the
response times, assessment information, treatments, and so forth, for the patient.
FH Medic User's Guide 129
3. (Optional) Do any of the following.
To do this
Do this
Filter the information displayed
1. Above the summary list, depending on the summary information you want to view, click one of the following buttons.
l
Show Only Call Times
l
Show Only Vitals
l
Show Only Assessments
l
Show Only Treatments / Protocols
Edit a data item in a. In the list of summary items, select the item you want to edit.
the summary
b. In the lower right corner of the interface, click Edit.
The tab or sub-tab containing the field for the data item appears.
c. Change the value in the field as needed.
Delete a data
item
a. In the list of summary items, select the item you want to delete.
b. In the lower right corner of the interface, click Delete.
The data item disappears from the patient summary, and the values are cleared in the tab or sub-tab corresponding to the
deleted item.
4. In the upper left corner of the interface, click Go Back to return to working in FH Medic.
130 FH Medic User's Guide
View, fax, or print the patient care report (PCR)
1. Depending on where you are in the FH Medic interface, do one of the following.
If you are
here
At Incidents
screen
On any data
entry tab
At any screen
except the
Incidents
screen
Do this
l
At the bottom of the interface, click View PCR.
l
In the upper right corner of the interface, click View PCR.
a. Choose FH → Incident → Forms.
The Forms screen appears.
b. Under Forms for this Incident, click PCR.
c. In the lower right corner of the interface, click View Selected.
The Patient Care Report screen appears.
FH Medic User's Guide 131
2. (Optional) Do any of the following.
To do this
Do this
Fax the PCR
to a person or
facility
a. In the center of the top of the interface, click Fax.
The No Destination Specified - enter fax number dialog box
appears.
b. Click Choose Other Location.
The Select Location dialog box appears. If any fax numbers are
already defined in FH Medic, a list of them appears in the dialog
box.
c. (If the fax number you need is listed) Click the pre-defined
fax number.
d. (If the fax number you need is not listed) In the blank field, type the
number of the fax machine to send the PCR to.
e. Click Send Fax.
A confirmation message dialog box appears.
132 FH Medic User's Guide
To do this
Do this
f. Click OK.
Print the PCR
a. In the upper right corner of the interface, click Print.
A standard Print dialog box appears.
b. Make selections in the dialog box as normal, and then click Print.
The PCR, and any supplemental forms you filled in, are sent to the printer or fax machine
for transmission.
3. In the upper left corner of the interface, click Go Back to return to working in FH Medic.
FH Medic User's Guide 133
View, fax, or print supplemental forms
1. Depending on where you are in the FH Medic interface, do one of the following.
If you are
here
At Incidents
screen
Do this
a. At the bottom of the interface, click View PCR.
The Patient Care Report screen appears.
b. In the upper left corner of the interface, click View Supplemental.
At any screen
except the
Incidents
screen
a. Choose FH → Incident → Forms.
The Forms screen appears.
b. Under Forms for this Incident, click Supplemental.
c. In the lower right corner of the interface, click View Selected.
134 FH Medic User's Guide
Any supplemental information you added to patient care report, such as injury markers on
a human body diagram, vehicle crash data, automatic narrative, and so forth, appears.
2. (Optional) Do any of the following.
To do this
Do this
Fax the supplemental
forms to a person or facility
a. In the center of the top of the interface, click Fax.
The No Destination Specified - enter fax number dialog box
appears.
b. Click Choose Other Location.
The Select Location dialog box appears. If any fax numbers are
already defined in FH Medic, a list of them appears in the dialog
box.
FH Medic User's Guide 135
To do this
Do this
c. (If the fax number you need is listed) Click the pre-defined
fax number.
d. (If the fax number you need is not listed) In the blank field, type the
number of the fax machine to send the supplemental forms to.
e. Click Send Fax.
A confirmation message dialog box appears.
f. Click OK.
Print the supplemental
forms
a. In the upper right corner of the interface, click Print.
A standard Print dialog box appears.
b. Make selections in the dialog box as normal, and then click Print.
The supplemental forms you filled in are sent to the printer or fax machine for transmission.
3. In the upper left corner of the interface, click Go Back to return to working in FH Medic.
136 FH Medic User's Guide
View or print a Physician Certification Statement (PCS)
1. Depending on where you are in the FH Medic interface, do one of the following.
If you are here Do this
At Incidents
screen
a. At the bottom of the interface, click View PCR.
The Patient Care Report screen appears.
b. In the upper left corner of the interface, click View PCS.
At any screen
except the
Incidents
screen
a. Choose FH → Incident → Forms.
The Forms screen appears.
b. Under Forms for this Incident, click PCS.
c. In the lower right corner of the interface, click View Selected.
On any data
entry tab
a. In the upper right corner of the interface, click View PCR.
The Patient Care Report screen appears.
b. In the upper left corner of the interface, click View PCS.
FH Medic User's Guide 137
A Physician Certification Statement appears, generated from the information you have
entered when you attached a PCS form to the patient's insurance information.
Information on attaching a PCS form is available in Attach a Physician's Certification
Statement (PCS) form, on page 47.
2. (Optional) Print the PCS
a. In the upper right corner of the interface, click Print.
A standard Print dialog box appears.
b. Make selections in the dialog box as normal, and then click Print.
3. In the upper left corner of the interface, click Go Back to return to working in FH Medic.
138 FH Medic User's Guide
View, fax, or print the Controlled Substance Usage / Waste form
Note: To view, fax, or print this form, you must have already added it to the incident, as
described in Add forms to the incident, on page 128.
1. Depending on where you are in the FH Medic interface, do one of the following.
If you are
here
At Incidents
screen
Do this
a. At the bottom of the interface, click View PCR.
The Patient Care Report screen appears.
b. In the upper left corner of the interface, click View Narcotic.
At any screen
except the
Incidents
screen
a. Choose FH → Incident → Forms.
The Forms screen appears.
b. Under Forms for this Incident, click Controlled Substance.
c. In the lower right corner of the interface, click View Selected.
FH Medic User's Guide 139
Any controlled substance usage or waste information you added to the incident appears.
2. (Optional) Do any of the following.
To do this
Do this
Fax the controlled substance
usage/wastage
form to a person or facility
a. In the center of the top of the interface, click Fax.
The No Destination Specified - enter fax number dialog box
appears.
b. Click Choose Other Location.
The Select Location dialog box appears. If any fax numbers are
already defined in FH Medic, a list of them appears in the dialog
box.
140 FH Medic User's Guide
To do this
Do this
c. (If the fax number you need is listed) Click the pre-defined
fax number.
d. (If the fax number you need is not listed) In the blank field, type
the number of the fax machine to send the supplemental forms to.
e. Click Send Fax.
Aconfirmation message dialog box appears.
f. Click OK.
Print the controlled substance
usage/wastage
form
a. In the upper right corner of the interface, click Print.
A standard Print dialog box appears.
b. Make selections in the dialog box as normal, and then click Print.
The supplemental forms you filled in are sent to the printer or fax machine for transmission.
3. In the upper left corner of the interface, click Go Back to return to working in FH Medic.
FH Medic User's Guide 141
Attach files to or delete files attached to an incident
1. Choose FH → Incidents → Attachments.
The Attach Files to screen appears.
2. Click Add File.
A file browser appears.
3. Use the file browser to navigate to and select the file to attach to the incident.
The file is added to the list on the Attach Files to screen.
4. (Optional) Select the file you want to delete, and then click Delete Selected.
The file disappears from the list, and is no longer attached to the incident.
142 FH Medic User's Guide
View the procedure for treating a symptom
1. Choose FH → Incidents → Protocols.
A list of symptoms appears.
2. Click the symptom you want to see procedural steps for.
A screen showing a flowchart, diagram, or series of steps appears, depending on the
established protocol for treating the symptom you selected.
Example: If you click Airway Drug Assisted Intubation, the Airway Drug Assisted
Intubation screen appears, containing a flowchart of steps, questions, medication to
administer.
3. (Optional) Print the protocol.
a. In the upper right corner of the interface, click Print.
A standard Print dialog box appears.
b. Make selections in the dialog box as normal, and then click Print.
4. In the upper left corner of the interface, click Go Back to return to the list of symptoms.
FH Medic User's Guide 143
View installation and synchronization information
You can view information about your FH Medic installation and discover at a glance whether or not
the mobile computer is sending data to the FH Medic Cloud as expected.
1. In the upper left corner of the interface, click the FH logo.
A menu appears.
2. Choose FH → Info.
The Status Information screen appears, listing information about your FH Medic installation. The value in the Queued Data Count field indicates whether there is data on the
mobile computer that has not yet synchronized with the FH Medic Cloud, which can indicate whether or not the computer has an active Internet connection.
3. (Optional) On the far right side of the screen, click Refresh to update the information displayed on the page.
144 FH Medic User's Guide
Minimize or exit FH Medic
1. In the upper left corner of the interface, click the FH logo.
A menu appears.
2. Depending on what you want to do, do one of the following.
To do this
Leave FH Medic
running, but minimized
Exit FH Medic
Do this
l
Choose Minimize.
FH Medic continues running, but is minimized and no longer
appears on your working screen. An icon for FH Medic appears
in your status bar, and your can click the icon to return
FH Medic to normal use.
l
Choose Exit.
FH Medic closes completely.
Note: Because FH Medic automatically relays your data to
the server using a wireless connection as you work, you do
not need to save data before exiting,
Caution: Be sure to exit FH Medic before shutting down or
restarting your computer.
FH Medic User's Guide 145