1
ScadaPhone User Manual
Version 5.0.3.40
ScadaTec, Inc.
P.O. Box 11590
Reno, NV 89510-1590
888-722-3283 (Sales)
775-348-7471 (Support)
Table of Contents
INTRODUCTION .............................................................................................................9
About ScadaPhone ......................................................................................................................................... 9
Basic Steps for Creating a Project ........................................................................................................... 10
How to Use Help ........................................................................................................................................... 11
Contents................................................................................................................................................. 11
Index....................................................................................................................................................... 11
Search..................................................................................................................................................... 11
Installation ..................................................................................................................................................... 12
Hardware Installation.................................................................................................................................... 12
Software Installation..................................................................................................................................... 12
Main Menu Overview .................................................................................................................................. 13
File | Project......................................................................................................................................... 13
Load/New ............................................................................................................................................... 13
Save......................................................................................................................................................... 13
Save As ................................................................................................................................................... 13
Rename .................................................................................................................................................. 13
Export ..................................................................................................................................................... 13
Import..................................................................................................................................................... 13
Restore ................................................................................................................................................... 14
Compatibility ......................................................................................................................................... 14
Print Listing(s)....................................................................................................................................... 15
File | Program....................................................................................................................................... 15
About ...................................................................................................................................................... 15
Register .................................................................................................................................................. 16
Uninstall ScadaPhone........................................................................................................................... 16
Create Shortcuts................................................................................................................................... 16
File | Exit............................................................................................................................................... 16
Mode ....................................................................................................................................................... 16
Development ......................................................................................................................................... 16
Runtime.................................................................................................................................................. 16
Options ................................................................................................................................................... 16
Alarm Ack Options ................................................................................................................................ 16
Alarm Announcement .......................................................................................................................... 17
Amplitude Adjustment......................................................................................................................... 19
Audio Devices........................................................................................................................................ 19
Email Settings........................................................................................................................................ 20
Incoming Calls ....................................................................................................................................... 22
Log 'System Active' Hourly .................................................................................................................. 22
Minimize On StartUp ............................................................................................................................ 22
Pager String ........................................................................................................................................... 22
Remote Access Software ..................................................................................................................... 23
Show System Info.................................................................................................................................. 23
Shutdown Tag........................................................................................................................................ 23
Standby Options.................................................................................................................................... 23
Text To Speech ..................................................................................................................................... 24
1
Watchdog Features............................................................................................................................... 25
Window................................................................................................................................................... 26
Activity Log............................................................................................................................................ 26
Alarm Group Statuses Window ........................................................................................................... 26
Alarms..................................................................................................................................................... 26
Analog Tags............................................................................................................................................ 26
Audio Analyzer...................................................................................................................................... 26
Call Log................................................................................................................................................... 26
Contact Sequence Log ......................................................................................................................... 26
Discrete Tags ......................................................................................................................................... 26
Email Log................................................................................................................................................ 26
Performance Log................................................................................................................................... 26
Run Log................................................................................................................................................... 26
System Errors ........................................................................................................................................ 27
Window List ........................................................................................................................................... 27
SCADA Link ............................................................................................................................................ 27
Setup....................................................................................................................................................... 27
Status...................................................................................................................................................... 27
Scan Rate ............................................................................................................................................... 27
Response Log......................................................................................................................................... 28
Discrete Representations .................................................................................................................... 28
OPC Quality Options............................................................................................................................. 28
Server Startup Delay ............................................................................................................................ 28
Modem .................................................................................................................................................... 28
Scheduler ............................................................................................................................................... 28
Session.................................................................................................................................................... 28
Help......................................................................................................................................................... 28
Contents................................................................................................................................................. 28
Index....................................................................................................................................................... 28
Search for Help On ............................................................................................................................... 28
Tutorial................................................................................................................................................... 28
About ...................................................................................................................................................... 28
Main Window Tab Overview ..................................................................................................................... 29
Menus tab .......................................................................................................................................................... 29
Alarms tab ......................................................................................................................................................... 30
Contacts tab...................................................................................................................................................... 30
Users tab............................................................................................................................................................ 30
Mail Boxes tab................................................................................................................................................... 31
Wav Files tab .................................................................................................................................................... 31
Discretes tab..................................................................................................................................................... 31
Analogs tab........................................................................................................................................................ 32
Strings tab ......................................................................................................................................................... 32
Sys Wavs tab ..................................................................................................................................................... 33
2
Sys Menus tab ................................................................................................................................................... 33
Registering ScadaPhone............................................................................................................................. 33
Starting ScadaPhone ................................................................................................................................... 35
SCADAPHONE_PROJECTS........................................................................................36
About WAV files ............................................................................................................................................ 36
Technical Note ................................................................................................................................................. 37
Controls and Options..................................................................................................................................... 37
Recording Tips ............................................................................................................................................... 37
Acknowledging Alarms ............................................................................................................................... 38
Phone Acknowledgement.............................................................................................................................. 38
Console Acknowledgement ........................................................................................................................... 38
Acknowledgement from the SCADA application ......................................................................................... 39
Alarm Announcement Options ................................................................................................................ 39
Scroll Bar Timing Settings............................................................................................................................. 40
Custom Preamble .......................................................................................................................................... 40
Announce acknowledged alarms after announcing un-acknowledged alarms ......................................... 41
Including a touch tone at the beginning of the preamble......................................................................... 41
Call-out Options............................................................................................................................................. 41
Alarm Options ................................................................................................................................................ 41
Alarm Groups ................................................................................................................................................ 42
Computed Tags .............................................................................................................................................. 44
Contact ScadaTec.......................................................................................................................................... 46
Creating a Schedule ..................................................................................................................................... 46
About Scheduling........................................................................................................................................... 46
Action Scheduling .......................................................................................................................................... 48
Schedule names ......................................................................................................................................... 48
Creating New Schedules ...................................................................................................................... 49
Editing Schedules.................................................................................................................................. 49
Assigning Schedules to the Day-of-Week ................................................................................................ 49
Creating a Schedule for the Next 24 Hours ............................................................................................ 49
Creating Special Schedules....................................................................................................................... 49
Using the Callout Schedule Grid .............................................................................................................. 50
Deleting Schedules .................................................................................................................................... 52
Contact Scheduling........................................................................................................................................ 52
Adding or Removing Contacts................................................................................................................... 53
Editing Alarm Contact Information ......................................................................................................... 53
Changing the Contact Order..................................................................................................................... 53
Setting up Schedule Rotations............................................................................................................ 54
Setting up the Contact Schedule ............................................................................................................. 56
Using the Contact Availability Scheduler Window .......................................................................... 57
Creating New Contact Schedules...................................................................................................... 57
Editing Contact Schedules................................................................................................................. 57
Assigning Contact Schedules to the Day-of-Week........................................................................... 57
3
Creating a Contact Schedule for the Next 24 Hours....................................................................... 58
Creating Contact Special Schedules ................................................................................................. 58
Deleting Contact Schedules .............................................................................................................. 59
The Schedule Override Bit ................................................................................................................ 59
Schedule Holes ................................................................................................................................... 59
Using the Contact Schedule Grid........................................................................................................ 60
Creating a User's List................................................................................................................................... 61
Creating a Supervisor .................................................................................................................................... 62
Creating User Accounts................................................................................................................................. 62
Editing or Deleting a User............................................................................................................................. 64
Creating Alarm Tags and Messages ........................................................................................................ 65
Alarm Type..................................................................................................................................................... 67
Tag/Alarm Name ........................................................................................................................................... 67
Ack Tag Name ................................................................................................................................................ 68
Alarm Group................................................................................................................................................... 68
Priority............................................................................................................................................................ 68
Signal Filtering............................................................................................................................................... 69
Automatically Ack When Reported .............................................................................................................. 70
Setting High and Low Alarm Limits.............................................................................................................. 70
Text Message for e-mail or Alpha-numeric Pagers..................................................................................... 71
Analog Tag Text Message Example: ................................................................................................... 71
Discrete Tag Text Message Example:....................................................................................................... 72
String Text Message Example: .................................................................................................................. 72
Voice Message Composition............................................................................................................................ 72
Creating Message Segments.......................................................................................................................... 72
Defining WAV Message Segments ............................................................................................................. 73
Defining Analog Value Message Segments ............................................................................................... 74
Defining Discrete Value Message Segments............................................................................................. 74
Defining Conditional WAV Message Segments ......................................................................................... 74
Managing Message Segments ........................................................................................................................ 75
Saving the Alarm Message............................................................................................................................... 75
Deleting an Alarm ............................................................................................................................................ 76
Creating and Editing Answer Detection Scripts ................................................................................. 77
Creating a New Answer Detection Script .................................................................................................... 78
The Events Box........................................................................................................................................... 79
Recording a Script ................................................................................................................................ 79
Adding a Script ...................................................................................................................................... 80
Script Actions............................................................................................................................................. 81
Multiple Scripts.............................................................................................................................................. 81
Editing Answer Detection Scripts ................................................................................................................. 82
Examples ........................................................................................................................................................ 83
Troubleshooting ............................................................................................................................................. 83
Creating and Editing Phone Menus ........................................................................................................ 84
About ScadaPhone Menus ............................................................................................................................. 84
ScadaPhone's Default Menu Structure ..................................................................................................... 84
Main Menu Options ............................................................................................................................... 84
Main Menu Option 0 (Security Code Entry) ...................................................................................... 85
Main Menu Option 1 (Alarm Menu) ................................................................................................... 85
4
Alarm Menu Option 1 (Active Alarms) ............................................................................................. 85
Alarm Menu Option 2 (Alarm Acknowledgement Menu) ................................................................. 85
Alarm Menu Option 3 (Individual Alarm Menu).............................................................................. 86
Testing a Menu............................................................................................................................................... 87
Customizing Menus ........................................................................................................................................ 87
Adding and Editing Menus......................................................................................................................... 87
Menu Item Enable ................................................................................................................................. 89
Menu Item Message Composition........................................................................................................ 90
Creating Message Segments .............................................................................................................. 91
Defining WAV Message Segments.................................................................................................... 91
Defining Analog Value Message Segments ...................................................................................... 92
Defining Discrete Value Message Segments..................................................................................... 92
Managing Message Segments ............................................................................................................. 93
Menu Item Action.................................................................................................................................. 93
Menu Item Action Examples .............................................................................................................. 94
Deleting a Menu ............................................................................................................................................. 94
Changing ScadaPhone's Starting Menu ......................................................................................................... 94
Editing WAV Files......................................................................................................................................... 94
Edit WAV File Window Menu Items .............................................................................................................. 96
Entering Alarm Contact Information..................................................................................................... 97
Creating Contacts.......................................................................................................................................... 98
EnteringTag Names.......................................................................................................................................... 102
Entering Tag Names................................................................................................................................... 102
Mail Boxes..................................................................................................................................................... 104
Creating a Mail Box ..................................................................................................................................... 104
Opening a Mail Box ...................................................................................................................................... 105
Deleting a Mail Box...................................................................................................................................... 105
Modifying Tag Values ................................................................................................................................ 106
Modifying Tag Values from the Console .................................................................................................... 106
Modifying Tag Values Via the Telephone .................................................................................................. 106
Opening an Existing Project.................................................................................................................... 106
Removing Unused Tags ............................................................................................................................ 107
Retrieving Voice Mail ................................................................................................................................ 108
Running a Project....................................................................................................................................... 109
Saving a Project........................................................................................................................................... 109
Setting up a Project .................................................................................................................................... 111
Creating a Project Folder ........................................................................................................................... 111
Setting up the Modem COM Port ........................................................................................................... 112
Setting the COM Port from the Main Window ........................................................................................... 112
Setting the COM Port in the Select Port Window ................................................................................ 112
Testing the Modem Connection.................................................................................................................. 113
Setting the COM Port from Error Windows................................................................................................ 113
5
Response Time Out Window ................................................................................................................... 113
Modem Error Window.............................................................................................................................. 114
System Menu Action Items Reference ................................................................................................. 114
Tag Properties ............................................................................................................................................. 116
Tag References ............................................................................................................................................ 117
Testing Alarm Callouts in Run Mode.................................................................................................... 118
Testing Alarm Callouts ................................................................................................................................ 119
The Message Segment Window.............................................................................................................. 122
Creating Message Segments........................................................................................................................ 122
Defining WAV Message Segments ..................................................................................................... 122
Defining Analog Value Message Segments....................................................................................... 123
Defining Discrete Value Message Segments.................................................................................... 123
Defining IF WAV Message Segments................................................................................................. 124
The Modem Window.................................................................................................................................. 124
Menu Overview............................................................................................................................................... 125
Main Window ............................................................................................................................................ 125
Port ........................................................................................................................................................... 125
Reset ......................................................................................................................................................... 126
Volume...................................................................................................................................................... 126
Log | Diagnostics ..................................................................................................................................... 126
Log | Snapshot ......................................................................................................................................... 126
Log | Freeze............................................................................................................................................. 127
Log | Clear ............................................................................................................................................... 127
Command.................................................................................................................................................. 127
Show/Hide LEDs ....................................................................................................................................... 127
TimeOuts .................................................................................................................................................. 127
Dial Options.............................................................................................................................................. 127
Force Modem Type .................................................................................................................................. 128
SCADA Link Interface ............................................................................................................................... 129
Setting Up the SCADA Link Interface ......................................................................................................... 129
The DDE Server List Window ........................................................................................................................ 130
The OPC Server List Window ........................................................................................................................ 132
The OLE Server List Window....................................................................................................................... 132
Checking the SCADA Link ............................................................................................................................ 133
Watchdog Features .................................................................................................................................... 133
Main Thread Watchdog ............................................................................................................................... 134
Heartbeat Tag.............................................................................................................................................. 134
Modem Error Tag ......................................................................................................................................... 135
No Dial Tone Tag ......................................................................................................................................... 135
Modem Error Restart ................................................................................................................................... 135
$ScadaLinkFailed Alarm .............................................................................................................................. 136
ADVANCED_FEATURES ...........................................................................................137
The Audio Analyzer.................................................................................................................................... 137
6
Citect Interface............................................................................................................................................ 140
Importing Citect Alarm Tags....................................................................................................................... 140
Citect Alarm Browser Dialog ............................................................................................................. 142
Alarm Message Generator dialog...................................................................................................... 142
Edit Alarm Message Word List Dialog............................................................................................... 144
Importing CitectSCADA Analog, Discrete, and String Tags ...................................................................... 147
Creating Custom Install Programs........................................................................................................ 148
Discrete Expected, Analog Received..................................................................................................... 148
Remote Access Software (RAS) Interface ........................................................................................... 149
ScadaPhone's OLE Server........................................................................................................................ 153
Overview ...................................................................................................................................................... 153
Accessing ScadaPhone's OLE server ........................................................................................................... 154
Methods Available ................................................................................................................................... 154
Accessing the ScadaPhone OLE server....................................................................................................... 155
ScadaPhone's OPC Server........................................................................................................................ 155
Overview ...................................................................................................................................................... 155
Accessing ScadaPhone's OPC server........................................................................................................... 155
Server Startup Delay ................................................................................................................................. 155
Setting Discrete Representations...................................................................................................................... 156
Setting Discrete Representations .......................................................................................................... 156
About Discrete Representations................................................................................................................. 156
Non-standard Discretes at Runtime ........................................................................................................... 156
Adding/Editing Discrete Values from the Menu........................................................................................ 156
Invalid Discrete Responses.......................................................................................................................... 157
Analog Response List button ...................................................................................................................... 158
Text To Speech Interface.......................................................................................................................... 158
Transfer Authorization Code.................................................................................................................. 159
Troubleshooting.......................................................................................................................................... 160
Tools.............................................................................................................................................................. 160
Problems.......................................................................................................................................................... 160
EXAMPLES.................................................................................................................162
Menu_Item_Action........................................................................................................................................... 163
Menu Item Action Example ........................................................................................................................ 163
Modify Analog........................................................................................................................................... 163
Menu Item Action Example ........................................................................................................................ 165
Modify Discrete ........................................................................................................................................ 165
Play Menu...................................................................................................................................................... 167
Menu Item Action Example ........................................................................................................................ 167
Play Menu ................................................................................................................................................. 167
Creating the TankLevelsMenu.......................................................................................................... 169
7
Testing the TankLevelsMenu ........................................................................................................... 171
Menu Item Action Example ........................................................................................................................ 172
Record Voice Mail .................................................................................................................................... 172
Creating the Voice Mail Menu.......................................................................................................... 173
Voice Mail Menu Prefix Option........................................................................................................ 173
Voice Mail Menu Options 1 and 2.................................................................................................... 174
Testing the Voice Mail Menu............................................................................................................ 176
Alarm Contact Window Example .......................................................................................................... 177
Answering Machine Contact Example ........................................................................................................ 177
Alarm Contact Window Example .......................................................................................................... 179
Pager Alarm Contact Example.................................................................................................................... 179
POPUPS......................................................................................................................184
Boolean .......................................................................................................................................................... 184
Development Mode and Run Mode....................................................................................................... 184
Math Operators and Functions........................................................................................................................ 184
Math Operators and Functions .............................................................................................................. 185
ScadaPhone System Variables................................................................................................................ 186
Discretes:........................................................................................................................................ 186
Analogs: ......................................................................................................................................... 186
Strings: ............................................................................................................................................... 186
Using the Windows Clipboard ..................................................................................................................... 187
To copy information into the Windows Clipboard: ....................................................................... 187
To paste information from the Windows Clipboard:..................................................................... 187
Using the Select Directory Window ...................................................................................................... 187
8
Introduction
About ScadaPhone
ScadaPhone is a 32 bit Windows based alarm dialer designed to work with Windows based SCADA
systems. ScadaPhone's primary function is to continuously poll a SCADA system for the status of
discrete, analog, and string tags and place telephone calls to report alarms as they are triggered. Alarms
may also be triggered from computed discrete tags. The SCADA tags that trigger a callout, the alarm
messages, and the people (contacts) to call may be customized for your application.
In addition to alarm dialing, ScadaPhone allows a user to dial into the system from any touch tone phone
to hear SCADA system alarms, analog and discrete values, and, (with the proper access level), to change
analog and discrete values (setpoints). ScadaPhone also allows the creation of voice mail boxes which
will act as an answering machine.
ScadaPhone can be licensed in one of two configurations, the full featured version known as
ScadaPhone with all the features described in this help file and a limited version known as
ScadaPhoneLite. The 'Lite' version has the following Project limitations:
1. Maximum of 16 alarms
2. 1 user defined menu (MainMenu)
3. 1 alarm group
4. No e-mail contacts
5. No computed tags
6. No RAS (Remote Access Software) interface
This same help file is used for both systems so please keep the above limitations in mind.
A ScadaPhoneLite system may be upgraded to the full ScadaPhone system by obtaining and entering a
new 'Full Featured' authorization code in the registration window. (Help | About | Register)
ScadaPhone is very versatile yet simple to configure and use. It has default setups for the following
SCADA systems:
Ÿ Citect
Ÿ GE Cimplicity
Ÿ Excel (for testing)
Ÿ Intellution FIX DMAX
Ÿ LookOut
Ÿ RSView
Ÿ RSLinx
Ÿ Siemens, WinCC
Ÿ USDATA Factory Link
Ÿ Wonderware InTouch
Ÿ Wonderware FSGateway
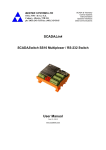
The ScadaPhone main window appears as follows:
9
ScadaPhone main window
The main window consists of (from top to bottom):
Ÿ Main menu (File, Mode, Options, etc....)
Ÿ Project name and location (C:\ScadaTEC\ScadaPhone\Projects\Sample)
Ÿ Tab control (Menus, Alarms, Contacts, etc....)
Ÿ A white list box containing the items pertaining to the selected tab
Ÿ Buttons -- the buttons vary depending upon the selected tab and ScadaPhone’s current operating
mode
Ÿ Status label -- time and Development Mode or Run Mode
ScadaPhone comes with a sample project (named sample.) The files in this project can be customized to
meet the user's specific needs or a new project may be created.
Related Topics:
Basic Steps for Creating a Project
Main Menu Overview
Main Window Tab Overview
Basic Steps for Creating a Project
A ScadaPhone project consists of various files needed to define users, passwords, schedules, tag
names, alarms, menus, and other items required for a customized system. ScadaPhone groups these
project definition files into a project folder (or project directory). Project definition files include text files,
(containing definitions of alarms, menus, telephone contacts, etc.), as well as WAV files, (containing the
voice messages that enunciate alarm and menu messages.) A typical project folder will contain a few text
files (Alarms.txt, Menus.txt, Contacts.txt, and so forth) and a few dozen WAV files.
A new project is created in Development Mode. An indicator at the bottom of the ScadaPhone main
window shows whether ScadaPhone is in Development Mode or Run Mode. The first time ScadaPhone is
started, it will startup in Development Mode. After that, which ever mode ScadaPhone is in when exited is
the mode it will start up in when next started. To switch from one mode to the other, select Mode from the
top menu and select either Development or Runtime.
10
There are ten basic steps to create a new ScadaPhone project:
Ÿ
Ÿ
Ÿ
Ÿ
Ÿ
Ÿ
Ÿ
Ÿ
Ÿ
Ÿ
Set up a Project
Set up the Modem COM Port
Create a Supervisor and set up other Users
Create a Schedule
Enter Tag Names
Enter Alarm Contact Information
Create Alarm Tags and Messages
Create and Edit Phone Menus
Configure the SCADA Link Interface
Test Alarm Callouts in Run Mode
Note: ScadaPhone comes with a sample project (named sample.) The files in this project can be
customized to meet the user's specific needs or a new project may be created.
How to Use Help
Open Help by selecting it on the top menu bar.
The Help menu offers Contents, Index, Search for Help On, and Tutorial.
Selecting Tutorial will open a Help window with step-by-step instructions for creating a sample project.
Selecting Contents, Index, or Search for Help On opens a Help window containing a left navigation
pane with Contents, Index, and Search tabs. The Help window opens with the selected tab displayed.
Click on another tab to select it. The left navigation pane allows access to specific topics and keywords.
The right pane contains information about the selected topic.
Contents
The contents tab displays topics in a format similar to a printed book's table of contents. Topics are
arranged in a tree-style outline. The book icons represent a major topic. Open a book by clicking on the
plus sign next to it or by double-clicking on the book. An opened book displays a list of specific topics.
Click on a specific topic under the book to display that information in the right pane. Close a book by
clicking the minus sign next to it or by double-clicking on the open book.
Index
The index allows searches for specific words or phrases. A word may be typed into the keyword box or
selected by using the right scroll bar. Use the scroll bar to scroll through the list of keywords, click on the
desired keyword, and click the Display button.
If there is only one topic associated with the keyword, the information will be displayed in the right pane. If
there is more than one topic associated with the keyword, a second box will open with a list of topics.
Select the topic to display from the list.
Search
Search allows searches for any words that occur within the content of the Help system. Enter the desired
words or phrases in the keyword box and click List Topics. A list of topics containing the keyword(s) will
be displayed. Click on the desired topic and click the Display button. The topic will be displayed in the
right pane with the keyword(s) highlighted.
11
Installation
Hardware Installation
ScadaPhone is shipped with a top-quality voice modem, serial cable, and a microphone that have been
certified to work with the system. A speaker to work with the modem is also available as an option. During
development of a project, the recording and playback of sound (WAV) files may be done either through
the voice modem or a PC sound card. To use the PC sound card, you will need to provide a microphone
and speakers that are compatible with the sound card. If you do not plan to use the PC sound card, you
will need to order the optional speaker.
Follow the instructions that come with the modem to connect the phone line, microphone, and power to
the modem. If using the voice modem to record and play sound files, connect the optional speaker
shipped with the modem.
If using the PC sound card to record and play sound files, connect compatible microphone and speakers.
Connect the serial cable between the modem and one of the computer's COM ports. Make note of which
COM port the modem is connected to. It is recommended that you connect the modem to a telephone line
that is not shared with any other office telephone or part of a multiple line telephone system. Furthermore,
the telephone line must be a standard voice line, not digital or ISDN.
Software Installation
ScadaPhone's installation program (ScadaPhoneInstall.exe) installs ScadaPhone into selected folders
and provides options to create desktop and/or start menu shortcuts.
To install from a CD, insert the CD and wait for the automatically triggered screen to appear. Select
Install ScadaPhone to start the install program. Note: If the automatic trigger screen does not
appear, use Windows Explorer to display the contents of the CD and double click AutoRun.exe.
If you have downloaded ScadaPhoneInstall.exe from www.scadatec.com, execute the install
program by using Windows Explorer to navigate to the ScadaPhoneInstall.exe file and double click
on it.
If you are installing from floppies, use Windows Explorer to display the contents of the floppy and
double click Install.exe from the root directory of the first floppy.
When the install program appears, note the two blue labels which contain the default folders for
ScadaPhone's program files and a ScadaPhone sample project. Click on a blue label to change the
default folder to a new location. Also note the check box next to the Sample Project item. Uncheck this
box to NOT install the ScadaPhone sample project.
When all options are complete, click the Install button at the bottom of the install program window. Follow
the prompts to complete the installation.
To start ScadaPhone automatically when the PC is re-booted, place a shortcut in the startup folder.
12
Main Menu Overview
File | Project
Load/New
Opens an existing project or starts a new one.
Details: Setting up a Project
Save
Saves a project.
Details: Saving a Project
Save As
Saves a project with a new name.
Details: Saving a Project
Rename
Opens a dialog box which allows entry of a new name for an existing project.
Export
Allows users to create a .zip copy of the current project so that it can be transferred from one
machine to another with ease. The wav and log files may be included or excluded from the export
as desired.
Import
Allows the importing of projects that were exported with the export feature. The import filename
and project directory to import to may be selected by clicking on the red text.
13
Restore
Each time a ScadaPhone project is saved, an archived copy of the project being overwritten (if it
exists) is automatically zipped and stored in the 'AutoBackups' sub-folder. These zipped backups
will be erased after 30 days (if there are more than 10 archives total).
This feature allows the selection and restoration of these backups
Compatibility
This shows the Project Compatibility window (which delineates the list of limitations for the 'Lite'
system).
14
Print Listing(s)
Opens the Print Listing(s) dialog box:
Click the checkbox for the option(s) to be printed and click the Print button. Click the Printer Setup
button to change printer settings. Click Cancel to close the dialog box without printing.
File | Program
About
Provides version number, computer key, registration status, and allows transfer of the authorization
code to another PC.
Details:
Registering ScadaPhone
Transfer Authorization Code
15
Register
Allows registration of ScadaPhone.
Details: Registering ScadaPhone
Uninstall ScadaPhone
Un-installs ScadaPhone from the current system.
Create Shortcuts
Opens the Create Shortcuts dialog box:
Create Start Menu Shortcut adds a shortcut to start ScadaPhone via the Start menu. To use this
shortcut, click the Start button and select Programs | ScadaTec | ScadaPhone.
Create Desktop Shortcut places a shortcut on the desktop. To use this shortcut, doubleclick the
ScadaPhone icon on the desktop.
Create Start-Up Shortcut places a shortcut in the Windows Startup folder. This shortcut will cause
Windows to automatically start ScadaPhone when the computer is first turned on.
File | Exit
Exits ScadaPhone
Mode
Development
Switches ScadaPhone to Development mode.
Details: Development Mode and Run Mode
Runtime
Switches ScadaPhone to Run mode.
Details: Development Mode and Run Mode
Options
Alarm Ack Options
Opens the Alarm Acknowledgement Options dialog.
16
The user can control how ScadaPhone handles the alarm acknowledgement bit. The options are:
Ÿ Clear the acknowledge bit when alarm triggers
Ÿ Set the acknowledge bit when alarm triggers
Ÿ Allow alarms to be played and acknowledged without login
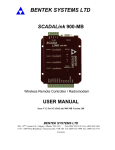
Alarm Announcement
Opens the Alarm Announcement Options window:
17
The three scroll bars are used to set the following:
1. How long the alarms should be announced over the speaker before placing a telephone
call
2. How long ScadaPhone should pause between announcing alarms
3. How many times the alarms should be announced during each announcement.
A customized preamble may be created by clicking the Custom radio button and clicking the blue
WAV file link.
A touch tone may be added to the beginning of the preamble file by selecting the Transmit touch
tone at beginning of preamble option and clicking the button following the option.
18
The Callout Options frame provides options to:
1. Control how alarms are reported to contacts that have not acknowledged previous alarms.
2. Limit how many times an alarm is reported.
3. Adjust the length of time a local alarm warning is given before the callout is made.
Details: Alarm Announcement Options
Ÿ
Amplitude Adjustment
Opens the Set Amplitude Level dialog box:
When the option Automatically Adjust Amplitude When Recording is toggled on (as indicated
by a checkmark), the amplitude of all future recorded WAV files will automatically be adjusted to
the level specified by the scroll bar. To adjust all existing WAV files, see the following related topic.
Related Topic: Editing WAV Files
Audio Devices
Opens the Audio Device Options window:
This window offers the following options;
19
Use Sound Card When Possible: When this option is checked and the modem is hooked up
and working, ScadaPhone will use the modem to dial out to make alarm calls and answer calls,
but when playing and recording WAV files, ScadaPhone will use the sound card.
When playing audio via telephone...
Use telephone only (mute speaker): When this is selected, ScadaPhone will use only the
telephone to play alarm messages or menu options.
Use telephone and speaker: When this is selected, ScadaPhone will play alarm messages or
menu options over both the telephone and the speakers.
Email Settings
This menu option opens the Email Settings dialog box:
Instead of dialing a pager or a phone, ScadaPhone can send alarm notification via e-mail. To send
a message via email requires the following:
(1) Select the Email option in the Alarm Contact Window. Enter the e-mail address in the box.
(2) Create the alarm text message to be sent in the Alarm Information Window.
(3) Enter the e-mail settings in the above Email Settings dialog box.
Ÿ Enter the name of the SMTP server or IP address. This is the same name entered in Outlook
or Outlook Express on the Servers tab for the Outgoing mail (SMTP) server. (In Outlook
Express, this is found under Tools | Accounts. Highlight an account, select Properties and
select the Servers tab.) For example: mail.greatbasin.net
Ÿ User ID is the user name that is entered in the Dial-up Connection box for the above mail
server.
Ÿ Enter the user password.
Ÿ From Address is the text that will be placed in the From line of the e-mail message. This
20
Ÿ
Ÿ
Ÿ
Ÿ
Ÿ
may be used to identify the ScadaPhone system that is sending the e-mail message.
Use Alarm As Email Subject - By default, ScadaPhone set the subject line of all outgoing
emails to "ScadaPhone Alarms"; the Use Alarm As Email Subject option allows you to
change this behavior so that the newest and most high priority alarm text message will be
used as the subject of the outgoing email.
Use Dial-up Networking - This box must be checked if the e-mail is to be sent via a dial-up
network connection instead of using a network connection to the e-mail server. Note: If this is
grayed out it means that there are no dial-up networking connections configured on the PC.
Dial-up Networking Uses Voice Modem - This box must be checked if the dial-up network
connection is to use the same modem ScadaPhone uses for callout notifications instead of a
separate modem.
Dial-up Connection to use - Select the desired dial-up connection from the drop down list. If
there are no connections in the list, use the MS Windows Dial-Up Networking applet to create
one.
TimeOuts - Clicking on this blue text brings up the E-mail Timeouts dialog box:
The following timeout values may be set from the Email Timeouts dialog:
Ÿ Email Server Connect Timeout - the time ScadaPhone will wait for dial-up networking
to connect to the email server.
Ÿ Email Result Timeout - the time ScadaPhone will wait for the e-mail result code after
sending the e-mail.
Ÿ DUN Connect Timeout - the time ScadaPhone will wait for the Dial-Up Networking
component to make the connection.
Ÿ DUN Pre Hangup Pause - the time ScadaPhone will wait after receiving the email result
before it hangs up the connection. This time may need to be increased if an anti-virus
program scans the e-mail before sending it.
Ÿ DUN Post Hangup Pause - the time ScadaPhone will wait after hanging up the dial-up
connection before accepting alarm acknowledgements.
21
Incoming Calls
Opens a dialog box which uses a scroll bar to set the number of rings before ScadaPhone will
answer an incoming call. Select a different initial menu name (By default, the MainMenu is played
when an incoming call is detected.). It also provides an option to play the active alarms before the
initial menu.
Details: Changing the Starting Menu
Ÿ
Log 'System Active' Hourly
When toggled on (as indicated by a checkmark), ScadaPhone makes an entry in the Activity Log
each hour indicating that the system is alive and operating in Run Mode.
Minimize On StartUp
When toggled on (as indicated by a checkmark), ScadaPhone will startup minimized. This may be
useful to prevent ScadaPhone from starting up on top of the SCADA software and confusing the
operator. There is a short delay before ScadaPhone is minimized to allow the operator to prevent
minimization. Note: This will only work in 'Run' mode.
Pager String
Opens the Pager String window:
The pager string is used for numeric pagers only. The phone number entered into this dialog box is
stored in the system variable named PagerStr. This variable is used in answer detection scripts.
After ScadaPhone calls the number specified in the Alarm Contact window and receives a pager
signal tone, it sends the phone number entered into the Pager String dialog box. This is the phone
number that the pager user is to call and is typically the access number of the SCADA system or
the ScadaPhone system.
Details: Pager Alarm Contact Example
22
Remote Access Software
This option allows ScadaPhone to be configured to interact with Remote Access Software such as
pcAnywhere. This feature allows ScadaPhone to share the voice modem with the Remote Access
Software, thereby eliminating the need for an extra modem.
Details: Remote Access Software
Show System Info
When toggled on (as indicated by a checkmark), ScadaPhone displays system tag names on the
Discretes, Analogs, and Strings tabs and also displays two additional tabs: System Wavs and
System Menus.
Shutdown Tag
Opens a dialog box which allows entry of a discrete tag which will cause ScadaPhone to be shut
down when it is set to TRUE.
Standby Options
Opens the following dialog box which allows entry of a single discrete tag which will cause
ScadaPhone to go into General Standby Mode when it is set to TRUE. Also, individual alarm
groups may be placed in standby mode by entering separate discrete tags for each alarm group. In
General Standby Mode, ScadaPhone will continue to poll the SCADA database for tag values but
will not report any alarms or answer any incoming calls. If individual alarm groups are placed in
standby mode, ScadaPhone will continue to poll the SCADA database for tag values but will not
report any alarms in the alarm groups that are in standby but will continue to answer any incoming
calls even if all call groups are individually placed in standby. This feature may be used to
eliminate conflict between SCADA nodes linked in a hot-backup configuration.
23
Text To Speech
Selecting this option causes ScadaPhone to generate the speech WAV files for tag names and
text. This can be used instead of actually recording the WAV files for the alarm announcement
text. Note: This optional feature requires that the Microsoft voice and speech components be
installed. The MS Installer files needed to install the Microsoft voice and speech components are
SAPI5SpeechInstaller.msi and SAPI5VoiceInstaller.msi.
Selecting this menu option opens the Text to Speech Options window.
24
This window allows the user to choose whether to use the recorded WAV files or the WAV files
generated by the text to speech interface. If the option to use the WAV files generated by the text
to speech interface is selected, then the voice that will be used may be selected by clicking on the
blue text following the Voice: option. After selecting the 'Text to Speech' option and clicking the
OK button, ScadaPhone will begin converting all of the existing user and system WAV files into
WAV files to the selected voice. The WAV files are saved in separate folders,
\ScadaPhone\SystemFiles\TTS and \ScadaPhone\Projects\projectname\TTS.
Details: Text To Speech Interface
Watchdog Features
This is where all of ScadaPhone's watchdog features are consolidated.
Details Watchdog Features
25
Window
Activity Log
The Activity Log displays a log that keeps track of important events such as when alarms trigger,
when calls are made, when acknowledgements are received, etc... The supervisor can check this
log to see what has happened over the last 31 days. The ViewArchives menu item in this window
brings up the CLogViewer which will let you combine various log files so they can be viewed
together..
Alarm Group Statuses Window
Displays the alarm group statuses window. Thhis wildow displays the status of all alarm groups.
This window may also be displayed by clicking on the status bar at the bottom of the ScadaPhone
window. Note: This window is only available in 'Run' mode.
Alarms
Displays the information on the Alarms tab in a separate window
Analog Tags
Displays the information on the Analogs tab in a separate window
Audio Analyzer
Opens the Voice Modem Audio Analyzer window.
Details: Audio Analyzer
Call Log
The Call Log shows the pertinent information for each call such as Contact, User, Alarm, Alarm
Group, Audio Analyzer File, and Call Events.
Contact Sequence Log
Opens the contact sequence log which displays a log of the time and events for each alarm contact
attempt.The supervisor can check this log to see what has happened over the last 31 days. The
ViewArchives menu item in this window brings up the CLogViewer which will let you combine
various log files so they can be viewed together.
Discrete Tags
Displays the information on the Discretes tab in a separate window
Email Log
Opens the Email log window which displays the events that occur when sending each email. This
log is used mainly for troubleshooting. The supervisor can check this log to see what has
happened over the last 31 days. The ViewArchives menu item in this window brings up the
CLogViewer which will let you combine various log files so they can be viewed together.
Performance Log
Displays the date and time, CPU usage, and memory used by ScadaPhone. It also shows the time
and date of program start, stop, and mode changes. A log entry is added each minute. The
supervisor can check this log to see what has happened over the last 31 days. The ViewArchives
menu item in this window brings up the CLogViewer which will let you combine various log files so
they can be viewed together. The memory used value takes into consideration the number of
processors in the computer.
Run Log
Displays a log of ScadaPhone start and stop times and runtimes. It lists the last 100 runs as well as
the longest 100 runs of the program.
26
System Errors
Opens the ScadaPhone System Error Log, which keeps a listing of any error messages reported
during the execution of ScadaPhone. If and when error messages pop up, ScadaPhone displays
them in a popup System Error window and also logs them to the System Error Log. All system
errors should be reported to ScadaTEC. Tech Support may request an e-mail copy of the error log
file. The error log file is named ScadaPhoneSysErrorLog.txt and is saved in the project folder.
See: Contact ScadaTec
Window List
Displays a list of open ScadaPhone windows. Clicking on any window in the list will bring that
window to the top.
SCADA Link
Setup
Opens the SCADA Link Setup window, which allows ScadaPhone to know the configuration of the
SCADA software's tag server interface and enables the link.
Details: The SCADA Link Interface
Status
This item opens the SCADA Link Status window. This window displays the current status of the
DDE, OPC or OLE queries between ScadaPhone and the selected SCADA system.
Scan Rate
Opens the Adjust Scan Rate window.
This dialog allows the user to adjust the rate at which ScadaPhone polls the SCADA software for
data and the number of tags to read during each scan. If the scan rate is set too high, ScadaPhone
will use a high percentage of the CPU’s time; if the Scan Rate is set too low, it will take a long time
for ScadaPhone to cycle through the list of SCADA system tags. The 'Development Mode' and
'Run Mode' radio buttons allow viewing of the CPU usage, Seconds per cycle, and the number of
27
tags read per second in either the development or run modes.
Response Log
Opens the ScadaLink Response Log window which displays a log of the response received for each
tag polled via the ScadaLink interface.
Discrete Representations
Allows the configuration of representations of discrete values.
Details: Setting Discrete Representations
OPC Quality Options
Allows the setting of the acceptable level of OPC quality. The program will reject OPC data which
is below this setting.
Server Startup Delay
Opens the Server Startup Delay window, which will configure ScadaPhone to wait a number of
seconds at program startup before attempting to link to the SCADA server.
Details: Server Startup Delay
Modem
Opens the Modem window.
Details: The Modem Window
Scheduler
Opens the Scheduler.
Details: Creating a Schedule
Session
Opens a dialog box which allows the supervisor to log in and start a session or log out of a current
session.
Help
Contents
Opens the Help window with the Contents tab selected.
Details: How to Use Help
Index
Opens the Help window with the Index tab selected.
Details: How to Use Help
Search for Help On
Opens the Help window with the Search tab selected.
Details: How to Use Help
Tutorial
Opens a Help window with step-by-step instructions for creating a sample project.
About
Brings up the Program Information dialog box.
28
Main Window Tab Overview
When Options | Show System Info on the main menu is not checked, the main window tab set looks like
this:
Main Window Tabs
If Show System Info is checked, two additional tabs are available:
Main Window Tabs with System Tabs
If the window is too narrow to display all the tabs, right and left arrow buttons will appear at the right end
of the tab set. Click the arrow buttons to display additional tabs.
Below each tab is a list which contains the items pertaining to the selected tab (Menus, Alarms, Contacts,
etc..) Below the item list are buttons. The buttons vary depending upon the selected tab and
ScadaPhone’s current operating mode (Development or Runtime). Some buttons are always enabled,
other buttons are only enabled when a list item is highlighted or ScadaPhone is in Development mode.
The tabs are:
Menus Tab
Alarms Tab
Contacts Tab
Users Tab
MailBoxes Tab
Wav Files Tab
Discretes Tab
Analogs Tab
Strings Tab
Sys Wavs Tab
Sys Menus Tab
Menus tab
When a person contacts ScadaPhone by phone, the caller is presented with an automated menu system.
29
ScadaPhone comes with a default menu structure. However, the menu messages and choices presented
to the person on the phone may be customized. The Menus tab gives access to the list of user defined
menus. There are four buttons on the Menus tab:
New
Edit
Delete
Test
Creates new user defined menus (development mode only).
Opens and loads the Menu Information window with the selected menu (development
mode only).
Removes unwanted menus (development mode only).
Plays the selected menu over the modem speaker or telephone (depending upon the
settings selected in the main menu Options | Modem Devices) for testing purposes
(development mode only).
Details: Creating and Editing Phone Menus
Alarms tab
ScadaPhone allows an unlimited number of alarm messages to be defined. The alarm messages report
the status of alarm bit tags in a SCADA system. These alarms may be grouped so that different groups of
people can be notified for different alarms. The Alarms tab gives access to the list of alarms. Additionally,
the items in the alarm list display alarm status information. When an alarm bit is on but the Signal Filtering
delay time has not yet elapsed, the alarm line displays the amount of time remaining before the alarm is
considered active. When an alarm is active, the background color of that line turns yellow and the text
turns red. If an active alarm has not yet been acknowledged, the words “Awaiting Phone Ack” are also
displayed. There are five buttons on the Alarms tab:
New
Edit
Delete
Play
Ack
Creates new alarms (development mode only).
Edits pre-existing alarms (development mode only).
Removes unwanted alarms (development mode only).
Plays the selected alarm (development mode only).
Acknowledges active alarms. When alarms are configured to require console
acknowledgement, this is the button that registers the console acknowledgement
(development and runtime).
Details: Creating Alarm Tags and Messages
Note: The information on the Alarms tab may also be displayed in a separate window by selecting
Window | Alarms
Contacts tab
In ScadaPhone, the term contact refers to a telephone number that is to be called in the event of an
alarm. The Contacts tab gives access to the list of alarm contacts. Which contacts are called and the
order in which they are called is determined by the ScadaPhone Scheduler. Details: Creating a Schedule
There are three buttons on the Contacts tab:
New
Edit
Delete
Creates new contacts (development mode only).
Edits pre-existing contacts (development mode only).
Removes unwanted contacts (development mode only).
Details: Entering Alarm Contact Information
Users tab
Access to ScadaPhone is controlled by passwords. A user list must be created in order to specify
passwords and access levels for authorized users of the system. The Users tab gives access to the list of
authorized ScadaPhone users. There are three buttons on the Users tab:
30
New
Edit
Delete
Creates a new user profile (development mode only).
Edits pre-existing user profiles (development and runtime).
Removes unwanted user profiles (development and runtime).
Details: Creating a User's List
Mail Boxes tab
The Mail Boxes tab gives access to the mail boxes created by menus that utilize the Record Voice Mail
action. Mail boxes are folders (directories) where recorded WAV files are stored. Mailbox folders are
created automatically, but must be manually deleted if the menu reference which created the mailbox is
removed. When a mailbox contains messages, its line will be displayed with a green background. If the
menu reference that created a mailbox has been removed, its line will be displayed with gray text. There
are two buttons on this tab:
Open
Opens the selected mailbox and displays the available messages for playback and removal
(development and runtime).
Remove Allows removal of unwanted mailboxes that are no longer referenced by any of the user
defined menus (development and runtime).
Details: Mail Boxes
Wav Files tab
The WAV Files tab displays the list of user defined WAV files that are referenced by the user defined
menus and alarms. Filenames displayed in red indicate that the WAV file is referenced by an alarm or
menu but does not exists on disk (The WAV file needs to be recorded). Filenames displayed in gray
indicate WAV files that exists on disk but are not referenced by any alarms or menus. There are five
buttons on this tab:
New
Record/
(Generat
e)
Opens the Create New WAV file dialog box to allow creation of new WAV files
Allows the re-recording of a selected WAV file.
Note: If the 'Text to Speech' option is selected, the Record button will change to Generate.
Selecting an existing WAV file and clicking on the Generate button will generate a new WAV
file replacing the selected WAV file. The new WAV file will use the currently selected voice;
the voice speaks the name of the WAV file.
Play
Plays the selected WAV file.
Edit
Opens the Edit WAV File window loaded with the selected WAV file. Details: Editing WAV
Files
Remove Removes a selected WAV file that is displayed in gray.
Details: About WAV files
Discretes tab
The Discretes tab displays the list of discrete tags (and their values) referenced by the alarms and user
defined menus. Tag names used in ScadaPhone must exactly match the tag names in the SCADA
system, unless the tag is a computed tag. See: Computed Tags. In addition, ScadaPhone reserves the
"$" symbol for predefined system tags. If the SCADA tag name happens to begin with "$", prefix the alarm
tag name with two dollar signs: "$$".
ScadaPhone will poll the SCADA system for the values of these tags. Tags that are not referenced by any
alarm or menu are displayed in gray. When the main menu Options | Show System Info option is
checked, discrete system tag names are also visible on this tab. ScadaPhone does not poll the SCADA
system for system tags. This tab has four buttons:
31
New
Properti
es
Invert
Remove
Opens a dialog box that allows entry of new tag names (development mode only).
Displays the properties of the selected tag (development mode only). See: Tag Properties
Inverts the value of the selected discrete tag (development and runtime).
Removes a selected discrete tag that is displayed as gray because it is not being used by
any menu or alarm (development and runtime).
Referenc Displays all the places where this tag is used within the ScadaPhone project.
es
Note: The information on the Discretes tab may also be displayed in a separate window by selecting
Window | Discrete Tags
Analogs tab
The Analogs tab displays the list of analog tags (and their values) referenced by the alarms and user
defined menus. Tag names used in ScadaPhone must exactly match the tag names in the SCADA
system, unless the tag is a computed tag. See: Computed Tags. In addition, ScadaPhone reserves the
"$" symbol for predefined system tags. If the SCADA tag name happens to begin with "$", prefix the alarm
tag name with two dollar signs: "$$".
ScadaPhone will poll the SCADA system for the values of these tags. Tags that are not referenced by any
alarm or menu are displayed in gray. When the main menu Options | Show System Info option is
checked, analog system tags are also visible, ScadaPhone does not poll the SCADA system for system
tags. This tab has four buttons:
New
Properti
es
Modify
Remove
Creates new user defined menus (development mode only).
Displays the properties of the selected tag (development mode only). See: Tag Properties
Allows the value of the selected analog tag to be changed (development and runtime).
Removes a selected analog tag that is displayed as gray because it is not being used by any
menu or alarm (development and runtime).
Referenc Displays all the places where this tag is used within the ScadaPhone project.
es
Note: The information on the Analogs tab may also be displayed in a separate window by selecting
Window | Analog Tags
Strings tab
The Strings tab displays the list of string tags (and their values) referenced by the alarms and user
defined menus. Tag names used in ScadaPhone must exactly match the tag names in the SCADA
system, unless the tag is a computed tag. See: Computed Tags. In addition, ScadaPhone reserves the
"$" symbol for predefined system tags. If the SCADA tag name happens to begin with "$", prefix the alarm
tag name with two dollar signs: "$$".
ScadaPhone will poll the SCADA system for the values of these tags. Tags that are not referenced by any
alarm or menu are displayed in gray. When the main menu Options | Show System Info option is
checked, system string tags are also visible, ScadaPhone does not poll the SCADA system for system
tags. This tab has four buttons:
New
Creates new user defined menus (development mode only).
Properti Displays the properties of the selected tag (development mode only). See: Tag Properties
es
Modify Allows the value of the selected string tag to be changed (development and runtime).
32
Remove Removes a selected string tag that is displayed as gray because it is not being used by any
menu or alarm (development and runtime).
Referenc Displays all the places where this tag is used within the ScadaPhone project.
es
The two remaining tabs are only visible if the main menu Options | Show System Info option is checked.
Sys Wavs tab
The Sys Wavs tab displays the list of system WAV files that are referenced by the system menus, user
defined menus, and alarms. Filenames displayed in red indicate that the WAV file is referenced by an
alarm or menu but does not exists on disk. A WAV filename displayed in red needs to be recorded.
Filenames displayed in gray indicate WAV file that exists on disk but are not referenced by any alarms or
menus. There are four buttons on this tab:
Record/ Allows the selected WAV file to be re-recorded (development mode only).
(Generat Note: If the 'Text to Speech' option is selected, the Record button will change to Generate.
e)
Selecting an existing WAV file and clicking on the Generate button will generate a new WAV
file replacing the selected WAV file. The new WAV file will use the currently selected voice;
the voice speaks the name of the WAV file
Play
Plays the selected WAV file (development mode only).
Edit
Opens the Edit WAV File window loaded with the selected WAV file (development mode
only). See: Editing WAV Files
Remove Deletes a selected WAV file that is displayed in gray (development mode only).
Details: About WAV files
Sys Menus tab
The Sys Menus tab gives access to the list of system menus. It is NOT recommended that the content of
the system menus be modified, as it may adversely affect the performance of ScadaPhone. System
menus may be re-recorded to change the voice to match other user-defined WAV files, but the message
should stay the same. See: Editing WAV Files. If a needed WAV file is missing, ScadaPhone will create
the default menu structure, but the missing WAV files will be displayed in red on the Sys Wavs tab.
(Contact ScadaTec support for help restoring these files.) There are two buttons on the Menus tab:
Edit
Test
Opens and loads the Menu Information window with the selected menu (development
mode only).
Plays the selected menu over the modem speaker or telephone (depending upon the
settings selected in the main menu Options | Modem Devices) for testing purposes
(development mode only).
Details: Creating and Editing Phone Menus
Registering ScadaPhone
ScadaPhone is available as a free trial version. The trial version will work in Run mode for one hour and
then must be restarted. To eliminate this restriction and use ScadaPhone in your SCADA application, you
must register by contacting SCADATEC's sales department. Upon registration, you will receive an
authorization code. Depending on your needs, this authorization code will be for the full featured
ScadaPhone system or for the limited ScadaPhoneLite system. This code must be entered into the
correct ScadaPhone Registration text box. To open the registration window, select File | Program |
Register from the main screen's menu bar.
33
As indicated in this window, a unique Identification number is generated on each PC. You will need this
ID number when you call to register your copy of ScadaPhone. When the appropriate Authorization Code
is entered, ScadaPhone is enabled to run indefinitely on the current PC as either the full featured or
limited system. This registration may be transferred to another PC. See: Transfer Authorization Code
The following is the full vs. limited features screen.
34
Starting ScadaPhone
Note: The ScadaPhone installation program provides options to create desktop and/or start menu
shortcuts.
To start ScadaPhone:
Double-click the desktop shortcut.
OR
use the start menu shortcut to ScadaPhone, by clicking Start | Programs | ScadaTEC |
Scadaphone version #
OR
Use Windows Explorer to display the ScadaPhone.exe program and double-click program name.
Note: ScadaPhone will automatically restart if the amount of Windows memory used is greater than 3
times the baseline established one hour into the current run. This prevents ScadaPhone from gobbling up
all of the available system memory and crashing the system due to unforeseen memory leaks and/or
heap fragmentation. This is merely a precaution and is not expected to happen. ScadaPhone is rigorously
tested for both memory leaks and heap fragmentation.
35
ScadaPhone_Projects
About WAV files
There are two types of WAV (sound) files in ScadaPhone:
1. WAV files recorded by the user
2. System WAV files that come with the ScadaPhone software. System WAV files may be rerecorded so that the voice matches other WAV files, but the content should remain the same.
Changing system WAV files may adversely affect the performance of ScadaPhone.
User defined WAV files are displayed on the WAV Files tab. These WAV files are referenced by the user
defined menus and alarms. Filenames displayed in red indicate that the WAV file is referenced by an
alarm or menu but does not exists on disk. (The WAV file needs to be recorded.) Filenames displayed in
gray indicate WAV files that exists on disk but are not referenced by any alarms or menus. There are five
buttons on this tab:
New
Opens the Create New WAV file dialog box. To create the WAV file, do the following steps:
1. Enter the name of the WAV file in the File Name edit box. Note: Do not enter a file
extension. The extension '.WAV' will be added by ScadaPhone. It is recommended
that the name of the WAV file be the same as the recorded text. If the Text to
Speech option is used, this is mandatory. Example: If the WAV file contains the
phrase, "Chlorine tank level low" the file name should be ChlorineTankLevelLow.
ScadaPhone will append .WAV to the end of the file name. Spaces between the
words are optional.
2. Click Record. ScadaPhone will display a pop-up box with a Stop button. When the
pop-up box indicates recording is in progress, speak the desired message segment
into the microphone.
3. Click Stop to end the recording. This will close the recording box and open the Edit
WAV file window. The Edit WAV file window may be used to play back the WAV
file and to eliminate beginning and ending pauses. Details: Editing WAV Files.
4. Click the OK button on the Edit WAV file window to save the WAV file and return to
the main window.
Record Allows the re-recording of a selected WAV file. A dialog box will open asking confirmation of
the overwrite. Click Yes to open the pop-up recording box. Click Stop to end the recording
and to return to the main window.
Play
Plays the selected WAV file.
Edit
Opens the Edit WAV File window loaded with the selected WAV file. Details: Editing WAV
Files
Remove Removes a selected WAV file that is displayed in gray.
System WAV files are displayed on the Sys Wavs tab. If the Sys Wavs tab is not visible, open the
Option menu and select the Show System Info option. System WAV files are sound files referenced by
the system menus, user defined menus, and alarms. Filenames displayed in red indicate that the WAV
file is referenced by an alarm or menu but does not exists on disk. A WAV filename displayed in red
needs to be copied from the ScadaPhone CD or the ScadaTEC website or re-recorded. Filenames
displayed in gray indicate WAV file that exists on disk but are not referenced by any alarms or menus.
There are four buttons on this tab:
Record
Allows the re-recording of a selected WAV file. A dialog box will open asking confirmation of
the overwrite. Click Yes to open the pop-up recording box. Click Stop to end the recording
36
and to return to the main window.
Plays the selected WAV file.
Opens the Edit WAV File window loaded with the selected WAV file. Details: Editing WAV
Files
Remove Removes a selected WAV file that is displayed in gray.
Play
Edit
WAV files may also be recorded when creating voice messages for alarms (see:Voice Message
Composition) and message segments for phone menus (see: Menu Item Message Composition). In
addition, new WAV files may be created from the Edit WAV file window. (See: Editing WAV Files.)
Technical Note
This note explains the options available for recording and playback of WAV files in ScadaPhone version
4.2.1.10 and above. It also provides some suggestions for getting the best sound quality.
Two options for recording and playback of WAV files are:
1. Through the voice modem.
2. Through the PC sound card.
There are other options such as using special software and hardware packages, but these will not be
discussed in this note. If other methods of creating the WAV files are used, the resulting WAV files must
be 16 bit monaural and recorded at 8K samples/sec.
Which of the two above options will give the best sound quality depends on the following:
Ÿ Quality of the microphone
Ÿ Quality of the speaker(s). Note: The MultiTech modem uses an amplified speaker or it may be
patched into the PC sound card 'Line' input to play through the PC speakers.
Ÿ Quality of the PC sound card.
Ÿ PC soundcard setup.
High quality recordings may be created using the MultiTech modem and microphone that is shipped with
the ScadaPhone software. Recordings may also be created using the PC sound card. If both options are
available, it is best to try both of them and see which works best with any given PC. Another possibility is
that the best results will be obtained by recording via the modem on a development PC and using the PC
sound card for playback on the production PC. Another option is to use a good quality stereo
microphone/headphone combination. In any case, the following recording tips will be useful.
Controls and Options
The following controls and options are available:
1. Automatically adjust the recording volume:
From the main menu, select Options | Amplitude Adjustment and check the Auto Adjust
Amplitude When Recording checkbox.
2. Use the PC sound card:
Select Options | Audio Devices from the main menu and check the Checkbox.
3. Adjust the modem playback volume level:
Select Modem | Volume from the main menu and adjust the slider bar.
4. Adjust the sound card record and playback volume:
Use the Windows volume control applet. From the Start menu, select Programs | Accessories |
Entertainment | Volume Control'
Recording Tips
Ÿ Select a quiet area. Noise from the PC fan, hard disk, as well as other room noise is detrimental
to recording quality. During playback there should be no ambient noise recorded during the
37
pauses between spoken words.
Ÿ Use a foam cover on the microphone to minimize the hisses and pops that are common during
speech.
Ÿ Speak at a 90 degree angle to the microphone instead of directly into it.
Ÿ Speak clearly and distinctly with adequate volume.
Ÿ If using the modem for output, start by adjusting the modem volume to ¼ full volume. (From the
ScadaPhone main menu select Modem | Volume.)
Ÿ If recording via the modem, start by leaving the Options | Amplitude Adjustment - Auto Adjust
Amplitude When Recording Checkbox unchecked.
Ÿ If using the 'system' WAV files provided, try to match the recording level of the 'system' WAV files
as closely as possible.
Ÿ The amplitude of one or more files may be adjusted after they are recorded in the 'Edit Wav File'
form. However, boosting the level of a low volume WAV file will also boost any ambient
background noise. It is better to record the WAV files with sufficient volume to begin with.
Acknowledging Alarms
There are three ways to acknowledge alarms in ScadaPhone: 1) Over the phone, 2) From the
ScadaPhone application on the PC (console acknowledgement), and 3) From the SCADA application.
ScadaPhone can also be configured so that when an alarm is acknowledged in the SCADA software
ScadaPhone will consider the alarm to have been 'phone acknowledged'.
Alarm acknowledgement is configured when an alarm is defined in the Alarm Information window. (See
Creating Alarm Tags and Messages.)
Phone Acknowledgement
To acknowledge an alarm from the phone, the user listens to the alarms and presses the proper keypad
key to acknowledge the alarms individually or all active alarms at once. If the alarm requires only phone
acknowledgement, ScadaPhone will stop trying to call contacts for the alarm.
If the alarm requires both console and phone acknowledgement, ScadaPhone will discontinue calling
contacts for the period of time set by the Ack Timeout slider in the Alarm Contact window. (See:
Entering Alarm Contact Information.) If this time expires and there has been no console
acknowledgement, ScadaPhone will start calling contacts for the alarm again.
Acknowledging an alarm from the console always causes ScadaPhone to stop trying to phone contacts
for that alarm unless the alarm clears and re-occurs. Of course, ScadaPhone will continue calling
contacts for new or unacknowledged alarms.
ScadaPhone can also be configured so that when an alarm is acknowledged in ScadaPhone, it will set
the acknowledge tag for the alarm to True in the SCADA software. This is accomplished by filling in the
Ack Tag Name text box on the Alarm Information window. See: Ack Tag Name
Console Acknowledgement
Any alarm may be acknowledged from ScadaPhone at the PC. This is known as console
acknowledgement. Console acknowledgement is accomplished by highlighting the alarm name(s) on the
Alarms tab of the main ScadaPhone screen and clicking on the Ack button.
Any alarm can be acknowledged from the console, even if it has been configured for phone
acknowledgment or for both phone and console acknowledgement. Once an alarm has been
acknowledged from the console, ScadaPhone will not try to call any contacts for that alarm unless the
alarm is cleared and re-occurs.
38
Acknowledgement from the SCADA application
If an acknowledge tag name is entered in the Ack Tag Name text box in the Alarm Information window,
(see: Ack Tag Name), and the SCADA software sets this tag to 'True', ScadaPhone will consider the
alarm to have been 'phone acknowledged'. If ScadaPhone is configured to require console
acknowledgement as well as phone acknowledgement, then the alarm will still have to be acknowledged
from the ScadaPhone software at the console. If this is not done within the period of time set by the Ack
Timeout slider in the Alarm Contact window, then ScadaPhone will resume dialing contacts for the
alarm. (See: Entering Alarm Contact Information.)
Alarm Announcement Options
The timing of alarm announcements as well as the preamble phase "The following alarms require
acknowledgment" can be customized via the Alarm Announcement Options window. To open this
window, select from the main screen's top menu Options | Alarm Announcement:
39
Alarm Announcement Options window
Scroll Bar Timing Settings
Adjust the three local announcement options scroll bars to set the following:
1. How long the alarms should be announced over the speaker before placing a telephone call
2. How long ScadaPhone should pause between announcing alarms
3. How many times the alarms should be announced during each announcement.
Custom Preamble
By default, ScadaPhone alarm announcements are introduced by the following WAV file: "The following
alarms require acknowledgment". To create a custom preamble, click on the Custom radio button and
40
click on the blue CustomPreamble.wav link. (Note: Do not change this name.) Clicking on the
CustomPreable.wav link opens the Edit Wav File dialog box. Click on the Record button, speak the new
preamble message and click on the Stop button when done. Details: Editing WAV Files
Announce acknowledged alarms after announcing unacknowledged alarms
Does just what it says.
Including a touch tone at the beginning of the preamble
In many telephone systems, calls that are not answered within a certain number of rings are automatically
rolled over to voice mail. When this happens there is a voice prompt from the message service that tells
the caller to "Leave a message after the beep...". Because ScadaPhone uses voice detection in
determining when to start enunciating alarms, this voice prompt can trigger a premature alarm
announcement before voice mail recording has begun. In some cases this can be avoided by configuring
ScadaPhone to wait for a longer period of silence after a voice detection event and before playing the
alarms. (See: MultipleScripts in the topic Creating and Editing Answer Detection Scripts.)
However, if the voice mail prompt contains unusually long periods of silence, the resulting answer
detection script may cause annoyingly long periods of delay when the call is answered by a live contact.
To avoid this, ScadaPhone can be configured to emit a "touch tone" that interrupts the voice mail prompt
and switches the voice mail system into record mode immediately. To add this touch tone, select the
Transmit touch tone at beginning of preamble option and click square button that follows this option.
This opens the Select Preamble Touch Tone window. Select the key that corresponds to the tone to be
transmitted. The number or character selected will be displayed in the square button.
Call-out Options
1. Normal Sequencing - Alarms subsequent to the initial alarm will not be reported to contacts after
their acknowledgement time-out period has expired until the entire list of contacts has been
called.
2. Strict Sequencing - Each alarm will be reported to each contact in sequence regardless of
acknowledgement time-outs.
3. Max Calls - Sets the maximum number of times an alarm will be reported to each available
contact. A counter is kept for each alarm for each available contact. This counter is set to zero
each time the alarm goes false.
4. Max Alarms - This sets the maximum number of alarms that are reported to each call-out and
announced locally. This can be used to reduce the length of alarm announcements.
5. Call Warning Delay - This sets how long the yellow alarm warning box is displayed before the
alarm is announced or a call-out is made.
Alarm Options
Announce Alarm Trigger Time - When the Announce Alarm Trigger Time option is checked, each
alarm announcement will start by stating the time the alarm triggered. For example:
Without trigger time option: "Tank 1 High Level"
With trigger time option: "12:46 AM Tank 1 High Level"
Punctuate End of Alarm Messages With a Beep - The Punctuate Alarm Message With A Beep
option can be used to make sure that audio alarm announcements do not "run together" when played
back-to-back. In some cases, the wav files recorded to announce an alarm may lack the proper
inflection or "silence pad" at the end; in order to make the alarm messages unmistakably separate,
ScadaPhone has this option so that at the end of every audio alarm announcement an audible
41
separator (i.e. a Beep) is inserted. For example:
If two or more alarms are being reported, their audio messages (WAV files) are played back-to-back:
Tank 1 High Level Pump 3 Power Fault Wet Well High Level"
If the Punctuate With A Beep option is checked, the message would be:
"Tank 1 High Level <BEEP>
Pump 3 Power Fault <BEEP>
Wet Well High Level <BEEP>"
This ensures that the contact will know that there are 3 separate alarms.
Alarm Groups
Alarms may be assigned to named groups, with different contacts assigned to each group. This allows
different people to be called for different types of alarms, such as plant process alarms, building A/C
alarms, security alarms, etc.
Alarm groups may be added or edited either in the Alarm Information window or the Edit User window.
Contacts are assigned to an alarm group from the Scheduler window. By default, ScadaPhone has one
alarm group named General and alarms and users are assigned to this group.
The Alarm Information window may be opened one of two ways:
1. Click on the Alarms tab on the main window, then click on the New button near the bottom of this
window.
OR
2. Select Window | Alarms from the main menu and click on the New button.
The Alarm Group information is on the left side of this window under the Tag/Alarm Name.
The Edit User window is opened by selecting the Users tab from the main window. Either click the New
button or select a user and click the Edit button. The Alarm Group information is on the left side of this
window under the User Name.
To select a different group, or to create a new group, remove a group, or change a group name, click on
the blue alarm group link. This will open the Select Alarm Group window:
42
The Select Alarm Group window with the default General group
Click the Edit Alarm Groups button. This will open the Alarm Groups window:
The Alarm Groups window
A new group name may be created by clicking the New button. Type the new name into the popup box
and click the OK button. The new name will appear in the Alarm Groups window.
43
An existing group name may be deleted by selecting the group name and clicking the Delete button.
An existing group name may be edited by selecting the group name and clicking the Rename button.
Type the new name into the popup box and click the OK button.
Click the Close button to return to the Select Alarm Group window:
The Select Alarm Group window with two groups
To assign the alarm to a new group, select the group name and click the OK button. ScadaPhone will
return to the Alarm Information window. The blue Alarm Group link will display the new group name the
Alarm or the User is assigned to.
Note: Users may be assigned to multiple groups. Press and hold the CTRL key down while selecting
alarm group names to select multiple group names.
Computed Tags
Computed tags are tags that hold the value of a computation. This computation may be a discrete or
analog expression involving literal values or other tags. Computed tags are added and edited in
Development Mode.
Computed tags may be created by selecting the Discrete, Analog, or String tab on ScadaPhone's main
screen. Create a new tag by clicking the New button. Select the tag name and open the Tag Properties
window by clicking the Properties button. Select the Computed Tag option in the Tag Class panel. This
will open a panel for entering computed tag expressions:
44
Tag Properties window with Computed Tag Expression panel
The tags used in the expression may be any tag name appearing on the Discrete, Analog, or String
tabs. Analog and Discrete tag names may be entered using the Browse/Paste Analogs or Discretes
buttons. The four basic math operators are entered using the standard symbols: + - * /. The following
logical operators may also be entered: AND, OR, NOT, XOR, <>, =. See: Math Operators for a full list of
math operators supported by ScadaPhone.
String tag names may also be entered by typing the tag name; there is no button to browse string names.
Strings are concatenated with the '+' operator. String literals may also be added; these must be in double
quotes.
If ScadaPhone detects an error in the computed tag expression, the expression will change to red and the
Check Syntax button will be enabled. Click the button to see suggestions for correcting the syntax.
In the example below, a computed discrete tag named Chemical Pump5 is being created. This tag value
will be TRUE when the value in the Analog tag named ChlorineTankLevel is less than or equal to the
value of the Analog tag named ChlorineLowLevelAlarmSP:
45
Tag Properties for the computed tag ChemicalPump5
Click the OK button to return to the ScadaPhone main window. The computed tag name will appear on
the tab panel and may be used as any other tag name.
Contact ScadaTec
To purchase a license and receive the unlock code for any of our products please call us at 888-7223283. Note: You will need to have the product demo running or have the computer key generated by the
product available when you call.
Creating a Schedule
About Scheduling
There are two types of scheduling that must be set up in ScadaPhone: Action Scheduling and Contact
Scheduling. Note: The scheduling must be created for each Alarm Group. All scheduling is created in
Development Mode.
Action Scheduling determines what action ScadaPhone will perform and at what time on specific days.
This schedule may be based upon the time of day, day of week, or specific date. Each hour of the 24
hour schedule may be set to one of four actions, which will be triggered when alarms occur:
1. Announce, then call: Announces alarm messages over the modem speaker for a few minutes
before dialing the phone number and performing the action as specified in the Alarm Contact
window. This is used during business hours when system operators are likely to be in close
proximity to the SCADA system, but also might be out of the office and only reachable by
telephone or pager.
46
2. Call but do not announce: Immediately dials the phone number and performs the action as
specified in the Alarm Contact window without playing alarm messages through the modem
speaker. This is desirable during non-business hours when it is unlikely that anyone will be at the
office.
3. Announce but do not call: Announces alarm messages over the modem speaker without time
limit. This is useful if there are operators on duty 24 hours a day. This setting will insure that the
operators are alerted to alarm conditions by the modem speaker if they are away from the
SCADA console or viewing a screen that gives them no visual indication of active alarms.
4. Do not announce, do not call: This setting may be used during testing so that no calls are
placed and no alarms are announced over the speakers.
Details: Action Scheduling
Contact Scheduling tells ScadaPhone which contacts are currently available. The Contacts tab in
ScadaPhone's main window displays a list of who is to be contacted in the event of an alarm. By default,
ScadaPhone assumes contacts are available 24 hours a day, seven days a week. To change this, each
individual contact must have a schedule set up that specifies what hours they may be contacted. This
schedule may be based upon the time of day, day of week, or specific date. Each hour of the 24 hour
schedule may be set to one of two actions, either the contact is available or is not available. Details:
Contact Scheduling
Both Action Scheduling and Contact Scheduling are set up from the Scheduler window. To open the
Scheduler window, select Scheduler from the main screen's top menu:
The default Scheduler window
The above example shows the Scheduler window with one tab named General. The General tab
corresponds to the General alarm group. If there is more than one alarm group, the Scheduler window
47
will have one tab for each alarm group. For example, if the ScadaPhone system had a second alarm
grouped named "AlphaPage", the Scheduler window would appear as follows:
The Scheduler window with two alarm groups
Note: Be sure to select the correct Alarm Group tab when setting up scheduling.
The Scheduler window consists of two panes, Action Scheduling and Contact Scheduling.
Action Scheduling
The left pane of the Scheduler window is named Action Scheduling. Action Scheduling is used to set
up what action ScadaPhone will perform and at what time on specific days. The left part of this pane
contains a list box called Schedule names. The Schedule names list displays defined schedules.
Existing schedules may be edited and new ones created. The right part of the Action Scheduling pane
contains a panel called Day-of-week defaults. When ScadaPhone is first started, it has two default
schedules, Weekday, which is assigned to Monday-Friday, and Weekend, which is assigned to Saturday
and Sunday.
Schedule names
The left part of the Action Scheduling pane contains a list box called Schedule names. The Schedule
names list displays defined schedules. ScadaPhone starts with two predefined schedules, Weekday and
Weekend. The default Weekday schedule is set to "Announce, then call" for the hours between 8:00 a.m.
and 5:00 p.m. The remaining hours of the weekday are set to "Call but do not announce." The default
Weekend schedule is set to "Call but do not announce" for the whole 24 hour period. These schedules
may be edited and new schedules created as needed.
48
Creating New Schedules
To create a new schedule, first click the correct Alarm Group tab in the Scheduler window. Next, click the
New button under the Schedule names list box. This will open the Callout Schedule grid window. See:
Using the Callout Schedule Grid. Once a new schedule is created, the name will be listed in the
Schedule names box. After the schedule is created, it may be assigned to the appropriate day of the
week.
Editing Schedules
To edit a schedule, highlight the schedule name in the Schedule names list box in the Scheduler
window and click the Edit button. This will open the Callout Schedule grid window. See: Using the
Callout Schedule Grid
Assigning Schedules to the Day-of-Week
The Day-of-week box to the right of the Schedule names list in the Scheduler window is used to assign
a schedule (from the Schedule names list) to each day of the week. Before a schedule will be run, it
must be assigned to a day of the week. Change a day-of-week setting by highlighting a schedule in the
Schedule names list and then clicking the day-of-week label. The setting will change to the highlighted
schedule.
Note: Special schedules may be created using the Configure Upcoming Hours and the Configure
Upcoming Holidays and Special Schedules buttons. These schedules are run automatically and do not
need to be assigned to a day of the week.
Creating a Schedule for the Next 24 Hours
A schedule may be created for the next 24 hours period. To create a 24-hour schedule, first click the
correct Alarm Group tab in the Scheduler window. Next, click on the Configure Upcoming Hours button
below the Day-of-week defaults panel. This will open the Callout Schedule grid window. See: Using the
Callout Schedule Grid.
When the 24-hour schedule is created, ScadaPhone will display the name(s) in the Schedule names box
in the format year-month-day(nameofday). Usually a 24-hour schedule will consist of two schedule
names, each covering part of a day. For example, a 24-hour schedule running from 8:00 a.m. on Jan 1,
2003 to 8:00 a.m. on Jan. 2, 2003 will be displayed in the Schedule names box as "2003-01-01(Weds)"
and "2003-01-02(Thurs)." The 2003-01-01(Weds) schedule covers the hours 8:00 a.m. to midnight and
the 2003-01-02(Thurs) schedule covers the hours from midnight to 8:00 a.m. This schedule is run
automatically during the scheduled time period, instead of the day-of-the-week schedule.
When a 24-hour schedule has expired, it may be removed by clicking the Delete Expired Schedules
button
Creating Special Schedules
Special schedules may be created for upcoming days such as holidays. To create a special schedule,
first click the correct Alarm Group tab in the Scheduler window. Next, click on the Configure upcoming
holidays and special schedules button. This will open the special schedules calendar:
49
The special schedules calender
Click on the date for the upcoming special schedule. This will open the Callout Schedule grid window.
See: Using the Callout Schedule Grid. When the schedule grid is completed, click on the OK button to
return to the calendar. Click on another date or click the Done button if finished.
A special schedule will be entered into the Schedule names box of the Scheduler window in the format
year-month-day(nameofday). For example, a special schedule might appear as follows: 2003-01-03(Fri).
This schedule is run automatically during the scheduled time period, instead of the day-of-the-week
schedule.
After special schedules dates have passed, click on the Delete Expired Schedules button to remove
them.
Using the Callout Schedule Grid
The Callout Schedule Grid window is opened from the Scheduler window whenever a new schedule is
created or an existing schedule is edited:
50
The callout schedule grid
The Callout Schedule Grid consists of 288 (24 X 12) cells that represent a 24-hour day divided into 5minute time slices. The grid columns represent hours, the grid rows represent 5-minute intervals. Each
cell in the grid can be set to one of four states:
1. Announce, then call: Announces alarm messages over the modem speaker for a few minutes
before dialing the phone number and performing the action as specified in the Alarm Contact
window. This is used during business hours when system operators are likely to be in close
proximity to the SCADA system, but also might be out of the office and only reachable by
telephone or pager.
2. Call but do not announce: Immediately dials the phone number and performs the action as
specified in the Alarm Contact window without playing alarm messages through the modem
speaker. This is desirable during non-business hours when it is unlikely that anyone will be at the
office.
3. Announce but do not call: Announces alarm messages over the modem speaker without time
limit. This is useful if there are operators on duty 24 hours a day. This setting will insure that the
operators are alerted to alarm conditions by the modem speaker if they are away from the
SCADA console or viewing a screen that gives them no visual indication of active alarms.
4. Do not announce, do not call: This setting may be used during testing so that no calls are
placed and no alarms are announced over the speakers.
To set cell states, click the desired color swatch in the Color Key box. The selected color swatch will be
displayed in the Selected action color swatch. Click on the Set Whole Grid button to set the entire 24
hour period to the Selected action color. Click a column heading to set an entire hour to the Selected
action color. Click on an individual cell or click and drag to set individual cells to the Selected action
color.
51
To save the schedule, click on the OK button. To exit a schedule without saving, click on the Cancel
button. To remove a previously saved schedule, click on the Delete button.
Deleting Schedules
To remove a schedule listed in the Schedule names box in the Scheduler window, select the name and
click the Delete button. Expired special schedules and 24-hour schedules may be deleted by clicking the
Delete Expired Schedules button.
Contact Scheduling
The right pane of the Scheduler window is named Contact Scheduling. To open the Scheduler window,
click Scheduler from the main screen's top menu:
The Scheduler window with two alarm groups
Contact Scheduling is used to set up the list of whom ScadaPhone is to contact in the event of an alarm.
Each individual contact must have a schedule set up that specifies what hours they may be contacted.
The Contact List box displays the name of the contacts in the order they will be contacted. The next
contact to be called is highlighted with an
icon to the left of the name. If a contact has not been
enabled, or their schedule makes them unavailable, the icon to the left of the name will be red and the
name grayed out.
When working with contacts, be sure to select the appropriate Alarm Group tab in the Scheduler window.
If a contact is assigned to more than one alarm group, the contact's schedule set up for one alarm group
will not affect their schedule for a different alarm group.
52
Adding or Removing Contacts
To add or remove a contact to or from the Contact List box, first click the correct Alarm Group tab in the
Scheduler window. Next, click the Add/Remove Contacts button. This will open the Add/Remove
Contacts window:
Add/Remove contacts for the General alarm group
This window displays the contacts defined on the main window's Contact tab. See: Entering Alarm
Contact Information. Contacts that have already been scheduled to be called appear in the left pane.
Contacts not yet assigned and that are available appear in the right pane. To move a contact from one
pane to the other, highlight the contact name and click the right or left arrow button.
To create a new contact, click the New button. This will open the Alarm Contact window. See: Entering
Alarm Contact Information. Enter the new contact information and click OK. The new contact will be listed
in the Available Contacts pane and also will be entered on the main window's Contact tab.
When finished adding or removing contacts, click the OK button to return to the Scheduler window.
Editing Alarm Contact Information
Each contact displayed in the Contact List pane in the Scheduler window has previously defined data,
such as the telephone number to dial, call persistence settings, and answer detection scripts. This
information may be edited by clicking the Edit button. This will open the Alarm Contact window. See:
Entering Alarm Contact Information. Edit the contact information and click OK. ScadaPhone will return to
the Scheduler window.
Changing the Contact Order
When alarms trigger, ScadaPhone will continuously cycle through the list of contacts displayed in the
Contact List pane in the Scheduler window until someone acknowledges the active alarm(s). The
contacts will be called in the order they are displayed in the list, starting from top to bottom. The contact
list may be reordered either manually, by clicking on the name of the contact and then click on the up or
down arrows to move the contact up or down in the list, or automatically based on a user defined
schedule rotation .
53
Setting up Schedule Rotations
To set up automatic schedule rotations to reorder the contact list at on a given day and time, click the
'Schedule Rotations' button on the scheduler screen. This will bring up the following window.
Rotation Scheduler window
To setup a new contact sequence and set the date and time for the new sequence to occur, click the
'New' button. To edit an existing Scheduled Rotation. click the 'Edit' button. Either of these actions will
display the following window.
NOTE: Be sure to select the desired alarm group tab first.
54
Edit Rotation window
Select the date and time for the new contact sequence to occur. Reorder the contact sequence as
desired by selecting a name and clicking the up or down buttons. Click the 'OK' button.
NOTES: If ScadaPhone is in 'Run' mode the contact sequence will be automatically changed to the new
sequence at each scheduled rotation. The new sequence will exist until the next scheduled rotation or is
changed manually. If the contact list is reordered manually in the scheduler window after adding one or
more scheduled rotation, the following window will be displayed.
55
Contact Rotation Sequence Mismatch window
This window allows various options as described. Click on the desired button.
Setting up the Contact Schedule
By default, ScadaPhone assumes contacts are available 24 hours a day, seven days a week. To change
this, each individual contact must have a schedule set up that specifies what hours they may be
contacted. To set up the contact's schedule, first select the appropriate Alarm Group tab in the Scheduler
window. If a contact is assigned to more than one Alarm Group, the contact's schedule created for one
alarm group will not affect their schedule for a different alarm group.
Next, click the name of the contact in the Contact list box and click the Configure contact availability
schedule button. This will open the Contact Availability Scheduler window:
56
Contact Availability Scheduler window
Using the Contact Availability Scheduler Window
The Contact Availability Scheduler window is almost identical to the left Action Scheduling pane in the
Scheduler window. The difference is that the Contact Availability Scheduler window is used to set up
when a specific contact is available, whereas the Action Scheduling pane determines what action
ScadaPhone will perform and at what time on specific days. The left part of the Contact Availability
Scheduler window contains a list box called Schedule names. The Schedule names list displays
defined schedules. Existing schedules may be edited and new ones created. The right part of the
Contact Availability Scheduler window contains a panel called Day-of-week defaults. Each contact
has two default schedules, Weekday, which is assigned to Monday-Friday, and Weekend, which is
assigned to Saturday and Sunday. However, the two default schedules are identical--both make a contact
available 24 hours a day. The schedules may be edited as needed.
Creating New Contact Schedules
To create a new contact schedule, click the New button under the Schedule names list box in the
Contact Availability Scheduler window. This will open the Contact Schedule grid window. See: Using
the Contact Schedule Grid. Once a new schedule is created, the name will be listed in the Schedule
names box. After the schedule is created, it may be assigned to the appropriate day of the week.
Editing Contact Schedules
To edit a contact's schedule, highlight the schedule name in the Schedule names list box in the Contact
Availability Scheduler window and click the Edit button. This will open the Contact Schedule grid
window. See: Using the Contact Schedule Grid.
Assigning Contact Schedules to the Day-of-Week
The Day-of-week box to the right of the Schedule names list in the Contact Availability Scheduler
window is used to assign a schedule (from the Schedule names list) to each day of the week. Before a
schedule will be run, it must be assigned to a day of the week. Change a day-of-week setting by
highlighting a schedule in the Schedule names list and then clicking the day-of-week label. The setting
will change to the highlighted schedule.
57
Note: Special schedules may be created using the Configure Upcoming Hours and the Configure
Upcoming Holidays and Special Schedules buttons. These schedules are run automatically for the
contact and do not need to be assigned to a day of the week.
Creating a Contact Schedule for the Next 24 Hours
A schedule may be created for the next 24 hours period. To create a 24-hour schedule, click on the
Configure Upcoming Hours button below the Day-of-week defaults panel in the Contact Availability
Scheduler window. This will open the Contact Schedule grid window. See: Using the Contact Schedule
Grid.
When the 24-hour schedule is created, ScadaPhone will display the name(s) in the Schedule names box
in the format year-month-day(nameofday). Usually a 24-hour schedule will consist of two schedule
names, each covering part of a day. For example, a 24-hour schedule running from 8:00 a.m. on Jan 1,
2003 to 8:00 a.m. on Jan. 2, 2003 will be displayed in the Schedule names box as "2003-01-01(Weds)"
and "2003-01-02(Thurs)." The 2003-01-01(Weds) schedule covers the hours 8:00 a.m. to midnight and
the 2003-01-02(Thurs) schedule covers the hours from midnight to 8:00 a.m. This schedule is run
automatically for the contact during the scheduled time period, instead of the day-of-the-week schedule.
When a 24-hour schedule has expired, it may be removed by clicking the Delete Expired Schedules
button
Creating Contact Special Schedules
Special schedules may be created for upcoming days such as holidays. To create a special schedule,
click on the Configure upcoming holidays and special schedules button in the Contact Availability
Scheduler window. This will open the special schedules calendar:
58
The contact special schedules calender
Click on the date for the upcoming special schedule. This will open the Contact Schedule grid window.
See: Using the Contact Schedule Grid. When the schedule grid is completed, click on the OK button to
return to the calendar. Click on another date or click the Done button if finished.
A special schedule will be entered into the Schedule names box of the Contact Availability Scheduler
window in the format year-month-day(nameofday). For example, a special schedule might appear as
follows: 2003-01-03(Fri). This schedule is run automatically for the contact during the scheduled time
period, instead of the day-of-the-week schedule.
After special schedules dates have passed, click on the Delete Expired Schedules button to remove
them.
Deleting Contact Schedules
To remove a schedule, highlight the schedule name in the Schedule names list box in the Contact
Availability Scheduler window and click the Delete button. Expired special schedules and 24-hour
schedules may be deleted by clicking the Delete Expired Schedules button.
The Schedule Override Bit
The regularly scheduled callout action can be superceeded by an override action if this discrete bit is
True. The override bit and the override action is configured on the Schedule Override Bit form.
Schedule Holes
A schedule hole is a period of time where there are no contacts available to receive alarm callouts. If an
alarm is triggered during a schedule hole, ScadaPhone will be unable to report it. To check for holes in
the schedule click on the Check For Schedule Holes button. This will display the following window if
there are holes. This check is performed automatically each time the scheduler window is closed.
59
To exclude alarm groups from this check click on the Exclude Alarms Group(s) Button.
Using the Contact Schedule Grid
The Contact Schedule Grid window is opened from the Contact Availability Scheduler window
whenever a new schedule is created or an existing schedule is edited:
60
The contact schedule grid filled out for a half-day schedule
The Contact Schedule Grid consists of 288 (24 X 12) cells that represent a 24-hour day divided into 5minute time slices. The grid columns represent hours, the grid rows represent 5-minute intervals. Each
cell in the grid can be set to one of two states, Available or Not Available.
To set cell states, click the desired color swatch in the Color Key box. The selected color swatch will be
displayed in the Selected action color swatch. Click on the Set Whole Grid button to set the entire 24
hour period to the Selected action color. Click a column heading to set an entire hour to the Selected
action color. Click on an individual cell or click and drag to set individual cells to the Selected action
color.
To save the schedule, click on the OK button. To exit a schedule without saving, click on the Cancel
button. To remove a previously saved schedule, click on the Delete button. ScadaPhone will return to the
Contact Availability Scheduler window.
Creating a User's List
Access to ScadaPhone is controlled by passwords. A user list must be created in order to specify
passwords and access levels for authorized users of the system. To access the user list, click the Users
tab on ScadaPhone’s main Window. If no users have been defined, the message "No users defined" will
be displayed. Before a user list can be created, a supervisor must be defined; supervisor access is
required to create the user list. After the supervisor is defined, user accounts may be created. The user
list must be created in Development Mode.
61
Note: In the Sample project included with ScadaPhone, the default Supervisor password is 2000.
Creating a Supervisor
To create a supervisor, on the Users tab of the main window, click the New button. The Create
Supervisor window will appear:
The Create Supervisor window
Select a supervisor password, enter it twice (as indicated). Be sure to remember this password! After the
passwords are entered, either select Start a session or Grant access (no session). Starting a session
allows the supervisor to perform all password-controlled functions for up to 60 minutes without having to
repeatedly enter the password. Set the session length using the scroll bar. The Grant access option only
allows performance of a single operation. Click OK when finished.
Creating User Accounts
After the supervisor login is defined, any number of additional users with varying access levels may be
defined. To define users, click the New button from the Users tab of the main window. The Edit User
window will be displayed:
62
The Edit User window
This window allows entry of the user's name, alarm group, access level, and password. All passwords
must be unique a non-unique password is entered a red warning label is displayed as shown above, the
'OK' button is grayed out and the following warning dialog is displayed. The format is "UserName1"
password = "UserName2" password. A check for duplicate passwords is also done when switching to
'RUN' mode.
Type the new user's name in the User Name text entry box.
Each user may be assigned a base menu to be played when he/she logs in. The default menu is
MainMenu. To assign a different base menu click on the blue text to the right of 'Base Menu'. This option
is used to assign different menu trees to different users.
The new user must be assigned to one of the four Access Levels:
Ÿ Limited: This allows the user to listen to alarms and menus, but does not allow the user to
63
acknowledge alarms or change setpoints (analog or discrete values).
Ÿ Alarm Ack: This allows the user to listen to alarms and menus, acknowledge alarms, but does
not allow the user to change setpoints (analog or discrete values).
Ÿ Data Entry: This allows the user to listen to alarms and menus, acknowledge alarms, and
change setpoints (analog or discrete values).
Ÿ Supervisor: Can do all of the above as well as make other changes within ScadaPhone, such as
adding or deleting users and changing user passwords.
Alarm grouping allows alarms and callouts to be assigned to different groups, so that different people will
be called for different alarms. By default, the new user is assigned to the General group. To select a
different group, or to create a new group, click on the blue link. The following dialog will appear. For more
information about creating alarm groups, see: Alarm Groups.. This will display the following dialog box.
Click on the '*ALL* button to assign the user to receive alarms from all current and future groups.
Enter the user's unique password in the Password and Confirm Password boxes. Clicking the Hide
check box will alternate the characters displayed in the password boxes: If Hide is checked, asterisks are
displayed; if Hide is not checked, the password is visible. Also note that when Hide is not checked, a
label showing the password converted into telephone digits is displayed (e.g. if the password is Rocky,
the telephone digits will be 76259).
When the user definition is completed, click the OK button. The new user will be added to the list
displayed on the Users tab in the main window.
Editing or Deleting a User
A user may be edited by highlighting the user name on the Users tab of the main window and clicking the
Edit button. The Edit User window will be displayed. Enter the changes and click the OK button.
64
To remove a user, highlight the user name on the Users tab of the main window and click the Delete
button.
Creating Alarm Tags and Messages
Alarm tags and messages are created in Development Mode.
ScadaPhone allows an unlimited number of alarm messages to be defined. The alarm messages report
the status of analog or discrete alarm tags in a SCADA system. These alarms may be grouped so that
different groups of people can be notified for different alarms. Alarm messages are added through the
Alarm Information window.
Note: If ScadaPhone is being configured for use with CitectSCADA software, alarm tags may be imported
directly form the CitectSCADA software. Please see the topic, Citect Interface.
To open the Alarm Information window, click on the Alarms tab on the main window, then click on the
New button or selecting an alarm and clicking the Edit button near the bottom of this window. The Alarm
Information window will appear.
Note: The Alarm Information window can also be opened by selecting Window | Alarms from the main
screen's top menu and clicking on the New button. Existing alarms may be edited by selecting the alarm
and clicking on the Edit button.
65
The Alarm Information Window for discrete alarm tags
66
The Alarm Information Window for analog alarm tags
Alarm Type
Alarms may be generated from discrete or analog tags. Start by selecting the type of tag which will be
used for this alarm, this will change the alarm information window to allow entry of the appropriate
information.
Tag/Alarm Name
The name of the SCADA tag to be polled (and which will trigger this alarm) must be entered into the top
Tag/Alarm Name box. To enter a tag name do one of the following:
Type the tag name of the SCADA system alarm data point into the Tag Name text entry box exactly
as it appears in the SCADA system database (except as noted below).
OR
Click the Browse button to see a list of discrete tag names defined on the alarm tab but not used in
67
an alarm. (Related topic: Entering Tag Names)
OR - If Citect has been selected in ScadaLink Setup:
Click the blur Browse Citect Alarms text to select and import alarms from the Citect SCADA
software. Note: The blue text shows up only if Citect has been selected in ScadaLink Setup.
Note: The tag name may also be a computed tag, in which case it does not need to match a tag name in
the SCADA system. See: Computed Tags. In addition, ScadaPhone reserves the "$" symbol for
predefined system tags. If the SCADA tag name happens to begin with "$", prefix the alarm tag name with
two dollar signs: "$$".
Ack Tag Name
ScadaPhone can report alarm acknowledgment back to the SCADA system via the Ack Tag Name box in
the Alarm Information window. To utilize this feature, an acknowledgment tag name needs to be entered
into this dialog box. If a tag name is entered into this box, ScadaPhone will set this tag in the SCADA
system to a logical "1" when the alarm has been acknowledged in ScadaPhone. ScadaPhone will set this
value back to "0" after it has recognized the acknowledgement. Some SCADA systems provide the ability
to acknowledge an alarm via an extension on the alarm tag name. A common extension is .ack. For
example, if the alarm tag name is TurbHighAlarm, then to have ScadaPhone send an acknowledgement
for this alarm to the SCADA system, the Ack Tag Name will be TurbHighAlarm.ack. A quick way to enter
this common acknowledgment tag name is by clicking on the blue link following the Ack Tag Name box.
For iFix alarms the suffex appended is .A_NALM. If the SCADA system uses a different
acknowledgement scheme, type in the entire acknowledgment tag name. If the SCADA system requires
that the acknowledgment tag be set to a logical "0" when the alarm has been acknowledged in
ScadaPhone then check the Inverse Logic checkbox.
Alarm Group
Under the Tag/Alarm name box in the Alarm Information window is the Alarm Group settings. The blue
link shows which alarm group the alarm will be placed in. By default, a new alarm is assigned to the
General group. To select a different group, or to create a new group, click on this link. Note: Alarm
grouping allows alarms and callouts to be assigned to different groups, so that different people will be
called for different alarms. For more information about creating alarm groups, see: Alarm Groups
Check the enabled option to have ScadaPhone report the alarm. If the enabled option is unchecked,
ScadaPhone will NOT report the alarm. Select additional appropriate options for the alarm group by
clicking on one or more of the corresponding check boxes:
Ÿ Enabled - Enable/disable this alarm from being reported.
Ÿ Latching Phone Ack - Requires that the alarm be acknowledged from the phone even if the alarm is
no longer active. This will also ensure that the contact will know which alarm caused the callout even if
it is no longer active.
Ÿ Console Ack Required - Requires that the alarm be acknowledged from the PC console.
Ÿ Latching Console Ack - Requires that the alarm be acknowledged from the PC console even if it is
no longer active.
Ÿ Negative Logic - If this option is selected, the alarm is reported when the discrete tag turns FALSE
instead of the normal mode which reports the alarm when the discrete tag turns TRUE.
Priority
Alarms can be assigned one of 6 priorities: Very Low, Low, Normal, High, Very High, and Broadcast. An
alarm's priority dictates how it will be positioned within alarm announcements (i.e. Broadcast alarms will
be reported before Very High priority alarms, Very High priority alarms will be reported before High priority
alarms, etc...). The highest priority alarms, Broadcast, will be announced to every available contact in
rapid succession (ScadaPhone will not wait for contacts to acknowledge Broadcast alarms before calling
the next contact). After all of the contacts have been called to report a Broadcast alarm, ScadaPhone will
wait for phone acknowledgements.
68
Signal Filtering
Under the Tag/Alarm name box in the Alarm Information window is the Filter delay display . The
amount of time shown in this display determines how long the alarm condition must be active before the
alarm is reported. The boolean field following the filter delay time display indicates if this delay will be
applied when the alarm clears. To change the setting Click on the blue display text. This will bring up the
Alarm Filter Delay dialog where the delay value may be adjusted.
The Alarm Filter Delay Window
Note that this same delay may be applied when the alarm clears by selecting the Yes radio button. For a
detailed explanation click on the blue text to the right of the radio buttons. This will bring up the following
dialog.
69
Automatically Ack When Reported
To have alarms to be "automatically acknowledged" upon being successfully reported check this box. If
this box is not checked the alarm will not be considered acknowledged until it us physically acknowledged
by a user, either at the console of via the phone.
Setting High and Low Alarm Limits
If the Analog Alarm type is selected you may set the High, High High, Low, and Low Low alarm limits.
This is done by clicking on the blue text to the right of any of the limits. This will bring up the Analog Alarm
Limits dialog. Numeric values or analog tag names may be entered for each limit. Clicking on either of the
'Defaults' buttons will antomaticaly enter the correct alarm limit tags for the indicated SCADA system.
70
The Analog Alarm Limits window
Text Message for e-mail or Alpha-numeric Pagers
In the center of the Alarm Information window is a text box for entering alpha-numeric text messages.
ScadaPhone can send a text message with an embedded tag value to an alpha-numeric pager or to an email address. (To send a text message, select either the Alpha-numeric Pager using TAP protocol
option or the Email option in the Alarm Contact Window. E-mail settings must be set from the main menu
under Options | Email Settings.)
The text message is composed of static text (text that does not change), the tag name, and formatting
information. The static text must be enclosed in double-quotes and separated from the tag name with plus
signs. As the text message is composed, the display format will be shown under the text box. If a multiline text message is desired, click on the blue Multi-Line Edit text to the right of the text message title.
This will bring up the Multi-Line Text Message Editor window which will allow the insertion of carriage
returns in the message.
Note: If there are any errors in the configuration of a text message, the message will be output as is.
Analog Tag Text Message Example:
To display the message "Tank 1 high level" followed by the current value (to one decimal place) for
the Tank1Level analog tag, enter this text message :
"Tank 1 high level : "+Tank1Level(X.X)+" feet"
If Tank1Level has a value of 26.223, the above text message will produce this output :
Tank 1 high level : 26.2 feet
Notice that with the format X.X, the tag value is rounded to one decimal place. A format of X.X will
produce the following output given the following values for TankLevel1:
TankLevel1
0.05234
71
X.X
0.1
9.86111
99.95000
9.9
100.0
The fact that only one X is specified to the left of the decimal point does not affect the output.
ScadaPhone will add more digits as needed. (Similarly, the formatting may be entered as XX.X, or
even XXX.X. The number of X's to the left of the decimal place has no effect on output.)
Discrete Tag Text Message Example:
To display the text message "Tank 1 high level, transfer pump" followed by the value of a discrete
tag named XferPump1A as RUNNING (if the tag value is true) or as OFF (if the tag value is false),
enter this text message :
"Tank 1 high level, transfer pump : "+XferPump1A(RUNNING/OFF)
If the tag value is true, the above text message will produce this output :
Tank 1 high level, transfer pump : RUNNING
The general format is tagname(TrueString/FalseString). If the given tag value is true, the text
message will display the string specified for the TrueString and if the given tag value is false the
text message will display the string specified for the FalseString.
String Text Message Example:
To display the text message "Current status" followed by the value of the first ten characters of a
string tag named StatusStr, enter this text message:
"Current status: "+StatusStr(10)
If StatusStr has a value of "BACKWASH FILTER #2", the above text message will produce this
output:
Current status : BACKWASH F
The number in parenthesis following StatusStr is the maximum number of characters of the string
tag's value that will display. If there is no limit for the length of the tag value, specify a length of (-1).
Voice Message Composition
At the bottom of the Alarm Information window is a text box for creating voice messages. A message
must be created for ScadaPhone to use when an alarm is triggered. Most alarm messages are simple
and straightforward, such as "Sulfuric acid tank is overflowing" or "Reactor core is approaching meltdown
temperature." A single sound (WAV) file message segment can handle messages such as these.
However, ScadaPhone's alarm and menu messages allow one or more message segments to be
appended together, so that live tag values can be incorporated into the message.
Creating Message Segments
There are four types of message segments:
1. WAV File: Any recorded message.
2. Analog Value: Enunciates the current value of an analog tag from the SCADA system.
3. Discrete Value: Enunciates the current value of a discrete tag from the SCADA system.
4. If WAV: Allows the inclusion of a wav file in the message segment based on a boolean
expression.
To create message segments, click the Add button in the Voice Message Composition box of the
72
Alarm Information window. This will open the Message Segment window.
The Message Segment window
There three options in the Segment Type panel, covered in detail below:
Ÿ WAV file
Ÿ Analog Value
Ÿ Discrete Value
Ÿ IF WAV
When the WAV file option is selected, the Message Segment box will include a File Functions box.
When the Analog Value is selected, the File Functions box is replaced by the Analog Formats box.
When the Discrete Value is selected, the File Functions box is replaced by the Discrete Formats box.
Defining WAV Message Segments
To use an existing WAV file message segment:
Ÿ In the Message Segment window, click the Browse button. This will open the Select
WAV file window.
Ÿ Click on the name of the WAV file to be added
Ÿ Click on the OK button.
Ÿ Click the OK button in the Message Segment window to return to the Alarm
Information window. The name of the message segment will be entered into the Voice
Message Composition list.
To create a new WAV File message segment:
Ÿ In the Message Segment window, click the WAV File option.
Ÿ Enter the name of the WAV file in the File Name edit box. Note: Do not enter a file
extension. The extension '.WAV' will be added by ScadaPhone.
Ÿ Click Record. ScadaPhone will display a pop-up box with a Stop button. When the popup box indicates recording is in progress, speak the desired message segment into the
microphone.
Ÿ Click Stop to end the recording. This will close the recording box.
Ÿ Click the Play button to listen to the message segment just recorded. If necessary, rerecord a WAV segment by clicking the Record button again. If the WAV file already
exists, a pop-up box will ask confirmation of the file overwrite.
Note: The recording and playback of sound (WAV) files may be done either through the voice
modem or a PC sound card. See: Setting the COM Port from the main window
WAV files may also be edited for content or unwanted noise at the beginning and/or end of the
73
recording may be trimmed. To edit a WAV file, select the file click the Edit button in the Message
Segment window. This will open the Edit Wav File window. Details: Editing WAV Files
When the message segment is complete, click OK from the Message Segment window to return
to the Alarm Information window. The name of the message segment will be entered into the
Voice Message Composition list.
Defining Analog Value Message Segments
An analog value may be added to an alarm message. To add an Analog value message segment
to the Alarm Information window's Voice Message Composition box, click Add. The Message
Segment window will open. Click the Analog Value option. The File Functions box is replaced by
Analog Formats.
Enter the name of the analog tag to be enunciated. Use the Browse button to see a list of analog
tag names defined on the main window's Analog tab.
Adjust the slider to select the number of digits to the right of the decimal point to be enunciated.
Click OK to return to the Alarm Information window. The name of the analog tag will be entered
into the Voice Message Composition list.
Defining Discrete Value Message Segments
A discrete value may be added to an alarm message. To add an Discrete Value message segment
to the Alarm Information window's Voice Message Composition box, click Add. The Message
Segment window will open. Click the Discrete Value option. The File Functions box is replaced
by Discrete Formats.
Enter the name of the discrete tag to be enunciated. Use the Browse button to see a list of
discrete tag names defined on the main window's Discrete tab.
Click the appropriate option button in the Discrete Formats box to select the how the discrete
value will be enunciated.
Click OK to return to the Alarm Information window. The name of the discrete tag will be entered
into the Voice Message Composition list.
Defining Conditional WAV Message Segments
An existing WAV file may be conditionally added to an alarm message. To add a conditional WAV
file segment to the Alarm Information window's Voice Message Composition box, click Add. The
Message Segment window will open.
74
The Message Segment window with and IF WAV condition
Click the If WAV option. Select the name of the WAV file segment to be conditionally added by
clicking on the Browse button next to the File Name text box. Enter the logical conditional
expression in the Conditional Expression text box. The text will be shown in red until a valid
logical expression is entered. Analog and discrete tags may be selected by clicking on the Analog
or Discrete buttons.
The selected WAV file segment will be added to the voice message only when the conditional
expression is True.
For example, this option may be used in situations such as enunciating the position of an HOA
switch in either Hand, Off, or Auto. In this example, the message segment begins by stating "The
HOA switch is in". This is followed by the word "Hand" when the value of the tag named HOA=1, by
the word "Off" when HOA=2, or by the word "Auto" when HOA=3.This requires three IF WAV
segments. The "Hand" IF WAV segment is shown above.
Managing Message Segments
To insert a new segment between existing segments in the Alarm Information window's Voice Message
Composition box, click on the message segment just below where the new segment needs to be. Click
on the Insert button. Define and record segments in the Message Segment window just as when the Add
button is clicked.
To change an existing message segment, highlight it and click the Edit button.
To delete a segment, highlight it and click the Remove button.
Click the Play button to hear the alarm message.
To change the order of message segments, use the up and down arrow buttons to move them to the
correct position.
Saving the Alarm Message
To save an alarm message in the Alarm Information window and return to ScadaPhone's main window,
click the OK button.
75
To save the current alarm message and open the previously defined message on the main window's
Alarms tab into the Alarm Information window, click the OK,Previous button.
To save the current alarm message and open the next defined message on the main window's Alarms tab
into the Alarm Information window, click the OK,Next button.
To save the current alarm message and start a new one, click the OK, New button.
To exit the current alarm message without saving any changes, click the Cancel button.
Deleting an Alarm
To remove an alarm, highlight the alarm name on the Alarms tab of the main window and click the
Delete button. This will bring up the following dialog.
One or more alarms may be selected for deletion. When an alarm is deleted all the tags that are
associated with the deleted alarm(s) and not used elsewhere are also deleted.
76
Creating and Editing Answer Detection Scripts
Answer detection scripts dictate how ScadaPhone handles outgoing (alarm reporting) telephone calls.
Answer detection scripts are set up in the Alarm Contact window. Open the Alarm Contact window by
selecting the Contacts tab on ScadaPhone's main window and then either click the New button or select
a contact name and click the Edit button. The Answer Detection Scripts box is in the center of this
window:
The Alarm Contact window
Each contact can have an unlimited number of answer detection scripts; however, most contacts will only
have one script. The conceptual format of a script is as follows:
Event + Event = Action
Each event corresponds to audio signal states detected by ScadaPhone's Audio Analyzer. The Audio
Analyzer recognizes Voice, Silence, and Tone events. Tone events are used to recognize the beeps in
pager service, voice mail system or answering machine prompts. The Voice Check event is intended to
be used to check to see if a hardware dialer is alive and well. If the hardware dialer fails to respond to the
call with a voice, ScadaPhone will set the bit specified in the 'SetBit' action TRUE, if not it will be set
77
FALSE. This bit can then be used to trigger an alarm. Note: If the hardware modem is calling out when
ScadaPhone attempts to check it a false alarm may be generated.
Action corresponds to one of five possible actions that ScadaPhone can take if the specified events are
detected:
1.
2.
3.
4.
5.
Play the alarms
Play a menu
Play the alarms and a menu
Send pager tones
SetBit
For example, in the Alarm Contact window shown above, the default answer detection script reads:
Voice(0.1) + Silence(0.5) = PlayAlarmsAndMenu(MainMenu)
This script causes ScadaPhone to do the following when alarms are reported to this contact:
Ÿ Instruct the modem to dial the number in the Phone Number box
Ÿ Turn on the Audio Analyzer and "listen" to the audio signal coming from the remote telephone.
Ÿ Disregard signal states that do not correspond to the script events (i.e. the ringing signal from the
telephone company, the silence between the rings, etc.).
Ÿ If a voice is detected for at least 0.1 seconds, and it is followed by 0.5 seconds of silence,
announce the list of active alarms and then present the contact with the MainMenu.
Note that in the in above example, both the Voice event parameter (0.1), and the Silence event parameter
(0.5) specify duration in seconds. ScadaPhone also recognizes tone events. The parameter for tone
events specifies a sound frequency (in Hz.) rather than duration in seconds.
Creating a New Answer Detection Script
To create a new answer detection script, click the New button under the Answer Detection Scripts box
in the Alarm Contact window. This will open the Edit Script window:
78
The Edit Script window
The Events Box
The Events box in the Edit Script window shows the list of events that will occur when the script is
triggered. A new event is added by clicking either the Record or the Add button. The Record button
allows the actual recording of an event. The Add button allows manual entry of an event.
Note: Once events are listed in the Events box, ScadaPhone enables the Insert and Remove buttons. A
new event may be inserted before an existing event by selecting that event and clicking Insert. This will
open the New Script Event window. An existing script may be removed by selecting that script and
clicking Remove.
Recording a Script
The easiest way to create a new script is to record it. A script should be recorded if the exact setup of the
events that occur when ScadaPhone dials a contact is uncertain, or if the contact prompts callers with
one or more beeps and the frequency of the beeps is uncertain. To record a script, click the Record
button in the Edit Script window. This will open the Record Script window:
79
Recording a script requires three steps:
1. Verify that the phone number in the top box is correct or make any needed changes
2. Click the Call and Record button
3. Click the Set Action Point button to stop recording.
After step 3, ScadaPhone will return to the Edit Script window. The recorded script will be entered into
the Events box.
Adding a Script
When the exact sequence that occur when ScadaPhone dials a contact is known, script events may be
added manually. Click the Add button to open the New Script Event window:
Select the Event Type. For Silence, Voice and VoiceCheck events, use the scroll bar to set the length of
80
the event in seconds. For Tone events, use the scroll bar to set the frequency in hertz. Click the OK
button to return to the New Script Event window. The event will be entered into the Events box.
Note: Once events are listed in the Events box, ScadaPhone enables the Insert and Remove buttons. A
new event may be inserted before an existing event by selecting that event and clicking Insert. This will
open the New Script Event window. An existing script may be removed by selecting that script and
clicking Remove.
Script Actions
The Actions box of the Edit Script window is used to determine what action ScadaPhone will take when
an answer detection script's events are detected. ScadaPhone can be configured to perform one of four
actions:
Ÿ Play Alarms: If this action is selected, ScadaPhone will announce "The following alarms require
acknowledgment", followed by the alarm messages. After the alarm messages, ScadaPhone
will state: "This call will be reissued if acknowledgments are not received within __ minutes."
The number of minutes is set in the Ack Time-out setting on the Alarm Contact window. The
call will be terminated after these messages have been played. This action is best suited for
making calls to voice mail services or answering machines.
Ÿ Play Menu: This action will cause a specified menu to be played when an answer is detected.
This action should only be selected if the contact is an attended telephone (that is, a person will
answer the phone, not a message service). Otherwise, the menu will be played repeatedly until
it times-out after one minute of no response. Unlike the Play Alarms action, ScadaPhone will
not wait a set amount of minutes for alarm acknowledgments before placing another call.
Attended contacts are expected to provide acknowledgment before hanging up.
Ÿ Play Alarms & Menu: This action combines the previous two actions. A typical call utilizing this
action would be as follows: "The following alarms require acknowledgment. Tank number one
high level. Main menu. To enter your security code, press zero..." As in the Play Menu action,
this action should only be selected for use with an attended contact because the menu will be
waiting for someone to select an option.
Ÿ Numeric Pager: This action is used when the contact is a numeric pager service. This action will
cause ScadaPhone to send a specific phone number (using telephone touch-tones) after
ScadaPhone hears the pager service's prompt (usually three beeps). The pager string number
is set from the main window under Options | Pager String. The pager string value is stored in
a system variable named PagerStr. This number is typically the access number of the SCADA
system or the ScadaPhone system.
Ÿ SetBit: This action is used in conjunction with the 'VoiceCheck' event to verify the status of
hardware dialers.. It is set TRUE if the hardware dialer responds to the call with a voice,
otherwise it is set to FALSE. The specified discrete can then be used to trigger a ScadaPhone
alarm. SetBit could conceivably be used for other purposes as well.
Select the appropriate option in the Action Type box of the Edit Script window. Select the appropriate
button. If Play Menu or Play Alarms & Menu is selected, ScadaPhone will open an Action Parameter
box in the Edit Script window. The Action Parameter is where the name of the menu to be played
should be specified. Use the Browse button to select the correct menu.
Once the answer detection script is set up, click the OK button at the bottom of the Edit Script window.
ScadaPhone will return to the Alarm Contact window. The new and/or edited scripts are displayed in the
Answer Detection Scripts box.
Multiple Scripts
A contact may have more than one script. This allows ScadaPhone to act appropriately if an answering
machine is encountered at a telephone number that is normally attended (where a person answers the
phone). That is, ScadaPhone will not play a menu repeatedly for one minute to an answering machine
that can't respond to the menu's prompts. For example, the following two scripts would take one action
81
when the telephone is answered by a live person and another when the telephone is answered by an
answering machine:
Voice (0.10) + Silence (1.00) = PlayAlarmsAndMenu (MainMenu)
Tone (607) + Silence (0.10) = PlayAlarms
Note that the first script requires a voice followed by one full second of silence. The length of the silence
event is important in order to prevent the first script from being triggered during brief pauses in the
answering machine's prompt. For example, an answering machine might play the following message: "Hi
this is Ken. <Pause> I'm not home right now. <Pause> Leave your name and number and I'll call you
back. <Beep>." If the pauses in the prompt message are less than one second, then ScadaPhone won't
start the PlayAlarmsAndMenu action erroneously. If Ken is home, he will have to remain silent for one
second after saying "Hello" before the first script will be triggered into action. Note: For this to work
properly, not only must the contact know to pause at least one second after answering the phone, the
answering machine message must not contain pauses longer than one second in length or the first script
will be triggered. To examine an answering machine message and check the length of any pauses, first
record the message using the Record button on the Edit Script window. After recording the script,
examine the length of any pauses within the script file with the Audio Analyzer.
Details:
The Audio Analyzer
Answering Machine Contact Example
Editing Answer Detection Scripts
An existing script in the Alarm Contact window may be edited by selecting that script and clicking the
Edit button. This will open the Edit Script window. For example, the default script Voice(0.1) +
Silence(0.5) may be edited by selecting that script and clicking Edit. The following window will be
displayed:
82
The Edit Script window when editing the PlayAlarmsAndMenu script
At the top of the Edit Script window is a label that shows the current value of the script being edited (in
the format: Event + Event = Action). The Events box shows the list of events and provides the means for
editing the event list.
Note that the Event Type and Event Parameter settings correspond to the selected event in the Events
list box on the left. Clicking on a different event in the list will show the Event Type and Event Parameter
settings for that event. The settings for an event may be changed by selecting that event and then
changing the Event Type and/or adjusting the Event Parameter scroll bar. The script label at the top of
the window will reflect any changes.
Events can be added or removed via the Record, Add, Insert, and Remove buttons. See: The Events
Box under the heading Creating a New Answer Detection Script.
Related Topics:
Entering Alarm Contact Information
Examples
Pager Alarm Contact Example
Answering Machine Contact Example
Troubleshooting
If an answer detection script does not work properly, it may be analyzed with ScadaPhone's Audio
83
Analyzer and the settings refined. See: The Audio Analyzer
Creating and Editing Phone Menus
About ScadaPhone Menus
When a person contacts ScadaPhone by phone, the caller is presented with an automated menu system.
ScadaPhone comes with a default menu structure. However, the menu messages and choices presented
to the person on the phone may be customized. There are two types of menus:
1. User Defined Menus: These are the customizable menus. The User Defined menus are
accessed via the Menus tab in ScadaPhone's main window. Note: Do not prefix User
Defined menu names with a "$". This is reserved for system menu names and system
variables. A MainMenu is defined by default. The MainMenu is normally the first menu
played when an incoming call is answered by ScadaPhone.
2. System Menus: These all start with a dollar sign, such as $AlarmMenu or
$EnterAnalogMenu and may be viewed by clicking the Sys Menus tab. Note: If the Sys
Menus tab is not visible on the main window menu, select Options | Show System Tabs.
If the main window is too narrow to show all the tabs, additional tabs may be seen by
clicking the right or left arrows at the right end of the tabs, or by widening the window. The
voice files of the system menus may be edited, but do not change the Menu Item Actions
or Menu Item Enable conditions as this could adversely affect system operation.
ScadaPhone's Default Menu Structure
When a new project is started, ScadaPhone creates a default menu structure with a main menu named
MainMenu. MainMenu presents a system submenu named $EnterCodeMenu. When a caller enters a
valid security code, the MainMenu presents the $AlarmMenu. The $AlarmMenu uses three system
submenus, $AlarmAckMenu, $IndividualAlarmAckMenu, and $IndividualAlarmMenu.
Note: ScadaPhone's menu structure uses a number of system WAV files. These WAV files may be
viewed on the main window's Sys Wavs tab. ScadaPhone's system works best if the content of these
files is not changed. They may be re-recorded to change the voice to match other user-defined WAV files,
but the message should stay the same. See: Edit WAV Files. If a needed WAV file is missing,
ScadaPhone will create the default menu structure, but the missing WAV files will be displayed in red on
the Sys Wavs tab.
The following describes what happens when a user calls into the default menu structure.
Note: On all ScadaPhone menus, the message will repeat until:
The caller hangs up
OR
the message times out after 60 seconds and ScadaPhone hangs up
OR
the caller presses the requested touch tone.
Main Menu Options
When a user first calls into ScadaPhone, only option 0 is enabled. ScadaPhone will announce the
following:
"Main menu. To enter your security code, press 0. To hang up, press #"
After a caller enters their security code, only option 1 is enabled. ScadaPhone will announce the
following:
84
"Main menu. To hear the alarm menu, press 1."
Main Menu Option 0 (Security Code Entry)
On the Main Menu, when 0 is pressed, ScadaPhone presents the Enter Code Menu.
ScadaPhone announces:
"Enter code followed by # sign. To clear input and start again, press *. To abort input press * twice."
The message repeats until the caller enters a security code using the touch-tone keys. Note: A
user's security code is the same as their password. See: Create a User's List
If an invalid security code is entered:
ScadaPhone announces:
"Invalid code entered."
ScadaPhone then returns to the Main Menu.
If a valid security code is entered:
ScadaPhone announces:
"[Caller's access level] enabled."
ScadaPhone then returns to the Main Menu.
Main Menu Option 1 (Alarm Menu)
After the caller enters a valid security code, option 1 is enabled. When the caller presses 1 from the
Main Menu, ScadaPhone presents the Alarm Menu:
"Alarm menu. To hear all active alarms, press 1. To hear all alarms requiring acknowledgement,
press 2. To hear alarms individually, press 3. To return to the previous menu, press *. To return to
the main menu, press #."
Note: ScadaPhone will only present acknowledgeable alarms to callers with the proper access
level.
Alarm Menu Option 1 (Active Alarms)
When the caller presses 1 from the Alarm Menu, ScadaPhone announces all alarms as
follows:
"There are [number] active alarms."
ScadaPhone then plays the alarm message for each alarm. (This message is defined in the
Alarm Information window.) ScadaPhone then repeats the Alarm Menu.
Alarm Menu Option 2 (Alarm Acknowledgement Menu)
When the caller presses 2 from the Alarm Menu, ScadaPhone presents the Alarm Ack
Menu. ScadaPhone announces all acknowledgeable alarms as follows:
"There are [number] acknowledgeable alarms."
ScadaPhone then plays the message for each acknowledgeable alarm. (This message is
defined in the Alarm Information window.) The alarm messages are followed by:
"To acknowledge these alarms press 1. To repeat the alarm list press 2. To return to the
previous menu, press *. To return to the main menu press #."
If there are no acknowledgeable alarms, ScadaPhone will not ask the caller to press 1 and
returns to the alarm menu.
Alarm Ack Menu Option 1 (Acknowledge Alarms)
When the caller presses 1 from the Alarm Ack Menu, ScadaPhone recognizes all
telephone acknowledgeable alarms as acknowledged and will no longer announce
these alarms as needing telephone acknowledgment. Console acknowledgeable alarms
will still be announced as needing console acknowledgment. (Console alarms must be
85
acknowledged by highlighting the alarm name on ScadaPhone's alarm tab and clicking
the Acknowledge button.)The alarms will still be active and will be announced as
active, until the value is reset. After the caller presses 1, ScadaPhone will return to the
Alarm Menu.
Alarm Menu Option 3 (Individual Alarm Menu)
When the caller presses 3 from the Alarm Menu, ScadaPhone presents the Individual
Alarm Menu. ScadaPhone announces individual alarms as follows:
"There are [number] active alarms. There are [number] alarms requiring telephone
acknowledgement. There are [number] alarms requiring console acknowledgement. To hear
the next active alarm, press 1. To hear the next alarm requiring telephone
acknowledgement, press 2. To hear the next alarm requiring console acknowledgement,
press 3. To return to the previous menu, press *. To return to the main menu press #."
Individual Alarm Menu Option 1 (Next Active Alarm)
When the caller presses 1 from the Individual Alarm Menu, ScadaPhone presents the
Individual Alarm Ack Menu. ScadaPhone plays the next active alarm message. (This
message is defined in the Alarm Information window.) The alarm message is followed
by:
"To acknowledge this alarm press 1. To return to the previous menu, press *. To return
to the main menu press #."
Individual Alarm Menu Option 2 (Next Alarm Requiring Telephone
Acknowledgement)
When the caller presses 2 from the Individual Alarm Menu, ScadaPhone presents the
Individual Alarm Ack Menu. ScadaPhone plays the next active telephone
acknowledgeable alarm message. (This alarm message is defined in the Alarm
Information window.) The alarm message is followed by:
"To acknowledge this alarm press 1. To return to the previous menu, press *. To return
to the main menu press #."
Individual Alarm Menu Option 3 (Next Alarm Requiring Console
Acknowledgement)
When the caller presses 3 from the Individual Alarm Menu, ScadaPhone presents the
Individual Alarm Ack Menu. Scadaphone plays the next active console
acknowledgeable alarm message. (This message is defined in the Alarm Information
window.) If the alarm has not been acknowledged previously by telephone, the alarm
message is followed by:
"To acknowledge this alarm press 1. To return to the previous menu, press *. To return
to the main menu press #."
Individual Alarm Ack Menu Option 1 (Acknowledge Alarms)
When the caller presses 1 from the Individual Alarm Ack Menu, if this alarm is a
telephone acknowledgeable alarm, ScadaPhone recognizes this alarm as
acknowledged and will no longer announce it as requiring telephone acknowledgement.
If the alarm is a console acknowledgeable alarm, it will still be announced as needing
console acknowledgment. (Console alarms must be acknowledged by highlighting the
alarm name on ScadaPhone's alarm tab and clicking the Acknowledge button.) The
alarm will still be active and will be announced as active, until the value is reset. After
the caller presses 1, ScadaPhone announces "Alarm acknowledged" and returns to the
Individual Alarm Menu.
86
Testing a Menu
To test a menu, click the Menus tab on ScadaPhone's main window. Select the menu name and click the
Test button. The Menu Test window will open:
Menu Test window for testing the MainMenu
Simulate telephone key presses by clicking the buttons. Buttons that are either undefined or disabled are
grayed out. Click the Stop button to terminate the menu test.
Customizing Menus
Menus are added and edited in Development Mode.
To begin to customize the menu system, click the Menus tab on ScadaPhone's main window. Menus
may be added, edited, deleted, and played from the Menus tab. ScadaPhone defines a MainMenu by
default. This default MainMenu is played when ScadaPhone answers an incoming call.
Adding and Editing Menus
To edit a menu, select a menu name on the main window's Menus tab and click the Edit button. To
create a new menu, click the New button. Clicking either Edit or New will open the Menu Information
window:
87
Menu Information window for the default MainMenu
The Menu Information window allows the customization of the voice messages that will be played and the
actions that will be performed for each of the twelve available menu items. Each menu item corresponds
to a button on a touch-tone phone. Additionally, ScadaPhone menus usually have a prefix message that
is not associated with a telephone button, but is played as soon as the caller accesses the menu. The
prefix message typically identifies the menu by vocalizing the menu's name. For example, in the default
MainMenu, the prefix consists of a WAV file that says "Main menu."
The box at the top of the Menu Information window defines the menu's name. Type the name of the menu
into this box or use the Browse button to see a list of previously defined menus.
The check boxes in the Menu Items section are used to indicate the menu items that are defined in the
menu. Each check box corresponds to a key on the telephone touch pad. When the caller presses a key,
the ScadaPhone performs the actions defined by that option's properties. To set a menu item's property,
first click the check box to the left of the option. This enables that option. Next, move the mouse pointer
over the menu item label. When the mouse pointer is moved over an enabled option, the mouse pointer
will change from an arrow to a pointing hand. Click the option and the Menu Item window will open:
88
Menu Item window for the default MainMenu Prefix option
The Menu Item window is where properties of the menu item are defined. The Menu Item window is
divided into three sections, covered in detail below:
Ÿ Menu Item Enable
Ÿ Menu Item Message Composition
Ÿ Menu Item Action
In the above example, the properties of the default MainMenu's prefix item are displayed. The Menu Item
Enable is set to Always Enabled. This means that this menu item will be offered every time the menu
is played. The Menu Item Message Composition contains only the system WAV file $MainMenu. The
Menu Item Action is set to No Action. This is typical for a menu prefix item.
Menu Item Enable
89
Menu Item Enable pane
This section of the Menu Item window defines the condition which will enable the menu item and make it
available to the caller. For the menu item to always be enabled, select the Always Enabled option. For
the menu item to be enabled under certain conditions, select the Conditionally Enabled option. If the
menu item is conditionally enabled, a logical (or Boolean) expression must be entered into the Condition
box. Logical expressions may utilize any of the ScadaPhone system variables. See: ScadaPhone System
Variables
For example, the default MainMenu has items defined for the 1 and * options, but they are not announced
when a user first answers the telephone. This is because the 1 and * items are conditionally enabled. The
default MainMenu has three conditionally enabled items:
Ÿ Menu item 1 condition: $CurrentAccessLevel > 0
Ÿ Menu item 0 condition: $CurrentAccessLevel = 0
Ÿ Menu item * condition: $PrevMenuBit
$CurrentAccessLevel is an analog system variable that holds a value representing the access level of the
current user. This value is set when a caller enters their security code. Details: ScadaPhone System
Variables. At the beginning of a telephone call, $CurrentAccessLevel is zero; therefore, menu item 1 is
disabled and menu item 0 is enabled. If the caller presses 0 and enters a valid security code,
$CurrentAccessLevel will be greater than zero; consequently, MainMenu item 1 will be enabled and item
0 will be disabled.
The $PrevMenuBit is a discrete system variable. This condition for menu item * is true if and only if
MainMenu has been invoked from another menu. This prevents the MainMenu from prompting "To return
to the previous menu, press star" if there is no previous menu to return to.
Use the Analogs button under the Condition box to browse and add analog tags defined on the main
window's Analogs tab. Use the Discretes button to browse and add discrete tags defined on the main
window's Discretes tab.
If the syntax for the condition expression is incorrect, the Check Condition Expression Syntax button
will be highlighted in red. Click the button for suggested corrections.
Menu Item Message Composition
90
Menu Item Message Composition pane
This section of the Menu Item window allows the construction of menu item prompts. The message
created in this section is played only if the menu item is enabled. The words specifying which button to
press, such as "press one" or "press star" are appended to menu item prompts automatically. For
example, in the default MainMenu, menu item 0's prompt states: "To enter your security code, press
zero." The menu item message consists of a single WAV file: ToEnterYourSecurityCode.wav. The
"press zero" suffix is contained in a system WAV file ($Press0.wav) which is played automatically and
therefore should not to be specified in the menu item message.
Creating Message Segments
There are three types of message segments:
1. WAV File: Any message you want to record.
2. Analog Value: Enunciates the current value of an analog tag from the SCADA system.
3. Discrete Value: Enunciates the current value of a discrete tag from the SCADA system.
To create message segments, click the Add button in the Menu Item Message Composition box of the
Menu Item window. This will open the Message Segment window.
The Message Segment window
There are three options in the Segment Type panel, covered in detail below:
Ÿ WAV file
Ÿ Analog Value
Ÿ Discrete Value
When the WAV file option is selected, the Message Segment box will include a File Functions box.
When the Analog Value is selected, the File Functions box is replaced by the Analog Formats box.
When the Discrete Value is selected, the File Functions box is replaced by the Discrete Formats box.
Defining WAV Message Segments
To use an existing WAV file message segment:
Ÿ In the Message Segment window, click the Browse button. This will open the Select WAV file
91
window.
Ÿ Click on the name of the WAV file to be added
Ÿ Click on the OK button.
Ÿ Click the OK button in the Message Segment window to return to the Menu Item window. The
name of the message segment will be entered into the Menu Item Message Composition list.
To create a new WAV File message segment:
Ÿ In the Message Segment window, click the WAV File option.
Ÿ Enter the name of the WAV file in the File Name edit box. Note: Do not enter a file extension.
The extension '.WAV' will be added by ScadaPhone.
Ÿ Click Record. ScadaPhone will display a pop-up box with a Stop button. When the pop-up box
indicates recording is in progress, speak the desired message segment into the microphone.
Ÿ Click Stop to end the recording. This will close the recording box.
Ÿ Click the Play button to listen to the message segment just recorded. If necessary, re-record a
WAV segment by clicking the Record button again. If the WAV file already exists, a pop-up box
will ask confirmation of the file overwrite.
Note: The recording and playback of sound (WAV) files may be done either through the voice modem or
a PC sound card. See: Setting the COM Port from the main window
WAV files may also be edited for content or unwanted noise at the beginning or end of the recording may
be trimmed. To edit a WAV file, select the file and click the Edit button in the Message Segment window.
This will open the Edit Wav File window. Details: Editing WAV Files
When the message segment is complete, click OK from the Message Segment window to return to the
Menu Item window. The name of the message segment will be entered into the Menu Item Message
Composition list.
Defining Analog Value Message Segments
An Analog value may be added to a menu message. To add an analog message segment to the Menu
Item Message Composition box in the Menu Item window, click Add. The Message Segment window
will open. Click the Analog Value option. The File Functions box is replaced by Analog Formats.
Enter the name of the analog tag to be enunciated or use the Browse button to see a list of analog tag
names defined on the main window's Analog tab.
Adjust the slider to select the number of digits to the right of the decimal point to be enunciated.
Click OK to return to the Menu Item window. The name of the analog tag will be entered into the Menu
Item Message Composition list.
Defining Discrete Value Message Segments
A Discrete value may be added to a menu message. To add a discrete message segment to the Menu
Item Message Composition box in the Menu Item window, click Add. The Message Segment window
will open. Click the Discrete Value option. The File Functions box is replaced by Discrete Formats.
Enter the name of the discrete tag to be enunciated or use the Browse button to see a list of discrete tag
names defined on the main window's Discrete tab.
Click the appropriate option button in the Discrete Formats box to select the how the discrete value will
be enunciated.
Click OK to return to the Menu Item window. The name of the discrete tag will be entered into the Menu
Item Message Composition list.
92
Managing Message Segments
To insert a new segment between existing segments in the Menu Item window's Menu Item Message
Composition box, click on the message segment just below where the new segment needs to be. Click
on the Insert button. Define and record segments in the Message Segment window just as when the
Add button is clicked.
To change an existing message segment, highlight it and click the Edit button.
To delete a segment, highlight it and click the Remove button.
Click the Play button to hear the alarm message.
To change the order of message segments, select the name of the segment and click the up or down
arrow buttons to move it to the correct position.
Menu Item Action
Menu Item Action pane
When a caller selects a menu item, ScadaPhone will perform a specific action. The Menu Item Action
pane in the Menu Item window lists fourteen possible actions for a menu item to perform. However, it is
recommended that user-defined menus use only the first five or the last three. These actions are as
follows:
Ÿ No Action: Used in menu prefix items. In most menus, the prefix item states the menu name and
performs no other action. However, the prefix item can perform actions, particularly if there are
no other menu items defined in the menu.
Ÿ Play Menu: When the menu item is selected, this action transfers the caller to a different menu.
When this action is specified a new pane is opened and the name of the menu to transfer to
must be entered.
Ÿ Record Voice Mail: Prompts the caller to leave a message after the beep. When this action is
specified, a new pane will pend and the name of a mail box into which the caller's message will
be placed must be entered. ScadaPhone will create a new mail box with this name.
Ÿ Modify Discrete: Prompts the caller to change the state of a specified discrete tag. When this
action is specified a new pane is opened and the name of the discrete tag must be entered.
Ÿ Modify Analog: Prompts the caller to change the value of a specified analog tag. When this
action is specified a new pane is opened and the name of the analog tag must be entered.
Ÿ Enter Security Code: Enter user security code.
Ÿ Play Active Alarms: Play all active alarms..
Ÿ Play Ackable Alarms: Play all acknowledgeable alarms.
Ÿ Play Acked Alarms: Play previously acknowledged alarms that are still in alarm condition.
Ÿ Ack Alarms: Acknowledge all alarms.
93
Ÿ Play Alarm: Play a single alarm.
Ÿ Ack Alarm: Acknowledge a single alarm.
Ÿ Launch RAS: Launches the Remote Access Software, such as PCAnywhere. RAS must be
configured from ScadaPhone's main screen menu under Options | Remote Access Software.
See: Remote Access Software
Ÿ Hang Up: Causes ScadaPhone to hang up the phone immediately.
Ÿ Reboot Computer: Reboots the computer.
Ÿ Voice Mail Alarm: Allows the recording of voice mail wav files that are considered to be alarms.
When a caller selects the menu item to which this action is assigned, an alarm is created in the
alarm group which was specified when the Voice Mail Alarm action was defined. After these
voice mail messages are recorded, a numbered alarm (in the format $VoiceMailAlarm1,
$VoiceMailAlarm2,...) will be automatically added to the alarm list. These alarms are treated the
same as any other alarm. The wav files can be seen under the Mailbox tab in 2 automatically
generated mailboxes named "Active Voice Mail Alarms" and "Acknowledged Voice Mail
Alarms". When the alarms are acknowledged, their wav files are moved from one directory to
the other.
The remaining actions are utilized by ScadaPhone's default MainMenu structure. Incorporating them into
user-defined menus could have an adverse effect on the MainMenu and therefore is not recommended.
For information about these actions, see: System Menu Action Items Reference
Menu Item Action Examples
Play Menu
Record Voice Mail
Modify Discrete
Modify Analog
Deleting a Menu
To remove a menu, highlight the menu name on the Menus tab of the main window and click the Delete
button.
Changing ScadaPhone's Starting Menu
Access to ScadaPhone’s menu system may be accessed from any touch tone phone. By default, the
MainMenu is played when an incoming call is detected; however, a different menu may be created and
played first. In many systems, an introductory menu to announce the name of the facility is desirable. For
example, callers could be greeted with a message similar to the following: “You have reached the city of
Springfield’s sewer treatment plant. Business hours are from 8 to 5, Monday through Friday. If you’re
calling to report a sewer emergency, please call 555-1234. To leave a non-emergency message for the
plant operators, press one. To hear the main menu, press zero”.
Following the steps for creating a new menu given above, the greeting message should be recorded in a
new menu with a name such as IntroMenu.
To setup ScadaPhone to play this menu when an incoming call is answered, on the main window's menu
select Options | Incoming Calls | Initial Menu. Enter the name of the new start menu (such as
IntroMenu) or use the Browse button to open a window with a list of existing menus and select the
appropriate menu name. When the correct menu name has been entered, click the OK button.
Editing WAV Files
94
WAV files are edited in Development Mode.
WAV files may be edited to eliminate beginning or ending pauses. They may also be re-recorded to
change the message content entirely. WAV files are edited with the Edit WAV File window. This window
will open when editing an alarm message segment WAV file. (Click the Edit button in the Message
Segment window.) It may also be opened by selecting the WAV files tab on ScadaPhone's main window,
selecting a WAV file name, and then clicking the Edit button.
Edit Wav File window
Clicking on the blue filename link above the WAV display will open the Select WAV files window, which
allows selection of other WAV files listed on the WAV files tab.
Note: System WAV files may be displayed in the Select WAV files window by checking the Show
System WAVs option. However, neither the content nor the name of these files should be changed. They
may be re-recorded to change the voice to match other user-defined WAV files, but the message should
stay the same.
The Play button allows the file to be played. The Record button allows the file to be re-recorded.
The Generate button will be enabled if 'text to speech' has been enabled. Clicking this button will cause
the 'text to speech' subsystem to generate the wave file automatically, based on the WAV file name. If the
'Use wav files generated by 'Text to Speech ' interface' has been selected in the Text to Speech Options
window, the generated wav file will be saved in the TTS directory, if not it will be saved in the project
directory.
See: Text To Speech Interface
Note: The recording and playback of sound (WAV) files may be done either through the voice modem or
a PC sound card. See: Setting the COM Port from the main window
95
To save the current WAV file and exit the Edit WAV file window, click the OK button.
To save the current WAV file and open the previously defined message on the main window's WAV files
tab into the Alarm Information window, click the OK,Previous button.
To save the current WAV file and open the next defined message on the main window's WAV files tab
into the Alarm Information window, click the OK,Next button.
To save the current WAV file and start a new one, click the OK, New button.
To exit the current WAV file without saving any changes, click the Cancel button.
Edit WAV File Window Menu Items
File - New
Allows entry of a new filename and recording of the new WAV file.
File - Open
Opens the Select WAV files window which allows selection of other WAV files listed on the WAV files tab.
Note: System WAV files may be displayed in the Select WAV files window by checking the Show System
WAVs option.
File - Save
Saves the current WAV file.
File - SaveAs
Allows the current WAV file to be saved in a new file. This copies the current WAV file to a new file with a
different name.
File - Reload
This menu item is enabled after changes have been made. It allows the last saved version of the WAV file
to be reloaded into the editor.
Trim
Used in conjunction with the Start at sample and Stop at sample slider bars. Adjust the sliders to
indicate where the beginning and/or end of the WAV file should be trimmed, then select Trim.
Pad
Used to add 1000 samples or 1/8th of a second of silence to the beginning or end of the WAV file.
Splice
Allows two exiting WAV files to be spliced together to form a new WAV file.
Adjust Amplitude
Opens a Set Amplitude Level dialog box:
96
This dialog box allows the selected WAV file or all WAV files to be scaled to between 50 and 100 percent
of full scale amplitude. This allows the file(s) to be scaled up or down for best sound quality and volume.
When a WAV file is scaled, the data points that have the largest 1% of all values are discarded. This
helps to eliminate spurious spikes in the data file. This feature allows the user to scale all WAV files to the
same sound level.
The radio buttons and check boxes at the bottom of the dialog box allow either the selected file or all files
of a given type to be scaled. User WAVs are the sound files recorded by the user and saved with the
project. These files are shown on the Wav Files tab. System files are prerecorded sound files used by
system menus and are saved in the system directory and are shown on the Sys Wavs tab.
Find References
Displays a form which lists all locations where the current WAV file is used. The list includes the area,
such as menus, alarms, etc., as well as the menu item for menus, and message segments. Note that the
message segments are numbered with a starting value of zero rather than one.
Entering Alarm Contact Information
In ScadaPhone, the term contact refers to a telephone number that is to be called in the event of an
alarm. In addition to the telephone number to dial, contact definitions contain call persistence settings and
answer detection scripts. The call persistence setting dictates how many times or how long ScadaPhone
will attempt to call and obtain alarm acknowledgements from a contact. Answer detection scripts are used
to determine what action is to be taken based upon the audio signal coming from the remote telephone.
ScadaPhone implements an audio signal analyzer that can distinguish between silence, tone, and voice
coming from the telephone being called. Depending upon the sequence, duration, and frequency of these
three signal states, ScadaPhone can be configured to respond in different ways.
Contacts must be created in Development Mode. To set up a contact, select the Contacts tab on the
main window. When a project doesn't contain any contact information, the Contacts tab will display "No
97
Contacts Defined." Otherwise, the Contacts tab will display a list of previously defined contacts.
ScadaPhone main window Contacts tab
Which contacts are called and the order in which they are called is determined by the ScadaPhone
Scheduler. Details: Creating a Schedule
From the Contacts tab on the main window, new contacts may be defined, existing contacts may be
edited or deleted, and the order in which the contacts are called may be changed.
Creating Contacts
To create a new contact, click the New button on the main window Contacts tab. The Alarm Contact
window will be displayed:
The Alarm Contact
window
98
The above window is displayed when the Voice or Numeric Pager Contact Type is chosen. When
Alpha-numeric Pager using TAP protocol or Email is chosen, the window will change, as described
below.
The sections in the Alarm Contact window are as follows:
Ÿ Enabled: When this box is checked, ScadaPhone will call this contact to report the presence
of alarms.
Ÿ Name: This specifies the name of this contact. This name will be displayed in the contact list
and logged in the activity log.
Ÿ Phone Number: This box specifies the telephone number for ScadaPhone to dial when
reporting alarms.
Ÿ Contact Type:
Select one of three contact types:
Voice or Numeric Pager
Alpha-numeric Page using TAP protocol
Email
Voice or Numeric Pager
Select the Voice or Numeric Pager option when ScadaPhone needs to call the contact
via regular phone or call the contact's numeric pager. This option requires the creation of
an Answer Detection Script, which determines how ScadaPhone handles outgoing
(alarm reporting) telephone calls. Details: Answer Detection Scripts
99
Alpha-numeric Pager using TAP protocol
The Alarm Contact window when Alpha-numeric pager is selected
Select the Alpha-numeric Pager using TAP protocol option to send a text message to
the contact via their alphanumeric pager. When this option is selected, the phone
number for the pager service is entered into the Phone Number box. ScadaPhone will
also display a Pager ID number box. Enter the ID number that the paging service uses to
identify the pager that ScadaPhone is contacting into this box. Some alpha-numeric
pager systems require a password. (Usually this is only for systems outside of the U.S.)
If the system requires a password, enter the password into the Password box.
Adjust the COM Settings, if necessary, by clicking on the blue link. (The proper COM
settings must be obtained from the pager service; '1200,7,E,1' is a common setting, see
note in Com Port Settings form below.) When this contact is made, ScadaPhone sends
the pager/phone message defined in the Alarm Information window to the pager.
Details: Text Message for Alpha-numeric Pagers/Phones.
100
Email
The Alarm Contact window when Email is selected
Select the Email option to have ScadaPhone send alarm notification via e-mail. When
the Email option is selected, leave the Phone Number box blank. ScadaPhone will open
an Address box. Enter the contact's e-mail address into this box. Note: more than one
address may be entered, separated by commas. When this contact is made,
ScadaPhone sends the pager/phone message defined in the Alarm Information
window. Details: Text Message for Alpha-numeric Pagers/Phones. Note: When Email is
selected, the e-mail settings must be entered via the main menu, under Options | E-mail
Settings. Details: Email Settings.
101
Ÿ Voice or Numeric Pager Options
Select the 'After dialing, use audio analyzer and answer detection scripts' for normal operation.
This is the default. Is you have a special situation in which it is desirable to bypass the audio
analyzer and answer detection scripts select the second option.
Ÿ Call Persistence: This box determines how long ScadaPhone will wait or how many times
to attempt to get through to the contact. If ScadaPhone receives a busy signal or gets no
answer when calling this contact, it will keep trying to get through until this timer expires or the
count is reached (depending on which mode is selected). Select the mode of operation in the
Based Upon box by clicking either Time or Count. Adjust the slider until the appropriate
number is displayed.
Ÿ Contact Persistence: This box determines how long to call or how many times to call
this contact in order to receive alarm acknowledgement. If ScadaPhone calls this contact but
does not receive alarm acknowledgement, it will call this contact until this timer expires or the
count is reached (depending on which mode is selected). Select the mode of operation in the
Based Upon box by clicking either Time or Count based operation. Adjust the slider until the
appropriate number is displayed.
Ÿ Ack Timeout: Use this slider if an alarm is configured to require both console and phone
acknowledgment (in the Alarm Information window.). Adjust the slider to set how long
ScadaPhone should wait for an alarm to be acknowledged from the console after the alarm is
acknowledged from the phone, before placing another call. If the alarm is not acknowledged
from the phone, ScadaPhone will continue to call contacts with no waiting period.
EnteringTag Names
Entering Tag Names
Tag names are added and edited in Development Mode.
When using ScadaPhone, in most cases a SCADA system will already be configured and tag names will
be defined. Tag names used in ScadaPhone must exactly match the tag names in the SCADA system,
unless the tag is a computed tag. See: Computed Tags. In addition, ScadaPhone reserves the "$" symbol
for predefined system tags. If the SCADA tag name happens to begin with "$", prefix the alarm tag name
with two dollar signs: "$$".
Note: If there is a text file containing the list of tag names used in the SCADA system, the standard
Windows copy and paste keys may be used to enter the tag names into ScadaPhone. See: Using the
Windows Clipboard. The advantage of using copy and paste is that the tag names entered into
ScadaPhone will exactly match the tag names in the SCADA system, including case. This is absolutely
necessary for tag data to be retrieved from the SCADA software. The exception to this is if the optional
ScadaLink alias is used. In that case the tag name may be any valid tag name as long as the tag name
used in the SCADA software is entered into the ScadaLink Alias field in the tab properties dialog.
Note1: Valid tag names in ScadaPhone must begin with one of the following characters: A..Z, a..z, $,
_, \, [ the following characters may include letters, numbers, spaces, and the following special
characters: :, ., |, µ, ], #, &, %, -, /, <, >, =.
Note2: If ScadaPhone encounters a tag name that is not valid in ScadaPhone during import or when
102
entered manually it will create a valid alias for use within ScadaPhone by placing an underscore in front of
the tag name (/tag1 becomes _/tag1). The alias will be used within ScadaPhone but the original tag name
will be used when communicating with the SCADA software.
Analog, Discrete, or String Tag Names are entered the same way. From the main ScadaPhone window,
select either the Analogs, Discretes, or Strings tab. Next, click the New menu item on the main screen's
top menu. This will open a window for entering tag names:
Tag names may be either typed or pasted into the text box, one tag name per line. If Citect has been
selected in ScadaLink Setup, one additional button will appear labeled 'Browse Citect', clicking on the
button will allow you to select and import tags and alarms from the Citect SCADA software. In order for
this to work the Citect runtime must be running.
Note: The OPC Browser filters the browsing operation if iFix is the designated server. By default, only
tags ending in .F_CV are returned into the OPC Browser; however the user can select any of the other
iFix tag suffixes (e.g. A_NALM, F_LO, etc...) by clicking on the blue hyperlink at the bottom of the OPC
Tag Browser (this link is only visible if iFix is selected in the ScadLink Setup).
If ScadaLink is set to OPC a different button will appear labeled Browse OPC. If the configured OPC
server supports namespace browsing, the tags from that server will be listed in a new browsing window.
Click the OK button when finished.
103
Upon returning to the main window, new tags are listed, but they are shown in gray. The gray color
indicates that they are not referenced by any alarm or menu.
The main advantage of entering tags before creating alarm messages or menus is that it eliminates typing
when adding the tag names to alarms or menus. Tag names that appear on the ScadaPhone main tab
panes are available via the Browse button in the windows used for creating alarm messages or menus.
Note1: Once a tag name is entered on a tab pane, it may not be edited, only removed. If a tag name is
gray, it may be removed by selecting the tag and clicking Remove on the bottom menu. If a tag name is
being used in an alarm or a menu (as indicated by a black color), it must be removed from the alarm or
menu before it can be removed from the tab pane.
Note2: If an analog tag is inadvertently imported into the discrete tab ScadaPhone will pop up the
'Discrete Expected Analog Received' window during runtime when analog data is received. The 'Discrete
Expected Analog Received' window has 2 new buttons: 'Change To Analog' and 'Find References'. the
'Change To Analog' button allows the user to change the data type from discrete to analog (on unused
tags only). This situation usually occurs when a system designer grabs the entire list of tags from the
OPC Tag Browser and inserts all of them into the Discretes Tab. ScadaPhone does not complain about
the analog tags in the discrete list until the ScadaLink is fired-up in run mode and analog values start
coming back from the server.
This feature can be exploited by doing the following: Start with a blank project (no alarms, menus, or
tags), configure the appropriate ScadaLink, go to the Discretes Tab, click the New button, click the
Browse OPC button, select all of the tags and click OK, enter run mode, wait for the Discrete Expected
Analog Received window to fill up with errant analogs (this may not catch all of the analogs if they return
a value of zero or one which are valid discrete values), select the entire contents of the Discrete Expected
Analog Received list (it's a multi-select list), click the Change To Analog button. Note that this data type
change can only be performed on unused tags (not used in any alarms or menus). If one of the tags in
the type mismatch list is being used, the user can highlight it and click the Find References button to see
where it is being used and, if necessary, change the context in which it is being used (analog vs.
discrete).
Related Topics:
Tag Properties
Modifying Tag Values
Mail Boxes
Creating a Mail Box
Mail boxes are created when the Menu Item Action in the Menu Item window is set to Record Voice
Mail and a new mail box name is entered.
104
Example: Creating a Supervisor mail box
For details on creating menus to record voice mail see:
Voice Mail Example
Adding and Editing Menus
Opening a Mail Box
See: Retrieving Voice Mail
Deleting a Mail Box
To remove a mail box, it must not be currently used in any menu. An entire menu for voice mail may be
deleted, or the option for the single mail box may be cleared. See: Voice Mail Example
To remove an unused mail box, highlight the mail box name on the Mail Boxes tab of the main window
and click the Delete button.
105
Modifying Tag Values
Modifying Tag Values from the Console
Tag values may be modified either in Run Mode or in Development Mode.
If a SCADA link tag value is modified in Development Mode, its value is only changed in ScadaPhone. If a
SCADA link tag value is modified in Run Mode, the value of the tag will be changed in both ScadaPhone
and the SCADA system.
To modify a discrete tag value, select the Discretes tab from ScadaPhone's main window. Select the tag
name and click the Invert button to toggle the value from FALSE to TRUE or from TRUE to FALSE.
To modify an analog tag value, select the Analogs tab from ScadaPhone's main window. Select the tag
name and click the Modify button. Enter the new tag value and click the OK button. Note: an invalid
analog tag value (such as text) will be displayed in red and the OK button will be grayed out until a valid
value is entered.
To modify a string tag value, select the Strings tab from ScadaPhone's main window. Select the tag
name and click the Modify button. Enter the new tag value and click the OK button.
Modifying Tag Values Via the Telephone
ScadaPhone allows callers to modify SCADA system analog and discrete values over the phone. This
feature is accomplished via the Modify Discrete and Modify Analog menu item actions. When menu
options defined with these actions are selected, ScadaPhone 'pokes' data through the SCADA link
interface into the SCADA system.
For details on creating a menu to allow the caller to modify tag values, see:
Creating and Editing Phone Menus
Modify Analog
Modify Discrete
When a menu option has been enabled to allow a caller to modify a discrete value, ScadaPhone will
present the caller with a message similar to this: "To modify the Control Bit, press five." When the caller
presses the appropriate telephone key, ScadaPhone will announce, "To set the Bit on, press 1. To set the
Bit off, press 0. To cancel, press star." Pressing 1 sets the discrete value as 1 or TRUE. Pressing 0 sets
the discrete value as 0 or FALSE.
When a menu option has been enabled to allow a caller to modify an analog value, ScadaPhone will
present the caller with a message similar to this: "To modify the Set Point, press four." When the caller
presses the appropriate telephone key, ScadaPhone will announce, "Enter number followed by pound
sign. To indicate a decimal point, press star. To clear input and start again, press star twice. To abort
input, press star three times." When the caller enters a number, they are presented with the Confirm
Analog Menu. ScadaPhone announces, "If this is correct, press 1. If this is not correct and you want to
enter it again, press 2. To cancel, press star." When the caller presses 1, the analog value is reset with
the new value.
Opening an Existing Project
ScadaPhone must be in Development Mode to open an existing project.
To open a project, select from the main screen's top menu File | Project | Load/New. This will open the
106
Select Directory window:
Select Project Directory with the sample folder selected
Click the down arrow to the right of the Drives box to select the correct drive (if needed.) In the
Directories box, double click the project folder name and click OK. Opening the folder opens the project.
ScadaPhone will return to the main window with the project loaded.
Related Topic: Setting up a Project
Removing Unused Tags
Tag names may be removed in Development Mode. To remove tags, first select the Discretes, Analogs,
or Strings tab from the main window.
Unused tag names appear in gray on a tab. Only unused tags may be removed. If a tag name is being
used in an alarm or a menu (as indicated by a black color), it must be removed from the alarm or menu
before it can be removed from the tab pane. Either a single tag or all the unused tags appearing on the
current tab may be removed. Select the tag to be removed (or any gray tag name if all are to be
removed) and click the Remove button on the bottom menu. This will open the Remove Unused Tags
window:
107
Select the correct option to remove either the selected tag or all unused tags. Click the OK button when
done.
Retrieving Voice Mail
To retrieve voice mail from the computer console, first select the Mail Boxes tab on ScadaPhone's main
window. Mailboxes are displayed with a green background when there are new messages:
Main menu Mail Boxes tab -the Supervisor mail box has new messages
To listen to the voice mail messages, double click on the mail box name. This will open the Mail Box
window:
The Mail Box window for the Supervisor
108
Messages are placed into WAV files. The WAV files are time-stamped to indicate the date and time when
the message was recorded. To hear voice mail messages, highlight the desired message and click the
Play button. Delete old messages by highlighting them and clicking the Remove button. Click the Close
button to return to the ScadaPhone main window.
Running a Project
Once a project is configured, it may be switched to Run Mode. In Run Mode, ScadaPhone repetitiously
scans the list of alarms to see if any alarm has triggered. If an alarm has triggered (i.e. the alarm bit has
been active for a period of time greater than or equal to the Signal Filtering time defined in the Alarm
Information window), ScadaPhone will consult the Scheduler to see what action is to be taken (call next
contact immediately, announce alarm over the modem speaker before calling, etc.)
To run a project:
1. Verify that the modem is properly connected and turned on.
2. Start ScadaPhone.
3. If the current project is not the desired project, in Development Mode, open the project.
Ÿ Select File | Project | Load/New. Details: Opening an Existing Project
4. Verify the ScadaLink setup and that the enabled box is selected
Ÿ Select SCADA Link | Setup. Details: The SCADA Link Interface
5. Switch to Runtime mode.
Ÿ Select Mode | Runtime from the main menu.
6. Check the ScadaLink status to verify that the tags are being updated.
Ÿ Select Scada Link | Status to open the SCADA Link Status window. When a link is working, the
tag names referenced in the active project will cycle to the right of the Tag Name label.
Saving a Project
Projects are saved in Development Mode.
To save a project, click File | Project | Save from the main screen's top menu.
To save a project with a new name and/or to a different folder, click File | Project | Save As from the
main screen's top menu. This opens the Save Directory window:
Each time a ScadaPhone project is saved, an archived copy of the project being overwritten (if it exists) is
automatically zipped and stored in the 'AutoBackups' sub-folder. These zipped backups will be erased
after 30 days (if there are more than 10 archives total). These backups may be restored using the
Restore feature, File|Project|Restore
109
The Select Directory box with the sample project loaded
To save the project with a new name and/or location:
1. Click the down arrow to the right of the Drives box to select the correct drive (if needed.)
2. In the Directories box, double click the parent folder for the new location. (This will usually be the
Projects folder.)
3. Click at the end of the pathname in the Directory Name box
4. Type a backslash (\) followed by the new project name at the end of the directory box. In the
example below, the project is being being saved with the name Project1 under the Projects
folder:
Select Directory box with the Projects folder selected
and a new name of Project1
110
When done entering the project name, click the OK button. ScadaPhone will return to the main window,
creating the necessary new folders for the new project name and location.
Note: If an existing folder name is selected when using the Save As command, ScadaPhone overwrites
all data stored in the folder with the data for the current project.
Setting up a Project
ScadaPhone organizes projects by grouping project definition files into a project folder (or project
directory). Project definition files include text files (containing definitions of alarms, menus, telephone
contacts, etc.), as well as WAV files (containing the voice messages that enunciate alarm and menu
messages). A typical project folder will contain a few text files (Alarms.txt, Menus.txt, Contacts.txt, and so
forth) and a few dozen WAV files. Unless you are a system integrator who designs numerous SCADA
systems for numerous clients, you will probably only need to create one project folder for your SCADA
system. If you are a system integrator with numerous clients, project folders allow you to keep your
various projects separated and organized.
Creating a Project Folder
ScadaPhone must be switched to Development Mode to create a new project. The status line at the
bottom of ScadaPhone's main window displays 'Development Mode' or 'Run Mode' depending on which
mode is current. If ScadaPhone is in Run Mode, to switch to Development Mode click Mode on the main
screen's top menu and select Development.
To create a new project, select from the main screen's top menu File | Project | Load/New. This will
open the Select Directory window:
Select Directory box with the sample folder selected
To create a new project:
1. Click the down arrow to the right of the Drives box to select the correct drive (if needed.)
2. In the Directories box, double click the parent folder for the new project. (This will usually be the
Projects folder.)
111
3. Click at the end of the pathname in the Directory Name box
4. Type a backslash (\) followed by the project name at the end of the directory box. In the example
below, a new project named Project1 under the Projects folder is being created:
Select Directory box with the Projects folder selected
and a new Project1 added
When done entering the project name, click the OK button. ScadaPhone will open a popup box asking for
confirmation to create the specified directory. Click the Yes button. ScadaPhone will return to the main
window, creating the necessary new folders and new project definition files for the project.
Setting up the Modem COM Port
During development of a project, the use of the modem is optional. The recording and playback of sound
(WAV) files may be done either through the voice modem or a PC sound card. If a sound card is used,
the COM port does not need to be set. However, before running a ScadaPhone project, the COM port
must be set.
Most of the time the system will automatically detect the modem and the port it is plugged into. But in the
event this does not happen, the port will need to be manually selected.
Setting the COM Port from the Main Window
The modem COM port may be set up from ScadaPhone's main window. Open the Modem Window by
selecting Modem from the main screen's top menu. Then select Port from the Modem Window's top
menu. This opens the Select Port window.
Setting the COM Port in the Select Port Window
The Select Port window displays which COM ports are available:
112
The Select Voice Modem COM Port with COM1 selected
To use the PC sound card for the recording and playback of sound (WAV) files rather than the modem,
click the Disable Voice Modem button.
COM ports that are not available are grayed out. Click the radio button corresponding to the COM port to
which the modem is attached and click OK.
If the Select Port window was accessed from the Modem Window, when OK is clicked ScadaPhone will
return to the Modem Window. Otherwise, ScadaPhone will return to the main window.
Testing the Modem Connection
The modem connection may be tested from the Modem Window. To open the Modem Window, select
Modem from ScadaPhone's top menu:
The modem window
To check that the modem is connected properly, click on the Reset menu item. There should be some
activity in the Modem Window log. The last line should display "<DLE>h" or "OK<CR><LF>". This
indicates that the modem is ready. The display should NOT show "ERROR<CR><LF>".
Setting the COM Port from Error Windows
Response Time Out Window
113
ScadaPhone needs to be connected to the correct COM port. The software may automatically detect the
right port. If not, the Response Time-out window will be displayed at program start-up when
ScadaPhone attempts to reset the modem:
To use the PC sound card for the recording and playback of sound (WAV) files rather than the modem,
click the Disable voice modem interface button.
Click the Set COM port button to display the Select Port window. This window can also be accessed from
ScadaPhone's top menu under Modem, then select Port from the Modem window.
Modem Error Window
Another possibility at program start-up is that ScadaPhone will be configured to a COM port that is
connected to a modem that does not use one of the supported voice modem command sets. In this
event, the modem will most likely respond "ERROR" to one of the voice modem commands issued by
ScadaPhone. If this happens, the Modem Error window will be displayed:
If one of the supported modems is being used, the problem may be able to be fixed by clicking on the Set
COM Port button. Use the Select Port window to manually set the COM port. If this does not fix the
problem, contact ScadaTec support. See: Contact ScadaTec
System Menu Action Items Reference
114
The Menu Item window with the Menu Item Action pane at the bottom
When a caller selects a menu item, ScadaPhone will perform a specific action. There are fourteen
possible actions for a menu item to perform. It is recommended that user-defined menus use only the first
five or the last three. The remaining actions are utilized by ScadaPhone's default MainMenu structure.
Incorporating them into user-defined menus could have an adverse effect on the MainMenu and therefore
is not recommended. However, they are described here for reference:
Ÿ Enter Security Code: Opens a submenu ($EnterCodeMenu) that allows the caller to enter their
security code.
Ÿ Play Active Alarms: Plays the messages for all current active alarms
Ÿ Play Ack Alarms: Plays the messages for all current alarms requiring acknowledgement
Ÿ Ack Alarms: Opens a submenu ($AlarmAckMenu) that allows the caller to acknowledge alarms.
This also displays a Hang Up checkbox. When this checkbox is checked, after the caller
acknowledges the alarm ScadaPhone hangs up.
115
Ÿ Play Alarm: Plays the message for the next active alarm
Ÿ Ack Alarm: Opens a submenu ($InvidualAlarmAckMenu) that allows the caller to acknowledge
the next active alarm
For information about the remaining menu items, see: Menu Item Action
Tag Properties
Tag properties are viewed and edited in Development Mode.
The properties of a tag listed on a tab in the main window may be viewed by selecting the tag name and
clicking the Properties button. This will open the Tag Properties window:
The Tag Properties window for a discrete tag named ControlBit
The name of the tag, the data type, and the tag class are displayed. A tag may be one of the following
classes:
Ÿ System Tag: These are tag names used by the ScadaPhone program. These tags should not be
changed.
Ÿ ScadaLink Tag: These are tag names from the SCADA system, which allow ScadaPhone to
retrieve tag data
Ÿ Data Comm: This class is not yet implemented. These are tags used to retrieve data directly from
PLC's (Programmable Logic Controllers).
Ÿ Computed Tags: These tags hold the results of a computation. When this property is select, the
Tag Properties window opens a lower pane. Details: Computed Tags
Ÿ Holding Tags: These tags are used to hold fixed values and are often used in comparisons and
in the computations for computed tags. Holding tags may be analog, discrete, or string values.
Ÿ ScadaLink Alias: This field allows the tag name to be different than the datalink "Data Source"
field which ScadaPhone uses to request the tag information from the SCADA software.
ScadaPhone will use the name in the ScadaLink Alias field as the tag name to request the tag
data but use the name in the "Tag Name" field for display within ScadaPhone. For instance, In
116
a ScadAlarm project, the Tag Name may be something like "Lewis_Ave_Main_Pressure" and
the Data Source may be "[alarmlist.xls]Sheet1|R0205C005". A list of more than 1000 tags in
the format of the aforementioned DataSource are very repetitive and hard read when trying to
find a particular tag. By using the ScadaLinkAlias to hold the less descriptive string and setting
the Tag Name to a more descriptive string, the alarm list displayed on screen is more readable.
When a new tag is created, it is assigned the ScadaLink Tag class. Change the class by clicking the
correct option button.
Clicking the blue References link will open the References to Tag window, which lists all the places the
tag is used within the ScadaPhone project. Details: Tag References
Related Topics:
Entering Tag Names
Modify Tag Values
Tag References
Tag references provide a method to find every place a tag is used within a ScadaPhone project. Tag
references can be seen by selecting a tag name on the Discretes, Analogs, or Strings tab and clicking
the References button. They may also be seen from the Tag Properties dialog box by clicking the blue
References link. This will open the References to Tag window:
ScadaPhone References to the Tag ChlorineTankLevel
In the above example, the tag ChlorineTankLevel is used three times within the ScadaPhone project:
1. ChlorineTankLevel is used in the TankLevels menu in that menu's prefix menu item. The tag is
used in the third message segment in the Menu Item Message Composition box.
2. ChlorineTankLevel is used in the SendAlphaPage alarm. The tag is used in the third message
segment in the Voice Message Composition box.
3. ChlorineTankLevel is used as part of a Computed Tag, ChemicalPump5. Examining the
properties of ChemicalPump5 shows this computation:
ChlorineTankLevel<=ChlorineLowLevelAlarmSP. Details: Computed Tags
117
Testing Alarm Callouts in Run Mode
After a ScadaPhone project has been set up, it should be tested in Run Mode. Switch to Run Mode by
clicking Mode | Runtime from the main window’s top menu. Switching modes requires a password,
therefore the Supervisor Login window will appear:
Login using the supervisor password for this project. (See: Create a User's List.) For testing, select Start
a session and use the scrollbar to set the Session Length to one hour. This will prevent ScadaPhone
from asking for a password for every protected action. Upon successfully logging in, the status line at the
bottom of ScadaPhone’s main window should read Run Mode: Idle.
In Run Mode, ScadaPhone repeatedly scans the list of alarms to see if an alarm has been triggered. If an
alarm has triggered (i.e. the alarm has been active for a period of time greater than or equal to the Signal
Filtering time defined in the Alarm Information window), ScadaPhone will consult the action schedule to
see what action is to be taken (call next contact immediately, announce alarm over the modem speaker
before calling, etc...). For testing, it may be preferable to create a schedule with the action set to
Announce then call for the testing time period. This way, both modes of alarm announcement (over the
speaker and over the telephone) may be observed. For details on how to set up a schedule, see:
Creating a Schedule.
In addition to creating a testing schedule, the Alarm Announcement options settings may be changed for
testing. From the main menu, select Options | Alarm Announcement to open the Alarm
Announcement Options window:
118
The Alarm Announcement Options window
This window contains three scroll bars that specify the following: (1) how long the alarms should be
announced over the speaker before placing a telephone call, (2) how long ScadaPhone should pause
between announcing alarms, and (3) how many times the alarms should be announced during each
announcement. Suggested values for testing are: (1) one minute before placing a call, (2) ten seconds for
pausing, and (3) play alarms two times. Click OK when finished.
Testing Alarm Callouts
Alarm tag values may be manually changed in order to test the callout procedure. To do this,
ScadaPhone’s SCADA Link should be disabled; otherwise, the alarm bits may be overwritten by values
obtained from the SCADA system. To make sure that the SCADA Link is disabled, on the main menu
click Scada Link | Setup. This will open the SCADA Link Setup window. Remove the check mark in the
Enabled box. Click OK to close the window.
To select an alarm to test, click the Alarms tab in the main window. Next, from the main menu click
Window | Discrete Tags. This will display the Discretes window:
119
Viewing both the Alarms tab and the Discretes window
The information in this window is identical to the information on the Discretes tab in the main window.
The Discretes window exists for the convenience of being able to see and manipulate the discrete tag
values while simultaneously viewing a different tab in the main window.
Toggling a discrete tag value from FALSE to TRUE will trigger any alarm polling this tag. (However, if the
alarm option was set to Negative Logic, toggling a discrete tag value from TRUE to FALSE will trigger
the alarm. To review an alarm's settings, select the alarm and click the Edit button. This will open the
Alarm Information window.) To manually change the status of a discrete tag, select a discrete tag name
and click the Toggle button. If the Signal Filtering (in the Alarm Information window) for the alarm was
set to a value greater than 0, the alarm will display a countdown showing how much time remains before
the alarm is triggered. When the countdown reaches 00:00:00, the alarm line in the Alarms tab will turn
yellow.
As soon as the alarm line turns yellow, the voice message defined in the Alarm Information window
should play. If the Alarm Announcement Options were set as suggested above, this message will be
played twice and then there will be 10 seconds of silence before the next iteration. This cycle will repeat
for one minute and then it will be time for ScadaPhone to make a telephone call.
ScadaPhone will issue a warning for ten seconds before making a telephone call, just in case someone is
at the console and doesn’t want the call to be placed. The warning is displayed via the Call Warning
window:
120
The Call Warning window
There are two ways to prevent a callout from proceeding: acknowledge the alarms: by clicking the Ack
Alarms button or by clicking the Exit Run Mode button.
When testing, rather than waiting for the timer to count down, click the Call Now button. When the Call
Warning window disappears, the modem will dial the telephone number of the next available contact (as
determined by the contact availability scheduler). After the dialing has stopped, the modem goes into
answer detection mode and waits for one of the current contact’s answer detection scripts to be satisfied.
(On an external modem, the receive data light (RD) will turn on.) If an answer detection script is satisfied,
the appropriate action will be performed. If not, ScadaPhone will either try to call again (depending on the
Call Persistence setting in the Alarm Contact window) or will call the next contact.
The action taken by ScadaPhone is determined by the answer detection script for that alarm. (See:
Creating and Editing Answer Detection Scripts.) If the detected script’s action was either PlayAlarms or
Pager String, ScadaPhone will either play the alarm messages or send the pager string, hang up the
phone, and switch to awaiting acknowledgement mode. Calls performing either of these two actions are
not interactive calls (i.e. the contact was not given the opportunity to access the AlarmMenu and to
acknowledge the alarms that were reported). Non-interactive calls require the person contacted to either
call ScadaPhone to acknowledge the alarms over the phone or to travel to the SCADA system and
acknowledge the alarms from the computer console.
If the detected script’s action was either PlayAlarmsAndMenu or PlayMenu, ScadaPhone will interact with
the person via the menu system until the person hangs up the phone. Upon completion of the call,
ScadaPhone will return to its Run Mode: Idle state. However, if the contacted person failed to
acknowledge the alarms that were reported, the next scan through the alarm list will trigger another
callout.
In some cases, if answer detection script audio events are not being detected correctly, it may be
necessary to tweak the parameters of ScadaPhone’s Audio Analyzer. For example, if the facility housing
the SCADA system has telephone lines with poor signal quality, Tone events may be mistaken for Voice.
Additionally, if the person answering the call has a smooth voice, some Voice signals may be detected as
Tone. If the answer detection scripts are not performing well on your phone system, refer to The Audio
Analyzer
After testing alarm callouts manually, the SCADA Link should be enabled and the status checked to verify
it is working correctly. First, start the SCADA system. Next, click Scada Link | Setup from the main
menu. (For details on setting up the SCADA link, see: The SCADA Link Interface.) Put a check mark in
the Enabled check box on the Scada Link Setup window and click the OK button. ScadaPhone will now
attempt to poll the SCADA software for tag values. To verify that the conversation is working correctly,
click Scada Link | Status to open the SCADA Link Status window:
121
The SCADA Link Status window displaying a working link
In the image above, a snapshot of successful communications is shown. The SCADA Link Status
window will also report a SCADA Link failure and inactivity via the status line. When a link is working, the
tag names referenced in the active project will cycle to the right of the Tag Name label.
The Message Segment Window
Creating Message Segments
There are four types of message segments:
1. WAV File: Any recorded message.
2. Analog Value: Enunciates the current value of an analog tag from the SCADA system.
3. Discrete Value: Enunciates the current value of a discrete tag from the SCADA system.
4. IF WAV: Conditionally selects WAV files.
To create message segments, click the Add button in the Voice Message Composition box of the
Alarm Information window or the Menu Item window. This will open the Message Segment window.
The Message Segment window
There are four options in the Segment Type panel, covered in detail below:
Ÿ WAV file
Ÿ Analog Value
Ÿ Discrete Value
Ÿ IF WAV
When the WAV file option is selected, the Message Segment box will include a File Functions box.
When the Analog Value is selected, the File Functions box is replaced by the Analog Formats box.
When the Discrete Value is selected, the File Functions box is replaced by the Discrete Formats box.
When IF WAV is selected, the File Functions box is replaced by the Conditional Expression box.
Defining WAV Message Segments
To use an existing WAV file message segment:
122
Ÿ In the Message Segment window, click the Browse button. This will open the Select WAV file
window.
Ÿ Click on the name of the WAV file to be added
Ÿ Click on the OK button.
Ÿ Click the OK button in the Message Segment window to return to the Alarm Information
window or the Menu Item window. The name of the message segment will be entered into the
Voice Message Composition list.
To create a new WAV File message segment:
Ÿ In the Message Segment window, click the WAV File option.
Ÿ Enter the name of the WAV file in the File Name edit box. Note: Do not enter a file extension.
The extension '.WAV' will be added by ScadaPhone.
Ÿ Click Record. ScadaPhone will display a pop-up box with a Stop button. When the pop-up box
indicates recording is in progress, speak the desired message segment into the microphone.
Ÿ Click Stop to end the recording. This will close the pop-up recording box.
Ÿ Click the Play button to listen to the message segment just recorded. If necessary, re-record a
WAV segment by clicking the Record button again. If the WAV file already exists, a pop-up box
will ask confirmation of the file overwrite.
Note: The recording and playback of sound (WAV) files may be done either through the voice modem or
a PC sound card. See: Setting the COM Port from the main window
WAV files may also be edited for content or unwanted noise at the beginning and/or end of the recording
may be trimmed. To edit a WAV file, select the file click the Edit button in the Message Segment
window. This will open the Edit Wav File window. Details: Editing WAV Files
When the message segment is complete, click OK from the Message Segment window to return to the
Alarm Information window or the Menu Item window. The name of the message segment will be
entered into the Voice Message Composition list.
Defining Analog Value Message Segments
An analog value may be added to an alarm message. To add an Analog value message segment to the
Alarm Information or the Menu Item window's Voice Message Composition box, click Add. The
Message Segment window will open. Click the Analog Value option. The File Functions box is
replaced by Analog Formats.
Enter the name of the analog tag to be enunciated. Use the Browse button to see a list of analog tag
names defined on the main window's Analog tab.
Adjust the slider to select the number of digits to the right of the decimal point to be enunciated.
Click OK to return to the Alarm Information window or the Menu Item window. The name of the analog
tag will be entered into the Voice Message Composition list.
Defining Discrete Value Message Segments
A discrete value may be added to an alarm message. To add an Discrete Value message segment to the
Alarm Information or the Menu Item window's Voice Message Composition box, click Add. The
Message Segment window will open. Click the Discrete Value option. The File Functions box is
replaced by Discrete Formats.
Enter the name of the discrete tag to be enunciated. Use the Browse button to see a list of discrete tag
names defined on the main window's Discrete tab.
123
Click the appropriate option button in the Discrete Formats box to select the how the discrete value will
be enunciated.
Click OK to return to the Alarm Information window or the Menu Item window. The name of the discrete
tag will be entered into the Voice Message Composition list.
Defining IF WAV Message Segments
An existing WAV file may be conditionally added to an alarm message. To add a conditional WAV
file segment to the Alarm Information window's Voice Message Composition box, click Add. The
Message Segment window will open.
The Message Segment window with and IF WAV condition
Click the If WAV option. Select the name of the WAV file segment to be conditionally added by
clicking on the Browse button next to the File Name text box. Enter the logical conditional
expression in the Conditional Expression text box. The text will be shown in red until a valid
logical expression is entered. Analog and discrete tags may be selected by clicking on the Analog
or Discrete buttons.
The selected WAV file segment will be added to the voice message only when the conditional
expression is True.
For example, this option may be used in situations such as enunciating the position of an HOA
switch in either Hand, Off, or Auto. In this example, the message segment begins by stating "The
HOA switch is in". This is followed by the word "Hand" when the value of the tag named HOA=1, by
the word "Off" when HOA=2, or by the word "Auto" when HOA=3.This requires three IF WAV
segments. The "Hand" IF WAV segment is shown above.
The Modem Window
To open the Modem Window, select Modem from ScadaPhone's top menu:
124
The modem window
The modem window displays the log of voice modem communications. Each line is color coded as
follows:
Blue
Purple
Black
Red
Green
Commands sent to the modem
Modem responses
Voice and WAV file actions
Error information
Diagnostic information
Menu Overview
Main Window
Brings up ScadaPhone's main window without closing the Modem Window.
Port
Opens the Select Port window which displays available COM ports:
125
The Select Voice Modem COM Port with COM1 selected
To use the PC sound card for the recording and playback of sound (WAV) files rather than the modem,
click the Disable Voice Modem button.
COM ports that are not available are grayed out. To select a port, click the radio button corresponding to
the COM port to which the modem is attached and click OK.
Reset
Resets the modem.
To check that the modem is connected properly, click on the Reset menu item. There should be some
activity in the Modem Window log. The last line should display "<DLE>h" or "OK<CR><LF>". This
indicates that the modem is ready. You should NOT get "ERROR<CR><LF>".
Volume
Opens the Volume Control window:
Move the slider to adjust the modem volume. Click the Test button to check the volume. Click OK when
done.
Log | Diagnostics
When toggled on (as indicated by a checkmark) extended diagnostic data will be entered into the modem
log for troubleshooting purposes. Log diagnostics will be displayed in green. The extended log
diagnostics will help technical support in diagnosing problems. The log file is named ModemLog.rtf and is
stored in the project folder.
Log | Snapshot
Copies the current modem log data into memory, opens Microsoft Word, and pastes the data into a new
Word document. This document can be saved and e-mailed to technical support.
126
Log | Freeze
Freezes the log so that data is no longer updated.
Log | Clear
Clears the current modem log data.
Command
Opens the Modem Command window:
Ÿ The Drop DTR button causes the Data Terminal Ready (DTR) line to go low.
Ÿ Enter any special modem command into the text box and click the Send button to send it to the
modem.
Ÿ Click Close when done.
Show/Hide LEDs
Displays or Hides the row of LED indicators at the top of the Modem Window.
TimeOuts
Brings up the Configure Modem Timeouts Window.
Configure Modem Timeouts window
Use the slider to set the wait times for modem response to AT commands, ATDT commands, and how
long to wait for the carrier detect signal when calling TAP pagers.
Dial Options
127
Brings up the Dial Options window.
Enter any additional AT commands that need to be inserted between the AT and DT modem commands.
Example: "AT X0 DT555-1234"
Force Modem Type
Brings up the Force Modem Model window.
128
SCADA Link Interface
Setting Up the SCADA Link Interface
Before ScadaPhone can obtain data from the SCADA software system, it must know the configuration of
the SCADA software's tag server interface.
There are three interface types supported by ScadaPhone: DDE, OPC, and OLE. To select the interface
type, click SCADA Link | Setup from ScadaPhone's top menu. This will open the SCADA Link Setup
window:
129
The Enabled checkbox controls the link to the SCADA system. During development, it may be preferable
to disable the link by leaving the checkbox unchecked. When the SCADA link is enabled, ScadaPhone
may try to start and stop the SCADA software each time the mode is switched between development and
runtime. After development is completed, enable the link by checking the Enabled box.
Select the Interface Type radio button appropriate for the SCADA software.
To specify the server name, click the blue text under Selected Server . One of three windows will open,
depending upon which interface has been selected: the DDE Server List window, the OPC Server List
window, or the OLE Server List window.
If the SCADA software (server) is running on a different PC than ScadaPhone, select the 'Server on
remote machine' checkbox and enter or select the remote PC's network name in the 'Remote Machine
Name' text box. The names of all the computers currently on the network will be listed in the dropdown list
box.
Once the SCADA Link interface is set up and the selected server properly installed, and if the SCADA
software supports automatic launching, switching to run mode should cause the SCADA application to
launch. If the SCADA application fails to launch, the SCADA software may need to be started manually.
To avoid spurious alarms, whenever the SCADA software is shut down, ScadaPhone should be shut
down first, then the SCADA software system.
The DDE Server List Window
130
By default, a few popular SCADA servers are pre-defined in the DDE Server List window. To configure
DDE servers not found in the default list, click New from the top menu. To see and/or to modify an
existing server definition, highlight the server definition name and click Edit from the top menu. Both New
and Edit will open the Edit DDE Server window.
The Edit DDE Server window when
Wonderware Interface is selected
The Name field lists the name of the server (which will be shown in the DDE Server List window). The
Service field is the name of the program providing the data. The Topic field is the document name or
topic within that program. (Consult your SCADA software's manual to determine what these values should
be).
The optional Tag Name Suffix can be specified if all of the tag names that are to be obtained from the
SCADA software have repetitious suffixes. This way, the tag names that appear in ScadaPhone do not
need to include this suffix and clutter the appearance.
When all values have been entered, click OK to return to the DDE Server List window.
131
To configure DDE servers not found in the default list, click New from the top menu of the DDE Server
List window. The window will display blank edit boxes which may be used to custom configure DDE
servers. Consult your SCADA software's manual to determine what these values should be.
The OPC Server List Window
A few SCADA servers are pre-defined in the OPC Server List window. To configure OPC servers not
found in the default list, click New from the top menu. To see and/or to modify an existing server
definition, highlight the server definition name and click Edit from the top menu. Both New and Edit will
open the Edit OPC Server window:
.
Consult the SCADA software's documentation to obtain the Name and Service for any OPC servers not
in the default list.
GUIDs can be used in place of class strings when setting up OPC server connections. For example,
instead of specifying TCPTagServer.OPCServer.1 as the server class string you can specify {C05157E0B5E2-4D66-94C7-3C3283413DE2}.
When the values have been entered, click OK to return to the OPC Server List window. Click OK again
to return to the ScadaPhone main screen.
Note: The list of OPC item handles is dumped to a text file named OPCItemHandles.txt each time an
OPC connection is initialized.
The OLE Server List Window
132
Because there is no standard for non-OPC OLE interfaces, selecting an OLE server is much more
restrictive than DDE or OPC. Click on one of the option buttons to select one of the pre-defined OLE
interfaces. Any additional OLE interfaces will have to be implemented by ScadaTEC's programming staff.
Click OK to return to the ScadaPhone main screen.
Checking the SCADA Link
Once the SCADA Link is set up, it should be enabled and the status checked to verify it is working
correctly. First, start the SCADA system. Next, click Scada Link | Setup from ScadaPhone's top menu.
This will open the SCADA Link Setup window. Put a check mark in the Enabled check box and click the
OK button. ScadaPhone will now attempt to poll the SCADA software for tag values. To verify that the
conversation is working correctly, click Scada Link | Status to open the SCADA Link Status window:
The SCADA Link Status window displaying a working link
In the image above, a snapshot of successful communications is shown. The SCADA Link Status
window will also report a SCADA Link failure and inactivity via the status line. When a link is working, the
tag names referenced in the active project will cycle to the right of the Tag Name label.
Watchdog Features
All of the "watchdog" features are consolidated into the Watchdog Features window (Opeions |
Watchdog Features). All of the features have been documented in separate explanation windows
which can be viewed by clicking on the Explanation labels in the Watchdog Features window.
133
Main Thread Watchdog
ScadaPhone uses several different "process threads" to perform the various tasks necessary to
function as a Windows application. The main thread is responsible for handling all of the operator
input and time driven logic within ScadaPhone. In rare and abnormal situations, this thread may
"hang" or "lock up" (usually due to operating system events caused by other applications or
hardware).
As a mission critical 24 hour per day application, ScadaPhone has a built in safeguard to detect
these abnormal events and correct them if possible. This is accomplished by the Main Thread
Watchdog; this watchdog is a very simple process thread that does nothing but monitor the
function of the main process thread; if and when there is a problem with the main execution thread,
the watchdog launches a separate application named RestartScadaPhone.exe.
RestartScadaPhone will attempt to close ScadaPhone gracefully at first and then result to brute
force if necessary. After ScadaPhone has been successfully closed, RestartScadaPhone will
launch ScadaPhone so that normal operation can resume. This safeguard is completely automatic
and no user intervention is required.
Heartbeat Tag
If an analog ScadaLink tag is specified to be the HeartbeatTag, ScadaPhone will write the current
minute from the real time clock (0..59) to the selected SCADA/PLC tag once per minuite. Logic in
134
the SCADA/PLC can monitor this tag and assert an output to a backup hardware dialer in the event
that the HeartbeatTag fails to change within a configured amount of time (e.g. 5 mins). You can
see evidence of the heartbeat tag in the Activity Log via the repetitive "SCADA system accepted
new tag value..." messages logged every time a write is issued. Also note that this feature only
works in Run Mode; thus, it also serves as a "the operator left it in Development Mode" watchdog.
For example, logic can be inserted into either the SCADA or the PLC to energize an output
whenever the value of the Heartbeat Tag fails to change over a 5 minute interval; the backup
hardware dialer can be programmed to issue a brief message such as "ScadaPhone alarm dialer is
not active" whenever the PLC output is energized.
This feature not only provides protection against failures on the SCADA computer, it also catches
operator errors such as inadvertently leaving ScadaPhone in Development Mode after making
modifications to the project.
Modem Error Tag
In the event that the voice modem should fail to respond to ScadaPhone's commands, a bit can be
turned on in the SCADA system. This bit can be used to trigger a secondary hardware alarm dialer
or to cycle the power to the modem via a "reset cable" controlled by the PLC.
To use this optional safeguard, specify the name of the discrete tag you wish ScadaPhone to use
as a modem failure signal. Whenever the modem is operating normally, this bit will be set to logical
zero (FALSE); if the modem fails to respond to ScadaPhone's AT commands, ScadaPhone will
write a logical one (TRUE) to this bit. The Modem Error Bit will be returned to zero as soon as a
valid response is received from the modem.
When using this feature, it is advisable to apply some filtering to any SCADA/PLC logic that is
associated with this bit; for example the logic should wait for the Modem Error Bit to be TRUE for
30 seconds or more before taking action. Otherwise, brief modem communication problems may
produce annoying false alarms.
No Dial Tone Tag
The Modem Error Tag option handles situations where the voice modem stops responding to
ScadaPhone's commands; however, in situations where the phone line is dead, the modem will
issue repetitive "NO DIALTONE" result codes.
This scenario fails to activate the Modem Error Tag because the Modem Error Tag is reset every
time a valid response is received from the modem. The No Dial Tone Tag covers instances where
the modem is functioning properly but the phone line is not.
The No Dial Tone Tag will be set to a logical one (TRUE) whenever 3 attempts to call out are
aborted due to the modem returning "NO DIALTONE". The bit will be reset to a logical zero
(FALSE) as soon as the modem responds to the AT DT command with a valid result code (i.e.
"OK", "CONNECT", or "VCON").
To use this optional safeguard, specify the name of the discrete tag you wish ScadaPhone to use
as a dial tone failure signal. This bit can be mapped to a PLC output to trigger some other means
of notifying the operators of a phone line failure (e.g. back up hardware dialer, strobe, etc...) .
Modem Error Restart
135
On some systems, it has been observed that the voice modem can become unresponsive due to
problems with either the COM port hardware or the COM port driver. ScadaPhone tries to
overcome these problems by closing and reopening the COM port; however, in some cases, it
becomes necessary to shut down and restart ScadaPhone.
ScadaPhone has the ability to automatically respond to this failure scenario without any operator
intervention. If the "Restart ScadaPhone if the voice modem fails..." check box is selected, this
watchdog will be activated. If and when the voice modem becomes unresponsive for the configured
amount of time, ScadaPhone will launch RestartScadaPhone.exe.
This feature can be used in conjunction with the Modem Error Tag; however, it is advisable to
extend the modem failure restart interval in order to allow the functions associated with the Modem
Error Tag enough time to operate.
$ScadaLinkFailed Alarm
In every ScadaPhone project, a discrete system tag named $ScadaLinkFailed is automatically
defined. This tag reflects the current status of the OPC/OLE connection between ScadaPhone and
the SCADA server being polled by ScadaPhone.
If ScadaPhone polls the entire list of tags that are needed from the SCADA server and fails to
receive at least one valid response, the $ScadaLinkFailed bit is set to a logical one (TRUE). As
soon as a valid polling response is received the $ScadaLinkFailed bit is reset to logical zero
(FALSE).
The status of this bit can be used to drive a predefined system alarm (also named
$ScadaLinkFailed). Clicking the checkbox on the Watchdog Features window will automatically
create and/or enable this alarm. With this alarm activated, ScadaLink failures can be announced
via any of the standard ScadaPhone methods (voice, email, pager, etc...)
Once created, this alarm can be modified just like any other alarm; the most common modification
would be to change the Alarm Group field so that an appropriate contact is alerted if and when this
alarm triggers.
136
Advanced_Features
The Audio Analyzer
The Audio Analyzer window may be opened from ScadaPhone by selecting Window | Audio Analyzer
on the main screen's top menu. ScadaPhone utilizes an audio signal analyzer to detect when a contact,
whether a person or a beep, has answered the telephone during a callout. The Audio Analyzer may be
used to help correct an answer detection script that is not working properly.
The Audio Analyzer becomes active after a callout has been placed and the voice modem is in record
mode. As the digitized audio signal from the telephone line streams in, ScadaPhone categorizes 50
millisecond samples of the data into one of three categories: Silence, Voice, and Tone.
The Audio Analyzer comes pre-configured with values that specify the thresholds for categorizing these
signal states; however, in some instances it may be necessary to tweak these parameters for more
accurate signal detection. The most common problem that can arise is when the voice modem is
connected to a telephone line that has poor signal quality, which could cause ScadaPhone to categorize
Tone signals as Voice signals. If this happens, ScadaPhone may deem the ring-back (the tone
generated by the phone company to indicate that the telephone being called is ringing) to be voice. If the
Answer Detection Script for the current contact is Voice(0.10)+Silence(0.50) =
PlayAlarmsAndMenu(MainMenu), ScadaPhone will start playing the alarms after the first ring-back. If
the person being called picks up the phone on the third ring, ScadaPhone will already have been talking
for 10 seconds or more.
When ScadaPhone makes a callout, the results of the Audio Analyzer's recording are stored in a timestamped file with the extension .WAV in the project directory. ScadaPhone automatically deletes old
Audio Analyzer files, but keeps up to ten on disk. If there are problems with any answer detection scripts,
any of the latest ten files may be opened and the data examined for errant calls.
When the Audio Analyzer is opened (from the main window, select Window | Audio Analyzer), it
automatically loads the most recent file.
137
The Audio Analyzer window with a sample WAV file displayed
To examine a different file, click the 'Prev File' or 'Next File' buttons or 'click the blue file name link at the
top of the window. ScadaPhone opens the AudioAnalyzer folder, where the .WAV files are stored in the
format year-month-day hours.minutes.seconds. Select the desired file name and click the
Open button.
The data is displayed graphically in two boxes. The top box, the Signal State Graph, displays the signal
states 50 milliseconds per pixel. As the color swatches indicate, a vertical white line represents a silence
sample, a green line represents a voice sample, and a yellow line represents a tone sample. The scroll
bar beneath the signal state graph moves the vertical selection line, which allows individual cells to be
selected and displayed in the lower Cell Graph box. The selection line may also be moved by clicking on
the graphic data display. The above example is a voice cell.
The Script Events box to the right of the Signal State Graph may be used to analyze the sequence of
138
events. The Script Events list displays the signal states recorded in the Audio Analyzer file in the same
format that ScadaPhone uses for its Answer Detection Scripts. This list may be used when the length of
silence within recorded voice mail WAV files needs to be determined in order to create multiple scripts.
Note that there are usually numerous repetitions in the Script Events list. When ScadaPhone is
comparing this list to Answer Detection Scripts, the list is continuously being minimized to remove
redundancies. To see what the minimized list looks like, click the Minimize Script button.
The lower Cell Graph box graphs the signal amplitude for the 360 samples in the 50 millisecond cell.
Light red lines are drawn to indicate points where the audio signal deviates from a smooth sine wave
(asymmetries). A clean tone usually has no asymmetries.
The red marks in the Audio Analyzer's Cell Graph indicate signal asymmetries. To illustrate exactly
what constitutes an asymmetry, examine the sine wave graph. In this figure, a sine wave has been
divided into four sections indicating signal states:
1. Negative and descending. As this state progresses, the slope of the graph should continuously
approach zero.
2. Negative and ascending. As this state progresses, the slope of the graph should continuously
steepen (positively).
3. Positive and ascending. As this state progresses, the slope of the graph should continuously
approach zero.
4. Positive and descending. As this state progresses, the slope of the graph should continuously
steepen (negatively).
Conceptually, a signal asymmetry occurs when the signal disobeys the rules stated above. In actuality,
these rules are too strict for the digitized audio coming from the telephone line. Due to signal noise and
analog to digital round off error, the slope of a tone signal may deviate slightly from one sample to the
next.
For example: assume that the modem is digitizing a tone, the current sample is deemed to be in state 2,
and that the slope from the pervious sample to the current sample is 10 units. If the next sample is also in
state 2 (negative and ascending), but its digitized value is only 9 units higher than the previous sample,
the slope has regressed by one unit (the rule for state 2 is that the slope should be continuously
increasing). If the rules are strictly applied, a signal asymmetry would be flagged at this sample. However,
ScadaPhone's Audio Analyzer allows a Maximum Slope Regression threshold to be specified, in order
to accommodate telephone lines with less than perfect signal quality (i.e. all of them).
The Maximum Slope Regression can be adjusted via the scroll bar in the Asymmetry Settings section
of the Audio Analyzer window. Setting this value to zero means that the Audio Analyzer will be very
139
critical of the audio signal thus producing more asymmetries per cell; setting this value higher causes the
Audio Analyzer to be more forgiving of signal quality. Be careful, setting the Maximum Slope
Regression too high may result in some voice signals being interpreted as tone.
The Maximum Asymmetries Per Cell scroll bar works in conjunction with the Maximum Slope
Regression scroll bar in differentiating between voice and tone signals. As the label above the scroll bar
indicates, cells with fewer asymmetries than this threshold are deemed to be tone and cells with more
asymmetries are deemed to be voice.
The Signal Threshold scroll bar is used to specify the threshold between silence and signal (signal
being either voice or tone). If this threshold is set too high, some tone and voice events will not be
recognized because they will be deemed silence. If this threshold is set to low, extraneous cells
containing short bursts of noise may be misinterpreted as valid signals.
Due to the considerable processing time, the graphs are not updated immediately as these three scroll
bars are moved. After changing the scroll bars, click the Update button to see what effect the changes
make on the signal graphs.
The Record And Playback controls allow you to watch the Audio Analyzer in action. Note that the
buttons in this box resemble the buttons on a tape or CD player. They are as follows:
Record
Play
Stop
To record an Audio Analyzer file, enter the desired telephone number and press the record button. The
modem will dial the number and the call will be heard while in progress. As time elapses, the Signal State
Graph will track from right to left showing its perception of the audio stream coming from the modem. To
hang up, click the Stop button. To hear what was just recorded, click the Play button. To listen to a
previously recorded Audio Analyzer file, click the File option on the top menu and select one from the list.
Citect Interface
This is a feature of ScadaPhone that allows the users of the CitectSCADA software to display and
selectively import tags that are defined in the CitectSCADA software. The alarm tag types that may
be imported are: Digital, Analog, Advanced, Time Stamped, and Multi Digital. General tag types
that may be imported are: Analog, Digital, and String.
Importing Citect Alarm Tags
If Citect has been selected in the SCADA Link Setup window,
140
then when you add or edit an alarm tag a new link, 'Browse Citect Alarms' , is added to the upper
right of the Alarm Information window as shown.
For this link to work the CitectSCADA software must be running the desired project on the same
PC. This is necessary to allow the tag information to be imported. For general information on alarm
tags please see the topic Creating Alarm Tags and Messages.
Note1: When importing an analog alarm from the CitectSCADA software seven new alarms are
created in ScadaPhone. These are: .DeviationHighAlarm, .DeviationLowAlarm, .HIghAlarm,
.HighHighAlarm, .LowAlarm, .LowLowAlarm, and .RateOfChangeAlarm. There is also one analog
tag generated, .State, and eight discrete tags: .DeviationHighAlarm, .DeviationLowAlarm,
.HIghAlarm, .HighHighAlarm, .LowAlarm, .LowLowAlarm, .RateOfChangeAlarm and .Ack. When an
alarm is deleted, all tags associated with the deleted alarm that are not referenced elsewhere in
ScadaPhone are removed.
Note2: If ScadaPhone encounters a tag name that is not valid in ScadaPhone during import or
entered manually it will create a valid alias for use within ScadaPhone by placing an underscore in
front of the tag name (/tag1 becomes _/tag1). The alias will be used within ScadaPhone but the
original tag name will be used when communicating with the SCADA software.
Clicking on the blue 'Browse Citect Alarms' link will display the following dialog.
141
Citect Alarm Browser Dialog
This dialog allows the selection of sum or all the alarm tags currently defined in the CitectSCADA
software project. Each tab displays tags of the different types. As tags are selected and imported
into ScadaPhone they are excluded from the lists. To display tags that are already referenced on
ScadaPhone, check the 'Show Tags Already Being Referenced' checkbox. After all the desired
tags are selected, click the 'OK' button. The Alarm Message Generator dialog will be displayed.
Alarm Message Generator dialog
142
The purpose of this dialog is to allow the configuration of the text and/or voice messages for the
alarms. The alarm message is shown in the 'Alarm Message' column. The composition of the alarm
messages is controlled by selecting or de-selecting the check boxes. The order of the selected
fields may be changed by selecting the field and clicking on the up/down arrows in the text box.
Note: The composition of the alarm message is very important if you are using the text-to-speech
facility to generate the speech files for the alarm messages. For an alarm to be imported and
generated in ScadaPhone, the alarm(s) must be selected and one of the three buttons at the
bottom of the dialog clicked. When this is done the selected alarms are imported to ScadaPhone
and removed from the list.
When the 'Close' button is clicked any remaining alarm tags in the list are not imported into
ScadaPhone. The alarm message may be manually edited by selecting the alarm(s) and clicking
on the 'Manually Edit Selected Items' button. If the 'Use Default(Alarm Tagname)Alarm
Message(s)' button is clicked the selected alarms are imported and just the alarm tag name is used
for the alarm message. When all the desired alarm tags have been imported click the 'Close'
Button. The following dialog will appear.
143
As the alarm tags are imported the words in each alarm message are compared with a list of
acceptable words that work well with the text-to-speech generator. Any not found are flagged for
editing. The above dialog allows ScadaTec to learn of new words that we have not thought of and
add then to the list.
Click one of the two buttons.
If any alarm message contain text that is not in the acceptable word list then the following Dialog
will appear.
Edit Alarm Message Word List Dialog
144
ScadaPhone has the ability to use the Windows Text To Speech interface to produce alarm wav
files.
When using the TTS interface, there is a possibility that abbreviated words can produce
unintelligible
messages. The 'Unknown Word List' lists words that may pose a problem when rendered through
TTS.
This window allows you to change these words in the alarm messages so that this does not
happen. In
this window you can select words, listen to their TTS representation, and change them if
necessary.
ScadaPhone comes pre-configured with approximately 10,000 known words; your project may
be using
valid words that were simply omitted from the 'Accepted Word List'; if this is the case and some of
the words
in the 'Unknown Words List' are valid, simply highlight them and click the 'Accept Word(s)' button to
have
them included in the 'Accepted Word List'.
If you intend to manually record wav files to enunciate the alarms you've just defined, thereby
145
bypassing
the Text To Speech interface, editing the word list is unnecessary. If you do intend to allow
ScadaPhone to use the Text To Speech interface to produce the alarm wav files, here is a brief
description of how the buttons on this window function:
The 'Text To Speech' button allows you to hear the TTS rendering of any words that are
highlighted in
either the 'Unknown Word List' or the 'Accepted Word List'. If you are satisfied with TTS rendering
of any
word or abbreviation in the 'Unknown Word List', you can click the 'Accept Word(s)' button while
that word
is highlighted and it will be moved into the 'Accepted Word List'. If you don't like the rendering of
any word
that is in the 'Accepted Word List', you can click the 'Reject Word(s)' button and it will be moved
into the
'Unknown Word List'. Note: These list boxes are 'multi-select' list boxes; so you can select one or
more
items by holding either the <Shift> or <Ctrl> keys while clicking items in either list.
The 'Show Instances' button will only be enabled when exactly one item in the 'Unknown Word
List' is
highlighted. This opens a window that shows you a list of alarm messages that include the word in
question.
The word in question will be displayed in red so that you can easily see where it is being used.
The 'Ignore Word(s)' button will remove word(s) from the 'Unknown Word List' without
transferring them to
the 'Accepted Word List'. This button can be used if the word(s) in question are acceptable in the
context of
the current project, but will probably never be used in any other project.
The 'Accept Word(s)' button moves the highlighted word(s) from the 'Unknown Word List' into the
'Accepted Word List'. These words will be saved into the 'AcceptedWordList.txt' file so that they will
be
available in future projects where the Alarm Message Generator will be used.
The 'Change Words' button will build a list of all highlighted words in the 'Unknown Word List' and
then
prompts you to enter a new word to replace the unknown word. Any changes made in the 'Change
Word'
dialog will be applied to the alarm messages currently being generated. For example: If 20 alarms
that were
highlighted in the 'Alarm Message Generator' contain the abbreviation 'gals' to represent the word
'gallons',
changing the word 'gals' to 'gallons' in the 'Change Word' dialog would also change the word in
each of the
20 alarms that use the abbreviation 'gals'.
The 'Reject Word(s)' button will move items from the 'Accepted Word List' into the 'Unknown
Word List'
where they can be changed. This is sometimes necessary if you've accepted words and then
realized that
you don't like the way TTS renders them.
146
The 'Close' button closes the Word List window and leaves all remaining items in the 'Unknown
Word
List' unchanged. The alarms will be generated as soon as this window closes.
The 'Back (Prev. Window)' button allows you to return to the Alarm Message Generator if you
decide that
you don't like the message construction of the alarms you've accepted in the Alarm Message
Generator.
After being returned to the Alarm Message Generator, you can change the alarm message
composition or
change the alarm selection(s).
Importing CitectSCADA Analog, Discrete, and String Tags
Clicking on the 'New' button in the Analog, Discretes, or Strings tab bring up a dialog that allows
new tag names to be entered. Existing tags from the CitectSCADA software may be imported by
clicking on the 'Browse Citect' button. This will bring up the following dialog box.
One or more tags may be selected. When the 'Ok' button is clicked the selected tags are imported
into ScadaPhone.
PLEASE NOTE:
In order for ScadaPhone to be able to retrieve alarm information from Citect via the Citect Alarm
Browser, the Citect project needs to have the following I/O device defined:
147
If this I/O device does not exist in your Citect project, use the Citect Project Editor to insert this
device. After this device has been added, you will be able to browse for alarms via ScadaPhone's
alarm browser.
Creating Custom Install Programs
A developer may wish to configure ScadaPhone with a default project that can be installed on a new
system. There is a separate install program called ScadaPhoneMakeInstall.exe, which will create a
custom install program. This custom install program will install ScadaPhone with a custom project as the
default. Contact ScadaTec for details.
Discrete Expected, Analog Received
When ScadaPhone is polling tag values and receives an analog response for a discrete tag, the Discrete
Expected, Analog Received window pops up:
148
The window displays a list of the tag(s) whose values are analog but are defined by the ScadaPhone
project as discrete. To fix this, make sure the ScadaPhone project is not referencing an analog tag as a
discrete tag. For example, an analog tag name may have been placed on the main window's Discretes
tab.
The Discrete Expected, Analog Received window may be opened from the main menu by selecting
SCADA Link | Discrete Representations. This opens the Discrete Representations window. Click the
Analog Response List button in the lower right corner to open the Discrete Expected, Analog
Received window.
Related topic: Setting Discrete Representations
Remote Access Software (RAS) Interface
ScadaPhone's RAS Interface allows the use of remote access software such as Symantec's
pcAnywhere on the same modem and telephone line as ScadaPhone. ScadaPhone has a special menu
item action to launch the RAS. Before launching the RAS, ScadaPhone releases control of the voice
modem so that the RAS can use it to make its connection. When the RAS is closed, ScadaPhone reassumes control of the voice modem. The following example uses pcAnywhere for configuration.
First, start pcAnywhere as normal. A "Be A Host PC" item needs to be created and it will be configured
to use the voice modem provided with ScadaPhone. To avoid conflicts during this set-up, either shutdown ScadaPhone or remove the check mark next to the "Automatically launch after wizard" option in
step 3 of the "Add Be A Host PC Item" configuration wizard. In order to make this host item's
configuration file easy to find, name it "ScadaPhone RAS" as in the example below:
149
pcAnywhere with ScadaPhone RAS file
After this item is created, exit pcAnywhere.
Next, open ScadaPhone's RAS Controller window by selecting from the main menu Options | Remote
Access Software:
The RAS Controller window
150
The RAS Controller window allows a pre-defined RAS host item to be started. (In this example,
pcAnyWhere "ScadaPhone RAS".) To configure the RAS option, fill in the controls on this window from
top to bottom, starting with Command Line. To fill in the Command Line edit box, it's easiest to use the
Browse button (circled in yellow). For this pcAnywhere example, navigate to the Data folder under
pcAnywhere's main program directory and select the file name "ScadaPhone RAS.bhf". Next, the RAS
Window Titles needs to be setup. ScadaPhone will watch for these window titles to determine if
pcAnywhere is still running. If ScadaPhone fails to locate one of these window titles, ScadaPhone
assumes that the remote access session has been terminated and ScadaPhone re-assumes control over
the voice modem. To configure RAS Window Titles, click the Configure button (circled in red).
When the Configure button is clicked, ScadaPhone will launch the pcAnywhere host item specified in the
Command Line box. Therefore, in this example, pcAnywhere should launch the ScadaPhone RAS host.
In addition to launching the pcAnywhere host, the RAS Configuration window will appear:
The RAS Configuration Window
This window lists the titles all of the windows currently running (visible or not). The list should display
window titles pertaining to pcAnywhere. At right, two pcAnywhere windows are shown with checkmarks:
pcAnywhere Initializing... and pcAnywhere Waiting...
There are more pcAnywhere window titles that need to be included; the window titles will change as
soon as someone calls in and starts a remote control session with this host. Therefore, a brief session
must be started in order to get these window titles to be included in the list.
151
As soon as the remote control session starts, these new window titles should be displayed:
Ÿ pcAnywhere [Logon - Remote User Logging On]
Ÿ pcAnywhere [In Session]
Put check marks next to all of the pcAnywhere windows and click OK. A prompt should appear to shut
down the RAS (pcAnywhere) before continuing. Shutdown the RAS and ScadaPhone will return to the
RAS Controller window.
Typically, the Remote Access Software will be terminated by the person that has requested the remote
control session when he or she has finished; however, in some instances it may become necessary for
ScadaPhone to shut down the RAS (e.g. the RAS session terminated abnormally and the RAS is locked
up). The Shut-down RAS controls specify how the shut down is to be performed. In some cases, it may
be possible to send a simple "CLOSE WINDOW" command through the operating system. In the case of
pcAnywhere, there is a utility program specifically for this purpose. For this example, click the "Executing
the following program" radio button and click the Browse button to locate "Stophost.exe" in
pcAnywhere's main program folder.
If pcAnywhere is being used, the PCAnywhere Quick Config button may be used. Clicking this button
sets up the RAS Windows Title box as well as the two command line edit boxes. NOTE: pcAnywhere
must be installed on the computer for this to work. If the text in the command line edit boxes is red, this
means that ScadaPhone could not find the "ScadaPhone RAS.bhf" file created above. Click on the
Browse button and locate "ScadaPhone RAS.bhf".
The last item to examine on the RAS Controller is the Watchdog Timer. The watchdog's purpose is to
make sure that the RAS software has not locked up or remained idle thereby preventing ScadaPhone
from recapturing the voice modem's COM port. Every five minutes (by default) the RAS Watchdog
window appears and asks the remote user to click an OK button to let ScadaPhone know that the remote
control session is still in progress. If the OK button is not clicked within 30 seconds, ScadaPhone will
force the RAS to close.
The RAS Watchdog window
The watchdog can be set to use two different time-out periods: default and extended. The default period
is used unless the Use Extended Watchdog Timer button has been clicked. The extended period is
useful when the remote control user wants to download a file which will take longer than the default
watchdog period.
152
The Watchdog Timer Configuration window
Click OK to close the Watchdog Timer Configuration window and to return to the RAS Controller
window.
Once the RAS Controller is configured, the RAS interface may be tested by clicking the Trigger RAS
button. Watch the title bar on this window and notice that the current state of the RAS controller is
displayed after the colon (in the example below, the state is Idle).
The RAS Controller window in an Idle state
Click the OK button to exit the RAS Controller window and return to ScadaPhone.
ScadaPhone's OLE Server
Overview
153
ScadaPhone can be used as an ActiveX(OLE) server. This is not to be confused with ScadaPhone's
ability to access SCADA software data using the OLE protocol.
Accessing ScadaPhone's OLE server
The OLE server class string is 'ScadaPhone.ScadaPhoneTagServer'.
Methods Available
GetTagValue(TagName: WideString): WideString
Returns the value of TagName as a string.
ReloadProject()
This causes ScadaPhone to reload the current ScadaPhone project. This is useful if you want to be
able to change the project remotely over a network and then cause ScadaPhone to load and run
the changed project without manually going to the PC on which ScadaPhone is running to restart it.
GetAckStatus(const AlarmName: WideString): WordBool
Returns TRUE if AlarmName is active and acknowledged, FALSE if AlarmName
is either clear or active and un-acknowledged.
GetTagList(IncludeDataType, IncludeValue: WordBool): WideString
Returns a list containing every tag name separated by <CR><LF>. If IncludeDataType and
Includevalue are set to TRUE, each line includes the data type and tag value separated by
commas.
GetAlarmList(IncludeAlarmStatus, IncludeAckStatus: WordBool): WideString
Returns a list containing every alarm separated by <CR><LF>. If IncludeAlarmStatus &
IncludeAckStatus are TRUE each line includes the
AlarmStatus and AckStatus separated by commas.
Shutdown()
Causes ScadaPhone to shut down.
DoNotShutdown()
DoNotShutdown is called by RestartScadaPhone if the operator clicks the "Delay Restart (5
minutes)" button. When DoNotShutdown is called, a timer in ScadaPhone
(OLEShutdownIgnoreTimer) is reset so that events that would normally launch RestartScadaPhone
are suppressed.
GotoDevelopmentMode()
Switches ScadaPhone to development mode
GotoRunMode()
Swiches ScadaPhone to run mode
LoadProject(Projectname)
Causes ScadaPhone to load 'Projectname'.
GetExePath(): WideString
Returns the path to the ScadaPhone EXE file.
154
SetTagValue(TagName, NewVal: WideString)
Sets the value of 'TagName' to 'NewVal'.
Accessing the ScadaPhone OLE server
These functions are accessed in the standard ActiveX(OLE Automation) manner from Visual Basic, C++,
Delphi, or any other application that supports the instantiation and use of out-of-process ActiveX
components. Sample programs are available in Delphi and Visual Basic from ScadaTec technical
support.
The syntax for creating a reference to the ScadaPhone server is:
1.) In Delphi
private
{ Private declarations }
OLEServer:Variant;
OLEServer := CreateOLEObject('ScadaPhone.ScadaPhoneTagServer');
2).In Visual Basic
Dim oScadaPhone As ScadaPhone.ScadaPhoneTagServer
Set oScadaPhone = CreateObject("ScadaPhone.ScadaPhoneTagServer")
ScadaPhone's OPC Server
Overview
ScadaPhone can be used as an OPC server. This is not to be confused with ScadaPhone's ability to
access SCADA software data using the OPC protocol. The ScadaPhone OPC server follows the OPC
standard which is too complicated to reproducer here. For documentation on the OPC protocol please
visit the OPC organization web site at www.opcfoundation.org. NOTE: ScadaPhone only supports the
OPC DA Version 1 and 2 standard.
Accessing ScadaPhone's OPC server
The program ID (ProgID) needed to attach to ScadaPhone's OPC server is:
ScadaPhone.OPCServer.1
Most OPC DA clients will connect to the ScadaPhone OPC server using the above ProgID.
Server Startup Delay
ScadaPhone may be configured to wait a number of seconds at program startup before attempting to link
to the SCADA server. This feature fixes a problem that may arise on system startup: if the SCADA
software and ScadaPhone are both configured to launch when the system starts, ScadaPhone can start
asking for tag values before the SCADA software is ready to handle these queries. In some cases, this
can cause run time errors in the SCADA system and have a fatal effect on the SCADA startup.
To set how many seconds ScadaPhone should wait before linking to the SCADA server, ScadaPhone
must be in development mode. From the top menu, select ScadaLink | Server Startup Delay. This will
open the Server Startup Delay window:
155
Use the slider bar to set the number of seconds ScadaPhone should wait before connecting to the
SCADA server.
Setting Discrete Representations
Setting Discrete Representations
About Discrete Representations
Some SCADA packages return discrete TRUE and FALSE values with different text strings. For example,
Intellution's Fix software can be configured to return OPEN for FALSE and CLOSE for TRUE. In addition,
some software packages may represent TRUE as -1 rather than the norm of 1. ScadaPhone can be
configured to understand these non-standard representations of discrete values.
When ScadaPhone is first installed, it is configured to recognize the text strings "CLOSE", "ON", "TRUE",
as well as the value 1 as representing a TRUE state. The strings "OPEN", "OFF", and "FALSE" as well as
the value 0 are used to represent a FALSE state.
Non-standard Discretes at Runtime
In most cases, non-standard discrete strings are revealed at runtime. If ScadaPhone receives an
undefined response for a discrete query, the Discrete Representations window is displayed with the
undefined response(s) shown in the list box on the right side of the window. If this happens, highlight an
item in the response list, click either the TRUE or FALSE radio button as appropriate, and then click the
Assign button.
Adding/Editing Discrete Values from the Menu
To configure Discrete Representations, click SCADA Link | Discrete Representations from the main
screen's top menu. This opens the Discrete Representations window:
156
To add a non-standard text string for a TRUE state, click the Add button under the Bit = 1 (TRUE) list box
on the left side of the window. To add a non-standard text string for a FALSE state, click the Add button
under the Bit = 0 (FALSE) list box. This will open a window that allows you to enter a text value for a
discrete representation:
Window to add a Discrete Representation for a TRUE state
Click the OK button when finished typing the text string. This will add the text value to the appropriate list
box.
If a text string displayed in a list box needs to be edited, click on that string and click the Edit button.
If a text string needs to be moved from the TRUE list box to the FALSE list box or vice-versa, select the
string and click on the
or
button to move the string from one list box to the other.
Invalid Discrete Responses
157
When new discrete tags are added or imported, ScadaPhone assumes that they are valid discrete tags
and will return a recognized discrete response. When a non recognized discrete, analog or string value is
received from the SCADA system for a discrete tag, ScadaPhone will display a list of the unrecognized
responses received in the right hand list box. Select one or more responses and click the appropriate
radio button to tell ScadaPhone to recognize the response as either a valid True or False discrete value
or to redefine the non discrete tags that returned the unrecognized response.
Analog Response List button
Clicking the Analog Response List button in the lower right corner of the Discrete Representations
window displays a list of tags assumed to be discrete by ScadaPhone but when polled returned analog
values. See: Discrete Expected, Analog Received
Text To Speech Interface
The text to speech (TTS) functionality in ScadaPhone allows the generation of voice or wav files
automatically in one of several voices. It may be accessed in several ways. First, by selecting
'Options | Text To Speech' from the main menu.
Selecting this option causes ScadaPhone to generate the speech WAV files for tag names and
text. This can be used instead of actually recording the WAV files for the alarm announcement
text. Note: This optional feature requires that the Microsoft voice and speech components be
installed. The MS Installer files needed to install the Microsoft voice and speech components are
SAPI5SpeechInstaller.msi and SAPI5VoiceInstaller.msi. They are usually included on the install
CD and are available from the downloads directory on the ScadaTec web site.
www.scadatec.com/downloads or from technical support.
Selecting this menu option opens the Text to Speech Options window.
This window allows the user to choose whether to use the recorded WAV files or the WAV files
generated by the text to speech interface. If the option to use the WAV files generated by the text
to speech interface is selected, then the voice that will be used may be selected by clicking on the
blue text following the Voice: option. After selecting the 'Text to Speech' option and clicking the
OK button, ScadaPhone will begin converting all of the existing user and system WAV files into
WAV files to the selected voice. The WAV files are saved in separate folders,
\ScadaPhone\SystemFiles\TTS and \ScadaPhone\Projects\projectname\TTS.
If the 'Text to Speech' option is selected, the Record button on the main window's Wav Files and
System Wavs tabs will change from Record to Generate. Selecting an existing WAV file and
clicking on the Generate button will generate a new WAV file replacing the selected WAV file.
The new WAV file will use the currently selected voice; the voice speaks the name of the WAV
file. The windows that the Edit and New buttons bring up also have a Generate as well as a
Record button. If the 'Use wav files generated by Text To Speech interface' option has been
158
selected in the Text To Speech options window, clicking the Generate button will save the
resulting file will be saved in the TTS directory, otherwise it will be saved in the project directory.
The alarm 'Message Segment' window also includes a Generate(TTS) button.
Wav files which are referenced in the ScadaPhone project but do not exist will automatically be
generated by the TTS interface if it is available.
Note: It is imperative that the name of the WAV file be the text that the voice is to speak.
Example: If the WAV file contains the phrase, "Chlorine tank level low" the file name should be
ChlorineTankLevelLow.wav. (ScadaPhone automatically appends .WAV to recorded WAV files.)
Spaces between the words in the WAV file name are optional.
Transfer Authorization Code
This feature allows registered users of ScadaPhone to transfer authorization codes from one PC to
another. Transferring authorization codes is done in development mode.
To transfer authorization codes, first start ScadaPhone on the source computer. Open the Transfer
Authorization Code window by clicking on the main screen's menu File | Program | About and clicking
on the blue [Full | Lite] System Enabled text. A supervisor password must be entered to transfer the
authorization code. When a valid password is entered, ScadaPhone will display the following window:
Next, do the following:
Ÿ Start ScadaPhone on the computer you wish to transfer authorization to (the target computer).
Ÿ Write down the ScadaPhone 'Computer Key' from the target computer. (On ScadaPhone's main
menu, click on File | Program | About to display this number.)
Ÿ Enter the target computer's key number in the designated space on the source computer.
159
Ÿ Click the Transfer button. This will display an authorization code and transfer code for the target
computer and disable ScadaPhone on the source computer.
Ÿ Enter the authorization and transfer codes from the previous step into the registration window of
the target computer.
ScadaPhone will be enabled on the target computer and disabled on the source computer. Repeat this
procedure at any time to transfer authorization again.
Troubleshooting
Tools
Tool:
Activity Log
Use:
Log of all system activity (Window | Activity Log). Schedule Holes,
Duplicate Passwords, and Missing Menus are also logged to the Activity
Log each time their respective warning windows are displayed.
Audio Analyzer
Visual display of audio files. May be used to help troubleshoot problems
with answer detection scripts (Window | Audio Analyzer)
Contact Sequence Log
Log of contact calls and changes (Window | Contact Sequence Log)
Email Log
Log of email activity (Window | Email Log)
Find References
Allows the user to find all the places in ScadaPhone where a selected tag
is referenced.
Invalid Modem Response File of invalid modem responses. Saved in a file named:
Log
.\InvalidModemModelResopnces.txt .( For factory troubleshooting, not
accessible from ScadaPhone).
CLogViewer
This is a log file viewer which allows log files to be combined and viewed
as one file. This can help in troubleshooting by seeing all the events
sequentially from the different log files combined and displayed together.
It is accessed from the 'ViewArchives' menu on the various log windows.
Memory Usage
Log of ScadaPhone windows memory usage (Window | Memory Usage
Log)
Modem Window
Log of modem activity. Includes optional extended diagnostics.
Modem Diagnostics Log
Contains a list that may help Tech Support diagnose modem problems.
Modem LED display
Visual display of modem LED status lights.
Print Listings
Allows printing lists of tags, menus, & WAV files
Restart Log
File of attempted automatic ScadaPhone restarts.( For factory
troubleshooting, not accessible from ScadaPhone).
Run Log
Log of ScadaPhone start, stop, and run times (Window | Run Log)
SCADA Link Status
Displays SCADA link status and tag values as they are received.
SCADA Link Response Log Log of SCADA link tag values that have been received (ScadaLink |
Response Log)
System Error Log
Contains a list of any errors ScadaPhone encountered. This list is used by
Tech Support to help solve any ScadaPhone problems (Window | System
Error
Problems
The following is not a comprehensive list but covers some possible problems that may arise when using
ScadaPhone.
Problem:
Solution:
See:
160
Answer detection script not
working
Can not retrieve one or more tag
values from Intellution Fix
SCADA software
Discrete expected, analog
received window
Discrete representation
undefined window
Modem error window
Modem hangs up and will not
respond to ScadaPhone
Remote technical support
needed
Response Time-out window
Runtime errors in the SCADA
system
161
Use the audio analyzer to
The Audio Analyzer
troubleshoot the audio file.
If the SCADA link status form shows
'E1212' error in place of the tag
value, the problem is that the tag is
set to 'Off Scan' in the Intellution Fix
software. Set the tag to 'On Scan' to
be able to retrieve the value.
The ScadaPhone project may be
Discrete Expected Analog
referencing an analog tag as a
Received
discrete tag; change this reference.
Setting Discrete
If ScadaPhone receives an
undefined response for a discrete Representations
query, this window is opened with
undefined response(s) shown on
the right side; highlight an item in
the response list, click either the
TRUE or FALSE radio button and
click Assign.
Click on the Set COM Port button Modem Error window
or use the Select Port Window to
manually set the COM port
A modem error tag can be
designated that will be set to True
when the modem fails to respond.
This can be used to take
appropriate action. This bit is
specified by going to Options |
Modem Error Tag on the main
menu.
Set up a RAS session with technical Remote Access Software
support.
This is shown when no response is Setting up the Modem COM
received form the modem. To use Port
the PC sound card for the recording
and playback of sound (WAV) files
rather than the modem, click the
Disable voice modem interface
button; or click the Set COM port
button to display the Select Port
Window.
If the SCADA software and
Server Startup Delay
ScadaPhone are both configured to
launch when the system starts,
ScadaPhone may start asking for
tag values before the SCADA
software is ready to handle these
queries. This may can cause run
time errors in the SCADA system.
Select ScadaLink | Server Startup
Delay and use the slider bar to set
the number of seconds
ScadaPhone should delay before
starting.
If this does not resolve the problem,
runtime errors are logged to the
System Errors log. Please contact
Technical Support for resolution.
Turn on or increase the number of
ScadaPhone displays an error
message such as 'Not enough FIFO buffers on the PC. This is
usually done from the 'Advanced
CPU time to adsorb modem
stream' when it attempts to make Port Settings' dialog box from the
communications port properties
a callout.
form, which is accessed from the
Windows device manager.
ScadaPhone cycles through
From the main window, select
Options|Scan Rate and use the
SCADA system tags slowly
slider bar to adjust the rate at which
ScadaPhone polls the SCADA
software
ScadaPhone gives errors if scan From the main window, select
rate is too high when using DDE Options|Scan Rate and use the
slider bar to decrease the rate at
which ScadaPhone polls the
SCADA software
ScadaPhone uses a high
From the main window, select
Options|Scan Rate and use the
percentage of CPU time
slider bar to decrease the rate at
which ScadaPhone polls the
SCADA software
ScadaPhone does not announce The most likely cause is that the
option to 'Call but do not announce'
alarms over speaker before
option has been selected for the
calling out
current schedule. Go to the
Scheduler, select the current
schedule name, and click the Edit
button. Choose the correct option
for the schedule.
ScadaPhone does not work with Upgrade to OPC driver version 7.33
or higher
Intellution OPC Driver version
7.11.
Spurious alarms
Whenever the SCADA software is
shut down, ScadaPhone should be
shut down first, then the SCADA
software system
Volume level on recorded WAV Select the Wav Files tab, highlight
files differ
any wave file name and click the
Edit button. On the Edit Wav File
form, select Adjust Amplitude from
the top menu. This will open the Set
Amplitude dialog box. Adjust the
amplitude of the selected WAV file
or all user defined and/or system
WAV files.
Scan Rate
Scan Rate
Scan Rate
Creating a Schedule
Spurious Alarms
Adjust Amplitude
Examples
162
Menu_Item_Action
Menu Item Action Example
Modify Analog
ScadaPhone allows callers to modify SCADA system values over the phone. This feature is
accomplished via the Modify Discrete and Modify Analog menu item actions. When menu options
defined with these actions are selected, ScadaPhone 'pokes' data through the SCADA link interface into
the SCADA system.
In this example, an option 5 will be added to the MainMenu which will allow the caller to modify an analog
tag. Option 5 will prompt: "To modify the set point, press five."
To modify the MainMenu, double click MainMenu on the Menus tab of ScadaPhone's main window. This
will open the Menu Information window. Click the check box by Option 5. The label will change from
gray to black, indicating that Option 5 properties may now be edited. Click on the Option 5 label to open
the Menu Item window:
163
The Menu Item window for MainMenu option 5 - set to modify an analog value
Since this menu option allows the caller to modify SCADA system parameters it needs to be
Conditionally Enabled. In this case, the Menu Item Enable condition should be
$CurrentAccessLevel >= 3. $CurrentAccessLevel is a system variable that contains a value
pertaining to the access level of the current caller. Before the caller enters a security code, this value is 0.
After the caller enters a security code, the value will be 3 for Data Entry access and 4 for Supervisor
access. Click the Analogs button to see a list of available analog names and select the system variable
$CurrentAccessLevel. After the variable name, type in ">= 3". This will only allow callers who have
entered a valid security code to access this option.
The message for MainMenu option 5 will consist of a single WAV file saying "To modify the set point."
Record a WAV file by clicking the Add button in the Menu Item Message Composition section. In the
Message Segment window, type the filename "ToModifyTheSetPoint" and click the Record button.
When the ScadaPhone message box indicates it is recording, speak the words "To modify the set point".
Click the Stop button to stop recording. Click the OK button to return to the Menu Item window.
164
The Menu Item Action is set to Modify Analog. When this item action is selected, the name of the
analog tag to be modified must be specified in the edit box in the Analog Tag Name edit box. For this
example, assume that the SCADA system has a tag named SetPoint. If tag names are case sensitive in
the SCADA system that will interface with ScadaPhone, be sure to enter all tag names exactly as they are
defined in the SCADA system, including case. Use the Browse button to see a list of the tag names
defined on the Analog tab.
Once the Menu Item window is set up, click OK to return to the Menu Information window. Click OK
again to return to ScadaPhone's main window.
Related Topics:
Adding and Editing Menus
Modifying tag values via the telephone
Menu Item Action Example
Modify Discrete
ScadaPhone allows callers to modify SCADA system values over the phone. This feature is
accomplished via the Modify Discrete and Modify Analog menu item actions. When menu options
defined with these actions are selected, ScadaPhone 'pokes' data through the SCADA link interface into
the SCADA system.
In this example, an option 4 will be added to the MainMenu which will allow the caller to modify a discrete
tag. Option 4 will prompt: "To modify the control bit, press four."
To modify the MainMenu, double click MainMenu on the Menus tab of ScadaPhone's main window. This
will open the Menu Information window. Click the check box by Option 4. The label will change from gray
to black, indicating that Option 4 properties may now be edited. Click on the Option 4 label to open the
Menu Item window:
165
The Menu Item window for MainMenu option 4 - set to modify an analog value
Since this menu option allows the caller to modify SCADA system parameters it needs to be
Conditionally Enabled. In this case, the Menu Item Enable condition should be
$CurrentAccessLevel >= 3. $CurrentAccessLevel is a system variable that contains a value
pertaining to the access level of the current caller. Before the caller enters a security code, this value is 0.
After the caller enters a security code, the value will be 3 for Data Entry access and 4 for Supervisor
access. Click the Analogs button to see a list of available analog names and select the system variable
$CurrentAccessLevel. After the variable name, type in >= 3. This will only allow callers who have entered
a valid security code to access this option.
The message for MainMenu option 4 will consist of a single WAV file saying "To modify the control bit."
Record a WAV file by clicking the Add button in the Menu Item Message Composition section. In the
Message Segment window, type the filename "ToModifyTheControlBit" and click the Record button.
When the ScadaPhone message box indicates it is recording, speak the words "To modify the control bit."
Click the Stop button to stop recording. Click the OK button to return to the Menu Item window.
166
The Menu Item Action is set to Modify Discrete. When this item action is selected, the name of the
discrete tag to be modified must be specified in the edit box in the Discrete Tag Name edit box. For this
example, assume that the SCADA system has a tag named ControlBit. If tag names are case sensitive in
the SCADA system that will interface with ScadaPhone, be sure to enter all tag names exactly as they are
defined in the SCADA system, including case. Use the Browse button to see a list of the tag names
defined on the Analog tab.
Once the Menu Item window is set up, click OK to return to the Menu Information window. Click OK
again to return to ScadaPhone's main window.
Related Topics:
Adding and Editing Menus
Modifying tag values via the telephone
Play Menu
Menu Item Action Example
Play Menu
In this example, ScadaPhone's MainMenu option 2 will be set up to play a menu named
TankLevelsMenu. The TankLevelsMenu plays the values of two SCADA system variables,
ChlorineTankLevel and LowerTankLevel. These two variables must be added to the main screen's
Analog tab. See: Entering Tag Names
To edit the MainMenu, select the Menu tab on the main screen, select MainMenu and click the Edit
button. This will open the Menu Information window. Click the check box by Option 2. The label will
change from gray to black, indicating that Option 2 properties may now be edited. Click on the Option 2
label to open the Menu Item window:
167
Menu Item window for MainMenu option 2 - set to play the TankLevelsMenu
In order to prevent unauthorized callers from accessing this menu option, it may be conditionally enabled
with the condition $CurrentAccessLevel > 0. This will only allow callers who have entered a valid
security code to access this option. Click the Analogs button to see a list of available analog names and
select the system variable $CurrentAccessLevel. After the variable name, type in "> 0".
In the Menu Item Message Composition section, the message needs to say "To hear tank levels"
(ScadaPhone automatically adds the words "press two". Do NOT add these words to the recorded
message). To record this message, click the Add button. This will open the Message Segment window:
168
Message Segment window ready to record the WAV file ToHearTankLevels
In the Message Segment window, type the filename "ToHearTankLevels" and click the Record button.
When the ScadaPhone message box indicates it is recording, speak the words "To hear tank levels".
Click the Stop button to stop recording. Click the OK button to return to the Menu Item window.
In the Menu Item window, the Menu Item Action section should be set to play the TankLevelsMenu.
Click the option Play Menu. If the TankLevelsMenu has yet to be created, type the name
"TankLevelsMenu" in the Menu Name box. If the menu already exists, click the Browse button and select
the menu name. (Creating the TankLevelsMenu is described in the following section.)
Click OK to return to the Menu Information window. MainMenu option 2 is now complete. Click the OK
button at the bottom of the Menu Information window to save the changes to MainMenu.
Creating the TankLevelsMenu
To create a new menu, click New from the bottom of the Menus tab of ScadaPhone's main window. This
will open the Menu Information window. Enter TankLevelsMenu in the Menu Name box:
Creating the TankLevelsMenu
Note that by default, menu options * and # are pre-defined. The * option will play the message"To return
to the previous menu, press star", and the # option will play the message "To return to the main menu,
press pound." In this example, the TankLevelsMenu is always opened from option 2 on the MainMenu;
169
therefore, the Option * check box may be cleared by clicking on it. In addition, the menu prefix option will
be configured to automatically return to the main menu. Therefore, the # option may also be cleared.
The purpose of the TankLevelsMenu is to enunciate the values of two SCADA system variables,
ChlorineTankLevel and LowerTankLevel. (These two variables must be added to the main screen's
Analog tab. See: Entering Tag Names.)
To play the tank level values, a multi-segmented menu prefix message must be created to announce the
analog tag values representing the tank levels. The message should sound something like this: "The
chlorine tank level is twelve point two feet. The lower tank level is fifteen point nine feet." Click on the
Menu Prefix label to open the Menu Item window. The window below shows how such a multisegmented message is assembled:
TankLevelsMenu multi-segmented message
170
Since the message will always be announced whenever the TankLevelsMenu is accessed, Menu Item
Enabled is set to Always Enabled.
To compose the message, click in the Menu Item Message Composition box. In the above example, the
message contains six segments. Each segment is created as follows:
1. Click the Add button. In the Message Segment window, type the filename
"TheChlorineTankLevelIs" and click the Record button. When the ScadaPhone message box
indicates it is recording, speak the words "The chlorine tank level is". Click the Stop button to
stop recording. Click the OK button to return to the Menu Item window
2. Click the Add button. In the Message Segment window, click the Analog Value option and click
the Browse button to see a list of Analog tags. Select ChlorineTankLevel and click the OK
button. Adjust the slider so that ChlorineTankLevel will display one decimal place. Click the OK
button to return to the Menu Item window.
3. Click the Add button. In the Message Segment window, type the filename "Feet" and click the
Record button. When the ScadaPhone message box indicates it is recording, speak the word
"Feet". Click the Stop button to stop recording. Click the OK button to return to the Menu Item
window
4. Click the Add button. In the Message Segment window, type the filename
"TheLowerTankLevelIs" and click the Record button. When the ScadaPhone message box
indicates it is recording, speak the words "The lower tank level is". Click the Stop button to stop
recording. Click the OK button to return to the Menu Item window
5. Click the Add button. In the Message Segment window, click the Analog Value option and click
the Browse button to see a list of Analog tags. Select LowerTankLevel and click the OK button.
Adjust the slider so that LowerTankLevel will display one decimal place. Click the OK button to
return to the Menu Item window.
6. Click the Add button. In the Message Segment window, click the browse button to see a list of
WAV filenames. Select "Feet" and click the OK button. Click the OK button to return to the Menu
Item window
Note: WAV file segments may be edited to eliminate beginning or ending pauses. See: Editing WAV Files
The TankLevelsMenu will be configured to return to the previous menu after announcing the tank levels
without requiring the caller to press a key. To do this, set the Menu Item Action to Play Menu. Use the
Browse button to see a list of menu names and select $PrevMenu. $PrevMenu is a system variable that
contains the name of the previous active menu (MainMenu in this case). Click the OK button to return to
the Menu Item window.
Once the TankLevelsMenu's prefix item is set up, click OK to return to the Menu Information window.
Click OK again to return to ScadaPhone's main window.
Testing the TankLevelsMenu
To test the TankLevelsMenu, highlight MainMenu on the Menus tab and click the Test button. Unless the
MainMenu has been modified, it should say "Main menu, to enter your security code, press zero." The
menu will pause briefly and then repeat itself for up to one minute until zero is clicked. When zero is
clicked on the Menu Test window, ScadaPhone presents the $EnterCodeMenu. This menu states: "Enter
code followed by pound sign." Enter a valid user code. (Details: Create a User's List.) When a valid code
is entered, ScadaPhone will state the user's access level and then say: "Main menu. To hear the alarm
menu, press one. To hear tank levels, press two." Press 2 to hear the TankLevelsMenu. When the
TankLevelsMenu is finished reporting the tank levels, ScadaPhone will return control to the MainMenu.
Click the Stop button on the Menu Test window to terminate the test.
Related Topic: Adding and Editing Menus
171
Menu Item Action Example
Record Voice Mail
In this example, ScadaPhone's MainMenu option 3 will be set up to record voice mail. When the
MainMenu is played, option 3 will say "To leave voice mail, press 3". This option will open a menu named
VoiceMailMenu. The VoiceMailMenu will allow the caller to leave mail for either the Supervisor or the
Secretary.
To edit the MainMenu, select the Menu tab on the main screen, select MainMenu and click the Edit
button. This will open the Menu Information window. Click the check box by Option 3. The label will
change from gray to black, indicating that Option 3 properties may now be edited. Click on the Option 3
label to open the Menu Item window.
The Menu Item window for MainMenu option 3 - set to play the VoiceMailMenu
172
Option 3 is set to Always Enabled so that anyone, even people who are not authorized system users,
will have access to the VoiceMailMenu.
The message for MainMenu option 3 will consist of a single WAV file saying "To leave voice mail." Record
a WAV file by clicking the Add button in the Menu Item Message Composition section. In the Message
Segment window, type the filename "ToLeaveVoiceMail" and click the Record button. When the
ScadaPhone message box indicates it is recording, speak the words "To leave voice mail". Click the Stop
button to stop recording. Click the OK button to return to the Menu Item window.
The Menu Item Action is set to Play Menu. Enter the menu name as VoiceMailMenu.
Once the Menu Item window is complete, click the OK button. Click OK from the Menu Information
window to save the MainMenu with its new option 3.
Creating the Voice Mail Menu
To create the VoiceMailMenu, click the New button from the Menus tab of the MainMenu. This will open
the Menu Information window. Enter "VoiceMailMenu" in the Menu Name edit box. In this example two
mailboxes are set up, Supervisor and Secretary. The menu will say the following : "Voice mail menu. To
leave a message for the supervisor, press 1. To leave a message for the secretary, press 2."
The Menu Information window for the VoiceMailMenu
Note that by default, menu options * and # are pre-defined. The * option will play the message"To return
to the previous menu, press star", and the # option will play the message "To return to the main menu,
press pound." In this example, the VoiceMailMenu is always opened from option 2 on the MainMenu;
therefore, the Option * check box may be cleared by clicking on it.
Voice Mail Menu Prefix Option
The words "Voice mail menu", will be handled by the menu prefix. In the Menu Information window,
check the menu prefix box and click the Menu prefix label. This will open the Menu Item window:
173
The Menu Item window for the VoiceMailMenu prefix option
The menu prefix is set to Always Enabled.
The Menu Item Message Composition box consists of a single WAV file. Click the Add button. In the
Message Segment window, type the filename "VoiceMailMenu" and click the Record button. When the
ScadaPhone message box indicates it is recording, speak the words "Voice mail menu". Click the Stop
button to stop recording. Click the OK button to return to the Menu Item window.
Set the Menu Item Action to No Action. Click OK to return to the Menu Information window.
Voice Mail Menu Options 1 and 2
The VoiceMailMenu Option 1 in the Menu Information window will be set up to record voice mail for the
supervisor. Check the menu Option 1 box and click the Menu Option 1 label. This will open the Menu
Item window:
174
The Menu Item window for the VoiceMailMenu Option 1
Ÿ The menu prefix is set to Always Enabled.
Ÿ The Menu Item Message Composition box consists of a single WAV file. Click the Add button.
In the Message Segment window, type the filename "ToLeaveAMessageForTheSupervisor"
and click the Record button. When the ScadaPhone message box indicates it is recording,
speak the words "To leave a message for the supervisor". Click the Stop button to stop
recording. Click the OK button to return to the Menu Item window.
Ÿ Set the Menu Item Action to Record Voice Mail. In the Mailbox name, type "Supervisor". Click
OK to return to the Menu Information window.
The VoiceMailMenu option 2 will be set up to record voice mail for the secretary. It is set up in an identical
manner to option 1, only substitute the word "secretary" for "supervisor". Check the menu Option 2 box
175
and click the Menu Option 2 label. This will open the Menu Item window.
Ÿ The menu prefix is set to Always Enabled.
Ÿ The Menu Item Message Composition box consists of a single WAV file. Click the Add button.
In the Message Segment window, type the filename "ToLeaveAMessageForTheSecretary"
and click the Record button. When the ScadaPhone message box indicates it is recording,
speak the words "To leave a message for the secretary". Click the Stop button to stop
recording. Click the OK button to return to the Menu Item window.
Ÿ Set the Menu Item Action to Record Voice Mail. In the Mailbox name, type "Secretary". Click
OK to return to the Menu Information window.
When a mailbox is created as above, the mailbox name will be added to the Mail Boxes tab on
ScadaPhone's main window.
Related Topic: Adding and Editing Menus
Testing the Voice Mail Menu
To test the VoiceMailMenu, from the Menus tab of ScadaPhone's main window, highlight MainMenu and
click the Test button. The MainMenu should say the following : "Main menu. To leave voice mail, press
two. To enter your security code, press zero." Press 2 to test the VoiceMailMenu. The VoiceMailMenu
should say:"Voice mail menu. To leave a message for the supervisor, press one. To leave a message for
the secretary, press two. To return to the main menu, press pound." Press 1 to leave a message for the
supervisor. ScadaPhone will respond by playing the $VoiceMailPrompt system menu: "Record message
after the tone. Press any key when finished. <beep>." Say a few words into the microphone, (which is the
active recording device when testing in development mode), and click one of the Menu Test window
buttons (except for the Stop button) when the test message is complete. ScadaPhone will return to the
VoiceMailMenu. Click the Stop button on the Menu Test window to terminate the test.
To hear the test message, select the Mail Boxes tab on ScadaPhone's main window. The Supervisor
mailbox is displayed with a green background to indicate that there are new messages:
Main menu Mail Boxes tab -the Supervisor mail box has new messages
176
To listen to the test message, double click on Supervisor. This will open the Mail Box window:
The Mail Box window for the Supervisor
Messages are placed into WAV files that are time-stamped to indicate the date and time that the
message was recorded. To hear voice mail messages, highlight the desired message and click the Play
button. Delete old messages by highlighting them and click the Remove button. Click the Close button to
return to the ScadaPhone main window.
Alarm Contact Window Example
Answering Machine Contact Example
Answering machine contacts usually use two Answer Detection Scripts in the Alarm Contact window.
This allows ScadaPhone to perform one action if a person answers the phone and perform a different
action when a voice mail system or an answering machine answers. The following example has two such
scripts:
177
Two scripts, one for a live person and one for an answering machine
Note that the first script is a modified version of the default script ScadaPhone creates when a new
contact is created. This script is used to detect when a live person answers the phone. Whenever
ScadaPhone hears a voice followed by one second of silence, ScadaPhone will announce the list of
active alarms and then present the MainMenu. If ScadaPhone fails to detect the conditions in the first
script, it will listen for the events in the second script, a tone with a frequency of 607 Hz. followed by .1
seconds of silence.
To create an Answer Detection Script that checks first for a live person and then for an answering
machine message requires three steps:
1. Record a new script to capture the tone at the end of the answering machine message
To record a new script, click the New button in the Alarm Contact window. This opens the
Edit Script window. Click the Record button to open the Record Script window. Verify that
the phone number in the top box is correct, click the Call and Record button, and then click
the Set Action Point button to stop recording. ScadaPhone will return to the Edit Script
window. The new script should be listed in the Events box and contain a Tone event followed
by a Silence event. For answering machine messages, usually the action is left as the default
Play Alarm option. Click the OK button to return to the Alarm Contact window. The new
script should be listed after the default script. Details: Creating New Answer Detection Scripts
2. Analyze the length of any pauses in the new script with the Audio Analyzer
The length of the silence event in the first script is important. This is to prevent the first script
from being triggered during brief pauses in the recorded message. For example, an
answering machine might play the following message: "Hi this is Ken. <Pause> I'm away from
178
my desk. <Pause> Leave your name and number and I'll call you back. <Beep>." The length
of the Silence event in the first script must be longer than the pauses in the recorded
answering machine message. To determine the length of the pauses in the answering
machine message, click the OK button on the Alarm Contact window to close it and select
Window | Audio Analyzer from the main menu to open the Audio Analyzer. The Audio
Analyzer automatically loads the most recent sound (or WAV) file. If the most recent file is not
the correct file, a different file may be selected by clicking the blue file name link at the top of
the window. The Events within the WAV file are listed in the Script Events box on the right
side of the window. The Silence events are followed by a numeric value which gives the
length of the event in seconds. Determine which is the longest silence event and make a note
of this value. Click Close to exit the Audio Analyzer. Details: The Audio Analyzer
3. Adjust the length of the silence event at the end of the first script to be longer than the longest
pause in the new script.
Select the contact name on the Contacts tab and click the Edit button to reopen the Alarm
Contact window. Select the first script and click the Edit button. This will open the Edit
Script window. Select the Silence event and adjust the slider bar in the Event Parameter
panel until the length of the silence event is longer than any pauses in the recorded
answering machine message. Click the OK button to return to the Alarm Contact window.
To see how the above settings work, assume the following events take place: An alarm triggers and a call
is placed to Ken, but his line is busy, so ScadaPhone hangs up. ScadaPhone counts this as a failed call,
so the Call Persistence setting is checked. Less than thirty minutes have elapsed since the first dialing
attempt was made, so another call is attempted. This time, Ken answers, "Hello, this is Ken. May I help
you?" Ken must know to pause at least one second after his greeting, in case ScadaPhone is trying to
reach him and for the Answer Detection Script to work properly. Ken pauses the required one second and
ScadaPhone recognizes the required events for the first script: Voice for at least one tenth of a second
and Silence for one second. Therefore, ScadaPhone plays the alarms and presents Ken with the Main
Menu. However, Ken fails to acknowledge the alarms within the Ack Timeout interval (30 minutes).
ScadaPhone checks the Contact Persistence setting. The Contact Persistence is set to two attempts
and only one attempt has been made; therefore, another call is placed to Ken. This time, Ken's answering
machine answers the phone. When ScadaPhone detects the Tone event (the beep at the end of the
answering machine message), followed by a tenth of a second of Silence, the second script is triggered
and ScadaPhone plays the Alarm menu. Once again, ScadaPhone hangs up and waits for
acknowledgements. If Ken still fails to acknowledge the alarms with thirty minutes, ScadaPhone will start
trying to call the next contact in the Scheduler's contact list.
Alarm Contact Window Example
Pager Alarm Contact Example
A pager alarm contact might have settings in the Alarm Contact window similar to the following:
179
The Alarm Contact window with Maintenance Pager settings
The above Maintenance Pager contact is defined with the following settings:
Ÿ Answer Detection Script: Tone(1335) + Silence(0.10) = PagerStr
Ÿ Call Persistence: Based upon time, 3 minutes.
Ÿ Contact Persistence: Based upon count, 3 attempts
Ÿ Ack Timeout: 30 minutes.
The Answer Detection Script is set to "Tone(1335) + Silence(0.10) = PagerStr". This script
causes ScadaPhone to listen for a sound frequency of 1335 Hz. followed by at least a tenth of a second
of silence. When ScadaPhone detects this, it will send the value stored in the system variable named
PagerStr. (Note: The value stored in PagerStr is set from the main window under Options | Pager
String.) The first part of this script, (Tone(1335) + Silence(0.10) in the above example), may be
set up by recording the events. To record a script, click the New button; this opens the Edit Script
window.
180
The Edit Script window
To record a script, click the Record button in the Edit Script window. This will open the Record Script
window:
181
Recording a script requires three steps:
1. Verify that the phone number in the top box is correct or make any needed changes
2. Click the Call and Record button
3. Click the Set Action Point button to stop recording.
After step 3, ScadaPhone will return to the Edit Script window. The recorded script will be entered into
the Events box.
After recording the script, select the Numeric Pager option in the Edit Script window. This adds the last
part of the script, "= PagerStr". Note: The value stored in PagerStr is set from the main window under
Options | Pager String. The Edit Script window should appear similar to the following:
182
Edit Script window with events for the Maintenance Pager
Click the OK button to exit the Edit Script window and return to the Alarm Contact window. The Alarm
Contact window should now contain an answer detection script for a maintenance pager.
To see how the above Maintenance Pager settings work, assume the following events take place: An
alarm triggers, a call is placed to the Maintenance Pager, but the pager service's line is busy, so
ScadaPhone hangs up. ScadaPhone counts this as a failed call, so the Maintenance Pager's Call
Persistence setting is checked. Less than three minutes have elapsed since the first dialing attempt was
made, therefore another call is attempted. This time, the pager service answers and beeps; so,
ScadaPhone transmits the pager string, hangs up the phone, and goes into Awaiting Acknowledgment
mode. However, the person on-call fails to call back and acknowledge the alarm within the Ack Timeout
interval (thirty minutes). ScadaPhone checks the Contact Persistence setting. The Contact Persistence
is set to three attempts and only one attempt has been made; therefore, another call is placed to the
Maintenance Pager. Once again, the call is successful, the beep is detected, the pager string is sent, the
phone is hung up, and ScadaPhone waits for acknowledgements. This time, however, the person on-call
calls in and acknowledges the alarm. This satisfies ScadaPhone's need for acknowledgement, so
ScadaPhone goes into Idle mode awaiting the next alarm or incoming call. If either the Call Persistence
or Contact Persistence settings are exceeded, ScadaPhone will abandon the current contact and start
trying to call the next contact in the Scheduler's contact list.
183
Popups
Boolean
Boolean: A logical expression. In ScadaPhone, the Boolean expression will usually be an "If" statement
checking the value of a system variable.
Development Mode and Run Mode
An indicator at the bottom of the ScadaPhone main window shows whether ScadaPhone is in
Development Mode or Run Mode. The first time ScadaPhone is started, it will startup in Development
Mode. After that, which ever mode ScadaPhone is in when exited is the mode it will start up in when next
started.
To switch from one mode to the other, select Mode from the top menu and select either Development or
Runtime. Access to ScadaPhone, including changing from one mode to another, is controlled by
passwords. A user list must be created to specify passwords and access levels for authorized users of
ScadaPhone. See: Create a User's List
Changing from one mode to another requires a supervisor password. The following box will appear:
Enter the password and select either Start a session or Grant access (no session). Starting a session
allows access to ScadaPhone functions for up to sixty minutes without having to repeatedly enter the
password. Use the scroll bar to set the session length. The Grant access option only gives access to
perform a single operation. Click OK when finished.
Math Operators and Functions
184
Math Operators and Functions
AAA_Operators : (Analog op Analog = Analog)
Ÿ "+" ADD
Ÿ "-" SUBTRACT
Ÿ "*" MULTIPLY
Ÿ "/" DIVIDE
Ÿ "DIV" Integer division (returns quotient)
Ÿ "MOD" Integer division (returns remainder)
AA_Operators : op(Analog) = Analog
Ÿ TRUNC( ) Truncates floating point to integer (e.g. Trunc(123.99) = 123)
Ÿ FRAC( ) Returns fractional part of floating point (e.g. Frac(12.345) = 0.345)
Ÿ SQRT( ) Returns square root (e.g. Sqrt(4) = 2)
Ÿ ROUND( ) Rounds floating point to integer (e.g. Round(123.5) = 124)
Ÿ SIN( ) Returns sine of argument (given in radians) (e.g. Sin(1) = 0.84147...)
Ÿ COS( ) Returns cosine of argument (given in radians) (e.g. Cos(1) = 0.5403...)
Ÿ LN( ) Returns the natural log of argument (e.g. LN(10) = 2.302585)
Ÿ ABS( ) Returns the absolute value of argument (e.g. Abs(-123.45) = 123.45)
AAD_Operators : Analog op Analog = Discrete
Ÿ "<" LESS
Ÿ "=" EQUAL
Ÿ ">" GREATER
Ÿ "<=" LESS_EQUAL
Ÿ ">=" GREATER_EQUAL
Ÿ "<>" NOT_EQUAL
Ÿ "EQMASK" Bitmask comparison (i.e. Arg EQMASK Mask = True if Arg and Mask = Mask
Example:
Let's say you wanted to test to see if bits 0,1 & 7 are on in an analog tag (ATAG).
Mask = 131 = 1000 0011
Result = ATag EQMASK Mask
ATag Val
0
7
211
210
243
ATag (Bits)
0000 0000
0000 0111
1101 0011
1101 0010
1111 0011
Result
FALSE
TRUE
TRUE
FALSE
TRUE
Note that ATag and Mask can be tag names, analog constants, or complex expressions ie:
Result = 200 EQMASK 5
Result = (ATag+200) EQMASK (Setpoint1+Setpoint2)
Not that these forms would make any sense. Just think of EQMASK as being able to be
placed anywhere in an expression that a relational operator (e.g. "<", ">", "<=",...) could be
placed. It's a discrete operator that takes 2 analog arguments.
SSD_Operators : String op String = Discrete (string comparison)
Ÿ "=" STREQ_OPCODE
Ÿ "<" STRLT_OPCODE
Ÿ ">" STRGT_OPCODE
Ÿ "<=" STRLTE_OPCODE
Ÿ ">=" STRGTE_OPCODE
Ÿ "<>" STRNEQ_OPCODE
185
DDD_Operators : Discrete op Discrete = Discrete
Ÿ "AND"
Ÿ "OR"
Ÿ "XOR" Analogous to "<>" for discretes
Ÿ "XNOR Analogous to "=" for discretes
DD_Operators : op Discrete = Discrete
Ÿ NOT Inverts argument
SSS_Operators : String op String = String
Ÿ "+" STRADD_OPCODE (e.g. "String1" + "String2" = "String1String2")
ScadaPhone System Variables
Discretes:
$PrevMenuBit: Value is 0 when the Main Menu has not been invoked from another menu. Value is 1
when the Main Menu is accessed from another menu. The value of this variable may be checked in order
to determine whether to play or not to play the system WAV file "ToReturnToThePreviousMenu".
$RASBit: Used internally. It is true whenever the remote access software is controlling the computer.
$ScadaLinkFailed: Value goes True(1) when the entire polling list fails to return a valid response. Is set
to False(0) as soon as a valid polling response for any tag is received. This tag can be used to generate
an alarm if the polling link to the SCADA software fails.
Analogs:
$AnalogInput: Contains the value of the analog number a user enters via the telephone when the Modify
Discrete Menu Action Item is enabled.
$CurrentAccessLevel: Contains a value pertaining to the access level of the current caller. Before the
caller enters a security code, this value is 0. After the caller enters a security code, the value will be set as
follows:
Access Level
Value
Limited
1
Alarm Ack
2
Data Entry
3
Supervisor
4
See: Create a User's List
$NumActiveAlarms: number of alarms currently active
$NumConsoleAckAlarms: number of alarms requiring console acknowledgement
$NumPhoneAckAlarms: number of alarms requiring telephone acknowledgement
$NumAckedAlarms: number of acknowledged alarms
$Year: Current year
$Month: Current month
$Day: Current day
$Hour: Current hour
$Minute: Current minute
$Second: Current second
$DayOfWeek: Current day of the week
Strings:
$LastAlarmPlayed: name of the last alarm played for the caller
$NextActiveAlarm: name of the next active alarm which will be played for the caller
186
$NextConsoleAckAlarm: name of the next alarm requiring console acknowledgement which will be
played for the caller
$NextPhoneAckAlarm: name of the next alarm requiring telephone acknowledgement which will be
played for the caller
$NextAckedAlarm(String): Returns the tag name of the next acknowledged alarm. Used with the play
acknowledged alarms feature.
Using the Windows Clipboard
To copy information into the Windows Clipboard:
1. Select the information to be copied by either dragging with the mouse or by using the Shift+(any
arrow key)
OR
To select an entire document:
Press Ctrl+A
OR
Open the Edit menu and choose Select All
OR
Right-click and choose Select All
2. To copy the information:
Press Ctrl+C
OR
Open the Edit menu and select Copy
OR
Right-click and choose Copy
To paste information from the Windows Clipboard:
1. Select the window where the information needs to be pasted and position the insertion point.
2. Press Ctrl+V
OR
Open the Edit menu and select Paste
OR
Right-click and choose Paste
Using the Select Directory Window
The Select Directory window is opened when creating a new project, opening an existing project, and
when saving the current project with a new name. To create a new project or open an existing project,
select from the main screen's top menu File | Project | Load/New. To save a current project with a new
name or to a new location, select File | Project | Save As.
The Select Directory window appears as follows:
187
Select Directory box with the sample folder selected
The Drives box shows the current drive. To change drives, click the down arrow and select the correct
drive.
The Directories box shows the folders on the current drive. (Only the folders contained within the lowest
open folder in the list will be displayed at any one time.) To change folders, double-click on a folder name.
The Files box displays the files within the open folder. (A file cannot be opened with the Select Directory
window.)
The Directory Name box shows the current path. To add a new folder, click at the end of the pathname
in the Directory Name box. Type a backslash (\) followed by the project name at the end of the directory
box. In the example below, a new project named Project1 under the Projects folder is being created:
188
Select Directory box with the Projects folder selected
and a new Project1 added
189
Index
A
abs....................................................................................................................................................................................... 185
Ack Alarms........................................................................................................................................................................... 38
Ack Tag Name ...................................................................................................................................................................... 65
Acknowledging ..................................................................................................................................................................... 38
Alarms.............................................................................................................................................................................. 65
acknowledging alarms .......................................................................................................................................................... 38
action schedule grid.............................................................................................................................................................. 46
action scheduling .................................................................................................................................................................. 46
ActiveX ............................................................................................................................................................................... 153
activity log ............................................................................................................................................................................ 13
adding a script ...................................................................................................................................................................... 77
adjust amplitude................................................................................................................................................................... 95
Editing WAV Files - Adjust Amplitude dialog box .......................................................................................................... 95
main menu | Options | Amplitude Adjustment dialog box ............................................................................................... 13
Alarm...............................................................................................................................................38, 39, 42, 65, 97, 118, 179
Alarm Ack Options............................................................................................................................................................... 13
Alarm Announcement .......................................................................................................................................................... 13
alarm announcement Options .............................................................................................................................................. 39
Call-out Options ............................................................................................................................................................... 39
Custom Preamble ............................................................................................................................................................. 39
Alarm Callouts ................................................................................................................................................................... 118
Alarm Contact Example..................................................................................................................................................... 179
Alarm Contact Information ................................................................................................................................................. 97
alarm contacts ...............................................................................................................................................................97, 179
alarm contact window ...................................................................................................................................................... 97
contact calling order......................................................................................................................................................... 46
scheduling......................................................................................................................................................................... 46
alarm groups ........................................................................................................................................................................ 42
alarm group statuses window........................................................................................................................................... 13
alarm groups window....................................................................................................................................................... 42
alarm information window................................................................................................................................................. 179
Ack Tag Name.................................................................................................................................................................. 65
Alarm Priority.................................................................................................................................................................. 65
alarm signal filtering ........................................................................................................................................................ 65
analog value message segments ........................................................................................................................................ 65
Automatic Acknowledgement .......................................................................................................................................... 65
discrete value message segments ...................................................................................................................................... 65
managing message segments ............................................................................................................................................ 65
pager alarm contact example ......................................................................................................................................... 179
pager messages ................................................................................................................................................................. 65
saving the alarm message ................................................................................................................................................. 65
setting alarm limits........................................................................................................................................................... 65
signal filtering................................................................................................................................................................... 65
voice message composition ............................................................................................................................................... 65
WAV message segments ................................................................................................................................................... 65
alarm limits .......................................................................................................................................................................... 65
alarm messages..................................................................................................................................................................... 65
alarm tab .............................................................................................................................................................................. 29
alarm tags ............................................................................................................................................................................. 65
alpha-numeric pager message .............................................................................................................................................. 97
190
amplitude adjustment..................................................................................................................................................... 13, 95
Editing WAV Files - Adjust Amplitude dialog box .......................................................................................................... 95
main menu | Options | Amplitude Adjustment dialog box ............................................................................................... 13
analog response list button ................................................................................................................................................. 156
analog tab ............................................................................................................................................................................. 29
analog value message segments ............................................................................................................................................ 65
Answer detection script ...................................................................................................................................................... 137
answer detection scripts ........................................................................................................................................ 77, 177, 179
answering machine example........................................................................................................................................... 177
creating a new script ........................................................................................................................................................ 77
edit script window ............................................................................................................................................................ 77
multiple scripts................................................................................................................................................................. 77
pager alarm example...................................................................................................................................................... 179
recording a script ............................................................................................................................................................. 77
script actions .................................................................................................................................................................... 77
answer ring count ................................................................................................................................................................. 13
answering machine contact example .................................................................................................................................. 177
audio analyzer .................................................................................................................................................................... 137
audio device options ............................................................................................................................................................. 13
Audio Devices ....................................................................................................................................................................... 13
AudioAnalyzer.................................................................................................................................................................... 137
authorization ...................................................................................................................................................................... 159
B
Basic Steps ............................................................................................................................................................................ 10
Creating............................................................................................................................................................................ 10
C
call warning window........................................................................................................................................................... 118
changing the starting menu .................................................................................................................................................. 84
Citect Interface................................................................................................................................................................... 140
Citect tags....................................................................................................................................................................... 140
Importing ....................................................................................................................................................................... 140
Importing Citect Tags .................................................................................................................................................... 140
clipboard---using ................................................................................................................................................................. 187
CLogViewer........................................................................................................................................................................ 160
Compatibility........................................................................................................................................................................ 13
computed tags....................................................................................................................................................................... 44
conditional WAV message segments .................................................................................................................................... 65
Console Acknowledgement................................................................................................................................................... 38
contact ScadaTec .................................................................................................................................................................. 46
contact schedule grid ............................................................................................................................................................ 46
contact scheduling ................................................................................................................................................................ 46
Contact Sequence Log .......................................................................................................................................................... 13
contacts................................................................................................................................................................................. 29
contacts tab........................................................................................................................................................................... 29
copy and paste-using the Windows clipboard ....................................................................................................................... 187
cos ....................................................................................................................................................................................... 185
create shortcuts .................................................................................................................................................................... 13
creating..........................................................................................................................................................................10, 148
Alarm ............................................................................................................................................................................... 65
alarm groups .................................................................................................................................................................... 42
alarm tags and messages .................................................................................................................................................. 65
answer detection scripts ................................................................................................................................................... 77
Basic Steps........................................................................................................................................................................ 10
Custom Install Programs ............................................................................................................................................... 148
phone menus..................................................................................................................................................................... 84
schedules........................................................................................................................................................................... 46
191
supervisor ......................................................................................................................................................................... 61
tag names........................................................................................................................................................................ 102
user accounts .................................................................................................................................................................... 61
user list ............................................................................................................................................................................. 61
custom install programs ..................................................................................................................................................... 148
Creating.......................................................................................................................................................................... 148
D
DDE .................................................................................................................................................................................... 129
DDE server list window ...................................................................................................................................................... 129
defining alarm tags and messages ........................................................................................................................................ 65
deleting ..........................................................................................................................................................................84, 107
alarms............................................................................................................................................................................... 65
contact schedules .............................................................................................................................................................. 46
contacts............................................................................................................................................................................. 46
mail boxes....................................................................................................................................................................... 104
menu................................................................................................................................................................................. 84
schedules........................................................................................................................................................................... 46
tags ................................................................................................................................................................................. 107
users ................................................................................................................................................................................. 61
desktop shortcut ................................................................................................................................................................... 13
development mode .............................................................................................................................................................. 184
Dial Options........................................................................................................................................................................ 124
Discrete Expected Analog Received ................................................................................................................................... 148
Discrete Expected-Analog Received window...................................................................................................................... 148
discrete representations...................................................................................................................................................... 156
discrete value message segments .......................................................................................................................................... 65
discretes tab.......................................................................................................................................................................... 29
div ....................................................................................................................................................................................... 185
E
Edit DDE server window.................................................................................................................................................... 129
Edit OPC server window.................................................................................................................................................... 129
Edit Script window............................................................................................................................................................... 77
Edit User window ................................................................................................................................................................. 61
editing ................................................................................................................................................................................. 102
alarm groups .................................................................................................................................................................... 42
answer detection scripts ................................................................................................................................................... 77
phone menus..................................................................................................................................................................... 84
tag names........................................................................................................................................................................ 102
tag values........................................................................................................................................................................ 106
users ................................................................................................................................................................................. 61
WAV files ......................................................................................................................................................................... 36
Editing Answer Detection Scripts......................................................................................................................................... 77
Editing Phone Menus ........................................................................................................................................................... 84
e-mail log .............................................................................................................................................................................. 13
Email Log ............................................................................................................................................................................. 13
e-mail messages .................................................................................................................................................................... 13
Email Settings....................................................................................................................................................................... 13
EMail Settings window......................................................................................................................................................... 13
e-mail timeouts ..................................................................................................................................................................... 13
EnteringTag Names............................................................................................................................................................ 102
eqmask................................................................................................................................................................................ 185
error ................................................................................................................................................................................... 133
Events box ............................................................................................................................................................................ 77
Existing............................................................................................................................................................................... 106
Opening .......................................................................................................................................................................... 106
Export................................................................................................................................................................................... 13
192
F
failed ................................................................................................................................................................................... 133
find references ...................................................................................................................................................................... 95
force.................................................................................................................................................................................... 124
force modem ....................................................................................................................................................................... 124
force modem type ............................................................................................................................................................... 124
frac ..................................................................................................................................................................................... 185
Functions ............................................................................................................................................................................ 185
H
Heartbeat............................................................................................................................................................................ 133
Heartbeat Tag..................................................................................................................................................................... 133
HeartbeatTag ..................................................................................................................................................................... 133
help ....................................................................................................................................................................................... 11
holding tags ........................................................................................................................................................................ 116
I
IF WAV message segments................................................................................................................................................... 65
Import................................................................................................................................................................................... 13
Incoming Calls...................................................................................................................................................................... 13
initial menu-changing........................................................................................................................................................... 84
inserting a script................................................................................................................................................................... 77
install program-creating..................................................................................................................................................... 148
installation .....................................................................................................................................................................12, 148
custom install programs ................................................................................................................................................. 148
Interface ......................................................................................................................................................................155, 158
K
key......................................................................................................................................................................................... 33
L
ln 185
Load/New.............................................................................................................................................................................. 13
Log...................................................................................................................................................................................... 160
log system active hourly........................................................................................................................................................ 13
M
mail boxes ....................................................................................................................................................................104, 108
creating........................................................................................................................................................................... 104
deleting ........................................................................................................................................................................... 104
opening ........................................................................................................................................................................... 108
mail boxes tab....................................................................................................................................................................... 29
Mail Boxes-Creatingamailbox ............................................................................................................................................ 104
Mail Boxes-Deletingamailbox............................................................................................................................................. 104
main menu overview............................................................................................................................................................. 13
Main Thread Watchdog ..................................................................................................................................................... 133
main window tab overview ................................................................................................................................................... 29
MainMenu ............................................................................................................................................................................ 13
managing message segments................................................................................................................................................. 65
Math ................................................................................................................................................................................... 185
math functions ...................................................................................................................................................................... 44
193
Math Operators.................................................................................................................................................................. 185
Menu Item Action Examples .........................................................................................................................163, 165, 167, 172
create menu example....................................................................................................................................................... 167
modify analog example.................................................................................................................................................... 163
modify discrete example .................................................................................................................................................. 165
play menu example.......................................................................................................................................................... 167
voice mail example .......................................................................................................................................................... 172
menus tab ............................................................................................................................................................................. 29
message segment window ................................................................................................................................................... 122
Messages ............................................................................................................................................................................. 122
Messages#SavingtheAlarmMessage ..................................................................................................................................... 65
Messages-AckTagName........................................................................................................................................................ 65
Messages-AlarmPriority....................................................................................................................................................... 65
Messages-AutomaticallyAckWhenReported ........................................................................................................................ 65
Messages-DefiningAnalogMessageSegments........................................................................................................................ 65
Messages-DiscreteMessageSegment ..................................................................................................................................... 65
Minimize On StartUp ........................................................................................................................................................... 13
mod ..................................................................................................................................................................................... 185
modem ................................................................................................................................................................. 112, 124, 133
Modem AT Commands ...................................................................................................................................................... 124
Modem COM Port.............................................................................................................................................................. 112
modem command ............................................................................................................................................................... 124
Modem Dial Options .......................................................................................................................................................... 124
Modem Error Tag .............................................................................................................................................................. 133
modem error window ......................................................................................................................................................... 112
modem port--setting up ...................................................................................................................................................... 112
modem timeouts ................................................................................................................................................................. 124
modem type ........................................................................................................................................................................ 124
modem window................................................................................................................................................................... 124
modes-development and runtime ....................................................................................................................................... 184
Modify Analog..................................................................................................................................................................... 163
Modify Discrete ................................................................................................................................................................... 165
modifying tag values........................................................................................................................................................... 106
multiple scripts ..................................................................................................................................................................... 77
N
New Script Event window .................................................................................................................................................... 77
O
OLE .................................................................................................................................................................................... 153
OLE Methods ..................................................................................................................................................................... 153
OLE procedures ................................................................................................................................................................. 153
OLE Server ........................................................................................................................................................................ 153
OLE server list window ...................................................................................................................................................... 129
OLE server procedures ...................................................................................................................................................... 153
OPC .................................................................................................................................................................................... 155
OPC Server ........................................................................................................................................................................ 155
OPC server list window ...................................................................................................................................................... 129
Opening .............................................................................................................................................................................. 106
Existing........................................................................................................................................................................... 106
Operators ........................................................................................................................................................................... 185
P
Pager................................................................................................................................................................................... 179
pager messages ..............................................................................................................................................................65, 179
pager alarm contact example ......................................................................................................................................... 179
Pager String.......................................................................................................................................................................... 13
194
pager string (PagerStr variable)........................................................................................................................................... 13
passwords ....................................................................................................................................................................... 13, 61
Performance Log .................................................................................................................................................................. 13
Phone Acknowledgement ..................................................................................................................................................... 38
phone menus...................................................................................................................................................84, 163, 167, 172
actions............................................................................................................................................................................... 84
adding a menu .................................................................................................................................................................. 84
creating a menu example................................................................................................................................................. 167
creating message segments ............................................................................................................................................... 84
customizing menus ........................................................................................................................................................... 84
default menu structure..................................................................................................................................................... 84
editing a menu .................................................................................................................................................................. 84
managing message segments ............................................................................................................................................ 84
menu item action .............................................................................................................................................................. 84
menu item enable ............................................................................................................................................................. 84
menu item message composition ...................................................................................................................................... 84
menu item window ........................................................................................................................................................... 84
modify analog ................................................................................................................................................................... 84
modify analog example.................................................................................................................................................... 163
modify discrete ................................................................................................................................................................. 84
modify discrete example .................................................................................................................................................. 165
play menu ......................................................................................................................................................................... 84
record voice mail .............................................................................................................................................................. 84
testing menus.................................................................................................................................................................... 84
voice mail example .......................................................................................................................................................... 172
Play Menu ........................................................................................................................................................................... 167
Print Listing(s) ..................................................................................................................................................................... 13
printing................................................................................................................................................................................. 13
procedure ........................................................................................................................................................................... 153
ProgID ................................................................................................................................................................................ 155
Project ............................................................................................................................................................10, 106, 109, 111
Running.......................................................................................................................................................................... 109
Saving ............................................................................................................................................................................. 109
projects .................................................................................................................................................................. 10, 106, 111
basic steps for creating ..................................................................................................................................................... 10
new ................................................................................................................................................................................. 111
opening ........................................................................................................................................................................... 106
setting up ........................................................................................................................................................................ 111
R
RAS..................................................................................................................................................................................... 149
recording a script ................................................................................................................................................................. 77
references to tag names ...................................................................................................................................................... 117
registering ScadaPhone ........................................................................................................................................................ 33
remote access software ..................................................................................................................................................13, 149
Removing............................................................................................................................................................................ 107
Unused............................................................................................................................................................................ 107
removing unused tags ......................................................................................................................................................... 107
Rename................................................................................................................................................................................. 13
reporting alarm ack to SCADA system ................................................................................................................................ 65
response time out window .................................................................................................................................................. 112
restart ................................................................................................................................................................................. 133
RestartScadaPhone............................................................................................................................................................. 133
Restore.................................................................................................................................................................................. 13
round .................................................................................................................................................................................. 185
Run Log ................................................................................................................................................................................ 13
run mode ............................................................................................................................................................................ 184
Running .............................................................................................................................................................................. 109
Project ............................................................................................................................................................................ 109
running a project................................................................................................................................................................ 109
195
S
Saving ................................................................................................................................................................................. 109
Project ............................................................................................................................................................................ 109
saving a project................................................................................................................................................................... 109
saving the alarm message ..................................................................................................................................................... 65
SCADA link interface......................................................................................................................................................... 129
checking the interface..................................................................................................................................................... 129
Remote ScadaLink server .............................................................................................................................................. 129
ScadaLink......................................................................................................................................................................13, 133
ScadaLink Response Log...................................................................................................................................................... 13
ScadaLinkFailed................................................................................................................................................................. 133
ScadaPhone's...................................................................................................................................................................... 155
scan rate ............................................................................................................................................................................... 13
Scheduler .............................................................................................................................................................................. 46
about scheduling............................................................................................................................................................... 46
Action scheduling ............................................................................................................................................................. 46
24 hour schedules ......................................................................................................................................................... 46
changing day-of-week defaults ..................................................................................................................................... 46
configure upcoming hours............................................................................................................................................ 46
day-of-week pane ......................................................................................................................................................... 46
deleting action schedules .............................................................................................................................................. 46
editing action schedules................................................................................................................................................ 46
grid ............................................................................................................................................................................... 46
new action schedules .................................................................................................................................................... 46
schedule grid ................................................................................................................................................................ 46
schedule names............................................................................................................................................................. 46
special schedules........................................................................................................................................................... 46
alarm group tabs .............................................................................................................................................................. 46
Contact scheduling ........................................................................................................................................................... 46
24 hour schedules ......................................................................................................................................................... 46
adding contacts............................................................................................................................................................. 46
changing contact order................................................................................................................................................. 46
changing day-of-week defaults ..................................................................................................................................... 46
configure upcoming hours............................................................................................................................................ 46
contact availability scheduler window ......................................................................................................................... 46
day-of-week pane ......................................................................................................................................................... 46
deleting contact schedules ............................................................................................................................................ 46
editing contact information .......................................................................................................................................... 46
editing contact schedules.............................................................................................................................................. 46
grid ............................................................................................................................................................................... 46
new contact schedules .................................................................................................................................................. 46
removing contacts ........................................................................................................................................................ 46
Rotations ...................................................................................................................................................................... 46
schedule grid ................................................................................................................................................................ 46
Schedule Holes ............................................................................................................................................................. 46
schedule names............................................................................................................................................................. 46
Schedule Override Bit .................................................................................................................................................. 46
Schedule Rotations ....................................................................................................................................................... 46
setting up the contact schedule..................................................................................................................................... 46
special schedules........................................................................................................................................................... 46
opening the Scheduler ...................................................................................................................................................... 46
script actions......................................................................................................................................................................... 77
Select Alarm Group window ................................................................................................................................................ 42
Select Directory window..................................................................................................................................................... 187
select port window .............................................................................................................................................................. 112
Server ..........................................................................................................................................................................153, 155
server startup delay.......................................................................................................................................................13, 155
session ................................................................................................................................................................................... 13
set amplitude .................................................................................................................................................................. 13, 95
Editing WAV Files - Adjust Amplitude dialog box .......................................................................................................... 95
196
main menu | Options | Amplitude Adjustment dialog box ............................................................................................... 13
setting High and Low Alarm Limits..................................................................................................................................... 65
setting up the modem port.................................................................................................................................................. 112
Setup................................................................................................................................................................................... 111
show system information ...................................................................................................................................................... 13
shutdown tag ........................................................................................................................................................................ 13
signal filtering....................................................................................................................................................................... 65
sin ....................................................................................................................................................................................... 185
Sound.................................................................................................................................................................................. 158
sqrt ..................................................................................................................................................................................... 185
standby mode........................................................................................................................................................................ 13
Standby Options ................................................................................................................................................................... 13
standby tag ........................................................................................................................................................................... 13
start menu shortcut .............................................................................................................................................................. 13
starting menu-changing........................................................................................................................................................ 84
starting ScadaPhone ............................................................................................................................................................. 35
startup delay......................................................................................................................................................................... 13
start-up shortcut................................................................................................................................................................... 13
strings tag ............................................................................................................................................................................. 29
sys menus tab........................................................................................................................................................................ 29
sys wavs tab .......................................................................................................................................................................... 29
system error log .................................................................................................................................................................... 13
System Errors....................................................................................................................................................................... 13
system menu action items ................................................................................................................................................... 114
System Menu Action Items Reference................................................................................................................................ 114
System Tags........................................................................................................................................................................ 186
system variables.................................................................................................................................................................. 186
T
tab overview.......................................................................................................................................................................... 29
Tag...................................................................................................................................................................................... 102
Tag Properties .................................................................................................................................................................... 116
tag references...................................................................................................................................................................... 117
tags ......................................................................................................................................................... 65, 106, 107, 116, 117
entering .......................................................................................................................................................................... 102
modifying values............................................................................................................................................................. 106
properties ....................................................................................................................................................................... 116
removing unused names ................................................................................................................................................. 107
Tag Names...................................................................................................................................................................... 102
Valid tag names .............................................................................................................................................................. 102
testing
alarm callouts ................................................................................................................................................................. 118
menus ............................................................................................................................................................................... 84
modem COM port .......................................................................................................................................................... 112
SCADA Link Interface................................................................................................................................................... 129
text message for email/pagers............................................................................................................................................... 65
text to speech .................................................................................................................................................................13, 158
Speech............................................................................................................................................................................. 158
Text to Speech Options window ........................................................................................................................................... 13
timeouts .............................................................................................................................................................................. 124
transfer authorization code ................................................................................................................................................ 159
troubleshooting.................................................................................................................................................... 137, 148, 155
analog values received-discrete expected ....................................................................................................................... 148
answer detection script not working properly ............................................................................................................... 137
Modem Error window.................................................................................................................................................... 112
Response Time Out window........................................................................................................................................... 112
run time errors on SCADA startup................................................................................................................................ 155
SCADA software does not start...................................................................................................................................... 129
spurious alarms on shutdown......................................................................................................................................... 129
trunc ................................................................................................................................................................................... 185
197
type ..................................................................................................................................................................................... 124
U
unistalling ScadaPhone......................................................................................................................................................... 13
Unused tags ........................................................................................................................................................................ 107
Removing........................................................................................................................................................................ 107
users...................................................................................................................................................................................... 61
users tab ............................................................................................................................................................................... 29
V
Voice Check.......................................................................................................................................................................... 77
voice mail.....................................................................................................................................................................108, 172
adding to a phone menu ................................................................................................................................................... 84
example........................................................................................................................................................................... 172
retreiving ........................................................................................................................................................................ 108
Voice Mail Example ............................................................................................................................................................ 172
voice message compostion..................................................................................................................................................... 65
W
watchdog........................................................................................................................................................................13, 133
Watchdog Features........................................................................................................................................................13, 133
Watchdog Features window ............................................................................................................................................... 133
Wav..................................................................................................................................................................................... 158
WAV Files ............................................................................................................................................................................ 36
wav files tab .......................................................................................................................................................................... 29
WAV files-about ................................................................................................................................................................... 36
WAV Files-AdjustAmplitude ............................................................................................................................................... 95
WAV message segments ....................................................................................................................................................... 65
Wave................................................................................................................................................................................... 158
Windows Clipboard ............................................................................................................................................................. 187
198